
A
Hardware Review
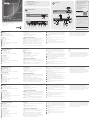
Front View
1
USB 3.1 Gen 1 Type
-
A Port*
2
USB 3.1 Gen 1 Type-C Port*
*All USB ports provide BC 1.2 fast charging.
Rear View
1
Gigabit LAN Port
2
USB 3.1 Gen 1 Type
-
A Port*
3
Audio In Port
4
Audio Out Port
5
Thunderbolt 3 (USB-C) Port with laptop charging**
6
Thunderbolt 3 (USB-C) Port
7
Display Port
8
DC Power Jack
Requirements
Thunderbolt 3 enabled computer with one of the following
operating systems:
• Windows
®
10 (32-bit / 64-bit) and above
• Mac OS X 10.12 and above
B
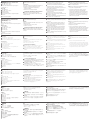
Hardware Installation
To set up your installation, refer to the diagram (the numbers in
the diagram correspond to the steps), and do the following:
1
Plug the AC power adapter (included with this package) to the
DC power jack on the rear of the UH7230.
2
Connect the Thunderbolt 3 (USB-C) cable (included with this
package) to a Thunderbolt 3 enabled computer and then
connect the other end to the Thunderbolt 3 Charging port.**
3
Connect a DisplayPort monitor to the DisplayPort port on the
UH7230. The computer will automatically detect the display.
4
Connect the Gigabit LAN port to an internet connection.
5
Connect the Line In and Line Out ports to a microphone
and speakers.
6
Connect a USB 3.0/2.0/1.1 peripheral to the rear USB 3.1
Gen 1 port.
7
Connect a Thunderbolt 3 peripheral device to the 2nd
Thunderbolt 3 port on the rear.
8
Connect a peripheral device to the front USB 3.1 Gen 1 port.*
9
Connect a compatible peripheral to the front USB-C port.
** Laptops that comply with standard USB power delivery
specifi cations can be charged by the UH7230. The UH7230
supports 20V/4.25A, 15V/3A, 9V/3A and 5V/3A power
specifi cation for the output power; although this does not
guarantee power charging will work for all devices.
B
Package Contents
1 UH7230 Thunderbolt
™
3 Multiport Dock
1 Thunderbolt 3 USB-C Cable
1 AC Power Adapter with Cable
1 User Instructions
Installation
© Copyright 2017 ATEN
®
International Co., Ltd.
ATEN and the ATEN logo are trademarks of ATEN International Co., Ltd. All rights reserved. All
other trademarks are the property of their respective owners.
This product is RoHS compliant.
Printing Date: 10/2017
Thunderbolt
™
3 Multiport Dock
Quick Start Guide
UH7230
UH7230 Thunderbolt 3 Multiport Dock
www.aten.com
Station d’accueil multi-port Thunderbolt 3 UH7230
www.aten.com
UH7230 Thunderbolt-3-Multiport-Dock
www.aten.com
Base de acoplamiento UH7230 Thunderbolt 3 Multipuerto
www.aten.com
Docking multiporta Thunderbolt 3 UH7230
www.aten.com
Support and Documentation Notice
All information, documentation, fi rmware,
software utilities, and specifi cations
contained in this package are subject to
change without prior notifi cation by
the manufacturer.
To reduce the environmental impact of our
products, ATEN documentation and software
can be found online at
http://www.aten.com/download/
Technical Support
www.aten.com/support
Scan for
more information
Front View
Rear View
3
4
1
6
8
9
2
7
5
EMC Information
FEDERAL COMMUNICATIONS COMMISSION INTERFERENCE STATEMENT:
This equipment has been tested and found to comply with the limits for
a Class B digital service, pursuant to Part 15 of the FCC rules. These limits
are designed to provide reasonable protection against harmful interference
in a residential installation. Any changes or modifi cations made to this
equipment may void the user s authority to operate this equipment. This
equipment generates, uses, and can radiate radio frequency energy. If not
installed and used in accordance with the instructions, may cause harmful
interference to radio communications. However, there is no guarantee that
interference will not occur in a particular installation. If this equipment does
cause harmful interference to radio or television reception, which can be
determined by turning the equipment off and on, the user is encouraged to
try to correct the interference by one or more of the following measures:
- Reorient or relocate the receiving antenna;
- Increase the separation between the equipment and receiver;
- Connect the equipment into an outlet on a circuit different from
that to which the receiver is connected;
- Consult the dealer/an experienced radio/television technician for help.
FCC Caution: Any changes or modifi cations not expressly approved by the
party responsible for compliance could void the user's authority to operate
this equipment.
This device complies with Part 15 of the FCC Rules. Operation is subject
to the following two conditions: (1) this device may not cause harmful
interference, and (2) this device must accept any interference received,
including interference that may cause undesired operation.
이 기기는 가정용(B급) 전자파적합기기로서 주로 가정에
서 사용하는 것을 목적으로 하며, 모든 지역에서 사용할
수 있습니다.
A
Revisión de hardware
Vista frontal
1
Puerto USB 3.1 Gen 1 Tipo-A*
2
Puerto USB 3.1 Gen 1 Tipo-C*
*Todos los puertos USB proporcionan carga rápida BC 1.2.
Vista posterior
1
Puerto LAN Gigabit
2
Puerto USB 3.1 Gen 1 Tipo-A*
3
Puerto de entrada de audio
4
Puerto de salida de audio
5
Puerto Thunderbolt 3 (USB-C) con carga para PC portátil**
6
Puerto Thunderbolt 3 (USB-C)
7
Display Port
8
Conector de alimentación de CC
Requisitos
PC con Thunderbolt 3 habilitado y con uno de los siguientes
sistemas operativos:
• Windows
®
10 (32-bits / 64-bits) y superior
• Mac SO X 10.12 y superior
B
Instalación del hardware
Para confi gurar su instalación, consulte el diagrama (los números
en el diagrama corresponden a los pasos), y haga lo siguiente:
1
Conecte el adaptador de alimentación de CA (incluido con
este paquete) al conector de alimentación de CC en la parte
posterior del UH7230.
2
Conecte el cable Thunderbolt 3 (USB-C) (incluido con este
paquete) a un equipo con Thunderbolt 3 habilitado y luego
conecte el otro extremo al puerto de carga Thunderbolt 3.**
3
Conecte un monitor DisplayPort al puerto DisplayPort del
UH7230. El PC detectará automáticamente la pantalla.
4
Conecte el puerto LAN Gigabit a una conexión a Internet.
5
Conecte los puertos de Línea de Entrada y Línea de Salida a un
micrófono y altavoces.
6
Conecte un periférico USB 3.0/2.0/1.1 al puerto posterior USB
3.1 Gen 1.
7
Conecte un dispositivo periférico Thunderbolt 3 al segundo
puerto Thunderbolt 3 en la parte posterior.
8
Conecte un dispositivo periférico al puerto frontal
USB 3.1 Gen 1.*
9
Conecte un periférico compatible al puerto USB-C frontal.
A
Aperçu du matériel
Vue de devant
1
Port USB 3.1 Gen 1 Type
-
A*
2
Port USB 3.1 Gen 1 Type-C*
*Tous les ports USB offrent la recharge rapide BC 1.2.
Vue de derrière
1
Port LAN Gigabit
2
Port USB 3.1 Gen 1 Type
-
A*
3
Port d’entrée audio
4
Port de sortie audio
5
Port Thunderbolt 3 (USB-C) avec recharge ordinateur
portable**
6
Port Thunderbolt 3 (USB-C)
7
Display Port
8
Prise d'alimentation CC
Conditions requises
Ordinateur équipé Thunderbolt 3 avec un des systèmes
d’exploitation suivants :
• Windows
®
10 (32-bits / 64-bits) ou supérieur
• Mac OS X 10.12 ou supérieur
B
Installation du matériel
Pour confi gurer votre installation, consultez le diagramme (les
chiffres du diagramme correspondent aux étapes) et effectuez ce
qui suit :
1
Branchez l'adaptateur secteur (inclus dans l’emballage) sur la
prise d'alimentation CC à l'arrière de l'UH7230.
2
Raccordez le câble Thunderbolt 3 (USB-C) (fourni dans
l’emballage) à un ordinateur équipé Thunderbolt 3, puis
connectez l'autre extrémité au port de recharge
Thunderbolt 3.**
3
Branchez un moniteur DisplayPort sur le port DisplayPort de
l’UH7230. L’ordinateur détecte automatiquement l'affi chage.
4
Raccordez le port LAN Gigabit à une connexion Internet.
5
Raccordez les ports d’entrée ligne et de sortie ligne à un
microphone et à des haut-parleurs.
6
Branchez un périphérique USB 3.0 / 2.0 / 1.1 sur le port USB
3.1 Gen 1 à l‘arrière.
7
Branchez un périphérique Thunderbolt 3 sur le 2ème port
Thunderbolt 3 à l’arrière.
8
Branchez un périphérique sur le port USB 3.1 Gen 1 à l’avant.*
A
Descrizione hardware
Vista anteriore
1
Porta USB 3.1 Gen 1 tipo
-
A*
2
Porta USB 3.1 Gen 1 tipo
-
C*
*Tutte le porte USB forniscono carica rapida BC 1.2.
Vista posteriore
1
Porta LAN Gigabit
2
Porta USB 3.1 Gen 1 tipo
-
A*
3
Porta di ingresso audio
4
Porta di uscita audio
5
Porta Thunderbolt 3 (USB-C) con carica per laptop**
6
Porta Thunderbolt 3 (USB-C)
7
Display Port
8
Connettore di alimentazione CC
Requisiti
Computer abilitato per Thunderbolt 3 con uno dei seguenti sistemi
operativi:
• Windows
®
10 (32-bit / 64-bit) e superiore
• Mac OS X 10.12 e superiore
B
Installazione dell'hardware
Per l'installazione, fare riferimento allo schema (i numeri sullo
schema corrispondono alle operazioni) ed eseguire quanto di
seguito:
1
Inserire l'adattatore di alimentazione CA (in dotazione) al
connettore di alimentazione CC sul retro dell'UH7230.
2
Collegare il cavo Thunderbolt 3 (USB-C) (in dotazione) ad un
computer abilitato per Thunderbolt 3, quindi collegare l'altra
estremità alla porta di carica Thunderbolt 3.**
3
Collegare un monitor DisplayPort alla porta DisplayPort
dell'UH7230. Il computer rileva automaticamente il display.
4
Collegare la porta LAN Gigabit ad una connessione Internet.
5
Collegare le porte di ingresso e uscita linea ad un microfono e
agli altoparlanti.
6
Collegare una periferica USB 3.0/2.0/1.1 alla porta USB 3.1 Gen
1 posteriore.
7
Collegare una periferica Thunderbolt 3 alla 2ª porta
Thunderbolt 3 sul retro.
8
Collegare una periferica alla porta USB 3.1 Gen 1 anteriore.*
9
Collegare una periferica compatibile palla porta USB-C
anteriore.
A
Hardwareübersicht
Ansicht von vorne
1
USB-3.1-Gen-1-Type
-
A-Port*
2
USB-3.1-Gen-1-Type-C-Port*
*Alle USB-Anschlüsse bieten BC-1.2-Schnellladefunktion.
Ansicht von hinten
1
Gigabit-LAN-Anschluss
2
USB-3.1-Gen-1-Type
-
A-Port*
3
Audioeingang
4
Audioausgang
5
Thunderbolt-3-Port (USB-C) mit Notebook-Aufl adung**
6
Thunderbolt-3-Port (USB-C)
7
Anzeigeanschluss
8
Gleichspannungsanschluss
Anforderungen
Thunderbolt-3-fähiger Computer mit einem der folgenden
Betriebssysteme:
• Windows
®
10 (32 Bit / 64 Bit) und aktueller
• Mac OS X 10.12 und aktueller
B
Hardwareinstallation
Beachten Sie zur Einrichtung Ihrer Installation das Diagramm (die
Nummern in den Diagrammen entsprechen den Schritten) und
gehen Sie wie folgt vor:
1
Schließen Sie das Netzteil (mitgeliefert) an den
Gleichspannungsanschluss an der Rückseite des UH7230 an.
2
Verbinden Sie das Thunderbolt-3-Kabel (USB-C) (mitgeliefert)
mit einem Thunderbolt-3-fähigen Computer, schließen Sie das
andere Ende an den Thunderbolt-3-Ladeanschluss an.**
3
Verbinden Sie einen DisplayPort-Monitor mit dem DisplayPort-
Anschluss am UH7230. Der Computer erkennt das Display
automatisch.
4
Verbinden Sie den Gigabit-LAN-Port mit einer
Internetverbindung.
5
Verbinden Sie die Line-Eingänge und -Ausgänge mit einem
Mikrofon und Lautsprechern.
6
Schließen Sie ein USB-3.0/2.0/1.1-Peripheriegerät am
rückseitigen USB-3.1-Gen-1-Anschluss an.
7
Verbinden Sie ein Thunderbolt-3-Peripheriegerät mit dem
zweiten Thunderbolt-3-Anschluss an der Rückseite.
8
Verbinden Sie ein Peripheriegerät mit dem vorderen USB-3.1-
Gen-1-Port.*
9
Verbinden Sie ein kompatibles Peripheriegerät mit dem
vorderen USB-C-Port.
** Notebooks, die mit den Standard-USB-Power-Delivery-
Spezifi kationen übereinstimmen, können über den
UH7230 aufgeladen werden. Der UH7230 unterstützt die
Energiespezifi kationen 20 V/4,25 A, 15 V/3 A, 9 V/3 A und 5
V/3 A als Ausgangsleistung; dennoch ist nicht garantiert, dass
die Aufl adung bei allen Geräten funktionieren wird.
9
Branchez un périphérique compatible sur le port USB-C à
l’avant.
** Les ordinateurs portables conformes aux spécifi cations de
fourniture d’alimentation USB standard peuvent être chargés
par l'UH7230. L'UH7230 prend en charge les spécifi cations
d’alimentation 20V / 4,25A, 15V / 3A, 9V / 3A et 5V / 3A pour
la puissance de sortie; toutefois cela ne garantit pas.
** Los PCs portátiles que cumplen con las especifi caciones de
suministro de alimentación USB estándar pueden cargarse
con el UH7230. El UH7230 admite la especifi cación de
alimentación de 20V / 4,25A, 15V / 3A, 9V / 3A y 5V / 3A para
la potencia de salida; aunque esto no garantiza que la carga
de energía funcione para todos los dispositivos.
** I laptop conformi alle specifi che standard di alimentazione USB
possono essere caricati tramite l'UH7230. L'UH7230 supporta
specifi che di alimentazione a 20 V/4,25 A, 15 V/3 A, 9 V/3 A
e 5 V/3 A per la potenza in uscita; ciò non garantisce che la
carica funzioni per tutti i dispositivi.
A
Hardware Review
La página se está cargando...
Transcripción de documentos
Package Contents Support and Documentation Notice B 1 UH7230 Thunderbolt™ 3 Multiport Dock 1 Thunderbolt 3 USB-C Cable 1 AC Power Adapter with Cable 1 User Instructions Installation 8 A 9 All information, documentation, firmware, software utilities, and specifications contained in this package are subject to change without prior notification by the manufacturer. To reduce the environmental impact of our products, ATEN documentation and software can be found online at http://www.aten.com/download/ Technical Support Hardware Review www.aten.com/support Front View Scan for more information 5 3 EMC Information UH7230 Thunderbolt™ 3 Multiport Dock Quick Start Guide Rear View 1 © Copyright 2017 ATEN® International Co., Ltd. 4 ATEN and the ATEN logo are trademarks of ATEN International Co., Ltd. All rights reserved. All other trademarks are the property of their respective owners. 6 This product is RoHS compliant. 2 Printing Date: 10/2017 FEDERAL COMMUNICATIONS COMMISSION INTERFERENCE STATEMENT: This equipment has been tested and found to comply with the limits for a Class B digital service, pursuant to Part 15 of the FCC rules. These limits are designed to provide reasonable protection against harmful interference in a residential installation. Any changes or modifications made to this equipment may void the user s authority to operate this equipment. This equipment generates, uses, and can radiate radio frequency energy. If not installed and used in accordance with the instructions, may cause harmful interference to radio communications. However, there is no guarantee that interference will not occur in a particular installation. If this equipment does cause harmful interference to radio or television reception, which can be determined by turning the equipment off and on, the user is encouraged to try to correct the interference by one or more of the following measures: - Reorient or relocate the receiving antenna; - Increase the separation between the equipment and receiver; - Connect the equipment into an outlet on a circuit different from that to which the receiver is connected; - Consult the dealer/an experienced radio/television technician for help. FCC Caution: Any changes or modifications not expressly approved by the party responsible for compliance could void the user's authority to operate this equipment. This device complies with Part 15 of the FCC Rules. Operation is subject to the following two conditions: (1) this device may not cause harmful interference, and (2) this device must accept any interference received, including interference that may cause undesired operation. 7 이 기기는 가정용(B급) 전자파적합기기로서 주로 가정에 서 사용하는 것을 목적으로 하며, 모든 지역에서 사용할 수 있습니다. UH7230 Thunderbolt 3 Multiport Dock A Hardware Review Front View www.aten.com Requirements 3 Thunderbolt 3 enabled computer with one of the following 1 USB 3.1 Gen 1 Type-A Port* operating systems: 4 2 USB 3.1 Gen 1 Type-C Port* • Windows® 10 (32-bit / 64-bit) and above 5 *All USB ports provide BC 1.2 fast charging. • Mac OS X 10.12 and above Rear View 1 Gigabit LAN Port B Hardware Installation To set up your installation, refer to the diagram (the numbers in 2 USB 3.1 Gen 1 Type-A Port* the diagram correspond to the steps), and do the following: 3 Audio In Port 4 Audio Out Port 5 Thunderbolt 3 (USB-C) Port with laptop charging** 6 Thunderbolt 3 (USB-C) Port package) to a Thunderbolt 3 enabled computer and then 7 Display Port connect the other end to the Thunderbolt 3 Charging port.** 8 DC Power Jack 1 Plug the AC power adapter (included with this package) to the DC power jack on the rear of the UH7230. 2 Connect the Thunderbolt 3 (USB-C) cable (included with this 6 Connect a DisplayPort monitor to the DisplayPort port on the ** Laptops that comply with standard USB power delivery UH7230. The computer will automatically detect the display. specifications can be charged by the UH7230. The UH7230 Connect the Gigabit LAN port to an internet connection. supports 20V/4.25A, 15V/3A, 9V/3A and 5V/3A power Connect the Line In and Line Out ports to a microphone specification for the output power; although this does not and speakers. guarantee power charging will work for all devices. Connect a USB 3.0/2.0/1.1 peripheral to the rear USB 3.1 Gen 1 port. 7 Connect a Thunderbolt 3 peripheral device to the 2nd Thunderbolt 3 port on the rear. 8 Connect a peripheral device to the front USB 3.1 Gen 1 port.* 9 Connect a compatible peripheral to the front USB-C port. Station d’accueil multi-port Thunderbolt 3 UH7230 A Aperçu du matériel Vue de devant 1 Port USB 3.1 Gen 1 Type-A* 2 Port USB 3.1 Gen 1 Type-C* *Tous les ports USB offrent la recharge rapide BC 1.2. Vue de derrière 1 Port LAN Gigabit 2 Port USB 3.1 Gen 1 Type-A* 3 Port d’entrée audio 4 Port de sortie audio 5 Port Thunderbolt 3 (USB-C) avec recharge ordinateur portable** 6 Port Thunderbolt 3 (USB-C) www.aten.com 7 Display Port 8 Prise d'alimentation CC 2 l’emballage) à un ordinateur équipé Thunderbolt 3, puis d’exploitation suivants : • Windows® 10 (32-bits / 64-bits) ou supérieur • Mac OS X 10.12 ou supérieur B Installation du matériel Pour configurer votre installation, consultez le diagramme (les Thunderbolt 3.** 3 1 l’avant. ** Les ordinateurs portables conformes aux spécifications de Branchez un moniteur DisplayPort sur le port DisplayPort de fourniture d’alimentation USB standard peuvent être chargés l’UH7230. L’ordinateur détecte automatiquement l'affichage. par l'UH7230. L'UH7230 prend en charge les spécifications Raccordez le port LAN Gigabit à une connexion Internet. d’alimentation 20V / 4,25A, 15V / 3A, 9V / 3A et 5V / 3A pour 5 Raccordez les ports d’entrée ligne et de sortie ligne à un la puissance de sortie; toutefois cela ne garantit pas. microphone et à des haut-parleurs. 6 Branchez un périphérique USB 3.0 / 2.0 / 1.1 sur le port USB 7 Branchez un périphérique Thunderbolt 3 sur le 2ème port 3.1 Gen 1 à l‘arrière. Thunderbolt 3 à l’arrière. Branchez l'adaptateur secteur (inclus dans l’emballage) sur la prise d'alimentation CC à l'arrière de l'UH7230. Branchez un périphérique compatible sur le port USB-C à 4 chiffres du diagramme correspondent aux étapes) et effectuez ce qui suit : 9 connectez l'autre extrémité au port de recharge Conditions requises Ordinateur équipé Thunderbolt 3 avec un des systèmes Raccordez le câble Thunderbolt 3 (USB-C) (fourni dans 8 Branchez un périphérique sur le port USB 3.1 Gen 1 à l’avant.* www.aten.com UH7230 Thunderbolt-3-Multiport-Dock A Hardwareübersicht Ansicht von vorne Anforderungen automatisch. UH7230 aufgeladen werden. Der UH7230 unterstützt die 4 Verbinden Sie den Gigabit-LAN-Port mit einer Energiespezifikationen 20 V/4,25 A, 15 V/3 A, 9 V/3 A und 5 Internetverbindung. V/3 A als Ausgangsleistung; dennoch ist nicht garantiert, dass 5 Verbinden Sie die Line-Eingänge und -Ausgänge mit einem die Aufladung bei allen Geräten funktionieren wird. Betriebssysteme: 2 USB-3.1-Gen-1-Type-C-Port* • Windows® 10 (32 Bit / 64 Bit) und aktueller • Mac OS X 10.12 und aktueller 1 Gigabit-LAN-Anschluss B Hardwareinstallation Beachten Sie zur Einrichtung Ihrer Installation das Diagramm (die 2 USB-3.1-Gen-1-Type-A-Port* Nummern in den Diagrammen entsprechen den Schritten) und 3 Audioeingang gehen Sie wie folgt vor: 4 Audioausgang 5 Thunderbolt-3-Port (USB-C) mit Notebook-Aufladung** 6 Thunderbolt-3-Port (USB-C) 7 Anzeigeanschluss mit einem Thunderbolt-3-fähigen Computer, schließen Sie das Gleichspannungsanschluss andere Ende an den Thunderbolt-3-Ladeanschluss an.** 8 ** Notebooks, die mit den Standard-USB-Power-DeliverySpezifikationen übereinstimmen, können über den USB-3.1-Gen-1-Type-A-Port* Ansicht von hinten Verbinden Sie einen DisplayPort-Monitor mit dem DisplayPortAnschluss am UH7230. Der Computer erkennt das Display 1 *Alle USB-Anschlüsse bieten BC-1.2-Schnellladefunktion. 3 Thunderbolt-3-fähiger Computer mit einem der folgenden 1 Schließen Sie das Netzteil (mitgeliefert) an den Gleichspannungsanschluss an der Rückseite des UH7230 an. 2 Verbinden Sie das Thunderbolt-3-Kabel (USB-C) (mitgeliefert) Mikrofon und Lautsprechern. 6 Schließen Sie ein USB-3.0/2.0/1.1-Peripheriegerät am 7 Verbinden Sie ein Thunderbolt-3-Peripheriegerät mit dem rückseitigen USB-3.1-Gen-1-Anschluss an. zweiten Thunderbolt-3-Anschluss an der Rückseite. 8 Verbinden Sie ein Peripheriegerät mit dem vorderen USB-3.1- 9 Verbinden Sie ein kompatibles Peripheriegerät mit dem Gen-1-Port.* vorderen USB-C-Port. Base de acoplamiento UH7230 Thunderbolt 3 Multipuerto A Revisión de hardware Vista frontal 1 Puerto USB 3.1 Gen 1 Tipo-A* 2 Puerto USB 3.1 Gen 1 Tipo-C* www.aten.com Requisitos PC con Thunderbolt 3 habilitado y con uno de los siguientes Conecte un monitor DisplayPort al puerto DisplayPort del ** Los PCs portátiles que cumplen con las especificaciones de UH7230. El PC detectará automáticamente la pantalla. suministro de alimentación USB estándar pueden cargarse sistemas operativos: 4 Conecte el puerto LAN Gigabit a una conexión a Internet. con el UH7230. El UH7230 admite la especificación de • Windows® 10 (32-bits / 64-bits) y superior 5 Conecte los puertos de Línea de Entrada y Línea de Salida a un alimentación de 20V / 4,25A, 15V / 3A, 9V / 3A y 5V / 3A para micrófono y altavoces. la potencia de salida; aunque esto no garantiza que la carga 6 Conecte un periférico USB 3.0/2.0/1.1 al puerto posterior USB de energía funcione para todos los dispositivos. 7 Conecte un dispositivo periférico Thunderbolt 3 al segundo *Todos los puertos USB proporcionan carga rápida BC 1.2. • Mac SO X 10.12 y superior Vista posterior Puerto LAN Gigabit B Instalación del hardware Para configurar su instalación, consulte el diagrama (los números 2 Puerto USB 3.1 Gen 1 Tipo-A* en el diagrama corresponden a los pasos), y haga lo siguiente: 3 Puerto de entrada de audio 4 Puerto de salida de audio este paquete) al conector de alimentación de CC en la parte 5 Puerto Thunderbolt 3 (USB-C) con carga para PC portátil** posterior del UH7230. 1 3 1 Conecte el adaptador de alimentación de CA (incluido con 6 Puerto Thunderbolt 3 (USB-C) 7 Display Port paquete) a un equipo con Thunderbolt 3 habilitado y luego 8 Conector de alimentación de CC conecte el otro extremo al puerto de carga Thunderbolt 3.** 2 Conecte el cable Thunderbolt 3 (USB-C) (incluido con este 3.1 Gen 1. puerto Thunderbolt 3 en la parte posterior. 8 Conecte un dispositivo periférico al puerto frontal 9 Conecte un periférico compatible al puerto USB-C frontal. USB 3.1 Gen 1.* Docking multiporta Thunderbolt 3 UH7230 A Descrizione hardware Vista anteriore www.aten.com Requisiti Computer abilitato per Thunderbolt 3 con uno dei seguenti sistemi 1 Porta USB 3.1 Gen 1 tipo-A* operativi: 2 Porta USB 3.1 Gen 1 tipo-C* • Windows® 10 (32-bit / 64-bit) e superiore *Tutte le porte USB forniscono carica rapida BC 1.2. • Mac OS X 10.12 e superiore Vista posteriore Porta LAN Gigabit B Installazione dell'hardware Per l'installazione, fare riferimento allo schema (i numeri sullo 2 Porta USB 3.1 Gen 1 tipo-A* schema corrispondono alle operazioni) ed eseguire quanto di 3 Porta di ingresso audio seguito: 4 Porta di uscita audio 5 Porta Thunderbolt 3 (USB-C) con carica per laptop** 6 Porta Thunderbolt 3 (USB-C) 7 Display Port computer abilitato per Thunderbolt 3, quindi collegare l'altra 8 Connettore di alimentazione CC estremità alla porta di carica Thunderbolt 3.** 1 3 1 Inserire l'adattatore di alimentazione CA (in dotazione) al connettore di alimentazione CC sul retro dell'UH7230. 2 Collegare il cavo Thunderbolt 3 (USB-C) (in dotazione) ad un Collegare un monitor DisplayPort alla porta DisplayPort ** I laptop conformi alle specifiche standard di alimentazione USB dell'UH7230. Il computer rileva automaticamente il display. possono essere caricati tramite l'UH7230. L'UH7230 supporta 4 Collegare la porta LAN Gigabit ad una connessione Internet. specifiche di alimentazione a 20 V/4,25 A, 15 V/3 A, 9 V/3 A 5 Collegare le porte di ingresso e uscita linea ad un microfono e e 5 V/3 A per la potenza in uscita; ciò non garantisce che la agli altoparlanti. carica funzioni per tutti i dispositivi. 6 Collegare una periferica USB 3.0/2.0/1.1 alla porta USB 3.1 Gen 1 posteriore. 7 Collegare una periferica Thunderbolt 3 alla 2ª porta Thunderbolt 3 sul retro. 8 Collegare una periferica alla porta USB 3.1 Gen 1 anteriore.* 9 Collegare una periferica compatibile palla porta USB-C anteriore.-
 1
1
-
 2
2


en otros idiomas
- français: ATEN UH7230 Guide de démarrage rapide
- italiano: ATEN UH7230 Guida Rapida
- English: ATEN UH7230 Quick start guide
- Deutsch: ATEN UH7230 Schnellstartanleitung
- русский: ATEN UH7230 Инструкция по началу работы
- português: ATEN UH7230 Guia rápido
- 日本語: ATEN UH7230 クイックスタートガイド
Artículos relacionados
-
ATEN UH3231 Guía de inicio rápido
-
ATEN UH3233 Guía de inicio rápido
-
-
-
ATEN US3342 Guía de inicio rápido
-
-
ATEN UH3236 Guía de inicio rápido
-
-
-