
Installation Guide
Home Network System
Outdoor Camera
Model No. KX-HNC600
Thank you for purchasing a Panasonic product.
This document explains how to install the outdoor camera properly.
For details about how to use the system, refer to the User’s Guide (page
25).
Please read this document before using the unit and save it for future reference.
For assistance, please contact us at 1-800-272-7033 or visit our Web site:
http://shop.panasonic.com/support for customers in the U.S.A.
Please register your product: http://shop.panasonic.com/support
Printed in China
HNC600_(en_en)_0615_ver.130.pdf 1 2015/06/16 21:06:04

Introduction
Accessory information ..................................3
Important Information
About this system .........................................4
For your safety .............................................4
Important safety instructions ........................5
For best performance ...................................5
Privacy and rights of portrait ........................6
Other information .........................................6
Installation Location
Wireless communication range ....................7
Information about sensor features ...............7
Information about night vision mode ............9
Installation location examples ....................10
Do not install in these locations
..................12
Setup
Part names and functions ..........................14
LED indicator ..............................................14
Setup overview ...........................................14
Registering the camera ..............................15
Confirming the registration area .................15
Installation ..................................................16
Appendix
Testing the motion detection range ............21
Adjusting the infrared sensor range ...........21
Features available when using the [Home
Network] app ..............................................25
Accessing the User’s Guide .......................25
Specifications .............................................26
FCC and other information .........................27
Customer services .....................................28
Limited Warranty (ONLY FOR U.S.A.) .......29
2
Table of Contents
HNC600_(en_en)_0615_ver.130.pdf 2 2015/06/16 21:06:04

Accessory information
Supplied accessories
No. Accessory item/Part number Quantity
A AC adaptor/PNLV2360Z 1
B Camera mounting stand/PNZB1002Z 1
C Wall mounting screws (25 mm (1 inch))/XTB4+25AVW 4
D Suspension wire tool
–
Safety wire: 1
PQME10080Z
– Washers: 2
Small washer for attaching safety wire to camera
ø12 mm (15/32 inches)/XWG26D12VW
Large washer for attaching safety wire to wall
ø16 mm (5/8 inches)/XWG4F16VW
– Screws: 2
Small screw for attaching safety wire to camera
10 mm (3/8 inches)/XTB26+10GVW
Large screw for attaching safety wire to wall
25 mm (1 inch)/XTB4+25AVW
1
E Sensor range cap/PNHG1210Z 1
A B C D E
Other information
R D
esign and specifications are subject to change without notice.
R The illustrations in these instructions may vary slightly from the actual product.
Trademarks
R m
icroSDHC is a trademark of SD-3C, LLC.
R iPhone and iPad are registered trademarks of Apple Inc.
R Android is a trademark of Google Inc.
R Microsoft, Windows, and Internet Explorer are either registered trademarks or trademarks of
Microsoft Corporation in the United States and/or other countries.
R All other trademarks identified herein are the property of their respective owners.
Notice
R T
he hub supports microSD and microSDHC memory cards. In this document, the term
“microSD card” is used as a generic term for any of the supported cards.
For assistance, please visit http://shop.panasonic.com/support
3
Introduction
HNC600_(en_en)_0615_ver.130.pdf 3 2015/06/16 21:06:04

About this system
R T
his system is an auxiliary system; it is not
designed to provide complete protection
from property loss. Panasonic will not be
held responsible in the event that property
loss occurs while this system is in operation.
R The system’s wireless features are subject
to interference, therefore functionality in all
situations cannot be guaranteed.
Panasonic will not be held responsible for
injury or damage to property that occurs in
the event of wireless communication error
or failure.
For your safety
T
o prevent severe injury and loss of life/
property, read this section carefully before
using the product to ensure proper and safe
operation of your product.
WARNING
Power connection
R U
se only the power source marked on the
product.
R Do not overload power outlets and
extension cords. This can result in the risk
of fire or electric shock.
R Completely insert the AC adaptor/power
plug into the power outlet. Failure to do so
may cause electric shock and/or excessive
heat resulting in a fire.
R Regularly remove any dust, etc. from the
AC adaptor/power plug by pulling it from
the power outlet, then wiping with a dry
cloth. Accumulated dust may cause an
insulation defect from moisture, etc.
resulting in a fire.
R Unplug the product from power outlets if it
emits smoke, an abnormal smell, or makes
an unusual noise. These conditions can
cause fire or electric shock. Confirm that
smoke has stopped emitting and contact us
at http://shop.panasonic.com/support
R Unplug from power outlets and never touch
the inside of the product if its casing has
been broken open. Danger of electric shock
e
xists.
R Never touch the plug with wet hands.
Danger of electric shock exists.
R Do not connect non-specified devices.
R When opening holes in walls for installation
or wiring, or when securing the power cord,
make sure you do not damage existing
wiring and ductwork.
R Do not leave the power cable exposed
outdoors.
Installation
R D
o not place or use this product near
automatically controlled devices such as
automatic doors and fire alarms. Radio
waves emitted from this product may cause
such devices to malfunction resulting in an
accident.
R Do not allow the power cord to be
excessively pulled, bent or placed under
heavy objects.
R Do not mount the bracket in an unstable
location, in a location subject to frequent
vibration, on a ceiling, or on a weak wall.
(Do not mount on gypsum board, concrete
blocks, wooden materials exposed to the
outdoors, walls with very rough surfaces, or
surfaces that are narrower than the width of
the wall mount bracket.) There is a risk of
injury if the product falls, or of fire or electric
shock if water enters the product.
R Keep small parts (microSD cards, screws,
washers, sensor range caps, etc.) out of
the reach of children. There is a risk of
swallowing. In the event they are
swallowed, seek medical advice
immediately.
Operating safeguards
R U
nplug the product from power outlets
before cleaning. Do not use liquid or
aerosol cleaners.
R Do not disassemble the product.
R Keep the sensor range caps out of the
reach of children. There is a risk of
swallowing. In the event they are
swallowed, seek medical advice
immediately.
R Never put metal objects inside the product.
If metal objects enter the product, turn off
4
For assistance, please visit http://shop.panasonic.com/support
Important Information
HNC600_(en_en)_0615_ver.130.pdf 4 2015/06/16 21:06:04

the circuit breaker and contact an
a
uthorized service center.
Medical
R C
onsult the manufacturer of any personal
medical devices, such as pacemakers or
hearing aids, to determine if they are
adequately shielded from external RF
(radio frequency) energy. DECT features
operate between 1.92 GHz and 1.93 GHz
with a peak transmission power of 115 mW.
R Do not use the product in health care
facilities if any regulations posted in the
area instruct you not to do so. Hospitals or
health care facilities may be using
equipment that could be sensitive to
external RF energy.
CAUTION
Installation and location
R N
ever install wiring during a lightning storm.
R Although this product conforms to the IPX5*
code, do not intentionally expose it to water.
*IPX5 indicates that the product is
protected against water jets: water
projected at all angles through a 6.3 mm
(1/4 inches) nozzle flow rate of 12.5 liters/
minute at a pressure of 30 kN/m
2
for 3
minutes from a distance of 3 meters (9 feet
10 inches).
R The AC adaptor is used as the main
disconnect device. Ensure that the AC
outlet is installed near the product and is
easily accessible.
R If the wiring is underground, do not make
any connections underground.
R If the wiring is underground, make sure the
power cable and other wiring is properly
waterproofed by running the cables through
a conduit.
Preventing accidents and injuries
R T
he safety wire must be used when
mounting the product. There is a risk of
injury if the product falls.
R Do not put your ear(s) near the speaker, as
loud sounds emitted from the speaker may
cause hearing impairment.
Important safety
i
nstructions
When using your product, basic safety
precautions should always be followed to
reduce the risk of fire, electric shock, and
injury to persons, including the following:
1. Use only the power cord indicated in this
document.
SAVE THESE INSTRUCTIONS
For best performance
Hub location/avoiding noise
The hub and other compatible Panasonic
devices use radio waves to communicate with
each other.
R For maximum coverage and noise-free
communications, place your hub:
– at a convenient, high, and central
location with no obstructions between
the product and hub in an indoor
environment.
– away from electronic appliances such as
TVs, radios, personal computers,
wireless devices, or other phones.
– facing away from radio frequency
transmitters, such as external antennas
of mobile phone cell stations. (Avoid
putting the hub on a bay window or near
a window.)
R If the reception for a hub location is not
satisfactory, move the hub to another
location for better reception.
Environment
R K
eep the product away from electrical noise
generating devices, such as fluorescent
lamps and motors.
R The product should be kept free from
excessive smoke, dust, high temperature,
and vibration.
R Do not expose this product to direct
sunlight or other forms of powerful light
such as halogen lights for long periods of
time. (This may damage the image sensor.)
For assistance, please visit http://shop.panasonic.com/support
5
Important Information
HNC600_(en_en)_0615_ver.130.pdf 5 2015/06/16 21:06:04

R D
o not place heavy objects on top of the
product.
R When you leave the product unused for a
long period of time, unplug the product from
the power outlet.
R The product should be kept away from heat
sources such as heaters, kitchen stoves,
etc. It should not be placed in rooms where
the temperature is less than -20 °C (-4 °F)
or greater than 50 °C (122 °F). Damp
basements should also be avoided.
R Do not allow the lens cover or the infrared
sensor to become scratched or dirty. (This
may cause image quality to be reduced,
incorrect detections, malfunctions, or
damage to the lens cover and infrared
sensor.)
R Operating the product near electrical
appliances may cause interference. Move
away from the electrical appliances.
Privacy and rights of
p
ortrait
When installing or using the camera, please
take into consideration the rights of others with
regard to privacy.
It is generally said that “privacy” means the
ability of an individual or group to stop
information about themselves from becoming
known to people other than those whom they
choose to give the information. “Rights of
portrait” means the right to be safe from
having your own image taken and used
indiscriminately without consent.
Other information
Routine care
R T
o prevent incorrect detections, unplug the
product before performing routine care.
R Wipe the outer surface of the product with a
soft moist cloth.
R Do not use benzine, thinner, or any
abrasive powder.
R Do not apply running water to the product.
Camera image quality
R C
amera images may have the following
characteristics.
– Colors in images may differ from the
actual colors.
– When there is light behind the subject
(i.e., backlighting), faces may appear
dark.
– Image quality may be reduced in dark
locations.
– Images may appear hazy when there
are outdoor lights in use.
Protecting your recordings
R D
o not remove the microSD card or
disconnect the hub’s AC adaptor while
reading or writing data to the microSD card.
Data on the card could become corrupted.
R If a microSD card malfunctions or is
exposed to electromagnetic waves or static
electricity, data on the card could become
corrupted or erased. Therefore we
recommend backing up important data to a
computer or other device.
Notice
6
For assistance, please visit http://shop.panasonic.com/support
Important Information
HNC600_(en_en)_0615_ver.130.pdf 6 2015/06/16 21:06:04

Wireless communication range
T
he wireless communication range of each device in the system from the hub is approximately
50 m (160 feet) indoors and approximately 300 m (1,000 feet) outdoors. Wireless communication
may be unreliable when the following obstacles are located between the hub and other devices.
R Metal doors or screens
R Walls containing aluminum-sheet insulation
R Walls made of concrete or corrugated iron
R Double-pane glass windows
R Multiple walls
R When using each device on separate floors or in different buildings
Note:
R The camera’s LED indicator blinks in red if it is out of range of the hub. In this case, confirm all
connections, including those of the hub.
Information about sensor features
T
he camera has 2 sensor features that are used for motion detection: a visual sensor and an
infrared sensor (i.e., heat sensor).
Please read the following information before deciding where to install the camera.
Note:
R The camera’s sensor features are not designed to be used in situations that require high
reliability. We do not recommend use of the sensor features in these situations.
R Panasonic takes no responsibility for any injury or damage caused by the use of the camera’s
sensor features.
Detection method
Visual sensor Infrared sensor
The camera detects changes in the images
being displayed.
R The camera detects changes in the
brightness levels of moving objects.
The camera detects temperature differences
of objects in the images being displayed.
R The infrared sensor uses infrared rays to
detect temperature differences within its
range that are emitted naturally by people,
animals, etc.
For assistance, please visit http://shop.panasonic.com/support
7
Installation Location
HNC600_(en_en)_0615_ver.130.pdf 7 2015/06/16 21:06:04

Detection range
Visual sensor Infrared sensor
Can detect motion anywhere in the visible
i
mage.
R Y
ou can adjust the area detectable by the
visual sensor. For more information, refer
to the User’s Guide (page 25).
Can detect motion only in part of the visible
i
mage (shown here in gray)
R Y
ou can adjust the area detectable by the
infrared sensor. See “Adjusting the infrared
sensor range”, page 21.
R Detection does not occur when there are
obstacles in front of the infrared sensor.
Remove the obstacles or change the
installation location.
Main characteristics
Visual sensor Infrared sensor
Easily detects movement in the daytime or
w
hen it is bright.
R Movement may be incorrectly detected
when the moving object and the
background have a similar color.
R Movement may be incorrectly detected
when there are sudden changes to the
overall brightness levels such as when
external lights are used.
Easily detects when there is a big difference
between the temperatures of objects and the
surrounding environment, such as in winter or
late at night.
R The sensor cannot easily detect when
there is no difference between the
temperatures of objects and the
surrounding environment, such as in
summer or during the daytime.
R If the camera is mounted facing a road, the
sensor may detect incorrectly due to
interference caused by the heat from
passing cars.
8
For assistance, please visit http://shop.panasonic.com/support
Installation Location
HNC600_(en_en)_0615_ver.130.pdf 8 2015/06/16 21:06:04

Direction of motion
I
t is easier to detect objects that move sideways in front of the camera, and more difficult to
detect objects that move directly toward the front of the camera.
A
B
C
D
A
It is difficult to detect movement directly towards the front of the camera.
B It is easy to detect movement sideways in front of the camera.
C Detection range
D Camera
Information about night vision mode
T
he camera features an array of infrared LEDs that light automatically in low-light conditions,
allowing camera images to be viewable even when the surrounding area is dark.
Note:
R When night vision mode is active, the colors in camera images may appear different from
normal.
R When night vision mode is active, the array of infrared LEDs that surround the camera’s lens
light up in a faint red color that can be seen in the dark.
R If the camera is installed in front of a window and points directly at the window, images may be
poor when night vision mode is active.
For assistance, please visit http://shop.panasonic.com/support
9
Installation Location
HNC600_(en_en)_0615_ver.130.pdf 9 2015/06/16 21:06:04

Installation location examples
I want to detect visitors approaching the house
R
efer to the table below for detecting visitors at an entrance or gate without detecting cars in the
street.
Ideal example Poor example
1
1
Approx. 3 m (9.8 feet)
V
isitors pass in front of the camera from side
to side, cars in the street are less likely to
cause false detections.
Cars in the street are more likely to cause
f
alse detections.
10
For assistance, please visit http://shop.panasonic.com/support
Installation Location
HNC600_(en_en)_0615_ver.130.pdf 10 2015/06/16 21:06:04

I want to detect people entering the garage
R
efer to the table below for detecting people entering a garage without detecting cars in the
street.
Ideal example Poor example
Visitors pass in front of the camera from side
t
o side, cars in the street are less likely to
cause false detections.
R To prevent faces from being obscured by
tall vehicles, adjust the installation position
and angle of the camera.
Cars in the street are more likely to cause
f
alse detections.
For assistance, please visit http://shop.panasonic.com/support
11
Installation Location
HNC600_(en_en)_0615_ver.130.pdf 11 2015/06/16 21:06:04

Do not install in these
l
ocations
Installing in the following areas may
c
ause deformation, discoloration,
malfunction, or operational failure
R In direct sunlight or directly under an
outdoor light (even if the surroundings are
within operational temperature range, parts
of the product may become hot)
R Areas subject to frequent vibration, shock,
or impact
R Near fire, heating devices, magnetic fields
(such as near magnets), or air conditioners
(including outdoor equipment such as unit
compressors)
R Areas exposed to grease or steam
R Near devices that emit strong radio waves,
such as mobile phones
R Areas subject to extreme temperature
changes (which can lead to condensation)
R Near coasts directly subjected to sea
breezes, or near sulfuric hot springs
(exposure to salt can shorten the life of the
product)
R Near TVs, radios, automated office
equipment such as computers, air
conditioners, water heater panels (with
intercom), or home security equipment
(these may cause noise)
R Near satellite broadcasting receivers such
as tuners, TVs with built-in satellite tuners,
and recorders (broadcasted images may be
distorted)
R Areas where hydrogen sulfide, ammonia,
dust, or toxic gases are present
Installing in the following areas may
c
ause false detections
R Areas where people approach directly from
the front of the camera, such as narrow
walkways
1
Camera
2
Difficult to detect
1
2
R A
reas where objects such as trees or
hanging laundry move due to wind
(temperature variation and motion may
cause false detections)
R O
n roads with high traffic (passing cars
may cause sensor detections even if they
are 5 m (16.4 feet) or more away)
12
For assistance, please visit http://shop.panasonic.com/support
Installation Location
HNC600_(en_en)_0615_ver.130.pdf 12 2015/06/16 21:06:04

R A
reas affected by breezes from fans, air
conditioning unit compressors, water
heaters, or car exhaust (severe
temperature variations may cause false
detections)
R A
reas subject to severe weather, such as
strong wind (camera shake can cause false
detections) or rain (strong rain may be
detected as an object moving in front of the
camera)
R Areas with reflective objects, such as glass,
that can interfere with detection of
temperature variation
R Areas where brightness changes easily
(such as areas where shadows form in the
afternoon and lights turn on at night)
R Areas where backlight occurs (faces
appear dark and are difficult to identify),
such as the following
– Areas where most of the background is
the sky
– Areas where direct sunlight reflects off a
white wall or background
– Bright areas such as those exposed to
direct sunlight
For assistance, please visit http://shop.panasonic.com/support
13
Installation Location
HNC600_(en_en)_0615_ver.130.pdf 13 2015/06/16 21:06:04

Part names and functions
J
C D FEBA
I
H
G
Microphone
Sensor range cap (Standard)
Infrared sensor
LED indicator
Lens unit
Speaker
M N
U
sed when registering the camera to the
hub.
Safety wire
Camera mounting stand
DC cable
LED indicator
Y
ou can use the LED indicator to confirm the
camera’s status.
Indicator Status
Off No power, or LED
i
ndicator is turned
off
*1
Green, lit
Normal operation
*
1
Green, blinking
s
lowly
Registration mode
Red Motion detected
Indicator Status
Red, blinking slowly Live images are
b
eing viewed or
recorded
Red, blinking Camera is out of
r
ange of the hub, or
device malfunction
Amber, blinking
s
lowly
Camera is not
registered to a hub
*1 You can configure the camera so that its
LED indicator does not light during
normal operation. For more information,
refer to the User’s Guide (page 25).
Setup overview
1 I
nitial setup
Make sure you can access the system
using your mobile device. For details,
refer to the System Setup Guide included
with your hub.
2 Registration
Required only if the camera was
purchased separately (i.e., not as part of
a bundle).
3 Confirm the installation area
Read the information in this document to
confirm that the desired installation area
is suitable to proper operation.
4 Installation
Install the camera in the desired location
and connect the camera to the power
outlet.
5 Adjust the infrared sensor range
Confirm the sensor range area and adjust
it if necessary using the included sensor
range adjustment caps.
14
For assistance, please visit http://shop.panasonic.com/support
Setup
HNC600_(en_en)_0615_ver.130.pdf 14 2015/06/16 21:06:04

Registering the camera
This procedure is not required for devices
t
hat were included as part of a bundle.
Before you can use the camera, it must be
r
egistered to the hub.
If the camera is not registered to a hub, the
camera’s LED indicator blinks slowly in amber.
You can register each device by using the
registration buttons or the [Home Network]
app.
Note:
R Before registering the camera, make sure
the AC adaptors of the hub and camera are
connected and each device is powered.
Using registration buttons
1 H
ub:
Press and hold M
CAMERAN until the
LED indicator blinks slowly in green.
2 Camera:
Using an object with a thin tip, press and
hold M N
until the LED indicator blinks
slowly in green (page 14).
R When registration is complete, the hub
sounds one long beep.
Note:
R T
o cancel without registering the camera,
press M
N
on the hub and on the camera
again.
R If registration fails, the hub sounds several
short beeps.
Using the app
W
hen you register the camera by using the
[Home Network] app, you can assign a name
to your devices and group them by location.
For more information, refer to the User’s
Guide (page 25).
Confirming the registration
a
rea
Before deciding where to install the camera,
carefully read the chapter “Installation
Location”, beginning on page 7, to confirm the
installation location and direction.
For assistance, please visit http://shop.panasonic.com/support
15
Setup
HNC600_(en_en)_0615_ver.130.pdf 15 2015/06/16 21:06:05

Installation
Installation precautions
R D
o not install the camera on a ceiling.
R Holes must be made in the wall for cables
and wires to pass through. Panasonic takes
no responsibility for issues related to
opening holes in walls.
R Make sure to waterproof the holes you
make in the wall.
R Make sure you attach the safety wire to
prevent the camera from falling.
R Do not use an impact driver. (This may lead
to damaged screws or over-tightening.)
R Mount the camera on the stable location
where the unit can be adequately
supported when installing.
R The AC adaptor should be connected to a
vertically oriented or floor-mounted AC
outlet. Do not connect the AC adaptor to a
ceiling-mounted AC outlet, as the weight of
the adaptor may cause it to become
disconnected.
R Do not mount the camera on a soft
material. It may fall down, break or cause
injury.
Wall material information
Siding
R U
se the included screws ø4 mm ´ 25 mm
(ø5/32 inches ´ 1 inch). Make sure the
pull-out capacity of each screw is at least
294 N (30 kgf).
R If the weight of the camera is supported by
the siding only, the siding could become
damaged. Make sure you mount the
camera in a location where the structure
behind the siding can be used to support
the weight of the camera. If this is not
possible due to the thickness of the siding,
use commercially-available screws ø4 mm
´ longer than 25 mm (ø5/32 inches ´ longer
than 1 inch).
R Drill a pilot hole using a drill bit that is
appropriate for the type of siding. Remove
any debris after drilling the pilot hole. Do
not drill the pilot hole into the structure
behind the siding.
Poor example
No support behind exterior surface
2
1
1
Siding
2
Open space, no support
16
For assistance, please visit http://shop.panasonic.com/support
Setup
HNC600_(en_en)_0615_ver.130.pdf 16 2015/06/16 21:06:05

Ideal example
S
tructure supports exterior surface
2
1
1
Siding
2
Structure behind siding
Concrete
R D
o not use the included screws. Use screw
anchors (screw ø: 4 mm (5/32 inches))
designed for concrete walls.
R Carefully read the instructions supplied with
the anchors. Follow instructions regarding
drill bit diameter, hole depth, etc.
R Drill a pilot hole. Remove any debris after
drilling the pilot hole.
1 Mark the hole depth on the drill bit (
1
)
a
nd then drill a pilot hole.
1
2 R
emove debris.
3 I
nsert an anchor, tighten the screw, then
remove the screw to secure the anchor.
4 I
nsert the screw and tighten it.
2
2
Camera mounting stand
ALC (autoclaved lightweight cellular
concrete)
R Depending on the type of ALC panel, you
may not be able to attach the camera.
Consult the ALC panel manufacturer.
R Do not use the included screws. After
consulting the manufacturer of the ALC
panel, use only commercially-available
metal screw anchors (screw ø: 4 mm
(5/32 inches)) designed for ALC panels.
R Carefully read the instructions supplied with
the anchors. Follow instructions regarding
drill bit diameter, hole depth, etc.
R Drill a pilot hole. Remove any debris after
drilling the pilot hole.
R Seal the pilot hole with a
commercially-available waterproof sealant.
Other materials (mortar, tile, etc.)
R D
o not use the included screws.
R Consult the builder or licensed professional
regarding the type of anchor appropriate for
the installation location and materials.
R Do not install on gypsum board or concrete
blocks.
For assistance, please visit http://shop.panasonic.com/support
17
Setup
HNC600_(en_en)_0615_ver.130.pdf 17 2015/06/16 21:06:05

Installing the camera
1 Attach the safety wire to the camera.
R Place the ring of the safety wire (A)
over the screw hole.
R Place a washer (B) on top of the ring
of the safety wire.
R Tighten the screw (C) for the safety
wire on top of the washer.
1
2
3
2 A
ttach the camera mounting stand to an
outdoor wall.
R Secure the stand to the wall by
tightening 4 screws (A).
R
1
37 mm (1 15/32 inches)
1
1
1
1
Note:
R U
se the following template below when
determining the location of the screw
holes.
37 mm
(1 15/32 inches)
37 mm
(1 15/32 inches)
18
For assistance, please visit http://shop.panasonic.com/support
Setup
HNC600_(en_en)_0615_ver.130.pdf 18 2015/06/16 21:06:05

3 A
ttach the camera to the stand using the
stand attachment hole on the rear or
bottom of the camera, depending on the
direction you want to aim the camera.
R Loosen the screw (
1
).
R I
nsert the tip of the stand (A) into the
stand attachment hole (B) on the rear
or bottom side.
R Secure the camera by tightening the
screw (
2
).
A
ttaching to the hole on the rear side
1
1
2
2
Attaching to the hole on the bottom
s
ide
1
2
12
4 A
djust the camera angle.
R Loosen the screw (
1
) and then adjust
t
he camera to the desired angle.
R Tighten the screw (
1
) while holding
t
he screw (
2
) until the camera is
secure.
11 2
For assistance, please visit http://shop.panasonic.com/support
19
Setup
HNC600_(en_en)_0615_ver.130.pdf 19 2015/06/16 21:06:05

5 A
ttach the safety wire to the wall.
R Place the ring of the safety wire (A)
on the wall.
R Place the washer (B) on top of the
ring of the safety wire.
R Tighten the screw (C) for the safety
wire on top of the washer.
1
2
3
Note:
R A
ttach the safety wire while it is bent.
R Attach the safety wire high on the wall
so that the camera does not strike
anyone in the event the camera
detaches from the wall.
R Do not hang from the camera or stand.
6 C
onnect the DC cable to the AC adaptor.
R Pull the DC cable indoors, and connect
the DC cable plug (A) to the AC
adaptor plug (B).
R Connect the AC adaptor (C) to the
power outlet.
1
Outdoors
2
Indoors
3
21
12
Note:
R U
se only the supplied Panasonic AC
adaptor PNLV236.
R Be sure to connect the DC cable plug
and AC adaptor plug indoors.
Note about power connections
AC adaptor connection
R T
he AC adaptor must remain connected at
all times. (It is normal for the adaptor to feel
warm during use.)
R The AC adaptor should be connected to a
vertically oriented or floor-mounted AC
outlet. Do not connect the AC adaptor to a
ceiling-mounted AC outlet, as the weight of
the adaptor may cause it to become
disconnected.
Power failure
R T
he camera will not work during a power
failure.
20
For assistance, please visit http://shop.panasonic.com/support
Setup
HNC600_(en_en)_0615_ver.130.pdf 20 2015/06/16 21:06:05

Testing the motion
d
etection range
After you have installed the [Home Network]
app on your mobile device, you can use your
mobile device to test the performance of the
camera’s motion detection features.
For details about these operations, refer to the
User’s Guide (page 25).
1 Start the [Home Network] app and
display live images from the camera.
2 Move to an area within the camera’s
viewable area.
3 While moving near the camera, use your
mobile device to observe where you are
in the viewable area when the camera’s
motion detection features are triggered.
R When the motion detection features
are triggered, the camera’s LED
indicator lights in red for about 3
seconds.
4 Note the areas of the viewable area
where movement is detected, and make
adjustments as necessary.
Note:
R You can adjust the area detectable by the
visual sensor. For more information, refer to
the User’s Guide (page 25).
R You can adjust the area detectable by the
infrared sensor. See “Adjusting the infrared
sensor range”, page 21.
Testing the microphone
T
o test the microphone, speak loudly and
clearly into the microphone while a mobile
device user is viewing live images from the
camera.
Adjusting the infrared
s
ensor range
If there are objects that you do not want the
infrared sensor to detect, you can adjust the
detectable area by attaching sensor range
caps.
Sensor range cap types and
d
etectable area
In addition to the standard cap (already
attached to the camera), there are 4 cap types
(cap 1-4). Each cap blocks different areas of
the sensor range and can be attached at
45-degree increments. Refer to the following
and attach the proper cap at the proper angle.
R The detectable areas shown here are an
approximation for when the [IR Sensor]
setting is set to [Normal]. For more
information, refer to the User’s Guide
(page 25).
R The detectable area rotates according to
the sensor range cap angle.
For assistance, please visit http://shop.panasonic.com/support
21
Appendix
HNC600_(en_en)_0615_ver.130.pdf 21 2015/06/16 21:06:05

Situation and cap
t
ypes
Approximate detection range (view when looking from above)
*
1
20 °C (68 °F) 0 °C (32 °F) 30 °C (86 °F)
When you want
b
oth sides of the
camera to be
detectable
Standard cap
(attached to the
camera)
1
1
5 m (16.4 feet)
2
2
6 m (19.7 feet)
3
3
4 m (13.1 feet)
When you want one
s
ide to be
undetectable
Cap 1
Cap 2
Cap 3
(Example) Cap 1
1
1
5 m (16.4 feet)
(Example) Cap 1
2
2
6 m (19.7 feet)
(Example) Cap 1
3
3
4 m (13.1 feet)
(Example) Cap 3
1
1
5 m (16.4 feet)
(Example) Cap 3
2
2
6 m (19.7 feet)
(Example) Cap 3
3
3
4 m (13.1 feet)
When you want
b
oth sides to be
undetectable
Cap 4
(Example) Cap 4
1
1
5 m (16.4 feet)
(Example) Cap 4
2
2
6 m (19.7 feet)
(Example) Cap 4
3
3
4 m (13.1 feet)
*1 Varies by ambient temperature at the camera installation location. Numeric values are
a
pproximate. Detectable area is indicated by
.
22
For assistance, please visit http://shop.panasonic.com/support
Appendix
HNC600_(en_en)_0615_ver.130.pdf 22 2015/06/16 21:06:05

About the attachment angle of the sensor range cap
Example 1
When there is an object on the right side of the viewable area that you do not want to be
detected (such as trees):
Attach one of caps 1-3 as shown in the example (
1
) according to the area you do not want to be
d
etected.
Example 2
When there is an object on the top left of the viewable area that you do not want to be
detected (cars in a street, etc.):
Attach one of caps 1-3 as shown in the example (
2
) according to the area you do not want to be
d
etected.
Example 1
1
2
Example 2
For assistance, please visit http://shop.panasonic.com/support
23
Appendix
HNC600_(en_en)_0615_ver.130.pdf 23 2015/06/16 21:06:05

Replacing sensor range caps
1 Remove the attached standard cap.
2 R
emove the desired sensor range cap from one of the 4 types (A) and attach it to the
sensor (B).
R When attaching, rotate the tab (
1
) on the cap toward the top or at a 45-degree angle
according to the type of cap or direction, and attach the cap on the camera, shown in the
following illustration.
1
2
1
24
For assistance, please visit http://shop.panasonic.com/support
Appendix
HNC600_(en_en)_0615_ver.130.pdf 24 2015/06/16 21:06:05

Features available when
u
sing the [Home Network]
app
Some of the camera’s features that are
available when using the [Home Network]
app are listed below. For more information,
refer to the User’s Guide (page 25).
– Alarm system
You can use the app to arm and disarm the
alarm system, confirm the current status of
the sensor, and view a log of previous
events.
– Live camera monitoring
You can view live images from the camera,
even while away from home.
– Listen and talk
You can use your mobile device to talk and
listen to anyone within range of the
camera’s microphone and speaker.
– Sensor adjustment
You can adjust the camera’s motion
detection features, such as detection
sensitivity and detection area.
– Sensor integration
You can configure the camera’s sensor
features to trigger other system events,
such as camera recording
*1
, turning on an
electric device (such as a lamp), etc.
(Appropriate device required.)
*1 A commercially-available microSD
card must be inserted into the hub in
order to record images.
– Notification
You can configure the camera to send a
notification to the [Home Network] app
when the camera detects motion.
Accessing t
he User’s Guide
The User’s Guide is a collection of online
documentation that helps you get the most out
of the [Home Network] app.
1 iPhone
®
/iPad
®
Tap
in the app’s home screen.
A
ndroid™ devices
Tap
or press your mobile device’s
menu button in the app’s home screen.
2 Tap [User’s Guide].
Note:
R Microsoft
®
Windows
®
Internet Explorer
®
8
and earlier versions are not supported.
R Android 4.1 or later versions are
recommended.
R You can also access the User’s Guide at
the web page listed below.
www.panasonic.net/pcc/support/tel/
h
omenetwork/manual/
For assistance, please visit http://shop.panasonic.com/support
25
Appendix
HNC600_(en_en)_0615_ver.130.pdf 25 2015/06/16 21:06:05

Specifications
R S
tandards
DECT (Digital Enhanced Cordless
Telecommunications)
R Frequency range
DECT: 1.92 GHz – 1.93 GHz
R RF transmission power
DECT: 115 mW (max.)
R Power source
120 V AC, 60 Hz
R Power consumption
Standby: 2.3 W
During operation:
3.1 W (when the LED lights are not lit)
4.5 W (when the LED lights are lit)
R Operating conditions
-20 °C – 50 °C (-4 °F – 122°F)
up to 90 % relative humidity
(non-condensing)
R Transmitting range
Approx. 50 m (160 feet) indoors
Approx. 300 m (1,000 feet) outdoors
R Image sensor
0.3 megapixel CMOS
R Minimum illuminance required
0 lx
*1
R Focal length
Fixed (0.4 m (1.3 feet) – infinity)
R Angular field of view (camera angle)
Horizontal: approx. 70°
Vertical: approx. 50°
R Motion detection method
Pyroelectric infrared sensor (PIR sensor)
and visual sensor
R PIR sensor detection range (when the
surrounding temperature is approx.
25 °C (77 °F))
Horizontal: approx. 70°
Vertical: approx. 20°
Detection range: approx. 5 m
R Visual sensor detection range
Horizontal: approx. 70°
Vertical: approx. 50°
R IP rating
IP55
*2
R Adjustable mounting angles
Horizontal: ±90°
Vertical: facing forward - facing down
approx. 60°
(adjustable when mounting)
R D
imensions (height ´ width ´ depth)
Approx. 75 mm ´ 75 mm ´ 173 mm
(2 15/16 inches ´ 2 15/16 inches ´
6 13/16 inches)
R Mass (weight)
Approx. 305 g (0.67 lb)
*1 The infrared LEDs that surround the
camera lens will illuminate in low-light
conditions.
*2 Water resistance is only assured if the
camera is installed correctly according to
the instructions in the Installation Guide,
and appropriate water protection
measures are taken.
26
For assistance, please visit http://shop.panasonic.com/support
Appendix
HNC600_(en_en)_0615_ver.130.pdf 26 2015/06/16 21:06:05

FCC and other information
T
his device complies with Part 15 of the FCC
Rules. Operation is subject to the following
two conditions:
(1) This device may not cause harmful
interference, and (2) this device must accept
any interference received, including
interference that may cause undesired
operation.
Privacy of communications may not be
ensured when using this device.
CAUTION:
Any changes or modifications not expressly
approved by the party responsible for
compliance could void the user’s authority to
operate this device.
NOTE:
This equipment has been tested and found to
comply with the limits for a Class B digital
device, pursuant to Part 15 of the FCC Rules.
These limits are designed to provide
reasonable protection against harmful
interference in a residential installation. This
equipment generates, uses, and can radiate
radio frequency energy and, if not installed
and used in accordance with the instructions,
may cause harmful interference to radio
communications. However, there is no
guarantee that interference will not occur in a
particular installation. If this equipment does
cause harmful interference to radio or
television reception, which can be determined
by turning the equipment off and on, the user
is encouraged to try to correct the interference
by one or more of the following measures:
– Reorient or relocate the receiving antenna.
– Increase the separation between the
equipment and receiver.
– Connect the equipment into an outlet on a
circuit different from that to which the
receiver is connected.
– Consult the dealer or an experienced radio/
TV technician for help.
Some devices operate at frequencies that may
cause interference to nearby TVs and VCRs.
To minimize or prevent such interference, this
device should not be placed near or on top of
a TV or VCR. If interference is experienced,
m
ove this device further away from the TV or
VCR. This will often reduce or eliminate
interference.
FCC RF Exposure Warning:
R This product complies with FCC radiation
exposure limits set forth for an uncontrolled
environment.
R To comply with FCC RF exposure
requirements, the device must be installed
and operated 20 cm (8 inches) or more
between the product and all person’s body.
R This product may not be collocated or
operated in conjunction with any other
antenna or transmitter.
R For body-worn operation, the device must
be used only with a non-metallic accessory.
Use of other accessories may not ensure
compliance with FCC RF exposure
requirements.
Notice:
R FCC ID can be found on the rear of the unit.
For assistance, please visit http://shop.panasonic.com/support
27
Appendix
HNC600_(en_en)_0615_ver.130.pdf 27 2015/06/16 21:06:05

Customer services
You may also contact us directly at: 1-800-272-7033,
Monday - Friday 9 am to 9 pm;
Saturday - Sunday 10 am to 7 pm, EST.
Accessories!
http://shop.panasonic.com/support
Customer Services Directory
Shop
for all your Panasonic gear
Go to
Get everything you need to get the most out of
your Panasonic products
Accessories & Parts for your Camera, Phone, A/V
products, TV, Computers & Networking, Personal
Care, Home Appliances, Headphones, Ba!eries,
Backup Chargers & more…
For Product Informa"on, Opera"ng Assistance,
Parts, Owner’s Manuals, Dealer and Service info
go to http://shop.panasonic.com/support
For the hearing or speech impaired TTY: 1- 877-833-8855
As of June 2015
28
For assistance, please visit http://shop.panasonic.com/support
Appendix
HNC600_(en_en)_0615_ver.130.pdf 28 2015/06/16 21:06:05

Limited Warranty (ONLY FOR U.S.A.)
Limited Warranty Coverage (For USA Only)
Labor
One (1) Year
Parts
One (1) Year
To submit a new repair request and for quick repair status visit our Web Site at
http://shop.panasonic.com/support
Panasonic Products Limited Warranty
Online Repair Request
Mail-In Service--Online Repair Request
If your product does not work properly because of a defect in materials or workmanship,
Panasonic Corporation of North America (referred to as “the warrantor”) will, for the length
of the period indicated on the chart below, which starts with the date of original purchase
(“warranty period”), at its option either (a) repair your product with new or refurbished parts,
(b) replace it with a new or a refurbished equivalent value product, or (c) refund your
purchase price. The decision to repair, replace or refund will be made by the warrantor.
During the “Labor” warranty period there will be no charge for labor. During the “Parts”
warranty period, there will be no charge for parts. This Limited Warranty excludes both
parts and labor for non-rechargeable batteries, antennas, and cosmetic parts (cabinet).
This warranty only applies to products purchased and serviced in the United States.
This warranty is extended only to the original purchaser of a new product which was
not sold “as is”.
Home Network System Products
microSD card (Included model only) 90 days N/A
When shipping the unit, carefully pack, include all supplied accessories listed in the
Owner’s Manual, and send it prepaid, adequately insured and packed well in a carton box.
When shipping Lithium Ion batteries please visit our Web Site at
http://shop.panasonic.com/support as Panasonic is committed to providing the most up to
date information. Include a letter detailing the complaint, a return address and provide a
daytime phone number where you can be reached. A valid registered receipt is required
under the Limited Warranty.
IF REPAIR IS NEEDED DURING THE WARRANTY PERIOD, THE PURCHASER WILL
BE REQUIRED TO FURNISH A SALES RECEIPT/PROOF OF PURCHASE INDICATING
DATE OF PURCHASE, AMOUNT PAID AND PLACE OF PURCHASE. CUSTOMER WILL
BE CHARGED FOR THE REPAIR OF ANY UNIT RECEIVED WITHOUT SUCH PROOF
OF PURCHASE.
Product or Part Name
For assistance, please visit http://shop.panasonic.com/support
29
Appendix
HNC600_(en_en)_0615_ver.130.pdf 29 2015/06/16 21:06:05

Limited Warranty Limits and Exclusions
(As examples, this excludes damages for lost time, travel to and from the servicer,
loss of or damage to media or images, data or other memory or recorded content.
The items listed are not exclusive, but for illustration only.)
This warranty ONLY COVERS failures due to defects in materials or workmanship,
and DOES NOT COVER normal wear and tear or cosmetic damage. The warranty
ALSO DOES NOT COVER damages which occurred in shipment, or failures which
are caused by products not supplied by the warrantor, or failures which result from
accidents, misuse, abuse, neglect, mishandling, misapplication, alteration, faulty
installation, set-up adjustments, misadjustment of consumer controls, improper
maintenance, power line surge, lightning damage, modification, introduction of sand,
humidity or liquids, commercial use such as hotel, office, restaurant, or other business
or rental use of the product, or service by anyone other than a Factory Service Center
or other Authorized Servicer, or damage that is attributable to acts of God.
THERE ARE NO EXPRESS WARRANTIES EXCEPT AS LISTED UNDER
“LIMITED WARRANTY COVERAGE”.
THE WARRANTOR IS NOT LIABLE FOR INCIDENTAL OR CONSEQUENTIAL
DAMAGES RESULTING FROM THE USE OF THIS PRODUCT, OR ARISING OUT
OF ANY BREACH OF THIS WARRANTY.
ALL EXPRESS AND IMPLIED WARRANTIES, INCLUDING THE WARRANTY OF
MERCHANTABILITY, ARE LIMITED TO THE PERIOD OF THE LIMITED WARRANTY.
PARTS AND SERVICE, WHICH ARE NOT COVERED BY THIS LIMITED WARRANTY,
ARE YOUR RESPONSIBILITY.
Some states do not allow the exclusion or limitation of incidental or consequential damages,
or limitations on how long an implied warranty lasts, so the exclusions may not apply to you.
This warranty gives you specific legal rights and you may also have other rights which vary
from state to state. If a problem with this product develops during or after the warranty period,
you may contact your dealer or Service Center. If the problem is not handled to your
satisfaction, then write to:
Consumer Affairs Department
Panasonic Corporation of North America
661 Independence Pkwy
Chesapeake, VA 23320
As of June 2015
30
For assistance, please visit http://shop.panasonic.com/support
Appendix
HNC600_(en_en)_0615_ver.130.pdf 30 2015/06/16 21:06:05

A
B
Reconnect the AC adaptor to the camera.
If your product is not working properly. . .
IMPORTANT!
Visit our Web site: http://shop.panasonic.com/support
• FAQ and troubleshooting hints are available.
Use the Home Network app to access the User’s Guide
and refer to the Troubleshooting section.
For your future reference
W
e recommend keeping a record of the following information to assist with any repair under
warranty.
Serial No. Date of purchase
(found on the rear of the unit)
N
ame and address of dealer
Attach your purchase receipt here.
Two Riverfront Plaza, Newark, NJ 07102-5490
© Panasonic System Networks Co., Ltd. 2014
HNC600_(en_en)_0615_ver.130.pdf 32 2015/06/16 21:06:05

Guía de instalación
Sistema de red doméstico
Cámara Exterior
Modelo n° KX-HNC600
Gracias por adquirir un producto Panasonic.
Este documento explica cómo instalar la cámara exterior de forma correcta.
Para obtener detalles sobre cómo usar el sistema, consulte la Guía del usuario (pági-
na 21).
Lea este documento antes de usar la unidad, y guárdelo para consultarlo en el futuro.
Para obtener ayuda, comuníquese con nosotros llamando al 1-800-272-7033 o visite nuestro
sitio web:
http://shop.panasonic.com/support para clientes en los EE. UU. (solo en inglés)
Por favor, registre su producto: http://shop.panasonic.com/support
PNQX6697YA CC0814WK1065 (E)
HNC600_(es_es)_0623_ver.130.pdf 1 2015/06/23 9:29:52

Ubicación de la instalación
Alcance de la comunicación inalámbrica .............3
Información acerca de las características del
sensor ..................................................................3
Información acerca del modo de visión
nocturna ...............................................................5
Ejemplos de ubicaciones para instalación ...........6
No instale en las ubicaciones siguientes .............8
Configuración
Nombres de los componentes y funciones ........10
Led indicador ......................................................10
Resumen de configuración ................................10
Cómo registrar la cámara ...................................11
Confirmación del área de registro ......................11
Instalación ..........................................................12
Apéndice
Cómo probar el alcance de detección de
movimiento .........................................................17
Ajuste del alcance del sensor infrarrojo .............17
Acceso a la Guía del usuario .............................21
2
Tabla de Contenido
HNC600_(es_es)_0623_ver.130.pdf 2 2015/06/23 9:29:52

Alcance de la comunicación inalámbrica
El alcance de la comunicación inalámbrica de cada dispositivo en el sistema del hub es de
aproximadamente 50 m (160 pies) en interiores y de aproximadamente 300 m (1,000 pies) en el exterior. Es
posible que la comunicación inalámbrica no sea tan confiable cuando se encuentran los obstáculos
siguientes entre el hub y otros dispositivos.
R Puertas o pantallas metálic
as
R Paredes que contengan aislamiento de aluminio
R Paredes de hormigón o hierro corrugado
R Ventanas de vidrio doble
R Varias paredes
R Cuando los dispositivos están en pisos o edificios diferentes
Nota:
R Si el Led indicador de la cámara parpadea en rojo, se encuentra fuera de alcance del concentrador. En
este caso, confirme todas las conexiones, incluso las del hub.
Información acerca de las características del sensor
La cámara tiene 2 características de sensor que se usan para la detección de movimiento: un sensor visual
y un sensor infrarrojo (es decir, sensor de calor).
Lea la información siguiente antes de decidir dónde instalar la cámara.
Nota:
R Las funciones del sensor de la cámara no están preparadas para que se las use en situaciones que
requieran alta confiabilidad. No recomendamos el uso de las características del sensor en esas
situaciones.
R Panasonic no asume ninguna responsabilidad por lesiones o daños provocados por el uso de las
características del sensor de la cámara.
Método de detección
Sensor visual Sensor infrarrojo
La cámara detecta cambios en las imágenes que
aparecen.
R La cámara detecta los cambios en los niveles
de brillo de los objetos en movimiento.
La cámara detecta las diferencias de temperatura
de los objetos en las imágenes que aparecen.
R El sensor infrarrojo usa rayos infrarrojos para de-
tectar las diferencias de temperatura dentro su
alcance que emiten de forma natural las perso-
nas, anima
les, etc.
Para obtener ayuda, visite http://shop.panasonic.com/support
3
Ubicación de la instalación
HNC600_(es_es)_0623_ver.130.pdf 3 2015/06/23 9:29:52

Alcance de detección
Sensor visual Sensor infrarrojo
Puede detectar el movimiento en cualquier parte
de la imagen visible.
R Puede ajustar el área detectable mediante el
sensor visual. Para obtener más información,
consulte la Guía del usuario (página 21).
Puede detectar el movimiento solo en la parte de la
imagen visible (se muestra aquí en gris)
R Puede ajustar el área detectable mediante el
sensor infrarrojo. Consulte “Ajuste del alcance
del sensor infrarrojo”, página 17.
R La detección no es posible cuando hay obstácu-
los frente al sensor infrarrojo. Quite los obstácu-
los o cambie la ubicación de instalación.
Características principales
Sensor visual Sensor infrarrojo
Detecta el movimiento de manera fácil durante el
día o cuando está alumbrado.
R Es posible que no se detecte correctamente el
movimiento cuando el objeto en movimiento y el
fondo tengan un color similar.
R Es posible que no se detecte correctamente el
movimiento cuando haya cambios bruscos en
los niveles generales de brillo, como cuando se
encienden las luces exteriores.
La detección se faci
lita cuando hay una gran dife-
rencia entre las temperaturas de los objetos y el en-
torno, como en invierno o de noche.
R El sensor no puede detectar fácilmente cuando
no hay diferencias entre las temperaturas de los
objetos y el entorno, como en verano o durante
el día.
R Si la cámara está montada cara a una carrete-
ra, es posible que el sensor no detecte de forma
correcta debido a la interferencia generada por
el calor de los vehículos que pasan.
4
Para obtener ayuda, visite http://shop.panasonic.com/support
Ubicación de la instalación
HNC600_(es_es)_0623_ver.130.pdf 4 2015/06/23 9:29:52

Dirección del movimiento
Es más fácil detectar objetos que se mueven de lado frente a la cámara y es más difícil detectar objetos que
se mueven de frente hacia la cámara.
A
B
C
D
A Es difícil detectar movimiento directamente hacia la parte delantera de la cámara.
B Es fácil detectar movimiento lateral frente de la cámara.
C Alcance de detección
D Cámara
Información acerca del modo de visión nocturna
La cámara presenta una selección de indicadores Led infrarrojos que se encienden automáticamente en
condiciones de baja iluminación, lo que permite que las imágenes de las cámaras puedan visualizarse
cuando los alrededores están oscuros.
Nota:
R Cuando el modo de visión nocturna está activo, es posible que los colores de las imágenes de la cámara
no sean los normales.
R Cuando el modo de visión nocturna está activo, la selección de indicadores Led que rodean el lente de la
cámara están encendidos en un color rojo tenue que puede verse en la oscuridad.
R Si la cámara está instalada frente a una ventana y apunta directamente a la ventana, es posible que la
calidad de las imágenes sea baja cuando el modo de visión nocturna esté activo.
Para obtener ayuda, visite http://shop.panasonic.com/support
5
Ubicación de la instalación
HNC600_(es_es)_0623_ver.130.pdf 5 2015/06/23 9:29:52

Ejemplos de ubicaciones para instalación
Quiero detectar a los visitantes que se acerquen a la casa
Consulte la tabla siguiente para detectar a los visitantes en la entrada o puerta sin detectar los vehículos de
la calle.
Ejemplo ideal Ejemplo incorrecto
1
1
Aprox. 3 m (9.8 pies)
Los visitantes pasan en frente de la cámara de la-
do a lado, y es poco probable que los vehículos en
la calle generen detecciones falsas.
Es más probable que los vehículos en la calle ge-
neren detecciones falsas.
6
Para obtener ayuda, visite http://shop.panasonic.com/support
Ubicación de la instalación
HNC600_(es_es)_0623_ver.130.pdf 6 2015/06/23 9:29:52

Quiero detectar a las personas que ingresen al garaje
Consulte la tabla siguiente para detectar a las personas que ingresen al garaje sin detectar los vehículos de
la calle.
Ejemplo ideal Ejemplo incorrecto
Los visitantes pasan en frente de la cámara de la-
do a lado, y es poco probable que los vehículos en
la calle generen detecciones falsas.
R Para evitar que los vehículos altos oscurezcan
los rostros, ajuste la posición de instalación y el
ángulo de la cámara.
Es más probable que los vehículos en la calle ge-
neren detecciones falsas.
Para obtener ayuda, visite http://shop.panasonic.com/support
7
Ubicación de la instalación
HNC600_(es_es)_0623_ver.130.pdf 7 2015/06/23 9:29:52

No instale en las ubicaciones
siguientes
Si se instala en las áreas siguientes
puede provocar deformación, falta de
color, errores o fallas de operación
R A la luz del sol o bajo una luz exterior (incluso si
el entorno está dentro del rango de temperatura
funcional, es posible que algunas partes del
producto se calienten)
R Áreas sujetas a vibraciones, golpes o impactos
frecuentemente
R Cerca del fuego, calefactores, campos
magnéticos (como cerca de imanes) o aires
acondicionados (incluyendo equipos para
exteriores como unidades compresoras)
R Áreas expuestas a grasa o vapor
R Cerca de dispositivos que emiten ondas de
radio potentes, como teléfonos móviles
R Áreas sujetas a cambios extremos de
temperatura (lo que puede generar
condensación)
R Cerca de costas, donde hay brisa marítima, o
cerca de termas de azufre (la exposición a la sal
puede reducir la vida útil del producto)
R Cerca de televisores, radios, equipos de oficina
automáticos, como ordenadores, aires
acondicionados, paneles para calentar agua
(con intercomunicador) o equipos de seguridad
para el hogar (pueden generar ruido)
R Cerca de receptores de transmisión satelital
como sintonizadores, televisores con
sintonizadores satelitales incluidos, y
grabadoras (es posible que las imágenes
transmitidas se distorsionen)
R Áreas donde haya ácido sulfhídrico, amoníaco,
polvo o gases tóxicos
Si se instala en las áreas siguientes es
posible que existan detecciones falsas
R Áreas donde las personas se acercan de forma
directa y frontal a la cámara, como en pasillos
angostos
1
Cámara
2
Dificultad para detectar
1
2
R Áreas donde objetos como árboles o ropa
colgada se mueven por efecto del viento (es
posible que la variación de temperatura y el
movimiento causen detecciones falsas)
R En carreteras con mucho tránsito (es posible
que los vehículos generen detecciones del
sensor incluso si están a 5 m (16.4 pies) o más
de distancia)
8
Para obtener ayuda, visite http://shop.panasonic.com/support
Ubicación de la instalación
HNC600_(es_es)_0623_ver.130.pdf 8 2015/06/23 9:29:52

R Áreas afectadas por brisas de ventiladores,
unidades compresoras de aires acondicionados,
calentadores de agua o caños de escape de
vehículos (es posible que las variaciones fuertes
de temperatura generen detecciones falsas)
R Las áreas sujetas a malas condiciones
climáticas, como vientos fuertes (la cámara
puede provocar detecciones falsas al sacudirse)
o lluvias (las lluvias fuertes pueden detectarse
como objetos en movimiento frente a la cámara)
R Áreas con objetos reflectivos, como vidrios, que
pueden interferir con la detección de la variación
de temperatura
R Áreas donde el brillo cambia con facilidad (como
áreas donde se formen sombras en la tarde y se
enciendan luces de noche)
R Áreas donde haya luces de fondo (los rostros se
oscurecen y son difíciles de identificar), como
las siguientes
– Áreas donde la mayor parte del fondo es el
cielo
– Áreas donde la luz del sol se refleje en una
pared blanca o fondo
– Áreas brillantes como aquellas expuestas a
la luz del sol
Para obtener ayuda, visite http://shop.panasonic.com/support
9
Ubicación de la instalación
HNC600_(es_es)_0623_ver.130.pdf 9 2015/06/23 9:29:52

Nombres de los componentes
y funciones
J
C D FEBA
I
H
G
Micrófono
Tapa de alcance del sensor (Estándar)
Sensor infrarrojo
Led indicador
Unidad del lente
Altavoz
M N
Se usa para registrar la cámara en el hub.
Cable de seguridad
Soporte de montaje de la cámara
Cable de corriente continua
Led indicador
Puede usar el Led indicador para confirmar el
estado de la cámara.
Indicador Estado
Apagado Sin energía, o el Led in-
dicador está apagado
*1
Verde, encendido Funcionamiento nor-
mal
*1
Verde, parpadeando
lentamente
Modo de registro
Rojo Se detectó movimiento
Indicador Estado
Rojo, parpadeando len-
tamente
Las imágenes se están
visualizando o graban-
do
Rojo, parpadeante La cámara está fuera
de alcance del hub o
falla el dispositivo
Ámbar, parpadeo lento La cámara no está re-
gistrada en el hub
*1 Puede configurar la cámara de forma tal que
el Led indicador no se encienda durante el
funcionamiento normal. Para obtener más
información, consulte la Guía del usuario
(página 21).
Resumen de configuración
1 Configuración inicial
Asegúrese de poder acceder al sistema
mediante su dispositivo móvil. Para obtener
más detalles, consulte la Guía de
configuración del sistema que viene con su
hub.
2 Registro
Solo se requiere si se compró la cámara por
separado (es decir, no como parte de un
paquete).
3 Confirme el área de instalación
Lea la información de este documento para
confirmar que el área
de instalación deseada
sea la adecuada para el correcto
funcionamiento.
4 Instalación
Instale la cámara en el sitio deseado y
conecte la cámara a la toma de corriente.
5 Ajuste del alcance del sensor infrarrojo
Confirme el área de alcance del sensor y
ajuste, si es necesario, con las tapas de ajuste
de alcance del sensor incluidas.
10
Para obtener ayuda, visite http://shop.panasonic.com/support
Configuración
HNC600_(es_es)_0623_ver.130.pdf 10 2015/06/23 9:29:52

Cómo registrar la cámara
Este procedimiento no es necesario para unida-
des que son parte de un paquete.
Antes de que pueda usar la cámara, se debe
registrar en el hub.
Si la cámara no se ha registrado a un hub, el Led
indicador de la cámara parpadea lentamente en
ámbar.
Puede registrar cada unidad mediante los botones
de registro o la aplicación [Home Network].
Nota:
R Antes de registrar la cámara, asegúrese que
todos los adaptadores de corriente del hub y la
cámara estén conectados y cada dispositivo
reciba alimentación.
Uso de los botones de registro
1 Hub:
Oprima y mantenga oprimido M
CAMERAN hasta que el Led indicador
parpadee lentamente en verde.
2 Cámara:
Con un objeto de puta fina, mantenga
presionado M
N hasta que el Led indicador
parpadee lentamente en verde (página 10).
R Cuando se ha completado el registro, el
hub emitirá un pitido largo.
Nota:
R Para cancelar sin registrar la cámara, oprima
M
N en el hub y en la cámara de nuevo.
R Si el registro falla, el hub emitirá varios pitidos
cortos.
Uso de la aplicación
Cuando registre su cámara con la aplicación
[Home Network], puede asignar un nombre a sus
dispositivos y agruparlos por ubicación. Para
obtener más información, consulte la Guía del
usuario (página 21).
Confirmación del área de
registro
Antes de decidir dónde instalará la cámara, lea con
cuidado la “Ubicación de la instalación” en la
página 3 para confirmar la dirección y la ubicación
de la instalación.
Para obtener ayuda, visite http://shop.panasonic.com/support
11
Configuración
HNC600_(es_es)_0623_ver.130.pdf 11 2015/06/23 9:29:52

Instalación
Precauciones de instalación
R No instale la cámara en un techo.
R Se deben hacer orificios en la pared para que
pasen los cables. Panasonic no asume ninguna
responsabilidad ante problemas relacionados
por abrir orificios en paredes.
R Asegúrese de proteger los orificios que haga en
la pared contra el agua.
R Asegúrese de ajustar el cable de seguridad para
evitar que la cámara se caiga.
R No use un destornillador
neumático (esto puede
dañar los tornillos o ajustarlos de más).
R Monte la cámara en una ubicación estable
donde la unidad se pueda colocar con seguridad.
R El adaptador de corriente debe estar conectado
a un enchufe de corriente orientado
verticalmente o en una toma de corriente alterna
colocada en el piso. No conecte el adaptador de
corriente alterna a una toma de corriente
montada en el techo, ya que el peso del
adaptador puede hacer que se desconecte.
R No coloque la cámara sobre un material blando.
Podría caerse, romperse o provocar lesiones.
Información sobre el material de
instalación
Revestimiento
R Use los tornillos incluidos de ø4 mm ´ 25 mm
(ø5/32 pulgadas ´ 1 pulgada). Asegúrese de
que la fuerza nominal de cada tornillo sea como
mínimo de 294 N (30 kgf).
R El revestimiento podría dañarse, si el peso de la
cámara se sostiene solo con el revestimiento.
Asegúrese de montar la cámara en un sitio
donde la estructura detrás del revestimiento
pueda usarse para sostener el peso de la
cámara.
Si no es posible debido al grosor del
revestimiento, use tornillos disponibles de forma
comercial de ø4 mm ´ más largos de 25 mm
(ø5/32 pulgadas ´ más largos de 1 pulgada).
R Taladre un orificio con una broca que sea
apropiada para el tipo de revestimiento. Retire
todos los restos después de taladrar el orificio
guía. No taladre el orificio guía en la estructura
detrás del revestimiento.
Ejemplo incorrecto
N
o hay soporte detrás de la superficie exterior
2
1
1
Revestimiento
2
Espacio abierto, no hay soporte
12
Para obtener ayuda, visite http://shop.panasonic.com/support
Configuración
HNC600_(es_es)_0623_ver.130.pdf 12 2015/06/23 9:29:52

Ejemplo ideal
La estructura sustenta la superficie exterior
2
1
1
Revestimiento
2
Estructura detrás del revestimiento
Concreto
R No use los tornillos incluidos. Use los taquetes
(tornillos de ø: 4 mm (5/32 pulgadas)) diseñados
para paredes de concreto.
R Lea con atención las instrucciones
suministradas con los taquetes. Siga las
instrucciones sobre el diámetro de la broca,
profundidad del orificio, etc.
R Taladre un orificio guía. Retire todos los restos
después de taladrar el orificio guía.
1 Marque la profundidad del orifici
o en el taladro
(
1
) y después, perfore un orificio guía.
1
2 Retire los restos.
3 Introduzca un taquete, apretando el tornillo,
después quite el tornillo para asegurar el
taquete.
4 Introduzca el tornillo y ajústelo.
2
2
Soporte de montaje de la cámara
ALC (concreto celular ligero en autoclave)
R Dependiendo del tipo de panel de ALC, es
posible que no pueda colocar la cámara.
Consulte al fabricante del panel de ALC.
R No use los tornillos incluidos. Después de
consular al fabricante del panel de ALC, use
solo taquetes de metal disponibles de manera
comercial (tornillo ø: 4 mm (5/32 pulgadas))
diseñados para los paneles de ALC.
R Lea con atención las instrucciones
suministradas con los taquetes. Siga las
instrucciones sobre el diámetro de la broca,
profundidad del orificio, etc.
R Taladre un orificio guía. Retire todos los restos
después de taladrar el orificio guía.
R Selle el orificio guía con un sellador resistente al
agua disponibles de forma comercial.
Otros materiales (mortero, mosaico, etc.)
R No use los tornillos incluidos.
R Consulte con el constructor o el profesional con
licencia sobre el tipo de taquete apropiado para
la ubicación y los materiales de la instalación.
R No instale sobre tablas de yeso o bloques de
concreto.
Para obtener ayuda, visite http://shop.panasonic.com/support
13
Configuración
HNC600_(es_es)_0623_ver.130.pdf 13 2015/06/23 9:29:52

Cómo instalar la cámara
1 Coloque el cable de seguridad en la cámara.
R Coloque la terminal circular del cable de
seguridad (A) sobre el agujero para el
tornillo.
R Coloque una arandela (B) encima de la
terminal circular del cable de seguridad.
R Ajuste el tornillo del cable de seguridad
(C) encima de la arandela.
1
2
3
2 Coloque el soporte de montaje de la cámara a
una pared exterior.
R Asegure el soporte a la pared ajustando 4
tornillos (A).
R
1
37 mm (1 15/32 pulgadas)
1
1
1
1
Nota:
R Utilice la siguiente plantilla cuando
determine la ubicación de los orificios de
los tornillos.
37 mm
(1 15/32 pulgadas)
37 mm
(1 15/32 pulgadas)
3 Para fijar la cámara en el soporte, use el
orificio de colocación de soporte en el lado
inferior o posterior de la cámara, según la
dirección en la que quiera que apunte la
cámara.
R Afloje el tornillo (
1
).
R Inserte la punta del soporte (A) en el
orificio de colocación del soporte (B) en el
lado inferior o posterior.
R Asegure la cámara ajustando el tornillo
(
2
).
Colocación en el orificio en la parte trasera
1
1
2
2
14
Para obtener ayuda, visite http://shop.panasonic.com/support
Configuración
HNC600_(es_es)_0623_ver.130.pdf 14 2015/06/23 9:29:52

Colocación en el orificio en la parte inferior
1
2
12
4 Ajuste el ángulo de la cámara.
R Afloje el tornillo (
1
) y, a continuación,
ajuste la cámara según el ángulo que
desee.
R Ajuste el tornillo (
1
) mientras sostiene el
tornillo (
2
) hasta que la cámara esté
segura.
11 2
5 Coloque el cable de seguridad en la pared.
R Coloque la terminal circular del cable de
seguridad (A) sobre la pared.
R Coloque la arandela (B) encima de la
terminal circular del cable de seguridad.
R Ajuste el tornillo del cable de seguridad
(C) encima de la arandela.
1
2
3
Nota:
R Coloque el cable de seguridad mientras
está doblado.
R Coloque el cable de seguridad bien alto
para que la cámara no golpee a nadie en
caso de que la cámara se desprenda de la
pared.
R No se cuelgue de la cámara o del soporte.
Para obtener ayuda, visite http://shop.panasonic.com/support
15
Configuración
HNC600_(es_es)_0623_ver.130.pdf 15 2015/06/23 9:29:52

6 Conecte el cable de CC al adaptador de
corriente.
R Hale el cable de CC interior y conecte el
enchufe de cable de CC (A) al enchufe del
adaptador de corriente (B).
R Conecte el adaptador de corriente (C) a la
toma de corriente.
1
Exterior
2
Interior
3
21
1 2
Nota:
R Use solo el adaptador de corriente alterna
Panasonic PNLV236 que se suministra.
R Asegúrese de conectar el enchufe del
cable de CC y el enchufe del adaptador de
corriente interiores.
Nota acerca de las conexiones de
alimentación
Adaptador de corriente alterna
R El adaptador de corriente debe permanecer
conectado en todo momento (es normal que el
adaptador se caliente durante su uso).
R El adaptador de corriente debe estar conectado
a un enchufe de corriente orientado
verticalmente o en una toma de corriente alterna
colocada en el piso. No conecte el adaptador de
corriente alterna a una toma de corriente
montada en el techo, ya que el peso del
adaptador puede hacer que se desconecte.
Falla en el suministro eléctrico
R La cámara no funciona durante las fallas del
suministro eléctrico.
16
Para obtener ayuda, visite http://shop.panasonic.com/support
Configuración
HNC600_(es_es)_0623_ver.130.pdf 16 2015/06/23 9:29:52

Cómo probar el alcance de
detección de movimiento
Después de instalar la aplicación de [Home
Network] en su dispositivo móvil, puede usarlo
para probar el funcionamiento de las características
de detección de movimiento de la cámara.
Para obtener más detalles sobre estas
operaciones, consulte la Guía del usuario
(página 21).
1 Inicie la aplicación [Home Network] y
muestre imágenes en vivo desde la cámara.
2 Mué
vase a un área dentro de la zona visible
de la cámara.
3 Mientras se mueva cerca de la cámara, use
su dispositivo móvil para observar dónde se
encuentra en el área visible cuando se activan
las características de detección de
movimiento de la cámara.
R Cuando se activan las características de
detección de movimiento, el Led indicador
se enciende en rojo alrededor de 3
segundos.
4 Observe las zonas del área visi
ble de la
cámara cuando se detecta movimiento y haga
los ajustes necesarios.
Nota:
R Puede ajustar el área detectable mediante el
sensor visual. Para obtener más información,
consulte la Guía del usuario (página 21).
R Puede ajustar el área detectable mediante el
sensor infrarrojo. Consulte “Ajuste del alcance
del sensor infrarrojo”, página 17.
Cómo probar el micrófono
Para probar el micrófono, hable fuerte y claro en el
micrófono mientras un usuario de dispositivo móvil
observa las imágenes en vivo desde la cámara.
Ajuste del alcance del sensor
infrarrojo
Si hay objetos que no desee que el sensor
infrarrojo detecte, puede ajustar el área de
detección colocando tapas de alcance del sensor.
Tipos de tapas de alcance y áreas de
detección del sensor
Además de la tapa estándar (incluida en la
cámara), existen 4 tipos de tapas (tapa 1-4). Cada
tapa bloquea distintas áreas del alcance del sensor
y se pueden colocar con incrementos de
45-grados. Consulte la tabla a continuación y
coloque la tapa adecuada para el ángulo indicado.
R Las áreas de detección, como se muestra, son
una aproximación para cu
ando la configuración
[Sensor de IR] está ajustada en [Normal]. Para
obtener más información, consulte la Guía del
usuario (página 21).
R El área de detección rota en función del ángulo
de la tapa de alcance del sensor.
Para obtener ayuda, visite http://shop.panasonic.com/support
17
Apéndice
HNC600_(es_es)_0623_ver.130.pdf 17 2015/06/23 9:29:52

Situación y tipos de ta-
pas
Alcance de detección aproximado (vista desde arriba)
*1
20 °C (68 °F) 0 °C (32 °F) 30 °C (86 °F)
Cuando desea que se
detecten ambos lados
de la cámara
Tapa estándar
(colocada en la cámara)
1
1
5 m (16.4 pies)
2
2
6 m (19.7 pies)
3
3
4 m (13.1 pies)
Cuando desea que se
detecte solo un lado
Tapa 1
Tapa 2
Tapa 3
(Ejemplo) Tapa 1
1
1
5 m (16.4 pies)
(Ejemplo) Tapa 1
2
2
6 m (19.7 pies)
(Ejemplo) Tapa 1
3
3
4 m (13.1 pies)
(Ejemplo) Tapa 3
1
1
5 m (16.4 pies)
(Ejemplo) Tapa 3
2
2
6 m (19.7 pies)
(Ejemplo) Tapa 3
3
3
4 m (13.1 pies)
Cuando desea que no
se detecten ambos la-
dos
Tapa 4
(Ejemplo) Tapa 4
1
1
5 m (16.4 pies)
(Ejemplo) Tapa 4
2
2
6 m (19.7 pies)
(Ejemplo) Tapa 4
3
3
4 m (13.1 pies)
*1 Varía en función de la temperatura ambiente en la ubicación de la instalación de la cámara. Los
valores numéricos son aproximaciones. El área de detección se indica con
.
18
Para obtener ayuda, visite http://shop.panasonic.com/support
Apéndice
HNC600_(es_es)_0623_ver.130.pdf 18 2015/06/23 9:29:52

Acerca del ángulo de colocación de la tapa de alcance del sensor
Ejemplo 1
Cuando hay un objeto en el lado derecho del área visible que no quiere que se detecte, (como
árboles):
Coloque una de las tapas 1-3 como se muestra en el ejemplo (
1
) de acuerdo con el área que no desea
que se detecte.
Ejemplo 2
Cuando hay un objeto en el extremo superior izquierdo del área visible que no desea que se detecte
(vehículos en la calle, etc.):
Coloque una de las tapas 1-3 como se muestra en el ejemplo (
2
) de acuerdo con el área que no desea
que se detecte.
Ejemplo 1
1
2
Ejemplo 2
Para obtener ayuda, visite http://shop.panasonic.com/support
19
Apéndice
HNC600_(es_es)_0623_ver.130.pdf 19 2015/06/23 9:29:53

Reemplazo de las tapas de alcance del sensor
1 Extraiga la tapa estándar ya colocada.
2 Retire la tapa de alcance del sensor deseado de uno de los 4 tipos (A) y colóquelo en el sensor (B).
R Al instalar, gire la pestaña (
1
) en la tapa hacia arriba o a un ángulo de 45-grados de acuerdo con
el tipo de tapa o dirección y coloque la tapa de la cámara, como se muestra en la siguiente
ilustración.
1
2
1
20
Para obtener ayuda, visite http://shop.panasonic.com/support
Apéndice
HNC600_(es_es)_0623_ver.130.pdf 20 2015/06/23 9:29:53

Acceso a la Guía del usuario
La Guía del usuario es una colección de documentación en línea que lo ayuda a aprovechar al máximo la
aplicación [Home Network].
1 iPhone
®
/iPad
®
Toque
en la pantalla de inicio de la aplicación.
Dispositivos Android™
Toque
u oprima el botón menú de su dispositivo en la pantalla de inicio de la aplicación.
2 Toque [Guía del Usuario].
Nota:
R No se admite Microsoft
®
Windows
®
Internet Explorer
®
8 y versiones anteriores.
R Se recomienda Android 4.1 y versiones posteriores.
R También puede acceder a la Guía del usuario mediante la página web a continuación.
www.panasonic.net/pcc/support/tel/homenetwork/manual/
Para obtener ayuda, visite http://shop.panasonic.com/support
21
Apéndice
HNC600_(es_es)_0623_ver.130.pdf 21 2015/06/23 9:29:53
-
 1
1
-
 2
2
-
 3
3
-
 4
4
-
 5
5
-
 6
6
-
 7
7
-
 8
8
-
 9
9
-
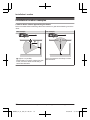 10
10
-
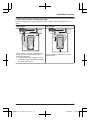 11
11
-
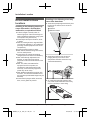 12
12
-
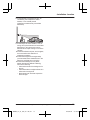 13
13
-
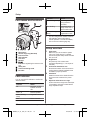 14
14
-
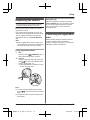 15
15
-
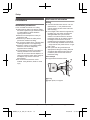 16
16
-
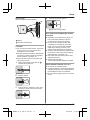 17
17
-
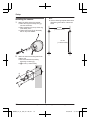 18
18
-
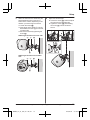 19
19
-
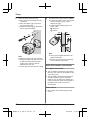 20
20
-
 21
21
-
 22
22
-
 23
23
-
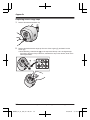 24
24
-
 25
25
-
 26
26
-
 27
27
-
 28
28
-
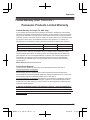 29
29
-
 30
30
-
 31
31
-
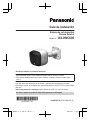 32
32
-
 33
33
-
 34
34
-
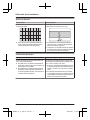 35
35
-
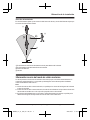 36
36
-
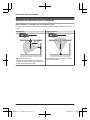 37
37
-
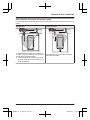 38
38
-
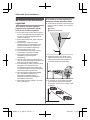 39
39
-
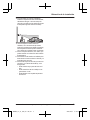 40
40
-
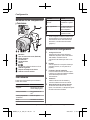 41
41
-
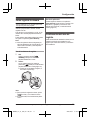 42
42
-
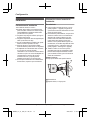 43
43
-
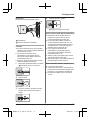 44
44
-
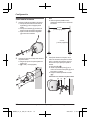 45
45
-
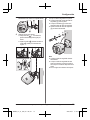 46
46
-
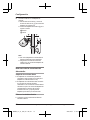 47
47
-
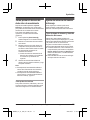 48
48
-
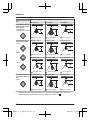 49
49
-
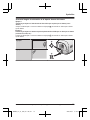 50
50
-
 51
51
-
 52
52


Panasonic KXHN6091 Instrucciones de operación
- Tipo
- Instrucciones de operación
en otros idiomas
Artículos relacionados
-
Panasonic KXHN6001 Instrucciones de operación
-
Panasonic KXHN6002 Instrucciones de operación
-
-
-
-
-
-
-
Panasonic KXHN6001 El manual del propietario
-