
ge.com
©
Safety Instructions ........ 2, 3
Operating Instructions ..... 4, 5
Care and Cleaning
Air Filter .................. 6
Grille and Case ............. 6
Outdoor (]oils .............. 6
Installation Instructions
Preparing to Install the
Air Conditioner ............. 7
Through-the-Wall
Installation--Optional ....... 13
Window Installation ....... 8-12
Troubleshooting Tips ...... 14
Normal Operating Sounds . . .15
Consumer Support
Consumer Support ......... 18
Warranty ................. 17
A GWI 0
A(;HI2
AGWI2
Writethemodelandserial numbershere:
Model #
Serial #
Find these numbers on a label on the
side of the air condifioneL
49-7565 11-06JR

iMPORTANTSAFETYiNFORMATiON.
READALLiNSTRUCTiONSBEFOREUSING.
A
m
For your safety, the information in this manual must be followed tominimize the risk of fire, electric shock
or personal injury.
SAFETYPRECAUTIONS
iiiiiiiiiiiii!
Use this appliance only for its intended
purpose as described in this Owner's
Manual.
This air conditioner must be properly
installed in accordance xdth the Installation
Instructions before it is used.
Never unplug your air conditioner by
pulling on the power cord. Always grip
plug firmly and pull straight out from the
receptacle.
Replace immediately all electric ser\,ice
cords that have become fiayed or otherwise
damaged. A damaged power supply cord
must be replaced with a new power supply
cord obtained fiom the manufacturer and
not repaired. Do not use a cord that shows
cracks or abrasion damage along its length
or at either the plug or connector end.
If the receptacle does not match the plug,
the receptacle must be changed out by a
qualified electrician.
Turn the unit OFFmld unplug your air
conditioner before making any repairs
or cleaning.
GE does not support rely ser\,icing of the
air condidone_: We strongly recommend
that you do not attempt to serx@e the
air conditioner yoursel£
For your safety...do not store or use
combustible mamrials, gasoline or other
flammable vapors or liquids in the x,icinity
of this or any other appliance.
All air conditioners contain refiigerants,
which under federal law must be removed
prior m product disposal. If you are getting
rid of an old product with refrigerants, check
with the company handling disposal about
what to do.
HOWTOCONNECTELECTRICITY
Do not, under any circumstances, cut or remove
the third (ground) prong from the power cord. For
personal safety, this appliance must be properly
grounded.
DONOT use anadapterplug with this appliance.
The power cord of this appliance is equipped
with a 3-prong (grounding) plug which mates
with a standard 3-prong (grounding) wall
outlet to minimize the possibility of electric
shock hazard from this appliance.
Power cord includes a current intermpmr
dex,ice. A test and reset button is prox,ided on
the plug case. The dex,ice should be tested on a
periodic basis by first pressing the rESrbutton
and then the RESErbuuon._f the rESrbutto.
does not trip or if the RESErbutton will not
stay engaged, discontinue use of the air
conditioner and contact a qualified
ser\,ice technician.
Have the wall outlet and circuit checked by a
qualified electrician to make sure the outlet is
properly _ounded.
Where a 2-prong wall outlet is encounmred,
it is your personal responsibility and obligation
to have it replaced with a properly grounded
3-prong wall outlet.
The air conditioner should always be
plugged into its own indix,idual electrical
outlet which has a voltage rating that matches
the rating plate.
This prox,ides the best performance and also
prevents overloading house xdring circuits
which could cause a fire hazard from
overheated xdres.
See the Installation Instructions, Electrical
Requirements section fin specific electrical
connection requirements.
2

ge.com
WARNING!
USEOFEXTENSIONCORDS
Because of potential safety hazards under certain
conditions, we strongly recommend against the
use of an extension cord.
However, if you must use an extension cord,
it is absolumly necessa U that it be a UL-listed,
14 gauge, 3:wire grounding type appliance
extension cord ha\,ing a _ounding type plug
and outlet and that the electrical rating of the
cord be 15 amperes (minimum) and 195 vohs.
READANDFOLLOWTHISSAFETYINFORMATIONCAREFULLY.
SAVETHESEINSTRUCTIONS
3

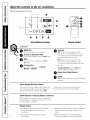
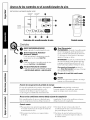
About the controls on the air conditioner.
Features and appearance may vary.
Fan
Only on
Coolon Timeron
Co01 • F1 LOW
I a.%
Fan ! Temp
M Timer Fan
--0
Air Conditioner Controls
Controls
0
@
@
0
ON/OFFPad
Turns air conditioner on and off.
Increase •/Decrease • Pads
Use to set temperature when in Coolmode.
Mode
Use to set tile air conditioner to Coolor
Fanmode.
Fan Speed Pad
Use to set tile fan speed to LOW(F1),
MED(F2)or HIGH(F3).
Remote Control
0
fimer Pad
ON--When tile air conditioner is off.
it can be set to attmmafically come on in
1 m 12 hours at its previous setting. Each
touch will set tile timer in houls.
OFF_\_31en tile air conditioner is on,
it can be set to attmmatically mrn off in
1 m 12 hours. Each much will set tile timer
in hours.
O
Tocancelthetimer,press tile Timerpad
until tile display time disappears.
Remote ControlSignal Receiver
O Display
Shows tile set temperature or time remaining
on timeL
Power Outage Recovery Feature
In tile case of a power outage or interruption, tile
unit will atKomafically re-start in tile settings last
used after tile power is restored. If tile Timer
feature was set, it will resmne its countdown.
You may need to set a new time if desired.
Do Not Operate in Freezing Outdoor Conditions
This cool<rely air conditioner was not designed for
freezing outdoor conditions. It must not be used in
fieezing outdoor conditions.
4
Remote Control
To ensure proper operation, aim tile remote
control at tile sigmal receiver on tile air
condifioneL
Tile remote control sigmal has a range of
tap to 20 feet.
Make sure nofldng is between file air conditioner
and tile remote conuol that could block the
signal.
Make sure batteries are flesh and installed
correctly as indicamd on the remora conuol.

Lights next to the touch pads on the air conditioner
control panel indicate the selected settings.
_e.com
CoolMode
Use the Coolmode with HIGH(F3), MED (F2) or
LOW(F1) fan for cooling. Use the INCREASER=/
DECREASE • pads to set the desired tempemune
between 60°F and 86°F in 1°F increments.
An electronic fllemlostat is used to maintain file
room temperature. The compressor will cycle on and
off to keep file room at file set level of comfort. Set
file themlostat at a lower number and file indoor air
will become cooleL Set file flleI_nostat at a higher
number and file indoor air will become wamleL
NOTE:If theair conditioneris off andis thenturnedon
whilesettoa Coolsettingorif turnedfroma fansetting
to a Coolsetting,# will takeappreximately3 minutesfor
the compressortostartand coolingto begin.
CoolingDescriptions
ForNormal Cooling--Select file Coolmode and
HIGH(F3)or MED(F2)fan wifll a middle set
temperature.
ForMaximumCooling--Select file Coolmode
and HIGH(F3)fan with a lower set temperature.
For Quieter & Nighttime Cooling--Select file
Cool mode and LOW (F1)fan with a middle set
temperature.
NOTE:If youswitch from a Coolsettingto OFFor to
a fan setting,wait atleast 3 minutesbeforeswitching
back to a Coolsetting.
Fan Speed Mode
Use the fan at HIGH(F3),MED(F2)or LOW(F1)to
provide air circulation and filtering without cooling.
Since fan only settings do not provide cooling,
a mmperamre setting will not be displayed.
Vent Control
The vent control is located beside the control
panel.
X_qmnset at CLOSE,only the air inside the room
will be circulamd and conditioned. When set at
OPEN,some inside air is exhausted outside.
Toopen the vent, pull the lever toward you.
Toclose it,push it in.
Air Direction--Side-to-Side
The side-to-side air direction is adjusted by moving
the lever to the left or right.
Air Direction--Up and Down
Fingertip pressure on the horizontal louvers
adjusts the air direction up or down.
5

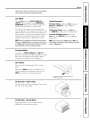
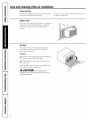
Careand cleaningoftheair conditioner.
Grille and Case
Turn the air conditioner off and remove the plug To clean, use water and a mild detergent° Do not
flom the wall outlet before cleaning, use bleach or M)msives.
Outdoor Coils
The coils on file outdoor side of file air conditioner
should be checked regularly: If flley are clogged
Mth dirt or soot, they may be professionMly
cleaned.
Air Filter
The air filter behind the flont gMlle should be
checked and cleaned at least every 30 days or
more often if necessary:
Toremove:
[_] pen the inlet grille dowmvard by pulling out
the top corne_s of the inlet grille.
[-2-] Pull up slightly on the filter to release it and
pull it out.
Clean file filter Mill warm, soapy wam_. Rinse and
let the filter dry before replacing it.
CAUTION:SONOroperatetheair
conditioner without a filter becausedirt andlint will clog it
andreduceperformance.
6

ilnsta,,at,onnsttuct,onsIAirC°n"it'°nerl
I_ Questions? Call 800.GE.CARES (800.432.2737) or Visit our Website at: ge.com
BEFORE YOU BEGIN
Read these instructions completely
and carefully.
IMPORTANT - Savethese
instructions for local inspector's use.
• IMPORTANT - Observeall
governing codes and ordinances.
• Note to Installer- Be sure to leave these
instructions with the Consumer.
• Note to Consumer- Keep these
instructions for future reference.
• Skill level - Installation of this appliance
requires basic mechanical skills.
• Completion time- Approximately 1 hour
• We recommend that two people install
this product.
• Proper installation is the responsibility
of the installer.
Product failure due to improper installation
is not covered under the Warranty.
You MUST use all supplied parts and use
proper installation procedures as described
in these instructions when installing this
air conditioner.
ELECTRICAL REQUIREMENTS
(_ Some models require a 115/120-volt a.c.,
60 Hz grounded outlet protected with a
15-amp time delay fuse or circuit breaker.
The 3-prong grounding plug minimizes the
possibility of electric shock hazard. If the wall
outlet you plan to use is only a 2-prong outlet,
it is your responsibility to have it replaced with
a properly grounded 3-prong wall outlet.
CAUTION:
Do not, under any circumstances, cut or
remove the third (ground) prong from the
power cord.
Do not change the plug on the power cord
of this air conditioner.
Aluminum house wiring may present special
problemsmconsult a qualified electrician.
TOOLS YOU WILL NEED
Phillips head screwdriver
Flat-blade screwdriver
Pencil Ruler or tape measure
Level Scissors or knife
I
7
Power cord includes a current interrupter
device. A test and reset button is provided on
the plug case. The device should be tested on a
periodic basis by first pressing the TEST button
and then the RESET button. If the TEST button
does not trip or if the RESET button will not stay
engaged, discontinue use of the air conditioner
and contact a qualified service technician.

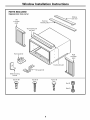
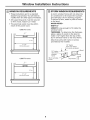
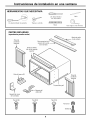
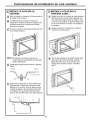
Window Installation Instructions
PARTS INCLUDED
(Appearance may vary)
Left
accordion
panel
Topmounting rail
seal strip
Frameguide (2)
Window locking
bracket
_Sill support (2)
Topmounting rail
Right
accordion
)anel
TypeA (16) Type B (3) Type C(5)
Nut (2)
Bolt (2)
8

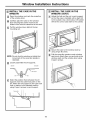
Window Installation instructions
Ill WINDOW REQUIREMENTS
• These instructions are for a standard
double-hung window. You will need to
modify them for other types of windows.
• All supporting parts must be secured
to firm wood, masonry or metal.
• The electrical outlet must be within
reach of the power cord.
10,000BTUmodels
//,
1
15"min.
25" to36"
(Withaccordionpanels)
12,000BTUmodels
16"min.
27" to39"
(Withaccordionpanels)
[] STORM WINDOW REQUIREMENTS
A storm window frame will not allow the
air conditioner to tilt toward the outside,
and will keep it from draining properly.
To adjust for this, attach a piece of wood
to the stool.
WOOD PIECES-
WIDTH: 2"
LENGTH: Long enough to fit inside the
window frame.
THICKNESS: To determine the thickness,
place a piece of wood on the stool to
make it 1/2" higher than the top of the
storm window frame or the vinyl frame.
Attach securely with nails or screws
provided by the installer.
1/2" higher
than vinyl frame
L (on some windows)
|
w
JL__ / Wood
1/2" higher Z .
than storm T rl YJ, J= _//.I
window -_---rl _1_II
froze
Storm window •
frame J _ _/inyl frame I I
9

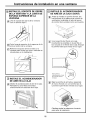
Window Installation Instructions
131REMOVE THE AIR CONDITIONER
FROM THE CASE
r-A-] Remove the 2 shipping screws from the
back of the case.
FB1 Remove the 2 screws on each side of the
case. Keep these for later use.
FC-1Slide the air conditioner from the case by
gripping the base pan handle and pulling
forward while bracing the case.
[_] PREPARE THE WINDOW AND
THE CASE
r-A-] Cut the window sash seal to the proper
length. Peel off the backing and attach the
seal to the underside of the window sash.
I_1PREPARE THE WINDOW AND
THE CASE (CONT.)
FB1 Carefully insert the plastic frame guides
into the bottom of the case on each side.
Bottomofcase
\
uide
Fc-1 Remove the backing from the top mounting
rail seal strip and attach it to the bottom of
the top mounting rail.
®
Install the top mounting rail with 3 type A
screws on the inside of the case. Insert the
frames for the accordion panels into the top
mounting rail and the frame guides. Attach
the accordion panels to the side of the case
using 4 type A screws on each side.
Topmountingrail
Frameguides
10

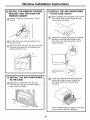
Window Installation Instructions
[] INSTALL THE CASE IN THE
WINDOW
[_] Open the window and mark the centerline
of the window stool.
[_] Carefully place the case on the window
stool and align the center mark on the
bottom front with the centerline of the stool.
[] Pull the window down behind the top
mounting rail.
NOTE: Do not shut the window so tightly that
movement of the accordion panels is
restricted.
[_] Loosely assemble the sill supports.
INDOOR OUTDOOR
Sillsupport
Select the position that will place the sill
supports near the outermost point on the
sill. Attach the sill supports to the case track
hole in relation to the selected position
using 2 type A screws in each support.
Frameguide
[] INSTALL THE CASE IN THE
WINDOW (CONT.)
[_] Adjust the bolt and the nut in each support
so that the case is installed with a slight tilt
to the outside. Use a level; about 1/3 bubble
will be the correct case slant to the outside.
i
FG--]Secure the case to the window stool by
using 3 type B screws.
Pull the accordion panels to each window
sash track. Attach them on each side to the
window sash and the window stool using
4 type C screws.
11

Window Installation Instructions
[] INSTALL THE WINDOW LOCKING
BRACKET AND THE FOAM TOP
WINDOW GASKET
r_ Attach a support bracket with a Type C
screw.
Cut the foam top window gasket to the
window width.
Stuff the foam between the glass and the
L__
window to prevent air and insects from
getting into the room.
/
171INSTALL THE AIR CONDITIONER
IN THE CASE
Slide the air conditioner into the case.
L/_tJ
Reinstall the 2 screws removed earlier on
each side of the case.
t
Screw
Screw
Powercord
m INSTALL THE AIR CONDITIONER
IN THE CASE (CONT.)
[_] Before installing the front grille, pull out the
vent control lever located beside the unit
control panel, as shown.
[]
Attach the front grille to the case by inserting
the tabs on the grille into the slots on the
front of the case. Push the grille in until it
snaps into place.
Guidethe lever carefully
through the grille as you
push it in.
®
Lower the inlet grille and secure the front
frame with a type A screw through the
front grille. Raise the inlet grille back
into place.
irille
Caulk or weather-strip any gaps or openings
to the outside to seal the installation.
12

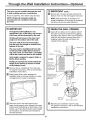
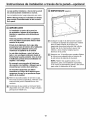
Through-the-Wall Installation Instructions--Optional
The case may be installed through-the-wall
in both existing and new construction.
Read completely, then follow step-by-step.
NOTE: Obtain all materials locally for
mounting the air conditioner through-
the-wall.
ITI IMPORTANT (cont.)
[] Secure with 14 wood screws anchored at
least an inch into the wall support structure.
NOTE: Drill pilot holes, if necessary, for
proper installation. If the frame is oversized,
use shims to prevent case distortion.
13]IMPORTANT
Through-the-wall installation is not
appropriate if any of the side or top louvers
in the case will be obstructed by the wall.
All side and top louvers in the case must
project on the outdoor side of the wall.
The room side of the case must project
into the room far enough to maximize the
balance of the unit.
The case must be installed level from side-
to-side and with a slight tilt from front to
rear. Use a level; no more than a 1/2 bubble
will be the correct case slant to the outside.
Lintel angle is required to support bricks or
blocks above opening.
Flashing is required and should extend the
length of the opening to ensure no inside
cavity leakage occurs.
[_] Remove the air conditioner from the case.
For specific instruction, refer to the Window
Installation Instructions.
[] Make certain that a wall receptacle is
available close to the hole location or make
arrangements to install a receptacle.
Place the case in the wall opening and
place wood support strips between the case
bottom and the flashing on both sides of the
bottom rail. They should be the same height
as the bottom rail and the same length as
the wall opening.
[] FINISH THE WALL OPENING
[_] Caulk all four sides on the outdoor side of
the case to prevent moisture from getting
through to the interior wall. Use of flashing
(drip rail) will further prevent water from
dripping inside the wall and down the
outside of the building.
Lintel angle
Caulking
OUTSIDE I/--
Wood filler and
caulking (above
and below the
flashing)
Plaster line
Trim molding
(if desired)
INSIDE
Bottom rail
/
Flashing
(Drip rail)
Bottom
rail
Flashing
(Drip rail)
Wood support strips
[_] Place the air conditioner into the case.
For specific instruction, refer to the Window
Installation Instructions.
13

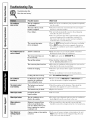
TroubleshootingTips.
Troubleshooting -tips.
Save time and money!
Airconditioner
doesnotstart
Possible Causes What ToDo
The air conditioner
is tmplugged.
The fuse is blown/circuit
breaker is tripped.
Power failure.
• Make sure tile air conditioner plug is pustled completely
into tile outlet.
• Check tile house fllse/circuit breaker box and replace
tile fllse or reset tile breakeL
• Tile unit will automatically re-start in tile settings last
used after tile power is restored.
• There is a protective finle delay (approxinlately 3 minutes)
m prevent uipping of tile compressor overload. For
this reason, tile unit mW not start hernial cooling for
3 minums after it is tinned back on.
The current interrupter
device is tripped.
• Press tile RESETbuttonlocated on tile power cord plug.
• If tile RESETbutton will not stay engaged, discontinue
use of tile air conditioner and contact a qualified service
teclmician.
Air conditioner does not Airflow is restricted. • Make sure fllere me no curtains, blinds or fluniture
coolas itshould blocking tile flont of tile air condifioneL
The temp control may not • In Cool mode, press tile DECREASE Vpad.
be set correctly.
The air filter is dirty. • Clean tile filter at least every 30 days.
See tile Operating Instructions section.
The room may have been hot. • XVllen file air conditioner is filst turned on, you need to
allow finle for tile rootll m cool down.
Cold air is escaping. • Check for open flunace floor reg,istels and cold air
YeDIIllS.
• Set tile air condifioneFs vent m tile closed position.
Cooling coils have iced up. • See "Air conditionerfreezingup"below.
Air conditioner Ice blocks the air flow and • Set tile conuols at HIGH(F3)Fan or HIGH (F3)Cooland
freezing up stops the air conditioner set tile tllemlostat to a higher teInpel_mne.
from cooling the room.
Theremote control The batteries are inserted • Check tile position of file batteries. They should be
is notworking incorrectly, inserted in tile opposite (+) and (-) direction.
The batteries may he dead. * Replace tile batteries.
Water drips outside Excessively hot and • This is nomlal.
humid weather.
Waterdripsindoors The air conditioner is not • For proper water disposal, make sure tile air conditioner
tilted to the outside, slants slightly flom tile case flont to tile reaL
Watercollectsin
basepan
Moisture is removed from
indoor air and drains into
rear of a cabinet where a fan
blows it against the outdoor
condenser coil.
• This is nomlal for a stlort period in areas wittl little
hunlidity; noml_fl for a longer period in very hunlid areas.
Timer feature not A power outage or interruption * In tile case of a power outage or intenupfion, tile unit
working properly occurred. Timer feature will reset to tile original setting. You may
14 need to set a new finle if desired.

_e.com
Normal Operating Sounds
You may hear a pinging noise caused by water
being picked up and fluown against the
condenser on rainy days or when file humidi U
is high. This design feature helps remove
moisture and improve efficiency.
You may hear file fllemlostat click when file
compressor cycles on and off.
Water will collect in file base pan during high
humidity or on _Mny days. The water may
overflow and d_ip from the outdoor side of
the unit.
The fan may run even when the compressor
does not.
/'5

m
Notes.
m
m
m
m
w
16

GEAir ConditionerWarranty--One YearLimited Warranty.
Staple yourreceipt here.
Proof of the original purchase date
is needed to make a warranty claim.
We Will Replace:
Replacement unitfor any product which fails due to a defect in materials or workmanship.
The exchange unit is warmnmd for the remainder of your product's original one-year
origina!purchase warranty period.
Properly pack your unit. We recommend using the
original carton and packing materials.
Return the product to the retail location where it
was purchased.
Include in the package a copy of the sales receipt or other
evidence of date of original purchase. Also print your
name and address and a description of the defect.
Customer instruction. This owner's manual provides
information regarding operating instructions and
user controls.
Improper installation. If you have an installation problem,
or if the air conditioner is of improper cooling capacity
for the intended use, contact your dealer or installer.
You are responsible for providing adequate electrical
connecting facilities.
Failure of the product resulting from modifications to
the product or due to unreasonable use including failure
to provide reasonable and necessary maintenance.
Replacement of house fuses or resetting of circuit
breakers.
Damage to the product caused by improper power supply
voltage, accident, fire, floods or acts of God.
Incidental or consequential damage caused by possible
defects with this air conditioner.
This warranty is extended to the original purchaser and any succeeding owner for products purchased for home
use within the USA.
Some states do not allow the exclusion or limitation of incidental or consequential damages. This warranty gives
you specific legal rights, and you may also have other rights which vary from state to state. Toknow what your
legal rights are, consult your local or state consumer affairs office or your state's Attorney General
Exclusion of implied warranties: Except where prohibited or restricted by law, there are no warranties, whether
express, oral or statutory which extend beyond the description on the face hereof, including specifically the
impfied warranties of merchantability or fitness for a particular purpose.
Warrantor: General Electric Company.Louisville, KY 40225
17

ConsumerSupport.
GEAppliancesWebsite
ge.corn
Have a quesdon or need assistance with your appliance? Try the GE Appliances Website 24 hems a day,
any day of the year! For greater convenience and faster service, you can now download Owner's Manuals,
or even order parts on-line.
RealLifeDesignStudio
go.corn
GE supports the Universal Design concept-products, services and emqromnents dmt can be used by
people of all ages, sizes and capabilities. V_!erecognize the need to design for a wide range of physical and
mental abilities and impah_nents. For derails of GE's Universal Design applications, including kitchen
design ideas for people with disabilities, check out our Website today. For the hearing impaired, please ca/1
800.TDD.GEAC (800.833.4322).
PartsandAccessories
Individuals qualified to service their own appliances can have parts or accessories sent direcdy to their
homes (VISA, MasterCard and Discover cards are accepted). Order on-line today, 24 hom_ eve_T day or
by phone at 800.626.2002 during nortnal business hours.
Instructions contained in thismanualcoverprocedurestobeperformedbyanyuser.GEdoesnotsupport
anyservicing of theair conditioner.Westronglyrecommendthatyoudonotattempttoservice theair
conditioner yourself
go.corn
ContactUs
go.corn
If you are not sadsfied widl die service you receive flom (;E, contact us on our Websim widl all die derails
including your phone nmnbe_; or wfim to: General Manage_; Customer Relations
(;E Appliances, Appliance Park
Louisville, KY 40225
"/8 Printed in China

ge.com
Instrucdones de seguridad .... 2, 3
Instrucdones de @eraci6n .... 4, 5
Cuidado y limpieza
Bobinas para exteriores .......... 6
Filtro de aire ................... 6
Rejilla y caja ................... 6
Instrucdones de im_alad6n
Instalaci6n a trav6.s
de la pared--opcional ..... 13, 14
Instalaci6n en ventanas ....... 8-12
Preparfindose para instalar
el acondicionador de aire ........ 7
Soluciouar problemas ......... 15
Sonidos normales
de operaci6n ................. 16
Apoyo al consumidor
Apoyo al consumidor .......... 18
Garan6a ..................... 17
A GWI 0
AGHI2
AGWI2
©
©
Escribalos numemsdemodeloy serie aqui:
# de Modelo
#de Serie
Puede elicontiai estos II/llIleIos en tllla
efiquem en el cosmdo del acondicionador
de aire.
3828A21031L 49-7565 11-06JR

/NFORMAC/ONIMPORTANTEDESEGUR/DAD.
LEATODASIJ4SINSTRUCCIONESANTESDEUSAR.
, iAD !
Por su seguridad, se debe seguir la informacidn en este manual para minimizar el riesgo de incendios,
descargasel#ctricaso lesionespersonales.
2
PRECAUCIONESDESEGURIDAD
iiiiiiiiiiiii!
Use este electrodomOstico solamente para
el prop6sito determinado seg%n se describe
en el Manual del propietario.
Este acondicionador de aire debe instalarse
correctamente de acuerdo con las
Instmcciones de instalaci6n antes de su uso.
Nunca desenchufe su acondicionador de
aire drando del cable elOctrico. Siempre
agarre firmemente el enchufe y tire de
_1directamente hacia _uera.
Reemplace inmediatamenm todos los
cables elOctricos que se hayan pelado
o que se hayan daflado de alguna otra
manera. Un cable de corriente daflado no
debe repararse, sino que debe ser sustituido
por uno nuevo que se adquiera del
fhbricanm. No use un cable elOctrico que
muestre ex,idencias de demrioro, o daflos
de abrasi6n en su superficie en alguno
de sus extremos.
Si el receptaculo no coincide con el
enchufe, un electricista calificado debe
reemplazar el receptaculo.
Apague la unidad y desenchufe su
acondicionador de aire antes de hacer
cualquier reparaci6n o limpiar.
GE no esta no apoya que se le proporcione
ningdn ser\,icio al acondicionador de aire.
Vehementemente recomendamos que
usmd no intente proporcionar ser\,icio
al acondicionador de aire usted mismo.
Por su seguridad...no almacene ni use
materiales combustibles, gasolina u otros
vapores o lfquidos imqamables en la
proximidad de 4sm o algdn otro
electrodom4stico.
iiiiiiiiiiiii!
Todos los acondicionadores de aire
contiene ref_igerantes, los que por i,ey
Federan deben ser remox,idos antes de
desecharlos. Si usted planea deshacerse de
algdn producm que conmnga refrigerantes,
p6ngase en contacm con la compaflfa que
se encarga de recoger su basura para que le
indiquen quO hacer.
COMOCONECTARLAELECTRICIDAD
Bajo ninguna circunstancia, corte o remueva la
tercera pEla(tierra) del cable el#ctrico. Enpos
de la seguridad personal, este electrodomfistico
debe siempre conectarse a tierra.
NO usetin enchufe adaptadorcon este
electrodomestico.
E1 cable el_ctrico de este electrodom_stico esta
equipado con un enchufe de tres pdas (tierra)
que combina con un tomacorriente est_ndar
de tres mmas de pared para minimizar la
posibilidad de una descarga el_ctrica.
E1cable de alimentaci6n incluye un
dispositivo para intermpci6n de corriente.
Se incluye un bot6n de pmeba y de reinicio
en el dispositivo. E1dispositivo debe ponerse
a pmeba peri6dicamente: primero se presiona
el bot6n de TEST(pmeba) y luego RESET
(reinicio). Si el bot6n rESr,o se dispara
o si el bot6n RESETno queda enganchado,
de,je de utilizar el acondicionador de aire y
comunfquese con un t_cnico calificado.
Pida a un t_cnico que inspeccione el
tomacorriente y el circuito para cerciorarse
de que el mmacorriente esta conectado a
tierra de la manera apropiada.
Donde exista un tomacorriente de dos tomas,
es su responsabilidad y obligaci6n personal
hacer que dicho mmacorriente sea
reemplazado por uno de tres mmas con
conexi6n a tierra.
E1acondicionador de aire deberfa siempre
estar conectado a un tomacorriente indix,idual
con su circuito de volta,je correspondiente.
Esm proporciona el mayor rendimiento y
ademas ex,itaque los circuitos del resto de
la casa se sobrecarg_en, lo cual podrfa causar
incendios por el sobrecalentamiento
del cableado.
Ver las Instmcciones de instalaci6n, en la
secci6n Requisitos El_ctricos para los requisitos
especfficos de conexi6n.

ge.com
&iABVER' I
USODECABLESDEEXTENSION
Debido al potencial de riesgos de seguridad
bajo ciertas condiciones, enfirgicamente
recomendamos contra el uso de cables de
extensiSn.
Sin embargo, siusted se ve en la necesidad
de usar un cable elOctdco de extensi6n,
es absolutamenm necesario que el mismo
estOlistado ba,jo UI,, sea calibre 14, del tipo
de 3 mmas con conexi6n a derra para
electrodomOsticos y el fndice elOctrico debe
ser de 15 amperios (mfnimo) y 195 voltios.
LEAYSIGAESTASINSTRUCCIONESDESEGURIDADCUIDADOSAMENTE.
GUARDEESTASINSTRUCCIONES
3

Acerca de loscontrolesen el acondicionadorde aire.
Las funciones y el aspecto pueden variar.
Ventilador
solamente
encendido
Enfriamiento Sincronizador
encendido encendido
Cool•
I
___@
4
Controlesdel acondicionadordeaire Control remoto
Controles
ON/OFF(ENCENDIDO/APAGADO)
Apaga y prende el acondicionador de aire.
Teclas deIncrease • (Aumentar)/
Decrease • (Reducir)
Usado para _jusmr la temperamra cuando
se encuentre en el modo Cool (Frio).
MODO
Usado pare _justar el acondicionador de aire
al modo Cool (Frio)o Fan (Ventilador).
Fan Speed (Velocidad de ventilador)
Usado para @1star la velocidad del ventilador
a tOW (Fll (BAJOI, MED (F2Io HIGH (F3I (ALTO).
0
Bmer (Sincronizador)
ON (ENCENDIDO)--Cuando el acondicionador
de aire estfi apagado, puede _iusmrse para
que se encienda aummdficamenm dentro de
1 a 12 horas en el nivel previo. Cada toque
@lsmrfi el fiempo en horns.
OFF(APAGADO)--(_uando el acondidonador de
aire estd encendido, puede @lstmse para que
se apague automfiticamente denuo de I a 12
horns. Cada tuque @lstaM el dempo en horns.
Paracancelarelsincronizador,presione la
tecla rimer (Sincronizador) hasm que el fiempo
en la panmlla desaparezca.
Receptor de la se_al del controlremoto
Pantalla
Muestra la temperamra _jusmda o el tiempo
resmnte en el sincronizado_.
Funcion de recuperacion de perdida de energia
En caso de la p&dida de la energfa o interrupci6n, Sincronizador esmba definida, continuar_
la unidad reiniciaM aumm_ificamente en las la cuenm regresiva. Es posible que usted necesite
flmciones de la dlfima vez que tim usado una _jusmr un fiempo nuevo si asf lo desea.
vez la ener_a sea resmblecida. Si la flmcidn del
No use en las condiciones externas debajo el punto de congelacion
Este acondicionador de aire no es diseriado para congelaci6n. No use en las condiciones externas
usar en temperaturas externas deb_jo el punto de deb_jo el punto de congelaci6n.
Control remoto
Para garanfizar una operacidn apropiada, ofiente
el control remoto hacia el receptor de serial del
acondicionador de aire.
E1 receptor de serial tiene un tango mfiximo
de 20 pies.
Cercidrese de que no haya nada entre el
acondicionador de aire y el control remoto
que pueda bloquear la serial.
Cercidrese de que las baterfas sean flescas y
se insmlen correcmmente segfin se indica en
el control remoto.

ge.com
Las luces al lado de las teclas de toque en el panel
de control del acondicionador de aire indicar_n los
ajustes seleccionados.
Modo Cool(Frio)
Use el modo Coolcon ventilador HIGH(F3)(ALTO),
MED(F2)(MEDIO)o LOW(F1)(BAJO)para enffiaL Use
lasteclasde INCREASE• (AUMENTAR)/DECREASE•
(REDUCIR)[)a_ _justar a la temperatura deseada
enue 60°F y 86°F en incremenms de I°E
Se usa un mmlosmto electr6nico pa_v_mantener la
mmperamra de la habitaci6n. E1compresor hard
ciclo enue apagado y encendido pma mantener
la habimci6n a la mmperamra deseada. Ajusm el
mrmosmm a un nfimero menoi y el aire inmrno
se enfliaM m_'ts.Si lo @1sin a un nfimero mayo_,
la temperamra del aire interno se calenmM rods.
NOTA:Siel acondicionadorde aire est# apagadoy
luego seenciendemientrasest# ajustadoenun ajuste
Cool(Frio)o sise cambiade un ajustede ventiladora
uno deCool(Frio),tomar#aproximadamente3 minutos
para que el compresorcomiencea enfriarotra vez.
Descripciones de enfriamiento
ParaenfriamientonormaI--Seleccioneel modo de
ventilador Cool(Frio)y HIGH(F3)(ALTO)o MED(F2)
(MEDIO)con una temperatura de @lste media.
Paraenfriamientomaximo--Seleccione el modo
de ventilador Cool},HIGHF3(ALTO)con una
tempe_mlra de _juste menoL
Paraenfriamientosilencioso yenfriamiento
nocturno_Seleccioneel modo de ventilador Cool
y LOW(F1)(BAJO)con una temperatura de ;_juste
media.
NOTA:Si cambiadeun ajuste Cool(Frio)a OFF
(APAGADO)oa un ajustede ventilador,espere
aproximadamente3minutosantes de cambiarotra
vezal ajuste deCool(Frio).
Modo de Fan Speed (Velocidad de ventilador)
Use el ventilador en High(F3)(ALTO),MED(F2)
(MEDIO)o LOW(F1)(BAJO)para pmporcionar
circulaci6n de aire yfilt_mi6n sin enfiiamiento.
Debido a que los nNeles de venfilador dnicamenm
no proporcionan enfiiamiento, el nivel de
tempe_mlra no se muesm_ en la pantalla.
Control de la ventilacion
E1control de ventilaci6n est;ilocalizado al lado
del panel de control.
Cuando est_ _justado en CLOSE(CERRADO),
solamenm el aire en el inmrior de la habimci6n
circulaM y se acondicionaM. Cuando estfi _jusmdo
en OPEN(ABIERTO),un poco del aire interno es
expelido hacia afimx_u
Para abrir la rejilla, tirede la palancahacia
usted.Para cerrar/a, empSjelahacia adentro.
Direccion del aim--de lado a lado
I,a direcci6n de lado a lado del aire es _justada
moviendo la palanca hacia la derecha o izquierda.
Oireccion del aire--hacia arriba y hacia abajo
Una presi6n sencilla con los dedos en lasparfillas
horizontales _justarfi la direcci6n del aire hacia
arriba o hacia ab_jo.
5

Cuidadoy limpiezade/acondicionador de aim.
Rejilla y caja
Apague el acondidonador de ahe y retire el
enclmfe del tomaconJente de la pared antes
de limpiar
Para limpiai; use agua y tm detergente suave.
No use cloro o materiales abrasivos.
Bobinas para exteriores
Se deben inspeccionar con flecuencia las bobinas
en el lado exterior del acondicionador de ahe°
Si kL_mismas estfin obsmfldas con suciedad u
ll()llfn, podrfim limpia_e profesionahnente.
Filtro de aire
E1 filtro de aire deuSs de la rejilla flontal debe
inspeccionarse y limpia_se pot lo menos cada
30 dfas o rags a menudo si fllese necesario.
Para retirarlo:
[_] bm la rejilla de entrada hacia ab_jo fimndo
de las esquinas supefiores de la rejilla de
entmda.
[-2-] Levante ligeramente sobre el filtro pare
liberarlo y exuSigalo.
Limpie el filuo con agua tibia yjabdn. E_jufiguelo y
pemflm que se seque antes de colocarlo otto vez en
su lugaL
PRECAUCION:Noo fRfo/
amndidonador de a/resin d fi/tm debidoaque /asudedad
y /aspelusasIoobstruir_ny reducir_nsu rendimiento.
6

Instrucciones
de instalacion
Acondicionador
de aire
[_ i Preguntas? Llame 800.GE.CARES (800.432.2737) o Visite nuestra pagina en la red en: ge.com I
ANTES DE INICIAR
Lea estas instrucciones completa y
cuidadosamente
IMPORTANTE - Guardeestas
instrucciones para uso del inspector local.
• IMPORTANTE - Observetodos
los c6digos y 6rdenes de ley.
• Nota al instalador- AsegQrese de dejar
estas instrucciones con el consumidor.
• Nota al consumidor- Conserve estas
instrucciones para referencia futura.
• Nivel de destreza- La instalacion de este
aparato requiere de destrezas mecanicas
basicas.
• "13empo de ejecucion - Aprox. 1 hora
• Recomendamos dos personas para
la instalacion de este producto.
• La instalacion apropiada es la
responsabilidad del instalador.
• La falla del producto debido a una
instalacion inadecuada no esta cubierta
por la garantia.
• Cuando instale este acondicionador
de aire, DEBE usar todas las piezas
suministradas y usar procedimientos
adecuados de instalaci6n.
REQU ISITOS ELC:CTRICOS
(_ lgunos modelos requieren
tomacorrientes de 115/120 voltios de
corriente alterna y 60 Hz conectados a
tierra, protegidos con un fusible de
dilataci6n de tiempo de 15 amperios o
un cortacircuitos.
El enchufe de tres pQas con conexion a tierra
minimiza la posibilidad de descargas electricas.
Si el tomacorriente de la pared que usted planea
usar solamente tiene 2 tomas, es su
responsabilidad hacer que un tecnico Io
reemplace por uno de tres tomas con conexion
a tierra.
El cable de alimentacion incluye un dispositivo
para interrupcion de corriente. Se incluye un
boton de prueba y de reinicio en el dispositivo.
El dispositivo debe ponerse a prueba
periodicamente: primero se presiona el boton
de TEST (prueba) y luego RESET (reinicio).
Si el bot6n TEST no se dispara o si el bot6n
RESET no queda enganchado, deje de utilizar
el acondicionador de aire y comuniquese
con un tecnico calificado.
PRECAUCION:
Bajo ninguna circunstancia corte o remueva
la tercera pua (conexion a tierra) del cable
electrico.
No cambie el enchufe en el cable electrico de
este acondicionador de aire.
Los cables caseros de aluminio podrian
presentar problemas especiales. Consulte a
un tecnico electricista calificado.
7

Instrucciones de instalacion en una ventana
HERRAMIENTAS QUE NECESITARA
Un destornillador de estrella
Tijeras o cuchilla
Un destornillador
con hoja plana
Nivel
Lapiz
Una regla o cinta metrica
PARTES INCLUlDAS
(apariencia puede variar)
Panel de
acorde6n
izquierdo
Cintade sellado
del riel de montaje
superior
Partesuperior de
espuma de la junta --
de la ventana
Banda e sello
entana
6uia del marco (2)
Soporte de cierre
de la ventana
_ _OmPbOrra_e(d)el
Topmounting rail
Panel de
acorde6n
derecho
TipoA (16) Tipo B (3) Tipo C(5)
Tuerca (2)
Tornillo (2)
8

Instrucciones de instalaci6n en una ventana
N-I REQUlSITOS PARA LA VENTANA
• Estas instrucciones son para una
ventana estandar de dos pliegues.
Usted necesitara modificar el proceso
para otros tipos de ventanas.
• Todas las partes de apoyo deben quedar
totalmente aseguradas a algQn metal,
mamposter/a o a la madera.
• El tomacorriente electrico debe estar al
alcance del cable electrico del
acondicionador de aire.
M0delos de 10.000BTU
15"min.
25" a36"
(conpanelesdeacorde6n)
m
C
M0delos de 12.000BTU
16"min.
27"a 39"
(conpanelesdeacorde6n)
I
C
[] REQUlSITOS DE UNA VENTANA
DE TORMENTAS
Un marco de ventana de tormentas no
permitira que el acondicionador de aire se
incline hacia el exterior y evitara que drene
apropiadamente. Para solucionar este problema,
adhiera un pedazo de madera a la repisa.
PEDAZOS DE IVIADERA-
ANCHO: 2"
LONGITUD: Lo suficientemente largo
como para ajustar en el interior del marco
de la ventana.
GRUESO: Para determinar el grueso, coloque
un pedazo de madera en la repisa para
hacerla 1/2" mas alta que la parte superior
del marco de la ventana de tormentas o del
marco vinilo.
Peguelo firmemente con clavos o con
tornillos proporcionados por el instalador.
| 1/2" mas alto que el
_marco vinilo (en algunas1/2" mas alto ___L_ventanas)
queel marco _ I-Madera
de ventana _ rl--_-im ,
detormentas _ II|!k _J Repisa ............."_
oo,co e
ventana de rco vinilo
tormentas
9

Instrucciones de instalacion en una ventana
131RETIRE EL ACONDICIONADOR DE
AIRE DE LA CAJA
r_ Remueva los 2 tornillos de envio de la parte
posterior de la caja.
FB1 Retire los 2 tornillos en cada lado de la caja.
Guardelos para mas tarde.
_._
Deslice el acondicionador de aire de la caja
agarrando la empufladura del c_Srterbase y tire
hacia adelante mientras sostiene la caja.
[_] PREPARE LA VENTANA Y
LA CAJA
Corte el sello de la banda de la ventana a la
Iongitud apropiada. Pele la parte posterior y
pegue el sello a la parte inferior de la banda
de la ventana.
141PREPARE LA VENTANA Y LA
CAJA (CONT.)
®
Fond0dela caja
\
Con cuidado, inserte las guias del marco
plastico en el fondo de la caja en cada lado.
delmarco
[] Remueva la parte posterior de la banda de
sellado del riel de montura superior y Qnala
al fondo del riel de montaje superior.
®
Instale el riel de montaje superior con 3
tornillos tipo A en el interior de la caja.
Inserte los marcos para los paneles de
acordeon en el riel de montaje superior y
las guias del marco. Una los paneles de
acordeon al lado de la caja usando 4
tornillos tipo A en cada lado.
Rieldemontajesuperior
(r_3
C_'m
Gu[asdelmarco
10

Instrucciones de instalaci6n en una ventana
[] INSTALE LA CAJA EN LA
VENTANA
[] Abra la ventana y marque la Iinea central de
la repisa de la ventana.
[_] Cuidadosamente coloque la caja en la
repBa de la ventana y alinee la ventana con
la marca central en el fondo con la Iinea
central en la repisa.
[] -Iqre de la ventana hacia abajo detras del riel
de montaje superior.
NOTA: No apriete la ventana tanto que el
movimiento de los paneles de acorde6n
quede restringido.
[_] Ensamble los apoyos del umbral y dejelos
flojos.
INTERIOR EXTERIOR
Sop0rtedelumbral
Seleccione la posicion en que colocara los
soportes del umbral cerca del punto mas
alejado en el umbral. Una los soportes del
umbral al agujero de trayectoria de la caja
en relacion con la posicion seleccionada
usando dos tornillos tipo A en cada soporte.
Gufadelmarco
7
INSTALE LA CAJA EN LA
VENTANA (CONT.)
Ajuste el tornillo y la tuerca en cada soporte
de forma tal que la caja este instalada con
una inclinacion ligera hacia el exterior. Use
un nivel, una burbuja de aproximadamente
1/3 es la inclinacion correcta con respecto a
la ventana.
i-6-1Asegure la caja a la repisa de la ventana
usando 3 tornillos tipo B.
[] -Iqre de los paneles de acordeon hacia cada
paso del marco de la ventana. 0nalos a
cada lado del marco de la ventana y la
repisa de la ventana usando 4 tornillos
tipo C.
11

Instrucciones de instalacion en una ventana
[] INSTALE EL SOPORTE DE CIERRE
DE LA VENTANA Y LA JUNTA DE
ESPUMA SUPERIOR DE LA
VENTANA
Una el soporte de cierre de la ventana
con un tornillo tipo C.
Corte la parte superior de la espuma de la
L__
junta al ancho de la ventana.
Rellene la espuma entre el vidrio y la
ventana para evitar que aire e insectos se
introduzcan en la habitacion.
I I
1711NSTALE EL ACONDICIONADOR
DE AIRE EN LA CAJA
r_ Deslice el acondicionador de aire en la caja.
Reinstale los 2 tornillos removidos
anteriormente en cada lado de la caja.
Tol Tornill0
Cableel6ctrico_-_
1711NSTALE EL ACONDICIONADOR
DE AIRE EN LA CAJA (CONT.)
[_] Antes de instalar la parrilla frontal, tire
hacia afuera de la palanca de control de
ventilacion Iocalizada al lado del panel
de control de la unidad, como se muestra.
[] Una la parrilla del frente a la caja
insertando las orejillas en la parrilla en
las ranuras en el frente de la caja. Empuje
la parrilla hasta que encaje en su lugar.
Guiela palanca
cuidadosamente a trav#s
de la parrilla mientras
la empuja.
Baje la parrilla de entrada y asegOrela
[_] al marco frontal con un tornillo tipo A.
Levante la parrilla de entrada a su lugar.
Parrillade
entrada
Calafatee todas las aberturas al exterior
para sellar la instalacion.
12

Instrucciones de instalacion a traves de la pared--opcional
La caja podria instalarse a traves de la pared
en construcciones existentes o nuevas.
Lea completamente, luego siga paso por paso.
NOTA: Obtenga todos los materiales en tiendas
para montar el acondicionador de aire a traves
de la pared.
m IMPORTANTE
La instalacion a traves de la pared no
es apropiada si alguna de las persianas
laterales o superiores esta obstruida por
la pared.
Todas las persianas laterales y superiores
en la caja deben proyectarse hacia el lado
exterior de la pared.
El lado de la habitacion de la caja debe
proyectarse hacia el interior de la habitacion
con la distancia suficiente como para
maximizar el equilibrio de la unidad.
La caja debe instalarse a nivel, de lado a
lado, y con una ligera inclinacion desde el
frente hacia la parte posterior. Use un nivel;
la inclinacion correcta sere una inclinacion no
superior a 1/2 burbuja.
Es necesaria una escuadra de lintel para
dar soporte a los ladrillos o bloques que se
encuentran por encima de la abertura.
Se necesitan tapajuntas que deben
extenderse a Io largo de la abertura para
asegurarse de que no se produzcan fugas
dentro de la cavidad.
_-] Retire el acondicionador de aire de la caja.
Para instrucciones especificas, refierase a las
Instrucciones para la instalacion en una
ventana.
[-_ Cerciorese de que existe un tomacorriente
disponible cerca del orificio o haga arreglos
para que se instale uno.
[TI IMPORTANTE (cont.)
®
Coloque la caja en la abertura de la pared
y coloque las bandas de soporte de madera
entre la parte inferior de la caja y los
tapajuntas de ambos lados del riel inferior.
Deben ser de la misma altura que el riel
inferior y de la misma Iongitud que la
abertura de la pared.
Asegure con 14 tornillos para madera fijados
al menos una pulgada hacia el interior de
la estructura de soporte de la pared.
NOTA: Taladre los agujeros piloto, si es
necesario, para una instalacion apropiada.
Si el marco es demasiado grande, use cutlas
para evitar la distorsi6n de la caja.
13

Instrucciones de instalacion a traves de la pared--opcional
I_] TERMINE LA ABERTURA
EN LA PARED
I--A-]Calafatee los cuatro lados del lado exterior
de la caja para evitar que la humedad
penetre a traves de la abertura en la pared.
El uso de tapajuntas (riel de goteo) evitara
aQn masque el agua gotee hacia el interior
de la pared y hacia el exterior de la
construccion.
D,ngulo del lintel
Calafateo
EXTERIOR J !--
nersianas I /
de aire V
(persianas /4j.-_"
supenores y 'F I
laterales debe I
proyectar I
hacia el lado
exter or de
la pared)
Relleno de madera
y calafateo (por
encima y por debajo
del tapajuntas)
Fondo
Riel
Tapajuntas de la inferior
(riel de goteo) caja
Lfnea
del yeso
Moldeado
del marco
(si se desea)
INTERIOR
Riel inferior
J
Tapajuntas
(riel de goteo)
Bandas de soporte
de madera
[] Coloque el acondicionador de aire hacia
el interior de la caja. Para instrucciones
especfficas, refierase alas Instrucciones
para la instalacion en una ventana.
14

Solucionarproblemas, ge.com
E1acondicionadorde
airenoenciende
Causas posibles Que hacer
El acondicionador de afire * Cercidrese de que el acondicionador de aire estfi
estfi desconectado, enclmfado totalmente en el tomacorriente.
El fusible se dispar6 / • Inspeccione los fusibles/caja de interruptores de la casa
el eortaeireuitos se disparr, y reemplace cualquier flMble o re@lste el inmrrupmL
Interrupd6n en el
suIninistro el6ctrico.
El dispositivo de interrupci6n
de corriente se ha activado.
• I,a unidad se reiniciard aummdficamente con la
configuracidn ufilizada pot filfima vez luego de
reestablecer la electricidad.
• Exism un rem_so de fiempo pot protecci6n (de
aproximadamenm 3 minums) para evimr la desconexirn
pot sobrecarga del compresoL Pot esm razrn, es posible
que la unidad no comience a enfliar de forum nomml hasm
mmscurridos 3 minums desde que voM6 a encenderse.
• Presione el bot6n RESETubicado en el cable de
alimenmcidn.
• Si el botdn RESETno se mantiene en su lugar, no
ufilice mils el acondicionador de aire y comunfquese
con un tr.cnico calificado.
Elacondicionador de aire El flujo de afire estfi restringido. * Cercidrese de que no existe ninguna corona, persiana o
no enfria como deberia mueble bloqueando el flente del acondicionador de aire.
El control de temperatura no • En el modo Cool (Frio),presione el botdn DECREASE V.
estfi ajustado apropiadamente.
El filtro de afire estli sucio. • I,impie el filtro cada 30 dfas pot lo menos. Vet la seccidn
de Instrucciones de OperaciOn.
La habitacidn podria haber • Cuando el acondicionador de aire se enciende, usted
estado caliente, necesim darle fiempo para que enfli(" la habimcidn.
El afire frio se estfi escapando. • Cercidrese de que los regisuos de la calefaccidn no estfin
abierms y se encuenmm retornando el aire flfo.
• Goloque la venmnilla del acondicionador de aire en
la posicidn cerrada.
Las bobinas de enfriamiento • Vet "acondicionador de aire congelgmdose" m_is adelante.
se eongelaron.
Elacondicionador de aire El hielo bloquea el flujo • Coloque los controles en HIGH(F3) Fan (Ventilador
se esta congelando de afire haeia el aeondieionador ALTO)o HIGH(F3)Cool(FrioALTO)y coloque el
de aire evitando que se enfrie termdmetro a una temperature mils alia.
la habitacirn.
El controlremoto Las baterias estfin insertadas • Inspeccione la posicidn de las bamrfas. Deben esmr
no funciona ineorreetamente, insermdas en la posicidn indicada, (+) y (-).
Las baterias estfin agotadas. • Reemplace las baterfas.
Hayagua goteandoafuera Calor exeesivo y tiempo hfimedo. • Esto es nomml.
Hayaguagoteandoenel El aeondicionador de afire • Para drenar el agua al)ropiadamente, cercforese de que
interior de la habitacion no estfi inclinado hacia afuera, el acondicionador de aire estfi inclinado ligemmente
desde el flente hacia atrfis.
Seacumulaagua
enlabandeja
La humedad es removida
del afire interno y drenada hacia
la parte posterior del gabinete
donde un ventilador la empuja
contra el embobinado del
consumidor.
• Esm es nomml pot un corm perfodo en dreas con poca
humedad; normal pot un perfodo de fiempo m_'ts
posmrgado en _reas m_'ts hdmedas.
LafunciOnde
Sincronizador(Timer)
noestafuncionando
apropiadamente
Una p6rdida en el suministro
el6ctrico o tma interrupci6n ha
oeurrido.
• En el caso de una p&dida del suminisno elrcu-ico o
una inmrmpcidn, la fimcidn de Sincronizadoren la
unidad se re_justm_ al _juste origimd. Es posible que
usmd necesim @1star un fiempo nuevo si _ksflo desea.
15

So/ucionarpmb/emas.
Sonidos de operacion normales
Quizds escuche un sonido metfilico causado pot
el agua ramada y firada contm el condensador en
los dias lluviosos o cuando la humedad es aim.
Esm caracm_fsfica de disef/o wuda a _emove_ la
humedad y mejo_w la eficiencia.
O..uizdsescuche que el mmlosmm hace clic
cuando el compreso_ hace ciclo enue encendido
y apagado.
E1agua se acumula en la bandeja duiante dfas
lluviosos o con mucha humedad. E1agua podria
de_ramaIse y gotea_ desde el lado extolno de
la unidad.
E1venfilado_ pod_fa flmciona_ aun si el
comp_eso_ no lo hace.
16

Garantiade su acondicionadorde aire garantia limitada de una o.
Grapeaquf su recibo.
Se requiere facilitar prueba de la fecha de compra
original para hacer un reclamo de garantfa.
A part#de la fecha
de la compra original
Nosotros reemplazaremos:
Unidadde reemplazo para cualquier producto que falle debido a defectos en los matefiales o en
el proceso de fabricacidn. La unidad de intercambio esui gamntizada para el resto del perfodo
de un afio de gamntia original del producto.
Empaque su tmidad apropiadamente. Recomendamos
ttsar el cart6n original y los materiales de empaquetado.
Regrese el producto al local de ventas donde usted
1o compr6.
Incluya en el paquete tma copia del recibo de venta
u otra evidencia de la fecha original de la compra.
Adem_ imprima su nombre y direcci6n y tma
descripci6n del defecto.
Instrucciones al cliente. El Manual del propietario
proporciona informaci6n acerca de las instrucciones
de operaci6n y de los controles del usuario.
Instalaci6n inapropiada. Si usted tiene tm problema
durante la instalaci6n, o si su acondicionador de aire no
tiene la capacidad de enfriamiento que usted necesita,
p6ngase en contacto con nuestro distribuidor o
instalador. Usted es responsable de proporcionar
las facilidades de conexi6n el6ctrica necesarias.
Fallo del producto resultante de modificaciones al
producto o debido a uso irrazonable incluyendo no
proporcionar mantenimiento razonable y necesario.
Reemplazo de fusibles de la casa o reajuste del sistema
de circuitos.
Dafio al producto causado por voltaje inapropiado hacia
el equipo, accidentes, incendios, intmdaciones o actos
de la naturaleza de fuerza mayor.
Dafios incidentales o consecuenciales causados por
defectos posibles con este acondicionador de aire.
Esta garantfa so extiende al comprador original y cualquier comprador posterior de productos comprados para uso
residencial dentro de Estados Unidos.
Algunos estados no permiten la exclusiSn o las limitaciones de dafios incidentales o consecuenciales. Esta garantfa
da derechos legales especfficos, y usted podrfa tener otros derechos que variar#n de estado a estado. Para saber
cu#les son sus derechos legales, consulte a la oficina de asuntos del consumidor local o la oficina del Attomey General
en su Iocalidad.
Exclusion de garantias implicadas: Excepto donde est# prohibido o restringido por la ley, no hay garantfas,
expresas, orales o estatutarias que extiendan m#s all# de la descripci6n especffica, incluyendo especfficamente
las garantfas implicadas de mercantibilidad o propiedad para un prop6sito particular.
Garante: General Electric Company.Louisville, KY 40225
17

Ppoyoai consumidor.
P_ginaWebdeGEAppliances
ge.corn
dTiene alguna pregunm sobre su electrodom&dco? ;Pmebe la p_gina Web de GE Appliances 24 horas al
dfa, cualquier dfa del afio! Para mayor conveniencia y servicio m_isr_ipido, ya puede descargar los Manuales
de los Propiem_ios, o incluso pedir piez_s hacer una cim en lfnea.
RealLifeDesignStudio(Estudodedisefioparala vidared)
ge.com
(;E apoya el concepto de Disefio Universa/--productos, servicios yambientes que pueden usar genre de
tod_Ls1asedades, tamafios y capacidades. Reconocemos la necesidad de disefiar para una gran gama de
habilidades y dificulmdes fiMcasymenm/es. Para rods detaUes cobre las aplicaciones de (;E Disefio Universal,
incluyendo ideas de disefio para la cocina para pe_omks con discapacidades, mire nuesua p_gina Web hoy
mismo. Para personas con dificulmdes audifivas, favor de llmnar a/800.TDD.GEAC (800.833.4322).
Piezasj/accesorios
Aquellos individuos con la caUficacidn necesaria para repaint sus propios elecuodom4sdcos pueden
pedir que se les manden las piez_s o accesorios direcmmenm a sus hogares (aceptamos l_s m_jetas
\qSA, MasterCard y Discover). Haga su pedido en lfnea hoy, 24 horas cada dfa o llamar pot ml£fbno
a/ 800.626.2002 dumnm hor_s noitlla[es de oficina.
ge.corn
Lasinstruccionesdescritasenestemanualcubrenlospmcedimientosa seguirpot cualquier usuario.GEnoesta
noapoyaquesole proporcione ningunservicio a/ acondicionadordoaim. Vehomentementerecomendamosque
ustednointente proporcionarservicio alacondicionadordeaim ustedmismo.
Pdngaseencontactoconnosotros
ge.corn
Si no est_ satisfe.cho con el servicio que recibe de GE, pdngase en conmcto con nos(mos en nuesm_ pdgina
Web indicando todos los deta/les asf como su ndmero de ml_fbno o escrfl)anos a:
General Manage_; Custoi]aer RelaOons
(;E Appliances, Appliance Park
Louisville, KY 40225
"/8 Impreso on China
-
 1
1
-
 2
2
-
 3
3
-
 4
4
-
 5
5
-
 6
6
-
 7
7
-
 8
8
-
 9
9
-
 10
10
-
 11
11
-
 12
12
-
 13
13
-
 14
14
-
 15
15
-
 16
16
-
 17
17
-
 18
18
-
 19
19
-
 20
20
-
 21
21
-
 22
22
-
 23
23
-
 24
24
-
 25
25
-
 26
26
-
 27
27
-
 28
28
-
 29
29
-
 30
30
-
 31
31
-
 32
32
-
 33
33
-
 34
34
-
 35
35
-
 36
36


GE AGW12AKG1 El manual del propietario
- Tipo
- El manual del propietario
en otros idiomas
- English: GE AGW12AKG1 Owner's manual
Artículos relacionados
-
GE AEE08ASL1 El manual del propietario
-
-
-
LG AGM24DHG1 El manual del propietario
-
-
-
-
-
-
GE AEWO8 and Owner's Manual and Installation Instructions