IK Multimedia iRig Keys Pro Manual de usuario
- Categoría
- Teclados MIDI
- Tipo
- Manual de usuario

Universal keyboard controller
for iPhone/iPod touch/iPad and Mac/PC
USER MANUAL

Contents
2
Table of Contents
Contents 2
English 7
iRig Keys Pro 7
Feautures 7
Overview 8
Register your iRig Keys Pro 8
Installing SampleTank 3 SE 8
Installation and setup 9
iOS/Android Devices 9
Mac or Windows based computers 10
Playing with iRig KEYS PRO 11
Octave Shift
7
11
Volume/Data Knob
4
11
Pitch Bend
9
12
Modulation Wheel
10
12
Pedal
3
12
Prog
8
13
EDIT mode 13
Set the MIDI Transmit Channel 13
Set different velocity (touch) response 14
Assign a specific MIDI Control Change number to the VOL/DATA knob 15
Send specific MIDI Program Changes numbers, and set Current Program number 15
Send “All Notes Off” MIDI message 16
Transpose the keyboard in semitones 16
Reset iRig KEYS PRO 17
SETs 17
How to load a SET 17
How to program a SET 17
How to save a SET 17
Troubleshooting 18
Warranty 18
Support and more info 18
Français 19
iRig Keys Pro 19
Caractéristiques d’iRig KEYS PRO 19
Enregistrer votre iRig KEYS PRO 20
Installation de SampleTank 3 SE 20
Connexion et Configuration 21
Dispositifs iOS/Android 21
Ordinateurs Mac ou Windows 22
Jouer avec l’iRig KEYS PRO 23
Octave Shift / Changement d’octave
7
23

Contents
3
Bouton de Volume/Data
4
23
Pitch Bend
9
24
Molette de Modulation
10
24
Pédale
3
25
Prog
8
25
EDIT mode 25
Sélectionner le canal de transmission MIDI 26
Changer la sensibilité au toucher (vélocité) 26
Assigner un numéro de Control Change MIDI spécifique au bouton VOL/DATA 27
Envoyer des numéros de Program Change MIDI spécifiques, et sélectionner le programme courant 27
Envoyer un message MIDI de type “All Notes Off” 28
Transposer le clavier par semi-tons 28
Réinitialiser l’iRig KEYS PRO 29
SETs 29
Comment charger un SET 30
Comment programmer un SET 30
Comment sauvegarder un SET 30
Résolution des problèmes 30
Garantie 31
Informations et support 31
Español 32
iRig Keys PRO 32
Registre su iRig KEYS PRO 32
Instalar SampleTank 3 SE 32
Características del iRig KEYS PRO 33
Conexión y Configuración 33
Dispositivos iOS/Android 33
Sistemas a base de Mac o Windows 34
Tocando con iRig KEYS PRO 35
Desplazamiento de Octavas
7
35
Perilla de Volumen/Data
4
36
Pitch Bend
9
36
Rueda de Modulación
10
36
Pedal
3
37
Prog
8
37
Modo EDIT 37
Configuración del Canal de Transmisión MIDI 38
Configuración de sensibilidad de velocidad (touch) 38
Asignar un número específico de MIDI Control Change a la perilla VOL/DATA 39
Envío de números de Cambio de Programa MIDI, y configuración del número de Programa Corriente 39
Envío de mensaje MIDI “All Notes Off” (Apagar todas las notas) 40
Transponer el teclado en semitonos 40
Restablecer iRig KEYS PRO 41
SETs 41

Contents
4
Cómo cargar un SET 42
Cómo programar un SET 42
Cómo guardar un SET 42
Resolución de Problemas 42
Garantía 43
Servicio Técnico y Más Información 43
Italiano 44
iRig Keys Pro 44
Registra iRig KEYS PRO 44
Installa SampleTank 3 SE 44
Caratteristiche 45
Connessione ed impostazione 45
Dispositivi iOS/Android 45
Computer Mac o Windows 46
Utilizzare iRig KEYS PRO 47
Spostamento di Ottava
7
47
Manopola Volume/Data
4
48
Controllo di Pitch Bend
9
48
Controllo di Modulation
10
48
Ingresso Pedale
3
49
Prog
8
49
Modo EDIT 49
Impostare il Canale di Trasmissione MIDI 50
Impostare differenti sensibilità al tocco 50
Assegnare uno specifico MIDI Control Change alla manopola VOL/DATA 51
Trasmettere specifici MIDI Program Change ed impostare il programma corrente 51
Trasmettere messaggi MIDI “All notes off” 52
Trasporre la tastiera in semitoni 52
Reimpostare un SET alla modalità fabbrica 53
SETs 53
Come caricare un SET 54
Come programmare un SET 54
Come salvare un SET 54
Risoluzione dei problemi 54
Garanzia 55
Supporto e ulteriori informazioni 55
Deutsch 56
iRig Keys Pro 56
Registrieren Sie Ihr iRig KEYS PRO 56
Installation von SampleTank 3 SE 56
iRig KEYS PRO Eigenschaften 57
Anschluss und Einstellungen 57
iOS/Android-Geräte 57
Mac oder Windows-basierte Computer 58

Contents
5
Spielen des iRig KEYS PRO 59
Oktave - OCT
7
59
Volume/Data-Regler
4
59
Pitch Bend
9
60
Modulationsrad MOD
10
60
Pedal
3
61
Prog
8
61
EDIT Mode 61
Einstellen des MIDI-Sendekanals 62
Einstellen der Anschlagsempfindlichkeit – Velocity 62
Zuweisen eines gewünschten MIDI Controllers für das VOL/DATA-Rad 63
Senden von MIDI Programm-Nummern 63
Senden von MIDI “All Notes Off” 64
Transponieren in Halbtönen 64
Zurücksetzen des iRig KEYS PRO - Reset 65
SETs 65
Aufrufen eines SETs 65
Programmieren eines SETs 65
Speichern eines SETs 66
Fehlerbehebung 66
Gewährleistung 66
Support und weitere Informationen 66
日本語 67
はじめに 67
同梱されているもの 67
iRig KEYS PRO登録のお願い 67
SampleTank 3 SEのインストールについて 67
主な仕様 68
接続と設定 68
iOS/Androidデバイスの場合: 68
Mac、Windowsコンピューターの場合 69
iRig KEYS PROで演奏する 70
O C T( オ ク タ ー ブ ・ シ フ ト )
7
70
VOL(ボリューム)ツマミ
4
71
ピッチベンド・ホイール
9
71
モジュレ ーション・ホ イー ル
10
71
ペダル入力端子
3
72
PROG(プログラム・チェンジ)
8
72
EDITモード 72
送信MIDIチャンネルの設定 73
ベロシティ感度(タッチ)の設定 73
特定のMIDIコントロール•チェンジ・ナンバーをVOL(ボリューム)ツマミに割り当てる 74
特定のMIDIプログラム・チェンジ・メッセージの送信と、現在のプログラム・チェンジ・ナンバーの設定 75
「オール・ノート・オフ」MIDIメッセージ送信 75
半音単位のトランスポーズ設定 76

Contents
6
iRig KEYS PROセッティングのリセット 76
SET(セッティング)機能 77
SET(セッティング)を読み込む方法 77
SET(セッティング)をプログラムする方法 77
SET(セッティング)を保存する方法 77
トラブ ル シュー ティング 77
保証について 78
中文 簡体字 79
产品介绍 79
网上注册iRig KEYS PRO 79
安装SampleTank 3 SE 79
iRig KEYS PRO主要特性: 80
安装和连接 80
连接iOS/Android设备 80
连接Mac 或Windows 电脑 81
使用iRig KEYS PRO演奏 82
八度转换
7
82
音量调节旋钮
4
82
弯音轮
9
83
调制轮
10
83
踏板
3
84
音色切换
8
84
EDIT设置 84
在EDIT中可以设置 84
设置MIDI发送通道 85
设置不同的力度感应灵敏度 85
设置特定的MIDI控制键,改变原有的音量/数据旋钮编号 86
发送特定的MIDI程序更改号码,并设定当前编号 86
发送“关闭所有音色设置”的MIDI信号 87
在键盘上转置半音 87
重置 iRig KEYS PRO 88
SETs 88
如何加载SET 88
如何为SET编程 88
如何保存SET 88
常见问题 89
保修 89
获取更多信息 89
Regulatory 90

English
7
iRig Keys Pro
Thank you for purchasing iRig KEYS PRO.
iRig KEYS PRO is a versatile mobile keyboard MIDI controller designed to be directly compatible with iPhone/
iPod touch/iPad/Android. It is also compatible with Mac and Windows-based computers.
Your package contains:
• iRig KEYS PRO.
• Lightning Cable.
• OTG Cable.
• USB Cable.
• Quick Start Guide.
• Registration Card.
Feautures
• 37-note velocity-sensitive keyboard.
• Compatible with iPhone, iPod touch, iPad and Android.
• Compatible with Mac and Windows-based computers.
• Pitch Bend Wheel.
• Modulation Wheel.
• Illuminated Octave Up/Down buttons.
• Illuminated Program Change Up/Down buttons.
• 4 User SETS for quick setup recall.
• Assignable Control Knob.
• Edit mode.
• Sustain / Expression Pedal jack.
• USB or iOS device powered.
• Dedicated iOS cables.
• Micro USB cable.

English
8
Overview
1. iOS port
2. Micro-USB port
3. Pedal input
4. Volume/Data knob
5. USB / iOS LED
6. Set button
7. Octave buttons
8. Program buttons
9. Pitch wheel
10. Modulation wheel
Register your iRig Keys Pro
By registering, you can access technical support, activate your warranty and receive free JamPoints™ which will
be added to your account. JamPoints™ allow you to obtain discounts on future IK purchases! Registering also
keeps you informed of all the latest software updates and IK products.
Register at: www.ikmultimedia.com/registration
Installing SampleTank 3 SE
After registering iRig Keys Pro serial number, a download link and serial number of SampleTank 3 SE for Mac/
PC is added to your User Area. Please download it at User Area and authorize it with Authorization Manager.
User Area
www.ikmultimedia.com/userarea
Authorization Manager
www.ikmultimedia.com/am
1
2
3 4 5 6 7 8
109
C2
C3
C4 C5

English
9
Installation and setup
iOS/Android Devices
1. Connect the included Lightning cable to the “iOS” port on iRig KEYS PRO
1
.
2. Connect the Lightning connector to the iPhone/iPod touch/iPad.
3. Connect the included OTG cable to the “micro-USB” port on iRig KEYS PRO
4. Connect the OTG connector to the Android device.
2

English
10
5. If you have not done so already, download the SampleTank app from the App Store and launch it. The “iOS”
LED
5
will light up. You are now ready to play SampleTank from iRig KEYS PRO.
6. You can use iRig KEYS PRO with any other Core MIDI-compatible app.
Mac or Windows based computers
1. Connect the included Micro USB cable to the Micro USB port on iRig KEYS PRO
2
.
2. Connect the USB plug to a free USB socket on your computer.
3. The “USB” LED
5
will light up. You are now ready to play virtual instruments installed on your computer from
iRig KEYS PRO.
SampleTank
iGrand Piano
iLectric Piano
ikdownloads.com/irigkeyspro

English
11
4. Depending on the software you use, you might need to select “iRig KEYS PRO” from the available MIDI IN
devices.
Playing with iRig KEYS PRO
You can start playing as soon as you connect iRig KEYS PRO to your iOS device or computer and launch a
virtual instrument app or plug-in. Pressing the keys on the iRig KEYS PRO keyboard sends MIDI note messages.
iRig KEYS PRO has a 37-note keyboard that is approximately centered in the middle of a full 88-note piano
keyboard.
Octave Shift
7
By default, iRig KEYS PRO plays notes between C2 and C5. If you need to play notes lower or higher than this
range, you can shift the whole keyboard in octaves using the OCT up and down buttons
7
.
When the LEDs for both OCT buttons are off, no octave shift is applied. You can shift a maximum of 3 octaves
up or 4 octaves down. OCT up or down buttons will illuminate when an octave shift is active.
The OCT up or down buttons will flash each time you press them.
The number of times they flash corresponds to the number of octaves up or down the keyboard is shifted.
Volume/Data Knob
4
This knob controls MIDI Volume (CC#07) on iRig KEYS PRO by default, so you can use this to control the
volume of the instrument you are playing.
This control is assignable, so it is also possible to send any other MIDI control change (CC) message.
See the chapter “EDIT mode” for more information.

English
12
Pitch Bend
9
Move this wheel up or down to send Pitch Bend messages. The wheel has a central rest position.
Moving the wheel up will increase the pitch; moving it down will decrease the pitch.
Note that the amount of pitch change depends on how the receiving virtual instrument is set.
Modulation Wheel
10
Move this wheel to send Modulation Wheel messages (MIDI CC#01). The lowest position sends a value of 0; the
highest position sends a value of 127.
Most instruments use this message to control the amount of vibrato or tremolo in the sound, but note that this
depends solely on how the receiving instrument itself is programmed and not on the iRig KEYS PRO settings.
Pedal
3
iRig KEYS PRO supports both Sustain Pedals and Expression Pedals. Connect a NORMALLY OPEN sustain
pedal to the jack
3
BEFORE connecting iRig KEYS PRO to the iOS device or to the computer. When the pedal
is depressed, you will sustain all keyed notes until the pedal is released. iRig KEYS PRO sends MIDI CC#64 with
a value of 127 when the pedal is depressed and a value of 0 when released.
Connect a continuous expression pedal to the jack
3
BEFORE connecting iRig KEYS PRO to the iOS device
or to the computer to control EXPRESSION on the sounds you’re playing. iRig KEYS PRO sends MIDI CC#11
when the expression pedal is moved.

English
13
Prog
8
Sound modules like virtual instrument apps or plug-ins can switch sounds when they receive the Program
Change MIDI message. iRig KEYS PRO sends Program Changes by pressing the PROG
8
up or down buttons.
Starting with the currently selected program, iRig KEYS PRO will send the next higher program numbers when
you press PROG UP and lower program numbers when you press PROG DOWN. To set the current program
see the chapter, “EDIT mode”.
EDIT mode
iRig KEYS PRO allows you to customize most of its parameters to match any kind of need.
In EDIT mode you can:
• Set the MIDI Transmit Channel.
• Set different touch (velocity) sensitivities.
• Assign a specific MIDI Control Change number to the VOL/DATA knob.
• Send specific MIDI Program Change numbers and set the current program number.
• Send “All Notes Off” MIDI message.
• Transpose the keyboard in semitones.
• Reset a specific SET to factory state.
To enter in EDIT mode, press both OCT buttons
7
.
Both OCT buttons will light up to indicate EDIT mode.
You can exit EDIT mode at any time by pressing the C2 key marked “CANCEL/NO”.
Please refer to the user manual of the control app for detailed information on this. From the app you’ll also be
able to select which MIDI messages the external pedals will send.
Set the MIDI Transmit Channel
MIDI instruments can respond to 16 different MIDI channels. For iRig KEYS PRO to play an instrument, you
need the iRig KEYS PRO MIDI Transmit Channel to match the receiving channel of your instrument.

English
14
To set the MIDI Transmit Channel:
• Enter EDIT mode (see beginning of Chapter 3).
• Press the D#2 key (MIDI CH). Both OCT buttons will flash.
• Enter the MIDI Channel number you need using the C3-E4 white keys marked from 0 to 9. Valid numbers
are from 1 to 16, so when needed, you can enter two digits consecutively.
• Press the C5 key (ENTER/YES) to confirm your input. Both PROG buttons will flash to show the setting has
been accepted, and iRig KEYS PRO will automatically exit EDIT mode.
Set different velocity (touch) response
The keyboard on iRig KEYS PRO is velocity sensitive. Usually this means that the harder you hit the keys, the
louder the sound that is produced. However this ultimately depends on how the instrument you’re controlling is
programmed and your playing style.
In order to match the style of individual users, iRig KEYS PRO offers six different velocity response settings:
0. FIXED, 64. This setting will always send a fixed MIDI velocity value of 64 without any touch response.
1. FIXED, 100. This setting will always send a fixed MIDI velocity value of 100 without any touch response.
2. FIXED, 127. This setting will always send a fixed MIDI velocity value of 127 without any touch response.
3. VEL SENS, LIGHT. Use this setting if you prefer a light touch on the keys. This is especially useful when you
need to play fast passages or program drum patterns.
4. VEL SENS, NORMAL. This setting is the default setting and works well in most cases.
5. VEL SENS, HEAVY. Use this setting if you prefer a heavy touch on the keys.
To set the velocity response:
• Enter EDIT mode (see beginning of Chapter 3).
• Press the F#2 key (VEL), both OCT buttons will flash.
• Enter your velocity response selection by using the C3-A3 white keys marked from 0 to 5.
• Press the C5 key (ENTER/YES) to confirm your input. Both PROG buttons will flash to show the setting has
been accepted, and iRig KEYS PRO will automatically exit EDIT mode.

English
15
Assign a specific MIDI Control Change number to the VOL/DATA knob
By default, the VOL/DATA knob sends MIDI Volume messages which are assigned to MIDI Controller #7.
However, you can customize the MIDI Controller number that is associated with the VOL/DATA knob.
To assign a Controller number to the KNOB:
• Enter EDIT mode (see beginning of Chapter 3).
• Press the G#2 key (KNOB), both OCT buttons will flash.
• Enter the MIDI CC number you need using the C3-E4 white keys marked from 0 to 9. Valid numbers are
from 0 to 127, so you can enter up to three digits consecutively when needed.
• Press the C5 key (ENTER/YES) to confirm your input. Both PROG buttons will flash to show the setting has
been accepted, and iRig KEYS PRO will automatically exit EDIT mode.
Send specific MIDI Program Changes numbers, and set Current Program number
iRig KEYS PRO can send MIDI Program Changes in two ways:
1. Program Changes are sent sequentially by using the PROG up and PROG down buttons
8
.
2. Program Changes are sent directly by sending a specific Program Change number from within EDIT mode.
After sending a specific Program Change number, the PROG up and down buttons will work sequentially
from that point.
To send a specific Program Change number:
• Enter EDIT mode (see beginning of Chapter 3).
• Press the A#2 key (PROG), both OCT buttons will start flashing.
• Enter the Program Change number using the C3-E4 white keys marked from 0 to 9. Valid numbers are from
1 to 128, so you can enter up to three digits consecutively when needed.
• Press the C5 key (ENTER/YES) to confirm your input. Both PROG buttons will flash to show the setting has
been accepted, and iRig KEYS PRO will automatically exit EDIT mode.

English
16
Send “All Notes Off” MIDI message
Sometimes it may be necessary to stop all notes playing on the current MIDI channel when they are stuck or
when controllers are not resetting properly.
iRig KEYS PRO can send MIDI CC# 121 + 123 to reset all controllers and stop all notes.
To reset all controllers and set all notes off:
• Enter EDIT mode (see beginning of Chapter 3).
• Press the F#4 key (ALL NOTES OFF).
Both PROG buttons will flash to show the reset has been sent, and iRig KEYS PRO will automatically exit EDIT
mode.
Transpose the keyboard in semitones
The iRig KEYS PRO keyboard can be transposed in semitones. This can be useful when, for example, you need
to play a song that is in a difficult key, but you still want to physically play it in an easier or more familiar key.
To transpose iRig KEYS PRO:
• Enter EDIT mod.
• Press the G#4 key (TRANSP), both OCT buttons will start flashing.
• Press any note on the keyboard: from this moment on, when you press a C key, iRig KEYS PRO will actually
sent the MIDI note you pressed at this step.
Both PROG buttons will flash to show the semitone transpose has been set, and iRig KEYS PRO will
automatically exit EDIT mode.
Example
If you need to play a song that has been recorded in key of D#, but you would like to play it on the keyboard as
if it was in C, do the following:
• Enter in EDIT mode.
• Press the G#4 key (TRANSP).
• Press any D# key on the keyboard.
From this moment on when you press a C key on the keyboard, iRig KEYS PRO will actually send a D# MIDI
note. All other notes are transposed by the same amount.

English
17
Reset iRig KEYS PRO
iRig KEYS PRO can be reset to its original factory state. This can be done independently for each one of the
SETs or for the normal no-SET mode.
To reset iRig KEYS PRO or a SET:
• Load the SET you would like to reset, or to not load any SET, you can reset the normal no-SET mode.
• Enter EDIT mode (see beginning of Chapter 3).
• Press the A#4 key (RESET).
Both PROG buttons will flash to show the SET has been reset, and iRig KEYS PRO will automatically exit EDIT
mode.
SETs
iRig KEYS PRO offers many options to satisfy the most demanding user. However, when the keyboard is used
live or to control many different instruments, it could be time consuming and tricky to manually set all the
parameters you need each time.
For this reason, iRig KEYS PRO has 4 user configurable presets that can be recalled on the fly by pressing just
one button, these are called SETs.
How to load a SET
To load any of the four SETs just press the SET
6
button. Each time the SET button is pressed, iRig KEYS PRO
loads the NEXT SET, cycling this way:
-> NO SET -> SET 1 -> SET 2 -> SET 3 -> SET 4 -> NO SET …
How to program a SET
To program a specific SET, always select it before, then set up iRig KEYS PRO as you prefer (see the Chapters
“Playing with iRig KEYS PRO” and “Edit mode”).
How to save a SET
To store a SET so that it will permanently save all settings that you have made, HOLD the SET button for two

English
18
seconds. The current SET LED will flash to confirm that the SET has been saved. Remember to always save a
SET if you have made modifications to it that you would like to keep.
When no SET is loaded, iRig KEYS PRO automatically uses the previous settings that were made before loading
a SET.
Troubleshooting
I have connected iRig KEYS PRO to my iOS device, but the keyboard doesn’t turn on, no iOS LED is
lighting up.
In this case, make sure an app that uses Core MIDI (like iGrand Piano or SampleTank from IK Multimedia) is
open and running on your iOS device. In order to save the iOS device battery, iRig KEYS PRO only turns on
when there is an app running that can use it.
iRig KEYS PRO doesn’t play my instrument even if though it is turned ON.
Make sure the MIDI Transmit Channel matches the receiving MIDI channel of your instrument. See the
paragraph “Set MIDI Transmit Channel”.
iRig KEYS PRO suddenly appears to have different settings from those I used.
You have probably loaded a SET. If you don’t want to use a SET, press the SET button repeatedly until all SET
LEDs are off.
Warranty
Please visit:
www.ikmultimedia.com/warranty
for the complete warranty policy.
Support and more info
www.ikmultimedia.com/support
www.irigkeys.com
Apple is not responsible for the operation of this device or its compliance with safety and regulatory standards.

Français
19
iRig Keys Pro
Merci d’avoir acheté l’iRig KEYS PRO.
L’iRig KEYS PRO est un clavier-contrôleur MIDI polyvalent projeté spécialement pour être directement
compatible avec iPhone/iPod touch/iPad. Il est aussi compatible avec les ordinateurs Mac ou Windows.
Contenu de la boîte:
• iRig KEYS PRO.
• Câble Lightning.
• Câble OTG.
• Câble USB.
• Guide de prise en main rapide.
• Carte d’enregistrement.
Caractéristiques d’iRig KEYS PRO
• Clavier de 37 notes sensibles à la vélocité.
• Compatible avec iPhone, iPod touch et iPad.
• Compatible avec les ordinateur Mac et Windows.
• Molette de Pitch Bend.
• Molette de Modulation.
• Boutons lumineux d’Octave Up/Down.
• Boutons lumineux de Program Change Up/Down.
• 4 SETS utilisateurs pour un rappel rapide de configuration.
• Bouton de contrôle assignable.
• Mode Edit.
• Jack pour pédale de Sustain / Expression.
• Alimenté par USB ou par dispositif iOS.
• Câbles spécifiques iOS.
• Câble Micro USB.

Français
20
Enregistrer votre iRig KEYS PRO
Lorsque vous enregistrez un produit, vous pouvez accéder à l’assistance technique, activer votre garantie, et
recevoir des JamPoints™ gratuitement. Les JamPoints™ vous donnent droit à des conditions spéciales sur vos
futurs achats IK!
L’enregistrement vous permet aussi de vous maintenir au courant des nouvelles sur les produits et des
informations de mise à jour!
Enregistrez sur : www.ikmultimedia.com/registration
Installation de SampleTank 3 SE
Après l’enregistrement du numéro de série d’iRig Keys Pro, un lien pour le téléchargement ainsi qu’un numéro
de série de SampleTank 3 SE pour Mac/PC sont ajoutés à votre User Area.
Veuillez le télécharger depuis la User Area et l’autoriser avec l’Authorization Manager.
User Area
www.ikmultimedia.com/userarea
Authorization Manager
www.ikmultimedia.com/am

Français
21
Connexion et Configuration
Dispositifs iOS/Android
1. Brancher le câble Ligthning ou 30-pin inclus à la prise “iOS” de l’iRig KEYS PRO
1
.
2. Brancher le connecteur Lightning ou 30-pin à l’iPhone/iPod touch/iPad.
3. Brancher le câble OTG inclus à la prise “micro-USB” de l’iRig KEYS PRO .
4. Brancher le connecteur OTG à l’Android.

Français
22
5. Si ce n’est pas déjà fait, téléchargez l’app SampleTank sur l’App Store, et lancez-la. Le voyant “iOS”
5
s’allumera, et vous serez alors prêts à jouer sur SampleTank avec l’iRig KEYS PRO.
6. Vous pouvez utiliser l’iRig KEYS PRO avec n’importe quelle autre app compatible avec Core MIDI.
Ordinateurs Mac ou Windows
1. Brancher le câble micro USB inclus à la prise Micro USB sur l’iRig KEYS PRO
2
.
2. Brancher la prise USB à une prise USB libre de votre ordinateur.
3. Le voyant “USB”
5
s’allumera, et vous serez prêts à jouer des instruments virtuels installés sur votre
ordinateur avec l’iRig KEYS PRO.
4. Selon le logiciel que vous utilisez, vous devrez peut-être sélectionner “iRig KEYS PRO” parmi les différents
dispositifs MIDI IN disponibles.
SampleTank
iGrand Piano
iLectric Piano
ikdownloads.com/irigkeyspro

Français
23
Jouer avec l’iRig KEYS PRO
Vous pouvez commencer à jouer après avoir branché l’iRig KEYS PRO à votre dispositif iOS ou ordinateur, et
lancé une app d’instrument virtuel ou un plug-in. Appuyer sur les touches du clavier de l’iRig KEYS PRO envoie
des messages de note MIDI. L’iRig KEYS PRO possède un clavier de 37 notes qui est à peu près centré sur le
milieu d’un clavier de piano complet de 88 notes.
Octave Shift / Changement d’octave
7
Par défaut, l’iRig KEYS PRO joue des notes entre Do2 (C2) et Do5 (C5). Si vous vous voulez jouer des notes
plus graves ou plus aiguës que cela, vous pouvez transposer tout le clavier par octave à l’aide des boutons
OCT up et down
7
.
Lorsque les voyants des deux boutons OCT sont éteints, aucun changement d’octave n’est appliqué.
Vous pouvez transposer au maximum de 3 octaves vers le haut ou de 4 octaves vers le bas. Les boutons OCT
up et down s’illuminent lorsque une transposition d’octave est active. Les boutons OCT up et down clignotent
chaque fois que vous y appuyez. Le nombre de fois qu’ils clignotent correspond au nombre d’octaves vers le
haut ou vers le bas dont le clavier est transposé.
Bouton de Volume/Data
4
Par défaut ce bouton contrôle le volume MIDI (CC#07) sur l’iRig KEYS PRO, ce qui vous permet de contrôler le
volume de l’instrument dont vous jouez.
Ce contrôle est assignable, et vous pouvez ainsi envoyer n’importe quel autre message de Control Change MIDI
(CC).
Lire le chapitre “Mode EDIT” pour de plus amples informations.

Français
24
Pitch Bend
9
Déplacez cette molette vers le haut ou vers le bas pour envoyer des messages de Pitch Bend.
La molette a un position d’équilibre centrale.
Tourner la molette vers le haut augmente la hauteur de la note; tourner la molette vers le bas abaisse la hauteur
de la note.
Remarque : la hauteur de la note sera plus ou moins affectée selon la configuration de l’instrument virtuel de
réception.
Molette de Modulation
10
Tourner cette molette pour envoyer des messages de Modulation Wheel (MIDI CC#01).
La position la plus basse envoie une valeur de 0; la plus haute envoie une valeur de 127.
La plupart des instruments utilisent ce message pour contrôler la quantité de vibrato ou de trémolo du son,
mais cela dépend uniquement de la façon de laquelle l’instrument en réception est programmé, et pas de la
configuration de l’iRig KEYS PRO.

Français
25
Pédale
3
L’iRig KEYS PRO supporte aussi bien les pédales de Sustain que les pédales d’Expression.
Brancher une pédale de sustain de type NORMALLY OPEN au jack
3
AVANT de connecter l’iRig KEYS PRO au
dispositif iOS ou à l’ordinateur. Ensuite, lorsque vous appuierez sur la pédale, toutes les notes en cours seront
maintenues jusqu’à ce que vous relâchiez la pédale. L’iRig KEYS PRO envoie le MIDI CC#64 avec une valeur de
127 lorsque la pédale est complètement appuyée, et une valeur de 0 lorsqu’elle est relâchée.
Brancher une pédale d’expression continue au jack
3
AVANT de connecter l’iRig KEYS PRO au dispositif iOS ou
à l’ordinateur, pour contrôler l’EXPRESSION des sons que vous jouez. L’iRig KEYS PRO envoie le MIDI CC#11
lorsque la position de la pédale d’expression change.
Prog
8
Les modules de son tels que des apps ou plug-ins d’instruments virtuels peuvent changer de son lorsqu’ils
reçoivent une commande MIDI particulière appelée Program Change. L’iRig KEYS PRO envoie des Program
Changes en appuyant sur les boutons PROG
8
up ou down.
En partant du programme actuellement sélectionné, l’iRig KEYS PRO envoie le prochain numéro de programme
si vous pressez PROG UP, ou le précédent si vous pressez PROG DOWN. Pour sélectionner le programme en
cours, voir le chapitre “Mode EDIT”.
EDIT mode
L’iRig KEYS PRO permet la personnalisation de la plupart de ses paramètres pour satisfaire toutes les
exigences.
En mode EDIT vous pouvez:
• Choisir le canal de transmission MIDI.
• Choisir parmi différentes sensibilités au toucher (vélocité).
• Assigner un numéro de Control Change MIDI au bouton VOL/DATA.
• Envoyer des numéros de Program Change MIDI spécifiques et sélectionner le numéro de programme
courant.
• Envoyer un message MIDI de type “All Notes Off”.
• Transposer le clavier par semi-tons.
• Rétablir un SET particulier à son état d’usine.

Français
26
Pour entrer en mode Edit, presser à la fois les deux boutons OCT
7
.
Les deux boutons OCT s’allumeront alors pour signaler que vous êtes entrés en mode EDIT.
Vous pouvez quitter le mode EDIT à tout moment en pressant la touche C2 marquée “CANCEL/NO”.
Sélectionner le canal de transmission MIDI
Les instruments MID peuvent répondre à 16 canaux MIDI différents. Pour que l’iRig KEYS PRO puisse contrôler
un instrument, son canal de transmission MIDI doit correspondre à celui de l’instrument en réception.
Pour sélectionner le canal de transmission MIDI :
• Entrer en mode EDIT (voir début du Chapitre 3).
• Presser la touch D#2 (MIDI CH). Les deux boutons OCT se mettront à clignoter.
• Taper le numéro de canal MIDI désiré grâce aux touches C3-E4 marquées de 0 à 9. Les valeurs acceptées
sont de 1 à 16. Vous pouvez donc taper 2 chiffres de suite si nécessaire.
• Presser la touche C5 (ENTER/YES) pour confirmer votre choix. Les deux boutons PROG clignoteront pour
signaler que votre choix a été accepté, et l’iRig KEYS PRO quittera automatiquement le mode EDIT.
Changer la sensibilité au toucher (vélocité)
Le clavier de l’iRig KEYS PRO est sensible à la vélocité. En général cela signifie que plus vous battez fort sur
les touches plus le son produit est fort. Cependant ceci dépend totalement de la façon dont est programmé
l’instrument que vous contrôlez.
Afin de s’adapter au style de différents utilisateurs, l’iRig KEYS PRO offre six configurations différentes de
sensibilité
0. FIXED, 64. Ce réglage envoie toujours une vélocité MIDI fixe de 64, sans réponse au toucher.
1. FIXED, 100. Ce réglage envoie toujours une vélocité MIDI fixe de 100, sans réponse au toucher.
2. FIXED, 127. Ce réglage envoie toujours une vélocité MIDI fixe de 127, sans réponse au toucher.
3. VEL SENS, LIGHT. Réglage à utiliser si vous préférez un toucher léger sur le clavier. Particulièrement utile
pour jouer des passages rapides ou pour programmer des patterns de batterie.
4. VEL SENS, NORMAL. Ce réglage par défaut fonctionne bien dans la plupart des cas.
5. VEL SENS, HEAVY. Réglage à utiliser si vous préférez a toucher lourd sur le clavier

Français
27
Régler la sensibilité de vélocité :
Entrer en mode EDIT (voir début du Chapitre 3).
Presser la touche F#2 (VEL), les deux boutons OCT se mettront à clignoter.
Taper la sensibilité de vélocité que vous désirez grâce aux touches blanches C3-A3 marquées de 0 à 5.
Presser la touche C5 key (ENTER/YES) pour confirmer votre choix. Les deux boutons PROG clignoteront pour
signaler que votre choix a été accepté, et l’iRig KEYS PRO quittera automatiquement le mode EDIT.
Assigner un numéro de Control Change MIDI spécifique au bouton VOL/DATA
Par défaut, le bouton VOL/DATA envoie des messages de Volume MIDI assigné au contrôleur MIDI #7.
Cependant, vous pouvez personnaliser le numéro de Contrôleur MIDI associé à ce bouton.
Pour assigner un numéro de contrôleur à ce bouton :
• Entrer en mode EDIT (voir début du Chapitre 3).
• Presser la touche G#2 (KNOB), les deux boutons OCT se mettront à clignoter.
• Taper le numéro de CC MIDI que vous désirez grâce aux touches blanches C3-E4 marquées de 0 à 9. Les
valeurs acceptées sont de 1 à 127. Vous pouvez donc taper 3 chiffres de suite si nécessaire.
• Presser la touche C5 (ENTER/YES) pour confirmer votre choix. Les deux boutons PROG clignoteront pour
signaler que votre choix a été accepté, et l’iRig KEYS PRO quittera automatiquement le mode EDIT.
Envoyer des numéros de Program Change MIDI spécifiques, et sélectionner le pro-
gramme courant
L’iRig KEYS PRO peut envoyer des Program Changes MIDI de deux façons :
1. Les Program Changes sont envoyés de façon séquentielles grâce aux boutons PROG up et PROG down
8
.
2. Un Program Change spécifique est envoyé directement depuis le mode EDIT. Après avoir envoyé un numéro
de Program Change particulier, les boutons PROG up et down fonctionneront de façon séquentielle à partir
de ce dernier
Pour envoyer un numéro de Program Change particulier :
• Entrer en mode EDIT (voir début du Chapitre 3).
• Presser la touche A#2 (PROG), les deux boutons OCT se mettront à clignoter.

Français
28
• Taper le numéro de Program Change que vous désirez grâce aux touches blanches C3-E4 marquées de 0 à
9. Les valeurs acceptées sont de 1 à 128. Vous pouvez donc taper 3 chiffres de suite si nécessaire.
• Presser la touche C5 (ENTER/YES) pour confirmer votre choix. Les deux boutons PROG clignoteront pour
signaler que votre choix a été accepté, et l’iRig KEYS PRO quittera automatiquement le mode EDIT
Envoyer un message MIDI de type “All Notes Off”
Parfois il peut être nécessaire d’arrêter toutes les notes en cours sur le canal MIDI courant lorsqu’elles sont
bloquées ou lorsque certains contrôleurs ne se réinitialisent pas correctement.
L’iRig KEYS PRO peut envoyer les Control Change MIDI 121 + 123 pour réinitialiser tous les contrôleurs et
arrêter toutes les notes.
Pour réinitialiser tous les contrôleurs et arrêter toutes les note :
• Entrer en mode EDIT (voir début du Chapitre 3).
• Presser la touche F#4 key (ALL NOTES OFF).
Les deux boutons PROG clignoteront pour signaler que votre choix a été accepté, et l’iRig KEYS PRO quittera
automatiquement le mode EDIT.
Transposer le clavier par semi-tons
Le clavier de l’iRig KEYS PRO peut être transposé par semi-tons. Cela peut être utile par exemple dans le
cas d’un morceau dans une tonalité difficile, pour pouvoir l’exécuter quand même mais dans une tonalité plus
simple ou plus familière.
Pour transposer l’iRig KEYS PRO :
• Entrer en mode EDIT (voir début du Chapitre 3).
• Presser la touche G#4 (TRANSP), les deux boutons OCT se mettront à clignoter.
• Presser n’importe quelle touche sur le clavier : à partir de ce moment là, lorsque vous pressez une touche
de C, l’iRig KEYS PRO enverra automatiquement la note MIDI que vous avez pressée à cette étape.
Les deux boutons PROG clignoteront pour signaler que votre choix a été accepté, et l’iRig KEYS PRO quittera
automatiquement le mode EDIT.

Français
29
Exemple
Si vous voulez jouer un morceau enregistré en tonalité de D#, et vous préférez le jouer comme s’il était en C,
suivez la procédure suivante :
• Entrer en mode EDIT.
• Presser la touche G#4 (TRANSP).
• Presser une touche de D# quelconque sur le clavier.
Maintenant, lorsque vous presserez une touche de C sur le clavier, l’iRig KEYS PRO enverra un D# en pratique.
Toutes les autres notes sont transposées de la même quantité.
Réinitialiser l’iRig KEYS PRO
L’iRig KEYS PRO peut être réinitialisé à son état d’usine. Ceci peut être fait indépendamment pour chacun des
SETs ou pour le mode normal no-SET (voir Chapitre 4, SETs).
Pour réinitialiser l’iRig KEYS PRO ou un SET :
• Charger le SET à réinitialiser, ou n’en charger aucun si vous voulez réinitialiser le mode no-SET normal.
• Entrer en mode EDIT (voir début du Chapitre 3)
• Presser la touche A#4 (RESET).
Les deux boutons PROG clignoteront pour signaler que votre choix a été accepté, et l’iRig KEYS PRO quittera
automatiquement le mode EDIT.
SETs
L’iRig KEYS PRO offre plusieurs options pour satisfaire les utilisateurs les plus exigeants.
Cependant, lorsque le clavier est utilisé en live ou pour contrôler plusieurs instruments, il pourrait être compliqué
et long de régler tous les paramètres nécessaires à chaque fois. Pour cette raison, l’iRig KEYS PRO dispose
de 4 programmes personnalisables qui peuvent être rappelés rapidement en pressant un unique bouton. Ces
programmes s’appellent des SETs.

Français
30
Comment charger un SET
Pour charger l’un des quatre SETs, presser simplement le bouton SET
6
.
Chaque fois que le bouton SET est pressé, l’iRig KEYS PRO charge le prochain SET. Le cycle est comme suit :
-> NO SET -> SET 1 -> SET 2 -> SET 3 -> SET 4 -> NO SET …
Comment programmer un SET
Pour programmer un SET particulier, chargez-le d’abord, puis configurez l’iRig KEYS PRO comme vous le
désirez (voir les Chapitres “Jouer avec l’iRig KEYS PRO” et “Mode Edit”).
Comment sauvegarder un SET
Pour sauvegarder un SET afin d’enregistrer de façon permanente tous les réglages que vous avez faits,
MAINTENEZ le bouton SET appuyé pendant 2 secondes. Le voyant du SET courant clignotera pour confirmer
que le SET a été sauvegardé. N’oubliez pas de sauvegarder un SET si vous avez effectué des modifications que
vous ne voulez pas perdre.
Lorsqu’aucun SET n’est chargé, l’iRig KEYS PRO utilise automatiquement les réglages effectués avant de
charger un SET.
Résolution des problèmes
J’ai branché l’iRig KEYS PRO à mon dispositif iOS, mais le clavier ne s’allume pas. Aucun voyant iOS ne
s’allume.
Dans ce cas, assurez-vous qu’une app utilisant Core MIDI (comme iGrand Piano ou SampleTank d’IK
Multimedia) est ouverte et fonctionne sur votre dispositif iOS. Afin d’économiser les batteries du dispositif iOS,
l’iRig KEYS PRO ne s’allume que lorsqu’une app pouvant l’utiliser est en cours de fonctionnement.
L’iRig KEYS PRO ne contrôle pas mon instrument bien qu’il soit allumé.
Assurez-vous que le canal de transmission MIDI correspond au canal de réception MIDI de votre instrument.
Voir le paragraphe “Sélectionner le canal de transmission MIDI”.
L’iRig KEYS PRO semble avoir soudainement des réglages différents de ceux que j’utilise habituellement.
Vous avez probablement chargé un SET. Si vous ne voulez pas charger de SET, appuyez plusieurs fois sur SET
jusqu’à ce que tous les voyants SET soient éteints.

Français
31
Garantie
Allez sur :
www.ikmultimedia.com/warranty
pour consulter notre politique de garantie.
Informations et support
www.ikmultimedia.com/support
www.irigkeys.com
Apple décline toute responsabilité concernant le functionnement de ce dispositif ou sa conformité aux normes
de sécurité et techniques.

Español
32
iRig Keys PRO
Gracias por su compra de iRig KEYS PRO.
iRig KEYS PRO es un teclado de control MIDI móvil versátil especialmente diseñado para ser directamente
compatible con iPhone/iPod touch/iPad. Es también compatible con sistemas a base de Mac o Windows.
Incluido en la caja:
• iRig KEYS PRO.
• Cable Lightning.
• Cable OTG.
• Cable USB.
• Guía de Inicio Rápido.
• Tarjeta de registración
Registre su iRig KEYS PRO
Al registrarse, podrá acceder soporte técnico, activar su garantía y recibir JamPoints™ gratis añadidos a su
cuenta. ¡JamPoints™ ofrece descuentos para compras de IK en el futuro!
Registrarse también lo mantiene al día con noticias sobre nuevos productos e información sobre
actualizaciones.
Regístrese en: www.ikmultimedia.com/registration
Instalar SampleTank 3 SE
Después de registrar el número de serie del iRig Keys Pro, se agregará un enlace de descarga y número de
serie para SampleTank 3 SE para Mac/PC en su área de usuario. Por favor visite su área de usuario para
descargar y autorizar con Authorization Manager.
Área de usuario
www.ikmultimedia.com/userarea
Authorization Manager
www.ikmultimedia.com/am

Español
33
Características del iRig KEYS PRO
• Teclado de 37 notas con sensibilidad de velocidad.
• Compatible con iPhone, iPod touch, y iPad.
• Compatible con sistemas a base de Mac y Windows.
• Rueda Pitch Bend.
• Rueda de Modulación.
• Botones iluminados Octave Up/Down.
• Botones iluminados Program Change Up/Down.
• 4 SETS para llamar configuraciones del usuario rápidamente.
• Perilla Control asignable.
• Modo Edit.
• Conexión para pedal de Sustain/Expresión.
• Potenciado por un dispositivo iOS o USB.
• Cables dedicados para iOS.
• Cable Micro USB.
Conexión y Configuración
Dispositivos iOS/Android
1. Conecte el cable Lightning o 30-pin incluido al conector “iOS” del iRig KEYS PRO
1
.
2. Conecte el conector Lightning o 30-pin a su iPhone/iPod touch/iPad.

Español
34
3. Conecte el cable OTG incluido al conector “micro-USB” del iRig KEYS PRO.
4. Conecte el conector OTG a su Android.
5. Si todavía no lo ha adquirido, descargue el app SampleTank del App Store e inícielo. La luz “iOS”
5
se
iluminará. Ahora está listo para tocar SampleTank con el iRig KEYS PRO.
6. Puede usar iRig KEYS PRO con cualquier otro app compatible con el sistema Core MIDI
Sistemas a base de Mac o Windows
1. Conecte el cable incluido Micro USB a la conexión Micro USB en el iRig KEYS PRO
2
.
2. Conecte el conector USB a una conexión USB disponible en su sistema.
SampleTank
iGrand Piano
iLectric Piano
ikdownloads.com/irigkeyspro

Español
35
3. La luz LED “USB”
5
se iluminará. Ahora está listo para tocar instrumentos virtuales en su sistema usando
iRig KEYS PRO.
4. Dependiendo del programa software que esté usando, es posible que se deba seleccionar “iRig KEYS
PRO” como el controlador MIDI deseado.
Tocando con iRig KEYS PRO
Se puede empezar a tocar tan pronto como se conecte el iRig KEYS PRO a su dispositivo iOS o sistema e
iniciar el app o plug-in de instrumento virtual. Al presionar las teclas en el iRig KEYS PRO se envían mensajes
de notas MIDI. iRig KEYS PRO cuenta con un teclado de 37 notas que son centradas aproximadamente a la
mitad de un teclado completo de piano de 88 notas.
Desplazamiento de Octavas
7
En primer inicio, iRig KEYS PRO toca las notas entre C2 y C5. Si necesita tocar notas más bajas o más agudas
que esta selección, usted puede desplazar el teclado entero a diferentes octavas usando los botones OCT
hacia arriba o abajo
7
. Cuando las luces LED estan apagadas para ambos botones OCT, el desplazamiento de
octavas no se aplicará.
Se puede cambiar hasta un máximo de 3 octavas hacia arriba o 4 octavas hacia abajo. Los botones OCT hacia
arriba o hacia abajo se iluminarán cuando el cambio de octavas está activado. Los botones OCT hacia arriba o
abajo parpadearán cada vez que se presionan. El número de veces que parpadean corresponde al número de
octavas hacia arriba o abajo de la posición del teclado.

Español
36
Perilla de Volumen/Data
4
Esta perilla controla el volumen MIDI (CC#07) del iRig KEYS PRO a primer inicio, se puede usar para controlar el
volumen del instrumento que está tocando.
Este control se puede asignar para poder enviar cualquier otro mensaje MIDI control change (CC).
Consulte el capítulo “Modo EDIT” para más información.
Pitch Bend
9
Mueva esta rueda hacia arriba o hacia abajo para enviar mensajes Pitch Bend. La rueda tiene una posición de
descanso central. Moviendo la rueda hacia arriba incrementa el tono a más agudo; moviendo la rueda hacia
abajo disminuye el tono a más bajo. Tenga en cuenta que la cantidad de cambio de tono depende de como
esté configurado el instrumento virtual que se está tocando.
Rueda de Modulación
10
Mueva esta rueda para enviar mensajes de Modulación (MIDI CC#01). La posición mínima envía el mensaje con
valor de 0; la posición máxima envía el mensaje con valor de 127.

Español
37
La mayoría de instrumentos utilizan este mensaje para controlar la cantidad de vibrato o tremolo del sonido,
pero tenga en cuenta que esto depende solamente de como esté programado el instrumento receptor y no
depende de la configuración del iRig KEYS PRO.
Pedal
3
iRig KEYS PRO es compatible con pedales de Sustain y Expresión.
Conecte un pedal de sustain NORMALMENTE ABIERTO a la conexión
3
ANTES de conectar el iRig KEYS PRO
al dispositivo iOS o al sistema de computación. Cuando presiona el pedal, las teclas que se están presionando
se sostendrán hasta que se suelte el pedal. iRig KEYS PRO envía el mensaje MIDI CC#64 con un valor de 127
cuando el pedal se presiona y un valor de 0 cuando se suelta.
Conecte un pedal de expresión continua a la conexión
3
ANTES de conectar iRig KEYS PRO al dispositivo iOS
o al sistema de computación para controlar el mensaje EXPRESSION de los sonidos que se están tocando. iRig
KEYS PRO envía el mensaje MIDI CC#11 cuando el pedal de expresión se mueve.
Prog
8
Módulos de sonido como apps de instrumentos virtuales o plug-ins pueden cambiar de sonido cuando reciben
un mensaje MIDI específico llamado Program Change. iRig KEYS PRO envía mensajes Program Change al
presionar los botones PROG
8
hacia arriba o abajo.
Empezando con el programa corrientemente seleccionado, iRig KEYS PRO envía el próximo número de
programa más alto cuando presiona PROG hacia ARRIBA y menores números cuando se presiona PROG hacia
ABAJO.Para configurar el programa corriente vea el capítulo “Modo EDIT”.
Modo EDIT
iRig KEYS PRO le permite personalizar la mayoría de los parámetros para adaptarse a cualquier tipo de
necesidad.
En modo EDIT se puede:
• Configurar el canal de transmisión MIDI.
• Configurar diferentes sensibilidades de toque (velocidad).
• Asignar un número específico de control MIDI Control Change a la perilla VOL/DATA.
• Enviar números específicos de MIDI Program Change y configurar el número de programa corriente.
• Enviar un mensaje MIDI “All Notes Off” (Apagar todas las notas).
• Transponer el teclado en semitonos.
• Restablecer un SET específico al estado de fabrica.

Español
38
Para acceder el modo EDIT, presione ambos botones OCT
7
. Ambos botones OCT se iluminarán indicando
que se ha activado el modo EDIT. Se puede salir del modo EDIT en cualquier momento presionando la tecla C2
marcada “CANCEL/NO”.
Configuración del Canal de Transmisión MIDI
Instrumentos MIDI responden a 16 canales MIDI diferentes. Para que iRig KEYS PRO pueda tocar un
instrumento, el Canal de Transmisión MIDI del iRig KEYS PRO debe ser el mismo canal receptor de su
instrumento.
Para configurar el Canal de Transmisión MIDI:
• Entre al modo EDIT (vea el inicio del Capítulo 3).
• Presione la tecla D#2 (MIDI CH). Los botones OCT comenzarán a parpadear.
• Introduzca el número del Canal MIDI que desea usar presionando las teclas C3-E4 denominadas 0-9.
Números válidos son del 1 al 16. Si es necesario, se pueden introducir dos números consecutivos.
• Presione la tecla C5 (ENTER/YES) para confirmar su selección. Ambos botones PROG se encenderán
intermitentemente para indicar que la configuración fue aceptada, y iRig KEYS PRO saldrá del modo EDIT
automáticamente.
Configuración de sensibilidad de velocidad (touch)
El teclado del iRig KEYS PRO es sensible a velocidad. Usualmente, esto significa que cuando toca las
teclas fuertemente, el sonido será producido con volumen más fuerte. Esto depende de la programación del
instrumento que esta controlando.
Para adaptarse al estilo de teclistas individuales, iRig KEYS PRO ofrece seis configuraciones diferentes para
establecer la sensibilidad de velocidad:
0. FIXED, 64. Esta configuración siempre enviará el valor de velocidad de 64 sin ningún cambio de
sensibilidad.
1. FIXED, 100. Esta configuración siempre enviará el valor de velocidad de 100 sin ningún cambio de
sensibilidad.
2. FIXED, 127. Esta configuración siempre enviará el valor de velocidad de 127 sin ningún cambio de
sensibilidad.
3. VEL SENS, LIGHT. Utilice esta configuración si prefiere un toque ligero en las teclas. Esto es particularmente
útil cuando se toca frases rápidas o al programar patrones rítmicos.

Español
39
4. VEL SENS, NORMAL. Esta configuración viene predeterminada y funciona bien en la mayoría de los casos.
5. VEL SENS, HEAVY. Utilice esta configuración si se prefiere un toque más fuerte a los teclados.
Para configurar la sensibilidad de velocidad:
• Entre al modo EDIT (vea el inicio del Capítulo 3).
• Presione la tecla F#2 (VEL), ambos botones OCT comenzarán a parpadear.
• Introduzca su selección de Sensibilidad de Velocidad usando las teclas blancas C3-A3 denominadas 0 al 5.
• Presione la tecla C5 (ENTER/YES) para confirmar su selección. Ambos botones PROG parpadearán para
mostrar que la configuración fue aceptada, y iRig KEYS PRO saldrá automáticamente del modo EDIT.
Asignar un número específico de MIDI Control Change a la perilla VOL/DATA
La perilla VOL/DATA está predeterminada a enviar mensajes control MIDI de Volumen #7. Sin embargo, se
puede personalizar el número de mensaje control MIDI que se envía usando la perilla VOL/DATA.
Para asignar otro número de control a la PERILLA:
• Entre al modo EDIT (vea el inicio del Capítulo 3).
• Presione la tecla G#2 (KNOB), ambos botones OCT comenzarán a parpadear.
• Introduzca el número MIDI CC que desea usar con las teclas blancas C3-E4 denominadas 0 al 9. Números
válidos son del 0 al 127. Si es necesario, se pueden introducir hasta tres números consecutivos.
• Presione la tecla C5 (ENTER/YES) para confirmar su selección. Ambos botones PROG se encenderán
intermitentemente para indicar que la configuración fue aceptada, y iRig KEYS PRO saldrá automáticamente
del modo EDIT.
Envío de números de Cambio de Programa MIDI, y configuración del número de
Programa Corriente
iRig KEYS PRO puede enviar Cambios de Programa MIDI en dos diferentes formas:
1. Cambios de Programa se envían secuencialmente usando los botones PROG hacia arriba y PROG hacia
abajo
8
.
2. Cambios de Programa se envían directamente al enviar un número de Cambio de Programa específico
usando el modo EDIT. Al enviar el número de Cambio de Programa específico, los botones PROG hacia

Español
40
arriba y abajo enviarán los números consecuentes desde este punto.
Para enviar un número específico de Cambio de Programa:
• Entre al modo EDIT (vea el inicio del Capítulo 3).
• Presione la tecla A#2 (PROG), ambos botones OCT comenzarán a parpadear.
• Introduzca el número de Cambio de Programa usando las teclas blancas C3-E4 denominadas del 0 al 9.
Números válidos son del 0 al 127. Si es necesario, se pueden introducir hasta tres números consecutivos.
• Presione la tecla C5 (ENTER/YES) para confirmar su selección. Ambos botones PROG se encenderán
intermitentemente para indicar que la configuración fue aceptada, y iRig KEYS PRO saldrá automáticamente
del modo EDIT.
Envío de mensaje MIDI “All Notes Off” (Apagar todas las notas)
A veces es necesario detener todas las notas que se han tocado en el canal MIDI corriente cuando las notas se
pegan o cuando los controladores no se restablecen correctamente.
iRig KEYS PRO puede enviar el mensaje MIDI CC# 121 + 123 para restablecer todos los controladores y
detener todas las notas.
Para restablecer todos los controladores y detener todas las notas:
• Entre al modo EDIT (vea el inicio del Capítulo 3).
• Presione la tecla F#4 (ALL NOTES OFF).
Ambos botones PROG se encenderán intermitentemente para indicar que se envió el restablecimiento, y iRig
KEYS PRO saldrá automáticamente del modo EDIT.
Transponer el teclado en semitonos
El teclado del iRig KEYS PRO se puede transponer en semitonos. Esto es útil cuando, por ejemplo, se necesita
tocar una pieza en una clave difícil, pero usted quiere tocar en una clave físicamente más fácil o más familiar.
Para transponer iRig KEYS PRO:
• Entre al modo EDIT (vea el inicio del Capítulo 3).
• Presione la tecla G#4 (TRANSP), ambos botones OCT comenzarán a parpadear.
• Presione cualquier nota en el teclado: desde este momento, cuando presione una tecla C, iRig KEYS PRO
enviará la nota MIDI que usted presionó en este paso.

Español
41
Ambos botones PROG se encenderán intermitentemente para indicar que se envió el restablecimiento, y iRig
KEYS PRO saldrá automáticamente del modo EDIT.
Ejemplo
Si necesita tocar una pieza que se ha grabado en la clave D#, pero le gustaría tocar la pieza en el teclado como
si fuera en clave de C, haga lo siguiente:
• Entre al modo EDIT.
• Presione la tecla G#4 (TRANSP).
• Presione la tecla D# en el teclado.
Desde este instante cuando presiona la tecla C en el teclado, iRig KEYS PRO enviará la nota MIDI D# . Todas
las otras notas se transponen por la misma cantidad.
Restablecer iRig KEYS PRO
Se puede restablecer el iRig KEYS PRO al estado original de fabrica. Esto se puede hacer independientemente
para cada uno de los SETs o para el modo normal no-SET (vea el Capítulo 4, SETs).
Para restablecer iRig KEYS PRO o un SET:
• Cargue el SET que desea restablecer, o no cargue ningún SET, se puede restablecer el modo normal
no-SET.
• Entre al modo EDIT (vea el inicio del Capítulo 3).
• Presione la tecla A#4 (RESET).
Ambos botones PROG se encenderán intermitentemente para indicar que el SET se restableció, y iRig KEYS
PRO saldrá automáticamente del modo EDIT.
SETs
iRig KEYS PRO ofrece muchas diferentes opciones para satisfacer al usuario más exigente.
Sin embargo, puede tomar mucho tiempo y dificultad en cambiar los parámetros necesarios cada vez que se
está tocando en vivo para controlar diferentes instrumentos.
Por esta razón, iRig KEYS PRO tiene 4 presets configurables que se pueden cargar rápidamente al presionar un
sólo botón, llamados SETs.

Español
42
Cómo cargar un SET
Para cargar cualquiera de los cuatro SETs simplemente presione el botón SET
6
.
Cada vez que presiona el botón SET, iRig KEYS PRO carga el siguiente SET, en ciclo de esta manera:
-> NO SET -> SET 1 -> SET 2 -> SET 3 -> SET 4 -> NO SET …
Cómo programar un SET
Para programar un SET específico, siempre selecciónelo antes, y luego configure iRig KEYS PRO a su
preferencia (vea los Capítulos “Tocando con iRig KEYS PRO” y “Modo EDIT”).
Cómo guardar un SET
Para guardar un SET para que guarde permanentemente las configuraciones hechas por usted, SUJETE
el botón SET por dos segundos. La luz LED del SET corriente parpadeará para confirmar que el SET se ha
guardado. Recuerde de siempre guardar el SET si se han hecho modificaciones que desea mantener.
Cuando no se ha cargado un SET, iRig KEYS PRO automáticamente utiliza configuraciones previas hechas
antes de cargar un SET.
Resolución de Problemas
He conectado iRig KEYS PRO a my dispositivo iOS, pero el teclado no muestra actividad, la luz LED iOS
no se enciende.
En este caso, asegúrese de tener abierto un app que use Core MIDI (como iGrand Piano o SampleTank de IK
Multimedia) en su dispositivo iOS. iRig KEYS PRO sólo se enciende cuando se detecta un app que lo pueda
utilizar, en modo de ahorrar la batería del dispositivo iOS.
iRig KEYS PRO no toca mi instrumento a pesar de que está encendido.
Asegúrese que el Canal de Transmisión MIDI sea el mismo canal MIDI que utiliza el instrumento receptor. Vea la
sección “Configuración del Canal de Transmisión MIDI”.
iRig KEYS PRO aparenta haber cambiado la configuración repentinamente de la que estaba usando.
Es posible que haya cargado un SET. Si no quiere usar un SET, presione el botón SET hasta que todas las luces
LED SET se apaguen.

Español
43
Garantía
Por favor visite:
www.ikmultimedia.com/warranty
para ver la póliza completa de garantía.
Servicio Técnico y Más Información
www.ikmultimedia.com/support
www.irigkeys.com
Apple no se hace responsable por la operación de este dispositivo ni por su cumplimiento con las normas de
seguridad y reglamentación.

Italiano
44
iRig Keys Pro
Grazie per l’acquisto di iRig KEYS PRO.
iRig KEYS PRO è una tastiera MIDI piccola e portabile, progettata per essere direttamente compatibile con
iPhone/iPod touch/iPad e Android. iRig KEYS PRO è anche compatible con computers Mac e basati su
Windows.
La confezione include:
• iRig KEYS PRO.
• Cavo Lightning.
• Cavo OTG.
• Cavo USB.
• Manuale d’uso.
• Cartolina di registrazione.
Registra iRig KEYS PRO
In seguito alla registrazione hai accesso al supporto tecnico, attivi la garanzia e ricevi JamPoints™ sul tuo
account. I JamPoints™ ti permettono di ottenere sconti sui prossimi acquisti di prodotti IK!
La registrazione ti consente inoltre di essere informato tempestivamente sui nuovi prodotti e sugli aggiornamenti.
Registra su: www.ikmultimedia.com/registration
Installa SampleTank 3 SE
Dopo aver registrato il numero di serie di iRig Keys Pro, un link di download e un numero di serie di SampleTank
3 SE per Mac/PC viene aggiunto nella tua User Area. Si prega di scaricarlo nella User Area e di autorizzarlo con
l’Authorization Manager.
User Area
www.ikmultimedia.com/userarea
Authorization Manager
www.ikmultimedia.com/am

Italiano
45
Caratteristiche
• 37 tasti sensibili al tocco.
• Compatible con iPhone, iPod touch e iPad.
• Compatible con computers Mac e Windows.
• Pitch Bend Wheel.
• Modulation Wheel.
• Tasti soft touch di Ottava retroilluminati.
• Tasti soft touch di Programma retroilluminati.
• Tasto SET per memorizzare e richiamare 4 differenti set-up customizzati.
• Controllo rotativo assegnabile.
• Modalità EDIT.
• Ingresso per pedale Sustain o di Espressione.
• Alimentato dal device iOS o dalla porta USB.
• Cavi per connettori iOS dedicati.
• Cavo Micro USB.
Connessione ed impostazione
Dispositivi iOS/Android
1. Connetti il cavo Lightning o 30-pin alla porta “iOS” su iRig KEYS PRO
1
.
2. Connetti il connettore Lightning o 30-pin all’iPhone / iPod touch / iPad.

Italiano
46
3. Connetti il cavo OTG alla porta “micro-USB” su iRig KEYS PRO.
4. Connetti il connettore OTG al dispositivo Android.
5. Se non l’hai già fatto, scarica l’app Sample Tank dall’App Store e aprila. Il LED “iOS”
5
si accenderà.
6. iRig KEYS PRO funziona con qualunque app compatibile con lo standard Core MIDI.
Computer Mac o Windows
1. Collega il cavo Micro USB incluso alla porta Micro USB su iRig KEYS PRO
2
.
2. Collega il cavo ad una porta USB libera sul tuo computer.
SampleTank
iGrand Piano
iLectric Piano
ikdownloads.com/irigkeyspro

Italiano
47
3. Il LED “USB”
5
si accenderà. Ora puoi suonare e controllare gli strumenti virtuali installati sul tuo computer
con iRig KEYS PRO.
4. A seconda del software che usi potrebbe essere necessario selezionare “iRig KEYS PRO” fra i vari dispositivi
di MIDI IN disponibili.
Utilizzare iRig KEYS PRO
Puoi cominciare a suonare la tua app virtual instrument o software plug-in non appena iRig KEYS PRO è
collegato al tuo dispositivo iOS o al tuo computer. Premendo i tasti iRig KEYS PRO manda messaggi di MIDI
NOTE ON. iRig KEYS PRO ha una tastiera di 37 tasti, approssimativamente posizionata al centro delle 88 note
di un pianoforte.
Spostamento di Ottava
7
Di default iRig KEYS PRO suona le note fra C2 e C5. Se hai bisogno di suonare note più basse o più alte di
questo range, puoi spostare tutta la tastiera in ottave, usando i tasti OCT UP e DOWN
7
.
Quando i LED dei pulsanti OCT sono spenti, non è applicato nessuno spostamento di ottava. E’ possibile
spostare la tastiera di un massimo di 3 ottave in su o 4 ottave in giù.
I pulsanti OCT up e down si illuminano per indicare che è attivo uno spostamento di ottava, e lampeggiano ogni
volta che vengono premuti. Il numero di volte che i pulsanti lampeggiano corrisponde al numero di ottave di cui
la tastiera è spostata.

Italiano
48
Manopola Volume/Data
4
Questa manopola regola il MIDI Volume (CC#07) di default, in questo modo è possibile regolare il volume dello
strumento che si sta suonando.
Questa manopola, tuttavia, è assegnabile in modo che sia possibile eventualmente mandare altri MIDI control
change (CC). Vedi il capitolo “Modo EDIT” per maggiori informazioni.
Controllo di Pitch Bend
9
Muovi il Pitch Bend wheel in su ed in giù per mandare messaggi MIDI di Pitch Bend. La wheel ha una posizione
centrale di riposo. Muovendo la wheel in su il pitch aumenterà, e viceversa. Notare che la quantità di pitch bend
dipenderà da come lo strumento che riceve i dati MIDI è impostato.
Controllo di Modulation
10
Muovi questa wheel per mandare messaggi di Modulation Wheel (MIDI CC#01). La posizione più bassa manda
un valore = 0, la posizione più alta manda un valore = 127.

Italiano
49
La maggior parte degli strumenti usano questo messaggio per controllare il vibrato o il tremolo in un suono, ma
questo dipende da come lo strumento che riceve i comandi da iRig KEYS PRO è impostato.
Ingresso Pedale
3
iRig KEYS PRO supporta sia pedali di Sustain che di Espressione.
Collega un pedale di Sustain normalmente aperto al Jack
3
prima di collegare iRig KEYS PRO al dispositivo
iOS o al computer. Quando il pedale è premuto le note verranno mantenute fino a quando il pedale non viene
rilasciato, come succede su un pianoforte. iRig KEYS PRO trasmette un MIDI CC#64 127 quando il pedale è
premuto e 0 quando il pedale è rilasciato.
Collega un pedale di espressione continuo al jack
3
prima di collegare iRig KEYS PRO al dispositivo iOS o al
computer per controllare l’espressione del timbro che stai suonando. iRig KEYS PRO trasmette un MIDI CC#11
da 0 a 127 quando il pedale di espressione viene mosso.
Prog
8
Moduli sonori come virtual instruments app o plug-ins pososno cambiare suono quando ricevono uno specifico
comando MIDI chiamato Program Change. iRig KEYS PRO può trasmettere Program Changes premendo i
pulstanti PROG
8
up o down.
Partendo dal programma corrente iRig KEYS PRO trasmetterà il prog. successivo premendo PROG up ed il
programma precedente premendo PROG down.
Per impostare il programma corrente vedi il capitolo “Modo Edit”.
Modo EDIT
iRig KEYS PRO permette di personalizzare gran parte dei suoi parametri per andare incontro ad ogni tipo di
utilizzo.
In modo Edit è possibile:
• Impostare il canale di trasmissione MIDI.
• Impostare differenti sensibilità al tocco.
• Assegnare uno specifico numero di MIDI control change alla manopola VOL/DATA.
• Trasmettere specifici Program Change ed impostare il programma corrente.
• Trasmettere messaggi MIDI “All notes Off”.
• Trasporre la tastiera in semitoni.

Italiano
50
• Reimpostare un SET alla modalità fabbrica.
Per entrare in modo EDIT premi contemporaneamente i pulsanti OCT up e OCT down
7
.
Entrambi i pulsanti si illumineranno indicando che iRig KEYS PRO si trova in modo EDIT.
É possibile uscire dal modo EDIT in ogni momento premendo il tasto C2 marcato “CANCEL/NO”.
Impostare il Canale di Trasmissione MIDI
Gli strumenti MIDI possono rispondere a 16 canali MIDI. Perché iRig KEYS PRO possa suonare uno strumento è
necessario che trasmetta sullo stesso canale sul quale lo strumento riceve.
Per impostare il canale MIDI di trasmissione:
• Entra in Modo EDIT (vedi l’inizio del capitolo 3).
• Premi il tasto D#2 (MIDI CH). Entrambi i pulsanti OCT lampeggeranno.
• Inserisci il numero del canale MIDI che si desidera utilizzare attraverso i tasti C3-E4, marcati da 0 a 9. Sono
validi i numeri da 1 a 16, quando è necessario è possibile inserire due cifre consecutive.
• Premi il tasto C5 (ENTER/YES) per confermare il dato inserito. Entrambi i tasti OCT lampeggeranno per
confermare che l’impostazione è avvenuta e iRig KEYS PRO automaticamente uscirà dal modo EDIT.
Impostare differenti sensibilità al tocco
La tastiera di iRig KEYS PRO è sensiblie al tocco (velocity). Questo normalmente significa che più forte suoni
sui tasti più intenso sarà il suono emesso. Questo però dipende da come lo strumento che riceve i dati da iRig
KEYS PRO è impostato.
Per andare incontro alle varie esigenze iRig KEYS PRO offre sei diverse impostazioni per la sensibilità al tocco:
0. FISSO, 64. Questa impostazione trasmetterà sempre una velocity di valore 64 indipendentemente dalla forza
con cui si suona.
1. FISSO, 100. Questa impostazione trasmetterà sempre una velocity di valore 100 indipendentemente dalla
forza con cui si suona.
2. FISSO, 127. Questa impostazione trasmetterà sempre una velocity di valore 127 indipendentemente dalla
forza con cui si suona.
3. TOCCO LEGGERO. Usa questa impostazione se preferisci un tocco leggero sui tasti. Questo è
particolarmente utile quando è necessario suonare passaggi veloci o programmare pattern di batteria.

Italiano
51
4. TOCCO NORMALE. Questa impostazione è quella di default ed è la più indicata nella maggior parte dei
casi.
5. TOCCO PESANTE. Usa questa impostazione se preferisci un tocco pesante sui tasti.
Per impostare la sensibilità al tocco:
• Entra in Modo EDIT (vedi l’inizio del capitolo 3).
• Premi il tasto F#2 (VEL). Entrambi i pulsanti OCT lampeggeranno.
• Inserisci la risposta al tocco preferita attraverso i tasti A3-A3 marcati da 0 a 5.
• Premi il tasto C5 (ENTER/YES) per confermare il dato inserito. Entrambi i tasti OCT lampeggeranno per
confermare che l’impostazione è avvenuta e iRig KEYS PRO automaticamente uscirà dal modo EDIT.
Assegnare uno specifico MIDI Control Change alla manopola VOL/DATA
Normalmente la manopola VOL/DATA trasmette messaggi di volume MIDI (CC#7), tuttavia è possibile
personalizzare il numero del MIDI controller associato alla manopola.
Per assegnare un MIDI controller alla manopola:
• Entra in Modo EDIT (vedi l’inizio del capitolo 3).
• Premi il tasto G#2 (KNOB). Entrambi i pulsanti OCT lampeggeranno.
• Inserisci il numero di MIDI Controller desiderato usando i tasti C3-E4 marcati da 0 a 9. Sono validi numeri da
0 a 127 quindi è possibile quando necessario inserire più cifre consecutive.
• Premi il tasto C5 (ENTER/YES) per confermare il dato inserito. Entrambi i tasti OCT lampeggeranno per
confermare che l’impostazione è avvenuta e iRig KEYS PRO automaticamente uscirà dal modo EDIT.
Trasmettere specifici MIDI Program Change ed impostare il programma corrente
iRig KEYS PRO può trasmettere MIDI Program Change in due modi:
1. I messaggi di Program Change sono trasmessi in maniera sequenziale usando i tasti PROG up e PROG
down
8
.
2. I messaggi di Program Change sono trasmessi direttamente inviando uno specifico numero di P.C. A quel
punto i tasti PROG up e PROG down funzioneranno sequenzialmente da quel valore.
Per trasmettere uno specifico Program Change:

Italiano
52
• Entra in Modo EDIT (vedi l’inizio del capitolo 3).
• Premi il tasto A#2 (PROG). Entrambi i pulsanti OCT lampeggeranno.
• Inserisci il Program Change che desideri trasmettere usando i tasti C3-E4 marcati da 0 a 9. Sono validi
numeri da 1 a 128 quindi è possibile quando necessario inserire più cifre consecutive.
• Premi il tasto C5 (ENTER/YES) per confermare il dato inserito. Entrambi i tasti OCT lampeggeranno per
confermare che l’impostazione è avvenuta e iRig KEYS PRO automaticamente uscirà dal modo EDIT.
Trasmettere messaggi MIDI “All notes off”
A volte può essere necessario bloccare tutte le note MIDI che stanno suonando sul canale MIDI corrente, per
esempio quanto queste rimangono appese e non possono venir spente in nessun altro modo.
iRig KEYS PRO può trasmettere i messaggi MIDI CC 121+123 per bloccare tutte le note attive e per resettare
tutti i controllers.
Per resettare tutti i controllers e spegnere tutte le note attive:
• Entra in Modo EDIT (vedi l’inizio del capitolo 3).
• Premi il tasto F#4 (ALL NOTES OFF). Entrambi i pulsanti OCT lampeggeranno.
Entrambi i pulsanti OCT lampeggeranno per confermare l’invio dei messaggi di reset e iRig KEYS PRO
automaticamente uscirà dal modo EDIT.
Trasporre la tastiera in semitoni
La tastiera di Rig KEYS può essere trasposta in semitoni. Questo può essere utile, per esempio, quando si vuole
suonare una canzone scritta in una tonalità difficile, e si preferisce suonarla fisicamente sulla tastiera in una
tonalità più familiare.
Per trasporre iRig KEYS PRO:
• Entra in Modo EDIT (vedi l’inizio del capitolo 3).
• Premi il tasto G#4 (TRANSP). Entrambi i pulsanti OCT lampeggeranno.
• Premi qualunque nota sulla tastiera: da questo momento in poi, quando suonerai una nota C (DO), iRig
KEYS PRO in realtà trasmetterà la nota premuta all’inizio di questo passo.
Entrambi i tasti OCT lampeggeranno per confermare che l’impostazione è avvenuta e iRig KEYS PRO
automaticamente uscirà dal modo EDIT.

Italiano
53
Esempio
Se devi suonare una canzone scritta in tonalità di D#, ma vuoi suonarla sulla tastiera come se la canzone fosse
scritta in tonalità di C, segui questi passi:
• Entra in Modo EDIT.
• Premi il tasto G#4 (TRANSP).
• Premi qualunque tasto D# sulla tastiera.
Da questo momento in poi quando premi un tasto C sulla tastiera, iRig KEYS PRO in realtà trasmetterà D#. Tutte
le altre note verranno trasposte dello stesso numero di semitoni.
Reimpostare un SET alla modalità fabbrica
iRig KEYS PRO può essere resettato alla modalità fabbrica. Questo può essere fatto indipendentemente per
ogni SET o per il modo di utilizzo normale no-SET (vedi capitolo SETs).
Per resettare iRig KEYS PRO o un SET:
• Carica il SET che vuoi resettare, o non caricare nessun SET se vuoi resettare il modo no-SET.
• Entra in Modo EDIT.
• Premi il tasto A#4 key (RESET).
Entrambi i tasti OCT lampeggeranno per confermare che il SET è stato resettato e iRig KEYS PRO
automaticamente uscirà dal modo EDIT.
SETs
iRig KEYS PRO offre svariate opzioni per soddisfare l’utente più esigente. Tuttavia quanto la tastiera è utilizzata
dal vivo o per controllare svariati strumenti, potrebbe essere troppo complicato impostare tutti i parametri
eventualmente richiesti manualmente.
Per questo motivo iRig KEYS PRO ha 4 presets configurabili che possono essere richiamati istantaneamente
premendo un tasto. Questi presets sono chiamati SETs.

Italiano
54
Come caricare un SET
Per caricare uno dei quattro SETs basta premere il tasto SET
6
.
Ogni volta che il tasto SET è premuto, iRig KEYS PRO carica il SET successivo, seguendo questo ciclo:
-> NO SET -> SET 1 -> SET 2 -> SET 3 -> SET 4 -> NO SET …
Come programmare un SET
Per programmare uno specifico SET occorre che il SET sia stato caricato prima, e poi occorre impostare iRig
KEYS PRO come richiesto (vedi i capitoli “Utilizzare iRig KEYS PRO” e “Modo EDIT”).
Come salvare un SET
Per salvare un SET in modo che rimanga permanentemente nella memoria di iRig KEYS PRO, mantieni premuto
il tasto SET per due secondi almeno. Il LED relativo al SET corrente lampeggerà per confermare che il SET è
stato salvato. Ricordati di salvare sempre un SET se ti interessa mantenere le impostazioni per quanto userai
quel SET in futuro.
Quando nessun SET è caricato (no-SET), iRig KEYS PRO automaticamente usa tutte le impostazioni che erano
state fatte prima che un SET venisse caricato.
Risoluzione dei problemi
Ho collegato iRig KEYS PRO al mio device iOS ma la tastiera non si accende, il led “iOS” non si accende.
In questo caso assicurati di aver aperto una app che faccia uso di Core MIDI come (iGrand Piano o SampleTank
di IK Multimedia). Per risparmiare la batteria dei device iOS iRig KEYS PRO si accende solo quando un’app
Core MIDI è aperta.
iRig KEYS PRO non suona il mio strumento anche se è accesa.
Assicurati che il canale MIDI di trasmissione su cui è impostato iRig KEYS PRO sia lo stesso su cui lo strumento
riceve. Vedi il paragrafo “Impostare il Canale di Trasmissione MIDI”.
iRig KEYS PRO sembra improvvisamente essere impostata diversamente.
Probabilmente hai caricato un SET inavvertitamente. Se non vuoi usare un SET premi il tasto SET più volte fin
che nessun LED SET è acceso.

Italiano
55
Garanzia
Visita:
www.ikmultimedia.com/warranty
per il completo contratto di garanzia.
Supporto e ulteriori informazioni
www.ikmultimedia.com/support
www.irigkeys.com
Apple declina ogni responsabilità in merito al funzionamento del dispositivo e alla sua conformità alle normative
e agli standard di sicurezza.

Deutsch
56
iRig Keys Pro
Vielen Dank für den Erwerb unseres iRig KEYS PRO .
iRig KEYS PRO ist ein vielseitiger Keyboard-MIDI-Controller, der für den direkten Anschluss eines iPhone/iPod
touch/iPad konstruiert wurde. Selbstverständlich können Sie ihn aber auch an einen Windows- oder Apple-
Computer anschließen.
Packungsbeilage:
• iRig KEYS PRO
• Lightning-Kabel
• OTG Kabel
• USB-Kabel
• Quick Start
• Registrierkarte
Registrieren Sie Ihr iRig KEYS PRO
Mit der Registrierung Ihres iRig KEYS PRO können Sie unseren technischen Support in Anspruch nehmen, die
Garantie Ihres Gerätes aktivieren und JamPoints™ für Ihren Account sammeln. Mit JamPoints sparen Sie bei
Ihrem nächsten Einkauf bei IK Multimedia!
Durch die Registrierung bleiben Sie bei IK stets auf dem Laufenden und erfahren als Erste Neuigkeiten über
Produkte und Updates.
Registrierung: www.ikmultimedia.com/registration
Installation von SampleTank 3 SE
Nachdem Sie Ihre iRig Keys Pro Seriennummer registriert haben, erhalten Sie einen Download Link und eine
Seriennummer von SampleTank 3 SE für Mac/PC in Ihrer IK User Area. Bitte laden Sie es in der User Area
herunter und autorisieren Sie es mit dem Authorization Manager.
User Area
www.ikmultimedia.com/userarea
Authorization Manager
www.ikmultimedia.com/am

Deutsch
57
iRig KEYS PRO Eigenschaften
• 37-Tasten-Keyboard mit Anschlagdynamik
• Kompatibel mit iPhone, iPod touch und iPad
• Kompatibel mit Mac und PC
• Pitch Bend Rad
• Modulationsrad
• Beleuchtete Oktaven-Taster
• Beleuchtete Taster für Programm-Wechsel
• 4 User SETS für sofortiges Aufrufen von Einstellungen
• Rad für individuell zuweisbare Funktionen
• Edit-Mode
• Anschluss für Sustain / Expression-Pedal
• Stromversorgung über USB oder iOS-Gerät
• Spezielle Anschusskabel für iOS
• Micro-USB-Kabel
Anschluss und Einstellungen
iOS/Android-Geräte
1. Schließen Sie das beigelegte Lightning- oder 30-pin Kabel an den “iOS”-Port des iRig KEYS PRO
1
an.
2. Verbinden Sie den Lightning oder 30-pin Anschluss mit dem iPhone /iPod touch/iPad.

Deutsch
58
3. Schließen Sie das beigelegte OTG Kabel an den “micro-USB”-Port des iRig KEYS PRO an.
4. Verbinden Sie den OTG Anschluss mit dem Android.
5. Falls noch nicht installiert, laden Sie die App SampleTank aus dem App Store und starten diese. Die “iOS”
LED
5
leuchtet. Jetzt können Sie die Klänge aus SampleTank mit Ihrem iRig KEYS PRO spielen.
6. iRig KEYS PRO kann auch für jede andere Core MIDI-kompatible App verwendet werden.
Mac oder Windows-basierte Computer
1. Schließen Sie das beigelegte Micro USB-Kabel an den Micro USB-Port des iRig KEYS PRO
2
an.
2. Nutzen Sie einen freien USB-Port Ihres Computers zum Anschluss des Kabels.
SampleTank
iGrand Piano
iLectric Piano
ikdownloads.com/irigkeyspro

Deutsch
59
3. Die “USB” LED
5
leuchtet. Jetzt können Sie mit iRig KEYS PRO virtuelle Instrumente in Ihrem Computer
spielen.
4. Gegebenenfalls müssen Sie in Ihrer Software “iRig KEYS PRO” als MIDI IN Gerät zuweisen.
Spielen des iRig KEYS PRO
Mit dem Anschließen Ihres iRig KEYS PRO an ein iOS-Gerät oder einen Computer und dem Öffnen einer
virtuellen Instrumenten-App bzw. eines Plug-Ins können Sie sofort mit dem Spielen beginnen.
iRig KEYS PRO verfügt über ein 37-Tasten-Keyboard, dessen Spielbereich sich ungefähr in der Mitte eines
vergleichbaren 88-Tasten-Keyboards befindet.
Oktave - OCT
7
In der Voreinstellung spielt iRig KEYS PRO Noten zwischen C2 und C5.
Die Tastatur lässt sich bis zu drei Oktaven nach oben bzw. vier Oktaven nach unten transponieren.
Nutzen Sie dazu die beiden OCT-Taster, diese leuchten entsprechend der gewählten Anzahl der Oktaven auf.
Volume/Data-Regler
4
Dieser Regler bestimmt in der Voreinstellung MIDI-Volume (CC#07) und erlaubt damit Lautstärkeeinstellungen für
das angeschlossene Instrument.
Dem Regler lassen sich weitere MIDI-Controller zuweisen, Einzelheiten dazu finden Sie unter “EDIT-Mode”.

Deutsch
60
Pitch Bend
9
Bewegen Sie das Pitch Rad, um die Tonhöhe gespielter Noten zu artikulieren.
Nach Loslassen rastet das Rad wieder in der Mittenposition ein.
Drehen nach oben bewirkt das Erhöhen eines Tones, Drehen nach unten erniedrigt diesen.
Das Intervall der maximalen Tonhöhenänderung wird durch die Einstellung im virtuellen Instrument bestimmt.
Modulationsrad MOD
10
Drehen Sie das Rad zum Erzeugen einer Modulation (MIDI CC#01).
In der tiefsten Position sendet iRig KEYS PRO einen MIDI-Parameterwert von 0, in der Maximalposition einen
Wert von 127.
Via Modulationsrad werden Instrumente in der Regel ein Vibrato oder ein Tremolo generieren. Die Art der
Modulation wird dabei nicht vom iRig KEYS PRO sondern von den Einstellungen des virtuellen Instruments
bestimmt.

Deutsch
61
Pedal
3
iRig KEYS PRO unterstützt sowohl Sustain-Pedale (Taster) als Lautstärkeschweller.
Schließen Sie ein NORMAL ÖFFNENDES Pedal an die Klinkenbuchse
3
BEVOR Sie die Verbindung zum
iOS-Gerät bzw. Computer vornehmen. Bei gedrücktem Pedal werden alle gespielten Noten bis zum wieder
Loslassen gehalten. iRig KEYS PRO sendet MIDI CC#64 mit einem Wert von 127 bei gehaltenem und einem
Wert von 0 bei losgelassenem Pedal.
Schließen Sie ein Lautstärke-Schwellerpedal an die Klinkenbuchse
3
BEVOR Sie die Verbindung zum iOS-Gerät
bzw. Computer vornehmen. iRig KEYS PRO sendet MIDI CC#11bei Bewegen des Lautstärkeschwellers.
Prog
8
Sound-Module wie z.B. virtuelle Instrumenten-Apps bzw. -Plug-Ins wechseln Klänge beim Empfang spezieller
MIDI-Nachrichten, den so genannten Program Change Messages. Mit dem Drücken eines der beiden PROG-
Tasters
8
sendet iRig KEYS PRO entsprechende MIDI Program Changes.
Ausgehend vom aktuell angewählten Klang wird mit den OCT-Tastern die Programm-Nummer um den Wert 1
erhöht bzw. erniedrigt. Einzelheiten zum Setzen des aktuellen Klanges finden Sie unten in “EDIT Mode”.
EDIT Mode
Mit Ihrem iRig KEYS PRO lassen viele Parameter den eigenen Anforderungen anpassen.
Im EDIT Mode können Sie:
• Den MIDI Sendekanal (TX) ändern.
• Die Anschlagsdynamik (Velocity) einstellen.
• Weitere MIDI Control Changes für das VOL/DATA-Rad zuweisen.
• MIDI Programm-Nummern senden.
• Den “All Notes Off” MIDI Befehl senden.
• In Halbtonschritten transponieren.
• Die Werkseinstellungen zurückrufen.
Drücken Sie zum Aktivieren des EDIT Mode beide OCT-Taster
7
gleichzeitig, die Taster leuchten zur Bestätigung.
Sie können den EDIT Mode jederzeit durch Drücken der Taste C2 “CANCEL/NO” verlassen.

Deutsch
62
Einstellen des MIDI-Sendekanals
MIDI-Instrumente lassen sich 16 verschiedenen MIDI-Kanälen zuweisen. Zum Spielen eines Instruments via
MIDI muss iRig KEYS PRO auf dem Kanal senden der im Empfangsgerät als Empfangskanal ausgewählt
wurde. Sende- und Empfangskanal müssen stets übereinstimmen. In der Regel sind Instrumente auf Kanal 1
voreingestellt, so dass in iRig KEYS PRO keine Änderungen vorgenommen werden müssen.
Einstellen des MIDI-Sendekanals (TX):
• Rufen Sie den EDIT Mode auf (siehe Anfang Kapitel 3).
• Drücken Sie die D#2 Taste (MIDI CH). Beide OCT-Taster blinken.
• Geben Sie den gewünschten MIDI-Kanal mit den weißen Tasten C3-E4 ein, diese sind mit “0 - 9”
gekennzeichnet. Gültige Kanalnummern sind 1 bis 16 es lassen sich 2-stellige Nummern eingeben.
• Drücken Sie die C5 Taste (ENTER/YES) zur Bestätigung Ihrer Eingabe. Beide PROG-Taster blinken zur
Bestätigung und iRig KEYS PRO beendet den EDIT-Mode automatisch.
Einstellen der Anschlagsempfindlichkeit – Velocity
Die Tastatur Ihres iRig KEYS PRO ist anschlagsdynamisch. Härteres Anschlagen einer Taste bewirkt so eine
höhere Lautstärke des ausgegebenen Tones. Letztlich bestimmt aber die Einstellung im angeschlossenen
Instrument wie die Anschlagsempfindlichkeit ausgewertet wird.
In iRig KEYS PRO können Sie mit 6 verschiedenen Dynamikstufen Ihre individuelle Spielweise anpassen:
0. FIXED, 64. Diese Einstellung sendet einen konstanten Wert für die MIDI-Velocity von 64 ohne
Anschlagsempfindlichkeit.
1. FIXED, 100. Diese Einstellung sendet einen konstanten Wert für die MIDI-Velocity von 100 ohne
Anschlagsempfindlichkeit.
2. FIXED, 127. Diese Einstellung sendet einen konstanten Wert für die MIDI-Velocity von 127 ohne
Anschlagsempfindlichkeit.
3. VEL SENS, LIGHT. Diese Einstellung eignet sich für ein leichtes Tasten-Ansprechen, insbesondere für das
Einspielen von schnelleren Passagen oder von Drum-Pattern.
4. VEL SENS, NORMAL. Diese Normal-Anschlagsempfindlichkeit ist voreingestellt.
5. VEL SENS, HEAVY. Wählen Sie diese Einstellung bei starkem Tastenanschlag.

Deutsch
63
Einstellen der Anschlagsempfindlichkeit - Velocity Sensitivity:
• Rufen Sie den EDIT Mode auf (siehe Anfang Kapitel 3).
• Drücken Sie die F#2 Taste (VEL), Beide OCT-Taster blinken.
• Wählen Sie die gewünschte Anschlagsempfindlichkeit mit den weißen Tasten C3 – A3, gekennzeichnet mit
0 – 5.
• Drücken Sie die C5 Taste (ENTER/YES) zur Bestätigung Ihrer Eingabe. Beide PRG-Taster blinken zur
Bestätigung kurz auf und iRig KEYS PRO beendet den EDIT-Mode automatisch.
Zuweisen eines gewünschten MIDI Controllers für das VOL/DATA-Rad
In der Voreinstellung sendet das VOL/DATA-Rad gewünschte MIDI-Lautstärke-Daten über den MIDI-Befehl
CC#7. Für Parametersteuerungen in Ihrem Instrument können Sie dem VOL/DATA-Rad jeden beliebigen MIDI
Control Change Befehl (CC) zuweisen.
Controller-Zuweisung für das VOL/DATA-Rad (KNOB):
• Rufen Sie den EDIT Mode auf (siehe Anfang Kapitel 3).
• Drücken Sie die G#2 Taste (KNOB), beide OCT-Taster blinken.
• Geben Sie den gewünschten MIDI CC mit den weißen Tasten C3-E4 ein, diese sind mit “0 - 9”
gekennzeichnet. Gültige Control Changes sind 0 bis 127, es lassen sich bis zu drei Stellen eingeben.
• Drücken Sie die C5 Taste (ENTER/YES) zur Bestätigung Ihrer Eingabe. Beide PRG-Taster blinken kurz und
iRig KEYS PRO beendet den EDIT-Mode automatisc
Senden von MIDI Programm-Nummern
iRig KEYS PRO erlaubt das Senden von MIDI Program Changes mittels zweier Vorgehensweisen:
1. Die aktuelle Programm-Nummer wird mit den PROG-Tastern
8
jeweils um den Wert 1 erhöht bzw. erniedrigt.
2. Im EDIT-Mode wird eine bestimmte Programm-Nummer gesendet. Die PROG-Taster erhöhen bzw.
erniedrigen dann die gewählte Programm-Nummer.
Senden einer bestimmten Programm-Nummer:
• Rufen Sie den EDIT Mode auf (siehe Anfang Kapitel 3).
• Drücken Sie die A#2 Taste (PROG), beide OCT-Taster blinken.
• Geben Sie die gewünschte Programm-Nummer mit den weißen Tasten C3 - E4 ein, diese sind mit “0 - 9”

Deutsch
64
gekennzeichnet. Gültige Nummern sind 1 bis 128, es lassen sich bis zu drei Stellen eingeben.
• Drücken Sie die C5 Taste (ENTER/YES) zur Bestätigung Ihrer Eingabe. Beide PRG-Taster blinken kurz und
iRig KEYS PRO beendet den EDIT-Mode
Senden von MIDI “All Notes Off”
Um von Zeit zu Zeit auftretende “Notenhänger” zu stoppen und Controller korrekt zurück zu setzen kann MIDI
CC# 121 + 123 gesendet werden (auf dem aktuellen MIDI-Kanal).
Zurücksetzten von Controllern und Ausschalten aller Noten:
• Rufen Sie den EDIT Mode auf (siehe Anfang Kapitel 3).
• Drücken Sie die F#4 Taste (ALL NOTES OFF).
Beide PRG-Taster blinken zur Bestätigung kurz auf und iRig KEYS PRO beendet den EDIT-Mode automatisch.
Transponieren in Halbtönen
Die Tastatur Ihres iRig KEYS PRO lässt sich in Halbtönen transponieren. Nutzen Sie diese Funktion zum
Ausgeben von Noten in einer schwierigen Tonart obwohl Sie weiterhin in einer für Sie bequemen Tonart
einspielen.
Transponieren in iRig KEYS PRO:
• Rufen Sie den EDIT Mode auf (siehe Anfang Kapitel 3).
• Drücken Sie die G#4 Taste (TRANSP), beide OCT-Taster blinken.
• Schlagen Sie eine Taste an, die der gewünschten Transponierung entspricht.
• Bestätigen Sie mit C5 ENTER/YES.
Beide PRG-Taster blinken kurz auf und iRig KEYS PRO beendet den EDIT-Mode automatisch.
Beispiel
Zum Spielen eines Songs in D#-Dur können Sie die Noten bequem in C-Dur eingeben:
• Rufen Sie den EDIT Mode auf.
• Drücken Sie die Taste G#4 (TRANSP).
• Spielen Sie ein beliebiges D# auf der Tastatur.
• Bestätigen über C5 ENTER/YES.

Deutsch
65
Von jetzt ab gibt iRig KEYS PRO beim Drücken der Taste C die MIDI-Note D# aus und alle weiteren Noten
werden jeweils um einen Ton nach oben transponiert.
Zurücksetzen des iRig KEYS PRO - Reset
iRig KEYS PRO lässt sich auf die Werksvoreinstellungen zurücksetzen. Reset können Sie entweder unabhängig
für jedes einzelne SET oder den no-SET Mode (keine SET-Led leuchtet) durchführen (siehe Abschnitt 4, SETs).
Zurücksetzen des iRig KEYS PRO oder eines SETs:
• Zurücksetzen des iRig KEYS PRO oder eines SETs. Oder setzten Sie das iRig KEYS PRO im no-SET Mode
zurück (keine SET-Led leuchtet).
• Rufen Sie den EDIT Mode auf (siehe Anfang Kapitel 3).
• Drücken Sie die A#4 Taste (RESET).
Beide PRG-Taster blinken kurz auf und iRig KEYS PRO beendet den EDIT-Mode automatisch.
SETs
iRig KEYS PRO stellt auch dem erfahrenen Nutzer eine Vielzahl von Funktionen zur Verfügung. Trotzdem
kann insbesondere für den Live-Betrieb oder auch bei der Ansteuerung mehrerer verschiedener Instrumente
das Vorprogrammieren oft benötigter Parameter eine gehörige Zeitersparnis darstellen und mögliche
Fehler ausschließen. Zu diesem Zweck stehen in iRig KEYS PRO insgesamt 4 konfigurierbare Presets mit
programmierbaren Parametern zur Verfügung die sich einfach und komfortabel über einen einzigen Taster
aufrufen lassen. Diese konfigurierbaren Presets werden als SETs bezeichnet.
Aufrufen eines SETs
Zum Aufrufen eines der vier SETs drücken Sie den SET-Taster
6
.
Mit jedem erneuten Drücken lädt iRig KEYS PRO das nächste SET:
-> NO SET -> SET 1 -> SET 2 -> SET 3 -> SET 4 -> NO SET …
Programmieren eines SETs
Zum Programmieren eines spezifischen SETs muss dieses zunächst aufgerufen werden. Nehmen Sie dann die
gewünschten Einstellungen für das SET gemäß Abschnitt “Spielen des iRig KEYS PRO” und “EDIT-Mode” vor.

Deutsch
66
Speichern eines SETs
Damit alle vorgenommenen Einstellungen eines SETs gesichert sind, muss das SET gespeichert werden.
Drücken und Halten Sie den SET-Taster für ca. 2 Sekunden. Die LED des aktuellen SETs blinkt zur Bestätigung.
Beachten Sie, dass ein SET stets gesichert werden muss, um die vorgenommenen Einstellungen zu erhalten
Wenn kein SET geladen ist (keine SET-LED leuchtet) ruft iRig KEYS PRO automatisch jene Einstellungen auf,
welche vor dem Laden eines SETs vorgenommen wurden.
Fehlerbehebung
Ich habe iRig KEYS PRO mit meinem iOS-Gerät verbunden aber das Keyboard schaltet sich nicht ein und
die iOS-LED leuchtet nicht.
Zum Betrieb ist eine geöffnete Core MIDI App (wie iGrand Piano oder SampleTank von IK Multimedia)
erforderlich. Aus Gründen der Stromeinsparung Ihres iOS-Gerätes wird iRig KEYS PRO erst eingeschaltet, wenn
eine Core MIDI App aktiv ist.
iRig KEYS PRO spielt mein Instrument nicht obwohl die iOS-LED leuchtet.
Vergewissern Sie sich, dass der MIDI-Sendekanal von iRig KEYS PRO mit dem Empfangskanal des
Instrumentes übereinstimmt. Einzelheiten dazu finden Sie unter “Einstellen des MIDI-Sendekanals”.
iRig KEYS PRO scheint plötzlich über andere Einstellungen als die vorher benutzten zu verfügen.
Sie haben sicherlich ein SET geladen. Falls Sie keine SET- Einstellungen verwenden wollen drücken Sie den
SET-Taster so oft bis keine SET-LED mehr leuchtet.
Gewährleistung
Bitte besuchen Sie:
www.ikmultimedia.com/warranty
für weitere Informationen.
Support und weitere Informationen
www.ikmultimedia.com/support
www.irigkeys.com
Apple haftet weder für die Funktion dieses Geräts, noch für seine Einhaltung der Sicherheits- und übrigen
Vorschriften.

日本語
67
はじめに
iRig KEYS PROをご購入いただき、ありがとうございます。
iRig KEYS PROはiPhone、iPod touch、iPadに直接接続して使用するために設計されたモバイルMIDIキーボード
で、MacやWindowsのコンピューターでも使用することができます。
同梱されているもの
• iRig KEYS PRO。
• Lightningケーブル。
• OTGケーブル。
• USBケーブル。
• ク イ ッ ク・ス タ ー ト・ガ イ ド 。
• Registration Card
iRig KEYS PRO登録のお願い
iRig KEYS PROを登録するとテクニカル・サポートのご利用や保証などのサービスを受けることができ、さらに
JamPointが付与されます。JamPoint™ は、次回IK Multimedia製品をご購入いただく時に使用してディスカウントをす
ることのできるポイント・サービスです!また登録することによってIK Multimedia製品の最新ニュースやアップデート
情報を入手できるメール・サービスにも登録されます。
登録はこちらにて: www.ikmultimedia.com/registration
SampleTank 3 SEのインストールについて
iRig Keys Proのシリアル・ナンバーをご登録になると、SampleTank 3 SE for Mac/PCのダウンロード・リンクとシリア
ル・ナンバーがユーザーエリアに追加されます。ユーザーエリアからSampleTank 3のインストーラーをダウンロード
し、Authorization Managerによりオーサライズを行ってください。
ユーザーエリア
www.ikmultimedia.com/userarea
Authorization Manager
www.ikmultimedia.com/am

日本語
68
主な仕様
• 37鍵のベロシティ対応ミニ鍵盤。
• iPhone、iPod touch、iPadに対応。
• Mac、Windowsコンピューターに対応。
• ピッチベンド・ホイール搭載。
• モジュレーション・ホイール搭載。
• バックライト付きオクターブ・アップダウン・ボタン(OCT)。
• バックライト付きプログラムチェンジ・アップダウン・ボタン(PROG)。
• 4つのユーザー・セッティングを保存、読み込み可能なSETボタン機能。
• MIDIコントロール・チェンジをアサイン可能なVOL(ボリューム)ツマミ。
• カスタマイズ用EDITモード。
• サステイン/エクスプレッション・ペダルを接続可能。
• USBもしくはiOSデバイスのバスパワーで動作。
• iOSデバイス専用ケーブル付属。
• Micro USBケーブル付属。
接続と設定
iOS/Androidデバイスの場合:
1. 付属のLightningまたは30-pinケーブルを、iRig KEYS PROの「iOS」ポートに接続してください
1
。
2. Lightningまたは30-pinコネクターをiPhone、iPod touch、iPadに接続します。

日本語
69
3. 付属のOTGケーブルを、iRig KEYS PROの「iOS」ポートに接続してください 。
4. OTGコネクターをiPhone、iPod touch、iPadに接続します。
5. SampleTankアプリをまだインストールしていない場合は、App StoreからSampleTankアプリをインストール
して、起動してください。「iOS」LED
5
が点灯します。これでiRig KEYS PROでSampleTankアプリを利用する準備は完了
で す 。
6. iRig KEYS PROはその他のCore MIDI対応アプリでもご使用いただけます。
Mac、Windowsコンピューターの場合
1. 付属のマイクロUSBケーブルを、 iRig KEYS PROのマイクロUSBポート
2
に接続してください。
2. USBプラグをコンピューターのUSBソケットに接続してください。
SampleTank
iGrand Piano
iLectric Piano
ikdownloads.com/irigkeyspro

日本語
70
3. 「USB」LED
5
が点灯します。これでコンピューター上のバーチャル・インストゥルメントをiRig KEYS PROで利
用する準備は完了です。
4. ご使用のソフトウェアによって異なりますが、MIDI INデバイスとして「iRig KEYS PRO」を設定する必要がある
場合があります。
iRig KEYS PROで演奏する
iRig KEYS PROをiOSデバイス、またはコンピュータに接続して、Core MIDIアプリまたはソフトウェア音源を起動すれ
ば、すぐに演奏をはじめることができます。iRig KEYS PROのキーボードで鍵盤を弾くと、MIDIノート・メッセージが送
信されます。iRig KEYS PROは、88鍵ピアノ・キーボードのほぼ中央の音域をカバーできる、37鍵のキーボードです。
O C T( オ ク タ ー ブ ・ シ フ ト )
7
デフォルトでは、iRig KEYS PROはC2〜C5の間の音域を演奏できます。この範囲より低い、または高い音域を演奏し
たい場合は、OCT(オクターブ)アップ、ダウン・ボタン(7)を使ってキーボード全体の音域を1オクターブごとに上下に
ずらすことができます。
アップ、ダウン両方のOCTボタンのLEDが消灯しているときは、オクターブ・シフトは適用されていません。オクター
ブ・シフトでは上に3、下に4オクターブまでシフトすることができます。
OCTアップ、ダウン・ボタンは、オクターブ・シフトされている時、点灯します。またOCTアップ、ダウン・ボタンは押すた
びに光るようになっています。そのときに光った数が、何オクターブ上、または下にオクターブ・シフトされているかを
表します。

日本語
71
VOL(ボリューム)ツマミ
4
デフォルトではMIDIコントロール・チェンジのボリューム(CC#07)をコントロールすることができ、現在演奏している
インストゥルメントのボリュームをコントロールすることができます。
このツマミは他のコントロール・チェンジを割り当て可能で、設定したMIDI CC#メッセージを送信することができる
ようになります。詳しくは「3.EDITモード」の章をご覧ください。
ピッチベンド・ホイール
9
このホイールを上下に操作すると、ピッチベンド・メッセージを送信することができます。ホイールは操作していない
時には、自動的にセンター・ポジション(ピッチ変化無し)の状態に戻ります。
ホイールを上に動かすとピッチが上がり、下に動かすとピッチが下がります。
ホイールを動かした量に対して実際にどのぐらいピッチが変化するかは、音源となるインストゥルメント側で設定す
ることになります。
モジュレーション・ホイー ル
10
このホイールを操作すると、モジュレーション・メッセージ(MIDI CC#01)を送信することができます。最も低いポジシ

日本語
72
ョンではCC #1が0の値を送り、最も高いポジションでは127の値を送ります。
大抵の楽器アプリ、ソフトウェア音源では、このモジュレーション・ホイールによってビブラートまたはトレモロの量を
コントロールすることができますが、実際にどのようにサウンドを変化するかについては、iRig KEYS PROの設定では
なく、そのインストゥルメント自体がどのようにプラグラムされているかに依存します。
ペダル入力端子
3
iRig KEYS PROは、サステイン・ペダルとエクスプレッション・ペダルに対応しています。
サステイン・ペダル(通常時ペダルが上がっており、踏み込んだ時のみONとなるペダル)をiRig KEYS PROのペダル
入力端子(3)に接続する場合は、iOSデバイス、コンピューターにiRig KEYS PROを接続する前に行うようにしてくださ
い。このペダルを踏むと、踏んだ時に弾いていた鍵盤のノートは、ペダルを離すまでその音を持続するようになりま
す。ペダルが踏まれている間はiRig KEYS PROはMIDI CC#64(サステイン)の127を送信し、離すと0を送信します。
連続的なコントロール情報を出力可能なエクスプレッション・ペダルをiRig KEYS PROのペダル入力端子(3)に接続
する場合も、iOSデバイス、コンピューターにiRig KEYS PROを接続する前に行うようにしてください。エクスプレッショ
ン・ペダルを操作するとiRig KEYS PROは、MIDI CC#11(エクスプレッション)にて連続的なデータを送信します。
PROG(プログラム・チェンジ)
8
楽器アプリ、ソフトウェア音源には、プログラム・チェンジと呼ばれる特定のMIDIメッセージを受けると、音色が切り替
わる機能を備えたものがあります。
iRig KEYS PROでは、PROGアップ、ダウン・ボタン(8)を押すことによって、このプログラムチェンジ・メッセージを送信
することができます。現在選択している音色に対して、iRig KEYS PROのPROGアップ・ボタンを押すと1つ上のプログ
ラムチェンジ・ナンバーの音色に変化し、反対にPROGダウン・ボタンを押すと1つ下のプログラムチェンジ・ナンバ
ーの音色に変化します。
現在のプログラムチェンジ・ナンバーをどれにするか設定したい場合は、「3.EDITモード」の章をご覧ください。
EDITモード
iRig KEYS PROはどのようなニーズにも対応できるように、コントローラーの設定をカスタマイズすることができま
す。
EDITモードでは以下の設定が可能です:
• 送信するMIDIチャンネル設定。
• ベロシティ感度の設定。
• VOL(ボリューム)ツマミへのMIDIコントロール・チェンジの割り当て。

日本語
73
• 特定のMIDIプログラムチェンジ・メッセージの送信と、現在のプログラムチェンジ・ナンバーの設定。
• 「オール・ノート・オフ」MIDIメッセージ送信。
• 半音単位のトランスポーズ設定。
• iRig KEYS PROのセッティング(SETボタンに保存したもの)を工場出荷時に戻すリセット。
EDITモードに入るには、OCTアップ、ダウン・ボタン
7
を両方押してください。
EDITモードに入ると、両方のOCTボタンが点灯します。
「CANCEL/NO」と記されているC2の鍵盤を押すと、いつでもEDITモードを抜けることができます。
送信MIDIチャンネルの設定
通常、楽器アプリ、ソフトウェア音源の各パートにはMIDIチャンネル1~16のうち1つのチャンネルが割り当てられてい
ます。音源をiRig KEYS PROで演奏するためには、iRig KEYS PROの送信MIDIチャンネルを、各音源の受信MIDIチャン
ネルに合わせる必要があります。
送信MIDIチャンネルの設定方法:
• EDITモードに入ります(入り方はこの第3章の最初をご覧ください)。
• D#2の鍵盤(MIDI CH)を押します。OCTアップ、ダウン・ボタンが光ります。
• 0から9まで数字がマークされているC3~E4の白鍵を使って、設定したいMIDIチャンネル番号を入力してくだ
さい。設定できる数字は1から16までなので、2桁を入力する場合には続けて2つの数字を入力してください。
• 入力した数字を確定し設定するには、C5キー(ENTER/YES)を押してください。PROGアップ、ダウン・ボタンが
光り、MIDIチャンネルが設定され、iRig KEYS PROはEDITモードを自動的に抜けます。
ベロシティ感度(タッチ)の設定
iRig KEYS PROのキーボードは、ベロシティに対応しています。通常、鍵盤を弾くタッチが強いほど、接続された音源が
大きな音で再生されます。実際に鳴るサウンドの音量は、iRig KEYS PROから送信されたベロシティに対して、演奏し
ているインストゥルメントがどのぐらいの音量を出すようにプログラムされているかに依存します。
ユーザーの演奏スタイルにマッチするように、iRig KEYS PROには6つの異なるベロシティ感度設定をすることができ
ま す:

日本語
74
0. ベロシティ64固定:このセッティングでは、どんなタッチで鍵盤を弾いても、送信されるベロシティが常に64
になります。
1. ベロシティ100固定:このセッティングでは、どんなタッチで鍵盤を弾いても、送信されるベロシティが常に
100になります。
2. ベロシティ127固定:このセッティングでは、どんなタッチで鍵盤を弾いても、送信されるベロシティが常に
127になります。
3. ベロシティ対応ライト:軽いタッチでの演奏したい時は、このセッティングを使ってください。ドラム・パターン
のプログラミングや速いフレーズを弾く場合には、この設定が特に便利だと思われます。
4. ベロシティ対応ノーマル:デフォルトではこの設定で、ほとんどの場合に対応できます。
5. ベロシティ対応ヘビー:重めのタッチで演奏したい時は、このセッティングを使ってください。
ベロシティ感度(タッチ)の設定方法:
• EDITモードに入ります(入り方はこの第3章の最初をご覧ください)。
• F#2の鍵盤(VEL)を押すと、OCTアップ、ダウン・ボタンが光ります。
• 0から5まで数字がマークされているC3〜A3の白鍵を使って、設定したいベロシティ感度を選択してくださ
い。
• 入力した数字を確定し設定するには、C5キー(ENTER/YES)を押してください。PROGアップ、ダウン・ボタンが
光り、ベロシティ感度が設定され、iRig KEYS PROはEDITモードを自動的に抜けます。
特定のMIDIコントロール•チェンジ・ナンバーをVOL(ボリューム)ツマミに割り当てる
デフォルトではVOL(ボリューム)ツマミは、MIDIコントロール・チェンジ CC#7のボリューム・メッセージを送信するよ
うに設定されています。VOL(ボリューム)ツマミに設定されているMIDIコントロール・チェンジの番号を変えたい時
は、下記を参照してください。
MIDIコントロール・チェンジ・ナンバーをVOL(ボリューム)ツマミに割り当てる方法:
• EDITモードに入ります(入り方はこの第3章の最初をご覧ください)。
• G#2の鍵盤(KNOB)を押すと、OCTアップ、ダウン・ボタンが光ります。
• 0から9まで数字がマークされているC3〜E4の白鍵を使って、設定したいMIDIコントロール・チェンジ(CC #)
の番号を入力してください。設定できる数字は0から127までなので、3桁を入力する場合には続けて3つの数字を入
力してください。
• 入力した数字を確定し設定するには、C5キー(ENTER/YES)を押してください。PROGアップ、ダウン・ボタンが
光り、MIDIコントロール・チェンジがVOLツマミに設定され、iRig KEYS PROはEDITモードを自動的に抜けます。

日本語
75
特定のMIDIプログラム・チェンジ・メッセージの送信と、現在のプログラム・チェンジ・ナンバ
ーの設定
iRig KEYS PROには、MIDIプログラムチェンジ・メッセージを送信する方法が2つあります:
1. PROGアップ、ダウン・ボタン
8
を使って、1つずつ順送りする形でプログラムチェンジ・メッセージを送信す
る 。
2. EDITモード内から特定のプログラムチェンジ・ナンバーのメッセージを直接送信することもできます。特定の
プログラムチェンジ・ナンバーを送信した後には、PROGアップ、ダウン・ボタンは、そのプログラムチェンジから順番
に1つずつ変化させることができるようになります。
特定のMIDIプログラム・チェンジ・ナンバーを送信する方法:
• EDITモードに入ります(入り方はこの第3章の最初をご覧ください)。
• A#2の鍵盤(PROG)を押すと、OCTアップ、ダウン・ボタンが光ります。
• 0から9まで数字がマークされているC3〜E4の白鍵を使って、送信したいプログラムチェンジ・ナンバーを入
力してください。設定できる数字は1から128までなので、3桁を入力する場合には続けて3つの数字を入力してくだ
さい。
• 入力した数字を確定し設定するには、C5キー(ENTER/YES)を押してください。PROGアップ、ダウン・ボタンが
光り、プログラムチェンジ・メッセージが送信され、iRig KEYS PROはEDITモードを自動的に抜けます。
「オール・ノート・オフ」MIDIメッセージ送信
演奏中の音が鳴りっぱなしになったり、コントロール・チェンジが適切に反応しなくなった時など、該当のMIDIチャン
ネルで発音しているノート全てをストップさせたい時もあるでしょう。
iRig KEYS PROは、全てのコントロール・チェンジをリセットして(リセット・オール・コントローラー)、全ての音の発音
を止める(オール・ノート・オフ)ために、MIDI CC# 121+123を送信することができます。
「リセット・オール・コントローラー」、「オール・ノート・オフ」MIDIメッセージの送信方法:
• EDITモードに入ります(入り方はこの第3章の最初をご覧ください)。
• F#4の鍵盤(ALL NOTES OFF)を押します。PROGアップ、ダウン・ボタンが光り、「リセット・オール・コントローラ
ー」、「オール・ノート・オフ」MIDIメッセージが送信され、iRig KEYS PROはEDITモードを自動的に抜けます。

日本語
76
半音単位のトランスポーズ設定
iRig KEYS PROのキーボードは、半音単位でトランスポーズすることができます。例えば、演奏が難しいキー(調)の曲
を、より簡単で弾き慣れたキーで演奏したい場合に、この機能は役に立つでしょう。
iRig KEYS PROのトランスポーズ設定方法:
• EDITモードに入ります(入り方はこの第3章の最初をご覧ください)。
• G#4の鍵盤(TRANSP)を押すと、OCTアップ、ダウン・・ボタンが光ります。
• キーボード上のどれかのノートを押してください。するとそのときに押したノートが、iRig KEYS PROでCキー
を押したときに送信されるノートに設定されます。
その後PROGアップ、ダウン・ボタンが光り、リセットMIDIメッセージが送信され、iRig KEYS PROはEDITモードを自動
的に抜けます。
例)
D#のキーで録音された曲を演奏する必要があって、その曲をキーボード上ではCキーとして演奏したい場合は、次
の よう に 設 定 してくだ さ い:
• EDITモードに入ります。
• G#4の鍵盤(TRANSP)を押します。
• キーボード上でD#キーを押します。
これでトランスポーズ設定が完了し、キーボード上のCの鍵盤を弾くと、iRig KEYS PROは実際にはD#のMIDIノートを
送信するようになります。その他の鍵盤も同様にトランスポーズされます。
iRig KEYS PROセッティングのリセット
iRig KEYS PROは、工場出荷時の状態に戻すリセットをすることができます。これは、SET機能を使って保存した4つの
セッティングの中から特定のセッティングだけに対しても行うことができますし、SET機能を使用しないモード(no
SETモード)でのリセットを行うこともできます(詳しくは「4. SET機能」をご覧ください)。
iRig KEYS PROのファクトリー・リセット方法:
• SET機能によって保存したSET(セッティング)の中で、リセットを行いたいセッティングを読み込んでくださ
い。読み込まない場合はSET機能を使用しないモード(NO SETモード)のリセットが行われます。
• EDITモードに入ります(第3章の最初をご覧ください)。
• A#4の鍵盤(RESET)を押すと、PROGアップ、ダウン・ボタンが光り、セッティングがファクトリー・リセットさ
れ、iRig KEYS PROはEDITモードを自動的に抜けます。

日本語
77
SET(セッティング)機能
iRig KEYS PROは、キーボードのヘビーユーザーのニーズを満たすために様々な設定を行うことができます。しかし、
ライブや多くのインストゥルメントを操作する場合には、これらの機能をその都度いちいち設定していると時間をと
られるだけでなく、思わぬミスを起こしかねません。
そこで、iRig KEYS PROには1つのボタンを押すだけで、ユーザー自身が設定したiRig KEYS PROのセッティングを読み
込むことの出来る機能を用意しました。これがSET(セッティング)機能です。
SET(セッティング)を読み込む方法
4つのSET(セッティング)の中の1つを読み込むには、SETボタン
6
を押してください。
SETボタンが押されるたびに、iRig KEYS PROは次のSET(セッティング)を読み込み、このように循環します:
-> NO SET -> SET 1 -> SET 2 -> SET 3 -> SET 4 -> NO SET …
SET(セッティング)をプログラムする方法
特定のSET(セッティング)をプログラムするには、そのSETをあらかじめ読み込んだ状態で、好きなようにiRig KEYS
PROをカスタマイズしてください(カスタマイズ方法は「iRig KEYS PROで演奏する」と「Editモード」の章をご覧くださ
い )。
SET(セッティング)を保存する方法
設定したSET(セッティング)を後で読み込めるように保存するには、SETボタンを2秒押してください。現在のSETの
LEDが光り、これでセッティングが保存されたことになります。SET(セッティング)の設定内容を変更し、後に再現した
い設定ができた時は、すぐに保存すると癖をつけると良いでしょう。
(SET 1〜4以外の)NO SETモードではiRig KEYS PROは、直前に読み込んでいたSET(セッティング)を利用することに
なります。
トラブ ル シュー ティング
iRig KEYS PROをiOSデバイスに接続したのにキーボードの電源が入らず、iOS LEDが点灯しません。
iOSデバイスで、Core MIDI対応のアプリ(IK MultimediaのiGrand Piano、SampleTankなど)が起動していることを確
認してください。iOSデバイスのバッテリーを節約するために、Core MIDI対応アプリを立ち上げた時だけ、iRig KEYS
PROの電源が入るようになっています。
iRig KEYS PROの電源は入っているのに、音源を演奏できません。
接続された楽器、ソフトウェア音源等の受信MIDIチャンネルと、iRig KEYS PROの送信MIDIチャンネルが同じチャン
ネルになっているかご確認ください。詳しくは「3.EDITモード」の「送信するMIDIチャンネルの設定」項目をご覧くださ
い。

日本語
78
iRig KEYS PROのセッティングが、突然変わってしまった。
気づかない間にSETボタンを押して、保存してあるSET(セッティング)が読み込まれたものと思われます。SET(セッテ
ィング)機能を利用したくない場合は、SETボタンを何回か押し、SET LEDが点灯しない状態にしてご使用ください。
保証について
保証規定について詳しくは:
www.ikmultimedia.com/warranty
製品、アップデート情報について:
www.irigkeys.com
サポート情報、お問い合わせは:
www.ikmultimedia.com/support
アップルは、本製品の機能および安全および規格への適合について一切の責任を負いません。

中文 簡体字
79
产品介绍
感谢您购买了 iRig KEYS PRO。iRig KEYS PRO是一款多功能移动MIDI键盘控制器,专为iPhone/iPod
touch/iPad设计可直接连接使用。同时也能与Mac及Windows电脑连接使用。
包装盒内包含了以下物品:
· iRig KEYS PRO
· Lightning 接口线缆
· OTG 接口线缆
· USB接口线缆
· 快速操作指南
· 注册卡
网上注册iRig KEYS PRO
产品注册后,将可以得到技术支持和相应的保修服务,并且能为您免费添加JamPoints™积分在您的账号中,通
过它你可以在今后购买IK产品时享受一定的折扣!同时还能获得最新产品资讯和相关动态。
注册地址: www.ikmultimedia.com/registration
安装SampleTank 3 SE
完成注册iRig Keys Pro序列号之后,您将在用户区看到一个下载链接和SampleTank 3 SE Mac/PC版序列
号。请在用户区下载并使用Authorization Manager进行注册。
用户区
www.ikmultimedia.com/userarea
Authorization Manager
www.ikmultimedia.com/am

中文 簡体字
80
iRig KEYS PRO主要特性:
· 37键力度感应迷你键盘
· 兼容 iPhone, iPod touch和iPad
· 兼容 Mac 和 Windows电脑
· 弯音轮
· 调制轮
· 音量及数据旋钮(可分配)
· 八度音阶,升降键,带背光
· 音色切换键,带背光
· 可储存4种自定义设置
· 可指定控制旋钮
· 编辑模式
· 可连接延音踏板/表情踏板
· 可通过USB或 iOS 接口连接供电
· 配有iOS设备连接线
· 配有USB连接线
安装和连接
连接iOS/Android设备
1. 使用 Lightning或30-pin 端口线缆,连接到iRig KEYS PRO上的“iOS” 设备接入端
1
。
2. 将 Lightning 或30-pin 端口线缆的另一端连接iPhone /iPod touch/iPad。

中文 簡体字
81
3. 使用 OTG 端口线缆,连接到iRig KEYS PRO上的“iOS” 设备接入端。
4. 将 OTG 端口线缆的另一端连接Android。
5. 如果还未下载SampleTank 软件,可以在苹果软件商店下载安装。安装完成后打开软件 LED灯“iOS”
5
将会亮起。就可以在iRig KEYS PRO上使用 SampleTank软件演奏了。
6. iRig KEYS PRO还可搭配上任何其他的MIDI兼容软件使用。
连接Mac 或Windows 电脑
1. 使用USB 连接线通过USB 接口与 iRig KEYS PRO
2
连接
2. 将 USB 接口连接到电脑上的空余USB端口
SampleTank
iGrand Piano
iLectric Piano
ikdownloads.com/irigkeyspro

中文 簡体字
82
3. LED
5
将会亮起。现在你可以通过iRig KEYS PRO操控你电脑上的虚拟乐器了
4. 根据使用的软件的不同,需要从可用的MIDI输入设备中选择“iRig KEYS PRO”。
使用iRig KEYS PRO演奏
将 iRig KEYS PRO 插入到iOS 设备或是电脑,打开虚拟乐器软件就能演奏。通过iRig KEYS PRO 键盘发送
MIDI信号。iRig KEYS PRO配置了37键键盘,约是完整88 -键的钢琴键盘中间部分。
八度转换
7
默认设置 iRig KEYS PRO演奏从C2到C5。如果你需要演奏高于或低于这一区域的范围,你可以转变整个键盘
的八度音,通过OCT升、降键 来调整。
当两个 OCT 键的背光灯都熄灭时,无法转变键盘。调整的最大范围是升3个八度、降4个八度。当两个OCT升
降键的背光灯都亮起是,表明还可转变键盘。
当点击OCT上升或OCT 下降键时,背景灯将会闪烁。
灯光闪烁的次数对应了键盘八度音升降转换的次数。
音量调节旋钮
4
iRig KEYS PRO 上的音量控制旋钮(CC#07) 为默认设置,因此你可以用它来控制你演奏乐器的音量大小。
该旋钮可指定分配的,可以发送任何其他的MIDI调控(CC) 信号。
了解更多的使用方法,请看“EDIT 模式”章节。

中文 簡体字
83
弯音轮
9
上下转动此轮,发送弯音信号。
不使用时将还原到中间位置。
向上滑动,将会升高音高;向下滑动,将会降到音高。
注意音高转变的大小,根据虚拟乐器接收的设定决定。
调制轮
10
上下转动此轮,发送调制轮信号(MIDI CC#01)。
最低点位置发送0值;最高点位置发送127。
绝大多数的乐器都能通过此轮来调节歌曲中的颤音。但需要注意的是,调制轮信号仅取决于虚拟乐器接收的设
定,而不是 iRig KEYS PRO的设定决定。

中文 簡体字
84
踏板
3
iRig KEYS PRO可连接延音踏板和表情踏板使用。
先将iRig KEYS PRO通过接口
3
连接到iOS 设备或电脑上,再连接开启的延音踏板使用。当踏板踩下去时,键
盘上的按键音都将延时,踏板踩下去时 iRig KEYS PRO发送MIDI CC#64 音量大小127,还原后为0。
连接表情踏板时,也是先将iRig KEYS PRO通过接口
3
连接到iOS 设备或电脑上,再连接表情踏板,通过iOS
设备或电脑来控制表情踏板上演奏的声音。当踏上踏板时, iRig KEYS PRO发送MIDI CC#11 。
音色切换
8
音色模块,如虚拟仪器应用程序或插件当收到一个具体的MIDI命令可以改变音效时,这就叫做程序改变。 iRig
KEYS PRO 发送程序改变是通过点击PROG
8
上下键来完成。
使用已选定的程序,当点击PROG UP键,iRig KEYS PRO 将会发送 下一个更高音色,点击PROG DOWN
键,iRig KEYS PRO 将会发送 下一个更低音色
设定正确的程序,详见“EDIT模式”章节。
EDIT设置
iRig KEYS PRO可以设置 绝大多数的参数值,以满足各种要求。
在EDIT中可以设置
· 设置MIDI发送通道
· 不同的力度感应灵敏度
· 设置特定的MIDI控制键,改变原有的音量/数据旋钮编号
· 发送特定的MIDI程序更改号码,并设定当前编号
· 发送“关闭所有音色设置”的MIDI信号
· 转置半音演奏
· 重新设定为出厂值
同时点击两个OCT键
7
,进入EDIT 设置。
当两盏灯都亮起表明你已进入到EDIT设置。
需退出EDIT 设置,可以随时点击C2键,键盘上方标有“CANCEL/NO.”

中文 簡体字
85
设置MIDI发送通道
MIDI乐器可以应对16个不同的MIDI通道 。使用iRig KEYS PRO 来演奏乐器,需要 iRig KEYS PRO的MIDI传
输通道与接收乐器的通道匹配。
如何设置MIDI传输通道:
· 进入EDIT设置 ( 第 3章开头部分有详细介绍)
· 点击 D#2 键(MIDI CH),两个OCT按钮都将会闪光
· 选择进入 MIDI 通道的数时,需要用 到C3-E4白键,上方标有0-9的数字。有效的通道 数如果是1-16,
因此在需要的时候,可以输入两位数。
· 点击C5键(ENTER/YES)以确认您的输入。当两个 PROG 键闪光时表明设置成功, iRig KEYS PRO将
会自动退出EDIT设置。
设置不同的力度感应灵敏度
iRig KEYS PRO键盘是一款力度感应键盘。这就意味着,当你越用力敲击键盘,发出的声响便会越大。然而,
最终大小取决于程序设定。为了能满足每位用户的演奏风格,根据力度灵敏不同,iRig KEYS PRO提供了6种设
置:
0. 固定值, 64。定MIDI速度值,将会发送固定的MIDI速度值64,键盘触控无任何反应
1. 固定值, 100。 通过设定MIDI速度值,将会发送固定的MIDI速度值100,键盘触控无任何反应
2. 固定值, 127。通过设定MIDI速度值,将会发送固定的MIDI速度值127,键盘触控无任何反应
3. VEL SENS, 轻。使用这个设置,通常是偏好触键力度较轻,在演奏较快章节,或设定鼓点情况下使用。
4. VEL SENS, 一般。这个设定是系统默认值,通常在大多数情况下使用。
5. VEL SENS, 重。使用这个设置,通常是偏好在键盘上触键力度较重。
设置力度灵敏度:
· 进入EDIT 模式(详见第三章开头部分)
· 点击 F#2 键 (VEL),两个 OCT 按钮都将会闪光
· 进入速度敏感设定,使用键盘上 C3-A3 白键标注的0-5。
· 点击 C5 键(ENTER/YES) 来确定输入。当两个 PROG按钮闪光时,表明设置成功,并且 iRig KEYS
PRO将会自动退出EDIT 设置。

中文 簡体字
86
设置特定的MIDI控制键,改变原有的音量/数据旋钮编号
在默认情况下,音量/数据旋钮发送MIDI音量信号,指定MIDI控制器# 7。然而,你也可以自行设定MIDI 音量/
数据旋钮编号。
设定一个数字给控制器旋钮:
· 进入EDIT 模式(详见第三章)
· 点击G#2键(KNOB),两个OCT 旋钮都将会闪光
· 选择MIDI CC数字时,需要使用键盘上 C3-E4 白键,上方标有0-9的数字。有效设定从0 到127,因此
在需要的时候,可输入三位数字。
· 点击C5 (ENTER/YES) 以确定输入,当两个 PROG按钮闪光时,表明设置成功,并且 iRig KEYS PRO
将会自动退出EDIT 设置。
发送特定的MIDI程序更改号码,并设定当前编号
使用iRig KEYS PRO 能通过两种方式来发送MIDI程序变化
1. 程序发送顺序变化可通过PROG上和PROG下键
8
来更改
2. 程序变化可以直接在编辑模式中通过发送一个特定的程序改变号码,当发送了特定的程序更改号
码,PROG上、PROG下键将会从该值开始排序。
发送特定的MIDI程序更改号码
· 进入EDIT 模式(详见第三章)
· 点击A#2键(PROG),两个OCT 旋钮都将会闪光
· 输入程序改变数字,你需要使用键盘上 C3-E4 白键,上方标有0-9的数字。有效设定从0 到128,因此
在需要的时候,允许输入三位数字。
· 点击C5 (ENTER/YES) 以确定输入,当两个 PROG按钮闪光时,表明设置成功,并且 iRig KEYS PRO
将会自动退出EDIT 模式。

中文 簡体字
87
发送“关闭所有音色设置”的MIDI信号
有些时候需要关闭处理所有的在MIDI声道音符,当通道被卡住,或当控制器重置不当。
在iRig KEYS PRO 上发送MIDI CC# 121 + 123,就能将所有的控制器重置,停止所有音符。
重置所有控制器并且关闭所有音调设置:
· 进入EDIT 模式(详见第三章)
· 点击 F#4键(ALL NOTES OFF)
当两个PROG键闪光时,表明 已重新发送, iRig KEYS PRO将会自动退出EDIT设置。
在键盘上转置半音
通过iRig KEYS PRO键盘可以转置半音。这一功能将会十分方便,例如,当你所要演奏的歌曲曲调比较复杂,
但是你依然想通过弹奏方式完成,那么就可以通过此功能在更简单的或更熟悉的音调来完成。
转置iRig KEYS PRO:
· 进入EDIT 模式(详见第三章)
· 点击 G#4键(TRANSP), 两个 OCT键都会闪光
· 可以点击各种音调在键盘上的:从这一时刻起,如果你选择C调,iRig KEYS PRO 将会从这一步起发送
MIDI音调。
当两个PROG键闪光时,表明 已重新发送, iRig KEYS PRO将会自动退出EDIT模式。
例如
如果你要演奏的歌曲录音中定的 D#调,但是你想在键盘上用C调来演奏,可以按照以下方法设置:
· 先进入到EDIT 模式
· 点击 G#4键 (TRANSP)
· 点击 D# 在键盘上的任意一个键
从这一刻起当你点击键盘上的C调任何一个键时,iRig KEYS PRO 实际就是发送D# 调,

中文 簡体字
88
重置 iRig KEYS PRO
iRig KEYS PRO可以通过重置还原到出厂值。可单独还原每一个设置,或 设置为通常使用的
no-SET模式(详见第4章)
重置 iRig KEYS PRO
· 加载你想要重置的SET,或不加载任何SET,你可以设置为通常的no-SET模式。
· 进入EDIT 模式(详见第四章开头部分)
· 点击A#4 键(RESET)
当两个PROG键闪光时,表明 已重置, iRig KEYS PRO将会自动退出EDIT设置
SETs
iRig KEYS PRO提供了多种选择来满足客户的需求。然而,当使用键盘在现场演奏,或是用来控制很多不同的
乐器时,就需要根据不同的乐器手动设置不同的参数,这样不仅耗时而且特别麻烦。
因此,iRig KEYS PRO专门配置了4个预置按钮,点击按键后,瞬间可提取自定义值,这被称为 SETs.
如何加载SET
加载任何四组SETs只需点击SET
6
键。
每次当 SET 键按下, iRig KEYS PRO便加载到下一组,以此循环:
-> NO SET -> SET 1 -> SET 2 -> SET 3 -> SET 4 -> NO SET …
如何为SET编程
要编写一套特殊的SET,先选择好了后,然后设置你喜爱的 iRig KEYS PRO(参见“用 iRig KEYS PRO来演
奏”和“编辑模式”)
如何保存SET
存储一个SET,这样就将永久保存你所有的设置,长按SET键两秒。当SET键背景灯闪烁就表明已经成功储存。如
果对SET进行了一些修改,请记住一定要将SET保存。
当没有加载SET,iRig KEYS PRO将自动使用先前加载设定的一组。

中文 簡体字
89
常见问题
已将iRig KEYS PRO连接到 iOS 设备,但是键盘却没有发声,iOS LED灯也不亮,这是为什么?
在这种情况下,搭配使用的应用程序一定要确保是Core MIDI (如, iGrand Piano或 SampleTank IK
Multimedia出品) 在iOS 设备上运行。为了节省 iOS 设备电源, iRig KEYS PRO只有在使用 Core MIDI 应用
程序时才会启动。
即使已经开启了我的乐器软件,iRig KEYS PRO仍然无法演奏。这是为什么?
确保MIDI传输通道与演奏乐器的MIDI接收通道相匹配。具体操作请查看“设置 MIDI传输通道”
iRig KEYS PRO突然冒出了许多与过去使用不同的设定值。
您可能加载了一组设定值。如果你不想使用设定,可以按SET键直到LED灯熄灭为止。
保修
请浏览网页
www.ikmultimedia.com/warranty
了解完整的质量保修条款,
获取更多信息
www.irigkeys.com
www.ikmultimedia.com/support
苹果公司对该设备的操作使用,以及设备的生产安全和制造标准不负有责任。

90
Regulatory
2015/11/18
Registration number for iRig KEYS PRO:
MSIP – REM – IK0 – 029900001
B 급 기기
( 가정용 방송통신기자재 )
Class B Equipment
(For Home Use Broadcasting & Communication Equipment)
이 기기는 가정용 (B 급 ) 전자파적합기기로서 주로 가정에서 사용하는 것을
목적으로 하며 , 모든 지역에서 사용할 수 있습니다 .
This equipment is home use (Class B) electromagnetic
wave suitability equipment and to be used mainly
at home and it can be used in all areas.
IK Multimedia
IK Multimedia Production Srl
Via dell’Industria 46, 41122 Modena, Italy
Phone: +39-059-285496 - Fax: +39-059-2861671
IK Multimedia US LLC
1153 Sawgrass Corporate Parkway, Sunrise, FL 33323
Phone: 954-846-9101 - Fax: 954-846-9077
IK Multimedia Asia
TB Tamachi Bldg. 1F, MBE #709,
4-11-1 Shiba, Minato-ku, Tokyo 108-0014
www.ikmultimedia.com/contact-us
“Made for iPod,” “Made for iPhone,” and “Made for iPad” mean that an electronic accessory has been designed to connect specically to iPod, iPhone, or iPad, respectively, and has been certied by
the developer to meet Apple performance standards. Apple is not responsible for the operation of this device or its compliance with safety and regulatory standards. Please note that the use of this
accessory with iPod, iPhone, or iPad may affect wireless performance.
iRig® KEYS PRO, iGrand Piano™ and SampleTank® are trademarks property of IK Multimedia Production Srl. All other product names and images, trademarks and artists names are the property of
their respective owners, which are in no way associated or afliated with IK Multimedia. iPad, iPhone, iPod touch Mac and Mac logo are trademarks of Apple Computer, Inc., registered in the U.S. and
other countries. Lightning is a trademark of Apple Inc. App Store is a service mark of Apple Inc.
-
 1
1
-
 2
2
-
 3
3
-
 4
4
-
 5
5
-
 6
6
-
 7
7
-
 8
8
-
 9
9
-
 10
10
-
 11
11
-
 12
12
-
 13
13
-
 14
14
-
 15
15
-
 16
16
-
 17
17
-
 18
18
-
 19
19
-
 20
20
-
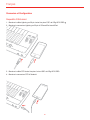 21
21
-
 22
22
-
 23
23
-
 24
24
-
 25
25
-
 26
26
-
 27
27
-
 28
28
-
 29
29
-
 30
30
-
 31
31
-
 32
32
-
 33
33
-
 34
34
-
 35
35
-
 36
36
-
 37
37
-
 38
38
-
 39
39
-
 40
40
-
 41
41
-
 42
42
-
 43
43
-
 44
44
-
 45
45
-
 46
46
-
 47
47
-
 48
48
-
 49
49
-
 50
50
-
 51
51
-
 52
52
-
 53
53
-
 54
54
-
 55
55
-
 56
56
-
 57
57
-
 58
58
-
 59
59
-
 60
60
-
 61
61
-
 62
62
-
 63
63
-
 64
64
-
 65
65
-
 66
66
-
 67
67
-
 68
68
-
 69
69
-
 70
70
-
 71
71
-
 72
72
-
 73
73
-
 74
74
-
 75
75
-
 76
76
-
 77
77
-
 78
78
-
 79
79
-
 80
80
-
 81
81
-
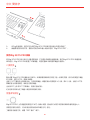 82
82
-
 83
83
-
 84
84
-
 85
85
-
 86
86
-
 87
87
-
 88
88
-
 89
89
-
 90
90


IK Multimedia iRig Keys Pro Manual de usuario
- Categoría
- Teclados MIDI
- Tipo
- Manual de usuario
en otros idiomas
Artículos relacionados
Otros documentos
-
Logitech PowerShell Guía de instalación
-
CME U2MIDI Pro Professional USB MIDI Interface Guía del usuario
-
Logitech PowerShell Controller + Battery Guía de instalación
-
Akai Synth Station 25 El manual del propietario
-
Bodet STYLE II 7 Guía de inicio rápido
-
M-Audio ex-p El manual del propietario
-
Work-pro LS-1 Manual de usuario
-
Samson Carbon 49 El manual del propietario
-
Samson Carbon 61 Manual de usuario
-
Yamaha S90 ES Manual de usuario