
QUICK START GUIDE
https://us.alcatelmobile.com/
User Manual and FAQ
are available online
5099A
CJB1L3401AAB

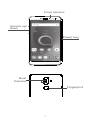
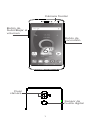
1
Power key
Volume up/
down
Front camera
Dual
Camera
Fingerprint

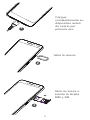
2
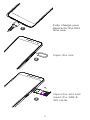
1
Fully charge your
device for the rst
time use.
2
Open the slot and
insert the SIM &
SD cards.
Open the slot
3

3
1
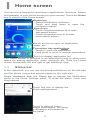
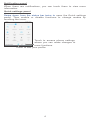
Home screen
You can move frequently used items (applications, shortcuts, folders
and widgets) to your Home screen for quick access. Touch the Home
key to switch to the Home screen.
Touch to display application list.
Status bar
• Status/Notification indicators
• Touch and drag down to open the
notification panel.
Touch an icon to open an application,
folder, etc.
Favourites tray applications
• Touch to enter the application.
• Long press to move or change applications.
Search bar
• Touch Google search bar to enter
text search screen.
• Touch microphone icon to enter
voice search screen.
The Home screen is provided in an extended format to allow more
space for adding application icons, shortcuts etc. Slide the Home
screen horizontally left and right to get additional view.
1.1 Status bar
In the status bar, you can see the phone notifications on the left side
and the phone connection service status on the right side.
Swipe downward from the Status bar to access the Notification
panel or the Quick Settings panel. To close the panel, touch and
drag upward.
Touch to clear all event-
based notifications. On-going
notifications will remain on
the panel.
Touch this icon to display the
Quick settings panel.

4
Notification panel
When there are notifications, you can touch them to view more
information.
Quick settings panel
Swipe down from the status bar twice to open the Quick settings
panel. Then enable or disable functions or change modes by
touching the icons.
Touch to edit your profile.
Touch to access phone settings,
where you can make changes to
more functions.

5
2
Phone call
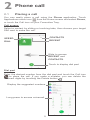
2.1 Placing a call
You can easily place a call using the Phone application. Touch
Applications menu icon from the Home screen and select Phone,
or touch the Call icon on your Favourites Tray.
Call screen
Select a contact by sliding or touching tabs, then choose your target
SIM card to make the call.
Slide to access
RECENT and
CONTACTS.
Touch to display dial pad.
CONTACTS
SPEED
DIAL
RECENT
Dial pad
Enter the desired number from the dial pad and touch the Call icon
to place the call. If you make a mistake, you can delete the
incorrect digits by touching the Delete button .
Display the suggested numbers.
Long press to access voicemail.

6
Answering or rejecting a call
When you receive a call:
Slide up the icon to answer;
Slide up the icon to to reject;
Touch to reject the call by sending a preset message.
Touch to reject the call and set an alarm for calling back.
To mute the ringtone volume of an incoming call, press the Volume
Up/Down key or turn the phone over (Enable this feature by going to
Settings > Advanced Features> Gestures > Turn over to mute).
Call history
You can access your call history by touching the RECENT tab
from the Call screen to view missed calls, outgoing calls, and
incoming calls.

7
3
Contacts
Contacts are stored in your phone with the Contacts app. It allows
you to add, delete, or edit your contacts. You can also import or
export your contacts from different locations such as a SIM card, an
external storage, your Gmail or other email account.
3.1 Adding a contact
Open the Contacts app from applications list, then touch the Plus
button on the bottom right of the screen to add a new contact.
3.2 Synchronising contacts in multiple
accounts
Contacts, data or other information can be synchronised from
multiple accounts, depending on the applications installed on your
phone.
4
Messaging
This phone comes with a pre-installed Messaging app that allows
you to send and receive SMS (Short Message Service) or MMS
(Multimedia Messaging Service) with your wireless service provider.
To open your Messaging app, go to the Home screen and touch the
Messaging icon in the Favourites tray or from the application list.
To check messages stored in your SIM card, touch the
button from the Messaging screen, then touch Settings >
ADVANCED > Manage SIM messages.
4.1 Write message
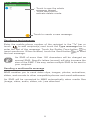
On the Messaging app screen, touch the new message Plus button
in the bottom right of the screen to begin.

8
Touch to create a new message.
• Touch to see the whole
message thread.
• Touch and hold to
activate delete mode.
Sending a text message
Enter the mobile phone number of the recipient in the "To" bar or
touch to add recipient(s) and touch the Type message bar to
enter the text of the message. Touch the Smiley Face button to
insert emoticons. When finished, touch the Send button to send
the text message.
An SMS of more than 160 characters will be charged as
several SMS. Specific letters (accent) will also increase the
size of the SMS. This may cause multiple SMS to be sent to
your recipient.
Sending a multimedia message
MMS enables you to send video clips, images, photos, animations,
slides, and sounds to other compatible phones and email addresses.
An SMS will be converted to MMS automatically when media files
(image, video, audio, slides, etc.) are attached.

9
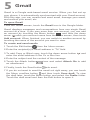
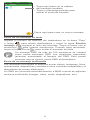
5
Gmail
Gmail is a Google web-based email service. When you first set up
your phone, it is automatically synchronised with your Gmail account.
With this app, you can receive and send email, manage your email,
and archive your email, etc.
To open Gmail
From the Home screen, touch the Gmail icon in the Google folder.
Gmail displays messages and conversations from one single Gmail
account at a time. If you own more than one account, you can add
an account by touching the Menu button and then the down
arrow after your account name from the Inbox screen, then touch
Add account. When finished, you can switch to another account by
touching the name of the account you want to view.
To create and send emails
1 Touch the Edit button from the Inbox screen.
2 Enter the recipient(s)’s email address in "To" field.
3 To add Copy or Blind copy, touch the down arrow button and
enter the email address in the Cc or Bcc line.
4 Enter the subject and the content of the message.
5 Touch the Attach button icon and select Attach file to add
an attachment.
6 Finally, touch the Send button to send.
7 If you do not want to send the email out right away, you can touch
the Menu overflow button and then touch Save draft. To view
the draft later, touch the Menu button and select the Drafts folder.
Touch the draft email and then the Edit button to open it.

10
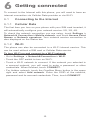
6
Getting connected
To connect to the Internet with this phone, you will need to have an
internet connection via Cellular Data provider or via Wi-Fi.
6.1 Connecting to the Internet
6.1.1 Cellular Data
The first time you turn on your phone with your SIM card inserted, it
will automatically configure your network service: 2G, 3G, 4G.
To check the network connection you are using, touch Settings >
Network & Connection > Mobile network, and touch Access Point
Names or Network operators. Your network service connection is
also displayed on the Status bar.
6.1.2 Wi-Fi
The phone can also be connected to a Wi-Fi internet service. This
can be used without a SIM card or Cellular Data service.
To turn Wi-Fi on and connect to a Wi-Fi network
• Go to Settings > Network&Connection > Wi-Fi.
• Touch the OFF switch to turn on Wi-Fi.
• Touch a Wi-Fi network to connect. If the network you selected is
a secured network, you will need to enter a password or other
credentials. When finished, touch CONNECT.
• For hidden network, touch the Overflow Menu button in the upper
right and select Add network. Enter the SSID of the network,
password and its secured credentials. Then, touch CONNECT.

Instructivo de Uso
https://us.alcatelmobile.com/
Instructivo de uso y preguntas frecuentes
disponibles en la sección de soporte en:
AHORRE
PAPEL
SALVE
ÁRBOLES
PIENSE EN EL MEDIO AMBIENTE
ANTES DE IMPRIMIR

1
Botón de
encendido
Botón de
Subir/Bajar el
volumen
Cámara frontal
6"
Dual
cámara
Sensor de
huella digital

2
1
Cargue
completamente su
dispositivo antes
de usarlo por
primera vez.
2
Abra la ranura e
inserte la tarjeta
SIM y SD.
Abra la ranura.
3

3
1
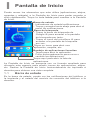
Pantalla de Inicio
Puede mover los elementos que más utiliza (aplicaciones, atajos,
carpetas y widgets) a la Pantalla de Inicio para poder acceder a
ellos rápidamente. Toque la tecla Inicio para cambiar a la Pantalla
de Inicio.
Toque aquí para abrir la lista de
aplicaciones.
Barra de estado
• Indicadores de estado/notificaciones.
• Toque y arrastre hacia abajo para abrir el
panel de notificaciones.
Toque un icono para abrir una
aplicación, carpeta, etc.
Bandeja de aplicaciones favoritas
• Toque para abrir la aplicación.
• Pulse prolongadamente para mover o
cambiar las aplicaciones
.
Barra de búsqueda
• Toque la barra de búsqueda de
Google para acceder a la pantalla
de búsqueda por texto.
• Toque el icono del micrófono para
acceder a la pantalla de búsqueda
por voz.
La Pantalla de Inicio se presenta con un formato ampliado para
ofrecerle más espacio para añadir iconos de aplicaciones, atajos,
etc. Deslice la Pantalla de Inicio horizontalmente de izquierda a
derecha para obtener una vista completa.
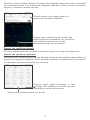
1.1 Barra de estado
En la barra de estado, puede ver las notificaciones del teléfono a
la izquierda y el estado del servicio de conexión del teléfono a la
derecha.

4
Deslice hacia abajo desde la barra de estado para acceder al panel
de notificaciones o al panel de ajustes rápidos. Para cerrar el panel,
toque y arrastre hacia arriba.
Toque aquí para borrar todas las
notificaciones basadas en eventos.
Las notificaciones en curso
permanecerán en el panel.
Toque este icono para abrir el
panel de ajustes rápidos.
Panel de notificaciones
Si hay notificaciones, puede tocarlas para ver más información.
Panel de ajustes rápidos
Deslice dos veces hacia abajo desde la barra de estado para abrir el
panel de ajustes rápidos. Aquí puede activar o desactivar funciones,
o cambiar modos tocando los iconos.
Toque aquí para editar su perfil.
Toque aquí para acceder a los
ajustes del teléfono, donde puede
modificar otras funciones.

5
2
Llamada telefónica
2.1 Cómo realizar una llamada
Puede realizar llamadas fácilmente con la aplicación Teléfono.
Toque el icono del menú Aplicaciones en la Pantalla de Inicio
y seleccione Teléfono, o toque el icono de llamada en la bandeja
de favoritos.
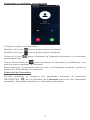
Pantalla de llamada
Seleccione un contacto deslizando o tocando las pestañas para
realizar una llamada.
Deslice para acceder
a RECIENTES y a
CONTACTOS.
Toque aquí para acceder
al teclado de marcación.
CONTACTOS
MARCACIÓN
RÁPIDA
RECIENTES
Teclado de marcación
Ingrese el número que desee en el teclado de marcación y toque el
icono de teléfono para realizar la llamada. Si se equivoca, puede
eliminar los dígitos incorrectos tocando el botón Eliminar .
Se muestran los números/
contactos sugeridos.
Pulse prolongadamente para
acceder al buzón de voz.

6
Contestar o rechazar una llamada
Cuando reciba una llamada:
Deslice el icono hacia arriba para contestar.
Deslice el icono hacia arriba para rechazar.
Pulse el icono para rechazar la llamada enviando un mensaje
preestablecido.
Toque Recordatorio para rechazar la llamada y establecer una
alarma para regresar la llamada.
Para silenciar el volumen del tono de una llamada entrante, pulse el
botón de Subir/Bajar el volumen.
Historial de llamadas
Puede acceder al registro de llamadas tocando la pestaña
RECIENTES en la pantalla de Llamada para ver las llamadas
perdidas, llamadas salientes y llamadas entrantes.

7
3
Contactos
Los contactos se almacenan en su teléfono mediante la aplicación
Contactos. Le permite añadir, eliminar o editar sus contactos.
También puede importar o exportar contactos desde sitios distintos,
como una tarjeta SIM, un almacenamiento externo, su cuenta de
Gmail u otras cuentas de correo electrónico.
3.1 Añadir un contacto
Abra la aplicación Contactos desde la lista de aplicaciones y
toque el botón Más en la parte inferior derecha de la pantalla
para añadir un contacto nuevo.
3.2 Sincronización de contactos en múltiples
cuentas
Es posible sincronizar contactos, datos y otra información desde
distintas cuentas en función de las aplicaciones instaladas en el
celular.
4
Mensajes
Este teléfono cuenta con una aplicación de mensajes preinstalada
que le permite enviar y recibir SMS (mensajes de texto) o MMS
(mensajes multimedia) a través de su operador de servicio.
Para abrir la aplicación de Mensajes, vaya a la Pantalla de Inicio y
toque el icono de Mensajes en la bandeja de favoritos o en la lista
de aplicaciones.
Para consultar los mensajes almacenados en la tarjeta SIM,
toque en la pantalla de mensajes y, a continuación,
toque Ajustes > AVANZADOS > Gestionar mensajes de
SIM.
4.1 Escribir mensaje
En la pantalla de la aplicación de mensajes, toque Más en
la parte inferior derecha de la pantalla para comenzar a crear un
mensaje nuevo.

8
Toque aquí para crear un nuevo mensaje.
• Toque aquí para ver la cadena
del mensaje completo.
• Toque y mantenga pulsado para
activar el modo de borrado.
Envío de un mensaje de texto
Ingrese el número de teléfono del destinatario en la barra “Para”
o toque para añadir destinatarios y toque la barra Escribir
mensaje para ingresar el texto del mensaje. Toque el botón con el
emoticono para insertar emoticonos. Cuando haya terminado,
toque el botón Enviar para enviar el mensaje de texto.
Un mensaje SMS de más de 160 caracteres se cobrará
como varios mensajes SMS. Los caracteres especiales
(acentos) aumentarán el tamaño del SMS. Esto puede
provocar que se envíen varios SMS al destinatario.
Envío de un mensaje multimedia
Los mensajes multimedia le permiten enviar videos, imágenes, fotos,
animaciones, diapositivas y sonidos a otros celulares compatibles y a
direcciones de correo electrónico.
Un SMS se convertirá automáticamente a MMS cuando se adjunten
archivos multimedia (imagen, video, audio, diapositivas, etc.).

9
5
Gmail
Gmail es un servicio de correo electrónico basado en web de
Google. Al configurar el teléfono por primera vez, se sincroniza
automáticamente con su cuenta de Gmail. Con esta aplicación podrá
recibir y enviar correos electrónicos, gestionarlos y archivarlos, entre
otras opciones.
Para abrir Gmail
En la Pantalla de Inicio, toque el icono Gmail en la carpeta Google.
Gmail muestra mensajes y conversaciones de una única cuenta de
Gmail al mismo tiempo. Si tiene más de una cuenta, podrá añadir
otra tocando la tecla Menú y, a continuación, la flecha hacia
abajo tras el nombre de la cuenta en la pantalla de la bandeja de
entrada. Después, toque Añadir cuenta. Cuando haya terminado,
puede cambiar a otra cuenta tocando el nombre de cuenta que
desea ver.
Para crear y enviar mensajes de correo electrónico
1 Toque el botón Editar en la pantalla de la bandeja de entrada.
2 Ingrese la dirección de correo electrónico del destinatario en el
campo “Para”.
3 Para añadir una copia o una copia oculta, toque el botón de flecha
hacia abajo e ingrese la dirección de correo electrónico en la
línea CC o CCO.
4 Ingrese el asunto y el contenido del mensaje.
5 Toque el icono del botón Adjuntar y seleccione Adjuntar
archivo para añadir un archivo adjunto.
6 Por último, toque el botón Enviar para enviarlo.
7 Si no desea enviar el correo electrónico en ese momento, puede
tocar la tecla del menú desplegable y a continuación tocar
Guardar borrador. Para ver el borrador más tarde, toque la tecla
Menú y seleccione la carpeta Borradores. Toque el borrador y el
botón Editar para abrirlo.

10
6
Cómo conectarse
Para conectarse a Internet con este teléfono, necesitará una
conexión a Internet a través de un proveedor de datos móviles o a
través de Wi-Fi.
6.1 Conexión a Internet
6.1.1 Datos móviles
La primera vez que encienda el celular con la tarjeta SIM, se
configurará automáticamente el servicio de red: 2G, 3G, 4G.
Para comprobar la conexión de red que esté utilizando, toque
Ajustes > Conexión de red > Redes móviles y toque Nombre
de puntos de acceso u Operadores de red. Su conexión de red
también se muestra en la barra de estado.
6.1.2 Wi-Fi
Este teléfono también se puede conectar a un servicio de Internet
por Wi-Fi. Esta función se puede utilizar sin tarjeta SIM o sin servicio
de datos móviles.
Para activar la función Wi-Fi y conectarse a una red inalámbrica
• Vaya a Ajustes > Conexión de red > Wi-Fi.
• Toque el interruptor para activar/desactivar la función Wi-Fi.
• Toque una red Wi-Fi para conectarse. Si la red seleccionada está
protegida, deberá ingresar una contraseña u otras credenciales.
Cuando termine, toque CONECTAR.
• Para seleccionar una red oculta, seleccione Añadir red. Ingrese
el SSID de la red, la contraseña y las credenciales de seguridad.
Después, toque CONECTAR.
-
 1
1
-
 2
2
-
 3
3
-
 4
4
-
 5
5
-
 6
6
-
 7
7
-
 8
8
-
 9
9
-
 10
10
-
 11
11
-
 12
12
-
 13
13
-
 14
14
-
 15
15
-
 16
16
-
 17
17
-
 18
18
-
 19
19
-
 20
20
-
 21
21
-
 22
22


Alcatel 3V - 5099A El manual del propietario
- Categoría
- Smartphones
- Tipo
- El manual del propietario
en otros idiomas
- English: Alcatel 3V - 5099A Owner's manual
Artículos relacionados
-
Alcatel One Touch Pop3 - 5054A Manual de usuario
-
-
-
-
-
-
-