Cuisinart CPT160SE El manual del propietario
- Categoría
- Tostadoras
- Tipo
- El manual del propietario
Este manual también es adecuado para

BABYLISS SARL
99 avenue Aristide Briand
92120 Montrouge
France
www.cuisinart.eu
IB-4/429E
4
1
2
3
5
6
7
8
9
CPT160E
CPT180E
Тостер
Производитель: BaByliss SARL
99 Авеню Аристид Бриан
92120, Монруж, Франция
Факс 33 (0) 1 46 56 47 52
Сделано в Китае
Дата производства (неделя, год): см. на товаре
CPT160E/CPT180E
TOASTER
CPT160E
CPT180E
Q113d
FAC 2020 / 07
Instructions - Hinweise - Instructies - Istruzioni -
Instrucciones - instruções - instrukcji -инструкциями

SOMMAIRE
1. Consignes de sécurité . . . . . . . . . . 1
2. Introduction . . . . . . . . . . . . . . . . . 4
3. Caractéristiques produit . . . . . . . . . 4
4. Instructions d’utilisation . . . . . . . . . 4
A. Ajuster le croustillant de la tranche . . . . 5
B. Utilisation des diérentes touches . . . . . 5
5. Conseils et astuces . . . . . . . . . . . . 5
6. Nettoyage et entretien . . . . . . . . . . . 5
Garantie internationale . . . . . . . . . . 51
CONTENTS
1. Safety instructions . . . . . . . . . . . . . 6
2. Introduction . . . . . . . . . . . . . . . . . 8
3. Product features . . . . . . . . . . . . . . 9
4. Instructions for use . . . . . . . . . . . . 9
A. Setting the browning level of the slice . . 9
B. Using the various settings . . . . . . . . . 10
5. Hints & tips . . . . . . . . . . . . . . . . . 10
6. Cleaning & maintenance . . . . . . . . . 10
International Guarantee. . . . . . . . . . . 51
INHALTSVERZEICHNIS
1. Sicherheitshinweise . . . . . . . . . . . . 11
2. Einleitung . . . . . . . . . . . . . . . . . . 14
3. Merkmale. . . . . . . . . . . . . . . . . . . 14
4. Gebrauch . . . . . . . . . . . . . . . . . . . 15
A. Anpassen der Bräunungsstufe . . . . . . 15
B. Gebrauch der verschiedenen Tasten . . . 15
5. Ratschläge und empfehlungen . . . . 15
6. Reinigung & pege . . . . . . . . . . . . 16
Internationale Garantie . . . . . . . . . . . 51
INHOUD
1. Veiligheidsinstructies . . . . . . . . . . . 17
2. Inleiding . . . . . . . . . . . . . . . . . . . 20
3. Kenmerken . . . . . . . . . . . . . . . . . 20
4. Gebruik . . . . . . . . . . . . . . . . . . . . 20
A. Het roosteren van het sneetje brood
instellen . . . . . . . . . . . . . . . . . . . . 21
B. Gebruik van de verschillende toetsen . . 21
5. Tips & trics . . . . . . . . . . . . . . . . . . 21
6. Reiniging & onderhoud . . . . . . . . . 21
Internationaal garantiebewijs . . . . . . 51
CONTENUTO
1. Istruzioni di sicurezza . . . . . . . . . . . 23
2. Introduzione. . . . . . . . . . . . . . . . . 26
3. Caratteristiche del prodotto. . . . . . . 26
4. Istruzioni pèr l’uso . . . . . . . . . . . . . 26
A. Regolazione della doratura. . . . . . . . . 27
B. Utilizzo dei tasti . . . . . . . . . . . . . . . . 27
5. Consigli e suggerimenti . . . . . . . . . 27
6. Pulizia e manutenzione . . . . . . . . . 27
Garanzia Internazionale . . . . . . . . . . . 51
CONTENIDO
1. Consignas de seguridad . . . . . . . . . 28
2. Introducción. . . . . . . . . . . . . . . . . 31
3. Características del producto . . . . . . 31
4. Instucciones de uso . . . . . . . . . . . . 32
A. Graduar el dorado de la tostada . . . . . 32
B. Las tres teclas . . . . . . . . . . . . . . . . . 32
5. Consejos y sugerencias . . . . . . . . . . 32
6. Limpieza y mantenimiento . . . . . . . 33
Garantía Internacional . . . . . . . . . . . 51
ÍNDICE
1. Instruções de segurança . . . . . . . . . 34
2. Introdução . . . . . . . . . . . . . . . . . . 37
3. Características . . . . . . . . . . . . . . . 37
4. Modo de emprego . . . . . . . . . . . . . 37
A. Regulação do nível de torragem . . . . . . 38
B. Utilização das várias teclas . . . . . . . . . . 38
5. Sugestões e dicas . . . . . . . . . . . . . 38
6. Limpeza e manutenção . . . . . . . . . 38
Garantia internacional . . . . . . . . . . . . 51
ISTREŚCI
1. Przepisy dotyczące bezpieczeństwa . 39
2. Wstęp . . . . . . . . . . . . . . . . . . . . . 42
3. Funkcje produktu . . . . . . . . . . . . . 42
4. Instrukcja obsługi . . . . . . . . . . . . . 43
A. Wybór chrupkości kromki . . . . . . . . . . 43
B. Używanie różnych funkcji. . . . . . . . . . .43
5. Wskazówki i sugestie . . . . . . . . . . . 43
6. Czyszczenie i konserwacja . . . . . . . . 43
Gwarancja miedzynarodowa . . . . . . . 51
СОДЕРЖАНИЕ
1. Инструкции по безопасности . . . . . 45
2. Вступление . . . . . . . . . . . . . . . . . 48
3. Характеристики и
комплектация изделия . . . . . . . . . 49
4. Руководство по эксплуатации . . . . 49
А. Регулирование степени
поджаристости ломтика . . . . . . . . . . 49
В. Назначение кнопок . . . . . . . . . . . . . . 50
5. Полезные советы . . . . . . . . . . . . 50
6. Уход и обслуживание . . . . . . . . . . 50
Международная гарантия . . . . . . . . 51

1
1. CONSIGNES DE SÉCURITÉ
INSTRUCTIONS ORIGINALES
LIRE ATTENTIVEMENT CES CONSIGNES DE SECURITE
AVANT D’UTILISER L’APPAREIL !
• ATTENTION : Surface chaude.
• La température des surfaces accessibles peut être élevée lorsque
l’appareil est en fonctionnement.
• Le pain peut brûler, en conséquences, ne pas utiliser le toaster
à proximité ou sous des matériaux combustibles, tels que les
rideaux ou sous les éléments muraux de la cuisine.
• Cet appareil est destiné à un usage strictement domestique et
n’est pas prévu pour être utilisé dans des applications telles que:
les coins cuisines réservés au personnel des magasins, bureaux
et autres environnements professionnels ; les fermes ; l’utilisation
par les clients des hôtels, motels et autres environnements à
caractère résidentiel ; les environnements de type chambres
d’hôtes.
• Si le câble d’alimentation est endommagé, il doit être remplacé
par le fabricant, son service après-vente ou des personnes de
qualication similaire an d’éviter un danger.
• Cet appareil peut être utilisé par des enfants âgés de 8 ans et
plus et des personnes aux capacités physiques, sensorielles ou
mentales réduites, ou des personnes dénuées d’expérience et
de connaissance, si elles ont pu bénécier d’une surveillance ou
d’instructions préalables concernant l’utilisation de l’appareil
en toute sécurité si elles comprennent les risques impliqués. Le
nettoyage et l’entretien de l’appareil pourront être réalisés par
des enfants s’ils sont âgés de plus de 8 ans et s’ils bénécient
d’une surveillance.
• Garder l’appareil et son cordon électrique hors de la portée des
enfants âgés de moins de 8 ans.

2
• Jeter immédiatement le sachet de gel de silice. Ne pas manger
et tenir hors de portée des enfants.
• Laisser refroidir l’appareil avant de le ranger.
• Ne jamais mettre les mains à l’intérieur de l’appareil. Ne pas
y insérer d’aliments trop grands, d’emballages métalliques ni
aucun ustensile.
• Ne pas tenter de dégager des aliments lorsque l’appareil est
branché.
• Laisser refroidir l’appareil complètement et le débrancher
avant de le nettoyer. Utiliser une éponge imprégnée d’eau
savonneuse pour nettoyer l’extérieur du toaster, puis le
sécher soigneusement. Pour retirer les miettes, ôter le tiroir,
jeter les miettes, puis remettre le tiroir en place. Ne pas utiliser
le toaster sans le tiroir. Pour retirer des morceaux coincés
dans le toaster, le retourner et secouer légèrement pour faire
tomber les morceaux. Ne jamais insérer de couteau ou autre
instrument dans le toaster an d’éviter de l’endommager.
• Ne pas placer l’appareil sur ou à proximité d’un appareil chauant.
Ne pas l’utiliser sur des surfaces sensibles à la chaleur.
• Ne pas laisser le cordon dépasser du bord du plan de travail et
ne pas le mettre en contact avec des surfaces chaudes.
• Ne pas laisser l’appareil en fonctionnement sans surveillance.
• Ne pas immerger dans l’eau ou tout autre liquide.
• Toujours débrancher l’appareil après utilisation et avant de le
nettoyer. Ne jamais laisser l’appareil branché sans surveillance.
Pour débrancher, tirer sur la che et jamais sur le cordon.
• L’appareil n’est pas destiné à être mis en fonctionnement au
moyen d’une minuterie extérieure ou par un système de
commande à distance séparé.
• Ne brancher l’appareil que sur une prise avec terre incorporée.
Nous recommandons de vérier que l’installation électrique est
équipée d’un dispositif à courant diérentiel résiduel approprié.
Demander conseil à un installateur.

3
• Ne pas utiliser l’appareil s’il est tombé ou s’il présente des traces
apparentes de dommage.
• Aucune réparation ne peut être eectuée par l’utilisateur.
• Ne pas utiliser à l’extérieur.
ATTENTION : Les sachets en polyéthylène contenant
le produit ou son emballage peuvent être dangereux.
Tenir ces sachets hors de portée des bébés et des
enfants.
Ne pas les utiliser dans les berceaux, les lits d’enfants, les
poussettes ou les parcs pour bébés. Le n lm peut coller au
nez et à la bouche et empêcher la respiration. Un sachet n’est
pas un jouet.
DEEE - FIN DE VIE DES ÉQUIPEMENTS ÉLECTRIQUES
ET ÉLECTRONIQUES
Dans l’intérêt de tous et an de prendre une part active
dans la protection de l’environnement et de la santé
publique :
• Ne pas jeter vos produits avec vos déchets ménagers non triés.
• Les DEEE (déchets d’équipements électriques et électroniques)
doivent être collectés séparément.
• Ayez recours au système de reprise et de collecte mis en place
pour les DEEE dans votre région. De cette façon, certains
matériaux pourront être recyclés, réutilisés ou récupérés.
• En veillant à ce que ce produit soit mis au rebut adéquatement,
vous contribuerez à éviter de potentielles conséquences néfastes
pour l’environnement et la santé publique dues aux éventuelles
substances dangereuses contenues.
Pour de plus amples informations concernant la mise au rebut
de ce produit, veuillez prendre contact avec votre service local
de traitement des déchets ménagers.
JR 2020/02

4
2. INTRODUCTION
Félicitations! Vous venez d’acheter le nouveau Toaster Cuisinart.
Cuisinart fabrique du matériel de cuisine haut de gamme depuis plus de 30 ans. Tous les produits
Cuisinart se distinguent par leur durée de vie exceptionnellement longue et sont conçus pour
orir, jour après jour, d’excellentes performances et une grande facilité d’utilisation.
Pour en savoir plus sur nos produits ou découvrir nos recettes, consultez notre site Internet
www.cuisinart.eu.
3. CARACTERISTIQUES PRODUITS (voir couverture)
1. Fentes extra-larges (36mm)
Permet de griller tous types de pains et petits pains. Sur le modèle CPT160, 2 ouvertures vous
permettent de griller 2 tranches à la fois. Le modèle CPT180 permet de griller jusqu’à 4 tranches
grâce à ses 4 ouvertures contrôlées par 2 commandes indépendantes.
2. Système de centrage
Maintient le pain au centre du toaster, quelle que soit l’épaisseur de votre tranche, pour un
croustillant parfait.
3. Levier
Remonte automatiquement à la n du cycle. Le levier peut également être remonté pour
mettre n au cycle. L’éjection à deux niveaux permet une remontée maximale pour retirer les
tranches les plus petites.
4. Touche Max :
Ajouter un peu de temps au programme du grille-pain pour obtenir des pains plus épais, des
petits pains, des muns et des bagels parfaitement grillés.
5. Touche Décongeler:
Permet de décongeler et de griller les tranches en un seul cycle.
6. Touche Réchauer:
Permet de réchauer le pain sans le dorer davantage.
7. Touche Annuler
Interrompt le cycle et éjecter le pain.
8. Touche Ajuster
6 niveaux pour obtenir exactement le croustillant souhaité.
9. Tiroir ramasse-miettes amovible (accessible à l’arrière du toaster)
Permet de retirer les miettes en toute facilité.
4. INSTRUCTIONS D’UTILISATION
• Placer le toaster sur une surface plane.
• Vérier que le tiroir ramasse-miettes est en place et brancher l’appareil.
• Insérer le pain dans l’ouverture et appuyer sur le levier.
• Pour arrêter le toaster avant la n du cycle, presser la touche Stop ou remonter le levier.
N.B. : Le modèle CPT180 est équipé de 2 commandes indépendantes, permettant de griller
plusieurs types de pain en même temps. Pour griller 4 tranches, il faut actionner les 2 commandes.

5
A. AJUSTER LE CROUSTILLANT DE LA TRANCHE
Régler le bouton sur le niveau de croustillant souhaité. Le croustillant obtenu varie en fonction du
type de pain et du degré d’humidité des tranches. En règle générale, pour un léger croustillant,
régler le toaster sur le niveau 4-5 pour griller du pain dense ou du pain frais, et sur 2-3 pour du
pain sec.
B. UTILISATION DES DIFFÉRENTES TOUCHES
Les 3 touches Max, Décongeler et Réchauer permettent d’ajuster le temps
nécessaire en fonction du type de pain et du niveau de croustillant souhaité. Chacune s’utilise
en combinaison avec la touche d’ajustement du croustillant de la tranche. Un témoin lumineux
indique la touche sélectionnée.
Ajouter un peu de temps au programme du grille-pain pour obtenir des pains plus épais,
des petits pains, des muns et des bagels parfaitement grillés.
Ajoute le temps nécessaire pour décongeler d’abord le pain, puis le griller.
Permet de réchauer le toast sans le dorer davantage.
N.B.: Pour annuler la sélection, presser la touche Annuler. Ceci arrête le cycle et fait remonter le
pain.
5. CONSEILS ET ASTUCES
• Les petits pains, viennoiseries ou tranches épaisses doivent être grillés pendant plus longtemps.
Nous vous recommandons d’utiliser la touche
, puis d’ajuster le niveau de croustillant selon
vos préférences.
• Pour griller des croissants, les couper en deux horizontalement et presser la touche
. Pour les
réchauer seulement, utiliser la touche Réchauer
.
• Pour griller des pains aux fruits, ôter les fruits de la surface de la tranche an d’éviter que les fruits
tombent dans le toaster ou se collent sur les résistances.
• Pour griller une seule tranche de pain, sélectionner un niveau plus bas que pour deux tranches.
6. NETTOYAGE ET ENTRETIEN
• Débrancher immédiatement le toaster après utilisation et le laisser refroidir avant de le nettoyer.
• Ne pas plonger l’appareil dans de l’eau ou dans tout autre liquide et ne pas le mettre au lave-
vaisselle.
• Ne pas utiliser de détergents abrasifs. Frotter simplement l’extérieur à l’aide d’un chion propre
et humide et sécher soigneusement. Toujours appliquer le détergent sur le chion, et non sur
le toaster.
• Pour éliminer les miettes, retirer le tiroir et jeter les miettes, puis remettre le tiroir en place.
• Pour retirer des morceaux de pain coincés dans le toaster, retourner l’appareil et le secouer
délicatement.
• Ne pas enrouler le cordon d’alimentation autour du toaster.
IMPORTANT : Ne jamais insérer d’instrument dur, pointu ou métallique dans les fentes du toaster,
car cela risquerait d’endommager l’appareil et de compromettre la sécurité.

6
1. SAFETY INSTRUCTIONS
(TRANSLATION OF ORIGINAL INSTRUCTIONS)
READ THESE SAFETY INSTRUCTIONS CAREFULLY BEFORE
USING THE APPLIANCE!
• CAUTION: Hot surface.
• The temperature of accessible surfaces may be high when
the appliance is in use.
• Because the bread can burn, do not use the toaster near or
under combustible materials like curtains or under kitchen
wall cabinets.
• This appliance is intended for strictly domestic use and is
not intended to be used in applications such as: sta kitchen
areas in shops, oces and other working environments; farm
houses; by clients in hotels, motels and other residential type
environments; bed and breakfast type environments.
• If the power cable is damaged, it should be replaced by the
manufacturer, its after-sales service or a similarly qualied
professional to avoid danger.
• This appliance may be used by children aged 8 upwards and
people with reduced physical, sensory or mental capabilities
or lack of experience and knowledge if they have been
supervised or instructed on using the appliance safely and
understand the hazards involved. The appliance can be
cleaned and maintained by children aged over 8 years old, if
supervised.
• Keep the appliance and its cord out of reach of children aged
less than 8 years.
• Dispose of the sachet of silica gel immediately. Do not eat
and keep out of the reach of children.
• Allow the appliance to cool before storing.
• Never put your hands inside the appliance. Food that is too

7
big, metal packaging or utensils must not be inserted in the
toaster.
• Never attempt to dislodge food when the toaster is plugged
into the mains.
• Let the appliance cool down completely and disconnect it
before cleaning. Wipe the the outside of the toaster with a
clean damp cloth, then dry it carefully. To remove crumbs, slide
out the crumb tray and throw the breadcrumbs away, then
put the crumb collector back in place. Do not use the toaster
without the crumb collector. To remove pieces remaining in
the toaster, turn it upside down and shake gently to cause the
pieces to drop. Never insert a knife or any sharp object in the
toaster as this could cause damage.
• Do not place the appliance on or near a hot appliance. Do not
use on heat-sensitive surfaces.
• Do not let the cable hang over the edge of the work surface
and do not let it touch hot surfaces.
• Do not leave the appliance unattended when on.
• Do not immerse in water or any other liquid.
• Always unplug the appliance after use and before cleaning.
Never leave the appliance unattended when plugged in. Pull
on the plug to unplug, never on the cable.
• The appliance should not be used with an external timer or
with a separate remote control system.
• Only plug the appliance into a socket with a built-in earth.
We recommend checking that the electrical installation is
equipped with an appropriate residual current device. Ask a
service engineer for advice.
• Do not use the appliance if it has fallen or if it looks damaged.
• Do not try to repair the appliance yourself.
• Do not use outdoors.

8
WARNING: The polyethylene bags over the product or
its packaging may be dangerous. Keep these bags out
of the reach of babies and children.
Never use them in cribs, children’s beds, pushchairs or playpens.
The thin lm may cling to the nose and mouth and prevent
breathing. A bag is not a toy.
WEEE - END-OF-LIFE ELECTRICAL AND ELECTRONIC
EQUIPMENTS
In everybody’s interest and to actively participate in
protecting the environment and human health:
• Do not discard your products with your unsorted household
wastes.
• The WEEE (wastes of electrical and electronic equipments) must
be collected separately.
• Use the return and collection systems dedicated to the WEEE
available in your area. In this way, some materials can be
recycled, re-used or recovered.
• By ensuring this product is disposed of properly, you will help
prevent potential negative consequences for the environment
and human health due to possible content of hazardous
substances.
For more detailed information about the disposal of this product,
please contact your local household waste disposal service.
2. INTRODUCTION
Congratulations on your purchase of a new Cuisinart Toaster.
For over 30 years Cuisinart’s aim has been to produce the very nest kitchen equipment. All
Cuisinart products are engineered for exceptionally long life, and designed to be easy to use as
well as to give excellent performance day after day.
To learn more about our products and for recipe ideas visit our website www.cuisinart.eu.

9
3. PRODUCT FEATURES (refer to cover)
1. Extra-wide (36mm) toasting slots
Allow you to toast all kinds of bread and rolls. On mod. ref. CPT160, 2 slots allow you to toast 2
slices at a time. Mod. ref. CPT180 allows you to toast up to 4 slices thanks to the 4 slots with 2
separate control sets.
2. Self-centering bread rack
Maintains bread in the middle of the toaster, whatever the thickness of the slice, for even
toasting.
3. Lever
Rises up automatically at the end of the toasting cycle. The lever can also be raised to stop the
cycle. The high rise allows easy removal of the bread slices.
4. Max:
Adds time to the toasting cycle for best results with thicker breads, rolls, muns and bagels.
5. Defrost setting:
Defrosts and toasts the slices in a single cycle.
6. Reheat setting:
Reheats the bread without over browning.
7. Cancel setting
To stop the toasting cycle and eject the bread.
8. Variable toasting dial
To get exactly the desired toasting level.
9. Removable crumb collector (accessible from the back of the toaster)
Allows you to easily remove the bread crumbs.
4. INSTRUCTIONS FOR USE
• Place the toaster on a at, even surface.
• Check that the crumb collector is installed and plug in the appliance.
• Insert bread in the slot and press the lever.
• To stop the toaster before the end of the cycle, press Cancel or raise the lever.
N.B. Model CPT180 features 2 separate control sets, allowing you to toast 2 types of bread at the
same time. If you wish to toast 4 slices, both control sets must be used.
A. SETTING THE BROWNING LEVEL OF THE SLICE
Turn the control button to the desired level. The browning of your toast varies depending on the
type of bread and degree of humidity of the slices. As a general rule, for medium toasting, set
your toaster on level 4-5 to toast denser bread or fresh bread and on 2-3 for toasting stale bread.

10
B. USING THE VARIOUS SETTINGS
By using the various settings Max
,
Defrost and Reheat you adjust the necessary time
depending on the type of bread and toasting level desired. Each setting can be combined with
the browning level control dial. A light indicator shows the selected setting.
Adds time to the toasting cycle for best results with thicker breads, rolls, muns and bagels.
Adds the time necessary to rst defrost the bread, then toast it.
Reheats toast without over browning.
N.B. If you wish to cancel the selection, press Cancel. This will stop the cycle and raise the bread.
5. HINTS & TIPS
• Bread rolls, muns or thick slices should be toasted longer. We recommend to use the
setting, then to set the toasting level according to your preferences.
• To toast croissants, cut them in half horizontally and select the
setting. To reheat them only,
use the
setting.
• When toasting fruit breads, remove any loose fruits from the surface of the bread in order to
prevent fruit pieces from falling into the toaster or sticking on the guide wires in the slot.
• If you are toasting a single slice of bread, set the heat selector to a lighter setting than you
normally would.
6. CLEANING & MAINTENANCE
• Always disconnect the toaster from the mains immediately after use and allow to cool completely
before cleaning.
• Do not immerse the appliance in water or any other liquid or place in a dishwasher.
• Do not use abrasive cleaners. Simply wipe the exterior with a clean damp cloth and dry
thoroughly. Always apply any cleaning agent to a cloth, not to the toaster.
• To remove crumbs, slide out the crumb tray and throw the breadcrumbs away, then put the
crumb collector back in place.
• To remove any pieces of bread remaining in the toaster, turn the toaster upside down and gently
shake.
• Never wrap the cord around the outside of the toaster.
IMPORTANT: Never insert any hard, sharp or metal instruments into the slots as this could
damage the toaster and cause a safety hazard.

11
1. SICHERHEITSHINWEISE
(ÜBERSETZUNG DER ORIGINALFASSUNG DER
GEBRAUCHSANLEITUNG
LESEN SIE DIE SICHERHEITSHINWEISE VOR DEM
GEBRAUCH DES GERÄTS BITTE SORGFÄLTIG DURCH!
• ACHTUNG: Heiße Oberächen.
• Die zugänglichen Oberächen des Geräts können während
des Betriebs sehr heiß werden.
• Das Brot kann brennen, und aus diesem Grund sollte der
Toaster nicht in der Nähe von oder unter brennbarem Material
wie Gardinen oder Hängeschränken in der Küche verwendet
werden.
• Dieses Gerät ist ausschließlich für den Hausgebrauch
bestimmt und ist nicht für Anwendungen vorgesehen, wie:
Küchenbereiche, die für das Personal in Geschäften, Büros
und anderen professionellen Umgebungen gedacht sind;
landwirtschaftliche Betriebe; für die Nutzung durch Gäste in
Hotels, Motels und anderen Unterkünften; für Unterkünfte
wie beispielsweise Gästezimmer.
• Wenn das Kabel beschädigt ist, muss es durch den Hersteller,
seinen Kundendienst oder eine ähnlich qualizierte Person
ersetzt werden, um jede Gefahr zu vermeiden.
• Dieses Gerät kann von Kindern ab 8 Jahren und von
Personen mit eingeschränkten physischen, sensorischen
oder mentalen Fähigkeiten oder von unerfahrenen Personen
ohne Vorkenntnisse verwendet werden. Diese Personen
müssen dabei entweder beaufsichtigt werden oder zuvor
Anweisungen zum sicheren Gebrauch des Geräts erhalten
haben und die mit der Verwendung verbundenen Risiken
verstehen. Reinigung und Wartung des Geräts dürfen von
Kindern ab 8 Jahren nur unter Aufsicht durchgeführt werden.

12
• Bewahren Sie Gerät und Netzkabel außerhalb der Reichweite
von Kleinkindern unter 8 Jahren auf.
• Den Beutel mit Silicagel sofort entsorgen. Nicht essen und
außerhalb der Reichweite von Kindern aufbewahren.
• Das Gerät vor dem Verstauen abkühlen lassen.
• Nie die Hände in das Gerät stecken. Stecken Sie keine zu
großen Nahrungsmittel, Verpackungen aus Metall und auch
keine Gegenstände in das Gerät.
• Versuchen Sie nicht, festklemmende Nahrungsmittel
herauszuziehen, wenn das Gerät an den Netzstrom
angeschlossen ist.
• Das Gerät vor dem Reinigen vollständig abkühlen lassen
und den Netzstecker ziehen. Die Außenseite des Toasters
mit einem Schwamm und Seifenwasser reinigen und danach
sorgfältig trocknen. Zum Entfernen der Krümel die Lade
herausnehmen, die Krümel entfernen und die Lade wieder
einsetzen. Den Toaster nicht ohne Lade benutzen. Zum
Entfernen von Stückchen, die im Toaster steckengeblieben
sind, diesen herumdrehen und leicht schütteln, um die
Stückchen zu entfernen. Niemals ein Messer oder andere
Gegenstände in den Toaster stecken, um ihn nicht zu
beschädigen.
• Das Gerät nicht auf oder in die Nähe eines Geräts stellen, das
heiß werden kann. Nicht auf hitzeempndlichen Oberächen.
• Lassen Sie das Netzkabel nicht über den Rand der Arbeitsplatte
hängen und bringen Sie es nie in Berührung mit heißen
Oberächen.
• Das Gerät nicht unbeaufsichtigt lassen, wenn es in Betrieb ist.
• Den Sockel des Geräts nicht in Wasser oder andere
Flüssigkeiten tauchen.
• Nach dem Gebrauch und vor dem Reinigen stets den
Netzstecker des Geräts ziehen. Das Gerät nie unbeaufsichtigt
lassen, wenn es an den Netzstrom angeschlossen ist. Zum

13
Entfernen des Netzsteckers immer am Stecker und nicht am
Kabel ziehen.
• Das Gerät ist nicht für das automatische Einschalten
über eine externe Zeitschaltuhr oder ein getrenntes
Fernbedienungssystem geeignet.
• Das Gerät nur an eine Steckdose mit eingebauter
Erdung anschließen. Wir empfehlen zu prüfen, ob die
elektrische Installation mit einer geeigneten Fehlerstrom-
Schutzvorrichtung ausgestattet ist. Fragen Sie hierzu Ihren
Elektroinstallateur um Rat.
• Das Gerät nicht benutzen, wenn es gefallen ist oder
oensichtliche Spuren einer Beschädigung aufweist.
• Der Benutzer darf keinerlei Reparaturen selbst durchführen.
• Nicht im Freien verwenden.
ACHTUNG: Die Plastikbeutel, die das Produkt oder seine
Verpackung enthalten, können gefährlich sein. Diese
Beutel dürfen sich nicht in Reichweite von Babys oder
Kleinkindern benden.
Nicht in Wiegen, Kinderbetten, Kinderwagen oder Laufställchen
verwenden. Die dünne Folie kann auf Nase und Mund haften
bleiben und die Atmung behindern. Ein Beutel ist kein Spielzeug.
WEEE- ELEKTRO-UND ELEKTRONIK-ALTGERÄTE
Im Interesse der Allgemeinheit und als aktiven Beitrag
zum Schutz der Umwelt und unserer Gesundheit:
• Entsorgen Sie Ihre Geräte nicht mit dem unsortierten Hausmüll.
• WEEE (Elektro- und Elektronikgeräte-Abfall) muss getrennt
gesammelt werden.
• Nutzen Sie das Rücknahmesystem für Elektro- und Elektronik-
Altgeräte in Ihrer Region. Auf diese Weise können bestimmte
Materialien recycelt, wiederverwendet oder verwertet werden.
• Indem Sie darauf achten, dass dieses Produkt ordnungsgemäß

14
entsorgt wird, tragen Sie dazu bei, mögliche nachteilige
Auswirkungen auf die Umwelt und die öentliche Gesundheit
aufgrund von eventuell darin enthaltenen gefährlichen Stoen
zu vermeiden.
Für weitere Informationen zur Entsorgung dieses Produkts
wenden Sie sich bitte an Ihren örtlichen Hausmüllentsorger.
2. EINLEITUNG
Herzlichen Glückwunsch zum Kauf Ihrer neuen Cuisinart Toaster.
Schon seit über 30 Jahren ist es das erklärte Ziel von Cuisinart, die allerbesten Küchengeräte
herzustellen. Alle Produkte von Cuisinart sind äußerst langlebig und so konzipiert, dass sie leicht
zu verwenden sind und Tag für Tag hervorragende Leistungen vollbringen.
Mehr über unsere Produkte und Rezeptideen erfahren Sie auf unserer Webseite www.cuisinart.eu
3. MERKMALE (siehe Umverpackung)
1. Besonders breite Schlitze (36mm)
Damit Sie alle Sorten Brot und Brötchen toasten können. Mit dem Modell CPT160, können Sie
in 2 Önungen 2 Scheiben gleichzeitig toasten. Das Modell CPT180 toastet bis zu 4 Scheiben
dank der 4 Önungen, die durch 2 voneinander unabhängige Bedienungselemente gesteuert
werden.
2. Brotzentriersystem
Hält das Brot in der Mitte des Toasters, unabhängig von der Dicke der Scheibe, und sorgt für
gleichmäßige Bräunung.
3. Hebel
Hebt sich automatisch am Ende des Vorgangs. Der Hebel kann auch von Hand gehoben
werden, um den Toastvorgang zu beenden. Durch den Ausgabemechanismus in zwei Phasen
wird die Ausgabehöhe kontrolliert, so dass auch kleine Brotscheiben leicht entnommen
werden können.
4. Max:
Verlängert die Toastzeit für die besten Resultate bei dickeren Brotscheiben, Brötchen, Muns
und Bagels.
5. Auftautaste:
Auftauen und toasten der Brotscheiben in einem Vorgang.
6. Wärmtaste:
Aufwärmen der Toasts, ohne dass sie zu dunkel werden.
7. Abbrechen des Vorgangs
Unterbrechen des Vorgangs und Brotausgabe.
8. Drehregler für den Bräunungsgrad
6 Stufen für die gewünschte Bräunung.
9. Herausnehmbare Krümelfanglade (auf der Rückseite des Toasters)
Krümel können leicht entfernt werden.

15
4. GEBRAUCHSANLEITUNG
• Den Toaster auf eine ache Oberäche stellen.
• Vergewissern Sie sich, dass die Krümelfanglade installiert ist und schließen Sie das Gerät an den
Netzstrom an.
• Das Brot in die Önung stecken und den Hebel drücken.
• Zum vorzeitigen Beenden des Toastvorgangs die Stop-Taste drücken oder den Hebel heben
Anm.: Das Modell CPT180 ist mit 2 unabhängigen Bedienungs-elementen versehen, so dass
verschiedene Gebäckarten gleichzeitig getoastet bzw. aufgebacken werden können. Zum
Toasten von 4 Scheiben müssen beide Bedienelemente betätigt werden.
A. ANPASSEN DER BRÄUNUNGSSTUFE
Den Knopf auf die gewünschte Bräunungsstufe einstellen. Der Bräunungsgrad Ihrer Toasts hängt
von der Brotsorte und dem Feuchtigkeitsgehalt der Brotscheiben ab. Als Faustregel stellen Sie
Ihren Toaster für eine mittlere Bräunung auf die Stufe 4-5 für festes oder frisches Brot und auf 2-3
für trockenes Brot.
B. GEBRAUCH DER VERSCHIEDENEN TASTEN
Wenn die Zusatzeinstellung Max verwendet wird
,
und kann die Toastzeit auf die
Brotart und die gewünschte Bräunungsstufe eingestellt werden. Jede Einstellung kann zusammen
mit dem Drehregler für den Bräunungsgrad verwendet werden. Eine Anzeigeleuchte zeigt die
jeweils gewählte Einstellung.
Verlängert die Toastzeit für die besten Resultate bei dickeren Brotscheiben, Brötchen,
Muns und Bagels.
Fügt die notwendige Zeit hinzu, um das Brot erst aufzutauen und dann zu Toasten.
Aufwärmen der Toasts, ohne dass sie zu dunkel werden
Anm.: Wenn Sie den Vorgang abbrechen möchten, drücken Sie die Stopptaste. Der Vorgang wird
unterbrochen und das Brot aus dem Toaster gehoben.
5. RATSCHLÄGE UND EMPFEHLUNGEN
• Brötchen, Feingebäck oder dicke Scheiben müssen länger getoastet werden. Wir empfehlen,
die
taste zu betätigen und dann die Bräunungsstufe nach Ihren persönlichen Vorzügen
einzustellen.
• Zum Aufbacken von Croissants diese waagerecht halbieren und die
taste betätigen. Um sie
lediglich aufzuwärmen, die Taste
betätigen.
• Zum Toasten von Früchtebrot die Früchte von der Brotoberäche entfernen, damit sie nicht in
den Toaster fallen oder an den Widerständen festkleben.
• Wenn Sie nur eine Scheibe Brot toasten, sollten Sie eine kleinere Stufe wählen als für zwei
Scheiben.

16
6. REINIGUNG & PFLEGE
• Immer sofort nach Gebrauch den Netzstecker ziehen und den Toaster vor dem Reinigen
vollständig abkühlen lassen.
• Das Gerät nicht in Wasser oder andere Flüssigkeiten tauchen und nicht in der Spülmaschine
reinigen.
• Keine scheuernden Reinigungsmittel verwenden. Die Außenseiten einfach mit einem sauberen,
feuchten Tuch abwischen und gründlich abtrocknen. Geben Sie Reinigungsmittel immer auf ein
Tuch, nicht direkt auf den Toaster.
• Zum Entfernen der Krumen die Krümellade herausziehen, die Krümel ausschütten und den
Krümelfänger wieder korrekt einsetzen.
• Um eventuell im Toaster stecken gebliebene Brotstücke zu entfernen, den Toaster auf den Kopf
drehen und leicht schütteln.
• Das Netzkabel niemals um den Toaster wickeln.
WICHTIG: Führen Sie niemals harte, scharfe oder metallische Gegenstände in die Schlitze ein,
denn diese könnten den Toaster beschädigen und ein Sicherheitsrisiko verursachen.

17
1. VEILIGHEIDSINSTRUCTIES
(VERTALING VAN DE ORIGINELE INSTRUCTIES
LEES DEZE VEILIGHEIDSINSTRUCTIES ZORGVULDIG
DOOR VOORDAT U HET APPARAAT GEBRUIKT!
• OPGELET: Heet oppervlak.
• Als het apparaat in gebruik is, kunnen toegankelijke
oppervlakken van het apparaat heet zijn.
• Het brood kan verbranden. Gebruik daarom de broodrooster
niet in de buurt van of onder brandbare materialen, zoals
gordijnen of voorwerpen aan de keukenwand.
• Dit apparaat is uitsluitend bedoeld voor huishoudelijk gebruik
en mag niet in de volgende omstandigheden worden gebruikt:
kitchenettes / keukens voor personeel van winkels, kantoren en
andere werkomgevingen; boerderijen; gebruik door gasten in
hotels, motels en andere plekken met een residentieel karakter;
verblijfsaccommodaties zoals een chambre d’hôte.
• Wanneer het snoer beschadigd is, moet dit uit
veiligheidsoverwegingen worden vervangen door de
fabrikant, door diens reparatiedienst of door iemand met de
juiste kwalicaties daarvoor.
• Dit apparaat kan worden gebruikt worden door kinderen van 8
jaar en ouder en door mensen met fysieke, zintuiglijke of mentale
beperkingen of door personen zonder kennis of ervaring met
het apparaat, maar in alle gevallen dient dit te gebeuren onder
toezicht of na voorafgaande instructies met betrekking tot
het veilige gebruik van het apparaat. De bijkomende risico’s
moeten bekend zijn. Reiniging en onderhoud van het apparaat
kunnen worden verricht door kinderen van 8 jaar en ouder
onder toezicht.
• Houd het apparaat en het snoer buiten bereik van kinderen
jonger dan 8 jaar.

18
• Het zakje silicagel onmiddellijk weggooien. Niet opeten en
buiten bereik van kinderen houden.
• Het apparaat laten afkoelen alvorens het op te bergen.
• Steek nooit uw handen in het apparaat. Steek geen te grote
etenswaren, metalen verpakkingen of voorwerpen erin.
• Probeer geen etenswaren eruit te halen terwijl het apparaat
aanstaat.
• Het apparaat volledig laten afkoelen en loskoppelen vooraleer
het te reinigen. Een met zeepwater doordrenkte spons
gebruiken om de buitenkant van de broodrooster te reinigen en
deze dan zorgvuldig afdrogen. Om de kruimels te verwijderen
de schuif uittrekken, de kruimels wegwerpen en dan de schuif
weer inzetten. Om in de broodrooster vastgeraakte stukken te
verwijderen, de rooster omdraaien en lichtjes schudden om de
stukken te doen vallen. Nooit een mes of een ander voorwerp in
de broodrooster steken om te voorkomen dat u deze beschadigt.
• Het apparaat niet op of bij een hittebron plaatsen. Niet gebruiken
op oppervlakken die niet tegen warmte kunnen.
• Het snoer niet over de rand van het werkblad laten hangen en
niet in contact laten komen met warme oppervlakken.
• Het apparaat niet aan laten staan zonder toezicht.
• Dompel het apparaat niet onder in water of een andere vloeistof.
• Na gebruik en voor het schoonmaken altijd de stekker uit het
stopcontact halen. Laat het apparaat nooit zonder toezicht
achter met de stekker nog in het stopcontact. Om het apparaat
uit het stopcontact te halen, trekt u altijd aan de stekker en nooit
aan het snoer.
• Het apparaat is er niet voor bestemd om aangezet te worden
met een externe tijdschakelaar of door een bedieningssysteem
op afstand.
• Sluit het apparaat uitsluitend aan op een geaard stopcontact.
Wij raden aan te controleren of de elektrische installatie is
uitgerust met een geschikte dierentieelschakelaar. Vraag een

19
installateur om advies.
• Gebruik het apparaat niet als het gevallen is of als er zichtbare
beschadigingen zijn.
• De gebruiker mag zelf geen enkele reparatie aan het apparaat
uitvoeren.
• Gebruik het apparaat niet buiten.
OPGELET: Polyethyleenzakjes die het product of zijn
verpakking bevatten, kunnen gevaarlijk zijn. Houd deze
zakjes buiten het bereik van baby’s en kinderen.
Gebruik ze niet in wiegjes, kinderbedden, kinderwagens of een
park voor baby’s. De dunne lm kan blijven kleven aan de neus
of mond en kan de ademhaling hinderen. Een zakje is geen
speelgoed.
AEEA - EINDE LEVENSDUUR VAN ELEKTRISCHE EN
ELEKTRONISCHE TOESTELLEN
In het belang van allen en om actief mee te werken aan
de bescherming van het milieu en de volksgezondheid
vragen wij u:
• Gooi uw producten niet bij het huishoudelijk afval.
• AEEA (afgedankte elektrische en elektronische apparatuur)
moet apart worden ingezameld.
• Maak gebruik van de terugname- en inzamelpunten voor AEEA
in uw regio. Op die manier kunnen bepaalde grondstoen
gerecycleerd, hergebruikt of gerecupereerd worden.
• Als u dit product correct afdankt, helpt u mee om mogelijke
negatieve gevolgen voor het milieu en de volksgezondheid
die te wijten zijn aan eventueel gevaarlijke stoen die erin
verwerkt zitten, te vermijden.
Indien u meer informatie wenst over de afdanking van dit
product, vragen wij u om contact op te nemen met uw lokale
dienst voor de verwerking van huishoudelijk afval.

20
2. INLEIDING
Gefeliciteerd met uw nieuwe Cuisinart Broodrooster.
Al meer dan 30 jaar streeft Cuisinart ernaar de beste keukenapparatuur te produceren. Alle
Cuisinart producten zijn zo gemaakt dat ze een bijzonder lange levensduur hebben. Ze zijn ook
ontworpen om makkelijk in gebruik te zijn en dag in dag uit uitstekende prestaties te leveren.
Ga voor meer informatie over onze producten en voor recepten naar onze website
www.cuisinart.eu.
3. KENMERKEN zie voorpagina)
1. Extrabrede (36mm) opening
Om alle soorten brood en broodjes te roosteren. Het model CPT160 is voorzien van 2 gleuven
om 2 sneedjes gezamenlijk te roosteren. Het model CPT180 staat toe om 4 sneedjes gezamenlijk
te roosteren dankzij de 4 gleuven, gecontroleerd door 2 zelfstandige bedieningen.
2. Systeem om het brood te centreren
Houdt het brood in het midden van de broodrooster, ongeacht de dikte van uw sneetje, voor
een gelijkmatige goudbruine kleur.
3. Hendel
Gaat automatisch weer omhoog op het einde van de cyclus. De hendel kan ook weer omhoog
worden geduwd om de cyclus te beëindigen. Het maximaal weer omhoog zetten maakt een
vlot gebruik mogelijk.
4. Max:
Verlengt de roostertijd voor het beste resultaat bij wat dikker brood, broodjes, muns en
bagels.
5. Ontdooien-toets:
Ontdooit en roostert de sneetjes in 1 cyclus.
6. Opwarmen-toets:
Warmt het brood opnieuw op zonder het te bruin te laten worden.
7. Instelling annuleren
Om de cyclus te onderbreken en het brood uit te werpen.
8. Variabel roosteren draaiknop
6 niveaus om precies het gewenste roosterresultaat te bekomen.
9. Uitneembare kruimelschuif (Toegankelijk vanaf de achterkant van de broodrooster)
Om de kruimels in alle eenvoud te kunnen verwijderen.
4. GEBRUIK
• De broodrooster op een vlak oppervlak plaatsen.
• Controleer of de kruimelschuif geplaatst is en steek de stekker in het stopcontact.
• Het brood in de opening schuiven en op de hendel naar beneden duwen.

21
• Om de broodrooster uit te zetten voor het einde van de cyclus, de Stop-toets indrukken of de
hendel weer naar boven duwen.
N.B. Het model CPT180 beschikt over 2 zelfstandige bedieningen, wat toestaat verschillende
broodsoorten gezamenlijk te roosteren. Om 4 sneedjes te roosteren, moet u de 2 bedieningen
inschakelen.
A. HET ROOSTEREN VAN HET SNEETJE BROOD INSTELLEN
Stel de toets in op het gewenste roosterniveau. Hoe bruin uw toastje wordt, hangt af van het soort
brood en de hoeveelheid vocht in de sneetjes. Om minder geroosterde toasts te bekomen, stel
de toets in op niveau 4-5 om vaster brood of vers brood te roosteren en op niveau 2-3 om droog
brood te roosteren.
B. GEBRUIK VAN DE VERSCHILLENDE TOETSEN
Door de verschillende toetsen in te drukken stelt u de benodigde tijd in functie van het
broodtype en van het gewenste roosterniveau in. Elke instelling kan worden gecombineerd met
de draaiknop voor het bruiningsniveau. Een indicatorlampje toont de gekozen instelling.
Verlengt de roostertijd voor het beste resultaat bij wat dikker brood, broodjes, muns en
bagels.
Voegt de nodige tijd toe om het brood eerst te ontdooien en dan te roosteren.
armt het brood opnieuw op zonder het te bruin te laten worden.
N.B. Om de keuze te annuleren drukt u op Cancel. Dit maakt het ook mogelijk de cyclus stop te
zetten en het brood weer omhoog te laten komen.
5. TIPS & TRICS
• Broodjes, luxebroodjes of dikke sneden moeten langer worden geroosterd. We raden u aan de
-toets te gebruiken en dan het roosterniveau in te stellen volgens uw voorkeur.
• Om croissants te roosteren deze horizontaal in twee snijden en de
-toets indrukken. Om deze
alleen op te warmen, de
-toets gebruiken.
• Om brood met fruit te roosteren, verwijder het losliggen fruit om te vermijden dat het in de
rooster valt, of tegen de wanden bleeft
• Om één snede te roosteren, selecteer een niveau lager dan voor 2 sneedjes.
6. REINIGING & ONDERHOUD
• Haal na gebruik altijd direct de stekker uit het stopcontact en laat de broodrooster volledig
afkoelen voordat u hem gaat schoonmaken.
• Dompel het apparaat nooit in water of een andere vloeistof en doe hem niet in de vaatwasser.
• Gebruik geen schurende reinigingsmiddelen. Veeg de buitenkant eenvoudig af met een schone,
vochtige doek en maak hem weer goed droog. Breng bij gebruik van een schoonmaakmiddel dit

22
altijd eerst aan op een doekje en niet op de broodrooster zelf.
• Om kruimels te verwijderen, schuift u de kruimellade uit en gooit u de broodkruimels weg.
Daarna plaats u de kruimellade weer terug op zijn plaats.
• Om stukjes brood uit de broodrooster te verwijderen, houdt u de broodrooster ondersteboven
en schudt u hem voorzichtig heen en weer.
• Wikkel het snoer nooit om de broodrooster heen.
BELANGRIJK: Steek nooit harde, scherpe of metalen voorwerpen in de sleuven, omdat dit de
broodrooster kan beschadigen en gevaarlijk kan zijn.

23
1. ISTRUZIONI DI SICUREZZA
(TRADUZIONE DELLE ISTRUZIONI ORIGINALI
LEGGERE ATTENTAMENTE LE PRESENTI ISTRUZIONI DI
SICUREZZA PRIMA DI UTILIZZARE L’APPARECCHIO!
• ATTENZIONE: Supercie calda.
• La temperatura delle superci esposte può essere alta quando
l’apparecchio è in funzione.
• Il pane può bruciare; quindi, non utilizzare il tostapane vicino
o sotto a materiali combustibili, come delle tende o i pensili
della cucina.
• Questo apparecchio è destinato unicamente all’uso
domestico e non è idoneo alle seguenti applicazioni: angoli
cucina riservati al personale di negozi, uci e altri ambienti
professionali; fattorie; l’uso da parte di clienti di alberghi,
motel e altri ambienti a carattere residenziale; gli ambienti
tipo attacamere.
• Se danneggiato, il cavo di alimentazione deve essere sostituito
dal fabbricante, dal suo servizio di assistenza o da personale
con qualiche simili, onde evitare qualsiasi pericolo.
• Questo apparecchio può essere utilizzato da bambini, a partire
dagli 8 anni, e da persone con capacità siche, sensoriali o
mentali ridotte, o da soggetti privi della necessaria esperienza
o conoscenza, purché possano beneciare di sorveglianza o
di istruzioni preliminari riguardanti l’utilizzo dell’apparecchio
in tutta sicurezza e qualora ne comprendano i rischi. La pulizia
e la manutenzione dell’apparecchio possono essere eettuate
da bambini di età superiore a 8 anni, purché sotto sorveglianza.
• Tenere l’apparecchio e il suo cavo elettrico fuori dalla portata
dei bambini di età inferiore a 8 anni.
• Gettare immediatamente le bustine di gel di silice. Non ingerire
e tenere fuori dalla portata dei bambini.

24
• Lasciare rareddare l’apparecchio prima di riporlo.
• Non mettere mai le mani all’interno dell’apparecchio. Non
inserirvi alimenti troppo grandi, imballaggi metallici, né alcun
tipo di utensile.
• Non cercare di estrarre degli alimenti quando l’apparecchio è
attaccato alla corrente.
• Lasciar rareddare l’apparecchio completamente e staccarlo
dalla corrente prima di pulirlo. Utilizzare una spugnetta
insaponata per pulire la parte esterna del tostapane e
asciugare con cura.Per togliere le briciole, estrarre il cassettino,
gettare le briciole e reinserire. Non utilizzare il tostapane
senza il cassettino. Per rimuovere eventuali residui incastrati
all’interno, capovolgere il tostapane e scuoterlo leggermente
per farli cadere. Non inserire mai coltelli o altro nel tostapane
per evitare di danneggiare l’apparecchio.
• Non posizionare l’apparecchio vicino o sopra un dispositivo
di riscaldamento. Non utilizzare su superci sensibili al calore.
• Non lasciare che il cavo di alimentazione superi il bordo del
piano di lavoro, né metterlo a contatto con superci calde.
• Non lasciare l’apparecchio incustodito quando è acceso.
• Non immergere in acqua o altro liquido.
• Staccare sempre l’apparecchio dalla corrente dopo averlo
utilizzato e prima di pulirlo. Non lasciare mai l’apparecchio
collegato alla corrente e incustodito. Per scollegarlo, aerrare
la spina e non il cavo.
• Questo apparecchio non è destinato ad essere messo in
funzione da un timer esterno o da un telecomando separato.
• Collegare l’apparecchio solo a una presa con messa a terra
incorporata. Si consiglia di vericare che l’impianto elettrico
sia dotato di un dispositivo a corrente dierenziale residuale
appropriato. Rivolgersi a un installatore.
• Non usare l’apparecchio se è caduto o se presenta segni visibili
di danneggiamento.

25
• Nessuna riparazione può essere eseguita dall’utente.
• Non utilizzare l’apparecchio all’esterno.
ATTENZIONE: I sacchetti in polietilene che contengono
il prodotto o il suo imballaggio possono essere
pericolosi. Tenere questi sacchetti lontano dalla portata
di neonati e bambini.
Non utilizzare all’interno di culle, lettini per bambini, passeggini
o box. La pellicola sottile può aderire a naso e bocca e impedire
la respirazione. Un sacchetto non è un giocattolo.
RAEE – APPARECCHIATURE ELETTRICHE ED
ELETTRONICHE A FINE VITA
Nell’interesse collettivo, e al fine di partecipare
attivamente alla protezione dell’ambiente e della
salute pubblica:
• Non gettare i prodotti nei riuti domestici non dierenziati;
• I RAEE (riuti di apparecchiature elettriche ed elettroniche)
devono essere raccolti separatamente;
• Utilizzare il sistema di ritiro e recupero previsto per i RAEE del
proprio comune. In tal modo, alcuni materiali potranno essere
riciclati, riutilizzati o recuperati;
• Facendo sì che il prodotto venga smaltito in modo appropriato,
si contribuisce a evitare potenziali conseguenze nefaste per
l’ambiente e per la salute pubblica causate da eventuali
sostanze pericolose contenute al loro interno.
Per maggiori informazioni riguardanti lo smaltimento di questo
prodotto, rivolgersi al proprio servizio comunale di nettezza
urbana.

26
2. INTRODUZIONE
Complimenti, avete appena acquistato il nuovo tostapane Cuisinart.
Da oltre 30 anni Cuisinart punta a produrre il meglio delle attrezzature da cucina. Tutti i prodotti
Cuisinart sono progettati per durare eccezionalmente a lungo, essere facili da usare e dare risultati
ottimali, giorno dopo giorno.
Per saperne di più sui nostri prodotti o per idee di ricette, visitate il nostro sito Internet
www.cuisinart.eu.
3. CARATTERISTICHE DEL PRODOTTO
(riferimento alla copertina)
1. Camere di cottura molto larghe (36mm)
Permettono di tostare qualsiasi tipo di pane, anche panini. Il modello CPT160 è dotato di 2
aperture che permettono di tostare contemporaneamente 2 fette di pane. Il modello CPT180
può tostare no a 4 fette, grazie alle 4 aperture controllate da 2 comandi indipendenti.
2. Sistema per centrare il pane
Trattiene la fetta di pane, di qualsiasi spessore, al centro del tostapane, per una doratura
uniforme.
3. Leva
Fa risalire automaticamente le fette alla ne della tostatura. Si può interrompere la tostatura
agendo manualmente sulla leva. Grazie ai due livelli di espulsione delle fette, con l’innalzamento
massimo è possibile estrarre le fette più piccole.
4. Max:
Allunga il tempo del ciclo di tostatura per ottenere risultati migliori con pane più spesso, panini,
mun e bagel.
5. Tasto Scongelamento:
Scongela e tosta le fette in un unico ciclo.
6. Tasto Riscaldalmento:
Riscalda il pane senza dorarlo eccessivamente.
7. Tasto Annulla
Permette di interrompere la cottura ed espellere il pane.
8. Regolazione variabile della tostatura
6 diverse temperature per ottenere la tostatura desiderata.
9. Cassettino raccoglibriciole amovibile (accessibile dal retro del tostapane)
Permette di raccogliere facilmente le briciole.
4. ISTRUZIONI PÈR L’USO
• Posizionare il tostapane su una supercie piatta.
• Controllare che il cassettino raccoglibriciole sia inserito correttamente. Attaccare l’apparecchio
alla corrente elettrica.
• Inserire il pane nell’apposita apertura e spingere la leva.
• Per interrompere la tostatura prima della ne del ciclo stabilito, premere il tasto Stop o alzare la
leva manualmente.
N.B. Il modello CPT180 è dotato di 2 comandi indipendenti che permettono di grigliare più tipi di

27
pane contemporaneamente. Per tostare 4 fette, è necessario attivare i due comandi.
A. REGOLAZIONE DELLA DORATURA
Selezionare con l’apposita manopola il livello di doratura desiderato. La doratura del vostro toast
varia in funzione del tipo di pane e del grado di umidità delle fette. In generale, per ottenere una
doratura media di pane o fresco o consistente, selezionare il livello 4-5. 2-3 per il pane raermo.
B. UTILIZZO DEI TASTI
I 3 tasti , e permettono di regolare il tempo in funzione del tipo di pane e del grado di
doratura desiderato. Ogni tasto può essere usato in combinazione con la regolazione del livello di
doratura. Una spia luminosa indica il tasto selezionato.
Allunga il tempo del ciclo di tostatura per ottenere risultati migliori con pane più spesso,
panini, mun e bagel.
Questa funzione aggiunge il tempo necessario per scongelare e successivamente tostare il
pane.
Riscalda il toast pane senza dorarlo eccessivamente.
N.B. Se si desidera annullare la selezione, premere Annulla. La tostatura viene così arrestata e il
pane fatto uscire automaticamente.
5. CONSIGLI E SUGGERIMENTI
• Panini, prodotti da forno o fette spesse devono essere tostate più a lungo. Si raccomanda di
utilizzare il tasto
e di regolare il grado di tostatura desiderato.
• Per tostare i croissant, tagliarli in due in senso orizzontale e premere il tasto
. Per riscaldarli,
utilizzare il tasto
.
• Per tostare pane con pezzetti di frutta, togliere la frutta dalla supercie della fetta per evitare che
cada nel tostapane o che si incolli alla resistenza elettrica.
• Per tostare una sola fetta di pane, selezionare un tempo di tostatura più basso.
6. PULIZIA E MANUTENZIONE
• Staccare sempre il tostapane dalla corrente elettrica subito dopo l’uso. Lasciar rareddare
completamente prima di pulire.
• Non immergere l’apparecchio in acqua o altro liquido. Non mettere in lavastoviglie.
• Non usare prodotti abrasivi. Pulire l’esterno con un panno pulito leggermente inumidito e
asciugare bene. Versare l’eventuale prodotto per pulire sul panno e non sul tostapane.
• Per eliminare le briciole, estrarre l’apposito vassoietto e buttare via le briciole. Riposizionare il
vassoietto nel suo alloggiamento.
• Per togliere eventuali pezzetti di pane rimasti nel tostapane, rovesciare il tostapane all’ingiù e
scuotere delicatamente.
• Non avvolgere mai il cavo elettrico attorno al tostapane.
IMPORTANTE: Non inserire mai strumenti duri, alati o metallici nelle fessure. Ciò può
danneggiare il tostapane e costituire un pericolo per la sicurezza.

28
1. CONSIGNAS DE SEGURIDAD
(TRADUCCIÓN DE LAS INSTRUCCIONES ORIGINALES
¡LEA ATENTAMENTE ESTAS CONSIGNAS DE SEGURIDAD
ANTES DE UTILIZAR EL APARATO!
• ATENCIÓN: Supercie caliente.
• La temperatura de las supercies accesibles puede ser elevada
cuando el aparato está en funcionamiento.
• El pan se puede quemar. Por lo tanto, no utilice el tostador
cerca de materiales combustibles o debajo de ellos, como
cortinas o elementos murales de la cocina.
• Este aparato es para uso exclusivamente doméstico, no
está indicado para aplicaciones como: espacios de cocina
reservados al personal de comercios, ocinas y otros entornos
profesionales, granjas o casas rurales, uso por parte de los
clientes de hoteles, moteles y otras instalaciones de carácter
residencial, lugares como habitaciones para huéspedes.
• Si el cable de alimentación está dañado, debe sustituirlo
el fabricante o su servicio técnico, o bien una persona de
cualicación similar, para evitar situaciones peligrosas.
• Este aparato puede ser utilizado por niños a partir de los 8
años, y por personas con facultades físicas, sensoriales o
mentales reducidas, o bien por personas que no tengan
experiencia o conocimientos sucientes, siempre que estén
bajo supervisión o que hayan recibido las instrucciones
necesarias para utilizar el aparato con total seguridad y
que comprendan claramente los peligros inherentes a la
utilización del aparato. La limpieza y el mantenimiento del
aparato pueden ser llevados a cabo por niños mayores de 8
años y bajo supervisión.
• Conserve el aparato y su cable eléctrico lejos del alcance de
los niños menores de 8 años.
• Deseche inmediatamente la bolsa de gel de sílice. No comer

29
y mantenerlas fuera del alcance de los niños.
• Espere a que el aparato se enfríe antes de guardarlo.
• No introduzca las manos en el interior del tostador. No
introduzca en él alimentos demasiado grandes, embalajes
metálicos o utensilios.
• No intente liberar alimentos atascados con el tostador
enchufado.
• Cuando haya terminado de utilizarlo, deje que se enfríe el
aparato por completo y sólo luego lo puede desenchufar y
lavarlo si quiere. Utilice una esponja humedecida con agua
jabonosa para limpiar el exterior de la tostadora y después
séquela con cuidado. Para quitar las migas hay que sacar
el cajoncito correspondiente, tirarlas y después poner el
cajoncito en su sitio. No utilice la tostadora si el cajoncito no
está en su sitio. Para retirar trocitos y migas de pan que se
hayan incrustado en la tostadora hay que poner la tostadora
bocabajo y sacudirla ligeramente para que caigan esos
trocitos. No se le ocurra meter nunca un cuchillo ni nada
por el estilo en la tostadora porque podría causarle daño al
aparato.
• No coloque el aparato sobre una fuente de calor o cerca de
esta. No lo utilice sobre supercies sensibles al calor.
• No deje que el cable cuelgue de la encimera y no lo ponga en
contacto con supercies calientes.
• No deje nunca el aparato en funcionamiento sin vigilancia.
• No lo sumerja en agua o en cualquier otro líquido.
• Desenchufe el aparato después de utilizarlo y antes de
limpiarlo. No deje nunca el aparato encendido sin vigilancia.
Para desenchufarlo, tire de la clavija, no del cable.
• El aparato no está preparado para funcionar con un
temporizador externo ni con un sistema de mando a distancia.
• Conecte el aparato en un enchufe con toma de tierra
incorporada. Recomendamos comprobar que la instalación

30
eléctrica está equipada con un dispositivo diferencial de
corriente residual adecuado. Pida consejo a un instalador.
• No utilice el aparato si se ha caído o si parece que haya sufrido
algún daño.
• El usuario no puede realizar reparación alguna.
• No lo utilice en exteriores.
ATENCIÓN: Las bolsas de polietileno que contienen el
producto o su embalaje pueden ser peligrosas.
Mantenga estas bolsas fuera del alcance de los bebés
y de los niños.
No las utilice en cunas, camas de niños, cochecitos o corrales
para bebés. Esta película puede pegarse a la nariz y la boca,
impidiendo la respiración. Una bolsa no es un juguete.
RAEE - RESIDUOS DE APARATOS ELÉCTRICOS Y
ELECTRÓNICOS
En interés de todos y para participar activamente en la
protección del medio ambiente y de la salud pública:
• No se deshaga de estos productos junto con la basura
doméstica.
• Los RAEE (residuos de aparatos eléctricos y electrónicos) deben
recogerse por separado.
• Utilice el sistema de recogida de RAEE de su zona. De esta
manera, algunos materiales pueden ser reciclados, reutilizados
o recuperados.
• Al asegurarse de que este producto se elimina correctamente,
ayudará a evitar posibles consecuencias adversas para el medio
ambiente y la salud pública debido a las posibles sustancias
peligrosas que pueda contener.
Para más información sobre la eliminación de este producto,
póngase en contacto con el servicio local de recogida de
residuos domésticos.

31
2. INTRODUCCIÓN
Felicidades, acaba de adquirir una nueva tostadora Cuisinart.
Desde hace más de 30 años el objetivo de Cuisinart ha sido producir los mejores equipos de cocina
del mundo. Todos los productos Cuisinart están diseñados para una vida útil excepcionalmente
larga y una gran facilidad de uso, así como para obtener un excelente rendimiento día tras día.
Para obtener más información sobre nuestros productos y algunas ideas de recetas, visite nuestro
sitio web www.cuisinart.eu.
3. CARACTERÍSTICAS DEL PRODUCTO
(consulte la portada para referencia)
1. Rejillas muy anchas (36mm)
Para tostar toda clase de panes grandes o pequeños. El modelo CPT160 tiene 2 rejillas que
permiten tostar dos rebanadas al mismo tiempo. El modelo CPT180 permite tostar hasta cuatro
rebanadas a la vez gracias a sus cuatro rejillas controladas por dos mandos independientes.
Puede meter una o dos o tres o cuatro.
2. El sistema para centrar el pan
Mantiene el pan en el centro de la tostadora cualquiera que sea su espesor para obtener un
dorado uniforme.
3. Ascensor
Movido por un mando sirve para meter y sacar el pan en la tostadora. El pan sube
automáticamente de todas maneras al nal del ciclo cuando esté tostado o descongelado o
recalentado. Pero se puede subir si usted no quiere esperar al n del ciclo. Este sistema de
ascensor para arriba (sacar) y para abajo (meter) le permite a usted expulsar la rebanada mayor
para tener sitio para sacar las más pequeñas si las hay.
4. Max:
Añada tiempo extra al ciclo de tostado para obtener mejores resultados con panecillos más
gruesos, rollitos, muns y bagesls.
5. Tecla de descongelar:
Puede descongelar y tostar las tostadas en un solo ciclo.
6. Tecla de recalentar:
Recalienta el pan sin que se dore demasiado.
7. Cancelar el ajuste
Para interrumpir el ciclo y expulsar el pan.
8. Botón de ajuste del nivel de tostado
6 niveles de coloratura para obtener exactamente el color dorado que usted desee.
9. Cajoncito de migas amovible (se encuentra en la parte trasera de la tostadora)
Permite extraer las migas fácilmente.

32
4. INSTRUCCIONES DE USO
• Ponga la tostadora en una supercie plana.
• Compruebe que la bandeja recogemigas está en su sitio.
• Si está en su sitio puede enchufar el aparato.
• Meta las rebanadas o lo que sea en las rejillas y baje todo con el ascensor.
• Para detener el tostado antes de terminar el ciclo no tiene más que tocar el botón Stop o bien
levantar el ascensor y expulsar lo que se estaba tostando o descongelando o recalentando.
ATENCIÓN: El modelo CPT180 tiene dos mandos de ascensor independientes que permiten
tostar varios tipos de rebanadas y bollerías al mismo tiempo. Para tostar 4 rebanadas baje los dos
mandos de ascensor al mismo tiempo.
A. GRADUAR EL DORADO DE LA TOSTADA
Elija el nivel de dorado que más le guste. El color dorado de las tostadas depende del tipo de pan
y del grado de humedad del pan. En general, para un dorado medio hay que colocar el botón
rotativo entre 4-5 con panes densos o frescos y entre 2-3 para pan seco.
B. LAS TRES TECLAS
Hay tres teclas para , y . Permiten ajustar el tiempo necesario en función del tipo de
pan y del dorado deseado. Cada ajuste se puede combinar con el botón de ajuste del nivel de
tostado. Un indicador luminoso muestra el ajuste seleccionado.
Añada tiempo extra al ciclo de tostado para obtener mejores resultados con panecillos más
gruesos, rollitos, muns y bagesls.
Pone el tiempo necesario para primero descongelar el pan y después tostarlo.
Recalienta las tostadas sin que se doren demasiado.
ATENCIÓN: Pulse el botón «cancelar» para cancelar la selección. Esto detiene el ciclo y le permite
sacar el pan.
5. CONSEJOS Y SUGERENCIAS
• Los panes pequeños, la bollería o las rebanadas espesas deben tostarse más tiempo. Le
recomendamos que utilice la tecla
para elegir el nivel de dorado que preera.
• Para tostar bollería, por ejemplo croissants, tiene que cortar la pieza horizontalmente en dos
partes y luego pulsar la tecla
. Si sólo quiere recalentarlos, pulse la tecla de .
• Para tostar rebanadas con trocitos de frutas hay que quitar primero esos trocitos de la supercie
de la rebanada para evitar que caigan en la tostadora o se peguen a las resistencias que están
dentro de las rendijas.
• Para tostar una sola rebanada de pan hay que seleccionar un nivel más bajo que para dos
rebanadas.

3333
6. LIMPIEZA Y MANTENIMIENTO
• Desconecte siempre la tostadora de la red eléctrica después de su uso y deje que se enfríe
completamente antes de limpiarla.
• No sumerja el aparato en agua o cualquier otro líquido ni lo ponga en el lavavajillas.
• No utilice limpiadores abrasivos. Limpie el exterior con un paño limpio y húmedo y séquelo bien.
Si usa algún agente limpiador, aplíquelo a un paño, no a la tostadora.
• Para quitar las migas, saque la bandeja y tírelas; luego vuelva a poner la bandeja en su lugar.
• Para quitar los trozos pan que puedan haber quedado en el interior, dele la vuelta a la tostadora
y agítela suavemente.
• Nunca enrosque el cable alrededor de la tostadora.
IMPORTANTE: Nunca introduzca instrumentos duros, alados o metálicos en las ranuras, ya que
podría dañar la tostadora o provocar un accidente.

34
1. INSTRUÇÕES DE SEGURANÇA
(TRADUÇÃO DAS INSTRUÇÕES ORIGINAIS)
LEIA ATENTAMENTE TODAS AS INSTRUÇÕES ANTES DE
UTILIZAR O APARELHO!
• CUIDADO: Superfícies quentes.
• A temperatura das superfícies expostas pode ser elevada
quando o aparelho está em funcionamento.
• Porque o pão pode arder, não utilize a torradeira na
proximidade ou por baixo de materiais combustíveis, como
cortinas ou elementos murais da cozinha.
• Este aparelho destina-se apenas a uso doméstico e não deve
ser utilizado em aplicações como áreas de cozinha reservadas
ao pessoal em lojas, escritórios e outros ambientes de
trabalho; casas agropecuárias; clientes em hotéis, motéis e
similares; pequenos alojamentos turísticos.
• Se o cabo de alimentação estiver danicado, deve ser
substituído pelo fabricante, pelo respectivo serviço de
assistência técnica ou por uma pessoa igualmente qualicada
a m de evitar acidentes.
• Este aparelho pode ser utilizado por crianças a partir dos 8
anos e por pessoas com capacidades físicas, sensoriais ou
mentais diminuídas, ou sem experiência e conhecimento,
desde que supervisionadas ou instruídas sobre o modo de
emprego do aparelho em segurança e compreendam os
riscos envolvidos. A limpeza e a manutenção do aparelho
podem ser realizadas por crianças a partir dos 8 anos, desde
que supervisionadas.
• Mantenha o aparelho e o cabo de alimentação fora do alcance
de crianças com menos de 8 anos.
• Elimine o saco de gel de sílica imediatamente. Mantenha-o
fora do alcance de crianças para evitar a ingestão do mesmo.
• Deixe o aparelho arrefecer antes de o guardar.

35
• Nunca ponha a mão dentro do aparelho. Não introduza na
torradeira alimentos grandes demais, embalagens metálicas
nem qualquer utensílio.
• Nunca tente remover alimentos que tenham cado presos se
a torradeira estiver ligada à corrente.
• Deixe o aparelho arrefecer completamente e desligue-o
antes de limpar. Limpe o exterior da torradeira com uma
esponja embebida em água e detergente e, depois, seque-a
com cuidado. Para retirar as migalhas, remova a bandeja
de recolha de migalhas, esvazie-a e, seguidamente, volte
a colocá-la no lugar. Não utilize a torradeira sem a bandeja
de recolha de migalhas. Para remover pedaços de pão que
tenham cado presos na torradeira, vire-a ao contrário e
agite levemente para que caiam. Nunca introduza uma faca
ou qualquer objecto cortante na torradeira porque pode
provocar danos.
• Não coloque o aparelho sobre ou na proximidade de fontes
de calor. Não utilize sobre superfícies termo-sensíveis.
• Não deixe o cabo de alimentação pendurado na borda
da bancada e evite qualquer contacto entre o cabo de
alimentação e superfícies quentes.
• Nunca deixe o aparelho em funcionamento sem vigilância.
• Não mergulhe o aparelho em água ou em qualquer outro
líquido.
• Desligue sempre o aparelho depois de o utilizar e antes de
limpar. Nunca deixe o aparelho em funcionamento sem
vigilância. Puxe a cha para desligar, nunca puxe pelo cabo.
• O aparelho não se destina a ser operado por meio de
temporizador externo ou de telecomando.
• Ligue sempre o aparelho a uma tomada ligada à terra.
Recomenda-se que verique se a instalação eléctrica está
equipada com um dispositivo de corrente residual adequado.
Aconselhe-se com um electricista.
• Não utilize o aparelho se tiver caído ou se apresentar sinais
visíveis de danos.

36
• O consumidor deverá abster-se de toda e qualquer tentativa
de reparação.
• Não utilize no exterior.
ADVERTÊNCIA: Os sacos em polietileno contendo o
produto ou a sua embalagem podem ser perigosos.
Mantenha esses sacos fora do alcance dos bebés e das
crianças.
Não use em berços, camas de criança, carrinhos nem parques
para bebés. A película na pode colar-se ao nariz e à boca e
impedir a respiração. Um saco de plástico não é um brinquedo.
REEE - RESÍDUOS DE EQUIPAMENTOS ELÉCTRICOS
E ELESTRÓNICOS EM FIM DE VIDA
No interesse de todos e de modo a participar
activamente no esforço colectivo de protecção do
ambiente e da saúde pública:
• Não elimine os produtos no lixo doméstico não separado.
• Os REEE (resíduos de equipamentos eléctricos e electrónicos)
devem ser recolhidos separadamente.
• Utilize os sistemas de recolha e de reciclagem disponíveis na
sua região para os REEE. Alguns materiais poderão assim ser
reciclados, reutilizados ou recuperados.
• Garantindo que este produto é eliminado adequadamente,
estará a contribuir para evitar potenciais consequências
nefastas para o ambiente e a saúde pública devido às
eventuais substâncias perigosas nele contidas.
Para obter mais informações sobre o modo de eliminação do
aparelho, contacte o serviço local de recolha de lixo.

37
2. INTRODUÇÃO
Parabéns pela sua compra do novo Toaster da Cuisinart!
Há mais de 30 anos que o objectivo da Cuisinart® é produzir aparelhos de cozinha de grande qualidade.
Todos os produtos da Cuisinart são concebidos para terem uma vida útil excepcionalmente longa,
grande facilidade de utilização e um desempenho excelente dia após dia.
Para saber mais sobre os nossos produtos e descobrir ideias de receitas fantásticas, visite o site
www.cuisinart.eu.
3. CARACTERÍSTICAS (ver tampa da embalagem)
1. Aberturas extra-largas (36 mm)
Permitem torrar todos os tipos de pão (incluindo pães de pequenas dimensões). O modelo ref.
CPT160 permite torrar 2 fatias de cada vez graças às 2 aberturas. O modelo ref. CPT180 permite
torrar até 4 fatias graças às 4 aberturas com 2 comandos independentes.
2. Sistema de auto-centragem
Mantém o pão no meio da torradeira, qualquer que seja a espessura da fatia, para torrar
uniformemente.
3. Alavanca
Sobe automaticamente quando a torrada está pronta. A alavanca também pode ser accionada
para interromper o ciclo. A elevação extra permite retirar facilmente as fatias de pão mais
pequenas.
4. MAX:
Acrescenta mais tempo ao ciclo de torragem a m de produzir melhores resultados com pães
mais grossos, carcaças, muns e bagels.
5. Tecla de descongelar:
Permite descongelar as fatias e, depois, torrá-las num único ciclo.
6. Tecla de reaquecer:
Permite reaquecer a torrada sem a torrar mais.
7. Tecla de anular (‘Stop’)
Para interromper o ciclo e ejectar o pão.
8. Tecla de ajustar
6 níveis para obter exactamente o nível de torragem desejado.
9. Bandeja de recolha de migalhas removível (acessível na parte traseira da torradeira)
Permite retirar as migalhas com toda a facilidade.
4. MODO DE EMPREGO
• Coloque a torradeira numa superfície plana.
• Certique-se de que a bandeja de recolha de migalhas está correctamente instalada e ligue a
torradeira.
• Introduzia o pão na abertura e prima a alavanca.
• Para parar a torradeira antes de terminar o ciclo, prima a tecla ‘Stop’ ou accione a alavanca.
N.B. O modelo CPT180 dispõe de 2 comandos independentes, que permitem torrar 2 tipos de pão
ao mesmo tempo. Se quiser torrar 4 fatias, deve utilizar os 2 comandos.

38
A. REGULAÇÃO DO NÍVEL DE TORRAGEM
Regule o botão para o nível de torragem desejado. O nível de torragem depende do tipo de pão
e do grau de humidade das fatias. Por regra, para uma torragem média, regule a torradeira para o
nível 4-5 para torrar pão mais denso ou pão fresco e para o nível 2-3 para torrar pão duro.
B. UTILIZAÇÃO DAS VÁRIAS TECLAS
As três teclas Max
,
Descongelar e Reaquecer permitem ajustar o tempo necessário
consoante o tipo de pão e o nível de torragem desejado. Cada uma pode ser combinada com o
comando de torragem. Para maior facilidade, uma luz piloto indica a tecla seleccionada.
Acrescenta mais tempo ao ciclo de torragem a m de produzir melhores resultados com pães
mais grossos, carcaças, muns e bagels.
Acrescenta o tempo necessário para descongelar o pão e, depois, torrá-lo.
Permite reaquecer a torrada sem a torrar mais.
N.B. Se quiser cancelar a selecção, prima a tecla de anular (‘Stop’), o ciclo pára e o pão é ejectado.
5. SUGESTÕES E DICAS
• As carcaças, alguns produtos de pastelaria ou fatias grossas levam mais tempo a torrar.
Recomenda-se que utilize a tecla
e, seguidamente, regule o nível de torragem que preferir.
• Para torrar croissants, corte-os ao meio na horizontal e utilize a tecla
. Para reaquecer, utilize
a tecla
.
• Quando torrar pães com frutas secas, retire quaisquer frutas que estejam soltas à superfície do
pão para evitar que estas caiam dentro da torradeira ou quem coladas às grades laterais.
• Quando torrar uma única fatia de pão, seleccione uma regulação inferior à que utiliza
normalmente para duas fatias.
6. LIMPEZA E MANUTENÇÃO
• Desligue sempre a torradeira da corrente eléctrica imediatamente depois de a utilizar e deixe-a
arrefecer completamente antes de limpar.
• Nunca mergulhe o aparelho em água ou em qualquer outro líquido e não o coloque na máquina
de lavar loiça.
• Não utilize produtos abrasivos. Limpe o exterior com um pano limpo húmido e seque bem.
Aplique sempre o agente de limpeza no pano não no aparelho.
• Para remover as migalhas, extraia a bandeja de recolha de migalhas e depois volte a colocá-la
no lugar.
• Para remover quaisquer pedaços de pão que possam ter cado na torradeira, volte-a ao contrário
e sacuda com cuidado.
• Nunca enrole o cabo à volta do corpo da torradeira.
IMPORTANTE: Nunca introduza objectos duros, aados ou metálicos nas ranhuras porque
arrisca-se a danicar a torradeira e a pôr em causa a segurança.

39
1. PRZEPISY DOTYCZĄCE BEZPIECZEŃSTWA
(TŁUMACZENIE ORYGINALNEJ INSTRUKCJI OBSŁUGI)
PRZED UŻYCIEM URZĄDZENIA DOKŁADNIE PRZECZYTAĆ
PONIŻSZE PRZEPISY DOTYCZĄCE BEZPIECZEŃSTWA!
• UWAGA: Gorąca powierzchnia.
• Temperatura dostępnych powierzchni działającego
urządzenia może być wysoka.
• Pieczywo może zacząć się palić. Dlatego nie należy używać
tostera w pobliżu lub pod materiałami łatwopalnymi, takimi
jak zasłony lub pod osprzętem kuchennym wiszącym na
ścianie.
• Urządzenie przeznaczone jest wyłącznie do użytku
domowego i nie może być wykorzystywane w następujących
warunkach: w pomieszczeniach kuchennych przeznaczonych
dla personelu w sklepach, w biurach lub innym miejscu pracy;
na fermach; nie może być wykorzystywane przez klientów
hoteli, moteli i innych obiektów o charakterze mieszkalnym,
np. pokojów gościnnych.
• Jeżeli kabel zasilający jest uszkodzony, jego wymianę
należy zlecić producentowi, serwisowi posprzedażnemu lub
specjaliście, aby uniknąć niebezpieczeństwa.
• Urządzenie nie jest przeznaczone do użytkowania przez
dzieci w wieku poniżej 8 lat oraz osoby, których zdolności
zyczne, sensoryczne lub umysłowe są ograniczone lub też
osoby, które nie posiadają odpowiedniego doświadczenia
bądź wiedzy, chyba że pozostają one pod opieką i nadzorem
osoby odpowiedzialnej za ich bezpieczeństwo, która
przekazała im niezbędne informacje dotyczące prawidłowej
obsługi urządzenia. Czyszczenie i konserwacja urządzenia
mogą być wykonywane przez dzieci w wieku powyżej 8 lat, o
ile znajdują się one pod nadzorem osoby dorosłej.

40
• Urządzenie i jego przewód zasilający należy przechowywać
w miejscu niedostępnym dla dzieci w wieku poniżej 8 lat.
• Natychmiast wyrzucić torebkę z żelem krzemionkowym. Nie
połykać i przechowywać w miejscu niedostępnym dla dzieci.
• Przed schowaniem pozostawić urządzenie do wystygnięcia.
• Nie wkładać ręki do środka urządzenia. Nie wkładać zbyt
dużych produktów spożywczych, opakowań metalowych ani
żadnych przyborów kuchennych.
• Nie próbować wyjmować produktów, gdy urządzenie jest
podłączone do źródła zasilania.
• Przed każdym czyszczeniem urządzenia należy odłączyć je od
źródła zasilania i pozostawić do ostygnięcia. Do czyszczenia
tostera z zewnątrz użyć gąbki nasączonej wodą ze środkiem
myjącym, a następnie dokładnie osuszyć. Aby usunąć
okruchy, należy wyciągnąć szuadę, wyrzucić okruchy, a
następnie założyć szuadę na swoje miejsce. Nie używać
tostera bez szuady. Aby usunąć kawałki z rogów tostera,
należy odwrócić urządzenie i potrząsnąć nim. Nie wkładać
noża lub innego narzędzia do tostera, aby go nie uszkodzić.
• Nie stawiać urządzenia na lub w pobliżu grzejnika. Nie
używać urządzenia na powierzchniach wrażliwych na wysoką
temperaturę.
• Nie dopuszczać, aby przewód zwisał ze stołu czy blatu lub
dotykał rozgrzanych elementów urządzenia.
• Nie pozostawiać urządzenia w trakcie pracy bez nadzoru.
• Nie zanurzać w wodzie ani w żadnym innym płynie.
• Po użyciu i przed czyszczeniem zawsze odłączyć urządzenie
od prądu. Nigdy nie pozostawiać włączonego urządzenia bez
nadzoru. Podczas odłączania urządzenia z gniazdka zasilania
należy zawsze pociągać za wtyczkę, a nie za przewód.
• Urządzenie nie jest przeznaczone do sterowania za pomocą
zewnętrznego programatora czasowego lub jakiegokolwiek
innego systemu zdalnego sterowania.

41
• Urządzenie może być podłączone wyłącznie do gniazda
z uziemieniem. Zalecamy sprawdzić, czy instalacja
elektryczna jest wyposażona w odpowiednie zabezpieczenie
różnicowoprądowe. Poprosić o poradę elektryka.
• Nie używać urządzenia, które uległo uszkodzeniu lub upadło
na ziemię.
• Nie wykonywać żadnych napraw we własnym zakresie.
• Nie używać na zewnątrz.
UWAGA: Torebki polietylenowe zawierające produkt
lub jego opakowanie mogą być niebezpieczne. Torebki
należy przechowywać w miejscu niedostępnym dla
dzieci.
Nie wykorzystywać ich do kołysek, łóżeczek dziecięcych,
wózków lub kojców dla dzieci. Cienka folia może przykleić się
do nosa lub ust i uniemożliwić oddychanie. Torebka nie jest
zabawką.
WEEE - DYREKTYWA W SPRAWIE ZUŻYTEGO
SPRZĘTU ELEKTRYCZNEGO I ELEKTRONICZNEGO
W interesie wszystkich oraz aby aktywnie uczestniczyć
w ochronie środowiska i zdrowia publicznego:
• Nie wyrzucać urządzeń ze zwykłymi, niesegregowanymi
odpadami.
• WEEE (zużyty sprzęt elektryczny i elektroniczny) należy
poddawać selektywnej zbiórce.
• Skorzystać z systemu odzyskiwania i zbiórki WEEE w swoim
regionie. W ten sposób niektóre materiały można poddać
recyklingowi, ponownie wykorzystać lub odzyskać.
• Zapewniając prawidłową utylizację produktu, pomożesz
zapobiec potencjalnym, negatywnym skutkom dla
środowiska i zdrowia publicznego ze względu na zawarte w
nim substancje niebezpieczne.

42
Aby uzyskać szczegółowe informacje na temat utylizacji tego
produktu, prosimy o kontakt z lokalną rmą zajmującą się
przetwarzaniem odpadów z gospodarstw domowych.
2. WSTĘP
Gratulujemy wyboru oraz zakupu nowego tostera Cuisinart.
Firma Cuisinart produkuje wysokiej klasy sprzęt kuchenny od ponad 30 lat. Wszystkie produkty
Cuisinart wyróżniają się wyjątkowo długą żywotnością i są zaprojektowane tak, aby zapewnić
doskonałą wydajność oraz łatwość użytkowania każdego dnia.
Aby dowiedzieć się więcej o naszych produktach lub odkryć nasze przepisy, zachęcamy do
odwiedzenia naszej strony internetowej www.cuisinart.eu.
3. FUNKCJE PRODUKTU (patrz okładka)
1. Bardzo szerokie gniazda (36 mm)
Umożliwiają opiekanie wszystkich rodzajów pieczywa i bułek. W modelu CPT160, 2 otwory
umożliwiają jednocześnie opiekanie 2 kromek. Model CPT180 umożliwia opiekanie do 4
kromek dzięki 4 otworom sterowanym przez 2 niezależne panele sterowania.
2. System centrowania
Utrzymuje kromkę na środku tostera, bez względu na jej grubość, zapewniając doskonałą
chrupkość.
3. Dźwignia
Podnosi się automatycznie po zakończeniu cyklu. Dźwignia może być również podniesiona
ręcznie, aby zakończyć cykl. Wysunięcie dwupoziomowe umożliwia maksymalne podniesienie,
aby umożliwić wyciągnięcie bardzo małych kromek.
4. Max:
By uzyskać lepsze rezultaty, bardziej zwarte pieczywo, bułki, munki i bajgle, przeznacz kilka
dodatkowych minut na cykl opiekania.
5. Przycisk „Odmrażanie”:
Umożliwia odmrożenie i opiekanie kromek w jednym cyklu.
6. Przycisk „Podgrzewanie”:
Umożliwia podgrzanie pieczywa, bez nadmiernego zarumienienia.
7. Przycisk „Anuluj”
Umożliwia przerwanie cyklu i wysunięcie pieczywa.
8. Przycisk „Dostosuj”
6 poziomów, aby uzyskać żądaną chrupkość.
9. Taca na okruchy (wysuwana z tyłu tostera)
Umożliwia łatwe usunięcie okruchów.

43
4. INSTRUKCJA OBSŁUGI
• Ustaw toster na płaskiej powierzchni.
• Sprawdź, czy taca na okruchy jest założona i podłącz urządzenie do prądu.
• Włóż pieczywo do otworu i naciśnij dźwignię.
• Aby przerwać opiekanie przed zakończeniem cyklu, naciśnij przycisk „Stop” lub podnieś dźwignię.
UWAGA: Model CPT180 wyposażony jest w 2 niezależne panele sterowania umożliwiające
opiekanie różnych rodzajów pieczywa w tym samym czasie. Aby opiec 4 kromki, należy włączyć
dwa panele sterowania.
A. WYBÓR CHRUPKOŚCI KROMKI
Ustawić pokrętło na żądanym poziomie chrupkości. Uzyskana chrupkość zależy od rodzaju
pieczywa oraz stopnia wilgotności kromek. Z reguły, aby uzyskać lekko chrupkie pieczywo, należy
ustawić toster na poziomie 4-5 – w przypadku opiekania pieczywa o dużej gęstości lub świeżego,
natomiast na 2-3 – w przypadku pieczywa suchego.
B. UŻYWANIE RÓŻNYCH FUNKCJI
3 przyciski – „Max”
,–
„Odmrażanie” i „Podgrzewanie” umożliwiają ustawienie czasu
cyklu, w zależności od rodzaju pieczywa i żądanej chrupkości. Z każdą funkcją można użyć
pokrętła poziomu chrupkości kromki. Kontrolka informuje, który przycisk został użyty.
By uzyskać lepsze rezultaty, bardziej zwarte pieczywo, bułki, munki i bajgle, przeznacz kilka
dodatkowych minut na cykl opiekania.
Dodaje czas potrzebny do rozmrożenia pieczywa, a następnie opieczenia go.
Umożliwia podgrzanie kromki bez nadmiernego zarumienienia.
UWAGA: Aby anulować wybór, naciśnij przycisk „Anuluj”. Funkcja ta przerywa cykl i wysuwa
pieczywo.
5. WSKAZÓWKI I SUGESTIE
• Bułki, ciastka lub grube kromki powinny być opiekane dłużej. Zalecamy naciśnięcie przycisku
, a następnie ustawienie poziomu chrupkości wedle własnych upodobań.
• Do opiekania rogalików, należy je przeciąć wzdłuż na dwie połówki i nacisnąć przycisk
. Aby
jedynie podgrzać kromkę, nacisnąć przycisk
.
• Aby opiec bułeczki z owocami, należy usunąć owoce z powierzchni bułki, aby nie wpadły do
środka tostera lub nie przykleiły się do elementów grzejnych.
• Aby opiec tylko jedną kromkę, należy wybrać poziom niższy niż dla dwóch kromek.
6. CZYSZCZENIE I KONSERWACJA
• Natychmiast po użyciu odłącz toster od sieci elektrycznej i przed czyszczeniem pozostaw go do
ostygnięcia.
• Urządzenia nie wolno zanurzać w wodzie ani żadnej innej cieczy ani umieszczać go w zmywarce
do naczyń.

44
• Nie wolno używać środków czyszczących o właściwościach ściernych. Wystarczy przetrzeć
powierzchnię zewnętrzną czystą wilgotną ściereczką i dokładnie osuszyć. Środek czyszczący
należy zawsze nakładać na szmatkę, nie bezpośrednio na toster.
• Aby usunąć okruchy, wysuń tackę na okruchy i wyrzuć okruchy pieczywa, a następnie włóż z
powrotem tackę na okruchy z powrotem na miejsce.
• Aby usunąć resztki pieczywa pozostałe w tosterze, odwróć toster i delikatnie potrząśnij.
• Nie wolno owijać przewodu wokół obudowy tostera.
WAŻNE. Nie wolno wkładać żadnych twardych, ostrych lub metalowych narzędzi do szczelin,
ponieważ mogłoby to uszkodzić toster i stworzyć zagrożenie dla bezpieczeństwa.

45
1.
ПОЖАЛУЙСТА, ВНИМАТЕЛЬНО ПРОЧТИТЕ ДАННЫЕ
ИНСТРУКЦИИ ПО БЕЗОПАСНОСТИ ПРЕЖДЕ, ЧЕМ
ВОСПОЛЬЗОВАТЬСЯ ПРИБОРОМ!
• : горячая поверхность!
• В процессе функционирования прибора его доступные
поверхности могут очень сильно нагреваться.
• Хлеб может подгорать, поэтому не следует пользоваться
тостером вблизи легко воспламеняющихся материалов,
таких как шторы, либо под навесными кухонными
шкафчиками.
• Данный прибор предназначен исключительно для
домашнего пользования и не предусмотрен для
применения на кухнях коллективного пользования
для персонала офисов, магазинов или в любой другой
профессиональной среде, ни в гостевых домах на фермах;
электроприбор не предназначен для использования
клиентами гостиниц, мотелей и иных подобных мест
размещения, как, например, гостевые комнаты.
• Если шнур питания поврежден, во избежание возможных
опасностей он может быть заменен только изготовителем
или его гарантийной службой, либо специалистами
соответствующей квалификации.
• Данный электроприбор может использоваться детьми в
возрасте от 8 лет и старше, а также лицами с ограниченными
физическими, сенсорными или умственными
возможностями, или лицами с недостаточным опытом или
знаниями, только если они находятся под надлежащим
наблюдением, или если им были даны предварительные
инструкции по безопасному использованию прибора, и

46
риски, связанные с использованием прибора, были ими
поняты. Уход за прибором может производиться детьми в
возрасте от 8 лет и старше, только если они находятся под
надлежащим наблюдением.
• Прибор и его электрический шнур должны храниться в
местах, недоступных для детей в возрасте до 8 лет.
• Пакет с силикагелем следует сразу же выбросить. Не
употребляйте его в пищу и не держите в местах, доступных
для детей.
• Дайте прибору остыть перед тем, как убрать его на
хранение.
• Никогда не засовывайте руки внутрь прибора. Не
помещайте в отверстия для загрузки хлебопродукты
слишком больших размеров и не вставляйте в них
металлическую упаковку или кухонные приборы.
• Не пытайтесь доставать продукты из тостера, когда он
включен в сеть.
• Перед уходом за прибором отключите его от сети и дайте
полностью остыть. Протрите тостер снаружи губкой,
смоченной в мыльной воде, затем тщательно вытрите
его насухо. Чтобы удалить крошки из тостера, достаньте
поддон, стряхните с него крошки и установите поддон
на место. Не пользуйтесь тостером без поддона. Чтобы
извлечь застрявшие в тостере кусочки хлеба, переверните
прибор и слегка потрясите его, пока они не выпадут. Чтобы
не повредить прибор, никогда не вставляйте в тостер нож
или иной острый предмет.
• Не ставьте тостер на нагревательные приборы или
поблизости к ним. Не пользуйтесь тостером на
поверхностях, чувствительных к нагреву.
• Шнур питания не должен свисать со столешницы.
Не допускайте соприкосновения шнура с горячими
поверхностями.

47
• Не оставляйте без наблюдения работающий прибор.
• Не погружайте прибор в воду или иную жидкость.
• Закончив пользоваться тостером, а также перед уходом
за ним, обязательно отключайте прибор от сети. Никогда
не оставляйте без присмотра включенный в сеть прибор.
Чтобы отключить тостер от сети, потяните за вилку, но ни
в коем случае не за шнур питания.
• Электроприбор не предназначен для включения с
помощью внешнего таймера или пульта дистанционного
управления.
• Включайте прибор только в розетку с заземлением.
Мы рекомендуем убедиться в том, что электрическая
цепь оснащена соответствующим устройством
дифференциального тока. Обратитесь за советом к
профессиональному электрику.
• Не пользуйтесь прибором, если он падал, или если на нем
имеются видимые следы повреждений.
• Никакие виды ремонта прибора не могут выполняться
пользователем.
• Не пользуйтесь прибором вне помещения.
: Полиэтиленовые пакеты, в которые
уложен прибор или его упаковка, могут представлять
собой опасность. Держите пакеты в местах,
недоступных младенцам и детям.
Не пользуйтесь пакетами в колыбелях, детских кроватках,
колясках или манежах для детей. Пленка может приклеиться
к носу и ко рту и воспрепятствовать дыханию. Пакет не
игрушка.

48
–
В общих интересах и с целью активного участия в
защите окружающей среды и здоровья населения:
• Не выбрасывайте ваши э лектроприборы с несортируемыми
бытовыми отходами.
• Отходы электронного и электрического оборудования
(ОЭЭО) должны собираться отдельно.
• Используйте существующие в вашем регионе системы
возврата оборудования с истекшим сроком службы
и системы сбора ОЭЭО. Таким образом, некоторые
материалы могут быть переработаны, использованы
повторно или рекуперированы.
• Сделав все необходимое, чтобы данное изделие было
утилизировано соответствующим образом, вы поможете
избежать потенциальных пагубных последствий для
окружающей среды и здоровья населения, связанных с
возможным содержанием в приборе опасных веществ.
Для получения более подробной информации об
утилизации данного изделия обратитесь, пожалуйста, в
местную службу переработки бытовых отходов.
2.
Cuisinart!
Компания Cuisinart изготавливает высококачественное кухонное оборудование в течение
более 30 лет. Все изделия Cuisinart отличаются исключительной долговечностью. Благодаря
своей конструкции, они чрезвычайно просты в использовании и день за днем демонстрирует
свои выдающиеся эксплуатационные качества.
Чтобы поближе ознакомиться с нашими изделиями или открыть для себя идеи рецептов,
посетите наш сайт www.cuisinart.eu.

49
3.
(. )
1. (36 )
Позволяют поджаривать все виды хлеба и булочек. В тостере модели CPT160
предусмотрены 2 отверстия, позволяющие поджаривать одновременно два ломтика
хлеба. В тостере модели CPT180 можно поджаривать до 4 ломтиков хлеба благодаря
4-м отверстиям для загрузки, которые регулируются двумя независимыми системами
управления.
2.
Поддерживает хлеб по центру тостера, независимо от толщины ломтика, для получения
идеальных хрустящих тостов.
3.
Автоматически поднимается в конце цикла. Подняв рычажок, можно также остановить
цикл поджаривания в любой момент. Двухуровневая система выталкивания тостов
позволяет максимально приподнимать и извлекать самые маленькие ломтики хлеба.
4. Max:
Добавляет дополнительное время к циклу приготовления тостов для достижения лучших
результатов поджаривания толстых ломтиков хлеба, булочек, кексов, рогаликов.
5. «»:
Позволяет разморозить и поджарить ломтики хлеба за один цикл.
6. «»:
Позволяет подогреть хлеб, не поджаривая его.
7. «»
Служит для остановки цикла приготовления и для выталкивания тостов.
8. «»
6 уровней регулировки для достижения желаемой степени поджаристости.
9. ( )
Позволяет легко удалить крошки.
4.
• Установите тостер на ровную поверхность.
• Проверьте, установлен ли на место ли поддон для крошек, и включите прибор в сеть.
• Вставьте ломтик хлеба в отверстие для загрузки и нажмите на рычажок вниз.
• Чтобы выключить тостер до окончания цикла, нажмите на кнопку «Stop» или поднимите
рычажок.
N.B. В тостере модели CPT180 предусмотрены две независимые системы управления,
позволяющие поджаривать одновременно разные виды хлеба. Чтобы поджарить 4 ломтика,
нужно привести в действие обе системы управления.
.
Выберите с помощью кнопки желаемый уровень поджаристости. Степень поджаристости
определяется в зависимости от типа хлеба и от влажности ломтиков. Как правило, для
лёгкой степени поджаристости следует отрегулировать тостер на уровень 4-5, если вы
поджариваете плотный или свежий хлеб, или на уровень 2-3 для сухого хлеба.

50
.
Три кнопки - «Max»
- «размораживание»
и «подогрев» - позволяют регулировать
необходимую продолжительность цикла в зависимости от типа хлеба и от желаемой степени
поджаристости. Каждая из этих кнопок используется в сочетании с кнопкой регулировки
степени поджаристости. Световой датчик показывает, какая кнопка была выбрана.
Добавляет дополнительное время к циклу приготовления тостов для достижения
лучших результатов поджаривания толстых ломтиков хлеба, булочек, кексов, рогаликов
Добавляет время, необходимое для того, чтобы сначала разморозить хлеб, а затем
поджарить его.
Позволяет подогреть тост, не поджаривая его.
N.B. Чтобы отменить сделанный выбор, нажмите на кнопку «отмена» : цикл приготовления
остановится, и ломтик хлеба поднимется.
5.
• Булочки, выпечку или толстые ломти хлеба нужно поджаривать дольше. Мы рекомендуем
воспользоваться кнопкой
, затем отрегулировать степень поджаристости по вашему
желанию.
• Чтобы поджарить круассаны, разрежьте их пополам по горизонтали и воспользуйтесь
кнопкой
. Чтобы их просто подогреть, воспользуйтесь кнопкой .
• Чтобы поджарить фруктовый хлеб, удалите фрукты с поверхности ломтика, чтобы они не
упали в тостер и не пригорели к нагревательным элементам.
• Если вы хотите поджарить один ломтик хлеба, выберите более низкий уровень нагрева,
чем для двух ломтиков.
6.
• Закончив пользоваться тостером, сразу же отключите его от сети и дайте ему полностью
остыть перед тем, как очистить его.
• Не погружайте прибор в воду или любую иную жидкость, не мойте его в посудомоечной
машине.
• Не пользуйтесь абразивными чистящими средствами для ухода за прибором. Тостер
достаточно протереть снаружи чистой влажной тканью и затем вытереть насухо. Чистящие
средства всегда следует наносить на ткань, а не на сам прибор.
• Чтобы освободить от крошек поддон, достаньте его из тостера и стряхните с него крошки,
затем вставьте поддон на место.
• Чтобы удалить крошки, оставшиеся внутри тостера, переверните прибор отверстиями
вниз и слегка встряхните его.
• Никогда не наматывайте шнур вокруг тостера.
: Ни в коем случае не следует вставлять в отверстия тостера твердые,
острые или металлические предметы: это

51
Facture - Ticket de caisse / Receipt - Sales ticket / Rechnung - Kassenschein
/ Factuur - Kasticket / Fattura - scontrino / Factura - Tique de caja /
Factura - talão de caixa / Faktura - Paragon / -
Acheteur / Purchaser / Käufer / Koper / Acquirente / Comprador / Comprador / Nabywca / Покупатель
FRANÇAIS : CUISINART vous garantit une mise en relation facilitée
avec ses services consommateurs de tous les pays. Pour connaître
les coordonnées de votre service consommateur, composez le :
ENGLISH: CUISINART guarantees easier contact with its customer
services in every country. For details of the customer services in
your area, call:
DEUTSCH: CUISINART gewährleistet Ihnen eine unkomplizierte
Kontaktaufnahme mit den Kundendienststellen in allen Ländern.
Um die Adresse Ihres Kundendienstes zu erfahren, wählen Sie:
NEDERLANDS: CUISINART garandeert u een eenvoudig contact
met de klantenservice in alle landen. Om telefonisch contact
met de klantenservice te verkrijgen, raadpleegt u het volgende
nummer:
ITALIANO: CUISINART garantisce in ogni paese un facile contatto
con i propri servizi di assistenza ai consumatori. Per conoscere i
dettagli del vostro servizio consumatori, telefonate al numero:
ESPAÑOL: CUISINART le facilita la comunicación con los servicios
de atención al cliente de todos los países. Para conocer los datos
de su servicio de atención al cliente, marque el:
PORTUGUÊS: A CUISINART facilita o acesso aos seus serviços de
apoio ao consumidor em todos os países. Para entrar em contacto
com o seu serviço de apoio ao consumidor, marque o número:
POLSKI: Firma CUISINART zapewnia Państwu łatwy kontakt ze
swoim działem obsługi klientów we wszystkich krajach. Aby
uzyskać dane kontaktowe działu obsługi klientów w Państwa
kraju, należy wybrać numer:
: CUISINART гарантирует наличие сервисных
центров в любой стране. При приобретении изделий
домашнего применения торговой марки CUISINART
на территории Российской Федерации, информация
по ближайшим сервисным центрам и их адресам
предоставляется по телефону:
• Merci de conserver cette carte de garantie avec l’original de votre preuve d’achat.
• Please keep this warranty card with your original proof of purchase.
• Bitte bewahren Sie diese Garantiekarte zusammen mit dem Original Ihres Kaufbelegs auf.
• Bewaar deze garantiekaart goed, samen met uw originele aankoopbewijs
• Conservare il presente attestato di garanzia con l’originale della prova d’acquisto.
• Debe conservar este certicado de garantía junto con el original de su prueba de compra.
• Conserve este certicado de garantia com o original do comprovativo de compra.
• Proszę zachować tę kartę gwarancyjną z oryginałem dowodu zakupu.
•Пожалуйста, сохраняйте данный гарантийный талон вместе с оригиналами документов, подтверждающих Вашу
покупку.
N°VERT
00 800 2011 2014
France
Deutschland
Italia
España
Portugal
Polska
+31 (79) 363 4242
+7 495 729 76 13
+7 495 018 59 47
Nederland
00 800 5000 6000
GREEN
NUMBER
Belgique, België,
Belgien
00 800 5000 6000
GREEN
NUMBER
00 800 5000 6000
GREEN
NUMBER
00 800 5000 6000
GREEN
NUMBER
00 800 5000 6000
GREEN
NUMBER
00 800 5000 6000
GREEN
NUMBER
Hot Line: 00 800 5000 6000
cuisinart_international@conair.com
Garantie Internationale / International Guarantee/ Internationale Garantie / Internationaal
garantiebewijs / Garanzia Internazionale / Garantía Internacional / Garantia Internacional / Gwarancja
międzynarodowa /
CUISINART
99 avenue Aristide Briand
92120 MONTROUGE - FRANCE
www.cuisinart.eu

52
FRANCAIS : GARANTIE uniquement d’application en France + DOM/COM
(Martinique, Réunion, Guyane, Guadeloupe, Mayotte, Saint-Pierre-et-
Miquelon, Saint-Barthélemy), Nouvelle Calédonie, Polynésie Française,
Wallis-et-Futuna
3 ans de garantie à compter de la date d’achat sur présentation d’une preuve
d’achat.
- Un échange standard (produit identique ou à défaut produit équivalent)
du produit sera eectué pendant cette période (ticket de caisse ou facture).
La garantie couvre tout défaut de fabrication ou vice de matière mais s’applique
sous certaines conditions. En particulier :
- L’appareil doit avoir été utilisé exclusivement et conformément à sa
destination, telle qu’indiquée dans la notice d’utilisation et pour un usage
non professionnel.
- La garantie exclut les détériorations résultant d’une mauvaise utilisation,
d’une chute, de démontage, réparation ou modication eectués par des
personnes non autorisées par Cuisinart, d’une négligence, d’une utilisation
à une tension électrique non appropriée ou avec des accessoires ou
consommables non adaptés.
- Les accessoires et consommables ne sont pas pris en charge dans le cadre de
cette garantie.
- La garantie ne s’applique pas pour les dommages causés par une catastrophe
naturelle telle qu’un incendie ou dégât des eaux.
Nos produits peuvent être réparés, échangés ou remboursés, au choix exclusif
de Cuisinart et de son revendeur.
Cette garantie Cuisinart vient en complément de la garantie légale de
conformité telle que mentionnée aux articles L. 211-4 à L. 211-13 du code de
la consommation et de celle relative aux défauts de la chose vendue, dans les
conditions prévues aux articles 1641 à 1648 et 2232 du Code Civil.
Extrait du Code de la consommation :
Art. L. 211-4. « Le vendeur est tenu de livrer un bien conforme au contrat et
répond des défauts de conformité existant lors de la délivrance. Il répond
également des défauts de conformité résultant de l’emballage, des instructions
de montage ou de l’installation lorsque celle-ci a été mise à sa charge par le
contrat ou a été réalisée sous sa responsabilité ».
Art. L. 211-12. « L’action résultant du défaut de conformité se prescrit par deux
ans à compter de la délivrance du bien ».
Art. L. 211-5. « Pour être conforme au contrat, le bien doit :
1. Etre propre à l’usage habituellement attendu d’un bien semblable et, le
cas échéant :
- correspondre à la description donnée par le vendeur et posséder les qualités
que celui-ci a présentées à l’acheteur sous forme d’échantillon ou de modèle ;
- présenter les qualités qu’un acheteur peut légitimement attendre eu égard
aux déclarations publiques faites par le vendeur, par le producteur ou par son
représentant, notamment dans la publicité ou l’étiquetage.
2. Présenter les caractéristiques dénies d’un commun accord par les parties
ou être propre à tout usage spécial recherché par l’acheteur, porté à la
connaissance du vendeur et que ce dernier a accepté ».
Extrait du Code civil :
Art. 1641. « Le vendeur est tenu de la garantie à raison des défauts cachés de
la chose vendue qui la rende impropre à l’usage auquel on la destine, ou qui
diminuent tellement cet usage, que l’acheteur ne l’aurait pas acquise, ou n’en
aurait donné qu’un moindre prix, s’il les avait connus ».
Art. 1648 - alinéa 1er. « L’action résultant des vices rédhibitoires doit être
intentée par l’acquéreur dans un délai de deux ans à compter de la découverte
du vice »
Pièces détachées et accessoires :
Ce produit n’étant pas réparable, aucune pièce détachée de réparation n’est
disponible.
Toutefois, vous pouvez vous procurer les diérents accessoires et consom
-
mables indispensables à l’utilisation du produit pendant une période d’au
moins 5 ans à compter de la date d’achat. Pour cela, merci de contacter le
service consommateurs Cuisinart.
FRANÇAIS : GARANTIE (pays autres que la France)
Cuisinart vous ore 3 ans de garantie contre tout défaut de fabrication. Un
échange standard (produit identique ou à défaut produit équivalent) du pro
-
duit sera eectué pendant cette période. Pour en bénécier, le présent bon
doit comporter l’original de la preuve d’achat (ticket de caisse ou facture) ainsi
que vos coordonnées complètes. La garantie exclut les détériorations résultant
d’une mauvaise utilisation, d’une chute, de démontage ou de réparation par
des personnes non autorisées. Cette garantie contractuelle vient en complé
-
ment de la garantie légale.
ENGLISH: GUARANTEE
Cuisinart oers you a 3-year warranty. We oer a standard exchange of the
appliance (identical or equivalent) during this period. To benet from the war
-
ranty, the original proof of purchase (sales ticket or receipt) must be attached
to this warranty slip along with your full contact details. The warranty does not
cover damage resulting from misuse, falls, dismantling, or repair by unautho
-
rized persons. This guarantee in no way aects your rights under statutory law.
DEUTSCH: GARANTIE
Cuisinart bietet 3 Jahre Garantie. In diesem Zeitraum erfolgt ein
Standardumtausch des Geräts (identisches Produkt oder gegebenenfalls
gleichwertiges Produkt). Um auf diese Garantie zurückgreifen zu können,
muss dem vorliegenden Garantieschein das Original des Einkaufsbelegs
(Kassenzettel oder Rechnung) beigelegt werden. Die Garantie schließt Schäden
aufgrund einer unsachgemäßen Verwendung, eines Sturzes, eines Zerlegens
oder einer Reparatur durch nicht autorisierte Personen aus. Diese Garantie
schränkt auf keinen Fall Ihre gesetzlichen Rechte ein.
NEDERLANDS: GARANTIE
Cuisinart biedt u 3 jaar garantie. Tijdens eventuele reparatie wordt standaard
een vervangend product (een zelfde of vergelijkbaar apparaat) beschikbaar
gesteld. Om hiervan gebruik te kunnen maken dient u deze volledig ingevulde
bon en het originele aankoopbewijs te overleggen. De garantie omvat niet
beschadigingen voortvloeiend uit een verkeerd gebruik, een val, demontage
of herstelling door onbevoegde personen. Deze garantie heeft op geen enkele
manier invloed op uw rechten volgens de statutaire wet.
ITALIANO: GARANZIA
Cuisinart vi ore 3 anni di garanzia. Durante tale periodo sarà eettuato uno
scambio standard (prodotto identico o, in mancanza, prodotto equivalente).
Per beneciare della garanzia, il presente buono deve essere accompagnato
dall’originale della prova di acquisto (scontrino o fattura) e dai vostri dati
completi. Dalla garanzia sono esclusi deterioramenti dovuti ad un errato
utilizzo, a cadute, a smontaggio o riparazione eseguiti da personale non
autorizzato. La presente garanzia non inuisce in alcun modo sui vostri diritti
in base alle normative vigenti.
ESPAÑOL: GARANTíA
Cuisinart le ofrece 3 años de garantía. Durante este periodo se llevará a cabo un
cambio estándar (producto idéntico o, en su defecto, producto equivalente).
Para utilizarla, debe adjuntar a este bono el original de la prueba de compra
(tique de caja o factura), así como sus datos completos. La garantía excluye
el deterioro derivado de una utilización incorrecta, una caída, el desmontaje
o la reparación realizados por personal no autorizado. Lo dispuesto en este
contrato de garantía no puede afectar en modo alguno a los derechos que le
otorga la legislación de su país.
PORTUGUÊS: GARANTIA
A Cuisinart oferece 3 anos de garantia contra qualquer defeito de fabrico.
Durante esse período será efetuada uma troca padrão (produto idêntico ou,
na sua falta, produto equivalente). Para beneciar da garantia, esta deve ser
acompanhada do comprovativo de compra (talão de caixa ou factura), bem
como dos dados completos do comprador. Da garantia são excluídas as dete
-
riorações resultantes de uma utilização deciente, de uma queda, de desmon-
tagem ou de reparação por pessoas não autorizadas. O disposto na presente
garantia contratual não afeta os direitos legais vigentes no país do comprador.
POLSKI: GWARANCJA
Firma Cuisinart udziela gwarancji 3-letniej dotyczącej wad produkcyjnych.
W tym okresie przeprowadzona zostanie standardowa wymiana (na produkt
identyczny lub równoważny). Aby z niej skorzystać, niniejszy bon musi zawierać
oryginalny dowód zakupu (paragon lub fakturę) oraz Państwa pełne dane
identykacyjne. Gwarancja nie obejmuje uszkodzeń wynikających z niewłaś
-
ciwego użytkowania, upadku, demontażu lub przeprowadzenia naprawy przez
osoby nieupoważnione. Niniejsza gwarancja umowna stanowi uzupełnienie
gwarancji prawnej.
:
При приобретении товаров домашнего применения торговой марки
Cuisinart на территории Российской Федерации мы даем гарантию на
все заводские дефекты в течение 3 (трех) года (гарантийный срок).
В случае обнаружения в указанный гарантийный срок дефектов,
вызванных недостаточным качеством материалов или сборки в изделии,
приобретенном в Российской Федерации, в гарантийный период
оно может быть заменено на новое или аналогичное в соответствии с
Федеральным законом «О защите прав потребителей». Гарантийная
замена производится при предъявлении документов, подтверждающих
покупку товара (чек, квитанция, гарантийный талон с отметками и т.п.)
при условии соблюдения правил эксплуатации, описанных в инструкции
по эксплуатации изделия.
Гарантия на изделия не распространяется в случаях механических
повреждений, вызванных ненадлежащим использованием, выхода из
строя изделия из-за попадания внутрь инородных предметов, жидкостей,
насекомых и т.п., его падения; разборки, ремонта или преобразования
лицами, не уполномоченными Cuisinart и/или если использованы
неоригинальные детали; вскрытия пломб на изделии; использования
изделий в условиях и режимах, отличающихся от бытовых; нарушения
инструкций по эксплуатации.
Гарантия не распространяется на аксессуары и комплектующие.
В случае предъявления претензий в соответствии с условиями настоящей
Гарантии передайте изделие целиком вместе с гарантийным талоном в
любой из центров сервисного обслуживания.
Гарантийный срок – 3 года
Cрок службы – 3 года
-
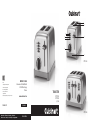 1
1
-
 2
2
-
 3
3
-
 4
4
-
 5
5
-
 6
6
-
 7
7
-
 8
8
-
 9
9
-
 10
10
-
 11
11
-
 12
12
-
 13
13
-
 14
14
-
 15
15
-
 16
16
-
 17
17
-
 18
18
-
 19
19
-
 20
20
-
 21
21
-
 22
22
-
 23
23
-
 24
24
-
 25
25
-
 26
26
-
 27
27
-
 28
28
-
 29
29
-
 30
30
-
 31
31
-
 32
32
-
 33
33
-
 34
34
-
 35
35
-
 36
36
-
 37
37
-
 38
38
-
 39
39
-
 40
40
-
 41
41
-
 42
42
-
 43
43
-
 44
44
-
 45
45
-
 46
46
-
 47
47
-
 48
48
-
 49
49
-
 50
50
-
 51
51
-
 52
52
-
 53
53
-
 54
54


Cuisinart CPT160SE El manual del propietario
- Categoría
- Tostadoras
- Tipo
- El manual del propietario
- Este manual también es adecuado para
en otros idiomas
- français: Cuisinart CPT160SE Le manuel du propriétaire
- italiano: Cuisinart CPT160SE Manuale del proprietario
- Deutsch: Cuisinart CPT160SE Bedienungsanleitung
- Nederlands: Cuisinart CPT160SE de handleiding
- português: Cuisinart CPT160SE Manual do proprietário
- polski: Cuisinart CPT160SE Instrukcja obsługi
Artículos relacionados
Otros documentos
-
Groupe Brandt TT-402 El manual del propietario
-
LAGRANGE Grille-pain Naos Manual de usuario
-
ELDOM TO295 TASTY Manual de usuario
-
Lund 67501 Instrucciones de operación
-
ELDOM TO280C Manual de usuario
-
Palson PHILADELPHIA El manual del propietario
-
Unold 38955 El manual del propietario
-
Unold Onyx Duplex 38915 El manual del propietario
-
Oster 6325-33 Manual de usuario
-
Dualit 6 Slice Classic Toaster Manual de usuario