
MODEL/MODELO: AWH084_098E
SAM’S MX
INSTRUCCIONES DE ARMADO
ASSEMBLY INSTRUCTIONS
MESA DE HOCKEY
MARCA: ESPN
MODELO: AWH084_098E
HECHO EN CHINA
ESPECIFICACIONES ELÉCTRICAS:
120 V ~ 60 Hz 0.48 A
4.5 V (INDICADOR)
UTILIZA TRES BATERÍAS TIPO AAA DE 1.5 V
CONSUMO DE ENERGÍA EN ESPERA: 0.0 Wh
CONSUMO DE ENERGÍA EN OPERACIÓN: 61.0 Wh
ANTES DE UTILIZAR EL PRODUCTO LEA EL
INSTRUCTIVO Y CONSÉRVELO PARA FUTURAS
REFERENCIAS.
RETIRE LA FUENTE DE ALIMENTACIÓN ANTES DE
DAR MANTENIMIENTO A SU APARATO.
ESTE APARATO NO SE DESTINA PARA UTILIZARSE
POR PERSONAS (INCLUYENDO NIÑOS) CUYAS
CAPACIDADES FÍSICAS, SENSORIALES O MENTALES
SEAN DIFERENTES O ESTÉN REDUCIDAS, O
CAREZCAN DE EXPERIENCIA O CONOCIMIENTO,
A MENOS QUE DICHAS PERSONAS RECIBAN UNA
SUPERVISIÓN O CAPACITACIÓN PARA EL
FUNCIONAMIENTO DEL APARATO POR UNA
PERSONA RESPONSABLE DE SU SEGURIDAD..
LOS NIÑOS DEBEN SUPERVISARSE
PARA ASEGURAR QUE ELLOS NO EMPLEEN LOS
APARATOS COMO JUGUETE.
SIGA LAS INSTRUCCIONES RECOMENDADAS PARA
SU INSTALACIÓN.
SI EL CORDÓN DE ALIMENTACIÓN ES DAÑADO,
ÉSTE DEBE SUSTITUIRSE POR EL FABRICANTE,
POR SU AGENTE DE SERVICIO AUTORIZADO O POR
PERSONAL CALIFICADO CON EL FIN DE EVITAR UN
PELIGRO.
IMPORTADO POR: COMERCIALIZADORA MÉXICO
AMERICANA, S. de R.L. de C.V.
DIRECCIÓN: AV. NEXTENGO NO. 78, COL. SANTA
CRUZ ACAYUCAN, AZCAPOTZALCO, CIUDAD DE
MÉXICO, MÉXICO C.P. 02770
R.F.C. CMA 9109119L0
TEL. IMPORTADOR: 58-99-12-00 Ext. 31616

Español
English
www.themdsports.com
AWH084_098E
1
(Continúe en la siguiente página.)
(Continued on the next page.)
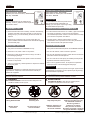
Phillips Screwdriver - Not Included
Standard (Flat Head Screwdriver) - Not Included
Allen Key - Included
CAUTION!
¡PRECAUCIóN!
CAUTION!
¡PRECAUCI N!
Electric Screwdrivers may be helpful during
assembly; however, please set a low torque and
use extreme caution.
1 - This product is intended for INDOOR use only.
2 - Please do not sit, climb or lean on the product.
3 - Please do not drag the product when moving it in order to
avoid damaging the legs.
4 - Please only use spray furniture polish to clean the exterior
surfaces on the product.
5 - This is not a child's toy, adult supervision is required for children
playing this game.
Changes or modifications not expressly approved by the party
responsible for compliance could void the user’s authority to
operate the equipment.
Power Tools
- Set Low Torque
High Torque
over tightened
Herramientas eléctricas
- bajo par
Alto par
más estrictas
1 - Please read the instructions carefully, and follow all assembly,
operation and safety instructions properly in order to avoid
damage or injury. For the assembly, at least two adults are
required.
2 - Some figures or drawings may not look exactly like your
product. Please read and understand the text before beginning
each assembly step.
Destornillador Phillips - No incluido
Destornillador de cabeza plana - No incluido
Llave Allen - Incluido
Los destornilladores eléctricos pueden ser de
gran ayuda durante el ensamblado; sin
embargo, por favor ajuste el par de giro bajo y
sea extremadamente precavido.
WARNING:
Adult Assembly Required.
WARNING:
CHOKING HAZARD
ADVERTENCIA:
Las tareas de montaje debe realizarlas un adulto.
PELIGRO DE ASFIXIA Este artículo contiene piezas
pequeñas. No apto para menores de 3 años.
ADVERTENCIA:
1 -
Este producto está destinado para el uso INTERIOR solamente.
2 - Por favor No sientes, subas o inclínes la producto.
3 - Por favor No arrastres la producto cuando está en movimiento
para evitar el daño sobre las piernas.
4 - Por favor use sólo la cera espray de muebles para limpiar las
superficies exteriores sobre la producto.
5 - Esto no es un juguete de niños, se requieren la supervisión
adulta para niños cuando está jugando este juego.
Los destornilladores eléctricos pueden ser de gran ayuda durante
el ensamblado; sin embargo, por favor ajuste el par de giro bajo y
sea extremadamente precavido.
X2
Adultos fuertes
necesarios
No tener niños en el
area de ensamble
Mantener alejados a los
animales domesticos
del area de ensamble
No usar o guardar el
producto en el exterior.
Solo para uso en interior.
No utilizar ni guardar el producto
en lugares humedos o mojados
Strong Adults Needed
No Children in
Assembly Area
Keep away from pets
Do not use or keep product
outdoors. For indoor use only.
No wet/humid conditions.
TOOLS REQUIRED HERRAMIENTAS NECESARIAS
ASSEMBLY TIPS CONSEJOS PARA EL ENSAMBLADO
IMPORTANT NOTICE! ¡AVISO IMPORTANTE!
1 - Por favor lea las instrucciones con cuidado y siga todo durante
el montaje, la operación o instrucciones de seguridad
correctamente para evitar el daño o la herida. Para el montaje,
por lo menos se requieren dos adultos.
2 - Algunas figuras o dibujos podrían parecer no estén
exactamente como su producto. Por favor lea y entienda el
texto antes de iniciar cada paso del montaje.

Español
English
www.themdsports.com
AWH084_098E
2
(Continúe en la siguiente página.)
(Continued on the next page.)
IMPORTANT SAFETY INSTRUCTIONS
Read all instructions
1. Read all instructions-All the safety and operating
instructions should be read carefully before this hockey
game is played.
2. Caution-This is not a toy and is intended for use by or
under the supervision of adults. Adults should review
safety guidelines with children to avoid possible risk of
electric shock or other injuries.
3. Power sources-This hockey game should be operated
only from 110-120V A.C., 60 cycle current as indicated
on the identification label. If you are not sure of the type
of power supply to your home, consult your appliance
dealer or local power company.
4. Power cord protection-Power cord should be routed so
that it is not likely to be walked on or pinched by items
placed upon or against it. Pay particular attention to
cords at plugs, convenience receptacles, and the point
of exit from the game.
5. Overloading-Do not overload wall outlets and extension
cords as this can result in a risk of fire or electric shock.
6. Object and liquid entry-Never push objects of any kind
into this game through openings as they may touch
dangerous voltage points or short-out parts which could
result in a fire or electric shock. Never spill liquid of any
kind on the game.
7. Ventilation-Openings in the game are provided for the
exhaust air to create a cushion effect. The openings on
the air blower are for the intake air. Keep clear of the air
blower when it is on. Do not put hands or any objects
near the intake openings. To ensure reliable operation
of the game and protect it from overheating these
openings must not be blocked or covered.
8. Damage requiring service-Unplug the game from the
wall outlet.
Do not attempt to service the blower yourself as opening
or removing covers may expose you to dangerous
voltage or other hazards. Refer servicing to qualified
service personnel under the following conditions.
A. When the power supply cord or plug is damaged.
B. If liquid has spilled, or objects have fallen into the
blower.
C. When the air blower exhibits a distinct change in
performance e.g. abnormal noise, this indicates a
need for service.
9. Grounding or Polarization-This game is equipped with a
polarized alternating current line plug (a plug having one
blade wider than the other). This plug will fit into the
power outlet only one way. This is a safety feature. If
you are unable to insert the plug fully into the outlet, try
reversing the plug. If the plug should still fail to fit,
contact your electrician to replace your obsolete outlet.
Do not defeat the safety purpose of the polarized plug.
IMPORTANTES INSTRUCCIONES DE SEGURIDAD
Lea todas las instrucciones
1. Lea todas las instrucciones – Todas las instrucciones de
seguridad y operación deberían ser leído con cuidado
antes de que este juego de hockey sea jugado.
2. Advertencia - Esto no es un juguete y que está
intencionado por el uso o bajo la supervisión de adultos.
Los adultos deberían repasar las directrices de
seguridad con niños para evitar el riesgo de posible
choque eléctrico u otras heridas.
3. Fuente de potencia - Este juego de hockey debería ser
operado solamente de 110-120V A.C., 60 ciclos de
corriente como indicado sobre la etiqueta de
identificación. Si usted no está seguro sobre el tipo de
suministro de energía de su casa, consulte con su
distribuidor de aparato o la empresa de energía local.
4. Protección del cable elétrico- El cable eléctrico debería
ser encaminado de modo que no sea probablemente
andado encima o pellizcado por artículos colocados
encima o contra ello. Preste atención especial sobre los
cables en enchufes, receptáculos convenientes y el
punto de salida del juego.
5. La sobrecarga - No sobrecargues las salidas de pared y
cuerdas de extensión como esto puede causar un
riesgo de fuego o choque eléctrico.
6. El objeto y la entrada de líquido - Nunca empujes los
objetos de cualquier clase a este juego por aperturas
como ellos puedan tocar puntos de voltaje peligrosos o
corto - partes externas podrían causar un fuego o
choque eléctrico. Nunca derrame cualquier clase de
líquido sobre el juego.
7. Ventilación- Las aperturas en el juego son
proporcionadas para el escape de aire para crear un
efecto de cojín. Las aperturas sobre el soplador de aire
son para la entrada de aire. Guarde libre del soplador de
aire cuando está conectado. No pongas la mano u otros
objetos cerca de las aperturas de entrada. Para
asegurar una operación confiable del juego y protejalo
de recalentarse estas aperturas que no deben ser
bloqueados o cubiertos.
8. El servicio de requisito de daño - Desconecte el juego de
la salida de pared. No intentes de atender el soplador
por usted mismo como la apertura o la eliminación de
cubiertas puedan exponerle al voltaje peligroso u otros
peligros.
Mande a la persona calificada de servicios bajo las
siguientes condiciones:
A. Cuando la cuerda de suministro de energía o el
enchufe están dañados.
B. Si se ha derramado el líquido o se han caído los
objetos en el soplador.
C. Cuando el soplador de aire exponga un cambio
distinto del funcionamiento, por ejemplo ruido
anormal, se indica una necesidad del servicio.
9. Conectando con tierra o la Polarización - Este juego está
equipado con un enchufe de línea de corriente alterna
polarizada ( un enchufe que tiene una hoja más amplia
que el otro). Este enchufe encajará a la salida de
potencia por un sólo camino. Esto es una característica
de seguridad. Si usted está incapaz de insertar
totalmente el enchufe en la salida, trate de examinar el
enchufe. Si el enchufe todavía falla en encajar, ponerse
en contacto con su electricista para sustituir la salida
anticuada. No derrotes el objetivo de seguridad del
enchufe polarizado.

Español
English
www.themdsports.com
AWH084_098E
3
(Continúe en la siguiente página.)
(Continued on the next page.)
IMPORTANT SAFETY INSTRUCTIONS
Read all instructions
10. CAUTION-ELECTRICALLY OPERATED PRODUCT-Not
recommended for children under 8 years of age. As with
all electrical products, precautions should be observed
during handling and use to reduce the risk of electric
shock.
11. We recommend that the game be periodically examined
for conditions that may result in the risk of fire, electrical
shock, or injury to persons. In the event such conditions
exist, the game should not be used until properly repaired.
12. RISK OF FIRE, ELECTRIC SHOCK, OR INJURY TO
PERSONS
WARNING - When using electric appliances, basic
precautions should always be followed, including the
following:
A) Read all the instructions before using the appliances.
B) To reduce the risk of injury, close supervision is
necessary when an appliance is used near children.
C) Do not contact moving parts.
D) Only use attachments recommended or sold by the
manufacturer.
E) Do not use outdoors.
F) For a cord-connected appliance, the following shall be
included:
-To disconnect, turn all controls to the off position,
then remove the plug from the outlet.
-Do not unplug by pulling on the cord. To unplug,
grasp the plug, not the cord.
-Unplug from the outlet when not in use and before
servicing or cleaning.
-Do not operate any appliance with a damaged cord
or plug, or after the appliance malfunctions or is
dropped or damaged in any manner. Return the
appliance to the nearest authorized service facility
for examination, repair, or electrical or mechanical
adjustment.
13. To reduce the risk of electric shock, this appliance has a
polarized plug (one blade is wider than the other).This
plug will fit in a polarized outlet only one way. If the plug
does not fit fully in the outlet, reverse the plug. If it still
does not fit, contact a qualified electrician to install the
proper outlet. Do not change the plug in any way.
IMPORTANTES INSTRUCCIONES DE SEGURIDAD
Lea todas las instrucciones
10. ADVERTENCIA –PRODUCTO OPERADO
ELECTRICAMENTE - No recomendado para niños
menores de 8 años de edad. Como con todos los
productos eléctricos, las precauciones deberían ser
observadas durante el manejo y el empleo para reducir
el riesgo de choque eléctrico.
11. Recomendamos que el juego de vez en cuando sea
examinado de las condiciones que puedan causar el
riesgo de fuego, electrochoque, o herida a personas.
En el caso de que mientras existan tales condiciones, el
juego no debería ser usado hasta correctamente
reparado.
12. RIESGOS DE FUEGO, ELECTROCHOQUE, O
HERIDA A PERSONAS
ADVERTENCIA - Cuando está usando aparatos
eléctricos, siempre deberían ser seguidas las
precauciones básicas, incluyendo los siguientes:
A) Lea todas las instrucciones antes de usar los
aparatos.
B) Para reducir el riesgo de herida, la supervisión
cercana es necesaria cuando el aparato está usado
cerca de niños.
C) No tenga contacto con partes móviles.
D) Sólo use el accesorio recomendado o vendido por el
fabricante.
E) No se use al aire libre.
F) Para un aparato de cuerda - conectada, será incluida
los siguientes:
- Para desconectar, gire todos los mandos a la
posición off, luego quite el enchufe de la salida.
- No desconectes a travás del tiro de la cuerda. Para
desconectar, agarre el enchufe, no la cuerda.
- Desconecte desde la salida cuando no esté en uso
y antes de revisar o limpiar.
- Que no operes el aparato cuando la cuerda o
enchufe esté dañado, o luego de malfuncionamiento
del aparato o fue caído o dañado de cualquier modo.
Vuelve el aparato al servicio autorizado más cercano
para examen, reparación o ajuste eléctrico o
mecánico.
13. Para reducir el riesgo de choque eléctrico, este aparato
tiene un enchufe polarizado (una hoja es más amplia
que la otra). Este enchufe encajará en una salida
polarizada por sólo un camino. Si el enchufe no cabe
totalmente en la salida, examine el enchufe. Si esto
todavía no se cabe, póngase en contacto con un
electricista calificado para instalar la salida apropiada.
No cambies el enchufe de ningún modo.
SAVE THESE INSTRUCTIONS
WARNING: To Reduce The Risk Of Fire Or Electric
Shock, Do Not Use This Fan With Any Solid-State
Speed Control Device.
SALVE ESTAS INSTRUCCIONES
ADVERTENCIA: Para reducir el riesgo de fuego o
choque eléctrico, no uses este abanico con cualquier
dispositivo de control sólido - velocidad estatal.
Solamente Para Uso Doméstico.For Household use only.

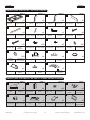
AWH084_098E PARTS LIST / LISTA DE PARTES
www.themdsports.com
AWH084_098E
4
(Continúe en la siguiente página.)
(Continued on the next page.)
Español
English
Panel de
Pata Final
Pata Izquierda Pata Derecha
9
10 11
12
13 14 15
18
2 3 41
x1 x2 x2 x2
6 7 85
x12
x4
x4
x1
x4
x4
19
Left Leg Right Leg End Leg Panel
M8x45mm Bolt
Cerrojo
M8x50mm
4x12mm Screw Tornillo 4x12mm
3.5x28mm Screw Tornillo 3.5x28mm
Felt Pad
Pusher
Unidad PrincipalMainframe
Golpeador
Almohadilla
de Fieltro
Electronic Scorer
Marcador
Electrónico
x18
Allen Key Llave Allen
x1
x2
Top Goal Box
Caja de Gol
Superior
Leg Panel Support
x2
FOR FIG. 2 FOR FIG. 3, 4
FOR FIG. 4
x20
M8 Washer Arandela M8
FOR FIG. 3, 4, 5
FOR FIG. 1
x4
Leg Leveler
Nivelador
de Pata
FOR FIG. 5
FOR FIG. 3, 4 FOR FIG. 1
FOR FIG. 3, 4 FOR FIG. 1, 4, 6
x8
FOR FIG. 5
FOR FIG. 6
FOR FIG. 2
FOR FIG. 6
FOR FIG. 3, 4, 5
FOR FIG. 2
FOR FIG. 6
x4
Puck Puck
Side Leg Panel
Panel de
Pierna Lateral
M8 Spring
Lock Washer
Arandela de
Cerradura
de Resorte M8
x20
16
17
Soporte de
Panel de Pata
Cerrojo
M8x32mm
M8x32mm Bolt
AWH084_098E PRE-INSTALLED PARTS / PIEZAS PREINSTALADAS
x4
Apron Corner
Scoring Sensor
Wire
Cable del Sensor
de Marcad
M8 T - Nut Tuerca - M8
P1 P2
x2
x12
P3
x4
P4
Delantal de
Rincón
FOR FIG. 2 FOR FIG. 3 FOR FIG. 3, 4 FOR FIG. 5
Square Nut with
Screws
Tuerca Cuadrada
con Tornillos
x1
Connect Box
x4
Caja de Conexión
P5
x1
P6 P7
P8
Motor
Motor
FOR FIG. 3
FOR FIG. 6FOR FIG. 2 FOR FIG. 2
Ball Return Cover
x2
Cubierta de
Retorno de Bola
Top Corner Rincón Superior

www.themdsports.com
AWH084_098E
5
(Continúe en la siguiente página.)
(Continued on the next page.)
Español
English
INSTRUCCIONES DE ENSAMBLAJE:
ASSEMBLY INSTRUCTIONS:
1. Encuentre un lugar limpio y nivelado para comenzar el
ensamblaje de su producto.
2. Retire todas las piezas de la caja y verifique que cuente
con todas las piezas enumeradas en las páginas de la
Lista de piezas. Corte o rasgue cuidadosamente las
cuatro esquinas de la caja de modo que el fondo de la
caja pueda ser usado como su superficie de trabajo.
1. Find a clean, level place to begin the assembly of your
product.
2. Remove all the parts from the box and verify that you
have all of the listed parts as shown on the parts list
pages. Carefully cut or tear the four corners of the box
so that the bottom of the box can be used as your work
surface.
¡Aviso Importante! No devuelva este
producto a su local de venta.
IMPORTANT NOTICE! Do Not Return This
Product To The Store.
¡Por favor guarde las instrucciones! Es necesario el
número de modelo para contac tarse con nosotros.
Por favor léa las instrucciones para poder familiarze con
las piezas y los pasos para armar. Corrobore que todas
las piezas que aparecen en el “Lista de Partes” se
encuentren en el paquete.
Please Keep Your Instructions! Your Model number is
necessary should you need to contact us. Please read
through this instruction manual book to familiarize
yourself with all parts and assembly steps. Kindly refer
to the parts list below and be sure that all parts have
been included.
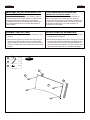
X 2
4
X 4
6
X 8
10
FIG. 1
4
6
6
10

www.themdsports.com
AWH084_098E
6
(Continúe en la siguiente página.)
(Continued on the next page.)
Español
English
X 1
P6
X 1
P5
X 1
1
X 4
11
X 2
17
X 2
P1
FIG. 2
P6
1
P5
Connect Box
/ Caja de Conexión
Connect Box
/ Caja de Conexión
Sensor Wire
/ Cable del Sensor
Sensor Wire
/ Cable del Sensor
FIG. 2B
P1
P1
17
11
FIG. 2A
17
X 1
7
X 2
P8
X 6
P3
X 1
2
X 1
3
X 6
9
X 6
12
X 6
13
X 4
P2
1
P2
P8
1
12
9
13
13
2
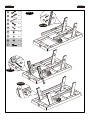
FIG. 3A
2
3
Note: Do NOT tighten
Bolt (#9) until FIG. 5.
/ Nota: NO el pestillo (#9)
hasta FIG. 5.
P3
FIG. 3

X 1
7
X 6
P3
FIG. 4
X 6
13
www.themdsports.com
AWH084_098E
7
(Continúe en la siguiente página.)
(Continued on the next page.)
Español
English
X 1
2
X 2
5
X 6
9
X 8
10
X 6
12
X 1
3
5
2
3
2
5
5
FIG. 4A
3
2
3
2
5
5
13
2
3
2
5
12
9
3
13
FIG. 4B
P3
5
3
10
FIG. 4C

X 1
7
X 8
8
X 8
12
X 8
13
X 4
18
X 4
P4
FIG. 5
www.themdsports.com
AWH084_098E
8
(Continúe en la siguiente página.)
(Continued on the next page.)
Español
English
P4
18
4
4
4
2
12
8
13
FIG. 5A
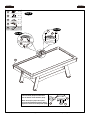
FIG. 1 Assembly
/ Ensamblaje FIG. 1
Note: After this step, tighten Bolt (#9).
/ Nota: Luego de este paso, apretar el
pestillo (#9).
Note: Go back and make sure that all connections are tightened.
/ Nota: Regrese y asegúrese de que todas las conexiones estén ajustadas.
CAUTION: Two strong adults are recommended to turn over
the table as shown.
1. Lift the table off the ground.
2. Turn the table over.
3. Place all four feet on the ground at the same time.
PRECAUCIÓN: Se recomienda la participación de dos
adultos para invertir la mesa como se muestra.
1. Levante la tabla del suelo.
2. Inviértala.
3. Coloque las cuatro patas en el suelo al mismo
tiempo.
DO NOT LEAN THE
TABLE ON ITS LEGS
/ NO INCLINAR LA MESA
SOBRE LAS PATAS
HOLD BY THE TABLETOP
/ SOSTENER DE LA
SUPERFICIE DE LA
MESA
CABINET
/ GABINETE
DO NOT HOLD THE TABLE
BY THE LEGS
/ NO SOSTENER LA
MESA POR LAS PATAS

www.themdsports.com
AWH084_098E
9
(Continúe en la siguiente página.)
(Continued on the next page.)
Español
English
X 2
10
X 4
14
X 4
15
X 1
19
X 4
P7
FIG. 6
15
15
14
Note: Tear off the backside papers
of the Felt Pads (#19) and stick them
onto the bottom of the Pushers (#18).
/ Nota: Arranque el papel de la parte
trasera de Almohadilla de Fieltro (#19) y
péguelos al fondo de los Golpeador (#18).
P5
19
19
10
FIG. 6A
FIG. 6B
P7

PLUG IN TABLE & ENJOY / ENCHUFESE A LA MESA Y DISFRUTE
ON/OFF SWITCH
/ INTERRUPTOR ON/OFF
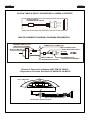
MOTOR SCHEMATIC DIAGRAM / DIAGRAMA ESQUEMATICO
CONNECTOR / CONECTOR
SPT-2 POWER CORD
/ CABLE ELÉCTRICO SPT-2
MOTOR / MOTOR
POLARIZED PLUG
/ ENCHUFE POLARIZADO
AC 120V
/ AC 120V
ON/OFF SWITCH
/ INTERRUPTOR ON/OFF
THERMAL PROTECTOR
/ PROTECTOR TERMAL
www.themdsports.com
AWH084_098E
10
(Continúe en la siguiente página.)
(Continued on the next page.)
Español
English
Electronic Connections Diagram (BOTTOM OF TABLE)
/ Diagrama de Conexión Electrónica (FONDO DE LA MESA)
Scorer wire / Cable del Marcador
Scorer / Marcador
Connect Box / Caja de Conexión
Sensor wire / Cable del Sensor
19
P5 P1

www.themdsports.com
AWH084_098E
11
(Continúe en la siguiente página.)
(Continued on the next page.)
Español
English
ADVERTENCIA:
!
1) Requiere 3 piezas de Baterias “AAA” (No incluido).
2) No mezcles baterias viejas y nuevas.
3) No mezcles baterias alkalina, estándar (carbón
zinc), o recargable (níquel-cadmio).
!
WARNING:
!
1) Require 3 pcs “AAA” Batteries (Not included).
2) Do not mix old and new batteries.
3) Do not mix alkaline, standard (carbon zinc), or
rechargeable (nickel-cadmium) batteries.
ELECTRONIC SCORER OPERATION OPERACIÓN DEL MARCADOR ELECTRÓNICO
Install Batteries
Battery Box: Unscrew bolt using a screwdriver and open the
battery box. Insert 3 “AAA” batteries ( not included) in the order
of polarity as shown on the inside cover. Then close the cover
using a screwdriver. Turn the power ON using the ON/OFF
switch.
Reminding:
a. Batteries must be installed according to the correct
polarization (+ and -) requires.
b. Please clean the battery contacts and also those of the
devices prior to battery installation.
c. If the game will not be used for a long period of time, we
recommend that the batteries should be removed.
Instalación de las pilas
Caja de Batería: Desatornille el cerrojo por usando un
destornillador y abra la Caja de Batería, inserte 3 “AAA” baterias
(no incluido) al orden de polaridad como mostrado el interno de
la Caja de Batería. Y luegp atornille sobre la cubierta usando
un destornillador.
Atención:
a. Las pilas deben ser instaladas según la polarización
correcta requerido (+ y -).
b. Limpie los contactos de baterias y también los aparatos
antes de la instalación de batería.
c. Si no jugará el juego por un largo período de tiempo,
recomendamos que quite las baterias.

www.themdsports.com
AWH084_098E
12
(La ultima página)
(The last page)
Español
English
ELECTRONIC SCORER OPERATION
OPERACION DEL MARCADOR ELECTRONICO
WARNING: Changes or modifications not expressly approved
by the party responsible for compliance could void the user’s
authority to operate the equipment.
NOTE: This equipment has been tested and found to comply
with the limits for a Class B digital device, pursuant to Part 15 of
the FCC Rules. These limits are designed to provide reasonable
protection against harmful interference in a residential
installation. This equipment generates, uses and can radiate
radio frequency energy and, if not installed and used in
accordance with the instructions, may cause harmful
interference to radio communications. However, there is no
guarantee that interference will not occur in a particular
installation. If this equipment does cause harmful interference to
radio or television reception, which can be determined by
turning the equipment off and on, the user is encouraged to try
to correct the interference by one or more of the following
measures:
-- Reorient or relocate the receiving antenna.
-- Increase the separation between the equipment and receiver.
-- Connect the equipment into an outlet on a circuit different from
that to which the receiver is connected.
-- Consult the dealer or an experienced radio/TV technician
for help.
ADVERTENCIA: Los cambios o modificaciones no
expresamente aprobado por la parte responsable del
cumplimiento podrían anular la autoridad del usuario para
operar el equipo.
NOTA: Este equipo ha sido probado y encontrado para cumplir
con los límites para el dispositivo digital de Clase B, de
conformidad con la Parte 15 de las Reglas de FCC. Estos
límites son diseñados para proporcionar protección razonable
contra la interferencia dañosa en una instalación residencial.
Este equipo genera, usa y podría irradiar la energía de
radiofrecuencia y, si no fuera instalado y usado conforme con
las instrucciones, podría causar interferencia dañosa para la
comunicación de radio. Sin embargo, no está garantizado que
la interferencia no ocurrirá en una instalación particular. Si este
equipo realmente causado interferencia dañosa a la radio o la
recepción de televisión, podría ser determinada por girando el
equipo off y on, el usuario está animado de corregir la
interferencia por una o más siguientes medidas:
-- Reoriente o recoloque la antena de recepción.
-- Incremente la separación entre el equipo y el receptor.
-- Conecte el equipo a una salida del circuito diferente que el
que está conectado con el receptor.
-- Consulte el proveedor o un técnico experienciado de radio/
televisión por ayudas.
YOU ARE NOW READY TO PLAY! ¡USTED ESTA AHORA LISTO PARA JUGAR!
1. Presione la perilla “ON/OFF” a “ON”. “Time” aparecerá como
“15:00” y la advertencia de “Quince Minutos” sonará.
2.
Para apagar el sonido, presione la perilla “SONIDO APAGADO”.
Para prender el sonido, presioine la perilla otra vez.
3. Presione la perilla “MINUTOS” para seleccionar entre 5, 10,
15 y minutos sin límite por el juego.
4. Para cambiar entre los modos de juego una vez el juego se
prenda, presione la perilla “INICIO/SELECCIONAR.
5.
Presione “INICIO/RESETEAR” para iniciar el juego. El tiempo
empezará en cuentra atrás una vez la música pare.
6. Cuando el jugador “ANFITRIÓN” saca 1 punto, el indicador
“ANFITRIÓN” mostrará 1 punto.
7. Cuando el jugador “VISITA” saca 1 punto, el indicador
“VISITA” mostrará 1 punto.
8. Luego de terminar el tiempo, el jugador con el más puntaje
gana. En caso de empate, se juego tiempo extra.
9. En el modo de cuenta atrás por el juego, el primer jugador
que saque 99 puntos será el ganador.
10. En el modo de juego sin límite, presione
“INICIO/SELECCIONAR” para iniciar el juego. El primer
jugador que saque 10 puntos será el ganador. Presione
“INICIO/SELECCIONAR” para reiniciar el juego.
11. De alcanzar el puntaje, el punto se agrega luego del sonido
de ovación.
12. Una vez iniciado el juego, el tiempo no se puede ajustar
usando la perilla “MINUTOS”. La única opción es resetear
el tiempo al tiempo de inicio.
NOTA: ESTO RESETEARÁ TAMBIÉN LOS PUNTOS A CERO.
13. En caso de que el juego quede inactivo por 5 minutos,
entrará en el modo de sueño. Presione
“INICIO/SELECCIONAR” para volver al juego.
1. Press the “ON/OFF” button into the “ON” position. “Time” will
be displayed as “15:00” and the “Fifteen Minute” warning
will sound.
2. To turn the sound off, press the “SOUND ON/OFF” button.
To turn the sound on, press the button again.
3. Press the “MINUTES” button to choose between 5, 10, 15
and unlimited minutes of game time.
4. To switch between game modes once the game is turned
on, press the “START/SELECT” button.
5. Press “START/RESET” to begin game play. The time
display will begin to count down once the music stops.
6. When the “HOME” player scores, the “HOME” indicator will
display 1 point.
7. When the “VISITOR” player scores, the “VISITOR” indicator
will display 1 point.
8. After the time finishes, the player with the highest score
wins. If the scores are level, extra time is added.
9. In the Countdown game mode, the first player to score 99
points is the winner.
10. In the Unlimited game mode, press “START/SELECT” to
begin the game. The first player to score 10 points is the
winner. Press “START/SELECT” to restart the game.
11. When a score is made, the point is added after the cheering
sound has finished.
12. Once the game has started, the time cannot be adjusted
using the “MINUTES” button. The only option is to reset the
time to the starting time.
NOTE: THIS WILL ALSO RESET THE SCORES TO ZERO.
13. If the game is inactive for 5 minutes, it will enter sleep
mode. Press “START/RESET” to return to the game.

GARANTIA
DESCRIPCION: MARCA: MODELO:
NOMBRE DEL CLIENTE:
.tnI °N .txE °N :OILICIMOD
:geleD/odatsE .loC
T
el.
CENTRO DE SERVICIO PARA PODER HACER EFECTIVA LA GARANTIA:
Cinescopios y Componentes S.A. de C.V. E-mail:
Ahuizotl # 94 Col. La Preciosa. Dirección: direccion@cicosa.com.mx
Del. Azcapotzalco Gerencia: gerencia@cicosa.com.mx
C.P.02460 México D.F.
Teléfono: 50014650
Lada: 01800-5703393
Para levantar un reporte vía internet la dirección es: www.cicosa.com.mx
EL APARATO QUE USTED HA ADQUIRIDO CUENTA CON UNA GARANTIA DE UN AÑO DE SERVICIO A
PARTIR DE LA FECHA DE ADQUISICION, BAJO LAS SIGUIENTES CONDICIONES:
1.- PARA HACER EFECTIVA LA GARANTIA, BASTARA PRESENTAR ESTA POLIZA
DEBIDAMENTE SELLADA POR LA TIENDA O UNIDAD VENDEDORA, JUNTO CON EL APARATO
EN LA TIENDA DONDE FUE COMPRADO EL ARTÍCULO.
2.- SE COMPROMETE A CAMBIAR EL ARTÍCULO O A DEVOLVER SU DINERO, SI LA FALLA ES
ATRIBUIBLE A DEFECTO DE FABR
ICACION. DURANTE LOS TREINTA DIAS POSTERIORES A LA
COMPRA LA GARANTÍA SE HARÁ VÁLIDA EN LA TIENDA DONDE ADQUIRIÓ EL PRODUCTO,
PRESENTANDO LOS DOCUMENTOS MENCIONADOS.
3.- EN NINGUN CASO EL TIEMPO DE REPARACIÓN SERÁ MAYOR A 30 DIAS, TRANSCURRIDO
ESTE TERMINO, COMERCIALIZADORA MEXICO AMERICANA, S. DE R.L. DE C.V. PROCEDERÁ A
EFECTUAR EL CAMBIO POR UN APARATO EQUIVALENTE O A LA DEVOLUCIÓN DEL IMPORTE
DE COMPRA VENTA RESPECTIVO
4.- ESTA GARANTÍA AMPARA LA TOTALIDAD DE LAS PIEZAS Y COMPONENTES DEL
PRODUCTO Y
MANO DE OBRA DE LA REPARACIÓN, ASÍ COMO GASTOS DE TRANSPORTACIÓN RESPECTIVOS
ÚNICAMENTE PARA EL CASO DE QUE NO HAYA UN CENTRO DE SERVICIO AUTORIZADO EN SU
LOCALIDAD.
5.- EL CLIENTE RECIBIRA NOTIFICACIÓN DEL TERMINO DE LA REPARACION DEL ARTICULO EL
CUAL DEBERA RECLAMAR EN UN MAXIMO DE 60 DÍAS NATURALES APARTIR DE ESTE AVISO.
ESTA GARANTIA SERA NULA EN LOS SIGUIENTES CASOS:
* CUANDO EL PRODUCTO SE HUBIESE UTILIZADO EN CONDICIONES DISTINTAS A LAS NORMALES
* CUANDO EL PRODUCTO NO HUBIES
E SIDO OPERADO DE ACUERDO CON EL INSTRUCTIVO DE
USO QUE SE LE ACOMPAÑA.
* CUANDO EL PRODUCTO HUBIESE SIDO ALTERADO O REPARADO POR PERSONAS NO AUTORIZADAS
POR EL FABRICANTE NACIONAL, IMPORTADOR O COMERCIALIZADOR RESPONSABLE RESPECTIVO.
LA PRESENTE GARANTIA ES OTORGADA POR:
Importado por: Comercializadora
México Americana, S. de R.L. de C.V.,
Av. Nextengo no. 78, Col. Santa Cruz
Acayucan, Azcapotzalco, Ciudad de
México, México, C.P. 02770.
FECHA EN QUE EL CONSUMIDOR RECIBE EL
PRODUCTO
SELLO DE TIENDA
-
 1
1
-
 2
2
-
 3
3
-
 4
4
-
 5
5
-
 6
6
-
 7
7
-
 8
8
-
 9
9
-
 10
10
-
 11
11
-
 12
12
-
 13
13
-
 14
14


en otros idiomas
- English: MD Sports AWH084_098E User manual
Artículos relacionados
-
MD Sports AWH072_018E Manual de usuario
-
-
-
-
-
-
-
-
