MD Sports 1418433 El manual del propietario
- Tipo
- El manual del propietario

Sears / Kmart USA
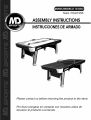
INSTRUCCIONESDEARMADO
Please contact us before returning the product to the store.
Pot favor pSngase en contacto con nosotros antes de
devolver el producto a la fienda.

[ English ]
This product is covered by a limited warranty that is effective for
90 days from the date of purchase. If, during the limited
warranty period, a part is found to be defective or breaks, we
will offer replacement part at no cost to you, the customer. The
only exceptions to the warranty include mainframe, table tops,
playing surfaces, batteries or tools.
The above warranty will not apply in cases of damages due to
improper usage, alteration, misuse, abuse, accidental damage
or neglect.
This Limited Warranty gives you specific legal rights and you
may also have other rights which vary from one State
(province) to another.
"PLEASE SAVE THESE INSTRUCTIONS
AND PURCHASE RECEIPT!"
A PURCHASE RECEIPT (or other proof of purchase date) will
be required before any warranty service is initiated. All requests
for warranty service, please feel free to contact our Consumer
Service Department at :
WEBSITE: www.themdsports.com
*Please be aware of your product's Limited Warranty for the
return/refund policy from the store, We, at Medal Sports, can
not handle the product which is out of product's limited warranty
since we only provide available parts.
PLEASE CONTACT US BEFORE RETURNING
THE PRODUCT TO THE STORE.
THANK YOU VERY MUCH!
[ EspaSol I
Este producto esta cubierto por una garantia efectiva de 90 dias a
partir de la fecha de su compra. Durante el peri6do limite de la
garantia, si una parte defectuosa o quebrada es encontrada, nosotros
ofreceremos una reparaci6n o un reemplazo de la parte sin ningOn
costo para ud, nuestro cliente. Las Onicas excepciones de la garantia
incluyen marcos unidad principal, tableros de mesa, superficies, pilas
o herramientas.
La susodicha garantia no se aplicara en los casos de dafios y
perjuicios debido al uso impropio, la alteraci6n, el mal uso, el abuso,
el dafio accidental o la negligencia.
Esta garantia limitada le da a usted derechos legales especificos,
usted tambien puede tener otros derechos que varian de un estado
(provincia) a otro.
"iPOR FAVOR GUARDE ESTAS INSTRUCCIONES
Y RECIBO DE LA COMPRA! "
EL RECIBO DE LA COMPRA (o cualquier otra prueba de la fecha de
su compra) seria requerida antes que cualquier servicio de garantia
fuera iniciada. Toda solicitud para el servicio de garantia, pot favor
sientase libre de ponerse en contacto con nuestro Departamento de
Servicio de Consumidor en:
WEBSITE: www.themdsports.com
*Por favor tenga atenci6n sobre el Limite de Garantia de su producto
de la politica de vuelta/reembolsa desde la tienda, Nosotros, Medal
Sports, no podemos manejar el producto que esta fuera del limite de
garantia ya que proporcionamos solamente partes disponibles.
POR FAVOR PONGASE EN CONTACTO CON NOSOTROS ANTES
DE DEVOLVER EL PRODUCTO A LA TIENDA.
iMUCHAS GRACIAS!
1 - Please leave your name, address, phone number, model number,
parts needed on the answering machine if there is no attendant.
Failure to do so will result in a delay in shipping parts to you.
2 - Please review the replacement parts list and make sure that
you have all your parts before beginning assembly. For
questions that may arise or for missing/damaged parts,
please contact us.
3 - Since you build all tables upside down, please inspect tabletops
or playing surfaces right away before putting together, all
damaged table tops/playing surfaces need to be returned to
the store. Please contact with retailer for their return policy.
Thank you very much.
1 - Por favor deje su hombre, direcci6n, nOmero telef6nico, nOmero
de modelo, partes necesarios a la maquina contestadora si no
fuera atendido. El fracaso de hacer asi le causara un retraso del
envio de partes.
2 - Por favor consultar la lista de piezas de recambio y asegurarse
que usted tiene todas sus piezasantes de comenzar la asamblea.
Para preguntas o para piezas que no se hayan incluidos/daSadas,
por favor pongase en contacto con nosotros.
3 - Ya que usted construye todas las mesas al reves, por favor
inspeccione las partes superiores de mesa o superficies de
juego enseguida antes de poner juntos, que todo tableros
de mesa/superficies daSado tiene que set devuelto a la tienda.
Por favor comunique con el minorista pot su pol[tica de
devoluci6n.iMuchas gracias!
1418433 (Continued on the next page.) 1 (ContinLie en la siguiente p_gina.) www.themdsports.com

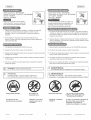
Phillips Screwdriver =Not Included
Standard (Fiat Head Screwdriver) =Not Included
Wrench =Included
Alien Key =Included
Electric Screwdrivers may be helpful
during assembly; however, please set
a low torque and use extreme caution.
Power Tools
-Bet Low Torque
......_;i__!_ii_'
1 =Please read the instructions carefully, and follow all assembly,
operation or safety instructions properly in order to avoid
damage or injury. For the assembly, at least two adults are
required.
2 =Some figures or drawings may not look exactly like your
product. Please read and understand the text before beginning
each assembly step.
1 =This product is intended for iNDOOR use only.
2 = Please Do Not sit, climb or lean on the product.
3 = Please Do Not drag the product when moving it in order to avoid the
damaged on the legs.
4 = Please only use spray furniture polish to clean the exterior surfaces
on the product.
5 =This is not a child's toy, adult supervision is required for children
playing this game.
IZ_ WARNING: Adult Assembly Required. ]
Z_ WARNING:
CHOKING HAZARD -- This item contains small parts or /
and small balls.Not suitable for children under Byears.
Destomillador Phillips = No incluido
Destomillador de Cabeza Plana =No incluido
Llave Inglesa =Incluido
Llave Allen = Incluido
Los destomilladores electricos pueden set
de gran ayuda durante el ensamblado; sin
embargo, por favor ajuste el par de giro
bajo y sea extremadamente precavido.
Herramientas el¢ctdcas
=Baje par
Alto par
rn_s es_d_tas
1 =Por favor lea las instrucciones con cuidado y siga todo durante el
montaje, la operaci6n o instrucciones de seguridad correctamente
para evitar el daSo o la herida. Para el montaje, por Io menos se
requieren dos adultos.
2 =AIgunas figuras o dibujos podrian parecer no esten exactamente
como su producto. Por favor lea y entienda el texto antes de iniciar
cada paso del montaje.
1 = Este producto esta destinado para el uso INTERIOR solamente.
2 = Por favor No sientes, subas o inclines la producto.
3 = Por favor No arrastres la producto cuando esta en movimiento para
evitar el daSo sobre las piernas.
4 = Por favor use s61o la cera espray de muebles para limpiar las
superficies exteriores sobre la producto.
5 = Esto no es un juguete de niSos, se requieren la supervisi6n adulta
para niSos cuando esta jugando este juego.
Z_ ADVERTENClA:
El ensamblaje debe ser realizado por una persona adulta.
ADVERTENClA:
ELtGRO DE ASFtXIO == Este articulo contiene piezas
queSas y / o pequeSas bolas. No apto para menores de 3 aSos.
Strong Adults Needed
Se requiere de dos
personas para ensamblar
No Children in
Assembly Area
Mantener a los niSos
alejados del area de
ensamble
Keep away from pets
Mantener a animales
alejados
Do not use or keep product
outdoors. For indoor use only.
No wet/humid conditions.
no usar y no guardar el producto al
aire Hbre. Para uso en interior
solamente. No guardar en
condiciones mojadas ! humedas
1418433 (Continued on the next page.) 2 (ContinOe en la siguiente p_gina,) www.themdsports.com

I English ]
IMPORTANT SAFETY INSTRUCTIONS
Read all instructions
1. Read all instructions-All the safety and operating
instructions should be read carefully before this
hockey game is played.
2. Caution-This is not a toy and is intended for use by or
under the supervision of adults. Adults should review
safety guidelines with children to avoid possible risk
of electric shock or other injuries.
3. Power sources-This hockey game should be operated
only from 110-120VA.C., 60 cycle current as
indicated on the identification label. If you are not
sure of the type of power supply to your home,
consult your appliance dealer or local power
company.
4. Power cord protection-Power cord should be routed
so that it is not likely to be walked on or pinched by
items placed upon or against it. Pay particular
attention to cords at plugs, convenience receptacles,
and the point of exit from the game.
5. Overloading-Do not overload wall outlets and
extension cords as this can result in a risk of fire or
electric shock.
6. Object and liquid entry-Never push objects of any
kind into this game through openings as they may
touch dangerous voltage points or short-out parts
which could result in a fire or electric shock. Never
spill liquid of any kind on the game.
7. Ventilation-Openings in the game are provided for the
exhaust air to create a cushion effect. The openings
on the air blower are for the intake air. Keep clear of
the air blower when it is on. Do not put hand or other
objects near the intake openings. To ensure reliable
operation of the game and protect it from overheating
these openings must not be blocked or covered.
8. Damage requiring service-Unplug the game from the
wall outlet.
Do not attempt to service the blower yourself as
opening or removing covers may expose you to
dangerous voltage or other hazards. Refer servicing
to qualified service personnel under the following
conditions.
A. When the power supply cord or plug is damaged.
B. If liquid has spilled, or objects have fallen into the
blower.
C. When the air blower exhibits a distinct change in
performance e.g. abnormal noise, this indicates a
need for service.
9. Grounding or Polarization-This game is equipped with
a polarized alternating current line plug (a plug having
one blade wider than the other). This plug will fit into
the power outlet only one way. This is a safety
feature. If you are unable to insert the plug fully into
the outlet, try reversing the plug. If the plug should
still fail to fit, contact your electrician to replace your
obsolete outlet. Do not defeat the safety purpose of
the polarized plug.
[ Espanol I
IMPORTANTES INSTRUCCIONES
DE SEGURIDAD
Lea todas las instrucciones
1. Lea todas las instrucciones - Todas las instrucciones de
seguridad y operaci6n deberian set leido con cuidado
antes de que este juego de hockey sea jugado.
2. Advertencia - Esto no es un juguete y que esta
intencionado pot el uso o bajo ta supervisi6n de adultos.
Los adultos deberian repasar las directrices de seguridad
con ni_os para evitar et riesgo de posible choque etectrico
u otras heridas.
3. Fuente de potencia - Este juego de hockey deberia set
operado solamente de 110-120V A.C., 60 cictos de
corriente como indicado sobre ta etiqueta de identificaci6n.
Si usted no esta seguro sobre el tipo de suministro de
energia de su casa, consulte con su distribuidor de aparato
o ta empresa de energia local.
4. Protecci6n det cable eletrico- Et cable electrico deberia set
encaminado de modo que no sea probabtemente andado
encima o pettizcado pot articulos colocados encima o
contra etto. Preste atenci6n especial sobre los cables en
enchufes, receptaculos convenientes y et punto de salida
det juego.
5. La sobrecarga - No sobrecargues las salidas de pared y
cuerdas de extensi6n como esto puede causar un riesgo de
fuego o choque etectrico.
6. El objeto y la entrada de liquido - Nunca empujes los
objetos de cualquier ctase a este juego por aperturas como
ellos puedan tocar puntos de voltaje petigrosos o corto -
partes extemas podrian causar un fuego o choque
etectrico. Nunca derrame cualquier clase de liquido sobre
et juego.
7. Ventitaci6n- Las aperturas en et juego son proporcionadas
para et escape de aire para crear un efecto de cojin. Las
aperturas sobre et soplador de aire son para la entrada de
aire. Guarde libre det soplador de aire cuando esta
conectado. No pongas ta mano u otros objetos cerca de las
aperturas de entrada. Para asegurar una operaci6n
confiable det juego y protejalo de recalentarse estas
aperturas que no deben set btoqueados o cubiertos.
8. Et servicio de requisito de da_o - Desconecte et juego de ta
salida de pared. No intentes de atender et soplador por
usted mismo como ta apertura o la etiminaci6n de cubiertas
puedan exponerle al voltaje petigroso u otros peligros.
Mande a ta persona calificada de servicios bajo tas
siguientes condiciones:
A. Cuando la cuerda de suministro de energia o et enchufe
estan da_ados.
B. Si se ha derramado et tiquido o se han caido los objetos
en et soplador.
C. Cuando et soplador de aire exponga un cambio distinto
det funcionamiento, por ejemplo ruido anormal, se indica
una necesidad del servicio.
9. Conectando con tierra o la Polarizaci6n - Este juego esta
equipado con un enchufe de tinea de corriente altema
polarizada ( un enchufe que tiene una hoja mas amptia que
et otro). Este enchufe encajara a la salida de potencia por
un s61o camino. Esto es una caracteristica de seguridad. Si
usted esta incapaz de insertar totalmente el enchufe en ta
salida, trate de examinar el enchufe. Si et enchufe todavia
falta en encajar, ponerse en contacto con su etectricista
para sustituir la salida anticuada. No derrotes et objetivo de
seguridad det enchufe polarizado.
1418433 (Continued on the next page.) 3 (ContinOe en la siguiente p_gina.) www.themdsports.com

I English ]
IMPORTANT SAFETY INSTRUCTIONS
Read all instructions
10. CAUTION-ELECTRICALLY OPERATED
PRODUCT-Not recommended for children under 8
years of age. As with all electrical products,
precautions should be observed during handling
and use to reduce the risk of electric shock.
11. We recommend that the game be periodically
examined for conditions that may result in the risk
of fire, electrical shock, or injury to persons. In the
event such conditions exist, the game should not
be used until properly repaired.
12. RISK OF FIRE, ELECTRIC SHOCK, OR INJURY
TO PERSONS
WARNING-When using electric appliances, basic
precautions should always be followed, including
the following:
A) Read all the instructions before using the
appliances.
B) To reduce the risk of injury, close supervision is
necessary when an appliance is used near
children.
C) Do not contact moving parts.
D) Only use attachment recommended or sold by
the manufacturer.
E) Do not use outdoors.
F) For a cord-connected appliance, the following
shall be included:
-To disconnect, turn all controls to the off position,
then remove plug from outlet.
-Do not unplug by pulling on cord. To unplug, grasp
the plug, not the cord.
-Unplug from outlet when not in use and before
servicing or cleaning.
-Do not operate any appliance with a damaged
cord or plug, or after the appliance malfunctions or
is dropped or damaged in any manner. Return
appliance to the nearest authorized service facility
for examination, repair, or electrical or mechanical
adjustment.
13. To reduce the risk of electric shock, this appliance
has a polarized plug (one blade is wider than the
other).This plug will fit in a polarized outlet only one
way. If the plug does not fit fully in the outlet,
reverse the plug. If it still does not fit, contact a
qualified electrician to install the proper outlet. Do
not change the plug in any way.
SAVE THESE INSTRUCTIONS
WARNING: To Reduce The Risk Of Fire Or
Electric Shock, Do Not Use This Fan With
Any Solid-State Speed Control Device.
[ For Householld use on|y. I
[ Espa_ol J
IMPORTANTES INSTRUCCIONES
DE SEGURIDAD
Lea todas las instrucciones
10.Advertencia -PRODUCTO OPERADO
ELECTRICAMENTE - Norecomendado para niSosbajos
de 8 aSosde edad. Como contodos los productos
etectricos, las precauciones deberian set observadas
durante et manejo y etempleo para reducir etriesgo de
choqueetectrico.
11. Recomendamosque etjuego de vez en cuandosea
examinado de tascondiciones que puedan causar el riesgo
de fuego, etectrochoque, oherida a personas. En et caso
de que mientrasexistan tales condiciones, etjuego no
deberia set usadohasta correctamente reparado.
12. RIESGOS DE FUEGO, ELECTROCHOQUE, O HERIDAA
PERSONASADVERTENClA
- Cuando esta usandoaparatos etectricos, siempre
deberian set seguidas tas precauciones basicas,
inctuy-endolos siguientes:
A) Lea todas tasinstrucciones antes de usar los aparatos.
B) Para reduciret riesgo de herida, la supervisi6n cercana es
necesaria cuando el aparatoesta usado cerca de niSos.
C) Nop6ngas en contacto con partes m6vites.
D)S61ouse etaccesorio recomendado o vendido por et
fabricante.
E) No usesal aire fibre.
F) Para un aparatode cuerda - conectada, sera incluida los
siguientes:
- Para desconectar, giretodos los mandos a la posici6n
OFF,luego quite etenchufe de la salida.
- No desconectes a travas det tiro de tacuerda. Para
desconectar, agarre et enchufe, no tacuerda.
- Desconecte desde la salida cuandono esteen uso y antes
de revisar o timpiar.
- Que no operes et aparatocuando la cuerda oenchufe este
da_ado, o luego de malfuncionamiento det aparatoo fue
caido o da_ado de cualquier modo.Vuetve etaparato al
servicio autorizado mas cercano paraexamen, reparaci6n
o ajuste etectricoo mecanico.
13.Parareducir et riesgo dechoque etectrico, este aparato
tiene un enchufe polarizado (una hojaes mas amplia que
la otra). Esteenchufe encajara en una salida polarizada
por s61oun camino.Si etenchufe no cabetotalmente en la
salida, examine el enchufe. Siesto todavia no se cabe,
p6ngaseen contacto con un etectricista calificado para
instalar lasalida apropiada. No cambieset enchufede
ning0n modo.
SALVE ESTAS INSTRUCCIONES
ADVERTENCIA: Para reducir el riesgo de fuego o
choque el_ctrico, no uses este abanico con
cualquier dispositivo de control s61ido -
velocidad estatal.
so|o.t
1418433 (Continued on the next page.) 4 (ContinOe en la siguiente p_gina.) www.themdsports.com

[ English I I Espan°l I
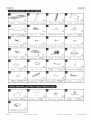
il_| l:_ _| ;,]:_t,i 5111_1111JI _II it;t11]:11;,];_Zll/ :[,:
m
xl
"it
!
I Unidad Principal
!
Mainframe
I1
Table Tennis
Top
m
x2
T
Parte Superior del
i Tenis de Mesa
x12
.... T
5/16" x 1-1/8" Bolt _ Cerrojo
5/16" x 1-1/8"
!
m
m
m
x2
!
Left Leg _ Pierna Izquierda
I
xl
m
m
ii
Right Leg
x2
11
!
I Pierna Derecha
!
m
m
x2
T
Leg Panel Ii Panel de Pierna
I
x2
1
!
Blower i Soplador
!
Puck Catcher
11
T
!
Colector Puck
I
Leg leveler
m
T
!
!
!
" T
1/4" x 1-1/2" Bolt _
!
x8
Cerrojo
114"x 1-1/2"
x4
x5
1
T4 x 5/8" Screw _ Tornillo T4x5/8"
!
m
xl
1
i Marcador
Electronic Scorer _ Electr6nico
!
x4
x7
T
T4 x 1/2" Screw _ Tornillo T4x1/2"
I
11
xl
Caja de BateriaBattery Box
11
Tit
!
!
!
xl
x4
Nivelador de
Pierna
x2
.[
T4 x 1" Screw _ Tornillo T4xl"
!
11
Conecte
T
!
Pusher i
!
x2
.......... 'T ......... _ ......... T .......... _:: 'T 'It
Atmohadilla de | _ , i , i Table Tennis i Sonorte de Mesa I Poste de Mesa
Felt Pad i F e tro | I-'UCK ! PUCK i Support i '-de Tenis Table Tennis Post i de Tenis
i _ i j -- i _ i
tl
©©
x2
• I Pelota de Mesa
Table Tennis Ball i de Tenis
I
|
xl
1'
!
Allen Key i Llave Alien
I
m
x2
' "It
Table Tennis i Paletas del Tenis
! de la Mesa
Paddle
B
oj
xl
1
Red de Mesa de
Table Tennis Net
!
Tenis
!
m w
x2 x4 x12 x4
.......... T ................... T ................... T ................... T ..........
Cab e de Delantal de ............ "L" Nut _ Tuerca "L"
Puck Catcher Wire_ Apron Corner _ . . u/]t_" l- i'_u[ _ /uerca u/]t_" .,L _ _ _ •
Colector Puck _ Rlncon ! wl[n bcrews _ con/ornlllOS
xl
Connect Box _ Caja de Conexidl
!
1418433 (Continued on the next page.) 5 (ContinOe en la siguiente p_gina.) www.themdsports.com

I English ]
ASSEMBLY iNSTRUCTiONS:
1. Find a clean, level place to begin the assembly of your
Air Hockey Table. The table will be assembled upside
down and then turned over on its legs once the
assembly completed. This game table is heavy, and
turning it over will require at least two strong adults.
2. Remove all the parts from the box and verify that you
have all of the listed parts as shown on the parts list
page. Carefully cut or tear the four corners of the box
so that the bottom of the box can be used as your
work surface.
INSTRUCClONES DE ENSAMBLAJE
1.
[ EspaSol I
Encuentre un lugar limpio, piano para comenzar el
montaje de su Mesa de Hockey de Aire. La mesa
ser_ montada al rev6s y luego voltee sobre sus
piernas una vez completado el montaje. Esta mesa
de juego es pesada y requerir_ por Io menos dos
adultos fuertes para el volteo.
,
Quite todas las partes de la caja y verifique que est_n
todas las partes catalogadas como mostrado en la
p_gina de lista de partes. Con cuidado de cortar o
rasgar los cuatro rincones de caja de modo que el
fondo de la caja podda ser usado como su superficie
de trabajo.
Xl
@ Xl
@) x5
@ x3
®j Xl
@ Xl
®
Air Box/Caja de Aire
Wire/
Sensor
Caja_de.Conexi6n
Sensor
]a b_!deWIi_e/isor
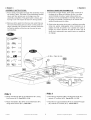
F|G.I
3. Attach the Blower (#6) to the Mainframe (#1) using
five Screws (#10). See FIG.1 & 1A.
4. Attach the Battery Box (#15) to the Mainframe (#1)
using three Screws (#11). See FIG.1.
F|G.I
3. Atornille los Soplador (#6) al Unidad Principal (#1)
usando 5 Tornillos (#10). Yea la FIG. 1 & 1A.
4. Atornille los Caja de Bateda (#15) al Unidad Principal
(#1) usando 3 Tornillos (#11). Yea la FIG. 1.
1418433 (Continued on the next page.) 6 (ContinOe en la siguiente p_gina.) www.themdsports.com

I English ] [ Espa_ol I
©
F|G,2
5. Attach the Puck Catcher (#7) to the Mainframe (#1)
using two Screws (#11) per Puck Catcher. See
FIG.2 & 2A.
Q X2
Q X2
(_) x4
® x12
@ x4
F|G,2
5. Atornille los Colector Puck (#7) al Unidad Principal
(#1) usando 2 Tornillos (#11 )por Colector Puck.
Vea la FIG. 2 & 2,4.
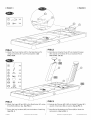
F|G,3
6. Attach the Legs (#2 and #3) to the Mainframe (#1) using
three Bolts (#9) per leg. See FIG. 3.
7. Screw the Leg Levelers (#8) into the bottom of each leg.
See FIG. 3.
F|G.3
6. Adjunte las Piernas (#2 & #3) al Unidad Principal (#1)
usando 3 Cerrojos (#9) por pierna.Vea la FIG. 3.
7. Atornille los Niveladores de Pierna (#8) al fondo de
cada pierna Vea la FIG. 3.
1418433 (Continued on the next page.) 7 (ContinOe en la siguiente p_gina.) www.themdsports.com

I English ] [ Espa_ol I
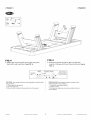
F|G.4
8. Attach the Leg Panel (#4) to the Legs using four
Bolts (#13) per Leg Panel. See FIG. 4.
F|G.4
8. Adjunte las Panel de Pierna (#4) alas Piernas
usando 4 Cerrojos (#13) por Panel de Pierna. Vea la
FIG. 4.
AGARRE LA
MESA
CABINET
GABINETE
DO NOT HOLD THE LEGS
NO AGARRES LAB PIERNAS
DO NOT LEAN THE
TABLE ON iTS LEGS
/NO APOYES LA MESA
SGBRE SUS PIERNAS
CAUTION: Two strong adults are recommended to turn the table
over as shown.
1. Lift the table off the ground.
2. Turn the table over.
3. Place it on all four feet at the same time on the ground.
PRECAUCION: Recomienda voltea la mesa per dos
adultos fuertes come mostrado.
1. Levante la mesa desde el piso.
2. Voltee la mesa.
3. Coloque los cuatro pies de la mesa sobre el piso al
mismo tiempo.
1418433 (Continued on the next page.) 8 (ContinOe en la siguiente p_gina.) www.themdsports.com

I English ] [ EspaSol I
©
F|G,5
9. Attach the Electronic Scorer (#14) to the Mainframe
(#1) using two Screws (#12). See FIG. 5.
F|G,5
9. Adjunte las Marcador Electr6nico (#14) al Unidad
Principal (#1) usando 2 Tornillos (#12). Yea la FIG. 5.
F|G,6
10. Place the Table Tennis Support (#19) on the
Mainframe and place the Table Tennis Tops (#5)
on the Hockey surface. And then Insert the Net
Posts (#20) and Net (#22) on the Table Tennis
Top. See FIG. 6.
F|G.6
10. Coloque el Soporte del Tenis de Mesa (#19) sobre el
UnidadPrincipaly coloque las Partes Superiores del Tenis
de Mesa (#5) sobre la superficie hockey. Y luego
inserte los Postes de Red (#20) y la Red (#22) sobre
la Parte Superior del Tenis de Mesa. Yea la FIG. 6.
1418433 (Continued on the next page.) 9 (ContinOe en la siguiente p_gina.) www.themdsports.com

I English ] [ Espa_ol I
® x4
@ x4
F|G.7
11.Tear off the backside paper of the Felt Pad (#17)
and stick them at the bottom of the Pushers (#16).
F|G.7
11. Arranque la trasera del papel de la Almohadilla de
Fieltro (#17) y p6guelos en el fondo del Camello
(#16).
Underside the tabielDebaje de |a mesa
Scorer/Ma_
Scorer wire/Cable dei Marcador Battery Box/Caja de Bateria
/
/
Battery Box wire elFJ._!,11!_IL
/Cable de ia Caja r-_l_ Plliili!i IP
II _ _ deBateria_z/ II_11°-I'Hi II
/ delSensor "_EJ_¢ l_'Sensorw,reSCabledelSenso r
Sensor wire/Cable
Connect Box/Caja de Conexidn
MOTOR SCHEMATIC DIAGRAM / DIAGRAMA ESQUEMATICO
THERMAL PROTECTOR / Protector Termal
MOTOR / M_
CONNECTOR / Conector
SPT-2 POWER CORD
__{[_jE_ Cable Electrico SPT-E_
AC 100-125V
AC 100-125V
ON/OFF SWITCH _
ON/OFF SWITCH POLARIZED PLUG
Enchufe Poiadzado
1418433 (Continued on the next page.) 1 0 (ContinOe en la siguiente p_gina.) www.themdsports.com

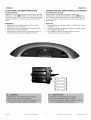
I English ]
ELECTRONIC SCORER OPERATION
instal| Batteries
Battery Box: Unscrew bolt using a screwdriver and open the
battery box. Insert 4 batteries ( not included) in the order
of polarity as shown on the inside cover. Then close the cover
using a screwdriver. Turn the power ON using the ON/OFF
switch.
Reminding:
a. Batteries must be installed according to the correct
polarization (+ and -) requires.
b. Please clean the battery contacts and also those of the
devices prior to battery installation.
c. If the game will not be used for a tong period of time, we
recommend that the batteries should be removed.
[ Espanol I
OPERACION DEL MARCADOR ELECTRONICO
instaiaci6n de las pilas
Caja de Bateria:Desatomitte et cerrojo por usando un
destornitlador y abra ta Caja de Bateria, inserte 4 baterias
(no incluido) al orden de polaridad como mostrado el interno de
la Caja de Bateria. Y luegp atornitte sobre la cubierta usando un
destornitlador.
Atencion:
a. Las pitas deben ser instaladas segOn ta polarizaci6n correcta
requerido (+ y -).
b. Limpie los contactos de baterias y tambien los aparatos antes
de ta instalaci6n de bateria.
c. Si no jugara et juego por un largo periodo de tiempo,
recomendamos que quite las baterias.
1- +
f+ -!
1418433 (Continued on the next page.) 11 (ContinOe en la siguiente p_gina.) www.themdsports.com

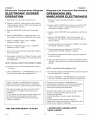
I English ]
Electronic Connections Diagram
ELECTRONIC SCORER
OPERATION
1. Plug battery box wire into the connect box.
2. Press the "ON/OFF" button into the "ON" position.
"Time" displayed will be "15:00" accompanied with
a "fifteen minute" warning.
3. Press the "MINUTES" button to set up playing
time.
4. Press "START/RESET" to begin game play. The
time display will count down after the music stops.
5. When the "HOME" player scores, "HOME"
indicator will show 1 point.
6. When the "VISITOR" player scores, "VISITOR"
indicator will show 1 point.
7. Score only counts when goal made after cheering
sound is finished.
8. Once game is started, the "Minutes" button cannot
be adjusted. This only option is to reset the time to
the starting time.
NOTE: THIS WILL RESET THE SCORES TO ZERO.
9. The scorer will turn off automatically when idle for
15 minutes.
10. Press "MINUTES" or" START/RESET" to turn on
the scorer again after the stoppage period.
Caution: changes or modifications not expressly
approved by the party responsible for compliance
could void the user's authority to operate this device
This device complies with the part 15 of the FCC
rules. Operation is subject to the following two
conditions :
(1) This device may not cause harmful interference.
(2) This device must accept any interference
received, including interference that may cause
undesired operation.
YOU ARE NOW READY TO PLAY!
[ Espa_ol I
Diagrama de Conexi6n Electr6nica
OPERACION DEL
lViARCADOR ELECTRONiCO
1. Enchufe el cable de la caja de bateda a la caja de
conexi6n.
2. Aprete el bot6n "ON/OFF" para entrar a la posici6n "ON".
"Time" ser_ mostrado "15:00" acompadado con una
advertencia de "fifteen minute".
3. Aprete el bot6n "MINUTES" para establecer el tiempo de
jugar.
4. Aprete el "START/RESET" para iniciar el juego. La
demostraci6n del tiempo se contar_ regresiva luego de
parar la m0sica.
5. Cuando marcado por eljugador del "HOME", el indicador
del "HOME" mostrar_ 1 puntaje.
6. Cuando marcado pot el jugador del "VISITOR", el
indicador del "VISITOR" mostrar_ 1 puntaje.
7. Se cuenta el puntaje s61ocuando el gol hecho luego del
sonido terminado.
8. Una vez iniciada el juego, no podda ser ajustado el bot6n
"Minutes". Esta opci6n 0nica es para reiniciar el tiempo de
partida.
NOTA : Se reiniciar& los puntajes a cero.
9. El marcador apagar_ autom_ticamente cuando el juego no
ha sido jugado pot 15 minutos.
10. Aprete "MINUTES" o "START/RESET" para encender
otra vez el marcador luego del periodo de suspenci6n.
Precauci6n: los cambios o modificaciones no
expresamente aprobadas por el partido responsable
del cumplimiento poddan anular la autoridad del
usuario para manejar esta dispositivo.
Este dispositivo cumple con la parte 15 de las reglas
de FCC. La operaci6n est_ sujeta alas dos
condiciones siguientes:
(1) Este dispositivo no podda causar interferencia
da_osa.
(2) Este dispositivo debe aceptar cualquier
interferencia recibida, incluyendo la interferencia que
podda causar operaci6n indeseada.
i USTED ESTA AHORA LISTO
PARA J UGAR!
1418433 (The last page) 12 (La ultima p_gina) www.themdsports.com
-
 1
1
-
 2
2
-
 3
3
-
 4
4
-
 5
5
-
 6
6
-
 7
7
-
 8
8
-
 9
9
-
 10
10
-
 11
11
-
 12
12
-
 13
13


MD Sports 1418433 El manual del propietario
- Tipo
- El manual del propietario
en otros idiomas
- English: MD Sports 1418433 Owner's manual
Artículos relacionados
-
MD Sports AWH084_108B Manual de usuario
-
-
-
-
-
-
-
-
-


