
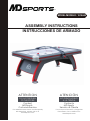
MODEL/MODELO: 1618440
INSTRUCCIONES DE ARMADO
ASSEMBLY INSTRUCTIONS
TM
ATTENTION
DO NOT RETURN
TO THE STORE
Contact
MD Sports
Customer Service
* For additional resources and Frequently
Ask Questions, please visit us at
themdsports.com
ATENCIÓN
Contacto
MD Sports
Servicio al Cliente
* Por mayor información y Preguntas
Frecuentes, favor visitarnos en
themdsports.com
NO DEVOLVERLO
A LA TIENDA

FREE FULL YEAR
EXTENDED WARRANTY!
Give Us Your Opinion and Receive A
Write a review for a recently purchased
item on TheMDSports.com and receive an
extended full year limited warranty,
valued at $150.00.
See TheMDSports.com
for additional details.
TM

Español
English
(Continúe en la siguiente página.) www.themdsports.com
1618440
1
(Continued on the next page.)
GARANTÍA LIMITA DE 90 DIAS
LIMITED 90 DAYS WARRANTY
1 - Please leave your name, address, phone number, model number,
parts needed on the answering machine if there is no attendance.
Failure to do so will result in a delay in shipping parts to you.
2 - Please review the replacement parts list and make sure that
you have all of your parts before beginning assembly.
For questions that may arise or for missing/damaged parts,
please contact us.
3 - Since you build all tables upside down, please inspect tabletops
or playing surfaces right away before putting together, all
damaged table tops/playing surfaces need to be returned to
the store. Please contact with retailer for their return policy.
1 - Por favor deje su nombre, dirección, número telefónico, número
de modelo, partes necesarios a la máquina contestadora si no
fuera atendido. El fracaso de hacer así le causará un retraso del
envío de partes.
2 - Por favor revise la lista de piezas de repuesto y asegúrese de que
tiene todas las piezas antes de comenzar el montaje.
Para preguntas o para piezas que no se hayan incluidos/dañadas,
por favor pongase en contacto con nosotros.
3 - Ya que usted construye todas las mesas al revés, por favor
inspeccione las partes superiores de mesa o superficies de
juego enseguida antes de poner juntos, que todo tableros
de mesa/superficies dañado tiene que ser devuelto a la tienda.
Por favor comunique con el minorista por su política de
devolución.
¡AVISO!NOTICE!
STAPLE YOUR RECEIPT HERE /
GRAPA SU RECIBO AQU
This product is covered by a limited warranty that is effective for
90 days from the date of purchase. If, during the limited
warranty period, a part is found to be defective or broken, we
will offer replacement parts at no cost to you, the customer. The
only exceptions to the warranty include mainframes, table tops,
playing surfaces, batteries or tools.
The above warranty will not apply in cases of damages due to
improper usage, alteration, misuse, abuse, accidental damage
or neglect.
This Limited Warranty gives you specific legal rights and you
may also have other rights which vary from one State
(province) to another.
A PURCHASE RECEIPT (or other proof of purchase) will be
required before any warranty service is initiated. For all
requests for warranty service, please feel free to contact our
Consumer Service Department at :
WEBSITE: www.themdsports.com
Please be aware of your product’s Limited Warranty for the
return/refund policy from the store, We, at Medal Sports, can
not handle the product which is out of product’s limited warranty
since we only provide available parts. Thank you!
PLEASE CONTACT US BEFORE RETURNING
THE PRODUCT TO THE STORE.
Este producto está cubierto por una garantía efectiva de 90 días a
partir de la fecha de su compra. Durante el periódo límite de la
garantía, si una parte defectuosa o quebrada es encontrada, nosotros
ofreceremos una reparación o un reemplazo de la partes sin ningún
costo para ud, nuestro cliente. Las únicas excepciones de la garantía
incluyen unidad principals, tableros de mesa, superficies, pilas o
herramientas.
La susodicha garantía no se aplicará en los casos de daños y
perjuicios debido al uso impropio, la alteración, el mal uso, el abuso,
el daño accidental o la negligencia.
Esta garantía limitada le da a usted derechos legales específicos,
usted también puede tener otros derechos que varían de un estado
(provincia) a otro.
EL
RECIBO DE LA COMPRA (U otra prueba de compra) sería
requerida antes que cualquier servicio de garantía fuera iniciada.
Para todo pedido por servicio de garantía, por favor siéntase libre de
ponerse en contacto con nuestro Departamento de Servicio de
Consumidor en:
WEBSITE: www.themdsports.com
Por favor tenga atención sobre el Límite de Garantía de su producto de
la política de vuelta/reembolsa desde la tienda, Nosotros, Medal
Sports, no podemos manejar el producto que está fuera del límite de
garantía ya que proporcionamos solamente partes disponibles.
¡Gracias!
POR FAVOR PÓNGASE EN CONTACTO CON NOSOTROS ANTES
DE DEVOLVER EL PRODUCTO A LA TIENDA.

(Continúe en la siguiente página.) www.themdsports.com
1618440
2
(Continued on the next page.)
Español
English
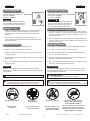
CAUTION !
ASSEMBLY TIPS
TOOLS REQUIRED
Phillips Screwdriver - Not Included
Standard (Flat Head Screwdriver) - Not Included
Wrench - Included
Allen Key - Included
Electric Screwdrivers may be helpful
during assembly; however, please set
a low torque and use extreme caution.
1 - This product is intended for INDOOR use only.
2 - Please do not sit, climb or lean on the product.
3 - Please do not drag the product when moving it in order to avoid
damaging the legs.
4 - Please only use furniture polish spray to clean the exterior surfaces
of the product.
5 - This is not a child's toy, adult supervision is required for children
playing this game.
WARNING:
CHOKING HAZARD -- This item contains small parts or /
and small balls.Not suitable for children under 3 years.
WARNING: Adult Assembly Required.
IMPORTANT NOTICE!
Power Tools
- Set Low Torque
Ajuste a Bajo par
High Torque
over tightened
demasiado apretadas
1 - Please read the instructions carefully, and follow all assembly,
operation and safety instructions properly in order to avoid
damage or injury. For the assembly, at least two adults are
required.
2 - Some figures or drawings may not look exactly like your
product. Please read and understand the text before beginning
each assembly step.
Destornillador Phillips - No incluido
Destornillador de Cabeza Plana - No incluido
Llave Inglesa - Incluida
Llave Allen - Incluida
Los destornilladores eléctricos pueden ser
de gran ayuda durante el ensamblado; sin
embargo, por favor ajuste el par de giro
bajo y sea extremadamente precavido.
PELIGRO DE ASFIXIA - - Este artículo contiene piezas
pequeñas y / o pelotas pequeñas. No apto para menores de 3 años.
ADVERTENCIA:
El ensamblaje debe ser realizado por un adulto.
Herramientas Necesarias
CONSEJOS PARA EL ENSAMBLADO
ADVERTENCIA:
1 - Este producto está destinado para el uso INTERIOR solamente.
2 - Por favor no sientes, subas o inclínes la producto.
3 - Por favor no arrastres el producto cuando está moviendo para
evitar el daño sobre las piernas.
4 - Por favor use solamente pulimento de rociar para muebles para
limpiar la superficie exterior del producto.
5 - Esto no es un juguete de niños, se requieren la supervisión adulta
para niños cuando está jugando este juego.
¡AVISO IMPORTANTE!
1 - Por favor lea las instrucciones con cuidado y siga todo durante el
montaje, la operación y instrucciones de seguridad correctamente
para evitar el daño o la herida. Para el montaje, por lo menos se
requieren dos adultos.
2 - Algunas figuras o dibujos podrían parecer no estén exactamente
como su producto. Por favor lea y entienda el texto antes de iniciar
cada paso del montaje.
¡
PRECAUCI N!
Adultos fuertes
necesarios
No tener niños en el
area de ensamble
Mantener alejados a los
animales domesticos
del area de ensamble
No usar o guardar el producto en el
exterior. Solo para uso en interior.
No utilizar ni guardar el producto en
lugares humedos o mojados
Strong Adults Needed No Children in
Assembly Area
Keep away from pets Do not use or keep product
outdoors. For indoor use only.
No wet/humid conditions.
X 2
CAUTION !
¡
PRECAUCI N!
Changes or modifications not expressly approved by the party
responsible for compliance could void the user’s authority to operate
the equipment.
Los destornilladores eléctricos pueden ser de gran ayuda durante
el ensamblado; sin embargo, por favor ajuste el par de giro bajo y
sea extremadamente precavido.

(Continúe en la siguiente página.) www.themdsports.com
1618440
3
(Continued on the next page.)
Español
English
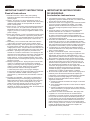
IMPORTANT SAFETY INSTRUCTIONS
Read all instructions
1. Read all instructions - All the safety and operating
instructions should be read carefully before this hockey
game is played.
2. Caution - This is not a toy and is intended for use by or
under the supervision of adults.Adults should review safety
guidelines with children to avoid possible risk of electric
shock or other injuries.
3. Power sources - This hockey game should be operated only
from 110-120V A.C., 60 cycle current as indicated on the
identification label. If you are not sure of the type of power
supply to your home, consult your appliance dealer or local
power company.
4. Power cord protection - Power cord should be routed so that
it is not likely to be walked on or pinched by items placed
upon or against it.Pay particular attention to cords at plugs,
convenience receptacles, and the point of exit from the
game.
5. Overloading - Do not overload wall outlets and extension
cords as this can result in a risk of fire or electric shock.
6. Object and liquid entry - Never push objects of any kind into
this game through openings as they may touch dangerous
voltage points or short - out parts which could result in a fire
or electric shock. Never spill liquid of any kind on the game.
7. Ventilation - Openings in the game are provided for the
exhaust air to create a cushion effect. The openings on the
air blower are for the intake air. Keep clear of the air blower
when it is on. Do not put hands or any objects near the
intake openings. To ensure reliable operation of the game
and protect it from overheating these openings must not be
blocked or covered.
8. Damage requiring service - Unplug the game from the wall
outlet. Do not attempt to service the blower yourself as
opening or removing covers may expose you to dangerous
voltage or other hazards. Refer servicing to qualified
service personnel under the following conditions.
A. When the power supply cord or plug is damaged.
B. If liquid has spilled, or objects have fallen into the blower.
C. When the air blower exhibits a distinct change in
performance e.g. abnormal noise, this indicates a need for
service.
9. Grounding or Polarization - This game is equipped with a
polarized alternating current line plug (a plug having one
blade wider than the other). This plug will fit into the power
outlet only one way. This is a safety feature. If you are
unable to insert the plug fully into the outlet, try reversing
the plug. If the plug should still fail to fit, contact your
electrician to replace your obsolete outlet. Do not defeat the
safety purpose of the polarized plug.
IMPORTANTES INSTRUCCIONES
DE SEGURIDAD
Lea todas las instrucciones
1. Lea todas las instrucciones – Todas las instrucciones de
seguridad y operación deberían ser leído con cuidado antes
de que este juego de hockey sea jugado.
2. Advertencia - Esto no es un juguete y que está intencionado
por el uso o bajo la supervisión de adultos. Los adultos
deberían repasar las directrices de seguridad con niños
para evitar el riesgo de posible choque eléctrico u otras
heridas.
3. Fuente de potencia - Este juego de hockey debería ser
operado solamente de 110-120V A.C., 60 ciclos de
corriente como indicado sobre la etiqueta de identificación.
Si usted no está seguro sobre el tipo de suministro de
energía de su casa, consulte con su distribuidor de aparato
o la empresa de energía local.
4. Protección del cable elétrico - El cable eléctrico debería ser
encaminado de modo que no sea probablemente andado
encima o pellizcado por artículos colocados encima o contra
ello. Preste atención especial sobre los cables en enchufes,
receptáculos convenientes y el punto de salida del juego.
5. La sobrecarga - No sobrecargues las salidas de pared y
cuerdas de extensión como esto puede causar un riesgo de
fuego o choque eléctrico.
6. El objeto y la entrada de líquido - Nunca empujes los
objetos de cualquier clase a este juego por aperturas como
ellos puedan tocar puntos de voltaje peligrosos o corto -
partes externas podrían causar un fuego o choque eléctrico.
Nunca derrame cualquier clase de líquido sobre el juego.
7. Ventilación - Las aperturas en el juego son proporcionadas
para el escape de aire para crear un efecto de cojín. Las
aperturas sobre el soplador de aire son para la entrada de
aire. Guarde libre del soplador de aire cuando está
conectado. No pongas la mano u otros objetos cerca de las
aperturas de entrada. Para asegurar una operación
confiable del juego y protejalo de recalentarse estas
aperturas que no deben ser bloqueados o cubiertos.
8. El servicio de requisito de daño - Desconecte el juego de la
salida de pared. No intentes de atender el soplador por
usted mismo como la apertura o la eliminación de cubiertas
puedan exponerle al voltaje peligroso u otros peligros.
Mande a la persona calificada de servicios bajo las
siguientes condiciones:
A. Cuando la cuerda de suministro de energía o el enchufe
están dañados.
B. Si se ha derramado el líquido o se han caído los objetos
en el soplador.
C. Cuando el soplador de aire exponga un cambio distinto
del funcionamiento, por ejemplo ruido anormal, se indica
una necesidad del servicio.
9. Conectando con tierra o la Polarización - Este juego está
equipado con un enchufe de línea de corriente alterna
polarizada ( un enchufe que tiene una hoja más amplia que
el otro). Este enchufe encajará a la salida de potencia por
un sólo camino. Esto es una característica de seguridad. Si
usted está incapaz de insertar totalmente el enchufe en la
salida, trate de examinar el enchufe. Si el enchufe todavía
falla en encajar, ponerse en contacto con su electricista para
sustituir la salida anticuada. No derrotes el objetivo de
seguridad del enchufe polarizado.

(Continúe en la siguiente página.) www.themdsports.com
1618440
4
(Continued on the next page.)
Español
English
10. CAUTION - ELECTRICALLY OPERATED PRODUCT -
Not recommended for children under 8 years of age. As
with all electrical products, precautions should be
observed during handling and use to reduce the risk of
electric shock.
11. We recommend that the game be periodically examined
for conditions that may result in the risk of fire, electrical
shock, or injury to persons. In the event such conditions
exist, the game should not be used until properly
repaired.
12. RISK OF FIRE, ELECTRIC SHOCK, OR INJURY TO
PERSONS
WARNING - When using electric appliances, basic
precautions should always be followed, including the
following:
A) Read all the instructions before using the appliances.
B) To reduce the risk of injury, close supervision is
necessary when an appliance is used near children.
C) Do not contact moving parts.
D) Only use attachments recommended or sold by the
manufacturer.
E) Do not use outdoors.
F) For a cord - connected appliance, the following shall
be included:
-To disconnect, turn all controls to the off position, then
remove the plug from the outlet.
-Do not unplug by pulling on the cord. To unplug, grasp
the plug, not the cord.
-Unplug from the outlet when not in use and before
servicing or cleaning.
-Do not operate any appliance with a damaged cord or
plug, or after the appliance malfunctions or is dropped or
damaged in any manner. Return the appliance to the
nearest authorized service facility for examination,
repair, or electrical or mechanical adjustment.
13. To reduce the risk of electric shock, this appliance has a
polarized plug (one blade is wider than the other).This
plug will fit in a polarized outlet only one way. If the plug
does not fit fully in the outlet, reverse the plug. If it still
does not fit, contact a qualified electrician to install the
proper outlet. Do not change the plug in any way.
SAVE THESE INSTRUCTIONS
WARNING: To Reduce The Risk Of Fire Or Electric
Shock, Do Not Use This Fan With Any Solid - State
Speed Control Device.
For Household use only.
Para Uso Doméstico Sólo.
IMPORTANT SAFETY INSTRUCTIONS
Read all instructions
IMPORTANTES INSTRUCCIONES
DE SEGURIDAD
Lea todas las instrucciones
10. ADVERTENCIA – PRODUCTO OPERADO
ELECTRICAMENTE - No recomendado para niños bajos
de 8 años de edad. Como con todos los productos
eléctricos, las precauciones deberían ser observadas
durante el manejo y el empleo para reducir el riesgo de
choque eléctrico.
11. Recomendamos que el juego de vez en cuando sea
examinado de las condiciones que puedan causar el riesgo
de fuego, electrochoque, o herida a personas. En el caso
de que mientras existan tales condiciones, el juego no
debería ser usado hasta correctamente reparado.
12. RIESGOS DE FUEGO, ELECTROCHOQUE, O HERIDA A
PERSONAS
ADVERTENCIA - Cuando está usando aparatos eléctricos,
siempre deberían ser seguidas las precauciones básicas,
incluy - endo los siguientes:
A) Lea todas las instrucciones antes de usar los aparatos.
B) Para reducir el riesgo de herida, la supervisión cercana es
necesaria cuando el aparato está usado cerca de niños.
C) No póngas en contacto con partes móviles.
D) Sólo use el accesorio recomendado o vendido por el
fabricante.
E) No uses al aire libre.
F) Para un aparato de cuerda - conectada, será incluida los
siguientes:
- Para desconectar, gire todos los mandos a la posición off,
luego quite el enchufe de la salida.
- No desconectes a travás del tiro de la cuerda. Para
desconectar, agarre el enchufe, no la cuerda.
- Desconecte desde la salida cuando no esté en uso y antes
de revisar o limpiar.
- Que no operes el aparato cuando la cuerda o enchufe esté
dañado, o luego de malfuncionamiento del aparato o fue
caído o dañado de cualquier modo. Vuelve el aparato al
servicio autorizado más cercano para examen, reparación
o ajuste eléctrico o mecánico.
13.Para reducir el riesgo de choque eléctrico, este aparato
tiene un enchufe polarizado (una hoja es más amplia que
la otra). Este enchufe encajará en una salida polarizada
por sólo un camino. Si el enchufe no cabe totalmente en la
salida, examine el enchufe. Si esto todavía no se cabe,
póngase en contacto con un electricista calificado para
instalar la salida apropiada. No cambies el enchufe de
ningún modo.
SALVE ESTAS INSTRUCCIONES
ADVERTENCIA: Para reducir el riesgo de fuego o
choque eléctrico, no uses este abanico con cualquier
dispositivo de control sólido - velocidad estatal.

Español
English
www.themdsports.com
1618440
5
(Continúe en la siguiente página.)
(Continued on the next page.)
1618440 PARTS LIST / LISTA DE PARTES
9
10 11
12
13 14 15
16
2 3 41
x1 x2 x2 x2
6 7 85
4x12x4x
x12 x24 x8 x8
x20
x4
x4
x4
x2
18 19 20
17
x2
M8 Nut
Almohadilla de
Fieltro
Puck
Right Leg Left Leg
Leg Panel Support
Pusher
Felt Pad
Puck
22
21
25 26 27
M8 Spring
Lock Washer
Arandela de
Cerradura
de Resorte M8
Arandela de
Cerradura
de Resorte M6
M6 Spring
Lock Washer
Wrench Llave Inglesa
Cerrojos
M8x76mm
M8x76mm
Bolt
Cerrojos
M6x32mm
M6x32mm
Bolt
Arandela M8
M8 Washer
Arandela M6
M6 Washer
x20
x12 x8
23 24
x2
x1
Leg Leveler
Leg Cap Gorra de pata
Nivelador de
Pierna
Adaptor Adaptador
x2
Top Goal Box
Caja de Gol
Superior
Bottom Goal Box
Caja de Gol
del Fondo
x1
Llave Allen
Allen Key
x 4 x 8 x 4
Mainframe
Unidad Principal
Pierna Dcha
Pierna Izda
End Leg Panel
Panel de
Pierna Final
M8 Tuerca
P3.5x16mm
P3.5x16mm
Screw
Tornillo
3x28mm
Screw
3.5x12mm
Screw
Tornillo
3x28mm
Tornillo
3.5x12mm
Soporte de
Panel de Pierna
28
x 1
29
x 2
30
x 1
Side Leg Panel
Panel de
Pierna Lateral
Golpeador
3x32mm
Screw
Tornillo
3x32mm
Electronic
Scorer - B
Marcador
Electrónico - B
Electronic
Scorer - C
Marcador
Electrónico - C
Electronic
Scorer - A
Marcador
Electrónico - A

Español
English
www.themdsports.com
1618440
6
(Continúe en la siguiente página.)
(Continued on the next page.)
INSTRUCCIONES DE ENSAMBLAJE:
ASSEMBLY INSTRUCTIONS:
4
5
13
X 2
X 4
X 12
FIG. 1
P1
x1
P2
x2
P3
x4 x8
P4
Motor
Motor
Scoring
Sensor Wire
1618440 PRE-INSTALLED PARTS / PIEZAS PREINSTALADAS
Tuerca Cuadrada
con Tornillos
Square Nut with
Screws
P5
x4
P6
x4
P7
x1
M6 Nut
1. Find a clean, level place to begin the assembly of
your Air Hockey Table. The table will be assembled
upside down and then turned over on its legs once
the assembly is completed. This game table is heavy,
and turning it over will require at least two strong
adults.
2. Remove all the parts from the box and verify that you
have all of the listed parts as shown on the parts list
pages. Carefully cut or tear the four corners of the
box so that the bottom of the box can be used as
your work surface.
1. Encuentre un lugar limpio, plano para comenzar
el montaje de su Mesa de Hockey de Aire. La
mesa será montada al revés y luego voltee
sobre sus piernas una vez completado el
montaje. Esta mesa de juego es pesada y
requerirá por lo menos dos adultos fuertes para
el volteo.
2. Quite todas las partes de la caja y verifique que
están todas las partes catalogadas como
mostrado en la página de lista de partes. Con
cuidado de cortar o rasgar los cuatro rincones
de caja de modo que el fondo de la caja podría
ser usado como su superficie de trabajo.
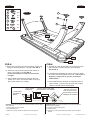
3. Attach the Leg Panel Supports (#5) to the End Leg
Panels (#4) using six Screws (#13) per Leg End Panel .
See FIG. 1.
3. Adjunte las Soportes de Panel de Pierna (#5) al Panel
de Pierna Final (#4) usando 6 Tornillos (#13) por
Panel de Pierna Final. Vea la FIG. 1.
FIG.1 FIG.1
5
13
4
5
Top corner Rincón Superior
Connect Box Caja de Conexión
Apron corner Delantal de Rincón
Tuerca M6
Cable del Sensor
de Marcador

www.themdsports.com
1618440
7
(Continúe en la siguiente página.)
(Continued on the next page.)
Español
English
FIG. 2
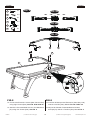
4. Attach the Legs (#2 and #3) to the Mainframe (#1)
using three Bolt (#9), six Washers (#10), three Spring
Lock Washer (#21) and three Nut (#7) per leg.
See FIG. 2.
5. Attach the Top Goal Boxes (#19) to the Mainframe
(#1) using four Screws (#14) per Top Goal Box.
See FIG. 2A.
6. Attach the Bottom Goal Boxes (#23) to the
Mainframe (#1) using two Screws (#14) per Bottom
Goal Box. See FIG. 2A.
4. Adjunte las Piernas (#2 y #3) al Unidad Principal
(#1) usando 3 Cerrojos (#9), 6 Arandelas (#10), 3
Arandela de Cerradura de Resorte (#21) y 3
Tuerca (#7) por pierna. Vea la FIG. 2 .
5. Adjunte la Caja de Gol Superior (#19) al Unidad
Principal (#1) usando 4 Tornillos (#14) por Caja
de Gol Superior. Vea la FIG. 2A.
6. Adjunte la Caja de Gol del Fondo (#23) al Unidad
Principal (#1) usando 2 Tornillos (#14) por Caja
de Gol del fondo. Vea la FIG. 2A.
FIG.2 FIG.2
1
2
3
7
9
10
14
19
21
23
X 1
X 2
X 2
X 12
X 24
X 12
15
X 2
X 2
X 12
X 2
X 12
P2
X 2
NOTE: Keep Bolts (# 9) loose until the Leg End
Panels and Low Aprons are set completely.
/ NOTA: Mantenga el tornillo # 9 está suelto hasta que
el panel final de la pierna y delantal baja están fijados
completamente.
NOTE: Legs should angle out!
/ NOTA: Los angulos de piernas deben hacia fuera.
P2
23
19
14
FIG. 2A
15
15
21
9
7
10
10
2
1
2
3
3

www.themdsports.com
1618440
8
(Continúe en la siguiente página.)
(Continued on the next page.)
Español
English
FIG. 3
7. Attach the FIG.1 Assembly to the Legs (#2 and
#3) using four Bolts (#11) and four Washers (#12)
and four Spring Lock Washers (#22) per FIG.1
Assembly. See FIG. 3.
8. Attach the Side Leg Panels (#6) to the Legs (#2
and #3) using four Screws (#13) per Side Leg
Panel. See FIG. 3.
7. Adjunte el Montaje FIG.1 a las Piernas (#2 y #3)
usando 4 Cerrojos (#11) y 4 Arandelas (#12 ) y 4
Arandelas de Cerradura de Resorte (#22) por
Montaje FIG.1. Vea la FIG. 3.
8. Adjunte las Panel de Pierna Lateral (#6) a las
Piernas (#2 y #3) usando 4 Tornillos (#13) por Panel
de Pierna Lateral. Vea la FIG. 3.
FIG.3 FIG.3
6
11
12
13
22
X 2
X 8
X 8
X 8
X 8
P4
X 8
P4
5
4
3
2
5
6
22
11
12
3
6
13
4
FIG.1 Assembly
/ Montaje FIG.1
Black inside /
Interior negro
Gray outside
/ Exterior gris

www.themdsports.com
1618440
9
(Continúe en la siguiente página.)
(Continued on the next page.)
Español
English
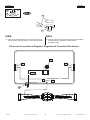
FIG. 4
NO APOYES LA MESA
SOBRE SUS PIERNAS
AGARRE LA
MESA
GABINETE
NO AGARRES LAS PIERNAS
DO NOT LEAN THE
TABLE ON ITS LEGS
HOLD TABLE
HOLD TABLE
DO NOT HOLD THE LEGS
CAUTION: Two strong adults are recommended to turn the table
over as shown.
1. Lift the table o
ff of the ground.
2. Turn the table over.
3.
Place it on all four feet at the same time on the ground.
PRECAUCION: Recomienda voltea la mesa por dos adultos
fuertes como mostrado.
1.Levante la mesa desde el piso.
2.Voltee la mesa.
3.Coloque los cuatro pies de la mesa sobre el piso al mismo
tiempo.
9. Screw the Leg Cap (#27) into the bottom of each leg
using two Screws (#14) per Leg Cap. See FIG. 4.
10. Screw the Leg Levelers (#8) into the bottom of
each Leg Leveler Top. See FIG. 4.
Go back and make sure that all connections
are tight.
11. Lift the table assembly from the floor with two
adults, turn it over, and set the table on its leg in
the location where you will play.
9. Atornillar la gorra de pata (#27) en el fondo de cada
pata usando 2 tornillos (#14) por gorra de pata.
Vea la FIG. 4.
10. Atornillar las Niveladors de Pierna (#8) en el fondo
de cada punta de Nivelador de Pierna . Vea la FIG. 4.
Regrese y asegúrese de que las conexiones
están fuertes.
11. Dos adultos fuertes levantan la mesa del suelo, le
dan la vuelta, y la ponen de pie sobre sus propias
patas en el lugar donde usted jugará.
FIG.4 FIG.4
8
P3
X 4
X 4
P1
X 1
P5
X 4
P6
X 4
14
X 8
27
X 4
P1
P6
P3
P5
27
8
14

www.themdsports.com
1618440
10
(Continúe en la siguiente página.)
(Continued on the next page.)
Español
English
FIG. 5
12. Connect the Electronic Scorers (#28, #29 and #30)
using eight Screws (#26). See FIG. 5A & 5B & 5C.
13. Attach the Pre-assembled Scorer to the Mainframe
(#1) using four Screws (#25). See FIG. 5.
12. Conectar el Marcapuntos Electrónico (#28, #29 y #30)
usando 8 tornillos (#26). Vea la FIG. 5A & 5B & 5C.
13. Adjunte el Goleador Preensamblado al Unidad
Principal (#1) usando 4 Tornillos (#25). Vea la FIG. 5.
FIG.5 FIG.5
FIG. 5B
FIG. 5C
29
29
26 26
26
25
28
P7
X 8
X 4
X 1
X 1
29
30
X 2
X 1
FIG. 5A
30 28
P7
25
1
FIG. 5D
P7
30
29
1

www.themdsports.com
1618440
11
(Continúe en la siguiente página.)
(Continued on the next page.)
Español
English
FIG. 6
18
16
FIG.6
14. Tear off the backside papers of the Felt Pads (#18)
and stick them onto the bottom of the Pushers (#16).
FIG.6
14. Arranque el papel de la parte trasera de Almohadilla
de Fieltro (#18) y péguelos al fondo de los
Golpeador (#16).
18
16
X 4
X 4
ON/OFF
P2
P7
P2
P1
20
Electronic Connections Diagram / Diagrama de Conexión Electrónica

www.themdsports.com
1618440
12
(La ultima página)
(The last page)
Español
English
Score Keeper Operation
1. Insert the power plug. The mode light of the
machine will illuminate in 1 minute and the
electronic score counter projection light will
illuminate.
2. The“MINUTES” button allows you to set the game
times; select between 5 game times: 1min, 2min,
3min, 4min and 5min.
3. The“ON/OFF(START/RESET)”button is for
confirmation of the time selected and starting the
game. Press and hold the
“ON/OFF(START/RESET)” button for 2 seconds to
switch off the machine.
4. The “SOUND(ON/OFF)” button allows you to turn on
or off the sound during the game.
Game descriptions:
The time begins to count down at the start of the
game. The score is counted when the ball goes into
the hole on the right or left side. A light will illuminate
when a ball goes in. The time will stop when the
countdown is over.
After the game a comparison will be made between the
number of lights illuminated on the left and right sides.
The LED on the side with the higher score will
illuminate and the LEDs on both sides will illuminate in
the case of equal scores.
Note:Pressing the MINUTES key at any point during
the game will have no effect.
If the ON/OFF (START/RESET) button is pressed
during the game, then the scores will be reset to zero
and the timer will be returned to the last time setting.
During the countdown, the maximum number of
scores can be 10. When either side gets the 10th
score, the game-over sound will occur and the game
end as the corresponding LED illuminates.
If there is no action taken during the game for 5
minutes, the score counter will enter the sleep mode.
Wake up the score counter by pressing the
“ON/OFF(START / RESET)” button. The display
status will return to that shown before the game
entered sleep mode.
Operación de Keeper de Cuenta
1. Inserte el enchufe de potencia. La luz de modo de la
máquina se iluminará en 1 minuto y la luz de
proyección del contador de cuenta electrónica se
iluminará.
2. El botón “MINUTES” le permite para definir el tiempo
del juego para la selección de los 5 tiempos de juego:
1 min, 2 min, 3min, 4min y 5 min.
3. El botón“ON/OFF(START/RESET)” es para la
confirmación del tiempo elegido y para iniciar el juego.
Aprete y mantenga el “ON/OFF(START/RESET)” por
2 segundos para apagar la máquina.
4. El botón “SOUND(ON/OFF)” es el interruptor de
sonido para que ud. inicie o apague el sonido durante
el juego.
Descripción del juego:
El tiempo se cuenta regresiva desde el inicio del juego.
El punto se cuenta cuando la bola se mete en el agujero
de la derecha o izquierda. Una luz se iluminará cuando
entrando una bola. La cuenta se detendrá cuando la
cuenta regresiva ha terminado.
Después del partido hará una comparación entre el
número de luces iluminadas sobre la derecha e
izquierda. La LED lateral con el punto más alto se
iluminará y la LED en ambos lados se iluminarán en el
caso del mismo punto.
NOTA:El presionar la tecla MINUTOS en cualquier punto
durante el juego no dará efecto.
De presionar la perilla ON/OFF (INICIAR/RESETEAR)
durante el juego, los puntos serán reseteados a cero y el
cronómetro volverá a la última programación de horas.
Durante la cuenta regresiva, los puntos se cuentan para
10 veces como máximo. Cuando cualquiera de las
partes obtiene el punto décimo, el sonido del game-over
se producirá y terminado el juego e iluminado la LED
correspondiente.
Si no toma ninguna acción durante el juego por 5
minutos, el contador de puntos entrará en el modo de
suspensión. Apretando los botones"ON / OFF (START /
RESET)" para despertar el contador de punto. El estado
de exposición es la misma que antes del modo de
suspensión.
This device complies with the part 15 of the FCC
rules. Operation is subject to the following two
conditions :
(1) This device may not cause harmful interfer-
ence, and
(2) This device must accept any interference
received, including interference that may
cause undesired operation.
Este dispositivo cumple con la parte 15 de las
reglas de FCC. La operación está sujeta a las dos
condiciones siguientes:
(1) Este dispositivo no podría causar interferencia
dañosa, y
(2) Este dispositivo debe aceptar cualquier inter-
ferencia recibida, incluyendo la interferencia
que podría causar operación indeseada.
YOU ARE NOW READY TO PLAY! ¡USTED ESTA AHORA LISTO PARA JUGAR!
-
 1
1
-
 2
2
-
 3
3
-
 4
4
-
 5
5
-
 6
6
-
 7
7
-
 8
8
-
 9
9
-
 10
10
-
 11
11
-
 12
12
-
 13
13
-
 14
14


en otros idiomas
- English: MD Sports AWH084_188E User manual
Artículos relacionados
-
MD Sports AWH084_098E Manual de usuario
-
-
-
-
-
-
-
-
-

