
Instruction #1036055B-1/9
CONTENTS • CONTENU • CONTENIDO
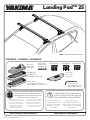
Landing Pad™ 25
REFER TO YAKIMA SKYLINE OR CONTROL
TOWER INSTRUCTIONS FOR IMPORTANT
WARNING AND LOAD LIMITATIONS, AND
YAKIMA’S LIMITED WARRANTY.
Landing Pad 25 has a load limit of
165 lbs. (75 kg) or 220 lbs. (100 kg)
when paired with Yakima HD Bars.
:
,
.
La limite de charge sur le
Landing Pad 25 est de 75
kg (165 lb), our de 100 kg
(220 lb) avec les barres
Yakima HD.
,
.
El peso límite para las
almohadillas Landing Pad 25 es
165 lbs. (75kg) o 220 lbs. (100 lg)
cuando se instalan con las barras
HD de Yakima
NOTE: CROSSBAR SPREAD IS FIXED.
M7 x 30 (4x)M7 x 50 (4x)
arandela (4x)
rondelle (4x)
washer (4x)
cover (4x)
cache (4x)
tapa (4x)
base (4x)
patin (4x)
base (4x)
lat pad (4x)
socle plat (4x)
almohadilla plana (4x)
step pad (4x)
socle à épaulement (4x)
almohadilla con reborde (4x) hex wrench (1x)
clé hexagonale (1x)
llave hexagonal (1x)
Pour le français, allez à la page 5. Para español ir a la página 5.
M7 x 40 (4x)

Instruction #1036055B-2/9
4X
4X
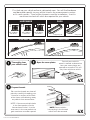
First look up your vehicle online at yakimatech.com. You will ind hardware
and base pads speciic to your vehicle listed in the measurements section
or it notes section. These will be the parts used for installation. Use this
worksheet to check off which are required for your vehicle.
Open the cover-plates.
Thoroughly clean
your vehicle’s roof.
Consult your vehicle’s
owner’s manual to determine
how your cover plates are
opened or removed. This will
vary from vehicle to vehicle.
M7 X 50mm
hardware stepped pad lat pad
HARDWARE
FLAT PAD FLAT PAD
PADS
STEPPED PAD
Prepare threads.
Be sure the threads are clear of
paint by carefully threading your
fastener in and out of the hole
a few times while blowing away
any debris that accumulates.
NOTE: If there are multiple holes
in the front pocket, use the
forward-most holes. Use the
rear-most in the rear pockets to
gain maximum crossbar spread.
NOTE: Some vehicles
have a plug in the threads
which must be removed.
M7 X 40mm
hardware
M7 X 30mm
hardware

Instruction #1036055B-3/9
4X
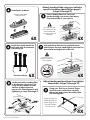
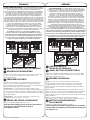
Place Landing Pad over each roof
pocket making sure arrows face away
from the middle of your vehicle.
Install the metal washer on
each bolt with the concave
side facing up.
Using the 5mm hex wrench, guide fastener
with washer through Landing Pad, and into the
threaded mounting point in the roof.
Jostle and rotate Landing Pad
in all directions to ensure it is
snug, but also allows a small
amount of adjustment to
prepare for inal alignment and
tightening in steps 9 through 12.
4X
4X
4X
4X
Attach each pad
to each base.
Install pads to bases.
Attach Landing Pads using your vehicles
speciic hardware identiied on page 2.
(steps 5 through 8)
DO NOT ALLOW
EDGES OF PAD TO
CURL UNDER!
Concave side up.
BE SURE TO USE
THE CORRECT PADS
AND HARDWARE
TO AVOID VEHICLE
DAMAGE!
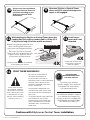
Adjust landing pad positions then tighten
them down. (steps 9 through 12)
Using your SkyLine or Control Tower
instruction as a reference, carefully
place a bar and towers assembly onto
the landing pads.
Align position of
Landing Pads to
allow SkyLine or
Control Towers
to fully close.

Instruction #1036055B-4/9
4X
1.5 Nm (13.3 in lb)
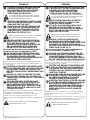
Center cross bars and attach
SkyLine or Control Towers to
crossbars according to your
SkyLine or Control Tower
instructions.
10 11
12 13
14
4X
Install covers
when rack is not
attached.
USING THE COVERS WILL
HELP KEEP THE BASES
FREE OF DEBRIS.
BE SURE ALL HARDWARE IS
SECURED ACCORDING TO
INSTRUCTIONS. FAILURE TO
PERFORM SAFETY CHECKS BEFORE
DRIVING AWAY CAN RESULT IN
PROPERTY DAMAGE, PERSONAL
INJURY, OR DEATH.
READ THESE WARNINGS!
MAKE SURE SKYLINE
OR CONTROL TOWERS,
WITH BARS INSTALLED,
SEAT COMPLETELY WITH
LANDING PAD. IF THEY
DO NOT SEAT PROPERLY,
REPEAT STEPS 912.
For additional product support,
visit yakima.com/support or
contact us directly at (888)925-
4621 Monday through Friday,
7:00 AM to 4:00 PM, PST.
DO NOT EXCEED
MAXIMUM WEIGHT LIMIT
FOR YOUR VEHICLE.
Continue with SkyLine or Control Tower installation.
ATTACHMENT HARDWARE CAN
LOOSEN OVER TIME. CHECK AND
TIGHTEN IF NECESSARY, BEFORE
EACH USE.
TO AVOID DAMAGE YOUR VEHICLE’S
FINISH REMOVE AND CLEAN
LANDING PADS AND MOUNTING
POINTS PERIODICALLY AS ROAD
SEDIMENT WILL ACCUMULATE
OVER TIME.
While holding the SkyLine or Control Tower above the
Landing Pad, fully tighten Landing Pad to 1.5 Nm (13.3
in lb) (use the long end of the wrench as shown).
Re-insert SkyLine or Control
Tower into the Landing Pad, fully
tighten tower (refer to tower
instruction) and close cover.
Open one SkyLine or Control Tower
cover, and lift it up while the opposite
tower is still engaged.
DO NOT OVER TIGHTEN AS DAMAGE
TO THE ROOF MAY OCCUR.
Repeat the process again for the
other Landing Pads to ensure
they have not changed position.
To review your vehicle’s
speciic weight limit and load
limitations for accessories,
visit.yakimatech.com.

Instruction #1036055B-5/9
FRANÇAIS ESPAÑOL
socle plat socle à
épaulement
M7 X 40mmM7 X 30mm M7 X 50mm
QUINCAILLERIE
SOCLES
almohadilla
plana almohadilla
con reborde
ALMOHADILLAS
AVISO IMPORTANTE! ES FUNDAMENTAL QUE TODAS LAS
PARRILLAS Y ACCESORIOS YAKIMA ESTÉN BIEN COLOCADOS
Y ASEGURADOS AL VEHÍCULO. UNA INSTALACIÓN DEFICIENTE
PODRÍA RESULTAR EN ACCIDENTE AUTOMOVILÍSTICO Y
PROVOCAR HERIDAS GRAVES O MUERTE A USTED O A
TERCEROS. USTED ES RESPONSABLE DE ASEGURAR LAS
PARRILLAS Y ACCESORIOS AL VEHÍCULO, VERIFICANDO
UNIONES Y AMARRES ANTES DE USAR E INSPECCIONANDO
EL AJUSTE DE LOS PRODUCTOS, SU DESGASTE Y POSIBLES
DAÑOS. POR ELLO DEBE LEER Y COMPRENDER TODAS LAS
INSTRUCCIONES Y ADVERTENCIAS QUE VIENEN CON LOS
PRODUCTOS YAKIMA ANTES DE INSTALARLOS O USARLOS. SI
NO ENTIENDE TODAS LAS INSTRUCCIONES Y ADVERTENCIAS,
O NO TIENE EXPERIENCIA EN MECÁNICA O NO ESTÁ
FAMILIARIZADO CON LOS PROCEDIMIENTOS DE INSTALACIÓN,
HAGA INSTALAR EL PRODUCTO POR UN PROFESIONAL EN UN
GARAGE RECONOCIDO O UN TALLER DE CARROCERÍA.
AVERTISSEMENT IMPORTANT: IL EST IMPÉRATIF QUE LES PORTE
BAGAGES ET LES ACCESSOIRES YAKIMA SOIENT CORRECTEMENT
ET SOLIDEMENT FIXÉS AU VÉHICULE. UN MONTAGE MAL
RÉALISÉ POURRAIT PROVOQUER UN ACCIDENT D’AUTOMOBILE,
QUI POURRAIT ENTRAÎNER DES BLESSURES GRAVES OU MÊME
LA MORT, À VOUS OU À D’AUTRES PERSONNES. VOUS ÊTES
RESPONSABLE DE L’INSTALLATION DU PORTEBAGAGES ET
DES ACCESSOIRES SUR VOTRE VÉHICULE, D’EN VÉRIFIER LA
SOLIDITÉ AVANT DE PRENDRE LA ROUTE ET DE LES INSPECTER
RÉGULIÈREMENT POUR EN CONTRÔLER L’ÉTAT, L’AJUSTEMENT ET
L’USURE. VOUS DEVEZ DONC LIRE ATTENTIVEMENT TOUTES LES
INSTRUCTIONS ET TOUS LES AVERTISSEMENTS ACCOMPAGNANT
VOTRE PRODUIT YAKIMA AVANT DE L’INSTALLER ET DE L’UTILISER.
SI VOUS NE COMPRENEZ PAS TOUTES LES INSTRUCTIONS
ET TOUS LES AVERTISSEMENTS, OU SI VOUS N’AVEZ PAS DE
COMPÉTENCES EN MÉCANIQUE ET NE COMPRENEZ PAS
PARFAITEMENT LA MÉTHODE DE MONTAGE, VOUS DEVRIEZ
FAIRE INSTALLER LE PRODUIT PAR UN PROFESSIONNEL, COMME
UN MÉCANICIEN OU UN CARROSSIER COMPÉTENT.
Tout d’abord, consulter sur le site itlookup.yakima.com et y
retrouver le véhicule. Le site indique la quincaillerie, les socles et
l’orientation des patins Landing Pad spéciiques au véhicule dans la
section “mesures” ou “notes de montage” (Fit Notes). Ce sont les
pièces nécessaires pour l’installation. Cocher dans les illustrations
ci-dessous les pièces à utiliser pour le véhicule en question.
Primero visite itlookup.yakima.com para obtener información en línea
sobre su vehículo. En las secciones Medidas o Notas de compatibilidad
(Fit Notes) encontrará las piezas de ijación, las almohadillas planas y
las orientaciones de las Landing Pad especíicas para su vehículo. Estos
son los componentes necesarios para la instalación. Utilice esta hoja de
trabajo para veriicar cuáles son los requeridos para su vehículo.
BIEN NETTOYER LE TOIT DU VÉHICULE.
LIMPIE A FONDO EL
TECHO DE SU VEHÍCULO.
AOUVRIR LES OBTURATEURS. ABRA LAS PLACAS PROTECTORAS.
Consulter le manuel du véhicule pour savoir comment
ouvrir ou retirer les obturateurs. Cela varie d’un
véhicule à l’autre.
Consulte el manual del propietario de su vehículo para
saber cómo abrir o retirar las placas protectoras. Esto
varía de un vehículo a otro.
PRÉPARER LES FILETS. PREPARE LAS ROSCAS.
REMARQUE : si les logements avant comportent
plusieurs trous, utiliser le trou le plus à l’avant. Employer
le trou le plus à l’arrière dans les logements arrière pour
que la distance entre les barres transversales soit la plus
grande possible.
NOTA: Si la cavidad delantera tiene más de un oriicio,
utilice el que se encuentre más adelante. En la cavidad
trasera, utilice el oriicio que se encuentra más atrás
para lograr la mayor separación posible entre las barras
transversales.
Vériier que les ilets ne sont pas obstrués par de la
peinture en vissant et dévissant soigneusement un
boulon dans le trou quelques fois tout en souflant pour
chasser les débris qui se formeraient.
Asegúrese de que los iletes de las roscas estén
libres de pintura. Para esto, enrosque y desenrosque
cuidadosamente los tornillos varias veces. Sople al
mismo tiempo para alejar toda partícula que pudiera
acumularse.
REMARQUE : sur certains véhicules, les ilets sont
protégés par un bouchon : le retirer. NOTA: Ciertos vehículos cuentan con tapones
protectores de los iletes de rosca que se deben retirar.
RÉUNIR LES PATINS À LEUR SOCLE. INSTALE LAS ALMOHADILLAS
EN LAS BASES.
Déposer chaque patin dans un socle. Introduzca cada almohadilla en su base.
Fixer les patins landing pads à l’aide de la quincaillerie
spéciique au véhicule indiquée en page 2.
Les opérations 5 à 8.
Utilice las piezas de ijación especíicas para su vehículo
identiicadas en la página 2 para instalar las landing pad.
Las etapas 5 a 8
M7 X 40mmM7 X 30mm M7 X 50mm
PIEZAS DE FIJACIÓN

Instruction #1036055B-6/9
FRANÇAIS ESPAÑOL
PLACER UN PATIN LANDING PAD SUR
CHAQUE LOGEMENT DANS LE TOIT
EN S’ASSURANT QUE LES FLÈCHES
POINTENT DANS LA DIRECTION
SPÉCIFIQUE AU VÉHICULE.
ENFILER UNE RONDELLE MÉTALLIQUE
SUR CHACUN DES BOULONS, LA FACE
CONCAVE VERS LE HAUT.
À L’AIDE DE LA CLÉ HEXAGONALE DE
5 MM, ENFILER LE BOULON MUNI DE
SA RONDELLE À TRAVERS LE PATIN
LANDING PAD ET DANS LE TROU DE
MONTAGE FILETÉ DU TOIT.
FAIRE PIVOTER ET GLISSER LE PATIN
DANS TOUS LES SENS POUR VÉRIFIER
QU’IL EST BIEN EN PLACE, MAIS
CONSERVER UN CERTAIN JEU EN VUE
DE L’ALIGNEMENT ET DU SERRAGE
DÉFINITIFS À L’OPÉRATIONS 9 À 12
EN SUIVANT LES INSTRUCTIONS QUI
ACCOMPAGNENT LES PIEDS SKYLINE
OU CONTROL TOWER, DÉPOSER
SOIGNEUSEMENT UNE BARRE MUNIE DE
SES PIEDS SUR LES PATINS.
CENTRER LES BARRES TRANSVERSALES
ET LES SERRER DANS LES PIEDS SKYLINE
OU CONTROL TOWER EN SUIVANT LES
INSTRUCTIONS QUI ACCOMPAGNENT LES
PIEDS.
OUVRIR LE CAPOT D’UN PIED SKYLINE
OU CONTROL TOWER ET LE SOULEVER
TANDIS QUE L’AUTRE PIED EST TOUJOURS
ACCROCHÉ.
UTILICE LAS INSTRUCCIONES DE LAS
TORRES SKYLINE O CONTROL TOWERS
COMO REFERENCIA PARA COLOCAR
CUIDADOSAMENTE UNA BARRA CON EL
PAR DE TORRES EN LAS ALMOHADILLAS.
CENTRE LAS BARRAS TRANSVERSALES
Y FIJE LAS TORRES A DICHAS BARRAS
SIGUIENDO LAS INSTRUCCIONES QUE
VIENEN CON LAS TORRES SKYLINE O
CONTROL TOWERS
ABRA UNA TAPA DE UNA TORRE SKYLINE
O CONTROL TOWER Y MANTÉNGALA
LEVANTADA MIENTRAS LA TORRE
OPUESTA SIGUE ENGANCHADA.
INSTALE UNA ARANDELA DE METAL
EN CADA TORNILLO CON EL LADO
CÓNCAVO HACIA ARRIBA.
UTILICE LA LLAVE HEXAGONAL DE 5
MM PARA GUIAR EL TORNILLO CON
ARANDELA A TRAVÉS DE LA LANDING
PAD Y DEL ORIFICIO ROSCADO DE
MONTAJE DEL TECHO.
EMPUJE Y GIRE LA LANDING PAD
EN TODAS LAS DIRECCIONES PARA
ASEGURARSE DE QUE QUEDE AJUSTADA
DEJANDO UN CIERTO JUEGO PARA
PREVER LA ALINEACIÓN Y EL APRETADO
FINAL EN EL PASO 9 A 12.
S’ASSURER D’EMPLOYER LES BONS SOCLES
ET LA BONNE QUINCAILLERIE POUR ÉVITER
D’ENDOMMAGER LE VÉHICULE !
COLOQUE UNA LANDING PAD EN CADA
CAVIDAD DEL TECHO, ASEGURÁNDOSE
DE QUE LAS FLECHAS QUEDEN
APUNTANDO EN LA DIRECCIÓN
ESPECIFICADA PARA SU VEHÍCULO.
ASEGÚRESE DE UTILIZAR LAS ALMOHADILLAS
Y LAS PIEZAS DE FIJACIÓN APROPIADAS PARA
EVITAR QUE EL VEHÍCULO SE DAÑE!
ADVERTENCIA: EVITE QUE LOS BORDES SE
PLIEGUEN DEBAJO DE LA ALMOHADILLA!
AVERTISSEMENT : NE PAS LAISSER LES REBORDS
DES SOCLES SE REPLIER ENDESSOUS !
Ajuster la position des patins Landing Pad pour que
l’on puisse fermer complètement les pieds SkyLine ou
Control Tower.
Alinee la posición de las Landing Pads para permitir
que las torres SkyLine o Control Towers queden
correctamente posicionadas.
Ajuster la position des patins landing pad et
les serrer ensuite.Las etapas 9 a 12.
Ajuster la position des patins landing pad et
les serrer ensuite. Les opérations 9 à 12.
10
11
10
11
TOUT EN TENANT LE PIED SKYLINE
OU CONTROL TOWER AUDESSUS DU
PATIN, SERRER COMPLÈTEMENT LE
BOULON DU PATIN À 1.5 NM 13.3 IN LB
EMPLOYER LE CÔTÉ LONG DE LA CLÉ,
TEL QU’ILLUSTRÉ.
12
NE PAS TROP SERRER, CAR ON RISQUERAIT
D’ENDOMMAGER LE TOIT.
Répéter l’opération pour les autres patins Landing Pad
en faisant en sorte qu’ils n’aient pas bougé.
Réengager le pied SkyLine ou Control Tower dans
le patin, serrer le pied complètement (suivre les
instructions qui accompagnent les pieds) et rabattre le
capot.
MIENTRAS SOSTIENE LA TORRE SKYLINE
O CONTROL TOWER SOBRE LA LANDING
PAD, APRIETE COMPLETAMENTE LA
LANDING PAD CON UNA FUERZA DE 1.5
NM 13.3 IN LB UTILICE EL EXTREMO
MÁS LARGO DE LA LLAVE, COMO SE
ILUSTRA.
12
Repita el proceso nuevamente con las otras Landing
Pad, asegurándose de que no hayan cambiado de
posición.
Vuelva a introducir las torres SkyLine o Control Tower en
la Landing Pad, apriete completamente la torre y cierre
la tapa (consulte las instrucciones de las torres).
NO APRIETE EXCESIVAMENTE PORQUE
PUEDE DAÑAR EL TECHO.

Instruction #1036055B-7/9
Continúe la instalación de las torres SkyLine o
Control Tower.
Poursuivre l’installation des pieds SkyLine
ou Control Tower.
INSTALE LAS TAPAS CUANDO LAS
TORRES NO ESTÉN FIJADAS.
LEA ESTAS ADVERTENCIAS!
POSER LES CACHES QUAND LES
BARRES NE SONT PAS EN PLACE
LIRE CES AVERTISSEMENTS !
13
14
13
14
Les caches empêchent que des débris ne s’accumulent
dans les patins Si instala las tapas, las bases se mantendrán
libres de partículas.
S’ASSURER QUE LES PIEDS SKYLINE OU CONTROL
TOWER, AVEC LES BARRES EN PLACE, SONT
COMPLÈTEMENT ENGAGÉS
DANS LES PATINS LANDING PAD. S’ILS NE
S’ENGAGENT PAS COMPLÈTEMENT, RÉPÉTER
L’OPÉRATION 6.
CERCIÓRESE DE QUE LAS TORRES SKYLINE
O CONTROL TOWERS, CON LAS BARRAS
INSTALADAS, QUEDEN BIEN ASENTADAS SOBRE
LAS LANDING PAD. DE LO CONTRARIO, REPITA EL
PASO 6.
S’ASSURER QUE LE MONTAGE EST SOLIDE ET
CONFORME AUX INSTRUCTIONS. SI L’ON N’EFFECTUE
PAS LES VÉRIFICATIONS DE SÉCURITÉ AVANT DE
PRENDRE LA ROUTE, ON RISQUE DE PROVOQUER DES
DOMMAGES, DES BLESSURES OU MÊME LA MORT.
CERCIÓRESE DE QUE TODAS LAS PIEZAS DE
FIJACIÓN ESTÉN ASEGURADAS SEGÚN LAS
INSTRUCCIONES. SI NO SE REALIZAN LAS
VERIFICACIONES DE SEGURIDAD ANTES DE PARTIR,
SE PUEDEN PROVOCAR DAÑOS MATERIALES,
HERIDAS CORPORALES O LA MUERTE
LES DISPOSITIFS DE FIXATION PEUVENT SE
DESSERRER À LA LONGUE. LES INSPECTER AVANT
CHAQUE UTILISATION ET LES RESSERRER AU BESOIN. LAS PIEZAS DE FIJACIÓN SE PUEDEN AFLOJAR
DESPUÉS DE UN CIERTO TIEMPO. VERIFIQUE ANTES
DE CADA USO Y, SI ES NECESARIO, APRIÉTELAS.
POUR PRÉVENIR LES DOMMAGES AU FINI DU
VÉHICULE, DÉMONTER PÉRIODIQUEMENT LES PATINS
LANDING PAD ET LES NETTOYER AINSI QUE LEURS
POINTS DE MONTAGE CAR DES SÉDIMENTS S’Y
ACCUMULERONT À LA LONGUE.
PARA EVITAR QUE EL ACABADO DE SU VEHÍCULO
RESULTE DAÑADO, RETIRE Y LIMPIE PERIÓDICAMENTE
LAS LANDING PAD Y LOS PUNTOS DE MONTAJE YA
QUE SE PUEDEN ACUMULAR PARTÍCULAS DE LA RUTA
DESPUÉS DE UN CIERTO TIEMPO.

Instruction #1036055B-8/9
Rack Installation
Inadequately secured loads and incorrectly mounted roof racks and
accessory racks can come loose during travel and cause serious
accidents! Therefore, installation, handling and use must be carried
out in accordance with product and vehicle instructions.
In addition to these instructions, review the mounting instructions for
the roof rack and the operating instructions of the vehicle.
These instructions should be kept together with the vehicle’s
operating instructions and carried in the vehicle when in use and en
route.
For your own safety, you should only use roof racks that are
authorized for use with your vehicle.
For roof racks that do not specify the distance between the front
and rear crossbars, the distance shall be at least 700 mm or as large
as possible. Please note that changes (e.g. additional drill holes) to
the accessory rack’s attachment system are not permissible.
Check attachment hardware and load for tight it and function:
• Before the start of any journey.
• After driving a short distance following rack or load install.
• At regular intervals on longer journeys.
• More frequently on rough terrain.
• After interruption of a journey during which the vehicle was left
unsupervised (check for damage due to outside intervention).
Rack Loading
Do not exceed the maximum load speciied for the roof rack,
accessory rack or the maximum load recommended by the vehicle
manufacturer.
Max Roof Load = weight of roof rack + weight of accessory racks +
weight of load.
Load shall be uniformly distributed with the lowest possible center of
gravity.
Load should not substantially extend beyond the loading surface of
the roof rack.
Vehicle Driving and Regulations
The speed driven must be suited to the load transported and
to oficial speed limits. In the absence of any speed limits, we
recommend a maximum speed of 80 mph (130 km/h).
When transporting any load, the speed of the vehicle must take into
account all conditions such as the state of the road, the surface of
the road, trafic conditions, wind, etc. Vehicle handling, cornering,
braking and sensitivity to side winds will change with the addition of
roof top loads.
If this product is off-road certiied, it is designed and intended to
be used on forest service roads, access roads or other non-technical
terrains at moderate speeds. It is not to be used while rock-crawling,
jumping, bogging, or other technical off-road terrains. When using
off-road certiied products with non-off-road certiied products,
always follow the warnings and restrictions stated in the non-off-
road certiied product instructions.
Maintenance
The accessory rack should be carefully cleaned and maintained,
particularly during the winter months. Use only a solution of
water and standard car wash liquid without any alcohol, bleach or
ammonium additives.
For reasons of fuel economy and the safety of other road users, the
accessory rack and roof rack should be removed when not in use.
Periodically inspect accessory rack for damage. Replace lost,
damaged, or worn parts. Use only original spare parts obtained from
a stocking specialist, dealer, or manufacturer.
Any changes made to the roof racks and accessory racks as well
as the use of spare parts or accessories other than those supplied
by the manufacturer will lead to the lapsing of the manufacturer’s
warranty and liability for any material damage or accidents. You
should observe these instructions to the letter and only use the
original parts supplied.
In order to replace any lost or defective keys, note the lock and key
numbers below and register them at www.yakima.com.
IMPORTANT WARNINGS AVERTISSEMENTS IMPORTANTS
Pose du porte-bagage
Une charge mal arrimée, un porte-bagage de toit, ou encore un de ses
accessoires, qui seraient mal installés pourraient se libérer en cours
de trajet et provoquer un grave accident ! C’est pourquoi la pose, la
manutention et l’utilisation de ce produit doivent être conformes aux
instructions visant le produit et le véhicule.
En plus d’observer les présentes instructions, vériier les instructions visant
la pose du porte-bagage et les instructions visant le véhicule.
Les présentes instructions devraient être jointes au manuel d’utilisation du
véhicule et conservées à bord lors du déplacement.
Par sécurité, on ne devrait utiliser que des porte-bagages qui sont
approuvés pour le véhicule.
Dans le cas des porte-bagages dont la distance entre les barres
transversales avant et arrière n’est pas spéciiée, cette distance doit
être la plus grande possible, mais d’au moins 700 mm. Prière de noter
qu’il est interdit d’apporter des modiications au système de montage de
l’accessoire (en perçant des trous supplémentaires, par exemple).
Vériier la solidité des dispositifs de ixation et l’arrimage de la charge :
• avant de prendre la route ;
• peu de temps après le départ si l’on a posé le porte-bagage ou si on l’a
chargé ;
• à intervalles réguliers sur les longs trajets ;
• plus fréquemment sur routes cahoteuses ;
• après tout arrêt durant lequel le véhicule a été laissé sans surveillance
(conirmer l’absence de dommages provoqués par des tiers).
Chargement du porte-bagage
Ne pas dépasser la charge maximale spéciiée pour le porte-bagage,
l’accessoire de transport ou la charge maximale recommandée par le
constructeur du véhicule.
Charge maximale sur le toit = poids du porte-bagage + poids de
l’accessoire de transport + poids de la charge.
La charge doit être répartie de manière uniforme et son centre de gravité
doit être le plus bas possible.
La charge ne doit pas dépasser signiicativement de la surface de charge
du porte-bagage.
Conduite du véhicule et réglementation
La vitesse à laquelle on roule doit tenir compte de la charge transportée
et des limitations de vitesse. En l’absence de limitation de vitesse, nous
recommandons de ne pas dépasser 130 km/h.
Quand on transporte n’importe quelle charge, la vitesse à laquelle on
roule doit aussi tenir compte des conditions ambiantes comme l’état de la
route, la surface de la route, les conditions de la circulation, le vent, etc. Le
comportement du véhicule, sa tenue en virage, son freinage et sa sensibilité
aux vents latéraux seront modiiés par l’addition de charges sur le toit.
Si ce produit est approuvé pour la conduite hors-route, il est destiné à
servir sur des chemins forestiers, des routes d’accès et d’autres terrains
peu accidentés à vitesse modérée. On ne doit pas l’utiliser si le véhicule
sert à franchir de gros rochers, à sauter, à rouler dans la boue profonde
ou à circuler sur des terrains très accidentés. Quand on se sert de produits
approuvés pour la conduite hors-route en conjonction avec d’autres qui ne
le sont pas, il faut toujours respecter les avertissements et les limitations
stipulés dans les instructions des produits qui ne sont pas approuvés pour
la conduite hors-route.
Entretien
L’accessoire de transport doit être nettoyé et entretenu avec soin,
particulièrement durant l’hiver. Pour le nettoyage, n’employer que du savon
liquide normal pour automobile et de l’eau, sans ajouter d’alcool, d’eau de
Javel ou d’ammonium.
Pour économiser du carburant et par sécurité pour les autres usagers de la
route, il est recommandé d’enlever l’accessoire de transport et le porte-
bagage quand ils ne servent pas.
Inspecter l’accessoire de transport régulièrement. Remplacer les pièces
perdues, endommagées ou usées. N’employer que des pièces d’origine, que
l’on peut se procurer auprès d’un détaillant ou du fabricant.
Toute modiication apportée au porte-bagage ou à l’accessoire de
transport, ainsi que l’emploi de pièces ou d’accessoires autres que ceux
fournis par le fabricant, annulerait la garantie et la responsabilité du
fabricant en cas de dommages matériels ou d’accident. L’utilisateur doit
donc respecter les présentes instructions à la lettre et n’employer que les
pièces d’origine fournies.
Ain de pouvoir remplacer des clés perdues ou défectueuses, prendre note
du numéro de la serrure et des clés ci-dessous et les enregistrer à www.
yakima.com.

Instruction #1036055B-9/9
ADVERTENCIAS IMPORTANTES
Instalación del portaequipaje
¡Si las cargas no están aseguradas de manera adecuada y si los portaequipajes
para techo y los accesorios de transporte están montados incorrectamente,
se pueden alojar durante un viaje y causar accidentes serios! Por lo tanto, la
instalación, manipulación y uso se deben realizar respetando las instrucciones del
producto y del vehículo.
Además de estas instrucciones, lea las instrucciones de montaje del portaequipaje
para techo y las instrucciones de operación del vehículo.
Estas instrucciones se deben guardar junto con las instrucciones de operación del
vehículo y llevar dentro del coche cuando este producto está instalado.
Para su propia seguridad, usted debe instalar solamente portaequipajes para
techo aprobados para su vehículo.
Para los portaequipajes de techo que no especiican la distancia entre las barras
transversales delantera y trasera, la separación debe ser de por lo menos 700 mm,
o lo más grande que sea posible. Por favor tenga en cuenta que no está permitido
realizar ningún cambio en el sistema de ijación de los portaequipajes (p. ej.:
agujeros adicionales).
Veriique los accesorios de ijación y la carga para asegurarse de que estén bien
ajustados y en buenas condiciones:
• Antes de salir de viaje.
• Una vez recorrida una corta distancia después de instalar el portaequipaje o
la carga.
• A intervalos regulares durante los viajes más largos.
• Con más frecuencia en terrenos irregulares.
• Después de cada parada durante un viaje, en la que el vehículo quedó sin
vigilancia (comprobación de daños debido a la posible acción de terceros).
Carga del portaequipaje
No exceda la carga máxima que corresponde al portaequipaje para techo, los
accesorios de transporte o la carga máxima recomendada por el fabricante del
vehículo.
Carga máxima del techo = peso del portaequipaje para techo + peso de los
accesorios de transporte + peso de la carga.
La carga debe estar uniformemente distribuida con el centro de gravedad lo más
bajo posible.
La carga no debe sobrepasar sustancialmente la supericie de carga del
portaequipaje para techo.
Manejo del vehículo y reglamentaciones
Se debe conducir a una velocidad que tenga en cuenta la carga transportada y
que respete los límites de velocidad reglamentarios. En caso de que el límite de
velocidad no esté indicado, recomendamos no superar los 130 km/h.
Cuando se transportan cargas sobre el techo, se debe circular a una velocidad que
tenga en cuenta todas las condiciones circundantes, como el estado de la ruta,
la supericie del camino, las condiciones del tráico, el viento, etc. El manejo del
vehículo, así como el frenado, agarre en las curvas y la inluencia de los vientos de
costado, cambian cuando se adicionan cargas sobre el techo.
Si este producto está certiicado para usar fuera de la carretera, signiica que
está diseñado y adaptado para emplearse en caminos de servicio forestales, rutas
de acceso u otros terrenos poco accidentados a velocidad moderada. No se debe
utilizar si el vehículo se emplea para trepar entre rocas, saltar, circular en pantanos
o en otros terrenos muy accidentados. Cuando se utilizan productos certiicados
para usar fuera de la carretera conjuntamente con otros que no lo son, respete
siempre las advertencias y restricciones establecidas en las instrucciones de los
productos que no están certiicados para usar fuera de la carretera.
Mantenimiento
Los accesorios de transporte se deben limpiar con cuidado y mantenerlos de
manera adecuada, especialmente durante los meses de invierno. Para esto, utilice
solamente una solución de agua y líquido lavacoches estándar, sin ningún añadido
de alcohol, blanqueador o amoníaco.
Por razones de economía de combustible y de seguridad para otros usuarios de
la carretera, el portaequipaje para techo y los accesorios de transporte se deben
desinstalar cuando no se utilizan.
Veriique periódicamente los accesorios de transporte por si están dañados.
Reemplace las piezas perdidas, rotas o gastadas. Utilice solamente repuestos de
fábrica provenientes de un especialista, distribuidor o fabricante.
La modiicación de los portaequipajes para techo y de los accesorios de transporte,
así como el uso de otras piezas de repuesto o accesorios diferentes de los provistos
por el fabricante, harán caducar la garantía y la responsabilidad del fabricante
por daños materiales o accidentes. Usted debe respetar al pie de la letra estas
instrucciones de uso y utilizar solamente las piezas de origen provistas.
Para reemplazar una llave perdida o defectuosa, anote más abajo los números de
la cerradura y de la llave y regístrelos en www.yakima.com.
YAKIMA PRODUCTS, INC.
4101 KRUSE WAY
LAKE OSWEGO, OR
97035-2541
USA
888.925.4621
yakima.com/support
YAKIMA AUSTRALIA PTY LTD
17 Hinkler Court
Brendale, QLD 4500
Australia
1800 143 548
www.yakima.com.au
www.yakima.co.nz
www.yakima.eu
www.yakima.com
-
 1
1
-
 2
2
-
 3
3
-
 4
4
-
 5
5
-
 6
6
-
 7
7
-
 8
8
-
 9
9


en otros idiomas
- français: YAKIMA 8000250 Manuel utilisateur
- English: YAKIMA 8000250 User manual
Artículos relacionados
-
YAKIMA 8000226 Guía de instalación
-
-
-
-
-
-
YAKIMA Landing Pad Instrucciones de operación
-
-
-