
NE PAS DÉPASSER
LA LIMITE DE CHARGE DANS LE PANIER:
60 kg (130 lb)
LIMITES DE CHARGE:
▲
35 lbs.
(16 kg)
▲
contenu de
pannier
NE PAS
DÉPASSER
LA LIMITE
DE CHARGE
du porte-
bagages!
Part #1032410 RevA
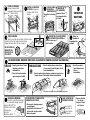
RECOMMENDED TOOLS:
Phillips screwdriver
Tapemeasure or ruler
OUTILS RECOMMANDÉS
Tournevis cruciforme
Ruban à mesurer
HERRAMIENTAS
RECOMENDADAS:
Destornillador Phillips
Cinta métrica o regla
NO SUPERE EL LÍMITE
DE PESO DEL CONTENIDO DE LA CESTA:
130 LBS. (60 KG)
LIMITES DE CARGA:
▲
35 lbs.
(16 kg)
▲
contenido
de la cesta
NO
SUPERE el
límite de
peso DE LA
PARRILLA.
LOAD LIMITS:
▲
35 lbs.
(16 kg)
▲
basket
contents
DO NOT
EXCEED
YOUR
RACK’S
weight limit!
DISTRIBUTE YOUR
LOAD EVENLY INSIDE
THE BASKET.
Siempre ate las cargas largas al
frente al frente y atrás.
Toujours attacher les charges
longues à l’avant et à l’arrière.
RÉPARTIR LA
CHARGE ÉGALEMENT
DANS LE PANIER.
DISTRIBUYA LA
CARGA PAREJA
DENTRO DE LA CESTA.
DO NOT EXCEED
BASKET CONTENT WEIGHT LIMIT:
130 LBS. (60 KG)
Always tie down long loads at
front and rear.
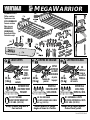
M
EGA
W
ARRIOR
(1x)
(2x)
(3x)
(3x)
(3x)
(11x)
(4x)
(4x)
(4x)
(4x)
(1x)
(1x)
(2x)
(4x)
(4x)

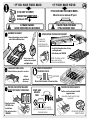
IF YOU HAVE BARS THAT CAN BE MOVED…
Move the bars to minimum 30" apart.
• Insert screws with
washers into each joint
and tighten them.
ATTACH FAIRING TO EITHER END OF BASKET.
Pry open the
SnapArounds,
attach them to the
LOWER FRONT BAR. • Insert bolts through washers, fairing
and SnapArounds.
• Attach knobs and TIGHTEN.
NOTE: The fairing can fold
down when carrying
accessories and long loads.
ASSEMBLE THE BASKET.
• Remove the machine screws from the
ends of the LoadWarrior tubes.
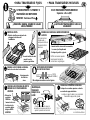
LOAD BASKET ONTO RACKS.
Center basket over your rack’s crossbars. DO NOT ATTACH BRACKETS
TO UNSTABLE POINTS.
Do not attach brackets at these locations.
•IF YOU HAVE FIXED BARS: •IF YOUR BARS MOVE:
(SIDE VIEW)
A friend
would make
this easier .
Q TOWER OWNERS:
NEVER REPOSITION THE Q TOWERS!
IF YOU HAVE “Q TOWERS”
OR BARS THAT CANNOT MOVE…
Continue to STEP .
POSITION THE SUPPORT BRACKETS
ABOVE YOUR VEHICLE’S CROSSBARS.
It may be necessary to move the
bracket to a new position, or to adjust
the basket position.
KEEP BAR
BELOW
TAB!
POSITION THE COVER BRACKETS.
Position cover bracket onto installed
support brackets.
Hooked tab should cover the larger
support bar.
Arrow points inboard to
center of vehicle.
TIGHTEN YOUR CROSSBARS
IF YOU LOOSENED THEM.
• Place the brackets
OUTSIDE of the
basket frame.
• Tabs on brackets face
INBOARD.

ATTACH THE KNOBS:
Engage the threads of the
bolts.
T-BOLT IS LOCKED
when the “T” of the
bolt is turned inside
the hole: TIGHTEN
THE KNOBS.
SECURE THE
BASKET TO
THE BARS.
Lock the T-Bolts.
ATTACH BOLTS.
Insert bolt into round hole,
and T-bolt into slotted hole.
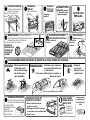
REFER TO THE DRAWINGS BELOW
FOR BAR PLACEMENT,
or to
determine if the bar is
required.
ATTACH LOAD BAR.
With a washer on the bolt, align the end
clamps to the hole in the bar. Thread the bolts
into the embedded nuts.
DO NOT COVER
JOINT SCREWS
WITH END
CLAMPS.
Tighten bolts
while pushing
the end clamps
together.
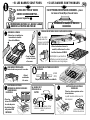
BIKES BOATS SKIS
Long loads may interfere with LoadBar.
• Attach carrier at front of
basket and to load bar.
• Adjust the bar for load
stability.
• For shorter boats, attach accessory at front
of basket and to load bar.
• Longer loads, such as canoes or sea kayaks,
require the load bar to be removed.
• Attach accessory at
front of basket and to
load bar.
On some
vehicles, hatch
interference is
unavoidable.
USE CAUTION
WHEN OPENING
YOUR HATCH.
CHECK INSTALLATION:
Make sure installation is secure
by tugging at basket.
TO REMOVE THE BASKET, DO NOT
DISASSEMBLE THE HARDWARE.
• Loosen the knobs until barely
attached.
• Unlock the T-bolts and let curved
brackets swing freely.
• Remove basket.
The basket should NOT
SLIDE on the bars.
Tighten knobs.
Always tie down
long loads to
front and rear of
vehicle.
ACCESSORIES MUST BE ATTACHED TO THE FRONT OF THE BASKET (FRONT OF VEHICLE).

S’IL EST POSSIBLE DE DÉPLACER LES BARRES… placer
les barres à 76 cm (30 po) l’une de l’autre.
• Poser les bonnes
vis dans les joints
et les serrer.
POSER LE DÉFLECTEUR À L’UN OU L’AUTRE BOUT DU PANIER.
Écarter les colliers
SnapAround et les
engager sur la BARRE
AVANT INFÉRIEURE. • Glisser les boulons à travers la
rondelle, le déflecteur et le collier.
• Installer le bouton et SERRER.
REMARQUE: On peut rabattre le
déflecteur quand on transporte des
accessoires ou une charge longue.
ASSEMBLER LE PANIER.
• Enlever les vis à métal qui se
trouvent dans le bout des
tubes du LoadWarrior.
LOAD BASKET ONTO RACKS.
Center basket over your rack’s crossbars. NE PAS FIXER LES ÉTRIERS À DES POINTS
INSTABLES.
Ne pas fixer les étriers à ces endroits.
•SI LES BARRES SONT FIXES: •SI LES BARRES SONT MOBILES:
(VUE DE
CÔTÉ)
A friend
would make
this easier .
PROPRIÉTAIRES DE PIEDS Q: IL NE FAUT JAMAIS
MODIFIER LA POSITION DES PIEDS Q!
SI L’ON A DES “PIEDS Q” OU DES
BARRES QUI NE BOUGENT PAS…
passer à l’opération .
Il faudra peut-être déplacer l’étrier
ailleurs ou modifier la position du
panier.
LA BARRE DOIT
ÊTRE
SOUS LA
PATTE!
La flèche pointe vers
l’intérieur du véhicule.
RESSERRER LES BARRES SI ON LES A
DESSERRÉES.
• Placer les
étriers À L’EXTÉRIEUR
du cadre du panier.
• La patte des étriers
doit pointer VERS
L’INTÉRIEUR.
BIEN
METTRE EN PLACE LES ÉTRIERS
SUPÉRIEURS.
Placer les étriers supérieurs sur les
étriers inférieurs.
La patte recourbée doit recouvrir le
tube du panier.
POSITIONNER LES ÉTRIERS
INFÉRIEURS AU-DESSUS DES BARRES
TRANSVERSALES
DU VÉHICULE.

CONSULTER LES ILLUSTRATIONS
CI-DESSOUS POUR SAVOIR
où
placer la barre, ou s’il
faut l’installer.
FIXER LA BARRE
Après y avoir mis une rondelle, enfiler le boulon
à travers les trous de l’embout et de la barre.
Engager le boulon dans l’écrou incorporé.
NE PAS POSER LES
EMBOUTS PAR-
DESSUS LES VIS
DES JOINTS..
Serrer les
boulons en
comprimant les
embouts.
VÉLOS EMBARCATIONS SKIS
Si la charge est longue, la barre intermédiaire peut gêner
Sur certains
véhicules, le
hayon touche
au panier.
FAIRE ATTENTION EN
OUVRANT LE HAYON.
POUR ENLEVER LE PANIER, NE PAS
DÉMONTER LES ÉTRIERS.
• Desserrer les boutons presque
complètement.
• Déverrouiller les boulons en “T”
et décrocher la patte courbe.
• Enlever le panier.
Toujours attacher
les charges
longues à l’avant
et à l’arrière.
VÉRIFIER LE MONTAGE:
Contrôler la solidité du montage
en essayant de bouger le panier.
Le panier NE DOIT PAS
GLISSER sur les barres
transversales.
Serrer les
boutons au besoin.
LE BOULON EN “T”
EST VERROUILLÉ
quand sa tête en “T”
est perpendiculaire
à la fente:
SERRER LES
BOUTONS.
FIXER LE PANIER
AUX BARRES
TRANSVERSALES.
Verrouiller les boulons
en “T”.
POSER LES BOULONS.
Glisser le boulon à tête
ronde dans le trou rond et le
boulon en “T” dans la fente.
METTRE LES BOUTONS
EN PLACE. Engager les
premiers filets sur les
boulons.
• Fixer le porte-vélos à l’avant
du panier et à la barre
intermédiaire.
• Placer la barre de manière
que la charge soit stable.
• Pour les embarcations courtes, fixer
l’accessoire à l’avant du panier et à la
barre intermédiaire.
• Fixer l’accessoire à
l’avant du panier et à
la barre
intermédiaire.
LES ACCESSOIRES DOIVENT ÊTRE FIXÉS À L’AVANT DU PANIER (L’AVANT DU VÉHICULE).
• Pour les embarcations longues, comme les canots ou les
kayaks de mer, il faut enlever la barre intermédiaire.

SI LOS TRAVESAÑOS PUEDEN MOVERSE:
Sepárelos a 76 cm (30").
• Inserte tornillos en cada
una de las ocho
junturas y apriételos.
COLOQUE LAS CARENAS A AMBOS EXTREMOS DE
LA CESTA.
Abra los broches
SnapAround, y
colóquelos sobre el
travesaño inferior
delantero. • Inserte tornillos a través de las arandelas,
la carena y los SnapAround.
• Coloque las perillas y ajuste.
NOTA: Las carenas pueden
bajarse para transportar
accesorios o cargas largas.
MONTE LA CESTA.
• Quite los tornillos mecánicos de los
extremos de los tubos del
LoadWarrior.
COLOQUE LA CESTA SOBRE LA PARRILLA.
Centre la cesta sobre los travesaños.
•PARA TRAVESAÑOS FIJOS: •PARA TRAVESAÑOS MÓVILES:
Un amigo puede
facilitar esta
tarea.
¡ATENCIÓN: NUNCA CAMBIE DE LUGAR
LOS Q-TOWERS!
SI TIENE SOPORTES “Q-TOWERS” O
TRAVESAÑOS QUE NO PUEDEN
MOVERSE: Continúe al Paso .
COLOQUE LAS ESCUADRAS DE APOYO
ENCIMA DE LOS TRAVESAÑOS DEL
VEHÍCULO.
Puede ser necesario mover la
escuadra a una nueva posición, o
ajustar la posición de la cesta.
¡MANTENGA EL
TRAVESAÑO
DEBAJO DE LA
ALETA!
¡AJUSTE LOS TRAVESAÑOS SI LOS HA
AFLOJADO!
• Coloque las
escuadras
FUERA de
l marco de la cesta.
NO COLOQUE LAS ESCUADRAS
EN PUNTOS INESTABLES.
No coloque escuadras en estos lugares.
(VISTA
LATERAL)
• Las aletas de las
escuadras deben
dirigirse HACIA
ADENTRO.
COLOQUE LAS ESCUADRAS SUPERIORES.
Coloque las escuadras superiores sobre las
escuadras de apoyo instaladas.
La aleta con gancho debe ir por encima del
travesaño de apoyo más grande.
La flecha apunta hacia dentro
al centro del vehículo.

COLOQUE LAS
PERILLAS:
Siga la rosca de los
tornillos.
EL TORNILLO ‘T’ ESTÁ
ASEGURADO cuando la
“T” del tornillo queda
dentro del agujero: AJUSTE LAS
PERILLAS.
ASEGURE LA
CESTA A LOS
TRAVESAÑOS.
Tranque los
tornillos T.
VEA LOS DIBUJOS QUE SIGUEN
PARA SABER DÓNDE COLOCAR LA
BARRA
o saber si la
necesita.
MONTE LA BARRA Con una arandela en el
tornillo, haga coincidir las piezas de extremo con
el agujero en la barra. Introduzca los
tornillos en las tuercas roscadas.
NO CUBRA LOS
TORNILLOS DE LAS
JUNTURAS CON
LAS PIEZAS DE
EXTREMO.
Ajuste los tornillos
mientras aprieta
para unir las
piezas de
extremo.
Las cargas largas pueden interferir con la barra
• Monte el portabicicletas
al frente de la cesta y
sobre la barra de carga.
• Ajuste la barra para
lograr estabilidad.
• Para botes cortos, coloque el
accesorio al frente de la cesta
y sobre la barra.
• Coloque el
accesorio al
frente de la cesta
y sobre la barra.
PARA SACAR LA CESTA, NO
DESMONTE EL CONJUNTO.
• Afloje las perillas hasta que
quedan casi sueltas.
• Destranque los tornillos T para que
las escuadras curvas cuelguen libres.
• Saque la cesta.
Siempre ate las
cargas largas al
frente al frente y
atrás.
LOS ACCESORIOS DEBEN COLOCARSE AL FRENTE DE LA CESTA (FRENTE DEL VEHÍCULO).
VERIFIQUE LA INSTALACIÓN:
Cerciórese de que la instalación
está segura sacudiendo la cesta.
La cesta NO DEBE
DESLIZARSE sobre los
travesaños.
Ajuste las perillas
si es necesario.
En algunos
vehículos, es
inevitable la
interferencia.
TENGA CUIDADO
CUANDO ABRA LA
MEDIA PUERTA
TRASERA.
BICICLETAS EMBARCACIONES ESQUÍES
• Para canoas, kayaks marinos y similares se
debe sacar la barra.
COLOQUE LOS TORNILLOS.
Inserte el tornillo común en
el agujero redondo y el
tornillo T en el agujero con
ranura.

GARANTÍA LIMITADA
Yakima Products (“Yakima”) se compromete a reparar o
reemplazar la mercancía que presente defectos en
materiales o en elaboración. Esta garantía limitada es
válida por un año contado desde la fecha de compra. La
garantía limitada es aplicable solamente si se han cumplido
con los requisitos de la Lista de Compatibilidad (Fit List) y
si el producto se ha usado en la forma debida. Si un
cliente cree que un producto Yakima es defectuoso, el cliente
debe devolver dicho producto a un representante
autorizado de Yakima, adjuntando prueba de compra.
Entonces Yakima dará autorización a dicho representante
para devolver el producto. Si al inspeccionar el producto
Yakima encuentra que es en realidad defectuoso, Yakima
reparará o reemplazará el artículo defectuoso a su
discreción, sin cargo alguno para el cliente. El cliente se
compromete a pagar por el flete para enviar el producto a
Yakima y Yakima pagará el flete que corresponda para
devolver dicho producto al cliente. No se aceptarán
devoluciones no autorizadas. Esta garantía limitada no
cubre el desgaste normal de los productos Yakima, ni daños
resultantes de uso inadecuado, accidentes o alteraciones.
El comprador reconoce que Yakima no tiene ningún control
sobre la forma en que sus productos han sido afianzados
a los vehículos o sobre la fijación de otros artículos a los
productos Yakima, por lo tanto, Yakima no asume
responsabilidad alguna por daños a la propiedad
resultantes de una fijación mal hecha del uso de sus
productos. Además, esta garantía limitada es aplicable
únicamente a los productos Yakima y no a otros productos
usados en conjunto con los productos Yakima. Esta garantía
limitada reemplaza cualquier otra garantía, explícita o
implícita, y no cubre daños consecuentes de ninguna clase
que puedan resultar del uso correcto o incorrecto de
cualquier producto Yakima.
LIMITED WARRANTY
Yakima Products (“Yakima”) will repair or replace
merchandise which proves defective in materials and/or
workmanship. The limited warranty is effective for one year
from the date of purchase. The limited warranty is applicable
only if the Fit List and instructions are followed and the
products are used properly. If a customer believes that a
Yakima product is defective, the customer must return it to
an authorized Yakima dealer with proof of purchase. Yakima
will then issue authorization to the dealer for the return of
these products. If an article is found to be defective upon
inspection by Yakima, Yakima will repair or replace the
defective article at its discretion without charge. The
customer will pay freight to Yakima, and Yakima will pay
any applicable return freight. Unauthorized returns will not
be accepted. Normal wear and tear of Yakima products
or damage resulting from misuse, accidents, or alterations
are not covered by this Limited Warranty.The purchaser
acknowledges that Yakima has no control over the
attachment of its products to vehicles or the attachment of
items to the Yakima products. Accordingly, Yakima cannot
assume responsibility for any damage to any property
arising out of the improper attachment or use of its products.
In addition, this Limited Warranty applies only to Yakima
products and not to other products used in conjunction with
Yakima products. This Limited Warranty is in lieu of all
other warranties, expressed or implied, and does not cover
consequential damages of any kind that may arise from
the use or misuse of any Yakima product.
GARANTIE LIMITÉE
Yakima Products (“Yakima”) s’engage à réparer ou à
remplacer les produits qui présenteraient des vices de
matériau ou de fabrication. Cette garantie limitée a une
durée d’un an à partir de la date d’achat. Cette garantie
limitée ne s’applique que si les instructions et la liste de
compatibilité (“Fit List”) ont été respectées et si les produits
ont été utilisés normalement. Si le client estime qu’un produit
Yakima est défectueux, le client doit le retourner à un
dépositaire Yakima autorisé, accompagné de la preuve
d’achat. Yakima autorisera alors le dépositaire à retourner
le produit. Si, après inspection, Yakima juge le produit
défectueux, Yakima réparera ou remplacera le produit, à
sa discrétion et sans frais. Le client devra assumer les frais
de transport jusqu’à Yakima et Yakima assumera les frais
de retour au client. Les retours non autorisés ne seront pas
acceptés. Cette garantie limitée ne couvre pas l’usure
normale ou les dommages résultant d’un usage abusif, d’un
accident ou de modifications aux produits Yakima.
L’acheteur reconnaît que Yakima n’a aucun contrôle sur la
façon dont ses produits sont fixés aux véhicules, ou dont les
articles transportés sont fixés aux produits Yakima. Il s’ensuit
que Yakima ne peut assumer de responsabilité pour des
dommages matériels consécutifs au mauvais montage ou
au mauvais emploi de ses produits. De plus, la présente
garantie limitée ne s’applique qu’aux produits Yakima et
non à d’autres produits utilisés conjointement aux produits
Yakima. Cette garantie limitée remplace toute autre garantie,
expresse ou tacite, et ne couvre pas d’éventuels dommages
indirects pouvant survenir par suite de l’emploi, correct ou
non, des produits Yakima.
SI NECESITA MÁS ASISTENCIA
TÉCNICA O REPUESTOS:
comuníquese con su
concesionario o llámenos al
(888) 925-4621 o
al (707) 826-8000, de lunes a
viernes de 8:00 am a 5:00 pm,
hora del Pacífico.
SI VOUS AVEZ BESOIN DE
RENSEIGNEMENTS TECHNIQUES
COMPLÉMENTAIRES OU DE PIÈCES DE
RECHANGE:
prière de contacter votre dépositaire
ou appelez-nous au (888) 925-4621
ou au (707) 826-8000, du lundi au
vendredi, entre 8 heures et 17
heures, heure du Pacifique.
IF YOU NEED FURTHER
TECHNICAL ASSISTANCE OR
REPLACEMENT PARTS:
Please contact your dealer
or call us at (888) 925-4621 or
(707) 826-8000, Monday
through Friday, 8:00am to
5:00pm Pacific time.
-
 1
1
-
 2
2
-
 3
3
-
 4
4
-
 5
5
-
 6
6
-
 7
7
-
 8
8


en otros idiomas
- français: YAKIMA 8007080 Guide d'installation
- English: YAKIMA 8007080 Installation guide
Artículos relacionados
-
YAKIMA 8007070 Guía de instalación
-
-
-
-
-
-
-
-
-