
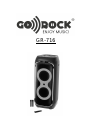
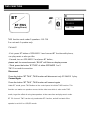
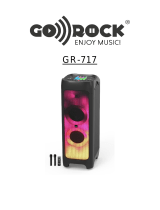
GR-716

PRECAUCIÓN
RIESGO DE SHOCK ELÉCTRICO
NO ABRIR
NO ABRIR
El relámpago con el símbolo de la punta de flecha dentro de un triángulo equilátero
pretende alertar al usuario de la presencia de "voltaje peligroso no aislado" dentro de
la carcasa del producto que puede ser de magnitud suficiente para constituir un riesgo
de descarga eléctrica para una persona.
El signo de exclamación dentro de un triángulo equilátero pretende alertar al usuario
sobre la presencia de importantes instrucciones de operación y mantenimiento
(servicio) en la documentación que acompaña a la unidad..
Precauciones de seguridad
Advertencia: Para evitar incendios o descargas eléctricas, no exponga este aparato a la
lluvia ni a la humedad..
INSTRUCCIONES DE SEGURIDAD IMPORTANTES
Precaución: Lea atentamente todas las siguientes medidas de seguridad importantes
para garantizar un funcionamiento seguro.
1. Lee las instrucciones:
Todas las instrucciones de seguridad y funcionamiento deben leerse antes de
utilizar el aparato.
2. Instrucciones de conservación:
Las instrucciones de seguridad y funcionamiento deben conservarse para futuras
consultas.
3. Siga las instrucciones:
Se deben seguir todas las instrucciones de funcionamiento.
4. Preste atención a las advertencias:
Se deben seguir todas las advertencias de la unidad y las instrucciones de funcionamiento.
5. Fuente de alimentación:
El aparato debe conectarse según las instrucciones.
6. Calor:
Mantenga la unidad alejada de fuentes de calor como radiadores,
refrigeradores, estufas u otros aparatos que puedan irradiar calor.
7. Períodos de no uso:
El cable de alimentación de la unidad debe desconectarse de la toma de corriente
cuando no la utilice durante mucho tiempo.
8. Daños que requieren servicio:
La unidad debe ser reparada por personal de servicio calificado en los siguientes casos:
a. El enchufe o el cable de alimentación se ha dañado;
b. Se han caído objetos o se ha derramado líquido sobre el aparato;
C. El aparato ha estado expuesto a la lluvia; d. El aparato funciona de forma anormal.


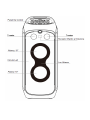
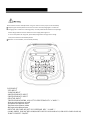
CONEXIONES
Entrada externa DC 12V
Interruptor
Entrada Alimentación
Accesorios
MANUAL DE MANDO DISTANCIA CABLE AUDIO CABLE ALIMENTACION MICRÓFONO INALÁMBRICO x1
INSTRUCCIONES

Lea atentamente los avisos antes de usarlo para garantizar un uso adecuado de la batería:
- Cargue completamente la batería antes de usarla por primera vez. La luz de carga completa se enciende después de la carga completa.
El tiempo de carga es relevante para la energía restante, normalmente tardará de 8 a 10 horas en cargarse por completo.
Cargue mientras el sonido es anormal o la luz de alimentación vacía está encendida
Si no usa el producto durante mucho tiempo, cárguelo completamente antes de guardarlo y recargarlo.
cada tres meses para evitar fallas en la batería.
- Las baterías son consumibles, no están cubiertas por la garantía.
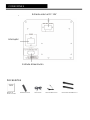
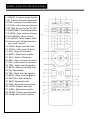
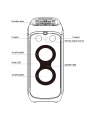
1. Puerto USB.
2. Puerto SD.
3. Línea de Entrada LINE IN.
4. Entrada Micrófono 2.
5. Entrada Micrófono 1.
6. Entrada para Guitarra.
7. Menú Ajuste de Micrófono. Ajuste presionando las teclas "+" y "-".
1st Pulse una vez y podrá ajustar el volumen del micrófono.
2nd Pulsando de nuevo podrá ajustar el “Echo” del micrófono.
3rd Pulsando de nuevo podrá ajustar el sonido agudo (Treble) del micrófono.
4th Pulsando de nuevo podrá ajustar el sonido grave (Bass) del micrófono.
8. Volumen de Guitarra. Puede ajustar el volumen de guitarra presionando las teclas "+" y "-".
9. Pulsación larga para grabar micrófono / Pulsación corta para reproducir (en modo USB o tarjeta SD).
10. On/Off de Micrófono Prioritario.

11. Tecla de repetición (REPEAT-ALL)
12. EQ : Tecla DSP (Incrementar / Disminuir)
13. Tecla Sonido Agudos y Graves. Ajustar presionando "+" y "-".
14. MODE : Pulsación corta cambia el modo de iluminación frontal / Pulsación larga On/Off luz.
15. USB/SD: Tecla para cambiar al modo USB/SD.
16. LINE IN: Tecla para cambiar al modo Entrada De Línea.
17. Pulsación corta para entrar en modo Bluetooth (Nombre del bluetooth: GR-716)
Pulsación larga para activar función BT.TWS
18. Tecla nula en este modelo y versión de altavoz.
19. Pulsación corta para pista anterior / Pulsación larga para carpeta anterior.
20. Tecla PLAY/PAUSE.
21. Pulsación corta para siguiente pista / Pulsación larga para siguiente carpeta.
22. Tecla para subir volumen.
23. Tecla MUTE para silenciar el sonido.
24. Tecla para bajar el volumen.

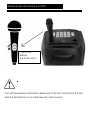
PRECAUCIÓN CON EL MICRÓFONO INALÁMBRICO
Apague el micrófono inalámbrico antes de colocarlo en la ranura. No lo
coloque en la ranura con el micrófono encendido o tendrá un sonido de
choque del micrófono.
(Apagar antes
de colocar
en su soporte.)

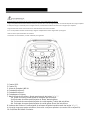
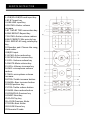
MANDO A DISTACIA INSTRUCCIONES
1. USB/SD: Cambia al modo Usb/Sd.
2. BT: Cambia al modo bluetooth.
3. LINE: Cambia a Entrada de Línea.
4. GUITAR+: Subir volumen Guitarra.
5. BT TWS: Activar función BT TWS
6. ONE REPEAT: Tecla Repetición.
7. GUITAR-: Bajar volumen Guitarra.
8. MIC PRIORITY: Mic Prioritario.
9. ALL REPEAT: Tecla Repetir todo.
10. Number pad: Teclado numérico
para modo Usb/Sd.
11. ECHO-: Bajar nivel de Echo
12. ECHO+: Subir nivel de Echo
13. VOL-: Bajar el Volumen
14. MUTE: Silenciar el sonido.
15. VOL+: Subir el Volumen.
16. MIC-: Bajar volumen micrófono.
17. MIC+: Subir volumen micrófono.
18. TRE+: Subir nivel de agudos.
19. BASS+: Subir nivel de graves.
20. EQ: Equalizador.
21. TRE-: Bajar nivel de agudos.
22. BASS-: Bajar nivel de graves.
23. PREVIOUS: Pista anterior.
24. NEXT: Siguiente pista.
25. PLAY: Reanudar reproducción.
26. <FLDR: Carpeta anterior.
27. FLDR>: Siguiente carpeta.
28. PAUSE: Pausar reproducción.
29. Código del control remoto.

Características:
1. Altavoz Bluetooth 1.0CH
2. Con ruedas para más actividades al aire libre.
3. Luces (luz del altavoz/LED circular)
4. Pantalla LED
5. Rango de funcionamiento de Bluetooth 10 metros
6. USB/SD
7 Karaoke (micrófono) * 2
8. Con ecualizador
9. Control de agudos
10. Control de graves
11. Control de volumen
12. Función de entrada de línea, adecuada para PC, MID, TV y otros dispositivos de audio
13. Control remoto de funciones completas
14. Batería recargable de plomo ácido incorporada 12V 9000mAh
15. Asa de transporte, fácil de mover
•
Dimensiones del producto 445(L)*410(W)*955(H) mm.
•
Canal de emisión micrófono inalámbrico
50mW
•
Frecuencia de Micrófono inalámbrico
201.6MHz + 202.2MHz
•
Frecuencia de respuesta
20Hz-20KHz
•
Altavoces
10”
woofer*2+ 3” tweeter*2
•
Batería y voltaje
12V,9000mah
•
Rango de alcance de
Bluetooth
10m
•
Frecuencia de
Bluetooth
2,402 GHz-
2,480 GHz
•
Canal de emisión
Bluetooth BTH
50mW
•
Versión de
Bluetooth
V5.0+BR+EDR+BLE
•
Potencia
RMS
200W, 3.6Ω
• Potencia de consumo
(promedio)
180W
(1K0DB)
•
Alimentación
100V-240V/50Hz/60Hz
Especificaciones técnicas:

FUNCIONES
Power On/Off
Presione el botón de encendido en el lado "encendido" para encender el altavoz,
presione el botón de encendido en el lado "apagado" para apagar el altavoz.
Reproducir música desde USB/SD:
1. Gire el botón de encendido a "ON".
2. Inserte USB/SD en las ranuras correspondientes, el altavoz reproducirá la
música almacenada automáticamente.
3. En el modo de reproducción, presione brevemente el botón Anterior o
Siguiente para seleccionar las canciones que le gustan, presione
prolongadamente para reproducir canciones de la carpeta anterior o siguiente
4. Presione brevemente Reproducir/Pausar para reproducir o pausar.
Observación: en el modo de reproducción de Bluetooth, inserte USB/SD
desconectará el Bluetooth y cambiará para reproducir el USB/SD. Presione
brevemente el botón BT para cambiar de nuevo al modo Bluetooth.
Line-in:
Para otros dispositivos de música compatibles o sus reproductores de MP3/MP4,
use el cable de audio provisto para conectar desde la "Salida de línea" del
dispositivo a la "Entrada de línea" de este dispositivo, luego Disfrute...
Cuando se utiliza un dispositivo externo, reproducir/pausar, volumen,
anterior/siguiente puede controlarse mediante el dispositivo externo.
Karaoke:
Use el micrófono inalámbrico provisto para disfrutar de la función de karaoke o
use un cable micrófono (preparado por el usuario).
Para micrófono de cable, insértelo en la ranura.
Ajuste el volumen del micrófono, el eco, los graves y los agudos con el botón de
menú del micrófono.
EQ
Cuando el altavoz esté reproduciendo música, presione el botón EQ para
seleccionar entre los 5 tipos de EQ para obtener el mejor efecto de sonido.

Treble (Agudos)
Cuando el altavoz esté reproduciendo música, presione el botón TREBLE/BASS para
ajustar los agudos.
Para evitar distorsiones, mantener bajo el volumen maestro.
Cuando el nivel de volumen maestro es alto, los agudos deben ajustarse a la baja y cuando
el volumen maestro es bajo, los agudos pueden subirse un poco más sin llegar a distorsión.
Bass (Graves)
Cuando el altavoz esté reproduciendo música, presione el botón TREBLE/BASS para
ajustar los graves.
Para evitar distorsiones, mantener bajo el volumen maestro.
Cuando el nivel de volumen maestro es alto, los graves deben ajustarse a la baja y cuando
el volumen maestro es bajo, los graves pueden subirse un poco más sin llegar a distorsión.
Iluminación. (Tecla MODE)
Cuando el altavoz está encendido, todas las luces se encienden automáticamente,
Luces láser: el usuario puede encender/apagar las luces presionando el botón de modo de
luz láser a través de lo siguiente:
1. 1ª pulsación, apaga la luz láser frontal
2. 2nd pulsación, enciende la luz láser frontal y apaga la luz láser superior al mismo tiempo
3. 3ª pulsación, apaga la luz láser frontal y superior
4. 4ta pulsación, enciende la luz láser frontal y superior Operación de rotación
Luces del panel frontal:
Mantenga presionado el botón de modo de luz para encender / apagar las luces del panel
frontal.
Ajuste la luz del altavoz, la luz del flash, el LED de funcionamiento circular presionando
brevemente el botón.
GUITAR VOL
Pulse este botón para ajustar el volumen de la guitarra.
MIC RECORD(Pulsación larga) / PLAYBACK(Pulsación corta)
En el modo de micrófono encendido, mantenga presionado este botón para comenzar a
grabar, presione brevemente para reproducir el registro.
MIC PRIORITY
Presione este botón para iniciar la función de prioridad del micrófono y vuelva a presionarlo
para desactivar esta función.
REPEAT
Presiones este botón para activar el modo repetición.
MÚSICA MP3 EN CARPETAS
“<FLDR or FLDR> (ambas pulsación larga)” botón para seleccionar carpetas.

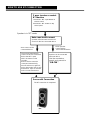
COMO CONECTAR Y USAR BLUETOOTH
2 formas de entrar o
reiniciar la función BT
1.Pulsar el botón BT en el mando
a distancia.
2.Pulsar el botón BT en el panel
de control del altavoz.
El Altavoz está en modo BT
Auto búsqueda y conectar
El altavoz entra en modo búsqueda
automática y buscará el último dispositivo
que fue vinculado.
Auto conexión al
ultimo dispositivo vinculado
El altavoz se auto-conectará
al último dispositivo vinculado
que tenga el bluetooth activo
y esté a menos de 20 metros
en varios segundos.
(Nota: Si el altavoz no se
conecta automáticamente,
apague y encienda el BT,
pulsando en otro modo para
volver a activar el BT y
reconectar el dispositivo.
Cuando no encuentra al
último dispositivo vinculado
Puede conectarse a un
nuevo dispositivo.
Buscar el nombre del
altavoz en el nuevo
dispositivo BT.
"GR-716 "
Conexión Satisfactoria
La conexión BT está completa.

FUNCION TWS
BT
BT.TWS
(Pulsación Larga)
La función TWS funciona con 2 altavoces: GR-716
No puede funcionar solo 1 altavoz.
Conexión
Dispositivos
Dispositivos
GR-716
~ Primero, presione el botón BT del ALTAVOZ 1 y conecte la función BT con el teléfono.
Puede reproducir música o lo que desee.
~ En segundo lugar, encienda el ALTAVOZ 2 y presione el botón BT,
espere unos segundos, parpadeará azul en la pantalla.
~ Tercero, presione el botón "BT TWS" del ALTAVOZ 1 o 2.
TWS Conexión exitosa.
Desconectar
Presione el botón "BT TWS", la función TWS desconectará solo la reproducción del
ALTAVOZ 1.
Volver a conectar
Presione el botón "BT TWS", la función TWS se conectará nuevamente
En el modo BT, presione el botón TWS en el panel de control para iniciar la
función TWS. Esta función puede hacer que un altavoz se conecte al otro
que también está en modo TWS, para obtener el efecto de usar dos
altavoces al mismo tiempo y reproducir música en el canal BT 2.0.
La función TWS solo se puede usar con la función BT.
No funcionará para cualquier otro modo AUX o USB/SD.

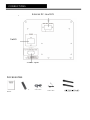
MUEVE EL ALTAVOZ CON LAS RUEDAS
Debajo de la unidad, hay 2 patas en la parte delantera y 2 ruedas en la parte
trasera.
Cuando mueva la unidad con ruedas, primero incline la unidad hacia atrás y
muévala.
CONDICIONES DE GARANTÍA
- Este aparato está cubierto contra cualquier avería siempre y cuando
haya sido causada por el propio sistema eléctrico del fabricante.
- El documento que da validez a la garantía será el ticket o factura de
compra siempre y cuando salga reflejado marca y modelo del aparato.
- La garantía no cubre golpes, piezas consumibles como baterías,
desgastes por usos excesivos, manipulaciones técnicas ni averías por
mal uso.
- Durante el período de garantía, la tienda que le vende el aparato será
la responsable de gestionar y tramitar la garantía en caso de avería.

GR-716

CAUTION
RISK OF ELECTRIC SHOCK
DO NOT OPEN
The lightning flash with the arrowhead symbol within an equilateral triangle is intended
to alert the user to the presence of "uninsulated dangerous voltage" within the
product's enclosure that may be of sufficient magnitude to constitute a risk of electric
shock to a person.
The exclamation point within an equilateral triangle is intended to alert the user to the
presence of important operating and maintenance (servicing) instructions in the
literature accompanying the unit.
Safety Precautions
Warning: To prevent fire or electric shock, do not expose this appliance to rain or moisture.
IMPORTANT SAFEGUARDS
Caution: Please carefully read all of the following important safeguards to ensure safe
operation.
1.Read Instructions:
All the safety and operating instructions should be read before the appliance
is operated.
2.Retain Instructions:
The safety and operating instructions should be retained for future reference.
3.Follow Instructions:
All operating instructions should be followed.
4.Heed Warnings:
All warnings on the unit and the operating instructions should be adhered to.
5.Power Source:
The appliance should be connected based on instructions.
6.Heat:
Keep the unit away from heat sources such as radiators,refrigerators,stoves
or other appliances that may radiate heat.
7.Non-use Periods:
The power cord of the unit should be unplugged from the outlet when you do not use
it for a long time.
8.Damage requiring service:
The unit should be repaired by qualified service personnel in the following cases:
a. The power plug or cable has been damaged;
b. Objects have fallen or liquid has been spilled on the appliance;
c. The appliance has been exposed to rain; d. The appliance is
functioning abnormally.


CONNECTIONS
External DC input 12V
Switch
Power input
Accessories
INSTRUCTION
REMOTE CONTROL
AUDIO CABLE
POWER CABLE
X1
MANUAL

Please read the notices carefully before using it in order to ensure proper use of the battery:
Fully charge the battery before use for the first time. The fully charge light is on after full.
Charging time is relevant to remaining power, normally it will take 8-10 hours for fully charge.
Please charge while the sound is abnormal or the empty power light is on
If not use the product for long time, please fully charge before storage and re-charge
every three months to avoid battery failure.
Batteries are consumables ,not covered by warranty
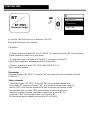
1.USB INPUT
2.SD INPUT
3.LINE IN INPUT
4.MICROPHONE 2 INPUT
5.MICROPHONE 1 INPUT
6.GUITAR INPUT
7.MICROPHONE MENU ,ADJUST BY PRESSING KEY "+" AND "-":
1st press:microphone volume
2nd press:microphone echo
3rd press:microphone treble
4th press:microphone bass
8.GUITAR VOLUME,ADJUST BY PRESSING KEY "+" AND "-"
9.LONG PRESS FOR MIC RECORD/SHORT PRESS FOR PLAYBACK (USB OR SD CARD PLUG IN)
10.MIC PRIORITY ON/OFF

11.REPEAT-ALL KEY
12.EQ :DSP INCREASE/WEAKER KEY
13.TREBLE / BASS KEY ,ADJUST BY PRESSING KEY "+" AND "-"
15. MODE :Short press and change the front light
mode Long press the front light ON/OFF
15.USB/SD INPUT KEY
16.LINE IN INPUT KEY
17.SHORT PRESS FOR BT INPUT KEY (BT SEARCHING NAME:8480)
/ LONG PRESS FOR BT.TWS INPUT
18.
19.SHORT PRESS FOR PREVIOUS KEY / LONG PRESS FOR PREVIOUS FOLDER KEY
20.PLAY/PAUSE KEY
21.SHORT PRESS FOR NEXT KEY / LONG PRESS FOR NEXT FOLDER KEY
22.Volume increase key
23.MUTE KEY
24.Volume reduce key

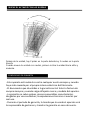
WIRELESS MICROPHONE CAUTION
Turn off the wireless microphone before put in the slot. Don't put in the slot
with the microphone on or it will have mic shock sound.
(Turn it off
before
put in the slot .)

REMOTE INSTRUCTION
1.USB/SD:USB/SD card input key
2.BT:BT input key
3.LINE:LINE input key
4.GUITAR+:Guitar volume
increase
5.BT TWS:BT TWS connection key
6.ONE REPEAT:Repeat key
7.GUITAR-:Guitar volume reduce
8.MIC PRIORITY:Mic priority key
9.ALL REPEAT:All song rotate play
key
10.Number pad: Choose the song
track under
USB/SD input
11.ECHO-:Echo reduce key
12.ECHO+:Echo increase key
13.VOL-:Volume reduce key
14.MUTE:Mute volume key
15.VOL+:Volume increase key
16.MIC-:microphone volume
reduce.
17.MIC+:microphone volume
increase.
18.TRE+:Treble increase button
19.BASS+:Bass increase button
20.EQ:Equalizer key
21.TRE-:Treble reduce button
22.BASS-:Bass reduce button
23.PREVIOUS:Previous key
24.NEXT:Next key
25.PLAY:Play key
26.<FLDR:Previous folder
27.FLDR>:Next folder
28.PAUSE:Pause key
29.Remote ID code

Features:
1. 1.0CH Bluetooth fabric speaker
2. With wheels for more outdoor activities
3. Lights (speaker light / Circle LED )
4. LED display
5. Bluetooth operating range 10 meters
6. USB/ SD
7. Karaoke(microphone) *2
8. With Equalizer
9. Treble control
10. Bass control
11. Volume control
12. Line-in function, suitable for PC, MID, TV and other audio devices
13. Full function remote
14. Built-in Lead acid rechargeable battery 12V 9000mAh
15. Carry handle, easy to move out
Technical Specifications:
• Power source
100V-240V/50Hz/60Hz
• Power Consumption(average)
180W (1K0DB)
• RMS Power
200W, 3.6Ω
• Bluetooth version
V5.0+BR+EDR+BLE
• Bluetooth channel emission power BTH
50mW
• Bluetooth Frequency
2,402 GHz- 2,480 GHz
• Bluetooth action range
10m
• Battery type and voltage
12V,9000mah
• Speakers
10” woofer*2+ 3” tweeter*2
• Frequency Response
20Hz-20KHz
•Wireless microphone frequency
•Wireless microphone channel emission power
• Product dimensions
445(L)*410(W)*955(H) mm.
50mW
201.6MHz + 202.2MHz

Power On/Off
Press the Power button on the “on” side to turn the speaker on, press
the Power button on “off” side to turn the speaker off.
Playing music from USB/SD:
1. Turn the Power button to “ON”.
2. Insert USB/SD into corresponding slots, the speaker will play the
stored music automatically.
3. Under playing mode, short -press Previous or Next button to select
songs you like, long -press to play songs from previous or next folder
4. Short-press Play/Pause to play or pause.
Remark: Under Bluetooth playing mode, insert USB/SD will disconnect the
Bluetooth and switch to play the USB/SD. Short-press the BT button to
switch to Bluetooth mode again.
Line-in:
For other compatible music devices or your MP3/MP4 players, use the audio
cable provided to connect from the device’s “Line Out” to the “Line In” of this
device, then Enjoy…
When using an external device, play/pause, volume, previous/next can
be controlled by the external device.
Karaoke:
Use the provided wireless microphone to enjoy karaoke function or use wire
microphone (prepare by user).For wire microphone, insert it into the slot
then use. Adjust microphone volume, echo , bass and treble by mic menu button
EQ
When the speaker is playing music, press EQ button to select from the 5
kinds of EQ to get the best sound effect.

Treble
When the speaker is playing music, press TREBLE/BASS button to adjust treble
To get harmonious effect and avoid distortion, when master volume is low,
Treble can be high, and when master volume is high, Treble should be set to low.
Bass
When the speaker is playing music, press TREBLE/BASS button to adjust bass
To get harmonious effect and avoid distortion, when master volume is low,
Bass can be high, and when master volume is high, Bass should be set to low.
Lights
When the speaker is turned on, all lights are on automatically,
Laser lights: user can turn on /off the lights by pressing laser light
mode button through below:
1.1st press, turn off the front laser light
2.2nd press, turn on the front laser light and turn off the top laser light at the same time
3.3rd press, turn off both front and top laser light
4. 4th press, turn on both front and top laser
light Rotate operation
Front panel lights:
Long press light mode button to turn on / off the front panel lights,
adjust speaker light, flash light, circle running LED by short pressing the button.
GUITAR VOL
Press this button to adjust volume for guitar.
MIC RECORD(Long Press)/ PLAYBACK(Short press)
Under microphone on mode, long press this button to start
recording, short press to to playback the record.
MIC PRIORITY
Press this button to initiate microphone priority function, and press it again
to turn off this function.
REPEAT
Press this button to repeat current song.
FOLDER FUNCTION
Long press “<FLDR (Long press) or FLDR>(Long press)” button to play songs from folders.

HOW TO USE BT CONNECTION
2 ways to enter or restart
BT function
1.Press the “ BT ” input button on
remote control
2.Press the “ BT ” button on top
control panel
Speaker is in "BT" mode
Auto search and connect
Speaker will enter auto search:it will
search for the last connected device.
Auto connect to the
connected device
The unit will automatically
connect to the last connected
device that BT is open
with in 20 metres in few
seconds.
Note: If device cannot be
connected automatically,
turn off and turn on again BT,
put in other mode (usb or aux)
and then BT again to activate
and re-connect the device.
When speaker
cannot find the
last connected device
Speaker can be connected
with new device
Use the new device
search and connect to
"GR-716 "
Successful Connection
The BT connection is completed.

TWS FUNCTION
BT
BT.TWS
(Long Press)
TWS function work under 2 speakers : GR-716
Can not work 1 speaker only.
Connect
DEVICES
DEVICES
GR-716
~First ,press BT button of SPEAKER 1 and connect BT function with phone,
can play music or else you like
~Second, turn on SPEAKER 2 and press BT button ,
please wait for several seconds ,“BLUE” will flicker on display screen
~Third, press the button “BT TWS” of either SPEAKER 1 or 2
TWS Successful connection.
Disconnect
Press the button “BT TWS” ,TWS function will disconnect only SPEAKER 1 play.
Connect Again
Press the button “BT TWS” ,TWS function will connect again
Under BT mode, press TWS button on the control panel to initiate TWS function. This
function can make one speaker connect to the other one which is also under TWS
mode, to get the effect of using two speakers at the same time and play music under
BT 2.0 channel. TWS can be only used under BT function, and will not work if the
speaker is set AUX or USB/SD mode.

MOVE THE SPEAKER BY WHEELS
Under the unit ,there are 2 legs in front and 2 wheels in
back
when move the unit by wheels, please tilt the unit backward
first and move
WARRANTY CONDITIONS
- This appliance is covered against any breakdown as long as
has been caused by the manufacturer's own electrical system.
- The document that validates the guarantee will be the purchase ticket or
invoice as long as the brand and model of the device is reflected.
- The guarantee does not cover blows, consumable parts such as batteries,
wear due to excessive use, technical manipulations or breakdowns due to
misuse.
- During the warranty period, the store that sold you the appliance will be
responsible for managing and processing the guarantee in the event of a
breakdown.

www.thulos.com
Información / Information: i[email protected]om
Servicio Técnico / Technical Service: sat@grupothulos.com
GR-716
-
 1
1
-
 2
2
-
 3
3
-
 4
4
-
 5
5
-
 6
6
-
 7
7
-
 8
8
-
 9
9
-
 10
10
-
 11
11
-
 12
12
-
 13
13
-
 14
14
-
 15
15
-
 16
16
-
 17
17
-
 18
18
-
 19
19
-
 20
20
-
 21
21
-
 22
22
-
 23
23
-
 24
24
-
 25
25
-
 26
26
-
 27
27
-
 28
28
-
 29
29


En otros idiomas
- English: Go-Rock GR-716 Owner's manual
Documentos relacionados


Otros documentos
-
DS18 TLV6 El manual del propietario
-
-
Gemini GHK-2800 Manual de usuario
-
QFX SBX-412401BTS Bluetooth Cabinet Portable Speaker Manual de usuario
-
-
Lenco PA-200BK Manual de usuario
-
-