
GR-717

PRECAUCIÓN
RIESGO DE SHOCK ELÉCTRICO
NO ABRIR
NO ABRIR
El relámpago con el símbolo de la punta de flecha dentro de un triángulo equilátero
pretende alertar al usuario de la presencia de "voltaje peligroso no aislado" dentro de
la carcasa del producto que puede ser de magnitud suficiente para constituir un riesgo
de descarga eléctrica para una persona.
El signo de exclamación dentro de un triángulo equilátero pretende alertar al usuario
sobre la presencia de importantes instrucciones de operación y mantenimiento
(servicio) en la documentación que acompaña a la unidad..
Precauciones de seguridad
Advertencia: Para evitar incendios o descargas eléctricas, no exponga este aparato a la
lluvia ni a la humedad..
INSTRUCCIONES DE SEGURIDAD IMPORTANTES
Precaución: Lea atentamente todas las siguientes medidas de seguridad importantes
para garantizar un funcionamiento seguro.
1. Lee las instrucciones:
Todas las instrucciones de seguridad y funcionamiento deben leerse antes de
utilizar el aparato.
2. Instrucciones de conservación:
Las instrucciones de seguridad y funcionamiento deben conservarse para futuras
consultas.
3. Siga las instrucciones:
Se deben seguir todas las instrucciones de funcionamiento.
4. Preste atención a las advertencias:
Se deben seguir todas las advertencias de la unidad y las instrucciones de funcionamiento.
5. Fuente de alimentación:
El aparato debe conectarse según las instrucciones.
6. Calor:
Mantenga la unidad alejada de fuentes de calor como radiadores,
refrigeradores, estufas u otros aparatos que puedan irradiar calor.
7. Períodos de no uso:
El cable de alimentación de la unidad debe desconectarse de la toma de corriente
cuando no la utilice durante mucho tiempo.
8. Daños que requieren servicio:
La unidad debe ser reparada por personal de servicio calificado en los siguientes casos:
a. El enchufe o el cable de alimentación se ha dañado;
b. Se han caído objetos o se ha derramado líquido sobre el aparato;
C. El aparato ha estado expuesto a la lluvia; d. El aparato funciona de forma anormal.

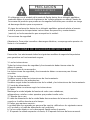
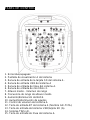
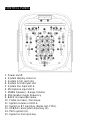
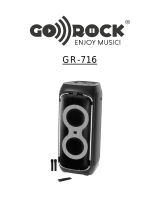
DESCRIPCIÓN DE PARTES
1. Panel de control.
2. Display / Receptor de Mando a distancia.
3. Tweeter (Altavoz de agudos).
4. Medios 8” (Altavoz de sonidos medios).
5. Subwoofer 12” (Altavoz de graves).
6. Salida de aire.

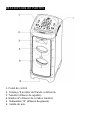
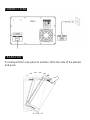
CONEXIONES
CONEXIONES
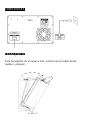
TRANSPORTE
Para transportar de un lugar a otro, inclinar hacia el lado de las
ruedas y empujar.

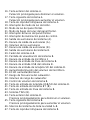
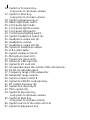
PANEL DE CONTROL
1. Encendido/apagado.
2. Pantalla de visualización A del sistema
3. Ranura de entrada de la tarjeta SD del sistema A.
4. Ranura de entrada USB del sistema A
5. Ranura de entrada de línea del sistema A.
6. Ranura de entrada de micrófono 2.
7. Altavoz medio - Volumen de rango
8. Frecuencia de rango de altavoz medio
9. Aumento/disminución de BASS.
10. Aumento/disminución de agudos.
11. Control de volumen del sistema A.
12. Tecla de entrada BT del sistema A (Nombre GR-717A).
13. Tecla de entrada del sistema USB/tarjeta SD (A).
14. Sistema TWS (A).
15. Tecla de entrada de línea del sistema A.

16. Tecla anterior del sistema A.
Pulsación prolongada para disminuir el volumen.
17. Tecla siguiente del sistema A.
Pulsación prolongada para aumentar el volumen.
18. Tecla de reproducción/pausa del sistema A.
19. Interruptor de modo de luz de botón.
20. Modo de luz del panel frontal.
21. Modo de fuego de la luz del panel frontal.
22. Interruptor de luces del panel frontal.
23. Interruptor de iluminación panel de control.
24. Salida de auriculares del sistema (A).
25. Ranura de salida de auriculares (A).
26. Volumen de los auriculares
27. Ranura de salida de auriculares (B).
28. Salida de auriculares del sistema B.
29. Fader del sistema A-B.
30. Pantalla de visualización del sistema B.
31. Ranura de entrada de micrófono 1
32. Ranura de entrada de línea del sistema B.
33. Ranura de entrada USB del sistema B.
34. Ranura de entrada de la tarjeta SD del sistema B.
35. Aumento/disminución del volumen del micrófono.
36. ECHO aumentar/disminuir.
37. Rango de frecuencia del subwoofer.
38. Volumen de rango de subwoofer.
39. Control de volumen del sistema B.
40. Tecla de entrada de la tarjeta USB/SD del sistema B.
41. Tecla de entrada del sistema BT (B).
42. Tecla de entrada de línea del sistema B.
43. Sistema TWS (B).
44. Tecla anterior del sistema B.
Presione prolongadamente para disminuir el volumen.
45. Tecla siguiente del sistema B.
Presione prolongadamente para aumentar el volumen
46. Silencio del sistema de toda la unidad A-B.
47. Tecla de reproducción/pausa del sistema B.

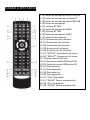
MANDO A DISTANCIA
1. (A) botón de entrada de tarjeta USB/SD.
2. (A) botón de entrada del sistema BT.
3. (B) Botón de entrada de tarjeta SD/USB.
4. (B) Botón de entrada BT.
5. (A) sistema BT TWS.
6. (A) botón de entrada de LÍNEA.
7. (B) Sistema BT TWS.
8. (B) Botón de entrada de LÍNEA.
9. (A) aumento de volumen.
10. (A) disminución del volumen.
11. (A) Ecualizador del sistema.
12. (B) Ecualizador del sistema.
13. (B) Aumento del volumen.
14. (B) Disminución del volumen.
15. (A) “REPEAT”. Reproducir de nuevo.
16. (B) “REPEAT”. Reproducir de nuevo.
17. Silenciar volumen (A y B).
18. (A) Selección modo USB/tarjeta SD.
19. (B) Selección modo USB/tarjeta SD.
20. (A) Pista anterior.
21. (A) Pista siguiente.
22. (B) Pista anterior.
23. (B) Pista siguiente.
24. (A) “Play” Reproducir.
25. (A) “PAUSE” Pausar reproducción.
26. (B) “Play” Reproducir.
27. (B) “PAUSE” Pausar reproducción.

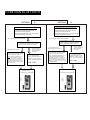
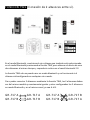
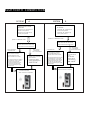
CONEXIÓN BLUETOOTH
SISTEMA
A
SISTEMA
B
2 formas de entrar o reiniciar Función BT
1. Presione el botón de entrada "BT" en
sistema de control remoto A
2. Presione el botón "BT" en la parte superior
sistema de panel de control A
Ahora el altavoz está en modo Bluetooth
Búsqueda automática y conexión
El altavoz ingresará a la búsqueda automática,
y buscará el último dispositivo conectado.
Conexión exitosa.
La conexión BT está completada.
2 formas de entrar o reiniciar Función BT
1. Presione el botón de entrada "BT" en
sistema de control remoto B.
2. Presione el botón "BT" en la parte superior
sistema de panel de control B.
Ahora el altavoz está en modo Bluetooth
Búsqueda automática y conexión
El altavoz ingresará a la búsqueda automática,
y buscará el último dispositivo conectado.
Conexión exitosa.
La conexión BT está completada.
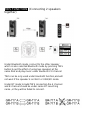
Conexión automática al
último dispositivo conectado
El bluetooth se conecta automáticamente
al último dispositivo conectado que esté
activado y a menos de 20 metros.
Nota: si el bluetooth del altavoz no se
conecta automáticamente al último
dispositivo que estuvo conectado salir
del modo bluetooth y volver a entrar.
Para ello presione cualquier otro modo,
espere unos segundos y vuelva a pulsar
el modo bluetooth.
Cuando el altavoz
no pudo encontrar el
último dispositivo
conectado
Conectar el altavoz
con un nuevo dispositivo.
Activar el bluetooth del nuevo
dispositivo, entrar en ajustes
y buscar el nombre del altavoz:
"GR-717A”
Conexión automática al
último dispositivo conectado
El bluetooth se conecta automáticamente
al último dispositivo conectado que esté
activado y a menos de 20 metros.
Nota: si el bluetooth del altavoz no se
conecta automáticamente al último
dispositivo que estuvo conectado salir
del modo bluetooth y volver a entrar.
Para ello presione cualquier otro modo,
espere unos segundos y vuelva a pulsar
el modo bluetooth.
Cuando el altavoz
no pudo encontrar el
último dispositivo
conectado.
Conectar el altavoz
con un nuevo dispositivo.
Activar el bluetooth del nuevo
dispositivo, entrar en ajustes
y buscar el nombre del altavoz:
"GR-717B”

FUNCIÓN TWS (Conexión de 2 altavoces entre sí).
En el modo Bluetooth, conéctese al otro altavoz que también está seleccionado
en el modo Bluetooth presionando el botón TWS, para obtener el efecto de usar
dos altavoces al mismo tiempo y reproducir música en el canal bluetooth 2.0
La función TWS solo se puede usar en modo bluetooth y no funcionará si el
altavoz está configurado en cualquier otro modo.
Para poder conectar 2 altavoces mediante la función TWS, los 2 altavoces deben
ser del mismo modelo y exactamente iguales y estar configurados los 2 altavoces
en modo Bluetooth y en el mismo canal, ya sea A ó B.
GR-717 A GR-717 A GR-717 A GR-717 B
GR-717 B GR-717 B GR-717 B GR-717 A

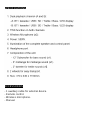
ESPECIFICACIONES
1. Doble Canal de reproducción (A y B):
- A: BT / karaoke / USB / SD / Treble / Bass / LED display.
- B: BT / karaoke / USB / SD / Treble / Bass / LED display.
2. Función TWS en ambos canales.
3. Micrófono Inalámbrico (x2).
4. Potencia: 500W.
5. Iluminación del altavoz completo y panel de control.
6. Puerto para auriculares.
7. Composición de la unidad:
- SubWoofer 12” para sonido de graves (x1).
- Medios 8” para sonido de medios (x1).
- Tweeter 2” para sonido de agudos (x1).
8. 2 ruedas para facilitar el transporte.
9. Tamaño: 370 x 440 x 1160 mm.
ACCESORIOS
- 1 cable auxiliar para dispositivo externo.
- Mando a distancia.
- Micrófono Inalámbrico.
- Manual de Instrucciones.

CONDICIONES DE GARANTÍACONDICIONES DE
GARANTÍA
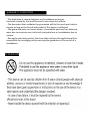
ATENCIÓN
- Este aparato puede ser utilizado por niños a partir de 8 años y
personas con capacidades físicas, sensoriales o mentales reducidas
o falta de experiencia y conocimiento si se les ha dado supervisión o
instrucciones sobre el uso del aparato de una manera segura y
entienden los peligros involucrados.
- En caso de cualquier avería, debe ser reparado por el servicio
técnico oficial de la marca.
- Nunca manipule usted mismo el aparato con intención a repararlo.
- Este aparato está cubierto contra cualquier avería siempre y cuando
haya sido causada por el propio sistema eléctrico del fabricante.
- El documento que da validez a la garantía será el ticket o factura de
compra siempre y cuando salga reflejado marca y modelo del aparato.
- La garantía no cubre golpes, piezas consumibles como baterías,
desgastes por usos excesivos, manipulaciones técnicas ni averías por
mal uso.
- Durante el período de garantía, la tienda que le vende el aparato será
la responsable de gestionar y tramitar la garantía en caso de avería.

GR-717

CAUTION
RISK OF ELECTRIC SHOCK
DO NOT OPEN
The lightning flash with the arrowhead symbol within an equilateral triangle is intended
to alert the user to the presence of "uninsulated dangerous voltage" within the
product's enclosure that may be of sufficient magnitude to constitute a risk of electric
shock to a person.
The exclamation point within an equilateral triangle is intended to alert the user to the
presence of important operating and maintenance (servicing) instructions in the
literature accompanying the unit.
Safety Precautions
Warning: To prevent fire or electric shock, do not expose this appliance to rain or moisture.
IMPORTANT SAFEGUARDS
Caution: Please carefully read all of the following important safeguards to ensure safe
operation.
1.Read Instructions:
All the safety and operating instructions should be read before the appliance
is operated.
2.Retain Instructions:
The safety and operating instructions should be retained for future reference.
3.Follow Instructions:
All operating instructions should be followed.
4.Heed Warnings:
All warnings on the unit and the operating instructions should be adhered to.
5.Power Source:
The appliance should be connected based on instructions.
6.Heat:
Keep the unit away from heat sources such as radiators,refrigerators,stoves
or other appliances that may radiate heat.
7.Non-use Periods:
The power cord of the unit should be unplugged from the outlet when you do not use
it for a long time.
8.Damage requiring service:
The unit should be repaired by qualified service personnel in the following cases:
a. The power plug or cable has been damaged;
b. Objects have fallen or liquid has been spilled on the appliance;
c. The appliance has been exposed to rain; d. The appliance is
functioning abnormally.

DESCRIPTION PARTS
1. Control panel.
2. Display / Remote Control Receiver.
3. Tweeter (Treble speaker).
4. 8” midrange (midrange speaker).
5. 12” subwoofer (woofer).
6. Air outlet.

CONNECTIONS
CONNECTIONS
TRANSPORT
To transport from one place to another, tilt to the side of the wheels
and push.

CONTROL PANEL
1. Power on/off.
2. System display screen A
3. System A SD card slot.
4. System A USB input slot
5. System line input slot A.
6. Microphone input slot 2.
7. Middle Speaker - Range Volume
8. Mid speaker range frequency
9. BASS increase/decrease.
10. Treble Increase / Decrease.
11. System volume control A.
12. System A BT input key (Name GR-717A).
13. USB/SD card system input key (A).
14. TWS system (A).
15. System A line input key.

16. System A Previous Key.
Long press to decrease volume.
17. System A Next Key.
Long press to increase volume.
18. System play/pause key A.
19. Button light mode switch.
20. Front panel light mode.
21. Front panel light fire mode.
22. Front panel light switch.
23. Control panel lighting switch.
24. System headphone output (A).
25. Headphone output slot (A).
26. Headphone volume
27. Headphone output slot (B).
28. System B headphone output.
29. A-B system fader.
30. System display screen B.
31. Microphone input slot 1
32. System line input slot B.
33. System B USB input slot.
34. System B SD card slot.
35. Increase/decrease the volume of the microphone.
36. ECHO increase/decrease.
37. Frequency range of the subwoofer.
38. Subwoofer range volume.
39. System volume control B.
40. System B USB/SD card input key.
41. BT system input key (B).
42. System line input key B.
43. TWS system (B).
44. System B previous key.
Long press to decrease volume.
45. System B Next Key.
Long press to increase volume
46. System silence of the entire unit A-B.
47. System B play/pause key.

REMOTE CONTROL
1. (A) USB/SD card input button.
2. (A) BT system input button.
3. (B) SD/USB card input button.
4. (B) BT input button.
5. (A) BT TWS system.
6. (A) LINE input button.
7. (B) BT TWS system.
8. (B) LINE input button.
9. (A) Volume increase.
10. (A) Volume decrease.
11. (A) System equalizer.
12. (B) System equalizer.
13. (B) Increase in volume.
14. (B) Decrease in volume.
15. (A) “REPEAT”. Play again.
16. (B) “REPEAT”. Play again.
17. Mute volume (A and B).
18. (A) USB/SD card mode selection.
19. (B) USB/SD card mode selection.
20. (A) Previous track.
21. (A) Next track.
22. (B) Previous track.
23. (B) Next clue.
24. (A) “Play” Play.
25. (A) “PAUSE” Pause playback.
26. (B) “Play” Play.
27. (B) “PAUSE” Pause playback.

BLUETOOTH CONNECTION
SYSTEM
A
SYSTEM
B
2 ways to enter or restart
BT function
1.Press the “ BT ” input button on
remote control system A
2.Press the “ BT ” button on top
control panel system A
Speaker is in "Bluetooth" mode
Auto search and connect
Speaker will enter auto search it will
search for the last connected device.
Successful Connection
The BT connection is completed.
2 ways to enter or restart
BT function
1.Press the “ BT ” input button on
remote control system B
2.Press the “ BT ” button on top
control panel system B
Speaker is in "Bluetooth" mode
Auto search and connect
Speaker will enter auto search it will
search for the last connected device
Successful Connection
The BT connection is completed.
Auto connect to the
connected device
The unit will automatically
connect to the last connected
device that Bluetooth is open
with in 20 meters in few seconds.
Note: If the bluetooth of the speaker is
not automatically connect to the last
device that was connected exit
out of bluetooth mode and re-enter.
To do this press any other mode,
wait a few seconds and press again
bluetooth mode.
When speaker
cannot find the
last connected device
Speaker can be connected
with new device
Use the new device
search and connect to
"GR-717 A”
Auto connect to the
connected device
The unit will automatically
connect to the last connected
device that Bluetooth is open
with in 20 meters in few seconds.
Note: If the bluetooth of the speaker
is not automatically connect to the
last device that was connected exit
out of bluetooth mode and re-enter.
To do this press any other mode,
wait a few seconds and press again
bluetooth mode.
When speaker
cannot find the
last connected device
Speaker can be
connected with new
device
Use the new
device search
and connect to
"GR-717 B”

TWS FUNCTION (Connecting 2 speakers
together)
Under Bluetooth mode, connect to the other speaker
which is also selected Bluetooth mode by pressing TWS
button,to get the effect of using two speakers at the
same time and play music under bluetooth 2.0 channel
TWS can be only used under bluetooth function,and will
not work if the speaker is set AUX or USB/SD mode.
Under BT mode to build TWS connection,the A channel
and B channel should be under same BT searching
name ,or they will be failed to connect.

SPECIFICATIONS
ACCESSORIES
- 1 auxiliary cable for external device.
- Remote control.
- Wireless microphone.
- Manual.

WARRANTY CONDITIONS
ATTENTION
- This appliance is covered against any breakdown as long as
has been caused by the manufacturer's own electrical system.
- The document that validates the guarantee will be the purchase ticket or
invoice as long as the brand and model of the device is reflected.
- The guarantee does not cover blows, consumable parts such as batteries,
wear due to excessive use, technical manipulations or breakdowns due to
misuse.
- During the warranty period, the store that sold you the appliance will be
responsible for managing and processing the guarantee in the event of a
breakdown.

www.thulos.com
Información / Information: i[email protected]om
Servicio Técnico / Technical Service: sat@grupothulos.com
GR-717
-
 1
1
-
 2
2
-
 3
3
-
 4
4
-
 5
5
-
 6
6
-
 7
7
-
 8
8
-
 9
9
-
 10
10
-
 11
11
-
 12
12
-
 13
13
-
 14
14
-
 15
15
-
 16
16
-
 17
17
-
 18
18
-
 19
19
-
 20
20
-
 21
21
-
 22
22
-
 23
23


en otros idiomas
- English: Go-Rock GR-717 Owner's manual
Artículos relacionados


Otros documentos
-
fontastic 262562 El manual del propietario
-
Infiniton K690 El manual del propietario
-
VIETA POWER Manual de usuario
-
fontastic 260520 Limboso Wireless Speaker Manual de usuario
-
Trevi XF 470 KB Manual de usuario
-
-
 ON.EARZ Enceinte P400 V2 BK El manual del propietario
