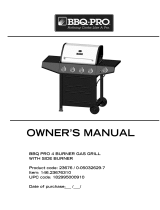
Kenmore 148.16656010 Manual de usuario
- Categoría
- Barbacoas
- Tipo
- Manual de usuario

Use& CareGuide
®
LiquidPropaneGasGrill
SearsModelNo. 148.16656010
ThisGrillisfor OutdoorUseOnly
• Readand follow all Safety,Assembly,
and Use& Care Instructionsin this Guide
beforeassembling and cooking
with this grill.
• Failureto follow all instructions in this
Use& Care Guidemay leadto fire or
explosion,which could result in property
damage, personal injuryor death.
• Safety
• Parts
• Useand Care
• Assembly
GrillInformationCenter
Missing Parts?Assembly Questions?
Operation Problems?Before returning
grill to store,call 1-800-482-0131
Tools needed for assembly:
Screwdriver(notprovided)
SAVETHESEINSTRUCTIONS!
See ourextensiveassortmentof outdoorlivingproductson-lineat
www.sears.comandwww.kmart.com
SearsBrandsManagementCorporation,HoffmanEstates,IL60179,U.S.A.
© 2010SearsBrands,LLC Printedin China L3018S-ManuaE

Ifyou smell gas:
1.Shut off gas to theappliance.
2. Extinguishany open flame.
3.Open lid.
4. If odor continues, keep awayfrom the
applianceand immediatelycall your gas
supplier or your fire department.
CALIFORNIA PROPOSITION 65
1. Combustion by-products produced when using
this product contain chemicals knownto the State
of California to cause cancer, birth defects, and
other reproductive harm.
2. This product contains chemicals, including lead
and lead compounds, known to the State of
California to cause cancer, birth defects or other
reproductive harm.
Washyour hands after handling this product.
1. Donot store or usegasoline or other
flammable liquidsor vapors in the vicinity
of this or any other appliance.
2. An LP cylinder not connectedfor useshall
notbe stored inthe vicinity ofthis or any
other appliance.
Call Grill Service Center For Help And Parts
If you have questionsor needassistanceduring assembly,
please call 1-800-482-0131.Youwill bespeakingto a
representativeof thegrill manufacturerand not a Sears
employee.To order new parts callSears at
1-800-4-MY-HOME.
Product Record
IMPORTANT: Fillout the productrecord information
below.
Model Number
Serial Number
See rating labelon grill for serial number.
Date Purchased
Installation Safety Precautions
• Use grill, as purchased, onlywith LP (propane) gas and the
regulator/valve assembly supplied. A conversion kit must
be purchased for use with natural gas.
• Grill installation must conformwith localcodes, or in their
absence of local codes, with either the National Fuel Gas
Code, ANSI Z223.1/NFPA 54,Natural Gasand Propane
Installation Code, CSA B149.1, orPropane Storage and
Handling Code, B149.2, or the Standard for Recreational
Vehicles,ANSI A 119.2/NFPA1192,and CSA Z240 RV
Series, Recreational Vehicle Code, as applicable.
• All electrical accessories (such as rotisserie) must be
electrically grounded in accordance with local codes, or
National Electrical Code, ANSI/NFPA 70 or Canadian
Electrical Code, CSA C22.1. Keep any electrical cords
and/or fuel supply hoses away from any hotsurfaces.
•This grill is safety certified for use in the UnitedStates
and/or Canada only. Do not modify for use in any other
location. Modification will result ina safety hazard.
Safety Symbols
The symbols and boxes shown below explain whateach
heading means. Readand follow all of the messages found
throughout the manual.
DANGER: Indicates an imminently hazardous
situation which, if not avoided, will result in death or
serious injury.
Forresidential use only. Donot use for
commercialcooking.
WARNING: Indicates an potentially hazardous
situation which, if not avoided, could result in death
or serious injury.

CAUTION:Indicatesapotentiallyhazardous
situationorunsafepracticewhich,ifnotavoided,
mayresultinminorormoderateinjury.
cancelforanyreasonduringtheproductwarrantyperiod,we
willprovideafullrefund.Or,aproratedrefundanytimeafter
theproductwarrantyperiodexpires.PurchaseyourRepair
ProtectionAgreementtoday!
Somelimitationsandexclusionsapply.
Forpricesandadditionalinformationcall1-600-627-6655.
SearsInstallationService
For Sears professional installation of home appliances, garage
door openers, water heaters, and other major home items, in
the U.S.A. call 1-600-4-MY-HOME®
For Your Safety .................................. 2
Grill Service Center............................... 2
Product Record Information ........................ 2
Safety Symbols.................................. 2
Installation Safety Precautions ....................... 2
Kenmore Grill Warranty ........................... 3
Use and Care ................................ 4-10
Natural Gas Conversion Box ...................... 11
Notes.......................................... 12
Parts List ...................................... 13
Parts Diagram................................... 14
Assembly .................................... 15-25
Troubleshooting............................... 26-27
Repair ProtectionAgreements
Congratulations on making a smartpurchase. Your new
Kenmore®productis designed and manufactured for years of
dependable operation. But like all products,it may require
repair from time to time. That's when having a Repair
ProtectionAgreement cansave you money and aggravation.
Purchase a Repair Protection Agreement now and protect
yourself from unexpected hassle and expense.
Here's what the Repair Protection Agreement includes:
[] Expert service by our 10,000 professional repair
specialists
[] Unlimited service and no charge for parts and labor on
all covered repairs
[] Product replacement up to $1500 if your covered
product can't be fixed
[] Discount of 10%from regular price of service and
related installed parts not covered by the agreement; also,
10% off regular price of preventive maintenance check
[] Fast help by phone - we call it Rapid Resolution-
phone support from a Sears representative. Think of us
as a "talking owner's manual."
Once you purchase the Repair ProtectionAgreement, a simple
phone callis all that ittakes for you toschedule service. You
can call anytime day or night, or schedule a service
appointment online.
The Repair Protection Agreement isa risk-free purchase. If you
Kenmore FullWarranty
If this grill fails due to a defect inmaterial or workmanship
within one year from the date of purchase, call 1-800-4-MY-
HOME®toarrange for free repair (or replacement if repair
proves impossible).
Limited Warranty on Burners
For tenyears from thedate of purchase, any stainless steel
burner that rusts throughwill be replaced free of charge. After
the first year from the date of purchase, you payfor labor if
you wish to have it installed.
All warranty coverage excludes ignitor batteries andgrill part
paint loss,discoloration or rusting, which are either
expendable parts that canwear outfrom normal use within
the warranty period, or are conditions that can be the result
of normal use, accident or improper maintenance.
All warranty coverage is void if thisgrill is ever used for
commercial or rental purposes.
All warranty coverage applies only if thisgrill is used in the
United States.
This warranty gives you specific legal rights, andyou may
also haveother rights whichvary from state to state.
Sears, Roebuck and Co., Hoffman Estates, IL 60179

• NEVERstore a spare LP cylinderunder or near
the grill applianceor in an enclosed area.
• Never fill a cylinder beyond80% full.
• Ifthe information in the two points above is not
followed exactly, a fire causing death or serious
injurymay occur.
°An over filled or improperlystored cylinderis a
hazarddue to possiblegas releasefrom the
safety relief valve. This could cause an intense
fire with risk of property damage,serious injury
or death.
° If you see, smell or heargas escaping,
immediatelyget awayfrom the LP cylinderand
grillapplianceand call your fire department.
LP Cylinder
• The LP cylinder used with your grill must meet the
following requirements:
• Use LP cylinders only with these required measurements: 12"
(30.5cm) (diameter) x 18"(45.7 cm) (tall) with 20 lb. (9 kg.)
capacity maximum.
• LP cylinders must be constructed and marked in accordance
with specifications for LP cylinders of the U.S. Department of
Transportation (DOT) or for Canada, CAN/CSA-B339,
cylinders, spheres and tubes for transportation of dangerous
goods. Transport Canada (TC). See LP cylinder collarfor
marking.
• LP cylinder valve must have:
•Type 1 outlet compatible with
regulator or grill.
•Safety relief valve.
• ULlisted Overfill Protection OPDHandWheel
Device(OPD). This OPD safety
feature is identified by a unique triangular hand wheel. Use
only LP cylinders equipped with this type of valve.
• LP cylinder must be arrangedfor vaporwithdrawal and
include collar to protect LP cylinder valve. Always keep LP
cylinders in upright position during use, transit or storage.
LP Tank Removal, Transport And Storage
•Turn OFF all control knobs and LP tank valve. Turn coupling
nutcounterclockwise by hand only - do not use tools to
disconnect. Lift LP tank wire upward off of LP tank collar, then
lift LP tank up and off of support bracket. Install safety cap
onto LP tank valve. Always use cap and strap suppliedwith
valve.
Failure to use safety cap as directed may result in
serious personal injury and/or property damage.
LPTankValve
@_ Safety Cap
RetainerStrap
•A disconnected LP tank in storage or being transported must
havea safety cap installed (as shown). Do not store an LP
tank in enclosed spaces such as acarport, garage, porch,
covered patio or other building. Never leave an LPtank inside
a vehicle which may becomeoverheated by the sun.
• Donot store an LP tank in an area where children play.
LP cylinder in upright position for vapor withdrawal
LP (Liquefied Petroleum Gas)
• LP gas is nontoxic, odorless and colorlesswhen produced.
For Your Safety, LP gas has been given an odor (similar to
rotten cabbage) so that it can be smelled.
• LP gas is highly flammable and mayignite unexpectedly
when mixed with air.
LP Cylinder Filling
• Use only licensed and experienced dealers.
• LP dealer must purge new cylinder before filling.
• Dealershould NEVER fill LP cylinder more than 80% of LP
cylinder volume.Volume of propane in cylinderwill vary by
temperature.
•A frosty regulator indicatesgas overfill. Immediately close LP
cylinder valve and call local LP gas dealer for assistance.
• Donot release liquid propane (LP) gas intothe atmosphere.
This isa hazardous practice.
•To remove gasfrom LP cylinder, contact an LP dealer or call
a localfire department for assistance. Check the telephone
directory under "Gas Companies"for nearest certified LP
dealers.

LP Tank Exchange
•Many retailers that sell grillsoffer you the option of replacing
your empty LP tank through an exchange service. Use only
those reputable exchange companies that inspect, precision
fill, test and certify their cylinders. Exchange your tank only
for an OPD safety feature-equipped tank as described in
the "LP Tank" section of this manual.
•Always keep new andexchanged LP tanks in upright position
during use, transit or storage.
,Leak test new and exchanged LP tanks BEFORE
connecting to grill.
LP Tank Leak Test
Foryoursafety
•Leak test must be repeatedeach time LP tank isexchanged
or refilled.
•Do not smoke during leak test.
•Do not use anopen flame to checkfor gas leaks.
•Grill mustbe leak tested outdoors ina well-ventilated area,
away from ignition sources such as gas fired or electrical
appliances. During leak test, keep grill away from open
flames or sparks.
•Usea clean paintbrush and a 50/50 mild soap and water
solution. Brushsoapy solution onto areas indicated by arrows
infigure below. Leaksare indicated by growing bubbles.
Connecting Regulator To The LP Tank
1. LP tank must be properly secured onto grill. (Referto
assembly section.)
2.Turn all control knobs to the OFF position.
3.Turn LP tank OFF by turning OPDhand wheel clockwise to
a full stop.
4. Remove the protective cap from LP tank valve. Always use
cap and strap suppliedwith valve.
OPDHandWheel
._ Type1 outletwith
threadon outside
SafetyReliefValve
/
Strapand Cap
If "growing" bubbles appear donot use or move the LP
tank. Contact an LP gas supplier or your fire department!
Do not insert a POLtransport plug
(plastic part with external threads)
into the Type 1 tank valve outlet. It
will defeat the Safety Relief Valve
feature.
• Do not use household cleaning agents. Damage to gas
train components (valve/hose/regulator) can result. 5. Hold regulator and insert nipple into LPtank valve.
Hand-tightenthe coupling nut, holding regulator in a straight
linewith LP tank valve so as not to crossthread the
connection.
Nipplehasto be centered
into the LPtank valve.

Holdcouplingnutandregulator
as shownfor properconnection
to LPtankvalve.
6. Turn the coupling nut clockwise and tighten to a full stop.
The regulatorwill seat on the back-check feature in the LP
tank valve, resulting in some resistance. An additional
one-half to three-quarters turn is required to complete
the connection. Tighten by hand only - do not use tools.
Leak Testing Valves, Hose and Regulator
1.TurnallgrillcontrolknobstoOFF.
2. Be sure regulator is tightly connected to LP tank.
.
Completely open LP tank valve by turning OPD hand wheel
counterclockwise. Ifyou hear a rushing sound, turn gas off
immediately.There is a major leakat the connection.
Correct before proceeding by calling Searsfor
replacement parts at 1-800-4-MY-HOME®.
4. Brush soapy solution onto areas where bubbles are shown
in picture below:
• Neverremovethreaded
orificeat endofvalve.
NOTE:
If you cannot complete the connection, disconnect regulator
and repeatsteps 5 and 6. If you are still unable to complete the
connection, do not use this regulatort Call 1-800-482-0131
for assistance.
• Do not insertany toolor foreign object intothevalve
outlet or safety relief valve.You may damagethe valve
and cause a leak. Leaking propane mayresult in
explosion,fire, severe personal injury,or death.
• Outdoorgas appliance is not intendedto be installed
in or on a boat.
• Outdoorgas appliance is not intendedto be installed
in or on an RV.
• Never attemptto attach this grill to the self-contained
LPgas system of a camper traileror motor home.
• Do not usegrill until leak-tested.
• If a leak isdetected at any time, STOPand callthe
fire department.
• If you cannotstop a gas leak,immediately close
LPcylindervalve and call LPgas supplier or yourfire
department!
5. If "growing" bubbles appear, there isa leak. Close LP tank
valve immediately and retighten connections. If leaks
cannot be stopped do not try to repair. Call Searsfor
replacement parts at 1-800-4-MY-HOME®.
6.Always close LP tank valve afterperforming leak test by
turning hand wheel clockwise.

ForSafe Use ofYour Grill and to Avoid Serious
Injury:
• Do not let childrenoperate or play neargrill.
• Keepgrill area clear and free frommaterials that
burn.
• Do notblock holes in sidesor backof grill.
• Check burnerflames regularly.
• Use grill only in well-ventilatedspace. NEVER usein
enclosedspace suchas carport,garage, porch,
covered patio,or under anoverhead structure of any
kind.
• Do not usecharcoal or ceramicbriquets ina gas grill.
(Unlessbriquets are suppliedwith your grill.)
• Use grillat least 3 ft. from anywall or surface.
Maintain 10ft. clearance toobjects that cancatch fire
or sourcesof ignition such as pilot lightson water
heaters,live electricalappliances, etc.
• Apartment Dwellers:
Checkwith managementto learnthe requirements
andfire codes for using an LPgas grill inyour
apartmentcomplex. If allowed, useoutside onthe
ground floor witha three (3)foot clearance fromwalls
or rails. Do not useon or under balconies.
° NEVERattempt to light burner with lid closed. A
buildup of non-ignited gas inside a closed grill is
hazardous.
• Never operate grill with LPcylinder out of correct
position specified in assembly instructions.
• Always close LP cylinder valve and remove
coupling nut before moving LP cylinder from
specified operation position.
Safety Tips
• Beforeopening LP cylinder valve, check the coupling nut
for tightness.
• When grill is not inuse, turn off all control knobs and LP
cylinder valve.
• Never move grill while in operation or still hot.
• Use long-handledbarbecue utensilsand oven mitts to
avoid burns and splatters.
• Maximum loadfor sideburner and side shelf is 10 Ibs.
• The grease tray must be inserted into grill and emptied
after each use. Donot remove grease tray untilgrill has
completely cooled.
• Clean grill often, preferably after each cookout. If a bristle
brush isused to clean any of the grill cooking surfaces,
ensure no loose bristles remain on cooking surfaces prior
to grilling. It is not recommended to clean cooking surfaces
while grill is hot.
• Ifyou notice grease or other hot materialdripping from grill
onto valve, hose or regulator, turn off gas supply at once.
Determinethe cause, correct it, then clean and inspect
valve, hose and regulator before continuing. Perform a
leak test.
• Keep ventilation openings in cylinder enclosure (grill cart)
free and clear of debris.
• Do not store objects or materials insidethe grill cart
enclosure that would block theflow of combustion air to the
underside of either the control panel or the firebox bowl.
• The regulator may make a humming or whistling noise
during operation. This will not affect safety or useof grill.
• Ifyou havea grill problem see the "Troubleshooting
Section".
• If the regulatorfrosts, turn off grill and LPcylinder valve
immediately. This indicates a problem with the cylinder and
it should not be used on any product. Return to supplier!
CAUTION
• Putting out grease fires by closingthe lid is not
possible. Grills are well ventilated for safety reasons.
• Do not use water on a grease fire. Personal injury may
result. Ifa grease fire develops, turn knobs and LP
cylinder off.
• Do not leave grill unattendedwhile preheating or
burning off food residue on HI. If grill has not been
regularly cleaned, a grease fire can occurthat may
damage the product.
Ignitor Lightingthe Grill
1. Read instructions before lighting your grill.
2. Open lid during lighting.
3. Open LP cylinder or natural gas valve.
4. Pushany burner control knob in and turn the knob to the left
to "HI"position. Keep pressing the knob untilthe burner is
lit.

5.Ifignitiondoesnotoccurin5seconds,turntheburner
controloff,wait5minutesforgastoclearaway,andrepeat
thelightingprocedure.
6.Tolightotherburners,repeatstep4.
NOTE:Ifignitordoesnotwork,followMatchLighting
instructions.
Turn controls and gassource or tank OFFwhen
not in use.
If ignitiondoesnotoccurin5 seconds,turnthe burner
controloff,wait5 minutes,andrepeatthe lighting
procedure.Ifthe burner does not ignitewith
the valve open,gas will continueto flow out ofthe
burner and couldaccidently ignitewith risk of
injury.
Match-Lighting
• Do not lean over grillwhile lighting.
1. Open lidduring lighting.
2. Place match into match holder (hanging from sideof cart).
Light match, place intothe firebox.
3. Push in and turn right knob to HIGH position. Besure burner
lights and stays Iit.
4. Light other burners by pushing knob in and turning to HI
position.
Sideburner Match Lighting
1. Open sideburner lid. Turn on gas at LP cylinder.
2. Place Iit match near burner.
&Turn sideburner knob to HI. Be sure burner lightsand
stays Iit.
Burner Flame Check
,Remove cooking grates and heatdiffusers. Light burners,
rotate knobs from HIGH to LOW. You should see asmaller
flame in LOW position than seen on HIGH. Perform burner
flame checkon sideburner, also. Always checkflame prior to
each use.
TurningGrillOff
•Turn all knobs to position. Turn LP cylinderoff by turning
hand-wheel clockwiseto a full stop.
Ignitor Check
•Turn gas off at LP cylinder. Push the control knob in and
turn the knob to the left to "HI"position."Click" should be
heard and spark seen each time between collector box or
burner and electrode. See "Troubleshooting"if no click or
spark.
Valve Check
•Important: Make sure gas is off at LP cylinder before
checking valves. Knobs lock in OFF position. To check
valves, first push in knobs and release, knobs should spring
back. If knobs do not spring back, replace valve assembly
before using grill. Turn knobs to LOW position then turn back
to OFF position.Valves should turn smoothly.
Hose Check
•Before each use,check to see ifhoses are cut or worn.
Replace damaged hoses before usinggrill. Use only identical
replacement part valve/hose/regulator as specified in the
Parts List of this Use and Care Guide.
General Grill Cleaning
•Do not mistakebrown or black accumulation of grease and
smoke for paint. Interiors of gas grills are not paintedat the
factory (and should never be painted). Apply a strong
solution of detergent and water or use a grill cleaner with
scrub brush on insides of grill lidand bottom. Rinse and allow
to completely air dry. Do not apply a caustic grill/oven
cleaner to painted surfaces.
• Plastic parts: Wash with warm soapywater and wipe dry.

Donotusecitrisot,abrasivecleaners,degreasersora
concentratedgrillcleaneronplasticparts.Damagetoand
failureofpartscanresult.
•Porcelainsurfaces:Becauseofglass-likecomposition,most
residuecanbewipedawaywithbakingsoda/watersolutionor
speciallyformulatedcleaner.Usenonabrasivescouring
powderforstubbornstains.
*Painted surfaces: Wash with mild detergent or nonabrasive
cleanerand warm soapy water. Wipe dry with a soft
nonabrasive cloth.
•Stainless steel surfaces: To maintain your grill's high quality
appearance, wash with mild detergent and warm soapy water
and wipe dry with a soft cloth after each use. Baked-on
grease deposits may require the use ofan abrasive plastic
cleaning pad. Use only in direction of brushed finish to avoid
damage. Do not use abrasive pad on areaswith graphics.
• Cooking surfaces: If a bristle brush is used to clean any of
the grill cooking surfaces, ensure no loose bristles remain on
cooking surfaces prior to grilling. It is not recommended to
cleancooking surfaces while grill is hot.
Storing Your Grill
•Clean cookinggrates.
•Store indry location.
•When LP cylinder is connected to grill, store outdoors in a
welIventiIatedspace and out of reach of children.
•Covergrill if stored outdoors. Choose from a variety of grill
covers offered by manufacturer.
•Store grillindoors ONLY if LP cylinder isturned off and
disconnected, removed from grill and stored outdoors.
•When removinggrill from storage, follow "Cleaning the Burner
Assembly' instructions before starting grill.
Cleaning the Burner Assembly
Follow these instructions to clean and/or replace parts of
burner assembly or if you have trouble ignitinggrill.
1.Turn gas off at control knobs and LP cylinder.
2. Remove cooking grates and heat diffusers.
3. Remove R pinsfrom rear of burners.
4. Carefully lift each burner up and away from valve openings.
SPIDER ALERT!
SPIDERANDWEBS
NSDEBURNERTUBE , -
If you notice that your grill is getting hard to light or that the
flame isn't as strong as it should be, take the time to check
and clean the burner tubes.
Insomeareasofthecountry,spidersor smallinsectshavebeen
knowntocreate"flashback"problems.Thespidersspinwebs,
buildnestsandlayeggsin thegrill'sburnertubesobstructingthe
flowof gastotheburner.Thebacked-upgascanignitein the
burnertubebehindthecontrolpanel.Thisisknownasa
flashbackanditcandamageyourgrill andevencauseinjury.
To preventflashbacksandensuregoodperformancetheburner
and burnertubeassemblyshouldberemovedfromthegrilland
cleanedbeforeusewheneverthegrillhasbeenidleforan
extendedperiod.
We suggest three ways to clean the burner tubes. Use the one
easiestfor you.
(A) Bend a stiff wire (a lightweight coat hanger works well)
intoa small hook. Runthe hook through each burner
tube several times.
J
'3
(B) Use a narrow bottle brush with a flexible handle(do not
use a brass wire brush), run the brush through each
burner tube several times.
(C)Wear eye protection: Use anair hose to force air into
the burner tube and out the burner ports. Check each
port to make sure air comes out each hole.
7.Wire brush entire outer surface of burner to remove food
residue and dirt.
8. Cleanany blocked ports with a stiffwire such as an open
paper clip.
9. Check burner for damage, due to normalwear and corrosion
some holes may become enlarged. If any large cracks or
holes are found replace burner.

VERY IMPORTANT: Burner tubes must reengage valve
openings.
Correct burner-to-valveengagement
Indirect Cooking
Poultry and large cutsof meat cook slowly to perfection on the
grill by indirect heat. Placefood over unlit burner(s); the heat
from lit burners circulates gently throughout the grill, cooking
meat or poultry without the touch of a direct flame.
This method greatly reduces flare-ups when cooking extra fatty
cuts because there is no direct flame to ignite the fats and
juices that drip during cooking.
1 Burner Cooking
Cook with direct or indirect heat.
Best for smaller meals or foods.
Consumes less fuel.
Indirect Cooking Instructions
• Always cook with the lid closed.
• Due toweather conditions, cooking times mayvary.
During cold and windy conditions the temperature setting
may need to be increased to insure sufficient cooking
temperatures.
• Place food over unlit burner(s)
2 Burner Cooking
Great indirect cooking on low.
Produces slow, even heating.
Idealfor slow roasting and baking.
Food Safety
Food safety is a very important part of enjoying the outdoor
cooking experience. To keepfood safe from harmful bacteria,
follow these four basic steps:
Clean: Wash hands, utensils, and surfaceswith hot soapy
water before and after handling raw meat and poultry.
Separate: Separate raw meatsand poultry from ready-to-eat
foods to avoid cross contamination. Use a clean platter and
utensilswhen removing cooked foods.
Cook: Cook meat and poultry thoroughly to kill bacteria. Use a
thermometer to ensure proper internal food temperatures.
Chill: Refrigerate prepared foods and leftovers promptly.
For more information call: USDA Meat and Poultry Hotline
at 1-800-535-4555 (In Washington, DC (202) 720-3333, 10:00
am-4:00 pm EST).
How To Tell If Meat Is Grilled Thoroughly
• Meat and poultry cookedon a grill often browns very fast on
the outside. Use a meat thermometer to be sure food has
reached a safe internal temperature, and cut into food to
check for visual signs of aloneness.
•Whole poultry should reach 180° F; breasts, 170° F. Juices
should run clear and flesh should not be pink.
• Hamburgers madeof any ground meat orpoultry should
reach 160° F, and be brown in the middle with nopink juices.
Beef, veal and lamb steaks, roasts and chopscan be cooked
to 145°F. All cuts of pork should reach 160° F.
• NEVER partially grill meat or poultry and finish cooking later.
Cook food completely to destroy harmful bacteria.
•When reheating takeout foods orfully cooked meats like hot
dogs, grill to 165° F,or until steaming hot.
WARNING: To ensure that it is safe to eat, food must be
cooked to the minimum internal temperatures listed inthe table
below.
USDA* Safe MinimumInternal Temperatures
Fish 145°F
Pork 160°F
Egg Dishes 160°F
Steaksand Roasts of Beef,
Vealor Lamb 145°F
Ground Beef, Vealor Lamb 160°F
Whole Poultry (Turkey,
Chicken, Duck, etc.) 165°F
Ground or Pieces Poultry 165°F
(Chicken Breast,etc.)
*United States Departmentof Agriculture
10

To purchase NaturalGas Conversion Partscall Searsat
1-800-4-MY-HOME®
Natural gasconversion kit
(Manufacturer PartNo.: L3018S-KIT)
Yourgrill canbe converted to naturalgas with this
conversion kitby a qualifiedgas technicianonly. Inorder
to convertthis grill the technicianwill needthis
conversion kit.
Natural gas 12' hose
If convertingthegrill to naturalgas, the technician in
most caseswill needthis 12' extension hose with 3/8" ID
(inner diameter),which is includedin the naturalgas
conversion kit.
11

Gas Requirements
For NaturalGas Connection
Preparing:
1. Turn off gassupply, and then remove capon gas
supplyside.
2. Recommended: Installashut-off valve on
gassupply side beforeinstallingthesocket.
3. Socket should beinstalled by an authorized
technicianin accordancewith the nationalfuel gas
code (NFPA54/ANSI223.1).
4. Before inserting plug, turnon gas supply and leak
testall connections includingthe stem of the shut-off
valve and the opening of thesocket. For best results,
use anammonia-free soap& water solution.
OperatingInstructions:
1.To connect, push backsocket sleeve.
Socket Sleeve = Plug
\
LP Gas
Ifyour grill isfor LPGas, the regulator supplied isset for
an 11-in.water column (WC)and isfor usewith LPgas
only.Thefactory-supplied regulatorand hose must be
usedwith a 20-lb. LPgastank.
Natural Gas
Ifyour grill isfor NaturalGas, it is set for a 7-in. water
column(WC) and isfor usewith NaturalGas only.Gas
pressureis affectedby gas line size and the lengthof
gas linerun from housegas line. Followthe
recommendationsin the chart below.
FromHouseto Grill
Distance Tubing Size
Up to 25 ft. 3/8 in.diameter
26-50 ft. 1/2in.diameter
2/3of the run:3/4 in. diameter
51-100ft.
1/3of the run :1/2 in. diameter
Over 101ft. 3/4 in.diameter
2. Insertplug and release sleeve.
3. Pushplug untilsleevesnaps forward. (Gaswill flow
automatically.Failure to connect plug properlyto
socketwill inhibitgasflow to the appliance.)
Socket Sleeve
\\\
To disconnect
1. Pull Sleeve back. Pullplug out ofsocket. (Gas is
automaticallyshutoff.)
2. Close shut-offvalve and replacedust caps onsocket
and plug.
12

Key Qty Description
1 1 HOODHANDLE(LEFT)
2 4 HANDLEBASE
3 1 LEFTHOOD
4 1 TEMPERATUREGAUGE
5 1 WASHER
6 1 RIGHTHOOD
7 2 COOKING GRID( MAIN BURNER )
8 1 LEFTWARMING RACK
9 1 RIGHTWARMINGRACK
10 1 COOKING GRID( SEAR BURNER)
11 3 HEAT DIFFUSER
12 1 SEAR BURNER
13 1 IGNITIONPIN ( SEAR BURNER)
14 1 IGNITIONPIN ( MAIN BURNER)
15 1 IGNITIONPIN ( MAIN BURNER)
16 1 IGNITIONPIN ( MAIN BURNER)
17 3 MAINBURNER
18 3 R-PIN
19 1 HOODHANDLE ( RIGHT)
20 1 DRAWERHEAD
21 1 DRAWERBODY
22 1 SIDE SHELF
23 2 HOODSLEEVE
24 1 BURNERBOX
25 1 SIDE BURNERGRID
26 1 SIDE BURNER HOOD
27 1 SIDE BURNERSHAFT
28 1 COLLECT BOX
29 1 SIDE BURNER
30 1 IGNITIONPIN ( SIDE BURNER)
31 1 SIDE BURNER
32 1 BOTTLEOPENER
33 1 SIDE BURNERVALVE
34 5 BEZEL
35 5 KNOB
36 1 MAINBURNERHOSE
37 1 LPGAS PRESSURE REGULATOR
38 1 MANIFOLD
39 1 CONTROL BOX
Key Qty Description
40 1 ELECTRICALIGNITOR
41 1 LEFTPANEL
42 1 BEAM
43 2 MAGNET
44 1 DRIPTRAY
45 1 DRIPTRAY SUPPORT
46 1 REAR PANELTOP
47 1 TANK RING BRACKET
48 1 TANK RING
49 1 REAR PANELBOTTOM
50 1 RIGHTPANEL
51 2 LOCKINGCASTER
52 1 BOTTOMPANEL
53 1 TANK SUPPORT
54 1 SIDE PANELBRACKET(RIGHT)
55 2 CASTER
56 1 HANDIGNITOR
57 1 RIGHTDOOR
58 1 SIDE PANELBRACKET(LEFT)
59 1 LEFTDOOR
60 2 DOORHANDLE
61 1 IGNITIONWIRE( MAIN BURNER)
62 1 IGNITIONWIRE( SIDE BURNER)
Not Pictured
1
2
HARDWAREPACK
PRODUCTMANUAL
If you aremissinghardwareor have
damagedparts afterunpackinggrill, call
1-800-482-0131for replacement.
Toorderreplacement parts afterusinggrill,
call 1-800-4-MY-HOME®
13

@
®
®
@
@ © ® @®®®_ ®
®
@
@
®
© @©
®
®
@
@ _ @
14

UNPACKING
Afterremoving all partsfrom the top of the shipping box, and when the only part showing isthe grill head,use a
knifeto slice down the sides of the box. Be carefulof staples along shipping boxedges.
Removestyrofoam packingto gain access tothe grill head.
Open grill lids and removeall packaged partsand packing material.
WARNING:Assemble and place the grill ona flat level surface.Compare the parts and hardwarewith the
list and diagrams. Donot attempt assemblyif any part is missing or damaged.
Attach the castersto the bottompanel with 4 screwseach as shown.Attach the two lockingcasters
at theback ofthe grill.After attaching allcasters,turn the bottompanel over.
Bottom Panel
Locking Caster
1/4-20x 5/8" Screw
Qty.16
Caster
Attach the door magnetto theholes in the front of the bottom panelwith 2 screws. Do notfully tighten
at this time.
Bottom Panel i/_
5/32-32x 1/2" Screw
Qty.2
Door Magnet
15

Slidetank supporttopfully forward on itsrails as shown.Attach railsto bottompanel with six screws.
1/4-20x 5/8" Screw
Qty.6
TankSu
BottomPanel
Attach Rear Panelto BottomPanel with4 screws as shown.
y 1/4-20x 5/8" Screw
Qty.4
Rear Panel Bottom
Bottom Panel
16

Attach side panels to bottom panel as shown. For each side panel, there are two screwsfor the rear
panel andthree for the bottompanel. Insertthe three bottom panelscrews first.
Rear Panel Bottom
RightPanel
Left Panel
1/4-20x 5/8" Screw
Qty.10
Attach theside panel bracketsto theside panels and bottompanelwith 3 screws each as shown.
Left Panel
SidePanel Bracket
Right Panel
1/4-20x 5/8" Screw
Qty.6
17

Attachthe rear panel topto theside panels with 2 screws each as shown.
RightPanel
Le_ Panel
Rear PanelTop
1/4-20x 5/8"
Qty.4
Screw
Slidethe tank ring bracket onto the endof the tankring as shown.Attach the bracket to the rear
paneltop with 2 screws as shown.
TankRing
TankRing Bracket
Rear PanelTop 1/4-20x 5/8" Screw
__ Qty.2
18

Attach front beamto side panelswith 2 screwseach asshown.
Left Panel
1/4-20x 5/8" Screw
Qty.4
RightPanel
Front Beam
Attach thedrip tray supportto thefront beamand rear panel topwith 4 screws as shown. NOTE: Drip
tray tabs connectto outside offront beam.
DripTraySupport
Rear PanelTop
1/4-20x 5/8" Screw
Qty.4
Front Beam
19

Slidethe drip tray through the rear panel topand intothe drip tray support as shown.
DripTraySupport
DripTray
Foreach door, attachwasher onto hinge pin,then insert bottomhinge pin into hole on bottompanel.
Push down on top hingepin to insert intohole in tab at top ofside panel.Adjust bottompanel door
magnetto contactdoors, and tightenmagnetscrews.
Washer 5
Qty.2
LeftDoor
RightDoor
Washer 5
20

Cut tiewraps holding regulatorand sideburnervalve in placeunderneathgrill headcontrol panel.Be
careful notto cut igniterwires. Withthe aid of an assistant,liftand place grill headonto cabinet. Grill
headsides go over attachmenttabson cabinet. Makesure that side burnervalve and igniterwires
hang outsidethe cabinet,and thatregulator hangs insidecabinet.Attach headto cabinetwith 4
screws asshown.
1/4-20x 5/8" Screw
Qty.4
Burner Box
j_
Cabinet
Loosen the three screws attachedto the left panel of the burner box3 to 4 turns as shown. Hang the
side shelf by the slotted holes in its side onto the three loosened screws. Open the grill lid and use
the screw to fasten the side shelf from the inside of the burner box as shown. Tighten the three
previously loosenedscrews.
Loosen
1/4-20x 5/4" Screw
Qty.1
SideShelf
21

Pull drawer body out of the side shelf.
Secure thedrawer head to the drawer body with 3screws on eachside as shown.
5/32-32x 1/2" Screw
Qty.6
Side Shelf
DrawerHead
Drawer Body
Side BurnerShelf
Loosen the four screws attached inthe right panelof the burnerbox 3 to 4 turns as shown. Hangthe
side burnershelf by the slotted holes in its side onto thefour loosenedscrews. Openthe grill lidand
use the single longerscrew to fastenthe side burnershelffrom the insideof the burnerbox as shown.
Tightenthefour previouslyloosenedscrews.Attach bottleopener toside burner shelfwith 2 screws
as shown.
Loosen
3/16-24x 1/2"Screw
Qty.2
1/4-20x 5/4" Screw
Qty.1
SideBurner Shelf
22

Side BurnerShelf
Loosen and removethetwo screws holdingside burnerin place.Align the 2 bezel screw holesto
those inside burner controlpanel. Insertthe valve controlstem through control paneland bezel main
holes.Attach bezelto control panel and valve controlstemwith 2 screws asshown. Press Knobonto
side burnervalve control stem.
Side Burner Shelf
M4x 8 Screw
Qty.2
Bezel
Knob
Side Burner Valve ControlStem
Side BurnerValve and Ignition Wire
Insertside burnervalve intoside burner tube as shown. Reattachside burnerto shelfwith 2
previously removedscrews.Connectthe side burnerignitionwire to the ignition pin.
IgnitionPin
IgnitionWire
Side Burner
SideBurner
Valve
CAUTION: Make sure thatvalve is insidetube.
23

Install the Heat Diffusers,Cooking Grates and Warming Racks
Position the heat diffusers, cookinggrates andwarming racks as shown.NOTE:The diffuser edgesfit
intoslots atfront and back of burner box. The rectangularhole in cooking grate goes to the front.
Remove batterycap and insertAA batterywith positive pole facing out. Replace cap.
WarmingRack
Side Burner Grid
Heat
Cooking Grid
AA Battery
_ ollect Box
Alignthe collect boxwith the 2 round screw headsat theback of the side burner shelf, and push the
box down to lock it in place. Youmay also invertthe boxand attach it to lengthentheshelf as shown.
SideBurner Shelf
Collect Box
24

LP TankInstallation
Open frontdoors of cabinet.Slideout tank support.Set base of tank intotank support hole. Connect
regulator totank (see page 5 of Use and Care section). Slidetank back intocabinet.
Z
25

Problem Possible Cause Corrective Action
Grill or side burner
will not light
Burner flame is
yellow and you
smell gas
1. Wires are loose or dis-
connected
2. Dead battery
3. Trying to light wrong
burner
4. Burner not engaged with
control valve
5. No gas flow.
Excessive flare-up
1. Burner is blocked.
2. Gas leaks.
1. Grease buildup.
2. Excessive fat in meat.
3. Excessive cooking tem-
perature.
1. Reconnect wires or replace wire
assembly.
2. Replace with a new battery.
3. See lighting instructions.
4. Make sure valves are positioned inside
of burner tubes.
5. Make sure gas hose is properly
connected to grill and the gas source is
turned on.
1. Check the burner inlet for obstruction,
especially for spiders and other insects.
2. Check for the source of gas leaks.
1. Clean burners and inside of grill.
2. Trim fat from meat before grilling.
3. Lower temperature accordingly.
26

Problem Possible Cause Corrective Action
Burner blows out
1. Burner defects.
2. Low on gas
supply.
Low heat, natural
Not right length of
gas
gas line.
Low heat
generated with
knob in "HI"
position
1. Burner is blocked.
2. Hose not properly
assembled.
3. Low gas pressure.
1. Check for any burner defects and proper
burner installation.
2. Make sure the gas supply is sufficient.
Follow the recommendations in the chart
below.
From House to Grill
Distance Tubing Size
Up to 25 ft. 3/8 in. diameter
26 -50 ft. 1/2 in. diameter
1/3 of the run:l/2 in. diameter.
51 -100 ft. 2/3 of the run:3/4 in. diameter.
1. Make certain the problem is isolated to only
one burner. If it appears so, clean the
orifice and burner, clearing ports of any
obstruction.
2. Check for a bent or kinked fuel hose.
3. Check for proper gas supply and pressure.
27

Your Home
For expert troubleshooting and home solutions advice:
www.managemyhome.com
For repair - in your home - of all major brand appliances,
lawn and garden equipment, or heating and cooling systems,
no matter who made it, no matter who sold it!
For the replacement parts, accessories and
owner's manuals that you need to do-it-yourself.
For Sears professional installation of home appliances
and items like garage door openers and water heaters.
1-800-4-MY-HOME ® (1-800-469-4663)
Call anytime, day or night (U.S.A. and Canada)
www.sears.com www.sears.ca
Our Home
For repair of carry-in items like vacuums, lawn equipment,
and electronics, call anytime for the location of your nearest
Sears Parts & Repair Service Center
1-800-482-0131 (U.S.A.) 1-800-482-0131 (Canada)
www.sears.com www.sears.ca
To purchase a protection agreement on a product serviced by Sears:
1-800-827-6655 (U.S.A.) 1-800-361-6665 (Canada)
Para pedir servicio de reparaci6n Au Canada pour service en fran£ais:
a domicilio, y para ordenar piezas: 1-800-LE-FOYER Mc
1-888-S U-H OGAR ® (1-800-533-6937)
www.sears.ca
® Registered Trademark / TMTrademark / SMService Mark of Sears Brands, LLC
® Marca Registrada ! TMMarca de Fabrica / SMMarca de Servicio de Sears Brands, LLC
MC MD
Marque de commerce / Marque deposee de Sears Brands, LLC
28
© Sears Brands, LLC

Guiaparael usoy cuidado
®
Parrillade gaspropanoliquido
Modelode Sears No148.16656010
Estaparrillaes parausoenexterioresOnicamente
Leay observetodas las instruccionesde
seguridad, ensamblaje,asi como de uso y
cuidadode esta guia antesde ensamblar y
cocinarcon esta parrilla
Noobservartodas las instrucciones de
esta guiade uso y cuidadopuedeconducir
a un incendio oexplosion, Io cual podria
resultaren dahos a la propiedad,lesiones
personaleso la muerte.
• Seguridad
• Piezas
• Usoy cuidado
• Ensamblaje
Centro de Informacion de la parrilla
z,Piezas faltantes? z,Preguntassobre el
ensamblaje? _,Problemascon el
funcionamiento?Antes de devolverla
parrillaa la tienda, Ilameal 1-800-482-0131.
Herramientanecesariaparael
ensamblado:
Destornillador (nose suministra)
iGUARDEESTASINSTRUCCIONES!
Vea nuestroextensosurtidode productosparaareassocialesal aire libreen Interneten
www.sears.comy www.kmart.com
SearsBrandsManagementCorporation,HoffmanEstates,IL 60179,EE.UU.
(c)2010 Sears Brands, LLC Impreso en China L3018S-Manual

Si detectaolor a gas:
1.Cierre el gasque va a la unidad.
2.Extingacualquier llamaexpuesta.
3.Abra latapa.
4.Si el olor contint_a,mantengase alejadode
la unidady Ilame de inmediatoa la
compahiaque lesuministra el gas o al
departamentode bomberoslocal.
1. Noalmacene ni utilice gasolina ni otros
liquidosovapores inflamablescerca de
esta ni de ninguna otra unidad.
2. Nodebera almacenarcerca de la parrillani
de ninguna otra unidad un cilindrode LP
que noeste conectadopara ser utilizado.
Llame al Centro de Servicio de Parrillas paraobtener
ayuda o repuestos
Sitiene dudaso necesitaasistenciadurante el ensamblaje,
Ilameal 1-800-482-0131.Hablaracon un representante
delfabricantede la parrilla, no conunempleadode Sears.
Para pedirpiezas nuevas Ilamea Sears al
1-800-4-MY-HOME.
Registro del producto
IMPORTANTE:Llene la informacionsobre el registro
del productoque aparece a continuacion.
N_odel modelo
N_ode serie
Refierase a laetiqueta de clasificaci6nde la
parrillaparael nQmerode serie.
Fechadecompra
PRECAUClON
Para uso residencial t_nicamente.Noutilice
para coccion comercial.
PROPOSIClON65 DE CALIFORNIA
1. Los subproductosde combustion que se
producencuandose utilizaeste producto
contienensustancias quimicas conocidas
en el Estadode California como
causantes de cancer, defectoscongenitos
y otros dahos delsistema reproductor.
2. Esteproductocontienesustanciasquimicas,
incluyendoplomoy componentesde plomo,
conocidosenel EstadodeCalifornia como
causantesde cancer,defectoscongenitosy
otrosdahosdelsistemareproductor.
Lavese /as manos despu_sde
manipu/ar este producto.
Precauciones de seguridad para la instalacion
• Utilice IaparrilIa,como Iacompr6,s61ocongas LP (propano) y
el ensambtede regulador/v_lvutaque se suministra.Deber_
comprarun kit deconversi6npara uso congas natural.
• La instalaci6nde IaparrilIadebera conformarse conta
normativalocal,o en ausencia de esta, conta Normativa
Nacionalpara Combustiblede Gas,ANSI Z223.1/NFPA 54,
Normativapara instalaci6nde gas naturaly propano, CSA
B149.1, o laNormativapara almacenajey manejo de
propano, B149.2, o la Normapara vehiculosrecreacionales,
ANSI A 119.2/NFPA 1192,y CSA Z240 SerieRV, Normativa
para vehiculosrecreacionales,seg_)nsea aplicable.
• Todoslosaccesorioselectricos(talescomo el asador)deber_n
estarconectadosa tierrade conformidadconlas normativas
localeso conla NormativaNacionalsobre Electricidad,ANSI/
NFPA 70o la NormativaCanadiensede Electricidad,CSA
C22.1.Conserveloscablesel6ctricosy/olasmanguerasde
suministrode combustiblealejadasdelas superficiescalientes.
• Esta parrilla tiene certificaci6n de seguridad para uso en
EstadosUnidos y/o Canada Onicamente.Nomodifiquepara
utilizar en cuatquier otra ubicaci6n. La modificaci6n
constituir_ un riesgoa la seguridad.
Simbolos de seguridad
Los simbotos y recuadros que aparecen a continuaci6n
explicar Ioque cada enunciadosignifica. Lea y observe todos
los mensajes que se encuentran a traves delmanual.
PELIGRO: Indica una situaci6nde peligro
inminenteque, denoevitarse, resultara enmuerte
o lesionesgraves.
ADVERTENClA: Indica una situaci6nde peligro
potencialque,de no evitarse,podria resultaren
muerteo lesionesgraves.

PRECAUCl0N
PRECAUCION: Indica una situaci6n potencial-
mente peligrosa o una practica insegura la cual,
de no evitarse, podria ocasionar lesiones menores
o moderadas.
Para su seguridad.......................................................... 2
Centre de Servicio para ta parriIIa..................................... 2
Informaci6n de registro del producto.................................. 2
Simbotos de seguridad................................................... 2
Precauciones de seguridad para la instataci6n.................... 2
Garantia de Ia parrilIa Kenmore........................................ 3
Uso y cuidado.......................................................... .4-10
Caja de conversi6na gas natural..................................... 11
Notas 12
.........................................................................
Lista de piezas............................................................. 13
Diagrama de piezas...................................................... 14
Ensambtaje 15-25
Sotuci6n de probtemas............................................. .26-27
Acuerdos de protecci6n para reparaci6n
Felicitaciones por su compra inteligente. Su nuevo producto
Kenmore®est_ disefiado y fabricado para brindarle aSosde
funcionamiento confiabte. Pero, como cuatquier otro producto,
puede que requiera reparacionesde cuando en cuando. Esatli
cuando tener un Acuerdo de protecci6n para reparaci6n puede
ahorrarle dinero y motestias.
Adquiera un Acuerdo de protecci6n de reparad6n ahora y
prot6jase de molestias y gastos imprevistos.
Heaqui Ioque el acuerdode protecci6npara reparaci6nincluye:
[] Servicio experto por parte de nuestros 10.000especiatistas
profesionates de reparaciones.
[] Servicio ilimitado sin cargo para taspiezas ymano de obra
de todas Ias reparaciones amparadas
[] Reemplazo del producto hasta $1500 si el producto
amparado no puede arreglarse
[] Descuento de110% del precio regular del servicio y Ias
piezas relacionadas instatadasno amparadas porel acuerdo;
tambien, 10% de descuento sobre el precio regularde Ias
revisiones preventivas de mantenimiento
[] Ayuda telef6nica rapida -Ia llamamos Resotuci6n R_pida-
apoyo telef6nico de un representante Sears. Piense en
nosotros como un manual de servicio parlante.
Unavezque hayaadquiridoel Acuerdode Protecci6npara repara-
ci6n,una simpleIlamadatelef6nicaestodoIoque necesitapara
programarel servicio.PuedeIlamaren cualquiermomento,de dia
o de noche,o programaruna citade servicioa travesde Intemet.
El Acuerdo de Protecci6n para reparaci6nes una compra sin
riesgos. Si cancela por cuatquier raz6ndurante el periodo de
garantia del producto, Ie proporcionaremos un reembotso
compteto.O un reembotso prorrateado en cuatquier momento
despues de que venza et periodode garantia del producto.
iAdquiera su Acuerdo de Protecci6n para Reparaci6n hoy
mismo!
Ciertas limitaciones y exclusiones aplican.
Para precios e informaci6n adicional, Ilame al 1-800-827-6655.
Servicio de instalaci6n Sears
Para la instalaci6n profesional de electrodom6sticos Sears,
abridores de puertas de garaje, calentadores de agua y
cualquier otro articulo grande en EE.UU., Ilame al
1-800-4-MY-HOME®
Garantia total Kenmore
Siesta parrilla presenta una falla originada por un defecto de material
o mano de obra, dentro de un afio a partir de la fecha de compra,
Ilame al 1-800-4-MY- HOME ®para obtener reparaci6n gratis (o
reemplazo si no fuese posible efectuar la reparaci6n).
Garantia limitada en los quemadores
Durante diez afios a partir de la fecha de compra, cualquier quemador
de acero inoxidable que se oxide completamente sera reemplazado
sin costo. Despues del primer afio a partir de la fecha de compra,
usted paga por la mano de obra si desea que se Io instalen.
Toda la cobertura de garantia excluye las baterias del encendedor y la
perdida de pintura de las partes de la parrilla, la decoloraci6n o el
6xido, los cuales son partes fungibles que pueden gastarse con el uso
normal dentro del periodo de garantia, o son situaciones que podrian
producirse por el uso normal, accidente o mantenimiento inadecuado.
Toda la cobertura de garantia queda anulada si la parrilla se utiliza
para fines comerciales o en alquiler.
Toda la cobertura de garantia aplica Qnicamente si la parrilla se utiliza
en Estados Unidos.
Esta garantia le otorga derechos legales especificos yes posible que
usted goce de otros derechos que varian segQn el estado.
Sears, Roebuck and Co., Hoffman Estates, IL 60179

• NUNCAguardeuncilindroderepuestodeLPdebajo
nicercadelaparrillanienunareaencerrada
• NuncaIleneuncilindroarnasde180%desucapacidad.
• Si la informacionde losdos puntosanteriores no
se sigueexactamente, puedeocurrir un incendio
que ocasionela muerte olesionesgraves.
° Uncilindroquese hayaIlenadoexcesivamenteo
inadecuadamentealmacenadoesun peligrodebido
a la posibilidaddeque lavalvuladeseguridadpara
aliviode lapresionliberegas. Estopodria
ocasionarun incendiointensocon riesgo dedahos
a la propiedad,lesionesgraveso lamuerte.
• Sive, hueleoescuchagasescapando,alejese
inmediatamentedelcilindrode LPy de laparrillay
Ilamealdepartamentodebomberos.
Rernocion del tanque de LP, transporte y almacenaje
•Cierre(girea OFF) todasIasperiIIasde controlyIavalvuladel
tanquede LP.GireIatuercade acopleen el sentidoantihorario
manualmentesolamente- no utiliceherramientaspara
desconectar.Levanteelcabledel tanquede de LP de IaaniIIadel
tanqueLP,IuegoIevanteel tanquey saque(odetsoporte.Instale
Iatapade seguridaden la valvutadel tanquede LP.Siempre
utiIiceIatapay Iabandaquesesuministracontavalvula.
Noutilizarlatapadeseguridadcomose indicapuedeoca-
sionarlesionespersonalesgravesy/odafioa lapropiedad.
Valvuladel _-_
tanque de
Tapadeseguridad
Bandaretenedora
• Untanque de LP desconectado para almacenar o transportar
debera tener cotocadata tapa de seguridad (como se iIustra).
Noatmacene un tanque de LP en espacios cerrados tales como
un puesto de estacionamiento, garaje, porche, patio cubierto u
otro edificio. Nunca deje un tanque de LPdentrode un vehiculo
que pueda recatentarse con el sol.
• Noguarde un tanquede LPen unarea dondejueguenlosni_os.
Cilindro de LP
• El cilindro de LP utilizado con su parrilla debera cumplir
con los siguientes requisitos:
• UtiIice los ciIindrosde LP con estas medidas requeridas: 12"
(30,5 cm) (diametro) x 18" (45,7cm) (alto) con20 lb. (9,1 kg)de
capacidad maxima.
• LosciIindros de LP deberan estarfabricados y marcados de
acuerdo con tas especificaciones para ciIindros LP del
Departamentode Transporte de EE.UU. (DOT) opara Canada,
CAN/CSA-B339, ciIindros, esferas y tubos para transporte de
mercancias peligrosas. Transport Canada (TC). Refierase at
anilIo del cilindro LP para tasmarcas.
• La valvutadel ciIindro LP deberatener:
• Salida tipo 1 compatible con elregutador o IaparriIIa.
•Valvuta de ativio de Iapresi6n.
• Dispositivode protecci6n contra elsobrelIenado con
clasificaci6n UL(OPD). Esta caracteristica OPD de seguridad
se identificapor una rueda manualtriangular Onica. UtiIices6to
los ciIindros LP equipados coneste tipo de valvula.
•El ciIindroLP deberaestar acondicionadoparasalidade vapore
incluirunaniIIoparaprotegerIavalvula LPdel ciIindro.Siempre
conservelosciIindrosLPenposici6nverticalduranteel uso,
transitoo almacenaje.
RuedamanualOPD
CilindrodeLPenposicionverticalparalaeliminaciondelvapor
LP (Gas licuado de petroleo)
•Elgas LP noes t6xico,esinodoroe incolorocuandose produce.
Por su seguridad, se proporcionado un otor atgas LP (similar
atrepotIo podrido) para que pueda oterse.
• El gas LP es muy inflamabtey puede incendiarse
inesperadamente cuando se mezcla con el aire.
Llenado del cilindro LP
• UtiIices6to distribuidores autorizados yexperimentados.
•El distribuidorLP deberapurgarel cilindronuevoantesde Ilenarlo.
• El distribuidor NUNCA debera tIenarel ciIindro LP mas del
80% de(volumen de( cilindro LP. El volumen depropano en el
cilindro variara con tatemperatura.
• Unregutador con escarcha indicara que esta sobreilenado.
Cierre inmediatamente Iavalvuta de( cilindro LP y Ilame at
distribuidor de gas LP local para asistencia.
• NoIiberegas de propano Iiquido (LP) en taatm6sfera. Esta es
una practica peligrosa.
• Pararetirar el gas de( cilindro LP, contacte a un distribuidor LP
o Ilame a los bomberos locales paraobtener asistencia.
Reviseel directorio telef6nico bajo "Compafiias de Gas" para
el distribuidor de LP certificado mas cercano.

Intercambio del tanque LP
•Muchosdistribuidoresque vendenparrilIasofrecenla opci6nde
reemplazarsutanquevaciode LP a travesde unserviciode
intercambio.Utilices61oIasempresasde intercambioconrepu-
taci6nqueinspeccionan,Ilenancon precisi6n,pruebanycertifican
sus cilindros.Intercambie su tanque s61opot un tanque
equipado con la caracteristica de seguridad OPDsegun se
describe en la seccibn "Tanque LP" de este manual.
• Siempreconserve lostanques LP nuevos e intercambiados en
posici6n vertical durante el uso, transporte o atmacenaje.
• Haga la prueba defugas en los tanques LP
intercambiadosANTES de conectarlo a la parrilla.
Prueba de fuga del tanque LP
Parasuseguridad
• La prueba de fuga debera repetirse cadavez que se
intercambiao se rellena un tanque de LP.
• Nofume durante Ia prueba de fugas.
• No utilice una llama expuesta pararevisar Ias fugas de gas.
• La parrilIa debera probarse en busca de fugas en exteriores,
en un area bien ventilada, atejadade lasfuentes de ignici6n
tales como losaparatos de encendido a gas o electrico.
Durante Iaprueba de fugas, mantenga taparrilIaatejadadeIas
llamas expuestas o chispas.
• Utilice una brocha limpia y una sotuci6nde 50/50 detergente
suave y agua. Aptique Iasotuci6njabonosa en tas areas que
indican tasflechas de Iafigura. Lasfugas se identiflcan
mediante burbujas crecientes.
Como conectar el regulador al tanque de LP
1. El tanque de LP debera estaradecuadamente fijado a ta
parrilIa. (Refierase a ta secci6n de ensambtaje).
2. Gire todas Ias perilIas de control a la posici6n OFF.
3.Cotoqueel tanquede LPen la posici6nOFFgirando Iarueda
manualOPDen sentidohoratiohastaquese detengatotalmente.
4. Retire Iatapa protectora de Iavalvutadel tanque LP.Siempre
utilice Iatapa y Iabanda que se suministran con ta valvula.
Valvulade
seguridad
RuedamanualOPD
_/ Salidatipo 1 con
roscaexterna
/
Banday tapa
Siaparecen burbujas"creciendo"no utilicenimuevael
tanque de LP. iContacte undistribuidor de gas LPo a
los bomberos!
Noinserte untapon de transporte
POL(pieza plasticacon roscas
extemas) en la salidatipo 1 de la
valvula del tanque.Anulara la
funcionde lavalvula de seguridad.
• No utiIiceagentes Iimpiadores domesticos. Podrian causar
dafios a los componentes y tuberias de gas
(valvuta/manguera/regulador).
5. Sostenga el regutadore inserte el empatme enta valvutadel
tanque de LP. Apriete a mano Iatuerca de acopte,
sosteniendo el regutador en tinea recta con tavalvuta del
tanque de LP a obieto de no dafiar Ia rosca.
Elempalmetiene queestar
centradoenla valvuladel
tanquedeLP
/
¢
/
/

Sostengalatuercade
empalmey elreguladorcomo
se ilustraparalaconexi6n
adecuadaa lavalvuladel
tanquede LP.
6. Gire Iatuerca de acopte en el sentido horario y apriete hasta
que se detenga completamente. El regutadorsellar_ en ta
funci6n disminuci6nde e revisi6n de Iav_lvutaamortiguadora
del tanque de LP, Io cuatocasiona cierta resistencia. Se
necesita un giro adicional de mitad o tres cuartos para
completar la conexi6n. Apriete a mano unicamente - no
utilice herramientas.
Valvulas para prueba de fugas, manguera y regulador
1. Gire todas Ias periIIasde control de IaparriIIa a la posici6n
OFF (cerrado).
2. Cerci6resede que el regutadoreste conectado de forma bien
ajustada at tanque de LP.
3.Abra comptetamente Iav_lvutadel tanque de LP girando Ia
rueda manual OPDen el sentido antihorario. Si escucha un
sonidosemejante a una rafaga, cierreel gas inmediatamente.
Hay una fuga importante en taconexi6n. Corrija antes de
proceder Ilamando a Sears para obtener piezas de repuesto
al 1-800-4-MY-HOME®.
4.Aptique Ia sotuci6njabonosa con una brocha en tas areas
donde aparecen burbujasen ta ilustraci6n:
ANunca retireelanilloroscado
del extremodela v_lvula
NOTA:
Si no puede comptetar Iaconexi6n, desconecte el regutadory
repitalos pasos 5 y 6. SiaQnno puede concluir Ia conexi6n, ino
utilice este reguladort Llame at 1-800-482-0131 para obtener
asistencia.
• Noinserteningunaherramienta niobjeto extraSoenla
salidade la valvulani en la valvulade seguridad.Puede
daSar la valvulay ocasionar unafuga. Lasfugas de
propano podrianocasionar unaexplosi6n,incendio,
lesiones personalesgraveso la muerte.
• Las unidadesde gas para exteriores no est_n disefiadas
para ser instatadas en un barco.
• Las unidadesde gas para exteriores no est_n disefiadas
para ser instatadas en vehicutos recreacionates.
• Nuncaintente fijar esta parrilIa atsistema de gas LP
aut6nomo de una caravan& remotqueo casa rodante.
• Noutilice IaparrilIa hastaque hayaefectuado Iapruebade
Iasfugas.
• Sidetecta una fuga en cualquier momento, PARE y Ilame
a los bomberos.
•Si no puede detener una fuga de gas inmediatamente
cierre Iav_lvuta del cilindro LP y itlame at distribuidor de
gas o a los bomberos!
5. Si aparecen burbujasque "crecen", hay una fuga. Cierre Ia
v_lvutadel tanque de LP inmediatamente y vuelva a apretar
Ias conexiones. Si no puededetener Ias fugas no trate de
repararlas. Llame a Sears para pedir piezas de repuesto
al 1-800-4-MY-HOME ®.
6. Siempre cierre Iavalvuta del tanque de LP despues de
reatizar Iaprueba de fugas, girando Ia rueda manual en el
sentido horario.

Para el uso seguro desu parrillay paraevitar
lesionesgraves:
• No permitaque los ni_os haganfuncionarla parrilla
ni deje que jueguen cerca de ella.
• Conserveel areade la parrilladespejada ysin
materialesque pudiesen arder.
• No obstruya los agujerosde los costadoso la parte
posteriorde la parrilla.
• Reviselas llamas delquemador regularmente.
• Utilicela parrillas61oenun espacio bienventilado.
NUNCA la utiliceen un espacio cerradotal como un
puestode estacionamiento,garaje, porche,patio
cubiertoo bajo una estructurade cualquier tipo.
• No use carb6n ni briquetasde ceramicaen una
parrilladegas. (A menosque lasbriquetasse
suministren consu parrilla.)
• Use la parrillaa unadistancia de al menos 3' (91
cm) de cualquier paredo superficie. Mantenga
una separaci6nde 10' (3 m) de los objetosque
puedanincendiarseo de las fuentes de ignici6n
comoluces deencendido de calentadoresde agua,
electrodomesticosconconexi6n activa, etc.
/
J
J
J
j_
/
/
/
• Ocupantesde apartamentos:
Revisenconlaadministraci6nparaconocerlos
requisitosy lasnormativassobreincendiorelativasal
usodeunaparrilladegasLPensucomplejodeaparta-
mentos.Sisepermiten,utilicefuerasobrepisodeplanta
bajaconunaseparaci6nde3 pies(91cm)de paredeso
barandas.No utiliceen balconesodebajodeellos.
• NUNCAintente encender un quemador con la tapa
cerrada. Unaacumulaci6n de gassin encender
dentro de una parrilla cerrada es peligrosa.
• Nunca haga funcionar la parrilla si el cilindro de
LP no est,_en la posici6n correcta especificada
en las instrucciones de ensamblaje.
• Siempre cierre la valvula del cilindro de LPy retire
la tuerca deacople antes de mover el cilindro de la
posicion especificada para el funcionamiento.
Consejos practicos sobre seguridad
• Antes deabrir Iav_lvuta del ciIindro de LP,verifique que Ia
tuerca de acople este bien apretada.
• Cuando IaparrilIano este en uso, cierre todas IasperilIas de
control y Iav_lvuta del ciIindro LP.
• Nunca mueva ta parriIIa mientras este en funcionamiento o
aQncatiente.
• UtiIiceutensiIios de mango largo para parriIIa y guantes
para homo para evitar quemaduras o satpicaduras.
• La carga maxima para el quemador lateral y el anaquel
lateral es 10 Ib (4,6 kg).
• Labandejarecotectorade grasadebera estar insertadaen la
parrilIay vaciarsedespuesde cadauso. NoretireIabandeja
de grasahastaque IaparriIIasehayaenfriadocompletamente.
• LimpieIa parriIIaa menudo, preferibtementedespues de
terminar cada parriIIadaataire Iibre. Si utiIizaunabrocha de
cerdas para timpiar cuatquiera de tassuperficies de cocci6n
de IaparrilIa, cerci6rese de no dejar cerdas sueltas en las
superficies de cocci6n antes de asar.No se recomienda
Iimpiar Ias superficies de cocci6n mientrasesten calientes.
• Si observa grasa u otro material caliente goteando de Ia
parriIIaen tav_lvuta, manguerao regulador, apague el
suministro de gas inmediatamente. Determine Ia causa,
corrijata y Iimpie e inspeccione Iav_lvuta, manguera y
regutadorantes de continuar. Realice una prueba de fugas.
• Lasaberturas de ventilaci6n en el compartimiento del
ciIindro (en el carrito de IaparriIIa)deben mantenerse sin
obstrucciones ni desechos.
• Noatmacene objetos ni materiatesdentro del
compartimiento del carrito de Ia parriIIaque pudiesen
btoquearel flujo del aire de combusti6n a la parteinferior del
panel de control o del taz6nde Ia camara de combusti6n.
• El regutadorpuede hacer un sonido de siIbido o zumbido
durante el funcionamiento. Esto no afecta taseguridad ni el
uso de IaparrilIa.
• Si tiene un probtema con taparrilIa,refierase a ta "Secci6n
de solud6n de problemas".
• Siel reguladorse congeta,apagueIaparrilIay Iav_lvuladetci-
Iindrode LPdeinmediato.Estoindicaun probtemaconetciIindroy
nodebeserutiIizadoconningt_nproducto,iRegresealdistribuidod
• Apagar los incendios que produce la grasa cerrando
latapa no es posible. Lasparrillas estan bien
ventiladas porrazones de seguridad.
• No utilice agua en un incendio ocasionado por la
grasa. Podrian ocurrir lesiones personales. Si se
desarrolla un incendio originado por la grasa, gire las
perillasy el cilindro de LPa la posicion de apagado.
• No deje la parrilla desatendida mientras precalienta o
limpia mediante el calor los residuos de comidas en
"HI". Si la parrilla no se ha limpiado regularmente,
puede ocurrir un incendio causado por la grasa que
pudiera daSarel producto.
Como encender la parrilla con elencendedor
1. Lea tas instrucciones antes de encender Ia parriIIa.
2. Abra tatapa durante el encendido.
3. Abra tav_lvuta del cilindro de LPo gas natural.

4.PresionehaciaadentrocualquierperilIadecontroldelquema-
dorygireIaperiIIahacialaizquierdaalaposici6n"HI".ContinQe
presionandoIaperiIIahastaqueelquemadorseencienda.
5.Sinoenciendeen5segundos,apagueelcontroldel
quemador,espere5minutosparaquesedisipeelgasy
repitaelprocedimientodeencendido.
6.Paraencenderotrosquemadores,repitaelpaso4.
NOTA:Sielencendedornofunciona,sigalasinstrucciones
deencendidoconf6sforos.
Apague (coloqueen OFF) loscontroles y la alimen-
tacion de qas del tanaue cuando no este en uso.
Sino enciendeen 5 segundos,apague el controldel
quemador, espere 5 minutos y repitael procedimiento
de encendido. Si el quemadorno enciende conla
valvula abierta, el gas continuarafluyendo por el
quemadory podria encenderseaccidentalmente conel
riesgode lesiones.
Encendido con fosforos
• No se incline sobre la parrilla para encenderla.
1. Abra la tapa durante el encendido.
2. Cotoque etf6sforo en el portaf6sforos (que cuelgadel
costado det carrito). Encienda el f6sforo, cot6quelo en ta
c_mara de combusti6n.
3. Presione hacia adentro y gire IaperiIla derecha a taposici6n
HIGH. Cerci6rese de que el quemador prende y permanece
encendido.
4. Encienda otros quemadores presionando IaperiIIa hacia
adentro y girando a ta posici6n HI.
Encendido del quemador lateral con fosforo
1. Abra la tapa del quemador lateral. Abra el gas en el
ciIindro LP
2. Cotoque el f6sforo encendido cerca del quemador.
3. Gire Ia periIIadel quemador lateral a HI. Cerci6resede que el
quemador prende y permanece encendido.
Revision de la llama del quemador
• RetireIas rejiIIasde cocci6ny los difusoresde calor. Encienda
losquemadores,gire Ias periIIasde HIGHa LOW. Debever una
llamam_s pequefiaen laposici6n LOWque Iaque vioen HIGH.
EfectQeuna revisi6nde Ia llamadel quemadoren el quemador
lateraltambien. Siemprerevise Iallamaantes de cadauso.
C6mo apagar la parrilla
• Gire todas Ias periIIasa la posici6n. Cotoque el tanque de LP
en taposici6n OFF girando Ia rueda manual en sentido horario
hasta que se detenga totalmente.
Revision del encendedor
• Cierreel gasen el cilindrode LP. PresioneIaperiIIadecontrol
haciaadentroy gire IaperiIIahaciala izquierdaa la posici6n"HI".
Debe escucharun "clic"y veruna chispa cada vez entre Iacaja
cotectorao el quemadoryel electrodo. Refierasea "Solud6nde
problemas"si no escuchaun clic nive una chispa.
Revision de la valvula
• Importante: Cerciorese de que el gas este apagado en el
cilindro de LP antes de revisar las valvulas. Las perilIas
trancan en la posici6n OFF. Pararevisar Iasv_lvutas, primero
presione Ias periIIashacia adentro y suelte, Ias periIIasdeben
regresar hacia atr_s mediante el resorte. Si no Io hacen,
reemptaceel ensambtede Iavalvutaantes de utiIizarIaparriIIa.
Gire IasperilIas a taposici6n LOW y Iuegonuevamente a OFF
Lasv_lvutas deben girar suavemente.
Revision de la manguera
•Antes de cada uso, revise si Ias mangueras tienen atg_n corte
o est_n gastadas. Cambie Iasmangueras gastadas antes de
utiIizar IaparriIIa.UtiIices6to piezas de repuesto identicas para
valvuta/manguera/regutadorsegOnloespecificado en la Lista
de piezas de esta guia de uso y cuidado.
Limpieza general de la parrilla
• Noconfunda taacumutaci6n de grasa y humo marr6n o negro
con tapintura. Elinterior de Ias parriIIasde gas no est_ pintado
de Dbrica (y nunca debe pintarse). Aptique una soluci6n
fuerte de agua y detergente o utiIice un timpiador de parriIIa
con un cepiIIopara frotar en tas partes internas de Ia tapa o Ia
parte inferior de IaparrilIa. Enjuague y deje secar
completamente at aire. No aplique limpiador caustico para
parrilla/horno a las superficies pintadas.

•Partesplasticas: Lave con agua calientejabonosa y seque.
NoutiIice Citrisot, Iimpiadoresabrasivos,desengrasadores ni
un timpiador concentrado para parrilIaen tas partes pDsticas.
Pueden ocurrir daSosy fatIaen esas partes.
• Superficies de porcelana: Debido ata composici6n
semejante al vidrio, Iamayoria de los residuospueden
Iimpiarsecon una sotuci6nde bicarbonato de soda/agua o un
Iimpiadorespeciatmente formulado. UtiIicepotvo no abrasivo
parafrotar Ias manchas rebeldes.
•Superficies pintadas: Lave condetergente suave o Iimpiador
no abrasivo y agua jabonosa tibia. Seque con un paso suave
no abrasivo.
• Superficies de acero inoxidable: Paraconservar Ia
apariencia de atta catidadde su parrilIa, Dvela con agua tibiay
detergente suave y sequela con un paso suave despues de
cada uso. Los dep6sitos de grasa adherida podr_n requerir el
usode una atmohadilIa de Iimpieza pDstica abrasiva. Utilice
s6to en tadirecci6n del acabado cepilIadopara evitar daSos.
Noutilice IaatmohadilIa abrasiva en areas con graficos.
• Superficies de coccion: Si utiIizauna brocha de cerdas para
Iimpiar cualquiera de Ias superficies de cocci6n de Ia parrilla,
cerci6resede no dejar cerdas sueltas en las superficies de
cocci6nantes de asar. No se recomienda limpiar Ias
superficies de cocci6n mientrasesten catientes.
Almacenaje de la parrilla
•Limpie las rejilIasde cocci6n.
• Guarde en una ubicaci6n seca.
• Cuandoel cilindro de LPest_ conectado a taparrilla,
mantenga en interioresen un espacio bienventiIadoy fuera del
atcancede los niSos.
• Cubrata parrilIasiesta en exteriores. Elija una cubierta para
parrilIa del surtido que ofrece el fabricante.
• Guarde la parrilIaen interiores SOLO si el cilindro LP esta
apagado y desconectado, retirado de IaparriIIa y conservado
en exteriores.
• CuandosaqueIaparrilIade dondeIaguarda,siga tasinstrucci-
onesde"Limpiezadel ensambledetquemador"antesde encenderta.
Lirnpieza del ensamble del quemador
Siga estas instrucciones para timpiar y/o reemplazar Iaspiezas
del ensambtedel quemadoro sitiene probtemaspara encender
IaparrilIa.
1.Apague el gas en las perillas de control y en el cilindro de LP.
2. Retire Ias rejilIasde cocci6n y los difusores de cator.
3. Retire los pasadores R de losquemadores traseros.
4. Levante cuidadosamente cada quemador hacia arriba y
alejelo de Ias aberturas de Ia v_lvuta.
iALERTA DE ARANAS!
Si observaquela parrillatienedificultades paraencendero
quela llamano es tanfuerte como deberia,t6meseel tiempo
derevisar y limpiar los tubos del quemador.
Enalgunas_reasdel pals,lasaraSaso losinsectospequeSos
tiendena crearproblemasde"llamasderetroceso'.LasaraSas
tejentelaraSas,construyennidosyponenhuevosen lostubosdel
quemadorobstruyendoelflujodegashaciaelquemador.Elgas
acumuladopuedeincendiarseen eltubodel quemadordetr_sctel
paneldecontrol.Estoseconocecomo"llamasderetroceso"y
puededaSarla parrillae inclusoocasionarlesiones.
ParaevitarlosyIograrbuendesempeSoctelquemadorel
ensambledeltuboctelquemadordeberetirarsede laparrillay
limpiarseantesdelusosiemprequela parrillahayaestadosinuso
cturanteunperiodoprolongado.
Sugerimos tres formas de Iimpiar lostubos del quemador.
UtiIice Iaque sea m_s DciI para usted.
(A) Dobteun alambre duro (un cotgador de abrigo Iiviano es
adecuado)formando un gancho pequeSo. Pase el gancho a
traves de cada tubo de quemador varias veces.
(B) Use un cepiIIopara timpiar botelIasque tenga un mango
flexible (no use un cepilIo de cerdasde metal) pas_ndoto a
traves de cada tubo de quemador varias veces.
(C) Use proteccion para los ojos: Use una manguera de aire
para forzar el aire en el tubo del quemador y fuera de los
puertos del quemador. Revise cada puerto para cerciorarse
de que el aire satga de cada agujero.
7. Pase un cepiIIode atambre por toda tasuperficie externa del
quemador para retirarlos residuos de atimento y la suciedad.
8. Limpie los puertos btoqueados con un atambre duro tat como
un sujetador de papel abierto.
9. Revise el quemador en busca dedaSosocasionados por el
uso normal y Ia corrosi6n,atgunos agujeros pueden haberse
agrandado. Si encuentra grietas grandes o agujeros, cambie
el quemador.

MUY IMPORTANTE: Los tubos del quemador deberan
volverse a enganchar en las aberturas de lasvalvulas.
Enganche correcto quernador-valvula
Coccion indirecta
Las aves ylos cortesgrandes de came se cocinan tentamente a
Ia perfecci6nen la parrilIamediante el calorindirecto. Cotoque
los alimentos sobre el(los) quemador(es) sin encender; el calor
de los quemadores encendidos circutasuavemente por toda ta
parrilIa, cocinando Iacame o Ias aves sin una llama directa.
Este metodo disminuye enormemente Ias Ilamaradas cuando
cocine cortes muy grasosos porque no hay llama directa que
encienda tagrasa ni losjugos que gotean mientras cocina.
Coccion con 1 quemador
Cocine concator directo o indirecto.
Mejor para comidas o atimentos m_s pequeSos
Consume menos combustible.
Instrucciones para coccion indirecta
• Siempre cocine con tatapa cerrada
• Debido a tas condiciones clim_ticas, los tiempos de cocci6n
pueden variar. En clima frio y conviento es posibte que
necesite aumentar Iaconfiguraci6n de temperatura para
Iogrartemperaturas de cocci6n.
• Cotoque los atimentos sobre el(los) quemador(es) sin
encender.
Coccion con 2 quemadores
Cocci6n indirecta estupenda a fuego bajo
Produce cator bajo y uniforme.
Idealpara asar a fuego lento y hornear.
10
Seguridad alirnentaria
La seguridad atimentaria es una parte muy importante de
disfrutar Iaexperiencia de cocinar ataire Iibre. Para conservar
los alimentos protegidos de Ias bacterias nocivas, siga estos
cuatro pasos b_sicos:
Limpiar: L_vese Ias manos,los utensiliosy superficies con
agua catientejabonosa antes y despues de manipular came o
aves crudas.
Separar: Separe Ias carnes y aves crudas de los atimentos
Iistos para comer para evitar contaminaci6n cruzada. Utilice un
plato y utensilios Iimpios para retirar los atimentos cocinados.
Cocinar: Cocine Ias carnes y aves comptetamente para matar
Ias bacterias. Use un term6metro para comprobarIas
temperaturas internas adecuadas de los atimentos.
Refrigerar: Refrigere los atimentos preparados y Ias sobras
r_pidamente.
Para mas informaci6n Ilame a: la linea de ayuda USDA
sobre came y ayes al 1-800-535-4555 (en Washington, DC
(202) 720-3333, 10:00 am-4:00 pm hora del este).
Como saber si la carne esta totalmente asada
• La came y las avescocinadas a ta parriIIaa menudose doran
muy r_pido por fuera. Use un term6metro de carnespara
cerciorarse de que el alimento haya atcanzado una
temperatura interna segura y haga cortes para observar
se_atesvisibtes de cocci6n.
• Lasaves completas deben atcanzar 180° F (82,2°C);
pechugas, 170°F (76,7°C). Losjugos deben salir
transparentes y Ia came no debe estar rosada.
• Lashamburguesas hechas de came motida o polio deben
alcanzar 160°F (71,1°C), yestar marrones atmedio sin jugos
rosados. La came deres, ternera y cordero, los asados y Ias
chutetas pueden cocinarse a 145°F (62,8°C). Todos los cortes
de cerdo deben atcanzar 160°F (71,1°C).
• NUNCA ase parciatmente Ia came o Iasaves y termine de
cocinar m_s tarde. Cocine losatimentos completamente para
destruir las bacterias nocivas.
• Cuando recatientelos atimentos preparados o Ias carnes
comptetamente cocidas como perros catientes,ase a 165°F
(73,9°C), o hasta que desprendan humo.
ADVERTENCIA: Para cerciorarse de que sean seguro para
comer, los alimentos deber_n estar cocinados a tatemperatura
interna minima indicada en la tabta siguiente.
Temperaturas internas minimas seguras segun USDA*
Pescado 145°F (62,8°C)
Cerdo 160°F (71,1°C)
Platos con huevos 160°F (71,1°C)
Bistesy asados o came de res, ternera o 145°F (62,8°C)
cordero
Came de res, ternera o cordero motida 160°F (71,1°C)
Aves enteras (Pavo, polio, pato,etc.) 165°F (73,9°C)
Aves motidas o en trozos (pechuga de 165°F (73,9°C)
polio, etc.)
*Departamento de agricuttura de EE.UU.

Para comprarlas piezas para conversi6n a gas natural
Ilamea Searsal
1-800-4-MY-HOME®
Kit paraconversion a gas natural
$61oun tecnico de gascalificado puede convertirsu
parrillaa gas natural con estekitde conversi6n Para
convertir estaparrilla el tecnico necesitaraeste kit de
conversi6n.
Manguerade 12' (3,7 m) paragas natural
Sidesea convertir la parrilla a gas natural,el tecnico
necesitaraen la mayoria de los casos esta manguerade
extensi6n de 12' (3,7m) con 3/8" ID (diametrointerno), la
cual vieneincluida en el kit deconversi6n degas natural.
11

Para la conexion de gas natural
Preparacion:
1. Cierreel suministrode gasy retire la tapa del lado de
suministrodel gas.
2. Recomendaci6n: Instale unavalvula decorte en el
ladodel suministrode gas antes de instalarel
conector.
3. El conectordeberainstalarlountecnico autorizadode
acuerdocon la normativa nacional para combustibles
degas (NFPA54/ANSI223.1).
4. Antes de insertarel tap6n, abra el suministro de gas y
haga la pruebade fuga entodas las conexiones
incluyendo el vastagode la valvula decorte y la
aberturadel conector.Para mejoresresultados,use
una soluci6n de aguay jab6n sin amoniaco.
Instrucciones para el funcionamiento:
1. Para conectar,hale el manguitodel conector.
Manguito
Soporte _ Tap6n
2. Inserteel tap6n y libereel manguito.
3. Presione el tap6nhasta queel manguitosalgaa
presi6n. (Elgasfluira automaticamente.No conectar el
tap6nadecuadamente alconector impedirael flujo de
gas a launidad).
Requisitosde gas
Gas LP
Sisu parrilla es paragas LP,el reguladorque se
suministra esta configuradoparauna columna de agua
(WC)de 11pulgadas (27,9 cm) yes para uso congas LP
Qnicamente.El reguladory la manguera que suministrala
fabrica deben utilizarsecon untanque de gas LPde 20 Ib
(9,1 kg).
Gas natural
Sisu parrilla es paragas natural,esta configuradopara
una columnade agua (WC) de7 pulgadas (17,8 cm)y es
parauso congas LP Qnicamente.El tamaSodeltubo de
gas y el largo de la tuberia que viene desde la tuberia de
gas de la casa afectan la presi6ndel gas. Siga las
recomendacionesque se detallan enel siguiente cuadro.
Distancia
Hasta25' (7,6 m)
26-50' (7,9-15,2m)
51-100'(15,5-30,5m)
Masde 101' (30,8 m)
Desdela casa hasta laparrilla
TamaSode la tuberia
3/8" (9,5 mm)dediametro
1/2" (1,3cm) de diametro
2/3de la Iongitud:3/4" (1,9cm)
dediametro
1/3de la Iongitud: 1/2"(1,3cm)
dediametro
3/4" (1,9 mm)dediametro
Soporte Manguito
\\
Para desconectar
1. Hale el manguitohacia atras.Saqueel tap6n del
conector.(Elgas se cerrara automaticamente).
2. Cierre lavalvulade cortey cambie las tapas
guardapolvoen el conectory el tap6n.
12

Clave Cant Descripcion
1 1 MANIJA DE LA CUBIERTA (IZQ)
2 4 BASE DE LA MANIJA
3 1 CUBIERTA IZQUIERDA
4 1 INDICADOR DETEMPERATURA
5 1 ARANDELA
6 1 CUBIERTA DERECHA
7 2 REJILLA DE COCCION (QUEMADOR
PPAL.)
8 1 REJILLA PARA CALENTAR IZQ.
9 1 REJILLA PARA CALENTAR DER.
10 1 REJILLA DE COCCl0N (QUEMADOR
PARAASAR A FUEGO DIRECTO)
11 3 DIFUSOR DE CALOR
12 1 QUEMADOR LATERAL
13 1 PASADORDEENCENDIDO(QMDRPPAL)
14 1 PASADORDEENCENDIDO(QMDRPPAL)
15 1 PASADORDEENCENDIDO(QMDRPPAL)
16 1 PASADORDEENCENDIDO(QMDRPPAL)
17 3 QUEMADOR PRINCIPAL
18 3 PASADOR R
19 1 MANIJA DE LA CUBIERTA (DER)
20 1 CABEZAL DE GAVETA
21 1 CUERPO DE LA GAVETA
22 1 ANAQUEL LATERAL
23 2 MANGUITO DE LA CUBIERTA
24 1 CAJA DEL QUEMADOR
25 1 REJILLA DEL QUEMADOR LATERAL
26 1 CUBIERTA DE COCClON LATERAL
27 1 EJE LATERAL DE ESTUFA
28 1 CAJA RECOLECTORA
29 1 ESTUFA LATERAL
30 1 PASADOR DE ENCENDIDO
(QUEMADOR LATERAL)
31 1 QUEMADOR LATERAL
32 1 ABRIDOR DE BOTELLAS
33 1 VALVULA DE QUEMADOR LATERAL
34 5 GUARNICION METALICA
35 5 PERILLA
36 1 MANGUERA DEL QUEMADOR PPAL.
37 1 REGULADOR DE PRESION DEGAS LP
38 1 COLECTOR
39 1 CAJA DE CONTROL
Clave Cant Descripcion
40 1 ENCENDEDOR ELECTRICO
41 1 PANEL IZQUIERDO
42 1 BARRA
43 2 IMAM
44 1 BANDEJARECOLECTORA
45 1 SOPORTE DE BANDEJA
RECOLECTORA
46 1 PARTE SUPERIOR DEL PANEL
TRASERO
47 1 SOPORTE DELARO DEL TANQUE
48 1 ARO DEL TANQUE
49 1 PARTE INFERIOR DEL PANEL
POSTERIOR
50 1 PANELDERECHO
51 2 RUEDACON BLOQUEO
52 1 PANEL INFERIOR
53 1 SOPORTE DEL TANQUE
54 1 SOPORTE DEL PANEL LATERAL
(DERECHO)
55 2 RUEDA
56 1 ENCENDEDOR MANUAL
57 1 PUERTADERECHA
58 1 SOPORTE DEL PANEL LATERAL
(IZQUIERDO)
59 1 PUERTA IZQUIERDA
60 2 MANIJA DE LA PUERTA
Nose ilustra
1 PAQUETEDE ACCESORIOS
2 MANUAL DEL PRODUCTO
Si hay accesorios faltantes o
da_ados despues de desempacar la
parrilla, Ilame al 1-800-482-0131 para
obtener un reemplazo.
Para pedir piezas de repuesto
despues de usar la parrilla Ilame a
Sears al 1-800-4-MY-HOME.
13

®
® ® ® ®
® ®
®
®
@ ®
®
@ @ @ ®®@@@ @
@
®
\
®® ® ® ®
@
@
@
@
@
@
@ @ @ @@ @@
14

COMO DESEMPACAR
Despuesde retirartodaslas piezasde la partesuperior dela cajadel embalaje ycuando la Onicaparte que quede
sea el cabezalde la parrilla, utilice uncuchillo pararasgar los costadosde la caja. Tengacuidado con lasgrapas
que se encuentranen los bordesde la caja de embalaje.
Retire el empaque de poliestirenoparaacceder al cabezal de laparrilla.
Abra las tapasde la parrillay retire todas laspiezas empacadas y el materialde empaque.
ADVERTENCIA:Ensambley coloquela parrilla en una superficieplana y nivelada. Compare las piezas y
los accesorioscon la lista y los diagramas. No intenteensamblar si haypartes faltantes o dahadas.
Fijelas ruedas alpanel inferior con4 tornillos cada una comose ilustra. Fije las dos ruedas con
bloqueo en la parte posteriorde la parrilla. Despuesde fijar todas lasruedas,delevuelta al panel
inferior.
Panel inferior _'_ iI]__
' Ruedabloqueable
Tornillode 1/4-20x 5/8"
Cant.16
Rueda
Fijeel iman de lapuerta a los agujeros alfrente del panel inferiorcon 2 tornillos. No apriete
completamenteeneste momento.
Panel inferior i']_
Tornillode 5/32-32x 112"
Cant.2
Imande puerta

Deslicelapartesuperiordelsoportedeltanquehaciaadelantesobresusrielescomoseilustra.Fijelos
rielesalpanelinferiorconseistornillos.
Tornillode1/4-20x518"
Cant.6
SOPORTEDELTANQUE
Panelinferior
Fijeelpanelposterioralpanelinferiorcon4tornilloscomoseilustra.
PARTE INFERIOR DEL
PANELPOSTERIOR
Tornillode1/4-20x 518"
Cant.4
Panelinferior
16

Fijelos paneles laterales al panel inferiorcomo se ilustra. Paracada panellateral, haydos tornillos
para el panel posteriory tres para el inferior.Inserteprimero los tres tornillos del panel inferior.
Panelderecho
Panelizquierda
Tornillode 1/4-20x 5/8"
Cant. 10
Panelinferior trasero
Fijelos soportesdel panel lateral a los paneles lateralesy al panel inferior con3 tornillos cada uno
comose ilustra.
Panelizquierda
Panelderecho
Tornillode 1/4-20x5/8"
Cant.6
Soportedel panel lateral
17

Fije la parte superiordel panel posteriora los paneleslaterales con2 tornilloscada uno comose
ilustra.
Panelderecho
Panel izquierda
Partesuperiordel
panel trasero
Tornillode 1/4-20x5/8"
Cant.4
Deslice elsoportedel aro deltanque enel extremodel arodel tanque comose ilustra.Fijeel soporte a
la partesuperiordel panel posteriorcon 2 tornillos cada una como se ilustra.
Aro del tanque
Soportede aro del tanque
Partesuperiordel
paneltrasero
Tomillode 1/4-20x 5/8"
Cant.2
18

Fijela barrafrontal a lospaneles lateralescon 2 tornillos cada uno como se ilustra.
Panel izquierda iI_
Tornillode 1/4-20x 5/8"
°_ Cant.4
Panelderecho
Barra frontal
Fijeel soportedela bandeja recolectoraala barrafrontal y a la partesuperior del panelposterior con4
tornillos como se ilustra.NOTA:Las pesta_asde la bandeja degoteose conectan a la parte deafuera
de la barrafrontal.
Partesuperiordel
paneltrasero
Soportede la bandejade goteo
i/I/
Tornillode 1/4-20x5/8"
Cant.4
Barrafrontal
19

Deslice la bandejarecolectoraa traves de la partesuperiordel panel posterioryen el soportede la
bandeja recolectoracomose ilustra.
Soportede la bandejade goteo
Bandeja
de goteo
Paracada puerta,inserte el pasadorde bisagra inferioren el agujero en el panel inferior.Presione
haciaabajoel pasadordela bisagra parainsertarloenel agujeroen la pestaSaen la partesuperiordel
panel lateral. Ajuste el imande la puertadel panelinferior paraque haga contacto con las puertasy
apriete los tornillos del iman.
Puertaizquierda
Puerta derecha
20
Arandela5
Arandela 5
Cant.2

Cortelosamarresqueregulanelreguladorylavalvuladelquemadorlateralensulugardebajodel
paneldecontroldelcabezaldelaparrilla.Tengacuidadodenocortarloscablesdelencendido.Conla
ayudadeunasistente,levanteycoloqueelcabezaldelaparrillaenelgabinete.Loslateralesdel
cabezaldelaparrillavansobrelaspesta_asdefijaci6ndelgabinete.Cerci6resedequelavalvuladel
quemadorlateralyloscablesdelencendedorcuelguenfueradelgabineteyqueelreguladorcuelgue
dentrodelgabinete.Fijeelcabezalalgabinetecon4tornilloscomoseilustra.
Tornillode 1/4-20 x 5/8"
Cant. 4
Caja de
quemadores
Gabinete
Afloje los tres tornillos fijados al panel izquierdo de la caja del quemador 3 o 4 giros como se ilustra.
Suspendael anaquel laterala traves de los agujerosranurados ensu costadosobre los tres tornillos
que ha aflojado.Abra la tapa de la parrilla y utilice eltornillo para apretar el anaquel lateraldesde la
parte interiorde la cajadel quemadorcomo se ilustra.Apriete los tres tornillosque afloj6previamente.
Afloje
Tornillode 1/4-20x 3/8"
Cant.4
Anaquel lateral
21

Hale el cuerpo de la gaveta haciaafuera.
Asegure el cabezalde la gaveta al cuerpode la mismacon 3 tornillos encada lado comose ilustra.
Tornillode 5/32-32x 1/2"
Cant.6
Anaquel lateral
Cabezal de la
gaveta
Cuerpo de la
gaveta
Anaquel del quemadorlateral
Aflojelos cuatrotornillosfijados al panel derechode la cajadel quemador3 o 4 giros como se ilustra.
Suspendael anaqueldelquemador laterala travesdelos agujerosranuradosensu costadosobre los
cuatro tornillos que ha aflojado.Abra la tapa dela parrilla y utilice el tornillo enicopara apretarel
anaquel delquemador lateraldesde la parte interior de lacaja del quemadorcomo se ilustra.Apriete
los cuatro tornillosque afloj6 previamente. Fijeel abridorde botellas al anaquel quemadorlateralcon
2 tornillos comose ilustra.
Afloje
Tornillode3/16-24xIA"
Cant.2
Tornillode 1/4-20x 1-3/8"
Cant.1
Anaquel lateralde estufa
botellas
22

Anaquel del quemador lateral
Aflojey retirelosdostornillos quesostienen el quemadorlateralensu lugar.Alinee los dosagujerosde
tornillosde la guarnici6n metalicacon losdel panelde control delquemador lateral.Inserteel vastago
de controlde la valvulaa travesdel panel de control y de los agujerosprincipales de la guarnici6n
metalica.Fije la guarnici6n metalicaal panel de controly alvastagode control de la valvula con2
tornilloscomo se ilustra.Presionela perilla enel vastagodelcontroldela valvuladel quemadorlateral.
Anaquel del quemador
TornillodeM4x8
Cant.2
Bisel
Perilla
Vastago de controlde la valvula
del quemador lateral
Valvula del quemador lateral y cablede encendido
Insertela valvuladel quemadorlateral enel tubo del quemador lateral comose ilustra.Vuelva afijar el
quemadorlateralal anaquel conlos 2 tornillosque retiro anteriormente.Conecteel cable de encendido
del quemadorlateral al pasador.
Pasadorde encendido
Cablede encendido
Quemador lateral
Valvula del
quemadorlateral
PRECAUCION:Cerci6resede ue la valvulaeste dentro del tubo.
23

Instale los difusoresde calor, las rejillas de coccion y las rejillas para mantener caliente
Coloquelos difusores de calor, lasrejillasde cocci6n y las rejillas paracalentar comose ilustra. NOTA:
Los bordesdel difusor encajanen lasranuras al frente y parte posterior de la caja del quemador.El
agujero rectangularen la rejillade cocci6n va al frente.
Retire latapa de la bateria e inserteuna bateria AAconel polo positivoorientado haciaafuera.Vuelva a
colocar la tapa.
Rejillapara mantenercaliente
Difusorde calor
Rejilladel quemadorlateral
Rejillaspara cocinar
Bateria AA
Caja recolectora
Alinee la caja recolectoracon los 2 tornillos cabezaredonda en la parte posterior del anaqueldel
quemadorlateraly presionela cajahaciaabajo parafijarla en su lugar.Tambienpuede invertir la cajay
fijarla paraalargarel anaquelcomo se ilustra.
Anaquel del
quemadorlateral
Caja
24

Instalacion del tanque LP
Abralas puertasfrontalesdel gabinete.Deslice el soportedeltanque haciaafuera.Coloquela base del
tanqueenel agujerodesoportedel tanque.Conecteel reguladoral tanque (refieraseala pagina 5de la
secci6nde usoy cuidado). Desliceel tanque nuevamenteenel gabinete.
@
©
25

Problema
Causa posible
Accion correctiva
La parrilla o el
quemador lateral
no encienden
La llama del
quemador es
amarilla y huele a
gas
Llamaradas
excesivas.
1. Los cables estan flojos o
desconectados
2. La bateria esta muerta
3. Esta tratando de
encender el quemador
equivocado
4. El quemador no encaja
con la valvula de control
5. No hay flujo de gas
1. El quemador esta
bloqueado.
2. Hay fuga de gas.
1. Acumulaci6n de grasa.
2. Excesiva cantidad de
grase en la came.
3. Excesiva temperatura de
cocci6n.
1. Reconecte los cables o reemplace el
ensamble de los cables.
2. Cambie la bateria por una nueva.
3. Refierase a las instrucciones de
encendido.
4. Cerci6rese de que las valvulas estan
colocadas dentro de los tubos del
quemador.
5. Cerci6rese de que la manguera de gas
este adecuadamente conectada a la
parrilla y que la alimentaci6n de gas
este activada.
1. Revise la entrada del quemador en
busca de una obstrucci6n,
especialmente arafias y otros insectos.
2. Revise para detectar la fuente de los
escapes de gas.
1. Limpie los quemadores y dentro de la
parrilla
2. Recorte la grasa de la carne antes de
asar.
3. Baje la temperatura.
26

Problema
Causa posible
Accion correctiva
El quemador se
apaga.
Poco calor, gas
natural.
Se genera poco
calor con la perilla
en la posici6n "HI"
(alto).
1. Defectos del
quemador.
2. Poco suministro de
gas.
La tuberia de gas no
tiene el largo
adecuado
1. El quemador esta
bloqueado.
2. La manguera no
esta
adecuadamente
ensamblada
3. Baja presi6n de
gas.
1. Revise si hay defectos en el quemador y
la instalaci6n adecuada del quemador.
2. AsegOrese de que el suministro de gas
sea suficiente.
Siga las recomendaciones que se detallan
en el siguiente cuadro.
Desde la casa hasta la parrilla
Distancia Tama_o de la tuberia
Hasta 25' (7,6 3/8" (9,5 mm) de diametro
m)
26-50' 1/2" (1,3 cm) de diametro
(7,9-15,2 m)
51-100'
(15,5-30,5 m)
1/3 de la Iongitud: ½" (1,3
cm) de diametro
2/3 de la Iongitud: 3/4" (1,9
cm) de diametro
1. AsegOrese de que el problema este
aislado solo a un quemador. Si es asi,
limpie el orificio y el quemador, y remueva
cualquier obstrucci6n del orificio.
2. Verifique si hay una manguera de
combustible enroscada o doblada.
3. Verifique si la presi6n y el suministro de
gas son correctos.
27

Su hogar
Para experta soluci6n de problemas y consejos practicos para el hogar:
Administracibn de mi hogar
www.managemyhome.com
Para reparaci6n - en su hogar - de todos los equipos grandes de marca, equipos de
cesped y jardin o para sistemas de calefacci6n o aire acondicionado,
iindependientemente de quien los haya fabricado, independientemente de
quien los venda!
Para piezas de repuesto, accesorios y manuales del propietario que necesite para
hacerlo usted mismo.
Para instalaci6n profesional de Sears o artefactos para el hogar y articulos tales como
abridores de puertas y calentadores de agua.
1-800-4-MY-HOME ®(1-800-469-4663)
Llame de dia o de noche (EE.UU. y Canada)
www.sears.com www.sears.ca
Su hogar
Para reparaci6n de articulos como aspiradoras, equipos de cesped y electr6nicos,
Ilame a cualquier hora para encontrar la ubicaci6n mas cercana de un Centro de
Servicio de Piezas y Reparaci6n de Sears.
1-800-482-0131 (EE.UU.) 1-800-482-0131 (Canada)
www.sears.com www.sears.ca
Para adquirir un acuerdo de protecci6n sobre un producto al cual Sears presta servicio:
1-800-827-6655 (EE.UU.) 1-800-361-6665 (Canad_l)
Para pedir semicio de reparaci6n
a domicilio, y para ordenar piezas:
1-888-SU-HOGAR _
Au Canada pour service en fran£ais:
1-800-LE-FOYER Mc
(1-800-533-6937)
www.sears.ca
® Registered Trademark _ :Trademark / Se_ice Mark of Sears Brands;, LLC
® Marca R_istrada / tM Marca de Fabdca / SMMarca de Servicie de Sears Brands LLC
_,_cMarque de commerce / #p Marque dep_ee de Seats Brands_ LLC
28
® Sears Brands LLC
-
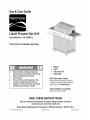 1
1
-
 2
2
-
 3
3
-
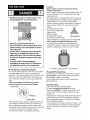 4
4
-
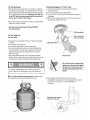 5
5
-
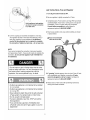 6
6
-
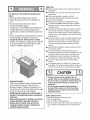 7
7
-
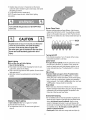 8
8
-
 9
9
-
 10
10
-
 11
11
-
 12
12
-
 13
13
-
 14
14
-
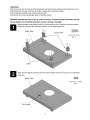 15
15
-
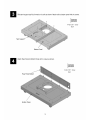 16
16
-
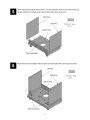 17
17
-
 18
18
-
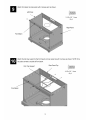 19
19
-
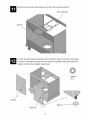 20
20
-
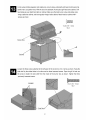 21
21
-
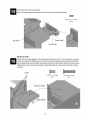 22
22
-
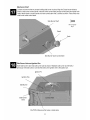 23
23
-
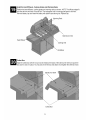 24
24
-
 25
25
-
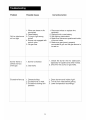 26
26
-
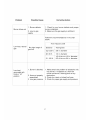 27
27
-
 28
28
-
 29
29
-
 30
30
-
 31
31
-
 32
32
-
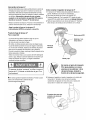 33
33
-
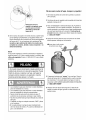 34
34
-
 35
35
-
 36
36
-
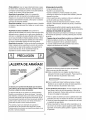 37
37
-
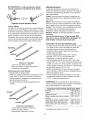 38
38
-
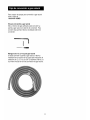 39
39
-
 40
40
-
 41
41
-
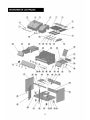 42
42
-
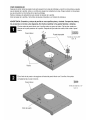 43
43
-
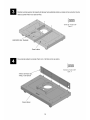 44
44
-
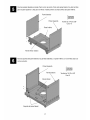 45
45
-
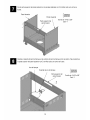 46
46
-
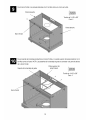 47
47
-
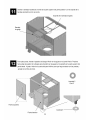 48
48
-
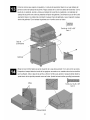 49
49
-
 50
50
-
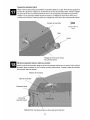 51
51
-
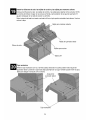 52
52
-
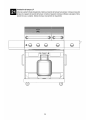 53
53
-
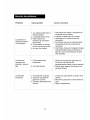 54
54
-
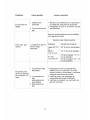 55
55
-
 56
56


Kenmore 148.16656010 Manual de usuario
- Categoría
- Barbacoas
- Tipo
- Manual de usuario
en otros idiomas
- English: Kenmore 148.16656010 User manual
Artículos relacionados
-
Kenmore 146.23676310 El manual del propietario
-
-
-
-
-
-
-