Panasonic DMRE95H Instrucciones de operación
- Categoría
- Reproductores de DVD
- Tipo
- Instrucciones de operación
Este manual también es adecuado para

Operating Instructions
Instrucciones de funcionamiento
DVD Video Recorder
Grabadora de DVD vídeo
Model No. DMR-E95H
HARD DISK DRIVE
Web Site: http://www.panasonic-europe.com
Dear customer
Thank you for purchasing this product. For optimum
performance and safety, please read these
instructions carefully.
Before connecting, operating or adjusting this
product, please read these instructions completely.
Please keep this manual for future reference.
Estimado cliente
Muchísimas gracias por haber adquirido este
aparato.
Lea con atención estas instrucciones para obtener
las máximas prestaciones y seguridad.
Antes de conectar, operar o ajustar este producto,
sírvase leer estas instrucciones completamente.
Guarde este manual.
Region number supported by
this unit
Region numbers are allocated to DVD players
and software according to where they are sold.
≥The region number of this unit is “2”.
≥The unit will play DVDs marked with labels
containing “2” or “ALL”.
Número de región soportado por
esta unidad
A los reproductores DVD y al software se les
asigna números de región según la zona donde
son vendidos.
≥El número de región de esta unidad es el “2”.
≥La unidad reproducirá DVDs con etiquetas que
tengan “2” o “ALL”.
Example:
Ejemplo:
2 ALL
3
5
2
RQT7463-1EEG
7463en.book Page 1 Tuesday, March 8, 2005 11:07 AM

2
RQT7463
Getting started
SUOMI
NORSK
CAUTION!
THIS PRODUCT UTILIZES A LASER.
USE OF CONTROLS OR ADJUSTMENTS OR
PERFORMANCE OF PROCEDURES OTHER THAN THOSE
SPECIFIED HEREIN MAY RESULT IN HAZARDOUS
RADIATION EXPOSURE.
DO NOT OPEN COVERS AND DO NOT REPAIR YOURSELF.
REFER SERVICING TO QUALIFIED PERSONNEL.
WARNING:
TO REDUCE THE RISK OF FIRE, ELECTRIC SHOCK OR
PRODUCT DAMAGE, DO NOT EXPOSE THIS APPARATUS
TO RAIN, MOISTURE, DRIPPING OR SPLASHING AND THAT
NO OBJECTS FILLED WITH LIQUIDS, SUCH AS VASES,
SHALL BE PLACED ON THE APPARATUS.
CAUTION!
≥DO NOT INSTALL OR PLACE THIS UNIT IN A BOOKCASE,
BUILT-IN CABINET OR IN ANOTHER CONFINED SPACE.
ENSURE THE UNIT IS WELL VENTILATED. TO PREVENT
RISK OF ELECTRIC SHOCK OR FIRE HAZARD DUE TO
OVERHEATING, ENSURE THAT CURTAINS AND ANY
OTHER MATERIALS DO NOT OBSTRUCT THE
VENTILATION VENTS.
≥DO NOT OBSTRUCT THE UNIT’S VENTILATION OPENINGS
WITH NEWSPAPERS, TABLECLOTHS, CURTAINS, AND
SIMILAR ITEMS.
≥DO NOT PLACE SOURCES OF NAKED FLAMES, SUCH AS
LIGHTED CANDLES, ON THE UNIT.
≥DISPOSE OF BATTERIES IN AN ENVIRONMENTALLY
FRIENDLY MANNER.
THIS UNIT IS INTENDED FOR USE IN MODERATE CLIMATES.
This product may receive radio interference caused by mobile
telephones during use. If such interference is apparent, please
increase separation between the product and the mobile
telephone.
The socket outlet shall be installed near the equipment and
easily accessible or the mains plug or an appliance coupler shall
remain readily operable.
Keep the small memory cards such as the SD
Memory Card out of reach of children. If
swallowed, seek medical advice immediately.
R - AUDIO - L
VIDEO
PR
S-VIDEO
R - AUDIO - L
VIDEO
S-VIDEO
OPTICAL
OUT
AV4 I N
RF IN
RF OUT
DIGITAL AUDIO OUT
(PCM/BITSTREAM)
COMPONENT
VIDEO OUT
(PROGRESSIVE/
INTERLACE)
PB
Y
AV1 (TV)
AV2 (DECODER/EXT)
AC IN
RQLS0233
-
-
-
-
-
-
-
-
-
-
VISIBLE AND INVISIBLE LASER RADIATION WHEN OPEN.
AVOID DIRECT EXPOSURE TO BEAM.
DANGER
(FDA 21 CFR)
(IEC60825-1)
VISIBLE AND INVISIBLE LASER RADIATION WHEN OPEN.
AVOID EXPOSURE TO BEAM.
CAUTION
RAYONNEMENT LASER VISIBLE ET INVISIBLE EN CAS D’OUVERTURE.
EXPOSITION DANGEREUSE AU FAISCEAU.
ATTENTION
SYNLIG OG USYNLIG LASERSTRÅLING VED ÅBNING.
UNDGÅ UDSÆTTELSE FOR STRÅLING.
ADVARSEL
AVATTAESSA OLET ALTTIINA NÄKYVÄÄ JA NÄKYMÄTÖN
LASERSÄTEILYLLE. ÄLÄ KATSO SÄTEESEEN.
VARO!
SYNLIG OCH OSYNLIG LASERSTRÅLNING NÄR DENNA DEL
ÄR ÖPPNAD. BETRAKTA EJ STRÅLEN.
VARNING
SYNLIG OG USYNLIG LASERSTRÅLING NÅR DEKSEL ÅPNES.
UNNGÅ EKSPONERING FOR STRÅLEN.
ADVARSEL
SICHTBARE UND UNSICHTBARE LASERSTRAHLUNG, WENN ABDECKUNG
GEÖFFNET. NICHT DEM STRAHL AUSSETZEN.
VORSICHT
(Inside of product)
(Tuotteen sisällä)
(Produktets innside)
VAROITUS!
LAITTEEN KÄYTTÄMINEN MUULLA KUIN TÄSSÄ
KÄYTTÖOHJEESSA MAINITULLA TAVALLA SAATTAA
ALTISTAA KÄYTTÄJÄN TURVALLISUUSLUOKAN 1
YLITTÄVÄLLE NÄKYMÄTTÖMÄLLE LASERSÄTEILYLLE.
VAROITUS:
TULIPALO-, SÄHKÖISKUVAARAN TAI TUOTETTA
KOHTAAVAN MUUN VAHINGON VÄHENTÄMISEKSI EI
LAITETTA SAA ALTISTAA SATEELLE, KOSTEUDELLE,
VESIPISAROILLE TAI ROISKEELLE, EIKÄ NESTETTÄ
SISÄLTÄVIÄ ESINEITÄ, KUTEN ESIMERKIKSI MALJAKOITA,
SAA ASETTAA LAITTEEN PÄÄLLE.
VAROITUS!
≥ÄLÄ ASENNA TAI LAITA TÄTÄ LAITETTA
KABINETTITYYPPISEEN KIRJAKAAPPIIN TAI MUUHUN
SULJETTUUN TILAAN, JOTTA TUULETUS ONNISTUISI.
VARMISTA, ETTÄ VERHO TAI MIKÄÄN MUU MATERIAALI
EI HUONONNA TUULETUSTA, JOTTA VÄLTETTÄISIIN
YLIKUUMENEMISESTA JOHTUVA SÄHKÖISKU- TAI
TULIPALOVAARA.
≥ÄLÄ PEITÄ LAITTEEN TUULETUSAUKKOJA
SANOMALEHDELLÄ, PÖYTÄLIINALLA, VERHOLLA TAI
MUULLA VASTAAVALLA ESINEELLÄ.
≥ÄLÄ ASETA PALAVAA KYNTTILÄÄ TAI MUUTA AVOTULEN
LÄHDETTÄ LAITTEEN PÄÄLLE.
≥HÄVITÄ PARISTOT LUONTOA VAHINGOITTAMATTOMALLA
TAVALLA.
TÄMÄ LAITE ON TARKOITETTU KÄYTETTÄVÄKSI LEUDOSSA
ILMASTOSSA.
Laite tulee asettaa lähelle verkkopistorasiaa ja pistokkeen täytyy
olla sellaisessa asennossa, että siihen on helppo tarttua
ongelman sattuessa.
ADVARSEL!
DETTE PRODUKTET ANVENDER EN LASER.
BETJENING AV KONTROLLER, JUSTERINGER ELLER
ANDRE INNGREP ENN DE SOM ER BESKREVET I DENNE
BRUKSANVISNING, KAN FØRE TIL FARLIG BESTRÅLING.
DEKSLER MÅ IKKE ÅPNES, OG FORSØK ALDRI Å
REPARERE APPARATET PÅ EGENHÅND. ALT SERVICE OG
REPARASJONSARBEID MÅ UTFØRES AV KVALIFISERT
PERSONELL.
ADVARSEL:
FOR Å REDUSERE FAREN FOR BRANN, ELEKTRISK STØT
ELLER SKADER PÅ PRODUKTET, MÅ DETTE APPARATET
IKKE UTSETTES FOR REGN, FUKTIGHET, VANNDRÅPER
ELLER VANNSPRUT. DET MÅ HELLER IKKE PLASSERES
GJENSTANDER FYLT MED VANN, SLIK SOM
BLOMSTERVASER, OPPÅ APPARATET.
ADVARSEL!
≥APPARATET MÅ IKKE PLASSERES I EN BOKHYLLE, ET
INNEBYGGET KABINETT ELLER ET ANNET LUKKET STED
HVOR VENTILASJONSFORHOLDENE ER
UTILSTREKKELIGE. SØRG FOR AT GARDINER ELLER
LIGNENDE IKKE FORVERRER
VENTILASJONSFORHOLDENE, SÅ RISIKO FOR
ELEKTRISK SJOKK ELLER BRANN FORÅRSAKET AV
OVERHETING UNNGÅS.
≥APPARATETS VENTILASJONSÅPNINGER MÅ IKKE
DEKKES TIL MED AVISER, BORDDUKER , GARDINER OG
LIGNENDE.
≥PLASSER IKKE ÅPEN ILD, SLIK SOM LEVENDE LYS, OPPÅ
APPARATET.
≥BRUKTE BATTERIER MÅ KASSERES UTEN FARE FOR
MILJØET.
DETTE APPARATET ER BEREGNET TIL BRUK UNDER
MODERATE KLIMAFORHOLD.
Utstyret bør plasseres i nærheten av AC-stikkontakten, og
støpslet må være lett tilgjengelig hvis det skulle oppstå
problemer.
2
7463en.book Page 2 Tuesday, March 8, 2005 11:07 AM

3
RQT7463
Getting started
Table of contents
Accessories . . . . . . . . . . . . . . . . . . . . . . . . . . . . . . . 3
Useful features . . . . . . . . . . . . . . . . . . . . . . . . . . . . . 4
The remote control. . . . . . . . . . . . . . . . . . . . . . . . . . 4
Control reference guide. . . . . . . . . . . . . . . . . . . . . . 5
STEP 1
Connection . . . . . . . . . . . . . . . . . . . . . . . . . 6
STEP
2
Channel reception settings. . . . . . . . . . . 10
STEP 3
Set up to match your television
and remote control. . . . . . . . . . . . . . . . . . . . . . . . 12
To enjoy progressive video. . . . . . . . . . . . . . . . . . . . . . . . . . . . 12
HDD, disc and card information . . . . . . . . . . . . . . 14
Recording television programmes . . . . . . . . . . . . 16
Recording modes and approximate recording times . . . . . . . . 17
Playing while you are recording . . . . . . . . . . . . . . . . . . . . . . . . 17
Flexible Recording . . . . . . . . . . . . . . . . . . . . . . . . . . . . . . . . . . 18
Direct TV Recording . . . . . . . . . . . . . . . . . . . . . . . . . . . . . . . . 18
Recording from satellite/digital receiver or decoder. . . . . . . . . 18
Timer recording . . . . . . . . . . . . . . . . . . . . . . . . . . . 19
Using SHOWVIEW number to make timer recordings. . . . . . . . . 19
Manually programming timer recordings . . . . . . . . . . . . . . . . . 20
Check, change or delete a programme . . . . . . . . . . . . . . . . . . 21
Linked timer recordings with external equipment (EXT LINK)
. . 21
Playing recorded video contents/Playing play-
only discs . . . . . . . . . . . . . . . . . . . . . . . . . . . . . . . 22
Operations during play. . . . . . . . . . . . . . . . . . . . . . . . . . . . . . . 23
Editing operations during play . . . . . . . . . . . . . . . . . . . . . . . . . 24
Changing audio . . . . . . . . . . . . . . . . . . . . . . . . . . . . . . . . . . . . 24
Using menus to play MP3 . . . . . . . . . . . . . . . . . . . 25
Playing still pictures . . . . . . . . . . . . . . . . . . . . . . . 26
Useful functions during still picture play. . . . . . . . . . . . . . . . . . 27
Using on-screen menus and Status messages. . 28
On-screen menus . . . . . . . . . . . . . . . . . . . . . . . . . . . . . . . . . . 28
Status messages . . . . . . . . . . . . . . . . . . . . . . . . . . . . . . . . . . . 29
Editing titles/chapters . . . . . . . . . . . . . . . . . . . . . . 30
Editing titles/chapters and playing chapters. . . . . . . . . . . . . . . 30
Title operations . . . . . . . . . . . . . . . . . . . . . . . . . . . . . . . . . . . . 31
Chapter operations . . . . . . . . . . . . . . . . . . . . . . . . . . . . . . . . . 31
Creating, editing and playing play lists . . . . . . . . 32
Creating play lists. . . . . . . . . . . . . . . . . . . . . . . . . . . . . . . . . . . 32
Editing and playing play lists/chapters . . . . . . . . . . . . . . . . . . . 33
Play list operations. . . . . . . . . . . . . . . . . . . . . . . . . . . . . . . . . . 33
Chapter operations . . . . . . . . . . . . . . . . . . . . . . . . . . . . . . . . . 33
Editing still pictures. . . . . . . . . . . . . . . . . . . . . . . . 34
Picture and folder operation. . . . . . . . . . . . . . . . . . . . . . . . . . . 34
Transferring (dubbing) titles or play lists . . . . . . 35
One Touch Transfer (dubbing) . . . . . . . . . . . . . . . . . . . . . . . . . 36
Transferring (dubbing) using the transferring (dubbing) list . . . 36
Transferring (dubbing) a finalized DVD-R . . . . . . . . . . . . . . . . . 38
Recording from a video cassette recorder . . . . . 39
Manual recording . . . . . . . . . . . . . . . . . . . . . . . . . . . . . . . . . . . 39
DV automatic recording (DV AUTO REC). . . . . . . . . . . . . . . . . 39
Transferring (dubbing) still pictures . . . . . . . . . . 40
Transferring (dubbing) using the transferring (dubbing) list . . . 40
Transferring (dubbing) all the still pictures on a card
—COPY ALL PICTURES . . . . . . . . . . . . . . . . . . . . . . . . . . . . . 41
FUNCTIONS window . . . . . . . . . . . . . . . . . . . . . . . 41
HDD, disc and card management . . . . . . . . . . . . 42
Setting the protection . . . . . . . . . . . . . . . . . . . . . . . . . . . . . . . . 42
Providing a disc with a name . . . . . . . . . . . . . . . . . . . . . . . . . . 42
Erasing all titles and play lists—Erase all titles. . . . . . . . . . . . . 42
Erasing all the contents of a disc or card—Format. . . . . . . . . . 43
Enabling DVD-R to be played on other equipment—Finalize . . 43
Entering text . . . . . . . . . . . . . . . . . . . . . . . . . . . . . 44
Changing the unit’s settings . . . . . . . . . . . . . . . . 45
Common procedures . . . . . . . . . . . . . . . . . . . . . . . . . . . . . . . . 45
Summary of settings. . . . . . . . . . . . . . . . . . . . . . . . . . . . . . . . . 45
Tuning . . . . . . . . . . . . . . . . . . . . . . . . . . . . . . . . . . . . . . . . . . . . 49
TV System . . . . . . . . . . . . . . . . . . . . . . . . . . . . . . . . . . . . . . . . 50
Clock settings . . . . . . . . . . . . . . . . . . . . . . . . . . . . . . . . . . . . . . 51
Child Lock . . . . . . . . . . . . . . . . . . . . . . . . . . . . . . . 51
Specifications . . . . . . . . . . . . . . . . . . . . . . . . . . . . 52
Glossary. . . . . . . . . . . . . . . . . . . . . . . . . . . . . . . . . 53
Frequently asked questions. . . . . . . . . . . . . . . . . 55
Error messages . . . . . . . . . . . . . . . . . . . . . . . . . . . 56
Troubleshooting guide . . . . . . . . . . . . . . . . . . . . . 57
Safety precautions . . . . . . . . . . . . . . . . . . . . . . . . 60
Maintenance/HDD, disc and card handling. . . . . 61
Index. . . . . . . . . . . . . . . . . . . . . . . . . . . . . . . . . . . . 62
Getting started
Recording
Playing back
Editing
Transfer (Dubbing)
Convenient functions
Reference
Accessories
Please check and identify the supplied accessories.
∏∏ ∏ ∏∏
1 Remote control
(EUR7721KM0)
1 AC mains lead
≥For use with this unit only. Do not
use it with other equipment.
1 RF coaxial cable 2 Batteries
for remote control
1 Audio/video cable
3
7463en.book Page 3 Tuesday, March 8, 2005 11:07 AM

4
RQT7463
Getting started
Useful features
This DVD Video recorder records high quality images to rapid random access capable HDD (Hard disk drive) and DVD-RAM. This
has resulted in many new features that out perform older tape formats. The following information summarizes a few of these
features.
Instant recording
You no longer need to search for empty disc space. By
pressing the recording button, the unit finds available
recording space and begins recording right away. There is no
need to worry about overwriting already recorded content.
HDD recording
You can keep on recording your favorite programmes to an
internal HDD that is able to record up to 284 hours [EP (8
Hour) mode].
You can also high speed transfer (dub) your favorite
programmes to DVD-RAM or DVD-R and create a backup
disc.
SD/PC card slot, DV input terminal
This unit is equipped with interfaces that allow networking
with digital equipment.
≥The SD/PC card slot of this unit lets you transfer (dub) digital
camera photographs from a card to DVD-RAM for easy storage
without using a computer.
≥The DV automatic recording function of this unit lets you easily
transfer (dub) digital images to the HDD by connecting only a
single DV cable.
Instant play
There is no need to rewind or search forward. Direct
Navigator guides you to the beginning of the recorded video
immediately.
∫ Batteries
≥Insert so the poles (i and j) match those in the remote control.
≥Do not use rechargeable type batteries.
≥Do not mix old and new batteries.
≥Do not use different types at the same time.
≥Do not heat or expose to flame.
≥Do not take apart or short circuit.
≥Do not attempt to recharge alkaline or manganese batteries.
≥Do not use batteries if the covering has been peeled off.
Mishandling of batteries can cause electrolyte leakage which can
damage items the fluid contacts and may cause a fire.
Remove if the remote control is not going to be used for a long
period of time. Store in a cool, dark place.
[Note]
If you cannot operate the unit or television using the remote control
after changing the batteries, please re-enter the codes (➡page 13).
∫ Use
Chasing playback
There is no need to wait until
recording is complete. Without
stopping recording, you can play the
video currently being recorded from
its beginning.
Simultaneous Recording
and Playback
While recording, you can play
another video programme that was
recorded previously.
Time Slip
During play and also while recording,
you can jump to the scene you wish
to view by specifying the skip time.
The remote control
R6/LR6, AA, UM-3
30˚
20˚
30˚
20˚
Remote control signal sensor
7 m directly in front of the unit
The manufacturer accepts no responsibility and offers no compensation for loss of recorded or edited material due to a problem
with the unit or recordable media, and accepts no responsibility and offers no compensation for any subsequent damage caused by
such loss.
Examples of causes of such losses are
≥A disc recorded and edited with this unit is played in a DVD recorder or computer disc drive manufactured by another company.
≥A disc used as described above and then played again in this unit.
≥A disc recorded and edited with a DVD recorder or computer disc drive manufactured by another company is played in this unit.
4
7463en.book Page 4 Tuesday, March 8, 2005 11:07 AM

5
RQT7463
Getting started
Control reference guide
Remote control
VOLUME
CH
DIRECT TV REC
DVD
TV
AV
123
456
78
0
9
MANUAL SKIP
ShowView
CH
CANCEL
INPUT SELECT
SKIP
STOP
PAU SE
PLAY/x1.3
SLOW/SEARCH
FUNCTIONS
ENTER
DIRECT NAVIGATOR
TOP MENU
RETURN
SUB MENU
CREATE
CHAPTER
TIMER
EXT LINK
PROG/CHECK
REC MODEERASE
REC
AUDIO
TIME SLIP
STATUS
DISPLAY
F
A B C
DUBBING
HDD DVD
SD/PC
Turn the unit on (➡page 10, 11)
Direct TV recording (➡page 18)
Select channels and title numbers etc./
Enter numbers
Cancel
Basic operations for recording and play
Show Top menu/Direct Navigator (➡page 22, 30)
Show on-screen menu (➡page 28)
Show timer recording programme screen
(➡page 20)
Erase items (➡page 24)
Programme recording standby/release
(➡page 19, 20)
Show sub menu (➡page 30)
Linked timer recordings with external equipment
(➡page 21)
Manual tuning operation (➡page 49)
Television operations (➡page 13)
Channel select (➡page 16)
Show S
HOWVIEW screen (➡page 19)
Skip 30 seconds forward (➡page 23)
Show FUNCTIONS window (➡page 41)
Selection/Enter, Frame-by-frame (➡page 10, 23)
Return to previous screen
Show status messages (➡page 29)
Skip the specified time/Display the television image
as a picture-in-picture (➡page 17, 23)
Start recording (➡page 16)
Select audio (➡page 24)
Create chapter (➡page 24)
Change recording mode (➡page 16)
Input select (AV1, AV2, AV3, AV4 or DV)
(➡page 18, 39)
Select drive (HDD, DVD, SD or PC)
(➡page 16, 22, 27)
One touch transfer (dubbing) (➡page 36)
Main unit
The unit’s display
OPEN/CLOSE
REC
/
x
1.3
TIME SLIP
CH
TIME SLIP
DRIVE SELECT
SD PCDVDHDD
SD CARD PC CARD EJECT
HDD DVD
AV3
S-VIDEO IN VIDEO IN AUDIO IN DV IN
R
L/MONO
Connection for camcorder
etc. (➡page 39)
Skip the specified time/Display the
television image as a picture-in-picture
(➡page 17, 23)
Disc tray (➡page 16, 22)
Remote control signal sensor/
Start recording (➡page 16)
Standby/on switch (
Í
/I) (➡page 10, 11)
Press to switch the unit from on to standby mode or vice
versa. In standby mode, the unit is still consuming a small
amount of power.
Display (➡below)
Stop (➡page 16, 23)
Open/close disc tray (➡page 16, 22)
Time Slip indicator (➡page 17)
Start play
(➡page 22)
Lights when the HDD, DVD, SD
or PC drive is selected
Select drive (➡page 16, 22, 27)
Channel select (➡page 16)
Skip/Slow/Search
(➡page 23)
SD/PC card slot (➡page 26)
Connection for digital video (DV)
camcorder (➡page 39)
Rear panel terminals (➡page 7, 8)
Lights when the HDD or DVD drive is selected
HDD
EXT
Link
SD PC
XP
SP
LP
EP
REC
PLAY
DVD
VCD
.MIX
R
-
AM
REC
PLAY
EXT
Link
REC
PLAY
DVD
EXT
Link
REC
PLAY
EXT
Link
REC
PLAY
Recording mode
Timer recording indicator
Main display section
D.MIX (multi-channel DVD-Audio only)
When lit: down-mixed audio is played.
When off: the disc prevents down-mixing so only
the two front channels can be played.
Linked timer recordings
with external equipment
indicator
Disc type
Recording Playback
Recording/Playback
Card indicator
Transferring (dubbing) in progress indicator
e.g.,
[HDD]
HDD indicator
5
7463en.book Page 5 Tuesday, March 8, 2005 11:07 AM

6
RQT7463
Getting started
STEP 1
Connection
≥The equipment connections described are examples.
≥Before connection, turn off all equipment and read the appropriate operating instructions.
≥Peripheral equipment and optional cables sold separately unless otherwise indicated.
∫ Recommended connection for your television
Q Link functions
Q Link offers a range of convenient functions (For further details ➡page 54). Make sure to connect a fully wired 21-pin Scart cable to the
television if using the Q Link function.
The following systems from other manufacturers have similar function to Q Link from Panasonic. For details, refer to your television’s operating
instructions or consult your dealer.
≥Q Link (registered trademark of Panasonic)
≥DATA LOGIC (registered trademark of Metz)
≥Easy Link (registered trademark of Philips)
≥Megalogic (registered trademark of Grundig)
≥SMARTLINK (registered trademark of Sony)
∫ Examples of equipment you can connect to this unit’s terminals
∫ Do not connect the unit through a video cassette recorder
Video signals fed through video cassette recorders will be affected by copyright
protection systems and the picture will not be shown correctly on the television.
≥When connecting to a television with a built in VCR, connect to the input terminals on
the television side, not the VCR side.
∫ When the unit is not to be used for a long time
To save power, unplug it from the household mains socket. This
unit consumes a small amount of power, even when it is turned off
(approx. 3 W).
What kind of input terminal does your television have?
Required
cable(s)
Page No. for
connections
Page No. for TV
settings
Scart Highly recommended connection.
≥You can enjoy high-quality RGB video from this
unit by connecting to an RGB compatible
television.
≥If your television has the Q Link feature, you can
use a variety of useful functions.
Fully wired 21-
pin Scart cable
➡7
➡11
≥If it’s a Q Link
television ➡10
Component
video
These terminals provide a purer picture than the S-
Video terminal.
≥If your television is compatible with progressive
scan, you can enjoy high-quality progressive video.
If you have a progressive compatible CRT
television, we cannot recommend this connection
as some flickering may occur.
3 video cables ➡8 ➡11
S-Video This terminal achieves a more vivid picture than the
video terminal.
S-Video cable ➡8 ➡11
Audio/Video The most basic connection.
Audio/Video
cable (included)
➡8
➡11
AV IN
COMPONENT
VIDEO IN
S-VIDEO IN
AUDIO IN
R L
VIDEO IN
Television
Video cassette recorder
Camcorder
This unit
Amplifier
To AV3 or DV input terminals (front) (➡page 39)
To AV2 or AV4 input terminals (rear)
From AUDIO OUT terminals or
DIGITAL AUDIO OUT terminal
From AV1, AUDIO/VIDEO OUT or
COMPONENT VIDEO OUT terminals
Satellite/digital
receiver or decoder
Television
This unit
VCR
Television
VCR
This unit
Before moving the unit, ensure the disc tray is
empty.
Failure to do so will risk severely damaging the disc and
the unit.
6
7463en.book Page 6 Tuesday, March 8, 2005 11:07 AM

7
RQT7463
Getting started
When there is no 21-pin Scart terminal on the television (➡page 8)
∫ RGB
This refers to the three primary colours of light, red (R), green (G), and blue (B) and also the method of producing video that uses them. By
dividing the video signal into the three colours for transmission, noise is reduced for even higher quality images.
Connecting a television with 21-pin Scart terminal and VCR
R - AUDIO - L
VIDEO
PR
S-VIDEO
R - AUDIO - L
VIDEO
S-VIDEO
OPTICAL
OUT
AV4 IN
RF IN
RF OUT
DIGITAL AUDIO OUT
(PCM/BITSTREAM)
COMPONENT
VIDEO OUT
(PROGRESSIVE/
INTERLACE)
PB
Y
AV1 (TV)
AV2 (DECODER/EXT)
AC IN
AV IN
VHF/UHF
RF IN
VHF/UHF
RF IN
R L
AUDIO OUT VIDEO OUT
2 134
1
4
To the aerial
Splitter
Television’s
rear panel
Aerial
cable
VCR’s rear panel
Cooling fan
RF coaxial cable
This unit’s rear panel
Red White Yellow
Audio/Video cable
To household mains socket
(AC 220–240 V, 50 Hz)
Fully wired 21-pin Scart cable
You can also connect with the AV2 terminal
on this unit using the 21-pin Scart cable.
Red White Yellow
indicates included accessories.
indicates accessories not included.
are required connections. Connect in the numbered order.
AV1 terminal
If your television is equipped with RGB
input capability, by connecting with a
fully wired 21-pin Scart cable you can
see video using RGB output on this
unit (➡below).
To output in RGB select “RGB (without
component)” from “AV1 Output” in the
SETUP menu (➡page 48) after tuning
is completed (➡page 10, 11).
Use a splitter if you
also want to connect
the aerial to your VCR.
AC mains lead
Connect only after all other
connections are complete.
7
7463en.book Page 7 Tuesday, March 8, 2005 11:07 AM

8
RQT7463
Getting started
STEP 1
Connection
Connecting to the television using the 21-pin Scart cables (➡page 7)
∫ Component video output
Component signal outputs the colour difference signals (PB/PR) and luminance signal (Y) separately in order to achieve high fidelity in
reproducing colours. If the television is compatible with progressive output, a high quality picture can be output because this unit’s component
video output terminal outputs a progressive output signal (➡page 53).
For progressive output (➡page 12)
Connecting a television with AUDIO/VIDEO, S-VIDEO or COMPONENT VIDEO
terminals and VCR
R - AUDIO - L
VIDEO
PR
S-VIDEO
R - AUDIO - L
VIDEO
S-VIDEO
OPTICAL
OUT
AV4 IN
RF IN
RF OUT
DIGITAL AUDIO OUT
(PCM/BITSTREAM)
COMPONENT
VIDEO OUT
(PROGRESSIVE/
INTERLACE)
PB
Y
AV1 (TV)
AV2 (DECODER/EXT)
AC IN
VHF/UHF
RF IN
COMPONENT
VIDEO IN
S-VIDEO IN
VHF/UHF
RF IN
AUDIO IN
R L
VIDEO IN
R L
AUDIO OUT VIDEO OUT
2 134
1
4
To the aerial
Splitter
Video cable
Aerial
cable
Cooling fan
RF coaxial cable
This unit’s rear panel
Audio/Video cable
To household mains socket
(AC 220–240 V, 50 Hz)
You can also connect with the AV2 terminal
on this unit using the 21-pin Scart cable.
S-Video
cable
Audio/Video cable
Red White Yellow
Red White Yellow
Red White Yellow
Red White Yellow
When making this connection, ensure you
connect the audio cables to the corresponding
audio input terminals on the television.
indicates included accessories.
indicates accessories not included.
are required connections. Connect in the numbered order.
Television’s
rear panel
VCR’s rear panel
S-VIDEO OUT terminal
The S-VIDEO OUT terminal achieves a more
vivid picture than the VIDEO OUT terminal.
(Actual results depend on the television.)
COMPONENT VIDEO OUT terminal
These terminals can be used for either interlace or
progressive output and provide a purer picture than the
S-VIDEO OUT terminal (➡below).
≥Connect to terminals of the same colour.
Use a splitter if
you also want
to connect the
aerial to your
VCR.
AC mains lead
Connect only after all other
connections are complete.
8
7463en.book Page 8 Tuesday, March 8, 2005 11:07 AM

9
RQT7463
Getting started
≥Decoder here means the device used to decode scrambled broadcasts (Pay TV).
≥Change the “AV2 Input” and “AV2 Connection” settings in the SETUP menu to match the connected equipment (➡page 48) after tuning is
completed (➡page 10, 11).
Viewing video from the decoder on the television while the
unit is stopped, or while recording
If you connected the television to the AV1 terminal and the decoder
to the AV2 terminal on this unit, press [0]i[ENTER]. (“DVD”
appears on the unit’s display.)
Press again to cancel. (“TV” appears on the unit’s display.)
≥If the television is compatible with RGB input, the RGB output
signal from the decoder can also be output from the main unit the
same way.
∫ To enjoy multi-channel surround sound on
DVD-Video
Connect an amplifier with Dolby Digital, DTS and MPEG decoders
using an optical digital audio cable and change the settings in
“Digital Audio Output” (➡page 47) after tuning is completed
(➡page 10, 11).
≥You cannot use DTS Digital Surround decoders not suited to
DVD.
≥Even if using this connection, output will be only 2 channels when
playing DVD-Audio.
∫ Connection to a stereo amplifier
Connecting a satellite receiver, digital receiver or decoder
PR
RF IN
RF OUT
COMPONENT
VIDEO OUT
(PROGRESSIVE/
INTERLACE)
PB
Y
AV1 (TV)
AV2 (DECODER/EXT)
AV OUT
Satellite receiver, digital
receiver or decoder’s rear
panel
21-pin Scart cable
This unit’s
rear panel
Connecting an amplifier or system component
R - AUDIO -
R - AUDIO -
OPTICAL
DIGITAL AUDIO OUT
(PCM/BITSTREAM)
AC IN
OPTICAL IN
Optical digital audio cable
Do not bend this cable sharply.
Insert fully, with this side facing up.
This unit’s rear panel
Amplifier’s rear panel
R - AUDIO - L
VIDEO
S-VIDEO
R - AUDIO - L
VIDEO
S-VIDEO
OPTICAL
OUT
AV4 IN
DIGITAL AUDIO OUT
(PCM/BITSTREAM)
AUDIO IN
R L
Audio cable
Red White
Red White
This unit’s rear panel
Amplifier’s rear panel
Do not place the unit on
amplifiers or equipment
that may become hot.
The heat can damage the unit.
9
7463en.book Page 9 Tuesday, March 8, 2005 11:07 AM

10
RQT7463
Getting started
STEP
2
Channel reception settings
When connecting to a television that has the Q Link
function (➡page 54) with a fully wired 21-pin Scart
cable (➡page 7).
You can download the tuning positions from the television.
This unit’s Auto Clock Setting function synchronizes the time when
the TV channel that is broadcasting time and date information is
tuned.
1 Turn on the television and select the
appropriate AV input to suit the
connections to this unit.
2 Press [Í DVD] to turn the unit on.
Downloading from the television starts.
Downloading is complete when you see the television
picture.
≥If the Country setting menu appears on the television,
press [3, 4, 2, 1] to select the country and press
[ENTER].
If you select “Schweiz”, “Suisse” or “Svizzera” in the Country
setting, or when the television tuning setting has been set to
Switzerland, the “Power Save” setting menu appears. Select
“On” or “Off” (➡page 45).
To stop partway
Press [RETURN].
∫ If the clock setting menu appears
Set the clock manually (➡page 51).
∫ To confirm that stations have been tuned
correctly (➡page 49)
∫ To restart Preset Download (➡page 50)
OPEN/CLOSE
REC
/
x
1.3
TIME SLIP
CH
TIME SLIP
DRIVE SELECT
SD PCDVDHDD
SD CARD PC CARD EJECT
HDD DVD
Í/ l
X CH W
VOLUME
CH
DIRECT TV REC
DVD
TV
AV
123
456
78
0
9
MANUAL SKIP
ShowView
CH
CANCEL
INPUT SELECT
SKIP
STOP
PAU SE
PLAY/x1.3
SLOW/SEARCH
FUNCTIONS
ENTER
DIRECT NAVIGATOR
TOP MENU
RETURN
SUB MENU
CREATE
CHAPTER
TIMER
EXT LINK
PROG/CHECK
REC MODEERASE
REC
AUDIO
TIME SLIP
STATUS
DISPLAY
F
A B C
DUBBING
HDD DVD
SD/PC
Í DVD
3,4,2,1
ENTER
RETURN
Preset Download
(Setup with Q Link functions)
Download from TV
Pos 4
Download in progress, please wait.
RETURN: to abort
RETURN
Country
RETURN: leave ENTER: access
Others
Deutschland
Österreich
Portugal
Suomi
Sverige
Schweiz
Suisse
Svizzera
België
Belgique
Belgien
Danmark
España
France
Italia
Nederland
Norge
ENTER
RETURN
SELECT
10
7463en.book Page 10 Tuesday, March 8, 2005 11:07 AM

11
RQT7463
Getting started
≥When connecting to a television with the VIDEO OUT,
S-VIDEO OUT or COMPONENT VIDEO OUT terminal
(➡page 8).
≥When connecting to a television that does not have
the Q Link function (➡page 54).
This unit’s Auto-Setup function automatically tunes all available TV
stations and synchronizes the time when the TV channel that is
broadcasting time and date information is tuned.
1 Turn on the television and select the
appropriate AV input to suit the
connections to this unit.
2 Press [Í DVD] to turn the unit on.
The Country setting menu appears.
If you select “Schweiz”, “Suisse” or “Svizzera”, the “Power
Save” setting menu appears. Select “On” or “Off”
(➡page 45).
3 Press [3, 4, 2, 1] to select the
country.
4 Press [ENTER].
Auto-Setup starts. This takes about 8 minutes.
Auto-Setup is complete when you see the television picture.
To stop partway
Press [RETURN].
∫ If the clock setting menu appears
Set the clock manually (➡page 51).
∫ To confirm that stations have been tuned
correctly (➡page 49)
∫ To restart Auto-Setup (➡page 50)
You can also use the following method to restart Auto-Setup.
When the unit is on and stopped
Press and hold [X CH] and [CH W] on the main unit until the
Country setting screen appears.
≥All the settings except for the ratings level, ratings password and
time settings return to the factory preset. The timer recording
programmes are also cancelled.
Auto-Setup
(Setup without Q Link functions)
Country
RETURN: leave ENTER: access
Others
Deutschland
Österreich
Portugal
Suomi
Sverige
Schweiz
Suisse
Svizzera
België
Belgique
Belgien
Danmark
España
France
Italia
Nederland
Norge
ENTER
RETURN
SELECT
Auto-Setup
Ch 1
Auto-Setup in progress, please wait.
RETURN: to abort
RETURN
11
7463en.book Page 11 Tuesday, March 8, 2005 11:07 AM

12
RQT7463
Getting started
STEP 3
Set up to match your television and remote control
Choose the setting to suit your television and preference.
1 While stopped
Press [FUNCTIONS].
2 Press [3, 4, 2, 1] to select
“SETUP” and press [ENTER].
3 Press [3, 4] to select “Connection”
and press [1].
4 Press [3, 4] to select “TV Aspect”
and press [ENTER].
5 Press [3, 4] to select the TV aspect
and press [ENTER].
≥16:9: 16:9 widescreen television
≥4:3: 4:3 aspect television
[HDD] [RAM] Titles are recorded as they appear on screen.
[DVD-V] Video recorded for a widescreen is played as Pan
& Scan (unless prohibited by the producer of the
disc) (➡page 53).
≥Letterbox: 4:3 aspect television
Widescreen picture is shown in the letterbox style
(➡page 53).
You can enjoy progressive video by connecting this unit’s
COMPONENT VIDEO OUT terminals to an LCD/plasma television
or LCD projector compatible with progressive scan (➡page 53).
1 While stopped
Press [FUNCTIONS].
2 Press [3, 4, 2, 1] to select
“SETUP” and press [ENTER].
3 Press [3, 4] to select “Connection”
and press [1].
4 Press [3, 4] to select “Progressive”
and press [ENTER].
5 Press [3, 4] to select “On” and
press [ENTER].
Output becomes progressive.
[Note]
≥When connected to a regular television (CRT: Cathode ray tube)
or a multi system television using PAL mode, even if it is
progressive compatible, progressive output can cause some
flickering. Turn off “Progressive” if this occurs (➡page 29).
≥There is no output from the COMPONENT VIDEO OUT terminals
if “AV1 Output” in the SETUP menu is set to “RGB (without
component)”. Set this item to either “Video (with component)” or
“S-Video (with component)” (➡page 48).
≥If the unit is connected to the television through VIDEO OUT, S-
VIDEO OUT or AV1 terminal, output will be interlace irrespective
of the settings.
To exit the screen
Press [RETURN] several times.
To return to the previous screen
Press [RETURN].
Selecting television type and aspect
VOLUME
CH
DIRECT TV REC
DVD
TV
AV
123
456
78
0
9
MANUAL SKIP
ShowView
CH
CANCEL
INPUT SELECT
SKIP
STOP
PAU SE
PLAY/x1.3
SLOW/SEARCH
FUNCTIONS
ENTER
DIRECT NAVIGATOR
TOP MENU
RETURN
SUB MENU
CREATE
CHAPTER
TIMER
EXT LINK
PROG/CHECK
REC MODEERASE
REC
AUDIO
TIME SLIP
STATUS
DISPLAY
F
A B C
DUBBING
HDD DVD
SD/PC
3,4,2,1
ENTER
FUNCTIONS
RETURN
Numbered
buttons
TV operation
buttons
HDD
DVD SD/PC
Recording
Dubbing
Edit
Playback
FUNCTIONS
Disc Remaining 68:00 SP
ENTER
RETURN
TIMER RECORDING
DIRECT NAVIGATOR
PLAY LIST
DUBBING
FLEXIBLE REC
DV AUTO REC
Setting
SETUP
DISC MANAGEMENT
SETUP
Others
Disc
Picture
Sound
Display
Connection
Tuning
Manual
Auto-Setup Restart
Download from TV
TAB
SELECT
RETURN
To enjoy progressive video
SETUP
Others
Disc
Picture
Sound
Display
Tuning
TV Aspect
16:9
4:3
Letterbox
Connection
SELECT
ENTER
RETURN
16:9 WIDE TV
4:3 TV
12
7463en.book Page 12 Tuesday, March 8, 2005 11:07 AM

13
RQT7463
Getting started
You can configure the remote control TV operation buttons to turn
the television on/off, change the television input mode, select the
television channel and change the television volume.
Point the remote control at the television
While pressing [Í TV], enter the code
with the numbered buttons.
Manufacturer and Code No.
Test by turning on the television and changing channels. Repeat
the procedure until you find the code that allows correct operation.
≥If your television brand is not listed or if the code listed for your
television does not allow control of your television, this remote
control is not compatible with your television.
If other Panasonic products are placed close together, change the
remote control code on the main unit and the remote control (the
two must match).
Under normal circumstances use the factory set code “DVD 1”.
1 While stopped
Press [FUNCTIONS].
2 Press [3, 4, 2, 1] to select
“SETUP” and press [ENTER].
3 Press [3, 4] to select “Others” and
press [1].
4 Press [3, 4] to select “Remote
Control” and press [ENTER].
5 Press [3, 4] to select the code
(“DVD 1”, “DVD 2” or “DVD 3”) and
press [ENTER].
6 To change the code on the remote control
While pressing [ENTER], press and
hold the numbered button ([1], [2] or
[3]) for more than 2 seconds.
7 Press [ENTER].
∫ When the following indicator appears on the
unit’s display
The unit’s remote
control code
Change the code on the remote control to match the main unit’s
(➡step 6).
[Note]
Executing “Shipping Condition” in the SETUP menu returns the
main unit code to “DVD 1”. Change the remote control code to 1
(➡step 6).
Television operation
e.g., 01: [0] ➡ [1]
Brand Code
Panasonic 01, 02, 03, 04, 45
AIWA 35
AKAI 27, 30
BLAUPUNKT 09
BRANDT 10, 15
BUSH 05, 06
CURTIS 31
DESMET 05, 31, 33
DUAL 05, 06
ELEMIS 31
FERGUSON 10
GOLDSTAR/LG 31
GOODMANS 05, 06, 31
GRUNDIG 09
HITACHI 22, 23, 31, 40, 41, 42
INNO HIT 34
IRRADIO 30
ITT 25
JVC 17, 39
LOEWE 07
METZ 28, 31
MITSUBISHI 06, 19, 20
MIVAR 24
NEC 36
NOKIA 25, 26, 27
NORDMENDE 10
ORION 37
PHILIPS 05, 06
PHONOLA 31, 33
PIONEER 38
PYE 05, 06
RADIOLA 05, 06
SABA 10
SALORA 26
SAMSUNG 31, 32, 43
SANSUI 05, 31, 33
SANYO 21
SBR 06
SCHNEIDER 05, 06, 29, 30, 31
SELECO 06, 25
SHARP 18
SIEMENS 09
SINUDYNE 05, 06, 33
SONY 08
TELEFUNKEN 10, 11, 12, 13, 14
THOMSON 10, 15, 44
TOSHIBA 16
WHITE WESTINGHOUSE 05, 06
When other Panasonic products
respond to this remote control
SETUP
Disc
Tuning
Remote Control
Others
Press “±” and “ENTER” together
for more than 2 seconds on the remote
control.
13
7463en.book Page 13 Tuesday, March 8, 2005 11:07 AM

14
RQT7463
Getting started
HDD, disc and card information
≥We recommend using Panasonic discs. DVD-R from other manufacturers may not be recorded or played due to the condition of the recording.
≥This unit cannot record to discs containing both PAL and NTSC signals. (However, both types of programmes can be recorded onto the HDD.)
Play of discs recorded with both PAL and NTSC on another unit is not guaranteed.
Which should I use, DVD-RAM or DVD-R?
The following chart indicates the differences. Select based upon
what you require.
[Note]
When “DVD-R Rec for High Speed mode” is set to “On” the
restrictions on secondary audio recording etc. are also applied to
DVD-RAM. Turn this setting “Off” if high speed transfer (dubbing) to
DVD-R is not necessary when recording a programme (➡page 46).
≥This unit plays CD-R/CD-RW discs (audio recording discs) which
have been recorded under one of the following standards: CD-DA,
MP3 and Video CD. Close the session or finalize the disc after
recording.
Play may be impossible on some CD-R or CD-RW discs due to the
condition of the recording.
≥The producer of the discs can control how discs are played. So you
may not always be able to control play as described in these
operating instructions. Read the disc’s instructions carefully.
HDD and discs you can use for recording and play
Type Logo Instructions
Hard disk drive (HDD)
≥160 GB
Indicated in these
instructions with [HDD]
—
Temporary storage
≥You can record up to 284 hours [in EP (8 Hour) mode] (➡page 17, Recording modes and
approximate recording times).
≥You can view the title being recorded from the beginning (Chasing playback, Time Slip) (➡page 17).
≥You can record digital broadcasts that allow “One time only recording”. You can transfer (dub) a
recorded title to a CPRM compatible DVD-RAM, however the title is erased from the HDD
(➡page 53).
≥You can play and transfer (dub) still pictures taken on a digital camera etc. (➡page 26, 40).
DVD-RAM
≥4.7 GB/9.4 GB, 12 cm
≥2.8 GB, 8 cm
[RAM]
Re-writable discs for backup use
≥You can record up to 16 hours [in EP (8 Hour) mode on double-sided disc. You cannot record or play
continuously on two sides] (➡page 17, Recording modes and approximate recording times).
≥You can view the title being recorded from the beginning (Chasing playback, Time Slip) (➡page 17).
≥Scratch and dust resistant cartridge discs and large capacity double sided discs (9.4 GB) are
commercially available.
≥You can record digital broadcasts that allow “One time only recording” when using CPRM (Content
Protection for Recordable Media) compatible discs (➡page 53). You cannot transfer (dub) a recorded
title.
≥This unit is compatible with 1k–3k recording speed discs.
≥You can transfer (dub) up to 24k recording speed by using a high speed recording compatible disc
(➡page 35).
≥You can play and transfer (dub) still pictures taken on a digital camera etc. (➡page 26, 40).
DVD-R
≥4.7 GB, 12 cm
≥1.4 GB, 8 cm
[DVD-R]
One time recording discs for backup use (recordable until the disc is full)
≥You can record up to 8 hours [in EP (8 Hour) mode] (➡page 17, Recording modes and approximate
recording times).
≥By finalizing the disc, you can play it in a DVD player as DVD-Video (Play only) (➡page 43, 53).
≥You cannot record digital broadcasts that allow “One time only recording”.
≥This unit is compatible with 1k–4k recording speed discs.
≥You can transfer (dub) up to 32k recording speed by using a high speed recording compatible disc
(➡page 35).
(Y: Possible, t: Impossible) DVD-RAM DVD-R
Re-writable Yt
Edit Y§1
Play on other players
Y
§2
Y
§3
Recording both M 1 and M 2 of bilingual
broadcast
Y
t
§4
Recording broadcasts that allow one copy
Y
§5
t
Recording 16:9 aspect picture Y§6
§ 1 You can erase, enter name and change thumbnail. Available
space does not increase after erasing.
§ 2 Only on DVD-RAM compatible players.
§ 3 After finalizing the disc (➡page 43, 53).
§ 4 Only one is recorded (➡page 47, Bilingual Audio Selection).
§ 5CPRM (➡page 53) compatible discs only.
§ 6 The picture is recorded in 4:3 aspect.
Play-only discs (12 cm/8 cm)
Disc type Logo Instructions
DVD-Audio
[DVD-A]
High fidelity music discs
≥Played on this unit in 2 channels.
DVD-Video
[DVD-V]
High quality movie and music discs
Video CD
[VCD]
Recorded music and video
(including CD-R/RW)
Audio CD
[CD]
Recorded music and audio
(including CD-R/RW)
—
CD-R and CD-RW with music
recorded in MP3 (➡page 25)
Discs that cannot be played
≥2.6 and 5.2 GB DVD-RAM, 12 cm
≥3.95 and 4.7 GB DVD-R for Authoring
≥Unfinalized DVD-R recorded on other equipment (➡page 53,
Finalize)
≥DVD-Video with a region number other than “2” or “ALL”
≥DVD-ROM ≥DVD-RW ≥iR ≥iRW
≥CD-ROM ≥CDV ≥CD-G ≥Photo CD
≥CVD ≥SVCD ≥SACD ≥MV-Disc
≥PD ≥Divx Video Disc, etc.
14
7463en.book Page 14 Tuesday, March 8, 2005 11:07 AM

15
RQT7463
Getting started
≥You can use SD Memory Cards with the following capacities (from 8 MB to 1 GB).
Please confirm the latest information on the following website.
http://panasonic.co.jp/pavc/global/cs
(This site is in English only.)
≥If the SD Memory Card is formatted on other equipment, the time spent for recording may become longer. Also if the SD Memory Card is
formatted on a PC, you may not be able to use it on this unit. In these cases, format the card on this unit (➡page 43, 53).
≥This unit supports SD Memory Cards formatted in FAT 12 system and FAT 16 system based on SD Memory Card Specifications.
≥We recommend using a Panasonic SD card.
When you use the discs recorded either PAL or NTSC, or playback a
title recorded on HDD using PAL or NTSC, refer to this table.
(Y: Possible, t: Impossible)
§1
If you select “NTSC” in “TV System” (➡page 50), the picture may
be clearer.
§2
Select “NTSC” in “TV System” (➡page 50).
§3
If your television is not equipped to handle PAL 525/60 signals
the picture will not be shown correctly.
≥When playing back a title recorded on the HDD, ensure that you
match the “TV System” setting to the title (➡page 50).
Cards useable on this unit
Type Instructions
SD Memory Card
MultiMediaCard
You can insert directly into the
SD card slot.
[SD]
≥You can play and transfer (dub) still pictures taken on a digital camera etc.
(➡page 26, 40).
≥You can set the DPOF (Digital Print Order Format) for automatic printing on your
home printer or at a photo developing store (➡page 34, 53).
≥Compatible with: FAT 12 or FAT 16
≥We recommend using a Panasonic SD card.
≥You cannot use SD cards that exceed 2 GB.
≥We recommend using this unit to format a card before recording (➡page 43, 53).
≥You may not be able to use the card if formatted on a computer.
§
Content saved on SD media storage (SV-PT1).
You can only play the recorded still pictures and transfer (dub) the data onto other
cards, HDD or DVD-RAM.
SD Memory Card
MultiMediaCard
CompactFlash
SmartMedia
M
EMORYSTICK
xD-Picture Card
Microdrive
You can insert into the PC
card slot using an adaptor
(TYPE II PC card adaptor).
[PC]
ATA Flash PC Card
Mobile hard disk
§
You can insert directly into the
PC card slot.
[PC]
Suitable SD Memory Cards
8 MB, 16 MB, 32 MB, 64 MB,
128 MB, 256 MB, 512 MB, 1 GB (Maximum)
Structure of folders displayed by this unit
The following can be displayed on this unit.
¢¢¢: Numbers XXX: Letters
§
Folders can be created on other equipment. However, these folders cannot be selected as a transferring (dubbing) destination.
≥The folder cannot be displayed if the numbers are all “0” (e.g., DCIM000 etc).
≥If a folder name or filename has been input using other equipment, the name may not be displayed properly or you may not be able to play or
edit the data.
XXXX
¢¢¢¢
.JPG
XXXX
¢¢¢¢
.TIF
DCIM
¢¢¢XXXXX
XXXX
¢¢¢¢
.JPG
XXXX
¢¢¢¢
.TIF
§
Card
(Higher folder)
IM¢¢CDPF or IMEXPORT
DCIM¢¢¢
JPEG
XXXX
¢¢¢¢
.JPG
XXXX
¢¢¢¢
.TIF
¢¢¢XXXXX
DCIM
XXXX
¢¢¢¢
.JPG
XXXX
¢¢¢¢
.TIF
§
¢¢¢XXXXX
DVD-RAM
(Higher folder)
Types of disc or title recorded on HDD
for the type of connected TV
TV type Disc/Titles
recorded on HDD
Yes/No
Multi-system TV
PA L Y
NTSC
Y
§1
NTSC TV
PA L t
NTSC
Y
§2
PAL TV
PA L Y
NTSC
Y
§3
(PAL60)
Accessory discs
DVD-RAM
9.4 GB, double-sided, type 4 cartridge:
4.7 GB, single-sided, type 2 cartridge:
4.7 GB, single-sided, non-cartridge:
LM-AD240LE
LM-AB120LE
LM-AF120LE
DVD-R
4.7 GB, single-sided, non-cartridge: LM-RF120LE
15
7463en.book Page 15 Tuesday, March 8, 2005 11:07 AM

16
RQT7463
Recording
Recording television programmes
[HDD] [RAM] [DVD-R]
≥It is not possible to record to both HDD (Hard disk drive) and DVD
drive simultaneously.
≥You can record up to 500 titles on HDD, 99 titles on one disc.
≥
It is not possible to record continuously from one side of a double sided
disc to the other. You will need to eject the disc and turn it over.
≥When using 8 cm DVD-RAM, remove the disc from the cartridge.
≥It is not possible to record CPRM (➡page 53) protected material
onto DVD-R or 2.8 GB DVD-RAM discs.
≥It is not possible to record to a card.
1 Press [HDD] or [DVD] to select the
recording drive.
The HDD or DVD indicator lights up on the unit.
2 If you selected the DVD drive
Press [< OPEN/CLOSE] on the main
unit to open the tray and insert a disc.
≥Press the button again to close the tray.
3 Press [WXCH] to select the channel.
To select with the numbered buttons:
4 Press [REC MODE] to select the
recording mode (XP, SP, LP or EP).
≥To record sound using LPCM (XP mode only):
Set the “Audio Mode for XP Recording” to “LPCM” in the
SETUP menu (➡page 47).
5 Press [¥ REC] to start recording.
Recording will take place on open space on the HDD or on
disc. Data will not be overwritten.
≥You cannot change the channel or recording mode during
recording.
≥[HDD] [RAM] You can change the audio being received by
pressing [AUDIO] during recording. (Does not affect the
recording of audio.)
∫ To stop recording
Press [∫].
From the start to the end of the recording is called one title.
[HDD]
When continuously recording for long durations, titles are
automatically divided every 8 hours.
[DVD-R]
It takes about 30 seconds for the unit to complete recording
management information after recording finishes.
∫ To pause recording
Press [;].
Press again to restart recording.
(Title is not split into separate titles.)
When transferring (dubbing) in high speed mode to DVD-R
after you have recorded to the HDD.
When transferring (dubbing) a title using the high speed mode to
a DVD-R, set “DVD-R Rec for High Speed mode” to “On” before
recording to the HDD (➡page 46).
However, the following restrictions apply.
≥When recording bilingual broadcasts, only the audio selected in
“Bilingual Audio Selection” (➡page 47) is recorded (“M 1” or
“M 2”).
≥Even 16:9 aspect (Widescreen) programmes are recorded in
4:3 aspect.
≥Even if “Hybrid VBR Resolution” is set to “Automatic”, it
changes to “Fixed” automatically, and the “Automatic” setting
does not work (➡page 46).
When recording to DVD-R
≥When recording bilingual broadcasts, only the audio selected in
“Bilingual Audio Selection” (➡page 47) is recorded (“M 1” or
“M 2”).
≥In order to play a DVD-R recorded using this unit on
another playback source, the disc must first be finalized
(➡page 43).
OPEN/CLOSE
REC
/
x
1.3
TIME SLIP
CH
TIME SLIP
DRIVE SELECT
SD PCDVDHDD
SD CARD PC CARD EJECT
HDD DVD
215
TIME SLIP
3
∫1
VOLUME
CH
DIRECT TV REC
DVD
TV
AV
123
456
78
0
9
MANUAL SKIP
ShowView
CH
CANCEL
INPUT SELECT
SKIP
STOP
PAU SE
PLAY/x1.3
SLOW/SEARCH
FUNCTIONS
ENTER
DIRECT NAVIGATOR
TOP MENU
RETURN
SUB MENU
CREATE
CHAPTER
TIMER
EXT LINK
PROG/CHECK
REC MODEERASE
REC
AUDIO
TIME SLIP
STATUS
DISPLAY
F
A B C
DUBBING
HDD DVD
SD/PC
3,4,2,1
ENTER
¥ DIRECT
TV REC
INPUT SELECT
STATUS
DIRECT
NAVIGATOR
F TIMER
∫
;
1
FUNCTIONS
RETURN
TIME SLIP
AUDIO
5
3
1
4
HDD, DVD indicator
Numbered
buttons
Time Slip indicator
e.g., 5: [0] ➡ [5]
15: [1] ➡ [5]
Insert with the arrow facing in.
Insert fully so it clicks into place.
Insert label-up.
HDD
EXT
Link
SD PC
XPXPXP
SP
LPLP
LP
EPEPEP
REC
PLAY
HDD
EXT
Link
SD PC
XP
SP
LP
EP
REC
PLAY
Remaining time on the disc
HDD
EXTEXT
LinkLink
XP
SPSP
SP
LPLP
EPEP
REC
PLAYPLAY PLA
16
7463en.book Page 16 Tuesday, March 8, 2005 11:07 AM

17
RQT7463
Recording
∫ To specify a time to stop recording—One Touch
Recording
During recording
Press [¥ REC] on the main unit to select the recording
time.
Each time you press the button:
≥This does not work during timer recordings (➡page 19) or while
using Flexible Recording (➡page 18).
To stop recording partway
Press [∫].
If a station broadcasts Teletext information
The unit automatically records the programme’s and station’s name
if the station’s Title Page is correctly set (➡page 49).
[Note]
The unit may take some time in retrieving titles (up to 30 minutes)
and may fail in some cases.
Depending on the content being recorded, the recording times may
become shorter than indicated.
(Unit: hour)
§
When “Recording time in EP mode” is set to “EP (6 Hour)” in the
SETUP menu.
The sound quality is better when using “EP (6 Hour)” than when
using “EP (8 Hour)”.
[Note]
When recording to DVD-RAM using “EP (8 Hour)” mode, play may
not be possible on DVD players that are compatible with DVD-RAM.
In this case use “EP (6 Hour)” mode.
FR (Flexible Recording Mode)
The unit automatically selects a recording rate between XP and EP
(8 Hour) that will enable the recordings to fit in the remaining disc
space with the best possible recording quality.
≥You can set when transferring (dubbing) or programming timer
recordings.
≥When recording to the HDD, picture quality is automatically
adjusted to precisely fit a transferred (dubbed) title on a 4.7 GB
disc.
≥All the recording modes from XP to EP appear in the
display.
You can change the drive and play while recording on this unit. Also,
while recording to the HDD or to DVD-RAM you can view the title
being recorded from the beginning as well as play a recorded title.
[HDD] [RAM]
Press [1](PLAY).
Time Slip indicator on the main unit lights.
1 Press [DIRECT NAVIGATOR].
2 Press [3, 4, 2, 1] to select a title
and press [ENTER].
Time Slip indicator on the main unit lights.
To exit the DIRECT NAVIGATOR screen
Press [DIRECT NAVIGATOR].
1 Press [TIME SLIP].
Time Slip indicator on the main unit lights.
≥You will hear the playback audio.
2 Press [3, 4] to select the time and
press [ENTER].
≥Press [TIME SLIP] to show the play images in full. Press
again to show the play and recording images.
∫ To stop play
Press [∫].
∫ To stop recording
2 seconds after play stops
Press [∫].
∫ To stop timer recording
Press [F TIMER].
≥You can also press and hold [∫] on the main unit for more than 3
seconds to stop recording.
[Note]
Chasing play can only be used with programmes of the same
encoding system (PAL/NTSC).
30 (min.) ""# 60 (min.) ""# 90 (min.) ""# 120 (min.)
^" Counter (cancel) ,"" 240 (min.) ,"" 180 (min.) ,}
Recording modes and approximate
recording times
Mode
HDD
(160 GB)
DVD-RAM
DVD-R
(4.7 GB)
Single-
sided
(4.7 GB)
Double-
sided
(9.4 GB)
XP (High quality) 36121
SP (Normal) 70242
LP (Long play) 138 4 8 4
EP (Extra long
play)
284
(212
§
)
8 (6
§
)16 (12
§
)8 (6
§
)
EP (6 Hour)
§
EP (8 Hour)
LP
SP
XP
Recording time
Picture quality
XP
SP
LP
EP
Playing while you are recording
Playing from the beginning of the title you are
recording—Chasing playback
Playing a title previously recorded while recording—
Simultaneous rec and play
Reviewing the recorded images while recording—
Time Slip
0 min
PLAY
REC
Play starts from 30
seconds previous.
The image currently being
recorded
17
7463en.book Page 17 Tuesday, March 8, 2005 11:07 AM

18
RQT7463
Recording
Recording television programmes
Refer to the control reference on page 16.
[HDD] [RAM] [DVD-R]
The unit sets the best possible picture quality that fits the recording
within the remaining disc space. The recording mode becomes FR
mode.
e.g.,
Preparation
Select the channel to record.
1 While stopped
Press [FUNCTIONS].
2 Press [3, 4, 2, 1] to select
“FLEXIBLE REC” and press [ENTER].
3 Press [2, 1] to select “Hour” and
“Min.” and press [3, 4] to set the
recording time.
≥You cannot record more than 8 hours.
≥You can also set the recording time with the numbered
buttons.
4 When you want to start recording
Press [3, 4, 2, 1] to select “Start”
and press [ENTER].
Recording starts.
To exit the screen without recording
Press [RETURN].
To stop recording partway
Press [∫].
To show the remaining time
Press [STATUS].
When connected to a television that has the Q Link
function using a fully wired 21-pin Scart cable.
This function allows you to immediately start recording the
programme that you are viewing on the TV.
1 Press [HDD] or [DVD] to select the
recording drive.
The HDD or DVD indicator lights up on the unit.
2 If you selected the DVD drive
Insert a disc. (➡page 16)
3 Press [¥ DIRECT TV REC].
Recording starts.
To stop recording
Press [∫].
Preparation
≥Connect a satellite/digital receiver or decoder to this unit’s input
terminals (➡page 9).
≥When recording bilingual programmes
[HDD] [RAM]
When both M 1 and M 2 is selected on the connected equipment,
you can select the audio type in playback.
[DVD-R]
Select either M 1 or M 2 on the connected equipment. (You cannot
select the audio type in playback.)
≥When the output signal from the external equipment is NTSC,
change the “TV System” to “NTSC” in the SETUP menu
(➡page 50).
≥Press [HDD] or [DVD] to select the recording drive.
1 While stopped
Press [INPUT SELECT] to select the
input channel for the equipment you
have connected.
e.g., If you have connected to AV2 input terminals, select
“AV2”.
2 Press [REC MODE] to select the
recording mode.
3 Select the channel on the other
equipment.
4 Press [¥ REC].
Recording starts.
To skip unwanted parts
Press [;] to pause recording. (Press again to restart recording.)
To stop recording
Press [∫].
Flexible Recording
Remain
45 minutes in
SP mode
60 minutes
Recorded
Perfectly fit!
Recording rate
between SP and LP
Programme to be recorded
FLEXIBLE REC
Start Cancel
Recording in FR mode
Set rec. time
3 Hour 00 Min.
Maximum rec. time
3 Hour 00 Min.
SELECT
RETURN
ARD
L R
DVD-RAM
REC 59
Remaining
time
Direct TV Recording
Recording from satellite/digital receiver
or decoder
18
7463en.book Page 18 Tuesday, March 8, 2005 11:07 AM

19
RQT7463
Recording
Timer recording
[HDD] [RAM] [DVD-R]
You can enter up to 32 programmes up to a month in advance.
Entering S
HOWVIEW numbers is an easy way of timer recording. You
can find these numbers in TV listings in newspapers and magazines.
1 Press [ShowView].
2 Press the numbered buttons to enter
the SHOWVIEW number.
Press [2] to move back to correct a digit.
3 Press [ENTER].
≥Confirm the programme and make corrections if necessary
using [3, 4, 2, 1] (➡page 20, step 3).
≥When “-- ---” appears in the “Name” column, you cannot set
timer recording. Press [3, 4] to select desired programme
position. After you have entered the information of a TV
station, it is kept in the unit’s memory.
≥You can also press [REC MODE] to change the recording
mode.
≥VPS/PDC (➡right)
ON!)OFF (– – –)
≥You can also press [HDD] or [DVD] to select the recording
drive.
When the recording drive is “DVD” and there is not enough
remaining space, recording automatically switches to the
“HDD” (➡right, Relief Recording).
≥RENEW (Auto Renewal Recording) [HDD] (➡page 20)
ON!)OFF
≥Programme Name
Press [2, 1] to select “Programme Name” and press
[ENTER] (➡page 44).
4 Press [ENTER].
The settings are stored.
Repeat steps 1–4 to programme other recordings.
5 Press [F TIMER].
“F” lights on the unit’s display to indicate timer recording
standby has been activated.
≥The message screen
appears. Only play is
possible while timer
recording is in standby (➡page 22, 23). (You cannot play a
title recorded using a different encoding system from that of
the TV system currently selected on the unit.)
≥The unit is not off. To save power, turn the unit off by
pressing [Í DVD].
Using SHOWVIEW number to make timer
recordings
VOLUME
CH
DIRECT TV REC
DVD
TV
AV
123
456
78
0
9
MANUAL SKIP
ShowView
CH
CANCEL
INPUT SELECT
SKIP
STOP
PAU SE
PLAY/x1.3
SLOW/SEARCH
FUNCTIONS
ENTER
DIRECT NAVIGATOR
TOP MENU
RETURN
SUB MENU
CREATE
CHAPTER
TIMER
EXT LINK
PROG/CHECK
REC MODEERASE
REC
AUDIO
TIME SLIP
STATUS
DISPLAY
F
A B C
DUBBING
HDD DVD
SD/PC
3,4,2,1
ENTER
F TIMER
PROG/CHECK
EXT LINK
REC MODE
ShowView
HDD, DVD
¢ CANCEL
Í DVD
Numbered
buttons
ShowView
1:58 SP
DVD
30:24 SP
Remain HDD
12:53:00 15. 7. TUE
Enter ShowView Number by using 0-9 key.
TIMER
RECORDING
12:54:00 15. 7. TUE
Programme Name
ModeStopStartName Date
VPS
PDC
HDD
DVD
20:0019:0015/ 7 TUE SP
OFF HDD
1 ARD
1:58 SP
DVD
30:24 SP
Remain HDD
∫ To release the unit from recording standby
Press [F TIMER].
“F” goes out.
≥Be sure to press [F TIMER] before the programme start time to
put the unit on recording standby. Timer recording will work only
if “F” is displayed.
∫ To cancel recording when recording has
already begun
Press [F TIMER].
≥You can also press and hold [∫] on the main unit for more than
3 seconds to stop recording.
[Note]
≥Timer recordings are activated regardless of whether the unit is
turned on/off.
≥Timer recordings begin when the set time is reached even
when playing.
≥Timer recordings do not begin while editing or transferring
(dubbing) in normal speed mode (➡page 35).
≥“F” flashes for about 5 seconds when the unit cannot go to
timer recording standby.
≥If the unit is not put in the timer recording standby mode at the
latest 10 minutes before the programmed timer recording
starting time, the “F” flashes on the unit display. In this case,
press [F TIMER] to put the unit in the timer recording standby
mode.
≥When you programme successive timer recordings to start
immediately one after the other, the unit cannot record the part
at the beginning of the later programmes (a few seconds when
recording with HDD or DVD-RAM and approximately 30
seconds when recording with DVD-R).
∫ VPS/PDC function (➡page 54)
As long as a VPS/PDC signal is being broadcast by the TV
station, even if the broadcast programme time changes, the
recording time automatically changes to match the new
broadcast time.
To activate the VPS/PDC function
In step 3 in the VPS/PDC column, press [3, 4] to select “ON”.
∫ Relief Recording
When the recording drive is set to “DVD” for timer recording and
if the programme will not fit onto the disc, the recording drive will
be altered to the “HDD” automatically.
≥If there is no disc in the tray or the disc cannot be recorded on
or when timer recording starts while transferring (dubbing), the
recording drive will be altered to the HDD.
≥The Direct Navigator shows which programmes were relief-
recorded (“ ” is displayed.) (➡page 22).
≥If the time remaining on the HDD is insufficient, as much of the
programme as possible will be recorded onto the HDD.
≥Relief recording is not activated when recording the programme
with VPS/PDC and it is extended so that it no longer fits on the
disc.
SP
OK
20:0019:00ARD 15/ 7 TUE01
Mode
Disc
space
StopStartNo. Name Date
TIMER
RECORDING
12:55:00 15. 7. TUE
New Timer Programme
OFF
VPS
PDC
HDD
DVD
1:58 SP
DVD
30:24 SP
Remain HDD
Check to make sure “OK”
is displayed (➡page 21).
Timer standby is active. Playback is possible.
19
7463en.book Page 19 Tuesday, March 8, 2005 11:07 AM

20
RQT7463
Recording
Timer recording
Refer to the control reference on page 19.
[HDD] [RAM] [DVD-R]
You can enter up to 32 programmes up to a month in advance.
(Each daily or weekly programme is counted as one programme.)
1 Press [PROG/CHECK].
2 Press [3, 4] to select “New Timer
Programme” and press [ENTER].
3 Press [1] to move through the items
and change the items with [3, 4].
≥Press and hold [3, 4] to alter the Start (Start time) and
Stop (Finish time) in 30-minute increments.
≥You can also set Name (Programme position/TV Station
Name), Date, Start (Start time), and Stop (Finish time) with
the numbered buttons.
≥You can also press [REC MODE] to change the recording
mode.
≥Date
≥VPS/PDC (➡page 19)
ON!)OFF (– – –)
≥You can also press [HDD] or [DVD] to select the recording
drive.
When the recording drive is “DVD” and there is not enough
remaining space, recording automatically switches to the
“HDD” (➡page 19, Relief Recording).
≥RENEW (Auto Renewal Recording) [HDD] (➡right)
ON!)OFF
≥Programme Name (➡page 44)
Press [2, 1] to select “Programme Name” and press
[ENTER].
4 Press [ENTER].
Repeat steps 2–4 to programme other recordings.
5 Press [F TIMER].
“F” lights on the unit’s display to indicate timer recording
standby has been activated.
≥The message screen
appears. Only play is
possible while timer
recording is in standby (➡page 22, 23). (You cannot play a
title recorded using a different encoding system from that of
the TV system currently selected on the unit.)
≥The unit is not off. To save power, turn the unit off by
pressing [Í DVD].
[HDD]
If you record a programme onto HDD repeatedly everyday or every
week using timer recording, the unit will record the new programme
over the old one.
This function can be used only when weekly recording or daily
recording is selected.
1 Press [PROG/CHECK].
2 Press [3, 4] to select the programme
and press [ENTER].
3 Press [2, 1] to select “RENEW”
column.
4 Press [3, 4] to select “ON” and press
[ENTER].
[Note]
≥If a programme set for Auto Renewal Recording is protected or
while play back is taking place from the HDD, or while transferring
(dubbing), the programme will not be overwritten. Instead the
programme set for recording will be saved as a separate
programme, and this programme will be the one to be overwritten
when the next Auto Renewal Recording takes place.
≥Play lists made from programmes that were set for Auto Renewal
Recording are erased along with auto renewal.
≥When there is not enough space on the HDD, the programme may
not be recorded completely.
Manually programming timer
recordings
[.
l
l
l
a.
Date: Current date up to one month later minus
one day;:
Daily timer: SUN-SAT>MON-SAT>MON-FRI
;:
Weekly timer: SUN>--->SAT
New Timer Programme
SELECT
ENTER
RETURN
Press ENTER to store
new programme.
Mode
Disc
space
StopStartNo. Name Date
TIMER
RECORDING
12:56:00 15. 7. TUE
VPS
PDC
HDD
DVD
1:58 SP
DVD
30:24 SP
Remain HDD
SP
OK
20:0019:00ARD 15/ 7 TUE01
OFF
TIMER
RECORDING
12:57:00 15. 7. TUE
Programme Name
ModeStopStartName Date
VPS
PDC
HDD
DVD
22:3022:0015/ 7 TUE
OFF HDD
1 ARD
1:58 SP
DVD
30:24 SP
Remain HDD
SP
Mode
Disc
space
StopStartNo. Name Date
TIMER
RECORDING
12:58:00 15. 7. TUE
New Timer Programme
VPS
PDC
HDD
DVD
1:58 SP
DVD
30:24 SP
Remain HDD
SP
OK
20:0019:00ARD 15/ 7 TUE01
OFF
SP
OK
22:3022:00ARD 15/ 7 TUE02
OFF
Check to make sure “OK”
is displayed (➡page 21).
Timer standby is active. Playback is possible.
∫ To release the unit from recording standby
Press [F TIMER].
“F” goes out.
≥Be sure to press [F TIMER] before the programme start time to
put the unit on recording standby. Timer recording will work only
if “F” is displayed.
∫ To cancel recording when recording has
already begun
Press [F TIMER].
≥You can also press and hold [∫] on the main unit for more than
3 seconds to stop recording.
[Note]
≥Timer recordings are activated regardless of whether the unit is
turned on/off.
≥Timer recordings begin when the set time is reached even
when playing.
≥Timer recordings do not begin while editing or transferring
(dubbing) in normal speed mode (➡page 35).
≥“F” flashes for about 5 seconds when the unit cannot go to
timer recording standby.
≥If the unit is not put in the timer recording standby mode at the
latest 10 minutes before the programmed timer recording
starting time, the “F” flashes on the unit display. In this case,
press [F TIMER] to put the unit in the timer recording standby
mode.
≥When you programme successive timer recordings to start
immediately one after the other, the unit cannot record the part
at the beginning of the later programmes (a few seconds when
recording with HDD or DVD-RAM and approximately 30
seconds when recording with DVD-R).
Auto Renewal Recording
TIMER
RECORDING
12:57:00 15. 7. TUE
Programme Name
Mode
RENEW
StopStartName Date
VPS
PDC
HDD
DVD
1:58 SP
DVD
30:24 SP
Remain HDD
22:3022:00 TUE
OFF HDD
1 ARD SP ON
20
7463en.book Page 20 Tuesday, March 8, 2005 11:07 AM

21
RQT7463
Recording
≥Even when the unit is turned off, you can display the timer
recording list by pressing [PROG/CHECK].
Press [PROG/CHECK].
∫ To change a programme
Press [3, 4] to select the programme and press [ENTER].
(➡page 20, step 3)
∫ To delete a programme
Press [3, 4] to select the programme and press [¢ CANCEL].
∫ To exit the timer recording list
Press [PROG/CHECK].
∫ To put the unit on timer recording standby
Press [F TIMER].
“F” lights on the unit’s display to indicate timer recording standby
has been activated.
≥Programmes that failed to record are deleted from the timer
recording list at 4 a.m. two days later.
[HDD] [RAM] [DVD-R]
If an external equipment (for example a satellite receiver) with a
timer function is connected to the AV2 terminal of this unit by a
21-pin Scart cable (➡page 9), it is possible to control the recording
of the unit with the equipment.
Preparation
≥Change the “Ext Link” in the SETUP menu to match the connected
equipment (➡page 48).
≥Timer programming has to be done on the external equipment and
switch to the timer recording standby mode. Refer to the
equipment’s operating instructions.
≥Press [HDD] or [DVD] to select the drive.
Press [EXT LINK].
The unit turns off and switches to the recording standby mode.
≥Recording begins when a signal is received from the connected
equipment.
≥As long as a video picture is being transmitted by the external
equipment, the unit will record it.
When the following message appears on the television screen, press
[2, 1] to select “Yes” (continue recording the current programme)
or “Cancel” (cancel recording) and press [ENTER].
To cancel the external control
Press [EXT LINK] to stop recording or to cancel linked timer
recording standby.
≥You can also press and hold [∫] on the main unit for more than 3
seconds to stop recording.
≥In order to prevent accidental operation, press [EXT LINK] to
cancel the setting after recording is finished.
For your reference
≥The video being recorded automatically appears on the television
when connected to this unit’s AV1 terminal with the 21-pin Scart
cable.
≥This function does not work with some equipment. Refer to the
equipment’s operating instructions.
≥The beginnings of recordings may not be recorded correctly in
some cases.
≥When “Ext Link” is set to “Ext Link 2”, this function does not work if
the input signal is NTSC system.
Check, change or delete a programme
TIMER
RECORDING
12:56:00 15. 7. TUE
SELECT
ENTER
RETURN
Press ENTER to store
new programme.
1:58 SP
DVD
30:24 SP
Remain HDD
Mode
Disc
space
StopStartNo. Name Date
12:55:00 15. 7. TUE
VPS
PDC
HDD
DVD
New Timer Programme
Icons
[ This programme is currently recording.
W The times overlap those in another programme.
Recording of the programme with the later start time
starts when the earlier programme finishes recording.
F The disc was full so the programme failed to record.
The material was copy-protected so it was not recorded.
X The programme did not complete recording because the
disc is dirty or some other reason.
Timer programmes set to Auto Renewal Recording
(➡page 20).
Titles that have been rerouted to the HDD
(Displayed while recording.)
Recording drive: HDD
Recording drive: DVD
Message displayed in the “Disc space” line
OK: Displayed if the recording can fit in the
remaining space.
> (Date): For recordings made daily or weekly, the display
will show until when recordings can be made (up
to a maximum of one month from the present
time) based on the time remaining on the disc.
! : It may not be possible to record because:
≥there is not enough space left
≥the number of possible titles has reached its
maximum.
Relief: Timer programmes that will be relief recorded to
the HDD.
Linked timer recordings with external
equipment (EXT LINK)
Yes Cancel
DVD now recording this programme.
ENTER
RETURN
21
7463en.book Page 21 Tuesday, March 8, 2005 11:07 AM

22
RQT7463
Playing back
Playing recorded video contents/Playing play-only discs
≥It is possible to watch playback from one drive while recording from
another (editing is not possible).
≥It is not possible to play continuously from one side of a double
sided disc to the other. You will need to eject the disc and turn it
over.
≥When using 8 cm DVD-RAM, remove the disc from the cartridge.
≥When playing back a title recorded on the HDD, ensure that you
match the “TV System” setting to the recorded title (➡page 50).
1 Press [HDD] or [DVD] to select the
playback drive.
The HDD or DVD indicator lights up on the unit.
2 If you selected the DVD drive
Press [< OPEN/CLOSE] on the main
unit to open the tray and insert a disc.
≥Press the button again to close the tray.
3 Press [1](PLAY).
[HDD] [RAM] [DVD-R]
Play starts from the most recently recorded
title.
[DVD-A] [DVD-V] [VCD] [CD]
Play starts from the beginning of the disc.
∫ Selecting recorded programmes (titles) to play—
Direct Navigator
[HDD] [RAM] [DVD-R]
1 Press [DIRECT NAVIGATOR].
Switching the Direct Navigator appearance
1 Press [SUB MENU] while Thumbnail Display is displayed.
2 Press [3, 4] to select “Table Display” and press [ENTER].
≥The display appearance last used is saved even after the unit is
turned off.
2Press [3, 4, 2, 1] to select “VIDEO” tab and
press [ENTER].
3Press [3, 4, 2, 1] to select the title and press
[ENTER].
You can also select titles with the numbered buttons.
To show other pages
Press [3, 4, 2, 1] to select “Previous” or “Next” and press
[ENTER].
≥You can also press [:, 9] to show other pages.
To exit the screen
Press [DIRECT NAVIGATOR].
Direct Navigator screen icons
∫ When a menu screen appears on the television
[DVD-A] [DVD-V]
Press [3, 4, 2, 1] to select the item and press [ENTER].
Some items can also be selected using the numbered buttons.
[VCD]
Press the numbered buttons to select the item.
≥To return to the menu screen
[DVD-A] Press [TOP MENU].
[DVD-V] Press [TOP MENU] or [SUB MENU].
[VCD] Press [RETURN].
OPEN/CLOSE
REC
/
x
1.3
TIME SLIP
CH
TIME SLIP
DRIVE SELECT
SD PCDVDHDD
SD CARD PC CARD EJECT
HDD DVD
2
3
1∫
D,
E
TIME SLIP
X CH W
VOLUME
CH
DIRECT TV REC
DVD
TV
AV
123
456
78
0
9
MANUAL SKIP
ShowView
CH
CANCEL
INPUT SELECT
SKIP
STOP
PAU SE
PLAY/x1.3
SLOW/SEARCH
FUNCTIONS
ENTER
DIRECT NAVIGATOR
TOP MENU
RETURN
SUB MENU
CREATE
CHAPTER
TIMER
EXT LINK
PROG/CHECK
REC MODEERASE
REC
AUDIO
TIME SLIP
STATUS
DISPLAY
F
A B C
DUBBING
HDD DVD
SD/PC
3,4,2,1
ENTER
2;
,
;1
ERASE
DIRECT
NAVIGATOR,
TOP MENU
SUB MENU
:, 9
∫
MANUAL SKIP
W X CH
6, 5
3
RETURN
TIME SLIP
AUDIO
CREATE
CHAPTER
;
1
Numbered
buttons
HDD, DVD indicator
Insert fully so it clicks into place.
Insert label-up.
Insert with the arrow facing in.
HDD
EXT
Link
XPXPXP
SP
LPLP
LP
EPEPEP
REC
PLAY
≥Thumbnail Display ≥Table Display
e.g., [HDD] [RAM] [DVD-R]
5: [0] ➡ [0] ➡ [5] 5: [0] ➡ [5]
15: [0] ➡ [1] ➡ [5] 15: [1] ➡ [5]
115: [1] ➡ [1] ➡ [5]
Title protected.
Title that was not recorded due to recording
protection (Digital broadcasts etc.)
t
Title cannot be played
[When transferring (dubbing) a title to the HDD,
or when data is damaged etc.]
[ Currently recording.
Titles that have been rerouted to the HDD
(➡page 19, Relief Recording)
Title with “One time only recording” restriction
(NTSC)
(PAL)
Title recorded using a different encoding
system from that of the TV system currently
selected on the unit.
≥Alter the “TV System” setting on this unit to
suit (➡page 50).
e.g., 5: [0] ➡ [5] 15: [1] ➡ [5]
DIRECT NAVIGATOR TITLE VIEW
Select
Previous 02/02 Next
SUB MENU
ARD 10/10 FRI ARD 11/10 SAT
ENTER
RETURN
007 008
- - -
- - -- - -- - -
HDD
PICTURE
VIDEO
DIRECT NAVIGATOR TITLE VIEW
Select
Previous 01/01 Next
SUB MENU
ENTER
RETURN
HDD
001
ARD 10/10 FRI 13:30
ZDF 10/10 FRI 9:25
AV2 4/10 SAT 16:10
ARD 3/10 FRI 22:05
AV2 3/10 FRI 20:00
ZDF 27/ 9 SAT 12:15
ARD 26/ 9 FRI 13:30
002
003
004
005
006
007
---
Name of titleTimeNo. Name Date Day
PICTURE
VIDEO
008
ARD 11/10 SAT 21:00
DIRECT NAVIGATOR TITLE VIEW
ARD 10/10 FRI ARD 11/10 SAT
007 008
- - -
HDD
PICTURE
VIDEO
22
7463en.book Page 22 Tuesday, March 8, 2005 11:07 AM

23
RQT7463
Playing back
Operations during play
Stop
Press [∫].
The stopped position is memorized.
The indicator on the right appears in the unit’s display. (Excluding when playing from
the Direct Navigator and when playing a play list.)
Resume play function
Press [1] (PLAY) to restart from this position.
Pause
Press [;].
Press again to restart play.
Search
Press [6] or [5].
≥On the main unit, press and hold [D] or [E].
≥The speed increases up to 5 steps.
≥Press [1] (PLAY) to restart play.
≥Audio is heard during first level search forward.
You can turn off the sound during search (➡page 47, “PLAY k1.3 & Audio during Search”).
Audio is heard during all levels of search. [DVD-A] (excluding moving picture parts) [CD]
Skip
Press [:] or [9].
≥On the main unit, press [D] or [E].
≥Each press increases the number of skips.
Starting from a
selected item
Press the numbered buttons.
e.g., 5: [0] ➡ [5] [HDD] 5: [0] ➡ [0] ➡ [5]
15: [1] ➡ [5] [CD] (MP3 discs only) 15: [0] ➡ [1] ➡ [5]
[DVD-A] Selecting groups
While stopped (screen saver is displayed on the television ➡right)
5: [5]
≥This works only when stopped (screen saver is displayed on the television
➡right) with some discs.
Quick View
[HDD] [RAM]
The play speed can be increased
without distorting the audio.
Press and hold [1](PLAY/a1.3).
≥Press again to return to normal speed.
≥This does not work if the setting is “Off” in “PLAY k1.3 & Audio during Search” (➡page 47).
Slow-motion
[HDD] [RAM] [DVD-R] [DVD-A] (Motion
picture parts only) [DVD-V] [VCD]
While paused, press [6] or [5].
≥On the main unit, press and hold [D] or [E].
≥The speed increases up to 5 steps.
≥Press [1] (PLAY) to restart play.
≥Forward direction only. [VCD]
≥The unit will pause if slow-motion play is continued for 5 minutes.
Frame-by-frame
[HDD] [RAM] [DVD-R] [DVD-A] (Motion
picture parts only) [DVD-V] [VCD]
While paused, press [2;] or [;1].
≥Each press shows the next frame.
≥Press [1] (PLAY) to restart play.
≥Forward direction only. [VCD]
Displaying the
television image as a
picture-in-picture
Press [TIME SLIP].
The unit displays the television image as a picture-in-
picture.
≥You will hear the playback audio.
≥Press [TIME SLIP] again to cancel.
≥The grey background does not appear on the
receiving screen even if you select “On” from the
“Grey Background” in the SETUP menu
(➡page 47).
Skipping the specified
time (Time Slip)
[HDD] [RAM] [DVD-R]
1 Press [TIME SLIP].
2Press [3, 4] to select the time and press [ENTER].
Play skips the specified time.
≥Press [TIME SLIP] to show the play images in full.
[Note]
Time Slip does not work while timer recording is in standby.
Manual Skip
[HDD] [RAM] [DVD-R]
Play restarts from approximately 30
seconds later.
Press [MANUAL SKIP].
HDD
EXTEXTEXT
LinkLinkLink
XPXPXP
SP
LPLP
LP
EPEPEP
RECRECREC
PLAYPLAYPLAY
Play images
Current receiving images
≥You can change the channel being
received by pressing [WXCH].
≥You cannot change the channel being
received while recording.
23
7463en.book Page 23 Tuesday, March 8, 2005 11:07 AM

24
RQT7463
Playing back
Playing recorded video contents/Playing play-only discs
Refer to the control reference on page 22.
Press [AUDIO].
[HDD] [RAM] [VCD]
LR>L>R
^---------------}
[DVD-A] [DVD-V]
You can change the audio channel number each time you press the
buttons. This allows you to change things like the soundtrack
language (➡page 28, Soundtrack).
[Note]
You cannot change the audio type in the following cases.
≥When a DVD-R disc is in the disc tray while DVD drive is selected.
≥When the recording mode is XP and “Audio Mode for XP Recording” is set to “LPCM” (➡page 47).
≥When “DVD-R Rec for High Speed mode” is set to “On” (➡page 46).
Editing operations during play
Erase
[HDD] [RAM] [DVD-R]
1 Press [ERASE].
2 Press [2, 1] to select “Erase” and press [ENTER].
≥A title cannot be restored once it is erased. Make certain before proceeding.
≥You cannot erase while recording or transferring (dubbing).
Create Chapter
(➡page 30, Title/Chapter)
[HDD] [RAM]
Press [CREATE CHAPTER].
≥Press [:, 9] to skip to the start of a chapter.
≥You cannot divide while recording or transferring (dubbing).
Changing audio
PLAY
L R
HDD
e.g., “L R” is selected
Soundtrack
1 ENG Î Digital 3/2.1ch
e.g., English is selected.
24
7463en.book Page 24 Tuesday, March 8, 2005 11:07 AM

25
RQT7463
Playing back
Using menus to play MP3
[CD] (MP3 discs only)
This unit plays MP3 files recorded on CD-R/RW designed for audio
recording that are finalized (➡page 53) on a computer. Files are
treated as tracks and folders are treated as groups.
1 Press [TOP MENU].
2 Press [3, 4] to select the track and
press [ENTER].
Play continues to the last track in the last group.
≥“0” indicates the track currently playing.
≥You can also select the track with the numbered buttons.
To show other pages
Press [3, 4, 2, 1] to select “Prev.” or “Next” and press [ENTER].
After listing all the tracks in one group, the list for the next group
appears.
To exit the screen
Press [TOP MENU].
While the file list is displayed
1 Press [1] while a track is highlighted
to display the tree screen.
2 Press [3, 4, 2, 1] to select a group
and press [ENTER].
The file list for the group appears.
To return to the file list
Press [RETURN].
e.g., 5: [0] ➡ [0] ➡ [5]
15: [0] ➡ [1] ➡ [5]
VOLUME
CH
DIRECT TV REC
DVD
TV
AV
123
456
78
0
9
MANUAL SKIP
ShowView
CH
CANCEL
INPUT SELECT
SKIP
STOP
PAU SE
PLAY/x1.3
SLOW/SEARCH
FUNCTIONS
ENTER
DIRECT NAVIGATOR
TOP MENU
RETURN
SUB MENU
CREATE
CHAPTER
TIMER
EXT LINK
PROG/CHECK
REC MODEERASE
REC
AUDIO
TIME SLIP
STATUS
DISPLAY
F
A B C
DUBBING
HDD DVD
SD/PC
3,4,2,1
ENTER
RETURN
TOP MENU
Numbered
buttons
001 Both Ends Freezing
002 Lady Starfish
003 Life on Jupiter
004 Metal Glue
005 Paint It Yellow
006 Pyjamamama
007 Shrimps from Mars
008 Starperson
009 Velvet Cuppermine
010 Ziggy Starfish
NextPrev.
1
1 : My favorite
2
3
4
5
6
7
8
9
10
Total Track
Tree
G 1
T 1
TOTAL
1/111
MENU
0 9
–
No.
GroupNo
SELECT
ENTER
RETURN
Selected group
G: Group No.
T: Track No. in the group
TOTAL: Track No./Total tracks
in all groups
Using the tree screen to find a group
Tips for making MP3 discs
≥Discs must conform to ISO9660 level 1 or 2 (except for
extended formats).
≥Compatible compression rate: between 32 kbps and 320 kbps
≥Compatible sampling rate: 16 kHz, 22.05 kHz, 24 kHz, 32 kHz,
44.1 kHz and 48 kHz
≥Maximum number of tracks and groups recognizable:
999 tracks and 99 groups
≥This unit is compatible with multi-session.
≥This unit is not compatible with ID3 tags or packet writing.
≥Depending on the recording, some items may not be playable.
≥Reading or play of the disc may take time if there are a lot of still
pictures or sessions.
≥The display order may differ from how the order is displayed on
a computer.
Naming folders and files
≥MP3 files must have the
extension “.MP3” or “.mp3”.
≥At the time of recording, give
folder and file names a 3-
digit numeric prefix in the
order you want them to play
(this may not work at times).
≥English alphabets and
Arabic numerals are
displayed correctly. Other
characters may not be
displayed correctly.
Tree
G 7/25
001 My favorite
001 Brazilian pops
002 Chinese pops
003 Czech pops
004 Hungarian pops
005 Liner notes
006 Japanese pops
007 Mexican pops
008 Philippine pops
009 Swedish pops
001 Momoko
002 Standard number
001 Piano solo
002 Vocal
MENU
No.
G 8
T 14
TOTAL
40/111
MP3 music
–
0 9
SELECT
ENTER
RETURN
You cannot select groups
that contain no compatible
files.
Selected group No. /Total groups
If the group has no track, “– –” is displayed
as group number.
002 group
001
001
001track.mp3
002track.mp3
003track.mp3
003 group
001track.mp3
002track.mp3
003track.mp3
001track.mp3
002track.mp3
003track.mp3
004track.mp3
e.g.,
Root
Order of play
(folder=group)
(file=track)
25
7463en.book Page 25 Tuesday, March 8, 2005 11:07 AM

26
RQT7463
Playing back
Playing still pictures
Only insert or remove the SD/PC card after turning the unit off.
When the card indicator (“SD” or “PC”) on the unit’s display is
flashing, the card is being read from or written to. Do not turn off the
unit or remove the card. Such action may result in malfunction or
loss of the card’s contents.
∫ SD card slot
≥You can use SD Memory Cards with capacities from 8 MB to 1 GB
(➡page 15).
∫ PC card slot
Regarding still pictures (JPEG, TIFF)
≥Compatible formats: DCF
§
compliant (Content recorded on a
digital camera etc.)
§
Design rule for Camera File system: unified standard
established by Japan Electronics and Information Technology
Industries Association (JEITA).
≥File format: JPEG, TIFF (non-compressed RGB chunky format)
≥Number of pixels:34k34 to 6144k4096
(Sub sampling is 4:2:2 or 4:2:0)
≥This unit can handle a maximum of 3000 files and 300 folders
(including higher folders).
≥Operation may take time to complete when playing TIFF format
still pictures, or when there are many files and/or folders, some
files may not display or be playable.
≥MOTION JPEG is not supported.
OPEN/CLOSE
REC
/
x
1.3
TIME SLIP
CH
TIME SLIP
DRIVE SELECT
SD PCDVDHDD
SD CARD PC CARD EJECT
HDD DVD
DRIVE SELECT
∫
VOLUME
CH
DIRECT TV REC
DVD
TV
AV
123
456
78
0
9
MANUAL SKIP
ShowView
CH
CANCEL
INPUT SELECT
SKIP
STOP
PAU SE
PLAY/x1.3
SLOW/SEARCH
FUNCTIONS
ENTER
DIRECT NAVIGATOR
TOP MENU
RETURN
SUB MENU
CREATE
CHAPTER
TIMER
EXT LINK
PROG/CHECK
REC MODEERASE
REC
AUDIO
TIME SLIP
STATUS
DISPLAY
F
A B C
DUBBING
HDD DVD
SD/PC
3,4,2,1
ENTER
SUB MENU
ERASE
DIRECT
NAVIGATOR
STATUS
HDD, DVD,
SD/PC
∫
Numbered
buttons
HDD, DVD, SD, PC indicatorSD card slot
PC card slot
Inserting/Removing the SD/PC card
Inserting the card
Removing the card
Inserting the card
There are cards requiring adaptors (➡page 15).
Removing the card
≥If using the adaptor, remove the adaptor and card together.
S
D
C
A
R
D
PC CARD
EJECT
Insert the card label up with cut-off
corner at the right.
Insert straight-in until it
fits into space.
S
D
C
A
R
D
P
C
C
A
R
D
EJECT
1
2
Press on the center of the card.
Draw straight out.
S
D
C
A
R
D
PC
C
AR
D
EJECT
1
2
Hold the edge of the card and insert until it
fits into place.
≥If using the adaptor, do not press directly
on the card.
Terminal connections facing into the unit
2 align to match
the mark
The labeled side facing upwards
S
D
C
A
R
D
P
C
C
A
R
D
EJECT
1
2
P
C
C
A
R
D
EJECT
P
C
C
A
R
D
EJECT
P
C
C
A
R
D
EJECT
Push
Eject button
comes out
Push again
26
7463en.book Page 26 Tuesday, March 8, 2005 11:07 AM

27
RQT7463
Playing back
[HDD] [RAM] [SD] [PC]
≥You can use SD Memory Cards with capacities from 8 MB to 1 GB
(➡page 15).
1 Press [HDD], [DVD] or [SD/PC] to
select the drive.
≥Each time you press [SD/PC]:
SD card drive ,". PC card drive
≥On the main unit, press [DRIVE SELECT]
several times.
The indicator lights up on the unit.
2 Press [DIRECT NAVIGATOR].
3 [HDD] [RAM]
Press [3, 4, 2, 1] to select
“PICTURE” tab and press [ENTER].
4 Press [3, 4, 2, 1] to select the still
picture and press [ENTER].
You can also select still pictures with the numbered buttons.
≥Press [2, 1] to display the previous or next still picture.
≥Useful functions during still picture play (➡below)
To stop playing
Press [∫].
To exit the screen
Press [DIRECT NAVIGATOR].
∫ To show the picture properties
Press [STATUS] twice.
To exit the picture properties screen
Press [STATUS].
[Note]
≥Still pictures cannot be played during recording.
[HDD] [RAM] [SD] [PC]
e.g.,
5: [0] ➡ [0] ➡ [0] ➡[5] 115: [0] ➡ [1] ➡ [1] ➡ [5]
15: [0] ➡ [0] ➡ [1] ➡ [5] 1115: [1] ➡ [1] ➡ [1] ➡ [5]
SD PCDVDHDD
e.g.,
SD card drive
DIRECT NAVIGATOR PICTURE (JPEG) VIEW
Select
Previous 001/001 Next
SUB MENU
ENTER
RETURN
SD CARD
0001
Folder 103__DVD
0002 0003 0004
0005 0006 0007 0008
0009
---- ---- ----
PICTURE
PICTURE (JPEG) VIEW
screen
∫ To select the still pictures in another folder
(➡page 15, Structure of folders displayed by this unit)
1 Press [3, 4, 2, 1] to select “Folder” and press
[ENTER].
2 Press [3, 4] to select the folder and press [ENTER].
You can also select folders with the numbered buttons.
e.g., 5: [0] ➡ [0] ➡[5]
15: [0] ➡ [1] ➡ [5]
115: [1] ➡ [1] ➡ [5]
≥If there is a multiple number of higher folders recognizable,
you can switch them using [2, 1].
DIRECT NAVIGATOR PICTURE (JPEG) VIEW
SD CARD
0001
Folder 103__DVD
0002 0003 0004
0005 0006 0007 0008
PICTURE
\DCIM
001 100__DVD
002 101__DVD
003 102__DVD
---
\DCIM\100__DVD
---
004 103__DVD
002 101__DVD
003 102 DVD
\DCIM\100__DVD
\DCIM
001 100__DVD
18:53:50 11.10.
Folder - Picture No. 103 - 0006
Date 11. 12. 2003
No. 3 / 9
Shooting date
Useful functions during still picture play
Start Slide Show
Slide Interval
You can display still pictures one by one with constant interval.
While the PICTURE (JPEG) VIEW screen is displayed
1 Press [SUB MENU].
2Press [3, 4] to select “Start Slide Show” and press
[ENTER].
≥To change the display timing
1 Press [3, 4] to select “Slide Interval” in step 2 and press [ENTER].
2 Press [2, 1] to select the desired timing (0–30 seconds) and press [ENTER].
Rotate
1 Press [SUB MENU].
2Press [3, 4] to select “Rotate RIGHT” or “Rotate LEFT”
and press [ENTER].
≥Rotation information will not be stored.
Zoom in
Zoom out
(Only for a still picture with a low
pixel count)
1 Press [SUB MENU].
2Press [3, 4] to select “Zoom in” and press [ENTER].
≥To return the picture to its original size, press [3, 4] to select “Zoom out” in step 2
and press [ENTER].
≥When zooming in, the picture may be cut off.
≥The enlargement information will not be stored.
Erase
1Press [ERASE].
2Press [2, 1] to select “Erase” and press [ENTER].
≥Once erased, the recorded contents are lost and cannot be restored. Make certain before
proceeding.
Set up Protection
Cancel Protection
Slide Interval
Start Slide Show
DPOF
Erase Picture
Rotate LEFT
Rotate RIGHT
ENTER
RETURN
Zoom in
ENTER
RETURN
Rotate LEFT
Rotate RIGHT
27
7463en.book Page 27 Tuesday, March 8, 2005 11:07 AM

28
RQT7463
Playing back
Using on-screen menus and Status messages
1 Press [DISPLAY].
≥Depending on the condition of the unit (playing, stopped,
etc.) and disc contents, there are some items that you
cannot select or change.
2 Press [3, 4] to select the menu and
press [1].
3 Press [3, 4] to select the item and
press [1].
4 Press [3, 4] to select the setting.
≥Some items can be changed by pressing [ENTER].
To clear the on-screen menus
Press [DISPLAY].
§
You may have to use the menus (➡page 22) on the disc to make
changes.
≥The display changes according to the disc content. You cannot
change when there is no recording.
Audio attribute
Language
On-screen menus
VOLUME
CH
DIRECT TV REC
DVD
TV
AV
123
456
78
0
9
MANUAL SKIP
ShowView
CH
CANCEL
INPUT SELECT
SKIP
STOP
PAU SE
PLAY/x1.3
SLOW/SEARCH
FUNCTIONS
ENTER
DIRECT NAVIGATOR
TOP MENU
RETURN
SUB MENU
CREATE
CHAPTER
TIMER
EXT LINK
PROG/CHECK
REC MODEERASE
REC
AUDIO
TIME SLIP
STATUS
DISPLAY
F
A B C
DUBBING
HDD DVD
SD/PC
3,4,2,1
ENTER
DISPLAY
STATUS
Disc
Play
Picture
Sound
Soundtrack
Subtitle
1
Audio channel
OFF
L R
Î Digital 2/0 ch
Menu Item Setting
Disc menu—Setting the disc content
Soundtrack
§
[HDD] [RAM] [DVD-R]
The disc’s audio attributes appear.
[DVD-A] [DVD-V]
Select the audio and language (➡below, Audio attribute,
Language).
Subtitle
§
[HDD] [RAM] [DVD-R]
(Only discs that contain subtitle on/off information)
[DVD-A] [DVD-V]
Turn the subtitle on/off and select the language (➡below,
Language).
≥Subtitle on/off information cannot be recorded using this
unit. [HDD] [RAM] [DVD-R]
Audio channel [HDD] [RAM] [VCD]
➡page 24, Changing audio
Angle
§
[DVD-A] [DVD-V]
STILL-P (Still picture)
[DVD-A]
Selects the play method for still pictures.
Slide Show: Plays according to the default order on the disc.
Page: Select the still picture number and play.
≥RANDOM: Plays in random order.
≥Return: Returns to the default still picture on the disc.
PBC (Playback control ➡page 53) [VCD]
Indicates whether menu play (playback control) is on or off.
LPCM/PPCM/ÎDigital/DTS/MPEG:
k (kHz):
b (bit):
ch (channel):
Signal type
Sampling frequency
Number of bits
Number of channels
ENG: English
FRA: French
DEU: German
ITA: Italian
ESP: Spanish
NLD: Dutch
SVE: Swedish
NOR: Norwegian
DAN: Danish
POR: Portuguese
RUS: Russian
JPN: Japanese
CHI: Chinese
KOR: Korean
MAL: Malay
VIE: Vietnamese
THA: Thai
¢: Others
28
7463en.book Page 28 Tuesday, March 8, 2005 11:07 AM

29
RQT7463
Playing back
This function works only when the elapsed play time is displayed.
§
Only when you have set “Progressive” to “On” in the SETUP menu
(➡page 12).
Status messages appear on the television when you operate the unit
to show the condition of the unit.
Press [STATUS].
The display changes each time you press the button.
≥Displayed information are examples.
≥TV audio type
STEREO: STEREO/NICAM stereo broadcast
M1/M2: Bilingual/NICAM dual-sound broadcast
M1: NICAM monaural broadcast
Play menu—Change the play sequence
Repeat Play
≥All
≥Chapter
≥Group
≥PL (Play list)
≥Title
≥Tr ac k
[VCD] [CD] (excluding MP3 discs)
[HDD] [RAM] [DVD-R] [DVD-V]
[DVD-A] [CD] (MP3 discs only)
[HDD] [RAM]
[HDD] [RAM] [DVD-R] [DVD-V]
[DVD-A] [VCD] [CD]
Select “OFF” to cancel.
Picture menu—Change the picture quality
Playback NR
Reduces noise and picture degradation.
Progressive
§
(➡page 53)
Select “ON” to enable progressive output.
Select “OFF” if the picture is stretched horizontally.
Transfer
§
[When “Progressive” (➡above) is set to “ON”.]
Select the method of conversion for progressive output to suit
the type of material being played (➡page 53, Film and video).
When the output signal is PAL
≥Auto
≥Video:
Detects 25 frame-per-second film content and
appropriately converts it.
Select when using “Auto”, and the video
content is distorted.
When the output signal is NTSC
≥Auto1
(normal):
≥Auto2:
≥Video:
Detects 24 frame-per-second film content and
appropriately converts it.
Compatible with 30 frame-per-second film
content in addition to 24 frame-per-second
film content. (Picture distortion may occur
depending on the content)
Select when using “Auto1” and “Auto2”, and
the video content is distorted.
Sound menu—Change the sound effect
V.S.S. [HDD] [RAM] [DVD-R] [DVD-V]
(Dolby Digital, MPEG, 2-channel or over only)
Enjoy a surround-like effect if you are using two front speakers
only.
≥Turn V.S.S. off if it causes distortion.
≥V.S.S. does not work for bilingual recordings.
Dialog Enhancer [DVD-A] [DVD-V]
(Dolby Digital, 3-channel or over only, including a centre channel)
The volume of the centre channel is raised to make dialogue
easier to hear.
Status messages
13:50 XP18:53:50 11.10.
π T2 0:05.14 XP
π T1 0:00.10 SP
Remain
π
REC
PLAY
STEREO
L R
DVD REC
HDD
Selected drive/type of disc
TV audio type being received (➡below)
Recording or play status/input channel
Selected audio type
Available recording time and
recording mode
Play position within the title
Title number and elapsed time during play/
Recording mode
Date and time
No display
Recording drive/
Transfer (dubbing) progress indicator
Used HDD
space
Title number and elapsed time during
recording/Recording mode
29
7463en.book Page 29 Tuesday, March 8, 2005 11:07 AM

30
RQT7463
Editing
Editing titles/chapters
[HDD] [RAM] [DVD-R]
≥The maximum number of items on a disc:
[HDD]
–Titles: 500
–Chapters: Approx. 1000 per title
(Depends on the state of recording.)
[RAM] [DVD-R]
–Titles: 99
–Chapters: Approx. 1000
(Depends on the state of recording.)
[Note]
≥Once erased, divided or partially erased, it cannot be restored to its
original state. Make certain before proceeding.
≥You cannot edit during recording, chasing play or transferring
(dubbing), etc.
≥Restricted recording information remains even after editing (e.g.
dividing a title etc.)
Preparation
≥Press [HDD] or [DVD] to select the drive.
≥Release protection (➡page 42). [RAM]
1 Press [DIRECT NAVIGATOR].
2 Press [3, 4, 2, 1] to select “VIDEO”
tab and press [ENTER].
3 Press [3, 4, 2, 1] to select the title.
4
Press [SUB MENU], then [
3
,
4
] to
select the operation and press [ENTER].
≥If you select “Edit”, press [3, 4] to select the operation and
press [ENTER].
∫ If you select “Chapter View”
5
Press [
3
,
4
,
2
,
1
] to select the chapter.
To start play ➡ Press [ENTER].
To edit ➡ Step 6.
≥To show other pages/Multiple editing (➡above)
6
Press [SUB MENU], then [
3
,
4
] to
select the operation and press [ENTER].
≥You can go back to Title View.
To exit the screen
Press [DIRECT NAVIGATOR].
To return to the previous screen
Press [RETURN].
Title/Chapter
Programmes are recorded as a single title consisting of one
chapter.
You can divide a title into multiple chapters. [HDD] [RAM]
(➡page 24, 31, Create Chapter)
You can change the order of chapters and create a play list
(➡page 32). [HDD] [RAM]
≥Titles are divided into about 5-minute chapters after finalizing
(➡page 43). [DVD-R]
VOLUME
CH
DIRECT TV REC
DVD
TV
AV
123
456
78
0
9
MANUAL SKIP
ShowView
CH
CANCEL
INPUT SELECT
SKIP
STOP
PAU SE
PLAY/x1.3
SLOW/SEARCH
FUNCTIONS
ENTER
DIRECT NAVIGATOR
TOP MENU
RETURN
SUB MENU
CREATE
CHAPTER
TIMER
EXT LINK
PROG/CHECK
REC MODEERASE
REC
AUDIO
TIME SLIP
STATUS
DISPLAY
F
A B C
DUBBING
HDD DVD
SD/PC
3,4,2,1
ENTER
DIRECT
NAVIGATOR
:, 9
SUB MENU
;
1
RETURN
HDD, DVD
Title
Chapter
Start End
Chapter
Title
Chapter Chapter Chapter
Editing titles/chapters and playing
chapters
To show other pages
Press [3, 4, 2, 1] to select “Previous” or “Next” and
press [ENTER].
≥You can also press [:, 9] to show other pages.
Multiple editing
Select with [3, 4, 2, 1] and press [;]. (Repeat.)
A check mark appears. Press [;] again to cancel.
DIRECT NAVIGATOR TITLE VIEW
Select
Previous 02/02 Next
SUB MENU
ARD 10/10 FRI ARD 11/10 SAT
ENTER
RETURN
007 008
- - -
- - -- - -
HDD
- - -
PICTURE
VIDEO
Title View screen
Set up Protection
Cancel Protection
Partial Erase
Divide Title
Change Thumbnail
Enter Name
Properties
Edit
Table Display
Chapter View
Erase
Refer to “Title
operations”.
page 22, Switching the Direct
Navigator appearance
DIRECT NAVIGATOR CHAPTER VIEW
Select
Previous 01/01 Next
SUB MENU
008 ARD 11/10 SAT
001
--- ---
--- ------ ---
--- ------ ---
---
ENTER
RETURN
HDD
PICTURE
VIDEO
Chapter View screen
Create Chapter
Combine Chapters
Title View
Erase Chapter
Refer to “Chapter
operations”.
30
7463en.book Page 30 Tuesday, March 8, 2005 11:07 AM

31
RQT7463
Editing
§
Multiple editing is possible.
§
Multiple editing is possible.
Title operations
Erase
§
[HDD] [RAM] [DVD-R]
Press [2, 1] to select “Erase” and press [ENTER].
≥Once erased, the recorded contents are lost and cannot be restored. Make certain before proceeding.
≥The available recording time on DVD-R does not increase when you erase titles.
Properties
[HDD] [RAM] [DVD-R]
Information (e.g., time and date) is shown.
Enter Name
[HDD] [RAM] [DVD-R]
You can give names to recorded titles.
➡page 44, Entering text
Set up Protection
§
Cancel Protection
§
[HDD] [RAM]
If set, this will protect the title from accidental erasure.
Press [2, 1] to select “Yes” and press [ENTER].
The lock symbol appears when the title is protected.
Partial Erase
[HDD] [RAM]
You can remove unnecessary parts of the recording such as commercials.
1 Press [ENTER] at the start point and end
point of the section you want to erase.
2 Press [3, 4] to select “Exit” and press
[ENTER].
≥Select “Next” and press [ENTER] to erase other sections.
3 Press [2, 1] to select “Erase” and press [ENTER].
Change Thumbnail
[HDD] [RAM] [DVD-R]
You can change an image to be shown as the thumbnail picture in the Title
View.
1 Press [1] (PLAY) to start play.
2 Press [ENTER] when the image you want
to use as a thumbnail is shown.
3 Press [3, 4] to select “Exit” and press
[ENTER].
Divide Title
[HDD] [RAM]
You can divide a title into two.
1 Press [ENTER] at the point you want to divide the title.
2 Press [3, 4] to select “Exit” and press [ENTER].
3 Press [2, 1] to select “Divide” and press [ENTER].
To confirm the division point
Press [3, 4] to select “Preview” and press [ENTER]. (The unit plays 10
seconds before and after the division point.)
To change the division point
Restart play and press [3, 4] to select “Divide”, then press [ENTER] at the point you want to change.
[Note]
≥The divided titles retain the title name and CPRM property (➡page 53) of the original title.
≥Video and audio just before and after the dividing point may momentarily cut out.
Properties
No.
Name
Date
26
12
11/10/2004
Time
Rec time
12:19
0:30 (SP)MON
Dinosaur
SELECT
DIRECT NAVIGATOR TITLE
ARD 10/10 FRI ARD 11/10
007 008
HDD
DIRECT NAVIGATOR Partial Erase
Start
Next
Exit
0:43.21
PLAY
008
End
- -:- -.- - - -:- -.- -
Start End
ENTER
RETURN
HDD
PICTURE
VIDEO
DIRECT NAVIGATOR Change Thumbnail
Change
Exit
0:06.45
0:06.45
Change
ENTER
HDD
;
008
PICTURE
VIDEO
DIRECT NAVIGATOR Divide Title
Preview
Exit
0:43.21
PLAY
008
Divide
- -:- -.- -
Divide
ENTER
HDD
PICTURE
VIDEO
Chapter operations
Erase Chapter
§
[HDD] [RAM]
Press [2, 1] to select “Erase” and press [ENTER].
≥Once erased, the recorded contents are lost and cannot be restored. Make certain before proceeding.
Create Chapter
[HDD] [RAM]
1 Press [ENTER] at the point you want to
divide.
≥Repeat this step to divide at other points.
2 Press [3, 4] to select “Exit” and press
[ENTER].
Combine Chapters
[HDD] [RAM]
Press [2, 1] to select “Combine” and press [ENTER].
≥The selected chapter and next chapter are combined.
For quicker editing
≥Use search, Time Slip or slow-motion (➡page 23) to find the desired point.
≥Press [:, 9] to skip to the end of a title.
DIRECT NAVIGATOR Create Chapter
Create
Exit
0:43.21
PLAY
008
HDD
PICTURE
VIDEO
31
7463en.book Page 31 Tuesday, March 8, 2005 11:07 AM

32
RQT7463
Editing
Creating, editing and playing play lists
[HDD] [RAM]
≥The maximum number of items on a disc:
–Play lists: 99
–Chapters in play lists: Approx. 1000
(Depends on the state of recording.)
[Note]
≥You cannot create or edit a play list while recording or while
transferring (dubbing).
≥Play lists must be made in accordance with the encoding system
currently selected in “TV System” (➡page 50).
Preparation
≥Press [HDD] or [DVD] to select the drive.
≥Release protection (➡page 42). [RAM]
1 While stopped
Press [FUNCTIONS].
2 Press [3, 4, 2, 1] to select “PLAY
LIST” and press [ENTER].
3 Press [3, 4, 2, 1] to select “Create”
and press [ENTER].
4 Press [2, 1] to select the source title
and press [4].
≥Press [ENTER] to select all the chapters in the title, then
skip to step 6.
5 Press [2, 1] to select the chapter you
want to add to a play list and press
[ENTER].
Press [3] to cancel.
≥You can also create a new chapter from the source title.
Press [SUB MENU] to select “Create Chapter” and press
[ENTER] (➡page 31, Create Chapter)
6 Press [2, 1] to select the position to
insert the chapter and press [ENTER].
≥Press [3] to select other source titles.
≥Repeat steps 5–6 to add other chapters.
7 Press [RETURN].
To exit the screen
Press [RETURN] several times.
To return to the previous screen
Press [RETURN].
You can arrange the chapters (➡page 30) to create a play list.
Transferring (dubbing) (➡page 35) a play list will create a title.
≥Editing play lists doesn’t modify the recording data.
≥Play lists are not recorded separately so this doesn’t use much
capacity.
Creating play lists
VOLUME
CH
DIRECT TV REC
DVD
TV
AV
123
456
78
0
9
MANUAL SKIP
ShowView
CH
CANCEL
INPUT SELECT
SKIP
STOP
PAU SE
PLAY/x1.3
SLOW/SEARCH
FUNCTIONS
ENTER
DIRECT NAVIGATOR
TOP MENU
RETURN
SUB MENU
CREATE
CHAPTER
TIMER
EXT LINK
PROG/CHECK
REC MODEERASE
REC
AUDIO
TIME SLIP
STATUS
DISPLAY
F
A B C
DUBBING
HDD DVD
SD/PC
3,4,2,1
ENTER
RETURN
FUNCTIONS
SUB MENU
HDD, DVD
Title
Chapter
Play list
Chapter
Title
Chapter Chapter Chapter Chapter
Chapter
HDD
DVD SD/PC
Recording
Dubbing
Edit
Playback
FUNCTIONS
Disc Remaining 68:00 SP
ENTER
RETURN
TIMER RECORDING
DIRECT NAVIGATOR
PLAY LIST
DUBBING
FLEXIBLE REC
DV AUTO REC
Setting
SETUP
DISC MANAGEMENT
PLAY LIST PLAY LIST VIEW
Previous 01/01 Next
- - - - - -
- - - - - -
Create
ENTER
RETURN
HDD
Create
001 ARD 11/10 SAT
001
001
Source Title
Source Chapter
Chapters in PLAY LIST
001/001
001/001
001/001
002 003
---
------------
002
SUB MENU
PLAY LIST
Press RETURN to exit.
ENTER
RETURN
HDD
------
PLAY LIST
Create
001 ARD 11/10 SAT
001
Source Title
Source Chapter
Chapters in PLAY LIST
001/001
001/001
002 003
---
------------
Press RETURN to exit.
SUB MENU
ENTER
RETURN
001
001/001
002
HDD
------
Create
001 ARD 11/10 SAT
001
001/001
001/001
002 003
---
------------
PLAY LIST
Source Title
Source Chapter
Chapters in PLAY LIST
Press RETURN to exit.
ENTER
RETURN
001
001/001
002
HDD
------
32
7463en.book Page 32 Tuesday, March 8, 2005 11:07 AM

33
RQT7463
Editing
1 Press [FUNCTIONS].
2 Press [3, 4, 2, 1] to select “PLAY
LIST” and press [ENTER].
3 Press [3, 4, 2, 1] to select the play
list.
To start play ➡ Press [ENTER].
To edit ➡ Step 4.
≥To show other pages/Multiple editing (➡page 30)
4 Press [SUB MENU], then [3, 4] to
select the operation and press
[ENTER].
≥If you select “Edit”, press [3, 4] to select the operation and
press [ENTER].
∫ If you select “Chapter View”
5 Press [3, 4, 2, 1] to select the
chapter.
To start play ➡ Press [ENTER].
To edit ➡ Step 6.
≥To show other pages/Multiple editing (➡page 30)
6 Press [SUB MENU], then [3, 4] to
select the operation and press
[ENTER].
≥You can go back to PLAY LIST View.
To exit the screen
Press [RETURN] several times.
To return to the previous screen
Press [RETURN].
§
Multiple editing is possible.
Editing chapters in a play list does not modify the source titles and
source chapters.
§
Multiple editing is possible.
Editing and playing play lists/chapters
PLAY LIST PLAY LIST VIEW
Select
Previous 01/01 Next
SUB MENU
01
Create
- -- -
- -- -- -
12/10 SUN 0:30
ENTER
RETURN
HDD
PLAY LIST View screen
Copy
Enter Name
Change Thumbnail
Create
Properties
Edit
Chapter View
Erase
Refer to “Play list
operations”.
PLAY LIST CHAPTER VIEW
Select
Previous 01/01 Next
SUB MENU
01 12/10 SUN 0:30
001
--- ---
--- ------ ---
--- ------ ---
002
ENTER
RETURN
HDD
Chapter View screen
Move Chapter
Create Chapter
Combine Chapters
Erase Chapter
PLAY LIST View
Add Chapter
Refer to “Chapter
operations”.
Play list operations
Erase
§
Press [2, 1] to select “Erase” and press
[ENTER].
Properties
Play list information (e.g., time and date) is
shown.
Create
➡page 32, Creating play lists
Copy
§
Press [2, 1] to select “Copy” and press
[ENTER].
Enter
Name
You can give names to play lists.
➡page 44, Entering text
Change
Thumbnail
➡page 31, Change Thumbnail
Chapter operations
Add
Chapter
➡page 32, Creating play lists, Step 4–6
Move
Chapter
Press [3, 4, 2, 1] to select the position
to insert the chapter and press [ENTER].
Create
Chapter
➡page 31, Create Chapter
Combine
Chapters
➡page 31, Combine Chapters
Erase
Chapter
§
➡page 31, Erase Chapter
Properties
Dinosaur
ENTER
SELECT
RETURN
No.
Chapters 0:30.53
Date
Total
10
002
12/10/2004 TUE
PLAY LIST Move Chapter
Previous 01/01 Next
01 12/10 SUN 0:30
001
--- ---
--- ------ ---
--- ------ ---
002
ENTER
RETURN
HDD
33
7463en.book Page 33 Tuesday, March 8, 2005 11:07 AM

34
RQT7463
Editing
Editing still pictures
[HDD] [RAM] [SD] [PC]
≥You can use SD Memory Cards with capacities from 8 MB to 1 GB
(➡page 15).
Preparation
≥Press [HDD], [DVD] or [SD/PC] to select the drive.
≥Release protection (➡page 42).
1 Press [DIRECT NAVIGATOR].
2 [HDD] [RAM]
Press [3, 4, 2, 1] to select
“PICTURE” tab and press [ENTER].
3 Press [3, 4, 2, 1] to select the still
picture.
≥To show other pages/Multiple editing (➡page 30)
≥To select the still pictures in another folder (➡page 27)
4 Press [SUB MENU], then [3, 4] to
select the operation and press
[ENTER].
∫ To edit still picture folders
In step 3 (➡above)
1 Press [3, 4, 2, 1] to select “Folder” and
press [ENTER].
2 Press [3, 4] to select the folder.
≥To show other pages/Multiple editing (➡page 30)
3 Press [SUB MENU], then [3, 4] to select the operation and
press [ENTER].
≥To select another higher folder (➡page 27)
To exit the screen
Press [DIRECT NAVIGATOR].
To return to the previous screen
Press [RETURN].
§
Multiple editing is possible.
VOLUME
CH
DIRECT TV REC
DVD
TV
AV
123
456
78
0
9
MANUAL SKIP
ShowView
CH
CANCEL
INPUT SELECT
SKIP
STOP
PAU SE
PLAY/x1.3
SLOW/SEARCH
FUNCTIONS
ENTER
DIRECT NAVIGATOR
TOP MENU
RETURN
SUB MENU
PROG/CHECK
TIME SLIP
STATUS
DISPLAY
HDD DVD
SD/PC
3,4,2,1
ENTER
SUB MENU
DIRECT
NAVIGATOR
HDD, DVD,
SD/PC
RETURN
Set up Protection
Cancel Protection
Slide Interval
Start Slide Show
DPOF
Erase Picture
below
page 27
Folder Name
Set up Protection
Cancel Protection
DPOF
Erase Whole Folder
Picture and folder operation
Erase Picture
§
Erase Whole Folder
§
[HDD] [RAM] [SD] [PC]
Press [2, 1] to select “Erase” and press [ENTER].
≥Once erased, the recorded contents are lost and cannot be restored. Make certain before
proceeding.
≥When erasing a folder, even the files not containing still pictures will also be erased if they are inside the
folder. (This does not apply to folders under the folder concerned.)
Set up Protection
§
Cancel Protection
§
[HDD] [RAM] [SD] [PC]
If set, this will protect the still picture or folder from accidental erasure.
Press [2, 1] to select “Yes” and press [ENTER].
The lock symbol appears when the still picture or folder is protected.
≥Even if the protection setting is used by this unit to protect a folder, the folder
may be erased by another unit.
DPOF
§
[SD] [PC]
You can select a whole folder or individual pictures for printing and specify the number of prints to be
made.
Press [2, 1] to select number of print (0 to 9)
and press [ENTER].
The DPOF mark appears.
≥This appears on the still pictures inside a folder when you make the DPOF setting for the folder.
To cancel the print setting
Set the number of print to “0”.
≥When this is set by this unit, any settings established by other units will be released.
≥Print settings (DPOF) made using this unit may not be viewable on other equipment.
≥Settings cannot be made for folders and files not in accordance with DCF standards or if there is no
remaining space on the card.
Folder Name
[HDD] [RAM] [SD] [PC]
You can give names to still picture folders.
➡page 44, Entering text
≥Folder names inputted using this unit may not be displayed on other equipment.
DIRECT NAVIGATOR PI
C
SD CARD
0001
Folder 103__
0002
0005 0006
DPOF
Set up DPOF on the picture (JPEG).
Setting on other equipment will be cancelled.
1
P ENTER t t
Number of prints
34
7463en.book Page 34 Tuesday, March 8, 2005 11:07 AM

35
RQT7463
Transfer (Dubbing)
Transferring (dubbing) titles or play lists
[HDD] [RAM] [DVD-R]
You can select from a variety of methods to transfer (dub) on this unit.
∫ Transferring (dubbing) direction
Normal speed mode: Select XP, SP, LP, EP or FR as the recording mode for transferring (dubbing) (➡page 17).
∫ Transferring (dubbing) mode
∫ Transferring (dubbing) speed mode types and features
§1
If you select a recording mode with better picture quality than the original, the picture quality does not improve. (However it does prevent
against degradation of picture quality.)
§2
When transferring (dubbing) play lists to DVD-R, the thumbnails may not reflect changes made to them.
∫ Approximate transferring (dubbing) times (Max. speed)
[Note]
≥When recording or playing while transferring (dubbing), the unit may not use the maximum recording speed.
≥Depending on the condition of the disc, the unit may not transfer (dub) using the maximum speed.
Regarding high speed transfer (dubbing) to DVD-R
To high speed transfer (dub) titles (or play lists created from those
titles), set “DVD-R Rec for High Speed mode” to “On” before
recording to the HDD (➡page 46).
However in the following cases, transferring (dubbing) to DVD-R
using the high speed mode does not work.
≥Play lists created from titles using a variety of recording modes
≥Play lists created from multiple titles using FR recording mode
≥Play lists mixed with a variety of audio types (Dolby Digital and
LPCM, etc.)
≥Titles that contain many erased segments
Regarding transferring (dubbing) of digital broadcasts that
allow “One time only recording”
You can transfer (dub) a recorded title to a CPRM (➡page 53)
compatible DVD-RAM, however the title is erased from the HDD.
≥You cannot use one touch transfer (dubbing). Use the transferring
(dubbing) list (➡page 36).
≥Titles will not be transferred if they are protected (➡page 31).
≥You cannot transfer play lists created from “One time only
recording” titles.
≥Titles with recording limitations and play lists cannot be registered
on the same transferring (dubbing) list.
≥Titles or play lists cannot be transferred from DVD-RAM to the HDD.
You can transfer (dub) your favorite titles and play lists to an archive disc.
≥Transferring (dubbing) a play list will create a title.
When you want to re-edit finalized content on
a DVD-R etc.
≥When you want to play a transferred
(dubbed) disc on other equipment, you must
finalize the disc after transferring (dubbing)
(➡page 43, 53).
§
Before recording to HDD, set “DVD-R Rec
for High Speed mode” to “On” (➡page 46).
§
Finalized DVD-R or DVD-Video on sale that
is not copy-protected, etc.
High speed mode
Normal speed mode
HDD RAM
High speed mode
§
Normal speed mode
HDD DVD-R
Normal speed mode
HDD
DVD-V
§
Transferring (dubbing) a title or a play list Transferring (dubbing) multiple titles and play lists together
One Touch Transfer (dubbing) (➡page 36) Transferring (dubbing) using the transferring (dubbing) list (➡page 36)
You can select transferring (dubbing) speed mode and picture quality (➡below)
High speed Normal speed (XP, SP, LP, EP, FR)
Features You can transfer (dub) in a very short amount
of time. You can transfer (dub) even faster if
you use a high speed recording compatible
disc.
You can record and play using the HDD while
high speed transferring (dubbing).
You can record for a long period of time on 1 disc.
For example, using LP mode, you can record approximately 4
hours on 1 (4.7 GB) disc (➡page 17).
e.g., 1 hour TV drama
Only one episode using XP mode
4 episodes using LP mode
Transferring (dubbing)
times
➡below, Approximate transferring (dubbing)
times
The same amount of time it takes to record the source
Picture quality Original picture quality
Can change
§1
Are chapters/thumbnails
maintained?
Ye s
§2
No (One title is recorded as one chapter. Thumbnails return to
the default position.)
Other operations while
transferring (dubbing)
You can record/play using the HDD. No
XP
LP LP LP LP
HDD
1
3
k
high speed recording compatible DVD-RAM 4
k
high speed recording compatible DVD-R
Recording mode Recording time Required time Speed Required time Speed
XP
1 hour
Approx. 20 min. 3k Approx. 15 min. 4k
SP Approx. 10 min. 6k Approx. 7.5 min. 8k
LP Approx. 5 min. 12k Approx. 4 min. 16k
EP (6 Hour) Approx. 3.5 min. 18k Approx. 2.5 min. 24k
EP (8 Hour) Approx. 2.5 min. 24k Approx. 2 min. 32k
35
7463en.book Page 35 Tuesday, March 8, 2005 11:07 AM

36
RQT7463
Transfer (Dubbing)
Transferring (dubbing) titles or play lists
[Note]
Titles and play lists recorded using a different encoding system from
the TV system currently selected on the unit cannot be transferred
(dubbed).
[HDD]
>
[RAM]
[HDD]
>
[DVD-R]
Preparation
Select the audio type for recording bilingual broadcast from
“Bilingual Audio Selection” (➡page 47) when transferring (dubbing)
to a DVD-R.
1 Play the title or play list you want to
transfer (dub).
2 Press [DUBBING].
3 Press [2, 1] to select “Yes” and
press [ENTER].
≥The transfer (dubbing) speed and picture quality are set as
follows.
The recording mode changes to FR mode if the remaining disc
space is exceeded using one of the recording modes indicated
below.
[HDD]
>
[RAM]
:
High speed mode
[HDD]
>
[DVD-R]
:
[Note]
Titles and play lists cannot be transferred (dubbed) if they contain
digital broadcast that allow “One time only recording”.
[HDD]
,-.
[RAM]
[HDD]
>
[DVD-R]
You can order titles and play lists for transfer (dubbing) as desired as
well as select the speed and picture quality.
Preparation
Select the audio type for recording bilingual broadcast from
“Bilingual Audio Selection” (➡page 47) when:
≥Transferring (dubbing) to a DVD-R.
≥When “Audio Mode for XP Recording” is set to “LPCM” (➡page 47)
and you are transferring (dubbing) in XP mode.
1 While stopped
Press [FUNCTIONS].
2 Press [3, 4, 2, 1] to select
“DUBBING” and press [ENTER].
≥If you are not going to change the registered list press [4]
several times (➡step 7).
3 Press [3, 4] to select “Dubbing
Direction” and press [1].
1 Press [3, 4] to select “Source” and press [ENTER].
2 Press [3, 4] to select the drive and press [ENTER].
3 Press [3, 4] to select “Destination” and press
[ENTER].
The same drive as the transfer (dubbing) source cannot be
selected.
4 Press [3, 4] to select the drive and press [ENTER].
5 Press [2] to confirm.
4 Press [3, 4] to select “Dubbing
Mode” and press [1].
1
Press
[3, 4] to select “Format” and press [ENTER]
.
2
Press
[3, 4] to select “VIDEO” and press [ENTER]
.
3
Press
[3, 4] to select “Recording Mode” and press
[ENTER]
.
4
Press
[3, 4]
to select the mode and press
[ENTER]
.
5 Press [2] to confirm.
5 Press [3, 4] to select “Create List”
and press [1].
Select the transferring (dubbing) items and register on the list.
≥When transferring (dubbing) to DVD-R using high speed
mode, only items indicated with “ ” can be registered.
1 Press [3, 4] to select “New item” and press [ENTER].
2 Press [3, 4, 2, 1] to select “Video” or “PLAY LIST”
tab and press [ENTER].
One Touch Transfer (dubbing)
DVD-R Rec for High Speed mode setting
On Off
High speed mode Same recording mode used as when
recording the source title (XP–EP, FR).
≥Play lists are transferred (dubbed) in FR
mode.
VOLUME
CH
DIRECT TV REC
DVD
TV
AV
123
456
78
0
9
MANUAL SKIP
ShowView
CH
CANCEL
INPUT SELECT
SKIP
STOP
PAU SE
PLAY/x1.3
SLOW/SEARCH
FUNCTIONS
ENTER
DIRECT NAVIGATOR
TOP MENU
RETURN
SUB MENU
CREATE
CHAPTER
TIMER
EXT LINK
PROG/CHECK
REC MODEERASE
REC
AUDIO
TIME SLIP
STATUS
DISPLAY
F
A B C
DUBBING
HDD DVD
SD/PC
3,4,2,1
ENTER
SUB MENU
DUBBING
∫
1
RETURN
FUNCTIONS
;
STATUS
:, 9
Numbered
buttons
DUBBING
High Speed mode is selected.
Is it OK to start?
Yes No
Transferring (dubbing) using the
transferring (dubbing) list
DUBBING
HDD
DVD
Select the dubbing direction.
1
2
3
Source
Destination
Cancel All
Dubbing Direction
Dubbing Mode
Create List
HDD > DVD
VIDEO High Speed
0
01/01
DUBBING
Create dubbing list.
Size: 0MB
Destination Capacity: 4343MB
No. Size
Previous
New item
Next
Set
ENTER
RETURN
1
2
3
Cancel All
Dubbing Direction
Dubbing Mode
Create List
Start Dubbing
HDD > DVD
VIDEO High Speed
Name of item
HDD
Create List
Select
Previous 02/02 Next
007
ARD 10/10 FRI
008 1200MB
ARD 11/10 SAT
- - -
ENTER
RETURN
- - -- - -- - -
PLAY LIST
Video
36
7463en.book Page 36 Tuesday, March 8, 2005 11:07 AM

37
RQT7463
Transfer (Dubbing)
3 Press [3, 4, 2, 1] to select the titles or play lists and
press [ENTER].
≥To select a multiple number of items together, press [;]
to add the check mark and press [ENTER] (➡below,
Multiple editing).
≥To show other pages (➡below)
≥To edit the transferring (dubbing) list (➡below)
6 Press [3, 4] to select “Set” and
press [ENTER].
The transferring (dubbing) list is registered.
7 Press [3, 4] to select “Start
Dubbing” and press [ENTER].
Press [2, 1] to select “Yes” and press [ENTER] to start
transferring (dubbing).
∫ To edit the transferring (dubbing) list
Select the item in step 5 (➡page 36, right column)
1 Press [SUB MENU].
2 Press [3, 4] to select the operation and press
[ENTER].
§
Multiple editing is possible (➡below).
To cancel all registered transferring (dubbing) setting and lists
In step 3 (➡page 36, right column)
1 Press [3, 4] to select “Cancel All” and press [ENTER].
2 Press [2, 1] to select “Yes” and press [ENTER].
≥The settings and lists may be cancelled in the following situations.
–When a title, still picture, etc. has been erased at the transfer
(dubbing) source
–When steps have been taken, for instance, to turn off the unit,
open the tray, change the transfer (dubbing) direction, etc.
Transferring (dubbing) list indicators
To show other pages
Press [3, 4, 2, 1] to select “Previous” or “Next” and press
[ENTER].
≥You can also press [:, 9] to show other pages.
Multiple editing
Select with [3, 4, 2, 1] and press [;]. (Repeat.)
Press [ENTER] to register to the list.
≥A check mark appears. Press [;] again to cancel.
≥When you switch between the “Video” and “PLAY LIST” tab, the
check mark is cancelled.
Add
Erase
§
Move
Erase All
Titles and play lists that can be transferred
(dubbed) in high speed mode to DVD-R
(➡page 46)
Title with “One time only recording” restriction
Titles erased from the HDD by “One time only
recording” restriction after transferring (dubbing).
Title or play list contains still picture(s)
≥Still picture(s) cannot be transferred (dubbed).
(NTSC)
(PAL)
Title or play list recorded using a different
encoding system from that of the TV system
currently selected on the unit.
≥Titles and play lists displaying these marks
cannot be selected.
Data size of each registered item
Data size recorded to the transfer
(dubbing) destination
≥For normal speed transfer (dubbing), the
total data size changes according to the
recording mode.
≥When transferring (dubbing) to the HDD
using high speed mode, data
management information is
automatically added so the total data
size becomes larger than the sum of the
data size for all registered items.
∫ To stop transferring (dubbing)
Press and hold [RETURN] for 3 seconds.
≥If stopped partway, transferring (dubbing) will be up to that point.
However, in high speed mode, only titles that have completed
transferring (dubbing) at the point stopped are transferred
(dubbed). [Even if the title was not transferred (dubbed) to the
DVD-R, the amount of remaining writable disc space becomes
less.]
∫ To return to the previous screen
Press [RETURN].
∫ Recording and playing while transferring
(dubbing)
You can record and play using the HDD while high speed
transferring (dubbing).
Press [ENTER] to cancel the screen display.
≥To confirm the current progress
Press [STATUS].
[Note]
≥You cannot perform chasing play or edit etc. while transferring
(dubbing).
≥Timer recordings executed while transferring (dubbing) are
recorded to the HDD regardless of the recording drive settings.
≥You cannot play a play list while transferring (dubbing) titles with
“One time only recording” restriction (➡page 35).
01/01
Size: 0MB
Destination Capacity: 4343MB
No. Size
Previous
New item
Next
Set
Name of item
37
7463en.book Page 37 Tuesday, March 8, 2005 11:07 AM

38
RQT7463
Transfer (Dubbing)
Transferring (dubbing) titles or play lists
Refer to the control reference on page 36.
[DVD-V]
>
[HDD]
While playing a disc, the content being played is transferred
(dubbed) to the HDD according to the set time.
After performing steps 1–4 (➡page 36, right column)
5 Press [3, 4] to select “Dubbing
Time” and press [1].
6 Press [2, 1] to select “Hour” and
“Min.” and press [3, 4] to set the
recording time.
≥You can also set the recording time with the numbered
buttons.
≥Set a few minutes longer than the source title, in order to
include the operation time before play begins.
7 Press [2] to select “Dubbing Time”.
8 Press [3, 4] to select “Start
Dubbing” and press [ENTER].
Press [2, 1] to select “Yes” and press [ENTER] to start
transferring (dubbing).
The disc top menu is displayed.
≥Disc play automatically begins from title 1 when “Title 1” is
selected from the “Auto-Play Select” menu when finalizing
the disc (➡page 43).
9 When the top menu is displayed
Press [3, 4, 2, 1] to select the title
you want to start transferring
(dubbing), and press [ENTER].
While playing in order, all the titles after the selected title are
recorded until the set time. (After the last title on the disc has
finished playing the top menu is recorded until the set time is
reached.)
To stop transferring (dubbing)
Press [∫].
You can also press and hold [RETURN] for 3 seconds to stop
transferring (dubbing).
≥If stopped partway, transferring (dubbing) will be up to that point.
To return to the previous screen
Press [RETURN].
[Note]
≥The screen on the right (screen saver) is
recorded at the beginning.
≥Recorded as 1 title from the start of transfer
(dubbing) to the end.
≥If play does not begin automatically or if the top menu does not
display automatically, press [1] (PLAY) to start.
≥Even if you transfer (dub) a high quality video/audio DVD, the
original picture and audio quality cannot be exactly replicated.
Transferring (dubbing) a finalized
DVD-R
≥Operations and on screen displays during transfer
(dubbing) are also recorded.
≥Almost all DVD-Video on sale have been treated to prevent
illegal copying, and cannot be transferred (dubbed).
≥The following cannot be transferred (dubbed): DVD-Audio,
Video CD, Audio CD and so on.
Set the time with the numbered
buttons or arrow buttons.
DUBBING
Min.
Set the time to finish dubbing.
1
2
3
Hour
00
2
Cancel All
Dubbing Direction
Dubbing Mode
Dubbing Time
Start Dubbing
DVD > HDD
DVD-Video XP
ENTER
RETURN
My favorite 01/02
01
Chapter 1
03
05
02
04
06
Chapter 2
Chapter 3 Chapter 4
38
7463en.book Page 38 Tuesday, March 8, 2005 11:07 AM

39
RQT7463
Transfer (Dubbing)
Recording from a video cassette recorder
e.g., Connecting other video equipment to the AV3 or DV input
terminals
≥Turn off the unit and other video equipment before connecting.
If the audio output of the other equipment is monaural, connect to L/MONO.
§
The S-VIDEO terminal achieves a more vivid picture than the
VIDEO terminal.
When recording from the unit’s DV terminal
Select the type of audio recording from “Audio Mode for DV Input” in
the SETUP menu (➡page 47).
[HDD] [RAM] [DVD-R]
Preparation
≥Connect a video cassette recorder to this unit’s input terminals.
≥Press [HDD] or [DVD] to select the recording drive.
≥When recording bilingual programmes
[HDD] [RAM]
When both M 1 and M 2 is selected on the connected equipment,
you can select the audio type in playback.
[DVD-R]
Select either M 1 or M 2 on the connected equipment. (You cannot
select the audio type in playback.)
≥
When the output signal from the external equipment is NTSC,
change the “TV System” to “NTSC” in the SETUP menu (
➡
page 50).
≥To reduce noise in input from a video cassette recorder, set “AV-in
NR” to “On” in the SETUP menu (➡page 46).
1 While stopped
Press [INPUT SELECT] to select the
input channel for the equipment you
have connected.
e.g., If you have connected to AV3 input terminals, select “AV3”.
2 Press [REC MODE] to select the
recording mode.
3 Start play on the other equipment.
4 Press [¥ REC].
Recording starts.
To skip unwanted parts
Press [;] to pause recording. (Press again to restart recording.)
To stop recording
Press [∫].
To record programmes to fill up the remaining space on the
disc
➡page 18, Flexible Recording
[HDD] [RAM]
When the “DV AUTO REC” function is used, programmes are
recorded as a title while at the same time chapters are created at
each break in the images and the play list is created automatically.
Preparation
1 Turn off the main unit and DV equipment, then connect the
equipment with the unit’s DV input terminal (➡left).
2 Turn on the main unit and DV equipment.
3 Pause play of the DV equipment at the point you want recording
to start.
4 Press [HDD] or [DVD] to select the recording drive.
≥
When the output signal from the external equipment is NTSC,
change the “TV System” to “NTSC” in the SETUP menu (
➡
page 50).
1 While stopped
Press [FUNCTIONS].
2 Press [3, 4, 2, 1] to select “DV
AUTO REC” and press [ENTER].
3 Press [REC MODE] to select the
recording mode.
4 Press [2, 1] to select “Rec” and
press [ENTER].
Recording starts.
When recording finishes
The confirmation screen appears. Press [ENTER] to finish DV
automatic recording.
To stop recording
Press [∫].
[Note]
≥Only one piece of DV equipment (e.g., digital video camcorder) can
be connected to the unit via the DV input terminal.
≥It is not possible to operate the unit from the connected DV
equipment.
≥The DV input on this unit is for use with DV equipment only. (It
cannot be connected to a computer, etc.)
≥The DV equipment name may not be shown correctly.
≥Depending on the DV equipment, the images or audio may not be
input properly.
≥The date and time information on the tape of the DV equipment will
not be recorded.
≥You cannot record and play simultaneously.
Manual recording
VOLUME
CH
DIRECT TV REC
DVD
TV
AV
123
456
78
0
9
MANUAL SKIP
ShowView
CH
CANCEL
INPUT SELECT
SKIP
STOP
PAU SE
PLAY/x1.3
SLOW/SEARCH
FUNCTIONS
ENTER
DIRECT NAVIGATOR
TOP MENU
RETURN
SUB MENU
TIMER
PROG/CHECK
REC MODEERASE
REC
TIME SLIP
STATUS
DISPLAY
F
HDD DVD
SD/PC
3,4,2,1
ENTER
FUNCTIONS
REC MODE
HDD, DVD
¥ REC
INPUT SELECT
∫
;
OPEN/CLOSE
REC
/
x
1.3
TIME SLIP
CH
TIME SLIP
DRIVE SELECT
SD PCDVDHDD
SD CARD PC CARD EJECT
HDD DVD
AV3
S-VIDEO IN VIDEO IN AUDIO IN DV IN
R
L/MONO
L/MONO - AUDIO IN - R
VIDEO IN DV IN
S-VIDEO IN
Audio/
Video cable
S-Video
cable
§
Other video
equipment
Yellow White Red
This unit
DV cable
(IEEE 1394, 4-pin)
Almost all videos and DVD software on sale have been
treated to prevent illegal copying. Any software that has
been so treated cannot be recorded using this unit.
DV automatic recording (DV AUTO REC)
If the DV automatic recording function does not work properly,
check the connections and DV equipment settings, and turn the
unit off and back on.
If that does not work, follow the instructions for manual
recording (➡left).
39
7463en.book Page 39 Tuesday, March 8, 2005 11:07 AM

40
RQT7463
Transfer (Dubbing)
Transferring (dubbing) still pictures
[HDD] [RAM] [SD] [PC]
≥You can use SD Memory Cards with capacities from 8 MB to 1 GB
(➡page 15).
1 While stopped
Press [FUNCTIONS].
2 Press [3, 4, 2, 1] to select
“DUBBING” and press [ENTER].
≥If you are not going to change the registered list press [4]
several times (➡step 7).
3 Press [3, 4] to select “Dubbing
Direction” and press [1].
1 Press [3, 4] to select “Source” and press [ENTER].
2 Press [3, 4] to select the drive and press [ENTER].
3
Press [
3
,
4
] to select “Destination” and press [ENTER].
4 Press [3, 4] to select the drive and press [ENTER].
The same drive as the transfer (dubbing) source can be
selected.
5 Press [2] to confirm.
4 Press [3, 4] to select “Dubbing
Mode” and press [1].
1
Press
[3, 4] to select “Format” and press [ENTER]
.
2
Press
[3, 4] to select “PICTURE” and press [ENTER]
.
“Recording Mode” is automatically set to “High Speed”.
3 Press [2] to confirm.
5 Press [3, 4] to select “Create List”
and press [1].
Select the transferring (dubbing) items and register on the list.
∫ To register individual still pictures
1 Press [3, 4] to select “New item” and press [ENTER].
2 Press [3, 4, 2, 1] to select the still picture and press
[ENTER].
≥To select a multiple number of items together, press [;]
to add the check mark and press [ENTER] (➡right,
Multiple editing).
≥To show other pages (➡right)
≥To select the still pictures in another folder (➡right)
≥To edit the transferring (dubbing) list (➡right)
∫ To register on a folder by folder basis
1
Press [
3
,
4
] to select “Picture/Folder” and press [ENTER].
2 Press [3, 4] to select “Folder” and press [ENTER].
3 Press [3, 4] to select “New item” and press [ENTER].
4 Press [3, 4] to select the folder and press [ENTER].
≥To select a multiple number of items together, press [;]
to add the check mark and press [ENTER] (➡below,
Multiple editing).
≥To show other pages (➡below)
≥To switch another higher folder (➡below)
≥To edit the transferring (dubbing) list (➡below)
Still pictures and folders cannot be registered on the same list.
6 Press [3, 4] to select “Set” and
press [ENTER].
The transferring (dubbing) list is registered.
7 Press [3, 4] to select “Start
Dubbing” and press [ENTER].
≥For individual still pictures only
When specifying another folder as the transferring (dubbing)
destination, select “Folder”.
Press [2, 1] to select “Yes” and press [ENTER] to start
transferring (dubbing).
To stop transferring (dubbing)
Press and hold [RETURN] for 3 seconds.
To return to the previous screen
Press [RETURN].
∫ To select another folder
1 Press [3, 4, 2, 1] to select “Folder” and press [ENTER].
2 Press [3, 4] to select the folder and press [ENTER].
≥The still pictures of different folders cannot be registered on the
same list.
≥If there is a multiple number of higher
folders recognizable, you can switch
them using [2, 1]. (Folders whose
higher folders are different cannot be registered on the same list.)
∫ To edit the transferring (dubbing) list
Select the item in step 5 (➡left)
1 Press [SUB MENU].
2 Press [3, 4] to select the operation and press
[ENTER].
§
Multiple editing is possible (➡below).
To cancel all registered transferring (dubbing) setting and lists
In step 3 (➡left)
1 Press [3, 4] to select “Cancel All” and press [ENTER].
2 Press [2, 1] to select “Yes” and press [ENTER].
≥The settings and lists may be cancelled in the following situations.
–When a still picture or folder has been recorded or erased at the
transfer (dubbing) source
–When steps have been taken, for instance, to turn off the unit,
remove the card, open the tray, change the transfer (dubbing)
direction, etc.
Transferring (dubbing) using the
transferring (dubbing) list
123
456
78
0
9
MANUAL SKIP
ShowView
CH
CANCEL
INPUT SELECT
SKIP
STOP
PAU SE
PLAY/x1.3
SLOW/SEARCH
FUNCTIONS
ENTER
DIRECT NAVIGATOR
TOP MENU
RETURN
SUB MENU
HDD DVD
SD/PC
3,4,2,1
ENTER
SUB MENU
RETURN
FUNCTIONS
SD/PC
:, 9
;
DUBBING
SD CARD
HDD
Select the dubbing direction.
1
2
3
Source
Destination
Cancel All
Dubbing Direction
Dubbing Mode
Create List
SD CARD > HDD
PICTURE
High Speed
0
01/01
DUBBING
Create dubbing list.
Destination Capacity: 4343MB
No. Size
Previous
New item
Next
Set
ENTER
RETURN
1
2
3
Cancel All
Picture
Dubbing Direction
Dubbing Mode
Create List
Picture/Folder
Start Dubbing
SD CARD > HDD
PICTURE
High Speed
Name of item
To show other pages
Press [
3
,
4
,
2
,
1
] to select “Previous” or “Next” and press [ENTER].
≥You can also press [:, 9] to show other pages.
Multiple editing
Select with [3, 4, 2, 1] and press [;]. (Repeat.)
Press [ENTER] to register to the list.
≥A check mark appears. Press [;] again to cancel.
DUBBING
Create dubbing list.
Destination Capacity: 4343MB
No. Size
New item
1
2
Cancel All
Picture
Dubbing Direction
Dubbing Mode
Picture/Folder
SD CARD > HDD
Name of item
Folder
Make a new folder and dub to it?
New folder
\JPEG\DCIM001
001 100__DVD
002 101__DVD
003 102__DVD
---
004 103__DVD
Create List Picture (JPEG)
SD CARD
0001
Folder 103__DVD
0002 0003 0004
\DCIM
001 100__DVD
002 101__DVD
003 102__DVD
---
\DCIM\100__DVD
004 103__DVD
002 101__DVD
003 102 DVD
\DCIM\100__DVD
\DCIM
001 100__DVD
Add
Erase
§
Erase All
40
7463en.book Page 40 Tuesday, March 8, 2005 11:07 AM

41
RQT7463
Convenient functions Transfer (Dubbing)
[SD]
or
[PC]
>
[HDD]
or
[RAM]
Preparation
Press [SD/PC] to select the source drive.
1 While stopped
Press [FUNCTIONS].
2 Press [3, 4, 2, 1] to select “COPY
ALL PICTURES” and press [ENTER].
≥If there is a multiple number of higher folders recognizable,
you can switch them using [2, 1].
3 Press [3, 4] to select “Copy from”
and press [2, 1] to select the drive.
4 Press [3, 4] to select “Copy to” and
press [2, 1] to select the drive.
5 Press [3, 4, 2, 1] to select “Copy”
and press [ENTER].
To stop transferring (dubbing)
Press and hold [RETURN] for 3 seconds.
To return to the previous screen
Press [RETURN].
By using the FUNCTIONS window you may access the main
functions quickly and easily.
1 While stopped
Press [FUNCTIONS].
Functions displayed depend on the selected drive or type of
disc.
2 Press [3, 4, 2, 1] to select an item
and press [ENTER].
To exit the FUNCTIONS window
Press [FUNCTIONS].
Transferring (dubbing) all the still
pictures on a card—COPY ALL
PICTURES
[Note]
≥When transferring (dubbing) the still pictures on a folder by
folder or card by card basis, files other than the still picture files
inside the folder will also be transferred (dubbed). (This does
not apply to the lower folders contained inside the folders.)
≥If still pictures are already contained inside the transfer
(dubbing) destination folder, the new still pictures are recorded
following the existing still pictures.
≥If the space on the destination drive runs out or the number of
files/folders to be transferred (dubbed) exceeds the maximum
(➡page 26), transferring (dubbing) will stop partway through.
≥When a name has been input by this unit for the transfer
(dubbing) source folder, the folder name will be reflected in the
transfer (dubbing) destination folder.
≥Print number setting (DPOF) is not transferred (dubbed).
≥The sequence in which the still pictures are registered on the
transfer (dubbing) list may not be reflected at the transfer
(dubbing) destination.
COPY ALL PICTURES
Copy from
SD CARD
\DCIM
Copy to
HDD
\JPEG\DCIM001
Copy all pictures (JPEG) in the card
VOLUME
CH
DIRECT TV REC
DVD
TV
AV
123
456
78
0
9
MANUAL SKIP
ShowView
CH
CANCEL
INPUT SELECT
SKIP
STOP
PAU SE
PLAY/x1.3
SLOW/SEARCH
FUNCTIONS
ENTER
DIRECT NAVIGATOR
TOP MENU
RETURN
SUB MENU
CREATE
CHAPTER
TIMER
EXT LINK
PROG/CHECK
REC MODEERASE
REC
AUDIO
TIME SLIP
STATUS
DISPLAY
F
A B C
DUBBING
HDD DVD
SD/PC
3,4,2,1
ENTER
FUNCTIONS
HDD
DVD SD/PC
Recording
Dubbing
Edit
Playback
FUNCTIONS
Disc Remaining 68:00 SP
ENTER
RETURN
TIMER RECORDING
DIRECT NAVIGATOR
PLAY LIST
DUBBING
FLEXIBLE REC
DV AUTO REC
Setting
SETUP
DISC MANAGEMENT
FUNCTIONS window
41
7463en.book Page 41 Tuesday, March 8, 2005 11:07 AM

42
RQT7463
Convenient functions
HDD, disc and card management
≥You can use SD Memory Cards with capacities from 8 MB to 1 GB
(➡page 15).
∫ Setting the protection for the whole disc or card
≥For a DVD-RAM with a cartridge or for a card
[RAM]
With the write-protect tab in the protect position,
play automatically starts when inserted in the unit.
[SD] [PC]
Switch the write-protect switch to the
“LOCK” position.
≥For a DVD-RAM without a cartridge
(➡below, Disc Protection)
∫ Other protection settings
[RAM]
Preparation
Press [DVD] to select the DVD drive.
1 While stopped
Press [FUNCTIONS].
2 Press [3, 4, 2, 1] to select “DISC
MANAGEMENT” and press [ENTER].
3 Press [3, 4] to select “Disc
Protection” and press [ENTER].
4 Press [2, 1] to select “Yes” and
press [ENTER].
The lock symbol appears closed when the disc is write-
protected.
[RAM] [DVD-R]
Preparation
≥Press [DVD] to select the DVD drive.
≥Release protection (➡left).
1 While stopped
Press [FUNCTIONS].
2 Press [3, 4, 2, 1] to select “DISC
MANAGEMENT” and press [ENTER].
3 Press [3, 4] to select “Disc Name”
and press [ENTER].
➡page 44, Entering text
≥The disc name is displayed in the FUNCTIONS window.
≥With a finalized DVD-R, the name is displayed on the Top
Menu.
[HDD] [RAM]
Preparation
≥Press [HDD] or [DVD] to select the drive.
≥Release protection (➡left).
1 While stopped
Press [FUNCTIONS].
2 Press [3, 4, 2, 1] to select “DISC
MANAGEMENT” and press [ENTER].
3 Press [3, 4] to select “Erase all
titles” and press [ENTER].
4 Press [2, 1] to select “Yes” and
press [ENTER].
5 Press [2, 1] to select “Start” and
press [ENTER].
A message appears when finished.
6 Press [ENTER].
[Note]
≥Once erased, the recorded contents are lost and cannot be
restored. Make certain before proceeding.
≥Still picture data (JPEG, TIFF) or computer data cannot be erased.
≥Erase does not work if one or more titles are protected.
To exit the screen
Press [RETURN] several times.
To return to the previous screen
Press [RETURN].
Setting the protection
Title
Select “Set up Protection” in step 4 on page 30.
Still picture or folder
Select “Set up Protection” in step 4 on page 34.
Disc Protection
VOLUME
CH
DIRECT TV REC
DVD
TV
AV
123
456
78
0
9
MANUAL SKIP
ShowView
CH
CANCEL
INPUT SELECT
SKIP
STOP
PAU SE
PLAY/x1.3
SLOW/SEARCH
FUNCTIONS
ENTER
DIRECT NAVIGATOR
TOP MENU
RETURN
SUB MENU
CREATE
CHAPTER
TIMER
EXT LINK
PROG/CHECK
REC MODEERASE
REC
AUDIO
TIME SLIP
STATUS
DISPLAY
F
A B C
DUBBING
HDD DVD
SD/PC
HDD, DVD,
SD/PC
3,4,2,1
ENTER
RETURN
FUNCTIONS
PROTECT
LOCK
e.g. SD Memory Card
Providing a disc with a name
Erasing all titles and play lists—Erase
all titles
DISC
MANAGEMENT
DVD-RAM
Title No. 11
Used
Remain
0 : 22
5:38 (EP)
On
Disc Name
Earse all titles
Format Disc
Disc Protection
SELECT
ENTER
RETURN
My favorite 01/02
01
Chapter 1
02
Chapter 2
HDD SD/PC
Playback
FUNCTIONS
DIRECT NAVIGATOR
DVD
DVD-RAM
Disc Protection O
f
Documentary
Cartridge Protecti
o
42
7463en.book Page 42 Tuesday, March 8, 2005 11:07 AM

43
RQT7463
Convenient functions
[HDD] [RAM] [SD] [PC]
Preparation
≥Press [HDD], [DVD] or [SD/PC] to select the drive.
≥Release protection (➡left).
1 While stopped
Press [FUNCTIONS].
2 Press [3, 4, 2, 1] to select “DISC
MANAGEMENT” or “CARD
MANAGEMENT” and press [ENTER].
3 Press [3, 4] to select “Format” or
“Format Disc” and press [ENTER].
4 Press [2, 1] to select “Yes” and
press [ENTER].
5 Press [2, 1] to select “Start” and
press [ENTER].
A message appears when formatting is finished.
6 Press [ENTER].
[Note]
≥To stop formatting
Press [RETURN].
(You can cancel formatting if it takes more than 2 minutes. The disc
or card must be reformatted if you do this.)
≥Formatting cannot be performed on DVD-R or CD-R/RW.
≥When a disc or card has been formatted using this unit, it may not
be possible to use it on any other equipment.
≥You cannot format a Microdrive or mobile hard disk on this unit.
[DVD-R]
Preparation
Press [DVD] to select the DVD drive.
1 While stopped
Press [FUNCTIONS].
2 Press [3, 4, 2, 1] to select “DISC
MANAGEMENT” and press [ENTER].
3 Press [3, 4] to select “Top Menu”
and press [ENTER].
Press [3, 4, 2, 1] to select the background and press
[ENTER].
You can select the background
that will be displayed as the
DVD-Video top menu after
finalizing.
≥You can change thumbnails
displayed in the top menu.
(➡page 31, Change
Thumbnail)
4 Press [3, 4] to select “Auto-Play
Select” and press [ENTER].
Press [3, 4] to select “Top Menu” or “Title 1” and press
[ENTER].
You can select whether to show the top menu after finalizing.
Top Menu: The top menu appears first.
Title 1: The disc content is played without displaying the
top menu.
5 Press [3, 4] to select “Finalize” and
press [ENTER].
1 Press [2, 1] to select “Yes” and press [ENTER].
2 Press [2, 1] to select “Start” and press [ENTER].
A message appears when finalizing is finished.
3 Press [ENTER].
[Note]
≥You cannot finalize DVD-R recorded on other manufacturer’s
equipment.
≥If you finalize a recorded DVD-R on Panasonic equipment other
than this unit, the background selected as “Top Menu” may not
display.
DVD-R finalized on this unit may not be playable on other players
due to the condition of the recording.
≥Visit Panasonic’s homepage for more information about DVDs.
http://www.panasonic-europe.com
To exit the screen
Press [RETURN] several times.
To return to the previous screen
Press [RETURN].
Erasing all the contents of a disc or
card—Format
≥Formatting erases all contents (including computer data),
and it cannot be restored. Check carefully before
proceeding. The contents are erased when you format it even if
you have set protection.
≥Do not disconnect the AC mains lead while formatting. This
can render the disc unusable.
Formatting normally takes a few minutes, however it may take up
to a maximum of 70 minutes ([RAM]).
Enabling DVD-R to be played on other
equipment—Finalize
After finalizing
≥The disc becomes play-only and you can no longer record
or edit.
≥When transferring (dubbing) in high speed, chapters will be
replicated.
≥Titles are divided into about 5-minute
§
chapters, if
–the titles were directly recorded to DVD-R.
–the titles were transferred (dubbed) using any mode other than
the high speed mode.
§
This time varies greatly depending on the condition and mode
of recording.
≥There is a pause of several seconds between titles and
chapters during play.
Do not disconnect the AC mains lead while the message
“Finalizing the disc” is on the television. This will render the
disc unusable.
Finalizing takes up to 15 minutes.
Before
finalizing
After
finalizing
Disc display on this unit DVD-R DVD-V
Recording/Editing/Entering name Yt
Play on other players tY
1
4
7 8
5
2
9
6
3
TOP MENU LIST
01
Display after finalizing
Thumbnail
(Still picture)
Title Name
43
7463en.book Page 43 Tuesday, March 8, 2005 11:07 AM

44
RQT7463
Convenient functions
Entering text
[HDD] [RAM] [DVD-R] [SD] [PC]
You can give names to recorded titles, etc.
The maximum number of characters:
§
Title name for timer recording
[Note]
If a name is long, parts of it may not be shown in some screens.
1 Show Enter Name screen.
2 Press [3, 4, 2, 1] to select a
character and press [ENTER].
Repeat this step to enter other characters.
≥To erase a character
Press [3, 4, 2, 1] to select the character in the name field
and press [;].
≥Using the numbered buttons to enter characters
e.g., entering the letter “R”
1 Press [7] to move to the 7th
row.
2 Press [7] twice to highlight
“R”.
3 Press [ENTER].
≥To enter a space
Press [¢ CANCEL] and press
[ENTER].
3 Press [∫] (SET).
Returns to the previously displayed screen.
To end partway
Press [RETURN].
Text is not saved.
For your reference
If you enter a long name, only part of it is shown in the Top Menu
after finalization (➡page 43). When entering a title name, the name
that will appear in the Top Menu can be previewed in “Title on TOP
MENU (DVD-R)” window.
[HDD] [RAM] Characters
Title
64 (44
§
)
Play list 64
Disc 64
Folder of still pictures 36
[DVD-R] Characters
Title 44
Disc 40
[SD] [PC] Characters
Folder of still pictures 36
VOLUME
CH
DIRECT TV REC
DVD
TV
AV
123
456
78
0
9
MANUAL SKIP
ShowView
CH
CANCEL
INPUT SELECT
SKIP
STOP
PAU SE
PLAY/x1.3
SLOW/SEARCH
FUNCTIONS
ENTER
DIRECT NAVIGATOR
TOP MENU
RETURN
SUB MENU
CREATE
CHAPTER
TIMER
EXT LINK
PROG/CHECK
REC MODEERASE
REC
AUDIO
TIME SLIP
STATUS
DISPLAY
F
A B C
DUBBING
HDD DVD
SD/PC
3,4,2,1
ENTER
¢ CANCEL
∫
;
RETURN
Numbered
buttons
Title (timer recording)
Select “Programme Name” in step 3 on page 19, 20.
Title
Select “Enter Name” in step 4 on page 30.
Play list
Select “Enter Name” in step 4 on page 33.
Disc
Select “Disc Name” in step 3 on page 42.
Folder of still pictures
Select “Folder Name” in step 4 on page 34.
_
Enter Name
11
2
3
4
5
6
7
8
9
0
2345
ABC a
DEF d
GH I
NO
g
JKL j
M
m
67890
bcij
ef/l %
hifl $
*
&
klON@
n
]
_
o[
SPACE
SET
ERASE
0
¢
PQRSp
TUV t
WXY Zw
qrs( )
uv{ }
-
xyz
`
^
|
!?
\
.
,
"
'
:
;
––
π
;
SELECT
ENTER
RETURN
Title on TOP MENU
(DVD-R)
Name field: shows the text you have entered
5
6
7
8
NO
JKL
M
PQR
S
TUV
7
7 7
Chapter 1_
Enter Name
Title on TOP MENU
(DVD-R)
11
2
3
4
2345
ABC a
DEF d
GH I g
67890
bcij
ef/l %
hifl $
*
&
Chapter 1
44
7463en.book Page 44 Tuesday, March 8, 2005 11:07 AM

45
RQT7463
Convenient functions
Changing the unit’s settings
1 While stopped
Press [FUNCTIONS].
2 Press [3, 4, 2, 1] to select “SETUP”
and press [ENTER].
3 Press [3, 4] to select the tab and
press [1].
4 Press [3, 4] to select the menu and
press [ENTER].
5 Press [3, 4] to select the option and
press [ENTER].
To exit the screen
Press [RETURN] several times.
To return to the previous screen
Press [RETURN].
The settings remain intact even if you switch the unit to standby.
VOLUME
CH
DIRECT TV REC
DVD
TV
AV
123
456
78
0
9
MANUAL SKIP
ShowView
CH
CANCEL
INPUT SELECT
SKIP
STOP
PAU SE
PLAY/x1.3
SLOW/SEARCH
FUNCTIONS
ENTER
DIRECT NAVIGATOR
TOP MENU
RETURN
SUB MENU
CREATE
CHAPTER
TIMER
EXT LINK
PROG/CHECK
REC MODEERASE
REC
AUDIO
TIME SLIP
STATUS
DISPLAY
F
A B C
DUBBING
HDD DVD
SD/PC
3,4,2,1
ENTER
RETURN
AC
B
FUNCTIONS
OPEN/CLOSE
REC
/
x
1.3
TIME SLIP
CH
TIME SLIP
DRIVE SELECT
SD PCDVDHDD
SD CARD PC CARD EJECT
HDD DVD
∫
< OPEN/CLOSE
Numbered
buttons
Common procedures
SETUP
Others
Disc
Picture
Sound
Display
Connection
Tuning
TAB
SELECT
RETURN
Remote Control
Clock
Power Save
Language
Shipping Condition
Default Settings
DVD 1
Off
English
Tabs
Menus Options
Summary of settings
Tabs Menus Options (Underlined items are the factory presets.)
Tuning
Manual (➡page 49)
Auto-Setup Restart (➡page 50)
Download from TV (➡page 50)
Others
Remote Control (➡page 13) ≥DVD 1 ≥DVD 2 ≥DVD 3
Clock
Auto Clock Setting (➡page 51)
Manual Clock Setting (➡page 51)
Power Save
≥Refer to the following when “Power Save” is set to “On”.
–“FL Display” is automatically set to “Automatic” (➡page 47).
–This function does not work in the timer recording standby
mode.
–When the unit is off, Pay TV programmes cannot be watched
on the TV because the signal from the connected decoder is
not looped through. To watch them, turn on the unit.
≥On: Power consumption is minimized when the unit is turned
to standby (➡page 52).
≥Off
Language
Choose the language for these menus and on-screen
messages.
≥English ≥Deutsch ≥Français ≥Italiano ≥Español
Shipping Condition
All the settings except for the ratings level, ratings password and
time settings return to the factory preset. The timer recording
programmes are also cancelled.
≥Ye s
≥No
Default Settings
All the settings other than the programmed channels, time
settings, country settings, language settings, disc language
settings, ratings level, ratings password and remote control
code return to the factory presets.
≥Ye s
≥No
45
7463en.book Page 45 Tuesday, March 8, 2005 11:07 AM

46
RQT7463
Convenient functions
Changing the unit’s settings
Tabs Menus Options (Underlined items are the factory presets.)
Disc
Language
Choose the language for audio, subtitle and disc menus. [DVD-V]
≥Press [ENTER] to show the following settings.
≥Some discs start in a certain language despite any changes you make here.
≥In case of English/French/German/Italian/Spanish languages, when you make download from TV, and Country setting of Auto-
Setup in plug-in, the language (“Soundtrack”/“Menus”) will be same and “Subtitle” will set to “Automatic”.
≥Enter a code (➡page 48) with the numbered buttons when you select “Other ¢¢¢¢”.
When the selected language is not available on the disc, the default language is played. There are discs where you can only
switch the language from the menu screen (➡page 22).
Soundtrack ≥English
≥French ≥German ≥Italian ≥Spanish
≥Original: The original language of each disc will be selected.
≥Other ¢¢¢¢
Subtitle ≥Automatic
: If the language selected for “Soundtrack” is not
available, subtitles of that language will
automatically appear if available on that disc.
≥English ≥French ≥German ≥Italian ≥Spanish
≥Other ¢¢¢¢
Menus ≥English
≥French ≥German ≥Italian ≥Spanish
≥Other ¢¢¢¢
Ratings
Set a ratings level to limit DVD-Video play.
Follow the on-screen instructions. Enter a 4-digit password with
the numbered buttons when the password screen is shown.
≥Do not forget your password.
≥8 No Limit
: All DVD-Video can be played.
≥1 to 7: Prohibits play of DVD-Video with corresponding
ratings recorded on them.
≥0 Lock All: Prohibits play of all DVD-Video.
≥Unlock Recorder ≥Change Password
≥Change Level ≥Temporary Unlock
Recording time in EP mode
Select the maximum number of hours for recording in EP mode
(➡page 17, Recording modes and approximate recording
times).
≥EP (6 Hour): You can record for 6 hours on an unused 4.7 GB
disc.
≥EP (8 Hour)
: You can record for 8 hours on an unused 4.7 GB
disc.
DVD-Audio Video mode Playback
Select “On” to play DVD-Video content on some DVD-Audio.
≥On: The setting returns to “Off” when you change the disc or
turn the unit off.
≥Off
DVD-R Rec for High Speed mode
When high speed transferring (dubbing) a title to DVD-R, it is
necessary to turn this setting “On” before recording to the HDD,
however the screen size etc. is restricted (➡right). We
recommend turning the setting “Off” if high speed transfer
(dubbing) to DVD-R is not necessary when recording a
programme.
≥On: Makes high speed mode transferring (dubbing) to DVD-R
possible. Press [2, 1] to select “Yes” and press
[ENTER]. [“ ” appears in the transferring (dubbing)
list (➡page 37).]
–Pictures are saved at 4:3.
–“Hybrid VBR Resolution” (➡below) setting is “Fixed”.
–Select the type of audio in advance from “Bilingual
Audio Selection” (➡page 47).
≥Off
Picture
Comb Filter
Select the picture sharpness when recording.
The setting is fixed with “On” if you set “TV System” to “NTSC”
(➡page 50).
≥On: Pictures become clear and vivid. Normally, use this
setting.
≥Off: Select it when recording noisy pictures.
Hybrid VBR Resolution (➡page 53, VBR) ≥Automatic: The resolution is automated to provide efficient
recording with less block noise. [HDD] [RAM]
≥Fixed
: The resolution is fixed to ensure that there is no
loss of source picture resolution while recording.
Still Mode
Select the type of picture shown when you pause play
(➡page 53, Frames and fields).
≥Automatic
≥Field: Select if jittering occurs when “Automatic” is selected.
≥Frame: Select if small text or fine patterns cannot be seen
clearly when “Automatic” is selected.
Seamless Play
Selects the play mode for play list chapter segments.
≥On
: The chapters in play lists are played seamlessly. This
does not work when there are several audio types
included on the play list and when using Quick View.
Additionally, the positioning of chapter segments may
change slightly.
≥Off: The points where chapters in play lists change are played
accurately, but the picture may freeze for a moment.
AV-in NR
Reduces video tape noise while transferring (dubbing).
≥On: Noise reduction works for input video.
≥Off:
Noise reduction is off. Select when you want to record
input as is.
46
7463en.book Page 46 Tuesday, March 8, 2005 11:07 AM

47
RQT7463
Convenient functions
Tabs Menus Options (Underlined items are the factory presets.)
Sound
PLAY k1.3 & Audio during Search
You may hear sound regardless of this setting with some discs.
≥On: Audio is heard during first level search forward.
≥Off: Audio is not heard during search. Quick View (➡page 23)
does not work.
Dynamic Range Compression [DVD-V] (Dolby Digital only)
Change the dynamic range for late night viewing.
≥On
≥Off
Bilingual Audio Selection
Select whether to record the main or secondary audio type
when:
–Recording or transferring (dubbing) to a DVD-R.
–Recording or transferring (dubbing) sound in LPCM. (➡below,
“Audio Mode for XP Recording”)
≥M1
≥M2
You cannot select this when recording from an external source
onto DVD-R. Select the audio on the other equipment.
Digital Audio Output
Change the settings when you have connected equipment through this unit’s DIGITAL AUDIO OUT terminal (➡page 9).
≥Press [ENTER] to show the following settings.
PCM Down Conversion
Select how to output audio with a sampling frequency of 96
kHz or 88.2 kHz.
≥On: Signals are converted to 48 kHz or 44.1 kHz. (Choose
when the connected equipment cannot process signals
with a sampling frequency of 96 kHz or 88.2 kHz.)
≥Off
: Signals are output as 96 kHz or 88.2 kHz. (Choose when
the connected equipment can process signals with a
sampling frequency of 96 kHz or 88.2 kHz.)
Signals are converted to 48 kHz or 44.1 kHz despite the above
settings if the signals have a sampling frequency of over 96 kHz
or 88.2 kHz, or the disc has copy protection.
Dolby Digital Select how to output the signal, to output
“Bitstream” so the connected equipment
decodes the signal, or to decode on this
unit and output the signal as “PCM” (2
channel).
[Note]
Not making the proper settings may result
in noise, possibly damage your hearing
and speakers, and digital recording may
not work properly.
≥Bitstream:
When connecting to equipment displaying the
Dolby Digital logo.
≥PCM: When connecting to equipment not displaying the Dolby
Digital logo.
DTS ≥Bitstream: When connecting to equipment displaying the DTS
logo.
≥PCM
: When connecting to equipment not displaying the DTS
logo.
MPEG ≥Bitstream: When connected to equipment with a built-in
MPEG decoder.
≥PCM
: When connected to equipment without a built-in MPEG
decoder.
Audio Mode for XP Recording
Choose the audio type when recording or transferring (dubbing)
with XP mode.
≥Dolby Digital
(➡page 53)
≥LPCM (➡page 53)
–The picture quality of LPCM recordings may be lower than
that of normal XP mode recordings.
–The audio recording becomes Dolby Digital even if you
selected LPCM when using a recording mode other than XP.
–When recording bilingual broadcast, select the type of audio
in advance from “Bilingual Audio Selection” (➡above).
Audio Mode for DV Input
You can select the kind of audio when recording from the unit’s
DV input terminal (➡page 39).
≥Stereo 1
: Records audio (L1, R1).
≥Stereo 2: Records added audio such as narration (L2, R2)
subsequent to original recording.
≥Mix: Records both Stereo 1 and Stereo 2.
When recording bilingual broadcast to a DVD-R or recording in
LPCM audio, select the type of audio in advance from “Bilingual
Audio Selection” (➡above).
Display
On-Screen Messages
Choose whether to show status messages automatically.
≥Automatic
≥Off
Grey Background
Select “Off” if you do not want to have the unit show the grey
background when reception is weak.
≥On
≥Off
FL Display
Changes the brightness of the unit’s display.
This setting is fixed with “Automatic” if you set “Power Save”
(➡page 45) to “On”.
≥Bright
≥Dim
≥Automatic: The display turns dark during play, and reappears
momentarily if a button is pressed. When the unit
is turned off all displays disappear. While using this
mode the standby power consumption can be
reduced.
47
7463en.book Page 47 Tuesday, March 8, 2005 11:07 AM

48
RQT7463
Convenient functions
Changing the unit’s settings
Tabs Menus Options (Underlined items are the factory presets.)
Connection
TV Aspect (➡page 12) ≥16:9 ≥4:3 ≥Letterbox
Progressive (➡page 12) ≥On ≥Off
TV System (➡page 50) ≥PAL ≥NTSC
AV1 Output
Selects the output from the AV1 terminal.
Select “RGB (without component)” for RGB output.
Select “Video (with component)” or “S-Video (with component)”
for component output.
≥Video (with component)
≥S-Video (with component)
≥RGB (without component)
AV2 Settings
Set to match the connected equipment.
≥Press [ENTER] to show the following settings.
AV2 Input
Set to “RGB (Not NTSC)” when receiving or recording
RGB output video from external equipment.
≥Video
≥S-Video
≥RGB (Not NTSC)
AV2 Connection
This setting is fixed with “Ext” if you set “TV System” to
“NTSC” (➡page 50).
≥Decoder
: When a decoder is connected.
≥Ext: When the VCR or a satellite receiver is connected.
Ext Link
This setting cannot be made when the “TV System” is set
to “NTSC” (➡page 50).
≥Ext Link 1: When a digital receiver which transmits a special
control signal recordings via the 21-pin Scart cable
is connected.
≥Ext Link 2
: When an external equipment with a timer function
is connected.
Language code list Input the code with the numbered buttons.
Abkhazian: 6566
Afar: 6565
Afrikaans: 6570
Albanian: 8381
Ameharic: 6577
Arabic: 6582
Armenian: 7289
Assamese: 6583
Aymara: 6588
Azerbaijani: 6590
Bashkir: 6665
Basque: 6985
Bengali; Bangla:
6678
Bhutani: 6890
Bihari: 6672
Breton: 6682
Bulgarian: 6671
Burmese: 7789
Byelorussian: 6669
Cambodian: 7577
Catalan: 6765
Chinese: 9072
Corsican: 6779
Croatian: 7282
Czech: 6783
Danish: 6865
Dutch: 7876
English: 6978
Esperanto: 6979
Estonian: 6984
Faroese: 7079
Fiji: 7074
Finnish: 7073
French: 7082
Frisian: 7089
Galician: 7176
Georgian: 7565
German: 6869
Greek: 6976
Greenlandic: 7576
Guarani: 7178
Gujarati: 7185
Hausa: 7265
Hebrew: 7387
Hindi: 7273
Hungarian: 7285
Icelandic: 7383
Indonesian: 7378
Interlingua: 7365
Irish: 7165
Italian: 7384
Japanese: 7465
Javanese: 7487
Kannada: 7578
Kashmiri: 7583
Kazakh: 7575
Kirghiz: 7589
Korean: 7579
Kurdish: 7585
Laotian: 7679
Latin: 7665
Latvian, Lettish: 7686
Lingala: 7678
Lithuanian: 7684
Macedonian: 7775
Malagasy: 7771
Malay: 7783
Malayalam: 7776
Maltese: 7784
Maori: 7773
Marathi: 7782
Moldavian: 7779
Mongolian: 7778
Nauru: 7865
Nepali: 7869
Norwegian: 7879
Oriya: 7982
Pashto, Pushto: 8083
Persian: 7065
Polish: 8076
Portuguese: 8084
Punjabi: 8065
Quechua: 8185
Rhaeto-Romance:
8277
Romanian: 8279
Russian: 8285
Samoan: 8377
Sanskrit: 8365
Scots Gaelic: 7168
Serbian: 8382
Serbo-Croatian: 8372
Shona: 8378
Sindhi: 8368
Singhalese: 8373
Slovak: 8375
Slovenian: 8376
Somali: 8379
Spanish: 6983
Sundanese: 8385
Swahili: 8387
Swedish: 8386
Tagalog: 8476
Tajik: 8471
Tamil: 8465
Tatar: 8484
Telugu: 8469
Thai: 8472
Tibetan: 6679
Tigrinya: 8473
Tonga: 8479
Turkish: 8482
Turkmen: 8475
Twi: 8487
Ukrainian: 8575
Urdu: 8582
Uzbek: 8590
Vietnamese: 8673
Volapük: 8679
Welsh: 6789
Wolof: 8779
Xhosa: 8872
Yiddish: 7473
Yoruba: 8979
Zulu: 9085
48
7463en.book Page 48 Tuesday, March 8, 2005 11:07 AM

49
RQT7463
Convenient functions
Refer to the control reference on page 45.
1 While stopped
Press [FUNCTIONS].
2 Press [3, 4, 2, 1] to select “SETUP”
and press [ENTER].
3 Press [3, 4] to select “Tuning” and
press [1].
You can add or delete channels, or change programme positions.
4 Press [3, 4] to select “Manual” and
press [ENTER].
To delete a programme position
Press [3, 4, 2, 1] to select a programme position and press [A].
To add a blank programme position
Press [3, 4, 2, 1] to select a programme position and press [B].
To move a TV station to another programme position
1 Press [3, 4, 2, 1] to select a programme position and press
[C].
2 Press [3, 4, 2, 1] to select the new programme position to
which you want to assign the TV station and press [ENTER].
[Note]
If Preset Download (➡page 10) has been performed, only deletion of
the programme position can be performed.
∫ To change the tuning settings for individual
programme position
5 Press [3, 4, 2, 1]
to select a
programme position
and press [ENTER].
Press [3, 4] to select an item and press [1].
You can make the following two settings by selecting the external
input channel (AV1, AV2, AV3, AV4) in step 4.
≥Video System (Auto/PAL/SECAM)
In order to record properly, make the appropriate settings to match
the connected equipment.
≥Title Page (Auto/Off)
Tuning
Manual
SETUP
Others
Tuning
Manual
Auto-Setup Restart
Download from TV
Manual Tuning
Pos
Name
Ch
Pos
Name
Ch
B C
A
Delete
Add
Move
1 ARD 4
2 ZDF
2
3 N3
5
4 HR3
8
5 BR3 10
6
7
8
9
10
11
12
13
14
15
16
17
18
19
20
SELECT
ENTER
RETURN
Pos To change the programme position in which
the TV stations are assigned
Press [3, 4] or numbered buttons to select the
number of the desired programme position and
press [ENTER].
Name To enter or change the name of a TV station
Press [3, 4, 2, 1] to enter station name and
press [ENTER].
If the station name needs a blank space, select
the blank between “Z” and “¢”.
Channel To enter newly available TV stations or change
the channel number of an already tuned TV
station
Press [3, 4] or the numbered buttons to enter
the channel number of the desired TV station.
Wait a few moments until the desired TV station
has been tuned.
After the desired TV station is tuned, press
[ENTER].
Fine Tuning To obtain the best tuning condition
Press [3, 4] to adjust the best tuning condition
and press [ENTER].
≥Press [1] to return to “Auto”.
Decoder To preset pay TV stations
Press [3, 4] to select “On” and press [ENTER].
Video
System
To select the video system type
Press [3, 4] to select “PAL” or “SECAM” if the
picture lacks colour, and press [ENTER].
Auto: This unit automatically distinguishes
PAL and SECAM signals.
PAL: For receiving PAL signals.
SECAM: For receiving SECAM signals.
Audio Mode To select the audio reception type
If sound quality is poor, press [3, 4] to select
“BG” or “L” and press [ENTER].
BG: PAL B.G.H/SECAM B.G
L: SECAM L, L’/PAL L
Mono To select the type of sound to be recorded
Press [3, 4] to select “On” if the stereo sound is
distorted due to inferior reception conditions, or if
you want to record the normal (mono) sound
during a stereo, bilingual or NICAM broadcast,
and press [ENTER].
Title Page To enter the Teletext title page for a channel
Entering title page number allows the unit to
automatically record programme and station
names.
Press [3, 4] or numbered buttons to enter the
number and press [ENTER].
≥To find the correct title page for the station, refer
to its Teletext TV guide.
Pos
Name
Channel
Fine Tuning
Decoder
Video System
1
Off
4
Auto
RETURN : leave
Manual
Tuning
ARD
Auto
Audio Mode
BG
Mono
Off
Title Page
301
SELECT
RETURN
49
7463en.book Page 49 Tuesday, March 8, 2005 11:07 AM

50
RQT7463
Convenient functions
Changing the unit’s settings
Refer to the control reference on page 45.
You can restart auto channel setting if Preset Download or Auto-
Setup (➡page 10, 11) fails for some reason.
After performing steps 1–3 (➡page 49)
∫ Auto-Setup Restart
4 Press [3, 4] to select “Auto-Setup
Restart” and press [ENTER].
5 Press [2, 1] to select “Yes” and
press [ENTER].
The country setting menu appears.
6 Press [3, 4, 2, 1] to select a
country and press [ENTER].
Auto-Setup starts.
∫ Download from TV
4 Press [3, 4] to select “Download
from TV” and press [ENTER].
5 Press [2, 1] to select “Yes” and
press [ENTER].
Downloading from the television starts.
To exit the screen
Press [RETURN] several times.
To return to the previous screen
Press [RETURN].
Change the settings to match the equipment you are connecting
with, or to match the title when there are both PAL and NTSC titles
on the HDD.
1 While stopped
Press [FUNCTIONS].
2 Press [3, 4, 2, 1] to select “SETUP”
and press [ENTER].
3 Press [3, 4] to select “Connection”
and press [1].
4 Press [3, 4] to select “TV System”
and press [ENTER].
5 Press [3, 4] to select the TV system
and press [ENTER].
≥PAL (factory preset)
–Select when connecting to a PAL or Multi-system
television. Titles recorded using NTSC are played as PAL
60.
–Select to record television programmes and PAL input from
other equipment.
–[HDD] Select when playing a PAL input title recorded on the
HDD.
≥NTSC
–Select when connecting to a NTSC television. Television
programmes cannot be recorded properly.
–Select to record NTSC input from other equipment.
–[HDD] Select when playing a NTSC input title recorded on
the HDD.
6 Press [2, 1] to select “Yes” and
press [ENTER].
To exit the screen
Press [RETURN] several times.
To return to the previous screen
Press [RETURN].
∫ To change the setting all at once (PAL!#NTSC)
While stopped, keep pressing [∫] and [< OPEN/CLOSE] on the
main unit for 5 or more seconds.
List of TV Reception Channels
§
Only for 8 MHz channel raster
Auto-Setup Restart, Download from TV
TV System
SETUP
Others
Disc
Picture
Sound
Display
Tuning
TV System
PAL
NTSC
Connection
SELECT
ENTER
RETURN
Channel
indication
TV Channel
Germany/Italy France Other Countries
2 – 4
E2 – E10
2 – 4
E2 – E12
5 – 10 5 – 10, G – J (172.00 – 220.00 MHz) (INTER BANDE)
11 – 12
E11 – E12 (Germany)
H1 – H2 (Italy)
—
13 – 20 A – H (Only Italy) — —
21 – 69 E21 – E69 E21 – E69 E21 – E69
74 – 78 S01 – S05 — S1 – S5
80 S1 — M1
81 – 89 S2 – S10 B – F (100.00 – 172.00 MHz) (INTER BANDE) M2 – M10
90 – 99 S11 – S20 K – Q (220.00 – 300.00 MHz) (INTER BANDE) U1 – U10
121 – 141 S21 – S41
§
(Hyperband) S21 – S41 (299.25 – 467.25 MHz) (INTER BANDE) S21 – S41 (Hyperband)
50
7463en.book Page 50 Tuesday, March 8, 2005 11:07 AM

51
RQT7463
Convenient functions
Usually, the unit’s Preset Download or Auto-Setup function (➡page 10, 11) automatically adjusts the clock to correct time. Under some reception
conditions, however, the unit cannot set the clock automatically.
In this case, follow the operation steps below to manually set the clock.
≥In the case of a power failure, the clock setting remains in memory for approximately 60 minutes.
1 While stopped
Press [FUNCTIONS].
2 Press [3, 4, 2, 1] to select “SETUP” and press [ENTER].
3 Press [3, 4] to select “Others” and press [1].
4 Press [3, 4] to select “Clock” and press [ENTER].
If a TV station transmits a time setting signal, and when “Automatic”
in the Clock setting menu is set to “On”, the automatic time
correction function checks the time and if necessary it is adjusted
several times every day.
5 Press [3, 4] to select “On” of
“Automatic” and press [ENTER].
Auto clock setting starts.
The following screen appears when setting is complete.
To stop partway
Press [RETURN].
5 Press [3, 4] to select “Off” of
“Automatic” and press [ENTER].
6 Press [2, 1] to select the item you
want to change.
The items change as follows:
Hour!#Minute!#Second!#Day!#Month!#Year
^-----------------------------------------------------------------------------------------J
7 Press [3, 4] to change the setting.
You can also use the numbered buttons for setting.
8 Press [ENTER] when you have
finished the settings.
The clock starts.
To exit the screen
Press [RETURN] several times.
To return to the previous screen
Press [RETURN].
The Child Lock deactivates all buttons on the unit and remote
control. Use it to prevent other people from operating the unit.
Press and hold [ENTER]
and [RETURN]
simultaneously until “X
HOLD” appears on the unit’s display.
If you press a button while the Child Lock is on, “X HOLD” appears
on the unit’s display and operation is impossible.
To cancel the Child Lock
Press and hold [ENTER] and [RETURN] simultaneously until “X
HOLD” disappears.
Clock settings
Auto Clock Setting
Clock
Automatic
Time Date
15
:
45 :
39
1
. 8
.
2004
CHANGE
ENTER
RETURN
On
Automatic clock setting completed.
ENTER: access RETURN: leave
Manual Clock Setting
Clock
Automatic Off
Time Date
15
:
45 :
39
1
. 8
.
2004
Please set clock manually.
ENTER: store RETURN: leave
0 9
No.
CHANGE
SELECT
ENTER
RETURN
Child Lock
STOP
PAU SE
PLAY/x1.3
FUNCTIONS
ENTER
DIRECT NAVIGATOR
TOP MENU
RETURN
SUB MENU
CREATE
CHAPTER
TIMER
EXT LINK
PROG/CHECK
REC MODEERASE
REC
AUDIO
TIME SLIP
STATUS
DISPLAY
F
A B C
DUBBING
RETURN
ENTER
51
7463en.book Page 51 Tuesday, March 8, 2005 11:07 AM

52
RQT7463
Reference
Specifications
Recording system DVD Video Recording format (DVD-RAM),
DVD-Video format (DVD-R)
Recordable discs
DVD-RAM: 12 cm 4.7 GB, 12 cm 9.4 GB, 8 cm 2.8 GB
12 cm 4.7 GB (Ver. 2.1/3k-SPEED DVD-RAM Revision 1.0)
DVD-R: 12 cm 4.7 GB, 8 cm 1.4 GB (for General Ver. 2.0)
12 cm 4.7 GB (for General Ver. 2.0/4k-SPEED DVD-R Revision 1.0)
Recording time Maximum 8 hours (with 4.7 GB disc)
XP: Approx. 1 hour, SP: Approx. 2 hours
LP: Approx. 4 hours, EP: Approx. 6 hours/8 hours
Maximum 284 hours (with built-in 160 GB HDD)
XP: Approx. 36 hours, SP: Approx. 70 hours
LP: Approx. 138 hours, EP: Approx. 212 hours/284 hours
Playable discs
DVD-RAM: 12 cm 4.7 GB, 12 cm 9.4 GB , 8 cm 2.8 GB
12 cm 4.7 GB (Ver. 2.1/3k-SPEED DVD-RAM Revision 1.0)
DVD-R: 12 cm 4.7 GB, 8 cm 1.4 GB (for General Ver. 2.0)
12 cm 4.7 GB (for General Ver. 2.0/4k-SPEED DVD-R Revision 1.0)
DVD-Video, DVD-Audio, Video CD, CD-Audio (CD-DA)
CD-R/RW (MP3, CD-DA, Video CD formatted discs)
Built-in HDD capacity 160 GB
Drive unit High Speed Drive (correspond to 4 times speed with
DVD-R disc and 3 times speed with DVD-RAM disc.)
LASER specification
Class I LASER Product (Pickup)
Wave length: 795 nm, 658 nm
Laser power:
No hazardous radiation is emitted with the safety protection
NORSK
Bølgelengde: 795 nm, 658 nm
Laserstyrke: Ingen farlig stråling sendes ut
Audio
Recording system: Dolby Digital 2ch, Linear PCM (XP mode, 2ch)
Audio in: AV1/AV2 (21 pin), AV3/AV4 (pin jack)
Input level: Standard: 0.5 Vrms, Full scale: 2.0 Vrms at 1 kHz
Input impedance: More than 10 k≠
Audio out: AV1/AV2 (21 pin), Audio Out (pin jack)
Output level: Standard: 0.5 Vrms, Full scale: 2.0 Vrms at 1 kHz
Output impedance: Less than 1 k≠
Digital audio out: Optical terminal (PCM, Dolby Digital, DTS, MPEG)
Television system
RF converter output: Not provided
Video
Video system:
SECAM (only input)/PAL colour signal, 625 lines, 50 fields
NTSC colour signal, 525 lines, 60 fields
Recording system: MPEG2 (Hybrid VBR)
Video in (SECAM/PAL/NTSC):
AV1/AV2 (21 pin), AV3/AV4 (pin jack) 1 Vp-p 75 ≠, termination
S-Video in (SECAM/PAL/NTSC):
AV2 (21 pin), AV3/AV4 (S terminal) 1 Vp-p 75 ≠, termination
RGB in (PAL):
AV2 (21 pin) 0.7 Vp-p (PAL) 75 ≠, termination
Video out (PAL/NTSC):
AV1/AV2 (21 pin), Video Out (pin jack) 1 Vp-p 75 ≠, termination
S-Video out (PAL/NTSC):
AV1 (21 pin), S-Video Out (S terminal) 1 Vp-p 75 ≠, termination
RGB out (PAL/NTSC):
AV1 (21 pin) 0.7 Vp-p (PAL) 75 ≠, termination
Component video output (NTSC 480P/480I, PAL 576P/576I)
Y: 1.0 Vp-p 75 ≠, termination
P
B: 0.7 Vp-p 75 ≠, termination
P
R: 0.7 Vp-p 75 ≠, termination
DV input (PAL/NTSC) IEEE 1394 Standard, 4 pin
SD/PC card slot SD Memory Card slot: 1 pc.
PC Card slot (Type II): 1 pc.
Still pictures (JPEG, TIFF)
Compatible media (SD card slot):
SD Memory Card, MultiMediaCard
Compatible media (PC card slot):
A PC card adaptor conforming to PC card standards,
ATA Flash PC Card,
PC card adaptor (SD Memory Card, xD-Picture Card,
Microdrive, MultiMediaCard, CompactFlash,
SmartMedia, M
EMORYSTICK), Mobile hard disk
Format: FAT12, FAT16
Image file format: JPEG conforming to DCF
(Design rule for Camera File system),
(sub sampling 4:2:2 or 4:2:0),
TIFF (uncompressed RGB chunky),
DPOF compatible
Number of pixels: 34a34 to 6144a4096
Thawing time: Approx. 7 sec. (2 M pixels)
Others
Region code: ‚ 2
Operating temperature: 5–40 oC
Operating humidity range: 10–80 % RH (no condensation)
Power supply: AC 220–240 V, 50 Hz
Power consumption: 42 W
Dimensions (WkDkH): Approx. 430 mmk291 mmk79 mm
Mass: Approx. 4.6 kg
[Note]
Specifications are subject to change without notice.
Mass and dimensions are approximate.
Tuner system Channel coverage
PA L- BG H
SECAM-BG
(CCIR)
VHF: E2–E12, A–H2 (Italy)
UHF: 21–69
CATV: S01–S05 (S1–S3),
S1–S20 (M1–U10), S21–S41
SECAM-L, L’
(France)
VHF: 2–10
UHF: 21–69
CATV: B–Q (100.5–299.5 MHz),
S21–S41 (299.5–467.25 MHz)
Power consumption in standby mode:
Approx. 3 W (Power Save mode)
52
7463en.book Page 52 Tuesday, March 8, 2005 11:07 AM

53
RQT7463
Reference
Glossary
Bitstream
This is the digital form of multi-channel audio data (e.g., 5.1 channel)
before it is decoded into its various channels.
CPRM (Content Protection for Recordable Media)
CPRM is technology used to protect broadcasts that are allowed to
be recorded only once. Such broadcasts can be recorded only with
CPRM compatible recorders and discs.
Dolby Digital
This is a method of coding digital signals developed by Dolby
Laboratories. Apart from stereo (2-channel) audio, these signals can
also be multi-channel audio. A large amount of audio information can
be recorded on one disc using this method.
When recording on this unit Dolby Digital (2 channel) is the default
audio.
Down-mixing
This is the process of remixing the multi-channel audio found on
some discs into two channels. It is useful when you want to listen to
the 5.1-channel audio recorded on DVDs through your television’s
speakers. Some discs prohibit down-mixing and this unit can then
only output the front two channels.
DPOF (Digital Print Order Format)
DPOF is the standard printing format for still picture data taken by a
digital camera, etc. It is used for automatic printing at a photo
developing store or on your home printer.
Drive
In the instance of this unit, this refers to the hard disk (HDD), disc
(DVD), SD card (SD) and PC card (PC). These perform the reading
and writing of data.
DTS (Digital Theater Systems)
This surround system is used in many movie theaters. There is good
separation between the channels, so realistic sound effects are
possible.
Dynamic range
Dynamic range is the difference between the lowest level of sound
that can be heard above the noise of the equipment and the highest
level of sound before distortion occurs.
Dynamic range compression means reducing the gap between the
loudest and softest sounds. This means you can listen at low
volumes but still hear dialogue clearly.
Film and video
DVD-Videos are recorded using either film or video. This unit can
determine which type has been used, then uses the most suitable
method of progressive output.
For PAL
Film is 25 frames per second.
Video is 50 fields per second (two fields making up one frame).
For NTSC
Film is 24 or 30 frames per second, with motion picture film generally
being 24 frames per second.
Video is 60 fields per second (two fields making up one frame).
Finalize
A process that makes play of a recorded CD-R, CD-RW, DVD-R, etc.
possible on equipment that can play such media. You can finalize
DVD-R on this unit.
After finalizing, the disc becomes play-only and you can no longer
record or edit.
Folder
This is a place on the hard disk or memory card where groups of
data are stored together. In the case of this unit, it refers to the place
where still pictures (JPEG, TIFF) are stored.
Formatting
Formatting is the process of making media such as DVD-RAM
recordable on recording equipment.
You can format the HDD, DVD-RAM and memory cards on this unit.
Formatting erases irrevocably all contents.
Frames and fields
Frames refer to the single images that constitute the video you see
on your television. Each frame consists of two fields.
≥A frame still shows two fields, so there may be some blurring, but
picture quality is generally better.
≥A field still shows less picture information so it may be rougher, but
there is no blurring.
HDD (Hard disk drive)
This is a mass data storage device used in computers etc. A disk
with a surface that has been treated with magnetic fluid is spun and
a magnetic head is brought in close proximity to facilitate the reading
and writing of large amounts of data at high speed.
JPEG (Joint Photographic Experts Group)
This is a system used for compressing/decoding colour still pictures.
If you select JPEG as the storage system on digital cameras etc.,
the data will be compressed to 1/10–1/100 of its original size. The
feature of JPEG is less deterioration in picture quality considering
the degree of compression.
LPCM (Linear PCM)
These are uncompressed digital signals, similar to those found on
CDs. LPCM sound is available when recording in XP mode.
MP3 (MPEG Audio Layer 3)
An audio compression method that compresses audio to
approximately one tenth of its size without any considerable loss of
audio quality. You can play MP3 you have recorded onto CD-R and
CD-RW.
Pan&Scan/Letterbox
In general, DVD-Video are produced with the intention that they be
viewed on a widescreen television (16:9 aspect ratio), so images
often don’t fit regular (4:3 aspect ratio) televisions. Two styles of
picture, “Pan & Scan” and “Letterbox”, deal with this problem.
Pan & Scan: The sides are cut off so the picture
fills the screen.
Letterbox: Black bands appear at the top and
bottom of the picture so the picture
itself appears in an aspect ratio of
16:9.
Playback control (PBC)
If a Video CD has playback control, you can select scenes and
information with menus.
(This unit is compatible with version 2.0 and 1.1.)
Progressive/Interlace
The PAL video signal standard has 625 (or 576) interlaced (I) scan
lines, whereas progressive scanning, called 625P (or 576P), uses
twice the number of scan lines. For the NTSC standard, these are
called 525I (or 480I) and 525P (or 480P) respectively.
Using progressive output, you can enjoy the high-resolution video
recorded on media such as DVD-Video.
Your television must be compatible to enjoy progressive video.
Panasonic televisions with 625 (576)/50I · 50P, 525 (480)/60I · 60P
input terminals are progressive compatible.
Protection
You can prevent accidental erasure by setting writing protection or
erasure protection.
Sampling frequency
Sampling is the process of converting the heights of sound wave
(analog signal) samples taken at set periods into digits (digital
encoding). Sampling frequency is the number of samples taken per
second, so larger numbers mean more faithful reproduction of the
original sound.
TIFF (Tag Image File Format)
This is a system used for compressing/decoding colour still pictures.
A common format for storing high quality images on digital cameras
and other devices.
Thumbnail
This refers to a miniature representation of a picture used to display
multiple pictures in the form of a list.
VBR (Variable bitrate)
This is a method of video recording that adjusts the bit rate
according to video signal.
u
r
Frame Field Field
53
7463en.book Page 53 Tuesday, March 8, 2005 11:07 AM

54
RQT7463
Reference
Glossary
Q Link
This function works only if the unit is connected via a fully wired 21-
pin Scart cable to a TV featuring the Q Link or similar function.
Q Link offers the following functions:
≥Download from the TV
§
When you connect the unit to a TV, the station list data is
automatically copied from the TV to the unit, and the TV stations
are assigned to the programme positions on the unit in the same
order as on the TV.
≥Direct TV Recording
By simply pressing [¥ DIRECT TV REC], you can at once record
the same programme that you are watching on the TV.
≥TV/DVD Auto On
§
Even if the TV and the unit are off (standby mode), pressing
[1] (PLAY), [DIRECT NAVIGATOR, TOP MENU], [ShowView] or
[PROG/CHECK] automatically turns on both the TV and the unit.
If the TV is off (standby mode) and the unit is on, when you press
[FUNCTIONS] or [1] (PLAY), or insert the disc (except DVD-RAM
and DVD-R), the TV automatically is turned on.
≥DVD Auto Standby
§
When you turn the TV off, the unit is turned off as well. However,
this function works in the stop mode.
This function does not work during the following operations: Preset
Download, Auto-Setup, Auto Clock Setting and Manual Tuning.
This function does also not work when the DVD drive selected and
an audio CD is in the disc tray.
≥On-Screen Messages
§
When you are watching a TV programme, the following messages
appear on the TV screen to inform you of the unit’s condition:
Depending on the type of TV used, the above messages may not
appear correctly.
§
These operations are only available if the unit is connected to a TV
featuring the Q Link function.
[Note]
If “Power Save” is set to “On”, Direct TV Recording function does not
work when the unit is switched off (standby mode).
VPS (Video Programme System)/PDC (Programme Delivery Control)
VPS or PDC is a very convenient system which records exactly from
beginning to end of the TV programmes set in timer recording, even
if the actual broadcasting time differs from the scheduled time due to
delayed start or extension of the programme duration. Also, if a
programme is interrupted, for example, some special news is
inserted, the recording will be paused automatically and resumed
when the programme continues.
Depending on the signals sent from the TV stations, the VPS/PDC
system may not work properly even when “VPS/PDC” has been set
to “ON”.
Please check with the broadcasters in your area for details.
≥In the case of VPS/PDC recording, use the correct time (VPS/PDC
time) for recording the TV programmes.
Set “VPS/PDC” to “OFF” when the recording time is not the correct
time (VPS/PDC time).
VPS/PDC recording is not performed when the time (VPS/PDC
time) is incorrect, even if only by one minute. To find out the correct
time (VPS/PDC time), consult Teletext, a newspaper or magazine,
or other source.
≥If the actual broadcasting times of timer recordings overlap
(regardless of whether they are VPS/PDC controlled), the
recording that starts first always has priority, and the recording of
the later programme will start only after the first timer recording has
finished.
≥When the VPS/PDC signal drops out because the broadcast signal
is weak, or when a TV station does not transmit a regular VPS/
PDC signal, the timer recording will be performed in the normal
mode (without VPS/PDC) even if it was programmed for VPS/PDC.
In this case, even if the timer recording is performed, whatever has
been programmed will not be cancelled at that particular time but
at 4 a.m. two days later.
≥The start times of scheduled programmes listed in the newspaper
or magazine may be changed at a later date. Set “VPS/PDC” to
“OFF” when programming a programme whose start time has
been subsequently changed. Particular care must be taken in this
respect with S
HOWVIEW programming since “VPS/PDC” is
automatically set to “ON” in some countries (➡below).
≥If a programme listed in a newspaper or magazine has two
S
HOWVIEW numbers, use the SHOWVIEW number for VPS/PDC if
you wish to proceed with VPS/PDC recording using S
HOWVIEW
programming.
≥The default settings for “VPS/PDC” differ depending on the country
concerned. Refer to the following table.
≥If the broadcasting station is not transmitting VPS/PDC signals, “jjj” appears in the menu for timer programming under “VPS/PDC”.
≥The beginnings of recordings may not be recorded correctly in some cases.
Message Message appears when:
This programme has
already started
A timer recording has just started.
Set DVD to timer
standby mode
The unit is not in the timer standby mode
10 minutes before the programmed
recording start time (message appears
every minute during these 10 minutes).
DVD is in timer
recording mode
[¥ REC] or [ShowView] was pressed while
the unit is in the timer recording mode.
When SHOWVIEW
programming
When the SHOWVIEW programming
start time is changed
When programming
manually
Belgium, Netherlands, Sweden,
Denmark, Finland, Norway, France
ON OFF OFF
Germany, Switzerland, Austria ON ON ON
Italy, Spain, Portugal, Greece,
Other Countries
OFF OFF OFF
54
7463en.book Page 54 Tuesday, March 8, 2005 11:07 AM

55
RQT7463
Reference
Frequently asked questions
Set up Page
Disc
Recording
What equipment is necessary to play multi
channel surround sound?
≥DVD-Video:
You can play DVD-Video multi channel surround by digitally connecting
an amplifier equipped with a Dolby Digital, DTS or MPEG decoder.
≥DVD-Audio:
This unit plays DVD-Audio in 2 channels. You cannot play multi channel
surround sound.
9
—
Are the headphones and speakers directly
connected to the unit?
≥You cannot directly connect to the unit. Connect through the amplifier
etc.
9
The television has a Scart terminal and
component video input terminal. Which
terminal should I connect with?
≥If you have a regular television (CRT: cathode ray tube) we recommend
using the Scart terminal. You can enjoy high-quality RGB video from
this unit by connecting to an RGB compatible television.
If you have an LCD/plasma television or LCD projector compatible with
progressive scan, connect through the component video terminals for
high-quality progressive video.
If you have a CRT television or a multi system television using PAL
mode that is compatible with progressive scan, we cannot recommend
progressive output as some flickering can occur.
7, 8
Is my television progressive output
compatible?
≥All Panasonic televisions that have 625 (576)/50I · 50P, 525 (480)/60I ·
60P input terminals are compatible. Consult the manufacturer if you
have another brand of television.
—
Can I play DVD-Video, DVD-Audio and
Video CDs bought in another country?
≥You cannot play DVD-Video if their region number does not include “2”
or “ALL”.
Cover
Can a DVD-Video that does not have a
region number be played?
≥The DVD-Video region number indicates the disc conforms to a
standard. You cannot play discs that do not have a region number.
—
Please tell me about DVD-R and DVD-RW
compatibility with this unit.
≥This unit records and plays DVD-R. However, you cannot record onto
DVD-R discs that are finalized.
≥This unit also records and plays high speed recording compatible discs.
≥This unit does not record or play DVD-RW.
—
—
—
Please tell me about CD-R and CD-RW
compatibility with this unit.
≥This unit plays CD-R/CD-RW discs (audio recording discs) which have
been recorded under one of the following standards: CD-DA, MP3 and
Video CD. Close the session or finalize the disc after recording.
≥You cannot write to a CD-R or CD-RW with this unit.
14, 25
—
Can I record from a commercially
purchased video cassette or DVD?
≥Most commercially sold video cassettes and DVD are copy protected;
therefore, recording is usually not possible.
—
Can a DVD-R recorded on this unit be
played on other equipment?
≥You can play on DVD-R compatible players after finalizing the disc on
this unit; however, due to the condition of the recording, play may not be
possible.
43
How many times can I write to a DVD-RAM
disc?
≥You can write to the disc approximately 100,000 times depending upon
the conditions of use.
—
Can I high speed transfer (dub) to a disc?
≥You can record up to 32k recording speed to DVD-R and up to 24k
recording speed to DVD-RAM when using a high speed compatible
disc.
35
Can I record digital audio signals using this
unit?
≥You cannot record digital signals. The digital audio terminals on this unit
are for output only. (The audio recorded using the DV automatic
recording function from a digital video camcorder, for example, is
recorded digitally.)
—
Can a digital audio signal from this unit be
recorded to other equipment?
≥You can record if using the PCM signal. When recording DVD, change
the “Digital Audio Output” settings to the following in the SETUP menu.
–PCM Down Conversion: On
–Dolby Digital/DTS/MPEG: PCM
However, only as long as digital recording from the disc is permitted and
the recording equipment is compatible with a sampling frequency of
48 kHz.
≥You cannot record MP3 signals.
47
—
Can I switch to bilingual broadcast during
recording?
≥With HDD and DVD-RAM, you can. Just press [AUDIO].
≥With DVD-R, you cannot. Change before recording with “Bilingual Audio
Selection” in the SETUP menu.
24
47
55
7463en.book Page 55 Tuesday, March 8, 2005 11:07 AM

56
RQT7463
Reference
Error messages
On the television Page
On the unit’s display
Cannot finish recording
completely.
≥The programme was copy-protected.
≥The HDD or disc may be full.
—
—
Cannot playback this title.
TV system is different from the
setting.
To playback this title, please
change the TV System in
SETUP.
≥You tried to play a title recorded using a different encoding system from that of the TV
system currently selected on the unit.
Alter the “TV System” setting on this unit to suit.
50
Cannot record on the disc. ≥The disc may be dirty or scratched.
≥You cannot format a Microdrive or mobile hard disk on this unit.
61
—
Please check the disc.
Unable to format.
Cannot play on this unit. ≥You tried to play a non-compatible image.
≥Turn the unit off and re-insert the card.
26
26
Cannot record. Disc is full. ≥Create space by erasing any unnecessary titles. [HDD] [RAM]
(Even if you erase recorded content from the DVD-R, there is no increase in disc space.)
≥Use a new disc.
24, 31,
42, 43
—
Cannot record. Maximum
number of titles exceeded.
Error has occurred. Please
press ENTER.
≥Press [ENTER] to start recovery process. You cannot operate the unit while it is recovering
(“SELF CHECK” appears on the unit’s display).
—
No Disc ≥The disc may be upside down. —
No folders. ≥There is no compatible folder in this unit. 15
No PC CARD
No SD CARD
No valid PC card.
No valid SD card.
≥The card is not inserted. If this message is displayed with a compatible card already
inserted, turn off the unit, remove and then re-insert the card.
≥The card inserted is not compatible or the card format does not match.
26
15
Not enough space on dubbing
destination.
≥Create space by erasing any unnecessary items.
≥Erase one or more items registered on the transfer (dubbing) list to ensure that the
“Destination Capacity” is not exceeded.
24, 27, 31,
34, 42, 43
37
Please change the disc. ≥There may be a problem with the disc. Press [< OPEN/CLOSE] on the main unit to
remove it and check it for scratches or dirt. (The unit turns off automatically after you open
the tray.)
61
This is a non-recordable disc. ≥The unit cannot record on the disc you inserted. Insert a DVD-RAM or unfinalized DVD-R.
≥You inserted an unformatted DVD-RAM. Format the disc with this unit.
—
43
This disc is not properly
formatted.
Formatting is necessary using
DISC MANAGEMENT.
$
≥The operation is prohibited by the unit or disc. —
HDD SLP ≥In order to extend HDD life, the HDD is in SLEEP mode. Press [HDD] to activate. 61
HARD ERR ≥If there is no change after turning the unit on and off, consult the dealer where the unit was
purchased.
—
NO READ ≥The disc is dirty or badly scratched. The unit cannot record, play, or edit.
≥You have used a DVD-RAM/PD lens cleaner and it has finished. Press [< OPEN/CLOSE]
on the main unit to eject the disc.
61
—
PROG FULL ≥There are already 32 timer programmes. Delete unnecessary timer programmes. 21
REMOTE DVD
(“∑” stands for a number.)
≥The remote control and main unit are using different codes. Change the code on the
remote control.
Press and hold [ENTER] and the indicated number
button at the same time for more than 2 seconds.
13
SELF CHECK ≥The unit is starting up. Wait until the message disappears. —
U14 ≥The unit is hot.
The unit switches to standby for safety reasons. Wait for about 30 minutes until the
message disappears.
Select a position with good ventilation when installing the unit. Do not block the cooling fan
on the rear of the unit.
—
U99 ≥The unit fails to operate properly. Press [Í/I] on the main unit to switch the unit to standby.
Now press [Í/I] on the main unit again to turn the unit on.
—
UNSUPPORT ≥You have inserted a disc the unit cannot play or record on. 14
X HOLD ≥The Child Lock function is activated.
Press and hold [ENTER] and [RETURN] simultaneously until “X HOLD” disappears.
51
56
7463en.book Page 56 Tuesday, March 8, 2005 11:07 AM

57
RQT7463
Reference
Troubleshooting guide
Before requesting service, make the following checks. If you are in doubt about some of the check points, or if the remedies indicated in the chart
do not solve the problem, consult your dealer for instructions.
The following do not indicate a problem with this unit:
Power Page
Displays
TV screen and video
≥Regular disc rotating sounds.
≥Poor reception due to atmospheric conditions.
≥Image disturbance during search.
≥Interruptions in reception due to periodic satellite broadcasting
breaks.
≥A sound is heard when the HDD goes into SLEEP mode, or
operations are slow to respond in SLEEP mode.
No power.
Unit does not turn on pressing
[Í DVD].
≥Insert the AC mains lead securely into a known active AC mains socket.
≥Linked timer recordings with external equipment is in recording standby. Press [EXT LINK]
to cancel the recording standby.
7, 8
21
The unit switches to standby
mode.
≥One of the unit’s safety devices is activated. Press [Í/I] on the main unit to turn the unit on. —
The display is dim. ≥Change “FL Display” in the SETUP menu. 47
“0:00” is flashing on the unit’s
display.
≥Set the clock. 51
The time recorded on the disc
and the available time shown
do not add up.
The play time shown for MP3
does not agree with the actual
time.
≥Times shown may disagree with actual times.
≥More disc space than the actual recording time is used after recording or editing the DVD-R
200 times or more.
≥While searching, the elapsed time may not display correctly.
≥Even if you erase recorded content from the DVD-R, there is no increase in disc space.
—
—
—
—
The clock is not correct. ≥Under adverse reception conditions, etc., the automatic time correction function may not
work. In this case, “Automatic” is automatically turned to “Off”. If re-setting the Auto Clock
Setting does not work, set the time manually.
51
Television reception worsens
after connecting the unit.
≥This can occur because the signals are being divided between the unit and other
equipment. It can be solved by using a signal booster, available from audio-visual suppliers.
—
Status messages do not
appear.
≥Select “Automatic” in “On-Screen Messages” in the SETUP menu. 47
The grey background does not
appear.
≥Select “On” in “Grey Background” in the SETUP menu. 47
Picture does not appear
during timer recording.
≥Timer recordings work regardless whether the unit is on or off. To confirm the timer
recording is going to work properly, turn the unit on.
—
The 4:3 aspect ratio picture
expands left and right.
Screen size is wrong.
≥Use the television to change the aspect. If your television does not have that function, set
“Progressive” in the Picture menu to “OFF”.
≥Check the settings for “TV Aspect” in the SETUP menu.
29
12
There is a lot of after-image
when playing video.
≥Set “Playback NR” in the Picture menu to “OFF”. 29
When playing DVD-Video
using progressive output, one
part of the picture
momentarily appears to be
doubled up.
≥Set “Progressive” in the Picture menu to “OFF”. This problem is caused by the editing
method or material used on DVD-Video, but should be corrected if you use interlace output.
29
There is no apparent change
in picture quality when
adjusted with the Picture
menu in the on-screen menus.
≥The effect is less perceivable with some types of video. —
The images from this unit do
not appear on the television.
Picture is distorted.
≥Make sure that the television is connected to the AV1 terminal, VIDEO OUT terminal, S-
VIDEO OUT terminal or COMPONENT VIDEO OUT terminals on this unit.
≥Make sure that the television’s input setting (e.g., AV 1) is correct.
≥The television isn’t compatible with progressive signals. Press and hold [∫] and [TIME SLIP]
on the main unit at the same time for about 5 seconds. The setting will change to interlace.
≥The unit’s “TV System” setting differs from the TV system used by the disc now playing.
While stopped, keep pressing [∫] and [< OPEN/CLOSE] on the main unit for 5 or more
seconds. The system switches from PAL to NTSC or vice versa.
7, 8
—
—
50
57
7463en.book Page 57 Tuesday, March 8, 2005 11:07 AM

58
RQT7463
Reference
Troubleshooting guide
Sound Page
Operation
Recording, timer recording and transferring (dubbing)
Continued on next page
No sound.
Low volume.
Distorted sound.
Cannot hear the desired audio
type.
≥Check the connections and settings. Check the input mode on the amplifier if you have
connected one.
≥Press [AUDIO] to select the audio.
≥Turn off V.S.S. in the following cases.
–When using discs that do not have surround sound effects such as Karaoke discs.
–When playing bilingual broadcast programmes.
≥The disc may have a restriction on the method of audio output. If “D.MIX” does not appear in
the display when playing multi-channel DVD-Audio, only audio for the two front channels will
be output. Refer to the disc’s jacket. [DVD-A]
7–9, 47
24
29
—
Cannot switch audio. ≥You cannot switch the audio in the following cases.
–When a DVD-R disc is in the disc tray while DVD drive is selected.
–When the recording mode is XP and “Audio Mode for XP Recording” is set to “LPCM”.
–When “DVD-R Rec for High Speed mode” is set to “On”
≥You have used a digital connection. Set “Dolby Digital” to “PCM” or connect using audio
cables (analog connection).
≥There are discs for which audio cannot be changed because of how the disc was created.
—
47
46
47, 9
—
Cannot operate the television.
The remote control doesn’t
work.
≥Change manufacturer code. Some televisions cannot be operated even if you change the
code.
≥The remote control and main unit are using different codes. Change the code on the remote
control.
Press and hold [ENTER] and the indicated number
button at the same time for more than 2 seconds.
≥The batteries are depleted. Replace them with new ones.
≥Coloured glass may obstruct the signal reception/transmission.
≥Don’t place the signal sensor in direct sunlight or in areas that may be subject to sunlight
exposure.
≥The child lock function is activated.
13
13
4
—
—
51
The unit is on but cannot be
operated.
≥Recording drive or playback drive has not been selected properly.
≥Some operations may be prohibited by the disc.
≥The unit is hot (“U14” appears on the display). Wait for “U14” to disappear.
≥One of the unit’s safety devices may have been activated.
Reset the unit as follows:
Press [Í/I] on the main unit to switch the unit to standby.
If the unit doesn’t switch to standby, press and hold [Í/I] on the main unit for about 10
seconds. The unit is forcibly switched to standby.
Alternatively, disconnect the AC mains lead, wait one minute, then reconnect it.
16, 22
—
—
—
HDD activation is slow. ≥The HDD is in SLEEP mode. (“HDD SLP” appears in the unit’s display.) 61
Cannot eject disc. ≥The unit may have a problem. While the unit is off, press and hold [∫] and [CH W] on the
main unit at the same time for about 5 seconds. Remove the disc and consult the dealer.
If the Child Lock function is activated, above operation does not work. Cancel the Child Lock
function.
51
Cannot tune channels.
Cannot download channel
presets from the television.
≥Check the connections.
≥You must connect to a television equipped with the Q Link function with a fully wired 21-pin
Scart cable to download channel presets.
7, 8
—
Cannot record. ≥You haven’t inserted a disc or the disc you inserted cannot be recorded on. Insert a disc the
unit can record onto.
≥The disc is un-formatted. Format the disc. [RAM]
≥The write-protect tab on the cartridge is set to PROTECT, or the disc is protected with DISC
MANAGEMENT.
≥Some programmes have limitations on the number of times they can be recorded (CPRM).
≥You cannot record when there is not enough space or when the number of titles has
reached its limit. Erase unwanted titles.
≥You cannot record on finalized DVD-R discs.
≥Due to peculiarities of DVD-R, you may be unable to record onto them if you either insert
and remove the disc or switch the unit on and off while a disc is loaded, a total of fifty times.
≥A DVD-R recorded on this unit may not be recordable on other Panasonic DVD recorders.
14
43
42
53
24, 31,
42, 43
—
—
—
Timer recording does not
work properly.
S
HOWVIEW programming does
not work properly.
≥The timer programme is incorrect or different timer programme times overlap. Correct the
programme.
≥The unit is not on timer recording standby. (“F” on the unit’s display is not on.) Press
[F TIMER].
≥Set the clock.
21
19, 20
51
58
7463en.book Page 58 Tuesday, March 8, 2005 11:07 AM

59
RQT7463
Reference
Recording, timer recording and transferring (dubbing) (Continued) Page
Play
Timer recording does not stop
even when [∫] is pressed.
≥While using timer recording, press [F TIMER]. (“F” disappears.)
≥When using the linked timer recording with external equipment, press [EXT LINK]. (“Ext
Link” disappears.)
19, 20
21
The timer programme remains
even after recording finishes.
≥The timer programme remains if set to daily or weekly. 20
A part or whole of a recorded
title has been lost.
≥If there is a power failure or the plug is disconnected from the household AC mains socket
while recording or editing, the title may be lost or the disc may become unusable.
You will have to format the disc ([HDD] [RAM]) or use a new disc. We cannot offer any
guarantee regarding lost programmes or discs.
—
Cannot transfer (dub) to a
DVD-R disc using the high
speed mode.
≥When recording to the HDD, set “DVD-R Rec for High Speed mode” to “On” in the SETUP
menu.
46
When transferring (dubbing),
it takes a long time even when
high speed mode is selected.
≥Use a disc that is compatible with high speed recording. Even if the disc is high speed
recording compatible, the maximum speed recording rating may not be possible due to the
condition of the disc.
≥It takes longer than normal to transfer (dub) many titles.
≥You cannot high speed transfer (dub) to DVD-R titles longer than 6 hours when using other
Panasonic DVD recorders that are not compatible with EP (8 hour) mode recording.
—
—
—
An unusually loud sound is
coming from the rotating DVD-R.
≥When recording or high speed transferring (dubbing) to a DVD-R, the sound of the disc
rotating may be louder than normal, however, this is not a problem.
—
The DV automatic recording
function does not work.
≥If images cannot be recorded or if the recording is aborted, check the connections and DV
equipment settings.
≥You cannot start recording until the images from the DV equipment appear on the television.
≥Recording may not be performed as desired if the time codes on the tape in the DV
equipment are not successive.
≥Depending on the equipment, the DV automatic recording may not operate properly.
39
—
—
—
Play fails to start even when
[1] (PLAY) is pressed.
Play starts but then stops
immediately.
≥Insert the disc correctly with the label facing up.
≥You tried to play a blank DVD-RAM/DVD-R, or disc unplayable on this unit.
≥You may be able to transfer (dub) a “One time only recording” title that was recorded to
DVD-RAM using a different Panasonic DVD Recorder to this unit’s HDD, but play is not
possible due to copyright protection.
≥When recording to DVD-RAM using “EP (8 Hour)” mode, play may not be possible on DVD
players that are compatible with DVD-RAM. In this case use “EP (6 Hour)” mode.
≥You cannot play discs during DV automatic recording.
22
14
—
46
—
Audio and video momentarily
pause.
≥This occurs between play list chapters.
≥This occurs between chapters and with partially deleted titles on finalized DVD-R that have
been transferred (dubbed) using the high speed mode.
—
—
DVD-Video is not played. ≥Some DVD-Video cannot be played when you change the ratings level. 46
Alternative soundtrack and
subtitles cannot be selected.
≥The languages are not recorded on the disc.
≥You may have to use the disc’s menus to select languages.
—
—
No subtitles. ≥Subtitles are not recorded on the disc.
≥Turn the subtitles on.
—
28
Angle cannot be changed. ≥Angles can only be changed during scenes where different angles are recorded. —
You have forgotten your
ratings password.
≥While the disc tray is open, press [DVD] then press and hold [D] and [E] on
the main unit at the same time for 5 or more seconds.
—
Quick View does not work. ≥This does not work if the setting is “Off” in “PLAY k1.3 & Audio during Search”.
≥This does not work when audio is other than Dolby Digital.
≥This does not work when recording is in XP or FR mode. [RAM]
47
—
—
The resume play function
does not work.
≥This function only works when the indicator on the right appears on the unit
display.
≥Memorized positions are canceled when the unit is turned off or when the
tray is opened. The memorized position on the play list is also canceled
when the play list and title are edited.
—
—
The Video CD picture does not
display properly.
≥When connecting to Multi-system TV, select “NTSC” in “TV System” in the SETUP menu.
≥When connecting to PAL TV, the lower part of the picture cannot be displayed correctly
during search.
50
—
Time Slip does not work. ≥Time Slip does not work when the unit’s “TV System” settings are different from the title
recorded on the disc.
50
HDD
EXTEXTEXT
LinkLinkLink
XPXPXP
SP
LPLP
LP
EPEPEP
RECRECREC
PLAYPLAYPLAY
59
7463en.book Page 59 Tuesday, March 8, 2005 11:07 AM

60
RQT7463
Reference
Troubleshooting guide
Edit Page
Still pictures
Set the unit up on an even surface away from direct sunlight, high
temperatures, high humidity, and excessive vibration. These
conditions can damage the cabinet and other components, thereby
shortening the unit’s service life.
Do not place heavy items on the unit.
Do not use high voltage power sources. This can overload the unit
and cause a fire.
Do not use a DC power source. Check the source carefully when
setting the unit up on a ship or other place where DC is used.
Ensure the AC mains lead is connected correctly and not
damaged. Poor connection and lead damage can cause fire or
electric shock. Do not pull, bend, or place heavy items on the lead.
Grasp the plug firmly when unplugging the lead. Pulling the AC
mains lead can cause electric shock.
Do not handle the plug with wet hands. This can cause electric
shock.
Do not let metal objects fall inside the unit. This can cause electric
shock or malfunction.
Do not let liquids get into the unit. This can cause electric shock or
malfunction. If this occurs, immediately disconnect the unit from the
power supply and contact your dealer.
Do not spray insecticides onto or into the unit. They contain
flammable gases which can ignite if sprayed into the unit.
Do not attempt to repair this unit by yourself. If sound is
interrupted, indicators fail to light, smoke appears, or any other
problem that is not covered in these instructions occurs, disconnect
the AC mains lead and contact your dealer or an authorized service
center. Electric shock or damage to the unit can occur if the unit is
repaired, disassembled or reconstructed by unqualified persons.
Extend operating life by disconnecting the unit from the power
source if it is not to be used for a long time.
Cannot format. ≥The disc is dirty. Use a special cleaner and wipe clean.
≥You tried formatting a disc that is not compatible with this unit.
61
14
Cannot create chapters.
Cannot mark the start point or
the end point during “Partial
Erase” operation.
≥The unit writes the chapter information to the disc when you turn it off or remove the disc.
The information is not written if there is an interruption to the power before this.
≥These operations are not possible with still pictures.
≥You cannot set points if they are too close to each other. You cannot set an end point before
a start point.
—
—
—
Cannot erase chapters. ≥When the chapter is too short to erase, use “Combine Chapters” to make the chapter
longer.
31
The available recording time
doesn’t increase even after
erasing recordings on the
disc.
≥Available recording space on the DVD-R does not increase even after erasing previously
recorded titles.
—
Cannot create a play list. ≥You cannot select all the chapters at once in a title if the title also includes still pictures.
Select them individually.
—
Cannot display Direct
Navigator screen.
≥This screen cannot be displayed during recording or transfer (dubbing) or while the unit is
standing by for linked timer recording with external equipment.
—
Cannot edit or format a card. ≥Release the card’s protection setting. (With some cards, the “Write protection Off” message
sometimes appears on the screen even when protection has been set.)
42
The contents of the card
cannot be read.
≥The card format is not compatible with the unit. (The contents on the card may be
damaged.)
Format using FAT 12 or FAT 16 with other equipment or format the card with this unit.
≥The card contains a folder structure and/or file extensions that are not compatible with this
unit.
≥Turn off and then turn on the unit again.
15, 26
43
15
—
Transferring (dubbing),
erasing and setting protection
takes a long time.
≥When there are a lot of folders and files, it may sometimes take a few hours.
≥When repeating transferring (dubbing) or erasing, it may sometimes take a long time.
Format the disc or card.
—
43
The PC card cannot be
removed.
≥Make sure the PC card is slotted home firmly before attempting to remove. 26
Safety precautions
Placement
Voltage
AC mains lead protection
Foreign matter
Service
60
7463en.book Page 60 Tuesday, March 8, 2005 11:07 AM

61
RQT7463
Reference
Maintenance/HDD, disc and card handling
The precision parts in this unit are readily affected by the
environment, especially temperature, humidity, and dust.
Cigarette smoke also can cause malfunction or breakdown.
To clean this unit, wipe with a soft, dry cloth.
≥Never use alcohol, paint thinner or benzine to clean this unit.
≥Before using chemically treated cloth, read the instructions that
came with the cloth carefully.
Observe the following points to ensure continued listening and
viewing pleasure.
Dust and dirt may adhere to the unit’s lens over time, making it
impossible to record or play discs.
Use the DVD-RAM/PD lens cleaner (LF-K123LCA1, where
available) about once every year, depending on frequency of use
and the operating environment. Read the lens cleaner’s instructions
carefully before use.
∫ How to hold a disc or
card
Do not touch the recorded
surface or the terminal surface.
∫ If there is dirt or condensation on the disc
[RAM] [DVD-R]
≥Clean with an optional DVD-RAM/PD disc cleaner (LF-K200DCA1,
where available).
≥Do not use cleaners for CDs or cloths.
[DVD-A] [DVD-V] [VCD] [CD]
Wipe with a damp cloth and then wipe dry.
∫ Handling precautions
≥Do not attach labels or stickers to discs. (This may cause disc
warping and un-balanced rotation, rendering it unusable.)
≥Do not write on the label side with a ball-point pen or other writing
instrument.
≥Do not use record cleaning sprays, benzine, thinner, static
electricity prevention liquids or any other solvent.
≥Do not use scratch-proof protectors or covers.
≥Do not expose the terminals of the card to water, garbage or other
strange things.
≥Do not use the following discs:
–Discs with exposed adhesive from removed stickers or labels
(rented discs etc).
–Discs that are badly warped or cracked.
–
Irregularly shaped discs, such as heart shapes.
≥Do not place in the following areas:
–In direct sunlight.
–In very dusty or humid areas.
–Near a heater
–Where static electricity or electromagnetic waves occur
The HDD is a high precision recording instrument and because of its
long recording capability and high speed operation it is a very
special device that is easily susceptible to damage.
As a basic rule, save important video content to a DVD disc as
backup.
∫ The HDD is a device that is not built to withstand
vibration/shock or dust
Depending on the setup environment and handling of the HDD some
content may become damaged and play and recording may no
longer be possible. Especially during operation, do not subject the
unit to any vibration, shock, or remove the AC mains lead from the
household mains socket. In the event of a power failure the content
during recording or play may be damaged.
∫ The HDD is a temporary storage device
The HDD is not an everlasting storage device for recorded content.
Use the HDD as a temporary storage place for viewing once, editing,
or for saving to a DVD disc.
∫ Immediately save (backup) all content as soon
as you feel there may be problem with the HDD
If there is an irregularity within the HDD, strange sounds or problems
with picture (block noise etc.) may result. Using the HDD in this
condition may worsen the problem and in the worst case the HDD
may no longer become usable. As soon as you notice this type of
problem, save all content to the DVD disc.
Recorded content (Data) on a HDD that has become unusable is
unrecoverable.
∫ HDD recording time remaining
This unit records using a VBR (Variable bit rate) data compression
system to vary recorded data segments to match video data
segments which may cause differences in the displayed amount of
time and space remaining for recording.
If the remaining amount time is insufficient, erase any unwanted
titles to create enough space before you start recording. (Erasing a
play list will not increase the amount of time.)
∫ When “HDD SLP (SLEEP)” appears in the
display
The HDD has automatically gone into SLEEP mode in order to
extend the life of the HDD. (While power is supplied, the HDD rotates
at high speed. If there is no disc in the unit, the HDD will go into
SLEEP mode after there has been no operation for 30 minutes or
longer.)
≥Press [HDD] to activate.
≥While in SLEEP mode play or recording may not begin right away
because the HDD takes time to be re-activated.
≥When not using the unit, we recommend removing the disc in the
tray in order to set the HDD to the SLEEP mode.
Unit care
Disc and card handling
HDD (Hard disk drive) handling care
∫ Setup precautions
≥Do not place in an enclosed area so the rear cooling fan
and the cooling vents on the side are covered up.
≥Place the unit on a surface that is flat and not subject to
vibration or impact.
≥Do not place on anything that
generates heat like a video cassette
recorder etc.
≥Do not place in an area often subject to
temperature changes.
≥Place in an area where condensation
does not occur. Condensation is a phenomenon where
moisture forms on a cold surface when there is an extreme
change in temperature. Condensation may cause internal
damage to the unit.
≥Conditions where condensation may occur
–When there is an extreme change in temperature (moving from
a very hot location to a very cold location, or vice versa, or when
subjected to an air conditioner or when cooled air directly
impacts the unit.) When the HDD (warms during operation) is
subjected to cold air, condensation may form on the inside of
the HDD and may cause damage to the HDD heads etc.
–When there is high humidity or a lot of steam in the room.
–During the rainy season.
≥In the above situation, without turning the unit on, let the unit
adjust to the room temperature and wait 2–3 hours until
condensation is gone.
∫ Cigarette smoke etc. causes malfunction or
breakdown
The unit may breakdown if cigarette smoke or bug spray/vapor
etc. gets inside the unit.
∫ While operating
≥Do not move the unit or subject to vibration or impact. (The
HDD may become damaged.)
≥Do not remove the AC mains lead from the household mains
socket, or flip the power breaker switch.
While the unit is on, the HDD is rotating at high speed. Sound or
movement due to rotation is normal.
∫ When moving the unit
1 Turn the unit off. (Wait until “BYE” disappears from the
display.)
2 Remove the AC mains lead from the household mains socket.
3 Move only after the unit has come to a complete stop (approx.
2 minutes) in order to avoid subjecting to vibration and shock.
(Even after turning the unit off, the HDD continues operating
for a short time.)
∫ Indemnity concerning recorded content
Panasonic does not accept any responsibility for damages
directly or indirectly due to any type of problems that result in loss
of recording or edited content (data), and does not guarantee any
content if recording or editing does not work properly. Likewise,
the above also applies in the case any type of repair is made to
the unit (including any other non-HDD related component).
This unit
VCR
61
7463en.book Page 61 Tuesday, March 8, 2005 11:07 AM

62
RQT7463
Reference
Index
Angle . . . . . . . . . . . . . . . . . . . . . . . . . . . 28
Aspect . . . . . . . . . . . . . . . . . . . . . . . . . . 12
Audio
Attribute . . . . . . . . . . . . . . . . . . . . . . . 28
Language . . . . . . . . . . . . . . . . . . . . . . 46
Playback . . . . . . . . . . . . . . . . . . . . . . 24
Receiving . . . . . . . . . . . . . . . . . . . . . . 29
Auto Renewal Recording . . . . . . . . . . . 20
Change Thumbnail . . . . . . . . . . . . . . . . 31
Channel
Audio . . . . . . . . . . . . . . . . . . . . . . . . . 28
Auto-Setup . . . . . . . . . . . . . . . . . . 11, 50
Preset Download . . . . . . . . . . . . . 10, 50
Chapter . . . . . . . . . . . . . . . . . . . . . . 24, 30
Chasing playback . . . . . . . . . . . . . . . . . 17
Child Lock . . . . . . . . . . . . . . . . . . . . . . . 51
Cleaning
Disc . . . . . . . . . . . . . . . . . . . . . . . . . . 61
Lens . . . . . . . . . . . . . . . . . . . . . . . . . . 61
Main unit . . . . . . . . . . . . . . . . . . . . . . 61
Clock settings . . . . . . . . . . . . . . . . . . . . 51
Connection
Aerial . . . . . . . . . . . . . . . . . . . . . . . . 7, 8
Amplifier, system component . . . . . . . . 9
AV3 input terminals . . . . . . . . . . . . . 39
DV input terminal . . . . . . . . . . . . . . . . 39
Satellite receiver, digital receiver,
decoder . . . . . . . . . . . . . . . . . . . . . . . . 9
Television . . . . . . . . . . . . . . . . . . . . . 7, 8
Video cassette recorder . . . . . . . 7, 8, 39
Copy (play list) . . . . . . . . . . . . . . . . . . . 33
Country setting . . . . . . . . . . . . . . . . 10, 11
CPRM . . . . . . . . . . . . . . . . . . . . . . . . . . . 53
Create Chapter . . . . . . . . . . . . . . . . 24, 31
Create play lists . . . . . . . . . . . . . . . . . . 32
Default Settings . . . . . . . . . . . . . . . . . . 45
Dialog Enhancer . . . . . . . . . . . . . . . . . . 29
Direct Navigator . . . . . . . . . 22, 27, 30, 34
Direct TV Recording . . . . . . . . . . . . . . . 18
Divide Title . . . . . . . . . . . . . . . . . . . . . . . 31
DPOF . . . . . . . . . . . . . . . . . . . . . . . . 34, 53
DV automatic recording . . . . . . . . . . . . 39
DVD-R (Enabling DVD-R to be played on
other equipment—Finalize) . . . . . . . . . 43
DVD-R Rec for High Speed mode . . . . 46
DVD-RAM, DVD-R . . . . . . . . . . . . . . . . . 14
Enter name
Disc . . . . . . . . . . . . . . . . . . . . . . . . . . 42
Entering text . . . . . . . . . . . . . . . . . . . . 44
Folder . . . . . . . . . . . . . . . . . . . . . . . . . 34
Play list . . . . . . . . . . . . . . . . . . . . . . . 33
Title . . . . . . . . . . . . . . . . . . . . 19, 20, 31
Erase
All titles . . . . . . . . . . . . . . . . . . . . . . . . 42
Chapter . . . . . . . . . . . . . . . . . 24, 31, 33
Folder . . . . . . . . . . . . . . . . . . . . . . . . . 34
Play list . . . . . . . . . . . . . . . . . . . . 24, 33
Still picture . . . . . . . . . . . . . . . . . . . . . 34
Title . . . . . . . . . . . . . . . . . . . . . . . 24, 31
Ext Link . . . . . . . . . . . . . . . . . . . . . . 21, 48
Finalize . . . . . . . . . . . . . . . . . . . . . . 43, 53
Flexible Recording . . . . . . . . . . . . . . . . 18
Format . . . . . . . . . . . . . . . . . . . . . . . 43, 53
FR (Flexible Recording Mode) . . . . . . 17
FUNCTIONS window . . . . . . . . . . . . . . 41
JPEG . . . . . . . . . . . . . . . . . . . . . . . . 26, 53
Language
Audio . . . . . . . . . . . . . . . . . . . . . . . . 46
Code list . . . . . . . . . . . . . . . . . . . . . . 48
On-screen . . . . . . . . . . . . . . . . . . . . . 45
Soundtrack . . . . . . . . . . . . . . . . . 28, 46
Subtitle . . . . . . . . . . . . . . . . . . . . 28, 46
LPCM . . . . . . . . . . . . . . . . . . . . . . . . 47, 53
Manual Skip . . . . . . . . . . . . . . . . . . . . . 23
Menu
MP3 . . . . . . . . . . . . . . . . . . . . . . . . . 25
On-screen . . . . . . . . . . . . . . . . . . . . . 28
SETUP . . . . . . . . . . . . . . . . . . . . . . . 45
Mode
Recording . . . . . . . . . . . . . . . . . . . . . 17
Still Mode . . . . . . . . . . . . . . . . . . . . . 46
MP3 . . . . . . . . . . . . . . . . . . . . . . . . . . . . 25
Noise reduction (NR)
AV-in NR . . . . . . . . . . . . . . . . . . . . . . 46
Playback NR . . . . . . . . . . . . . . . . . . . 29
One Touch Transfer (dubbing) . . . . . . 36
On-screen
Language . . . . . . . . . . . . . . . . . . . . . 45
Menus . . . . . . . . . . . . . . . . . . . . . . . . 28
Status messages . . . . . . . . . . . . . . . 29
Partial Erase . . . . . . . . . . . . . . . . . . . . . 31
PC card . . . . . . . . . . . . . . . . . . . . . . . . . 15
PCM Down Conversion . . . . . . . . . . . . 47
Picture settings . . . . . . . . . . . . . . . 29, 46
Play list . . . . . . . . . . . . . . . . . . . . . . . . . 32
Playback NR . . . . . . . . . . . . . . . . . . . . . 29
Power Save . . . . . . . . . . . . . . . . . . . . . . 45
Progressive . . . . . . . . . . . . 12, 29, 48, 53
Properties
Play list . . . . . . . . . . . . . . . . . . . . . . . 33
Still picture . . . . . . . . . . . . . . . . . . . . 27
Title . . . . . . . . . . . . . . . . . . . . . . . . . . 31
Protection
Card . . . . . . . . . . . . . . . . . . . . . . . . . 42
Cartridge . . . . . . . . . . . . . . . . . . . . . . 42
Disc . . . . . . . . . . . . . . . . . . . . . . . . . . 42
Folder . . . . . . . . . . . . . . . . . . . . . . . . 34
Still picture . . . . . . . . . . . . . . . . . . . . 34
Title . . . . . . . . . . . . . . . . . . . . . . . . . . 31
Q Link . . . . . . . . . . . . . . . . . . . . . . . . 6, 54
Quick View . . . . . . . . . . . . . . . . . . . . . . 23
Ratings level . . . . . . . . . . . . . . . . . . . . . 46
Recording . . . . . . . . . . . . . . . . . . . . . . . 16
Auto Renewal . . . . . . . . . . . . . . . . . . 20
Direct TV Recording . . . . . . . . . . . . . 18
DV automatic recording . . . . . . . . . . . 39
External Link . . . . . . . . . . . . . . . . . . . 21
Flexible Recording . . . . . . . . . . . . . . . 18
Mode . . . . . . . . . . . . . . . . . . . . . . . . . 17
Relief . . . . . . . . . . . . . . . . . . . . . . . . . 19
Timer . . . . . . . . . . . . . . . . . . . . . . 19–21
Relief Recording . . . . . . . . . . . . . . . . . . 19
Remote control code . . . . . . . . . . . . . . 13
Repeat Play . . . . . . . . . . . . . . . . . . . . . . 29
Resume play function . . . . . . . . . . . . . 23
RGB
Input . . . . . . . . . . . . . . . . . . . . . . . . . . 48
Output . . . . . . . . . . . . . . . . . . . . . . 7, 48
SD card . . . . . . . . . . . . . . . . . . . . . . . . . 15
SETUP menu . . . . . . . . . . . . . . . . . . . . . 45
Shipping Condition . . . . . . . . . . . . . . . . 45
S
HOWVIEW . . . . . . . . . . . . . . . . . . . . . . . . 19
Simultaneous rec and play . . . . . . . . . 17
Soundtrack . . . . . . . . . . . . . . . . . . . . . . 28
Status messages . . . . . . . . . . . . . . . . . 29
Still picture
Edit . . . . . . . . . . . . . . . . . . . . . . . . . . 34
Play . . . . . . . . . . . . . . . . . . . . . . . . . . 26
Transferring (dubbing) . . . . . . . . . . . . 40
Subtitle . . . . . . . . . . . . . . . . . . . . . . . . . 28
Teletext . . . . . . . . . . . . . . . . . . . . . . . . . 17
TIFF . . . . . . . . . . . . . . . . . . . . . . . . . 26, 53
Time Slip . . . . . . . . . . . . . . . . . . . . . 17, 23
Timer recording . . . . . . . . . . . . . . . 19–21
Transfer . . . . . . . . . . . . . . . . . . . . . . . . . 29
Transfer (dubbing)
List . . . . . . . . . . . . . . . . . . . . . . . . . . . 36
One Touch Transfer (dubbing) . . . . . 36
Still picture . . . . . . . . . . . . . . . . . . . . . 40
Tuning
Auto-Setup . . . . . . . . . . . . . . . . . . 11, 50
Manual . . . . . . . . . . . . . . . . . . . . . . . . 49
Preset Download . . . . . . . . . . . . . 10, 50
TV System (PAL/NTSC) . . . . . . . . . . . . 50
TV type . . . . . . . . . . . . . . . . . . . . . . . . . . 12
V.S.S. . . . . . . . . . . . . . . . . . . . . . . . . . . . 29
VPS/PDC . . . . . . . . . . . . . . . . . . . . . 19, 54
Manufactured under license from Dolby Laboratories.
“Dolby” and the double-D symbol are trademarks of Dolby
Laboratories.
“DTS” and “DTS 2.0iDigital Out” are trademarks of Digital
Theater Systems, Inc.
S
HOWVIEW is a trademark of Gemstar Development Corporation.
The S
HOWVIEW system is manufactured under licence from
Gemstar Development Corporation.
MPEG Layer-3 audio decoding technology licensed from
Fraunhofer IIS and Thomson multimedia.
This product incorporates copyright protection technology that is
protected by U.S. patents and other intellectual property rights.
Use of this copyright protection technology must be authorized
by Macrovision, and is intended for home and other limited
consumer uses only unless otherwise authorized by
Macrovision. Reverse engineering or disassembly is prohibited.
≥SD logo is a trademark.
≥Portions of this product are protected under copyright law and
are provided under license by ARIS/SOLANA/4C.
62
7463en.book Page 62 Tuesday, March 8, 2005 11:07 AM

RQT7463
MEMO
63
7463sp.book Page 1 Tuesday, March 8, 2005 11:12 AM

2
RQT7463
Preparativos
¡ADVERTENCIA!
ESTE APARATO UTILIZA UN LÁSER.
EL USAR LOS CONTROLES, HACER LOS REGLAJES O LOS
PASOS REQUERIDOS EN FORMA DIVERSA DE LA AQUÍ
EXPUESTA PUEDE REDUNDAR EN EXPOSICIÓN
PELIGROSA A LA RADIACIÓN.
NO ABRA LAS TAPAS NI HAGA REPARACIONES USTED
MISMO. EN CASO DE PRODUCIRSE ANOMALÍAS SOLICITE
AYUDA DE PERSONAL CUALIFICADO.
AVISO:
PARA REDUCIR EL RIESGO DE INCENDIOS,
DESCARGAS ELÉCTRICAS O DAÑOS EN ESTE
APARATO, NO LO EXPONGA A LA LLUVIA, HUMEDAD,
GOTEO NI SALPICADURAS, Y NO COLOQUE ENCIMA
DE ÉL OBJETOS QUE CONTENGAN LÍQUIDOS COMO,
POR EJEMPLO, FLOREROS.
¡ADVERTENCIA!
≥ PARA MANTENER BIEN VENTILADA ESTA UNIDAD, NO
LA INSTALE NI PONGA EN UN ESTANTE DE LIBROS,
MUEBLE EMPOTRADO U OTRO ESPACIO DE
DIMENSIONES REDUCIDAS. ASEGÚRESE QUE
CORTINAS Y OTROS MATERIALES NO OBSTRUYAN
LAS CONDICIONES DE VENTILACIÓN PARA
PREVENIR EL RIESGO DE SACUDIDAS ELÉCTRICAS O
INCENDIOS DEBIDOS AL RECALENTAMIENTO.
≥ NO OBSTRUYA LAS ABERTURAS DE VENTILACIÓN
DE LA UNIDAD CON PERIÓDICOS, MANTELES,
CORTINAS U OBJETOS SIMILARES.
≥ NO COLOQUE OBJETOS CON LLAMA DESCUBIERTA,
UNA VELA POR EJEMPLO, ENCIMA DE LA UNIDAD.
≥ TIRE LAS PILAS DE FORMA QUE NO CONTAMINE EL
MEDIO AMBIENTE.
ESTA UNIDAD HA SIDO DISEÑADA PARA SER UTILIZADA
EN CLIMAS MODERADOS.
Este producto puede tener interferencias causadas por
teléfonos móviles durante su utilización. Si tales
interferencias resultan evidentes, aumente la separación
entre el producto y el teléfono móvil.
El equipo deberá colocarse cerca de la toma de CA, y a la
clavija del cable de alimentación deberá poder accederse
fácilmente en el caso de que se produzca un problema.
R - AUDIO - L
VIDEO
PR
S-VIDEO
R - AUDIO - L
VIDEO
S-VIDEO
OPTICAL
OUT
AV4 I N
RF IN
RF OUT
DIGITAL AUDIO OUT
(PCM/BITSTREAM)
COMPONENT
VIDEO OUT
(NTSC:480P/480I,
PAL:576P/576I)
PB
Y
AV1 (TV)
AV2 (DECODER/EXT)
AC IN
RQLS0233
-
-
-
-
-
-
-
-
-
-
VISIBLE AND INVISIBLE LASER RADIATION WHEN OPEN.
AVOID DIRECT EXPOSURE TO BEAM.
DANGER
(FDA 21 CFR)
(IEC60825-1)
VISIBLE AND INVISIBLE LASER RADIATION WHEN OPEN.
AVOID EXPOSURE TO BEAM.
CAUTION
RAYONNEMENT LASER VISIBLE ET INVISIBLE EN CAS D’OUVERTURE.
EXPOSITION DANGEREUSE AU FAISCEAU.
ATTENTION
SYNLIG OG USYNLIG LASERSTRÅLING VED ÅBNING.
UNDGÅ UDSÆTTELSE FOR STRÅLING.
ADVARSEL
AVATTAESSA OLET ALTTIINA NÄKYVÄÄ JA NÄKYMÄTÖN
LASERSÄTEILYLLE. ÄLÄ KATSO SÄTEESEEN.
VARO!
SYNLIG OCH OSYNLIG LASERSTRÅLNING NÄR DENNA DEL
ÄR ÖPPNAD. BETRAKTA EJ STRÅLEN.
VARNING
SYNLIG OG USYNLIG LASERSTRÅLING NÅR DEKSEL ÅPNES.
UNNGÅ EKSPONERING FOR STRÅLEN.
ADVARSEL
SICHTBARE UND UNSICHTBARE LASERSTRAHLUNG, WENN ABDECKUNG
GEÖFFNET. NICHT DEM STRAHL AUSSETZEN.
VORSICHT
(Parte interior del aparato)
Guarde las pequeñas tarjetas de memoria como
es la tarjeta SD fuera del alcance de los niños.
En el caso de que se la traguen, consulte de
inmediato a un médico.
64
7463sp.book Page 2 Tuesday, March 8, 2005 11:12 AM

3
RQT7463
Preparativos
Índice
Accesorios . . . . . . . . . . . . . . . . . . . . . . . . . . . . . . . . 3
Características útiles . . . . . . . . . . . . . . . . . . . . . . . 4
El mando a distancia . . . . . . . . . . . . . . . . . . . . . . . 4
Guía de referencia de control . . . . . . . . . . . . . . . . 5
PASO 1
Conexión . . . . . . . . . . . . . . . . . . . . . . . . . . 6
PASO
2
Ajustes de recepción de canales . . . . . 10
PASO 3
Preparación según su televisor y
mando a distancia . . . . . . . . . . . . . . . . . . . . . . . 12
Para disfrutar de vídeo progresivo . . . . . . . . . . . . . . . . . . . . . 12
Información de HDD, disco y tarjeta . . . . . . . . . . 14
Grabación de programas de televisión . . . . . . . . 16
Modos de grabación y tiempos de grabación aproximados . . 17
Reproducción mientras usted está grabando . . . . . . . . . . . . . 17
Grabación flexible . . . . . . . . . . . . . . . . . . . . . . . . . . . . . . . . . . 18
Grabación directa del televisor . . . . . . . . . . . . . . . . . . . . . . . . 18
Grabación de señales procedentes del receptor
de satélite/digital o decodificador . . . . . . . . . . . . . . . . . . . . . 18
Grabación con temporizador . . . . . . . . . . . . . . . . 19
Utilización del número SHOWVIEW para hacer grabaciones con
temporizador . . . . . . . . . . . . . . . . . . . . . . . . . . . . . . . . . . . . 19
Programación manual de grabaciones con temporizador . . . 20
Comprobación, cambio o borrado de un programa . . . . . . . . 21
Grabaciones con temporizador enlazadas con equipo externo
(EXT LINK) . . . . . . . . . . . . . . . . . . . . . . . . . . . . . . . . . . . . . . 21
Reproducción de vídeo grabado/Reproducción
de discos de reproducción solamente . . . . . . . 22
Operaciones durante la reproducción . . . . . . . . . . . . . . . . . . . 23
Operaciones de edición durante la reproducción . . . . . . . . . . 24
Cambio de audio . . . . . . . . . . . . . . . . . . . . . . . . . . . . . . . . . . . 24
Utilización de menús para reproducir MP3 . . . . 25
Reproducción de imágenes fijas . . . . . . . . . . . . . 26
Funciones útiles durante la reproducción de imagen fija . . . . 27
Utilizando menús en pantalla y mensajes de
estado . . . . . . . . . . . . . . . . . . . . . . . . . . . . . . . . . . 28
Menús en pantalla . . . . . . . . . . . . . . . . . . . . . . . . . . . . . . . . . 28
Mensajes de estado . . . . . . . . . . . . . . . . . . . . . . . . . . . . . . . . 29
Edición de títulos/capítulos . . . . . . . . . . . . . . . . . 30
Edición de títulos/capítulos y reproducción de capítulos . . . . 30
Operaciones con títulos . . . . . . . . . . . . . . . . . . . . . . . . . . . . . 31
Operaciones con capítulos . . . . . . . . . . . . . . . . . . . . . . . . . . . 31
Creación, edición y reproducción de listas de
reproducción . . . . . . . . . . . . . . . . . . . . . . . . . . . . 32
Creación de listas de reproducción . . . . . . . . . . . . . . . . . . . . 32
Edición y reproducción de listas de reproducción/capítulos . . 33
Operaciones con listas de reproducción . . . . . . . . . . . . . . . . . 33
Operaciones con capítulos . . . . . . . . . . . . . . . . . . . . . . . . . . . 33
Edición de imágenes fijas . . . . . . . . . . . . . . . . . . 34
Operación con imagen y carpeta . . . . . . . . . . . . . . . . . . . . . . 34
Copia de títulos o listas de reproducción . . . . . 35
Copia de un toque . . . . . . . . . . . . . . . . . . . . . . . . . . . . . . . . . . 36
Copia utilizando la lista de copia . . . . . . . . . . . . . . . . . . . . . . . 36
Copia de un DVD-R finalizado . . . . . . . . . . . . . . . . . . . . . . . . . 38
Grabación desde una videograbadora . . . . . . . . 39
Grabación manual . . . . . . . . . . . . . . . . . . . . . . . . . . . . . . . . . . 39
Grabación automática DV (DV AUTO REC) . . . . . . . . . . . . . . 39
Copia de imágenes fijas . . . . . . . . . . . . . . . . . . . 40
Copia utilizando la lista de copia . . . . . . . . . . . . . . . . . . . . . . . 40
Copia de todas las imágenes fijas en una tarjeta—
COPIAR TODAS IMÁG.. . . . . . . . . . . . . . . . . . . . . . . . . . . . . 41
Ventana FUNCTIONS . . . . . . . . . . . . . . . . . . . . . . 41
Administración de la HDD, disco y tarjeta . . . . . 42
Puesta de la protección . . . . . . . . . . . . . . . . . . . . . . . . . . . . . . 42
Puesta de un nombre a un disco . . . . . . . . . . . . . . . . . . . . . . . 42
Borrado de todos los títulos y listas de reproducción—
Borrar todos los títulos . . . . . . . . . . . . . . . . . . . . . . . . . . . . . . 42
Borrado de todo el contenido de un disco o tarjeta—
Formateado . . . . . . . . . . . . . . . . . . . . . . . . . . . . . . . . . . . . . . 43
Ajuste para que los DVD-R se puedan reproducir
en otro equipo—Finalización . . . . . . . . . . . . . . . . . . . . . . . . . 43
Introducción de texto . . . . . . . . . . . . . . . . . . . . . . 44
Cambio de ajustes de la unidad . . . . . . . . . . . . . 45
Procedimientos comunes . . . . . . . . . . . . . . . . . . . . . . . . . . . . 45
Resumen de los ajustes . . . . . . . . . . . . . . . . . . . . . . . . . . . . . 45
Sintonización . . . . . . . . . . . . . . . . . . . . . . . . . . . . . . . . . . . . . . 49
Sistema TV . . . . . . . . . . . . . . . . . . . . . . . . . . . . . . . . . . . . . . . 50
Ajustes del reloj . . . . . . . . . . . . . . . . . . . . . . . . . . . . . . . . . . . . 51
Bloqueo para los niños . . . . . . . . . . . . . . . . . . . . 51
Especificaciones . . . . . . . . . . . . . . . . . . . . . . . . . 52
Glosario . . . . . . . . . . . . . . . . . . . . . . . . . . . . . . . . . 53
Preguntas más frecuentes . . . . . . . . . . . . . . . . . 55
Mensajes de error . . . . . . . . . . . . . . . . . . . . . . . . . 56
Guía para la solución de problemas . . . . . . . . . . 57
Precauciones de seguridad . . . . . . . . . . . . . . . . . 60
Mantenimiento/Manejo de la HDD, discos
y tarjetas . . . . . . . . . . . . . . . . . . . . . . . . . . . . . . . 61
Índice alfabético . . . . . . . . . . . . . Cubierta posterior
Preparativos
Grabación
Reproducción
Edición
Copia
Funciones convenientes
Referencia
Accesorios
Verifique e identifique los accesorios suministrados.
∏∏ ∏ ∏∏
1 Mando a distancia
(EUR7721KM0)
1 Cable de alimentación de CA
≥Para utilizar con esta unidad
solamente. No lo utilice con otro
equipo.
1 Cable coaxial
de RF
2Pilas
para el mando a
distancia
1 Cable de audio/vídeo
65
7463sp.book Page 3 Tuesday, March 8, 2005 11:12 AM

4
RQT7463
Preparativos
Características útiles
Esta grabadora de DVD Vídeo graba imágenes de alta calidad en medios HDD (unidad de disco duro) y DVD-RAM capaces de realizar un
acceso aleatorio rápido. Esto ha tenido como resultado muchas funciones nuevas cuyo rendimiento es muy superior al de los formatos de las
cintas antiguas. A continuación se indican de forma resumida unas pocas de estas funciones.
Grabación instantánea
Ya no es necesario buscar espacio vacío en el disco. Pulsando el
botón de grabación, la unidad encuentra el espacio de grabación
disponible y empieza a grabar inmediatamente. No es necesario
preocuparse de sobreescribir sobre el contenido ya grabado.
Grabación HDD
Puede seguir grabando sus programas favoritos en un HDD interno
capaz de grabar hasta 284 horas [modo EP ( 8horas )].
También puede hacer copias a alta velocidad de sus programas
favoritos en DVD-RAM o DVD-R y crear un disco de seguridad.
Ranura de tarjeta SD/PC, terminal de entrada DV
Esta unidad está equipada con interfaces que permiten el
funcionamiento en red con equipos digitales.
≥La ranura de tarjeta SD/PC de esta unidad le permite transferir
fotografías de cámara digital desde una tarjeta a un DVD-RAM
para guardarlas fácilmente sin utilizar un ordenador.
≥La función de grabación automática de DV de esta unidad le
permite copiar fácilmente imágenes digitales al HDD conectando
solamente un cable DV.
Reproducción instantánea
No es necesario rebobinar ni buscar hacia adelante. Direct
Navigator le guía inmediatamente al comienzo de la grabación.
∫ Pilas
≥Inserte las pilas de forma que los polos (i y j) coincidan con los
del mando a distancia.
≥No utilice baterías recargables.
≥No mezcle pilas viejas y nuevas.
≥No utilice tipos diferentes al mismo tiempo.
≥No caliente ni exponga las pilas a las llamas.
≥No las desarme ni cortocircuite.
≥No intente cargar pilas alcalinas o de manganeso.
≥No utilice pilas si se ha pelado la cubierta.
El manejo incorrecto de las pilas puede causar fugas de electrólito, el cual puede
dañar los objetos con los que entra en contacto y puede causar un incendio.
Quítelas si el mando a distancia no va a ser utilizado durante mucho
tiempo. Guárdelas en un lugar fresco y seco.
[Nota]
Si no puede controlar la unidad o televisor con el mando a distancia después de
haber cambiado las pilas, vuelva a introducir los códigos (
➡
página 13).
∫ Utilización
Reproducción de
persecución
No es necesario esperar hasta
terminar la grabación. Sin parar la
grabación, usted puede reproducir lo
que está grabando desde el
principio.
Grabación y reproducción
simultáneas
Mientras graba, puede reproducir
otro programa de vídeo grabado
previamente.
Time Slip
Durante la reproducción y la
grabación, puede saltar a la escena
que quiera ver especificando el
tiempo del salto.
El mando a distancia
R6/LR6, AA, UM-3
30˚
20˚
30˚
20˚
Sensor de señales del mando a distancia
7 m directamente enfrente de la unidad
MODELO DE DECLARACION DE CONFORMIDAD CON
NORMAS, EXPEDIDO POR EL FABRICANTE
El que suscribe Network Business Group,
Matsushita Electric Industrial Co., Ltd.
(Nombre de fabricante)
1-15, Matsuo-cho, Kadoma, Osaka,
571-8504, Japan (Razón social)
declara, bajo su propia responsabilidad, que el
Equipo: Grabadora de DVD vídeo
Fabricado por: Network Business Group,
Matsushita Electric Industrial Co., Ltd.
En: Japón
Marca: Panasonic
Modelo: DMR-E95HEG
objeto de esta declaración, cumple con la normativa
siguiente:
Reglamento Técnico del Servicio de Difusión de TV y del
Servicio Portador (RD 1160/1989) y Reglamento sobre
Perturbaciones Radioeléctricas e Interferencias (RD 138/1989)
Hecho en: Network Business Group,
Matsushita Electric Industrial Co., Ltd.
1-15, Matsuo-cho, Kadoma,
Osaka, 571-8504, Japan
Mayo 2004 (Lugar y fecha)
T. Yabuki
(Nombre y apellidos)
(Firma)
Director general de
regulaciones técnicas
(Cargo)
El fabricante no acepta ninguna responsabilidad ni ofrece ninguna compensación por la pérdida de material grabado o editado
debida a problemas con la unidad o el medio de grabación, y tampoco acepta responsabiliad ni ofrece compensación por los daños
que puedan ocasionar tales pérdidas.
Ejemplos de causas de tales pérdidas son:
≥
Un disco grabado y editado con esta unidad se reproduce en una grabadora DVD o en una unidad de disco de ordenador fabricada por otra compañía.
≥Un disco utilizado como se describe más arriba y reproducido de nuevo en esta unidad.
≥
Un disco grabado y editado con una grabadora DVD o unidad de disco de ordenador fabricada por otra compañía se reproduce en esta unidad.
66
7463sp.book Page 4 Tuesday, March 8, 2005 11:12 AM

5
RQT7463
Preparativos
Guía de referencia de control
Mando a distancia
VOLUME
CH
DIRECT TV REC
DVD
TV
AV
123
456
78
0
9
MANUAL SKIP
ShowView
CH
CANCEL
INPUT SELECT
SKIP
STOP
PAU SE
PLAY/x1.3
SLOW/SEARCH
FUNCTIONS
ENTER
DIRECT NAVIGATOR
TOP MENU
RETURN
SUB MENU
CREATE
CHAPTER
TIMER
EXT LINK
PROG/CHECK
REC MODEERASE
REC
AUDIO
TIME SLIP
STATUS
DISPLAY
F
A B C
DUBBING
HDD DVD
SD/PC
Enciende la unidad (➡página 10, 11)
Grabación directa del televisor (➡página 18)
Selección de canales, números de títulos, etc./
Introducción de números
Cancelar
Operaciones básicas para la grabación y
la reproducción
Visualización del menú inicial/Direct Navigator
(➡página 22, 30)
Muestra menús en pantallas (➡página 28)
Muestra pantalla de programación de grabación con
temporizador
(➡página 20)
Borra elementos (➡página 24)
Espera de grabación de programa/cancelación
(➡página 19, 20)
Muestra menús secundarios (➡página 30)
Grabaciones con temporizador enlazadas con
equipo externo (➡página 21)
Sintonización manual (➡página 49)
Funcionamiento de televisores (➡página 13)
Selección de canales (➡página 16)
Muestra la pantalla S
HOWVIEW (➡página 19)
Salta 30 segundos hacia adelante (➡página 23)
Muestra la ventana FUNCTIONS (➡página 41)
Selección/Introducción, cuadro a cuadro
(➡página 10, 23)
Retorno a pantalla anterior
Muestra mensajes de estado (➡página 29)
Salto del tiempo especificado/Visualización de imágenes de
televisión en el modo de imagen en imagen (
➡
página 17, 23)
Inicia la grabación (➡página 16)
Selecciona audio (➡página 24)
Creación de capítulos (➡página 24)
Guía para el modo de grabación (➡página 16)
Selector de entrada (AV1, AV2, AV3, AV4 o DV)
(➡página 18, 39)
Seleccione la unidad (HDD, DVD, SD o PC)
(➡página 16, 22, 27)
Copia con un toque (➡página 36)
Unidad principal
El visualizador de la unidad
OPEN/CLOSE
REC
/
x
1.3
TIME SLIP
CH
TIME SLIP
DRIVE SELECT
SD PCDVDHDD
SD CARD PC CARD EJECT
HDD DVD
AV3
S-VIDEO IN VIDEO IN AUDIO IN DV IN
R
L/MONO
Conexión para videocámara,
etc. (➡página 39)
Salto del tiempo especificado/
Visualización de imágenes de televisión en el modo
de imagen en imagen (
➡
página 17, 23)
Bandeja de disco (
➡
página 16, 22)
Sensor de señales del
mando a distancia/
Inicia la grabación
(➡página 16)
Interruptor de alimentación en espera/conectada (
Í
/I)
(
➡
página 10, 11)
Pulse este interruptor para cambiar del modo de alimentación conectada al
modo de alimentación en espera o viceversa. En el modo de alimentación
en espera, el aparato consume una pequeña cantidad de corriente.
Visualización (➡abajo)
Parada (➡página 16, 23)
Abertura/Cierre de bandeja de disco
(➡página 16, 22)
Indicador de Time Slip (➡página 17)
Inicia la
reproducción
(➡página 22)
Se enciende cuando se selecciona
la unidad HDD, DVD, SD o PC
Selección de unidad (
➡
página 16, 22, 27)
Selección de canales
(➡página 16)
Salto/Cámara lenta/
Búsqueda (➡página 23)
Ranura de tarjeta SD/PC
(
➡
página 26)
Conexión para videocámara de
vídeo digital (DV) (➡página 39)
Terminales del panel trasero (➡página 7, 8)
Se enciende cuando se selecciona la unidad HDD o DVD
HDD
EXT
Link
SD PC
XP
SP
LP
EP
REC
PLAY
DVD
VCD
.MIX
R
-
AM
REC
PLAY
EXT
Link
REC
PLAY
DVD
EXT
Link
REC
PLAY
EXT
Link
REC
PLAY
Modo de grabación
Indicador de grabación con temporizador
Sección del visualizador principal
D.MIX (DVD-Audio multicanal solamente)
Cuando está encendido: se reproduce la mezcla
de audio.
Cuando está apagado: el disco impide la
mezcla y el sonido se
reproduce por los dos
canales delanteros.
Indicador de grabaciones
con temporizador
enlazadas con equipo
externo
Tipo de disco
Grabación Reproducción Grabación/Reproducción
Indicador de tarjeta
Indicador de copia en curso
Ej.,
[HDD]
Indicador HDD
67
7463sp.book Page 5 Tuesday, March 8, 2005 11:12 AM

6
RQT7463
Preparativos
PASO 1
Conexión
≥Las conexiones del equipo descritas son ejemplos.
≥Antes de hacer la conexión, apague todos los equipos y lea los manuales de instrucciones apropiados.
≥El equipo periférico y los cables opcionales se venden por separado a menos que se indique lo contrario.
∫ Conexión recomendada para su televisor
Funciones Q Link
Q Link ofrece una gama de funciones muy útiles (para conocer más detalles ➡página 54). Si se utiliza la función Q Link, asegúrese de
conectar un cable Scart de 21 contactos todos cableados al televisor.
Los sistemas siguientes de otros fabricantes tienen una función similar a Q Link de Panasonic. Con respecto a los detalles, consulte las
instrucciones de funcionamiento de su televisor o consulte a su concesionario.
≥Q Link (marca registrada de Panasonic)
≥DATA LOGIC (marca registrada de Metz)
≥Easy Link (marca registrada de Philips)
≥Megalogic (marca registrada de Grundig)
≥SMARTLINK (marca registrada de Sony)
∫ Ejemplos de equipos que puede conectar a los terminales de esta unidad
∫ No conecte la unidad a través de una videograbadora
Las señales de vídeo enviadas a través de videograbadoras serán afectadas por los
sistemas de protección del copyright, y las imágenes no se mostrarán correctamente en
el televisor.
≥Cuando conecte a un televisor con videograbadora incorporada, conecte a los
terminales de entrada del televisor, no a los de la videograbadora.
∫ Cuando la unidad no vaya a utilizarse durante
mucho tiempo
Para ahorrar energía, desenchufe la unidad de la toma de
corriente. Esta unidad consume una pequeña cantidad de enegía
aunque se encuentre apagada (3 W aproximadamente).
¿Qué tipo de terminal de entrada tiene su televisor?
Cable(s)
necesario(s)
N.° de
página para
las
conexiones
N.° de página
para los ajustes
del televisor
Scart Conexión muy recomendada.
≥Conectando a un televisor compatible con RGB
puede disfrutar del vídeo RGB reproducido por
este aparato.
≥Si su televisor tiene una función Q Link, usted
podrá utilizar una variedad de funciones útiles.
Cable Scart de
21 contactos
completamente
cableados
➡7
➡11
≥Si es un
televisor
Q Link ➡10
Vídeo
componente
Estos terminales proporcionan una imagen más
pura que la del terminal S-Vídeo.
≥Si su televisor es compatible con la exploración
progresiva, usted podrá disfrutar de vídeo
progresivo de alta calidad.
Si tiene un televisor de CRT compatible con la
exploración progresiva no le recomendamos hacer
esta conexión porque la imagen fluctuará un poco.
3 cables de
vídeo
➡8
➡11
S-Vídeo Este terminal proporciona una imagen más viva que
la del terminal de vídeo.
Cable S-Vídeo ➡8 ➡11
Audio/
Vídeo
La conexión más básica.
Cable de audio/
vídeo (incluido)
➡8
➡11
AV IN
COMPONENT
VIDEO IN
S-VIDEO IN
AUDIO IN
R L
VIDEO IN
Televisor
Videograbadora
Videocámara
Esta unidad
Amplificador
A los terminales de entrada AV3 o DV (delante) (
➡
página 39)
A los terminales de entrada AV2 o AV4 (detrás)
Desde los terminales AUDIO OUT o
el terminal DIGITAL AUDIO OUT
Desde los terminales AV1, AUDIO/VIDEO OUT
o COMPONENT VIDEO OUT
Receptor de
satélite/digital o
decodificador
Televisor
Esta unidad
Videograbadora
Televisor
Videograbadora
Esta unidad
Antes de mover la unidad, asegúrese de que la
bandeja del disco esté vacía.
Si no lo hace correrá el riesgo de dañar seriamente el
disco y la unidad.
68
7463sp.book Page 6 Tuesday, March 8, 2005 11:12 AM

7
RQT7463
Preparativos
Cuando el televisor no tiene terminal Scart de 21 contactos (➡página 8)
∫ RGB
Esto se refiere a los tres colores primarios de la luz, el rojo (R), el verde (G) y el azul (B), y también al método de producción de vídeo que los
utiliza. Dividiendo la señal de vídeo en tres colores para la transmisión, el ruido se reduce y la calidad de las imágenes es aún mejor.
Conexión de un televisor con terminal Scart de 21 contactos y una videograbadora
R - AUDIO - L
VIDEO
PR
S-VIDEO
R - AUDIO - L
VIDEO
S-VIDEO
OPTICAL
OUT
AV4 IN
RF IN
RF OUT
DIGITAL AUDIO OUT
(PCM/BITSTREAM)
COMPONENT
VIDEO OUT
(PROGRESSIVE/
INTERLACE)
PB
Y
AV1 (TV)
AV2 (DECODER/EXT)
AC IN
AV IN
VHF/UHF
RF IN
VHF/UHF
RF IN
R L
AUDIO OUT VIDEO OUT
2 134
1
4
A la antena
Divisor
Panel trasero
del televisor
Cable de
antena
Panel trasero de la
videograbadora
Ventilador de refrigeración
Cable coaxial
de RF
Panel trasero de esta unidad
Rojo
Blanco
Amarillo
Cable de audio/vídeo
A una toma de corriente de casa
(CA 220–240 V, 50 Hz)
Cable Scart de 21 contactos
completamente cableados
También puede conectar con el terminal
AV2 de esta unidad utilizando el cable Scart
de 21 contactos.
Rojo
Blanco
Amarillo
indica accesorios incluidos.
indica accesorios no incluidos.
son conexiones necesarias. Conecte en el orden numerado.
Terminal AV1
Si su televisor está equipado con
capacidad para recibir la entrada RGB,
haciendo la conexión con un cable
Scart de 21 contactos todos cableados,
usted podrá ver imágenes utilizando la
salida RGB de este aparato (➡abajo).
Para dar salida en RGB seleccione
“RGB ( sin componentes )” desde
“Salida AV1” en el menú SETUP
(➡página 48) después de completar la
sintonización (➡ páginas 10, 11).
Utilice un divisor si
quiere conectar
también la antena a su
videograbadora.
Cable de alimentación de CA
Conecte solamente después de haber
finalizado todas las demás conexiones.
69
7463sp.book Page 7 Tuesday, March 8, 2005 11:12 AM

8
RQT7463
Preparativos
PASO 1
Conexión
Conexión al televisor utilizando cables Scart de 21 contactos (➡página 7)
∫ Salida de vídeo componente
La señal componente da salida separadamente a las señales de diferencia de color (PB/PR) y a la señal de luminancia (Y) para lograr una alta
fidelidad en la reproducción de los colores. Si el televisor es compatible con la salida progresiva, se puede dar salida a una imagen de alta
calidad porque el terminal de salida de vídeo componente de esta unidad da salida a una señal de salida progresiva (➡página 53).
Para la salida progresiva (➡página 12)
Conexión de un televisor con terminales AUDIO/VIDEO, S-VIDEO o COMPONENT
VIDEO y videograbadora
R - AUDIO - L
VIDEO
PR
S-VIDEO
R - AUDIO - L
VIDEO
S-VIDEO
OPTICAL
OUT
AV4 IN
RF IN
RF OUT
DIGITAL AUDIO OUT
(PCM/BITSTREAM)
COMPONENT
VIDEO OUT
(PROGRESSIVE/
INTERLACE)
PB
Y
AV1 (TV)
AV2 (DECODER/EXT)
AC IN
VHF/UHF
RF IN
COMPONENT
VIDEO IN
S-VIDEO IN
VHF/UHF
RF IN
AUDIO IN
R L
VIDEO IN
R L
AUDIO OUT VIDEO OUT
2 134
1
4
A la antena
Divisor
Cable de vídeo
Cable de
antena
Ventilador de
refrigeración
Cable coaxial de RF
Panel trasero
de esta unidad
Cable de audio/vídeo
A una toma de corriente de casa
(CA 220–240 V, 50 Hz)
También puede conectar con el terminal AV2
de esta unidad utilizando el cable Scart de 21
contactos.
Cable
S-Vídeo
Cable de
audio/vídeo
Rojo Blanco Amarillo
Rojo
Blanco
Amarillo
Rojo
Blanco
Amarillo
Rojo
Blanco
Amarillo
Cuando haga esta conexión, asegúrese de
conectar los cables de audio a los terminales
de entrada de audio correspondientes del
televisor.
indica accesorios incluidos.
indica accesorios no incluidos.
son conexiones necesarias. Conecte en el orden numerado.
Panel trasero
del televisor
Panel trasero de la
videograbadora
Terminal S-VIDEO OUT
Los terminales S-VIDEO OUT logran una
imagen más viva que la del terminal VIDEO
OUT. (El resultado real depende del televisor.)
Terminal COMPONENT VIDEO OUT
Estos terminales se pueden utilizar para la salida entrelazada
o progresiva, y pueden proporcionar una imagen más pura
que la del terminal S-VIDEO OUT (
➡
abajo).
≥Conecte a los terminales del mismo color.
Utilice un divisor
si quiere
conectar
también la
antena a su
videograbadora.
Cable de alimentación de CA
Conecte solamente después de
haber finalizado todas las demás
conexiones.
70
7463sp.book Page 8 Tuesday, March 8, 2005 11:12 AM

9
RQT7463
Preparativos
≥Decodificador se refiere aquí al dispositivo utilizado para decodificar emisiones codificadas (Televisión de pago).
≥Cambie los ajustes “Entrada AV2” y “Conector AV2” en el menú SETUP para que concuerden con el equipo conectado (➡página 48)
después de terminar la sintonización (➡página 10, 11).
Para ver imágenes procedentes del decodificador del
televisor mientras la unidad está parada o durante la
grabación
Si conectó el televisor al terminal AV1 y el decodificador al terminal
AV2 de esta unidad, pulse [0]i[ENTER]. (“DVD” aparece en el
visualizador de la unidad.)
Pulse de nuevo para cancelar. (“TV” aparece en el visualizador de
la unidad.)
≥Si el televisor es compatible con la entrada RGB, la señal de
salida RGB procedente del decodificador podrá salir también
desde la unidad principal de la misma forma.
∫ Para disfrutar del sonido ambiental de
múltiples canales de DVD-Vídeo
Conecte un amplificador con decodificadores Dolby Digital, DTS y
MPEG utilizando un cable de audio digital óptico, y cambie los
ajustes en “Salida Audio Digital” (➡página 47) después de
terminar la sintonización (➡página 10, 11).
≥No puede utilizar decodificadores DTS Digital Surround que no
sean adecuados para DVD.
≥Aunque utilice esta conexión, la salida sólo será de 2 canales
cuando se reproduzca DVD-Audio.
∫ Conexión a un amplificador estéreo
Conexión a un receptor de satélite, receptor o decodificador digital
PR
RF IN
RF OUT
COMPONENT
VIDEO OUT
(PROGRESSIVE/
INTERLACE)
PB
Y
AV1 (TV)
AV2 (DECODER/EXT)
AV OUT
Panel trasero del receptor de
satélite, receptor o
decodificador digital
Cable Scart de 21 contactos
Panel
trasero de
esta unidad
Conexión de un amplificador o componente de sistema
R - AUDIO -
R - AUDIO -
OPTICAL
DIGITAL AUDIO OUT
(PCM/BITSTREAM)
AC IN
OPTICAL IN
Cable de audio digital óptico
No doble excesivamente este
cable.
Insértelo a fondo con este lado hacia
arriba.
Panel trasero de esta unidad
Panel trasero del amplificador
R - AUDIO - L
VIDEO
S-VIDEO
R - AUDIO - L
VIDEO
S-VIDEO
OPTICAL
OUT
AV4 IN
DIGITAL AUDIO OUT
(PCM/BITSTREAM)
AUDIO IN
R L
Cable de audio
Rojo Blanco
Rojo Blanco
Panel trasero de esta unidad
Panel trasero del amplificador
No ponga la unidad
encima de
amplificadores u otros
equipos que puedan
calentarse.
El calor puede dañar la unidad.
71
7463sp.book Page 9 Tuesday, March 8, 2005 11:12 AM

10
RQT7463
Preparativos
PASO
2
Ajustes de recepción de canales
Cuando conecte a un televisor que tenga la función Q
Link (➡página 54) con un cable Scart de 21 contactos
todos cableados (➡página 7).
Puede descargar las posiciones de sintonización desde el
televisor.
La función de ajuste automático del reloj de esta unidad sincroniza
la hora cuando se sintoniza el canal de TV que está emitiendo
información de la hora y la fecha.
1 Encienda el televisor y seleccione
una entrada AV apropiada a las
conexiones de esta unidad.
2 Pulse [Í DVD] para encender la
unidad.
Empieza la descarga desde el televisor.
La descarga termina cuando usted ve la imagen en el
televisor.
≥Si aparece en el televisor el menú de ajuste del país, pulse
[3, 4, 2, 1] para seleccionar el país y pulse [ENTER].
Si selecciona “Schweiz”, “Suisse” o “Svizzera” en el ajuste
del país, o cuando la sintonización de su televisor haya sido
ajustada para Suiza, aparecerá el menú de ajuste “Ahorro
de energía”. Seleccione “On” u “Off” (➡página 45).
Para detenerse al rato de empezar
Pulse [RETURN].
∫ Si aparece el menú de ajuste del reloj
Ajuste manualmente el reloj (➡página 51).
∫ Para confirmar que las emisoras hayan sido
sintonizadas correctamente (➡página 49)
∫ Para reiniciar la descarga de presintonías
(➡página 50)
OPEN/CLOSE
REC
/
x
1.3
TIME SLIP
CH
TIME SLIP
DRIVE SELECT
SD PCDVDHDD
SD CARD PC CARD EJECT
HDD DVD
Í/ l
X CH W
VOLUME
CH
DIRECT TV REC
DVD
TV
AV
123
456
78
0
9
MANUAL SKIP
ShowView
CH
CANCEL
INPUT SELECT
SKIP
STOP
PAU SE
PLAY/x1.3
SLOW/SEARCH
FUNCTIONS
ENTER
DIRECT NAVIGATOR
TOP MENU
RETURN
SUB MENU
CREATE
CHAPTER
TIMER
EXT LINK
PROG/CHECK
REC MODEERASE
REC
AUDIO
TIME SLIP
STATUS
DISPLAY
F
A B C
DUBBING
HDD DVD
SD/PC
Í DVD
3,4,2,1
ENTER
RETURN
Descargas de presintonías
(Configuración con funciones Q Link)
Descarga desde TV
Pos 4
Realizando descarga. Por favor, espere.
RETURN: cancelar
RETURN
Country
RETURN: leave ENTER: access
Others
Deutschland
Österreich
Portugal
Suomi
Sverige
Schweiz
Suisse
Svizzera
België
Belgique
Belgien
Danmark
España
France
Italia
Nederland
Norge
ENTER
RETURN
SELECT
72
7463sp.book Page 10 Tuesday, March 8, 2005 11:12 AM

11
RQT7463
Preparativos
≥Cuando conecte a un televisor con el terminal VIDEO
OUT, S-VIDEO OUT o COMPONENT VIDEO OUT
(➡página 8).
≥Cuando conecte a un televisor que no tenga la
función Q Link (➡página 54).
La función Auto-Setup de este aparato sintoniza automáticamente
todas las emisoras de TV disponibles y sincroniza la hora cuando
se sintoniza el canal de TV que emite información de la hora y la
fecha.
1 Encienda el televisor y seleccione
una entrada AV apropiada a las
conexiones de esta unidad.
2 Pulse [Í DVD] para encender la
unidad.
Aparece el menú de ajuste de país.
Si selecciona “Schweiz”, “Suisse” o “Svizzera”, aparece el
menú de ajuste “Ahorro de energía”. Seleccione “On” u “Off”
(➡página 45).
3 Pulse [3, 4, 2, 1] para seleccionar
el país.
4 Pulse [ENTER].
Empieza Auto-Setup. Esto tarda unos 8 minutos.
Auto-Setup termina cuando usted ve la imagen en el
televisor.
Para detenerse al rato de empezar
Pulse [RETURN].
∫ Si aparece el menú de ajuste del reloj
Ajuste manualmente el reloj (➡página 51).
∫ Para confirmar que las emisoras hayan sido
sintonizadas correctamente (➡página 49)
∫ Para reiniciar Auto-Setup (➡página 50)
También puede utilizar el método siguiente para reiniciar Auto-
Setup.
Cuando la unidad está encendida y parada
Mantenga pulsado [X CH] y [CH W] en el aparato principal
hasta que aparezca la pantalla de ajuste del país.
≥Todos los ajustes, a excepción del nivel de calificación, la
contraseña de calificación y los ajustes de la hora pasan a ser los
ajustes de fábrica. Los programas de grabación con
temporizador también se cancelan.
Auto-Setup
(Preparación sin funciones Q Link)
Country
RETURN: leave ENTER: access
Others
Deutschland
Österreich
Portugal
Suomi
Sverige
Schweiz
Suisse
Svizzera
België
Belgique
Belgien
Danmark
España
France
Italia
Nederland
Norge
ENTER
RETURN
SELECT
Auto-Setup
Ch 1
Inicializando. Espere por favor.
RETURN: cancelar
RETURN
73
7463sp.book Page 11 Tuesday, March 8, 2005 11:12 AM

12
RQT7463
Preparativos
PASO 3
Preparación según su televisor y mando a distancia
Elija el ajuste adecuado para su televisor y preferencias.
1 Durante la parada
Pulse [FUNCTIONS].
2 Pulse [3, 4, 2, 1] para seleccionar
“SETUP” y pulse [ENTER].
3 Pulse [3, 4] para seleccionar
“Conexión” y pulse [1].
4 Pulse [3, 4] para seleccionar
“Relación de aspecto TV” y pulse
[ENTER].
5
Pulse [
3
,
4
] para seleccionar el
aspecto del televisor y pulse [ENTER].
≥16:9: Televisor de aspecto panorámico 16:9
≥4:3: Televisor de aspecto 4:3
[HDD] [RAM] Los títulos se graban como aparecen en la
pantalla.
[DVD-V] El vídeo grabado para una pantalla panorámica se
reproduce en el modo Pan & Scan (a menos que
lo prohíba el productor del disco) (➡página 53).
≥Buzón: Televisor de aspecto 4:3
La imagen panorámica se muestra en el estilo de buzón
(➡página 53).
Puede disfrutar de vídeo progresivo conectando los terminales
COMPONENT VIDEO OUT de esta unidad a un televisor con
pantalla LCD/plasma o a un proyector LCD compatible con la
exploración progresiva (➡página 53).
1 Durante la parada
Pulse [FUNCTIONS].
2 Pulse [3, 4, 2, 1] para seleccionar
“SETUP” y pulse [ENTER].
3 Pulse [3, 4] para seleccionar
“Conexión” y pulse [1].
4 Pulse [3, 4] para seleccionar
“Progresivo” y pulse [ENTER].
5 Pulse [3, 4] para seleccionar “On” y
pulse [ENTER].
La salida se convierte en progresiva.
[Nota]
≥Cuando conecte a un televisor convencional (CRT: tubo de rayos
catódicos) o a un televisor multisistema utilizando el modo PAL,
aunque éste sea compatible con vídeo progresivo, la salida
progresiva podrá causar algo de parpadeo. Desactive “Ajuste
gradual” si ocurre esto (➡página 29).
≥No habrá salida de los terminales COMPONENT VIDEO OUT si
“Salida AV1” en el menú SETUP se pone en “RGB ( sin
componentes )”. Ponga este elemento en “Vídeo ( y
componentes )” o “S-Vídeo ( y componentes )” (➡página 48).
≥Si se conecta la unidad al televisor a través del terminal VIDEO
OUT, S-VIDEO OUT o AV1, la salida será entrelazada,
independientemente de los ajustes.
Para salir de la pantalla
Pulse varias veces [RETURN].
Para volver a la pantalla anterior
Pulse [RETURN].
Selección del tipo y aspecto del
televisor
VOLUME
CH
DIRECT TV REC
DVD
TV
AV
123
456
78
0
9
MANUAL SKIP
ShowView
CH
CANCEL
INPUT SELECT
SKIP
STOP
PAU SE
PLAY/x1.3
SLOW/SEARCH
FUNCTIONS
ENTER
DIRECT NAVIGATOR
TOP MENU
RETURN
SUB MENU
CREATE
CHAPTER
TIMER
EXT LINK
PROG/CHECK
REC MODEERASE
REC
AUDIO
TIME SLIP
STATUS
DISPLAY
F
A B C
DUBBING
HDD DVD
SD/PC
3,4,2,1
ENTER
FUNCTIONS
RETURN
Botones
numerados
Botones de
control del
televisor
HDD
DVD SD/PC
Grabación
Copia
Editar
Reproducción
FUNCTIONS
Espacio disponible 68:00 SP
ENTER
RETURN
TIMER RECORDING
DIRECT NAVIGATOR
PLAY LIST
DUBBING
FLEXIBLE REC
DV AUTO REC
Ajuste
SETUP
GESTIÓN DISCO
SETUP
Otros
Disco
Video
Audio
Display
Conexión
Sintonización
Manual
Reiniciar Auto-Setup
Descarga desde TV
TAB
SELECT
RETURN
Para disfrutar de vídeo progresivo
SETUP
Otros
Disco
Video
Audio
Display
Sintonización
Relación de aspecto TV
16:9
ANCHO TV 16:9
TV 4:3
4:3
Buzón
Conexión
SELECT
ENTER
RETURN
74
7463sp.book Page 12 Tuesday, March 8, 2005 11:12 AM

13
RQT7463
Preparativos
Puede configurar los botones de control del televisor en el mando
a distancia para encender/apagar el televisor, cambiar el modo de
entrada del televisor, seleccionar canales de televisión y cambiar
el volumen del televisor.
Apunte el mando a distancia al televisor
Mientras pulsa [Í TV], introduzca el
código con los botones numerados.
Fabricante y número de código
Pruebe encendiendo el televisor y cambiando canales. Repita el
procedimiento hasta que encuentre el código que permita hacer
las operaciones correctas.
≥Si la marca de su televisor no está en la lista, o si el código
listado para su televisor no permite que éste sea controlado, este
mando a distancia no será compatible con su televisor.
Si hay otros productos Panasonic cerca, cambie el código del
mando a distancia en la unidad principal y en el mando a distancia
(los dos deben ser iguales).
Bajo circunstancias normales, utilice el código de fábrica “DVD 1”.
1 Durante la parada
Pulse [FUNCTIONS].
2 Pulse [3, 4, 2, 1] para seleccionar
“SETUP” y pulse [ENTER].
3 Pulse [3, 4] para seleccionar
“Otros” y pulse [1].
4 Pulse [3, 4] para seleccionar
“Mando a distancia” y pulse
[ENTER].
5 Pulse [3, 4] para seleccionar el
código (“DVD 1”, “DVD 2” o “DVD 3”)
y pulse [ENTER].
6 Para cambiar el código en el mando a distancia
Mientras pulsa [ENTER], mantenga
pulsado el botón numerado ([1], [2] o
[3]) durante más de 2 segundos.
7 Pulse [ENTER].
∫ Cuando el indicador siguiente aparece en la
pantalla del aparato
El código de mando a
distancia de la unidad
Cambie el código en el mando a distancia para que concuerde con
el de la unidad (➡paso 6).
[Nota]
Al ejecutar “Reset total” en el menú SETUP, el código del aparato
principal vuelve a “DVD 1”. Cambie el código del mando a
distancia a 1 (➡paso 6).
Funcionamiento de televisores
Ej., 01: [0] ➡ [1]
Marca Código
Panasonic 01, 02, 03, 04, 45
AIWA 35
AKAI 27, 30
BLAUPUNKT 09
BRANDT 10, 15
BUSH 05, 06
CURTIS 31
DESMET 05, 31, 33
DUAL 05, 06
ELEMIS 31
FERGUSON 10
GOLDSTAR/LG 31
GOODMANS 05, 06, 31
GRUNDIG 09
HITACHI 22, 23, 31, 40, 41, 42
INNO HIT 34
IRRADIO 30
ITT 25
JVC 17, 39
LOEWE 07
METZ 28, 31
MITSUBISHI 06, 19, 20
MIVAR 24
NEC 36
NOKIA 25, 26, 27
NORDMENDE 10
ORION 37
PHILIPS 05, 06
PHONOLA 31, 33
PIONEER 38
PYE 05, 06
RADIOLA 05, 06
SABA 10
SALORA 26
SAMSUNG 31, 32, 43
SANSUI 05, 31, 33
SANYO 21
SBR 06
SCHNEIDER 05, 06, 29, 30, 31
SELECO 06, 25
SHARP 18
SIEMENS 09
SINUDYNE 05, 06, 33
SONY 08
TELEFUNKEN 10, 11, 12, 13, 14
THOMSON 10, 15, 44
TOSHIBA 16
WHITE WESTINGHOUSE 05, 06
Cuando otros productos Panasonic
respondan a este mando a distancia
SETUP
Disco
Sintonización
Mando a distancia
Otros
Oprimir juntos “±” y “ENTER” por más
de 2 segundos en el mando a distancia.
75
7463sp.book Page 13 Tuesday, March 8, 2005 11:12 AM

14
RQT7463
Preparativos
Información de HDD, disco y tarjeta
≥
Recomendamos utilizar discos Panasonic. Los DVD-R de otros fabricantes tal vez no puedan grabarse, ni reproducirse según la condición de la grabación.
≥Esta unidad no puede grabar en discos que contienen señales PAL y NTSC. (Sin embargo, ambos tipos de programas se pueden grabar en el
HDD.) La reproducción de discos grabados con PAL y NTSC en otra unidad no está garantizada.
¿Cuál debo utilizar, DVD-RAM o DVD-R?
A continuación se indican las diferencias. Seleccione según sus requerimientos.
[Nota]
Cuando “Grab.ón DVD-R para copia rápida” se ponga en “Sí”, las
restricciones de la grabación de audio secundario, etc., también se
aplicarán al DVD-RAM. Ponga esta opción en “No” si la copia a alta
velocidad en un DVD-R no es necesaria cuando se graba un
programa (➡página 46).
≥Esta unidad reproduce discos CD-R/CD-RW (discos de grabación
de audio) que han sido grabados bajo uno de los estándares
siguientes: CD-DA, MP3 y Vídeo CD. Cierre la sesión o finalice el
disco después de grabar.
La reproducción tal vez sea imposible con algunos discos CD-R o
CD-RW debido a la condición de la grabación.
≥El productor del material puede controlar cómo se van a reproducir
los discos. Así que tal vez no pueda controlar siempre la
reproducción como se describe en estas instrucciones de manejo.
Le cuidadosamente las instrucciones del disco.
HDD y discos que usted puede utilizar para grabar y reproducir
Tipo Logotipo Instrucciones
Unidad de disco duro
(HDD)
≥160 GB
Indicada en estas
instrucciones con [HDD]
—
Almacenamiento temporal
≥Puede grabar hasta 284 horas [en el modo EP ( 8horas )] (➡página 17, Modos de grabación y
tiempos de grabación aproximados).
≥Puede ver desde el principio el título que está siendo grabado (Reproducción de persecución, Time
Slip) (➡página 17).
≥
Puede grabar emisiones digitales que permitan la “grabación de una sola vez”. Puede copiar títulos grabados en
un DVD-RAM compatible con CPRM, sin embargo, el título se borrará del HDD (
➡
página 53).
≥Puede reproducir y copiar imágenes fijas tomadas en una cámara digital, etc. (➡página 26, 40).
DVD-RAM
≥4,7 GB/9,4 GB, 12 cm
≥2,8 GB, 8 cm
[RAM]
Discos reescribibles para usos de seguridad
≥Puede grabar hasta 16 horas [EP ( 8horas ) en discos de dos caras. No puede grabar continuamente
en dos caras.] (➡página 17, Modos de grabación y tiempos de grabación aproximados).
≥Puede ver desde el principio el título que está siendo grabado (Reproducción de persecución, Time
Slip) (➡página 17).
≥Discos en cartuchos resistentes a las rayaduras y al polvo y discos de dos caras de gran capacidad
(9,4 GB) de venta en el comercio.
≥Cuando utilice discos compatibles con CPRM (Content Protection for Recordable Media) podrá
grabar emisiones digitales que permitan la “grabación de una sola vez” (➡página 53). No puede
copiar un título grabado.
≥Esta unidad es compatible con discos de velocidad de grabación de 1k–3k.
≥Utilizando un disco compatible con la grabación a alta velocidad puede copiar a una velocidad 24k
veces superior a la normal (➡página 35).
≥Puede reproducir y copiar imágenes fijas tomadas en una cámara digital, etc. (➡página 26, 40).
DVD-R
≥4,7 GB, 12 cm
≥1,4 GB, 8 cm
[DVD-R]
Discos de una sola grabación para usos de seguridad (grabables hasta que se
llena el disco)
≥Puede grabar hasta 8 horas [en el modo EP ( 8horas )]. (➡página 17, Modos de grabación y tiempos
de grabación aproximados)
≥Finalizando el disco, usted puede reproducirlo en un reproductor DVD como si fuera DVD-Vídeo
(reproducción solamente) (➡página 43, 53).
≥No puede grabar emisiones digitales que permitan la “grabación de una sola vez”.
≥Esta unidad es compatible con discos de velocidad de grabación de 1k–4k.
≥Utilizando un disco compatible con la grabación a alta velocidad puede copiar a una velocidad 32k
veces superior a la normal (➡página 35).
(Y: Posible, t: Imposible) DVD-RAM DVD-R
Reescribible Yt
Edición Y§1
Reproducción en otros reproductores
Y
§2
Y
§3
Grabación de M 1 y M 2 de emisiones
bilingües
Y
t
§4
Grabación de emisiones que permiten
una copia
Y
§5
t
Grabaciones de imágenes de aspecto 16:9
Y§6
§ 1 Puede borrar, introducir nombres y cambiar imágenes
miniatura. El espacio disponible no aumenta tras el borrado.
§ 2 Sólo en reproductores compatibles con DVD-RAM.
§ 3 Después de finalizar el disco (➡página 43, 53).
§ 4 Sólo se graba uno (➡página 47, Selec. Audio Dual).
§ 5 Disco compatible con CPRM (➡página 53) solamente.
§ 6 La imagen se graba con aspecto 4:3.
Discos de reproducción solamente
(12 cm/8 cm)
Tipo de
disco
Logotipo Instrucciones
DVD-Audio
[DVD-A]
Disco de música de alta fidelidad
≥
Reproducidos en esta unidad en 2 canales.
DVD-Vídeo
[DVD-V]
Discos de películas y música de
alta calidad
Vídeo CD
[VCD]
Música y vídeo grabados
(incluyendo CD-R/RW)
Audio CD
[CD]
Música y audio grabados
(incluyendo CD-R/RW)
—
CD-R y CD-RW con música
grabada en MP3 (➡página 25)
Discos que no pueden reproducirse
≥DVD-RAM de 2,6 y 5,2 GB, 12 cm
≥3,95 y 4,7 GB DVD-R for Authoring
≥DVD-R sin finalizar grabado en otro equipo (➡página 53,
Finalización)
≥DVD-Vídeo con un número de región que no sea el “2” o que no
tenga la palabra “ALL”
≥DVD-ROM ≥DVD-RW ≥iR ≥iRW
≥CD-ROM ≥CDV ≥CD-G ≥Photo CD
≥CVD ≥SVCD ≥SACD ≥MV-Disc
≥PD ≥Divx Video Disc, etc.
76
7463sp.book Page 14 Tuesday, March 8, 2005 11:12 AM

15
RQT7463
Preparativos
≥Puede utilizar tarjetas de memoria SD con la capacidades siguientes (de 8 MB a 1 GB).
Confirme la información más reciente en el sitio Web siguiente.
http://panasonic.co.jp/pavc/global/cs
(En este sitio sólo se utiliza el idioma inglés.)
≥Si la tarjeta de memoria SD se formatea en otro equipo, el tiempo para grabar tal vez aumente. Además, si la tarjeta de memoria SD se
formatea en un PC, es posible que no pueda utilizarla en esta unidad. En estos casos, formatee la tarjeta en esta unidad (➡página 43, 53).
≥Esta unidad soporta las tarjetas de memoria SD formateadas con el sistema FAT12 y el sistema FAT16 tomando como base las
especificaciones de las tarjetas de memoria SD.
≥Le recomendamos utilizar una tarjeta SD de Panasonic.
Cuando utilice los discos grabados con PAL o NTSC, o reproduzca un
título grabado en HDD utilizando PAL o NTSC, consulte esta tabla.
(Y: Posible, t: Imposible)
§1
Si selecciona “NTSC” en “Sistema TV” (➡página 50), la imagen
podrá ser más clara.
§2
Seleccione “NTSC” en “Sistema TV” (➡página 50).
§3
Si su televisor no está equipado para manipular señales PAL
525/60, la imagen no se mostrará correctamente.
≥Cuando reproduzca un título grabado en el HDD, asegúrese de
que el ajuste “Sistema TV” concuerde con el título (➡página 50).
Tarjetas que se pueden utilizar en esta unidad
Tipo Instrucciones
Tarjeta de memoria SD
MultiMediaCard
Puede insertarla
directamente en la
ranura de tarjeta SD.
[SD]
≥
Puede reproducir y copiar imágenes fijas tomadas en una cámara digital, etc. (
➡
página 26, 40).
≥Puede establecer el DPOF (Digital Print Order Format) para imprimir automáticamente en la
impresora de su casa o en una tienda de revelado fotográfico (➡página 34, 53).
≥Compatible con: FAT 12 o FAT 16
≥Recomendamos utilizar una tarjeta SD Panasonic.
≥No puede utilizar tarjetas SD de más de 2 GB.
≥Le recomendamos utilizar esta unidad para formatear una tarjeta antes de grabar
(➡página 43, 53).
≥Tal vez no pueda utilizar la tarjeta si la formatea en un ordenador.
§
Contenido guardado en un medio SD (SV-PT1).
Sólo puede reproducir las imágenes fijas grabadas y copiar los datos en otras tarjetas, HDD
o DVD-RAM.
Tarjeta de memoria SD
MultiMediaCard
CompactFlash
SmartMedia
M
EMORYSTICK
xD-Picture Card
Microdrive
Puede introducirla en
la ranura de tarjeta PC
utilizando un
adaptador (adaptador
de tarjeta PC TIPO
II
).
[PC]
Tarjeta PC ATA Flash
Disco duro móvil
§
Puede insertarla
directamente en la
ranura de tarjeta PC.
[PC]
Tarjetas de memoria SD apropiadas
8 MB, 16 MB, 32 MB, 64 MB
128 MB, 256 MB, 512 MB, 1 GB (Máximo)
Estructura de las carpetas visualizadas por esta unidad
La siguiente se puede visualizar en este aparato.
¢¢¢: Números XXX: Letras
§
Se pueden crear carpetas en otro equipo. Sin embargo, estas carpetas no se pueden seleccionar como destino de copias.
≥La carpeta no se puede visualizar si los números son todos “0” (ej., DCIM000, etc.).
≥Si un nombre de carpeta o nombre de archivo ha sido introducido utilizando otro equipo, el nombre puede que no sea visualizado
correctamente o usted tal vez no pueda reproducir o editar los datos.
XXXX
¢¢¢¢
.JPG
XXXX
¢¢¢¢
.TIF
DCIM
¢¢¢XXXXX
XXXX
¢¢¢¢
.JPG
XXXX
¢¢¢¢
.TIF
§
Tarjeta
(Carpeta alta)
IM¢¢CDPF o IMEXPORT
DCIM¢¢¢
JPEG
XXXX
¢¢¢¢
.JPG
XXXX
¢¢¢¢
.TIF
¢¢¢XXXXX
DCIM
XXXX
¢¢¢¢
.JPG
XXXX
¢¢¢¢
.TIF
§
¢¢¢XXXXX
DVD-RAM
(Carpeta alta)
Tipos de discos o títulos grabados en
HDD para el tipo de televisor conectado
Tipo de televisor
Disco/Título
grabado en HDD
Sí/No
Televisor
multisistema
PA L Y
NTSC
Y
§1
Televisor NTSC
PA L t
NTSC
Y
§2
Televisor PAL
PA L Y
NTSC
Y
§3
(PAL60)
Discos accesorios
DVD-RAM
9,4 GB, dos caras, cartucho tipo 4:
4,7 GB, una cara, cartucho tipo 2:
4,7 GB, una cara, sin cartucho:
LM-AD240LE
LM-AB120LE
LM-AF120LE
DVD-R
4,7 GB, una cara, sin cartucho: LM-RF120LE
77
7463sp.book Page 15 Tuesday, March 8, 2005 11:12 AM

16
RQT7463
Grabación
Grabación de programas de televisión
[HDD] [RAM] [DVD-R]
≥No se puede grabar simultáneamente en la HDD (unidad de disco
duro) y en el DVD.
≥Puede grabar hasta 500 títulos en una HDD y 99 títulos en un
disco.
≥
No es posible grabar continuamente desde una cara a la otra en un
disco de dos caras. Tendrá que expulsar el disco y darlo la vuelta.
≥Cuando utilice un DVD-RAM de 8 cm, retire el disco del cartucho.
≥No es posible grabar material protegido CPRM (➡página 53) en
discos DVD-R o DVD-RAM de 2,8 GB.
≥No es posible grabar en una tarjeta.
1 Pulse [HDD] o [DVD] para seleccionar
la unidad de grabación.
El indicador HDD o DVD se enciende en la unidad.
2 Si seleccionó la unidad DVD
Pulse [< OPEN/CLOSE] en la unidad
principal para abrir la bandeja e
insertar un disco.
≥Pulse de nuevo el botón para cerrar la bandeja.
3 Pulse [WXCH] para seleccionar el
canal.
Para seleccionar con los botones numerados:
4 Pulse [REC MODE] para seleccionar el
modo de grabación (XP, SP, LP o EP).
≥Para grabar sonido utilizando LPCM (modo XP solamente):
Ponga “Audio Mode para XP Recording” en “LPCM” en el
menú SETUP (➡página 47).
5 Pulse [¥ REC] para empezar a grabar.
La grabación se hará en el espacio vacío de la HDD o del
disco. Los datos no se escribirán encima de otros.
≥Durante la grabación no se puede cambiar el canal ni el
modo de grabación.
≥[HDD] [RAM] Puede cambiar el audio que está siendo recibido
pulsando para ello [AUDIO] durante la grabación. (No afecta
a la grabación de audio.)
∫ Para detener la grabación
Pulse [∫].
La sección desde que empieza hasta que termina la grabación es
un título.
[HDD]
Cuando la grabación continúa durante mucho tiempo, los títulos se
dividen cada 8 horas.
[DVD-R]
La unidad tarda unos 30 segundos en completar la grabación de la
información de administración después de finalizar la grabación.
∫ Para hacer una pausa en la grabación
Pulse [;].
Pulse de nuevo para reiniciar la grabación.
(El título no se divide en títulos separados.)
Cuando copie en el modo de alta velocidad en un DVD-R
después de haber grabado en la HDD.
Cuando copie un título utilizando el modo de alta velocidad en un
DVD-R, ponga “Grab.ón DVD-R para copia rápida” en “Sí” antes
de grabar en la HDD (➡ página 46).
Sin embargo, existen las restricciones siguientes.
≥Cuando se graban emisiones bilingües, sólo se graba el audio
seleccionado en “Selec. Audio Dual” (➡página 47) (“M 1” o
“M 2”).
≥Hasta los programas de aspecto 16:9 (pantalla panorámica) se
graban con el aspecto 4:3.
≥Aunque “Resolución Hybrid VBR” se ponga en “Automático”,
éste cambia automáticamente a “Fijo”, y el ajuste “Automático”
no funciona (➡página 46).
Cuando se graba en un DVD-R
≥Cuando se graban emisiones bilingües, sólo se graba el audio
seleccionado en “Selec. Audio Dual” (➡página 47) (“M 1” o
“M 2”).
≥Para reproducir un DVD-R grabado utilizando esta unidad u
otra fuente de reproducción, el disco deberá estar
finalizado (➡página 43).
OPEN/CLOSE
REC
/
x
1.3
TIME SLIP
CH
TIME SLIP
DRIVE SELECT
SD PCDVDHDD
SD CARD PC CARD EJECT
HDD DVD
215
TIME SLIP
3
∫1
VOLUME
CH
DIRECT TV REC
DVD
TV
AV
123
456
78
0
9
MANUAL SKIP
ShowView
CH
CANCEL
INPUT SELECT
SKIP
STOP
PAU SE
PLAY/x1.3
SLOW/SEARCH
FUNCTIONS
ENTER
DIRECT NAVIGATOR
TOP MENU
RETURN
SUB MENU
CREATE
CHAPTER
TIMER
EXT LINK
PROG/CHECK
REC MODEERASE
REC
AUDIO
TIME SLIP
STATUS
DISPLAY
F
A B C
DUBBING
HDD DVD
SD/PC
3,4,2,1
ENTER
¥ DIRECT
TV REC
INPUT SELECT
STATUS
DIRECT
NAVIGATOR
F TIMER
∫
;
1
FUNCTIONS
RETURN
TIME SLIP
AUDIO
5
3
1
4
Indicador HDD, DVD
Botones
numerados
Indicador de Time Slip
Ej., 5: [0] ➡ [5]
15: [1] ➡ [5]
Insértelo con la flecha hacia adentro.
Inserte completamente hasta
que haga un ruido seco.
Insértelo con la cara
impresa hacia arriba.
HDD
EXT
Link
SD PC
XPXPXP
SP
LPLP
LP
EPEPEP
REC
PLAY
HDD
EXT
Link
SD PC
XP
SP
LP
EP
REC
PLAY
Tiempo restante del disco
HDD
EXTEXT
LinkLink
XP
SPSP
SP
LPLP
EPEP
REC
PLAYPLAY PLA
78
7463sp.book Page 16 Tuesday, March 8, 2005 11:12 AM

17
RQT7463
Grabación
∫ Para especificar un tiempo y detener la
grabación—Grabación de un toque
Durante la grabación
Pulse [¥ REC] en la unidad principal para seleccionar el
tiempo de grabación.
Cada vez que usted pulsa el botón:
≥Esto no funciona durante las grabaciones con temporizador
(➡página 19) ni mientras se utiliza la grabación flexible
(➡página 18).
Para detener la grabación al rato de empezar
Pulse [∫].
Si una emisora emite información de teletexto
La unidad graba automáticamente los nombres de los programas y
las emisoras si Guía TV de la emisora está puesto correctamente
(➡página 49).
[Nota]
La unidad puede tardar un poco en recuperar los títulos (hasta
30 minutos) y en algunos casos puede que no pueda recuperarlos.
Dependiendo del contenido que está siendo grabado, los tiempos
de grabación pueden ser inferiores a los indicados.
(Unidad: hora)
§
Cuando “Tiempo grabación en modo EP” se pone en
“EP ( 6horas )” en el menú SETUP.
La calidad del sonido es mejor cuando se utiliza “EP ( 6horas )”
que cuando se utiliza “EP ( 8horas )”.
[Nota]
Cuando grabe en un DVD-RAM utilizando el modo “EP ( 8horas )”,
puede que no sea posible reproducir ese disco en reproductores
DVD compatibles con DVD-RAM. En este caso, utilice el modo
“EP ( 6horas )”.
FR (Modo de grabación flexible)
La unidad selecciona automáticamente una velocidad de grabación
entre XP y EP ( 8horas ) que permitirá que las grabaciones quepan
en el espacio restante del disco con la mejor calidad de grabación
posible.
≥Puede hacer el ajuste cuando grabe o programe grabaciones con
temporizador.
≥Cuando se graba en la HDD, la calidad de la imagen se ajusta
automáticamente para que quepa exactamente un título copiado
en un disco de 4,7 GB.
≥Todos los modos de grabación, desde XP a EP,
aparecen en el visualizador.
Puede cambiar la unidad y reproducir mientras graba en este
aparato. Además, mientras graba en la HDD o en un DVD-RAM,
puede ver desde el principio el título que está siendo grabado, y
también reproducir un título grabado.
[HDD] [RAM]
Pulse [1](PLAY).
El indicador de Time Slip de la unidad principal se enciende.
1 Pulse [DIRECT NAVIGATOR].
2 Pulse [3, 4, 2, 1] para seleccionar
un título y pulse [ENTER].
El indicador de Time Slip de la unidad principal se enciende.
Para salir de la pantalla DIRECT NAVIGATOR
Pulse [DIRECT NAVIGATOR].
1 Pulse [TIME SLIP].
El indicador de Time Slip de la unidad principal se enciende.
≥Oirá la reproducción de audio.
2 Pulse [3, 4] para seleccionar el
tiempo y pulse [ENTER].
≥Pulse [TIME SLIP] para mostrar las imágenes de
reproducción completas. Pulse de nuevo para mostrar las
imágenes de reproducción y grabación.
∫ Para detener la reproducción
Pulse [∫].
∫ Para detener la grabación
2 segundos después de parar la reproducción.
Pulse [∫].
∫ Para detener la grabación con temporizador
Pulse [F TIMER].
≥Para detener la grabación también puede mantener pulsado [∫] en
la unidad principal durante más de 3 segundos.
[Nota]
La reproducción de persecución sólo se puede utilizar con
programas del mismo sistema de codificación (PAL/NTSC).
30 (m) ""# 60 (m) ""# 90 (m) ""# 120 (m)
^" Contador (cancelar) ,"" 240 (m) ,"" 180 (m) ,}
Modos de grabación y tiempos de
grabación aproximados
Modo
HDD
(160 GB)
DVD-RAM
DVD-R
(4,7 GB)
Una cara
(4,7 GB)
Dos
caras
(9,4 GB)
XP (Alta calidad) 36121
SP (Normal) 70242
LP (Larga
duración)
138 4 8 4
EP (Duración
extralarga)
284
(212
§
)
8 (6
§
) 16 (12
§
)8 (6
§
)
EP (6 horas)
§
EP (8 horas)
LP
SP
XP
Tiempo de grabación
Calidad de imagen
XP
SP
LP
EP
Reproducción mientras usted está
grabando
Reproducción desde el comienzo del título mientras
está grabando—Reproducción de persecución
Reproducción de un título previamente grabado
mientras graba—Grabación y reproducción
simultáneas
Revisión de las imágenes grabadas mientras se
graba—Time Slip
0 min
PLAY
REC
La reproducción empieza
desde 30 segundos
antes.
La imagen que está
siendo grabada
79
7463sp.book Page 17 Tuesday, March 8, 2005 11:12 AM

18
RQT7463
Grabación
Grabación de programas de televisión
Consulte la referencia de controles en página 16.
[HDD] [RAM] [DVD-R]
La unidad establece la mejor calidad de imagen posible para la
grabación que se va a hacer en el espacio de disco disponible. El
modo de grabación se convierte en el modo FR.
Ej.,
Preparación
Seleccione el canal que va a grabar.
1 Durante la parada
Pulse [FUNCTIONS].
2 Pulse [3, 4, 2, 1] para seleccionar
“FLEXIBLE REC” y pulse [ENTER].
3 Pulse [2, 1] para seleccionar “H” y
“Min.” y pulse [3, 4] para ajustar el
tiempo de grabación.
≥No puede grabar más de 8 horas.
≥También puede poner el tiempo de grabación con los
botones numerados.
4 Cuando quiera iniciar la grabación
Pulse [3, 4, 2, 1] para seleccionar
“Empezar” y pulse [ENTER].
Empieza la grabación.
Para salir de la pantalla sin grabar
Pulse [RETURN].
Para detener la grabación al rato de empezar
Pulse [∫].
Para mostrar el tiempo restante
Pulse [STATUS].
Cuando conecte a un televisor que tenga la función Q
Link utilizando un cable Scart de 21 contactos todos
cableados.
Esta función le permite iniciar inmediatamente la grabación del
programa que está viendo en el televisor.
1 Pulse [HDD] o [DVD] para seleccionar
la unidad de grabación.
El indicador HDD o DVD se enciende en la unidad.
2 Si seleccionó la unidad DVD
Inserte un disco. (➡página 16)
3 Pulse [¥ DIRECT TV REC].
Empieza la grabación.
Para detener la grabación
Pulse [∫].
Preparación
≥Conecte un receptor de satélite/digital o un decodificador a los
terminales de entrada de esta unidad (➡página 9).
≥Cuando grabe programas bilingües
[HDD] [RAM]
Cuando se seleccionen M 1 y M 2 en el equipo conectado, usted
podrá seleccionar el tipo de audio en la reproducción.
[DVD-R]
Seleccione M 1 o M 2 en el equipo conectado. (No puede
seleccionar el tipo de audio en la reproducción.)
≥Cuando la señal de salida procedente del equipo externo sea
NTSC, cambie “Sistema TV” a “NTSC” en el menú SETUP
(➡página 50).
≥Pulse [HDD] o [DVD] para seleccionar la unidad de grabación.
1 Durante la parada
Pulse [INPUT SELECT] para
seleccionar el canal de entrada para el
equipo que usted ha conectado.
Ej., Si usted ha hecho la conexión a los terminales de
entrada AV2, seleccione “AV2”.
2 Pulse [REC MODE] para seleccionar el
modo de grabación.
3 Seleccione el canal en el otro equipo.
4 Pulse [¥ REC].
Empieza la grabación.
Para saltar partes que no desee
Pulse [;] para hacer una pausa en la grabación. (Pulse de nuevo
para reiniciar la grabación.)
Para detener la grabación
Pulse [∫].
Grabación flexible
Restante
45 minutos en
el modo SP
60 minutos
Grabado
Ajuste perfecto!
Velocidad de grabación
entre SP y LP
Programa que se va a grabar
FLEXIBLE REC
Empezar Cancelar
Grabación en modo FR
Ajustar REC TIME
3 H 00 Min.
REC TIME máximo
3 H 00 Min.
SELECT
RETURN
ARD
L R
DVD-RAM
REC 59
Tiempo
restante
Grabación directa del televisor
Grabación de señales procedentes del
receptor de satélite/digital o
decodificador
80
7463sp.book Page 18 Tuesday, March 8, 2005 11:12 AM

19
RQT7463
Grabación
Grabación con temporizador
[HDD] [RAM] [DVD-R]
Puede introducir hasta 32 programas con un mes de antelación.
Introducir los números S
HOWVIEW ayuda a facilitar la grabación con
temporizador. Puede encontrar estos números en los programas de
TV de periódicos y revistas.
1 Pulse [ShowView].
2 Pulse los botones numerados para
introducir el número SHOWVIEW.
Pulse [2] para retroceder y corregir un dígito.
3 Pulse [ENTER].
≥Confirme el programa y haga las correcciones que puedan
ser necesarias utilizando [3, 4, 2, 1] (➡página 20,
paso 3)
≥Cuando aparezca “-- ---” en la columna “Canal” no podrá
ajustar la grabación con temporizador. Pulse [3, 4] para
seleccionar la posición de programa deseada. Después de
introducir la información de una emisora de TV, ésta se
mantiene en la memoria de la unidad.
≥También puede pulsar [REC MODE] para cambiar el modo
de grabación.
≥VPS/PDC (➡derecha)
ON!)OFF (– – –)
≥También puede pulsar [HDD] o [DVD] para seleccionar la
unidad de grabación.
Cuando la unidad de grabación sea “DVD” y no haya
suficiente espacio restante, la grabación cambiará
automáticamente a la “HDD” (➡derecha, Grabación con
relevo).
≥RENEW (Grabación con renovación automática) [HDD]
(➡página 20)
ON!)OFF
≥Nombre progr.
Pulse [2, 1] para seleccionar “Nombre progr.” y pulse
[ENTER] (➡página 44).
4 Pulse [ENTER].
Los ajustes se guardan.
Repita los pasos 1–4 para programar otras grabaciones.
5 Pulse [F TIMER].
“F” se enciende en el visualizador de la unidad para indicar
que la espera de grabación con temporizador ha sido
activada.
≥Aparece la pantalla de
mensajes. Mientras la
grabación con
temporizador está en espera sólo se puede hacer la
reproducción (➡página 22, 23). (No puede reproducir un
título grabado utilizando un sistema de codificación diferente
del sistema de TV que se encuentra actualmente
seleccionado en la unidad.)
≥La unidad no está apagada. Para ahorrar energía, apague la
unidad pulsando [Í DVD].
Utilización del número SHOWVIEW para
hacer grabaciones con temporizador
VOLUME
CH
DIRECT TV REC
DVD
TV
AV
123
456
78
0
9
MANUAL SKIP
ShowView
CH
CANCEL
INPUT SELECT
SKIP
STOP
PAU SE
PLAY/x1.3
SLOW/SEARCH
FUNCTIONS
ENTER
DIRECT NAVIGATOR
TOP MENU
RETURN
SUB MENU
CREATE
CHAPTER
TIMER
EXT LINK
PROG/CHECK
REC MODEERASE
REC
AUDIO
TIME SLIP
STATUS
DISPLAY
F
A B C
DUBBING
HDD DVD
SD/PC
3,4,2,1
ENTER
F TIMER
PROG/CHECK
EXT LINK
REC MODE
ShowView
HDD, DVD
¢ CANCEL
Í DVD
Botones
numerados
ShowView
1:58 SP
DVD
30:24 SP
Espacio HDD
12:53:00 15. 7. Mar
Entre el ShowView mediante el teclado 0-9.
TIMER
RECORDING
12:54:00 15. 7. Mar
Nombre progr.
ModeStopStart
Canal Fecha
VPS
PDC
HDD
DVD
20:0019:0015/ 7 Mar SP
OFF HDD
1 ARD
1:58 SP
DVD
30:24 SP
Espacio HDD
∫ Para cancelar el modo de espera de
grabación
Pulse [F TIMER].
“F” se apaga.
≥Asegúrese de pulsar [F TIMER] antes de la hora de inicio del
programa para poner la unidad en espera de grabación. La
grabación con temporizador sólo funcionará si se visualiza “F”.
∫ Para cancelar la grabación cuando ésta ya ha
empezado
Pulse [F TIMER].
≥Para detener la grabación también puede mantener pulsado
[∫] en la unidad principal durante más de 3 segundos.
[Nota]
≥Las grabaciones con temporizador se activan
independientemente de si la unidad está encendida/apagada.
≥Las grabaciones con temporizador empiezan cuando se llega a
la hora establecida, incluso cuando está realizándose la
reproducción.
≥Las grabaciones con temporizador no empiezan cuando se
edita o se copia en el modo de velocidad normal (➡página 35).
≥“F” parpadea durante unos 5 segundos cuando la unidad no
se puede poner en el modo de espera de grabación con
temporizador.
≥Si la unidad no se pone en el modo de espera de grabación con
temporizador 10 minutos antes, como mínimo, de la hora de
inicio de la grabación con temporizador programada, “F”
parpadeará en el visualizador de la unidad. En este caso, pulse
[F TIMER] para poner la unidad en el modo de espera de
grabación con temporizador.
≥Cuando programa grabaciones con temporizador sucesivas
para que empiecen inmediatamente una tras otra, la unidad no
puede grabar el comienzo de los programas posteriores (unos
segundos cuando se graba con HDD o DVD-RAM y
30 segundos aproximadamente cuando se graba con DVD-R).
∫ función VPS/PDC (➡página 54)
Siempre que una emisora de TV emita una señal VPS/PDC,
aunque cambie la hora de emisión del programa, la hora de
grabación cambiará automáticamente para coincidir con la nueva
hora de emisión.
Para activar la función VPS/PDC
En el paso 3 de la columna VPS/PDC, pulse [3, 4] para
seleccionar “ON”.
∫ Grabación con relevo
Cuando la unidad de grabación se ponga en “DVD” para la
grabación con temporizador, y si el programa no cabe en el
disco, la unidad de grabación cambiará automáticamente a
“HDD”.
≥Si no hay un disco en la bandeja o el disco no puede grabarse,
o cuando la grabación con temporizador empieza durante la
copia, la unidad de grabación cambiará a HDD.
≥El Direct Navigator muestra qué programas fueron grabados
con relevo (se visualiza “ ”). (➡página 22).
≥Si el tiempo restante en la HDD no es suficiente, en la HDD se
grabará tanto del programa como sea posible.
≥La grabación con relevo no se activa cuando se graba el
programa con VPS/PDC y éste se extiende de forma que no
cabe más en el disco.
SP
OK
20:0019:00ARD 15/ 7 Mar01
Mode
Disc
space
StopStart
N˚
Canal Fecha
TIMER
RECORDING
12:55:00 15. 7. Mar
Nuevo programa
OFF
VPS
PDC
HDD
DVD
1:58 SP
DVD
30:24 SP
Espacio HDD
Asegúrese de que se
visualiza “OK”
(➡página 21).
Está en espera de la temporizada. Es posible reproducir.
81
7463sp.book Page 19 Tuesday, March 8, 2005 11:12 AM

20
RQT7463
Grabación
Grabación con temporizador
Consulte la referencia de controles en página 19.
[HDD] [RAM] [DVD-R]
Puede introducir hasta 32 programas con un mes de antelación.
(Cada programa diario o semanal se cuenta como un programa.)
1 Pulse [PROG/CHECK].
2 Pulse [3, 4] para seleccionar “Nuevo
programa” y pulse [ENTER].
3 Pulse [1] para moverse por los
elementos y cambiarlos con [3, 4].
≥Mantenga pulsado [3, 4] para cambiar Start (hora de
inicio) y Stop (hora de finalización) en incrementos de
30 minutos.
≥También puede poner Canal (posición de programa/nombre
de emisora de TV), Fecha, Start (hora de inicio) y Stop (hora
de finalización) con los botones numerados.
≥También puede pulsar [REC MODE] para cambiar el modo
de grabación.
≥Fecha
≥VPS/PDC (➡página 19)
ON!)OFF (– – –)
≥También puede pulsar [HDD] o [DVD] para seleccionar la
unidad de grabación.
Cuando la unidad de grabación sea “DVD” y no haya
suficiente espacio restante, la grabación cambiará
automáticamente a la “HDD” (➡página 19, Grabación con
relevo).
≥RENEW (Grabación con renovación automática) [HDD]
(➡derecha)
ON!)OFF
≥Nombre progr. (➡página 44)
Pulse [2, 1] para seleccionar “Nombre progr.” y pulse
[ENTER].
4 Pulse [ENTER].
Repita los pasos 2–4 para programar otras grabaciones.
5 Pulse [F TIMER].
“
F
” se enciende en el visualizador de la unidad para indicar
que la espera de grabación con temporizador ha sido activada.
≥
Aparece la pantalla de
mensajes. Mientras la
grabación con temporizador
está en espera sólo se puede hacer la reproducción
(
➡
página 22, 23). (No puede reproducir un título grabado
utilizando un sistema de codificación diferente del sistema de
TV que se encuentra actualmente seleccionado en la unidad.)
≥La unidad no está apagada. Para ahorrar energía, apague la
unidad pulsando [Í DVD].
[HDD]
Si usted graba repetidamente un programa en la HDD todos los días
o todas las semanas utilizando la grabación con temporizador, la
unidad grabará el programa nuevo sobre el viejo.
Esta función se puede utilizar sólo cuando se selecciona la
grabación semanal o diaria.
1 Pulse [PROG/CHECK].
2 Pulse [3, 4] para seleccionar el
programa y pulse [ENTER].
3 Pulse [2, 1] para seleccionar la
columna “RENEW”.
4 Pulse [3, 4] para seleccionar “ON” y
pulse [ENTER].
[Nota]
≥Si un programa para la grabación con renovación automática está
protegido, mientras se realiza la reproducción desde la HDD, o
durante la copia, el programa no será borrado escribiendo otro
encima. El programa para grabar se guardará como un programa
separado, y luego se grabará sobre él cuando se realice la
próxima grabación con renovación automática.
≥Las listas de reproducción hechas desde programas que fueron
establecidos para la grabación con renovación automática se
borran junto con la renovación automática.
≥Cuando no queda suficiente espacio en la HDD, el programa no
puede grabarse completamente.
Programación manual de grabaciones
con temporizador
[.
l
l
l
l
{.
Fecha: Fecha actual hasta un mes después
menos un día;:
Temporizador
diario:
Dom-Sáb>Lun-Sáb>Lun-Vie
;:
Temporizador
semanal:
Los dom>--->Los sáb
Nuevo programa
SELECT
ENTER
RETURN
Pulse ENTER para entrar un
nuevo programa.
Mode
Disc
space
StopStart
N˚
Canal Fecha
TIMER
RECORDING
12:56:00 15. 7. Mar
VPS
PDC
HDD
DVD
1:58 SP
DVD
30:24 SP
Espacio HDD
SP
OK
20:0019:00ARD 15/ 7 Mar01
OFF
TIMER
RECORDING
12:57:00 15. 7. Mar
Nombre progr.
ModeStopStart
Canal Fecha
VPS
PDC
HDD
DVD
22:3022:0015/ 7 Mar
OFF HDD
1 ARD
1:58 SP
DVD
30:24 SP
Espacio HDD
SP
Mode
Disc
space
StopStart
N˚
Canal Fecha
TIMER
RECORDING
12:58:00 15. 7. Mar
Nuevo programa
VPS
PDC
HDD
DVD
1:58 SP
DVD
30:24 SP
Espacio HDD
SP
OK
20:0019:00ARD 15/ 7 Mar01
OFF
SP
OK
22:3022:00ARD 15/ 7 Mar02
OFF
Asegúrese de que se
visualiza “OK”
(➡página 21).
Está en espera de la temporizada. Es posible reproducir.
∫ Para cancelar el modo de espera de
grabación
Pulse [F TIMER].
“F” se apaga.
≥Asegúrese de pulsar [F TIMER] antes de la hora de inicio del
programa para poner la unidad en espera de grabación. La
grabación con temporizador sólo funcionará si se visualiza “F”.
∫ Para cancelar la grabación cuando ésta ya ha
empezado
Pulse [F TIMER].
≥Para detener la grabación también puede mantener pulsado
[∫] en la unidad principal durante más de 3 segundos.
[Nota]
≥Las grabaciones con temporizador se activan
independientemente de si la unidad está encendida/apagada.
≥Las grabaciones con temporizador empiezan cuando se llega a
la hora establecida, incluso cuando está realizándose la
reproducción.
≥Las grabaciones con temporizador no empiezan cuando se
edita o se copia en el modo de velocidad normal (➡página 35).
≥“F” parpadea durante unos 5 segundos cuando la unidad no
se puede poner en el modo de espera de grabación con
temporizador.
≥Si la unidad no se pone en el modo de espera de grabación con
temporizador 10 minutos antes, como mínimo, de la hora de
inicio de la grabación con temporizador programada, “F”
parpadeará en el visualizador de la unidad. En este caso, pulse
[F TIMER] para poner la unidad en el modo de espera de
grabación con temporizador.
≥Cuando programa grabaciones con temporizador sucesivas
para que empiecen inmediatamente una tras otra, la unidad no
puede grabar el comienzo de los programas posteriores (unos
segundos cuando se graba con HDD o DVD-RAM y
30 segundos aproximadamente cuando se graba con DVD-R).
Grabación con renovación automática
TIMER
RECORDING
12:57:00 15. 7. Mar
Nombre progr.
Mode
RENEW
StopStart
Canal Fecha
VPS
PDC
HDD
DVD
1:58 SP
DVD
30:24 SP
Espacio HDD
22:3022:00Mar
OFF HDD
1 ARD SP ON
82
7463sp.book Page 20 Tuesday, March 8, 2005 11:12 AM

21
RQT7463
Grabación
≥Pulsando [PROG/CHECK] puede visualizar la lista de grabación
con temporizador aunque la unidad esté apagada.
Pulse [PROG/CHECK].
∫ Para cambiar un programa
Pulse [3, 4] para seleccionar el programa y pulse [ENTER].
(➡página 20, paso 3)
∫ Para borrar un programa
Pulse [
3
,
4
] para seleccionar el programa y pulse [
¢
CANCEL].
∫
Para salir de la lista de grabación con temporizador
Pulse [PROG/CHECK].
∫ Para poner la unidad en el modo de espera de
grabación con temporizador
Pulse [F TIMER].
“F” se enciende en el visualizador de la unidad para indicar que la
espera de grabación con temporizador ha sido activada.
≥Los programas que no se graban se borran de la lista de
grabaciones con temporizador a las 4 a.m. dos días después.
[HDD] [RAM] [DVD-R]
Si se conecta un equipo externo (un receptor de satélite, por
ejemplo) con función de temporizador al terminal AV2 de esta
unidad mediante un cable Scart de 21-contactos (➡página 9), será
posible controlar la grabación de la unidad desde este equipo.
Preparación
≥Cambie “Ext Link” en el menú SETUP para que concuerde con el
equipo conectado (➡página 48).
≥La programación del temporizador tiene que hacerse en el equipo
externo y ponerse en el modo de espera de grabación con
temporizador. Consulte el manual de instrucciones del equipo.
≥Pulse [HDD] o [DVD] para seleccionar la unidad.
Pulse [EXT LINK].
La unidad se apaga y se pone en el modo de espera de grabación.
≥La grabación empieza cuando se recibe una señal del equipo
conectado.
≥La unidad grabará imagen siempre que el equipo externo la
trasmita.
Cuando el mensaje siguiente aparezca en la pantalla del televisor,
pulse [2, 1] para seleccionar “Sí” (continuar grabando el programa
actual) o “Cancelar” (cancelar grabación) y pulse [ENTER].
Para cancelar el control externo
Pulse [EXT LINK] para detener la grabación o para cancelar la
espera de grabación con temporizador enlazada.
≥Para detener la grabación también puede mantener pulsado [∫] en
la unidad principal durante más de 3 segundos.
≥Para evitar una operación equivocada, pulse [EXT LINK] para
cancelar el ajuste después de terminar la grabación.
Para su referencia
≥La imagen que está siendo grabada aparece automáticamente en
el televisor conectado al terminal AV1 de esta unidad con el cable
Scart de 21 contactos.
≥Esta función no se activa con algunos equipos. Consulte el manual
de instrucciones del equipo.
≥El principio de las grabaciones puede que no se grabe
correctamente en algunos casos.
≥Cuando “Ext Link” se ponga en “Ext Link 2”, esta función no se
activará si la señal de entrada es del sistema NTSC.
Comprobación, cambio o borrado de
un programa
TIMER
RECORDING
12:56:00 15. 7. Mar
SELECT
ENTER
RETURN
Pulse ENTER para entrar un
nuevo programa.
1:58 SP
DVD
30:24 SP
Espacio HDD
Mode
Disc
space
StopStart
N˚
Canal Fecha
12:55:00 15. 7. TUE
VPS
PDC
HDD
DVD
Nuevo programa
Iconos
[ Este programa está grabándose.
W Las horas coinciden con las de otro programa. La
grabación del programa con la hora de inicio posterior
empieza cuando termina la grabación del programa
anterior.
F El disco estaba lleno y el programa no se grabó.
El material estaba protegido contra el copiado y no se
pudo grabar.
X El programa no terminó de grabarse porque el disco
está sucio o por otra razón.
Programas de temporizador puesto para la grabación
con renovación automática (➡página 20).
Títulos que han sido cambiados a la HDD
(Visualizado durante la grabación.)
Unidad de grabación: HDD
Unidad de grabación: DVD
Mensaje visualizado en la línea “Disc space”
OK: Se visualiza si la grabación cabe en el espacio
restante.
> (Fecha): Para grabaciones diarias o semanales, la
visualización se mostrará hasta cuando se
puedan hacer grabaciones (hasta un máximo
de un mes a partir de la fecha actual)
basándose en el tiempo restante del disco.
! : Puede que no sea posible grabar porque:
≥no queda espacio suficiente
≥el número de títulos posibles ha alcanzado su
máximo.
Desact.: Programas de temporizador que serán
grabados con relevo en la HDD.
Grabaciones con temporizador
enlazadas con equipo externo
(EXT LINK)
Sí Cancelar
El DVD está grabando este programa.
ENTER
RETURN
83
7463sp.book Page 21 Tuesday, March 8, 2005 11:12 AM

22
RQT7463
Reproducción
Reproducción de vídeo grabado/Reproducción de discos de reproducción solamente
≥Es posible ver la reproducción de una unidad mientras se graba en
la otra (no se puede editar).
≥No es posible reproducir continuamente desde una cara a la otra
en un disco de dos caras. Tendrá que expulsar el disco y darlo la
vuelta.
≥Cuando utilice un DVD-RAM de 8 cm, retire el disco del cartucho.
≥Cuando reproduzca un título grabado en la HDD, asegúrese de
que el ajuste “Sistema TV” concuerde con el título grabado
(➡página 50).
1 Pulse [HDD] o [DVD] para seleccionar
la unidad de reproducción.
El indicador HDD o DVD se enciende en la unidad.
2 Si seleccionó la unidad DVD
Pulse [< OPEN/CLOSE] en la unidad
principal para abrir la bandeja e
insertar un disco.
≥Pulse de nuevo el botón para cerrar la bandeja.
3 Pulse [1](PLAY).
[HDD] [RAM] [DVD-R]
La reproducción empieza desde el título
grabado más recientemente.
[DVD-A] [DVD-V] [VCD] [CD]
La reproducción empieza desde el comienzo del disco.
∫ Selección para reproducir programas (títulos)
grabados—Direct Navigator
[HDD] [RAM] [DVD-R]
1 Pulse [DIRECT NAVIGATOR].
Cambio de la apariencia de Direct Navigator
1 Pulse [SUB MENU] mientras se visualiza Visualizar icono.
2 Pulse [3, 4] para seleccionar “Visualización tabla” y pulse
[ENTER].
≥La apariencia de la visualización usada por última vez se
guarda aunque se apague la unidad.
2 Pulse [3, 4, 2, 1] para seleccionar la ficha
“VIDEO” y pulse [ENTER].
3 Pulse [3, 4, 2, 1] para seleccionar el título y
pulse [ENTER].
También puede seleccionar títulos con los botones numerados.
Para mostrar otras páginas
Pulse [3, 4, 2, 1] para seleccionar “Anterior” o “Sig.” y pulse
[ENTER].
≥También puede pulsar [:, 9] para mostrar otras páginas.
Para salir de la pantalla
Pulse [DIRECT NAVIGATOR].
Iconos de la pantalla Direct Navigator
∫
Cuando aparece una pantalla de menú en el televisor
[DVD-A] [DVD-V]
Pulse [3, 4, 2, 1] para seleccionar el elemento y pulse
[ENTER].
Algunos elementos también se pueden seleccionar con los botones numerados.
[VCD]
Pulse los botones numerados para seleccionar el elemento.
≥Para volver a la pantalla de menú
[DVD-A] Pulse [TOP MENU].
[DVD-V] Pulse [TOP MENU] o [SUB MENU].
[VCD] Pulse [RETURN].
OPEN/CLOSE
REC
/
x
1.3
TIME SLIP
CH
TIME SLIP
DRIVE SELECT
SD PCDVDHDD
SD CARD PC CARD EJECT
HDD DVD
2
3
1∫
D,
E
TIME SLIP
X CH W
VOLUME
CH
DIRECT TV REC
DVD
TV
AV
123
456
78
0
9
MANUAL SKIP
ShowView
CH
CANCEL
INPUT SELECT
SKIP
STOP
PAU SE
PLAY/x1.3
SLOW/SEARCH
FUNCTIONS
ENTER
DIRECT NAVIGATOR
TOP MENU
RETURN
SUB MENU
CREATE
CHAPTER
TIMER
EXT LINK
PROG/CHECK
REC MODEERASE
REC
AUDIO
TIME SLIP
STATUS
DISPLAY
F
A B C
DUBBING
HDD DVD
SD/PC
3,4,2,1
ENTER
2;
,
;1
ERASE
DIRECT
NAVIGATOR,
TOP MENU
SUB MENU
:, 9
∫
MANUAL SKIP
W X CH
6, 5
3
RETURN
TIME SLIP
AUDIO
CREATE
CHAPTER
;
1
Botones
numerados
Indicador HDD, DVD
Inserte completamente hasta
que haga un ruido seco.
Insértelo con la cara
impresa hacia arriba.
Insértelo con la flecha hacia adentro.
HDD
EXT
Link
XPXPXP
SP
LPLP
LP
EPEPEP
REC
PLAY
≥Visualizar icono ≥Visualización tabla
Ej., [HDD] [RAM] [DVD-R]
5: [0] ➡ [0] ➡ [5] 5: [0] ➡ [5]
15: [0] ➡ [1] ➡ [5] 15: [1] ➡ [5]
115: [1] ➡ [1] ➡ [5]
Título protegido.
El título no fue grabado debido a la protección
de grabación (Emisión digital, etc.)
t
No se puede reproducir el título
(Cuando copie un título en la HDD, o cuando
los datos estén dañados, etc.)
[ En grabación.
Títulos que han sido cambiados a la HDD
(➡página 19, Grabación con relevo)
Título con la restricción de “grabación de una
sola vez”
(NTSC)
(PAL)
Está seleccionado en la unidad un título
grabado utilizando un sistema de codificación
diferente del que tiene el sistema de televisión.
≥Cambie el ajuste “Sistema TV” de esta
unidad al que resulte adecuado
(➡página 50).
Ej., 5: [0] ➡ [5] 15: [1] ➡ [5]
DIRECT NAVIGATOR VISTA TITULO
Seleccionar
Anterior 02/02 Sig.
SUB MENU
ARD 10/10 Vie ARD 11/10 Sáb
ENTER
RETURN
007 008
- - -
- - -- - -- - -
HDD
IMAGEN
VIDEO
DIRECT NAVIGATOR VISTA TITULO
Seleccionar
Anterior 01/01 Sig.
SUB MENU
ENTER
RETURN
HDD
001
ARD 10/10 Vie 13:30
002
003
004
005
006
007
---
Nombre tít.HoraNº Nomb. Fecha Día
IMAGEN
VIDEO
008
ARD 11/10 Sáb 21:00
ZDF 10/10 Vie 9:25
AV2 4/10 Sáb 16:10
ARD 3/10 Vie 22:05
AV2 3/10 Vie 20:00
ZDF 27/ 9 Sáb 12:15
ARD 26/ 9 Vie 13:30
DIRECT NAVIGATOR VISTA TITULO
ARD 10/10 Vie ARD 11/10 Sáb
007 008
- - -
HDD
IMAGEN
VIDEO
84
7463sp.book Page 22 Tuesday, March 8, 2005 11:12 AM

23
RQT7463
Reproducción
Operaciones durante la reproducción
Parada
Pulse [∫].
La posición de detención se memoriza.
El indicador de la derecha aparece en el visualizador de la unidad. (Excepto cuando
se reproduce desde el Direct Navigator y cuando se reproduce una lista de
reproducción.)
Función de reanudación de la reproducción
Pulse [1] (PLAY) para reiniciar la reproducción desde esta posición.
Pausa
Pulse [;].
Pulse de nuevo para reiniciar la reproducción.
Búsqueda
Pulse [6] o [5].
≥Mantenga pulsado [D] o [E] en la unidad principal.
≥La velocidad aumenta hasta 5 pasos.
≥Pulse [1] (PLAY) para reiniciar la reproducción.
≥El audio se oye durante la búsqueda en avance de primer nivel.
Puede apagar el sonido durante la búsqueda (➡página 47, “PLAYk1.3 + Audio en Search”).
El audio se oye durante todos los niveles de la búsqueda. [DVD-A] (excluyendo partes con
imágenes en movimiento) [CD]
Salto
Pulse [:] o [9].
≥Pulse [D] o [E] en la unidad principal.
≥Cada pulsación aumenta el número de saltos.
Inicio desde un
elemento seleccionado
Pulse los botones numerados.
Ej., 5: [0] ➡ [5] [HDD] 5: [0] ➡ [0] ➡ [5]
15: [1] ➡ [5] [CD] (discos MP3 solamente) 15: [0] ➡ [1] ➡ [5]
[DVD-A] Selección de grupos
Durante la parada (el salvapantallas se visualiza en el televisor ➡derecha)
5: [5]
≥Esto sólo funciona durante la parada con algunos discos (el salvapantallas se
visualiza en el televisor ➡derecha).
Quick View
[HDD] [RAM]
La velocidad de reproducción puede
aumentar sin distorsionar el audio.
Mantenga pulsado [1](PLAY/a1.3).
≥Pulse de nuevo para volver a la velocidad normal.
≥Esto no funciona si el ajuste es “No” en “PLAYk1.3 + Audio en Search” (➡página 47).
Cámara lenta
[HDD] [RAM] [DVD-R] [DVD-A] (Partes
de película solamente) [DVD-V]
[VCD]
Durante la pausa, pulse [6] o [5].
≥Mantenga pulsado [D] o [E] en la unidad principal.
≥La velocidad aumenta hasta 5 pasos.
≥Pulse [1] (PLAY) para reiniciar la reproducción.
≥Dirección de avance solamente. [VCD]
≥La unidad hará una pausa si la reproducción a cámara lenta continúa durante 5 minutos.
Cuadro a cuadro
[HDD] [RAM] [DVD-R] [DVD-A] (Partes
de película solamente) [DVD-V]
[VCD]
Durante la pausa, pulse [2;] o [;1].
≥Cada pulsación muestra el cuadro siguiente.
≥Pulse [1] (PLAY) para reiniciar la reproducción.
≥Dirección de avance solamente. [VCD]
Visualización de
imágenes de televisión
en el modo de imagen
en imagen
Pulse [TIME SLIP].
La unidad muestra la imagen del televisor en el
modo de imagen en imagen.
≥Oirá la reproducción de audio.
≥Pulse de nuevo [TIME SLIP] para cancelar.
≥El fondo gris no aparecerá en la pantalla de
recepción aunque usted seleccione “On” desde
“Fondo gris” en el menú SETUP (➡página 47).
Salto del tiempo
especificado
(Time Slip)
[HDD] [RAM] [DVD-R]
1 Pulse [TIME SLIP].
2 Pulse [3, 4] para seleccionar el tiempo y pulse [ENTER].
La reproducción salta el tiempo especificado.
≥Pulse [TIME SLIP] para mostrar las imágenes de reproducción completas.
[Nota]
Time Slip no funciona mientras la grabación con temporizador está en espera.
Salto manual
[HDD] [RAM] [DVD-R]
La reproducción se reanuda
30 segundos después
aproximadamente.
Pulse [MANUAL SKIP].
HDD
EXTEXTEXT
LinkLinkLink
XPXPXP
SP
LPLP
LP
EPEPEP
RECRECREC
PLAYPLAYPLAY
Imágenes de
reproducción
Imágenes que están recibiéndose
≥Pulsando [WXCH] puede cambiar el
canal que está siendo recibido.
≥Mientras graba no puede cambiar el canal
que está recibiendo.
85
7463sp.book Page 23 Tuesday, March 8, 2005 11:12 AM

24
RQT7463
Reproducción
Reproducción de vídeo grabado/Reproducción de discos de reproducción solamente
Consulte la referencia de controles en página 22.
Pulse [AUDIO].
[HDD] [RAM] [VCD]
LR>L>R
^---------------}
[DVD-A] [DVD-V]
Cada vez que pulsa los botones puede cambiar el número del canal
de audio. Esto le permite cambiar elementos como el idioma de la
pista de sonido (➡página 28, Pista de audio).
[Nota]
No puede cambiar el tipo de audio en los casos siguientes.
≥Cuando hay un disco DVD-R en la bandeja del disco mientras se ha seleccionado la unidad DVD.
≥Cuando el modo de grabación es XP y “Audio Mode para XP Recording” se ha puesto en “LPCM” (➡página 47).
≥Cuando “Grab.ón DVD-R para copia rápida” está en “Sí” (➡página 46).
Operaciones de edición durante la reproducción
Borrar
[HDD] [RAM] [DVD-R]
1Pulse [ERASE].
2Pulse [2, 1] para seleccionar “Borrar” y pulse [ENTER].
≥Un título no puede ser restaurado una vez borrado. Asegúrese antes de proseguir.
≥Mientras graba o copia no puede borrar.
Crear capítulo
(➡página 30, Título/Capítulo)
[HDD] [RAM]
Pulse [CREATE CHAPTER].
≥Pulse [:, 9] para saltar al comienzo de un capítulo.
≥Mientras graba o copia no puede dividir.
Cambio de audio
PLAY
L R
Disco duro
Ej., está seleccionado “L R”
Pista de audio
1 ENG Î Digital 3/2.1ch
Ej., está seleccionado el inglés.
86
7463sp.book Page 24 Tuesday, March 8, 2005 11:12 AM

25
RQT7463
Reproducción
Utilización de menús para reproducir MP3
[CD] (Discos MP3 solamente)
Este aparato reproduce archivos MP3 grabados en discos CD-R/
RW diseñados para la grabación de audio que son finalizados
(➡página 53) en un ordenador. Los archivos se consideran como
pistas y las carpetas como grupos.
1 Pulse [TOP MENU].
2 Pulse [3, 4] para seleccionar la pista
y pulse [ENTER].
La reproducción continúa hasta la última pista del último
grupo.
≥“0” indica la pista que está reproduciéndose.
≥También puede seleccionar la pista con los botones
numerados.
Para mostrar otras páginas
Pulse [3, 4, 2, 1] para seleccionar “Ant.or” o “Sig.” y pulse
[ENTER].
Después de listar todas las pistas de un grupo aparece la lista para
el siguiente grupo.
Para salir de la pantalla
Pulse [TOP MENU].
Mientras se visualiza la lista de archivos
1 Pulse [1] mientras resalta una pista
para visualizar la pantalla de árbol.
2 Pulse [3, 4, 2, 1] para seleccionar
un grupo y pulse [ENTER].
Aparece la lista de archivos para el grupo.
Para volver a la lista de archivos
Pulse [RETURN].
Ej., 5: [0] ➡ [0] ➡ [5]
15: [0] ➡ [1] ➡ [5]
VOLUME
CH
DIRECT TV REC
DVD
TV
AV
123
456
78
0
9
MANUAL SKIP
ShowView
CH
CANCEL
INPUT SELECT
SKIP
STOP
PAU SE
PLAY/x1.3
SLOW/SEARCH
FUNCTIONS
ENTER
DIRECT NAVIGATOR
TOP MENU
RETURN
SUB MENU
CREATE
CHAPTER
TIMER
EXT LINK
PROG/CHECK
REC MODEERASE
REC
AUDIO
TIME SLIP
STATUS
DISPLAY
F
A B C
DUBBING
HDD DVD
SD/PC
3,4,2,1
ENTER
RETURN
TOP MENU
Botones
numerados
001 Both Ends Freezing
002 Lady Starfish
003 Life on Jupiter
004 Metal Glue
005 Paint It Yellow
006 Pyjamamama
007 Shrimps from Mars
008 Starperson
009 Velvet Cuppermine
010 Ziggy Starfish
Sig.
Ant.or
1
1 : My favorite
2
3
4
5
6
7
8
9
10
Total
Pista
Tree
G 1
T 1
Total
1/111
Menú
0 9
–
N˚
Grupo
N˚
SELECT
ENTER
RETURN
Grupo seleccionado
G: Número de grupo.
T: Número de pista en el
grupo
Total: Número de pista/
número total de
pistas en todos los
grupos
Utilización de la pantalla de árbol para encontrar un
grupo
Consejos para hacer discos MP3
≥Los discos deben cumplir con la norma ISO9660, nivel 1 o 2
(excepto para los formatos extendidos).
≥Frecuencia de muestreo compatible: entre 32 kbps y 320 kbps
≥Frecuencias de muestreo compatibles:
16 kHz, 22,05 kHz, 24 kHz, 32 kHz, 44,1 kHz y 48 kHz
≥Máximo número de pistas y grupos que puede ser reconocido:
999 pistas y 99 grupos
≥Esta unidad es compatible con sesiones múltiples.
≥Esta unidad no es compatible con las fichas ID3 ni con la
escritura de paquete.
≥Dependiendo de la grabación puede que algunos elementos no
puedan reproducirse.
≥La lectura o reproducción del disco puede tardar si hay muchas
imágenes fijas o sesiones.
≥El orden de visualización puede ser diferente del orden
visualizado en un ordenador.
Para dar nombres a
carpetas y archivos
≥Los archivos MP3 deberán
tener la extensión “.MP3” o
“.mp3”.
≥Al hacer la grabación, dé a
las carpetas y archivos
nombres con un prefijo de 3
dígitos en el orden en que
quiera reproducirlos (esto no
servirá a veces).
≥Las letras y los números
arábigos se visualizan
correctamente. Puede que otros caracteres no se visualicen
correctamente.
Tree
G 7/25
001 My favorite
001 Brazilian pops
002 Chinese pops
003 Czech pops
004 Hungarian pops
005 Liner notes
006 Japanese pops
007 Mexican pops
008 Philippine pops
009 Swedish pops
001 Momoko
002 Standard number
001 Piano solo
002 Vocal
Menú
N˚
G 8
T 14
Total
40/111
MP3 music
–
0 9
SELECT
ENTER
RETURN
No puede seleccionar
grupos que contienen
archivos incompatibles.
Número de grupo seleccionado/Número total de grupos
Si el grupo no tiene pistas se visualiza “– –” como número de grupo.
002 group
001
001
001track.mp3
002track.mp3
003track.mp3
003 group
001track.mp3
002track.mp3
003track.mp3
001track.mp3
002track.mp3
003track.mp3
004track.mp3
Ej.,
Raíz
Orden de reproducción
(carpeta=grupo)
(archivo=pista)
87
7463sp.book Page 25 Tuesday, March 8, 2005 11:12 AM

26
RQT7463
Reproducción
Reproducción de imágenes fijas
Introduzca o saque la tarjeta SD/PC sólo después de apagar la
unidad.
Cuando parpadee el indicador de tarjeta (“SD” o “PC”) en el
visualizador de la unidad, la tarjeta estará siendo leída o se estará
escribiendo en ella. No apague la unidad ni saque la tarjeta. Esto
puede causar un fallo en el funcionamiento o hacer que se pierda el
contenido de la tarjeta.
∫ Ranura de tarjeta SD
≥Puede utilizar tarjetas de memoria SD con capacidades de 8 MB a
1 GB (➡página 15).
∫ Ranura de tarjeta PC
Acerca de las imágenes fijas (JPEG, TIFF)
≥Formatos compatibles: Compatibilidad con DCF
§
(Contenido
grabado en una cámara digital, etc.)
§
Design rule for Camera File system: norma unificada
establecida por Japan Electronics and Information
Technology Industries Association (JEITA).
≥Formato de archivo: JPEG, TIFF (formato grande de RGB sin
comprimir)
≥Número de píxeles: 34k34 a 6144k4096
(El submuestreo es 4:2:2 o 4:2:0)
≥Esta unidad puede manejar un máximo de 3.000 archivos y
300 carpetas (incluyendo carpetas más altas).
≥La operación puede tardar en terminar cuando se reproducen
imágenes fijas del formato TIFF, o cuando hay muchos
archivos y/o carpetas, algunos archivos puede que no se
visualicen o reproduzcan.
≥MOTION JPEG no es compatible.
VOLUME
CH
DIRECT TV REC
DVD
TV
AV
123
456
78
0
9
MANUAL SKIP
ShowView
CH
CANCEL
INPUT SELECT
SKIP
STOP
PAU SE
PLAY/x1.3
SLOW/SEARCH
FUNCTIONS
ENTER
DIRECT NAVIGATOR
TOP MENU
RETURN
SUB MENU
CREATE
CHAPTER
TIMER
EXT LINK
PROG/CHECK
REC MODEERASE
REC
AUDIO
TIME SLIP
STATUS
DISPLAY
F
A B C
DUBBING
HDD DVD
SD/PC
3,4,2,1
ENTER
SUB MENU
ERASE
DIRECT
NAVIGATOR
STATUS
HDD, DVD,
SD/PC
∫
OPEN/CLOSE
REC
/
x
1.3
TIME SLIP
CH
TIME SLIP
DRIVE SELECT
SD PCDVDHDD
SD CARD PC CARD EJECT
HDD DVD
DRIVE SELECT
∫
Botones
numerados
Indicador HDD, DVD, SD, PC
Ranura de
tarjeta SD
Ranura de
tarjeta PC
Introducción/extracción de la tarjeta SD/PC
Inserción de la tarjeta
Extracción de la tarjeta
Inserción de la tarjeta
Hay tarjetas que requieren adaptadores (➡página 15).
Extracción de la tarjeta
≥Si utiliza el adaptador, quite el adaptador y la tarjeta juntos.
S
D
C
A
R
D
PC CARD
EJECT
Introduzca la tarjeta con la etiqueta hacia arriba
y la esquina recortada hacia la derecha.
Introduzca derecha la tarjeta
hasta que quede bien
colocada.
S
D
C
A
R
D
P
C
C
A
R
D
EJECT
1
2
Presione el centro de la tarjeta.
Sáqueda derecha.
S
D
C
A
R
D
PC
C
AR
D
EJECT
1
2
Sujete el borde de la tarjeta e insértela hasta
que quede bien colocada.
≥Si utiliza el adaptador, no presione
directamente la tarjeta.
Conexiones de terminales hacia el interior de la unidad
2 alinee para
que concuerde la
marca
Lado con etiqueta hacia arriba
S
D
C
A
R
D
P
C
C
A
R
D
EJECT
1
2
P
C
C
A
R
D
EJECT
P
C
C
A
R
D
EJECT
P
C
C
A
R
D
EJECT
Empuje
El botón de
expulsión sale
Empuje otra
vez
88
7463sp.book Page 26 Tuesday, March 8, 2005 11:12 AM

27
RQT7463
Reproducción
[HDD] [RAM] [SD] [PC]
≥Puede utilizar tarjetas de memoria SD con capacidades de 8 MB a
1 GB (➡página 15).
1 Pulse [HDD], [DVD] o [SD/PC] para
seleccionar la unidad.
≥Cada vez que pulse [SD/PC]:
Unidad de tarjeta SD ,". Unidad de tarjeta PC
≥En la unidad principal, pulse varias
veces [DRIVE SELECT].
El indicador se enciende en la
unidad.
2 Pulse
[DIRECT NAVIGATOR].
3 [HDD] [RAM]
Pulse [3, 4, 2, 1] para seleccionar
la ficha “IMAGEN” y pulse [ENTER].
4 Pulse [3, 4, 2, 1] para seleccionar
la imagen fija y pulse [ENTER].
También puede seleccionar imágenes fijas con los botones
numerados.
≥
Pulse [
2
,
1
] para visualizar la imagen fija anterior o siguiente.
≥Funciones útiles durante la reproducción de imagen fija
(➡abajo).
Para detener la reproducción
Pulse [∫].
Para salir de la pantalla
Pulse [DIRECT NAVIGATOR].
∫ Para mostrar las propiedades de las imágenes
Pulse dos veces [STATUS].
Fecha de filmación
Para salir de la pantalla de propiedades de imagen
Pulse [STATUS].
[Nota]
≥Las imágenes fijas no se pueden reproducir durante la grabación.
[HDD] [RAM] [SD] [PC]
Ej.,
5: [0] ➡ [0] ➡ [0] ➡ [5] 115: [0] ➡ [1] ➡ [1] ➡ [5]
15: [0] ➡ [0] ➡ [1] ➡ [5] 1115: [1] ➡ [1] ➡ [1] ➡ [5]
SD PCDVDHDD
Ej.,
Unidad de tarjeta SD
DIRECT NAVIGATOR VISTA IMAGEN (JPEG)
Seleccionar
Anterior 001/001 Sig.
SUB MENU
ENTER
RETURN
SD CARD
0001
Carpeta 103__DVD
0002 0003 0004
0005 0006 0007 0008
0009
---- ---- ----
IMAGEN
Pantalla VISTA IMAGEN
(JPEG)
∫ Para seleccionar imágenes fijas en otra
carpeta
(➡página 15, Estructura de las carpetas visualizadas por
esta unidad)
1 Pulse [3, 4, 2, 1] para seleccionar “Carpeta” y pulse
[ENTER].
2 Pulse [3, 4] para seleccionar una carpeta y pulse
[ENTER].
También puede seleccionar carpetas con los botones
numerados.
Ej., 5: [0] ➡ [0] ➡ [5]
15: [0] ➡ [1] ➡ [5]
115: [1] ➡ [1] ➡ [5]
≥Si hay un número múltiple de carpetas reconocible, usted
podrá cambiarlas utilizando [2, 1].
DIRECT NAVIGATOR VISTA IMAGEN (JPEG)
SD CARD
0001
Carpeta 103__DVD
0002 0003 0004
0005 0006 0007 0008
IMAGEN
\DCIM
001 100__DVD
002 101__DVD
003 102__DVD
---
\DCIM\100__DVD
---
004 103__DVD
002 101__DVD
003 102 DVD
\DCIM\100__DVD
\DCIM
001 100__DVD
18:53:50 11.10.
N. carp. y N. imag. 103 - 0006
Fecha 11. 12. 2003
Nº
3 / 9
Funciones útiles durante la reproducción de imagen fija
Mostrar diapos.
Intervalo diapos.
Puede visualizar imágenes fijas una a una con un intervalo constante.
Mientras se visualiza la pantalla VISTA IMAGEN (JPEG)
1 Pulse [SUB MENU].
2 Pulse [3, 4] para seleccionar “Mostrar diapos.” y pulse
[ENTER].
≥Para cambiar la sincronización de visualización
1Pulse [3, 4] para seleccionar “Intervalo diapos.” en el paso 2 y pulse [ENTER].
2Pulse [2, 1] para seleccionar la sincronización deseada (0–30 segundos) y
pulse [ENTER].
Girar
1 Pulse [SUB MENU].
2 Pulse [3, 4] para seleccionar “Girar a la derecha” o “Girar
a la izquie.” y pulse [ENTER].
≥La información de giro no se guarda.
Acercamiento
Alejamiento
(Sólo para una imagen fija con una
cuenta baja de píxeles)
1 Pulse [SUB MENU].
2 Pulse [3, 4] para seleccionar “Acercamiento” y pulse
[ENTER].
≥Para volver a poner la imagen en su tamaño original, pulse [3, 4] para
seleccionar “Alejamiento” en el paso 2 y pulse [ENTER].
≥Cuando se acerque la imagen con el zoom, ésta tal vez quede cortada.
≥La información de ampliación no se guardará.
Borrar
1 Pulse [ERASE].
2 Pulse [2, 1] para seleccionar “Borrar” y pulse [ENTER].
≥
Una vez borrado, el contenido grabado se pierde y no se puede recuperar.
Asegúrese antes de
proseguir.
Configura Prot.ón
Borrar protección
Intervalo diapos.
Mostrar diapos.
DPOF
Borrar imagen
Girar a la izquie.
Girar a la derecha
ENTER
RETURN
Acercamiento
ENTER
RETURN
Girar a la izquie.
Girar a la derecha
89
7463sp.book Page 27 Tuesday, March 8, 2005 11:12 AM

28
RQT7463
Reproducción
Utilizando menús en pantalla y mensajes de estado
1 Pulse [DISPLAY].
≥Dependiendo de la condición de la unidad (reproducción,
parada, etc.) y del contenido del disco, hay algunos
elementos que usted no puede seleccionar ni cambiar.
2 Pulse [3, 4] para seleccionar el
menú y pulse [1].
3 Pulse [3, 4] para seleccionar el
elemento y pulse [1].
4 Pulse [3, 4] para seleccionar el
ajuste.
≥Algunos elementos se pueden cambiar pulsando [ENTER].
Para cancelar menús en pantalla
Pulse [DISPLAY].
§
Puede que tenga que utilizar los menús (➡página 22) del disco
para hacer cambios.
≥La visualización cambia según el contenido del disco. No puede
cambiar cuando no hay grabación.
Atributo de audio
Idioma
Menús en pantalla
VOLUME
CH
DIRECT TV REC
DVD
TV
AV
123
456
78
0
9
MANUAL SKIP
ShowView
CH
CANCEL
INPUT SELECT
SKIP
STOP
PAU SE
PLAY/x1.3
SLOW/SEARCH
FUNCTIONS
ENTER
DIRECT NAVIGATOR
TOP MENU
RETURN
SUB MENU
CREATE
CHAPTER
TIMER
EXT LINK
PROG/CHECK
REC MODEERASE
REC
AUDIO
TIME SLIP
STATUS
DISPLAY
F
A B C
DUBBING
HDD DVD
SD/PC
3,4,2,1
ENTER
DISPLAY
STATUS
Disco
Play
Vídeo
Audio
Pista de audio
Subtítulo
1
Canal de audio
OFF
L R
Î Digital 2/0 ch
Menú Elemento Ajuste
Menú Disco—Selección del contenido del disco
Pista de audio
§
[HDD] [RAM] [DVD-R]
Aparecen los atributos de audio del disco.
[DVD-A] [DVD-V]
Seleccione el audio y el idioma (➡abajo, Atributo de audio,
Idioma).
Subtítulo
§
[HDD] [RAM] [DVD-R]
(Sólo los discos que contienen información de encendido/
apagado de subtítulos)
[DVD-A] [DVD-V]
Encienda/apague los subtítulos y seleccione el idioma
(➡abajo, Idioma).
≥La información de encendido/apagado de subtítulos no se
puede grabar utilizando esta unidad. [HDD] [RAM] [DVD-R]
Canal de audio [HDD] [RAM] [VCD]
➡página 24, Cambio de audio
Ángulo
§
[DVD-A] [DVD-V]
STILL-P (Imagen fija) [DVD-A]
Selecciona el método de reproducción para las imágenes
fijas.
Slide Show: Reproduce según el orden predeterminado en
el disco.
Pág.: Selecciona el número de la imagen fija y la
reproducción.
≥RANDOM: Reproduce en orden aleatorio.
≥Return: Retorna a la imagen fija predeterminada del
disco.
PBC (Control de reproducción ➡página 53) [VCD]
Indica si la reproducción con menú (control de reproducción)
está encendida o apagada.
LPCM/PPCM/ÎDigital/DTS/MPEG:
k (kHz):
b (bit):
ch (canal):
Tipo de señal
Frecuencia de muestreo
Número de bits
Número de canales
ENG: Inglés
FRA: Francés
DEU: Alemán
ITA: Italiano
ESP: Español
NLD: Holandés
SVE: Sueco
NOR: Noruego
DAN: Danés
POR: Portugués
RUS: Ruso
JPN: Japonés
CHI: Chino
KOR: Coreano
MAL: Malayo
VIE: Vietnamita
THA: Tailandés
¢: Otros
90
7463sp.book Page 28 Tuesday, March 8, 2005 11:12 AM

29
RQT7463
Reproducción
Esta función sólo sirve cuando se visualiza el tiempo de
reproducción transcurrido.
§
Sólo cuando ha puesto “Progresivo” en “On” en el menú SETUP
(➡página 12).
Cuando usted utiliza la unidad aparecen en el televisor mensajes de
estado para mostrar la condición de la misma.
Pulse [STATUS].
La visualización cambia cada vez que usted pulsa el botón.
≥La información visualizada se ofrece como ejemplo.
≥Tipo de audio de televisión
STEREO: Emisión STEREO/NICAM estéreo
M 1/M 2: Emisión de sonido doble Bilingüe/NICAM
M 1: Emisión NICAM mono
Menú Play—Cambia el orden de la reproducción
Repeat Play
≥To d o
≥Capítulo
≥Grupo
≥PL (Lista de
reproducción)
≥Título
≥Pista
[VCD] [CD] (excluyendo discos MP3)
[HDD] [RAM] [DVD-R] [DVD-V]
[DVD-A] [CD] (Discos MP3 solamente)
[HDD] [RAM]
[HDD] [RAM] [DVD-R] [DVD-V]
[DVD-A] [VCD] [CD]
Seleccione “OFF” para cancelar.
Menú Video—Cambia la calidad de la imagen
Red.ruido rep.ón
Reduce el ruido y la degradación de la imagen.
Ajuste gradual
§
(➡página 53)
Seleccione “ON” para activar la salida progresiva.
Seleccione “OFF” si la imagen se alarga horizontalmente.
Modo trasf.
§
[Cuando “Ajuste gradual”(➡arriba) está en “ON”.]
Seleccione el método de conversión para la salida progresiva
adecuado al tipo de material que está siendo reproducido
(➡página 53, Película y vídeo).
Cuando la señal de salida es PAL
≥Auto:
≥Vídeo:
Detecta el contenido de películas de
25 cuadros por segundo y lo convierte
apropiadamente.
Seleccione cuando se utilice “Auto” y el
contenido de vídeo esté distorsionado.
Cuando la señal de salida es NTSC
≥Auto 1
(normal):
≥Auto 2:
≥Vídeo:
Detecta el contenido de películas de
24 cuadros por segundo y lo convierte
apropiadamente.
Compatible con el contenido de películas de
30 cuadros por segundo y también de
24 cuadros por segundo. (Dependiendo del
contenido se puede producir distorsión en la
imagen)
Seleccione cuando se utilice “Auto 1” y
“Auto 2” y el contenido de vídeo esté
distorsionado.
Menú Audio—Cambia el efecto del sonido
V.S.S. [HDD] [RAM] [DVD-R] [DVD-V]
(Dolby Digital, MPEG, 2 canales o más solamente)
Disfrute de un efecto parecido al sonido ambiental si está
utilizando dos altavoces delanteros solamente.
≥Apague V.S.S. si causa distorsión.
≥V.S.S. no funciona con las grabaciones bilingües.
Realce diálogos [DVD-A] [DVD-V]
(Dolby Digital, 3 canales o más solamente, incluyendo un canal
central)
El volumen del canal central sube para que el diálogo se
pueda escuchar fácilmente.
Mensajes de estado
13:50 XP18:53:50 11.10.
π T2 0:05.14 XP
π T1 0:00.10 SP
Espacio
π
REC
PLAY
STEREO
L R
DVD REC
Disco duro
Unidad/tipo de disco seleccionado
Tipo de audio de televisión recibido (
➡
abajo)
Estado de la grabación o reproducción/
canal de entrada
Tipo de audio seleccionado
Tiempo de grabación disponible y
modo de grabación
Posición de reproducción dentro del título
Número de título y tiempo transcurrido
durante la reproducción/Modo de grabación
Fecha y hora
No hay visualización
Indicador de unidad de grabación/
progreso de la copia
Espacio de la HDD
utilizado
Número de título y tiempo transcurrido durante
la grabación/Modo de grabación
91
7463sp.book Page 29 Tuesday, March 8, 2005 11:12 AM

30
RQT7463
Edición
Edición de títulos/capítulos
[HDD] [RAM] [DVD-R]
≥Máximo número de elementos de un disco:
[HDD]
–Títulos: 500
–Capítulos: Aproximadamente 1.000 por título
(Depende del estado de la grabación.)
[RAM] [DVD-R]
–Títulos: 99
–Capítulos: Aproximadamente 1.000
(Depende del estado de la grabación.)
[Nota]
≥Una vez borrado, dividido o parcialmente borrado, no puede volver
a su estado original. Asegúrese antes de proseguir.
≥Durante la grabación, la reproducción de persecución, la copia,
etc., no se puede editar.
≥La información de grabación limitada permanece incluso después
de editar (ej., dividir un título, etc.).
Preparación
≥Pulse [HDD] o [DVD] para seleccionar la unidad.
≥Cancele la protección (➡página 42). [RAM]
1 Pulse [DIRECT NAVIGATOR].
2 Pulse [3, 4, 2, 1] para seleccionar
la ficha “VIDEO” y pulse [ENTER].
3 Pulse [3, 4, 2, 1] para seleccionar
el título.
4 Pulse [SUB MENU], luego pulse
[3, 4] para seleccionar la operación
y pulse [ENTER].
≥Si selecciona “Editar”, pulse [3, 4] para seleccionar la
operación y pulse [ENTER].
∫ Si selecciona “Vista capítulo”
5 Pulse [3, 4, 2, 1] para seleccionar
el capítulo.
Para iniciar la reproducción ➡ Pulse [ENTER].
Para editar ➡ Paso 6.
≥Para mostrar otras páginas/Edición múltiple (➡arriba)
6 Pulse [SUB MENU], luego pulse
[3, 4] para seleccionar la operación
y pulse [ENTER].
≥Puede volver a Vista título.
Para salir de la pantalla
Pulse [DIRECT NAVIGATOR].
Para volver a la pantalla anterior
Pulse [RETURN].
Título/Capítulo
Los programas se graban como un solo título consistente en un
capítulo.
Puede dividir un título en múltiples capítulos. [HDD] [RAM]
(➡página 24, 31, Crear capítulo)
Puede cambiar el orden de los capítulos y crear una lista de
reproducción (➡página 32). [HDD] [RAM]
≥Los títulos se dividen en capítulos de unos 5 minutos después
de la finalización (➡página 43). [DVD-R]
VOLUME
CH
DIRECT TV REC
DVD
TV
AV
123
456
78
0
9
MANUAL SKIP
ShowView
CH
CANCEL
INPUT SELECT
SKIP
STOP
PAU SE
PLAY/x1.3
SLOW/SEARCH
FUNCTIONS
ENTER
DIRECT NAVIGATOR
TOP MENU
RETURN
SUB MENU
CREATE
CHAPTER
TIMER
EXT LINK
PROG/CHECK
REC MODEERASE
REC
AUDIO
TIME SLIP
STATUS
DISPLAY
F
A B C
DUBBING
HDD DVD
SD/PC
3,4,2,1
ENTER
DIRECT
NAVIGATOR
:, 9
SUB MENU
;
1
RETURN
HDD, DVD
Título
Capítulo
Inicio Fin
Capítulo
Título
Capítulo Capítulo Capítulo
Edición de títulos/capítulos y
reproducción de capítulos
Para mostrar otras páginas
Pulse [3, 4, 2, 1] para seleccionar “Anterior” o “Sig.” y
pulse [ENTER].
≥
También puede pulsar [
:
,
9
] para mostrar otras páginas.
Edición múltiple
Seleccione con [3, 4, 2, 1] y pulse [;]. (Repetición.)
Aparece una marca de comprobación. Pulse de nuevo [;]
para cancelar.
DIRECT NAVIGATOR VISTA TITULO
Seleccionar
Anterior 02/02 Sig.
SUB MENU
ARD 10/10 Vie ARD 11/10 Sáb
ENTER
RETURN
007 008
- - -
- - -- - -
HDD
- - -
IMAGEN
VIDEO
Pantalla Vista título
Configura Prot.ón
Borrar protección
Borrado parcial
Dividir título
Cambiar icono
Entrar nombre
Propiedades
Editar
Visualización tabla
Vista capítulo
Borrar
Consulte
“Operaciones
con títulos”.
página 22, Cambio de la apariencia
de Direct Navigator
DIRECT NAVIGATOR VISTA CAPITULO
Seleccionar
Anterior 01/01 Sig.
SUB MENU
008 ARD 11/10 Sáb
001
--- ---
--- ------ ---
--- ------ ---
---
ENTER
RETURN
HDD
IMAGEN
VIDEO
Pantalla Vista capítulo
Crear capítulo
Combinar capítulos
Vista título
Borrar capítulo
Consulte
“Operaciones con capítulos”.
92
7463sp.book Page 30 Tuesday, March 8, 2005 11:12 AM

31
RQT7463
Edición
§
Es posible hacer la edición múltiple.
§
Es posible hacer la edición múltiple.
Operaciones con títulos
Borrar
§
[HDD] [RAM] [DVD-R]
Pulse [2, 1] para seleccionar “Borrar” y pulse [ENTER].
≥
Una vez borrado, el contenido grabado se pierde y no se puede recuperar.
Asegúrese antes de proseguir.
≥El tiempo de grabación disponible en los DVD-R no aumenta cuando usted borra títulos.
Propiedades
[HDD] [RAM] [DVD-R]
Se muestra información (ej., hora y fecha).
Entrar nombre
[HDD] [RAM] [DVD-R]
Puede poner nombres a títulos grabados.
➡página 44, Introducción de texto
Configura Prot.ón
§
Borrar protección
§
[HDD] [RAM]
Si lo pone, esto protegerá el título para no borrarlo por error.
Pulse [
2
,
1
] para seleccionar “Sí” y pulse [ENTER].
Cuando el título está protegido aparece el símbolo del candado.
Borrado parcial
[HDD] [RAM]
Puede eliminar las partes que no necesite en la grabación como, por ejemplo,
anuncios.
1
Pulse [ENTER] en los puntos de inicio y
finalización de la sección que quiere borrar.
2 Pulse [3, 4] para seleccionar “Salir” y
pulse [ENTER].
≥Seleccione “Sig.” y pulse [ENTER] para borrar otras secciones.
3 Pulse [2, 1] para seleccionar “Borrar” y pulse [ENTER].
Cambiar icono
[HDD] [RAM] [DVD-R]
En Vista título puede cambiar una imagen que va a ser mostrada como
imagen miniatura.
1 Pulse [1] (PLAY) para iniciar la
reproducción.
2 Pulse [ENTER] cuando se muestra la
imagen que usted quiere utilizar como imagen miniatura.
3 Pulse [3, 4] para seleccionar “Salir” y pulse [ENTER].
Dividir título
[HDD] [RAM]
Puede dividir un título en dos.
1
Pulse [ENTER] en el punto donde quiere dividir el título.
2
Pulse [
3
, 4]
para seleccionar “Salir” y pulse [ENTER].
3 Pulse [2, 1] para seleccionar “Dividir” y pulse
[ENTER].
Para confirmar un punto de división
Pulse [3, 4] para seleccionar “Preview” y pulse [ENTER]. (La unidad
reproduce 10 segundos antes y después del punto de división.)
Para cambiar el punto de división
Reinicie la reproducción y pulse [
3
,
4
] para seleccionar “Dividir”, y luego pulse [ENTER] en el punto que desea cambiar.
[Nota]
≥Los títulos divididos mantienen el nombre y la propiedad CPRM (➡página 53) del título original.
≥La imagen y el sonido justo antes y después del punto de división pueden quedar cortados
momentáneamente.
Propiedades
N˚
Canal
Fecha
26
12
11/10/2004
Hora
Tiemp.grab
12:19
0:30 (SP)Lun
Dinosaur
SELECT
DIRECT NAVIGATOR VIST
A
ARD 10/10 Vie ARD 11/10
007 008
HDD
DIRECT NAVIGATOR Borrado parcial
Iniciar
Sig.
Salir
0:43.21
PLAY
008
Fin
- -:- -.- - - -:- -.- -
Iniciar Fin
ENTER
RETURN
HDD
IMAGEN
VIDEO
DIRECT NAVIGATOR Cambiar icono
Cambiar
Salir
0:06.45
0:06.45
Cambiar
ENTER
HDD
;
008
IMAGEN
VIDEO
DIRECT NAVIGATOR Dividir título
Preview
Salir
0:43.21
PLAY
008
Dividir
- -:- -.- -
Dividir
ENTER
HDD
IMAGEN
VIDEO
Operaciones con capítulos
Borrar capítulo
§
[HDD] [RAM]
Pulse [2, 1] para seleccionar “Borrar” y pulse [ENTER].
≥
Una vez borrado, el contenido grabado se pierde y no se puede recuperar.
Asegúrese antes de proseguir.
Crear capítulo
[HDD] [RAM]
1 Pulse [ENTER] en el punto donde quiera
dividir.
≥Repita esto para dividir en otros puntos.
2 Pulse [3, 4] para seleccionar “Salir” y
pulse [ENTER].
Combinar capítulos
[HDD] [RAM]
Pulse [2, 1] para seleccionar “Combinar” y pulse [ENTER].
≥El capítulo seleccionado y el capítulo siguiente se combinan.
Para editar más rápidamente
≥Utilice la búsqueda, Time Slip o cámara lenta (➡página 23) para encontrar el punto deseado.
≥Pulse [:, 9] para saltar al final de un título.
DIRECT NAVIGATOR Crear capítulo
Crear
Salir
0:43.21
PLAY
008
HDD
IMAGEN
VIDEO
93
7463sp.book Page 31 Tuesday, March 8, 2005 11:12 AM

32
RQT7463
Edición
Creación, edición y reproducción de listas de reproducción
[HDD] [RAM]
≥Máximo número de elementos de un disco:
–Listas de reproducción: 99
–Capítulos en listas de reproducción:
Aproximadamente 1.000
(Depende del estado de la grabación.)
[Nota]
≥Mientras graba o mientras copia no puede crear ni editar una lista
de reproducción.
≥Las listas de reproducción se deben hacer según el sistema de
codificación seleccionado en “Sistema TV” (➡página 50).
Preparación
≥Pulse [HDD] o [DVD] para seleccionar la unidad.
≥Cancele la protección (➡página 42). [RAM]
1 Durante la parada
Pulse [FUNCTIONS].
2 Pulse [3, 4, 2, 1] para seleccionar
“PLAY LIST” y pulse [ENTER].
3 Pulse [3, 4, 2, 1] para seleccionar
“Crear” y pulse [ENTER].
4 Pulse [2, 1] para seleccionar el título
de la fuente y pulse [4].
≥Pulse [ENTER] para seleccionar todos los capítulos del
título, y luego salte al paso 6.
5 Pulse [2, 1] para seleccionar el
capítulo que quiera añadir a una lista
de reproducción y pulse [ENTER].
Pulse [3] para cancelar.
≥También puede crear un capítulo nuevo desde el título de
fuente. Pulse [SUB MENU] para seleccionar “Crear
capítulo” y pulse [ENTER] (➡página 31, Crear capítulo)
6 Pulse [2, 1] para seleccionar la
posición para insertar el capítulo y
pulse [ENTER].
≥Pulse [3] para seleccionar otros títulos de fuente.
≥Repita los pasos 5–6 para añadir otros capítulos.
7 Pulse [RETURN].
Para salir de la pantalla
Pulse varias veces [RETURN].
Para volver a la pantalla anterior
Pulse [RETURN].
Puede ordenar los capítulos (➡página 30) para crear una lista de
reproducción.
La copia (
➡
página 35) de una lista de reproducción creará un título.
≥La edición de listas de reproducción no modifica los datos de
grabación.
≥Las listas de reproducción no se graban separadamente, por lo
que no se utiliza mucha capacidad.
Creación de listas de reproducción
VOLUME
CH
DIRECT TV REC
DVD
TV
AV
123
456
78
0
9
MANUAL SKIP
ShowView
CH
CANCEL
INPUT SELECT
SKIP
STOP
PAU SE
PLAY/x1.3
SLOW/SEARCH
FUNCTIONS
ENTER
DIRECT NAVIGATOR
TOP MENU
RETURN
SUB MENU
CREATE
CHAPTER
TIMER
EXT LINK
PROG/CHECK
REC MODEERASE
REC
AUDIO
TIME SLIP
STATUS
DISPLAY
F
A B C
DUBBING
HDD DVD
SD/PC
3,4,2,1
ENTER
RETURN
FUNCTIONS
SUB MENU
HDD, DVD
Título
Capítulo
Lista de
reproducción
Capítulo
Título
Capítulo Capítulo Capítulo Capítulo
Capítulo
HDD
DVD SD/PC
Grabación
Copia
Editar
Reproducción
FUNCTIONS
Espacio disponible 68:00 SP
ENTER
RETURN
TIMER RECORDING
DIRECT NAVIGATOR
PLAY LIST
DUBBING
FLEXIBLE REC
DV AUTO REC
Ajuste
SETUP
DISC MANAGEMENT
PLAY LIST VISTA PLAY LIST
Anterior 01/01 Sig.
- - - - - -
- - - - - -
Crear
ENTER
RETURN
HDD
Crear
001 ARD 11/10 Sáb
001
001
Título origen
Capítulo orgen
Cap. en PLAY LIST
001/001
001/001
001/001
002 003
---
------------
002
SUB MENU
PLAY LIST
RETURN para salir.
ENTER
RETURN
HDD
------
PLAY LIST
Crear
001 ARD 11/10 Sáb
001
Título origen
Capítulo origen
Cap. en PLAY LIST
001/001
001/001
002 003
---
------------
RETURN para salir.
SUB MENU
ENTER
RETURN
001
001/001
002
HDD
------
Crear
001 ARD 11/10 Sáb
001
001/001
001/001
002 003
---
------------
PLAY LIST
Título origen
Capítulo origen
Cap. en PLAY LIST
RETURN para salir.
ENTER
RETURN
001
001/001
002
HDD
------
94
7463sp.book Page 32 Tuesday, March 8, 2005 11:12 AM

33
RQT7463
Edición
1 Pulse [FUNCTIONS].
2 Pulse [3, 4, 2, 1] para seleccionar
“PLAY LIST” y pulse [ENTER].
3 Pulse [3, 4, 2, 1] para seleccionar
la lista de reproducción.
Para iniciar la reproducción ➡ Pulse [ENTER].
Para editar ➡ Paso 4.
≥
Para mostrar otras páginas/Edición múltiple (
➡
página 30)
4 Pulse [SUB MENU], luego pulse
[3, 4] para seleccionar la operación
y pulse [ENTER].
≥Si selecciona “Editar”, pulse [3, 4] para seleccionar la
operación y pulse [ENTER].
∫ Si selecciona “Vista capítulo”
5 Pulse [3, 4, 2, 1] para seleccionar
el capítulo.
Para iniciar la reproducción ➡ Pulse [ENTER].
Para editar ➡ Paso 6.
≥
Para mostrar otras páginas/edición múltiple (
➡
página 30)
6 Pulse [SUB MENU], luego pulse
[3, 4] para seleccionar la operación
y pulse [ENTER].
≥Puede volver a Vista PLAY LIST.
Para salir de la pantalla
Pulse varias veces [RETURN].
Para volver a la pantalla anterior
Pulse [RETURN].
§
Es posible hacer la edición múltiple.
La edición de capítulos en una lista de reproducción no modifica los
títulos ni los capítulos de una fuente.
§
Es posible hacer la edición múltiple.
Edición y reproducción de listas de
reproducción/capítulos
PLAY LIST VISTA PLAY LIST
Seleccionar
Anterior 01/01 Sig.
SUB MENU
01
Crear
- -- -
- -- -- -
12/10 DOM 0:30
ENTER
RETURN
HDD
Pantalla Vista PLAY LIST
Copiar
Entrar nombre
Cambiar icono
Crear
Propiedades
Editar
Vista capítulo
Borrar
Consulte
“Operaciones
con listas de
reproducción”.
PLAY LIST VISTA CAPITULO
Seleccionar
Anterior 01/01 Sig.
SUB MENU
01 12/10 DOM 0:30
001
--- ---
--- ------ ---
--- ------ ---
002
ENTER
RETURN
HDD
Pantalla Vista capítulo
Desplazar capítulo
Crear capítulo
Combinar capítulos
Borrar capítulo
Vista PLAY LIST
Agregar capítulo
Consulte
“Operaciones con capítulos”.
Operaciones con listas de
reproducción
Borrar
§
Pulse [2, 1] para seleccionar “Borrar” y
pulse [ENTER].
Propiedades
Se muestra información de lista de
reproducción (Ej., hora y fecha).
Crear
➡página 32, Creación de listas de
reproducción
Copiar
§
Pulse [2, 1] para seleccionar “Copiar” y
pulse [ENTER].
Entrar
nombre
Puede poner nombres a listas de
reproducción.
➡página 44, Introducción de texto
Cambiar
icono
➡página 31, Cambiar icono
Operaciones con capítulos
Agregar
capítulo
➡página 32, Creación de listas de
reproducción, pasos 4–6
Desplazar
capítulo
Pulse [3, 4, 2, 1] para seleccionar la
posición para insertar el capítulo y pulse
[ENTER].
Crear
capítulo
➡página 31, Crear capítulo
Combinar
capítulos
➡página 31, Combinar capítulos
Borrar
capítulo
§
➡página 31, Borrar capítulo
Propiedades
Dinosaur
ENTER
SELECT
RETURN
N˚
Capítulos 0:30.53
Fecha
Total
10
002
12/10/2004 Mar
PLAY LIST Desplazer capítulo
Anterior 01/01 Sig.
01 12/10 Sáb 0:30
001
--- ---
--- ------ ---
--- ------ ---
002
ENTER
RETURN
HDD
95
7463sp.book Page 33 Tuesday, March 8, 2005 11:12 AM

34
RQT7463
Edición
Edición de imágenes fijas
[HDD] [RAM] [SD] [PC]
≥Puede utilizar tarjetas de memoria SD con capacidades de 8 MB a
1 GB (➡página 15).
Preparación
≥Pulse [HDD], [DVD] o [SD/PC] para seleccionar la unidad.
≥Cancele la protección (➡página 42).
1 Pulse [DIRECT NAVIGATOR].
2 [HDD] [RAM]
Pulse [3, 4, 2, 1] para seleccionar
la ficha “IMAGEN” y pulse [ENTER].
3 Pulse [3, 4, 2, 1] para seleccionar
la imagen fija.
≥
Para mostrar otras páginas/Edición múltiple (
➡
página 30)
≥Para seleccionar imágenes fijas en otra carpeta
(
➡
página 27)
4 Pulse [SUB MENU], luego pulse
[3, 4] para seleccionar la operación
y pulse [ENTER].
∫ Para editar carpetas de imágenes
fijas
En el paso 3 (➡arriba)
1 Pulse [3, 4, 2, 1] para seleccionar
“Carpeta” y pulse [ENTER].
2 Pulse [3, 4] para seleccionar la carpeta.
≥Para mostrar otras páginas/Edición múltiple (➡página 30)
3 Pulse [SUB MENU] y [3, 4] para seleccionar la operación y
luego pulse [ENTER].
≥Para seleccionar otra carpeta más alta (➡ página 27)
Para salir de la pantalla
Pulse [DIRECT NAVIGATOR].
Para volver a la pantalla anterior
Pulse [RETURN].
§
Es posible hacer la edición múltiple.
VOLUME
CH
DIRECT TV REC
DVD
TV
AV
123
456
78
0
9
MANUAL SKIP
ShowView
CH
CANCEL
INPUT SELECT
SKIP
STOP
PAU SE
PLAY/x1.3
SLOW/SEARCH
FUNCTIONS
ENTER
DIRECT NAVIGATOR
TOP MENU
RETURN
SUB MENU
PROG/CHECK
TIME SLIP
STATUS
DISPLAY
HDD DVD
SD/PC
3,4,2,1
ENTER
SUB MENU
DIRECT
NAVIGATOR
HDD, DVD,
SD/PC
RETURN
Configura Prot.ón
Borrar protección
Mostrar diapos.
Intervalo diapos.
DPOF
Borrar imagen
abajo
página 27
Nombre carpeta
Configura Prot.ón
Borrar protección
DPOF
Borr.enter.carpeta
Operación con imagen y carpeta
Borrar imagen
§
Borr.enter.carpeta
§
[HDD] [RAM] [SD] [PC]
Pulse [2, 1] para seleccionar “Borrar” y pulse [ENTER].
≥Una vez borrado, el contenido grabado se pierde y no se puede recuperar. Asegúrese antes de
proseguir.
≥Cuando se borra una carpeta, hasta los archivos que no contienen imágenes fijas se borrarán, siempre
que estén en la carpeta. (Esto no se aplica a las carpetas que están bajo la carpeta en cuestión.)
Configura Prot.ón
§
Borrar protección
§
[HDD] [RAM] [SD] [PC]
Si lo pone, esto protegerá la imagen fija o la carpeta para no borrarlas por error.
Pulse [2, 1] para seleccionar “Sí” y pulse
[ENTER].
Cuando la imagen fija o la carpeta está protegida aparece el símbolo del
candado.
≥Aunque esta unidad utilice el ajuste de protección para proteger una carpeta,
es posible que la carpeta pueda ser borrada por otra unidad.
DPOF
§
[SD] [PC]
Puede seleccionar una carpeta completa o imágenes individuales para imprimir y especificar el número
de copias que se va a hacer.
Pulse [2, 1] para seleccionar el número de
copias (0 a 9) y pulse [ENTER].
Aparece la marca DPOF.
≥Esto aparece en las imágenes fijas del interior de una carpeta cuando se hace el ajuste DPOF
para la carpeta.
Para cancelar el ajuste de impresión
Ponga el número de copias en “0”.
≥Cuando esta unidad haga este ajuste, cualquier ajuste establecido por otras unidades se cancelará.
≥Los ajustes de impresión (DPOF) hechos con esta unidad tal vez no se puedan ver en otro equipo.
≥No se pueden hacer ajustes para carpetas y archivos que no cumplen con las normas DCF, o si no
queda espacio en la tarjeta.
Nombre carpeta
[HDD] [RAM] [SD] [PC]
Puede poner nombres a las carpetas de imágenes fijas.
➡página 44, Introducción de texto
≥Los nombres de carpetas introducidos utilizando esta unidad puede que no se visualicen en otro equipo.
DIRECT NAVIGATOR VI
S
SD CARD
0001
Carpeta 103__D
V
0002
0005 0006
DPOF
Configurar DPOF en la imagen (JPEG).
El ajuste de otro equipo se suprimirá.
1
P l ENTER j t
Número de copias
96
7463sp.book Page 34 Tuesday, March 8, 2005 11:12 AM

35
RQT7463
Copia
Copia de títulos o listas de reproducción
[HDD] [RAM] [DVD-R]
Para copiar en esta unidad puede seleccionar entre una variedad de métodos.
∫ Dirección de la copia
Modo de velocidad normal: Seleccione XP, SP, LP, EP o FR como modo de grabación para copiar (➡página 17).
∫ Modo de copia
∫ Tipos y características de los modos de velocidad de copia
§1
Si selecciona un modo de grabación con mejor calidad de imagen que el original, la calidad de la imagen no mejora. (Sin embargo, esto impide
que se degrade la calidad de la imagen.)
§2
Cuando copie listas de reproducción a un DVD-R, las imágenes miniatura puede que no reflejen los cambios hechos en ellas.
∫ Tiempos de copia aproximado (Máxima velocidad)
[Nota]
≥Cuando grabe o reproduzca mientras copia, la unidad tal vez no pueda utilizar la velocidad máxima de grabación.
≥Dependiendo de la condición del disco, la unidad tal vez no copie utilizando la velocidad máxima.
Acerca de la copia a alta velocidad en DVD-R
Para copiar títulos a alta velocidad (o para reproducir listas creadas
desde esos títulos), ponga “Grab.ón DVD-R para copia rápida” en
“Sí” antes de grabar en la HDD (➡página 46).
Sin embargo, en los casos siguientes, la copia en el DVD-R a alta
velocidad no funciona.
≥Listas de reproducción creadas utilizando una variedad de modos
de grabación
≥Listas de reproducción creadas con múltiples títulos usando el
modo de grabación FR
≥Listas de reproducción mezcladas con una variedad de tipos de
audio (Dolby Digital, LPCM, etc.)
≥Títulos que contienen muchos segmentos borrados
Acerca de la copia de emisiones digitales que permite
“grabación de una sola vez”
Puede copiar un título grabado en un DVD-RAM compatible con
CPRM (➡página 53), sin embargo, el título se borrará de la HDD.
≥No puede utilizar la copia de un toque. Utilice la lista de copias
(➡página 36).
≥Los títulos no se transferirán si están protegidos (➡página 31).
≥No puede transferir listas de reproducción creadas desde títulos de
“grabación de una sola vez”.
≥Los títulos con limitaciones de grabación y las listas de
reproducción no se pueden registrar en la misma lista de copia.
≥Los títulos o listas de reproducción no se pueden transferir del
DVD-RAM a la HDD.
Puede copiar sus títulos y listas de reproducción favoritos en un disco de archivo.
≥La copia de una lista de reproducción creará un título.
Cuando desee volver a editar el contenido
finalizado en un DVD-R, etc.
≥Cuando quiera reproducir un disco copiado
en otro equipo, tendrá que finalizar el disco
después de copiarlo (➡página 43, 53).
§
Antes de grabar en la HDD, ponga
“Grab.ón DVD-R para copia rápida” en “Sí”
(➡página 46).
§
DVD-R o DVD-Vídeo finalizado que se
encuentre a la venta y que no esté protegido
contra la copia, etc.
Modo de alta velocidad
Modo de velocidad normal
HDD RAM
Modo de alta velocidad
§
Modo de velocidad normal
HDD DVD-R
Modo de velocidad normal
HDD
DVD-V
§
Copia de un título o lista de reproducción Copia de múltiples títulos y listas de reproducción juntos
Copia de un toque (➡página 36) Copia utilizando la lista de copia (➡página 36)
Puede seleccionar el modo de velocidad de copia y
la calidad de la imagen (➡abajo)
Alta velocidad Velocidad normal (XP, SP, LP, EP, FR)
Características Puede copiar en muy poco tiempo. Puede
copiar aún más rápido si utiliza un disco
compatible con la copia a alta velocidad.
Mientras se copia a alta velocidad puede
grabar y reproducir utilizando la HDD.
Puede grabar durante mucho tiempo en 1 disco.
Por ejemplo, con el modo LP, puede grabar aproximadamente
4 horas en 1 disco (4,7 GB) (➡página 17).
Ej., un drama de TV de 1 hora
Un solo episodio utilizando el modo XP
4 episodios utilizando el modo LP
Tiempos de copia ➡abajo, Tiempos de copia aproximado La misma cantidad de tiempo que se tarda en grabar la fuente
Calidad de imagen Calidad de imagen original
Puede cambiar
§1
¿Se mantienen los capítulos/
imágenes miniatura?
Sí
§2
No (Un título se graba como un capítulo. Las imágenes
miniatura se graban en la posición predeterminada.)
Otras operaciones mientras
se copia
Puede grabar/reproducir utilizando la HDD. No
XP
LP LP LP LP
HDD
1
DVD-RAM compatible con grabación a alta
velocidad 3k
DVD-R compatible con grabación a alta
velocidad 4k
Modo de
grabación
Tiempo de
grabación
Tiempo necesario Velocidad Tiempo necesario Velocidad
XP
1 hora
Aproximadamente 20 m 3k Aproximadamente 15 m 4k
SP Aproximadamente 10 m 6k Aproximadamente 7,5 m 8k
LP Aproximadamente 5 m 12k Aproximadamente 4 m 16k
EP ( 6horas ) Aproximadamente 3,5 m 18k Aproximadamente 2,5 m 24k
EP ( 8horas ) Aproximadamente 2,5 m 24k Aproximadamente 2 m 32k
97
7463sp.book Page 35 Tuesday, March 8, 2005 11:12 AM

36
RQT7463
Copia
Copia de títulos o listas de reproducción
[Nota]
No se pueden copiar los títulos ni listas de reproducción grabados
utilizando un sistema de codificación diferente del sistema de TV
actualmente seleccionado en la unidad.
[HDD]
>
[RAM]
[HDD]
>
[DVD-R]
Preparación
Seleccione el tipo de audio para grabar emisiones bilingües desde
“Selec. Audio Dual” (➡página 47) cuando copie en un DVD-R.
1 Reproduzca el título o lista de
reproducción que quiera copiar.
2 Pulse [DUBBING].
3 Pulse [2, 1] para seleccionar “Sí” y
pulse [ENTER].
≥La velocidad de copia y la calidad de la imagen se ajustan
como se indica a continuación.
El modo de grabación cambia a FR si el espacio restante del disco
se sobrepasa utilizando uno de los modos de grabación indicados
abajo.
[HDD] > [RAM]: Modo de alta velocidad
[HDD] > [DVD-R]:
[Nota]
Los títulos y las listas de reproducción no se pueden copiar si
contien emisiones digitales que sólo permiten la “grabación de una
sola vez”.
[HDD]
,-.
[RAM]
[HDD]
>
[DVD-R]
Puede ordenar títulos y listas de reproducción para copiar como
usted desee, y también seleccionar la velocidad y la calidad de la
imagen.
Preparación
Seleccione el tipo de audio para grabar emisiones bilingües desde
“Selec. Audio Dual” (➡página 47) cuando:
≥Copie a un DVD-R.
≥Cuando “Audio Mode para XP Recording” se ponga en “LPCM”
(➡página 47) y esté copiando en el modo XP.
1 Durante la parada
Pulse [FUNCTIONS].
2 Pulse [3, 4, 2, 1] para seleccionar
“DUBBING” y pulse [ENTER].
≥Si no va a cambiar la lista registrada, pulse varias veces [4]
(➡ paso 7).
3 Pulse [3, 4] para seleccionar
“Dirección copiado” y pulse [1].
1 Pulse [3, 4] para seleccionar “Fuente” y pulse
[ENTER].
2 Pulse [3, 4] para seleccionar la unidad y pulse
[ENTER].
3 Pulse [3, 4] para seleccionar “Destino” y pulse
[ENTER].
No se puede seleccionar la misma unidad que la fuente de
copia.
4 Pulse [3, 4] para seleccionar la unidad y pulse
[ENTER].
5 Pulse [2] para confirmar.
4 Pulse [3, 4] para seleccionar “Modo
copia” y pulse [1].
1 Pulse [3, 4] para seleccionar “Formato” y pulse
[ENTER].
2 Pulse [3, 4] para seleccionar “VIDEO” y pulse
[ENTER].
3 Pulse [3, 4] para seleccionar “Modo grab.ón” y pulse
[ENTER].
4 Pulse [3, 4] para seleccionar el modo y pulse
[ENTER].
5 Pulse [2] para confirmar.
5 Pulse [3, 4] para seleccionar “Crear
lista” y pulse [1].
Seleccione los elementos para copiar y regístrelos en la lista.
≥Cuando copie en un DVD-R utilizando el modo de alta
velocidad, sólo se podrán registrar los elementos indicados
con el signo “ ”.
1 Pulse [3, 4] para seleccionar “Nuevo detalle” y pulse
[ENTER].
2 Pulse [3, 4, 2, 1] para seleccionar la ficha “Vídeo” o
“PLAY LIST” y pulse [ENTER].
Copia de un toque
Ajuste Grab.ón DVD-R para copia rápida
Sí No
Modo de alta
velocidad
El mismo modo de grabación utilizado
cuando se graba el título de la fuente
(XP–EP, FR).
≥Las listas de reproducción se copian en
el modo FR.
VOLUME
CH
DIRECT TV REC
DVD
TV
AV
123
456
78
0
9
MANUAL SKIP
ShowView
CH
CANCEL
INPUT SELECT
SKIP
STOP
PAU SE
PLAY/x1.3
SLOW/SEARCH
FUNCTIONS
ENTER
DIRECT NAVIGATOR
TOP MENU
RETURN
SUB MENU
CREATE
CHAPTER
TIMER
EXT LINK
PROG/CHECK
REC MODEERASE
REC
AUDIO
TIME SLIP
STATUS
DISPLAY
F
A B C
DUBBING
HDD DVD
SD/PC
3,4,2,1
ENTER
SUB MENU
DUBBING
∫
1
RETURN
FUNCTIONS
;
STATUS
:, 9
Botones
numerados
DUBBING
El modo Copia rápid está seleccionado.
¿Iniciar?
Sí No
Copia utilizando la lista de copia
DUBBING
HDD
DVD
Seleccionar dirección copiado.
1
2
3
Fuente
Destino
Cancelar todo
Dirección copiado
Modo copia
Crear lista
HDD > DVD
VIDEO Copia ráp.
0
01/01
DUBBING
Crear lista de copiado.
Tamaño: 0MB
Capacidad de destino: 4343MB
N˚
Tamaño
Anterior
Nuevo detalle
Sig.
Definir
ENTER
RETURN
1
2
3
Cancelar todo
Dirección copiado
Modo copia
Crear lista
Iniciar copia
HDD > DVD
VIDEO Copia ráp.
Nombre del detalle
HDD
Crear lista
Seleccionar
Anterior 02/02 Sig.
007
ARD 10/10 Vie
008 1200MB
ARD 11/10 Sáb
- - -
ENTER
RETURN
- - -- - -- - -
PLAY LIST
Vídeo
98
7463sp.book Page 36 Tuesday, March 8, 2005 11:12 AM

37
RQT7463
Copia
3 Pulse [3, 4, 2, 1] para seleccionar los títulos o
listas de reproducción y pulse [ENTER].
≥Para seleccionar múltiples elementos juntos, pulse [;]
para agregar la marca de verificación y pulse [ENTER]
(➡ abajo, Edición múltiple).
≥Para mostrar otras páginas (➡abajo)
≥Para editar la lista de copia (➡abajo)
6 Pulse [3, 4] para seleccionar
“Definir” y pulse [ENTER].
La lista de copia se registra.
7 Pulse [3, 4] para seleccionar “Iniciar
copia” y pulse [ENTER].
Pulse [2, 1] para seleccionar “Sí” y pulse [ENTER] para
empezar a copiar.
∫ Para editar la lista de copia
Seleccione el elemento en el paso 5 (➡página 36,
columna derecha)
1 Pulse [SUB MENU].
2 Pulse [3, 4] para seleccionar la operación y
pulse [ENTER].
§
Es posible hacer la edición múltiple (➡abajo).
Para cancelar todas las listas y ajustes de copia registrados
En el paso 3 (➡página 36, columna derecha)
1 Pulse [3, 4] para seleccionar “Cancelar todo” y pulse [ENTER].
2 Pulse [2, 1] para seleccionar “Sí” y pulse [ENTER].
≥Los ajustes y las listas se pueden cancelar en las situaciones
siguientes.
–Cuando se ha borrado un título, una imagen fija, etc. en la fuente
de copia
–Cuando se han tomado medidas, por ejemplo, para apagar la
unidad, abrir la bandeja, cambiar el sentido de la copia, etc.
Indicadores de la lista de copia
Tamaño de datos de cada elemento registrado
Para mostrar otras páginas
Pulse [3, 4, 2, 1] para seleccionar “Anterior” o “Sig.” y pulse
[ENTER].
≥También puede pulsar [:, 9] para mostrar otras páginas.
Edición múltiple
Seleccione con [3, 4, 2, 1] y pulse [;]. (Repetición.)
Pulse [ENTER] para registrar en la lista.
≥Aparece una marca de comprobación. Pulse de nuevo [;] para
cancelar.
≥Cuando cambie entre la ficha “Vídeo” y “PLAY LIST”, la marca
de comprobación se cancelará.
Añadir
Mover
Borrar todo
Borrar
§
Los títulos y las listas de reproducción se pueden
copiar en el modo de alta velocidad en DVD-R
(➡página 46).
Título con la restricción de “grabación de una sola
vez”.
Títulos borrados de la HDD mediante la restricción
de “grabación de una sola vez ” tras la copia.
El título o la lista de reproducción contiene
imágenes fijas.
≥No se pueden copiar imágenes fijas.
(NTSC)
(PAL)
El título o lista de reproducción grabado utilizando
un sistema de codificación diferente del que
emplea el sistema de TV actualmente
seleccionado en la unidad.
≥Los títulos y listas de reproducción que muestran
estas marcas no se pueden seleccionar.
∫ Para detener la copia
Mantenga pulsado [RETURN] durante 3 segundos.
≥Si se detiene al rato de empezar, la copia se hará hasta ese
punto. Sin embargo, en el modo de alta velocidad, sólo se
copiarán los títulos que han sido copiados completamente hasta
ese punto. (Aunque el título no haya sido grabado en el DVD-R,
la cantidad que queda en el disco para escribir se reducirá.)
∫ Para volver a la pantalla anterior
Pulse [RETURN].
∫ Grabación y reproducción durante la copia
Mientras se copia a alta velocidad puede grabar y reproducir
utilizando la HDD.
Pulse [ENTER] para cancelar la visualización en pantalla.
≥Para confirmar el progreso actual
Pulse [STATUS].
[Nota]
≥Mientras copia no puede hacer la reproducción de persecución,
la edición, etc.
≥Las grabaciones con temporizador se ejecutan mientras se
copia en la HDD independientemente de los ajustes de la
unidad de grabación.
≥No puede reproducir una lista mientras copia títulos con la
restricción de “grabación de una sola vez” (➡página 35).
01/01
Tamaño: 0MB
Capacidad de destino: 4343MB
N˚
Tamaño
Anterior
Nuevo detalle
Sig.
Definir
Nombre del detalle
Tamaño de datos grabado en el destino de la
copia
≥Para hacer la copia a velocidad normal, el
tamaño total de los datos cambia según el
modo de grabación.
≥Cuando se hace la copia al HDD utilizando
el modo de alta velocidad, la información
de administración de los datos se agrega
automáticamente, por lo que el tamaño
total de los datos sobrepasa la suma del
tamaño de los datos para todos los
elementos registrados.
99
7463sp.book Page 37 Tuesday, March 8, 2005 11:12 AM

38
RQT7463
Copia
Copia de títulos o listas de reproducción
Consulte la referencia de controles en página 36.
[DVD-V]
>
[HDD]
Mientras se reproduce un disco, el contenido que está siendo
reproducido se copia en la HDD segun el tiempo establecido.
Después de realizar los pasos 1–4 (➡página 36, columna derecha)
5 Pulse [3, 4] para seleccionar
“Tiemp. copia” y pulse [1].
6 Pulse [2, 1] para seleccionar “H” y
“Min.” y pulse [3, 4] para ajustar el
tiempo de grabación.
≥También puede poner el tiempo de grabación con los
botones numerados.
≥Ponga unos minutos más que la duración del título de
reproducción para incluir el tiempo de funcionamiento que
se tarda hasta que empieza la reproducción.
7 Pulse [2] para seleccionar “Tiemp.
copia”.
8 Pulse [3, 4] para seleccionar “Iniciar
copia” y pulse [ENTER].
Pulse [2, 1] para seleccionar “Sí” y pulse [ENTER] para
empezar a copiar.
Se visualiza el menú inicial del disco.
≥La reproducción del disco empieza automáticamente desde
el título 1 cuando “Título 1” se selecciona desde el menú
“Selección Auto-Play” mientras se finaliza el disco
(➡página 43).
9 Cuando se visualiza el menú inicial
Pulse [3, 4, 2, 1] para seleccionar
el título que desea empezar a copiar y
pulse [ENTER].
Mientras se reproduce en orden, todos los títulos posteriores
al título seleccionado se graban hasta alcanzar el tiempo
establecido. (Después de finalizar la reproducción del último
título del disco, el menú inicial se graba hasta alcanzar el
tiempo establecido.)
Para detener la copia
Pulse [∫].
También puede mantener pulsado [RETURN] durante 3 segundos
para detener la copia.
≥Si se detiene al rato de empezar, la copia se hará hasta ese punto.
Para volver a la pantalla anterior
Pulse [RETURN].
[Nota]
≥La pantalla de la derecha (salvapantallas) se
graba al comienzo.
≥Grabado como 1 título desde el comienzo de la
copia hasta el final.
≥Si la reproducción no empieza automáticamente o si el menú
inicial no se visualiza automáticamente, pulse [1] (PLAY) para
empezar.
≥Aunque copie un DVD de vídeo/audio de alta calidad, la calidad de
la imagen y el sonido originales no podrán copiarse exactamente.
Copia de un DVD-R finalizado
≥También se graban las operaciones y visualizaciones en
pantalla mostradas durante la copia.
≥Casi todos los DVD-Vídeo a la venta han sido tratados para
impedir la copia ilegal, y, por lo tanto, no pueden ser copiados.
≥No se pueden copiar los discos siguientes: DVD-Audio, Vídeo
CD, Audio CD, etc.
Ajustar el tiempo con las teclas
numéricas o los botones de flecha.
DUBBING
Min.
Definir el tiempo para terminar
el copiado.
1
2
3
H
00
2
Cancelar todo
Dirección copiado
Modo copia
Tiemp. copia
Iniciar copia
DVD > HDD
DVD-Video XP
ENTER
RETURN
My favorite 01/02
01
Chapter 1
03
05
02
04
06
Chapter 2
Chapter 3 Chapter 4
100
7463sp.book Page 38 Tuesday, March 8, 2005 11:12 AM

39
RQT7463
Copia
Grabación desde una videograbadora
Ej., Conexión de otro equipo de vídeo a los terminales de
entrada AV3 o DV
≥Apague la unidad y otros equipos de vídeo antes de hacer la
conexión.
Si la salida de audio del otro equipo es mono, conecte a L/MONO.
§
Los terminales S-VIDEO logran una imagen más viva que la del
terminal VIDEO.
Cuando se graba desde el terminal DV de las unidades
Seleccione el tipo de grabación de audio en “Modo de audio para
entrada DV” en el menú SETUP (➡página 47).
[HDD] [RAM] [DVD-R]
Preparación
≥Conecte una videograbadora a los terminales de entrada de esta
unidad.
≥Pulse [HDD] o [DVD] para seleccionar la unidad de grabación.
≥Cuando grabe programas bilingües
[HDD] [RAM]
Cuando se seleccionen M 1 y M 2 en el equipo conectado, usted
podrá seleccionar el tipo de audio en la reproducción.
[DVD-R]
Seleccione M 1 o M 2 en el equipo conectado. (No puede
seleccionar el tipo de audio en la reproducción.)
≥Cuando la señal de salida procedente del equipo externo sea
NTSC, cambie “Sistema TV” a “NTSC” en el menú SETUP
(➡página 50).
≥Para reducir el ruido en la entrada procedente de una
videograbadora, ponga “Reductor ruido AV IN” en “Sí” en el menú
SETUP (➡página 46).
1 Durante la parada
Pulse [INPUT SELECT] para
seleccionar el canal de entrada para el
equipo que usted ha conectado.
Ej., Si usted ha hecho la conexión a los terminales de
entrada AV3, seleccione “AV3”.
2 Pulse [REC MODE] para seleccionar el
modo de grabación.
3
Inicie la reproducción en el otro equipo.
4 Pulse [¥ REC].
Empieza la grabación.
Para saltar partes que no desee
Pulse [;] para hacer una pausa en la grabación. (Pulse de nuevo
para reiniciar la grabación.)
Para detener la grabación
Pulse [∫].
Para grabar programas y llenar el espacio restante del disco
➡página 18, Grabación flexible
[HDD] [RAM]
Cuando se utiliza la función “DV AUTO REC”, los programas se
graban como un título mientras que, al mismo tiempo, se crean
capítulos con cada corte en las imágenes y la lista de reproducción
se crea automáticamente.
Preparación
1 Apague la unidad principal y el equipo DV, y luego conecte el
equipo al terminal de entrada DV de la unidad (➡izquierda).
2 Encienda la unidad principal y el equipo DV.
3 Haga una pausa en el equipo DV en el punto donde quiera
empezar a grabar.
4 Pulse [HDD] o [DVD] para seleccionar la unidad de grabación.
≥Cuando la señal de salida procedente del equipo externo sea
NTSC, cambie “Sistema TV” a “NTSC” en el menú SETUP
(➡página 50).
1 Durante la parada
Pulse [FUNCTIONS].
2 Pulse [3, 4, 2, 1] para seleccionar
“DV AUTO REC” y pulse [ENTER].
3 Pulse [REC MODE] para seleccionar el
modo de grabación.
4 Pulse [2, 1] para seleccionar “Rec” y
pulse [ENTER].
Empieza la grabación.
Cuando termina la grabación
Aparece la pantalla de confirmación. Pulse [ENTER] para finalizar la
grabación automática DV.
Para detener la grabación
Pulse [∫].
[Nota]
≥Sólo se puede conectar un equipo DV (ej., videcámara digital) a la
unidad mediante el terminal de entrada DV.
≥No se puede controlar la unidad desde el equipo DV conectado.
≥La entrada DV de esta unidad es para utilizar con equipos DV
solamente. (No se puede conectar a un ordenador, etc.)
≥El nombre del equipo DV puede que no se muestre correctamente.
≥Dependiendo del equipo DV, las imágenes o el sonido puede que
no se introduzcan correctamente.
≥
La información de la fecha y la hora de la cinta del equipo DV no se grabará.
≥No puede grabar y reproducir simultáneamente.
Grabación manual
VOLUME
CH
DIRECT TV REC
DVD
TV
AV
123
456
78
0
9
MANUAL SKIP
ShowView
CH
CANCEL
INPUT SELECT
SKIP
STOP
PAU SE
PLAY/x1.3
SLOW/SEARCH
FUNCTIONS
ENTER
DIRECT NAVIGATOR
TOP MENU
RETURN
SUB MENU
TIMER
PROG/CHECK
REC MODEERASE
REC
TIME SLIP
STATUS
DISPLAY
F
HDD DVD
SD/PC
3,4,2,1
ENTER
FUNCTIONS
REC MODE
HDD, DVD
¥ REC
INPUT SELECT
∫
;
OPEN/CLOSE
REC
/
x
1.3
TIME SLIP
CH
TIME SLIP
DRIVE SELECT
SD PCDVDHDD
SD CARD PC CARD EJECT
HDD DVD
AV3
S-VIDEO IN VIDEO IN AUDIO IN DV IN
R
L/MONO
L/MONO - AUDIO IN - R
VIDEO IN DV IN
S-VIDEO IN
Cable de
audio/vídeo
Cable de
S-Vídeo
§
Otro equipo
de vídeo
Amarillo
Blanco
Rojo
Esta unidad
Cable DV
(IEEE 1394,
4 contactos)
La mayoría de los vídeos y software de DVD a la venta han
sido tratados para evitar la copia ilegal. Cualquier software
que haya sido tratado de esta forma no podrá grabarse
utilizando esta unidad.
Grabación automática DV
(DV AUTO REC)
Si la función de grabación automática DV no funciona
correctamente, compruebe las conexiones y los ajustes del
equipo DV, y apague y encienda la unidad.
Si esto no surte efecto, siga las instrucciones para la
grabación manual (➡izquierda).
101
7463sp.book Page 39 Tuesday, March 8, 2005 11:12 AM

40
RQT7463
Copia
Copia de imágenes fijas
[HDD] [RAM] [SD] [PC]
≥Puede utilizar tarjetas de memoria SD con capacidades de 8 MB a
1 GB (➡página 15).
1 Durante la parada
Pulse [FUNCTIONS].
2 Pulse [3, 4, 2, 1] para seleccionar
“DUBBING” y pulse [ENTER].
≥Si no va a cambiar la lista registrada, pulse varias veces [4]
(➡ paso 7).
3 Pulse [3, 4] para seleccionar
“Dirección copiado” y pulse [1].
1
Pulse [
3
,
4
] para seleccionar “Fuente” y pulse [ENTER].
2
Pulse [
3
,
4
] para seleccionar la unidad y pulse [ENTER].
3
Pulse [
3
,
4
] para seleccionar “Destino” y pulse [ENTER].
4
Pulse [
3
,
4
] para seleccionar la unidad y pulse [ENTER].
Se puede seleccionar la misma unidad que la de fuente de copia.
5 Pulse [2] para confirmar.
4 Pulse [3, 4] para seleccionar “Modo
copia” y pulse [1].
1
Pulse
[3, 4] para seleccionar “Formato” y pulse
[ENTER]
.
2
Pulse
[3, 4] para seleccionar “IMAGEN” y pulse
[ENTER]
.
“Modo grab.ón” se pone automáticamente en “Copia rápid”.
3 Pulse [2] para confirmar.
5 Pulse [3, 4] para seleccionar “Crear
lista” y pulse [1].
Seleccione los elementos para copiar y regístrelos en la lista.
∫Para registrar imágenes fijas individuales
1Pulse [3, 4] para seleccionar “Nuevo detalle” y pulse
[ENTER].
2Pulse [3, 4, 2, 1] para seleccionar la imagen fija y
pulse [ENTER].
≥Para seleccionar múltiples elementos juntos, pulse [;]
para agregar la marca de verificación y pulse [ENTER]
(➡ derecha, Edición múltiple).
≥Para mostrar otras páginas (➡ derecha)
≥
Para seleccionar las imágenes fijas de otra carpeta (
➡
derecha)
≥
Para editar la lista de copia
(
➡
derecha)
∫Para registrar carpeta a carpeta
1
Pulse [
3
,
4
] para seleccionar “Imag./Carpeta” y pulse [ENTER].
2
Pulse [
3
,
4
] para seleccionar “Carpeta” y pulse [ENTER].
3
Pulse [
3
,
4
] para seleccionar “Nuevo detalle” y pulse [ENTER].
4
Pulse [
3
,
4
] para seleccionar una carpeta y pulse [ENTER].
≥Para seleccionar múltiples elementos juntos, pulse [;]
para agregar la marca de verificación y pulse [ENTER]
(➡ derecha, Edición múltiple).
≥Para mostrar otras páginas (➡ abajo)
≥Para cambiar a otra carpeta más alta (➡ abajo)
≥Para editar la lista de copia (➡ abajo)
Las imágenes fijas y las carpetas no se pueden registrar en la
misma lista.
6 Pulse [3, 4] para seleccionar
“Definir” y pulse [ENTER].
La lista de copia se registra.
7 Pulse [3, 4] para seleccionar “Iniciar
copia” y pulse [ENTER].
≥Para imágenes fijas individuales solamente
Cuando especifique otra carpeta como destino de la copia,
seleccione “Carpeta”.
Pulse [2, 1] para seleccionar “Sí” y pulse [ENTER] para
empezar a copiar.
Para detener la copia
Mantenga pulsado [RETURN] durante 3 segundos.
Para volver a la pantalla anterior
Pulse [RETURN].
∫Para seleccionar otra carpeta
1 Pulse [3, 4, 2, 1] para seleccionar “Carpeta” y pulse
[ENTER].
2 Pulse [3, 4] para seleccionar una carpeta y pulse [ENTER].
≥Las imágenes fijas de carpetas diferentes no se pueden registrar
en la misma lista.
≥Si hay un número múltiple de carpetas
reconocible, usted podrá cambiarlas
utilizando [2, 1]. (Las carpetas
cuyas carpetas más altas sean
diferentes no podrán ser registradas en la misma lista.)
∫ Para editar la lista de copia
Seleccione el elemento en el paso 5 (➡izquierda)
1 Pulse [SUB MENU].
2Pulse [3, 4] para seleccionar la operación y
pulse [ENTER].
§
Es posible hacer la edición múltiple (➡abajo).
Para cancelar todas las listas y ajustes de copia registrados
En el paso 3 (➡izquierda)
1Pulse [3, 4] para seleccionar “Cancelar todo” y pulse [ENTER].
2Pulse [2, 1] para seleccionar “Sí” y pulse [ENTER].
≥Los ajustes y las listas se pueden cancelar en las situaciones
siguientes.
–Cuando una imagen fija o una carpeta ha sido grabada o borrada
en la fuente de copia.
–Cuando se han tomado medidas, por ejemplo, para apagar la unidad,
quitar la tarjeta, abrir la bandeja, cambiar el sentido de la copia, etc.
Copia utilizando la lista de copia
123
456
78
0
9
MANUAL SKIP
ShowView
CH
CANCEL
INPUT SELECT
SKIP
STOP
PAU SE
PLAY/x1.3
SLOW/SEARCH
FUNCTIONS
ENTER
DIRECT NAVIGATOR
TOP MENU
RETURN
SUB MENU
HDD DVD
SD/PC
3,4,2,1
ENTER
SUB MENU
RETURN
FUNCTIONS
SD/PC
:, 9
;
DUBBING
SD CARD
HDD
Seleccionar dirección copiado.
1
2
3
Fuente
Destino
Cancelar todo
Dirección copiado
Modo copia
Crear lista
SD CARD > HDD
IMAGEN Copia ráp.
0
01/01
DUBBING
Crear lista de copiado.
Capacidad de destino: 4343MB
Nº
Tamaño
Anterior
Nuevo detalle
Sig.
Definir
ENTER
RETURN
1
2
3
Cancelar todo
Imagen
Dirección copiado
Modo copia
Crear lista
Imag./Carpeta
Iniciar copia
SD CARD > DVD
IMAGEN Copia ráp.
Nombre del detalle
Para mostrar otras páginas
Pulse [3, 4, 2, 1] para seleccionar “Anterior” o “Sig.” y pulse
[ENTER].
≥También puede pulsar [:, 9] para mostrar otras páginas.
Edición múltiple
Seleccione con [3, 4, 2, 1] y pulse [;]. (Repetición.)
Pulse [ENTER] para registrar en la lista.
≥
Aparece una marca de comprobación. Pulse de nuevo [
;
] para cancelar.
DUBBING
Crear lista de copiado.
Capacidad de destino: 4343MB
Nº
Tomaño
Nuevo detalle
1
2
Cancelar todo
Imagen
Dirección copiado
Dubbing Mode
Imag./Carpeta
SD CARD > HDD
Nombre del detalle
Carpeta
Make a new folder and dub to it?
Nueva carpeta
\JPEG\DCIM001
001 100__DVD
002 101__DVD
003 102__DVD
---
004 103__DVD
Crear lista Imagen (JPEG)
SD CARD
0001
Carpeta 103__DVD
0002 0003 0004
\DCIM
001 100__DVD
002 101__DVD
003 102__DVD
---
\DCIM\100__DVD
004 103__DVD
002 101__DVD
003 102 DVD
\DCIM\100__DVD
\DCIM
001 100__DVD
Añadir
Borrar
§
Borrar todo
102
7463sp.book Page 40 Tuesday, March 8, 2005 11:12 AM

41
RQT7463
Funciones convenientes Copia
[SD]
o
[PC]
>
[HDD]
o
[RAM]
Preparación
Pulse [SD/PC] para seleccionar la unidad fuente.
1 Durante la parada
Pulse [FUNCTIONS].
2 Pulse [3, 4, 2, 1] para seleccionar
“COPIAR TODAS IMÁG.” y pulse
[ENTER].
≥Si hay un número múltiple de carpetas reconocible, usted
podrá cambiarlas utilizando [2, 1].
3 Pulse [3, 4] para seleccionar “Copiar
de” y pulse [2, 1] para seleccionar la
unidad.
4 Pulse [3, 4] para seleccionar “Copiar
a” y pulse [2, 1] para seleccionar la
unidad.
5 Pulse [3, 4, 2, 1] para seleccionar
“Copiar” y pulse [ENTER].
Para detener la copia
Mantenga pulsado [RETURN] durante 3 segundos.
Para volver a la pantalla anterior
Pulse [RETURN].
Utilizando la ventana FUNCTIONS usted puede tener acceso rápido
y fácil a las funciones principales.
1 Durante la parada
Pulse [FUNCTIONS].
Las funciones visualizadas dependen de la unidad
seleccionada o del tipo de disco.
2 Pulse [3, 4, 2, 1] para seleccionar
un elemento y pulse [ENTER].
Para salir de la ventana FUNCTIONS
Pulse [FUNCTIONS].
Copia de todas las imágenes fijas en
una tarjeta—COPIAR TODAS IMÁG.
[Nota]
≥Cuando copie las imágenes fijas carpeta a carpeta o tarjeta a
tarjeta, los archivos que no sean archivos de imágenes fijas y
que estén en las carpetas también se copiarán. (Esto no se
aplica a las carpetas inferiores contenidas en las carpetas.)
≥Si ya hay imágenes fijas en el interior de la carpeta de destino
de la copia, las nuevas imágenes fijas se grabarán a
continuación de las existentes.
≥Si se agota el espacio de la unidad de destino o el número de
archivos/carpetas que se va a copiar excede el máximo
(➡ página 26), la copia se detendrá sin terminar.
≥Cuando esta unidad haya introducido un nombre para la
carpeta fuente de copia, el nombre de la carpeta se mostrará
en la carpeta de destino.
≥El ajuste del número de copia (DPOF) no se copia.
≥El orden en el que se registran las imágenes fijas en la lista de
copia no se reflejará en el destino de la copia.
COPIAR TODAS IMÁG.
Copiar de
SD CARD
\DCIM
Copiar a
HDD
\JPEG\DCIM001
VOLUME
CH
DIRECT TV REC
DVD
TV
AV
123
456
78
0
9
MANUAL SKIP
ShowView
CH
CANCEL
INPUT SELECT
SKIP
STOP
PAU SE
PLAY/x1.3
SLOW/SEARCH
FUNCTIONS
ENTER
DIRECT NAVIGATOR
TOP MENU
RETURN
SUB MENU
CREATE
CHAPTER
TIMER
EXT LINK
PROG/CHECK
REC MODEERASE
REC
AUDIO
TIME SLIP
STATUS
DISPLAY
F
A B C
DUBBING
HDD DVD
SD/PC
3,4,2,1
ENTER
FUNCTIONS
HDD
DVD SD/PC
Grabación
Copia
Editar
Reproducción
FUNCTIONS
Espacio disponible 68:00 SP
ENTER
RETURN
TIMER RECORDING
DIRECT NAVIGATOR
PLAY LIST
DUBBING
FLEXIBLE REC
DV AUTO REC
Ajuste
SETUP
GESTIÓN DISCO
Ventana FUNCTIONS
103
7463sp.book Page 41 Tuesday, March 8, 2005 11:12 AM

42
RQT7463
Funciones convenientes
Administración de la HDD, disco y tarjeta
≥Puede utilizar tarjetas de memoria SD con capacidades de 8 MB a
1 GB (➡página 15).
∫ Puesta de la protección para todo el disco o
tarjeta
≥Para un DVD-RAM con un cartucho o para una tarjeta
[RAM]
Con la lengüeta de protección contra escritura en
la posición de protección, la reproducción empieza
automáticamente cuando se introduce en la
unidad.
[SD] [PC]
Ponga el interruptor de protección contra escritura
en “LOCK”.
≥Para un DVD-RAM sin cartucho (➡abajo,
Protección del disco)
∫ Otros ajustes de protección
[RAM]
Preparación
Pulse [DVD] para seleccionar la unidad DVD.
1 Durante la parada
Pulse [FUNCTIONS].
2 Pulse [3, 4, 2, 1] para seleccionar
“GESTIÓN DISCO” y pulse [ENTER].
3 Pulse [3, 4] para seleccionar
“Protección del disco” y pulse
[ENTER].
4 Pulse [2, 1] para seleccionar “Sí” y
pulse [ENTER].
Cuando el disco está protegido contra la escritura aparece el
símbolo del candado cerrado.
[RAM] [DVD-R]
Preparación
≥Pulse [DVD] para seleccionar la unidad DVD.
≥Cancele la protección (➡ izquierda).
1 Durante la parada
Pulse [FUNCTIONS].
2 Pulse [3, 4, 2, 1] para seleccionar
“GESTIÓN DISCO” y pulse [ENTER].
3 Pulse [3, 4] para seleccionar
“Nombre del disco” y pulse [ENTER].
➡página 44, Introducción de texto
≥El nombre del disco se visualiza en la ventana FUNCTIONS.
≥Con un DVD-R finalizado, el nombre se visualiza en el menú
inicial.
[HDD] [RAM]
Preparación
≥Pulse [HDD] o [DVD] para seleccionar la unidad.
≥Cancele la protección (➡ izquierda).
1 Durante la parada
Pulse [FUNCTIONS].
2 Pulse [3, 4, 2, 1] para seleccionar
“GESTIÓN DISCO” y pulse [ENTER].
3 Pulse [3, 4] para seleccionar “Borrar
todos los títulos” y pulse [ENTER].
4 Pulse [2, 1] para seleccionar “Sí” y
pulse [ENTER].
5 Pulse [2, 1] para seleccionar
“Iniciar” y pulse [ENTER].
Cuando se termina aparece un mensaje.
6 Pulse [ENTER].
[Nota]
≥Una vez borrado, el contenido grabado se pierde y no se
puede recuperar. Asegúrese antes de proseguir.
≥Los datos de imagen fija (JPEG, TIFF) o los datos de ordenador no
se pueden borrar.
≥El borrado no sirve si uno o más títulos están protegidos.
Para salir de la pantalla
Pulse varias veces [RETURN].
Para volver a la pantalla anterior
Pulse [RETURN].
Puesta de la protección
Título
Seleccione “Configura Prot.ón” en el paso 4 de la página 30.
Imagen fija o carpeta
Seleccione “Configura Prot.ón” en el paso 4 de la página 34.
Protección del disco
VOLUME
CH
DIRECT TV REC
DVD
TV
AV
123
456
78
0
9
MANUAL SKIP
ShowView
CH
CANCEL
INPUT SELECT
SKIP
STOP
PAU SE
PLAY/x1.3
SLOW/SEARCH
FUNCTIONS
ENTER
DIRECT NAVIGATOR
TOP MENU
RETURN
SUB MENU
CREATE
CHAPTER
TIMER
EXT LINK
PROG/CHECK
REC MODEERASE
REC
AUDIO
TIME SLIP
STATUS
DISPLAY
F
A B C
DUBBING
HDD DVD
SD/PC
HDD, DVD,
SD/PC
3,4,2,1
ENTER
RETURN
FUNCTIONS
PROTECT
LOCK
Ej., tarjeta de
memoria SD
Puesta de un nombre a un disco
Borrado de todos los títulos y listas de
reproducción—Borrar todos los títulos
GESTIÓN
DISCO
DVD-RAM
N˚ título 11
Usado
Espacio
0 : 22
5:38 (EP)
On
Nombre del disco
Borrar todos los títulos
Protección del disco
SELECT
ENTER
RETURN
Formateo del disco
My favorite 01/02
01
Chapter 1
02
Chapter 2
HDD SD/PC
Reproducción
FUNCTIONS
DIRECT NAVIGATOR
DVD
DVD-RAM
Protección del dis
c
Documentary
Pestaña protecció
n
104
7463sp.book Page 42 Tuesday, March 8, 2005 11:12 AM

43
RQT7463
Funciones convenientes
[HDD] [RAM] [SD] [PC]
Preparación
≥Pulse [HDD], [DVD] o [SD/PC] para seleccionar la unidad.
≥Cancele la protección (➡izquierda).
1 Durante la parada
Pulse [FUNCTIONS].
2 Pulse [3, 4, 2, 1] para seleccionar
“GESTIÓN DISCO” o “GESTIÓN
TARJETA” y pulse [ENTER].
3 Pulse [3, 4] para seleccionar
“Formato”, “Formateo del disco” o
“Formatear” y pulse [ENTER].
4 Pulse [2, 1] para seleccionar “Sí” y
pulse [ENTER].
5 Pulse [2, 1] para seleccionar
“Iniciar” y pulse [ENTER].
Cuando termina el formateado aparece un mensaje.
6 Pulse [ENTER].
[Nota]
≥Para detener el formateado
Pulse [RETURN].
(Puede cancelar el formateado si éste tarda más de 2 minutos. (El
disco o la tarjeta tendrá que volver a ser formateado si hace esto.)
≥En los DVD-R o CD-R/RW no se puede hacer el formateado.
≥Cuando un disco o tarjeta hayan sido formateados con esta
unidad, es posible que no puedan ser utilizados con otro equipo.
≥En esta unidad no puede formatear un Microdrive o un disco duro
móvil.
[DVD-R]
Preparación
Pulse [DVD] para seleccionar la unidad DVD.
1 Durante la parada
Pulse [FUNCTIONS].
2 Pulse [3, 4, 2, 1] para seleccionar
“GESTIÓN DISCO” y pulse [ENTER].
3 Pulse [3, 4] para seleccionar “Top
Menu” y pulse [ENTER].
Pulse [3, 4, 2, 1] para seleccionar el fondo y pulse
[ENTER].
Puede seleccionar el fondo
que se visualizará como menú
inicial de DVD-Vídeo tras la
finalización.
≥Puede cambiar las imágenes
miniatura visualizadas en el
menú inicial. (➡página 31,
Cambiar icono)
4 Pulse [3, 4] para seleccionar
“Selección Auto-Play” y pulse
[ENTER].
Pulse [3, 4] para seleccionar “Top Menu” o “Título 1” y
pulse [ENTER].
Puede seleccionar si va a mostrar el menú inicial tras la
finalización.
Top Menu: Primero aparece el menú inicial.
Título 1: El contenido del disco se visualiza sin visualizarse
el menú inicial.
5 Pulse [3, 4] para seleccionar
“Cerrar” y pulse [ENTER].
1 Pulse [2, 1] para seleccionar “Sí” y pulse [ENTER].
2 Pulse [2, 1] para seleccionar “Empezar” y pulse
[ENTER].
Cuando termina la finalización aparece un mensaje.
3 Pulse [ENTER].
[Nota]
≥No puede finalizar los DVD-R grabados en equipos de otros
fabricantes.
≥Si finaliza un DVD-R grabado en un equipo Panasonic que no sea
esta unidad, el fondo seleccionado como “Top Menu” puede que
no se visualice.
Los DVD-R finalizados en esta unidad tal vez no puedan
reproducirse en otros reproductores debido a la condición de la
grabación.
≥Visite la página inicial de Panasonic para tener más información de
los DVDs.
http://www.panasonic-europe.com
Para salir de la pantalla
Pulse varias veces [RETURN].
Para volver a la pantalla anterior
Pulse [RETURN].
Borrado de todo el contenido de un
disco o tarjeta—Formateado
≥El formateado borra todo el contenido (incluyendo los datos
de ordenador), y éste no se puede recuperar. Verifique
cuidadosamente antes de proseguir. El contenido se borrará
al formatear aunque usted haya puesto la protección.
≥No desconecte el cable de alimentación de CA mientras
formatea. Esto puede inutilizar el disco.
El formateado tarda normalmente unos pocos minutos, pero
también puede tardar hasta 70 minutos ([RAM]).
Ajuste para que los DVD-R se puedan
reproducir en otro equipo—Finalización
Después de finalizar
≥El disco se convierte en uno de reproducción solamente y
usted no puede grabarlo ni editarlo.
≥Cuando se copie a alta velocidad, los capítulos se duplicarán.
≥Los títulos se dividen en capítulos de unos 5 minutos
§
, si
–los títulos fueron grabados directamente en DVD-R.
–los títulos fueron copiados utilizando un modo que no fue el
de alta velocidad.
§
Este tiempo cambia considerablemente dependiendo de la
condición y el modo de la grabación.
≥Entre los títulos y los capítulos hay pausas de varios segundos
durante la reproducción.
No desconecte el cable de alimentación de CA mientras el
mensaje “Cerrando el disco.” aparece en el televisor. Esto
puede inutilizar el disco.
La finalización puede tardar hasta 15 minutos.
Antes de
finalizar
Después
de finalizar
Visualización de disco en esta unidad DVD-R DVD-V
Grabación/Edición/
Introducción de nombre
Yt
Reproducción en otros reproductores tY
1
4
7 8
5
2
9
6
3
TOP MENU LIST
01
Visualización tras la finalización
Imagen miniatura
(Imagen fija)
Nombre de título
105
7463sp.book Page 43 Tuesday, March 8, 2005 11:12 AM

44
RQT7463
Funciones convenientes
Introducción de texto
[HDD] [RAM] [DVD-R] [SD] [PC]
Puede poner nombres a títulos grabados, etc.
Máximo número de caracteres:
§
Nombre de título para grabación con temporizador
[Nota]
Si un nombre es largo, es posible que algunas partes del mismo no
se vean en algunas pantallas.
1 Muestra la pantalla Entrar nombre.
2 Pulse [3, 4, 2, 1] para seleccionar
un carácter y pulse [ENTER].
Repita este paso para introducir otros caracteres.
≥Para borrar un carácter
Pulse [3, 4, 2, 1] para seleccionar el carácter en el campo
de nombre y pulse [;].
≥Utilización de los botones numerados para introducir
caracteres
Ej., introducción de la letra “R”
1 Pulse [7] para pasar a la
7ma fila.
2 Pulse dos veces [7] para
resaltar “R”.
3 Pulse [ENTER].
≥Para introducir un espacio
Pulse [¢ CANCEL] y pulse
[ENTER].
3 Pulse [∫] (SET).
Se vuelve a la pantalla visualizada previamente.
Para finalizar al rato de empezar
Pulse [RETURN].
No se guarda el texto.
Para su referencia
Si introduce un nombre largo sólo se mostrará parte del mismo en el
menú inicial tras la finalización (➡página 43). Cuando introduzca un
nombre de título, el nombre que aparecerá en el menú inicial podrá
presentarse preliminarmente en la ventana “Título TOP MENU
(DVD-R)”.
[HDD] [RAM] Caracteres
Título
64 (44
§
)
Lista de reproducción 64
Disco 64
Carpeta de imágenes fijas 36
[DVD-R] Caracteres
Título 44
Disco 40
[SD] [PC] Caracteres
Carpeta de imágenes fijas 36
VOLUME
CH
DIRECT TV REC
DVD
TV
AV
123
456
78
0
9
MANUAL SKIP
ShowView
CH
CANCEL
INPUT SELECT
SKIP
STOP
PAU SE
PLAY/x1.3
SLOW/SEARCH
FUNCTIONS
ENTER
DIRECT NAVIGATOR
TOP MENU
RETURN
SUB MENU
CREATE
CHAPTER
TIMER
EXT LINK
PROG/CHECK
REC MODEERASE
REC
AUDIO
TIME SLIP
STATUS
DISPLAY
F
A B C
DUBBING
HDD DVD
SD/PC
3,4,2,1
ENTER
¢ CANCEL
∫
;
RETURN
Botones
numerados
Título (grabación con temporizador)
Seleccione “Nombre progr.” en el paso 3 de las páginas
19, 20.
Título
Seleccione “Entrar nombre” en el paso 4 de la página 30.
Lista de reproducción
Seleccione “Entrar nombre” en el paso 4 de la página 33.
Disco
Seleccione “Nombre del disco” en el paso 3 de la página 42.
Carpeta de imágenes fijas
Seleccione “Nombre carpeta” en el paso 4 de la página 34.
_
Entrar nombre
11
2
3
4
5
6
7
8
9
0
2345
ABC a
DEF d
GH I
NO
g
JKL j
M
m
67890
bcij
ef/l %
hifl $
*
*
&
klON@
n
]
_
o[
ESPACIO
SET
BORRAR
0
¢
PQRSp
TUV t
WXY Zw
qrs( )
uv{ }
-
xyz
`
^
|
!?
\
.
,
"
'
:
;
––
π
;
SELECT
ENTER
RETURN
Título TOP MENU
(DVD-R)
Campo de nombre:
muestra el texto que usted ha introducido
5
6
7
8
NO
JKL
M
PQR
S
TUV
7
7 7
Chapter 1_
Título TOP MENU
(DVD-R)
11
2
3
4
2345
ABC a
DEF d
GH I g
67890
bcij
ef/l %
hifl $
*
&
Chapter 1
Entrar nombre
106
7463sp.book Page 44 Tuesday, March 8, 2005 11:12 AM

45
RQT7463
Funciones convenientes
Cambio de ajustes de la unidad
1 Durante la parada
Pulse [FUNCTIONS].
2 Pulse [3, 4, 2, 1] para seleccionar
“SETUP” y pulse [ENTER].
3 Pulse [3, 4] para seleccionar la ficha
y pulse [1].
4 Pulse [3, 4] para seleccionar el
menú y pulse [ENTER].
5 Pulse [3, 4] para seleccionar la
opción y pulse [ENTER].
Para salir de la pantalla
Pulse varias veces [RETURN].
Para volver a la pantalla anterior
Pulse [RETURN].
Los ajustes permanecen intactos aunque ponga la unidad en espera.
VOLUME
CH
DIRECT TV REC
DVD
TV
AV
123
456
78
0
9
MANUAL SKIP
ShowView
CH
CANCEL
INPUT SELECT
SKIP
STOP
PAU SE
PLAY/x1.3
SLOW/SEARCH
FUNCTIONS
ENTER
DIRECT NAVIGATOR
TOP MENU
RETURN
SUB MENU
CREATE
CHAPTER
TIMER
EXT LINK
PROG/CHECK
REC MODEERASE
REC
AUDIO
TIME SLIP
STATUS
DISPLAY
F
A B C
DUBBING
HDD DVD
SD/PC
3,4,2,1
ENTER
RETURN
AC
B
FUNCTIONS
OPEN/CLOSE
REC
/
x
1.3
TIME SLIP
CH
TIME SLIP
DRIVE SELECT
SD PCDVDHDD
SD CARD PC CARD EJECT
HDD DVD
∫
< OPEN/CLOSE
Botones
numerados
Procedimientos comunes
SETUP
Otros
Disco
Video
Audio
Display
Conexión
Sintonización
TAB
SELECT
RETURN
Mando a distancia
Fecha y Hora
Ahorro de energía
Idioma
Reset total
Ajustes predeterminados
DVD 1
Off
Español
Fichas
Menús Opciones
Resumen de los ajustes
Fichas Menús
Opciones (Los elementos subrayados son los
ajustes de fábrica.)
Sintoni-
zación
Manual (➡página 49)
Reiniciar Auto-Setup (➡página 50)
Descarga desde TV (➡página 50)
Otros
Mando a distancia (➡página 13) ≥DVD 1 ≥DVD 2 ≥DVD 3
Fecha y Hora
Ajuste automático del reloj (➡página 51)
Ajuste manual del reloj (➡página 51)
Ahorro de energía
≥Consulte lo siguiente cuando “Ahorro de energía” se ponga en
“On”.
–“Luminosidad del display” se pone automáticamente en
“Automática” (➡página 47).
–Esta función no se activa en el modo de espera de grabación
con temporizador.
–Cuando la unidad esté apagada, los programas de televisión
de pago no podrán verse en el televisor porque la señal
procedente del decodificador conectado no pasa en bucle.
Para verlos, encienda la unidad.
≥On: El consumo de energía se limita al mínimo cuando el
aparato se pone en el modo de espera (➡página 52).
≥Off
Idioma
Elija el idioma para estos menús y los mensajes en pantalla.
≥English ≥Deutsch ≥Français ≥Italiano ≥Español
Reset total
Todos los ajustes, a excepción del nivel de calificación, la
contraseña de calificación y los ajustes de la hora pasan a ser
los ajustes de fábrica. Los programas de grabación con
temporizador también se cancelan.
≥Sí
≥No
Ajustes predeterminados
Todos los ajustes que no sean los canales programados, los
ajustes de la hora, los ajustes de país, los ajustes de idioma,
los ajustes de idioma del disco, el nivel de calificación, la
contraseña de calificación y el código de control remoto pasan
a ser los ajustes de fábrica.
≥Sí
≥No
107
7463sp.book Page 45 Tuesday, March 8, 2005 11:12 AM

46
RQT7463
Funciones convenientes
Cambio de ajustes de la unidad
Fichas Menús
Opciones (Los elementos subrayados son los
ajustes de fábrica.)
Disco
Idiomas
Elija el idioma para el audio, subtítulos y menús del disco. [DVD-V]
≥Pulse [ENTER] para mostrar los ajustes siguientes.
≥Algunos discos empezarán con cierto idioma a pesar de los cambios que usted haga aquí.
≥En el caso de los idiomas Inglés/Francés/Alemán/Italiano/Español, cuando hace la descarga del televisor, y el ajuste de país de
preparación automática al enchufar, el idioma [“Audio ( diálogos )”/“Menús del disco”] será el mismo y “Subtítulos” se pondrá en
“Automático”.
≥Introduzca un código (➡página 48) con los botones numerados cuando seleccione “Otro ¢¢¢¢”.
Cuando el idioma seleccionado no se encuentre en el disco, se reproducirá el idioma predeterminado. Hay discos con los que
usted sólo puede cambiar el idioma desde la pantalla de menú (➡página 22).
Audio ( diálogos ) ≥Inglés
≥Francés ≥Alemán ≥Italiano ≥Español
≥Original: Se seleccionará el idioma original de cada disco.
≥Otro ¢¢¢¢
Subtítulos ≥Automático
: Si el idioma seleccionado para “Audio (diálogos)”
no se encuentra disponible, los subtítulos de ese
idioma aparecerán automáticamente si se
encuentran en ese disco.
≥Inglés ≥Francés ≥Alemán ≥Italiano ≥Español
≥Otro ¢¢¢¢
Menús del disco ≥Inglés
≥Francés ≥Alemán ≥Italiano ≥Español
≥Otro ¢¢¢¢
Restricción de acceso
Establezca un nivel de calificación para limitar la reproducción
de un DVD-Vídeo.
Siga las instrucciones de la pantalla. Introduzca un contraseña
de 4 dígitos con los botones numerados cuando aparezca la
pantalla de contraseña.
≥No olvide su contraseña.
≥8 Acceso a todos los títulos
: Todos los DVD-Vídeo pueden ser
reproducidos.
≥1 a 7: Se prohíbe la reproducción de los DVD-Vídeo con las
calificaciones correspondientes grabadas en ellos.
≥0 Todos prohibidos: Se prohíbe la reproducción de todos los
DVD-Vídeo.
≥Desbloquear el lector ≥Cambiar la contraseña
≥Elija el nivel de acceso ≥Desbloqueo provisional
Tiempo grabación en modo EP
Seleccione el número máximo de horas para grabar en el modo
EP (➡página 17, Modos de grabación y tiempos de grabación
aproximados).
≥EP ( 6horas ): Puede grabar durante 6 horas en un disco de
4,7 GB que no haya sido utilizado.
≥EP ( 8horas )
: Puede grabar durante 8 horas en un disco de
4,7 GB que no haya sido utilizado.
Repr.ón modo vídeo audio DVD
Seleccione “On” para reproducir el contenido DVD-Vídeo de
algunos DVD-Audio.
≥On: El ajuste vuelve a “Off” cuando usted cambia el disco o
apaga la unidad.
≥Off
Grab.ón DVD-R para copia rápida
Cuando se copie a alta velocidad un titulo en un DVD-R, será
necesario poner este ajuste en “Sí” antes de grabar en la HDD,
sin embargo, habrá restricciones con el tamaño de la pantalla,
etc. (➡derecha). Recomendamos poner el ajuste en “No” si no
se necesita hacer la copia a alta velocidad en un DVD-R
cuando se graba un programa.
≥Sí: Hace posible copiar a alta velocidad en DVD-R. Pulse
[2, 1] para seleccionar “Sí” y pulse [ENTER]. [“ ”
aparece en la lista de copiado (➡página 37).]
–Las imágenes se guardan con aspecto 4:3.
–El ajuste “Resolución Hybrid VBR” (➡abajo) es “Fijo”.
–Seleccione de antemano el tipo de audio desde “Selec.
Audio Dual” (➡página 47).
≥No
Video
Comb Filter
Seleccione la nitidez de la imagen cuando grabe.
El ajuste se fija con “Sí” si usted pone “Sistema TV” en “NTSC”
(➡página 50).
≥Sí: Las imágenes son más claras y vivas. Utilice
normalmente este ajuste.
≥No: Seleccione esto cuando grabe imágenes ruidosas.
Resolución Hybrid VBR (➡página 53, VBR) ≥Automático: La resolución está automatizada para hacer una
grabación eficiente con menos ruido de bloque.
[HDD] [RAM]
≥Fijo
: La resolución se fija para asegurar que no haya
pérdida en la resolución de la imagen de fuente
durante la grabación.
Modo de imagen fija
Seleccione el tipo de imagen mostrado cuando hace una pausa
en la reproducción (➡página 53, Cuadros y campos).
≥Automático
≥Campo: Seleccione esto si se producen fluctuaciones
cuando se selecciona “Automático”.
≥Cuadro: Seleccione esto si las letras o patrones pequeños no
se pueden ver claramente cuando se selecciona
“Automático”.
Reproducción sin saltos
Selecciona el modo de reproducción para los segmentos de
capítulos de listas de reproducción.
≥On
: Los capítulos de las listas de reproducción se
reproducen sin interrupción. Esto no funciona cuando
hay varios tipos de audio incluidos en la lista de
reprodución o cuando se utiliza Quick View. Además, el
posicionamiento de los segmentos de capítulos puede
cambiar un poco.
≥Off: Los puntos donde cambian los capítulos de las listas de
reproducción se reproducen correctamente, pero la
imagen puede congelarse un momento.
Reductor ruido AV IN
Reduce el ruido de la cinta de vídeo durante la copia.
≥Sí: La reducción de ruido funciona para el vídeo de entrada.
≥No
: La reducción de ruido se desactiva. Seleccione esto
cuando vaya a grabar la entrada como está.
108
7463sp.book Page 46 Tuesday, March 8, 2005 11:12 AM

47
RQT7463
Funciones convenientes
Fichas Menús
Opciones (Los elementos subrayados son los
ajustes de fábrica.)
Audio
PLAYk1.3 + Audio en Search
Independientemente de este ajuste es posible que oiga ruido
con algunos discos.
≥Sí: El audio se oye durante la búsqueda en avance de
primer nivel.
≥No: El audio no se oye durante la búsqueda. Quick View
(➡página 23) no funciona.
Compresión dinámica [DVD-V] (Dolby Digital solamente)
Cambie la gama dinámica para ver programas durante la
noche.
≥Sí
≥No
Selec. Audio Dual
Seleccione si va a grabar el tipo de audio principal o secundario
cuando:
–Grabe o copie en un DVD-R.
–Grabe o copie sonido en LPCM. (➡abajo, “Audio Mode para
XP Recording”)
≥M 1
≥M 2
No puede seleccionar esto cuando graba de una fuente externa
en un DVD-R. Seleccione el audio en el otro componente.
Salida Audio Digital
Cambie los ajustes cuando tenga un equipo conectado a través del terminal DIGITAL AUDIO OUT de esta unidad (➡página 9).
≥Pulse [ENTER] para mostrar los ajustes siguientes.
Conversión PCM
Seleccione cómo va a salir el audio con una frecuencia de
muestreo de 96 kHz u 88,2 kHz.
≥Sí: Las señales se convierten a 48 kHz o 44,1 kHz. (Elija
cuando el equipo conectado no pueda procesar señales
con una frecuencia de muestreo de 96 kHz u 88,2 kHz.)
≥No
: Las señales salen como de 96 kHz u 88,2 kHz. (Elija
cuando el equipo conectado pueda procesar señales con
una frecuencia de muestreo de 96 kHz u 88,2 kHz.)
Las señales se convierten a 48 kHz o 44,1 kHz a pesar de los
ajustes de arriba si las señales tienen una frecuencia de
muestreo superior a 96 kHz o 88,2 kHz, o si el disco está
protegido contra el copiado.
Dolby Digital Seleccione cómo va a salir la señal, para
dar salida a “Bitstream” para que el equipo
conectado decodifique la señal, o para
decodificar en esta unidad y dar salida a la
señal como “PCM” (2 canales).
[Nota]
Si no se hacen los ajustes correctos se
puede producir ruido que dañará
posiblemente sus oídos y altavoces, y la
grabación digital no se hará bien.
≥Bitstream
: Cuando conecte al equipo que muestre el logotipo
Dolby Digital.
≥PCM: Cuando conecte al equipo que no muestre el logotipo
Dolby Digital.
DTS ≥Bitstream: Cuando conecte al equipo que muestre el logotipo
DTS.
≥PCM
: Cuando conecte al equipo que no muestre el logotipo
DTS.
MPEG ≥Bitstream: Cuando conecte a un equipo con decodificador
MPEG incorporado.
≥PCM
: Cuando conecte a un equipo sin decodificador MPEG
incorporado.
Audio Mode para XP Recording
Elija el tipo de audio cuando grabe o copie con el modo XP.
≥Dolby Digital
(➡página 53)
≥LPCM (➡página 53)
–La calidad de la imagen de las grabaciones LPCM podrá ser
inferior a las de las grabaciones del modo XP normal.
–La grabación de audio se convertirá en Dolby Digital, aunque
usted haya seleccionado LPCM, cuando utilice un modo de
grabación que no sea XP.
–Cuando grabe emisiones bilingües, seleccione el tipo de
audio de antemano desde “Selec. Audio Dual” (➡arriba).
Modo de audio para entrada DV
Puede seleccionar la clase de audio cuando grabe desde el
terminal de entrada DV de la unidad (➡página 39).
≥Estéreo 1
:Graba audio (L1, R1).
≥Estéreo 2:Graba audio añadido como, por ejemplo, una
narración (L2, R2) posterior a la grabación original.
≥Mix: Graba ambos, Estéreo 1 y Estéreo 2.
Cuando se graben emisiones bilingües en un DVD-R o cuando
se grabe audio LPCM, seleccione de antemano el tipo de audio
desde “Selec. Audio Dual” (➡arriba).
Display
Mensajes por pantalla
Elija si va a mostrar los mensajes de estado automáticamente.
≥Automático
≥Off
Fondo gris
Seleccione “Off” si no quiere que la unidad muestre el fondo
gris cuando la recepción es débil.
≥On
≥Off
Luminosidad del display
Cambia el brillo del visualizador de la unidad.
Este ajuste se fija con “Automática” si usted pone “Ahorro de
energía” (➡página 45) en “On”.
≥Alta
≥Baja
≥Automática: La visualización se oscurece durante la
reproducción, y reaparece momentáneamente si
se pulsa un botón. Cuando se apaga la unidad
desaparecen todas las visualizaciones. Mientras
se utiliza este modo se puede reducir el consumo
de energía en espera.
109
7463sp.book Page 47 Tuesday, March 8, 2005 11:12 AM

48
RQT7463
Funciones convenientes
Cambio de ajustes de la unidad
Fichas Menús
Opciones (Los elementos subrayados son los
ajustes de fábrica.)
Conexión
Relación de aspecto TV (➡página 12) ≥16:9 ≥4:3 ≥Buzón
Progresivo (➡página 12) ≥On ≥Off
Sistema TV (➡página 50) ≥PAL ≥NTSC
Salida AV1
Selecciona la salida desde el terminal AV1.
Seleccione “RGB ( sin componentes )” para la salida RGB.
Seleccione “Vídeo ( y componentes )” o “S-Vídeo ( y
componentes )” para la salida componente.
≥Vídeo ( y componentes )
≥S-Vídeo ( y componentes )
≥RGB ( sin componentes )
Ajustes AV2
Haga el ajuste adecuado para el equipo conectado.
≥Pulse [ENTER] para mostrar los ajustes siguientes.
Entrada AV2
Ponga “RGB ( No NTSC )” cuando reciba o grabe el vídeo
de salida RGB procedente de un equipo externo.
≥Vídeo
≥S-Vídeo
≥RGB ( No NTSC )
Conector AV2
Este ajuste se fija con “Ext” si usted pone “Sistema TV” en
“NTSC” (➡página 50).
≥Decoder
: Cuando está conectado un decodificador.
≥Ext: Cuando está conectada una videograbadora o un
receptor de satélite.
Ext Link
Este ajuste no se puede hacer cuando “Sistema TV” está
en “NTSC” (➡página 50).
≥Ext Link 1: Cuando se conecte un receptor digital que
transmita una señal de control especial mediante
el cable Scart de 21 contactos.
≥Ext Link 2
: Cuando se conecta un equipo externo con función
de temporizador.
Lista de códigos de idiomas Introduzca el código con los botones numerados.
Abkhazio: 6566
Afar: 6565
Afrikaans: 6570
Aimara: 6588
Albanés: 8381
Alemán: 6869
Amharico: 6577
Árabe: 6582
Armenio: 7289
Asamés: 6583
Azerbaiyano: 6590
Bashkirio: 6665
Bengalí: 6678
Bielorruso: 6669
Bihari: 6672
Birmano: 7789
Bretón: 6682
Búlgaro: 6671
Butanés: 6890
Cachemiro: 7583
Camboyano: 7577
Catalán: 6765
Checo: 6783
Chino: 9072
Coreano: 7579
Corso: 6779
Croata: 7282
Danés: 6865
Eslovaco: 8375
Esloveno: 8376
Español: 6983
Esperanto: 6979
Estonio: 6984
Faroés: 7079
Finés: 7073
Fiyano: 7074
Francés: 7082
Frisón: 7089
Gaélico: 7168
Galés: 6789
Gallego: 7176
Georgiano: 7565
Griego: 6976
Groenlandés: 7576
Guaraní: 7178
Gujarati: 7185
Hausa: 7265
Hebreo: 7387
Hindi: 7273
Holandés: 7876
Húngaro: 7285
Indonesio: 7378
Inglés: 6978
Interlingua: 7365
Irlandés: 7165
Islandés: 7383
Italiano: 7384
Japonés: 7465
Javanés: 7487
Kannada: 7578
Kazajstano: 7575
Kirguiz: 7589
Kurdo: 7585
Laosiano: 7679
Latín: 7665
Letón: 7686
Lingala: 7678
Lituano: 7684
Macedonio: 7775
Malagasio: 7771
Malayalam: 7776
Malayo: 7783
Maltés: 7784
Maorí: 7773
Marathí: 7782
Moldavo: 7779
Mongol: 7778
Naurano: 7865
Nepalí: 7869
Noruego: 7879
Oriya: 7982
Pashto: 8083
Persa: 7065
Polaco: 8076
Portugués: 8084
Punjabi: 8065
Quechua: 8185
Romance: 8277
Rumano: 8279
Ruso: 8285
Samoano: 8377
Sánscrito: 8365
Serbio: 8382
Serbocroata: 8372
Shona: 8378
Sindhi: 8368
Singalés: 8373
Somalí: 8379
Suajili: 8387
Sudanés: 8385
Sueco: 8386
Tagalo: 8476
Tailandés: 8472
Tamil: 8465
Tártaro: 8484
Tayiko: 8471
Telugu: 8469
Tibetano: 6679
Tigrinia: 8473
Tonga: 8479
Turcomano: 8482
Turkmenio: 8475
Twi: 8487
Ucraniano: 8575
Urdu: 8582
Uzbeko: 8590
Vasco: 6985
Vietnamita: 8673
Volapük: 8679
Wolof: 8779
Xhosa: 8872
Yídish: 7473
Yoruba: 8979
Zulú: 9085
110
7463sp.book Page 48 Tuesday, March 8, 2005 11:12 AM

49
RQT7463
Funciones convenientes
Consulte la referencia de controles en página 45.
1 Durante la parada
Pulse [FUNCTIONS].
2 Pulse [3, 4, 2, 1] para seleccionar
“SETUP” y pulse [ENTER].
3 Pulse [3, 4] para seleccionar
“Sintonización” y pulse [1].
También puede agregar o borrar canales o cambiar posiciones de
programas.
4 Pulse [3, 4] para seleccionar
“Manual” y pulse [ENTER].
Para borrar una posición de programa
Pulse [3, 4, 2, 1] para seleccionar una posición de programa y
pulse [A].
Para añadir una posición de programa en blanco
Pulse [3, 4, 2, 1] para seleccionar una posición de programa y
pulse [B].
Para deplazar una emisora de TV a otra posición de programa
1 Pulse [3, 4, 2, 1] para seleccionar una posición de programa
y pulse [C].
2 Pulse [3, 4, 2, 1] para seleccionar la nueva posición de
programa a la que quiere asignar la emisora de televisión y pulse
[ENTER].
[Nota]
Si se ha realizado la descargas de presintonías (➡página 10), sólo
podrá hacerse el borrado de la posición del programa.
∫ Para cambiar los ajustes de sintonización para
posiciones de programas individuales
5 Pulse [3, 4, 2, 1]
para seleccionar una
posición de
programa y pulse
[ENTER].
Pulse [3, 4] para seleccionar un
elemento y pulse [1].
Puede hacer los dos ajustes siguientes seleccionando el canal de
entrada externo (AV1, AV2, AV3, AV4) en el paso 4.
≥Sist. Video (Auto/PAL/SECAM)
Para grabar bien, haga los ajustes apropiados para el equipo
conectado.
≥Guía TV (Auto/Off)
Sintonización
Manual
SETUP
Otros
Sintonización
Manual
Reiniciar Auto-Setup
Descarga desde TV
Sintonía manual
Pos
Nom.
Ch
Pos
Nom.
Ch
B C
A
Borrar
Add
Mover
1 ARD 4
2 ZDF
2
3 N3
5
4 HR3
8
5 BR3 10
6
7
8
9
10
11
12
13
14
15
16
17
18
19
20
SELECT
ENTER
RETURN
Pos Para cambiar la posición de programa en la
que están asignadas las emisoras de
televisión
Pulse [3, 4] o los botones numerados para
seleccionar el número de posición de programa
deseado y pulse [ENTER].
Nombre Para introducir o cambiar el nombre de una
emisora de televisión
Pulse [3, 4, 2, 1] para introducir el nombre de
la emisora y pulse [ENTER].
Si el nombre de la emisora necesita un espacio
en blanco, selecciónelo entre “Z” y “¢”.
Canal Para introducir emisoras de televisión nuevas
o para cambiar el número de canal de una
emisora de televisión ya sintonizada
Pulse [3, 4] o los botones numerados para
introducir el número de canal de la emisora de TV
deseada.
Espere un poco hasta que se sintonice la emisora
de televisión deseada.
Después de sintonizarse la emisora de televisión
deseada, pulse [ENTER].
Sint. Fina Para obtener la mejor condición de
sintonización
Pulse [3, 4] para ajustar la mejor condición de
sintonización y pulse [ENTER].
≥Pulse [1] para volver a “Auto”.
Decoder Para presintonizar emisoras de televisión de
pago
Pulse [3, 4] para seleccionar “On” y pulse
[ENTER].
Sist. Video Para seleccionar el tipo de sistema de vídeo
Pulse [3, 4] para seleccionar “PAL” o “SECAM”
si a la imagen le falta color, y luego pulse
[ENTER].
Auto: Esta unidad distingue automáticamente
las señales PAL y SECAM.
PAL: Para recibir señales PAL.
SECAM: Para recibir señales SECAM.
Sist. Audio Para seleccionar el tipo de recepción de audio
Si la calidad del sonido es pobre, pulse [3, 4]
para seleccionar “BG” o “L” y pulse [ENTER].
BG: PAL B.G.H/SECAM B.G
L: SECAM L, L’/PAL L
Mono Para seleccionar el tipo de sonido que va a
grabar
Pulse [3, 4] para seleccionar “On” si el sonido
estéreo se distorsiona debido a que las
condiciones de recepción son malas, o si usted
quiere grabar el sonido normal (mono) durante
una emisión estéreo, bilingüe o NICAM, y luego
pulse [ENTER].
Guía TV Para introducir la página de título de teletexto
para un canal
La introducción de la página del título permite al
aparato grabar automáticamente nombres de
programas y emisoras.
Pulse [3, 4] o los botones numerados para
introducir el número y pulse [ENTER].
≥Para encontrar la página de título correcto para
la emisora, consulte su guía de TV de teletexto.
Pos
Nombre
Canal
Sint. Fina
Decoder
Sist. Video
1
Off
4
Auto
RETURN : abandonar
Sintonía
manual
ARD
Auto
Sist. Audio
BG
Mono
Off
Guía TV
301
SELECT
RETURN
111
7463sp.book Page 49 Tuesday, March 8, 2005 11:12 AM

50
RQT7463
Funciones convenientes
Cambio de ajustes de la unidad
Consulte la referencia de controles en página 45
.
Si por alguna razón falla la descargas de presintonías o Auto-Setup
(➡página 10, 11), usted puede reiniciar el ajuste automático de los
canales.
Después de realizar los pasos 1–3 (➡página 49)
∫ Reiniciar Auto-Setup
4 Pulse [3, 4] para seleccionar
“Reiniciar Auto-Setup” y pulse
[ENTER].
5 Pulse [2, 1] para seleccionar “Sí” y
pulse [ENTER].
Aparece el menú de ajuste de país.
6 Pulse [3, 4, 2, 1] para seleccionar
un país y pulse [ENTER].
Empieza Auto-Setup.
∫ Descarga desde TV
4 Pulse [3, 4] para seleccionar
“Descarga desde TV” y pulse
[ENTER].
5 Pulse [2, 1] para seleccionar “Sí” y
pulse [ENTER].
Empieza la descarga desde el televisor.
Para salir de la pantalla
Pulse varias veces [RETURN].
Para volver a la pantalla anterior
Pulse [RETURN].
Cambie los ajustes según el equipo que tenga conectado, o según
el título cuando la HDD tenga títulos PAL y NTSC.
1 Durante la parada
Pulse [FUNCTIONS].
2 Pulse [3, 4, 2, 1] para seleccionar
“SETUP” y pulse [ENTER].
3 Pulse [3, 4] para seleccionar
“Conexión” y pulse [1].
4 Pulse [3, 4] para seleccionar
“Sistema TV” y pulse [ENTER].
5 Pulse [3, 4] para seleccionar el
sistema de televisión y pulse
[ENTER].
≥PAL (ajuste de fábrica)
–Selecciónelo cuando conecte a un televisor del sistema
PAL o de múltiples sistemas. Los títulos grabados
utilizando NTSC se reproducen como PAL 60.
–Selecciónelo para grabar programas de televisión y
entradas PAL procedentes de otros equipos.
–[HDD] Seleccione cuando reproduzca un título de entrada
PAL grabado en la HDD.
≥NTSC
–Selecciónelo cuando conecte a un sistema de televisión
NTSC. Los programas de televisión no se pueden grabar
correctamente.
–Selecciónelo para grabar entradas NTSC de otros equipos.
–[HDD] Seleccione cuando reproduzca un título de entrada
NTSC grabado en la HDD.
6 Pulse [2, 1] para seleccionar “Sí” y
pulse [ENTER].
Para salir de la pantalla
Pulse varias veces [RETURN].
Para volver a la pantalla anterior
Pulse [RETURN].
∫ Para cambiar el ajuste de una vez (PAL!#NTSC)
Durante la parada, mantenga pulsado [∫] y [< OPEN/CLOSE] en la
unidad principal durante 5 o más segundos.
Lista de canales de recepción de televisión
§
Sólo para la trama de canales de 8 MHz
Reiniciar Auto-Setup, Descarga desde TV
Sistema TV
SETUP
Otros
Disco
Video
Audio
Display
Sintonización
Sistema TV
PAL
NTSC
Conexión
SELECT
ENTER
RETURN
Indicación de
canal
Canal de televisión
Alemania/Italia Francia Otros países
2 – 4
E2 – E10
2 – 4
E2 – E12
5 – 10 5 – 10, G – J (172,00 – 220,00 MHz) (INTER BANDE)
11 – 12
E11 – E12 (Alemania)
H1 – H2 (Italia)
—
13 – 20 A – H (Sólo Italia) — —
21 – 69 E21 – E69 E21 – E69 E21 – E69
74 – 78 S01 – S05 — S1 – S5
80 S1 — M1
81 – 89 S2 – S10 B – F (100,00 – 172,00 MHz) (INTER BANDE) M2 – M10
90 – 99 S11 – S20 K – Q (220,00 – 300,00 MHz) (INTER BANDE) U1 – U10
121 – 141 S21 – S41
§
(Hiperbanda) S21 – S41 (299,25 – 467,25 MHz) (INTER BANDE) S21 – S41 (Hiperbanda)
112
7463sp.book Page 50 Tuesday, March 8, 2005 11:12 AM

51
RQT7463
Funciones convenientes
Generalmente, la función de descargas de presintonías o Auto-Setup (➡página 10, 11) pone automáticamente la hora correcta en el reloj. Bajo
algunas condiciones de recepción, sin embargo, la unidad no puede ajustar automáticamente el reloj.
En este caso, siga los pasos de operación de abajo para ajustar manualmente el reloj.
≥En el caso de producirse un fallo en la alimentación, el ajuste del reloj permanece en la memoria durante 60 minutos aproximadamente.
1 Durante la parada
Pulse [FUNCTIONS].
2 Pulse [3, 4, 2, 1] para seleccionar “SETUP” y pulse [ENTER].
3 Pulse [3, 4] para seleccionar “Otros” y pulse [1].
4 Pulse [3, 4] para seleccionar “Fecha y Hora” y pulse [ENTER].
Si una emisora de televisión transmite una señal de ajuste de la
hora, y cuando “Automático” del menú de ajuste del reloj se pone en
“On”, la función de corrección automática de la hora comprueba la
hora y, si es necesario, la ajusta varias veces al día.
5 Pulse [3, 4] para seleccionar “On”
de “Automático” y pulse [ENTER].
Empieza el ajuste automático del reloj.
Cuando termina el ajuste aparece la pantalla siguiente.
Para detenerse al rato de empezar
Pulse [RETURN].
5 Pulse [3, 4] para seleccionar “Off”
de “Automático” y pulse [ENTER].
6 Pulse [2, 1] para seleccionar el
elemento que usted quiera cambiar.
Los elementos cambian de la forma siguiente:
Hora!#Minuto!#Segundo!#Día!#Mes!#Año
^-----------------------------------------------------------------------------------------J
7 Pulse [3, 4] para cambiar el ajuste.
También puede utilizar los botones numerados para hacer el
ajuste.
8 Pulse [ENTER] cuando haya
terminado los ajustes.
El reloj se pone en funcionamiento.
Para salir de la pantalla
Pulse varias veces [RETURN].
Para volver a la pantalla anterior
Pulse [RETURN].
El bloqueo para los niños desactiva todos los botones de la unidad y
del mando a distancia. Utilícelo para impedir que otras personas
utilicen la unidad.
Mantenga pulsados
[ENTER] y [RETURN]
simultáneamente hasta
que “X HOLD” aparezca en el visualizador
de la unidad.
Si pulsa un botón mientras el bloqueo para niños está activado,
“X HOLD” aparecerá en el visualizador de la unidad y la operación
resultará imposible.
Para cancelar el bloqueo para los niños
Mantenga pulsados [ENTER] y [RETURN] simultáneamente hasta
que desaparezca “X HOLD”.
Ajustes del reloj
Ajuste automático del reloj
Fecha y Hora
Automático
Hora Fecha
15
:
45 :
39
1
. 8
.
2004
CHANGE
ENTER
RETURN
On
Ajuste automático del reloj
realizando correctamente.
ENTER: acceso RETURN: volver
Ajuste manual del reloj
Fecha y Hora
Automático Off
Hora Fecha
15
:
45 :
39
1
. 8
.
2004
Por favor, ajuste el reloj manualmente.
ENTER: guardar RETURN: cancelar
0 9
N˚
CHANGE
SELECT
ENTER
RETURN
Bloqueo para los niños
STOP
PAU SE
PLAY/x1.3
FUNCTIONS
ENTER
DIRECT NAVIGATOR
TOP MENU
RETURN
SUB MENU
CREATE
CHAPTER
TIMER
EXT LINK
PROG/CHECK
REC MODEERASE
REC
AUDIO
TIME SLIP
STATUS
DISPLAY
F
A B C
DUBBING
RETURN
ENTER
113
7463sp.book Page 51 Tuesday, March 8, 2005 11:12 AM

52
RQT7463
Referencia
Especificaciones
Sistema de grabación
Formato de grabación de vídeo DVD (DVD-RAM),
formato DVD-Vídeo (DVD-R)
Discos grabables
DVD-RAM: 12 cm 4,7 GB, 12 cm 9,4 GB, 8 cm 2,8 GB
12 cm 4,7 GB (Ver. 2.1/3k-SPEED DVD-RAM Revision 1.0)
DVD-R: 12 cm 4,7 GB, 8 cm 1,4 GB (para General Ver. 2.0)
12 cm 4,7 GB (para General Ver. 2.0/4
k
-SPEED DVD-R Revision 1.0)
Tiempo de grabación Máximo de 8 horas (con disco de 4,7 GB)
XP: 1 hora aproximadamente,
SP: Aproximadamente 2 horas
LP: Aproximadamente 4 horas, EP: Aproximadamente 6 horas/8 horas
284 horas máximo (HDD incorporada de 160 GB)
XP: Aproximadamente 36 horas, SP: Aproximadamente 70 horas
LP: Aproximadamente 138 horas,
EP: Aproximadamente 212 horas/284 horas
Discos de reproducción
DVD-RAM: 12 cm 4,7 GB, 12 cm 9,4 GB, 8 cm 2,8 GB
12 cm 4,7 GB (Ver. 2.1/3k-SPEED DVD-RAM Revision 1.0)
DVD-R: 12 cm 4,7 GB, 8 cm 1,4 GB (para General Ver. 2.0)
12 cm 4,7 GB (para General Ver. 2.0/4
k
-SPEED DVD-R Revision 1.0)
DVD-Vídeo, DVD-Audio, Vídeo CD, CD-Audio (CD-DA)
CD-R/RW (discos formateados, MP3, CD-DA, Vídeo CD)
Capacidad de la HDD incorporada 160 GB
Unidad de disco Unidad de disco de alta velocidad
(una velocidad 4 veces superior con discos DVD-R
y 3 veces superior con discos DVD-RAM.)
Especificación del LÁSER
Producto LÁSER clase I (Lector)
Longitud de onda: 795 nm, 658 nm
Potencia lasérica:
No se emite radiación peligrosa con la protección de seguridad
Audio
Sistema de grabación:
Dolby Digital 2 canales, PCM Lineal (Modo XP, 2 canales)
Entrada de audio:
AV1/AV2 (21 contactos), AV3/AV4 (toma de contactos)
Nivel de entrada:
Estándar: 0,5 Vrms, Escala completa: 2,0 Vrms a 1 kHz
Impedancia de entrada: Más de 10 k≠
Salida de audio:
AV1/AV2 (21 contactos), Salida de audio (toma de contactos)
Nivel de salida:
Estándar: 0,5 Vrms, Escala completa: 2,0 Vrms a 1 kHz
Impedancia de salida: Menos de 1 k≠
Salida de audio digital:
Terminal óptico (PCM, Dolby Digital, DTS, MPEG)
Sistema de televisión
Salida de convertidor de RF: No provista
Vídeo
Sistema de vídeo:
Señal de color SECAM (entrada solamente)/PAL, 625 líneas, 50 campos
Señal de color NTSC, 525 líneas, 60 campos
Sistema de grabación MPEG2 (VBR híbrido)
Entrada de vídeo (SECAM/PAL/NTSC):
AV1/AV2 (21 contactos), AV3/AV4 (toma de contactos) 1 Vp-p 75
≠
,
terminación
Entrada de S-Vídeo (SECAM/PAL/NTSC):
AV2 (21 contactos), AV3/AV4 (terminal S) 1 Vp-p 75 ≠, terminación
Entrada RGB (PAL):
AV2 (21 contactos) 0,7 Vp-p (PAL) 75 ≠, terminación
Salida de vídeo (PAL/NTSC):
AV1/AV2 (21 contactos), Salida de vídeo (toma de contactos) 1 Vp-p 75
≠
,
terminación
Salida de S-Vídeo (PAL/NTSC):
AV1 (21 contactos), salida de S-Vídeo (terminal S) 1 Vp-p 75 ≠,
terminación
Salida RGB (PAL/NTSC):
AV1 (21 contactos) 0,7 Vp-p (PAL) 75 ≠, terminación
Salida de vídeo componente (NTSC 480P/480I, PAL 576P/576I)
Y: 1,0 Vp-p 75 ≠, terminación
P
B: 0,7 Vp-p 75 ≠, terminación
P
R: 0,7 Vp-p 75 ≠, terminación
Entrada DV (PAL/NTSC) Estándar IEEE 1394, 4 contactos
Ranura de tarjeta SD/PC
Ranura de tarjeta de memoria SD:
1 pieza
Ranura de tarjeta PC (Tipo II): 1 pieza
Imágenes fijas (JPEG, TIFF)
Medio compatible (ranura de tarjeta SD):
Tarjeta de memoria SD, MultiMediaCard
Medio compatible (ranura de tarjeta PC):
Un adaptador de tarjeta PC que cumple con
las normas para tarjetas PC,
Tarjeta PC ATA Flash
Adaptador de tarjeta PC (tarjeta de memoria SD, xD-Picture Card,
Microdrive, MultiMediaCard, CompactFlash,
SmartMedia, M
EMORYSTICK), disco duro móvil
Formato: FAT12, FAT16
Formato de archivo de imágenes: JPEG que cumple con DCF
(Design rule for Camera File system),
(el submuestreo es 4:2:2 ó 4:2:0)
TIFF (RGB grande sin comprimir),
compatible con DPOF
Número de píxeles: 34a34 a 6144a4096
Tiempo de deshielo Aproximadamente 7 s (2 megapíxeles)
Otros
Código de región: ‚ 2
Temperatura de funcionamiento: 5–40 oC
Gama de humedades de funcionamiento:
10 %–80 % RH (sin condensación)
Alimentación: 220–240 V CA, 50 Hz
Consumo: 42 W
Dimensiones (AnkProfkAl):
Aproximadamente 430 mmk291 mmk79 mm
Peso: Aproximadamente 4,6 kg
[Nota]
Las especificaciones están sujetas a cambios sin previo aviso.
Los pesos y las dimensiones son aproximados.
Sistema de
sintonizador
Cobertura de canales
PA L- BG H
SECAM-BG
(CCIR)
VHF: E2–E12, A–H2 (Italia)
UHF: 21–69
CATV: S01–S05 (S1–S3),
S1–S20 (M1–U10), S21–S41
SECAM-L, L’
(Francia)
VHF: 2–10
UHF: 21–69
CATV: B–Q (100,5–299,5 MHz),
S21–S41 (299,5 –467,25 MHz)
Consumo en el modo de espera:
Aproximadamente 3 W (modo de ahorro de energía)
114
7463sp.book Page 52 Tuesday, March 8, 2005 11:12 AM

53
RQT7463
Referencia
Glosario
Bitstream
Esto es la forma digital de datos de audio de múltiples canales (5,1
canales, por ejemplo) antes de ser decodificados en sus diversos canales.
Carpeta
Un lugar del disco duro o tarjeta de memoria donde se guardan
juntos grupos de datos. En el caso de esta unidad, esto se refiere al
lugar donde se guardan las imágenes fijas (JPEG, TIFF).
Control de reproducción (PBC)
Si un Vídeo CD tiene control de reproducción, usted puede
seleccionar escenas e información con menús.
(Esta unidad es compatible con las versiones 2.0 y 1.1.)
CPRM (Content Protection for Recordable Media)
CPRM es una tecnología que se utiliza para proteger las emisiones,
pudiéndose grabar éstas una sola vez. Tales emisiones sólo se
pueden grabar con grabadoras y en discos que son compatibles con
CPRM.
Cuadros y campos
Los cuadros se refieren a las imágenes únicas que constituyen la
imagen que usted ve en su televisor. Cada cuadro consiste en dos
campos.
≥Un cuadro mostrará dos campos, por lo que podrá haber algo de
borrosidad, pero la calidad de la imagen será generalmente mejor.
≥Una imagen fija de campo mostrará menos información de
imagen, por lo que será menos precisa, pero no tendrá borrosidad.
Dolby Digital
Éste es un método de codificar señales digitales desarrollado por
Dolby Laboratories. Además de audio estéreo (2 canales), esta
señales también pueden ser audio de múltiples canales. Con este
método se pueden grabar grandes cantidades de información en un
disco.
Cuando graba en esta unidad, el ajuste predeterminado de audio es
Dolby Digital (2 canales).
DPOF (Digital Print Order Format)
DPOF es el formato de impresión estándar para datos de imágenes fijas
tomados por una cámara digital, etc. Se utiliza para imprimir de forma
automática en tiendas de desarrollo fotográfico o en la impresora de su casa.
DTS (Digital Theater Systems)
Este sistema de sonido ambiental se utiliza en muchos cines. La
separación entre los canales es buena, por lo que resulta posible
obtener una efectos de sonido excelentes.
Finalización
Un proceso que permite reproducir en otro equipo los CD-R, CD-
RW, DVD-R, etc. que hayan sido grabados. Puede finalizar discos
DVD-R en esta unidad.
Tras la finalización, el disco se convierte en uno de reproducción
solamente y usted no puede grabarlo ni editarlo.
Formateado
Formatear es el proceso de hacer que los medios grabables como,
por ejemplo, DVD-RAM puedan ser grabados en un equipo de
grabación.
En esta unidad puede formatear la HDD, discos DVD-RAM y tarjetas
de memoria. Al formatear se borra irrevocablemente todo el
contenido.
Frecuencia de muestreo
El muestreo es el proceso de convertir las muestras de las alturas
de las ondas de sonido (señal analógica) tomadas durante periodos
establecidos en dígitos (codificación digital). La frecuencia de
muestreo es el número de muestras tomadas por segundo, así que
cuanto más alto sean los números más fiel será la reproducción del
sonido original.
Gama dinámica
La gama dinámica es la diferencia entre el nivel más bajo del sonido
que puede oírse por encima del ruido del equipo y el nivel más alto
del sonido antes de que se produzca distorsión.
La compresión de la gama dinámica significa la reducción de la
diferencia entre los sonidos más altos y los más bajos. Esto significa
que usted puede escuchar a niveles de volumen bajo y además oír
claramente el diálogo.
HDD (Unidad de disco duro)
Éste es un dispositivo de almacenamiento de grandes cantidades
de datos usado en ordenadores, etc. Un disco con una superficie
tratada con un líquido magnético gira y se aproxima a él una cabeza
magnética que lee y escribe una gran cantidad de datos a alta
velocidad.
Imagen miniatura
Esto se refiere a una representación en miniatura de una imagen
empleada para mostrar múltiples imágenes en forma de lista.
JPEG (Joint Photographic Experts Group)
Éste es un sistema utilizado para comprimir/decodificar imágenes
fijas en color. Si selecciona JPEG como sistema de almacenamiento
en cámara digitales, etc., los datos se comprimirán a 1/10–1/100 de
su tamaño original. Considerando el grado de compresión, JPEG
proporciona menos deterioro en la calidad de la imagen.
LPCM (PCM Lineal)
Éstas son señales digitales sin comprimir similares a las de un CD.
El sonido LPCM se encuentra disponible cuando se graba en el
modo XP.
Mezcla descendente
Éste es el proceso de mezclar en dos canales el audio de múltiples
canales encontrado en algunos discos. Esto es muy útil para
cuando usted quiere escuchar el audio de 5,1 canales, grabado en
los DVDs, a través de los altavoces de su televisor. Algunos discos
prohíben hacer la mezcla descendente, y en ese caso, esta unidad
sólo puede dar salida a los dos canales delanteros.
MP3 (MPEG Audio Layer 3)
Un método de compresión de audio que comprime el audio a
aproximadamente una décima parte de su tamaño sin que se
produzca apenas pérdida en la calidad del sonido. Puede reproducir
MP3 que usted haya grabado en un CD-R y CD-RW.
Pan&Scan/Letterbox (Panorámica/Buzón)
En general, los DVD-Vídeo se producen con la idea de que sean
vistos en televisores de pantalla panorámica (formato 16:9), por lo
que las imágenes no caben a menudo en los televisores
convencionales (formato 4:3). Para hacer frente a este problema se
dispone de dos estilos de imagen, “Pan & Scan” y “Letterbox”.
Pan & Scan: Los lados se cortan para que la
imagen llene la pantalla.
Letterbox: Aparecen bandas negras en la parte
superior e inferior de la imagen para
que la propia imagen aparezca en el
formato de 16:9.
Película y vídeo
Los DVD-Vídeo se graban utilizando película o vídeo. Esta unidad
puede determinar qué tipo ha sido utilizado, y luego utiliza el método
más apropiado de la salida progresiva.
Para PAL
La película es de 25 cuadros por segundo.
El vídeo es de 50 campos por segundo (dos campos hacen un cuadro).
Para NTSC
La película es de 24 ó 30 cuadros por segundo, con la película
siendo generalmente de 24 cuadros por segundo.
El vídeo es de 60 campos por segundo (dos campos hacen un cuadro).
Progresiva/Entrelazada
La norma de señal de vídeo PAL tiene 625 (o 576) líneas de
exploración entrelazada (I), mientras que la exploración progresiva,
llamada 625P (o 576P), utiliza el doble de líneas de exploración.
Para la norma NTSC, a éstas se les llama respectivamente 525I (o
480I) y 525P (o 480P).
Utilizando la salida progresiva usted puede disfrutar del vídeo de
alta resolución grabado en un medio como, por ejemplo, DVD-Vídeo.
Su televisor deberá ser compatible para disfrutar de vídeo
progresivo.
Los televisores Panasonic con terminales de entrada 625 (576)/50I ·
50P, 525 (480)/60I · 60P son compatibles con vídeo progresivo.
Protección
Puede impedir el borrado por error estableciendo la protección
contra escritura o la protección contra el borrado.
TIFF (Tag Image File Format)
Éste es un sistema utilizado para comprimir/decodificar imágenes
fijas en color. Un formato común para guardar imágenes de alta
calidad en cámaras digitales y otros dispositivos.
Unidad
En el caso de esta unidad, esto se refiere al disco duro (HDD), disco
(DVD), tarjeta SD (SD) y tarjeta PC (PC). Éstas leen y escriben los datos.
VBR (Velocidad de bits variable)
Éste es un método de grabación de vídeo que ajusta la velocidad de
bits según la señal de vídeo.
u
r
Cuadro Campo Campo
115
7463sp.book Page 53 Tuesday, March 8, 2005 11:12 AM

54
RQT7463
Referencia
Glosario
Q Link
Esta función sólo se activa si la unidad está conectada con un cable
Scart de 21 contactos todos conectados a un televisor que disponga
de Q Link o una función similar.
Q Link ofrece las funciones siguientes:
≥Descarga del televisor
§
Cuando conecta la unidad a un televisor, los datos de la lista de
emisoras se copian automáticamente del televisor a la unidad, y a
las emisoras de televisión se les asignan posiciones de programa
en la unidad en el mismo orden que en el televisor.
≥Grabación directa del televisor
Pulsando simplemente [¥ DIRECT TV REC], usted puede grabar
inmediatamente el mismo programa que está viendo en el
televisor.
≥Conexión automática de la alimentación del televisor/DVD
§
Aunque el televisor y la unidad estén apagados (modo de espera),
al pulsar [1] (PLAY), [DIRECT NAVIGATOR, TOP MENU],
[ShowView] o [PROG/CHECK], el televisor y la unidad se
encienden automáticamente.
Si el televisor está apagado y la unidad encendida, cuando pulse
[FUNCTIONS] o [1] (PLAY), o cuando inserte el disco (excepto
DVD-RAM y DVD-R), el televisor se encenderá automáticamente.
≥Desconexión automática de la alimentación del DVD
§
Cuando apaga el televisor también se apaga la unidad. Sin
embargo esta función se activa en el modo de parada.
Esta función no se activa durante las operaciones siguientes:
Descargas de presintonías, Auto-Setup, Ajuste automático del
reloj y Sintonización manual.
Esta función tampoco se activa cuando se selecciona la unidad
DVD y hay un disco CD en la bandeja del disco.
≥Mensajes en la pantalla
§
Cuando vea un programa de televisión, los mensajes siguientes
aparecerán en la pantalla del televisor para informarle de la
condición de su unidad:
Dependiendo del tipo de televisor utilizado, los mensajes de arriba
puede que no aparezcan correctamente.
§
Estas operaciones sólo están disponibles si la unidad está
conectada a un televisor con función Q Link.
[Nota]
Si “Ahorro de energía” se pone “On”, la función Grabación directa
del televisor no funcionará cuando se apague la unidad (modo de
espera).
VPS (Video Programme System)/PDC (Programme Delivery Control)
VPS o PDC es un sistema muy conveniente que graba exactamente
de principio a fin los programas de televisión que han sido
preparados para ser grabados con el temporizador, aunque la hora
de emisión real sea diferente de la programada debido a retrasos
del comienzo o extensiones de los programas. Además, si se
interrumpe un programa y, por ejemplo, se inserta alguna noticia
especial, la grabación también hará una pausa automáticamente y
se reanudará cuando continúe el programa.
Dependiendo de las señales enviadas desde las emisoras de
televisión, el sistema VPS/PDC tal vez no funcione correctamente
incluso cuando “VPS/PDC” haya sido puesto en “ON”.
Verifique con las emisoras de su zona para conocer detalles.
≥En el caso de la grabación VPS/PDC, utilice la hora correcta (hora
VPS/PDC) para grabar los programas de televisión.
Ponga “VPS/PDC” en “OFF” cuando la hora de grabación no sea
correcta (hora VPS/PDC).
La grabación VPS/PDC no se realizará cuando la hora no sea
correcta (hora VPS/PDC), aunque la diferencia sólo sea de un
minuto. Para encontrar la hora correcta (hora VPS/PDC), consulte
Teletexto, un periódico, una revista u otra fuente.
≥Si las horas de emisión reales para las grabaciones con
temporizador coinciden (independientemente de si son
controladas por VPS/PDC), la grabación que empieza primero
siempre tiene prioridad, y la posterior sólo empezará después de
terminada la primera.
≥Cuando la señal de VPS/PDC desaparezca debido a que la
emisión es débil, o cuando una emisora de televisión no transmita
una señal VPS/PDC convencional, la grabación con temporizador
se realizará en el modo normal (sin VPS/PDC) aunque haya sido
programada para VPS/PDC.
En este caso, aunque se realice la grabación con temporizador, lo
que haya sido programado no se cancelará en ningún momento
particular, sino a las 4 a.m. dos días después.
≥Las horas de inicio de los programas programados listados en
periódicos o revistas pueden ser cambiadas más adelante. Ponga
“VPS/PDC” en “OFF” cuando programe un programa cuya hora de
inicio ha sido posteriormente cambiada. Debe tenerse cuidado a
este respecto con la programación de S
HOWVIEW porque “VPS/
PDC” se pone automáticamente en “ON” en algunos países
(➡abajo).
≥Si un programa listado en un periódico o revista tiene dos números
S
HOWVIEW, utilice el número SHOWVIEW para VPS/PDC si quiere
proseguir con la grabación VPS/PDC utilizando la programación
S
HOWVIEW.
≥Los ajustes predeterminados para “VPS/PDC” son diferentes
dependiendo del país pertinente. Consulte la tabla siguiente.
≥Si las emisoras no emiten señales VPS/PDC, “jjj” aparecerá en el menú para la programación del temporizador bajo “VPS/PDC”.
≥El principio de las grabaciones puede que no se grabe correctamente en algunos casos.
Mensaje El mensaje aparece cuando:
Comienza la
grabación
temporizada
Acaba de empezar una grabación con
temporizador.
Entrar en el modo
Timer Standby
La unidad no está en el modo de espera
del temporizador 10 minutos antes de la
hora de inicio de grabación con
temporizador programada (aparece un
mensaje cada minuto durante estos
10 minutos).
DVD en modo Timer
Recording
[¥ REC] o [ShowView] fue pulsado
mientras la unidad estaba en el modo de
grabación.
Cuando se haga la
programación S
HOWVIEW
Cuando se cambie la hora de inicio
de la programación S
HOWVIEW
Cuando se programa
manualmente
Bélgica, Holanda, Suecia,
Dinamarca, Finlandia, Noruega,
Francia
ON OFF OFF
Alemania, Suiza, Austria ON ON ON
Italia, España, Portugal, Grecia,
otros países
OFF OFF OFF
116
7463sp.book Page 54 Tuesday, March 8, 2005 11:12 AM

55
RQT7463
Referencia
Preguntas más frecuentes
Preparación Página
Disco
Grabación
¿Qué equipo se necesita para reproducir el
sonido ambiental de múltiples canales?
≥DVD-Vídeo:
Puede reproducir sonido ambiental multicanal de DVD-Vídeo
conectando digitalmente un amplificador equipado con un
decodificador Dolby Digital, DTS o MPEG.
≥DVD-Audio:
Esta unidad reproduce DVD-Audio en 2 canales. No puede reproducir
sonido ambiental de múltiples canales.
9
—
¿Se conectan directamente a esta unidad
los auriculares y los altavoces?
≥No puede conectarlos directamente a la unidad. Conéctelos a través
del amplificador, etc.
9
El televisor tiene terminal Scart y terminal
de entrada de vídeo componente. ¿A qué
terminal debo hacer la conexión?
≥Si tiene un televisor convencional (CRT: tubo de rayos catódicos) le
recomendamos utilizar el terminal Scart. Conectando a un televisor
compatible con RGB puede disfrutar del vídeo RGB reproducido por
este aparato.
Si tiene un televisor con pantalla LCD/plasma o un proyector LCD
compatible con la exploración progresiva, haga la conexión a través de
los terminales de vídeo componente para obtener vídeo progresivo de
alta calidad.
Si tiene un televisor CRT o un televisor multisistema que utiliza el modo
PAL compatible con la exploración progresiva, no le recomendamos la
salida progresiva porque se puede producir algo de parpadeo en la
imagen.
7, 8
¿Es mi televisor compatible con salida
progresiva?
≥Todos los televisores Panasonic que tienen terminales de entrada 625
(576)/50I· 50P, 525 (480)/60I · 60P son compatibles. Consulte al
fabricante si su televisor es de otra marca.
—
¿Puedo reproducir discos DVD-Vídeo,
DVD-Audio y Vídeo CDs comprados en
otro país?
≥No puede reproducir DVD-Vídeo si su número de región no incluye “2”
o “ALL”.
Cubierta
¿Se puede reproducir DVD-Vídeo que no
tiene número de región?
≥El número de región de DVD-Vídeo indica que el disco corresponde a
un estándar. No puede reproducir discos que no tengan un número de
región.
—
Hábleme de la compatibilidad de DVD-R y
DVD-RW con esta unidad.
≥Esta unidad graba y reproduce DVD-R. Sin embargo, usted no puede
grabar en discos DVD-R que estén finalizados.
≥Este aparato también graba y reproduce discos compatibles con la
grabación de alta velocidad.
≥Esta unidad no graba ni reproduce DVD-RW.
—
—
—
Hábleme de la compatibilidad de CD-R y
CD-RW con esta unidad.
≥Esta unidad reproduce discos CD-R/CD-RW (discos de grabación de
audio) que han sido grabados bajo uno de los estándares siguientes:
CD-DA, MP3 y Vídeo CD. Cierre la sesión o finalice el disco después
de grabar.
≥Con esta unidad no puede escribir en un CD-R o CD-RW.
14, 25
—
¿Puedo grabar de un videocasete o DVD
comprado en una tienda?
≥La mayoría de los videocasetes y DVDs de venta en el comercio están
protegidos contra el copiado; por lo tanto, la grabación resulta
generalmente imposible.
—
¿Se puede reproducir en otro equipo un
DVD-R grabado en esta unidad?
≥
Puede reproducir en reproductores compatibles con DVD-R después de
finalizar el disco en esta unidad; sin embargo, debido a las condiciones
de la grabación, puede que la reproducción resulte imposible.
43
¿Cuántas veces puede escribir en un DVD-
RAM?
≥Puede escribir aproximadamente 100.000 veces dependiendo de las
condiciones de utilización.
—
¿Puedo copiar a alta velocidad en un
disco?
≥Cuando utilice un disco compatible con alta velocidad podrá grabar a
velocidades que superan a la normal en 32k veces, en DVD-Rs, y en
24k veces, en DVD-RAMs.
35
¿Puedo grabar señales de audio digital
utilizando esta unidad?
≥No puede grabar señales digitales. Los terminales de audio digital de
esta unidad son para la salida de señales solamente. (El audio grabado
utilizando la función de grabación automática DV desde una
videocámara digital, por ejemplo, se graba digitalmente.)
—
¿Se puede grabar en otro equipo una señal
de audio digital de esta unidad?
≥Puede grabarla si utiliza la señal PCM. Cuando grabe DVD, cambie los
ajustes de “Salida Audio Digital” a lo siguiente en el menú SETUP.
–Conversión PCM: Sí
–Dolby Digital/DTS/MPEG: PCM
Pero sólo si está permitida la grabación digital del disco y el equipo de
grabación es compatible con una frecuencia de muestreo de 48 kHz.
≥No puede grabar señales MP3.
47
—
¿Puedo cambiar a emisiones bilingües
durante la grabación?
≥Con HDD y DVD-RAM, usted si puede. Pulse simplemente [AUDIO].
≥Con DVD-R, usted no puede. Cambie antes de grabar empleando
“Selec. Audio Dual” en el menú SETUP.
24
47
117
7463sp.book Page 55 Tuesday, March 8, 2005 11:12 AM

56
RQT7463
Referencia
Mensajes de error
En el televisor Página
En el visualizador de la unidad
Grabación incompleta. ≥El programa estaba protegido contra el copiado.
≥La HDD o el disco pueden estar llenos.
—
—
Imposible reproducir este
título.
El sistema TV difiere del ajuste.
Para reproducir este título,
cambie el sistema TV en
SETUP.
≥Intentó reproducir un título grabado utilizando un sistema de codificación diferente del
sistema de televisión seleccionado en la unidad.
Cambie el ajuste “Sistema TV” en esta unidad a uno que sea adecuado.
50
No se puede grabar el disco. ≥El disco puede estar sucio o rayado.
≥En esta unidad no puede formatear un Microdrive o un disco duro móvil.
61
—
Compruebe el disco.
No se puede formatear.
Imposible reproducir en esta
unidad.
≥Intentó reproducir una imagen incompatible.
≥Apague la unidad y vuelva a introducir la tarjeta.
26
26
No graba. Disco lleno. ≥Cree espacio borrando títulos que no quiera guardar. [HDD] [RAM]
(Aunque borre grabaciones de un DVD-R, el espacio del disco no aumentará.)
≥Use un disco nuevo.
24, 31,
42, 43
—
Imposible grabar, excedido el
número máximo de títulos.
Ha ocurrido un error. Pulsar
ENTER.
≥Pulse [ENTER] para iniciar el proceso de recuperación. No puede utilizar la unidad
mientras ésta está recuperándose (“SELF CHECK” aparece en el visualizador de la
unidad).
—
No hay disco ≥El disco puede estar al revés. —
No hay carpetas. ≥No hay carpeta compatible en esta unidad. 15
No hay PC CARD
No hay SD CARD
PC CARD no válida.
SD CARD no válida.
≥La tarjeta no está introducida. Si este mensaje aparece habiendo ya una tarjeta
compatible introducida, apague la unidad, saque la tarjeta y vuelva a meterla.
≥La tarjeta introducida no es compatible o su formato no es el apropiado
26
15
No hay bastante espacio en el
destino del copiado.
≥Cree espacio borrando elementos que no necesite.
≥Borre uno o más elementos registrados en la lista de copia para asegurarse de no
sobrepasar “Capacidad de destino”.
24, 27, 31,
34, 42, 43
37
Cambie el disco. ≥Puede haber problemas con el disco. Pulse [< OPEN/CLOSE] en la unidad principal para
retirarlo y comprobar si tiene rayas o está sucio. (La unidad se apaga automáticamente
después de abrir la bandeja.)
61
El disco no se puede grabar. ≥La unidad no puede grabar en el disco que usted insertó. Inserte un DVD-RAM o DVD-R
sin finalizar.
≥Insertó un DVD-RAM sin formatear. Formatee el disco con esta unidad.
—
43
Este disco no está formateado
correctamente.
Hay que formatearlo usando la
GESTIÓN DISCO.
$
≥La unidad o el diso prohíben la operación. —
HDD SLP ≥Para prolongar la duración de la HDD, ésta se encuentra en el modo SLEEP. Pulse [HDD]
para activar.
61
HARD ERR ≥Si no se produce cambio después de encender y apagar la unidad, póngase en contacto
con el concesionario a quien adquirió la unidad.
—
NO READ ≥El disco está sucio o muy rayado. La unidad no puede grabar, reproducir o editar.
≥Ha estado utilizando un limpiador de lentes DVD-RAM/PD y éste se ha terminado. Pulse
[< OPEN/CLOSE] en la unidad principal para expulsar el disco.
61
—
PROG FULL ≥Ya hay 32 programas de temporizador. Borre los que no necesite. 21
REMOTE DVD
(“∑” significa un número.)
≥El mando a distancia y la unidad principal utilizan códigos diferentes. Cambie el código del
mando a distancia.
Mantenga pulsados al mismo tiempo [ENTER] y el
botón del número indicado durante más de
2 segundos.
13
SELF CHECK ≥La unidad está iniciándose. Espere hasta que desaparezca el mensaje. —
U14 ≥La unidad está caliente.
La unidad cambia al modo de espera por razones de seguridad. Espere unos 30 minutos
hasta que desaparezca el mensaje.
Seleccione una posición con buena ventilación cuando instale la unidad. No tape el
ventilador de refrigeración de la parte trasera de la unidad.
—
U99 ≥La unidad no funciona correctamente. Pulse [Í/I] en la unidad principal para ponerla en
espera. Y ahora pulse de nuevo [Í/I] en la unidad principal para encenderla.
—
UNSUPPORT ≥Ha insertado un disco que la unidad no puede reproducir ni grabar. 14
X HOLD ≥La función de bloqueo para niños se ha activado.
Mantenga pulsados [ENTER] y [RETURN] simultáneamente hasta que desaparezca “X
HOLD”.
51
118
7463sp.book Page 56 Tuesday, March 8, 2005 11:12 AM

57
RQT7463
Referencia
Guía para la solución de problemas
Antes de solicitar el servicio de reparaciones, haga las comprobaciones siguientes. Si tiene dudas acerca de algunos de los puntos de
verificación, o si los remedios indicados en la tabla no solucionan el problema, consulte a su concesionario para recibir instrucciones.
Lo siguiente no indica ningún problema con esta unidad:
Alimentación Página
Visualizaciones
Pantalla del televisor y vídeo
≥Sonido normal de un disco que gira.
≥Mala recepción debido a las condiciones atmosféricas.
≥Distorsión en la imagen durante la búsqueda.
≥Interrupciones en la recepción debido a las cortes periódicos en las
emisiones del satélite.
≥Cuando la HDD se pone en el modo SLEEP se oye un sonido, o las
operaciones tardan en responder en el modo SLEEP.
No hay alimentación.
La unidad no se enciende al
pulsar [Í DVD].
≥Introduzca firmemente el cable de alimentación de CA en una toma de CA activa.
≥La grabación de temporizador enlazado con un equipo externo está en el modo de espera.
Pulse [EXT LINK] para cancelar la espera de grabación.
7, 8
21
La unidad se pone en el modo
de espera.
≥Se ha activado uno de los dispositivos de seguridad de la unidad. Pulse [Í/I] en la unidad
principal para encenderla.
—
El visualizador está poco
iluminado.
≥Cambie “Luminosidad del display” en el menú SETUP. 47
“0:00” parpadea en el
visualizador de la unidad.
≥Ajuste el reloj. 51
El tiempo grabado en el disco
y el tiempo disponible no se
suman.
El tiempo de reproducción
mostrado para MP3 no
concuerda con el tiempo real.
≥Los tiempos mostrados pueden ser diferentes de los tiempo reales.
≥Después de grabar o editar un DVD-R 200 veces o más se utiliza más espacio del disco
que el correspondiente al tiempo de grabación real.
≥Durante la búsqueda, el tiempo transcurrido no se visualiza correctamente.
≥Aunque borre grabaciones de un DVD-R, el espacio del disco no aumentará.
—
—
—
—
El reloj está mal. ≥Bajo condiciones de recepción adversas, etc., puede que la función de corrección
automática de la hora no funcione. En este caso, “Automático” cambia automáticamente a
“Off”. Si el ajuste automático del reloj no funciona, ponga la hora a mano.
51
La recepción de televisión
empeora después de conectar
la unidad.
≥Esto puede ocurrir porque las señales están siendo divididas entre la unidad y el otro
equipo. Se puede solucionar utilizando un reforzador de señales de venta en comercios de
productos audiovisuales.
—
No aparecen los mensajes de
estado.
≥Seleccione “Automático” en “Mensajes por pantalla” en el menú SETUP. 47
No aparece el fondo gris. ≥Seleccione “On” en “Fondo gris” en el menú SETUP. 47
La imagen no aparece durante
la grabación con
temporizador.
≥Las grabaciones con temporizador se activan independientemente de si la unidad está
encendida o apagada. Para confirmar si la grabación con temporizador va a funcionar
correctamente, encienda la unidad.
—
La imagen de relación de
aspecto 4:3 se expande a
izquierda y derecha.
El tamaño de la pantalla no es
correcto.
≥Utilice el televisor para cambiar el aspecto. Si su televisor no tiene esa función, ponga
“Ajuste gradual” en el menú Video en “OFF”.
≥Compruebe los ajustes para “Relación de aspecto TV” en el menú SETUP.
29
12
Cuando se reproduce vídeo
queda mucha imagen
posterior.
≥Ponga “Red.ruido rep.ón” en el menú Video en “OFF”. 29
Cuando se reproduce DVD-
Vídeo utilizando la salida
progresiva, una parte de la
imagen aparece
momentáneamente doblada.
≥Ponga “Ajuste gradual” en el menú Video en “OFF”. Este problema se debe al método de
edición o al material utilizado en DVD-Vídeo, pero deberá corregirse si usted utiliza la salida
entrelazada.
29
No hay cambio aparente en la
calidad de la imagen cuando
se ajusta con el menú Video
en los menús en pantalla.
≥El efecto se nota menos con algunos tipos de vídeo. —
Las imágenes procedentes de
esta unidad no aparecen en el
televisor.
Imagen distorsionada.
≥Asegúrese de que el televisor esté conectado a los terminales AV1, VIDEO OUT, S-VIDEO
OUT o COMPONENT VIDEO OUT de esta unidad.
≥Asegúrese de que el ajuste de entrada del televisor (ej., AV 1) sea correcto.
≥El televisor no es compatible con las señales progresivas. Mantenga pulsados al mismo
tiempo [∫] y [TIME SLIP] en la unidad principal durante unos 5 segundos. El ajuste
cambiará a entrelazado.
≥
El ajuste “Sistema TV” de la unidad es diferente del sistema de TV utilizado por el disco que está
siendo reproducido. Durante la parada, mantenga pulsado [
∫
] y [
<
OPEN/CLOSE] en la unidad
principal durante 5 segundos o más. El sistema cambiará de PAL a NTSC o viceversa.
7, 8
—
—
50
119
7463sp.book Page 57 Tuesday, March 8, 2005 11:12 AM

58
RQT7463
Referencia
Guía para la solución de problemas
Sonido Página
Operación
Grabación, grabación con temporizador y copiado
Continúa en la página siguiente
No hay sonido.
Volumen bajo.
Sonido distorsionado.
No se puede oír el tipo de
audio deseado.
≥Compruebe las conexines y los ajustes. Compruebe el modo de entrada del amplificador si
ha conectado uno.
≥Pulse [AUDIO] para seleccionar el audio.
≥Apague V.S.S. en los casos siguientes.
–Cuando se utilizan discos que no tienen efectos de sonido ambiental; discos de karaoke
por ejemplo.
–Cuando se reproducen programas de emisiones bilingües.
≥
El disco puede tener restricciones en el método empleado para la salida de audio. Si no aparece
“D.MIX” en el visualizador cuando se reproduce un DVD-Audio de múltiples canales, sólo saldrá
sonido para los dos canales delanteros. Consulte la carátula del disco.
[DVD-A]
7–9, 47
24
29
—
No se puede cambiar el audio. ≥No puede cambiar el audio en los casos siguientes.
–Cuando hay un disco DVD-R en la bandeja del disco mientras se ha seleccionado la
unidad DVD.
–Cuando el modo de grabación es XP y “Audio Mode para XP Recording” se ha puesto en
“LPCM”.
–Cuando “Grab.ón DVD-R para copia rápida” está en “Sí”.
≥Usted ha utilizado una conexión digital. Ponga “Dolby Digital” en “PCM” o haga la conexión
utilizando cables de audio (conexión analógica).
≥Hay discos cuyo audio no se puede cambiar debido a cómo se hizo el disco.
—
47
46
47, 9
—
No se puede utilizar el
televisor.
El mando a distancia no
funciona.
≥Cambie el código del fabricante. Algunos televisores no pueden funcionar aunque usted
cambie el código.
≥El mando a distancia y la unidad principal utilizan códigos diferentes. Cambie el código del
mando a distancia.
Mantenga pulsados al mismo tiempo [ENTER] y el botón
del número indicado durante más de 2 segundos.
≥Las pilas están agotadas. Cámbielas por otras nuevas.
≥El cristal de color puede obstruir la recepción/transmisión de la señal.
≥No ponga el sensor de señales a la luz solar directa ni en lugares que puedan quedar
expuestos a la luz del sol.
≥La función de bloqueo para niños se ha activado.
13
13
4
—
—
51
La unidad está encendida
pero no funciona.
≥La unidad de grabación o reproducción no se ha seleccionado correctamente.
≥Algunas operaciones pueden estar prohibidas por el disco.
≥
La unidad está caliente (aparece “U14” en el visualizador). Espere a que desaparezca “U14”.
≥Se ha activado uno de los dispositivos de seguridad de la unidad.
Reponga la unidad de la forma siguiente:
Pulse [Í/I] en la unidad principal para ponerla en espera.
Si la unidad no se pone en espera, mantenga pulsado [Í/I] en la unidad principal durante
unos 10 segundos. La unidad se pone a la fuerza en espera.
O desconecte el cable de alimentación de CA, espere un minuto y luego vuelva a conectarlo.
16, 22
—
—
—
La activación de la HDD es lenta.
≥La HDD está en el modo SLEEP. (“HDD SLP” aparece en el visualizador de la unidad.) 61
No es posible extraer el disco. ≥La unidad puede tener un problema. Mientras la unidad está apagada, mantenga pulsados
al mismo tiempo [∫] y [CH W] en la unidad principal durante unos 5 segundos. Retire el
disco y consulte a su concesionario.
Si la función de bloqueo para niños está activada, la operación de arriba no trabaja.
Cancele la función de bloqueo para niños.
51
No se pueden sintonizar
canales.
No se pueden descargar
canales presintonizados de la
televisión.
≥Verifique las conexiones.
≥Para descargar presintonías de canales deberá conectar un televisor equipado con la
función Q Link mediante un cable Scart de 21 contactos completamente cableado.
7, 8
—
No se puede grabar. ≥No ha insertado un disco o el disco que insertó no está grabado. Inserte un disco que la
unidad pueda grabar.
≥El disco no está formateado. Formatee el disco. [RAM]
≥La lengüeta de protección contra escritura del cartucho está en PROTECT o el disco está
protegido con GESTIÓN DISCO.
≥Algunos programas tienen limitaciones en el número de veces que pueden ser grabados
(CPRM).
≥Cuando no hay suficiente espacio o cuando el número de títulos ha llegado a su límite no
puede grabar. Borre los títulos que no desee.
≥No puede grabar en discos DVD-R finalizados.
≥Debido a las peculiaridades de los DVD-R, tal vez no pueda grabar en ellos si los introdujo
y sacó, o si encendió y apagó la unidad mientras estaba introducido un disco, un total de
cincuenta veces.
≥
Un DVD-R grabado en esta unidad tal vez no pueda grabarse en otra grabadora DVD de Panasonic.
14
43
42
53
24, 31,
42, 43
—
—
—
La grabación con
temporizador no funciona
bien.
La programación S
HOWVIEW no
funciona correctamente.
≥El programa de temporizador está mal o se superponen horas de diferentes programas de
temporizador. Corrija el programa.
≥La unidad no está en el modo de espera de grabación con temporizador. (“F” no está
encendido en el visualizador de la unidad.) Pulse [F TIMER].
≥Ajuste el reloj.
21
19, 20
51
120
7463sp.book Page 58 Tuesday, March 8, 2005 11:12 AM

59
RQT7463
Referencia
Grabación, grabación con temporizador y copiado (Continúa) Página
Reproducción
La grabación con
temporizador no se para
aunque se pulsa [∫].
≥Mientras utiliza la grabación con temporizador, pulse [F TIMER]. (“F” desaparece.)
≥Cuando se utilice la grabación con temporizador enlazada con un equipo externo, pulse
[EXT LINK]. (“Ext Link” desaparece.)
19, 20
21
El programa de temporizador
permanece a pesar de haber
terminado la grabación.
≥El programa de temporizador permanece si está ajustado para funcionar diaria o
semanalmente.
20
Se ha perdido parte o la
totalidad de un título grabado.
≥
Si se produce un fallo en la alimentación o se desconecta la clavija de alimentación de la toma
de CA mientras se graba o edita, el título podrá perderse o el disco tal vez no pueda utilizarse.
Tendrá que formatear el disco ([HDD] [RAM]) o utilizar uno nuevo. No podemos darle ninguna
garantía con respecto a los programas o discos pedidos.
—
No se puede copiar en un
disco DVD-R utilizando el
modo de alta velocidad.
≥Cuando grabe en la HDD, ponga “Grab.ón DVD-R para copia rápida” en “Sí” en el menú
SETUP.
46
Al copiar, esto tarda mucho
tiempo a pesar de haber
seleccionado el modo de alta
velocidad.
≥Utilice un disco que sea compatible con la grabación de alta velocidad. Aunque el disco sea
compatible con la grabación de alta velocidad, la velocidad de grabación máxima tal vez no
pueda alcanzarse debido a la condición del disco.
≥Copiar muchos títulos tarda más de lo normal.
≥Cuando se utilicen otras grabadoras DVD de Panasonic que no sean compatibles con la
grabación en el modo EP ( 8 horas ) no se podrá copiar a alta velocidad en discos DVD-R
títulos de más de 6 horas de duración.
—
—
—
El DVD-R que gira produce un
sonido muy alto.
≥Cuando grabe o copie a alta velocidad en un DVD-R, el sonido del disco que gira podrá ser
más alto de lo normal, sin embargo, esto no es ningún problema.
—
La función de grabación
automática DV no se activa.
≥Si no se pueden grabar imágenes o se interrumpe la grabación, compruebe las conexiones
y los ajustes del equipo DV.
≥No puede empezar a grabar hasta que las imágenes procedentes del equipo DV aparecen
en el televisor.
≥La grabación se puede realizar de la forma deseada si los códigos de tiempo de la cinta del
equipo DV no van seguidos.
≥Dependiendo del equipo, puede que la grabación automática DV no se haga
correctamente.
39
—
—
—
La reproducción no empieza a
pesar de pulsar [1] (PLAY).
La reproducción empieza pero
se detiene inmediatamente.
≥Inserte correctamente el disco con la etiqueta hacia arriba.
≥Intentó reproducir un DVD-RAM/DVD-R en blanco, o un disco que no puede reproducirse
en esta unidad.
≥Tal vez pueda copiar un título de “grabación de una sola vez” que fue grabado en un DVD-
RAM utilizando una grabadora DVD de Panasonic diferente de la HDD de esta unidad, pero
la reproducción no será posible debido a la protección del copyright.
≥Cuando grabe en un DVD-RAM utilizando el modo “EP ( 8horas )”, puede que no sea
posible reproducir ese disco en reproductores DVD compatibles con DVD-RAM. En este
caso, utilice el modo “EP ( 6horas )”.
≥Durante la grabación automática DV no puede reproducir discos.
22
14
—
46
—
Pausa momentánea de audio
y vídeo.
≥Esto ocurre entre capítulos de listas de reproducción.
≥Esto ocurre entre capítulos y con títulos borrados parcialmente en DVD-Rs finalizados que
han sido copiados en el modo de alta velocidad.
—
—
No se reproduce DVD-Vídeo. ≥Algunos DVD-Vídeo no pueden reproducirse cuando usted cambia el nivel de la
calificación.
46
No se pueden seleccionar
pistas de sonido y subtítulos
alternativos.
≥Los idiomas no se encuentran grabados en el disco.
≥Puede que tenga que utilizar los menús del disco para seleccionar idiomas.
—
—
No hay subtítulos. ≥Los subtítulos no se encuentran grabados en el disco.
≥Encienda los subtítulos.
—
28
No se puede cambiar el ángulo.
≥Los ángulos sólo se pueden cambiar con escenas grabadas desde ángulos diferentes. —
Ha olvidado su contraseña
para la calificación.
≥Mientras la bandeja del disco está abierta, pulse [DVD] y luego mantenga pulsados
[D] y [E] en la unidad principal al mismo tiempo durante 5 segundos o más.
—
Quick View no funciona. ≥Esto no funciona si el ajuste es “No” en “PLAYk1.3 + Audio en Search”.
≥Esto no funciona cuando el audio no es Dolby Digital.
≥Esto no funciona cuando se graba en el modo XP o FR. [RAM]
47
—
—
La función de la reanudación
de la reproducción no
funciona.
≥Esta función sólo se activa cuando el indicador de la derecha aparece en el
visualizador de la unidad.
≥Las posiciones memorizadas se cancelan cuando la unidad está apagada
o cuando se abre la bandeja. La posición memorizada en la lista de
reproducción también se cancela cuando se editan la lista de reproducción
y el título.
—
—
La imagen del Vídeo CD no se
visualiza bien.
≥Cuando conecte a un televisor de múltiples sistemas, seleccione “NTSC” en “Sistema TV”
en el menú SETUP.
≥Cuando se haga la conexión a un televisor PAL, la parte inferior de la imagen no se podrá
visualizar correctamente durante la búsqueda.
50
—
Time Slip no funciona. ≥Time Slip no funciona cuando los ajustes “Sistema TV” de la unidad son diferentes del título
grabado en el disco.
50
HDD
EXTEXTEXT
LinkLinkLink
XPXPXP
SP
LPLP
LP
EPEPEP
RECRECREC
PLAYPLAYPLAY
121
7463sp.book Page 59 Tuesday, March 8, 2005 11:12 AM

60
RQT7463
Referencia
Guía para la solución de problemas
Edición Página
Imágenes fijas
Coloque el aparato en una superficie plana lejos de la luz directa
del sol, temperatura y humedad altas, y vibración excesiva. Estas
condiciones pueden dañar el gabinete y otros componentes, y por lo
tanto acortar la vida útil del aparato.
No ponga objetos pesados sobre el aparato.
No use fuentes de alimentación de alto voltaje. Esto puede
sobrecargar el aparato y causar un incendio.
No use una fuente de alimentación de CC. Verifique
cuidadosamente la fuente cuando coloque el aparato en una
embarcación u otro lugar donde sea usada.
Asegúrese de que el cable de alimentación de CA esté
conectado correctamente y no dañado. Una mala conexión y daño
en el cable pueden causar un incendio o un choque eléctrico. No
jale, doble el cable ni coloque objetos pesados sobre él.
Coja el enchufe firmemente cuando desenchufe el cable. El jalar
el cable de alimentación de CA puede causar choque eléctrico.
No maneje el enchufe con manos mojadas. Esto puede causar
choque eléctrico.
No permita que objetos de metal caigan dentro del aparato. Esto
puede causar choque eléctrico o problemas.
No permita que líquidos penetren en el aparato. Esto puede
causar choque eléctrico o problemas. Si esto ocurre, desconecte
inmediatamente el aparato de su alimentación y póngase en
contacto con su distribuidor.
No rocíe insecticidas sobre o dentro del aparato. Contienen
gases inflamables que pueden encenderse si son rociados dentro
del aparato.
No intente reparar este aparato usted mismo. Si el sonido se
interrumpe, los indicadores no se iluminan, sale humo o sucede
cualquier problema que no está tratado en estas instrucciones,
póngase en contacto con su distribuidor o con un centro de servicio
autorizado. Si este aparato es reparado, desarmado o reconstruido
por personas no cualificadas, pueden producirse un choque
eléctrico o daños.
Extienda la vida útil del aparato desconectándolo de la fuente de
alimentación si no va a ser usado por largo tiempo.
No se puede formatear. ≥El disco está sucio. Utilice un limpiador especial o pase por él un paño blando.
≥Intentó formatear un disco que no es compatible con esta unidad.
61
14
No se pueden crear capítulos.
Durante la operación
“Borrado parcial” no se puede
marcar el punto de inicio ni el
de finalización.
≥La unidad escribe la información del capítulo en el disco cuando usted la apaga o saca el
disco. La información no se escribe si se produce una interrupción en el suministro eléctrico
antes de hacer esto.
≥Estas operaciones no se pueden hacer con imágenes fijas.
≥No puede poner puntos si éstos se encuentra muy próximos entre sí. Tampoco puede poner
el punto de finalización antes del punto de inicio.
—
—
—
No se pueden borrar
capítulos.
≥Cuando el capítulo sea demasiado corto para borrar, utilice “Combinar capítulos” para
alargarlo.
31
El tiempo de grabación
disponible no aumenta a
pesar de borrar grabaciones
del disco.
≥El espacio de grabación disponible en el DVD-R no aumenta a pesar de borrar títulos
grabados previamente.
—
No se puede crear una lista de
reproducción.
≥No puede seleccionar todos los capítulos de un título de una vez si el título incluye también
imágenes fijas. Selecciónelos individualmente.
—
No se puede visualizar la
pantalla Direct Navigator.
≥Esta pantalla no se puede visualizar durante la grabación o la copia, ni mientras la unidad
está esperando para hacer la grabación con temporizador enlazada con un equipo externo.
—
No se puede editar ni
formatear una tarjeta.
≥Cancele la protección de la tarjeta. (Con algunas tarjetas, el mensaje “Protección contra la
escritura No” aparecerá algunas veces en la pantalla, aunque la protección haya sido
establecida.)
42
No se puede leer el contenido
de la tarjeta.
≥El formato de la tarjeta no es compatible con la unidad. (El contenido de la tarjeta puede
estar dañado.)
Formatee utilizando FAT 12 o FAT 16 con otro equipo o formatee la tarjeta con esta unidad.
≥La tarjeta contiene una estructura de carpeta y/o extensiones de archivo incompatibles con
esta unidad.
≥Apague la unidad y vuelva a encenderla.
15, 26
43
15
—
La copia, borrado y puesta de
la protección lleva mucho
tiempo.
≥Cuando haya muchas carpetas y archivos, esto puede tardar algunas veces unos pocos
minutos.
≥Cuando se repita la copia o el borrado, esto puede tardar algo de tiempo algunas veces.
Formatee el disco o la tarjeta.
—
43
La tarjeta PC no se puede
quitar.
≥Asegúrese de que la tarjeta PC esté bien metida antes de intentar sacarla. 26
Precauciones de seguridad
Ubicación
Voltaje
Protección de cable de alimentación de CA
Objetos extraños
Servicio
122
7463sp.book Page 60 Tuesday, March 8, 2005 11:12 AM

61
RQT7463
Referencia
Mantenimiento/Manejo de la HDD, discos y tarjetas
A las piezas de precisión de esta unidad les afecta fácilmente el
medio ambiental, especialmente la temperatura, la humedad y
el polvo. El humo de los cigarrillos también puede causar fallos
en el funcionamiento o averías.
Para limpiar esta unidad, pase por ella un paño blando y seco.
≥No utilice nunca alcohol, diluyente de pintura o bencina para
limpiar esta unidad.
≥Antes de utilizar un paño tratado químicamente, lea
cuidadosamente las instrucciones entregadas con el paño.
Tenga en cuenta los puntos siguientes para disfrutar
escuchando y viendo su programas sin ningún problema.
El polvo y la suciedad puede adherirse a la lente de la unidad con el paso
del tiempo, imposibilitando la grabación o la reproducción de los discos.
Utilice el limpiador de lentes DVD-RAM/PD (LF-K123LCA1,
donde se encuentre disponible) una vez al año aproximadamente,
dependiendo de la frecuencia de utilización de la unidad y el entorno
de funcionamiento. Lea cuidadosamente las instrucciones del
limpiador de lentes antes de utilizarlo.
∫ Cómo sujetar los
discos o las tarjetas
No toque la superficie grabada
ni la superficie de los terminales.
∫ Si hay suciedad o condensación en el disco
[RAM] [DVD-R]
≥Limpie con un limpiador de discos DVD-RAM/PD opcional
(LF-K200DCA1, donde se encuentre disponible).
≥No utilice limpiadores para CDs ni paños.
[DVD-A] [DVD-V] [VCD] [CD]
Pase un paño húmedo y luego uno seco.
∫ Precauciones de manejo
≥No coloque etiquetas ni pegatinas en los discos. (Esto puede
causar deformaciones y desequilibrio en la rotación del disco, y
éste no podrá utilizarse más.)
≥No escriba en el lado de la etiqueta con un bolígrafo u otro
instrumento de escritura.
≥
No utilice limpiadores de discos de vinilo, bencina, diluyente, líquidos
para impedir la electricidad estática o cualquier otro disolvente.
≥No utilice protectores o cubiertas a prueba de arañazos.
≥No exponga los terminales de la tarjeta al agua, suciedad o
sustancias extrañas.
≥No utilice los discos siguientes:
–Discos con adhesivo expuesto de pegatinas o etiquetas quitadas
(discos de alquiler, etc.).
–Discos muy deformados o agrietados.
–Discos de formas irregulares como, por
ejemplo, en forma de corazón.
≥
No ponga los discos en los lugares siguientes:
–A la luz solar directa.
–Donde haya mucho polvo o humedad.
–Cerca de una calefacción
–Donde se produce electricidad estática u ondas electromagnéticas
La HDD es un instrumento de grabación de alta precisión, y debido
a su capacidad para poder hacer una grabación larga y a su
funcionamiento de alta velocidad, es un dispositivo muy especial y
muy susceptible de dañarse.
Como norma, guarde el contenido de vídeo importante en un disco
DVD como copia de seguridad.
∫
La HDD es un dispositivo que no ha sido construido
para aguantar la vibración o los golpes ni el polvo
Dependiendo del ambiente de instalación y del manejo de la HDD,
algún contenido podría estropearse, y la reproducción y la grabación
resultarán imposibles. Durante el funcionamiento, especialmente, no
someta la unidad a ninguna vibración ni golpe, y no desconecte el
cable de alimentación de CA de la toma de corriente de casa. En el
caso de que se produjese un fallo en el suministro de alimentación,
el contenido durante la grabación o la reproducción podría dañarse.
∫
La HDD es un dispositivo de almacenamiento temporal
La HDD no es un dispositivo de almacenamiento eterno para el
contenido grabado. Utilice la HDD como un dispositivo de
almacenamiento temporal para ver la reproducción una vez, editar o
guardar en un disco DVD.
∫ Guarde (copia de seguridad) inmediatamente
todo el contenido tan pronto como note que
puede haber un problema con la HDD
Si hay alguna irregularidad con la HDD se pueden producir sonidos
extraños o problemas con la imagen (ruido de bloque, etc.). La
utilización de la HDD en estas condiciones puede empeorar el
problema y, en el peor de los casos, la HDD tal vez no pueda
utilizarse más. Tan pronto como note este tipo de problema, guarde
todo el contenido en el disco DVD.
El contenido (datos) grabado en una HDD que no puede utilizarse
resulta irrecuperable.
∫ Tiempo de grabación restante de la HDD
Esta unidad graba utilizando un sistema de compresión de datos
VBR (velocidad de bits variable) para variar los segmentos de datos
grabados de forma que concuerden con los segmentos de datos de
vídeo que puedan causar diferencias en las cantidades de tiempo
visualizadas y en el espacio restante para grabar.
Si la cantidad de tiempo restante no es suficiente, borre cualquier
título que no necesite para crear espacio suficiente antes de
empezar a grabar. (Borrar una lista de reproducción no aumentará
el tiempo de grabación.)
∫ Cuando “HDD SLP (SLEEP)” aparezca en el
visualizador
La HDD se ha puesto automáticamente en el modo SLEEP para
aumentar su duración. (Mientras se suministra alimentación, el
disco de la HDD gira a alta velocidad. Si no hay un disco en la
unidad, la HDD se pone en el modo SLEEP después de pasar 30
minutos o más sin realizarse ninguna operación.)
≥Pulse [HDD] para activar.
≥En el modo SLEEP, la reproducción o la grabación no empezarán
inmediatamente porque la HDD tarda tiempo en reactivarse.
≥Cuando no se utilice la unidad recomendamos sacar el disco de la
bandeja para poner el HDD en el modo SLEEP.
Cuidados de la unidad
Manejo de discos y tarjetas
Cuidados de la HDD (unidad de disco duro)
∫ Precauciones para la instalación
≥No haga la instalación en un lugar cerrado donde el
ventilador de refrigeración trasero y las aberturas de
refrigeración laterales queden tapadas.
≥Ponga la unidad en una superficie plana que no esté sujeta
a vibraciones o golpes.
≥No la coloque encima de ningún
aparato que produzca calor como, por
ejemplo, una videograbadora, etc.
≥No la coloque tampoco en un lugar
donde se produzcan con frecuencia
cambios de temperatura.
≥
Colóquela en una zona donde no se produzca condensación. La
condensación es un fenómeno que forma humedad en una superficie
fría cuando se produce un cambio considerable en la temperatura. La
condensación puede causar daños internos en la unidad.
≥Condiciones bajo las que se puede producir condensación
–Cuando se produzca un cambio brusco de temperatura (al pasar
de un lugar muy caluroso a uno muy frío, o viceversa, cuando
esté expuesto al aire procedente de un acondicionador de aire o
cuando el aire refrigerado impacte directamente sobre la
unidad). Cuando la HDD (se calienta durante el funcionamiento)
esté sometida al aire frío se podrá formar condensación en su
interior, y esto podría dañar las cabezas de la HDD, etc.
–Cuando la humedad sea alta o haya mucho vapor en la habitación.
–Durante la estación lluviosa.
≥En los casos de arriba, sin encender la unidad, deje que ésta
se adapte a la temperatura de la habitación esperando 2–3
horas hasta que desaparezca la condensación.
∫ El humo de los cigarrillos, etc. causa fallos en
el funcionamiento o averías
La unidad puede estropearse si entra en ella el humo de
cigarrillos, insecticidas, vapor, etc.
∫ Durante el funcionamiento
≥No mueva la unidad ni la someta a vibraciones o golpes. (La
HDD puede dañarse.)
≥No desconecte el cable de alimentación de CA de la toma de
corriente de casa, ni desactive el disyuntor de la alimentación.
Mientras la unidad está encendida, la HDD gira a alta velocidad.
El sonido o movimiento debido al giro es normal.
∫ Cuando traslade la unidad
1 Apague la unidad. (Espere hasta que “BYE” desaparezca del
visualizador.)
2 Desconecte el cable de alimentación de CA de la toma de
corriente de casa.
3 Mueva la unidad cuando se haya parado completamente
(2 minutos aproximadamente) para evitar someterla a
vibraciones o golpes. (Aunque apague la unidad, la HDD
continuará funcionando durante unos momentos.)
∫
Indemnización con respecto al contenido grabado
Panasonic no acepta ninguna responsabilidad por los daños
directos o indirectos causados por cualquier tipo de problema
que resulten en una pérdida del contenido (datos) grabado o
editado, y tampoco garantiza ningún contenido si la grabación o
la edición no funcionan correctamente. De la misma forma, esto
que se acaba de indicar también se aplica en el caso de que se
hagan reparaciones en la unidad (incluyendo cualquier otro
componente que no esté relacionado con la HDD).
Esta unidad
Videograbadora
123
7463sp.book Page 61 Tuesday, March 8, 2005 11:12 AM

Referencia
Índice alfabético
Ahorro de energía . . . . . . . . . . . . . . . . 45
Ajuste de país . . . . . . . . . . . . . . . . . 10, 11
Ajustes de imagen. . . . . . . . . . . . . . 29, 46
Ajustes del reloj . . . . . . . . . . . . . . . . . . 51
Ajustes predeterminados . . . . . . . . . . . 45
Ángulo . . . . . . . . . . . . . . . . . . . . . . . . . . 28
Aspecto . . . . . . . . . . . . . . . . . . . . . . . . . 12
Audio
Atributo . . . . . . . . . . . . . . . . . . . . . . . 28
Idioma . . . . . . . . . . . . . . . . . . . . . . . . . 46
Recibiendo . . . . . . . . . . . . . . . . . . . . . 29
Reproducción . . . . . . . . . . . . . . . . . . . 24
Bloqueo para los niños . . . . . . . . . . . 51
Borrado parcial . . . . . . . . . . . . . . . . . . 31
Borrar
Capítulo . . . . . . . . . . . . . . . . . 24, 31, 33
Carpeta. . . . . . . . . . . . . . . . . . . . . . . . 34
Imagen fija . . . . . . . . . . . . . . . . . . . . . 34
Lista de reproducción . . . . . . . . . 24, 33
Título. . . . . . . . . . . . . . . . . . . . . . . 24, 31
Todos los títulos . . . . . . . . . . . . . . . . . 42
Cambiar icono . . . . . . . . . . . . . . . . . . . . 31
Canal
Audio . . . . . . . . . . . . . . . . . . . . . . . . . 28
Descarga de presintonías. . . . . . . 10, 50
Preparación automática . . . . . . . . 11, 50
Capítulo . . . . . . . . . . . . . . . . . . . . . . 24, 30
Código de mando a distancia . . . . . . 13
Conexión
Amplificador, componente de
sistema. . . . . . . . . . . . . . . . . . . . . . . . 9
Antena . . . . . . . . . . . . . . . . . . . . . . . 7, 8
Receptor de satélite, receptor digital o
decodificador . . . . . . . . . . . . . . . . . . . 9
Televisor . . . . . . . . . . . . . . . . . . . . . . 7, 8
Terminal de entrada de DV. . . . . . . . . 39
Terminales de entrada AV3 . . . . . . . . 39
Videograbadora . . . . . . . . . . . . . 7, 8, 39
Conversión PCM . . . . . . . . . . . . . . . . . . 47
Copia
Copia de un toque . . . . . . . . . . . . . . . 36
Lista . . . . . . . . . . . . . . . . . . . . . . . . . . 36
Imagen fija . . . . . . . . . . . . . . . . . . . . . 40
Copia (lista de reproducción) . . . . . . . 33
Copia de un toque . . . . . . . . . . . . . . . . 36
CPRM . . . . . . . . . . . . . . . . . . . . . . . . . . . 53
Creación de listas de reproducción. . . 32
Crear capÌtulo. . . . . . . . . . . . . . . . . . 24, 31
Direct Navigator . . . . . . . . . 22, 27, 30, 34
Dividir título . . . . . . . . . . . . . . . . . . . . . . 31
DPOF. . . . . . . . . . . . . . . . . . . . . . . . . 34, 53
DVD-RAM, DVD-R . . . . . . . . . . . . . . . . . 14
DVD-R (Ajuste para que los DVD-R se
puedan reproducir en otro equipo—
Finalización) . . . . . . . . . . . . . . . . . . . . 43
En pantalla
Idioma . . . . . . . . . . . . . . . . . . . . . . . . 45
Mensajes de estado . . . . . . . . . . . . . 29
Menús . . . . . . . . . . . . . . . . . . . . . . . . 28
Ext Link . . . . . . . . . . . . . . . . . . . . . . 21, 48
Finalización . . . . . . . . . . . . . . . . . . . 43, 53
Formateado . . . . . . . . . . . . . . . . . . 43, 53
FR (Modo de grabación flexible) . . . . . 17
Función de reanudación de la
reproducción . . . . . . . . . . . . . . . . . . . 23
Grabación . . . . . . . . . . . . . . . . . . . . . . . 16
Enlace externo. . . . . . . . . . . . . . . . . . 21
Grabación automática DV . . . . . . . . . 39
Grabación directa del televisor . . . . . 18
Grabación flexible . . . . . . . . . . . . . . . 18
Modo . . . . . . . . . . . . . . . . . . . . . . . . . 17
Relevo . . . . . . . . . . . . . . . . . . . . . . . 19
Renovación automática . . . . . . . . . . . 20
Temporizador . . . . . . . . . . . . . . . 19–21
Grabación automática DV . . . . . . . . . . 39
Grabación con relevo . . . . . . . . . . . . . 19
Grabación con renovación
automática . . . . . . . . . . . . . . . . . . . . . 20
Grabación con temporizador . . . . 19–21
Grabación directa del televisor . . . . . 18
Grabación DVD-R para copia rápida. . 46
Grabación flexible . . . . . . . . . . . . . . . . 18
Grabación y reproducción
simultáneas . . . . . . . . . . . . . . . . . . . . 17
Idioma
Audio . . . . . . . . . . . . . . . . . . . . . . . . 46
En pantalla . . . . . . . . . . . . . . . . . . . . 45
Lista de códigos. . . . . . . . . . . . . . . . . 48
Pista de sonido . . . . . . . . . . . . . . 28, 46
Subtítulo . . . . . . . . . . . . . . . . . . . 28, 46
Imagen fija
Copiar . . . . . . . . . . . . . . . . . . . . . . . . 40
Editar . . . . . . . . . . . . . . . . . . . . . . . . . 34
Reproducir . . . . . . . . . . . . . . . . . . . . 26
Introduzca un nombre
Carpeta . . . . . . . . . . . . . . . . . . . . . . . 34
Discos . . . . . . . . . . . . . . . . . . . . . . . . 42
Introducción de texto . . . . . . . . . . . . 44
Lista de reproducción . . . . . . . . . . . . 33
Título . . . . . . . . . . . . . . . . . . . 19, 20, 31
JPEG . . . . . . . . . . . . . . . . . . . . . . . . 26, 53
Limpieza
Discos . . . . . . . . . . . . . . . . . . . . . . . . 61
Lente . . . . . . . . . . . . . . . . . . . . . . . . . 61
Unidad principal . . . . . . . . . . . . . . . . 61
Lista de reproducción . . . . . . . . . . . . . 32
LPCM . . . . . . . . . . . . . . . . . . . . . . . . 47, 53
Mensajes de estado . . . . . . . . . . . . . . . 29
Menú
En pantalla . . . . . . . . . . . . . . . . . . . . . 28
MP3 . . . . . . . . . . . . . . . . . . . . . . . . . . 25
SETUP . . . . . . . . . . . . . . . . . . . . . . . . 45
Menú SETUP . . . . . . . . . . . . . . . . . . . . . 45
Modo
Grabación . . . . . . . . . . . . . . . . . . . . . 17
Mode de imagen fija . . . . . . . . . . . . . 46
MP3 . . . . . . . . . . . . . . . . . . . . . . . . . . . . 25
Nivel de calificación . . . . . . . . . . . . . . . 46
Pista de sonido . . . . . . . . . . . . . . . . . . . 28
Progresiva . . . . . . . . . . . . . . 12, 29, 48, 53
Propriedades
Imagen fija . . . . . . . . . . . . . . . . . . . . . 27
Lista de reproducción . . . . . . . . . . . 33
Titulo. . . . . . . . . . . . . . . . . . . . . . . . . . 31
Protección
Carpeta. . . . . . . . . . . . . . . . . . . . . . . . 34
Cartucho . . . . . . . . . . . . . . . . . . . . . . 42
Discos . . . . . . . . . . . . . . . . . . . . . . . . 42
Imagen fija . . . . . . . . . . . . . . . . . . . . . 34
Tarjeta. . . . . . . . . . . . . . . . . . . . . . . . . 42
Titulo. . . . . . . . . . . . . . . . . . . . . . . . . . 31
Q Link . . . . . . . . . . . . . . . . . . . . . . . . 6, 54
Quick View . . . . . . . . . . . . . . . . . . . . . . 23
Realzador de diálogo . . . . . . . . . . . . . 29
Reducción de ruido (NR)
Reductor ruido AV IN . . . . . . . . . . . . . 46
Reproducción NR . . . . . . . . . . . . . . . . 29
Repetición de reproducción . . . . . . . . 29
Reproducción de persecución . . . . . . 17
Reproducción NR . . . . . . . . . . . . . . . . . 29
Reset total . . . . . . . . . . . . . . . . . . . . . . . 45
RGB
Entrada . . . . . . . . . . . . . . . . . . . . . . . . 48
Salida . . . . . . . . . . . . . . . . . . . . . . . 7, 48
Salto hacia atrás (Time Slip). . . . . . 17, 23
Salto manual . . . . . . . . . . . . . . . . . . . . 23
S
HOWVIEW . . . . . . . . . . . . . . . . . . . . . . . . 19
Sintonización
Descarga de presintonías. . . . . . . 10, 50
Manual . . . . . . . . . . . . . . . . . . . . . . . . 49
Preparación automática . . . . . . . . 11, 50
Subtítulo . . . . . . . . . . . . . . . . . . . . . . . . 28
Systema TV (PAL/NTSC) . . . . . . . . . . . 50
Tarjeta PC. . . . . . . . . . . . . . . . . . . . . . . . 15
Tarjeta SD . . . . . . . . . . . . . . . . . . . . . . . 15
Teletexto. . . . . . . . . . . . . . . . . . . . . . . . . 17
TIFF . . . . . . . . . . . . . . . . . . . . . . . . . . 26, 53
Tipo de televisor . . . . . . . . . . . . . . . . . . 12
Transferencia. . . . . . . . . . . . . . . . . . . . . 29
V.S.S. . . . . . . . . . . . . . . . . . . . . . . . . . . . 29
Ventana FUNCTIONS. . . . . . . . . . . . . . . 41
VPS/PDC . . . . . . . . . . . . . . . . . . . . . 19, 54
Fabricado bajo licencia de Dolby Laboratories.
“Dolby” y el símbolo con una doble D son marcas comerciales
de Dolby Laboratories.
“DTS” y “DTS 2.0iDigital Out” son marcas de Digital Theater
Systems, Inc.
S
HOWVIEW es una marca registrada por Gemstar Development
Corporation. El sistema S
HOWVIEW está fabricado bajo licencia
de Gemstar Development Corporation.
MPEG La tecnología de decodificación de audio Layer-3
autorizada por Fraunhofer IIS y Thomson multimedia.
Este producto incorpora tecnología de protección del copyright
que a su vez está protegida por patentes y otros derechos de la
propiedad intelectual de los EE.UU.
La utilización de esta tecnología de protección del copyright
deberá contar con la autorización de Macrovision, y sólo con el
fin de ser usada en casas particulares o por consumidores que
hagan un uso limitado de la misma, a menos que Macrovision
autorice lo contrario. La inversión de ingeniería o el desmontaje
están prohibidos.
≥El logotipo SD es una marca de fábrica.
≥Hay partes de este producto que están protegidas por la ley de
los derechos de autor y se suministran con licencia de ARIS/
SOLANA/4C.
Matsushita Electric Industrial Co., Ltd.
Web Site: http://www.panasonic.co.jp/global/
pr
RQT7463-1E
F0404NT2025
7463sp.book Page 62 Tuesday, March 8, 2005 11:12 AM
-
 1
1
-
 2
2
-
 3
3
-
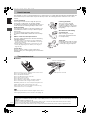 4
4
-
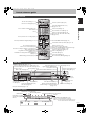 5
5
-
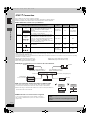 6
6
-
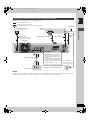 7
7
-
 8
8
-
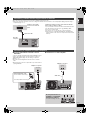 9
9
-
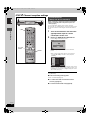 10
10
-
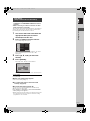 11
11
-
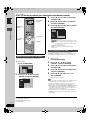 12
12
-
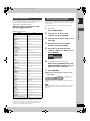 13
13
-
 14
14
-
 15
15
-
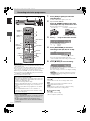 16
16
-
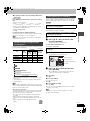 17
17
-
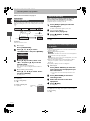 18
18
-
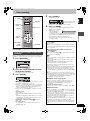 19
19
-
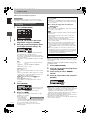 20
20
-
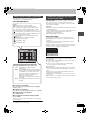 21
21
-
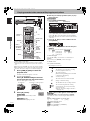 22
22
-
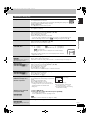 23
23
-
 24
24
-
 25
25
-
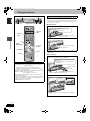 26
26
-
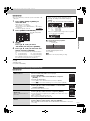 27
27
-
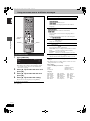 28
28
-
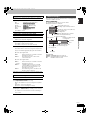 29
29
-
 30
30
-
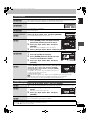 31
31
-
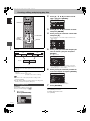 32
32
-
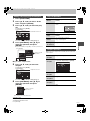 33
33
-
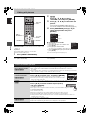 34
34
-
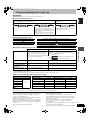 35
35
-
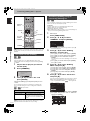 36
36
-
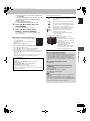 37
37
-
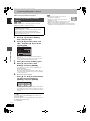 38
38
-
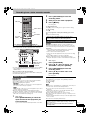 39
39
-
 40
40
-
 41
41
-
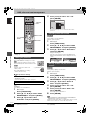 42
42
-
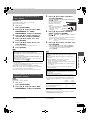 43
43
-
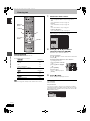 44
44
-
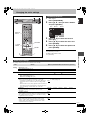 45
45
-
 46
46
-
 47
47
-
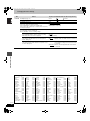 48
48
-
 49
49
-
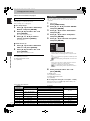 50
50
-
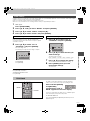 51
51
-
 52
52
-
 53
53
-
 54
54
-
 55
55
-
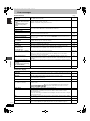 56
56
-
 57
57
-
 58
58
-
 59
59
-
 60
60
-
 61
61
-
 62
62
-
 63
63
-
 64
64
-
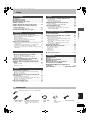 65
65
-
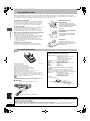 66
66
-
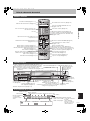 67
67
-
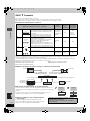 68
68
-
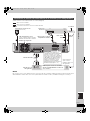 69
69
-
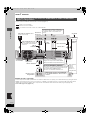 70
70
-
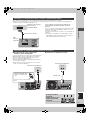 71
71
-
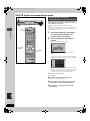 72
72
-
 73
73
-
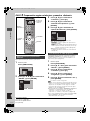 74
74
-
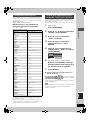 75
75
-
 76
76
-
 77
77
-
 78
78
-
 79
79
-
 80
80
-
 81
81
-
 82
82
-
 83
83
-
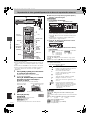 84
84
-
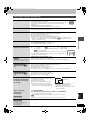 85
85
-
 86
86
-
 87
87
-
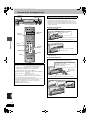 88
88
-
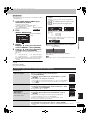 89
89
-
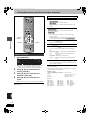 90
90
-
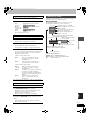 91
91
-
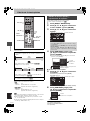 92
92
-
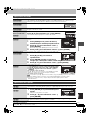 93
93
-
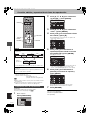 94
94
-
 95
95
-
 96
96
-
 97
97
-
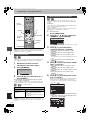 98
98
-
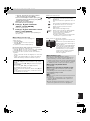 99
99
-
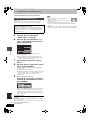 100
100
-
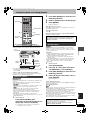 101
101
-
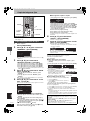 102
102
-
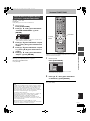 103
103
-
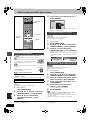 104
104
-
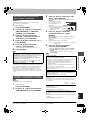 105
105
-
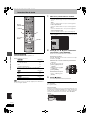 106
106
-
 107
107
-
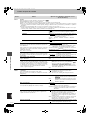 108
108
-
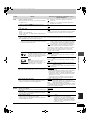 109
109
-
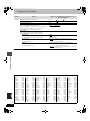 110
110
-
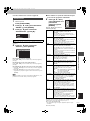 111
111
-
 112
112
-
 113
113
-
 114
114
-
 115
115
-
 116
116
-
 117
117
-
 118
118
-
 119
119
-
 120
120
-
 121
121
-
 122
122
-
 123
123
-
 124
124


Panasonic DMRE95H Instrucciones de operación
- Categoría
- Reproductores de DVD
- Tipo
- Instrucciones de operación
- Este manual también es adecuado para
en otros idiomas
Artículos relacionados
Otros documentos
-
Samsung DVD-HR720 Manual de usuario
-
Toshiba 26/32WL36 El manual del propietario
-
-
Toshiba 32WL56 El manual del propietario
-
LG RH278H-P1L Manual de usuario
-
LG RHT499H Manual de usuario
-
LG MD84000 Manual de usuario
-
Magnavox MDR865H El manual del propietario
-
Denon DVD-1600 Manual de usuario
-
Sony DAR-RH1000 El manual del propietario