Pleasant Hearth OAK100 Guía de instalación
- Categoría
- Chimeneas
- Tipo
- Guía de instalación

2019-01-1480-11-164
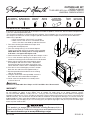
OUTSIDE AIR KIT
MODEL # OAK100
TO BE USED WITH ALL PLEASANT HEARTH
UNIVERSAL FIREBOX MODELS
OUTSIDE AIR KIT ASSEMBLY
Insulation
Gasket x1
#8 x 3/8 Sheet
Metal Screws x4
#8 Wood Screws
(Not Included) x4
Starting
Collar x1
Inlet Air
Vent x1
Hose Clamps
(Not included)
4" Semi-Rigid
Metal Vent Tube
(Not Included)
Before installing the outside air kit to firebox, please make sure you have the following items:
If within one year from the date of original purchase, this item fails due to a defect in material or workmanship,
we will replace or repair at our option, free of charge. To order parts or to obtain warranty service,
call 1-877-447-4768, Monday - Friday, 8:30 a.m. - 4:30 p.m. CST. This warranty does not cover defects resulting from
improper or abnormal use, misuse, accident, or alteration. Failure to follow all instructions in the owner’s manual will also
void this warranty. The manufacturer will not be liable for incidental or consequential damages, or common erosion of
outdoor products. Some states do not allow the exclusion or limitation of incidental or consequential damages, so the
above limitation may not apply to you. This warranty gives you specic legal rights, and you may also have other rights
which vary from state to state.
WARRANTY
This product can expose you to chemicals including Benzene which is
known to the State of California to cause cancer and reproductive harm.
For more information go to www.p65Warnings.ca.gov
If any part is missing or damaged, do not attempt to assemble the product. Contact our Technical Service Department at
1-877-477-4768 for replacement parts.
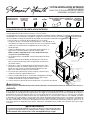
*The illustration provided is a simple outside are installation. Your installation may vary signicantly but try to keep the
hose length to no more than 20 feet in length to provide sufcient air ow. Keep the inlet air vent level or below the
rebox entry if possible.
• Never terminate the “inlet air vent” in a garage.
• Make sure the “inlet air vent” is located in an area
which is free from snow build-up and dense bushes.
1. Place the insulation gasket between the open air kit
starting collar and replace wall.
2. Place the starting collar (4”) on the side of replace.
Fasten it in place with the four sheet metal screws provided.
NOTE: When the air starting collar is securely attached,
it will form a seal against the fireplace wall.
3. Attach outside duct to starting collar with duct clamp or screws.
4. Cut a 6-inch diameter opening for the open air kit in the
outside wall covering where the outside vent is to be located.
5. Select and cut a piece of duct long enough to attach
to the replace and stick out at least 3” beyond the
face of the wall to which the open air kit inlet air vent
will be attached. Cut duct with a standard pocket knife.
6. If the duct is the insulated type, push the insulation
back from one end of the duct approximately 2”.
7. Slip the exposed end of the duct over the starting
collar on the replace.
8. Using the sheet metal screws provided, secure the
duct end to the collar attached to the replace.
9. Nail or screw the combustion air assembly to the
surface of the wall.
WARNING!
Do not use a combustible duct. Always use UL Listed Class 0 or 1 duct material.
Insulation Gasket
PHOAK Starting Collar
(4) Sheet Metal Screws
PHOAK Inlet Air Vent
PHOAK Starting Collar
4” Semi-Rigid Metal
Vent Tube
Insulation Gasket
(4) #8 Wood Screws
(Not Included)
Inlet Air Vent
(4) #8 x 3/8
Sheet Metal Screws
Starting Collar
(2) 4” Clamps
(Not Included)

Si en el lapso de un año a partir de la fecha de compra original este artículo falla debido a un defecto en el material o la
mano de obra, lo reemplazaremos o repararemos sin cargos a nuestra discreción. Para hacer un pedido de las piezas o
para obtener el servicio de garantía, llame al 1-877-447-4768, de lunes a viernes de 8:30 a.m. a 4:30 p.m., hora estándar
del Este. Esta garantía no cubre defectos que sean producto de un uso incorrecto o anormal, uso indebido, accidente
o alteración. No seguir todas las instrucciones del manual del propietario también anulará· esta garantía. El fabricante
no será· responsable de daños accidentales o resultantes. Algunos estados no permiten la exclusión o limitación de
los daños accidentales o resultantes, de modo que la exclusión o limitación de estos daños puede no aplicarse en su
caso. Esta garantía le otorga derechos legales especícos, pero podría tener también otros derechos que varían según
el estado.
GARANTÍA
Este producto puede exponerlo a sustancias químicas como el benceno que,
según el estado de California, puede provocar cáncer y daños reproductivos.
Para obtener más información, visite www.p65Warnings.ca.gov
ADVERTENCIA
KIT DE VENTILACIÓN EXTERIOR
MODELO # OAK100
USAR CON TODOS MODELOS DE FIREBOX
UNIVERSAL PLEASANT HEARTH
CONJUNTO DEL KIT DE VENTILACIÓN EXTERIOR
Si hace falta alguna pieza o se encuentra dañada, no intente ensamblar el producto. Para piezas de repuesto, llame a
nuestro departamento de servicio al cliente al 1-877-477-4768.
*La ilustración que se muestra es una instalación sencilla de la ventilación exterior. Puede que su instalación tenga diferencias
considerables, aun así trate de que el largo de la manguera no sea mayor a 20 pies, con el n de suministrar suciente ujo de
aire. Si es posible, mantenga la ventilación de entrada de aire al nivel de la entrada de la chimenea o por debajo de esta.
• Nunca instale la “ventilación de entrada de aire” en un garaje.
• Asegúrese de que la “ventilación de entrada de aire” está ubicada en un
área donde no se presente acumulación de nieve ni haya arbustos tupidos.
1. Coloque la junta aislante entre el adaptador del kit al aire libre y la
pared del hogar.
2. Coloque el adaptador (de 4") en el lateral del hogar. Sujételo en su
lugar con los cuatro tornillos de chapa de metal incluidos.
NOTA: cuando el adaptador de aire esté completamente fijo,
se ajustará a la pared del hogar.
3. Fije el ducto exterior al adaptador usando la abrazadera del ducto
o tornillos.
4. Corte una abertura de 6pulgadas de diámetro para el kit al aire
libre en la pared exterior que cubre el lugar donde se colocará la
ventilación exterior.
5. Seleccione y corte una parte del ducto lo sucientemente larga
para jarla al hogar, la cual debe sobresalir por lo menos 3" de la
pared en la que se jará la ventilación de entrada del kit al aire
libre. Corte el ducto usando una navaja estándar.
6. En caso de que el ducto tenga aisla
nte, empuje el aislante hacia
uno de los extremos, aproximadamente 2".
7.
Deslice el extremo de
l ducto sin aislante por el adaptador en el hogar.
8.
Asegure el extremo del ducto al ada
ptador que se jó al hogar
usando los tornillos de chapa de metal incluidos.
9
. Clave o atornille el conjunto de aire de
combustión a la supercie de la pared.
¡ADVERTENCIA!
No utilice un ducto combustible. Siempre utilice ductos fabricados con material que la norma UL determina como clase0 o 1.
1 junta
aislante
4 tornillos de chapa
de metal de 3/8 n.o 8
4 tornillos para
madera n.o 8
(no incluidos)
1
adaptador
1 Ventilación de
entrada de aire
Abrazaderas
para la manguera
(no incluidas)
Tubo de ventilación metálico
semirrígido de 4"
(no incluido)
Antes de instalar el kit de ventilación exterior en la chimenea, asegúrese de que cuenta con los siguientes artículos:
Junta aislante
Adaptador
4 tornillos de chapa
de metal de 3/8 n.o 8
PHOAK Inlet Air Vent
PHOAK Starting Collar
4” Semi-Rigid Metal
Vent Tube
Junta aislante
4 tornillos para madera n.o 8
(no incluidos)
Ventilación de
entrada de aire
4 tornillos de chapa
de metal de 3/8 n.o 8
Adaptador
Abrazaderas para
la manguera
(no incluidas)
-
 1
1
-
 2
2


Pleasant Hearth OAK100 Guía de instalación
- Categoría
- Chimeneas
- Tipo
- Guía de instalación
en otros idiomas
Artículos relacionados
-
Pleasant Hearth PH35PS Guía de instalación
-
-
-
-
-
-
-
-