

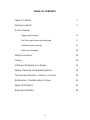
TABLE OF CONTENTS
Table of Contents
2
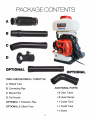
Package Contents
3
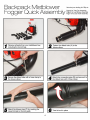
Quick Assembly
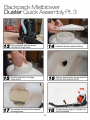
Fogger Quick Assembly
4
Tree-Top Height Booster Quick Assembly
6
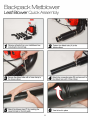
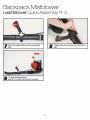
Leaf Blower Quick Assembly
8
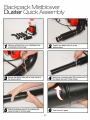
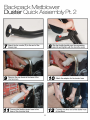
Duster Quick Assembly
10
Safety Precautions
13
Fueling
14
Starting and Stopping Your Engine
15
Adding Chemicals and Adjusting Options
16
Technical Specifications, Features, and Uses
18
Maintenance, Troubleshooting, Storage
19
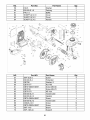
Spare Parts Manual
22
Warranty Information
28
2

3

4

5

6

7

8

9

10

11

12

SAFETY PRECAUTIONS AND WARNINGS
Operator Precautions
1. This product emits carbon monoxide, an invisible and odorless
toxin. Do not run this product indoors at any time.
2. Always turn engine off before adding fuel to the tank.
3. To avoid electrocution, do not touch the cap of the spark plug or
wiring while the engine is on.
4. Do not touch the surface of the muffler and the cylinder while
the engine is running. It is extremely hot.
Equipment Warnings
1. The TMD14’s 2 stroke engine runs on a minimum of 30:1 fuel
mix. Use 91 octane gas and two-cycle engine oil. Note: 50:1
pre-mix fuel is ideal for this product as it contains fuel
stabilizers to ensure longevity of the equipment.
2. After starting the engine, keep the throttle at a low speed for
several minutes before running at full throttle.
3. Gasoline is an extremely flammable fuel. When operating,
keep away from any flames. Do not smoke while operating.
4. Do not spray in the direction of others.
Chemical Handling
1. Wear ear protection.
2. Wear eye protection.
3. Use a mask to protect mouth and face against dust and
pesticides.
4. Wear closed-toed protective shoes.
5. Wear gloves to avoid contact with pesticides.
6. Wear proper clothing to protect arms and legs to avoid contact
with pesticides.
7. After spraying, wash hands and clothing immediately.
13

FUELING
This engine is certified to operate on unleaded gasoline and
two-stroke engine oil at a mix ratio of 50:1.
This engine requires a mixture of high-quality gasoline and two-
stroke air cooled engine oil.
Use mid-grade unleaded gasoline with a minimum octane rating
of 91 and no more than 10% ethanol content.
Keep the fuel tank far away from flames or sparks. Do not
smoke near fuel.
When adding pre-mixed fuel to the engine, use a funnel to
avoid spillage.
When the machine is running, do not add more to the fuel tank.
Open the fuel cap carefully to allow and pressure build-up in the
tank to release slowly and avoid fuel spillage.
At the end of a season, drain all fuel from gas tank and use fuel
stabilizer to insure a clear carburetor for your next season.
14

STARTING AND STOPPING YOUR ENGINE
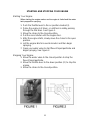
Starting Your Engine:
When starting the engine make sure the engine is fueled and the water
tank prepped for spraying.
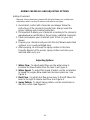
1. Push the throttle lever to the on position marked (I).
2. Prime the engine 4-5 times, or until fuel is visibly passing
through the fuel lines. See Figure 1.
3. Move the choke to the closed position.
4. Pull the recoil starter until the engine fires.
5. After the engine starts, slowly move the choke to the open
position.
6. Let the engine idle for several minutes and then begin
spraying.
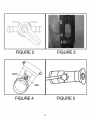
7. Open your water valve to start flow of liquid pesticide and
begin spraying. See Figure 2.
Stopping Your Engine:
1. Move the water valve to the closed position to stop the
flow of liquid pesticide.
2. Move the throttle lever to the down position (O) to stop the
engine.
3. Move the choke to the closed position.
15

ADDING CHEMICALS AND ADJUSTING OPTIONS
Adding Chemicals
Warning- Some chemicals sprayed with the mist blower can contain toxic
substances which can lead to serious side effects and injury.
1. Avoid direct contact with chemicals and always follow the
instructions of the chemical manufacturer. Always wear the
proper clothing and chemical protection
2. It’s important to dilute your chemicals according to the chemical
manufacturer’s specifications. Never spray undiluted chemicals.
3. Dilute and prepare your chemicals prior to turn on your mist
blower.
4. Prepare your chemical and pour into the mist blower water tank
outdoors or in a well ventilated area.
5. After spraying, do not keep the spray solution in the tank.
Properly dispose of the excess spray solution and rinse your
machine after each use.
Adjusting Options
1. Water Flow- To adjust water flow use the water valve to
increase the flow of water from the tank. See Figure 2.
2. Water Speed- To adjust the speed of water use the accelerator
to speed the engine blow speed and increase pressure. See
Figure 3.
3. Dust Flow- To adjust dust flow move lever to the left. Move the
lever to the right to reduce dust flow. See Figure 4.
4. Spray Pattern- To adjust spray pattern use the small knob on
the horn nozzle. See Figure 5.
16

17

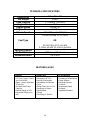
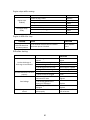
TECHNICAL SPECIFICATIONS
Dimensions
18’’ x 12’’ x 26’’
Net Weight
24 lbs
Tank Capacity
3.7 Gallons (14 Liters)
Engine Size
63cc
Engine Speed
6500RPM
Engine Power
1.5kW
Blower Speed
475 CFM (up to 200mph)
Fuel Type
Recommended 50:1 Premix
OR
No less than 30:1 mix with
2 stroke oil with 91 octane gasoline
Spraying Options
Dust or Liquid
Vertical Reach
20ft max (with elbow)
Horizontal Reach
Up to 40ft
FEATURES & USE
Features
Target Pests
For Use Around
• 3-In-One Fogger, Duster,
and Leaf blower
• Spray 1 acre in less than
30 minutes
• 4X faster than Pump
Sprayers
• Vertical Range of 20ft
• Horizontal Range up to
40ft
• Mosquitoes & Ticks
• Ants & Cockroaches
• Caterpillars and Worms
• Fleas
• Biting Flies & Horse Flies
• Scorpions & Wasps
• Spider Mites
• Thrips
• Stink Bugs & Beetles
• Commercial & Residential
• Farms & Barns
• Dairies & Kennels
• Livestock
• Ornamental Plants
• Orchards
• Vegetable Gardens
18

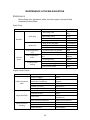
MAINTENANCE & TROUBLESHOOTING
Maintenance
Before fixing your equipment, make sure the engine is turned off and
completely cooled down.
Spark Plug:
PROBLEM
CAUSE
SOLUTION
No Spark
Spark Plug
1. Spark plug is wet
Dry Spark
Plug
2. Spark plug is dirty
Clean
3. The insulation is damaged
Replace
4. Spark gap is off
Adjust
Ignition coil
1. Wrap of wire damaged
Fix or Replace
2. Insulation of coil bad
Replace
3. The wire of coil broken
Replace
Normal
Spark
Good Compression
ratio
1. Too much fuel in the cylinder
Drain
2. Water or dirt in the fuel
Replace
Poor Compression
Ratio
1. Cylinder and piston ring worn or
torn
Replace
2. The plug is loose
Tighten
Carburetor Not
Fueling
1. No fuel in the tank
Add Fuel
2. Filter gauge is clogged
Clean
3. Fuel tank has a hole
Clean
Engine Lacks Power:
PROBLEM
CAUSE
SOLUTION
Good Compression
Ratio
1. Filter is clogged
Clean
2. Air passes through the
connection of carburetor
Tighten
3. Engine overheats
Stop Engine. Let Cool.
4. Water in the fuel
Replace Fuel
5. Dirt clogs the muffler
Clean
Engine Overheats
1. Gas is thin in fuel mix
Replace Fuel
2. Cylinder is dirty
Clean
3. Oil is bad
Replace Fuel with New 50:1
Pre Mix Fuel
4. No connection with hose
Adjust hose connection
Engine is noisy or
knocking
1. Fuel bad Replace fuel
Replace Fuel
2. Dirt in cylinder
Clean
3. Parts are worn
Fix or Replace
19

Engine stops while running:
PROBLEM
CAUSE
SOLUTION
Engine stops
suddenly
1. Wire of plug is loose
Replace
2. Piston is broken
Fix or Replace
3. Plug is dirty
Clean
4. Fuel is empty
Add Fuel
The engine stops
slowly
1. Carburetor is dirty
Clean
2. Hoses to tank are clogged
Clean
3. Water in the fuel
Replace Fuel
Engine is difficult to stop:
PROBLEM
CAUSE
SOLUTION
The engine still runs
with the throttle at
its lowest position
1. The throttle cord has short circuited or
carburetor piston is blocked.
Fix or Replace
Cord
Difficulties dusting:
PROBLEM
CAUSE
SOLUTION
No dust discharge or
discharge is intermittent
1. The dust gate cannot be
opened
Adjust
2. The tank lid not is tight
Tighten
3. The dust or granule is dirty
Clean
4. The dust/granule has lumps
Break lumps or replace
5. The granules are too big
Use smaller granule
The dust gate does not work
properly
1. Carburetor is dirty
Clean
2. Hoses to tank are clogged
Clean
Dust leakage
1. The clamp plate of the chemical
tank bottom is loose
Tighten
2. The sealing gasket of the
dusting lid is damaged
Replace
3. The O ring of the elbow is
damaged
Replace
The discharge rate is out of
control
1. The dust control lever is not
work properly
Adjust the cord or fix
the carburetor.
20

Difficulties fogging:
PROBLEM
CAUSE
SOLUTION
No mist or mist is
irregular
1. Nozzle switch or control
valve is clogged
Clean
2. Liquid lead pipe is clogged
Clean
3. No pressure or low
pressure
Tighten the tank lid and screw down
the two wing nuts.
Spray mixture leak
1. The lid is placed incorrectly
Tighten correctly
2. Thread joints are loose
Tighten correctly
21

22


24

25

26

27

28

CALIFORNIA AND FEDERAL EMISSION CONTROL WARRANTY STATEMENT
YOUR WARRANTY RIGHTS AND OBLIGATIONS
The California Air Resources Board, the United States Environmental Protection Agency
and Tomahawk Power, LLC are pleased to explain the emissions control system
warranty on your 2018-2019 small engine/equipment (SORE). In the United States and
California, new small engine/equipment must be designed, built and equipped to meet
the State's stringent anti-smog standards. Tomahawk Power, LLC must warrant the
emissions control system on your small engine/equipment for the periods of time listed
below provided there has been no abuse, neglect or improper maintenance of your small
engine/equipment.
Your emission control system may include parts such as the carburetor, fuel-injection
system, the ignition system, catalytic convertor, fuel tanks, fuel lines, fuel caps, valves,
canisters, filters, vapor hoses, belts, clamps, connectors, and other associated emission-
related components. For engines less than or equal to 80 cc, only the fuel tank is subject
to the evaporative emission control warranty requirements of this section.
(California only)
Where a warrantable condition exists, Tomahawk Power, LLC will repair your small off-
road engine/equipment at no cost to you including diagnosis, parts and labor.
MANUFACTURER'S WARRANTY COVERAGE:
The emissions control system is warranted for two years. If any emissions-related part on
your small engine/equipment is defective, the part will be repaired or replaced by
Tomahawk Power, LLC
OWNER'S WARRANTY RESPONSIBILITIES:
As the small engine/equipment owner, you are responsible for the performance of the
required maintenance listed in your owner's manual. Tomahawk Power, LLC
recommends that you retain all receipts covering maintenance on your small engine/
equipment, but Tomahawk Power, LLC cannot deny warranty solely for the lack of
receipts or for your failure to ensure the performance of all scheduled maintenance.
As the small engine/equipment owner, you should however be aware that Tomahawk
Power, LLC may deny your warranty coverage if your small engine/equipment or a part
has failed due to abuse, neglect, improper maintenance or unapproved modifications.
You are responsible for presenting your small engine/equipment to distribution center or
service center authorized by Tomahawk Power, LLC as soon as the problem exists. The
warranty repairs should be completed in a reasonable amount of time, not to exceed 30
days.
29

If you have any questions regarding your warranty rights and responsibilities, you should
contact Tomahawk Power, LLC customer service representative at 1-866-577-4476 or
Email: support@tomahawk-power.com .
DEFECTS WARRANTY REQUIREMENTS
(a)The warranty period begins on the date the small engine/equipment is
delivered to an ultimate purchaser.
(b)General Emissions Warranty Coverage. Tomahawk Power, LLC warrants to the
ultimate purchaser and each subsequent owner that the engine/equipment is:
(1) Designed, built, and equipped so as to conform with all applicable regulations
adopted by the Air Resources Board; and
(2) Free from defects in materials and workmanship that causes the failure of a
warranted part for a period of two years.
(c)Subject to certain conditions and exclusions as stated below, the warranty on
emissions related parts is as follows:
(1)Any warranted part that is not scheduled for replacement as required maintenance in
your Owner’s Manual is warranted for the warranty period stated above. If the part fails
during the period of warranty coverage, the part will be repaired or replaced by
Tomahawk Power, LLC according to Subsection (4) below. Any such part repaired or
replaced under warranty will be warranted for the remainder of the period.
(2)Any warranted part that is scheduled only for regular inspection in your Owner’s
Manual is warranted for the warranty period stated above. Any such part repaired or
replaced under warranty will be warranted for the remaining warranty period.
(3)Any warranted part that is scheduled for replacement as required maintenance in your
Owner’s Manual is warranted for the period of time before the first scheduled
replacement date for that part. If the part fails before the first scheduled replacement, the
part will be repaired or replaced by Tomahawk Power, LLC according to Subsection (4)
below. Any such part repaired or replaced under warranty will be warranted for the
remainder of the period prior to the first scheduled replacement point for the part.
(4)Repair or replacement of any warranted part under the warranty provisions herein
must be performed at a warranty station at no charge to the owner.
(5)Notwithstanding the provisions herein, warranty services or repair will be provided at
all of our distribution centers that are franchised to service the subject small engine/
equipment.
(6)The small engine/equipment owner must not be charged for diagnostic labor that
leads to the determination that a warranted part is in fact defective, provided that such
diagnostic work is performed at a warranty station.
(7)Tomahawk Power, LLC is liable for damages to other small engine/equipment
components proximately caused by a failure under warranty of any warranted part.
(8)Throughout the small engine/equipment warranty period stated above, Tomahawk
Power, LLC will maintain a supply of warranted parts sufficient to meet the expected
demand for such parts.
(9)Any replacement part may be used in the performance of any warranty maintenance
or repairs and must be provided without charge to the owner. Such use will not reduce
the warranty obligations of Tomahawk Power, LLC
30

(10)Add-on or modified parts that are not exempted by the Air Resources Board may not
be used. The use of any non-exempted add-on or modified parts by the ultimate
purchaser will be grounds for disallowing a warranty claims. Tomahawk Power, LLC will
not be liable to warrant failures of warranted parts caused by the use of a non-exempted
add-on or modified part.
(11)The manufacturer issuing the warranty shall provide any documents that describe
that manufacturer's warranty procedures or policies within five working days of request
by the Air Resources Board.
EMISSION WARRANTY PARTS LIST
The repair or replacement of any warranted part otherwise eligible for warranty coverage
may be excluded from such warranty coverage if Tomahawk Power, LLC demonstrates
that the small engine/equipment has been abused, neglected, or improperly maintained,
and that such abuse, neglect, or improper maintenance was the direct cause of the need
for repair or replacement of the part. That notwithstanding, any adjustment of a
component that has a factory installed, and properly operating, adjustment limiting
device is still eligible for warranty coverage. The following emissions warranty parts for
each engine family list is covered.
For engine families greater than 80cc:
(1)Fuel Metering System:
(a)Gasoline carburetor assembly and its internal components
(b)Carburetor gaskets
(c) Fuel tank
(d) Fuel Line
(e) Fuel Line Fittings
(f) Clamps
(g) Pressure regulator (if equipped)
(h) Mixer assembly and its internal components (if equipped)
(2) Air Induction System including:
(a)Intake pipe/manifold
(b)Air cleaner
(3)Ignition System including:
(a)Spark plug
(b)Ignition coil
(4)Catalytic Muffler Assembly including:
(a)Muffler gasket
(b)Exhaust manifold
(c)Catalytic converter
(5)Crankcase Breather Assembly including:
(a) Breather connection tube.
(6) Fuel tank evaporative emissions control system including:
(a) Purge Valves
(b) Carbon Canister
(c) Canister Mounting Brackets
(d) Fuel Cap
(e) Fuel Tank
(7)Miscellaneous items Used in Above Systems including:
(a) Switches
(b) Hoses, belts, connectors, and assemblies.
(8)Air injection system
31

(a) Pulse valve
For engine families less than or equal to 80cc:
(1)Fuel Metering System:
(a)Gasoline carburetor assembly and its internal components
(b)Fuel filter (if so equipped)
(c)Carburetor gaskets
(d)Fuel pump (if so equipped)
(2) Air Induction System including:
(a)Intake pipe/manifold
(b)Air cleaner
(3)Ignition System including:
(a) Spark plug
(b)Ignition module/coil
(4)Catalytic Muffler Assembly (if so equipped) including:
(a)Muffler gasket
(b)Exhaust manifold
(5)Crankcase Breather Assembly including:
(a) Breather connection tube.
(6)Miscellaneous items Used in Above Systems including:
(a) Switches
(b) Hoses, belts, connectors, and assemblies.
(7) Fuel tank evaporative emissions control system including:
(a) Fuel Tank
The warranty is provided in accordance with the “California AND FEDERAL Emission
Control Warranty Statement”.
32

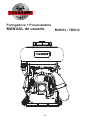
Fumigadora + Pulverizadora
MANUAL de usuario
MODEL: TMD14
33

1. El motor debe llevar gasolina mezclada 30:1 con aceite para motor de
dos tiempos.
2. Es altamente recomendado mantener encendido por 3 a 5 minutos el motor
a una velocidad baja antes y después de usar la máquina para prevenir el daño por
arrancones fuertes en frío.
3. Nunca detengas el motor cuando este encendido a alta velocidad. Estos
parones repentinos pueden dañar el motor.
4. Al agregar aceite, el motor debe estar apagado y asegúrese de que no
haya objetos flamables cerca y esta prohibido fumar cerca de la unidad.
5. Evite electrocutarse y no toque las tapas de las bujías ni los cables
conductores mientras el motor este encendido.
cuerpo a esta área y mantenga a los niños alejados.
6. La superficie del mofle y el cilindro se calientan mucho, así que evite acercar partes del
ADVERTENCIA
-1-
34

2. Uso principal ………………………………………….........……….….………….....….……5
3. Características …………………………..…………………………….………….….….…….5
4. Ensamblaje ....................................................……………………………………...……… 5
5. Rotación…………………….............…………………………………….……...........……….7
6. Pulverización....………….…………………………………………………….……………….9
7. Seguridad .....….………………………………………………….……….….…….................9
8. Resolución de fallas ....... …………………………………………..….…….........................10
9. Mantenimiento técnico ..................................................................................................13
Índice
-2-
Especificación técnica
35

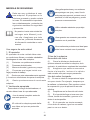
Debe ser muy cuidadoso al usar
esta máquina. El propulsor en la
voluta es punzante y puede cortarte
lo tocas. Es sumamente importante
leer cuidadosamente y entender las
siguientes medidas de seguridad
y precaución.
MEDIDAS DE SEGURIDAD
No preste ni rente esta unidad sin
entregar este Manual junto
con ella. Asegúrese que todo
usuario lea y entienda claramente
la información contenida en este
manual.
Uso seguro de esta unidad:
1. El operador
El operador de esta unidad debe estar
en condiciones fisicas y mentales saludables.
Absténgase de usar esta máquina:
(1) Pacientes con problemas mentales.
(2) Personas alcoholizadas.
(3) Menores de edad y gente muy mayor.
(4) Personas que hayan tenido una
larga jornada de trabajo.
(5) Gente que este extenuadamente agotada
y no este en condiciones de operar la máquina.
(6) Gente que desconozca el uso de esta
máquina.
3.Uso de la máquina
Encendido del motor
(1) Cierre la válvula por donde sale el
químico antes de encender la máquina, de lo
contrario, el pesticida se expulsará de inmediato.
(2) Asegurese que nadie se encuentre
frente a la boquilla, incluso si la válvula
está cerrada- esto para mayor precaución.
Uso del cañon fumigador
con poco viento. Por ejemplo, temprano por
(1) Su uso es ideal en temperaturas bajas
la mañana o al atardecer. Esto ayuda a reducir
la evaporación y que la aplicación sea más
efectiva.
(2) Desplácese en la dirección del viento.
(3) Si el pesticida llega a tocar sus ojos
o boca, lavesé de inmediato y procure a un
doctor lo antes posible.
(4) Si el operador se siente mareado
o con dolor de cabeza, igual es una señal
para ir a ver a un doctor.
-3-
2. Vestimenta apropiada
Para reducir el riesgo de lastimaduras, el
usuario deberá usar la ropa adecuada.
•Use gafas protectoras y una máscara
para proteger sus ojos y cara; Use la
máscara para prevenir contacto con el
pesticida, el cuál es peligroso y puede
provocar envenenamiento.
• Lea el manual completo antes de
usar este producto.
•El ruido de la máquina puede dañar
sus oídos, así que use protección
auricular.
•Una vestimenta protectora es ideal para
evitar hacer contacto con el pesticida.
•Utilice calzado resistente que proteja
sus pies.
•Usar guantes es necesario para evitar
contacto con el pesticida.
36

-4-
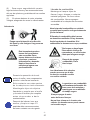
Llenado de combustible
Mantenga el tanque lejos de
flamas, fuego, chispas o cualquier
material peligroso. No fume cerca
del combustible. Nunca agregue
combustible si la máquina se encuentra
encendida.
Advertencia
Durante la operación de la má-
quina, el mofle y sus componentes
pueden calentarse bastante.
Evite contacto con estas partes
de la máquina en todo momento.
Manténgala lejos de objetos
flamables y permita que el mofle
y el motor se enfríen por completo
antes de proceder a darle
mantenimiento.
Después de laborar, lave sus
manos y limpie su ropa. El
pesticida debe removerse antes
de hacer contacto con otra gente.
(5) Para mayor seguridad del usuario
siga las instrucciones y las recomendaciones
del uso de químicos y pesticidas de los comites
agrícolas.
(6) Si quieres detener el motor mientras
fumigas, asegurate de cerrar la válvula antes.
Ponga especial atención a la dirección
del viento y evite fumigar si hay personas
en el área.
Esta herramienta produce
humos tóxicos mientras
este encendida. Estos
humos deben ser incoloros
e inodoros y contener
hidrocarburos y benzoles
limpios. Nunca use la
máquina en lugares con
poca ventilación.
Abra la tapa del combustible con cuidado
y permita que la presión se fugue lentamente
y evite derrames.
El llenado de combustible debe hacerse
en áreas bien ventiladas. Si hay derrames,
limpie la máquina de inmediato. Si el
combustible se derrama en su ropa, cambiese.
Revise que no haya fugas.
Para reducir el riesgo de
quemaduras, no use el motor
hasta que la fuga se arregle.
Después de agregar
combustible, cierre
bien la tapa.
Las vibraciones de la máquina
pueden provocar que la tapa
se abra por eso debe cerrarla
con mucho cuidado.
La gasoina es un combustible
extremadamente flamable. No
fume cerca de la máquina y
manténgase en un ambiente
de trabajo seguro.
Siempre apague el motor
antes de llenar el tanque.
Nunca llene el tanque si el motor esta
caliente. Un derrame menor puede causar
un incendio mayor.
37

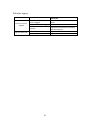
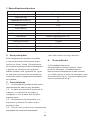
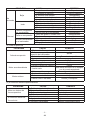
1. Especificaciones técnicas
Dimensiones (cm) 45.5 × 31.0 × 66.0
Peso neto (kg) 11
Capacidad del tanque (L) 14
Velocidad de abanicos (r/min) 6500
Rocío (kg/min)
≥ 2.3
Polvo (kg/min)
≥ 2.0
Alcance horizontal (m) ≥ 12
Diámetro de goteo (μm)
≤120
Combustible
Mezcla Gasolina:Aceite 30:1
Modelo del motor
Potencia (kW/r/min)
EB-500-E.1
1.5/6500
Chispa
CDI
Encendido
Cuerda de retroceso
Apagado
Válvula
2. Usos principales
Esta fumigadora de mochila es portable
y una herramienta eficiente para la pro-
tección de flora y fauna. Generalmente
se usa para la prevención de enfermedades
y pestes en plantas como algodón,
árboles frutales, café, aguacate etc. Igual
se usa para la prevención de epidemias
control de maleza, programas de sanidad en
en ciudades.
3. Características
3.1 La velocidad de la máquina esta contro-
lada haciendo de esta una muy duradera.
3.2 La parte principal es la bomba de la
máquina. La estructura es simple y
compacta, lo cual la hace fácil de darle
mantenimiento.
3.3 La máquina es de alta presión y un
flujo bueno y eficiente. El efecto de pro-
tección es claro.
3.4 Para el rocío existen tres componentes
principales los cuales son las boquillas
4. Ensamblado
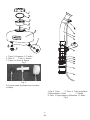
(1) Ensamblado para rociar
a.Ensamblado en tanque químico. Quite
la inferior del tanque, y cambiela hacia la
tapa que esta conectada con el tubo conector.
(no olvides poner el anillo de empaque como
se muestra en la Fig.2.). Conecte la tapa al tubo
como se muestra en la Fig.1.
-5-
las cuales tienen un largo alcance.
38

Fig 2
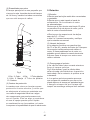
-6-
b.Conecta estas 3 piezas como muestra
el dibujo.
1. Tapa 2. Empaque 3. Tornillo
4. Filtro 5. Tubo 6. Tanque
7. Tapón 8. Cierre 9. Rosca
Fig 1
Tubo de plástico .4 obuT.3 Codo .2 pilC.1
5. Pipa plástica 6. Hule 7. Manija
8. Tubo 9. Pipa plástica 10.Boquilla 11. Anillo
Fig 3
39

Tubo plástico.5
pilC.4
Codo .2 pilC.1
6. Hule 5. Manija 9. Tubo de plástico
10. Cadena
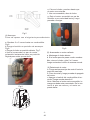
(3) Cadena de protección
La cadena que viene en la caja es para
protección contra shocks y evitar que
se electrocute al rociar por accidente una
una valla de seguridad eléctrica o algun
otro componente que pueda causar corto
con el líquido. Esto es algo a considerar
al usar el equipo puesto que el líquido
en combinación con los metales y el motor
lo exponen a la posibilidad de que se electrocute.
-7-
(2) Ensamblado para polvo
El tanque para polvo es uno pequeño que
viene en la caja. Insertelo dentro del tanque
de 14 litros y cambie los tubos conectores
que van del tanque al cañon.
5. Rotación
(1)Revisión
a.Revise que las bujías estén bien conectadas
y apretadas.
b.Revise que no este tapado el canal de
enfriamiento. De lo contrario el motor
se sobrecalentara.
no permite el flujo de aire en el motor, por lo
tanto el motor no será eficiente.
d.Revise que los espacios de las bujías
sean de 0.6
~
0.7mm.
e.Jale 2 o 3 veces el arrancador y verifique
que la rotación sea normal.
(2) Llenado del tanque
a.La máquina funciona con gasolina tipo
No.70 o No.90 y aceite de motor de 2-tiempos.
Una mezcla inadecuada puede dañar el
motor. Si tiene problemas con el motor, es
probable que se deba a la mezcla incorrecta.
b.Nunca llene el tanque con motor ence-
ndido o caliente.
(3) Para agregar el químico
a.La válvula debe estar cerrada mientras
llena el tanque químico.
Fig.5 Al pulverizar, igual, la válvula debe
estar cerrada colocándola en la posición
hacia abajo. De lo contrario, el químico se va
a derramar.
Fig 4
b. Los polvos químicos pueden provocar
que se tapen los conductos, por eso no los
puede dejar en el tanque por periodos largos.
c.Asegure siempre de que la tapa del
tanque se mantenga siempre bien sellado.
Revise que el filtro de aire este limpio. El polvo
40

-8-
Fig 5
ON
OFF
Fig 7
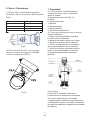
(4) Arranque
Favor de operar con el siguiente procedimiento:
a. Bombee 3 a 5 veces hasta ver combustible.
Fig.6.
b.Ponga el switch en posición de arranque.
Fig.8.
c.Ponga el choke en posición abierta, Fig.7.
d.Jale el arrancador un par de veces
guíandolo lentamente hacia su posición
original para evitar que se dañe.
Fig 8
e. Cierre el choke y acelere hasta que
el motor se encienda.
f. Una vez encendido, abra el choke.
g. Deje el motor encendido un par de
minutos a una velocidad lenta y luego
proceda a fumigar.
Fig 6
(6) Deteniendo el motor
a. Ponga ambas manijas de control hacia la
posición mas baja.
b. Pare de rociar y luego proceda al apagado
del motor.
c.Apague el switch del combustible al ter-
minar. Ponga mucha atención!!
Nota:
Mientras el motor este encendido, la
manguera debe estar conectada. De lo con-
trario el aire se reduce y el motor se
puede dañar.
(5) Arrancando un motor caliente
a. Mantenga el choke abierto
b. Si el motor permite pasar mucho combus-
tible, cierre el choke y jale 5 o 6 veces.
Luego encienda el motor de manera normal.
41

6. Rocío / Pulverizado
-9-
(1) Rocío. Use la válvula para regular la
cantidad y tipo de rocío que usted requiere.
Fig.9.
Abierto Descarga(L/min)
1 1
2 1.5
3 2
4 3
Fig 9
(2)Pulverizado.Regule la descarga
usando la tuerca que regula la cantidad
como se muestra en la Fig.10.
Fig 10
7. Seguridad
(1) Lea el manual cuidadosamente y
comprenda como usar la máquina
antes de usarla.
(2)Vestimenta adecuada (Fig.11)
b. Gafas protectoras
a. Gorra
c. Máscara
d. Guantes largos
e. Abrigo protector
f. Use botas de preferencia
(3)
Las siguientes personas no deben
operar la máquina.
a. Gente con enfermedades mentales.
b. Personas alcoholizadas
c. Menores de edad o gente muy mayor
d. Gente que desconozca la máquina
e. Gente extremadamente cansada o
sin la capacidad para usar la máquina.
f. Gente que se haya ejercitado mucho o
que no haya descansado lo suficiente.
g. Mujeres embarazadas o que estén
lactando.
Fig 11
b. Nunca llene el tanque de combustible
si el motor esta caliente o encendido.
(4) Incendios
a. No fume ni encienda nada cerca.
c. Mantenga bien cerrada la tapa del tanque.
d. Muévase al menos a 3 metros de distancia
de cualquier depósito de gasolina al encender
la máquina.
42

-10-
(5) Encendido
a.Cierre la válvula por donde sale el químico
de lo contrario, el pesicida se expulsará de
inmediato.
a. Su uso ideal es en temperaturas bajas
con poco viento. Por ejemplo, temprano
por la mañana o al atardecer. Esto ayuda a
reducir la evaporación y que la aplicación
sea más efectiva.
Asegúrese que nadie se encuentre frente
a la boquilla, incluso si la válvula esta cerrada-
esto para mayor precaución.
b
(6) Rocío/Pulverización
b.Desplácese en la dirección del viento.
c.Revise que el área donde va a fumigar
este libre de menores o gente que se
puede ver afectada si llegara a rociarla.
Igualmente, cuide que no haya obstá-
culos que lo puedan lastimar o con los
que se pueda tropezar.
d.Si el pesticida llega a tocar sus ojos o
boca, lávese de inmediato y procure a un
doctor lo antes posible.
e.Si el operador se siente mareado
o con dolor de cabeza, igual es una
señal para ir a ver a un doctor.
f.Para mayor seguridad del usuario, siga
las instrucciones y las recomendaciones
del uso de químicos y pesticidas de los
comites agricolas.
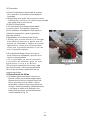
8. Resolución de fallas
(1) Si batalla para encender el motor o no
prende, revise que la bujía tenga chispa.
Apriete bien la bujía y coloque el polo de
forma que toque con el cilindro. Jale el
arrancador y observe que haya chispa en
la bujía. Jale el arrancador cuidadosamente
y no toque el metal de la bujía por que
esta puede provocar que se electrocute
como muestra la Fig. 12.
Fig 12
43

-11-
PROBLEMA CAUSA REMEDIO
Bujía
1. Los polos están mojados Séquelos
2. Cubiertos de carbono Limpie el carbono
3.El aislante esta dañado Reemplacelo
4. El espacio de la bujía es incorrecto
Ajuste a 0.6
~
0.7mm
5. Los polos están quemados Reemplacelos
Imán
1.El cableado esta dañado Arregle o reemplace
2. El bobinado del aislante no sirve Reemplacelo
3.
El bobinado esta dañado
4. El disparador esta defectuoso
Reemplacelo
Reemplacelo
Normal
Falla en compresión
Falla en compresión
por combustible
1.Demasiado combustible en el cilindro Drene
2.Agua o polvo en el combustible Reemplacelo
1. Anillo del pistón o cilindro roto
Reemplacelos
2.Tapón suelto Apriete
No entra combustible
en el carburador
1. No hay combustible en el tanque Agregue
2. Filtro tapado Limpie
3. El agujero de aire tapado Limpie
(2) Falta de potencia
PROBLEMA CAUSA REMEDIO
Limpie
2.Pasa aire por la
conexión del carburador
Apriete
3.Sobrecalienta el motor Pare el motor y enfríe
Drene y agregue nuevo
4. Agua en el combustible
5. El mofle se tapa con carbono
Limpie
Motor se sobrecalienta
1.Mezcla de gasolina mala Ajustar
2.Cilindro cubierto
de carbono Limpie
3. Aceite malo
Use aceite de motor de 2-tiempos
con la mezcla apropiada
4. Mala conexión manguera Ensamble adecuadamente
Motor ruidoso
1.Combustible malo Reemplace
2.Carbono en el cilindro Limpie
3.Partes rotas o dañadas Revise y reemplace
(3) El motor se detiene repentinamente
PROBLEMA CAUSA REMEDIO
Motor se detiene de
forma repentina
1. Cable principal de bujía suelto
2.Piston mordido Cambie o remedie
3. Bujía cubierta de carbono Limpie bujía
4. Falta de combustible Llene el tanque
El motor se detien de
forma lenta
1.Carburador saturado Limpie
2. Agujero de aire tapado Limpie
Agregue combustible limpio
Apriete
3. Agua en el combustible
No
enciende
F
alta de compresión
1. El plato del filtro tapado
44

(4) Dificultad para detener el motor
PROBLEMA CAUSA REMEDIO
El cable de la palanca no
sirve o el pistón esta bloqueado
Ajuste el cable o arregle el
carburador.
(5)Pulverización
PROBLEMA CAUSA REMEDIO
No hay salida de polvo o la
descarga es intermitente
1.No abre la rejilla del
polvo
Ajuste
2.La tapa del tanque suelta Apriete
3.El polvo se mezclo con otro
componente
Limpie
4.El polvo se hizo grumos Deshaga los grumos
5. Polvo granulado Sequelo
6.El granulado es muy grande Cambie el granulado
La rejilla no funciona
1. La rejilla no cierra Limpie
2.La rejilla esta tapada por
materiales ajenos
Apriete
Fuga de polvo
1 .La abrazadera en el
fondo del tanque esta suelta
Apriete
2.Los empaques de la tapa
del polvo están dañados
Cambie por uno nuevo
3.El empaque O del codo
esta dañado
Cambie por uno nuevo
La descarga esta fuera
de control
El control de la rejilla no
funciona apropiadamente
Remedielo
(6) Rocío
PROBLEMA CAUSA REMEDIO
No expulsa el pesticida o
el rocío es intermitente
1.La boquilla o la válvula de
control están tapadas
Limpie
2. Pipa principal tapada Limpie
Coloquela bien
3.No hay presión o la presión
es mínima
Apriete bien el tanque y las dos
abrazaderas de los costados
Hay fugas
1.La tapa del rociador esta
suelta o mal puesta
2. Las conexiones están sueltas Atornillelas
-12-
La palanca en posición
de apagado y el motor
no se detiene
45

9.Mantenimiento técnico y
servicio
(1) Componentes para rociar
a. Limpie todos los residuos del pesticida
que quedan en el tanque y en otras partes
después de cada uso, esto utilizando agua
limpia y secando acorde.
b. Limpie la rejilla del polvo y el tanque por
fuera y por dentro después de cada uso.
c. Suelte la tapa del tanque cuando la
máquina este apagada.
d. Encienda la máquina 2 minutos luego de
haberla limpiado.
(2) Mantenimiento del sistema de combustible
a. Agua o polvo en el combustible es la causa
principal de problemas en el motor, limpie el
sistema de combustible con regularidad.
b.Residuos de combustible en el tanque y
el carburador por periodos largos provocan
que se tape el sistema causando un mal
funcionamiento del motor. Todo el combu-
stible debe ser removido si la máquina no
se usa luego de una semana.
(3) Filtro de aire
a. Limpie el filtro después de cada uso.
Polvo adherido a la esponja reduce la
potencia del motor.
b. Seque el filtro antes de volverlo a instalar
c.Limpie el carbono y manchas del carburador
y ajuste la distancia de las bujías a 0.6
~
0.7mm.
d. El modelo de bujía para esta máquina es la
4106J. No use otros modelos- Fig. 13.
Fig 13
Nota:
a)Todo el trabajo involucrado en el
mantenimiento y limpieza debe efectuar-
se luego de detener la máquina y que no haya
peligro.
b)Al darle mantenimiento, la descarga
deberá apuntar hacia donde no se encuentre
nadie.
c)
Revise las abrazaderas de manera
regular. Sin falta reemplace las abrazaderas
que se vean dañadas.
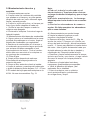
(4) Almacenamiento por mucho tiempo
a. Limpie la máquina y aplique un anti-
corrosivo a las partes de metal.
b. Remueva la bujía y vierta de 15
~
20g de
aceite de motor 2 tiempos al cilindro por
el hoyo del polo de la bujía. Jale del arrancador
unas 4
~
5 veces para distribuir el aceite dentro
del motor. Jale el gatillo lentamente hasta que
el pistán alcance lo más alto de su traslado y
manténgalo ahí. Después instale la bujía.
c. Remueva y limpie meticulosamente el tanque
químico por fuera y por dentro y luego instale
de nuevo el tanque con la tapa puesta sin
apretarla.
d.
Remueve y limpie todos los tubos y
mangueras, guardandolas por separado.
e. Vacié la gasolina del tanque y del
carburador en su totalidad.
f. Cubra la máquina con un plástico
que lo proteja del polvo y almacenela
en un lugar seco y limpio.
-13-
46
-
 1
1
-
 2
2
-
 3
3
-
 4
4
-
 5
5
-
 6
6
-
 7
7
-
 8
8
-
 9
9
-
 10
10
-
 11
11
-
 12
12
-
 13
13
-
 14
14
-
 15
15
-
 16
16
-
 17
17
-
 18
18
-
 19
19
-
 20
20
-
 21
21
-
 22
22
-
 23
23
-
 24
24
-
 25
25
-
 26
26
-
 27
27
-
 28
28
-
 29
29
-
 30
30
-
 31
31
-
 32
32
-
 33
33
-
 34
34
-
 35
35
-
 36
36
-
 37
37
-
 38
38
-
 39
39
-
 40
40
-
 41
41
-
 42
42
-
 43
43
-
 44
44
-
 45
45
-
 46
46


Tomahawk Mist Blower Guía del usuario
- Tipo
- Guía del usuario
- Este manual también es adecuado para
En otros idiomas
- English: Tomahawk Mist Blower User guide
Otros documentos
-
Makita PM7650H Manual de usuario
-
STIHL SR 200 Manual de usuario
-
-
-
Maruyama MD830-1 El manual del propietario
-
-
-
-
-
Simplicity 020234-0 Manual de usuario