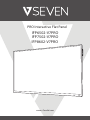
v7world IFP6502-V7PRO Interactive Flat Panel Guía del usuario
- Tipo
- Guía del usuario

PRO Interactive Flat Panel
IFP6502-V7PRO
IFP7502-V7PRO
IFP8602-V7PRO
www.v7world.com


Copyright
This document contains proprietary information
protected by copyright. All rights reserved. No part of
this manual may be reproduced by any mechanical,
electronic or other means, in any form, without prior
written permission of the manufacturer.
Trademarks
All trademarks and registered trademarks are the
property of their respective owners or companies.
Package Contents
• 3 m US/Schuko/UK power cord
• 2 m USB-C Cable
• 3 m HDMI cable
• 2 Writing Pens
• 1 Remote Control with 2 AAA batteries
• Quick Start Guide
• Heavy Duty Wall Mount
• 802.11ac (2T2R) Wi-Fi Module
INTRO

IMPORTANT
• Check www.v7world.com for the latest documentation
and downloads for this product
Safety Warning
• Do not place heavy objects on top of the unit.
• Do not put the unit near appliances that generate magnetic
elds
• Do not expose the unit to direct sunlight and other sources
of heat
• Do not place the unit on an unstable cart, stand, tripod,
bracket, table, or shelf
• Do not put any liquid near or on the unit
• Do not spill any liquid inside the unit
• Check and ensure AC source is grounded
• Only use the power cord that came with this product
• Do not use extension cords
• Unplug power during thunderstorm or lightning
• Make sure the unit’s operating voltage is compatible with
the plug you will use
• Unplug the power cable if the unit will be idle for a long
period of time
• Unplug the power cable before cleaning
• Clean the screen with a soft, dustless, dry cloth
• Never use water or spray type detergent to clean

• Never use any hard or sharp objects to replace the touch pen
• To ensure long life and display performance, do not keep
brightness on high setting for long periods of time
• Do not place the unit near or over a radiator or a heater
• If your unit is suddenly moved from a cold to a warm location,
please unplug the power cable and do not turn it on for at
least 2 hours to be sure the moisture inside the unit has been
evaporated
• Do not expose the unit to rain, or places of high humidity
• Make sure environment is dry, cool and well ventilated
• Check that you are following the environmental specications
for temperature and humidity
• Do not turn o the unit after the unit enters standby mode
• Make sure the remote control batteries are properly disposed
or recycled after changing
• This machine should only be maintained by certied engineer
Having trouble?
Contact our customer service team at www.v7world.com

ENERGY STAR is a U.S. Environmental Protection
Agency voluntary program that helps businesses
and individuals save money and protect our climate
through superior energy efficiency. Products that
earn the ENERGY STAR prevent greenhouse gas
emissions by meeting strict energy efficiency criteria
or requirements set by the U.S. Environmental
Protection Agency.
This product qualifies for ENERGY STAR in the
“Standard mode” setting and this is the setting in
which power savings will be achieved. Changing the
Standard mode picture settings or enabling other
features will increase power that could qualify for
ENERGY STAR rating.
Refer to Energy Star.gov for more information.
ENERGY STAR

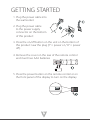
GETTING STARTED
1. Plug the power cable into
the wall socket
2. Plug the power cable
to the power supply
connector on the bottom
of this product
3. Press the on/o button on the unit on the bottom of
this product near the plug (“I” = power on, “O” = power
o )
4. Remove the cover on the rear of the remote control
and insert two AAA batteries
5. Press the power button on the remote control or on
the front panel of the display to turn on the display.

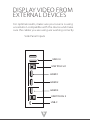
DISPLAY VIDEO FROM
EXTERNAL DEVICES
For optimal results, make sure your source is using
a resolution compatible with the device and make
sure the cables you are using are working correctly.
Side Panel Inputs
HDMI 1
HDMI 2
HDMI 3
USB-C
USB 3.0
USB TOUCH 1
USB TOUCH 2

Bottom Panel Inputs
Front Panel Inputs
USB 2.0 VGA RS232
Ethernet
AUDIO IN
SPDIF
AUDIO OUT
USB 3.0

HDMI IN 3
USB 2.0 1 ONLY FOR SOFTWARE UPDATE
USB 3.0 2 FRONT WITH PASSTHROUGH IN/OUT + 2 REAR
USBC 1 65W PD, DP 1.4, TOUCH PASS THROUGH
TOUCH OUT 2 X USB 3.0
VGA IN 1
AUDIO IN 3.5 MM
AUDIO OUT 1
SPDIF 1
WIFI 802.11AC 2T2R WIFI MODULE INCLUDED WITH
HOTSPOT
LANRJ45 10/100/1000MBPS LAN IN & OUT PASS THROUGH
AUTO SWITCH
RS232 1 X DB9

Copyright
Dieses Dokument enthält firmeneigene,
urheberrechtlich geschützte Informationen. Alle Rechte
vorbehalten. Kein Teil dieses Handbuchs darf ohne
vorherige schriftliche Genehmigung des Herstellers
mechanisch, elektronisch oder durch andere Mittel in
irgendeiner Form reproduziert werden.
Trademarks
Alle Marken und eingetragenen Marken sind Eigentum
ihrer jeweiligen Besitzer oder Unternehmen.
Verpackungsinhalt
• 3 m US/Schuko/UK-Netzkabel
• 2 m USB-C Kabel
• 3 m HDMI-Kabel
• 2 Touchpens
• 1 Fernbedienung mit 2 AAA-Batterien
• Kurzanleitung
• Schwerlast-Wandhalterung
• 802.11ac (2T2R) WLAN-Modul
EINFÜHRUNG

WICHTIG:
• Informieren Sie sich auf www.v7world.com über die aktuelle
Dokumentation und die neuesten Updates für dieses Produkt.
Sicherheits- und Warnhinweise
• Keine schweren Gegenstände auf das Gerät stellen.
• Gerät nicht in Nähe anderer Geräte aufstellen, die magnetische
Felder erzeugen.
• Gerät von direkter Sonneneinstrahlung oder anderen
Wärmequellen fernhalten.
• Gerät nicht auf instabilen Rollwagen, Ständern, Stativen,
Halterungen, Tischen oder Regalen aufstellen.
• Keine Flüssigkeiten am oder in der Nähe des Geräts verwenden.
• Keine Flüssigkeiten über das Gerät gießen.
• Erdung der AC-Quelle sicherstellen.
• Nur das mitgelieferte Netzkabel verwenden.
• Keine Verlängerungskabel verwenden.
• Das Gerät bei Gewitter vom Stromnetz trennen.
• Die Betriebsspannung des Geräts muss der Netzspannung der
verwendeten Steckdose entsprechen.
• Das Gerät bei längerer Nichtbenutzung vom Stromnetz trennen.
• Netzkabel vor Reinigung abziehen.
• Bildschirm mit weichem, staubfreiem und trockenem Tuch
reinigen.
• Gerät niemals mit Wasser oder Reinigungsspray reinigen.

• Niemals anstelle des Touchpens andere harte oder scharfkantige
Objekte verwenden.
• Bildschirm für eine lange Lebensdauer und Leistung nicht über
längere Zeiträume mit hoher Helligkeit betreiben.
• Gerät nicht in der Nähe von Heizkörpern oder Heizlüftern
aufstellen.
• Wird das Gerät von einem kalten an einen warmen Standort
gebracht, die Stromversorgung trennen und das Gerät
mindestens 2 Stunden ausgeschaltet lassen, damit Feuchtigkeit im
Inneren verdampfen kann.
• Gerät nicht hoher Luftfeuchtigkeit oder Regen aussetzen.
• Der Gerätestandort muss trocken, kühl und gut belüftet sein.
• Prüfen, ob Temperatur und Luftfeuchtigkeit am Gerätestandort
den Herstellerangaben zu Anforderungen an die
Betriebsumgebung entsprechen.
• Das Gerät nicht im Standby-Modus ausschalten.
• Gebrauchte Batterien der Fernbedienung nach dem Wechsel
bestimmungsgemäß entsorgen bzw. recyceln.
• Dieses Gerät darf nur von zertifizierten Technikern gewartet
werden.
Haben Sie Fragen?
Bitte wenden Sie sich an unseren Kundenservice auf
www.v7world.com.

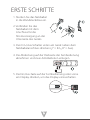
ERSTE SCHRITTE
1. Stecken Sie das Netzkabel
in die Wandsteckdose ein.
2. Verbinden Sie das
Netzkabel mit dem
Anschluss für die
Stromversorgung an der
Unterseite des Geräts.
3. Den Ein-/Aus-Schalter unten am Gerät neben dem
Netzkabelanschluss drücken („I“ = Ein, „O” = Aus).
4. Die Abdeckung auf der Rückseite der Fernbedienung
abnehmen und zwei AAA-Batterien einlegen.
5. Die Ein/Aus-Taste auf der Fernbedienung oder vorne
am Display drücken, um das Display einzuschalten.

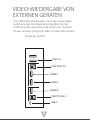
VIDEOWIEDERGABE VON
EXTERNEN GERÄTEN
Zur optimalen Wiedergabe muss die verwendete
Auflösung des Quellgeräts kompatibel mit der
Auflösung des Interactive Flat Panel sein. Darüber
hinaus müssen geeignete Kabel verwendet werden.
Eingänge seitlich
HDMI 1
HDMI 2
HDMI 3
USB-C
USB 3.0
USB TOUCH 1
USB TOUCH 2

Eingänge unten
Eingänge vorne
USB 2.0 VGA RS232
Ethernet
Audio-
Eingang
SPDIF
Audio-
Ausgang
USB 3.0

HDMIEINGÄNGE 3
USB 2.0 1 NUR FÜR SOFTWAREUPDATE
USB 3.0 2 VORN MIT PASSTHROUGH EIN/AUSGANG +
2 HINTEN
USBC 1 65W PD, DP 1.4, TOUCH PASSTHROUGH
TOUCHAUSGÄNGE 2 X USB 3.0
VGAEINGANG 1
AUDIOEINGANG 3,5MM
AUDIOAUSGANG 1
SPDIF 1
WLAN 802.11AC 2T2R INTEGRIERTES WLANMODUL MIT
HOTSPOT
LAN RJ45 10/100/1000MBPS LAN EIN/AUSGANG
PASSTHROUGH AUTO SWITCH
RS232 1 X DB9

Copyright
Il presente documento contiene informazioni
proprietarie protette da copyright. Tutti i diritti riservati.
Nessuna parte di questo manuale può essere riprodotta
mediante qualsiasi mezzo meccanico, elettronico
o di altro genere, in qualsiasi forma, senza previa
autorizzazione scritta del produttore.
Marchi commerciali
Tutti i marchi commerciali e i marchi registrati sono di
proprietà dei rispettivi titolari o società.
Contenuto della confezione
• Cavo di alimentazione US/Schuko/UK da 3 m
• Cavo USB-C da 2 m
• Cavo HDMI da 3 m
• 2 penne di scrittura
• 1 controllo remoto con 2 batterie AAA
• Guida rapida
• Supporto da parete ad alta resistenza
• Modulo Wi-Fi 802.11ac (2T2R)
INTRODUZIONE

IMPORTANTE
• Consultare www.v7world.com per la documentazione più recente
le ultime versioni disponibili per il download di questo prodotto
Avvertenza di sicurezza
• Non posizionare oggetti pesanti sopra l'unità.
• Non posizionare l'unità accanto ad apparecchiature che generano
campi magnetici.
• Non esporre l'unità alla luce diretta del sole e ad altre fonti di calore.
• Non posizionare l'unità su carrelli, supporti, tripodi, staffe, tavoli o
scaffali non stabili.
• Non posizionare liquidi sopra o accanto all'unità.
• Non versare liquidi dentro l'unità.
• Assicurarsi che la fonte AC sia messa a terra.
• Utilizzare esclusivamente il cavo di alimentazione fornito in
dotazione con il prodotto.
• Non utilizzare prolunghe.
• Scollegare l'alimentazione in caso di temporali o caduta di fulmini .
• Assicurarsi che la tensione operativa dell'unità sia idonea al cavo
utilizzato.
• Scollegare il cavo di alimentazione se si prevede che l'unità rimarrà
inattiva per un lungo periodo di tempo.
• Scollegare il cavo di alimentazione prima delle operazioni di pulizia.
• Pulire lo schermo con un panno morbido, privo di polvere e
asciutto.
• Non utilizzare acqua o detergenti spray per la pulizia.

• Non utilizzare oggetti duri o appuntiti in sostituzione della penna
touch.
• Per garantire una lunga durata del display e prestazioni massime, non
impostare la luminosità su livelli elevati per lunghi periodi di tempo.
• Non posizionare l'unità accanto o sopra a radiatori o termosifoni.
• Se l'unità viene spostata improvvisamente da un luogo freddo a un
luogo più caldo, scollegare il cavo di alimentazione e non accenderla
per almeno 2 ore per consentire all'umidità formatasi all'interno
dell'unità di evaporare.
• Non esporre l'unità alla pioggia e non posizionarla in luoghi con un
livello elevato di umidità.
• Assicurarsi che l'ambiente circostante sia asciutto, fresco e ben
ventilato.
• Assicurarsi di rispettare le specifiche ambientali relative a temperatura
e umidità.
• Non spegnere l'unità dopo l'attivazione della modalità standby.
• In caso di sostituzione, assicurarsi di smaltire o riciclare correttamente
le batterie del controllo remoto.
• Far eseguire le operazioni di manutenzione esclusivamente a
ingegneri qualificati.
Problemi?
Contattare il team del servizio clienti all'indirizzo www.v7world.com.

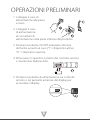
OPERAZIONI PRELIMINARI
1. Collegare il cavo di
alimentazione alla presa
a muro.
2. Collegare il cavo
di alimentazione
al connettore di
alimentazione nella parte inferiore del prodotto.
3. Premere il pulsante On/Off sulla parte inferiore
dell'unità, accanto al cavo ("I" = dispositivo attivo,
"O" = dispositivo spento).
4. Rimuovere il coperchio sul retro del controllo remoto
e inserire due batterie AAA.
5. Premere il pulsante di alimentazione sul controllo
remoto o sul pannello anteriore del display per
accendere il display.

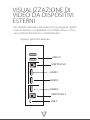
VISUALIZZAZIONE DI
VIDEO DA DISPOSITIVI
ESTERNI
Per risultati ottimali, assicurarsi che la sorgente utilizzi
una risoluzione compatibile con il dispositivo e che i
cavi utilizzati funzionino correttamente.
Ingressi pannello laterale
HDMI 1
HDMI 2
HDMI 3
USB-C
USB 3.0
USB TOUCH 1
USB TOUCH 2

Ingressi pannello inferiore
Ingressi pannello anteriore
USB 2.0 VGA RS232
Ethernet
AUDIO IN
SPDIF
AUDIO OUT
USB 3.0

HDMI IN 3
USB 2.0 1 SOLO PER AGGIORNAMENTO SOFTWARE
USB 3.0
2 ANTERIORI CON INGRESSO/USCITA PASSTHROUGH
+ 2 POSTERIORI
USBC 1 PASSTHROUGH 65W PD, DP 1.4, TOUCH
TOUCH OUT 2 X USB 3.0
VGA IN 1
AUDIO IN 3,5MM
AUDIO OUT 1
SPDIF 1
WIFI MODULO WIFI 802.11AC 2T2R INCLUSO CON
HOTSPOT
LAN RJ45 SWITCH AUTOMATICO LAN IN ENTRATA E USCITA
PASSTHROUGH DA 10/100/1000MBPS
RS232 1 X DB9

Droit d’auteur
Ce document contient des informations protégées
par des droits d’auteur. Tous droits réservés. Aucune
partie de ce manuel ne peut être reproduite par moyen
mécanique, électronique ou sous toute autre forme,
sans l’autorisation écrite préalable du fabricant.
Marques
Toutes les marques et les marques déposées sont
détenues par leurs entreprises ou propriétaires respectifs.
Contenu de l’emballage
• Câble d’alimentation US/Schuko/UK de 3 m
• Câble USB-C de 2 m
• Câble HDMI de 3 m
• 2 stylets
• 1 télécommande avec 2 piles AAA
• Guide de démarrage rapide
• Support mural robuste
• Module Wi-Fi 802.11ac (2T2R)
INTRODUCTION

IMPORTANT
• Rendez-vous sur www.v7world.com pour obtenir les
derniers documents et téléchargements pour ce produit.
Avertissements de sécurité
• Ne placez pas d’objets lourds sur le dessus de l’unité.
• Ne placez pas l’unité à proximité d’appareils qui génèrent des
champs magnétiques.
• N’exposez pas l’unité à la lumière directe du soleil ni à d’autres
sources de chaleur.
• Ne placez pas l’unité sur un chariot, un socle, un trépied, un
support, une table ou une étagère instables.
• Ne mettez pas de liquide sur l’unité ou à proximité.
• Ne renversez pas de liquide à l’intérieur de l’unité.
• Vérifiez et assurez-vous que la source AC est raccordée à la terre.
• Utilisez uniquement le câble d’alimentation fourni avec ce
produit.
• N’utilisez pas de rallonge électrique.
• Débranchez le câble d’alimentation en cas d’orage ou de foudre.
• Vérifiez que la tension de fonctionnement de l’unité est
compatible avec l’embase que vous utilisez.
• Débranchez le câble d’alimentation si l’unité reste éteinte
pendant une durée prolongée.
• Débranchez le câble d’alimentation avant le nettoyage.
• Nettoyez l’écran à l’aide d’un chiffon doux, sec et sans peluches.
• N’utilisez jamais d’eau ou de détergent en spray pour nettoyer
l’unité.

• N’utilisez jamais un objet dur ou pointu à la place du stylet tactile.
• Pour une durée de vie plus importante et de meilleures
performances d’affichage, ne maintenez pas l’écran sur une
luminosité élevée pendant une durée prolongée.
• Ne placez pas l’unité à proximité ou au-dessus d’un radiateur ou
d’un dispositif de chauffage.
• Si votre unité est soudainement déplacée d’un lieu froid à un
lieu chaud, veuillez débrancher le câble d’alimentation et ne pas
l’allumer pendant au moins 2 heures, afin de vous assurer que
l’humidité à l’intérieur de l’unité s’est complètement évaporée.
• N’exposez pas l’unité à la pluie et ne la placez pas dans un endroit
très humide.
• Veillez à ce que l’environnement soit sec, frais et bien aéré.
• Assurez-vous de suivre les spécifications environnementales en
matière de température et d’humidité.
• N’éteignez pas l’unité après son entrée en mode veille.
• Veillez à jeter les piles de la télécommande au bon endroit ou à les
recycler, lorsque vous les remplacez.
• Seul un ingénieur qualifié peut se charger de l’entretien de cette
machine.
Vous rencontrez des problèmes ?
Contactez notre service client sur www.v7world.com.

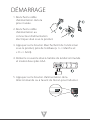
DÉMARRAGE
1. Branchez le câble
d’alimentation dans la
prise murale.
2. Branchez le câble
d’alimentation au
connecteur d’alimentation
électrique situé sous le produit.
3. Appuyez sur le bouton Marche/Arrêt de l’unité situé
sous le produit, près de l’embase (« I » = Marche et
« O » = Arrêt).
4. Retirez le couvercle situé à l’arrière de la télécommande
et insérez deux piles AAA.
5. Appuyez sur le bouton d’alimentation de la
télécommande ou à l’avant de l’écran pour l’allumer.

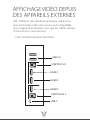
AFFICHAGE VIDÉO DEPUIS
DES APPAREILS EXTERNES
Afin d’obtenir des résultats optimaux, veillez à ce
que la résolution de votre source soit compatible
avec l’appareil et assurez-vous que les câbles utilisés
fonctionnent correctement.
Ports d’entrée latéraux de l’écran
HDMI 1
HDMI 2
HDMI 3
USB-C
USB 3.0
USB TOUCH 1
USB TOUCH 2

Ports d’entrée sous l’écran
Ports d’entrée à l’avant de l’écran
USB2.0 VGA RS232
Ethernet
ENTRÉE
AUDIO
S/PDIF
SORTIE
AUDIO
USB3.0

ENTRÉE HDMI 3
USB2.0 1 (POUR LA MISE À JOUR DU LOGICIEL UNIQUEMENT)
USB3.0 2 À L’AVANT (AVEC ENTRÉE/SORTIE INTERMÉDIAIRES)
+ 2 À L’ARRIÈRE
USB-C 1PORT INTERMÉDIAIRE (65W, DISPLAYPORT1.4,
TACTILE)
SORTIE TACTILE 2PORTS USB3.0
ENTRÉE VGA 1
ENTRÉE AUDIO 3,5MM
SORTIE AUDIO 1
S/PDIF 1
WI-FI MODULE WI-FI 802.11AC (2T2R) INCLUS DANS LE
POINT D’ACCÈS
LAN (RJ45) COMMUTATEUR AUTOMATIQUE (INTERMÉDIAIRE)
AVEC ENTRÉE ET SORTIE LAN 10/100/1000MBIT/S
RS232 1PORT DB9

Copyright
Este documento contiene información confidencial
protegida por copyright. Todos los derechos reservados.
Ninguna parte de este manual podrá reproducirse de
forma mecánica, electrónica o de cualquier otro modo
sin la previa autorización por escrito del fabricante.
Marcas comerciales
Todas las marcas comerciales y marcas comerciales
registradas pertenecen a sus respectivos propietarios o
empresas.
Contenido del paquete
• Cable de alimentación US/EU-Schuko/UK de 3 m
• Cable USB-C de 2 m
• Cable HDMI de 3 m
• Dos lápices de escritura
• Un control remoto con 2 pilas AAA
• Guía de inicio rápido
• Soporte resistente para montaje en pared
• Módulo Wi-Fi de 802.11ac (2T2R)
INTRODUCCIÓN

IMPORTANTE
• Visite www.v7world.com para ver la documentación y las
descargas más recientes de este producto.
Advertencia de seguridad
• No coloque objetos pesados encima de la unidad.
• No coloque la unidad cerca de aparatos que generen campos
magnéticos.
• No exponga la unidad a la luz solar directa ni a otras fuentes de calor.
• No coloque la unidad sobre un carrito, plataforma, trípode, soporte,
mesa o estante que sean inestables.
• No coloque ningún líquido cerca de la unidad ni sobre ella.
• No derrame ningún líquido dentro de la unidad.
• Compruebe que la fuente de alimentación CA está conectada a
tierra.
• Use solo el cable de alimentación que viene con este producto.
• No utilice alargadores.
• Desenchufe la alimentación cuando haya relámpagos o una
tormenta eléctrica.
• Asegúrese de que la tensión de funcionamiento de la unidad es
compatible con el enchufe que vaya a utilizar.
• Desenchufe el cable de alimentación si la unidad va a estar inactiva
durante un largo período.
• Desenchufe el cable de alimentación antes de la limpieza.
• Limpie la pantalla con un paño suave, limpio y seco.
• No utilice nunca agua ni detergente de tipo spray para limpiar
la unidad.

• No utilice nunca ningún objeto duro o afilado en lugar del lápiz táctil.
• Para garantizar una vida útil más larga y un mejor rendimiento, no
utilice la pantalla con un brillo elevado durante largos períodos.
• No coloque la unidad cerca de un radiador o un calentador ni encima
de ellos.
• Si traslada la unidad de un lugar frío a otro caliente, desenchufe el
cable de alimentación y deje pasar al menos dos horas antes de
encender la unidad, para asegurarse de que se evapore la humedad
del interior de la unidad.
• No exponga la unidad a la lluvia ni la utilice en lugares con mucha
humedad.
• Asegúrese de que está en un entorno seco, fresco y bien ventilado.
• Compruebe que está siguiendo las siguientes especificaciones
ambientales sobre temperatura y humedad.
• No apague la unidad después de que entre en el modo de reposo.
• Asegúrese de que las pilas del control remoto están correctamente
desechadas o recicladas después de cambiarlas.
• El mantenimiento de esta máquina solo debe llevarlo a cabo un
ingeniero con la certificación correspondiente.
¿Tiene algún problema?
Póngase en contacto con nuestro servicio de atención al cliente en
www.v7world.com
.

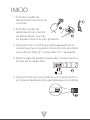
INICIO
1. Enchufe el cable de
alimentación a la toma de
corriente.
2. Enchufe el cable de
alimentación al conector
de alimentación que hay
en la parte inferior de este producto.
3. Pulse el botón on/off (encendido/apagado) de la
unidad que hay en la parte inferior de este producto,
cerca del enchufe (“I” = encendido, “O” = apagado).
4. Retire la tapa de la parte trasera del control remoto e
inserte las dos pilas AAA.
5. Pulse el botón de encendido en el control remoto o
en el panel delantero de la pantalla para encenderla.

VISUALIZACIÓN DE VÍDEO
DESDE DISPOSITIVOS
EXTERNOS
Para obtener resultados óptimos, asegúrese de que su
fuente está utilizando una resolución compatible con el
dispositivo y de que los cables que está usando funcionan
correctamente.
Entradas del panel lateral
HDMI 1
HDMI 2
HDMI 3
USB-C
USB 3.0
USB TOUCH 1
USB TOUCH 2

Entradas del panel inferior
Entradas del panel frontal
USB 2.0 VGA RS232
Ethernet
ENTRADA DE
AUDIO
SPDIF
SALIDA DE
AUDIO
USB 3.0

ENTRADA HDMI 3
USB 2.0 1 (SOLO PARA ACTUALIZACIONES DE SOFTWARE)
USB 3.0 2 DELANTEROS (CON PASSTHROUGH ENTRADA/
SALIDA) + 2 TRASEROS
USB-C 1 PASSTHROUGH (65W PD, DP 1.4, TÁCTIL)
SALIDA TÁCTIL 2 USB 3.0
ENTRADA VGA 1
ENTRADA DE
AUDIO
3,5MM
SALIDA DE
AUDIO
1
SPDIF 1
WI-FI MÓDULO WI-FI 802.11AC (2T2R) CON HOTSPOT
LAN (RJ45) INTERRUPTOR INALÁMBRICO DE ENTRADA Y
SALIDA LAN 10/100/1000MBPS (PASSTHROUGH)
RS232 1 DB9
-
 1
1
-
 2
2
-
 3
3
-
 4
4
-
 5
5
-
 6
6
-
 7
7
-
 8
8
-
 9
9
-
 10
10
-
 11
11
-
 12
12
-
 13
13
-
 14
14
-
 15
15
-
 16
16
-
 17
17
-
 18
18
-
 19
19
-
 20
20
-
 21
21
-
 22
22
-
 23
23
-
 24
24
-
 25
25
-
 26
26
-
 27
27
-
 28
28
-
 29
29
-
 30
30
-
 31
31
-
 32
32
-
 33
33
-
 34
34
-
 35
35
-
 36
36
-
 37
37
-
 38
38


v7world IFP6502-V7PRO Interactive Flat Panel Guía del usuario
- Tipo
- Guía del usuario
En otros idiomas
Documentos relacionados
Otros documentos
-
V7 IFP6502- Interactive Flat Panel 65 Inch 4K TV Guía del usuario
-
Dune HD Duo 4K Base Noir DEDUOBASE4K Manual de usuario
-
ASROCK CoreHT 231D Guía de inicio rápido
-
ASROCK Z87 Extreme9/ac Guía de inicio rápido
-
Legrand 29510 El manual del propietario
-
-
ASROCK VisionX Series Guía de inicio rápido
-
-
Dell S520 Guía del usuario
-
DeLOCK 12502 Ficha de datos