
3+
3+
Made in Germany
ortovox.com
GEBRAUCHSANLEITUNG
Lawinen-Verschütteten-Suchgerät
MANUAL
Avalanche Transceiver
MODE D‘EMPLOI
DVA
ISTRUZIONI PER I‘USO
Localizzatore a.r.t.va.
INSTRUCCIONES DE USO
Aparato de búsqeuda de victimas de avalanchas

3+SMART-ANTENNA
BESSER GEFUNDEN WERDEN!
Automatische Umschaltung auf die optimale Sende-Antenne.
BEING FOUND EASIER!
Automatic switchover to the best transmission antenna.
ETRE RETROUVE PLUS FACILEMENT!
Connexion automatique à l‘antenne émettrice optimale.
MEGLIO ESSERE TROVATI!
Commutazione automatica alla migliore antenna trasmittente.
¡SE LOCALIZA MÁS FÁCILMENTE!
Conmutación automática a la antena emisora óptima.

3+
X
Y
Z
SMART
ANTENNA

3+SMART-ANTENNA-TECHNOLOGIE
DIE ORTOVOX-GERÄTE HABEN
3 ANTENNEN (X, Y, Z) AN BOARD
Bei der SUCHE kommen alle 3 Antennen zum Einsatz. Für die Anzeige
der Entfernung und der Laufrichtung dienen die x- und y-Antenne. Die
z-Antenne wird ausschließlich für die Feinsuche benötigt.
Die ORTOVOX Geräte S1+, 3+ und ZOOM+ können als einzige Geräte
auf dem Markt die Position der Antennen analysieren mit der Smart-
Antenna-Technologie SOWOHL ÜBER DIE X- ALS AUCH ÜBER DIE
Y-ANTENNE SENDEN.
Dadurch erhöht sich die Sendereichweite des Verschüttenen
enorm (bis zu doppelt) und wird dadurch wesentlich besser gefunden
(VERBESSERTE SICHTBARKEIT)
VERTIKALE POSITION OHNE SMART-ANTENNA
= SCHLECHTE SICHTBARKEIT
Eine vertikal ausgerichtete Sendeantenne (x-Antenne) strahlt nur
vertikal aus und verursacht eine schlechte Sichtbarkeit durch minimale
Flächenabdeckung (Reichweite) im Suchbereich. Ein vertikaler SENDER
OHNE SMART-ANTENNA ist daher SCHWERER ZU FINDEN.
VERTIKALE POSITION MIT SMART-ANTENNA
= SEHR GUTE SICHTBARKEIT
Die PATENTIERTE SMART-ANTENNA-TECHNOLOGIE löst das Problem
der schlechten Sichtbarkeit der vertikalen Position. Der Lagesensor
analysiert die Position des Gerätes in der Lawine und SCHALTET
AUTOMATISCH auf die Y-ANTENNE um. Dadurch sendet die Antenne
wieder horizontal und vergrößert die Flächenabdeckung annäherend
auf maximale Reichweite.
© ORTOVOX 6/2013 Änderungen und Fehler vorbehalten. CONCEPT Dieter Kotlaba, Volker Heuer DESIGN www.volkerheuer.com
COVER Leonhard Habersetzer

DE 5
3+
GEBRAUCHSANLEITUNG 5 - 25
Lawinen-Verschütteten-Suchgerät
MANUAL 26 - 47
Avalanche Transceiver
ENGLISH
MODE D‘EMPLOI 48 - 69
DVA
FRANÇAIS
ISTRUZIONI PER I‘USO 70 - 91
Localizzatore a.r.t.va.
ITALIANO
INSTRUCCIONES DE USO 92 - 113
Aparato de búsqueda de victimas de avalanchas
ESPAÑOL
DEUTSCH
116 - 120
SERVICE

© ORTOVOX 6/2013 Änderungen und Fehler vorbehalten. CONCEPT Dieter Kotlaba, Volker Heuer DESIGN www.volkerheuer.com
PHOTO Leonhard Habersetzer
COVER Leonhard Habersetzer

6 DE
3+GEBRAUCHSANLEITUNG
Mit dem 3+ bist Du Herr der Lage!
Die patentierte SMART-ANTENNA-TECHNOLOGIE
mit der intelligenten Lageerkennung schaltet auto-
matisch auf die beste Sendeantenne um. DU WIRST
BESSER GEFUNDEN. Auch in punkto Suche gehen
wir keine Kompromisse ein. Das 3+ ist mit allen
Features eines modernen, digitalen 3-Antennen-
Gerätes ausgestattet. Das BELEUCHTETE REAL-
TIME-DISPLAY informiert über Laufrichtung,
Entfernung und Anzahl der Verschütteten.
Die PATENTIERTE KREISDARSTELLUNG, kombi-
niert mit der INTUITIVEN SUCHAKUSTIK, lässt in
der Feinsuche keine Zweifel aufkommen. Einmal
geortet, können Opfer mit der MARKIERFUNKTION
ausgeblendet werden. Für zusätzliche Sicherheit
sorgt die bewegungssensorbasierte NACHLAWI-
NENUMSCHALTUNG. Auch an die Zukunft haben
wir gedacht: Das 3+ ist UPDATEFÄHIG und schont
mit nur einer einzigen Batterie die Umwelt.
Wertvolle Informationen zur Kameradenhilfe, zur
Unfallvorbeugung und zu den aktuellen Sicher-
heitsprodukten von ORTOVOX findest Du unter:
www.ortovox.com
Per E-Mail erreichst Du uns unter:
ortovox@ortovox.com
ORTOVOX wünscht Dir schöne und sichere Touren!
DEUTSCH
RECCO
REFLECTOR
INSIDE!
Zur schnellen Suche
von Verschütteten
durch Profiretter!
Die Backup-Techno-
logie ist weltweit in
über 700 Skigebieten
und Rettungsteams
vorhanden.
Ozieller
Ausstatter

DE 7
3+BEDIENELEMENTE
10
1
3
2
4
5
8
9
6
7
12
2 Schiebeschalter
„Suchmodus“
3 Sendeumschalter
„Sendemodus“
4 Richtungsanzeige
5 Entfernungsanzeige
6 Batteriekapazität
7 Anzahl der Verschütteten
8 Markierungstaste
9 Lautsprecher
11 Komfort-Tragetasche
12 RECCO Reflector Inside
1 EIN/AUS-Schalter
+ Batteriefach
10 Entriegelungsschalter
11

8 DE
3+REGISTRIEREN / INFO
LVS-Geräte von ORTOVOX sollen die
Kameradenhilfe im Falle einer
Lawinenverschüttung unterstützen!
Ein Aufenthalt im ungesicherten
Gebiet ist potentiell riskant und
sollte nur mit erfahrenen Teilneh-
mern erfolgen. Der wirkungsvolle
Einsatz eines LVS-Gerätes erfordert
angemessenes Training und ständi-
ge Praxis.
ORTOVOX empfiehlt dringend, die
Gebrauchsanleitung für das LVS-
Gerät sorgfältig zu lesen.
Nehme zudem immer eine Schaufel
und eine Sonde mit, wenn Du Dich
abseits der Piste im ungesicherten
Gebiet befindest und gehe nie
alleine auf Tour.
Plane Deine O-Piste-Aktivitäten
mit dem aktuellen Lawinenlagebe-
richt zu finden unter:
www.ortovox.com
Bevor Du in lawinengefährdetes
Gebiet aufbrichst, solltest Du
sicherstellen, dass alle LVS-Geräte
einwandfrei funktionieren und alle
Batterien in gutem Zustand sind.
Das 3+ erfüllt maximale Sicher-
heitsansprüche und besticht durch
seine einfache Bedienung!
GARANTIEERWEITERUNG
Registriere Dein 3+ unter:
www.ortovox.com/registration
Dadurch verlängert sich die
Garantiezeit ab Kaufdatum
von 2 auf 5 Jahre.
Falls gewünscht informieren wir Dich regelmäßig
über Updates und Neuigkeiten zum 3+. So bleibst
Du und Dein Gerät immer auf dem neuesten
Stand. Nähere Infos zu Softwareupdates findest
Du unter: www.ortovox.com/update

DE 9
3+ANLEITUNG
TRAGEWEISE
WICHTIGER HINWEIS
Träger eines Herzschrittmachers sollten das 3+ auf der rechten
Körperseite tragen. Unbedingt die Anweisungen des Herzschritt-
macher-Herstellers beachten!
11
Das 3+ wird in der mitgelieferten Komfort-Trage-
tasche (11) mit dem Display vom Körper abge-
wandt getragen und sollte immer von mindes-
tens einer Bekleidungsschicht überdeckt werden.
Bei wärmeren Temperaturen kann das 3+ auch
in einer mittels Reißverschluss gesicherten
Hosentasche (keine aufgenähten Taschen)
getragen werden.
Im SENDEMODUS sollten
sich keine elektronischen
Geräte (Funkgeräte, Mobil-
telefone, weitere LVS-
Geräte) oder andere metallische
Gegenstände in unmittelbarer Nähe
(wenige Zentimeter) befinden.
Im SUCHMODUS sollten elektroni-
sche Geräte ausgeschaltet sein
oder zumindest im Abstand von
min. 50 cm getragen werden.
Störungen können ebenfalls
durch aufkommende Gewitter,
Lift- und Stromanlagen entstehen.
STÖRUNGEN VERMEIDEN

10 DE
3+ANLEITUNG
1
1
10
EINSCHALTEN
Den EIN/AUS-Schalter (1) gegen den Uhr-
zeigersinn drehen. Der Drehschalter rastet
in der Position „I“ ein und ist jetzt gegen
unbeabsichtigtes Ausschalten gesichert.
AUSSCHALTEN
Den Entriegelungsschreiber (10) lösen und
den EIN/AUS-Schalter (1) im Uhrzeigersinn
zur Position „O“ drehen.
INBETRIEBNAHME
Nach dem Einschalten des 3+ erscheint
die 10-stellige Seriennummer.
Der automatische Selbsttest startet mit
dem Display-Check.
Danach werden der Sender, der Empfänger,
die Smart Antenna und die Sensoren geprüft.
Außerdem wird die verbleibende Batterie-
kapazität in % (z.B. „99“) angezeigt.
Weitere Infos zur Batterie siehe S. 20
Anschließend folgt die installierte
Software-Version (z.B. „2.0“).
SELBSTTEST UND SENDEMODUS (Gerät im Sendemodus)

DE 11
3+ANLEITUNG
Nach dem Selbsttest erfolgt im Display
für 20 Sekunden die Anzeige der Smart
Antenna-Funktion.
Bei waagrechter Geräteposition
sendet das 3+ auf der X-Antenne.
In vertikaler Geräteposition
sendet das 3+ auf der Y-Antenne.
SMART ANTENNA
SENDEN
Nach erfolgreichem Selbsttest sendet das 3+
und die Sendeelemente blinken im Display.
Das Batteriesymbol zeigt die verbleibende
Batteriekapazität.
X
Y
Z

3+
12 DE
ANLEITUNG
3
2
STÖRUNG
Wird beim Selbsttest eine Betriebsstörung
oder ein Defekt erkannt, erfolgt im Display
die Anzeige „EE“.
Eine Warnung kann in der unmittelbaren Nähe
zu einem sendenden LVS-Gerät, Mobiltelefon,
drahtlosen Funkgerät, großen Metallteilen
oder besonders starken, magnetischen
Feldern ausgelöst werden.
Wird die Betriebsstörung beim Selbsttest angezeigt, dann diesen Test
im Freien in ungestörter Umgebung erneut durchführen.
Dabei unbedingt darauf achten, dass keine weiteren Sender in der Nähe
sind. Alle STÖRQUELLEN (Mobiltelefone, Funkgeräte etc.) AUSSCHALTEN
oder entfernt ablegen.
Wird diese Warnung wieder angezeigt, muss das Gerät zum ORTOVOX-
Service geschickt werden. Weitere Informationen zum Service siehe S. 21
Beim Partner-Check wird das Sendesignal der
LVS-Geräte der anderen Teilnehmer überprüft.
• Vor dem Einschalten das 3+ in den Such-
modus schalten. Dazu die beiden Schiebe-
schalter (2) gleichzeitig nach außen ziehen. Der
Sendeumschalter (3) erscheint.
PARTNER-CHECK

3+ANLEITUNG
DE 13
1
8
• Jetzt das 3+ einschalten. Hierfür den EIN/
AUS-Schalter (1) gegen den Uhrzeigersinn
drehen. Der Selbsttest beginnt.
• Während des Selbsttests die Markierungs-
taste (8) so lange gedrückt halten bis „PC“
erscheint. Das 3+ befindet sich jetzt in der
Partner-Check-Funktion, jedoch ist kein
Sendesignal vorhanden.
• Es kann immer nur 1 Sendesignal geprüft
werden. Der Abstand während des Partner-
Checks muss mindestens 1 m und zum
nächsten Sender mindestens 5 m betragen.
• Der Check prüft die Sendefrequenz, die
Sende- und Periodendauer. „EO“ bedeutet, dass
das überprüfte Sendesignal in Ordnung ist.
• Warnungen und Defekte der überprüften
Sender werden mit „EE“ angezeigt.
• Den Partner-Check beendet man durch
Eindrücken des Sendeumschalters (3)
in den Sendemodus oder durch Drücken
der Markierungstaste (8) in den Suchmodus.

14 DE
3+
< 20 m
< 40 m
X
ANLEITUNG
SIGNALSUCHE
Den Lawinenkegel während der
Signalsuche in der gezeigten Form
absuchen.
Mit dem 3+ darf die Suchstreifen-
breite von 40 m (entspricht 40-50
Schritte) nicht überschritten wer-
den. Der Abstand zum Lawinenrand
muss unter 20 m bleiben.
Zeitgleich nach Gegenständen oder
Teilverschütteten Ausschau halten.
VERSCHWINDEPUNKT DES
VERSCHÜTTETEN BEKANNT
Ist der Verschwindepunkt bekannt
oder Gegenstände ersichtlich wird
der Suchbereich eingeschränkt.
Dieser liegt unterhalb, in Fließ-
richtung der Lawine.
Dadurch kann wertvolle Zeit
gespart werden.
Beide SCHIEBESCHALTER (2) gleichzeitig
nach außen drücken.
Der SENDEUMSCHALTER (3) springt heraus.
Die Suchsituation wird automatisch
im Display dargestellt.
SUCHEN - FINDEN - BERGEN
2
3
PHOTO Klaus Fengler

DE 15
3+
< 40 m < 40 m
< 20 m
X
Y
Z
ANLEITUNG
4
5
Anzahl der
Signale (1)
GROBSUCHE
Das 3+ während der Grobsuche in
horizontaler Position verwenden!
Ab ca. 40 m Abstand zum Verschüt-
teten führen Dich die Richtungsan-
zeige (4) und Entfernungsanzeige
(5) entlang der Feldlinie zum Ziel.
Die Entfernungsanzeige (5) wird
kleiner und bestätigt die
Annäherung.
INTUITIVE SUCHAKUSTIK
Bewege Dich nach dem Erstsignal
schnell. Die intuitive Akustik
bestätigt die Annäherung.
Suche ab 10m langsamer und
präziser. Ein Akustikwechsel
hilft Dir dabei.
MEHRERE SUCHER
Die Sucher gehen den Suchbereich parallel ab. Der Abstand zwischen den
einzelnen Suchern mit 3+ muss unter 40 m bleiben.
Nach Erstsignal: SCHNELL
Ab 10 m: LANGSAM
Feinsuche: PRÄZISE
PHOTO Klaus Fengler

16 DE
3+ANLEITUNG
T
5
5
9
FEINSUCHE UND TENDENZANZEIGE
Die Feinsuche beginnt automatisch bei
2,5 m Entfernung. Die Richtungsanzeige
schaltet sich aus.
Je näher Du dem Verschütteten bist, desto
geringer zeigt das Display (5) die Entfernung
an und umso schneller taktet die intuitive
Suchakustik (9).
Die Tendenzanzeige (T) gestaltet die
Feinsuche einfach, schnell und präzise.
Entfernst Du Dich vom Verschütteten,
wird die Tendenzanzeige (T) geringer und
die Entfernungsanzeige (5) wieder größer.
PHOTO Klaus Fengler
Während der Fein-
suche die kleinste
Entfernung feststellen.
In Kreuzform das
Gerät 1 mal vor und
zurück bzw. 1 mal
nach links und nach
rechts führen.
Dabei das 3+
nicht drehen!
Die kleinste Entfernung
entspricht der
Verschüttungstiefe.

DE 17
3+ANLEITUNG
7
PHOTO Klaus Fengler
SUCHE BEI MEHREREN VERSCHÜTTETEN
Mit dem 3+ behältst Du auch bei mehreren
Verschütteten den Überblick.
Im Display wird die Anzahl der Verschütteten
in der Mehrverschütteten-Anzeige (7)
angezeigt.
MARKIEREN
Die scharfe Signalanalyse des 3+ führt Dich
jeweils zum nächsten Verschütteten. Nach-
dem man den ersten Verschütteten geortet
hat, kann dieses Signal mit der Markierungs-
taste (8) ausgeblendet werden.
Der Verschüttete wird schnell und verlässlich
als markiert angezeigt und Du kannst die
Suche nach weiteren Verschütteten sofort
fortsetzen.
Ein markiertes Sendesignal wird als weißes
Symbol auf schwarzem Hintergrund (7)
angezeigt.
Werden 4 oder mehr Sender erkannt,
erfolgt die Anzeige „4+“ im Display.
Die Markierung der Sender kann schnell
und einfach aufgehoben werden.
Dazu das 3+ durch Eindrücken des
Sendeumschalters (3) kurz in den
Sendemodus umschalten. Und sofort
wieder in den Suchmodus zurückschalten,
indem man die Schiebeschalter (2)
gleichzeitig nach außen drückt.
2
3
3
7
8

18 DE
3+ANLEITUNG
PUNKTSUCHE (SONDIEREN)
Den Punkt mit der kleinsten
Entfernungsmessung markieren
(mit Stockkreuz oder Schaufel).
Zur exakten Bestimmung des
Liegeortes von hier aus im gezeig-
ten Raster von 25 cm sondieren.
Die Sonde in 90° zur Oberfläche
zügig und tief einstechen. Eine
deutliche Abnahme der Eindring-
tiefe ist Zeichen für einen Treer.
Die Sonde bleibt als Anhaltspunkt
während des Ausgrabens stecken.
AUSGRABEN
Die Verschüttungstiefe (1)
an der Sonde ablesen.
Diesen Wert hangabwärts
gehen und V-förmig mit
dem Schaufeln beginnen.
Bei mehreren Helfern den
Schaufler an der Spitze
Blöcke abstechen lassen.
Die hinteren Helfer
schaufeln und schaen
den Schnee weg. Es gilt
die Atemwege möglichst
schnell freizulegen.
TIPP Schaufeln mit RÄUMFUNKTION können wertvolle Zeit sparen.
PHOTO Klaus Fengler
25 cm
1

DE 19
3+ANLEITUNG
SIGNALÜBERLAGERUNG
Die Sendesignale werden vom
3+ gemessen und analysiert.
Werden mehrere Sendesignale
empfangen und diese Sendesignale
senden exakt gleichzeitig, entsteht
eine Signalüberlagerung.
Die Signale sind überdeckt und
technisch nicht mehr auseinander
zu halten. Dies kann in ungünstigen
Fällen mehrere Sekunden dauern.
Diese Situation der Signalüberlage-
rung wird ohne Richtungspfeil (z.B.
„44” und 3 Signalen) dargestellt.
Es ist erforderlich die Überlage-
rungsdauer abzuwarten bevor die
Suche fortgesetzt werden kann.
AUTOMATISCHE SENDEUMSCHALTUNG
Im Falle einer NACHLAWINE und einer Verschüt-
tung von Dir selbst (Gerät im Suchmodus)
schaltet sich das 3+ nach 2 Minuten auto-
matisch in den Sendemodus um, sobald es
nicht mehr bewegt wird. Dies wird durch
einen 10-sekündigen Warnton signalisiert.
Dadurch besteht die Möglichkeit, dass
Du (falls verschüttet) ebenfalls gefunden
werden kannst.
PHOTO Klaus Fengler
120 Sec

20 DE
3+ANLEITUNG
1
10
ORTOVOX empfiehlt Batterien unter 50% Restkapazität auszutauschen.
BATTERIEWECHSEL (bei ausgeschaltetem Gerät)
Den Entriegelungsschalter (10) lösen
und den EIN/AUS-Schalter (1)
GEDRÜCKT im Uhrzeigersinn drehen.
Jetzt das Batteriefach (1) aus dem 3+ ziehen und eine frische
BATTERIE (1.5 V, Alkaline, AA, Mignon, LR 6) einsetzen.
Beim Batteriewechsel auf das korrekte Einlegen von + Pol und – Pol achten.
Die Batterie muss mit dem + Pol voraus eingelegt werden.
Die Batterie ist während der Sommerpause aus dem 3+ zu entfernen. Bei
Schäden wegen ausgelaufener Batterien erlischt die ORTOVOX-Garantie.
AUSGELAUFENE BATTERIEN BEDEUTEN LEBENSGEFAHR!
BATTERIE
AKKUS
Verwende NIEMALS aufladbare Batterien (Akkus wie z.B. Nickel-
Cadmium-Zellen, Lithium-Ionen-Akkus, etc).
Akkus haben eine wesentlich geringere Betriebsspannung, damit
eine geringere Reichweite und eine eingeschränkte Betriebsdauer.
Zudem sind defekte Akkus nicht sofort erkennbar.
Sie zeigen nach dem Wiederaufladen anfänglich die volle Betriebs-
spannung an, um nach sehr kurzer Betriebsdauer wieder stark
abzufallen (LEBENSGEFAHR!).

DE 21
3+SERVICE / GARANTIE
Das 3+ ist ein Rettungsgerät, von
dessen einwandfreier Funktion ein
Leben abhängen kann.
Elektronische Bauteile können
ausfallen – daher empfehlen wir
das Gerät unbedingt zu dem am
Prüfsiegel empfohlenen Termin zur
Werksüberprüfung einzusenden.
Die Zahl z.B. „2018” auf dem Siegel
im Batteriefach erinnert Sie an die
Geräteüberprüfung im Jahr 2018.
Mit der Zahl z.B. „1.057“ kann das
Fertigungslos des 3+ identifiziert
werden.
Bitte nimm unseren Überprüfungs-
service in den Sommermonaten in
Anspruch, damit Dein Gerät wieder
rechtzeitig zum Winterbeginn ein-
satzbereit ist.
Zur Reparatur oder Werksüberprü-
fung sende das 3+ INKLUSIVE
AUSGEFÜLLTER SERVICECARD
bitte direkt an unsere Servicestelle.
Servicecard siehe Seite 120.
Bei Vorlage der Händlerrechnung
gewähren wir die 2-jährige ORTO-
VOX-Garantie ab Verkaufsdatum.
Bei Registrierung des 3+ unter:
www.ortovox.com/registration
gewähren wir weitere 3 Jahre
Garantie. Die gesamte Garantiezeit
beträgt nach der Online-Registrie-
rung somit 5 Jahre.
Im Rahmen der ORTOVOX-Garantie
werden mangelhafte Teile unent-
geltlich instand gesetzt oder das
LVS-Gerät wird gegen ein bau-
gleiches Gerät ausgetauscht.
Ausgenommen sind Schäden, die
durch unsachgemäße Handhabung
und natürlichen Verschleiß hervor-
gerufen werden.
Batterien sind von der Garantie
ausgenommen.
Eine weitergehende Gewährleistung
bei Folgeschäden ist ausdrücklich
ausgeschlossen.
Durchgeführte Garantieleistungen
bewirken weder eine Verlängerung
der Garantiepflicht, noch beginnt
damit eine neue Garantiezeit.
Serviceadressen siehe Seite 116
Ü
B
E
R
P
R
Ü
F
U
N
G
2018
1.057
BATCH-NO.
C
H
E
C
K

22 DE
3+TECHNISCHE DATEN
BEZEICHNUNG ORTOVOX 3+
FUNKTION digital
GEHÄUSE ergonomisch, wasserdicht, schlagfest
GRÖSSE 119 x 71 x 25 mm
FREQUENZ 457 kHz
Das 3+ empfängt Sendesignale von jedem
normgerechten LVS-Gerät (EN 300 718) ohne
Einschränkungen.
BACKUP Reflector inside
Durch den RECCO Reflektor im 3+ wirst du
besser gefunden. Das 3+ ist jedoch nicht in
der Lage Reflektoren in Bekleidung oder
Skischuhen zu suchen.
DIGITALE EMPFANGS-
REICHWEITE
40 m
SUCHSTREIFENBREITE bis zu 40 m
TEMPERATURBEREICH -20° C bis +45° C
Sollte das Gerät nass geworden sein, NIE
MIT HEISSLUFT TROCKNEN! Durch Heißluft
erleidet das Gerät auch nach Abkühlung
einen bleibenden Funktionsschaden.
0682

DE 23
3+EU-KONFORMITÄTSERKLÄRUNG
STROMVERSORGUNG 1 x Alkaline AA 1.5 V LR 06 Batterie
BETRIEBSDAUER Senden: ca. 250 Stunden
Empfangen: ca. 15 Stunden
GEWICHT 3+ ca. 189 g inkl. Batterie
Komfort-Tragetasche ca. 98 g
Die Ortovox Sportartikel GmbH erklärt hiermit, dass sich das Gerät
ORTOVOX 3+ in Übereinstimmung mit den grundlegenden Anforderungen
und den übrigen einschlägigen Bestimmungen der Richtlinie 2014/53/EU
befindet.
Die Konformitätserklärung kann unter folgender Adresse gefunden
werden: http://www.ortovox.com/certification
Die maximal abgestrahlte Sendeleistung entspricht der magnetischen
Feldstärke von 2,23�A/m in einer Entfernung von 10m.
HERSTELLER: ORTOVOX Sportartikel GmbH
Rotwandweg 5
82024 Taufkirchen
Germany

3+
24 DE
STICHWORTVERZEICHNIS
PHOTO Hansi Heckmair
A
Ausgraben 18
Ausschalten 10
Autom. Sendeumschaltung 19
B
Batterie 10, 20, 22
Batteriefach 7, 20, 21
Betriebsstörung 12
D
Digitale Empfangsreichweite 22
E
EIN/AUS-Schalter 7, 10, 13
Einschalten 10
Entfernungsanzeige 7, 15
F
Feinsuche 15, 16
Frequenz 22
G
Garantie 20, 21
Garantieerweiterung 8
Grobsuche 15
M
Markieren 17
Mehrverschütteten-Anzeige 7, 17, 19
N
Nachlawine 19
P
Punktsuche 18
R
Richtungsanzeige 7, 15, 16
S
Schaufeln 18
Selbsttest 10, 11, 12
Senden 22
Seriennummer 10
Service 5, 12, 21
Signalsuche 14
Signalüberlagerung 19
Sondieren 18
Störquellen 12
Suche 7, 19
Suchstreifenbreite 14
T
Technische Daten 22
Tendenzanzeige 8
U
Update 8
V
Verschüttungstiefe 18
W
Warnung 12

3+
PHOTO Hansi Heckmair

26 EN
3+SMART-ANTENNA-TECHNOLOGY
THE ORTOVOX DEVICES HAVE
THREE ANTENNAS (X, Y, AND Z)
All three antennas are used during SEARCHES. The x and
y antennas are used to display the distance and the direction
of movement. The z antenna is solely used for the fine search.
The ORTOVOX device S1+, 3+ and ZOOM+ are the only devices
on the market that can analyze the position of the antennas using
smart antenna technology and TRANSMIT VIA BOTH THE X AND
THE Y ANTENNA.
This vastly increases (UP TO DOUBLES) the victim’s transmission
range, making him or her far easier to find (IMPROVED VISIBILITY).
VERTICAL POSITION WITHOUT SMART-ANTENNA
= poor visibility
A vertically positioned transmitter antenna (x antenna) only emits a
signal vertically and results in poor visibility due to minimum area
coverage (range) in the search area. A vertical TRANSMITTER WITHOUT
A SMART ANTENNA is therefore MORE DIFFICULT TO LOCATE.
VERTICAL POSITION WITH SMART-ANTENNA
= very good visibility
The PATENTED SMART-ANTENNA-TECHNOLOGY resolves this
problem of poor visibility in the vertical position. The position sensor
analyzes the device’s position in the avalanche and AUTOMATICALLY
SWITCHES TO THE Y-ANTENNA. As a result, the antenna once again
transmits horizontally and expands the area coverage to almost the
maximum range, making it easier to locate victims in less time.

EN 27
3+
DT 027
GEBRAUCHSANLEITUNG 5 - 25
Lawinen-Verschütteten-Suchgerät
DEUTSCH
ENGLISH
MANUAL 26 - 47
Avalanche Transceiver
MODE D‘EMPLOI 48 - 69
DVA
FRANÇAIS
ISTRUZIONI PER I‘USO 70 - 91
Localizzatore a.r.t.va.
ITALIANO
INSTRUCCIONES DE USO 92 - 113
Aparato de búsqueda de victimas de avalanchas
ESPAÑOL
116 - 120
SERVICE

28 EN
3+MANUAL
SMART AND EASY
With the 3+ you are in charge! The PATENTED
SMART-ANTENNA-TECHNOLOGY ™ with intelli-
gent position recognition automatically switches
to the best transmission antenna. YOU WILL BE
FOUND EASIER. We make no compromises in
terms of searching either. The 3+ is equipped
with all the features of a modern, digital 3-an-
tenna device.The ILLUMINATED REAL-TIME
DISPLAY tells you the direction, distance and
number of victims. The PATENTED CIRCULAR
DISPLAY, combined with the INTUITIVE
SEARCH ACOUSTICS, leaves no doubt when
operating in fine search mode. Once located,
victims can be removed from the display using
the flagging function. The motion-sensor-based
FOLLOW-UP AVALANCHE SWITCHOVER ensu-
res additional safety. We have also thought
about the future: the 3+ can be UPDATED and
protects the environment with just a single
battery.
Valuable information on how to help compa-
nions, accident prevention and the latest safety
products from ORTOVOX can be found at:
www.ortovox.com
You can reach us by e-mail at:
ortovox@ortovox.com
ORTOVOX hopes you have wonderful, safe trips!
ENGLISH
RECCO
REFLECTOR
INSIDE!
So professional
rescuers can quickly
find avalanche
victims! The backup
technology is used
by more than 700
ski areas and rescue
teams around the
world.
ocial
supplier

EN 29
3+OPERATING ELEMENTS
3
2
4
5
8
9
6
7
12
10
1
2 Sliding switch
‘search mode’
3 Transmission switch over
‘transmission mode’
4 Direction arrow
5 Distance indicator
6 Battery capacity
7 Number of signals
8 Flagging button
9 Loudspeaker
11 Comfort carrier bag
12 RECCO Reflector Inside
1 ON/OFF switch
+ battery compartment
10 Locking slide
11

30 EN
3+REGISTRATION / INFO
EXTENDED WARRANTY
Register your 3+ at:
www.ortovox.com/registration
In doing so, your warranty period
will extend from two to five years
from the date of purchase.
If you opt in, we will regularly inform you about
updates and the latest news in relation to the 3+.
This keeps you and your device up to date at all
times. Further information about software up-
dates can be found at: www.ortovox.com/update
Avalanche transceivers are designed
to support the assistance oered
by companions in the event of
avalanche burial.
Your presence in areas where
avalanche hazards exist is fraught
with potential risk. The eective
use of an avalanche transceiver
requires appropriate training and
constant practice.
ORTOVOX strongly recommends
that you carefully read the operating
instructions provided with the
avalanche transceiver and take
the appropriate avalanche educa-
tion courses.
In addition, always take a shovel
and a probe when you go o-piste
in areas where avalanche hazards
exist, and never head out alone.
Plan your o-piste activities using
the current avalanche report at:
www.ortovox.com
Before you enter an area at risk of
an avalanche, you should make sure
that all avalanche transceivers are
working properly and all batteries
are in good condition.
The 3+ fulfills the maximum safety
requirements and is characterized
by its simple operation!

EN 31
3+
11
INSTRUCTIONS
HOW TO CARRY THE DEVICE
IMPORTANT NOTICE
People with pacemakers should wear the 3+ on the right
side of their body. It is essential to observe the pacemaker
manufacturer’s instructions!
The 3+ is carried in the comfort carrier bag (11)
with the display facing away from your body and
should always be covered by at least one layer
of clothing.
In warmer temperatures, the 3+ can also
be carried in a zippered pant pocket (not
in sewn-on pockets).
In TRANSMISSION MODE,
no electronic devices
(wireless devices, mobile
phones, other avalanche
transceivers) or other metal objects
should be located in the immediate
vicinity (within a few centimeters).
In SEARCH MODE other electronic
devices should be switched o
or carried at a distance of at least
50 cm away.
Interference can also be caused
by approaching storms, lifts and
power systems.
AVOIDING INTERFERENCE

32 EN
3+
1
1
10
SWITCHING ON
Turn the ON/OFF switch (1) counter-
clockwise. The rotary switch clicks into
the position “I” and is now secured against
being unintention-ally switched o.
SWITCHING OFF
Undo the unlocking slide (10) and
turn the ON/OFF switch (1) clockwise
to the position “O”.
INITIAL USE
INSTRUCTIONS
After switching on the 3+, the 10-digit
serial number appears.
The automatic self-test begins with the
display check.
The transmitter, receiver, smart antenna,
and sensors are then tested.
The remaining battery capacity is also
displayed as a percentage (e.g. “99”).
For further information about the battery, see p. 42
The installed software version then follows
(e.g. “2.0”).
SELF-TEST, TRANSMISSION MODE (device in transmission mode)

EN 33
3+
After the self-test, the smart antenna
function is shown on the display for
20 seconds.
If positioned horizontally, the 3+
transmits on the X-antenna.
If positioned vertically, the 3+
transmits on the Y-antenna.
SMART ANTENNA
TRANSMISSION
Once the self-test has successfully concluded,
the 3+ will transmit and the transmission
lights flash on the screen.
The battery icon shows the remaining
battery capacity.
X
Y
Z
INSTRUCTIONS

3+
34 EN
3
2
FAULT
INSTRUCTIONS
If a malfunction or fault is detected during
the self-test, “EE” appears on the screen.
A warning can be triggered in the immediate
vicinity of a transmitting avalanche transceiver,
mobile phone, wireless appliance, large metal
objects, or particularly strong magnetic fields.
If the malfunction warning is displayed during
the self-test, then carry out the test again in
the open in surroundings without interference.
When doing so, it is essential to make sure that no other transmitters are
nearby. SWITCH OFF all SOURCES OF INTERFERENCE (mobile phones,
wireless devices etc.) or move them well away.
If the warning is displayed again, the device must be sent to the ORTOVOX
service department.
Further information about the service department can be found on p. 43
During the partner check, the transmission
signal of the other participants’ avalanche
transceivers is checked.
• Before switching on, switch the 3+ into
search mode by pushing apart the two
sliding switches (2) simultaneously. The
transmission switch over button (3) appears.
PARTNER-CHECK

3+
EN 35
1
8
INSTRUCTIONS
• Now turn on the 3+. To do so, turn the
ON/OFF switch (1) counter-clockwise.
The self-test begins.
• During the self-test, press the flagging
button (8) until “PC” appears. The 3+ is
now in the partner check function but
there is no transmission signal.
• Only one transmission signal can ever be
tested at a time. The minimum distance during
the partner check is 1 m; the distance to other
transmitters must be at least 5 m.
• The check looks at the transmission frequency,
the transmission duration, and the cycle
duration. “EO” means that the transmission
signal tested is fully functional.
• Warnings and defects for the inspected
transmitters are displayed as “EE”.
• The partner check is completed by pressing in
the transmission switch over button (3) in
transmission mode or by pressing the flagging
button (8) in search mode (8).

v36 EN
3+INSTRUCTIONS
< 20 m
< 40 m
X
SIGNAL SEARCH
Search the avalanche debris in
the indicated manner during the
signal search.
When using the 3+, a search
strip width of 40 m (equates to
40-50 steps) must not be excee-
ded. The distance from the edge
of the avalanche must remain
less than 20 m.
At the same time, keep an eye
out for objects or partially buried
victims.
VICTIM’S POINT OF
DISAPPEARANCE KNOWN
If the point of disappearance is
known or objects are visible, the
search area is narrowed down to
below this point in the avalanche
flow direction.
This can save valuable time.
Simultaneously press apart
both SLIDING SWITCHES (2).
The TRANSMISSION SWITCH
OVER BUTTON (3) springs up.
The search situation is automatic-
ally displayed on the screen.
SEARCHING - LOCATING - RESCUING
2
3
PHOTO Klaus Fengler

< 40 m < 40 m
< 20 m
vEN 37
3+
4
5
Number of
signals (1)
INSTRUCTIONS
X
Y
Z
COARSE SEARCH
Hold the 3+ in a horizontal position
during the coarse search!
From a distance of approx. 40 m to the
avalanche victim, move the direction
pointer (4) and distance indicator (5)
along the field line to the target point.
The distance indicator (5)
goes down and confirms
that you are getting closer.
INTUITIVE SEARCH ACOUSTICS
After the first signal, move quickly
during your search. The intuitive
search acoustics confirm your
approach. At 10 m you should move
slower and get more precise in
your search. An acoustic change
will help you to do so.
SEVERAL SEARCHERS
The searchers move across the search area in parallel. The distance
between the individual searchers with 3+ must remain less than 40m.
PHOTO Klaus Fengler
After first signal: QUICK
Under 10 m: SLOW
Fine search: PRECISE

38 EN
3+
T
5
5
9
INSTRUCTIONS
FINE SEARCH AND TENDENCY INDICATOR
Fine search starts automatically when you are
2.5 m away. The direction arrow is switched o.
The closer you are to the victim, the lower
the distance displayed (5) and the faster the
intuitive search acoustic signal beeps (9).
The tendency indicator (T) formulates the fine
search process simply quickly, and precisely.
If you move away from the victim, the tendency
indicator (T) gets smaller and the distance
indicator (5) larger again.
PHOTO Klaus Fengler
During the fine search,
determine the smallest
distance.
Move the device for-
ward and back once
and left and right once
in a cross shape.
Do not turn the 3+
during this process!
The smallest distance
corresponds to the
burial depth.

EN 39
3+
7
INSTRUCTIONS
PHOTO Klaus Fengler
SEARCHING FOR MULTIPLE VICTIMS
The 3+ also allows you to maintain an
overview in the event of multiple burials.
The number of victims is shown by
the multiple signal indicator (7).
FLAGGING
The sharp signal analysis on the 3+ leads
you to the next victim. Once you have found
the first victim, this signal can be hidden
by pressing the flagging button (8).
The victim is quickly and reliably displayed
as flagged and you can immediately continue
your search for additional victims.
A flagged transmission signal is displayed
as a white icon on a black background (7).
If 4 or more transmitters are detected,
“4+” appears on the display.
Flagged transmitters can be unflagged
again quickly and easily.
To do this, press the transmission switch
over button (3) to switch the 3+ to trans-
mission mode. Now switch straight back to
search mode by pushing apart the sliding
switches (2) simultaneously.
2
3
3
7
8

40 EN
3+INSTRUCTIONS
PHOTO Klaus Fengler
PINPOINTING (PROBING)
Mark the point with the smallest
distance reading (using crossed
poles or a shovel).
To now determine the precise
location of the victim, probe in
the displayed 25 cm grid.
Insert the probe quickly and
deeply at a 90° angle to the snow.
A clear decrease in the penetration
depth indicates a hit.
The probe remains in the ground
as a point of reference while you
dig out the victim.
DIGGING OUT
Read the burial depth (1)
on the probe. Move this
distance down the slope
and start shoveling in a
V-shape.
If there are several res-
cuers, the person shove-
ling at the top should cut
out blocks. Those behind
should shovel and move
the snow away. The air
passages should be
exposed as quickly as
possible.
TIP Shovels with a CLEARING FUNCTION can save valuable time.
25 cm
1

EN 41
3+INSTRUCTIONS
SIGNAL OVERLAP
The transmission signals are
measured and analyzed by the 3+.
If several transmission signals are
received and these transmission
signals are transmitting at the same
time then a signal overlap occurs.
The signals overlap and can no
longer be technically distinguished.
In the worst cases, this can last for
several seconds.
This situation is illustrated without
a direction arrow (e.g. “44” and
3 signals).
You must wait until the signal over-
lap period has passed before you
continue your search.
PHOTO Klaus Fengler
120 Sec
AUTOMATIC TRANSMISSION SWITCH OVER
In the event of a SECONDARY AVALANCHE
to which you fall victim (with your device in
search mode), the 3+ automatically switches
to transmission mode after 2 minutes of non-
movement. This is indicated by a 10-second
warning tone.
This makes it possible for you to also be found
if buried in an avalanche while searching.

42 EN
3+
1
10
INSTRUCTIONS
ORTOVOX recommends that you change the batteries when their remaining
capacity falls below 50%.
CHANGING THE BATTERY (when the device is switched o)
Loosen the locking slide (10) and
press in the ON/OFF switch (1)
WHILE TURNING it clockwise.
Now pull out the battery compartment (1) from the 3+ and
insert a new battery (1.5 V, alkaline, AA, mignon, LR 6).
When changing the battery, make sure the polarity is correct.
The battery must be inserted with the + pole first.
Remove the battery from the 3+ during the summer months.
Damage caused by battery leakage will void the ORTOVOX warranty.
LEAKY BATTERIES PRESENT A DANGER TO LIFE!
BATTERIE
RECHARGEABLE BATTERIES
NEVER use rechargeable batteries (such as nickel-cadmium
batteries, lithium-ion batteries etc.).
Rechargeable batteries have a significantly lower operating voltage,
and thus a lower range and limited service life. In addition, defective
rechargeable batteries cannot be detected immediately.
After recharging they initially show the full operating voltage,
only to severely drop o again after a very short operating period
(THIS CAN BE VERY DANGEROUS).

EN 43
3+SERVICE / WARRANTY
As the 3+ is a rescue device, a
life could depend on it functioning
properly.
As electronic components can stop
working, we recommend that you
always send the device for factory
inspection on the recommended
date shown on the test seal.
The number such as “1057” identi-
fies the batch number of the 3+.
Please use our inspection service
in the summer months so that your
device will be ready for operation
when winter begins.
For repairs or the factory check,
please send the 3+ INCLUDING THE
FILLED IN SERVICE CARD directly
to our service center. Service card
see page 120.
On presentation of the dealer in-
voice, we grant the 2-year ORTOVOX
warranty from the date of purchase.
If you register your 3+ at:
www.ortovox.com/registration
we will extend the warranty by
an additional three years.
Following online registration, the
total warranty period is therefore 5
years, but no longer than 6 years
from the date of manufacture. The
number i.e. 2022 on the seal in the
battery compartment indicates that
the transceiver was manufactured 6
years earlier in 2016. The number
also reminds you that the device
should be checked in 2022.
As part of the ORTOVOX warranty,
faulty parts are repaired free of
charge or the avalanche transceiver
is replaced by an appliance of the
same design.
Damage caused by improper hand-
ling and natural wear is excluded.
Batteries are excluded from
the warranty.
Any further liability for consequenti-
al damage is expressly excluded.
Enforced warranties do not extend
the warranty obligation or start a
new warranty period.
See page 116 for service center
addresses.
C
H
E
C
K
Ü
B
E
R
P
R
Ü
F
U
N
G
2022
1.057
BATCH-NO.

44 EN
3+TECHNICAL DATA
0682
NAME ORTOVOX 3+
FUNCTION digital
CASING ergonomic, waterproof, impact resistant
SIZE 119 x 71 x 25 mm
FREQUENCY 457 kHz
The 3+ receives transmission signals from
every avalanche transceiver conforming to
standards (EN 300 718) without restrictions.
BACK-UP Reflector inside
You’ll be easier to find thanks to the RECCO
reflector in the 3+.
However, the 3+ is not capable of searching
for reflectors on clothing or ski boots.
DIGITAL RECEPTION
RANGE
40 m
SEARCH STRIP WIDTH up to 40 m
TEMPERATURE RANGE -20° C to +45° C
If the transceiver gets wet, DO NOT USE
DIRECT HEAT such as a hair dryer to dry
it out! Heat applied in a direct manner may
permanently damage thedevice beyond
repair even after it has cooled down.
MANUFACTURER:
ORTOVOX Sportartikel GmbH
Rotwandweg 5
82024 Taufkirchen
Germany

EN 45
3+EU DECLARATION OF CONFORMITY
USA FCC STATEMENT
FCC ID: KF5ORTOVOX3
This device complies with Part 15 of the FCC
Rules. Operation is subject to the following
two conditions:
(1) the device may not cause harmful
interference and
(2) the device must accept any interference
received, including interference that may
cause undesired operation.
This equipment has been tested and found
to comply with the limits for an intentional
radiator pursuant to part 15 of the FCC
Rules. These limits are designed to provide
reasonable protection against harmful
interference in a residential installation.
This equipment generates, uses, and can
radiate radio frequency energy and, if not
installed and used in accordance with the
instructions, may cause harmful interfe-
rence to radio communications.
However, there is no guarantee that interfe-
rence will not occur in a particular installa-
tion. If this equipment does cause harmful
interference to radio or television reception,
which can be determined by turning the
equipment o and on, the user is encoura-
ged to try to correct the interference by one
or more of the following measures:
- Reorient or relocate the receiving antenna.
- Increase the separation between
the equipment and receiver.
- Connect the equipment into an
outlet on a circuit dierent from that
to which the receiver is connected.
- Consult the dealer or an experienced
radio/TV technician for help.
CHANGES OR MODIFICATIONS
TO THIS DEVICE NOT APPROVED
BY ORTOVOX CAN VOID THE
USERS AUTHORITY TO OPERATE
THE EQUIPMENT.
POWER SUPPLY 1 x alkaline AA 1.5 V LR 06 battery
OPERATING TIME Transmitting: approx. 250 hours
Receiving: approx. 15 hours
WEIGHT 3+ approx. 189 g incl. battery
Comfort carrier bag approx. 98 g
Ortovox Sportartikel GmbH, hereby declares that the product ORTOVOX 3+
is in compliance with the essential requirements and other relevant
provisions of Directive 2014/53/EU.
The declaration of conformity can be downloaded at the following source:
http://www.ortovox.com/certification
The maximum transmitter power output corresponds to a magnetic field
strength of 2.23 A/m at a distance of 10m.

3+
46 EN
INDEX
PHOTO Leonhard Habersetzer
A
Automatic transmission 41
B
Battery 29, 32, 33, 42, 43, 44
Battery compartment 29, 42, 43
Burial depth 38, 40
C
Coarse search 37
D
Digging out 40, 46
Digital reception range 44
Direction arrow 29
Distance indicator 29
E
Extended warranty 30
F
Fault 34
Fine search 37, 38
Flagging 29, 39
Frequency 44
M
Multiple signal indicator 39
O
ON/OFF switch 29, 32, 35, 42
P
Pinpointing 40
Probing 40
S
Search 26, 29, 31, 34, 35, 36, 37, 38,
39, 41, 45
Search strip width 44
Secondary avalanche 41
Self-test 32
Serial number 32
Service 27, 43, 46
Shoveling 40
Signal overlap 41
Signal search 36
Smart antenna 26, 32, 33
Switching o 32
Switching on 32
T
Technical data 44
Tendency indicator 38
Transmitting 34, 41, 44
U
Update 30
W
Warning 34, 41
Warranty 43

3+
PHOTO Leonhard Habersetzer

48 FR
3+TECHNOLOGIE SMART ANTENNE
LES DVA ORTOVOX SONT
ÉQUIPÉS DE 3 ANTENNES (X, Y, Z)
Lors de la RECHERCHE, les 3 antennes entrent en jeu. Les antennes
x et y permettent de connaître la distance et la direction de la victime.
L’antenne z est utilisée pour la localisation finale.
Les DVA ORTOVOX S1+, 3+ et ZOOM+ sont les seuls appareils sur
le marché capables d’analyser la position de leurs antennes grâce à
la technologie Smart-Antenne et d’ÉMETTRE AUSSI BIEN À PARTIR
DE L’ANTENNE X QU’À PARTIR DE L’ANTENNE Y.
Ceci permet une augmentation considérable (JUSQU’AU DOUBLE)
de la portée d’émission et la victime est ainsi retrouvée nettement
plus facilement (MEILLEURE VISIBILITÉ).
POSITION VERTICALE SANS SMART-ANTENNE
= MAUVAISE VISIBILITÉ
Une antenne émettrice positionnée à la verticale (Antenne x) n’émet
qu’à la verticale et cause ainsi une mauvaise visibilité en ne couvrant
qu’une surface minimale (portée) dans la zone de recherche. Un
émetteur à la VERTICALE SANS SMART-ANTENNE est, de ce fait,
plus DIFFICILE À LOCALISER.
POSITION VERTICALE AVEC SMART-ANTENNE
= EXCELLENTE VISIBILITÉ
La technologie BREVETÉE SMART-ANTENNE résout le problème de la
mauvaise visibilité en position verticale. Le capteur analyse la position
de l’appareil sous l’avalanche et commute AUTOMATIQUEMENT SUR
L’ANTENNE Y. Ainsi, l’antenne émet de nouveau horizontalement et
augmente la surface couverte, s’approchant de la portée maximale.

FR 49
3+
DT 049
GEBRAUCHSANLEITUNG 5 - 25
Lawinen-Verschütteten-Suchgerät
DEUTSCH
FRANÇAIS
MODE D‘EMPLOI 48 - 69
DVA
ISTRUZIONI PER I‘USO 70 - 91
Localizzatore a.r.t.va.
ITALIANO
INSTRUCCIONES DE USO 92 - 113
Aparato de búsqueda de victimas de avalanchas
ESPAÑOL
MANUAL 26 - 47
Avalanche Transceiver
ENGLISH
116 - 120
SERVICE

50 FR
3+MODE D‘EMPLOI
La technologie BREVETÉE SMART-ANTENNE avec re-
connaissance intelligente de la position d‘ense-velisse-
ment, commute automatiquement sur l‘antenne la mieux
orientée pour émettre. VOUS ÊTES AINSI RETROUVÉ
PLUS FACILEMENT et plus rapidement et ce par tous les
appareils en circulation. En matière de recherche aussi,
nous ne faisons aucun compromis. Le 3+ est équipé de
toutes les caractéristiques d’un appareil numérique
moderne à 3 antennes. L’ÉCRAN D’AFFICHAGE EN
TEMPS RÉEL rétro-éclairé indique clairement la direc-
tion, la distance et le nombre de victimes. La REPRÉ-
SENTATION BREVETÉE EN FORME DE CERCLE, associée
avec L’ACOUSTIQUE DE RECHERCHE, ne laisse la place à
aucun doute lors de la localisation finale. Une fois locali-
sées, les victimes peuvent être masquées grâce à la
fonction marquage. Le système de commutation auto-
matique en cas de sur-avalanche qui fonctionne grâce à
un capteur de mouvement augmente encore le niveau de
sécurité. Nous avons aussi pensé à l’avenir : le 3+ peut
être MIS À JOUR et, avec une seule pile, il garantit une
bonne autonomie tout en préservant l’environnement.
Vous trouverez des infos précieuses sur l’aide aux victi-
mes, la prévention des accidents et les derniers équipe-
ments de sécurité ORTOVOX sur : www.ortovox.com
Vous pouvez nous contacter par E-Mail sur :
ortovox@ortovox.com
ORTOVOX vous souhaite de
belles excursions en montagne!
FRANÇAIS
SYSTÈME
RECCO INTÉGRÉ !
Pour une localisation
plus rapide des
victimes par les
sauveteurs professi-
onnels ainsi que
pour servir de
Backup en cas de
DVA non allumé ou
de piles déchargées.
Fournisseur
ociel

FR 51
3+ELÉMENTS DE COMMANDE
3
2
4
5
8
9
6
7
10
1
2 Interrupteur à coulisse
„mode recherche“
3 Interrupteur à coulisse
„mode émission“
4 Achage de la direction
5 Achage de la distance
6 Témoin de charge des piles
7 Nombre de victimes
8 Touche de marquage
9 Haut-parleur
11 Etui confort
12 Systeme RECCO intégré
1 Interrupteur MARCHE/ARRET
+ compartiment pile
10 Bouton de déverrouillage
12
11

52 FR
3+INSCRIPTION / INFOS
Les DVA ORTOVOX sont faits pour
aider la recherche de victimes en
cas d’avalanche!
Une sortie en zone non sécurisée
est potentiellement risquée et elle
ne doit être entreprise que par et
avec des personnes expérimentées.
L’utilisation ecace d’un DVA de-
mande une bonne formation et
une pratique constante.
ORTOVOX vous recommande vive-
ment de lire très attentivement les
instructions d’utilisation du DVA.
Equipez vous toujours d’une pelle
et d’une sonde en plus de votre DVA
lorsque vous vous aventurez en
dehors d’un domaine sécurisé et ne
partez jamais seul en randonnée ou
sortie hors piste.
Planifiez vos sorties en hors piste
avec les bulletins de risques
d’avalanches que vous pourrez
trouver sur : www.ortovox.com
Avant de pénétrer dans une zone
à risque, veillez à ce que tous les
DVA fonctionnent correctement
et que toutes les piles soient cor-
rectement chargées.
Le 3+ ore un niveau de sécurité
maximal et il est particulièrement
simple à utiliser !
EXTENSION DE GARANTIE
Enregistrez votre 3+ sur :
www.ortovox.com/registration
La durée de votre garantie
passera ainsi de 2 à 5 ans à
partir de la date d’achat.
Si vous le souhaitez, nous vous informerons
régulièrement sur les mises à jour et les nou-
veautés qui concernent le 3+. Votre appareil
restera ainsi toujours au top et vous aussi ! Vous
trouverez plus de précisions sur les mises à jour
du logiciel sur : www.ortovox.com/update

FR 53
3+
PORT DU DVA
11
AVIS IMPORTANT
Les porteurs de stimulateurs cardiaques ou pacemakers
doivent porter le 3+ sur le coté droit du corps. Respectez
impérativement les instructions du fabriquant du stimulateur !
En MODE EMISSION,
aucun appareil électro-
nique (radios, téléphone
mobiles ou autres DVA)
ou autre objet métallique ne doit
se trouver à proximité (quelques
centimètres) du DVA.
En MODE RÉCEPTION, tous les
autres appareils électroniques
doivent être éteints ou distants
de 50 cm au minimum par rapport
au DVA.
Des interférences peuvent aussi
êtres causées par la proximité d’un
orage, d’une remontée mécanique
ou d’une ligne électrique.
EVITER LES INTERFÉRENCES
INSTRUCTIONS
Le 3+ doit être porté contre le corps, à l’aide de
son étui confort (11), l’écran faisant face à
l’extérieur et il doit toujours être recouvert par
une couche de vêtements au minimum.
Lorsqu’il fait très chaud, le 3+ peut aussi être
porté dans une poche de pantalon sécurisée à
l’aide d’un zip (pas dans une poche rapportée).

54 FR
3+
1
1
10
ALLUMER
Tourner l’interrupteur MARCHE/ARRET (1)
dans le sens inverse des aiguilles d’une montre.
L’interrupteur rotatif s’enclenche en position
„I“ et est automatiquement verrouillé pour
empêcher une extinction accidentelle.
ETEINDRE
Appuyer sur le bouton de déverrouillage (10)
et tourner l’interrupteur MARCHE/ARRET
(1) dans le sens des aiguilles d’une montre
jusqu’à la position „O“.
MISE EN SERVICE
INSTRUCTIONS
Une fois le 3+ allumé, son numéro de série
à 10 chires apparait.
L’autotest automatique commence avec le
test de l’achage.
Ensuite, les fonctionnements de l’émetteur, du
récepteur et de la Smart Antenne sont contrôlés.
Le niveau de charge de la pile est ensuite aché
en % (ex. „99“).
Pour plus d’infos sur les piles, voir p. 64
Enfin, l’appareil indique la version du logiciel
installée (ex. „2.0“)
AUTOTEST ET MODE EMISSION (Appareil en mode émission)

FR 55
3+
Après l’autotest, la fonction
Smart Antenne s’ache sur
l’écran pendant 20 secondes.
En position horizontale, le 3+
émet sur l’antenne X.
En position verticale, le 3+
émet sur l’antenne Y.
SMART ANTENNE
EMISSION
Une fois l’autotest terminé avec succès, le 3+
commence à émettre et le voyant de contrôle
de transmission clignote sur l’écran.
Le symbole de la batterie indique la capacité
restante des piles.
X
Y
Z
INSTRUCTIONS

3+
56 FR
3
2
ANOMALIES
INSTRUCTIONS
Dans le cas où l’autotest détecte une anomalie
ou un défaut de fonctionnement, l’avertissement
„EE” s’ache sur l’écran.
Un avertissement peut parfois être déclenché
dans la proximité immédiate d’un DVA en mode
émission, d’un téléphone portable, d’un émetteur
radio, de gros objets métalliques ou de champs
magnétiques particulièrement forts.
Si une anomalie de fonctionnement apparaît lors
de l’autotest, refaites ce test à l’extérieur, dans un
environnement non perturbé.
Veuillez à ce qu’aucun autre émetteur ne se trouve à proximité. Eloigner
ou éteindre toutes les sources possibles de perturbation (téléphones
portables, émetteurs radios etc.).
Si le signal d’avertissement apparaît à nouveau, l’appareil doit être
renvoyé au service après-vente ORTOVOX. Pour plus d’informations
sur le service après-vente, voir p. 65
Le Partner-Check vérifie le bon fonctionnement du
signal d’émission des DVA des autres partenaires.
• Sans allumer l‘appareil, mettre le 3+ en mode
recherche. Pour cela, pousser simultanément
les deux interrupteurs à glissière (2) vers
l’extérieur. L’interrupteur émission (3) apparait.
PARTNER-CHECK (contrôle des partenaires)

3+
FR 57
1
8
INSTRUCTIONS
• Allumer maintenant le 3+. Pour cela, tourner
l’interrupteur MARCHE/ARRET (1) dans le sens
inverse des aiguilles d’une montre. L’autotest
commence.
• Pendant l’autotest, maintenir la touche de
marquage (8) enfoncée jusqu’à ce que „PC“
apparaisse. Le 3+ est maintenant en fonction
Partner-Check, aucun signal d’émission
n’est émis.
• On ne peut contrôler qu’un signal d’émission à
la fois. La distance pour le Partner-Check doit
être d’au moins 1 m et l’émetteur suivant doit
être distant de 5 m au minimum.
• Le check vérifie la fréquence d’émission,
la durée et la période d’émission. „EO“
signifie que le signal d’émission
contrôlé fonctionne
correctement.
• Les anomalies ou défauts de fonctionnement
de l’émetteur testé sont indiquées par les
lettres „EE”.
• On termine le Partner-Check en repoussant
l’interrupteur d’émission (3) pour passer en
mode émission ou en poussant la touche de
marquage (8) pour passer en mode recherche.

58 FR
3+INSTRUCTIONS
< 20 m
< 40 m
X
RECHERCHE DU SIGNAL
Pendant la recherche du signal,
parcourir la zone de l’avalanche
comme indiqué sur le schéma.
Avec le 3+, la largeur de la bande
de recherche de 40 m (ce qui repré-
sente 40-50 pas) ne doit pas être
dépassée. La distance par rapport
au bord de l’avalanche ne doit pas
dépasser 20 m.
Dans le même temps, garder un
œil sur les objets ou victimes parti-
ellement ensevelies.
POINT DE DISPARITION
DE LA VICTIME CONNU
Si le point de disparition de la
victime est connu ou si des objets
sont visibles, la zone de recherche
est limitée en conséquence.
La victime se trouve en dessous,
dans le sens d’écoulement de
l’avalanche.
Cela permet de gagner un temps
précieux.
Pousser simultanément les deux INTER-
RUPTEURS À GLISSIÈRE (2) vers l’extérieur.
L’INTERRUPTEUR ÉMISSION (3) apparaît.
La situation de recherche est automatiquement
achée sur l’écran.
CHERCHER – TROUVER - SECOURIR
2
3
PHOTO Klaus Fengler

FR 59
3+
< 40 m < 40 m
< 20 m
4
5
Nombre de
signaux (1)
INSTRUCTIONS
X
Y
Z
RECHERCHE APPROXIMATIVE
Pendant la recherche approximative,
utiliser le 3+ à l’horizontale !
A environ 40 m de la personne ensev-
elie, la direction (4) et l’éloignement (5)
de la victime s’achent à l’écran pour
vous guider. L’indication de distance (5)
diminue et confirme que vous vous rapprochez.
ACOUSTIQUE DE
RECHERCHE INTUITIVE
Après le premier signal, déplacez-
vous rapidement pendant la recher-
che, la recherche sonore intuitive
confirme que vous vous approchez
de la victime.
A 10 m, vous devez vous déplacer
plus doucement et être plus précis
dans votre recherche, le son change
pour vous inciter à agir ainsi.
CHERCHEURS MULTIPLES
Les diérents chercheurs parcourent la zone d’avalanche en parallèle.
La distance entre les personnes qui cherchent avec le 3+ doit rester
inférieure à 40 m.
PHOTO Klaus Fengler
Après le premier signal : RAPIDE
A partir de 10 m : LENT
Recherche fine : PRÉCISE

60 FR
3+
T
5
5
9
INSTRUCTIONS
RECHERCHE FINE ET
AFFICHAGE DES TENDANCES
La recherche fine démarre automatiquement
lorsque vous vous trouvez à 2,5 m de la victime.
La flèche de direction disparait.
Plus vous vous rapprochez de la victime, plus
la distance indiquée sur l’écran (7) diminue et
plus le signal sonore accelere (9).
L’achage des tendances (T) rend la recherche
fine simple, rapide et précise.
Si vous vous éloignez de la victime, l’achage
des tendances (T) devient plus faible et
l’indication de l’éloignement (5) augmente
à nouveau.
PHOTO Klaus Fengler
La recherche fine permet
de trouver la distance la plus
faible avec la victime.
Déplacer l’appareil d’avant en
arrière en formant une croix,
par exemple 1 fois vers la gau-
che et une fois vers la droite.
Pendant cette étape, veiller
à ne pas tourner le 3+ !
Le plus petite mesure chirée
de rapprochement sur l’écran
correspond à la profondeur
d’ensevelissement.

FR 61
3+
7
INSTRUCTIONS
PHOTO Klaus Fengler
RECHERCHE EN CAS
DE VICTIMES MULTIPLES
Grâce au 3+, vous gardez une vue d’ensemble
même en cas de victimes multiples.
L’écran ache le nombre de victimes grâce
à l’indicateur du nombre de signaux (7).
MARQUAGE
L’analyse de signal précise du 3+ vous
guidera jusqu’à la prochaine victime. Une
fois la première victime localisée, son signal
peut être neutralisé grâce à la touche de
marquage (8).
La victime est identifiée rapidement et de
façon fiable comme marquée et vous pouvez
poursuivre sans attendre votre recherche
des victimes suivantes.
Un signal d’émission marqué est représenté
par un symbole blanc sur fonds noir (7).
Lorsque 4 émetteurs ou plus sont détectés,
l’achage „4+“ apparaît à l’écran.
Le marquage des émetteurs peut être
supprimé rapidement et facilement.
Pour cela, enfoncez l’interrupteur à coulisse
(3) pour faire passer le 3+ brièvement en
mode émission. Tout de suite après, repas-
sez en mode recherche en tirant sur
l’interrupteur à coulisse (2) vers l’extérieur.
2
3
3
7
8

62 FR
3+INSTRUCTIONS
PHOTO Klaus Fengler
RECHERCHE DU POINT
DE SONDAGE
Marquez le point exact de plus
faible éloignement (avec des
bâtons en croix ou une pelle).
Pour déterminer l’emplacement
exact de la victime, sonder à partir
de là de façon systématique tous
les 25 cm.
Enfoncez la sonde profondément en
formant un angle de 90° avec la
surface. Une diminution significative
de la profondeur de pénétration est
signe de succès.
La sonde reste enfoncée dans
la neige une fois le lieu
d’ensevelissement identifié.
DÉGAGEMENT DE
LA VICTIME
Lire la profondeur d’enfouisse-
ment de la victime (1) sur la
sonde. Descendre la pente
d’une distance équivalente à
cette profondeur et commencer
à creuser en forme de V.
Dans le cas où plusieurs person-
nes creusent, laisser la personne
la plus haute détacher des blocs.
Les autres personnes en des-
sous se chargent de pelleter et
dégager la neige. Dégager en
priorité les voies respiratoires.
ASTUCE Les pelles dotées d’une FONCTION PIOCHE
permettent d’économiser un temps précieux.
25 cm
1

FR 63
3+INSTRUCTIONS
SUPERPOSITION DES SIGNAUX
Les signaux d’émission sont
mesurés et analysés par le 3+.
Lorsque plusieurs signaux d’émis-
sion sont reçus et que ces signaux
émettent exactement simultané-
ment, les signaux se superposent.
Les signaux sont superposés et il
n’est techniquement plus possible
de les diérencier. Dans les cas les
plus défavorables, cela peut durer
plusieurs secondes. Cette situation
de superposition des signaux est
représentée par l’absence de flèche
de direction (par ex. „44” m et 3
signaux d’émission). Il est néces-
saire d’attendre jusqu’à ce que la
durée de superposition des signaux
soit terminée avant de poursuivre
la recherche.
PHOTO Klaus Fengler
120 Sec
COMMUTATION AUTOMATIQUE EN MODE ÉMISSION
En cas de nouvelle avalanche qui ferait du cher-
cheur (appareil en mode recherche) une nouvelle
victime, le 3+ commute automatiquement en
mode émission après 2 minutes sans mouve-
ment. Cette commutation est signalée par un
avertissement sonore de 10 secondes.
Cette fonction permet à la personne qui était
en train de chercher d’être aussi retrouvée
(si elle devient elle même victime) en cas de
sur-avalanche.

64 FR
3+
1
10
INSTRUCTIONS
ORTOVOX recommande de changer les piles lorsqu’elles arrivent en
dessous de 50% de capacité.
REMPLACEMENT DE LA PILE (sur un appareil éteint)
Appuyer sur le bouton de déverrouillage
(10) et tourner l’interrupteur MARCHE/ARRET
(1) enfoncé dans le sens des aiguilles d’une montre.
Retirez ensuite le compartiment à piles (1) du 3+ et insérer une nouvelle
pile (1.5 V, Alcaline, AA, Mignon, LR 6).
Veillez à bien respecter les polarités + et – en remplaçant la pile.
La pile doit être insérée avec le pôle + le premier.
Pendant la pause estivale, la pile doit être retirée du 3+. La garantie
ORTOVOX ne s’applique pas en cas de dommages liés à une fuite de la pile.
DES PILES DÉCHARGÉES CONSTITUENT UN DANGER DE MORT!
PILE
BATTERIES RECHARGEABLES
N’utilisez jamais de batteries rechargeables (Accus comme
par ex. Cadmium-Nickel, batteries Lithium-Ion, etc).
Les batteries rechargeables ont une tension de fonctionnement nette-
ment plus faible donc une portée plus faible et une durée de charge
plus limitée. De plus, les batteries défectueuses ne sont pas immédia-
tement identifiables. Une fois rechargées, elles indiquent au début un
niveau de charge maximal, pour ensuite baisser très fortement après
une durée d’utilisation très faible (DANGER DE MORT !).

FR 65
3+SERVICE / GARANTIE
Le 3+ est un appareil de sauvetage,
des vies humaines peuvent dépen-
dent de son bon fonctionnement.
Des composants électroniques
peuvent être soumis à des pannes–
c’est pourquoi nous vous recomman-
dons de renvoyer impérativement
votre 3+ pour qu’il soit contrôlé en
usine à la date mentionnée sur le
cachet de l’appareil.
Le chire indiqué sur le cachet du
compartiment à piles, par ex.
l’indication„2018” vous rappelle de
faire contrôler votre appareil en 2018.
L’autre chire, par ex.
„1.057“ permet
d’identifier le lot de
fabrication de votre3+.
Merci de faire appel à notre service
de contrôle pendant la période
estivale afin de pouvoir utiliser votre
appareil dès le début de l’hiver.
Pour les réparations ou contrôles,
nous vous invitons à déposer votre
appareil auprès d’un DÉTAILLANT
REVENDEUR ORTOVOX, ce dernier
s’occupera de l’envoi de votre ap-
pareil (facturation + retour du SAV au
magasin). Cette procédure vous
permettra de récupérer votre appareil
dans un délai d’environ 4 semaines.
Sur présentation de la facture
d’achat chez le revendeur, nous
orons la garantie ORTOVOX de 2
ans à compter de la date d’achat.
Si vous enregistrez votre 3+ sur :
www.ortovox.com/registration
nous vous orons 3 ans de garantie
supplémentaire. La durée totale de
garantie après enregistrement en
ligne passe ainsi à 5 ans.
Dans le cadre de la garantie ORTO-
VOX, les pièces défectueuses sont
réparées gratuitement ou le DVA est
remplacé par un appareil de concep-
tion similaire.
Sont exclus les dommages causés
par une mauvaise utilisation ou par
l’usure normale.
Les piles sont aussi exclues de la
garantie.
Toute autre garantie pour dommages
indirects est expressément exclue.
Les prestations réalisées dans le
cadre de la garantie n’entrainent ni
la prolongation de la garantie, ni le
début d’une nouvelle période de
garantie.
Ü
B
E
R
P
R
Ü
F
U
N
G
2018
1.057
BATCH-NO.
C
H
E
C
K

66 FR
3+CARACTÉRISTIQUES TECHNIQUES
DESCRIPTION ORTOVOX 3+
FONCTION digital
BOÎTIER ergonomique, étanche, antichoc
TAILLE 119 x 71 x 25 mm
FRÉQUENCE 457 kHz
Le 3+ reçoit les signaux d’émission de tous
les DVA satisfaisant aux normes DVA (EN 300
718) sans aucune restriction.
BACKUP Reflector inside
Grâce au réflecteur RECCO intégré au 3+,
vous êtes retrouvé plus facilement. Le 3+ ne
permet pas de chercher les réflecteurs
intégrés aux vêtements et chaussures de ski.
PORTÉE DE RÉCEPTION 40 m
LARGEUR DE LA BAN-
DE DE RECHERCHE
jusqu’à 40 m
PLAGE DE
TEMPÉRATURES
-20° C to +45° C
Lorsque l’appareil est humide, NE LE SÉCHEZ
JAMAIS AVEC DE L’AIR CHAUD ! L’air chaud
peut endommager l’appareil durablement,
même après refroidissement complet.
0682

FR 67
3+
ALIMENTATION 1 x pile Alcaline AA 1.5 V LR 06
AUTONOMIE Emission : env. 250 heures
Réception : env. 15 heures
POIDS 3+ env. 189 g pile comprise
Sac de transport confortable env. 98
Ortovox Sportartikel GmbH déclare que l’appareil ORTOVOX 3+ est
conforme aux exigences essentielles et aux autres d.ispositions
pertinentes de la directive 2014/53/EU.
La déclaration de conformité peut être téléchargée sur le site suivant:
http://www.ortovox.com/certification
La puissance maximale émise correspond à l‘intensité de champ magné-
tique de 2,23 A/m à une distance de 10 m.
FABRICANT : ORTOVOX Sportartikel GmbH
Rotwandweg 5
82024 Taufkirchen
Germany
DÉCLARATION DE CONFORMITÉ EUROPÉENNE

3+
68 FR
INDEX
PHOTO Leonhard Harbersetzer
A
Allumer 54, 57
Anomalies 56
Autotest 54
Avertissement 56, 63
C
Commutation automatique 63
D
Dégager 62
E
Eteindre 54
F
Fréquence 66
G
Garantie 65
Garantie, extension de 52
I
Interrupteur MARCHE/ARRET 51
L
Largeur de la bande de recherche
66
M
Marquage 61
Mise en service 54
N
Numéro de série 54
P
Pelleter 62
Perturbation 56
Pile 64
Pile, compartiment 51, 64, 65
Portée de réception 66
Profondeur d‘ensevelissement 60
R
Recherche 48, 51, 52, 56, 57, 58, 59,
60, 61, 63, 66
Recherche du signal 58
Recherche fine 59, 60
S
SAV 65
Smart Antenne 54, 55
Sonder 62
Superposition des signaux 63
Sur-avalanche 63
V
Victimes multiples 61

3+
PHOTO Leonhard Harbersetzer

70 IT
3+SMART-ANTENNA-TECHNOLOGY
I LOCALIZZATORI ORTOVOX
DISPONGONO DI 3 ANTENNE (X, Y, Z)
Le 3 antenne vengono utilizzate nella fase di ricerca. Le antenne
x e y servono per indicare la distanza e la direzione di marcia.
L‘antenna z serve esclusivamente per la ricerca di precisione.
Gli apparecchi ORTOVOX S1+, 3+ e ZOOM+ sono gli unici apparecchi
presenti nel mercato in grado di analizzare la posizione delle antenne
secondo tecnologia Smart Antenna e TRASMETTERE SIA CON
L‘ANTENNA X CHE CON L‘ANTENNA Y.
Questo permette un notevole incremento (FINO A DUE VOLTE) della
portata di trasmissione del travolto e maggior velocità nell‘intervento
di autosoccorso (MIGLIORE VISIBILITÀ).
POSIZIONE VERTICALE SENZA SMART ANTENNA
= LIMITATA VISIBILITÀ
Un‘antenna trasmittente posizionata verticalmente (antenna x)
trasmette solo verticalmente creando limitata visibilità ed una minima
copertura dell‘area di ricerca (portata). Un TRASMETTITORE VERTICALE
SENZA Smart Antenna è quindi più DIFFICILE da localizzare.
POSIZIONE VERTICALE CON SMART ANTENNA
= OTTIMA VISIBILITÀ
La BREVETTATA tecnologia Smart Antenna compensa il problema
della limitata visibilità in posizione verticale. Il sensore di inclinazione
analizza la posizione dell‘apparecchio trasmittente del travolto e
seleziona AUTOMATICAMENTE L‘ANTENNA Y. Questo permette una
trasmissione orizzontale del segnale aumentandone la superficie
di copertura (valore prossimo alla portata massima)

IT 71
3+
DT 071
MANUAL 26 - 47
Avalanche Transceiver
ENGLISH
MODE D‘EMPLOI 48 - 69
DVA
FRANÇAIS
ISTRUZIONI PER I‘USO 70 - 91
Localizzatore a.r.t.va.
INSTRUCCIONES DE USO 92 - 113
Aparato de búsqueda de victimas de avalanchas
ESPAÑOL
ITALIANO
GEBRAUCHSANLEITUNG 5 - 25
Lawinen-Verschütteten-Suchgerät
DEUTSCH
116 - 120
SERVICE

72 IT
3+
Con il 3+ la ricerca in valanga non avrà segreti. La
tecnologia SMART-ANTENNA (Brevetto ORTOVOX) con
identificazione della posizione del travolto, seleziona
automaticamente l’antenna di trasmissione migliore.
SARAI TROVATO CON PIÙ FACILITÀ. Anche in “ricerca”
non ci sono compromessi. 3+ è dotato di tutte le carat-
teristiche di un moderno apparecchio digitale a 3
antenne. Il DISPLAY ILLUMINATO con informazioni
in tempo reale, indica direzione, distanza e numero
dei travolti analizzati. La ricerca di precisione con
RAPPRESENTAZIONE ZIONE A CERCHI (brevetto
ORTOVOX) supportata da SEGNALAZIONE ACUSTICA
INTUITIVA a variazione di toni, non lascia alcun dubbio
alla localizzazione della vittima. La localizzazione è
confermata poi con la MARCATURA (ed esclusione del
segnale) della vittima. Per ulteriore sicurezza, è pre-
sente in 3+ la COMMUTAZIONE E AUTOMATICA IN
TRASMSSIONE (in caso di valanga secondaria). Abbia-
mo anche pen-sato al futuro: 3+ è dotato di SOFT-
WARE AGGIORNA-BILE e contribuisce alla salvaguar-
dia dell’ambiente utilizzando una sola batteria di
alimentazione.
Informazioni utili all’organizzazione dell’autosoccorso,
alla prevenzione degli incidenti e per i più recenti
prodotti di sicurezza di ORTOVOX sono reperibili al sito:
www.ortovox.com
Scriveteci all’indirizzo email:
ortovox@ortovox.com
ORTOVOX vi augura escursioni entusiasmanti e sicure!
ITALIANO
RECCO
REFLECTOR
INSIDE!
Per una ricerca più
veloce di travolti da
parte del soccorso
organizzato e come
backup se il dis-
positivo a.r.t.va.
è spento o batterie
di alimentazione
esaurite.
Fornitore
uciale
ISTRUZIONI PER I‘USO

IT 73
3+
3
2
4
5
8
9
6
7
COMPONENTI E COMANDI OPERATIVI
12
10
1
2 Interruttore a cursore
„Modalità ricerca“
3 Interruttore di
trasmissione
„Modalità trasmissione“
4 Indicatore di direzione
5 Indicatore di distanza
6 Autonomia batteria
7 Numero di travolti
8 Tasto marcatura
9 Altoparlante
11 Fodera di contenimento
11 RECCO Reflector Inside
1 Interruttore ON/O
+ vano batterie
10 Dispositivo di sicurezza
di bloccaggio
11

74 IT
3+REGISTRAZIONE / INFO
ESTENSIONE DELLA GARANZIA
Registrate il vostro 3+ su:
www.ortovox.com/registration
La garanzia sarà prorogata da
2 a 5 anni a decorrere dalla data
di acquisto.
I localizzatori a.r.t.va sono realizzati
per aiutare al ritrovamento veloce di
un travolto in incidente di valanga.
Le escursioni in aree a rischio di va-
langa devono essere attentamente
programmate ed eettuate in com-
pagnia di persone preparate e res-
ponsabili. Il corretto utilizzo di un
localizzatore a.r.t.va richiede un appro-
priato e continuo addestramento.
ORTOVOX raccomanda vivamente
l‘attenta lettura del manuale
d‘istruzione d‘uso del dispositivo.
E‘ inoltre fondamentale avere semp-
re con sé pala e sonda durante
l‘attività fuori pista o in aree potenzi-
almente a rischio valanghivo
ed evitare escursioni solitarie.
Abituatevi a programmare le vos-
tre attività fuori pista secondo le
indicazioni del bollettino valanghe
dell‘area, disponibile in:
www.ortovox.com
Prima di intraprendere un‘escur-
sione dovete accertarvi che tutti
i localizzatori a.r.t.va. funzionino
correttamente con batterie di
alimentazione sucientemente
cariche.
3+ soddisfa i più severi standard di
sicurezza con grande facilità d‘uso!
Se interessati possiamo informarvi regolarmente
su novità e miglioramenti riguardanti il vostro 3+.
Questo servizio vi permetterà di avere il vostro
a.r.t.va sempre aggiornato ed eciente. Informazi-
oni su aggiornamenti software sono disponibili in:
www.ortovox.com/update

IT 75
3+ISTRUZIONI
11
L’apparecchio 3+ si porta nella pratica custodia
protettiva (11) con il display lontano dal corpo e
deve essere indossato sotto almeno uno strato di
vestiario.
In caso di temperature più elevate, il localiz-
zatore 3+ può essere indossato anche
nella tasca dei pantaloni con chiusura lampo
(non in una tasca cucita).
COME INDOSSARLO
AVVISO IMPORTANTE
I portatori di pacemaker devono posizionare l‘a.r.t.va 3+
sul lato destro del corpo. Prestare la massima attenzione alle
indicazioni provenienti dal produttore del pacemaker!
In MODALITÀ DI TRAS-
MISSIONE non devono
essere attivi, nelle imme-
diate vicinanze (entro
un raggio di alcuni centimetri)
dispositivi elettronici (apparecchi
radio, telefoni cellulari, altri a.r.t.va)
o presenti altri oggetti metallici.
In MODALITÀ DI RICERCA i disposi-
tivi elettronici presenti nell‘area
devono essere spenti o tenuti ad
una distanza di almeno 50 cm.
Interferenze possono essere causa-
te anche da temporali, impianti di
risalita e cavi elettrici.
EVITARE INTERFERENZE

76 IT
3+
1
1
10
ACCENSIONE
Ruotare in senso antiorario l‘interruttore
ON/OFF (1). Il cursore di sicurezza si innesta
in posizione „I“ ed evita lo spegnimento
accidentale del dispositivo.
SPEGNIMENTO
Spostare il cursore di sicurezza (10)
e ruotare l‘interruttore ON/OFF (1) in
senso orario e portarlo in posizione „O”.
MESSA IN SERVIZIO
ISTRUZIONI
Dopo aver acceso il 3+, compare il numero
di serie a 10 cifre.
L‘operazione di auto-test automatico inizia
con il controllo del display.
Vengono quindi controllati in sequenza: tras-
mettitore, ricevitore, Smart Antenna e sensori.
La capacità di carica residua della batteria viene
poi espressa in % (es. 99)
Ulteriori informazioni sulla batteria a pag. 86.
Appare infine sullo schermo, a conclusione
dell‘autotest, la versione del software installato
(ad es. „2.0“).
AUTO-TEST TRASMISSIONE (apparecchio in modalità trasmissione)

IT 77
3+
Dopo l‘auto-test, sul display per 20
secondi viene visualizzata la funzionalità
della Smart Antenna.
Se posizionato orizzontalmente
3+ trasmette con antenna X.
Se posizionato verticalmente
3+ trasmette con‘antenna Y.
SMART ANTENNA
TRASMISSIONE
Con esito positivo di auto-test, l‘a.r.t.va 3+
inizia automaticamente a trasmettere.
Le spie intermittenti sul display segnalano
il funzionamento in trasmissione.
L‘icona ragurante la batteria indica la
capacità di carica residua.
X
Y
Z
ISTRUZIONI

3+
78 IT
3
2
ERRORE OPERATIVO
ISTRUZIONI
Se dall‘auto-test emerge un errore operativo
o difetto, sul display appare l‘indicazione „EE“.
Il segnale può apparire qualora nelle immediate
vicinanze si trovasse un altro a.r.t.va. trasmitten-
te, un telefono cellulare, un dispositivo wireless,
oggetti metallici di grandi dimensioni o intensi
campi magnetici.
Qualora venisse evidenziato il segnale di errore
si consiglia di ripetere l‘operazione in ambiente
aperto privo di interferenze.
E‘ importante prestare la massima attenzione ai dispositivi trasmit-
tenti nelle immediate vicinanze. Tutte le fonti di interferenza (telefoni
cellulari, apparecchi radio ecc.) vanno spente o allontanate.
In caso di persistenza di segnale di errore, spedire l’apparecchio
al centro assistenza ORTOVOX. Per maggiori informazioni su questo
servzio vedi pag. 87.
Con il Partner Check (controllo di gruppo) viene
controllato il segnale trasmittente dei localizza-
tori a.r.t.va. degli altri partecipanti.
• Prima di accendere il 3+, inserire la modalità
Ricerca spostando lateralmente e contempora-
neamente entrambi gli interruttori a cursore
(2). Apparirà l‘interruttore di trasmissione (3).
CONTROLLO DI GRUPPO

3+
IT 79
1
8
ISTRUZIONI
• Procedere all’accensione del localizzatore
a.r.t.va 3+. Ruotare in senso antiorario
l‘interruttore ON/OFF (1). L‘auto-test inizia.
• Durante l‘auto-test tenere premuto il tasto di
marcatura (8) fino alla comparsa delle lettere
„PC“. Il localizzatore a.r.t.va. si trova ora in
funzione Partner Check senza mantenere
la modalità trasmittente del segnale.
• Si può verificare un solo segnale trasmittente
per volta. Durante il Partner Check, la distanza
minima dall‘a.r.t.va da verificare deve essere
di almeno 1 m e la distanza rispetto al
trasmettitore successivo di almeno 5 m.
• Il controllo prevede la verifica della frequenza
di trasmissione, la durata dell‘impulso
e del periodo. „EO“ significa corretta
funzionalità del segnale
analizzato.
• Gli avvisi di errore o difetti dei trasmettitori
verificati vengono visualizzati con „EE“.
• Per concludere il Partner Check, premere
l‘interruttore di trasmissione (3) in modalità
Trasmissione o premere il tasto di marcatura
(8) in modalità Ricerca.

80 IT
3+ISTRUZIONI
< 20 m
< 40 m
X
Spostare contemporaneamente verso
l‘esterno i due INTERRUTTORI A CURSORE (2).
L‘INTERRUTTORE DI TRASMISSIONE (3)
fuoriesce.
Lo scenario di ricerca viene rappresentato
automaticamente sul display.
RICERCA - LOCALIZZAZIONE - RECUPERO
2
3
PHOTO Klaus Fengler
RICERCA DEL SEGNALE
Percorrere la superficie della valan-
ga durante la ricerca del segnale
secondo le seguenti direttive.
Con 3+, la larghezza del corridoio
di ricerca non deve superare i 40 m
(corrisponde a 40-50 passi). La
distanza rispetto al bordo della
valanga deve essere inferiore a 20 m.
Nel contempo, prestare attenzione
alla presenza di eventuali reperti-
oggetti, o persone semitravolte.
PUNTO DI SCOMPARSA
DEL TRAVOLTO.
Qualora si identificasse il punto di
scomparsa del travolto, l‘operazione
di ricerca del primo segnale inzie-
rebbe da quel punto identificando il
cono di flusso della valanga
Questo procedura .permetterebbe
un notevole risparmio di tempo.

IT 81
3+
< 40 m < 40 m
< 20 m
ISTRUZIONI
4
5
Segnali
identificati
(1)
RICERCA SOMMARIA
L‘apparecchio 3+ durante la ricerca
sommaria deve essere utilizzato in
posizione orizzontale!
Alla distanza di ca. 40 m dal travolto,
l‘indicatore di direzione (4) e di distanza
(5) conducono il ricercatore all‘obiettivo.
L‘indicatore di distanza (5) conferma l‘avvicinamento
quando i numeri sul display si riducono.
INTUITIVI SEGNALI
ACUSTICI DI RICERCA
A ricezione del segnale, procedere
con rapidità nella ricerca. L‘intuitivo
segnale acustico conferma la corretta
direzione.
A 10 metri dal travolto procedere
più lentamente e con precisione.
La variazione del tono acustico vi
aiuterà in questa fase.
PHOTO Klaus Fengler
PIÙ SOCCORRITORI
I soccorritori percorrono il settore di ricerca in parallelo.
La distanza tra i singoli soccorritori con 3+ non deve superare i 40 m.
X
Y
Z
Ricerca di precisione: CONTATTO TERRENO
A ricezione del segnale: RAPIDAMENTE
Entro 10 m: LENTAMENTE

82 IT
3+
T
5
5
9
ISTRUZIONI
RICERCA DI PRECISIONE E
INDICAZIONE DI TENDENZA
La ricerca di precisione comincia autom-
aticamente a 2,5 m di distanza. L‘indicatore
di direzione si spegne.
Più vicini ci si trova al travolto, minore è la
distanza che appare sul display (5) e più
rapida è la sequenza degli impulsi acustici (9).
L‘indicatore di tendenza (T) illustra la ricerca di
precisione in modo semplice, veloce e preciso.
Se il soccorritore si allontana dal travolto,
l‘indicatore di tendenza (T) rimpicciolisce e
l‘indicatore di distanza (5) diminuisce di nuovo
la frequenza degli impulsi.
PHOTO Klaus Fengler
Nella ricerca di precisione,
determinare la distanza
minima raggiunta.
Muovere l‘a.r.t.va. secondo lo
schema „a croce“ (linea retta
avanti-indietro, a 90° dx e sx).
In questa fase non ruotare il
3+, mantenere sempre lo
stesso asse.
La distanza minore visualiz-
zata sul display corrisponde
alla profondità del travolto.

IT 83
3+
7
ISTRUZIONI
PHOTO Klaus Fengler
RICERCA DI PIÙ PERSONE TRAVOLTE
Con 3+ è possibile gestire un intervento di
autosoccorso con più persone travolte.
Il numero di travolti appare sul display
nell‘indicatore Seppellimenti multipli (7).
MARCATURA
L‘ analisi del segnale adottata da 3+ permette
al soccorritore di dirigersi sul travolto succes-
sivo. Dopo aver localizzato il primo travolto, è
possibile escludere il segnale mediante il
tasto di marcatura (8).
Il travolto viene contrassegnato e „marcato“
in modo adabile.La ricerca della vittima
successiva può procedere immediatamente.
Un segnale trasmittente evidenziato in
bianco su sfondo nero (7) identifica il travolto
localizzato.
Nel caso in cui vengano rilevati 4 o più
trasmettitori, il simbolo „4+“ appare sullo
schermo.
La „marcatura“ dei trasmettitori può essere
disattivata in modo rapido e semplice.
Portare brevemente il dispositivo 3+ in moda-
lità Trasmissione, premendo l‘interruttore di
trasmissione (3). Tornare poi immediatamente
alla modalità Ricerca, spostando contempora-
neamente verso l‘esterno i due interruttori
a cursore (2).
2
3
3
7
8

84 IT
3+ISTRUZIONI
PHOTO Klaus Fengler
LOCALIZZAZIONE (sondaggio)
Contrassegnare il punto di minor
distanza rilevata (a croce con
bastoncini o con la pala).
Per stabilire con esattezza la
localizzazione, inserire la sonda
nel reticolo indicato di 25 cm.
Inserire la sonda a 90° rispetto
alla superficie. Una chiara riduzione
della profondità di penetrazione
è prova di ritrovamento.
La sonda deve rimanere infissa
come punto di riferimento durante
lo scavo.
SCAVO
Rilevare dalla sonda la profondità di
seppellimento (1). Spostarsi a valle
con distanza pari alla profondità del
travolto. Iniziare lo scavo secondo lo
schema a V suggerito.
In caso di più soccorritori, chi spala
al vertice (dello schema a V) deve
„incidere“ il manto nevoso mentre i
soccorritori ai lati devono sgomber-
are l‘area di scavo. E‘ importante
individuare e liberare velocemente
le vie respiratorie del travolto.
NOTA IMPORTANTE Le pale con funzione di „sgombero“
permettono una maggior ecacia di scavo.
25 cm
1

IT 85
3+ISTRUZIONI
SOVRAPPOSIZIONE DI SEGNALI
I segnali trasmittenti ricevuti da 3+
vengono attentamente misurati e
analizzati.
In caso di ricevimento di più segnali,
può succedere che questi tras-
mettano contemporaneamente
creando una sovrapposizione.
I segnali sono così „coperti“ e non
più facilmente distinguibili.. Nei casi
più sfavorevoli, la sovrapposizione
può protrarsi per diversi secondi.
Tale situazione viene rappresentata
sul display senza freccia direzionale
(ad es. „44“ e 3 segnali).
Occorre attendere la conclusione
della sovrapposizione prima di
proseguire nella ricerca.
PHOTO Klaus Fengler
120 Sec
COMMUTAZIONE AUTOMATICA IN TRASMISSIONE
In caso di valanga secondaria e di travolgi-
mento del soccorritore stesso (apparec-
chio in modalità Ricerca), il 3+, dopo
2 minuti di immobilità, si commuta auto-
maticamente in modalità Trasmissione.
Questo passaggio viene anticipato da un
segnale acustico di 10 secondi.
Questa funzione di sicurezza permette
al soccorritore (eventualmente travolto)
di essere localizzato.

86 IT
3+
1
10
ISTRUZIONI
ORTOVOX consiglia di provvedere alla sostituzione delle
batterie con capacità residua inferiore al 50%.
SOSTITUZIONE DELLA BATTERIA (con apparecchio spento)
Spostare l‘interruttore di sblocco (10)
e girare in senso orario l‘interruttore
ON/OFF (1) tenendolo premuto.
Estrarre il vano batteria (1) dal dispositivo 3+ e inserire
una nuova batteria (1,5 V, alcalina, AA, stilo, LR 6).
Durante la sostituzione della batteria, prestare attenzione al corretto
orientamento delle polarità. Inserire la batteria dal polo +.
Durante la pausa estiva, la batteria deve essere rimossa dal 3+.
La garanzia ORTOX sul dispositivo decade in caso di fuoriuscita
del liquido delle batterie. LE BATTERIE SCARICHE RAPPRESENTANO UN
GRAVE PERICOLO PER L’INCOLUMITÀ!
BATTERIA
BATTERIE RICARICABILI
Non utilizzare mai batterie ricaricabili (ad es. batterie NiCd,
batterie agli ioni di litio ecc.).
Queste batterie presentano una tensione di funzionamento
notevolmente più bassa e forniscono una portata più ridotta
oltre a una durata limitata. Inoltre le batterie difettose non sono
facilmente riconoscibili. Dopo la ricarica presentano la massima
tensione di funzionamento, per poi scaricarsi rapidamente in un
breve intervallo di tempo (PERICOLO PER LA SICUREZZA)!

IT 87
3+SERVIZIO / GARANZIA
Il localizzatore a.r.t.va. 3+ è un
dispositivo di salvataggio. Se
perfettamente funzionante, può
salvare vite umane.
I componenti elettronici possono
subire guasti, consigliamo pertanto
di inviare l‘apparecchio al centro
servizi, per un attento controllo
rispettando i tempi suggeriti sul
sigillo di collaudo.
Ad es. il numero „2018“, posto sul
sigillo del vano batterie, indica che
il controllo dell‘apparecchio deve
essere eseguito nel 2018.
Con il numero „1.057“ si identifica,
ad es. il lotto di produzione
dell‘apparecchio 3+.
Rivolgetevi al centro controllo
territoriale durante i mesi estivi
per avere il vostro apparecchio
controllato ed eciente all‘inizio
della stagione invernale.
Per servzio di controllo o riparazio-
ne vi invitiamo a spedire il vostro
3+ CON SERVICE CARD COMPILATA
direttamente al centro assistenza.
Vedi a pag. 120.
A presentazione di prova d‘acquisto
da rivenditore, concediamo una
garanzia ORTOVOX di 2 anni dalla
data di acquisto.
Alla registrazione del vostro 3+ su:
www.ortovox.com/registration
concediamo un‘estensione della
garanzia di altri 3 anni. Dopo la regis-
trazione online, il periodo comples-
sivo di garanzia è di 5 anni.
Durante il periodo di garanzia
ORTOVOX, i componenti difettosi
vengono riparati gratuitamente,
in alternativa il localizzatore a.r.t.va
viene sostituito con un dispositivo
equivalente.
Fanno eccezione i danni causati da
uso improprio o da normale usura.
Le batterie non sono comprese
nella garanzia.
Si esclude espressamente ogni
altra garanzia in caso di danni con-
seguenti. Le prestazioni eseguite in
garanzia non comportano proroga
alcuna dell‘obbligo di garanzia,
e tantomeno danno inizio ad un
nuovo periodo di garanzia.
Per gli indirizzi dell‘assistenza,
si veda pag. 116.
Ü
B
E
R
P
R
Ü
F
U
N
G
2018
1.057
BATCH-NO.
C
H
E
C
K

88 IT
3+DATI TECNICI
DENOMINAZIONE ORTOVOX 3+
FUNZIONAMENTO digitale
CUSTODIA ergonomica, impermeabile, resistente agli urti
DIMENSIONI 119 x 71 x 25 mm
FREQUENZA 457 kHz
3+ riceve segnali trasmittenti da qualsiasi
a.r.t.va conforme agli standard di normativa
(EN 300 718) senza limitazioni.
BACK UP Reflector inside
Grazie al riflettore RECCO del 3+ è più facile
essere trovati. 3+ non è però in grado di
cercare i riflettori nascosti nei capi di vestia-
rio e negli scarponi da sci.
PORTATA IN
RICEZIONE DIGITALE
40 m
LARGHEZZA DEL
CORRIDOIO DI RICERCA
fino a 40 m
ESCURSIONE
TERMICA DA
-20° C to +45° C
Qualora l‘apparecchio si bagnasse, NON
ASCIUGARLO MAI CON ARIA CALDA! L‘aria
calda potrebbe causare danni permanenti
anche dopo il rareddamento.
0682

IT 89
3+DICHIARAZIONE DI CONFORMITÀ CE
ALIMENTAZIONE 1 batteria alcalina AA 1,5 V LR 06
AUTONOMIA In trasmissione: ca. 250 ore
In ricezione: ca. 15 ore
PESO 3+ ca. 189 g incl. batteria
Custodia di arancazione ca. 98 g
Con la presente Ortovox Sportartikel GmbH dichiara che questo ORTOVOX
3+ è conforme ai requisiti essenziali ed alle altre disposizioni pertinenti
stabilite dalla direttiva 2014/53/EU.
La dichiarazione di conformità si può trovare all’indirizzo:
http://www.ortovox.com/certification
La massima potenza di trasmissione irradiata corrisponde a un’intensità di
campo magnetico di 2,23 A/m ad una distanza di 10 m.
PRODUTTORE: ORTOVOX Sportartikel GmbH
Rotwandweg 5
82024 Taufkirchen
Germany

3+
90 IT
INDICE
PHOTO Hansi Heckmair
A
Accensione 79
Auto-test 76, 77, 78, 79
Avviso 75
B
Batteria 72, 73, 76, 77, 86, 88
C
Commutazione automatica in
trasmissione 85
D
Dati tecnici 88
E
Errore operativo 78
Estensione della garanzia 74
F
Fonti di interferenza 78
Frequenza 79, 82
G
Garanzia 74, 86, 87
I
Indicatore di direzione 73
Indicatore di distanza 81, 82
Indicatore di tendenza 82
Interruttore ON/OFF 76, 79
L
Localizzazione 72, 80, 84
M
Marcatura 83
N
Numero di travolti 83
P
Profondità di seppellimento 84
R
Ricerca 78, 79, 80, 81, 82, 83, 85, 89
Ricerca del segnale 80
Ricerca di precisione 82
Ricerca sommaria 81
S
Scavo 84
Servizio 74, 76, 87
Smart Antenna 70, 76, 77
Sondaggio 84
Sovrapposizione di segnali 85
Spegnimento 76
T
Trasmissione 70, 72, 73, 75,
76, 77, 78, 79, 80, 83, 85, 88
V
Valanga secondaria 72, 85
Vano batterie 73, 87

3+
PHOTO Hansi Heckmair

92 ES
3+SMART-ANTENNA-TECHNOLOGY
LOS APARATOS ORTOVOX POSEEN
3 ANTENAS (X, Y, Z) A BORDO
En la búsqueda se utilizan las 3 antenas. Las antenas x e y sirven
para indicar la distancia y dirección de marcha. La antena z se utiliza
exclusivamente para la búsqueda detallada.
Los aparatos ORTOVOX S1+, 3+ y ZOOM+ son los únicos aparatos
del mercado que pueden analizar la posición de las antenas y enviar
señales a TRAVÉS DE LA ANTENA X Y DE LA ANTENA Y con
tecnología de Smart Antenna (antena inteligente).
De esta manera, el alcance de la víctima aumenta muchísimo (HASTA
EL DOBLE) y se hace más fácil encontrarla (MEJOR VISIBILIDAD)
POSICIÓN VERTICAL SIN SMART-ANTENNA
= PEOR VISIBILIDAD
Una antena de transmisión orientada en forma vertical (antena x) solo
emitirá verticalmente y provocará una visibilidad deficiente por la míni-
ma cobertura de superficie (alcance) en el área de búsqueda. Por ello,
es DIFÍCIL encontrar un TRANSMISOR VERTICAL SIN Smart Antenna.
POSICIÓN VERTICAL CON SMART-ANTENNA
= MUY BUENA VISIBILIDAD
La tecnología de Smart Antenna PATENTADA soluciona el problema
de la visibilidad deficiente de la posición vertical. El sensor de posición
analiza la posición del aparato en la avalancha y cambia AUTOMÁTICA-
MENTE A LA ANTENA Y. De esta manera, la antena vuelve a emitir
en forma horizontal y aumenta la cobertura de superficie aproximada-
mente al alcance máximo.

ES 93
3+
ESPAÑOL
MANUAL 26 - 47
Avalanche Transceiver
ENGLISH
MODE D‘EMPLOI 48 - 69
DVA
FRANÇAIS
ISTRUZIONI PER I‘USO 70 - 91
Localizzatore a.r.t.va.
ITALIANO
INSTRUCCIONES DE USO 92 - 113
Aparato de búsqueda de victimas de avalanchas
GEBRAUCHSANLEITUNG 5 - 25
Lawinen-Verschütteten-Suchgerät
DEUTSCH
116 - 120
SERVICE

94 ES
3+
¡CON EL 3+ DOMINARÁ LA SITUACIÓN!
La TECNOLOGÍA DE LA SMART ANTENNA patenta-
da con el reconocimiento inteligente del lugar
conmuta automáticamente a la mejor antena
de ransmisión. LO ENCONTRARÁN CON MAYOR
FACILIDAD. Incluso en cuanto a la búsqueda, no
faltamos a nuestro compromiso. El 3+ está equipa-
do con todas las funciones de un aparato digital
de 3 antenas moderno. La PANTALLA EN TIEMPO
REAL ILUMINADA, informa sobre la dirección de
marcha, la distancia y la cantidad de víctimas.
La PRESENTACIÓN CIRCULAR PATENTADA, com-
binada con la ACÚSTICA DE BÚSQUEDA intuitiva,
no permite tener dudas en la búsqueda detallada.
Una vez localizadas, las víctimas pueden eliminar-
se con la FUNCIÓN DE MARCADO. La CONMUTACI-
ÓN AUTOMÁTICA PARA NUEVAS AVALANCHAS
basada en sensor de movimiento, brinda mayor
seguridad. Incluso hemos pensado en el futuro:
el 3+ se puede ACTUALIZAR y protege el medio
ambiente utilizando una sola pila.
Encontrará información útil acerca de la ayuda
a compañeros, de la ayuda para evitar accidentes
y acerca de los productos de seguridad actuales
de ORTOVOX en: www.ortovox.com
Por correo electrónico nos podrá contactar en:
ortovox@ortovox.com
¡ORTOVOX le desea recorridos bonitos y seguros!
ESPAÑOL
INSTRUCCIONES DE USO
RECCO
REFLECTOR
INSIDE!
¡Para la búsqueda de
víctimas realizada
por rescatistas pro-
fesionales! La tecno-
logía está disponible
en todo el mundo, en
más de 700 regiones
de esquí y equipos
de rescate.
Proveedor
oficial

ES 95
3+
3
2
4
5
8
9
6
7
ELEMENTOS DE CONTROL
10
1
2 Interruptor deslizante
„modo búsqueda“
3 Interruptor de transmisión
„modo transmisión“
4 Indicador de dirección
5 Indicador de distancia
6 Capacidad de la pila
7 Cantidad de víctimas
8 Tecla de marcado
9 Altavoz
11 Funda
12 RECCO Reflector Inside
1 Interruptor de ENC./APAG.
+ compartimento de la pila
10 Interruptor de desbloqueo
12
11

96 ES
3+REGISTRARSE / INFORMACIÓN
¡Los A.R.V.A. de ORTOVOX ayudan
al compañero en caso de producirse
una avalancha con víctimas!
Mantenerse en un área insegura
es potencialmente peligroso y solo
deben realizarlo personas experi-
mentadas. El uso efectivo de un
A.R.V.A. requiere de un entrenamien-
to adecuado y de práctica continua.
ORTOVOX recomienda expresamente
leer con detenimiento las instruccio-
nes de uso del A.R.V.A.
Lleve siempre una pala y una sonda
si va a estar fuera de la pista, en un
lugar no seguro y nunca salga solo
a realizar los recorridos.
Planee sus actividades fuera de
pista con el informe de situación de
avalanchas que se encuentra en:
www.ortovox.com
Antes de practicar en un área con
riesgo de avalancha deberá ase-
gurarse de que todos los A.R.V.A.
funcionen correctamente y que
todas las pilas se encuentran en
buen estado.
¡El 3+ cumple con los máximos
requerimientos en seguridad y
seduce con su facilidad de manejo!
EXTENSIÓN DE LA GARANTÍA
Registre su 3+ en:
www.ortovox.com/registration
De esta manera, el periodo de
garantía se extiende de 2 a 5 años
a partir de la fecha de compra.
Si lo desea, podemos informarle regularmente
sobre actualizaciones y novedades del 3+.
Así, usted y su aparato siempre estarán
actualizados. Puede encontrar más información
sobre actualización del software en:
www.ortovox.com/update

ES 97
3+
11
INSTRUCCIONES
FORMA DE LLEVAR
El 3+ se lleva en el cuerpo, en la funda de trans-
porte de confort (11) suministrada con la pantalla
mirando al lado opuesto del cuerpo, y siempre
debería estar cubierto por al menos una capa de
ropa.
Con temperaturas más cálidas, el 3+
también se puede llevar en un bolsillo del
pantalón asegurado con cremallera (no en
bolsillos cosidos).
INFORMACIÓN IMPORTANTE
Las personas que tienen marcapasos deben llevar el 3+ sobre el
lado derecho del cuerpo. ¡Respetar estrictamente las instruccio-
nes del fabricante del marcapasos!
En el MODO TRANS-
MISIÓN no debe haber
ningún aparato electróni-
co (aparatos con transmi-
sión inalámbrica, teléfonos móviles,
otros A.R.V.A., etc.) ni otros objetos
metálicos muy cerca (pocos
centímetros).
En el MODO BÚSQUEDA, los
aparatos electrónicos deben
estar apagados o al menos a
una distancia mínima de 50 cm.
No obstante, pueden surgir inter-
ferencias causadas por tormentas
e instalaciones de electricidad
y de carga vertical.
EVITAR INTERFERENCIAS

98 ES
3+
1
1
10
ENCENDIDO
Girar el interruptor ENC./APAG. (1) en el sentido
contrario a las agujas del reloj. El interruptor
giratorio se encaja en la posición „I“ y queda
protegido contra un apagado no deseado.
APAGADO
Soltar el interruptor de desbloqueo (10) y
girar el interruptor ENC./APAG. (1) en el sentido
de las agujas del reloj hasta la posición „O“.
PUESTA EN MARCHA
INSTRUCCIONES
Una vez encendido el 3+ , aparecerá un
número de serie de 10 dígitos.
La auto-prueba automática comienza con
la comprobación de la pantalla.
Luego se comprueban el transmisor, el receptor,
la Smart Antenna y los sensores.
Por otra parte, el nivel de carga de la pila se
muestra en % (por ej. „99“). Para obtener mayor
información sobre la pila consulte la pág. 108
A continuación sigue la versión del software
instalada (por ej. „2.0“)
AUTO-PRUEBA Y MODO DE TRANSMISIÓN
(aparato en modo de transmisión)

ES 99
3+
Después de la auto-prueba, en la pantalla
aparece el aviso de la función de Smart
Antenna durante 20 segundos.
Con el aparato en posición
horizontal, el 3+ transmite en la antena X.
Con el aparato en posición
vertical, el 3+ transmite en la antena Y.
SMART ANTENNA
EMITIR
Despues de una auto-prueba exitosa, el 3+
transmite y los elementos de transmisión
parpadean en la pantalla.
El símbolo de la pila muestra el nivel de
carga de la pila.
X
Y
Z
INSTRUCCIONES

3+
100 ES
3
2
FALLO
INSTRUCCIONES
Si durante la auto-prueba se detecta un fallo
de funcionamiento o un defecto, en la pantalla
se muestra el indicador „EE“.
Se puede activar una advertencia en cercanía
inmediata de un A.R.V.A. que también esté
emitiendo señales, un teléfono móvil, un aparato
con transmisión inalámbrica, grandes piezas
de metal o campos magnéticos muy potentes.
Si en la auto-prueba se muestra el fallo de funcionamiento, realizar
nuevamente esta prueba al aire libre en un entorno sin interferencias.
En este caso, observar que no haya otros transmisores en los alrededores.
Apagar o alejar todas las fuentes de interferencias (teléfonos móviles,
aparatos de transmisión inalámbrica, etc.).
Si se muestra nuevamente esta advertencia, se debe enviar el aparato
al servicio ORTOVOX. Para obtener mayor información sobre el servicio
técnico consulte la pág. 109
Con el control del compañero se comprueba
la señal de transmisión de los A.R.V.A. de los
demás participantes.
• Antes de encender el 3+, colocarlo en modo de
búsqueda. Para ello, tirar hacia afuera de ambos
interruptores deslizantes (2) simultáneamente.
Aparece el interruptor de transmisión (3).
CONTROL DEL COMPAÑERO

3+
ES 101
1
8
INSTRUCCIONES
• Encender ahora el 3+. Para ello, girar el
interruptor ENC./APAG. (1) en el sentido
contrario a las agujas del reloj. Comienza
la auto-prueba.
• Durante la auto-prueba, mantener presionada
la tecla de marcado (8) hasta que aparezca
„PC“. El 3+ se encuentra ahora en la función de
control del compañero aunque no haya señal
de transmisión disponible.
• Solo se puede comprobar 1 señal de trans-
misión. La distancia durante el control del
compañero debe ser de al menos 1 m y de
al menos 5 m con el próximo transmisor.
• El control verifica la frecuencia de transmisión;
la duración de la transmisión y del periodo
„EO“ significa que la señal de transmisión
comprobada es correcta.
• Las advertencias y defectos del transmisor
comprobado se indican con „EE“.
• El control del compañero se finaliza presionan-
do el interruptor de transmisión (3) en el modo
de transmisión o presionando la tecla de
marcado (8) en el modo de búsqueda (8).

102 ES
3+INSTRUCCIONES
< 20 m
< 40 m
X
BÚSQUEDA DE SEÑAL
Buscar el cono de avalancha
en la forma mostrada durante
la búsqueda de señal.
Con el 3+ no se debe superar el
ancho de patrulla de búsqueda de
40 m (equivalente a 40-50 pasos).
La distancia hasta el borde de la
avalancha de ser menor de 20 m.
A la vez, buscar con la vista
objetos o personas parcialmente
enterradas.
Presionar ambos INTERRUPTORES DES-
LIZANTES (2) simultáneamente hacia afuera.
El INTERRUPTOR DE TRANSMISIÓN (3) salta.
La situación de búsqueda se representa
automáticamente en la pantalla.
BUSCAR - ENCONTRAR - RESCATAR
2
3
PHOTO Klaus Fengler
PUNTO DE DESAPARICIÓN
DE LA VÍCTIMA CONOCIDO
Si el punto de desaparición es
conocido o hay objetos a la vista,
el área de búsqueda se limita.
Este estará abajo, en la dirección
de avance de la avalancha.
De esta manera se puede ahorrar
tiempo muy valioso.

ES 103
3+
< 40 m < 40 m
< 20 m
4
5
Cantidad de
señales (1)
INSTRUCCIONES
BÚSQUEDA AMPLIA
¡Utilizar el 3+ en posición horizontal
durante la búsqueda amplia!
A partir de aprox. 40 m de distancia con
la víctima, el indicador de dirección (4)
y el de distancia (5) lo guiarán a lo largo
de la línea de fuerza hasta el objetivo.
El indicador de distancia (5) se vuelve
más pequeño confirmando el acercamiento.
ACÚSTICA DE
BÚSQUEDA INTUITIVA
Después de la primera señal, mué-
vete deprisa durante la búsqueda.
El ritmo en el sonido durante la
búsqueda intuitiva, confirma la proxi-
midad a la víctima.
A 10 mts de distancia a la víctima,
debes moverte más lento y ser más
preciso en la búsqueda. Un cambio
en el sonido, te ayudará.
VARIOS BUSCADORES
Los buscadores transitan el área de búsqueda en forma paralela. La dis-
tancia entre los distintos buscadores con 3+ debe ser menor de 40 m.
X
Y
Z
Después de la primera señal: RÁPIDO
A partir de 10 m : LENTO
Búsqueda detallada: PRECISA
PHOTO Klaus Fengler

104 ES
3+
T
5
5
9
INSTRUCCIONES
BÚSQUEDA DETALLADA E
INDICADOR DE TENDENCIA
La búsqueda detallada comienza auto-
máticamente a una distancia de 2,5 m.
El indicador de dirección se apaga.
Mientras más cerca esté de la víctima,
menor será la distancia que se indica en
la pantalla (7) y más rápido se oirá el ritmo
del sonido durante la búsqueda intuitiva.
El indicador de tendencia (T) organiza
la búsqueda detallada en forma sencilla,
rápida y precisa.
Si te alejas de la víctima, el indicador de
tendencia (T) será menor y el de distancia
(5), mayor.
PHOTO Klaus Fengler
Durante la búsqueda
detallada, determinar la
distancia mínima.
Mover el aparato formando
una cruz, 1 vez hacia ade-
lante y hacia atrás y 1 vez
hacia la izquierda y hacia
la derecha.
Durante el movimiento, ¡no
girar el 3+!
La menor distancia corres-
ponde a la profundidad de
enterramiento.

ES 105
3+
7
INSTRUCCIONES
PHOTO Klaus Fengler
BÚSQUEDA EN CASO DE
MÚLTIPLES VÍCTIMAS
Con el 3+ tendrás una vista general incluso
si hay varias víctimas.
En el indicador de múltiples víctimas (7) de
la pantalla se indica la cantidad de víctimas.
MARCADO
El análisis de señal fino del 3+ te guía
hacia la próxima víctima. Una vez que se
ha localizado a la primera víctima, esta
señal se puede suprimir con la tecla de
marcado (8).
La víctima se muestra de forma segura
y rápida como marcada y puedes continuar
con la búsqueda de otras víctimas.
Una señal de transmisión marcada se
muestra en forma de símbolo blanco
sobre un fondo negro (7).
Si se reconocen 4 o más transmisores,
aparece la indicación „4+“ en la pantalla.
El marcado del transmisor puede quitarse
rápida y fácilmente.
Para ello, cambie el 3+ al modo de
transmisión presionando por un instante
el interruptor de transmisión (3). Inmediata-
mente después, vuelva al modo de búsqueda
presionando hacia afuera los interruptores
deslizantes (2) simultáneamente.
2
3
3
7
8

106 ES
3+INSTRUCCIONES
BUSQUEDA DETALLADA (SONDEO)
Marcar el punto con la medición
de distancia más pequeña (con
una cruz de bastones o una pala).
Para determinar con precisión
el lugar, sondear desde aquí la
cuadrícula de 25 cm mostrada.
Insertar la sonda profunda y
rápidamente formando un ángulo
de 90° con la superficie. Una mar-
cada disminución de la profundidad
de penetración es buena señal.
La sonda queda fijada como punto
de referencia durante el desenter-
ramiento. DESENTERRAMIENTO
Leer la profundidad de
enterramiento (1) en la
sonda. Ir cuesta abajo
este valor y comenzar
a cavar en forma de V.
Si hay varios ayudantes,
hacer cortar bloques en
la superficie para quien
está cavando. Los de atrás
cavan y quitan la nieve.
Se deben liberar las vías
respiratorias lo más
rápido posible.
PHOTO Klaus Fengler
CONSEJO Las palas con FUNCIÓN DE HAZADA
pueden ahorrar tiempo precioso.
25 cm
1

ES 107
3+INSTRUCCIONES
SUPERPOSICIÓN DE LA SEÑAL
Las señales de transmisión son
medidas y analizadas por el 3+.
Si se reciben varias señales de
transmisión y estas señales trans-
miten con exacta simultaneidad,
surge una superposición de señal.
Las señales se solapan y, técnica-
mente, no se pueden mantener
separadas. Esto puede durar varios
segundos, en el peor de los casos.
Esta superposición de señal se
representa sin la flecha de dirección
(por ej. „44“ y 3 señales).
Es necesario esperar el tiempo que
dure la superposición antes de
poder continuar con la búsqueda.
PHOTO Klaus Fengler
120 Sec
CONMUTACIÓN DE TRANSMISIÓN AUTOMÁTICA
En el caso de una nueva avalancha que lo
entierre a usted mismo (aparato en modo
de búsqueda), el 3+ cambia automáticamente
al modo de transmisión a los 2 minutos de
haber dejado de moverse. Esto se indica con
un sonido de advertencia de 10 segundos.
De esta manera, existe la posibilidad de
que (en caso de ser enterrado) también
pueda ser encontrado.

108 ES
3+
1
10
INSTRUCCIONES
ORTOVOX recomienda cambiar las pilas que tengan menos del 50%
de capacidad restante.
CAMBIO DE PILAS (el aparato debe estar apagado)
Soltar el interruptor de desbloqueo (10)
y girar el interruptor ENC./APAG. (1) en el
sentido de las agujas del reloj estando presionado.
Extraer el compartimento de la pila (1) del 3+ y colocar
una pila nueva (1.5 V, alcalina, AA, mignon, LR 6).
Al cambiar las pilas, prestar atención a que los polos positivo (+) y negativo
(-) estén correctamente orientados. La pila debe colocarse con el polo +
hacia adelante. La pila debe quitarse del 3+ durante el verano. En caso de
daños debidos a pilas derramadas, la garantía ORTOVOX pierde validez.
¡LAS PILAS GASTADAS ENTRAÑAN PELIGRO DE MUERTE!
PILA
BATERÍAS RECARGABLES
Nunca utilice baterías recargables (por ej. baterías celulares
de níquel cadmio, baterías de iones de litio, etc.).
Las baterías tienen una tensión de operación considerablemente
menor y, en consecuencia, un menor alcance y una vida útil limitada.
Además, las baterías defectuosas no se pueden reconocer
inmediatamente.
Después de la recarga muestran inicialmente la tensión de
operación completa para pronto descargarse muy rápidamente
(¡PELIGRO DE MUERTE!).

ES 109
3+SERVICIO / GARANTÍA
El 3+ es un aparato de rescate y de
su correcto funcionamiento depen-
de que se pueda salvar una vida.
Los componentes electrónicos
pueden fallar; por esta razón
recomendamos enviar el aparato
en la fecha indicada en el sello
de control, para que se lo pueda
inspeccionar en fábrica.
Por ej., el número „2018“ situado
en el sello del compartimento de
la pila le recuerda que en el año
2018 deberá realizarse la revisión
del aparato.
Con el número „1.057“ se puede
identificar el lote de producción
del 3+.
Por favor, haga uso de nuestro
servicio de control durante los
meses de verano para que su
aparato vuelva a estar en condicio-
nes al comenzar el invierno.
Para realizar la reparación o la
revisión en fábrica, envíe el 3+
directamente a nuestro servicio
técnico, INCLUYENDO LA HOJA DE
SERVICIO COMPLETADA (pág. 120).
Presentando la factura, ofrecemos
una garantía ORTOVOX de 2 años a
partir de la fecha de compra.
Registrando el 3+ en:
www.ortovox.com/registration
le ofrecemos 3 años adicionales
de garantía. Así, el periodo completo
de garantía es de 5 años una vez
realizado el registro en línea.
En el marco de la garantía ORTOVOX
se repararán gratuitamente las
piezas defectuosas o se reempla-
zará el aparato de búsqueda de
víctimas de avalancha por otro
aparato de similares características.
Se excluyen los daños producidos
por un manejo inadecuado o
por el desgaste natural.
Las pilas están excluidas de
la garantía.
Se excluye expresamente otra
garantía o en caso de daños
derivados.
Las prestaciones de garantía realiz-
adas no implican que se amplíe la
obligatoriedad de la garantía, ni dan
inicio a un nuevo plazo de garantía.
Consulte las direcciones de servicio
técnico en la pág. 116
Ü
B
E
R
P
R
Ü
F
U
N
G
2018
1.057
BATCH-NO.
C
H
E
C
K

110 ES
3+ESPECIFICACIONES TÉCNICAS
DENOMINACIÓN ORTOVOX 3+
FUNCIONAMIENTO digital
CARCASA ergonómica, resistente al agua,
resistente a los golpes
TAMAÑO 119 x 71 x 25 mm
FRECUENCIA 457 kHz
El 3+ recibe las señales de cualquier A.R.V.A.
conforme a las normas (EN 300 718) sin
limitaciones.
BACKUP Reflector inside
El reflector RECCO que incorpora el 3+
permite localizarte mejor. No obstante, el 3+
no puede buscar reflectores en la ropa o en
botas de esquí.
ALCANCE DE
RECEPCIÓN DIGITAL
40 m
ANCHO DE PATRULLA
DE BÚSQUEDA
hasta 40 m
0682

ES 111
3+DECLARACIÓN CE DE CONFORMIDAD
RANGO DE
TEMPERATURAS DE
-20° C to +45° C
Si el aparato se humedeciera, ¡NUNCA
SECARLO CON AIRE CALIENTE! Con aire
caliente el aparato sufre daños permanentes
en el funcionamiento, incluso después de
haberse enfriado.
ALIMENTACIÓN DE
ENERGÍA
1 pila alcalina AA 1.5 V LR 06
DURACIÓN DE
FUNCIONAMIENTO
Transmisión: aprox. 250 horas
Recepción: aprox. 15 horas
PESO 3+ aprox. 189 g incl. pila
Funda aprox. 98 g
Por medio de la presente Ortovox Sportartikel GmbH declara que el
ORTOVOX 3+ cumple con los requisitos esenciales y cualesquiera otras
disposiciones aplicables o exigibles de la Directiva 2014/53/EU.
La declaración de conformidad puede ser descargada desde:
http://www.ortovox.com/certification
La potencia de emisión máxima radiada corresponde a una intensidad de
campo magnético de 2,23 A/m a una distancia de 10 m.
FABRICANTE: ORTOVOX Sportartikel GmbH
Rotwandweg 5
82024 Taufkirchen
Germany

3+
112 ES
ÍNDICE ALFABÉTICO
PHOTO Leonhard Habersetzer
A
Actualización 96
Advertencia 100, 107
Apagado 98, 108
Auto-prueba 98, 99, 100, 101
B
Búsqueda 103, 104, 105, 106
Búsqueda amplia 103
Búsqueda de señal 102
Búsqueda detallada 103, 104
C
Compartimento de la pila 95, 108
Conmutación de transmisión 107
D
Desenterramiento 106
E
Encendido 98
Especificaciones técnicas 110
Extensión de la garantía 96
F
Fallo de funcionamiento 100
Frecuencia 110
G
Garantía 96, 108, 109
I
Indicador de dirección 95
Indicador de distancia 95
Indicador de múltiples víctimas 105
Indicador de tendencia 104
Interruptor ENC./APAG. 98, 101, 108
M
Marcado 105
N
Nueva avalancha 107
Número de serie 98
P
Pila 95, 98, 99, 108, 109, 110
Profundidad de enterramiento
104, 106
S
Servicio técnico 100, 109
Smart Antenna 92, 98
Sondeo 106
Superposición de señal 107
T
Transmisión 92, 95, 97, 98, 99,
100, 101, 102, 105, 107

3+
PHOTO Leonhard Habersetzer

114
3+NOTIZ / NOTE

115
3+APPUNTO / ANOTACIÓN

116
3+
AUSTRIA
ORTOVOX Vertriebs GmbH
Salzburger Siedlung 258
A - 8970 Schladming
T +43 (0) 368 72 25 51
F +43 (0) 368 72 20 88
www.ortovox.com
BENELUX
Metropolis Sprl.
Zoning industriel de
Tyberchamps | Zone A
B - 7180 Senee
T +32 (0) 64 54 05 31
M +32 (0) 475 25 00 22
F +32 (0) 64 54 05 32
BULGARIA
Odysseia IN Ltd.
20v, Stamboliiski Blvd.
BG - 1301, Sofia
T +35 (0) 929 89 05 38
F +35 (0) 929 58 32 00
www.stenata.com
CANADA
ORTOVOX CANADA LTD
4610 Bowness Road NW
CA - Calgary, Alberta T3B 0B3
T +1 (0) 403 28 38 -944
F +1 (0) 403 28 38 -446
CHILE
Chile Montaña
Bucarest 046 Local A
Providencia (esq. Gral. Holey)
CL - Santiago
T +56 (0) 22 33 40 54
F +56 (0) 23 34 62 02
www.chilemontana.cl
CZECH REPUBLIC
SUMMIT TRADE
DISTRIBUTION s.r.o.
Huslenky 438
CZ - 75602 Huslenky
T +42 (0) 604 28 72 84
blazej@summit-trade.cz
www.summit-trade.cz
DENMARK
Fritidsagenten a/s
Lejrvej 23 A
DK - 3500 Vaerloese
T +45 (0) 44 47 90 94
F +45 (0) 44 47 80 84
FINLAND
Heaven Distribution Oy
Viertolantie 2–4B
FI - 00730 Helsinki
T +358 (0) 93 46 30 07
M +358 (0) 451 29 48 96
F +358 (0) 93 88 33 13
info@heaven.fi
www.heaven.fi
SERVICE

117
3+
FRANCE
Schwan-Stabilo Outdoor
France
11 rue du Pré Faucon
PAE Les Glaisins
F-74940 Annecy
T +33 (0)4 26 78 52 60
GERMANY
ORTOVOX Service Center
Kapellenstr. 5
D-92245 Kümmersbruck-Moos
T +49 (0) 9621 76 08 04
www.ortovox.com
GREAT BRITAIN
Noble Custom Ltd
Hillside Farm
Rempstone Lane Wymeswold,
Loughborough LE12 6UE
Leicestershire
T +44 (0) 15 09 88 91 95
HUNGARY
Koszta Jozsef u. 31.
1124 Budapest, Hungary
T +36 30 9 50 11 54
F +36 1 2 09 37 15
HONGKONG
Funnsnow Ltd
FNS Ski Sport Equipment
Specialty Shop
1104 Crawford House
70 Queen‘s Road Central
Central Hongkong
T 852-28 66 78 47
F 852-28 58 12 92
info@funnsnow.com
www.funnsnow.com
ICELAND
Utilif
Hagasmari 1
IS - 201 Kopavogi
T +354 (0) 545 15 00
F +354 (0) 522 80 01
utilif@utilif.is
www.utilif.is
INDIA
MATRIX CORPORATION
Patti Natha Singh Village
Haripur-Rampur Ghat Road
Poanta Sahib - H.P. India
T +91 (0) 941 80 - 896 40
www.matrixcorpn.com
ITALY
Outback ‘97 s.r.l.
Via Baioni, 24
I - 24123 Bergamo
T +39 (0)35 36 11 03
F +39 (0)35 36 17 76
SERVICE

118
3+
JAPAN
Magic Mountain co. Itd.
2-8-5 Nobidome, Niiza City
J - Saitama 352-0011
T +81 (0) 48 480 00 -88
F +81 (0) 48 480 00 -89
KOREA
FARO International Co., Ltd.
194-46, 1-ka, Hoehyun-dong
Choong-gu
KR - Seoul 100-874
T +82 (0) 27 79 79 -77
F +82 (0) 27 79 79 -74
NEW ZEALAND
Mountain Adventure NZ Ltd
128 Antigua Street
NZ - Christchurch 8024
T +64 (0) 3 375 50 00 or
0800-55 88 88
F +64 (0) 3 327 01 77 or
0800-25 80 00
www.mountainadventure.co.nz
NORWAY
Sport Sensation as
Sofiemyrveien 10
N - 1412 Sofiemyr
T +47 (0) 22 30 02 08
F +47 (0) 66 80 23 79
eivind@dynastar.no
POLAND
Bakosport S.C.
ul. Cieplarniana 28
PL - 05077 Warszawa-Wesola
T +48 (0) 227 73 33 10
F +48 (0) 227 73 33 10
ROMANIA
Alpin Expe
Str. Mihail Kogalniceanu, Nr. 66
RO - 410068 Oradea
T +40 (0) 741 30 05 71
www.alpinexpe.ro
RUSSIA
Alpex Srednaya
Pereyaslavskaya ul. 13
Stronenie 2
RUS - 129110 Moskau
T +7 (0) 49 56 31 18 55
F +7 (0) 49 56 84 36 08
SLOVAKIA
Zakladny Tabor, s.r.o.
Minčolska 11
SK - 038 61 Vrutky
T +421 (0) 434 22 04 97
SERVICE

119
3+
SLOVENIA
Iglu Sport d.o.o.
Litostrojska 40
SLO - 1000 Ljubljana
T +386 (0) 12 41 27 60
F +386 (0) 12 41 27 57
www. iglusport.si
SPAIN
Dinamic Limite, S.L.
c/Pericles, 3 Local A
ESP - 28011 Madrid
T +34 (0)99 15 26 70 66
F +34 915 26 70 67
www.dynamiclimite.es
SWEDEN
Wenaas Sport Nordic AS
Industrivägen 1
SE - 17148 Solna
T +46 (0)181 205 -35 or
T +46 (0)841 05 15 80
F +46 (0)181 205 -36
info@wsf.se
wsf.se
SWITZERLAND
SPORTCO
Worblentalstrasse 28
CH-3063 Ittigen
T +41 (0)31 924 15 - 15
F +41 (0)31 924 15 - 10
www.sportco.ch
UKRAINE
VIS Distribution LLC
Pochayninska str. 25/49,
oce 75
UA – Kiev
T +38 (0)44 360 20 79
info@visdistribution
www.visdistribution.com
USA
ORTOVOX USA / Deuter USA
1200 South Fordham St. Suite C
Longmont, CO 80503
Phone 30 36 52 31 02
Fax 30 36 52 31 25
Visit us on ortovox.com
SERVICE

120
3+SERVICE CARD
6
2
3
5
4
1

3+
3+
Made in Germany
ortovox.com
-
 1
1
-
 2
2
-
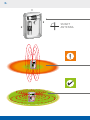 3
3
-
 4
4
-
 5
5
-
 6
6
-
 7
7
-
 8
8
-
 9
9
-
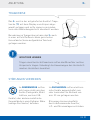 10
10
-
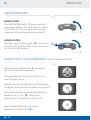 11
11
-
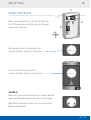 12
12
-
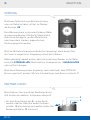 13
13
-
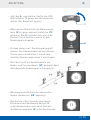 14
14
-
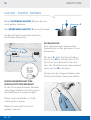 15
15
-
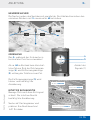 16
16
-
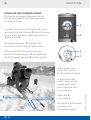 17
17
-
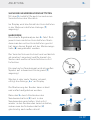 18
18
-
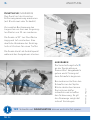 19
19
-
 20
20
-
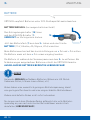 21
21
-
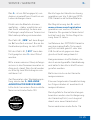 22
22
-
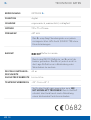 23
23
-
 24
24
-
 25
25
-
 26
26
-
 27
27
-
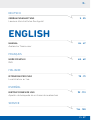 28
28
-
 29
29
-
 30
30
-
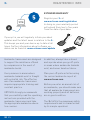 31
31
-
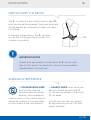 32
32
-
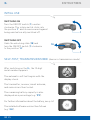 33
33
-
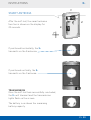 34
34
-
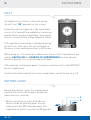 35
35
-
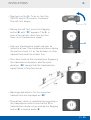 36
36
-
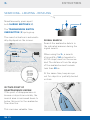 37
37
-
 38
38
-
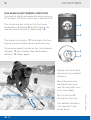 39
39
-
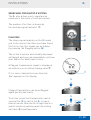 40
40
-
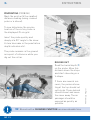 41
41
-
 42
42
-
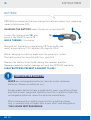 43
43
-
 44
44
-
 45
45
-
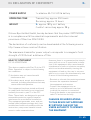 46
46
-
 47
47
-
 48
48
-
 49
49
-
 50
50
-
 51
51
-
 52
52
-
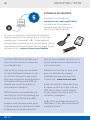 53
53
-
 54
54
-
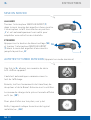 55
55
-
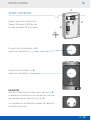 56
56
-
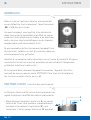 57
57
-
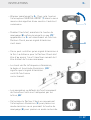 58
58
-
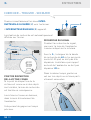 59
59
-
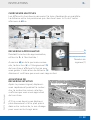 60
60
-
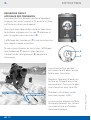 61
61
-
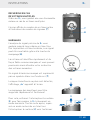 62
62
-
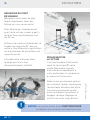 63
63
-
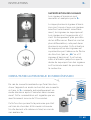 64
64
-
 65
65
-
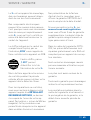 66
66
-
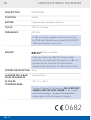 67
67
-
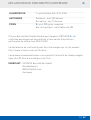 68
68
-
 69
69
-
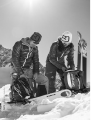 70
70
-
 71
71
-
 72
72
-
 73
73
-
 74
74
-
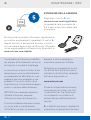 75
75
-
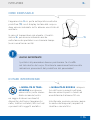 76
76
-
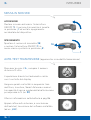 77
77
-
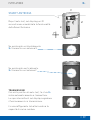 78
78
-
 79
79
-
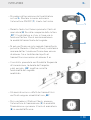 80
80
-
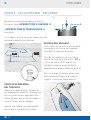 81
81
-
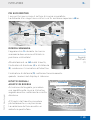 82
82
-
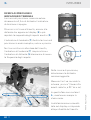 83
83
-
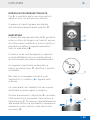 84
84
-
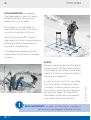 85
85
-
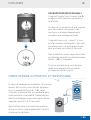 86
86
-
 87
87
-
 88
88
-
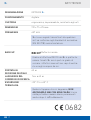 89
89
-
 90
90
-
 91
91
-
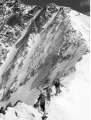 92
92
-
 93
93
-
 94
94
-
 95
95
-
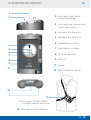 96
96
-
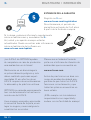 97
97
-
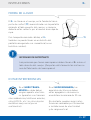 98
98
-
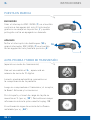 99
99
-
 100
100
-
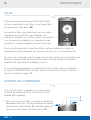 101
101
-
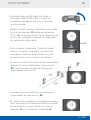 102
102
-
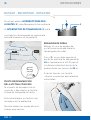 103
103
-
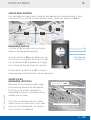 104
104
-
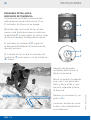 105
105
-
 106
106
-
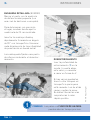 107
107
-
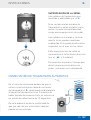 108
108
-
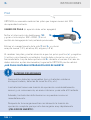 109
109
-
 110
110
-
 111
111
-
 112
112
-
 113
113
-
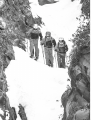 114
114
-
 115
115
-
 116
116
-
 117
117
-
 118
118
-
 119
119
-
 120
120
-
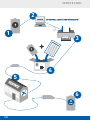 121
121
-
 122
122


En otros idiomas
- français: Ortovox 3+ Manuel utilisateur
- italiano: Ortovox 3+ Manuale utente
- English: Ortovox 3+ User manual
- Deutsch: Ortovox 3+ Benutzerhandbuch
Documentos relacionados
Otros documentos
-
Omron LVS-9580/LVS-9585 Instrucciones de operación
-
Petzl Duobelt LED 14 Manual de usuario
-
 Mammut Airbag Technology 3.0 Manual de usuario
-
Petzl ACCU NAO Manual de usuario
-
-
YUNEEC ION L1 Pro Guía de inicio rápido
-
-
Petzl TACTIKKA +RGB Manual de usuario
-
-
