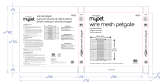
North States MyPet 4944 Manual de usuario
- Tipo
- Manual de usuario


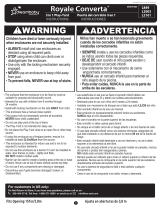
WARNING
!
Page 2
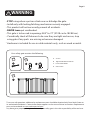
Your safety gate contains the following:
x10 x2
x1
ABC
D
A.
B.
C.
D.
Screws
Upper Wall Mount with Pin
Lower Wall Mount
Gate Frame
To ensure safe operation, additional or replacement parts should be obtained only from North States or
its authorized distributors. Contact information appears on the cover of these instructions. Replacement
parts can be ordered at www.northstatesind.com
Any damage to property during installation of your safety gate is the sole responsibility of the end user.
STOP using when a pet can climb over or dislodge the gate.
Install only with locking/latching mechanism securely engaged.
This product will not necessarily prevent all accidents.
NEVER leave pet unattended.
This gate is to be used in openings 38.3” to 72” (97.28 cm to 182.88 cm).
Periodically check all fasteners to be sure they are tight and secure, stop
using gate if any parts are missing or become damaged.
Hardware is included for use in solid materials only, such as wood or metal.
•
•
•
•
•
•
•

Page 3
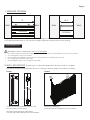
1. MEASURE OPENING
OPENING
72"
OPENING
38.3"
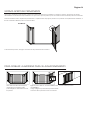
The gate can easily be adjusted to accommodate openings from 38.3". to 72" as shown above”.
If the opening is smaller than 72" you will need to angle the gate at the pivot points to fit the opening.
Installation
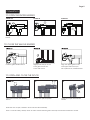
2.WALL MOUNTING-Follow steps 1-3 as illustrated below at both ends of the gate.
First, take enclosed mounting template and cut on cutting line. Place template on both sides of opening.
Locate the mounting template vertical to the
floor and mark the screw holes.
Mount the upper and lower wall mounts
onto the wall or flat molding with screws included.
Extend the folded gate.
Unfold the sides of the barrrier to fit in your space.
FIGURE 1 FIGURE 2
WallWall WallWall
WARNING: When installing at the t op of the stairs
• Do not mount hinges into sheetrock or plaster. Hardware is included for use in solid materials only, such as wood or metal.
• Do not allow gate to swing over the stairs.
• Place the gate in the opening so that the bottom of the gate frame is completely flat on the floor.
• Do not angle gate towards the top of stairs.
• Recess the gate at least 1" from the edge of the top stair.

Page 4
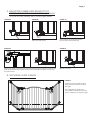
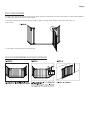
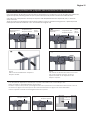
3. ADJUST THE LOWER GATE MOUNT TO FIT
DIFFERENT THICKNESS OF MOLDING (0-25mm)
* If you do not have molding, SKIP to "securing gate panels".
4. SECURING GATE PANELS
FIGURE 3A FIGURE 3B
Align both upper and lower gate mounts with the upper and lower wall mounts.
Press and hold the upper gate release button and set both gate mounts onto
the wall mounts.
FIGURE 3C
Loosen the screw.
FIGURE 3D FIGURE 3E
Tighten the screw.
Rotate both removable vertical
bars counterclockwise until they
are tight.
FIGURE 4
Adjust the lower gate mount to meet
the lower wall mount.
Place the pin of lower gate mount
into the lower wall mount first.
Note: Release by turning the
removable vertical bar clockwise
prior to folding or moving the gate.

Page 5
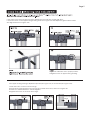
TO OPEN THE ENTIRE BARRIER
Operation
Press and hold the gate release
button.
Lift the entire gate upward. Turn the gate to open.
Hold the gate release button. Slightly insert the pin of the
lower gate mount into
lower wall mount.
Align the upper gate mount
with upper wall mount pin.
Set in place then, release button.
FIGURE 5A FIGURE 5B FIGURE 5C
TO CLOSE THE WHOLE BARRIER
Press and hold the door release
button.
Lift the door panel upward. Swing door open and release
button.
TO OPEN AND CLOSE THE DOOR
While the door is open, release it and it will close automatically.
NOTE: To ensure safety, always check to make certain that the gate is securely locked after it has been closed.

Page 6
To close gate, push gate gently toward frame.
STAY-OPEN SYSTEM
TO FOLD THE BARRIER FOR EASY STORAGE
The stay-open feature should be used only by adults. When it is activated, the auto-close feature is temporarily disabled,
rendering the gate ineffective as a pet barrier.
To activate the stay-open feature, simply swing the gate to its fully open position to hold the gate open for
easy access.

Page 7
Alignment marks are now in proper position.
Retighten screw on upper locking housing.
lower door
hinge
If the mark on the upper locking housing is displaced to the left(10A) or right(10B) then:
Loosen the screw on the upper locking housing as shown in figure 10C and adjust the gate until the marks
are aligned as shown in figure 10D.
10D
If the upper locking housing is displaced upward (as in figure 10F) or downward (as in figure 10G):
Loosen the screw on the lower door hinge.
Press the door panel and the lower door hinge towards each other, as shown in figure 10H
until the two marks illustrated in 10D are aligned.
Retighten the screw on the lower door hinge.

Page 8
Distributed exclusively in the United States by
North States Industries, Inc.
5455 Highway 169 N
Plymouth, MN 55442
www.northstatesind.com
Manufactured in China
CLEANING: Clean the safety gate using warm water and a mild detergent.
Use a soft cloth or sponge to avoid scratches. Never use solvents or chemicals to clean the safety gate.
CARE

Productos de calidad
para su estilo de vida
INSTRUCCIONES PARA EL MODELO 4944
IMPORTANTE: ¡CONSERVE COMO REFERENCIA FUTURA!
Para obtener consejos útiles e instrucciones, visite nuestro sitio web: www.northstatesind.com, o
Comuníquese con nuestro Departamento de Atención al Cliente por correo electrónico:
CustomerService@northstatesind.com
Teléfono: +1 (763) 486-1754 o número gratuito: (800) 848-8421
®

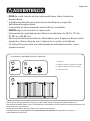
ADVERTENCIA
!
Página 10
x10 x2
x1
ABC
D
A.
B.
C.
D.
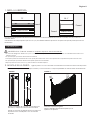
Tornillos
Soporte superior de pared c/pasador
Soporte inferior de pared c/pasador
Panel de puerta
Su puerta de seguridad incluye lo siguiente:
Para asegurar el funcionamiento seguro, las piezas adicionales o de repuesto deben obtenerse
únicamente de North States o de sus distribuidores autorizados. La información de contacto aparece en la
portada de estas instrucciones.
Se pueden pedir piezas de repuesto en www.northstatesind.com
Cualquier daño a la propiedad durante la instalación de su puerta de seguridad es exclusiva
responsabilidad usario fínal.
DEJE de usarla cuando un mascota pueda trepar sobre la puerta o
desprenderla.
Instálela únicamente con el mecanismo de bloqueo y enganche
debidamente enganchado.
Este portón no necesariamente evita todos los accidentes.
NUNCA deje a un mascota sin supervisión.
Esta puerta de seguridad puede utilizarse en aberturas de 38.3" a 72" (de
97.28 cm a 182.88 cm).
Revisar periódicamente todos los aanzadores para asegurarse de que estén
apretados y rmes, deje de usar si alguna de sus partes está dañada.
Se incluyen herrajes para usar únicamente en materiales macizos, como
madera o metal.
•
•
•
•
•
•
•

Página 11
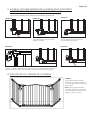
ADVERTENCIA: Cuando instale en la parte superior de las escaleras
1. MIDA LA ABERTURA
Pared
Pared
ABERTURA Pared
Pared
ABERTURA
La puerta puede ajustarse fácilmente para adaptarse a aberturas desde 97,3 cm (38,3") a 182,9 cm (72") como se
muestra arriba.
Si la abertura es más pequeña que 183 cm (72") necesitará doblar la puerta en los puntos de pivote para que entre en
la abertura.
Instalación
Siga los pasos 1-3 como se ilustra a continuación en ambos extremos de la puerta.
FIGURA 1 FIGURA 2
2. MONTAJE EN LA PARED-
• No monte las bisagras en tablaroca o yeso. Los accesorios de sujeción incluidos son sólo para usarse en materiales sólidos tales como
madera o metal.
• No permita que la puerta se abra sobre las escaleras.
• Coloque la puerta en la abertura de modo que la parte inferior del marco de la puerta esté completamente plano sobre el suelo.
• No permita que la puerta se abra hacia la parte superior de las escaleras.
• Aleje la puerta, al menos, 2.54 cm (1") del borde de la escalera superior.
Primero, tome la plantilla de montaje incluida y corte en la línea. Coloque la plantilla en ambos lados de la abertura.
Ubique la plantilla de montaje vertical respecto
del suelo y marque los orificios de los tornillos.
Monte los soportes de pared superior e inferior en
la pared o en el molde plano con los tornillos
incluidos.
Extienda la puerta plegada.
Abra los laterales de la barrera para que se
ajusten a su espacio.
PISO
72" 38.3"

Página 12
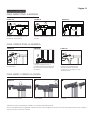
FIGURA 4
3. AJUSTE EL SOPORTE INFERIOR DE LA PUERTA PARA ADAPTARLO
A DIFERENTES ESPESORES DE MOLDURAS (0-25 mm)
4. FIJACI‡N DE LOS PANELES DE LA PUERTA
* Si no tiene moldura, PASE a "Fijación de los paneles de la puerta".
FIGURA 3A FIGURA 3B
Alinee los soportes de puerta superior e inferior con los soportes de pared
superior e inferior. Mantenga presionado el botón de liberación de la puerta
superior y coloque ambos soportes de la puerta en los soportes de pared.
FIGURA 3C
Afloje el tornillo.
FIGURA 3D FIGURA 3E
Ajuste el tornillo.
Ajuste el soporte inferior de la puerta
para que llegue hasta el soporte
inferior de pared.
Gire ambas barras verticales
extraíbles en sentido contrario a
las manecillas del reloj hasta que
estén firmes.
Nota: Libere girando la barra
removible vertical en sentido de
las manecillas del reloj antes de
plegar o mover la puerta.
Primero coloque el pasador del
soporte inferior de la puerta en el
soporte inferior de pared.

Funcionamiento
Página 13
Sostenga el botón de liberación
de la puerta.
Introduzca ligeramente el
pasador del soporte inferior de
la puerta en el soporte inferior
de pared.
Alinee el soporte superior de la
puerta con el pasador del
soporte superior de pared.
Colóquelo en su lugar y luego
suelte el botón.
PARA ABRIR TODA LA BARRERA
PARA CERRAR TODA LA BARRERA
PARA ABRIR Y CERRAR LA PUERTA
Presione y sostenga el botón de
liberación de la puerta.
Levante hacia arriba toda la
puerta.
Gire la puerta para abrirla.
FIGURA 5A FIGURA 5B FIGURA 5C
FIGURA 6A
FIGURA 7A
FIGURA 6B FIGURA 6C
Presione y sostenga el botón de
liberación de la puerta.
Levante el panel de la puerta
hacia arriba.
Gire la puerta para abrirla y suelte
el botón.
NOTA: Para garantizar la seguridad, verifique siempre para asegurarse de que la puerta esté bloqueada en forma segura
después de que haya sido cerrada.
Mientras la puerta está abierta, suéltela y se cerrará automáticamente.

Para cerrar la puerta, empuje suavemente la puerta hacia el marco.
SISTEMA APERTURA PERMANENTE
PARA DOBLAR LA BARRERA PARA SU ALMACENAMIENTO
La función "apertura permanente" debe ser usada únicamente por adultos. Cuando se activa, la función de cierre
automático se desactiva temporalmente, lo que hace que la puerta ya no sea eficaz como barrera para los mascotas.
Para activar la función "apertura permanente", simplemente empuje la puerta a su posición completamente abierta, a
fin de sostenerla abierta para un acceso fácil.
FIGURA 8A
Siga los pasos #5A-C “CÓMO ABRIR TODA
LA BARRERA.”
Luego pliegue el panel de la puerta hacia
el centro de la puerta como se muestra.
Gire ambas barras de bloqueo
verticales en sentido horario
para aflojar las articulaciones de
la puerta.
Doble toda la puerta.
FIGURA 9A FIGURA 9B FIGURA 9C
Página 14

Página 15
NOTA:
Utilice dos destornilladores al ajustar o
aflojar el tornillo.
NOTA:
Las marcas de alineación ahora se encuen-
tran en la posición correcta. Vuelva a
ajustar el tornillo en el alojamiento del
bloqueo superior.
Solución de problemas y ajuste del mecanismo de bloqueo
Si los indicadores de alineación del mecanismo de bloqueo no se alinean como en la figura 10D, realice los
siguientes ajustes para asegurarse de que el panel de la puerta pueda cerrarse automáticamente.
Si la marca en el alojamiento de bloqueo superior está desplazada hacia la izquierda (10A) o derecha
(10B), entonces:
Afloje el tornillo en el alojamiento de bloqueo superior como se muestra en la figura 10C, ajuste la puerta
hasta que las marcas se alineen como se muestra en la figura 10D.
Alojamiento del
bloqueo superior
Panel
de la
puerta
Esquina superior
izquierda
Esquina superior
izquierda Alojamiento del
bloqueo superior
Panel
de la
puerta
FIGURA 10A
Si se desplaza el alojamiento del bloqueo superior hacia arriba 10F o hacia abajo 10G:
Afloje el tornillo en la bisagra inferior de la puerta.
Presione el panel de la puerta y la bisagra inferior de la puerta el uno en dirección hacia el otro como se
muestra en la figura 10H hasta que las dos marcas ilustradas en la figura 10D estén alineadas.
Vuelva a ajustar el tornillo en la bisagra inferior de la puerta.
Alojamiento del
bloqueo superior Alojamiento del
bloqueo superior
Bisagra
inferior de
la puerta

Página 16
Rev 12/2021
CUIDADO
LIMPIEZA: Limpie la puerta de seguridad con agua tibia y un detergente suave.
Use un paño suave o una esponja para evitar rasguños. Nunca utilice solventes o sustancias químicas
para limpiar la puerta de seguridad.
Distribuido exclusivamente en los Estados Unidos por
North States Industries, Inc.
5455 Highway 169 N
Plymouth, MN 55442
www.northstatesind.com
Fabricado en China
-
 1
1
-
 2
2
-
 3
3
-
 4
4
-
 5
5
-
 6
6
-
 7
7
-
 8
8
-
 9
9
-
 10
10
-
 11
11
-
 12
12
-
 13
13
-
 14
14
-
 15
15
-
 16
16


North States MyPet 4944 Manual de usuario
- Tipo
- Manual de usuario
en otros idiomas
- English: North States MyPet 4944 User manual
Artículos relacionados
-
 North States MyPet 5435 Manual de usuario
-
NORTH STATES 5455 MyPet Wide Walk Thru EasyPass Pet Gate Manual de usuario
-
 NORTH STATES 5446 Manual de usuario
-
 North States MyPet 5274 Manual de usuario
-
 North States MyPet 4955 Manual de usuario
-
 North States MyPet 8805 Manual de usuario
-
 North States MyPet 8701 Manual de usuario
-
 North States MyPet 8679 Manual de usuario
-
 North States MyPet 4605 Instruction Sheet
-
 North States MyPet 4917 Manual de usuario


Otros documentos
-
 NORTH STATES 5455 MyPet Wide Walk Thru EasyPass Pet Gate Manual de usuario
-
 NORTH STATES 5446 Wide Deco EasyPass Pet Gate Manual de usuario
-
 NORTH STATES 4916 Instructions Manual
-
 NORTH STATES 8620 Instructions Manual
-
NORTH STATES 4955 MyPet Windsor Walk-Thru Petgate Instrucciones de operación
-
 Dreambaby L849 Manual de usuario


