Sony SRF-M606 El manual del propietario
- Categoría
- Radios
- Tipo
- El manual del propietario
El Sony SRF-M606 es una radio FM/AM PLL sintetizada que ofrece una experiencia de escucha confiable y placentera. Con su sistema sintetizador controlado por cuarzo y microprocesador, brinda una sintonización precisa y fácil. Además, permite memorizar hasta 10 emisoras en FM y 5 en AM para un acceso rápido a tus estaciones favoritas.
El Sony SRF-M606 es una radio FM/AM PLL sintetizada que ofrece una experiencia de escucha confiable y placentera. Con su sistema sintetizador controlado por cuarzo y microprocesador, brinda una sintonización precisa y fácil. Además, permite memorizar hasta 10 emisoras en FM y 5 en AM para un acceso rápido a tus estaciones favoritas.

Transcripción de documentos
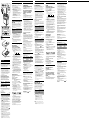
3-246-045-21(1) FM Stereo/AM PLL Synthesized Radio Operating Instructions Manual de instrucciones Bruksanvisning (på baksidan) Manual de instruções (lado inverso) < CS ( CS ) > Before You Begin Thank you for choosing the Sony radio! It will give you many hours of reliable service and listening pleasure. Before operating the radio, please read these instructions thoroughly and retain them for future reference. Printed in China FM SENS MEGA BASS HOLD LOCAL DX OFF ON POWER i The AM channel step differs depending on areas. The channel step of this unit is factory-set to 10 kHz (models for North and South America)/ 9 kHz (models for other countries). Channel step 10 kHz 9 kHz Installing the Batteries (See Fig. A) 1 2 3 Open the lid at the rear of the radio. Install two R03 (size AAA) batteries (not supplied) with correct polarity. Close the lid. Battery life (approx. hours) (JEITA*) AM 20 Using Sony R03 (size AAA) batteries * Measured by JEITA (Japan Electronics and Information Technology Industries Association) standards. The actual battery life may vary depending on the circumstance of the unit. Knowing When to Replace the Batteries 2 3 4 5 PRESET MHz kHz ENTER/ CLOCK SCAN TUNE/TIME SET BAND A Rear Parte posterior • When the batteries become weak, the sound becomes weak and distorted, and “ ” flashes in the display. Replace the batteries with new ones. When the batteries are completely exhausted, the radio is turned off. • Before replacing the batteries, make sure that the radio is turned off. Replace the batteries within one minute. Otherwise, the clock setting and preset stations could be erased. In this case, set the clock and preset the stations again. • To clear “ ”, press POWER. Notes on Batteries • Insert the batteries with correct polarity. • Do not charge the dry batteries. • Do not use different types of batteries at the same time. • When you replace the batteries, replace both with new ones. • When the unit is not being used for a long period of time, remove the batteries to avoid damage from battery leakage and corrosion. • If a battery leakage occurs, wipe the battery compartment with a soft cloth before inserting new ones. Setting the Clock The display will flash “0:00” when the batteries are first installed. Set the clock when the radio is turned off. 1 2 To stop flashing of the display, press ENTER/CLOCK. While holding down ENTER/CLOCK, press SCAN TUNE/TIME SET + or – to set the clock to the current time. Each time you press the button, the digits move forward or back by one. When you keep the button pressed, the digits change rapidly. When you release ENTER/CLOCK, the clock starts operating, and “:” starts flashing. • 24-hour system : “0:00”= midnight , “12:00”= noon. R03 (size AAA) × 2 R03 (tamaño AAA) × 2 Antes de comenzar Auto-Scan Tuning Time display: 24-hour system Frequency range: ¡Muchas gracias por la elección de esta radio Sony! Con esta radio conseguirá muchas horas de servicio fiable y placer de escucha. Antes de utilizar la radio, lea detenidamente estas instrucciones y consérvelas para futuras referencias. 1 2 3 4 Changing AM Channel Step The channel step of this unit is factory-set to 9 kHz or 10 kHz to match the frequency allocation system of the country as listed. When needed, change the channel step before listening to the radio. Area North and South American countries Other countries 1 2 Connect the headphones to i . Press POWER. Adjust VOL (volume). Press BAND to select the band. FM1* 5 Band FM AM Channel step 10 kHz 9 kHz Press POWER to turn off the power. While holding down ENTER/CLOCK, keep pressing POWER for more than 5 seconds. The AM channel step will be changed. If you proceed to step 2 again, the channel step changes again. Note • When the AM channel step is changed, the preset stations and the clock will be erased, and “0:00” flashes in the display. FM2* AM * When using FM1 or FM2 preset mode, you may listen to the radio on either mode. (See “Preset Tuning”) Press and hold SCAN TUNE/TIME SET + or –, then release it. • If the desired station cannot be received, tune in the station by pressing SCAN TUNE/TIME SET + or – repeatedly. • To stop the auto-scan, press any button. • To turn off the radio, press POWER. • To improve radio reception FM: Extend the headphones cord which functions as the FM antenna. AM: Rotate the unit horizontally for optimum reception. A ferrite bar antenna is built in the unit. • Set FM SENS to LOCAL if interference is prevalent when radio wave intensity is dramatically stronger. Under normal conditions, set to DX. Preset Tuning You can preset up to 10 stations in FM (5 stations in FM1, 5 stations in FM2), and 5 stations in AM. Presetting a Station Example: To set FM 90 MHz in preset button 2 for FM2. 1 2 3 4 Press POWER. Press BAND to select FM2. Tune in FM 90 MHz. (See “Auto-Scan Tuning”) While holding down ENTER/CLOCK, press the desired preset button 2. You can hear the confirmation beep and preset number “2” appears in the display. MHz kHz Frequency range 87.5 - 108 MHz 530 -1 610 kHz Channel step 0.1 MHz 10 kHz FM 87.5 - 108 MHz 0.05 MHz* AM 531 -1 602 kHz 9 kHz * The frequency display is raised or lowered by a step of 0.1 MHz. (Example: Frequency 88.05 MHz is displayed as “88.0 MHz”.) Scanning will start and when a station is received, scanning will stop and the station can be heard. Notes on AM Channel Step FM 14 1 Specifications Features Area North and South American countries Other countries VOL Operating the Radio Each press of the button changes the band in the following order. • Quartz-controlled PLL (Phase Locked Loop) synthesizer system using a microcomputer for easy pinpoint tuning. • Up to 10 stations in FM and 5 stations in AM can be preset. • You can tune in the stations easier by AutoScan tuning which automatically receives the stations. SRF-M606 Sony Corporation © 2002 Español English Power output: 5 mW + 5 mW (headphones) (at 10% harmonic distortion) Output: i (headphones) jack (stereo minijack) Power requirements: 3 V DC, two R03 (size AAA) batteries Dimensions: Approx. 60 × 104 × 21.5 mm (w/h/d) (Approx. 23⁄8 × 41⁄8 × 7⁄8 inches) not incl. projecting parts and controls Mass: Approx. 95 g (3.5 oz ) incl. batteries Accessories supplied: Stereo headphones (1) Design and specifications are subject to change without notice. Troubleshooting Guide Should any problem persist after you have made the following checks, consult your nearest Sony dealer. To preset another station, repeat these steps. • To change the preset station, preset a new station number. The previous station will be cancelled. Tuning in a Preset Station Press POWER. Select the band with BAND. Press desired preset tuning button. Adjust VOL (volume). 1 2 3 4 Useful Functions To Obtain Powerful Bass Sound Switch MEGA BASS to ON. The “MEGA BASS” system produces a powerful bass. To prevent accidental change of the receiving station—HOLD function Press HOLD. Then “-” is displayed, indicating that all the functions of the buttons are locked. To release the key protection, press HOLD again to “-” disappear. • Sistema sintetizador con bucle de enganche de fase (PLL) controlado por cuarzo que utiliza un microprocesador para lograr fácilmente una sintonía precisa. • Posibilidad de memorización de hasta 10 emisoras de FM y 5 de AM. • Usted podrá sintonizar emisoras de forma más fácil utilizando la sintonía con exploración automática, que le permitirá recibir emisoras de forma automática. Notas sobre el intervalo entre canales de AM Área Norte y Sudamérica Otros países Colocación de las pilas (Consulte la Fig. A) Display is dim, or no indication is displayed. • Weak batteries. • The unit is being used in extremely high or low temperatures or in a place with excessive moisture. 1 Very weak or interrupted sound, or unsatisfactory reception • Weak batteries • In a vehicle or in a building, listen near a window. The station cannot be received when a preset tuning button is pressed. • The station has not been preset. • The memory of the station has been erased. Preset the station again. “ flashes in 2 3 FM 14 Road safety Do not use headphones while driving, cycling, or operating any motorized vehicle. It may create a traffic hazard and is illegal in many areas. It can also be potentially dangerous to play your headphones at high volume while walking, especially at pedestrian crossings. You should exercise extreme caution or discontinue use in potentially hazardous situations. Preventing hearing damage Avoid using headphones at high volume. Hearing experts advise against continuous, loud and extended play. If you experience a ringing in your ears, reduce volume or discontinue use. Caring for others Keep the volume at a moderate level. This will allow you to hear outside sounds and to be considerate to people around you. Warning If there is lightning when you are using the unit, take off the headphones immediately. If you have any questions or problems concerning your unit, please consult your nearest Sony dealer. (JEITA*) AM 20 Utilizando una pila R03 (tamaño AAA) Sony * Medición realizada con las normas de JEITA (Japan Electronics and Information Technology Industries). La duración real de la pila puede variar dependiendo de las circunstancias de la unidad. Cuándo reemplazar las pilas • Cuando las pilas se gasten, el sonido se debilitará y distorsionará, y en el visualizador ”. parpadeará “ Reemplace las pilas por otras nuevas. Cuando las pilas se agoten completamente, la alimentación de la radio se desconectará. • Antes de remplazar las pilas, cerciórese de que la alimentación de la radio esté desconectada. Reemplace las pilas antes de un minuto. En caso contrario, el ajuste del reloj y las emisoras memorizadas se borrarían. En este caso, vuelva a ajustar el reloj y a memorizar las emisoras. ”, presione POWER. • Para borrar “ Notas sobre las pilas • Inserte las pilas con la polaridad correcta. • No cargue las pilas. • No utilice pilas de tipos diferentes al mismo tiempo. • Cuando tenga que reemplazar las pilas, cambie las dos. • Cuando no vaya a utilizar la unidad durante mucho tiempo, extraiga las pilas para evitar los daños que podría causar le electrólito de las mismas en caso de fugarse. • Si el electrólito de las pilas se fuga, limpie el compartimiento de las pilas con un paño seco antes de insertar pilas nuevas. Ajuste del reloj Cuando coloque por primera vez las pilas, en el visualizador parpadeará “0:00”. Ajuste el reloj cuando la alimentación de la radio esté desconectada. 1 Precautions Notes on Headphones Abra la tapa de la parte posterior de la radio. Instale dos pilas R03 (tamaño AAA) con la polaridad correcta. Cierre la tapa. Duración de la pila (horas aproximadas) 2 • Operate the unit only on 3 V DC with two R03 (size AAA) batteries. • Avoid exposure to temperature extremes, direct sunlight, moisture, sand, dust or mechanical shock. Never leave in a car parked in the sun. • Should anything fall into the unit, remove the batteries, and have the unit checked by qualified personnel before operating it any further. • To clean the casing, use a soft cloth dampened with a mild detergent solution. • In vehicles or buildings, radio reception may be difficult or noisy. Try listening near a window. 1 2 3 4 Para parar el parpadeo del visualizador, presione ENTER/CLOCK. Manteniendo pulsada ENTER/CLOCK, presione SCAN TUNE/TIME SET + o – para ajustar el reloj a la hora actual. Cada vez que presione la tecla, los dígitos avanzarán o retrocederán una unidad. Si mantiene presionada la tecla, los dígitos cambiarán rápidamente. Cuando suelte la tecla ENTER/CLOCK, el reloj empezará a funcionar, y se iniciará el parpadeo de “:”. • Sistema de 24 horas: “0:00” = medianoche, “12:00” = mediodía Cambio del intervalo entre canales de AM El intervalo entre canales de AM ha sido austado en fábrica a 9 kHz o a 10 kHz de acuerdo con el sistema de asignación de frecuencias de AM del país de destino, como se indica a continuación. Cuando sea necesario, cambie el intervalo entre canales antes de escuchar la radio. Área Norte y Sudamérica Otros países 1 2 Intervalo entre canales 10 kHz 9 kHz Presione POWER para desconectar la alimentación. Manteniendo pulsada ENTER/CLOCK, mantenga presionada POWER durante más de 5 segundos. El intervalo entre canales de AM cambiará. Si vuelve a realizar el paso 2, el intervalo entre canales cambiará otra vez. Nota • Cuando cambie el intervalo entre canales de AM, las emisoras memorizadas y el ajuste del reloj se borrarán, y en el visualziador parpadeará “0:00”. Conecte los auriculares a i. Presione POWER. Ajuste VOL. Presione BAND para seleccionar la banda. Cada vez que presione la tecla, la banda cambiará en el orden siguiente. FM1* FM2* AM • Alimente la unidad sólo con 3 V CC con dos pilas R03 (tamaño AAA). • Evite exponer la unidad a temperaturas extremadas, la luz solar directa, la humedad, arena, polvo, y golpes. No la deje nunca en un automóvil aparcado al sol. • Si cae algo dentro de la unidad, quite las pilas y haga que la unidad sea comprobada por personal cualificado antes de volver a utilizarla. • Para limpiar la caja, utilice un paño suave humedecido en una solución poco concentrada de detergente. • En vehículos o en edificios es posible que la radiorrecepción resulte difícil o ruidosa. Trate de escuchar cerca de una ventana. Notas sobre los auriculares 5 Intervalo entre canales 10 kHz 9 kHz Precauciones Sintonía con exploración automática El intervalo entre canales de Am varía dependiendo de la zona. El intervalo entre canales de esta unidad ha sido ajustado en fábrica a 10 kHz (modelos para Norte y Sudamérica)/9 kHz (modelos para otros países). The front panel buttons do not operate at all. • “-” is displayed. Press the HOLD button so that “-” will disappear. Sound is not heard and “ the display. • Weak batteries. MHz kHz Características Utilización de la radio * Cuando utilice el modo de memorización de FM1 o FM2, podrá escuchar la radio en cualquier modo. (Consulte “Sintonía de emisoras memorizadas”.) Mantenga presionada SCAN TUNE/ TIME SET + o –, y después suéltela. Se iniciará la exploración y, cuando se reciba una emisora, la exploración se parará y podrá oír la emisora. • Si no puede recibir la emisora deseada, sintonice la emisora presionando repetidamente SCAN TUNE/TIME SET + o –. • Para parar la exploración automática, presione cualquier tecla. • Para desconectar la alimentación de la radio, presione POWER. • Para mejorar la radiorrecepción FM: Extienda el cable de los auriculares, porque funciona como antena de FM. AM: Gire horizontalmente la unidad hasta obtener la óptima recepción. La unidad posee una antena de barra de ferrita incorporada. • Si la intensidad de la señal es notablemente intensa y hay interferencias continuas, ponga FM SENS en LOCAL. En condiciones normales, deje el selector en DX. Sintonía de emisoras memorizadas Memorización de una emisora Ejemplo: Para almacenar 90 MHz de FM en el número de memorización 2 para FM2. 4 Presione POWER. Presione BAND para seleccionar FM2. Sintonice 90 MHz de FM. (Consulte “Sintonía con exploración automática.) Manteniendo pulsada ENTER/CLOCK, presione la tecla de memorización deseada, en este caso 2. Usted oirá un pitido de confirmación y en el visualizador aparecerá el número de memorización “2”. MHz kHz Cuidado de sus oídos Evite utilizar los auriculares a gran volumen. Los expertos en oídos no aconsejan la escucha prolongada a gran nivel. Si experimenta un silbido en sus oídos, reduzca el volumen, o deje de escuchar a través de los auriculares. Respeto a los demás Mantenga el volumen a un nivel moderado. Esto le permitirá escuchar los sonidos del exterior y respetar a quienes se encuentren a su alrededor. Advertencia Cuando esté utilizando la unidad, si hay una tormenta eléctrica, quítese inmediatamente los auriculares. Si tiene alguna pregunta o problema con respecto a la unidad, póngase en contacto con su proveedor Sony. Usted podrá memorizar hasta 10 emisoras de FM (5 en FM1 y otras 5 en FM2), y 5 más en AM. 1 2 3 Seguridad en la carretera No utilice los auriculares cuando conduzca, vaya en bicicleta, o maneje cualquier vehículo motorizado. Esto podría suponer un peligro para el tráfico, y es ilegal en ciertos países. También puede resultar potencialmente peligroso escuchar a través de los auriculares a gran volumen mientras camine, especialmente en pasos cebra. En situaciones potencialmente peligrosas, deberá tener mucho cuidado o dejar de utilizar los auriculares. MHz kHz Para memorizar otra emisora, repita estos pasos. • Para cambiar una emisora memorizada, memorice otra nueva. La emisora previamente memorizada se borrará. Sintonía de una emisora memorizada 1 Presione POWER. 2 Seleccione la banda con BAND. 3 Presione la tecla correspondiente a la emisora memorizada. 4 Ajuste VOL. Funciones útiles Para obtener graves potentes Cambie MEGA BASS a ON. El sistema “MEGA BASS” produce graves potentes. Para evitar el cambio accidental de la emisora recibida—función de bloqueo Presione HOLD. En el visualizador aparecerá “-” indicando que todas las funciones de las teclas están bloqueadas. Para desactivar el bloqueo de las teclas, vuelva a presionar HOLD para hacer que desaparezca “-”. Especificaciones Visualización de la hora: Sistema de 24 horas Gama de frecuencias: Banda Gama de frecuencias Intervalo entre canales FM 87,5 - 108 MHz 0,1 MHz AM 530 -1 610 kHz 10 kHz FM 87,5 - 108 MHz 0,05 MHz* AM 531 -1 602 kHz 9 kHz * La indicación de la frecuencia aumentará o se reducirá en pasos de 0,1 MHz (Ejemplo: la frecuencia de 88,05 MHz se visualizará como “88.0 MHz”.) Salida de potencia: 5 mW + 5 mW (auriculares) (distorsión armónica del 10%) Salida: Toma i (auriculares) (minitoma estéreo) Alimentación: 3 V CC, dos pilas R03 (tamaño AAA) Dimensiones: Aprox. 60 × 104 × 21,5 mm, (an/al/prf) excluyendo partes y controles salientes Masa: Aprox. 95 g, incluyendo las pilas Accesorio suministrado: Auriculares estéreo (1) Diseño y especificaciones sujetos a cambio sin previo aviso. Guía para la solución de problemas Si el problema persiste después de haber realizado las comprobaciones siguientes, consulte a su proveedor Sony. Las teclas del panel frontal no funcionan en absoluto. • Está visualizándose “-”. Presione la tecla HOLD para hacer que desaparezca “-”. La visualización es débil, o no se visualiza ninguna indicación. • Las pilas están débiles. • La unidad está utilizándose a temperaturas extremadamente altas o bajas, o en un lugar con humedad excesiva. El sonido es muy débil o se oye interrumpido, o la recepción es insatisfactoria. • Las pilas están débiles. • En un vehículo o en un edificio, escuche cerca de una ventana. No es posible recibir emisoras memorizadas con las teclas. • No ha memorizado las emisoras. • La emisoras se han borrado de la memoria. Vuelva a memorizarlas. No se oye sonido, y en el visualizador ”. parpadea “ • Las pilas están débiles.-
 1
1
-
 2
2


Sony SRF-M606 El manual del propietario
- Categoría
- Radios
- Tipo
- El manual del propietario
El Sony SRF-M606 es una radio FM/AM PLL sintetizada que ofrece una experiencia de escucha confiable y placentera. Con su sistema sintetizador controlado por cuarzo y microprocesador, brinda una sintonización precisa y fácil. Además, permite memorizar hasta 10 emisoras en FM y 5 en AM para un acceso rápido a tus estaciones favoritas.
en otros idiomas
- English: Sony SRF-M606 Owner's manual
- português: Sony SRF-M606 Manual do proprietário
- svenska: Sony SRF-M606 Bruksanvisning
Artículos relacionados
-
Sony ICF-SW40 Instrucciones de operación
-
Sony ICF-M260 El manual del propietario
-
-
Sony Walkman SRF-M48RDS Manual de usuario
-
-
-
-
-
-
Sony WALKMAN SRF-M80 Manual de usuario