Canon PIXMA iP110 El manual del propietario

Tipo
El manual del propietario

La Canon PIXMA iP110 es una impresora inalámbrica multifunción que imprime, copia y escanea documentos y fotos. Es ideal para usuarios domésticos y de pequeñas oficinas que buscan una impresora asequible y fácil de usar. Con su diseño compacto y elegante, la iP110 cabe fácilmente en cualquier escritorio. También es muy fácil de configurar y usar. Simplemente conéctalo a tu computadora o dispositivo móvil y comienza a imprimir, copiar o escanear. La iP110 también es muy eficiente energéticamente, lo que te ayudará a ahorrar dinero en tus facturas de electricidad.

La Canon PIXMA iP110 es una impresora inalámbrica multifunción que imprime, copia y escanea documentos y fotos. Es ideal para usuarios domésticos y de pequeñas oficinas que buscan una impresora asequible y fácil de usar. Con su diseño compacto y elegante, la iP110 cabe fácilmente en cualquier escritorio. También es muy fácil de configurar y usar. Simplemente conéctalo a tu computadora o dispositivo móvil y comienza a imprimir, copiar o escanear. La iP110 también es muy eficiente energéticamente, lo que te ayudará a ahorrar dinero en tus facturas de electricidad.

3
4
5
1
2
XXXXXXXX © CANON INC. 2016
4
1
1
3
4
2
2
c
b
b
a
a
8
3
4
6
7
1
3
4
1
1
2
3
a
b
c
a
a
a
a
a
b
b
b
b
6
(B)(A)
2
5
5
ES
EN
ES
EN
ES
EN
ES
EN
ES
EN
ES
EN
ES
EN
ES
EN
ES
EN
ES
EN
EN
ES
ES
EN
No conecte aún el cable USB.
Cargue papel normal con el lado de impresión hacia arriba
consultando los puntos
y .
Si la luz de Alarma (Alarm) parpadea, pulse el botón REANUDAR/
CANCELAR (RESUME/CANCEL) y continúe con
. La Alineación
de los cabezales de impresión (Print Head Alignment) también
puede realizarse después de la instalación.
Alinee la marca con la marca para insertar el depósito
de tinta y empuje la marca PUSH hasta que encaje en su sitio.
¡No toque esta pieza
hasta que se detenga!
Aunque el interior del paquete y la tapa protectora estén
manchados de tinta, no afecta a la calidad de impresión.
Tenga cuidado para no mancharse de tinta.
Alinee la marca con la marca para instalar el cabezal
de impresión.
Una vez instalado el cabezal de impresión, no lo retire si no es
necesario.
Empuje las dos pestañas hasta que la palanca de bloqueo del
cabezal de impresión encaje en su sitio.
Si la luz de Alarma (Alarm) (B) parpadea, compruebe que el cabezal
de impresión y los depósitos de tinta están bien instalados.
Espere hasta que la luz de ENCENDIDO (POWER) (A) se
encienda y continúe.
Asegúrese de que la luz de Wi-Fi parpadee.
ESPAÑOL
Guía de inicio 1
Se dispone de tutoriales en vídeo
Do not connect the USB cable yet.
Load plain paper with the print side facing up by reference to
to
.
If the Alarm lamp ashes, press the RESUME/CANCEL button,
then proceed to
. Print Head Alignment can also be performed
after installation.
Align mark with mark to insert the ink tank and push
the PUSH mark until it snaps into place.
Do not touch this part
until it stops!
Even if the inside of the package and protective cap are
stained with the ink, it does not affect the print quality. Be
careful not to get ink on yourself.
Align mark with mark to install the Print Head.
Once you have installed the Print Head, do not remove it
unnecessarily.
Push both tabs until it snaps to lock the Print Head Lock Lever into
place.
If the Alarm lamp (B) ashes, check that the Print Head and ink tanks
are installed correctly.
Wait until the POWER lamp (A) is lit, then proceed.
Check that the Wi-Fi lamp ashes.
ENGLISH
Getting Started 1
Video Tutorials Available
QT6-1444-V01
PRINTED IN XXXXXXXX
RMC : K10404
6
1
2
3
4
5
4
a
a
b
b
ES
ES
ES
ES
ES
ES
ES
ES
ES
ES
ES
ES
ES
ES
ES
ES
EN
EN
EN
EN
EN
EN
EN
EN
EN
EN
EN
EN
EN
EN
EN
EN
EN
ES
ES
EN
ES
EN
ES
EN
ES
EN
ES
EN
Si normalmente utiliza la impresora mediante un enrutador inalámbrico y
desea usarla sin el enrutador, cambie el método de conexión a la conexión
directa.
Para obtener información sobre el cambio del método de conexión, consulte
el Manual en línea a continuación.
"Cambio del método de conexión entre el equipo y un teléfono inteligente/
ordenador"
Visite el siguiente sitio web desde su dispositivo, haga clic en
Leer el
Manual en línea (Read Online Manual) y, a continuación, seleccione su
sistema operativo.
Si aparece la pantalla que le solicita que seleccione un nombre de producto
antes de seleccionar un sistema operativo, seleccione iP110.
Conexión de la impresora mediante un enrutador inalámbrico
(Conexión mediante punto de acceso)
Conexión de la impresora con un cable USB
Conexión de la impresora mediante la conexión LAN
inalámbrica directamente (Conexión directa)
Cambio del método de conexión
La conexión con el ordenador ha nalizado.
Descargue el software de Internet para conectar la impresora al ordenador.
Existen tres métodos para conectar la impresora al ordenador.
Conecte la impresora al ordenador de acuerdo con su entorno.
Puede cambiar el método a posteriormente.
Si no puede seleccionar Conexión directa (Direct Connection), su ordenador ya se ha
conectado al enrutador inalámbrico. Conecte la impresora en el método
.
Si su ordenador muestra una pantalla de alerta para descargas, permita el
desbloqueo del navegador para continuar con la descarga.
Seleccione esta conexión para conectar la impresora de forma
inalámbrica para los siguientes usuarios: Su ordenador ya está
conectado a un enrutador inalámbrico. Usted desea conectar su
ordenador a un enrutador inalámbrico para utilizar la impresora.
Introduzca la siguiente URL en el navegador web de su ordenador y, a continuación,
visite el sitio web.
Haga clic en Congurar (Set Up).
Si aparece la pantalla siguiente, haga clic en Descargar (Download) para descargar
el software para la conexión.
Ejecute el archivo descargado y, a continuación, haga clic en Siguiente (Next).
Seleccione el método de conexión de la impresora y, a continuación, haga clic en Siguiente (Next).
Seleccione Conexión de LAN inalámbrica (Wireless LAN Connection).
Seleccione Conexión mediante punto de acceso (recomendada) (Access Point
Connection (recommended)) y haga clic en Siguiente (Next).
Seleccione Conexión directa (Direct Connection) y haga clic en Siguiente (Next).
Seleccione Conexión USB (USB Connection).
Siga las instrucciones que aparezcan en pantalla para la instalación.
Si utiliza un Windows PC, también puede
iniciar el software para la conexión desde
del CD-ROM de instalación.
Seleccione esta conexión para conectar la impresora de forma
inalámbrica para los siguientes usuarios: Usted no tiene un
enrutador inalámbrico. Usted no ha conectado su ordenador a un
enrutador inalámbrico aún.
No puede conectar el ordenador a Internet inalámbricamente
durante la conexión de la impresora al ordenador
directamente.
Para usuarios de teléfonos inteligentes/tabletas:
Siga las instrucciones que aparezcan en pantalla para la instalación.
Si conecta la impresora a un ordenador y a un teléfono inteligente/una tableta, conéctela primero al ordenador.
Para conectar la impresora solo a un teléfono inteligente/una tableta, consulte la Guía de inicio 2.
Manuales
For smartphone/tablet users:
Connecting the printer via a wireless router (Access Point
Connection)
Connecting the printer with a USB cable
Connecting the printer via wireless LAN connection directly
(Direct Connection)
If you usually use the printer via a wireless router and want to use it without
the router, change the connection method to the direct connection.
For information about changing the connection method, refer to the Online
Manual below.
"Changing Connection Method between Machine and Smartphone/
Computer"
Visit the following website from your device, click
Read Online Manual,
and then select your OS.
If the screen asking you to select a product name appears before selecting
an operating system, select iP110.
Changing the connection method
The connection with the computer is nished.
Download the software from the Internet to connect the printer to the computer.
There are three methods to connect the printer to the computer.
Connect the printer to the computer according to your environment.
You can change the method to later.
If you cannot select Direct Connection, your computer has already connected to the wireless
router. Connect the printer in the
method.
If your computer shows an alert screen for downloads, allow the browser block to
continue downloading.
Select this connection to connect the printer wirelessly for the
following users: You do not have a wireless router. You have not
connected your computer to a wireless router yet.
Select this connection to connect the printer wirelessly for the
following users: Your computer has already connected to a
wireless router. You want to connect your computer to a wireless
router to use the printer.
Enter the following URL on your computer web browser, and then visit the website.
Click Set Up.
If the screen below appears, click Download to download the software for connection.
Start up the downloaded le, and then click Next.
Select the printer connection method, and then click Next.
Select Wireless LAN Connection.
Select Access Point Connection (recommended) and click Next.
Select Direct Connection and click Next.
Select USB Connection.
Follow the on-screen instructions for setup.
If you use a Windows PC, you can also
start up the software for connection from
the setup CD-ROM.
You cannot connect your computer to the Internet wirelessly
during connecting the printer to the computer directly.
Follow the on-screen instructions for setup.
If you connect the printer to both a computer and a smartphone/tablet, connect it to the computer rst.
To connect the printer only to a smartphone/tablet, refer to the Getting Started 2.
Manuals
XXXXXXXX © CANON INC. 2016
2
ESPAÑOL
Select a printer connection method.
ENGLISH
What is Canon PRINT Inkjet/SELPHY?
: Search "Canon PRINT" in App Store.
: Search "Canon PRINT" in Google Play.
Or access the website by scanning the code on the right.
Getting Started 2
Users who has selected in the Getting
Started 1 and has finished the connection
with the computer
Canon PRINT Inkjet/SELPHY allows you to print photos and documents easily from your
smartphone and tablet.
You can use the printer from your smartphone/
tablet by connecting the device to a wireless
router.
Canon PRINT Inkjet/SELPHY is useful to print
photos and documents.
Install the Canon PRINT Inkjet/SELPHY and
follow the on-screen instructions to register the
printer.
Other users
Connecting the printer via a wireless router
Connecting the printer via wireless LAN connection directly
(Direct Connection)
iOS
Android
iOS
Android
Connecting the printer via a wireless router
1. Install Canon PRINT Inkjet/SELPHY to your smartphone/tablet.
For information about Canon PRINT Inkjet/SELPHY, refer to "What is Canon PRINT
Inkjet/SELPHY?".
2. Connect your device to the printer using the Canon PRINT Inkjet/
SELPHY.
* This procedure is described based on Canon PRINT Inkjet/SELPHY 2.2.0.
In other versions, follow the application instructions to complete the setup.
a Tap Settings on the home screen of the smartphone/tablet.
c Tap PRINT which was installed.
b Turn on the Wi-Fi on the Wi-Fi setting and tap Canon_ij_
XXXX.
If Canon_ij_XXXX does not appear on the list, see NOTE to
setup the printer and wait until Canon_ij_XXXX appears.
XXXX varies depending on your printer.
The extended survey screen appears on the rst startup.
d Tap the printer icon on the top left of the screen.
e Tap Register Printer.
f Tap Printer Setup.
g Tap Connect via wireless router (recommended).
If the printer is not detected and the Alarm lamp is lit, press the
RESUME/CANCEL button and start over from a.
h Tap OK.
i Select the SSID of your wireless router connected to your
device.
j When a password entry screen appears, enter the password
for your wireless router and tap OK.
k Wait for a while until the printer is detected.
l When the printer is detected, tap your printer's model name.
m Change the printer name as needed and tap OK.
n When the printer information appears on the screen, the
setup is complete.
Changing the connection method
NOTE
e Enter the password.
The default password is the serial number of the printer. The serial number can be seen at the label on
the back of the printer.
d Turn on the Wi-Fi on the Wi-Fi setting and tap XXXXXX-
iP110series.
If XXXXXX-iP110series does not appear on the list, start over
from b.
If Canon_ij_XXXX does not appear:
If a message saying "Printer is not registered. Perform printer setup?"
does not appear at Canon PRINT Inkjet/SELPHY startup:
Do the following on the printer.
b Check that the Wi-Fi lamp ashes quickly and
the POWER lamp is lit.
Do the following if this screen appears.
When the SSID of the desired wireless router appears, tap it.
Make sure your device is connected to the same SSID.
If the SSID of the desired wireless router does not appear or you are
not sure, tap If no target wireless router.
If Select Router screen appears:
Connecting the printer via wireless LAN
connection directly
a Check the status of the Wi-Fi lamp.
If the Wi-Fi lamp ashes, press the RESUME/CANCEL button. The Wi-Fi lamp is lit.
If the Wi-Fi lamp does not ash, proceed to b.
c Tap Settings on the home screen of the smartphone/tablet.
b Press and hold the Wi-Fi button until the POWER lamp
ashes 3 times, and then release the button.
The connection is nished.
Connecting the printer via a wireless router/
Connecting the printer via wireless LAN connection
directly
1. Install Canon PRINT Inkjet/SELPHY to your smartphone/tablet.
For information about Canon PRINT Inkjet/SELPHY, refer to "What is Canon PRINT
Inkjet/SELPHY?".
2. Connect your device to the printer using the Canon PRINT Inkjet/
SELPHY.
* This procedure is described based on Canon PRINT Inkjet/SELPHY 2.2.0.
In other versions, follow the application instructions to complete the setup.
Connecting the printer via a wireless router
Connecting the printer via wireless LAN connection directly
c Tap Yes.
b Tap PRINT which was installed.
The license agreement screen appears on the rst startup.
If the screen in c does not appear, see NOTE to setup the
printer and wait until the screen appears.
1. Make sure the SSID of the desired
wireless router appears and tap
Yes.
2. Enter the password of the wireless
router and tap OK.
1. Tap Yes.
2. Tap OK.
d Follow the on-screen instruction.
If the printer is not detected and the Alarm lamp is lit, press the
RESUME/CANCEL button and start over from b.
e Wait for a while until the printer is detected.
f When the printer is detected, tap your printer's model name.
g Change the printer name as needed and tap OK.
h When the printer information appears on the screen, the
setup is complete.
a Press and hold the Wi-Fi button until the
POWER lamp ashes twice, and then release
the button.
If you usually use the printer via a wireless router and want to use it without the router,
change the connection method to the direct connection.
For information about changing the connection method, refer to the Online Manual
below.
"Changing Connection Method between Machine and Smartphone/Computer"
Visit the following website from your device, click
Read Online Manual, and then
select your OS.
If the screen asking you to select a product name appears before selecting an
operating system, select iP110.
Restriction for connecting to the printer via wireless LAN connection
directly
• You may not connect your smartphone/tablet to the Internet wirelessly during
connecting the printer to your smartphone/tablet directly. In that case, you may be
charged depending on the contract with your service provider.
You may not connect your device equipped with Android to the Internet.
• Up to 5 devices can be connected to the printer via wireless LAN connection directly.
Have you nished all the steps in the Getting Started 1?
Please read this manual after completing the printer setup in the
Getting Started 1.
Canon PRINT Inkjet/SELPHY is useful to print photos and documents.
Install the Canon PRINT Inkjet/SELPHY and follow the on-screen instructions to register the printer. For
information about Canon PRINT Inkjet/SELPHY, refer to "What is Canon PRINT Inkjet/SELPHY?".
a Turn on the Wi-Fi on the Wi-Fi setting of the smartphone/tablet.
If you connect the printer via a wireless router, connect the smartphone/tablet to the
wireless router.
QT6-1453-V01
PRINTED IN XXXXXXXX
2
Seleccione un método de conexión de la impresora.
¿Qué es Canon PRINT Inkjet/SELPHY?
: Busque "Canon PRINT" en App Store.
: Busque "Canon PRINT" en Google Play.
O acceda al sitio web escaneando el código de la derecha.
Guía de inicio 2
Usuarios que han seleccionado en
la Guía de inicio 1 y han finalizado la
conexión con el ordenador
Canon PRINT Inkjet/SELPHY le permite imprimir fotos y documentos fácilmente desde
su teléfono inteligente y tableta.
Puede usar la impresora desde su teléfono
inteligente/tableta conectado el dispositivo a
un enrutador inalámbrico.
Canon PRINT Inkjet/SELPHY es útil para
imprimir fotos y documentos.
Instale la Canon PRINT Inkjet/SELPHY y siga
las instrucciones en pantalla para registrar la
impresora.
Otros usuarios
Conexión de la impresora mediante un enrutador inalámbrico
Conexión de la impresora mediante la conexión LAN inalámbrica
directamente (Conexión directa (Direct Connection))
iOS
Android
iOS
Android
Conexión de la impresora mediante un
enrutador inalámbrico
1. Instale Canon PRINT Inkjet/SELPHY en su teléfono inteligente/
tableta.
Para obtener información acerca de Canon PRINT Inkjet/SELPHY, consulte "¿Qué es
Canon PRINT Inkjet/SELPHY?".
2. Conecte su dispositivo a la impresora usando la Canon PRINT
Inkjet/SELPHY.
* Este procedimiento se describe basándose en Canon PRINT Inkjet/SELPHY 2.2.0.
En otras versiones, siga las instrucciones de la aplicación para completar la instalación.
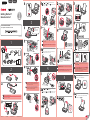
a Puntee en Ajustes (Settings) en la pantalla de inicio del
teléfono inteligente/la tableta.
c Puntee en PRINT que fue instalado.
b Active la Wi-Fi en el ajuste de Wi-Fi y puntee en Canon_ij_
XXXX.
Si Canon_ij_XXXX no aparece en la lista, consulte NOTA para
congurar la impresora, y espere hasta que aparezca Canon_ij_
XXXX.
XXXX varía dependiendo de su impresora.
La pantalla encuesta ampliada aparece en la primera instalación.
d Puntee en el icono de la impresora de la parte superior
izquierda de la pantalla.
e Puntee en Registrar impresora (Register Printer).
f Puntee en Preparar impresora (Printer Setup).
g Puntee en Conectar mediante router inalámbrico
(recomendado) (Connect via wireless router
(recommended)).
Si no se detecta la impresora y la luz Alarma (Alarm) está
encendida, pulse el botón REANUDAR/CANCELAR (RESUME/
CANCEL) y comience de nuevo desde a.
h Puntee en Aceptar (OK).
i Seleccione el SSID de su enrutador inalámbrico conectado a
su dispositivo.
j Cuando aparezca una pantalla de introducción de
contraseña, introduzca la contraseña para su enrutador
inalámbrico y puntee en Aceptar (OK).
k Espere un poco hasta que se detecte la impresora.
l Cuando se detecte la impresora, puntee en el nombre del
modelo de su impresora.
m Cambie el nombre de la impresora según sea necesario y
puntee en Aceptar (OK).
n Cuando aparezca la información de la impresora en la
pantalla, la instalación habrá nalizado.
Cambio del método de conexión
NOTA
e Introduzca la contraseña.
La contraseña predeterminada es el número de serie de la impresora. El número de serie se puede ver
en la etiqueta de la parte posterior de la impresora.
d Active la Wi-Fi en el ajuste de Wi-Fi y puntee en XXXXXX-
iP110series.
Si XXXXXX-iP110series no aparece en la lista, comience de
nuevo desde b.
Si no aparece Canon_ij_XXXX:
Si aparece un mensaje diciendo "Impresora no registrada. ¿Realizar
preparación de impresora? (Printer is not registered. Perform printer setup?)"
no aparece al iniciar Canon PRINT Inkjet/SELPHY:
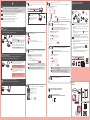
Realice lo siguiente en la impresora.
b Compruebe que la luz Wi-Fi parpadee
rápidamente y la luz ENCENDIDO (POWER)
esté encendida.
Si aparece esta pantalla, realice lo siguiente.
Cuando aparezca el SSID del enrutador inalámbrico deseado,
puntee en él.
Asegúrese de que su dispositivo esté conectado al mismo SSID.
Si el SSID del enrutador inalámbrico no aparece o no está seguro,
puntee en Si no hay router inalámbrico (If no target wireless
router).
Si aparece la pantalla Seleccionar router (Select Router):
Conexión de la impresora mediante la conexión
LAN inalámbrica directamente
a Compruebe el estado de la Wi-Fi luz.
Si la luz Wi-Fi parpadea, pulse el botón REANUDAR/CANCELAR (RESUME/CANCEL). La luz Wi-Fi está encendida.
Si la luz Wi-Fi no parpadea, continúe con b.
c Puntee en Ajustes (Settings) en la pantalla de inicio del
teléfono inteligente/la tableta.
b Mantenga pulsado el botón Wi-Fi hasta que la luz
ENCENDIDO (POWER) parpadee 3 veces y después
suelte el botón.
La conexión ha nalizado.
Conexión de la impresora mediante un
enrutador inalámbrico/Conexión de la impresora
mediante la conexión LAN inalámbrica directamente
1. Instale Canon PRINT Inkjet/SELPHY en su teléfono inteligente/
tableta.
Para obtener información acerca de Canon PRINT Inkjet/SELPHY, consulte "¿Qué es
Canon PRINT Inkjet/SELPHY?".
2. Conecte su dispositivo a la impresora usando la Canon PRINT
Inkjet/SELPHY.
* Este procedimiento se describe basándose en Canon PRINT Inkjet/SELPHY 2.2.0.
En otras versiones, siga las instrucciones de la aplicación para completar la instalación.
Conexión de la impresora mediante un enrutador
inalámbrico
Conexión de la impresora mediante la conexión LAN inalámbrica directamente
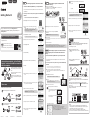
c Puntee en Sí (Yes).
b Puntee en PRINT que fue instalado.
La pantalla del acuerdo de licencia aparece en la primera
instalación.
Si no aparece la pantalla c, consulte NOTA para congurar la
impresora y espere hasta que aparezca la pantalla.
1. Asegúrese de que aparezca el
SSID del enrutador inalámbrico y
puntee en Sí (Yes).
2. Introduzca la contraseña del
enrutador inalámbrico y puntee en
Aceptar (OK).
1. Puntee en Sí (Yes).
2. Puntee en Aceptar (OK).
d Siga las instrucciones que aparecen en pantalla.
Si no se detecta la impresora y la luz Alarma (Alarm) está
encendida, pulse el botón REANUDAR/CANCELAR (RESUME/
CANCEL) y comience de nuevo desde b.
e Espere un poco hasta que se detecte la impresora.
f Cuando se detecte la impresora, puntee en el nombre del
modelo de su impresora.
g Cambie el nombre de la impresora según sea necesario y
puntee en Aceptar (OK).
h Cuando aparezca la información de la impresora en la
pantalla, la instalación habrá nalizado.
a Mantenga pulsado el botón Wi-Fi hasta que la
luz ENCENDIDO (POWER) parpadee dos veces
y después suelte el botón.
Si normalmente utiliza la impresora mediante un enrutador inalámbrico y desea usarla
sin el enrutador, cambie el método de conexión a la conexión directa.
Para obtener información sobre el cambio del método de conexión, consulte el Manual
en línea a continuación.
"Cambio del método de conexión entre el equipo y un teléfono inteligente/ordenador"
Visite el siguiente sitio web desde su dispositivo, haga clic en
Leer el Manual en
línea (Read Online Manual), y después seleccione su sistema operativo.
Si aparece la pantalla que le solicita que seleccione un nombre de producto antes de
seleccionar un sistema operativo, seleccione iP110.
Restricción para conectar con la impresora mediante la conexión
LAN inalámbrica directamente
• No puede conectar su teléfono inteligente/tableta a Internet inalámbricamente
durante la conexión de la impresora con su teléfono inteligente/tableta directamente.
En ese caso, se le cobrará en función del contrato con su proveedor de servicios.
No puede conectar su dispositivo equipado con Android a Internet.
• Se puede conectar un máximo de 5 dispositivos a la impresora mediante la conexión
LAN inalámbrica directamente.
¿Ha nalizado todos los pasos de la Guía de inicio 1?
Lea este manual después de completar la instalación de la impresora
de acuerdo con la Guía de inicio 1.
Canon PRINT Inkjet/SELPHY es útil para imprimir fotos y documentos.
Instale la Canon PRINT Inkjet/SELPHY y siga las instrucciones en pantalla para registrar la impresora.
Para obtener información acerca de Canon PRINT Inkjet/SELPHY, consulte "¿Qué es Canon PRINT Inkjet/
SELPHY?".
a Active la Wi-Fi en el ajuste de Wi-Fi del teléfono inteligente/la tableta.
Si conecta la impresora mediante un enrutador inalámbrico, conecte el teléfono inteligente/
la tableta al enrutador inalámbrico.
  • Page 1 1
  • Page 2 2
  • Page 3 3
  • Page 4 4

Canon PIXMA iP110 El manual del propietario

Tipo
El manual del propietario

La Canon PIXMA iP110 es una impresora inalámbrica multifunción que imprime, copia y escanea documentos y fotos. Es ideal para usuarios domésticos y de pequeñas oficinas que buscan una impresora asequible y fácil de usar. Con su diseño compacto y elegante, la iP110 cabe fácilmente en cualquier escritorio. También es muy fácil de configurar y usar. Simplemente conéctalo a tu computadora o dispositivo móvil y comienza a imprimir, copiar o escanear. La iP110 también es muy eficiente energéticamente, lo que te ayudará a ahorrar dinero en tus facturas de electricidad.

En otros idiomas