Jabra VXi OmniCord™: Una solución de audio para llamadas telefónicas clara y cómoda.
Compatibilidad: Funciona con una amplia gama de teléfonos, incluidos Polycom®, ShoreTel®, Panasonic y Avaya®. Configuración sencilla: Conecta el OmniCord al teléfono y al auricular, ajusta la configuración de compatibilidad y listo para usar. Ganancia de micrófono ajustable: Permite ajustar el nivel del micrófono para una calidad de sonido óptima. Comodidad durante todo el día: Incluye una diadema ajustable y almohadillas suaves para uso prolongado. Cable Quick Disconnect: Permite desconectar el auricular fácilmente cuando sea necesario.


Transcripción de documentos
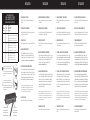
VXI LIMITED WARRANTY GARANTIE LIMITÉE DE VXi GARANTÍA LIMITADA DE VXi 1. VXi warrants that your product will be free from defects in material and workmanship for one year from the date of purchase. If, during that period from the date of purchase, your product fails to work due to a defect in material or workmanship, VXi will repair or replace the product, at its election, free of charge. Without proof of purchase, the warranty period begins on the date of manufacture. Consumable components (for example, cushion, battery and fuse) are not included in this warranty. 1. VXi garantit que ce produit est exempt de tout vice de matériau et de fabrication pour une période de un an à partir de la date d’achat. Si durant cette période consécutive à la date d’achat, votre produit devient défectueux en raison de ses matériaux ou de sa fabrication, VXI le réparera ou le remplacera, à sa discrétion, gratuitement. À défaut de preuve d’achat, la garantie commence à partir de la date de fabrication. Les composants consommables (par exemple, les coussinets, piles ou fusibles) ne sont pas couverts par cette garantie. 1. VXi garantiza que su producto estará libre de defectos materiales y de fabricación por un año desde la fecha de compra. Si, durante ese periodo desde la fecha de compra, su producto falla por un defecto material o de fabricación, VXi reparará o reemplazará el producto, a su criterio, sin cargo. Sin prueba de compra, el periodo de garantía comienza desde la fecha de fabricación. Los componentes de consumo (por ejemplo, fundas, batería y fusible) no se incluyen en esta garantía. 2. The foregoing limited warranty does not cover equipment failure attributable to accident, improper operation, misuse, abuse, or any cause other than defects in the materials or workmanship of VXi’s products. 2. La garantie limitée susmentionnée ne couvre pas les dommages causés par un accident, un mauvais usage, une utilisation abusive ou tout autre défaut n’étant pas lié aux matériaux ou à la fabrication des produits VXi. 3. VXi’s obligations under this warranty are limited to repair or replacement (at our option) of any defectivepart returned to VXi at the customer’s expense. Returned products require a Return Authorization that maybe obtained by calling 800-742-8588. Products returned to VXi for repair under this warranty will be returnshipped to the customer at VXi’s expense. 3. Au titre de cette garantie, les obligations de VXi se limitent à réparer ou remplacer (à notre discrétion) toute pièce défectueuse envoyée à VXi aux frais du client. Les produits renvoyés doivent être accompagnés d’un numéro d’Autorisation de renvoi, pouvant être obtenu en appelant au 800-742-8588. Les produits renvoyés à VXi pour réparation sous cette garantie seront ensuite renvoyés au client aux frais de VXi. 4. THIS LIMITED WARRANTY IS IN LIEU OF ALL OTHER WARRANTIES, EXPRESS OR IMPLIED, INCLUDING THE IMPLIED WARRANTIES OF MERCHANTABILITY AND FITNESS FOR A PARTICULAR PURPOSE. Some jurisdictions do not permit the exclusion of implied warranties and the foregoing exclusions may not apply to you. 5. In no event shall VXi be responsible for any other damages whatsoever, including direct, indirect, special, incidental, consequential, or other damages for breach of this or any other warranty, express or implied. 2. La garantía limitada anterior no abarca fallas del equipo que se atribuyan a accidentes, operación incorrecta, mal uso, abuso o cualquier otra causa que no sea defectos materiales o de fabricación de los productos VXi. 3. Las obligaciones de VXi bajo esta garantía quedan limitadas a reparar o reemplazar (a nuestro criterio) cualquier parte defectuosa que se devuelva a VXi a expensas del cliente. Los productos devueltos requieren una autorización de retorno que se puede obtener llamando al 800-742-8588. Los productos que se devuelvan a VXi para ser reparados con esta garantía serán enviados al cliente a cargo de VXi. 4. CETTE GARANTIE LIMITÉE REMPLACE TOUTE AUTRE GARANTIE, EXPRESSE OU IMPLICITE, Y COMPRIS LES GARANTIES IMPLICITES DE CONFORMITÉ ET D’USAGE. Certaines juridictions n’acceptent pas l’exclusion des garanties implicites, et il est possible que les exclusions ci-dessus ne soient pas applicables. 4. LA PRESENTE GARANTÍA ES LIMITADA Y SUSTITUYE A CUALQUIER OTRA GARANTÍA, TANTO EXPRESA COMO IMPLÍCITA, INCLUIDAS LAS GARANTÍAS IMPLÍCITAS DE COMERCIABILIDAD Y LAS GARANTÍAS IMPLÍCITAS DE IDONEIDAD PARA UN FIN EN PARTICULAR. Algunas jurisdicciones no permiten la exclusión de garantías implícitas y las exclusiones anteriores pueden no aplicarse en su caso. 5. VXi ne peut en aucun cas être tenu responsable de n’importe quels autres dommages, qu’ils soient directs, indirects, spéciaux ou accessoires, ni de la rupture de cette garantie ou d’une autre, expresse ou implicite. 5. En ningún caso, VXi será responsable de ningún otro daño, entre ellos, daños directos, indirectos, especiales, accidentales, consecuentes u otros daños por el incumplimiento de esta o cualquier otra garantía, expresa o implícita. EINGESCHRÄNKTE GARANTIE VON VXI 1. VXi gewährleistet, dass Ihr Produkt in den ersten einem (1) Jahr ab Kaufdatum frei von Materialdefekten und Arbeitsfehlern ist. Wenn Ihr Produkt innerhalb dieses Zeitraums ab dem Kaufdatum auf Grund eines Material- oder Verarbeitungsfehlers nicht mehr funktionieren sollte, sorgt VXi nach eigenem Ermessen für eine kostenlose Reparatur bzw. einen kostenlosen Umtausch des Produkts. Ohne Kaufbeleg beginnt der Garantiezeitraum am Fertigungstag. Verbrauchsartikel (wie beispielsweise Polster/Kissen, Akku und Sicherung) fallen nicht unter diese einjährige Garantie. 2. Die zuvor erwähnte eingeschränkte Garantie umfasst keinen Geräteausfall auf Grund von Unfällen, unsachgemäßer Bedienung, Missbrauch, falscher Verwendung oder anderen Ursachen mit Ausnahme von Material- oder Verarbeitungsfehlern von VXi-Produkten. 3. Die Verpflichtungen von VXi gemäß dieser Garantie sind auf die Reparatur oder den Austausch (in unserem Ermessen) von defekten Teilen beschränkt, die auf Kosten des Kunden an VXi zurückgesendet werden. Für eingesendete Produkte ist eine Rücksendungsautorisierung erforderlich, die unter der Rufnummer +1-800-742-8588 (USA) erhältlich ist. Für Produkte, die unter dieser Garantie zur Reparatur an VXi gesendet werden, übernimmt VXi die Rücksendungskosten. 4. DIESE EINGESCHRÄNKTE GARANTIE ERSETZT ALLE ANDEREN GARANTIEN, AUSDRÜCKLICH ODER STILLSCHWEIGEND, EINSCHLIESSLICH DER STILLSCHWEIGENDEN GARANTIEN DER MARKTFÄHIGKEIT UND DER EIGNUNG FÜR EINEN BESTIMMTEN VERWENDUNGSZWECK. Einige Gesetzgebungen gestatten den Ausschluss stillschweigender Garantien nicht, daher gelten die oben aufgeführten Ausnahmen für Sie möglicherweise nicht. 5. VXi ist auf keine Fall haftbar für jedwede anderen Schäden, ganz gleich, ob es sich um mittelbare, unmittelbare, spezifische, beiläufig entstandene Schäden oder um Folgeschäden handelt, die sich aus einer Verletzung dieser oder einer anderen Garantie – ausdrücklich oder stillschweigend – ergeben. VXi Corporation | 271 Locust Street, Dover, NH 03820 USA Toll Free | Sans frais | Número gratuito | Gebührenfrei: (800) 742-8588 Phone | Téléphone | Teléfono | Telefon: 1 603 742-2888 www.vxicorp.com PN 203368 © 2012 VXi Corporation Printed in China | Imprimé en Chine | Impreso en China | In China gedruckt USER GUIDE OmniCord ™ INSTALLATION PHONE COMPATIBILITY GUIDE GUIDE DE COMPATIBILITÉ DU TÉLÉPHONE GUÍA DE COMPATIBILIDAD DEL TELÉFONO LEITFADEN ZUR TELEFONKOMPATIBILITÄT Setting Réglage Configuración Einstellung Cord Cordon Cable Schnur Phone types Types de téléphone Tipos de teléfono Telefontypen A 1026 Most Common: Polycom®, ShoreTel®, Panasonic, others. Les plus communs : Polycom®, ShoreTel®, Panasonic et autres. Más común: Polycom®, ShoreTel®, Panasonic y otros. Am Gängigsten: Polycom®, ShoreTel®, Panasonic, andere. B 1029 Cisco® 6900, 7900, 8900, and 9900 Series phones Téléphones Cisco® séries 6900, 7900, 8900 et 9900 Series de teléfono Cisco® 6900, 7900, 8900 y 9900 Cisco®-Telefon der Serien 6900, 7900, 8900 und 9900 C 1027 Avaya® 1600, 9600, and 96x1 Series phones Téléphones Avaya® séries 1600, 9600 et 96x1 Series de teléfono Avaya® 1600, 9600 y 96x1 Avaya®-Telefone der Serien 1600, 9600 und 96x1 1. PLUG OMNICORD™ INTO PHONE Plug the RJ9 connector on the OmniCord into the headset port on your phone. 2. CONNECT HEADSET INTO OMNICORD Insert the Quick Disconnect (QD) plug on the end of your headset cord into the QD plug on the OmniCord. 3. OPEN ACCESS DOOR Remove the notched end of the cover to access the OmniCord controls. 4. SET THE COMPATIBILITY SWITCH Set the compatibility switch to the A, B, or C position; for basic setup guidelines, refer to the Phone Compatibility Guide on the left. If your specific phone isn’t shown on the chart, please refer to the VXi compatibility guide found at www.vxicorp.com/compatibility_guide. 5. SET THE MICROPHONE VOLUME ADJUSTMENT Connect RJ9 Connector into headset port on the phone. Insérez le raccord RJ9 dans le port du casque du téléphone. The OmniCord features an eight-position microphone gain adjustment to match the microphone level to the phone. If the person on the other end of the call says that your voice is too loud or too soft, increase or decrease the microphone volume by adjusting the slider. Position #1 gives you minimum (no additional) gain, position #8 delivers maximum gain. Inserte el conector RJ9 en el puerto para auricular del teléfono. Schließen Sie den Stecker RJ9 am Headset-Anschluss des Telefons an. Connect the Quick Disconnect (QD) plug to the headset. Branchez la prise Quick Disconnect (QD) dans le casque. Note: Certain phones will not provide the power needed to operate the OmniCord amplifier. Position #1 is provided as a pass-thru. Use this if the mic gain is not functioning correctly (e.g. the person on the other end of the test call is receiving poor or distorted audio). Conecte el enchufe de desconexión rápida (QD) al auricular. Schließen Sie den Schnellkupplungs (Quick Disconnect, QD)Stecker am Headset an. 6. CLOSE ACCESS DOOR Return the notched end of the cover to its original position. Microphone volume adjustment Compatibility switch Réglage volume du téléphone Commutateur de compatibilité Ajuste del volumen del micrófono Interruptor de compatibilidad Einstellung der Mikrofonlautstärke Kompatibilitätsschalter INSTALLATION 1. BRANCHER L’OMNICORD DANS LE TÉLÉPHONE Branchez le raccord RJ9 sur l’OmniCord dans le port pour casque de votre téléphone. 2. BRANCHER LE CASQUE AU OMNICORD Insérez la prise Quick Disconnect (QD) située au bout du cordon de votre casque dans la prise QD du Omnicord. 3. OUVRIR LE VOLET D’ACCÈS Retirez l’extrémité encochée du couvercle pour accéder aux commandes de l’OmniCord. 4. RÉGLER LE COMMUTATEUR DE COMPATIBILITÉ Réglez le commutateur de compatibilité à la position A, B ou C; pour les directives de configuration de base, consultez le Guide de compatibilité du téléphone à gauche. Si votre téléphone n’apparaît pas dans le tableau, veuillez consulter le guide de compatibilité VXi au www.vxicorp.com/compatibility_guide. 5. RÉGLER LE VOLUME DU MICROPHONE INSTALACIÓN 1. ENCHUFE EL OMNICORD™ EN EL TELÉFONO Enchufe el conector RJ9 del OmniCord en el puerto para auricular de su teléfono. 2. CONECTE EL AURICULAR A OMNICORD Inserte el enchufe de desconexión rápida (QD, por sus siglas en inglés) ubicado al extremo del cable del auricular en la toma QD del OmniCord. 3. ABRA LA PUERTA DE ACCESO Retire el extremo ranurado de la cubierta para obtener acceso a los controles de OmniCord. 4. POSICIONE EL INTERRUPTOR DE COMPATIBILIDAD Posicione el interruptor de compatibilidad a la posición A, B o C; para obtener pautas de configuración básica, consulte la Guía de compatibilidad del teléfono al lado izquierdo. Si su teléfono específico no se muestra en el cuadro, por favor consulte la guía de compatibilidad de VXi que se encuentra en www.vxicorp.com/compatibility_guide. 5. POSICIONE EL AJUSTE DE VOLUMEN DEL MICRÓFONO INSTALLATION 1. SCHLIESSEN SIE OMNICORD™ AM TELEFON AN Schließen Sie den Stecker RJ9 am OmniCord am Headset-Anschluss Ihres Telefons an. 2. ANSCHLUSS DES HEADSETS AM OMNICORD Führen Sie den Schnellkupplungs (Quick Disconnect, QD)-Stecker am Ende Ihres Headset-Kabels in den QD-Anschluss am OmniCord ein. 3. ÖFFNEN DER ZUGANGSKLAPPE Entfernen Sie das eingekerbte Ende der Abdeckung, um auf die OmniCord-Steuerungen zugreifen zu können. 4. EINSTELLEN DES KOMPATIBILITÄTSSCHALTERS Stellen Sie den Kompatibilitätsschalter in die Stellung A, B oder C. Grundlegende Konfigurationsrichtlinien erhalten Sie im Leitfaden zur Telefonkompatibilität auf der linken Seite. Wenn Ihr spezielles Telefon nicht im Diagramm angezeigt wird, finden Sie nähere Angaben im VXiKompatibilitätsleitfaden unter www.vxicorp.com/compatibility_guide. 5. EINSTELLUNG DER MIKROFONLAUTSTÄRKENREGELUNG L’OmniCord permet de régler le gain du microphone sur huit positions afin d’égaler le volume du téléphone. Si la personne à l’autre bout de l’appareil dit que votre voix est trop forte ou trop faible, augmentez ou diminuez le volume du microphone en ajustant le curseur. La première position offre un gain minimal (sans gain supplémentaire), tandis que la huitième position offre un gain maximal. OmniCord incluye un ajuste de micrófono de ocho posiciones para igualar el nivel del micrófono con el teléfono. Si la persona con la que está hablando por teléfono dice que su voz se escucha muy alta o muy baja, suba o baje el volumen del micrófono al ajustar el control deslizante. La posición n° 1 es el volumen mínimo (no adicional); la posición n° 8 es el volumen máximo. Das OmniCord umfasst eine Mikrofonverstärkungsjustierung mit 8 Positionen, um einen Abgleich der Mikrofonlautstärke mit dem Telefon zu ermöglichen. Wenn der Gesprächspartner anmerkt, Ihre Stimme klinge zu laut oder zu leise, erhöhen oder verringern Sie die Mikrofonlautstärke mit dem Schieberegler. In Position 1 haben Sie minimale (keine zusätzliche) Verstärkung. In Position 8 erhalten Sie die maximale Verstärkung. Remarque : certains téléphones ne fournissent pas l’énergie nécessaire à l’utilisation de l’amplificateur de l’OmniCord. La première position ne sert qu’à l’interconnexion. Utilisez-la si le gain du microphone ne fonctionne pas correctement (par ex., si la réception audio de la personne à l’autre bout du fil est mauvaise ou déformée). Nota: Ciertos teléfonos no brindarán la potencia que se necesita para operar el amplificador OmniCord. La posición n° 1 actúa como un sistema de paso. Utilice esto si el volumen del micrófono no está funcionando correctamente (por ejemplo, la persona del otro lado de la llamada de prueba recibe un audio bajo o distorsionado). Hinweis: Bestimmte Telefone verfügen nicht über die erforderliche Leistung für den Betrieb des OmniCord-Verstärkers. Position 1 dient zum Durchschleifen des Signals. Verwenden Sie diese Position, wenn die Mikrofonverstärkung nicht korrekt funktioniert (wenn die Audiowiedergabe beim Gesprächspartner des Testanrufs beispielsweise schlecht oder verzerrt empfangen wird). 6. FERMER LE VOLET D’ACCÈS Replacez l’extrémité encochée dans sa position originale. 6. CIERRE LA PUERTA DE ACCESO Vuelva a colocar el extremo ranurado de la cubierta en su posición original. 6. SCHLIESSEN DER ZUGANGSKLAPPE Führen Sie das eingekerbte Ende der Abdeckung wieder in die Originalposition zurück.-
 1
1
-
 2
2


Jabra VXi OmniCord™ Manual de usuario
- Tipo
- Manual de usuario
- Este manual también es adecuado para
Jabra VXi OmniCord™: Una solución de audio para llamadas telefónicas clara y cómoda.
Compatibilidad: Funciona con una amplia gama de teléfonos, incluidos Polycom®, ShoreTel®, Panasonic y Avaya®. Configuración sencilla: Conecta el OmniCord al teléfono y al auricular, ajusta la configuración de compatibilidad y listo para usar. Ganancia de micrófono ajustable: Permite ajustar el nivel del micrófono para una calidad de sonido óptima. Comodidad durante todo el día: Incluye una diadema ajustable y almohadillas suaves para uso prolongado. Cable Quick Disconnect: Permite desconectar el auricular fácilmente cuando sea necesario.
en otros idiomas
- français: Jabra VXi OmniCord™ Manuel utilisateur
- English: Jabra VXi OmniCord™ User manual
- Deutsch: Jabra VXi OmniCord™ Benutzerhandbuch