Canon PIXMA TS6120 El manual del propietario
- Categoría
- Cartuchos de tinta
- Tipo
- El manual del propietario
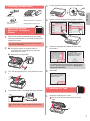
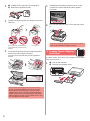
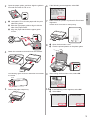
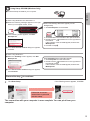
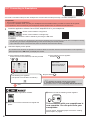
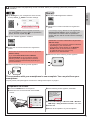
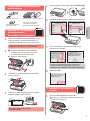
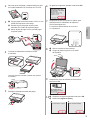
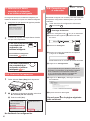
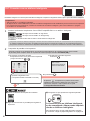
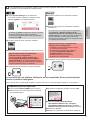
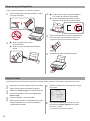
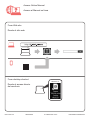
La Canon PIXMA TS6120 es una impresora multifunción inalámbrica que te permite imprimir, escanear, copiar y enviar faxes desde la comodidad de tu hogar u oficina. Con sus cinco tintas individuales, esta impresora ofrece impresiones nítidas y vibrantes, perfectas para fotos y documentos. Además, con su capacidad de impresión dúplex automática, podrás ahorrar papel y tiempo al imprimir documentos de varias páginas.
La Canon PIXMA TS6120 es una impresora multifunción inalámbrica que te permite imprimir, escanear, copiar y enviar faxes desde la comodidad de tu hogar u oficina. Con sus cinco tintas individuales, esta impresora ofrece impresiones nítidas y vibrantes, perfectas para fotos y documentos. Además, con su capacidad de impresión dúplex automática, podrás ahorrar papel y tiempo al imprimir documentos de varias páginas.


-
 1
1
-
 2
2
-
 3
3
-
 4
4
-
 5
5
-
 6
6
-
 7
7
-
 8
8
-
 9
9
-
 10
10
-
 11
11
-
 12
12
-
 13
13
-
 14
14
-
 15
15
-
 16
16
-
 17
17
-
 18
18
-
 19
19
-
 20
20


Canon PIXMA TS6120 El manual del propietario
- Categoría
- Cartuchos de tinta
- Tipo
- El manual del propietario
La Canon PIXMA TS6120 es una impresora multifunción inalámbrica que te permite imprimir, escanear, copiar y enviar faxes desde la comodidad de tu hogar u oficina. Con sus cinco tintas individuales, esta impresora ofrece impresiones nítidas y vibrantes, perfectas para fotos y documentos. Además, con su capacidad de impresión dúplex automática, podrás ahorrar papel y tiempo al imprimir documentos de varias páginas.
en otros idiomas
- English: Canon PIXMA TS6120 Owner's manual
Artículos relacionados
-
Canon PIXMA TR8520 El manual del propietario
-
Canon PIXMA TR7520 El manual del propietario
-
Canon PIXMA TS9120 El manual del propietario
-
Canon PIXMA TS8120 El manual del propietario
-
Canon PIXMA TS6150 Manual de usuario
-
Canon PIXMA TS5120 El manual del propietario
-
Canon PIXMA TR7550 Manual de usuario
-
Canon PIXMA TS702 El manual del propietario
-
Canon PIXMA G6020 Guía de inicio rápido
-
Canon PIXMA G5020 Guía de inicio rápido