Timex Data Link USB Guía del usuario
- Categoría
- Relojes
- Tipo
- Guía del usuario

Congratulations on your purchase of the
Timex
®
Ironman* Data Link
®
USB watch.
It’s a feature-rich Ironman sport watch.
It’s a PDA for your wrist.
This simple guide will get you started with
your new Timex Ironman Data Link USB
watch and help you use the many features
of the watch and software.
For complete instructions on using this
watch, see the Watch Help and Software
Help in the software. Printable versions
are loaded automatically onto your com-
puter when you install the Timex Data
Link USB software.
WHAT YOU NEED
QUICK START GUIDE
INSTALL THE SOFTWARE
While a computer is not needed for most
watch functions, the software makes
watch setting easy and unlocks powerful
features such as appointment and contact
management. Every feature can be set
simply and easily with a computer.
You need the following to take advantage
of all the watch functions:
The included CD-ROM with the Timex
Data Link
®
USB software.
The supplied USB cable.
A PC with the following configuration:
• Microsoft
®
Windows
®
98 2nd Ed.,
2000 (with Service Pack 1 or higher),
ME, XP or higher operating system
• 30 MB of free hard disk space
• USB port
The mini CD-ROM works in any standard
CD-ROM drive with a tray; place the CD-
ROM in the center of the tray. Visit
www.timex.com to download the software
if you have any trouble.
To install the software, load the CD-ROM
into your computer. A menu should auto-
matically appear (if not, run INTRO.EXE
on the CD). Select "Install Timex Data Link
USB." If you wish to keep track of your
workouts on the PC, you may also select
"Install Timex Trainer."
BATTERY
The life of a factory-installed battery is
estimated to be about 2 years, but battery
life will vary depending on actual usage.
When the watch's battery is low, the mes-
sage LO BATT is displayed in place of the
date, at the beginning of each day. The
reminder disappears when you change
the display. You should replace the battery
as soon as possible. While the watch will
continue to run, a low battery may cause
communication problems.
To avoid permanent damage to the watch,
Timex strongly recommends that you
have the battery replaced by a jeweler.
WATER RESISTANCE
This watch is rated as water resistant as
marked on the watch. A 100 m water-
resistant watch withstands pressure to 172
p.s.i. (equals immersion to 330 feet or 100
meters below sea level). A 50 m water-
resistant watch withstands pressure to 86
p.s.i. (equals immersion to 165 feet or 50
meters below sea level).
Do not press the watch buttons while
under water, as the watch will not remain
water resistant.
TECHNICAL SUPPORT
If you have any questions about the opera-
tion of your watch or its software, please
refer to the Watch Help and the Software
Help. For any questions not answered by
the Help, check the Timex website or call
the support line:
•Website: http://www.timex.com
•Technical support line in the US and
Canada: 1-800-328-2677
•Technical support line from other than
US and Canada: 1-501-370-5775
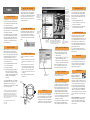
CONNECT THE WATCH
Connect the USB cable to your watch as
follows:
1. Insert the rectangular end of the USB
cable into an open USB port on your
PC.
2. Hook the bottom of the connector on
the other end of the cable to the left
side of the watch below the contacts.
3. Pull the connector lever down and
hook the upper end of the connector to
the watch.
4. The software automatically reads the
watch’s data.
Connector
Lever
USB
Connector
Connector
Hook
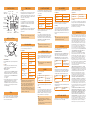
Indicates how much of the watch data
memory will be used by the data you
have selected to send. If it is more than
100%, select less data to send.
Click here to send data
from the computer to
the watch.
Double-click on
a mode to edit
its data.
IMPORTANT
The Timex Ironman Data Link USB Watch
is not a medical device. It should not be
used in the diagnosis, treatment, or pre-
vention of any disease or other medical
condition. Users should have alternate
methods for such purposes.
RUN THE SOFTWARE
The installation will place a watch icon in
the system tray at the lower right of the
screen. You may start the software by
double-clicking on this icon or simply con-
nect the watch, and it will start automati-
cally.
TRY IT OUT
The software comes loaded with sample
data, so if you want to try sending data to
your watch right away, just click the SEND
button in the software. Then disconnect
the watch and you should see the data in
the watch. See the other side of this sheet
for instructions on operating the watch.
SEND TO THE WATCH
Click the SEND button to download the
information to your watch.
*IRONMAN is a registered trademark of World Triathlon
Corporation. TIMEX, DATA LINK, and NIGHT-MODE are
registered trademarks of Timex Corporation. Microsoft,
Windows, and Outlook are registered trademarks of
Microsoft Corporation in the U.S. and in other countries.
INDIGLO is a registered trademark of Indiglo Corporation in
the U.S. and other countries.
Check the modes
you want to be in
the watch and
uncheck the ones
you don't want.
Number of
data entries
to be sent.
Move mode up
or down in the
list (reflected in
the watch).
Add a mode.You
can have multiple
versions of one
mode (e.g., two
Contact modes,
one business and
one personal).
Edit mode data.
Refresh auto-
imported data
(see Software
Help).
COMPLIANCE
FCC Notice: Tested To Comply
With FCC Standards FOR
HOME OR OFFICE USE.
This device complies with Part 15 of the
FCC Rules. Operation is subject to the fol-
lowing two conditions: (1) this device may
not cause harmful interference, and (2)
this device must accept any interference
received, including interference that may
cause undesired operation. Caution: Any
changes or modifications not expressly
approved by Timex Corporation could void
the user’s authority to operate this equip-
ment.
Industry Canada Notice: This Class B digi-
tal apparatus complies with Canadian
ICES-003. Cet appareil numérique de la
classe B est conforme à la norme NMB-
003 du Canada.
ENTER YOUR INFORMATION
You can add your contacts, appointments,
alarms, and other data in three ways:
1. Enter information directly into the
Timex software.
2. Import from Microsoft
®
Outlook
®
mes-
saging and collaboration client.
3. Import from a .csv file (this is a Save
As option in spreadsheet applications).
With the software you can also set up
your chronograph and timers. See the
Watch Help for detailed instructions.
Double-click on an
entry to edit it.
© 2003 Timex Corporation. All rights reserved.
D: 990-095194
G: 991-094067

WATCH DISPLAY
WATCH CONTROLS
MODE Button
Press the MODE button to cycle through the watch
modes.
Crown
Scrolling – In any mode (other than Time of Day),
turn the Crown to scroll through the entries.
INDIGLO
®
night-light –
Electrolumines-
cent technology used in the INDIGLO night-light
illuminates the entire watch face at night and in
low-light conditions. Press the crown to activate;
hold for 4 seconds to activate NIGHT-MODE® fea-
ture. for 8 hours
(see Options).
Setting – Pull the Crown out to set. Turn the Crown
to change the flashing item’s value. Press the
MODE button to advance to the next item or
STOP/RESET to return to the previous item. Push
the Crown in to save your changes and return to
the normal display.
TIME OF DAY COUNTDOWN TIMER
ALARM
Setting
Pull out the Crown to set. Turn the Crown to change
the flashing item’s value. Press MODE to set the
time, time format, date, date format, year, day of the
week or week number, and time zone name. Push in
the Crown to save your changes.
Time Zones
Press STOP/RESET once and hold it to display the
second time zone; press twice and hold to display
the third time zone. Continue holding to switch to
the displayed time zone.
Next Appointment/Occasion
Press START/SPLIT once and hold to display the next
Appointment; press twice and hold to display the
next Occasion.
CHRONOGRAPH
To start the chronograph
Press START/SPLIT
To take a split
Press START/SPLIT
To stop the chronograph
Press STOP/RESET
To restart the chrono-
graph
or
Press START/SPLIT
Pull out and turn
the Crown
To clear the workout
or
To store the workout
Press and hold
STOP/RESET
To recall a stored work-
out when the chrono is
reset (at zero)
then
To review lap/split times
or
To delete a workout
Turn the Crown to scroll
the entries
Turn the Crown one click
Hold STOP/RESET
To view the notes
Turn the Crown
To delete a note
Hold STOP/RESET
INTERVAL TIMER
Tip
• Use the PC software to set the watch; it’s much
easier than using the buttons.
Tip
•
After setting an interval, press START/SPLIT to go
to the next interval.
Tip
•The symbol AP appears when an appointment is
scheduled within the next 3 days.
Tips
• Lap/split times can be recalled while the chrono-
graph is running or after it is stopped.
• When you take a split, the display freezes for 10
seconds, then resumes with the next lap. Press
MODE to immediately display the next lap.
•When the chronograph is reset (at zero), you can
change the format of the display. Pull the Crown
out and turn to select the positions of the lap and
split times or the time of day.
Time an event and record lap or segment times that
you can review during or after the event.
Operation
This is a sequence of linked countdown timers.
When one countdown timer interval ends, an alert
sounds and the next interval starts. Operation and
setting are otherwise similar to the Countdown
Timer.
Enter and retrieve short messages.
Operation
A countdown timers counts backward to zero from a
time you set. You can set multiple countdown timers
on your watch
Operation
To start the timer
Press START/SPLIT
To view the timers
Turn the Crown
To stop the timer
Press STOP/RESET
Hold STOP/RESET
To resume countdown
or
To reset the timer
Press START/SPLIT
To arm or disarm an
alarm
Press START/SPLIT
To change to ON, OFF, or
AUTO
Press START/SPLIT or
STOP/RESET
To set the ON and OFF
times
Pull out the Crown, turn
the Crown, press MODE
To view the list of alarms
Turn the Crown
To delete an alarm
Hold STOP/RESET
Tip
•Activate the Halfway reminder by pressing
STOP/RESET before starting the timer.
Tips
• When setting the time of an alarm, press
START/SPLIT to switch between 5 minute and 1
minute increments.
•The alarm icon appears only when an alarm is set
to alert within 12 hours.
NOTE
Set one or more alarms.
Operation
OPTIONS
Access three watch options. Turn the Crown to
choose among them.
NIGHT-MODE
®
Feature
When this feature is activated, the INDIGLO
®
night-
light is turned on whenever a button is pressed. It
can be set to OFF, ON, or AUTO. When ON, the
NIGHT-MODE feature is active for 8 hours. AUTO
activates it between the ON and OFF times you set.
When an alarm alert sounds, press any button to
silence it. If not silenced, it repeats once in 5 min-
utes.
Setting
To set an alarm, turn the Crown to display an exist-
ing or unused alarm and pull out the Crown. Turn
the Crown to change the flashing item’s value. Press
MODE to set the time, active day(s), and message.
Push in the Crown to save your changes.
APPOINTMENT
This feature informs you of appointments.
Operation
ADDITIONAL MODES
Other modes can be downloaded to the watch with
the PC software. See the Software Help.
DEMO
Your watch may be preloaded with a running Demo
mode. You may exit the demo by pressing the MODE
button. The demo is deactivated when you set the
date or send data to the watch.
When an alert sounds, press any button to silence it.
If not silenced, it repeats once in 5 minutes.
Setting
To set an appointment, turn the Crown to display an
existing or unused appointment and pull out the
Crown. Turn the Crown to change the flashing item’s
value. Press MODE to set the time, recurrence, alert
time, and message. Push in the Crown to save your
changes.
To change to ON, OFF, or
AUTO
Press START/SPLIT or
STOP/RESET
To change between ON
and OFF
Press START/SPLIT or
STOP/RESET
To set the ON and OFF
times
Pull out the Crown, turn
the Crown, press MODE
Chime
When this feature is activated, the watch chimes at
each hour. It can be set to OFF, ON, or AUTO. When
ON, the watch chimes every hour. AUTO activates
the chime between the ON and OFF times you set.
Button Beep
When this feature is activated, the watch beeps with
each button press.
Setting
To edit or create a note, turn the Crown to display an
existing or unused note and pull out the Crown. Turn
the Crown to change the character at the cursor.
Press MODE to move to the next position. Push in
the Crown to save your changes.
To arm or disarm an
appointment
Press START/SPLIT
To view appointments
Turn the Crown
To delete an appointment
Hold STOP/RESET
MODE
Crown
STOP/
RESET
START/
SPLIT
USB
Connector
Chime
ON
Appointment
within 3 Days
Countdown
Timer
Running
Chronograph
Running
NIGHT-MODE
Feature ON
Alarm or Appt Alert
within 12 Hours
When the countdown finishes, an alert sounds until
you press any button or the Crown.
Setting
To set a timer, turn the Crown to display a timer
and pull out the Crown. Turn the Crown to change
the flashing item’s value. Press MODE to set the
hours, minutes, seconds, and the action at the end:
STOP, REPEAT, or (start) CHRONO. Push in the
Crown to save your changes.
Day of the
Week
Timeline
Date
Time in
HH:MM ss Format
WARRANTY
To obtain warranty service, please return your watch to
Timex, one of its affiliates or the Timex retailer where the
product was purchased, together with a completed origi-
nal Product Repair Coupon or, in the U.S. and Canada
only, the completed original Product Repair Coupon or a
written statement identifying your name, address, tele-
phone number and date and place of purchase. Please
include the following with your watch to cover postage
and handling (this is not a repair charge): a US$ 7.00
check or money order in the U.S.; a CAN$6.00 cheque or
money order in Canada; and a UK£ 2.50 cheque or
money order in the U.K. In other countries, Timex will
charge you for postage and handling. NEVER INCLUDE A
SPECIAL WATCHBAND OR ANY OTHER ARTICLE OF
PERSONAL VALUE IN YOUR SHIPMENT.
For the U.S., please call 1-800-448-4639 for additional
warranty information. For Canada, call 1-800-263-0981.
For Brazil, call 0800-168787. For Mexico, call 91-800-01-
060. For Central America, the Caribbean, Bermuda and
the Bahamas, call (501) 370-5775 (U.S.). For Asia, call
852-2815-0091. For the U.K., call 44 208 687 9620. For
Portugal, call 351 212 946 017. For France, call 33 3 81 63
42 00. For Germany, call 49 7 231 494140. For the Middle
East and Africa, call 971-4-310850. For other areas,
please contact your local Timex retailer or Timex distrib-
utor for warranty information.
TIMEX INTERNATIONAL WARRANTY (U.S. – LIMITED
WARRANTY) Your TIMEX® product is warranted against
manufacturing defects by Timex Corporation for a period
of ONE YEAR from the original purchase date. Timex and
its worldwide affiliates will honor this International
Warranty. Please note that Timex may, at its option,
repair your product by installing new or thoroughly
reconditioned and inspected components or replace it
with an identical or similar model. IMPORTANT –
PLEASE NOTE THAT THIS WARRANTY DOES NOT
COVER DEFECTS OR DAMAGES TO YOUR PRODUCT: 1)
after the warranty period expires; 2) if the product was
not originally purchased from an authorized Timex retail-
er; 3) from repair services not performed by Timex; 4)
from accidents, tampering or abuse; and 5) lens or crys-
tal, strap or band, watch or transceiver case, attachments
or battery. Timex may charge you for replacing any of
these parts.
THIS WARRANTY AND THE REMEDIES CONTAINED
HEREIN ARE EXCLUSIVE AND IN LIEU OF ALL OTHER
WARRANTIES, EXPRESS OR IMPLIED, INCLUDING ANY
IMPLIED WARRANTY OF MERCHANTABILITY OR FIT-
NESS FOR PARTICULAR PURPOSE. TIMEX IS NOT
LIABLE FOR ANY SPECIAL, INCIDENTAL OR CONSE-
QUENTIAL DAMAGES. Some countries and states do not
allow limitations on implied warranties and do not allow
exclusions or limitations on damages, so these limita-
tions may not apply to you. This warranty gives you spe-
cific legal rights and you may also have other rights
which vary from country to country and state to state.

Nuestras sinceras felicitaciones por com-
prar el reloj Timex
®
Ironman* Data Link
®
USB.
Es un reloj deportivo Ironman con
multitud de funciones.
Es un PDA ideal en su muñeca.
Esta guiá fácil le ayudará a comprender
rápidamente cómo usar el reloj Timex
Ironman Data Link USB y el software que
lo acompaña.
Las instrucciones completas de uso están
en el software, en la parte de Ayuda.
Cuando instala el software de Timex Data
Link USB, en su computadora se cargan
automáticamente versiones que se
pueden imprimir.
QUÉ NECESITA
GUÍA RÁPIDA DE USO
INSTALACIÓN DEL SOFTWARE
Si bien no se necesita una computadora
para usar la mayoría de las funciones del
reloj, el software permite programar el
reloj más fácilmente y también manejar
poderosas funciones (citas, contactos,
etc.).
Para poder usar todas las funciones del
reloj, necesita:
El CD-ROM con el software Timex Data
Link
®
USB.
El cable USB.
Una computadora con la siguiente
configuración:
• Sistema operativo Microsoft
®
Windows
®
98 2a. Ed., 2000 (con
Service Pack 1 o posterior), ME, XP
o posterior
• 30 MB de espacio libre en el disco
• Conector USB
El mini CD-ROM funciona en cualquier
unidad de CD-ROM estándar; coloque el
CD-ROM en el centro de la bandeja. Visite
www.timex.com para descargar el soft-
ware si se presentara cualquier problema.
Para instalar el software, cargue el CD-
ROM en la computadora y automática-
mente aparecerá un menú (de lo con-
trario, ejecute INTRO.EXE). Seleccione
"Instalar Timex Data Link USB". Si desea
mantener un registro de sus entrenamien-
tos en la computadora, seleccione
"Instalar Timex Trainer".
PILA
Se calcula que la vida útil de la pila insta-
lada en fábrica es de unos 2 años, pero
ese lapso varía dependiendo del uso.
Cuando la pila tiene poca carga, aparece
el mensaje LO BATT en lugar de la fecha
al comienzo de cada día. El recordatorio
desaparece cuando cambia de pantalla.
Reemplace la pila tan pronto como le sea
posible. Si bien el reloj seguirá funcionan-
do, una pila con poca carga puede causar
problemas de comunicación.
Para evitar daños permanentes al reloj,
Timex recomienda que la pila sea reem-
plazada por un joyero.
RESISTENCIA AL AGUA
Este reloj resiste al agua hasta el límite
marcado en el reloj. Si resiste 100 m,
soporta una presión de 172 p.s.i. (inmer-
sión a 330 pies, equivalente a 100 metros
debajo del mar). Si resiste 50 m, soporta
una presión de 86 p.s.i. (inmersión a 165
pies, equivalente a 50 metros debajo del
mar).
No oprima los botones mientras esté
sumergido, pues el reloj no mantendrá su
resistencia al agua en esas condiciones.
ASISTENCIA TÉCNICA
Si tuviera dudas acerca del funcionamien-
to del reloj o del software, refiérase a
“Ayuda”. Si eso no resolviera su proble-
ma, vea la página web de Timex o
llámenos por teléfono:
• Página web: http://www.timex.com
• Asistencia técnica en EE.UU. y Canadá:
1-800-328-2677
• Asistencia técnica desde fuera de
EE.UU. y Canadá: 1-501-370-5775
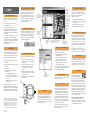
CONEXIÓN DEL RELOJ
Conecte el cable USB al reloj del siguiente
modo:
1. Inserte el extremo rectangular del
cable USB en un conector USB de la
computadora.
2. Conecte la parte inferior del conector
del otro extremo del cable al lado
izquierdo del reloj, debajo de los
contactos.
3. Mueva la palanca del conector hacia
abajo y enganche el extremo superior
del conector al reloj.
4. El software leerá automáticamente los
datos del reloj.
Gancho
conector
Conector
USB
Gancho
conector
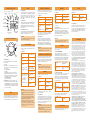
Indica cuánta memoria usarán los datos
que desea enviar. Si fuera más de
100%, envíe menos datos.
Haga clic aquí para
enviar datos de la
computadora al reloj.
Haga doble clic
en el modo
para cambiar
sus datos.
IMPORTANTE
El reloj Timex Ironman Data Link USB no
es un dispositivo médico. No lo use para
diagnóstico, tratamiento ni prevención de
enfermedades o trastornos de la salud.
Para tales fines, recurra a otros métodos.
USO DEL SOFTWARE
Al instalar el software aparece un símbolo
de un reloj en la esquina inferior derecha
de la pantalla. Para abrir el programa,
haga clic dos veces en el símbolo o sim-
plemente conecte el reloj y el programa
se abrirá automáticamente.
PRUÉBELO
El software contiene muchos ejemplos de
datos; si desea tratar de enviar datos al
reloj en forma inmediata, haga clic en el
botón ENVIAR del software. Desconecte
luego el reloj y verá los datos en él. Al
dorso hay más instrucciones sobre el fun-
cionamiento del reloj.
ENVÍO AL RELOJ
Haga clic en el botón SEND para transferir
la información al reloj.
*IRONMAN es una marca comercial registrada de World
Triathlon Corporation. TIMEX, DATA LINK y NIGHT-MODE
son marcas comerciales registradas de Timex Corporation.
Microsoft, Windows y Outlook son marcas comerciales
registradas de Microsoft Corporation en EE.UU. y en otros
países. INDIGLO es una marca comercial registrada de
Indiglo Corporation en EE.UU. y en otros países.
Seleccione los
modos que desea
activos en el reloj y
quite la marca del
resto.
Cantidad de
entradas de
datos a
enviar.
Cambiar modo
hacia arriba o
abajo (lo verá
en el reloj).
Agregado de modo.
Puede tener múlti-
ples versiones de
un modo (p.ej., dos
modos “Contacto”:
uno comercial y
otro personal).
Cambiar datos
en el modo.
Actualización
de datos
importados
(ver Ayuda en
Software).
CUMPLIMIENTO
Aviso de FCC: cumple con las
normas de FCC para USO EN
EL HOGAR O LA OFICINA.
Este reloj cumple con la Sección 15 de las
Reglas de FCC. Su funcionamiento está
sujeto a las siguientes dos condiciones:
(1) no provocará interferencias nocivas, y
(2) aceptará todas las interferencias que
reciba, incluso interferencias que pudieran
causar un funcionamiento no deseado.
Precaución: los cambios y modificaciones
no expresamente aprobados por Timex
Corporation podrían anular el derecho del
usuario a operar este reloj.
Aviso de la industria canadiense: este
aparato digital Clase B cumple con la
norma ICES-003 canadiense. Cet appareil
numérique de la classe B est conforme à
la norme NMB-003 du Canada.
INGRESO DE INFORMACIÓN
Agregue contactos, citas, alarmas y otros
datos de tres formas distintas:
1. Ingrese información directamente en el
software de Timex.
2. Importe mensajes y colaboración
cliente de Microsoft
®
Outlook
®
.
3. Importe de un archivo .csv (es una
opción “Guardar como” en aplica-
ciones de planilla de datos).
Con el software también puede programar
el cronómetro y contadores. Vea instruc-
ciones detalladas en Ayuda.
Haga doble clic en
una entrada para
modificarla.
© 2003 Timex Corporation. Todos los derechos reservados.
D: 990-095194
G: 990-095193

PANTALLA DEL RELOJ
CONTROLES DEL RELOJ
Botón MODE
Oprima el botón MODE para recorrer los distintos
modos del reloj.
Corona
Desplazamiento - En cualquier modo (que no sea la
Hora del día), gire la Corona para desplazarse por
las entradas.
Luz nocturna INDIGLO
®
–
Tecnología
electroluminiscente usada en la luz nocturna
INDIGLO, ilumina la cara del reloj en la noche y
cuando hay poca luz. Oprima la corona y mantén-
gala oprimida por 4 segundos para activar la
función NIGHT-MODE®
por 8 horas (ver Opciones).
Programación – Tire hacia afuera de la Corona y
gírela para cambiar el valor intermitente. Oprima
el botón MODE para avanzar al próximo u oprima
STOP/RESET para regresar al previo. Para guardar
los cambios y regresar a la pantalla normal, pulse
la Corona hacia adentro.
HORA CONTADOR REGRESIVO
ALARMA
Programación
Tire hacia afuera de la Corona y gírela para cambiar
el valor intermitente. Oprima MODE para programar
la hora y su formato, la fecha y su formato, el año, el
día de la semana o el número de la semana y la zona
horaria. Para conservar los cambios, pulse la Corona
hacia adentro.
Zona horaria
Oprima y mantenga oprimido STOP/RESET para ver
la segunda zona horaria; oprima dos veces y man-
tenga oprimido para ver la tercera zona horaria.
Mantenga oprimido para cambiar a la zona horaria
que se muestra.
Próxima cita/ocasión
Oprima y mantenga oprimido START/SPLIT para ver
la próxima cita; oprima dos veces y mantenga
oprimido para ver la próxima ocasión.
CRONÓMETRO
Para iniciar el cronómetro
Oprima START/SPLIT
Para cronometrar un
intervalo
Oprima START/SPLIT
Para parar el cronómetro
Oprima STOP/RESET
Para reiniciar el
cronómetro o
Oprima START/SPLIT
Tire hacia afuera de la
Corona y gírela
Para borrar el ejercicio
o
Para guardar el ejercicio
Oprima y mantenga
oprimido STOP/RESET
Para ver un ejercicio
guardado cuando se lleva
el cronómetro a cero
y luego
Para ver tiempos de
vuelta o intervalo
o
Para borrar un ejercicio
Gire la Corona para
desplazarse por las
entradas
Gire la Corona un clic
Mantenga oprimido
STOP/RESET
Para ver las notas
Gire la Corona
Para borrar una nota
Mantenga oprimido
STOP/RESET
INTERVALOS CONSECUTIVOS
Sugerencia
• Use el software para programar el reloj; es mucho
más fácil que usar los botones.
Sugerencia
•
Después de programar un intervalo, oprima
START/SPLIT para pasar al próximo intervalo.
Sugerencia
• Aparecerá el símbolo AP para avisarle que tiene
una cita dentro de los próximos 3 días.
Sugerencias
• Puede ver los tiempos de vueltas o intervalos
mientras funciona el cronómetro o después de
detenerlo
• Cuando mide un intervalo, la pantalla queda
pasiva por 10 segundos para luego retomar en
la siguiente vuelta. Oprima MODE para mostrar
inmediatamente la próxima vuelta.
• Cuando regresa el cronómetro a cero, puede
cambiar el formato de la pantalla. Tire hacia
afuera de la Corona y gírela para seleccionar las
posiciones de los tiempo de vuelta e intervalo
o la hora del día.
Tome el tiempo de un evento y registre el tiempo de
la vuelta o segmento para revisarlo durante el even-
to o después.
Operación
Es una secuencia de contadores regresivos vincula-
dos. Cuando termina el intervalo de un contador
regresivo, se emite una señal y comienza el próximo
intervalo. El funcionamiento y la programación son
similares al de contador regresivo.
Ingreso y recuperación de mensajes cortos.
Operación
El contador regresivo cuenta hacia atrás, hasta cero,
desde la hora que usted indique. Con el reloj puede
programar varias cuentas regresivas
Operación
Para iniciar el contador
Oprima START/SPLIT
Para ver los contadores
Gire la Corona
Para parar el contador
Oprima STOP/RESET
Mantenga oprimido
STOP/RESET
Para retomar la cuenta
regresiva
o
Para reiniciar el contador
Oprima START/SPLIT
Para activar o desactivar
una alarma
Oprima START/SPLIT
Para cambiar a SÍ, NO o
AUTO
Oprima START/SPLIT o
STOP/RESET
Para elegir la hora de
activación y desacti-
vación.
Tire hacia afuera de la
Corona, gírela y oprima
MODE
Para ver la lista de alar-
mas
Gire la Corona
Para borrar una alarma
Mantenga oprimido
STOP/RESET
Sugerencia
•Active el recordatorio de mitad de tiempo; oprima
STOP/RESET antes de iniciar el contador.
Sugerencias
•Cuando programe la hora de una alarma, oprima
START/SPLIT para cambiar entre incrementos de
5 minutos y 1 minuto.
•El símbolo de la alarma aparece sólo cuando ésta
va a sonar dentro de las próximas 12 horas.
NOTA
Programación de una o más alarmas.
Operación
OPCIONES
Acceso a tres opciones. Gire la Corona para selec-
cionar una de ellas
Función NIGHT-MODE
®
Cuando se activa esta función, se enciende la luz
nocturna INDIGLO
®
cada vez que se oprime
cualquier botón. Esta función puede activarse (ON),
desactivarse (OFF) o dejarse en automático (AUTO).
Si se activa, funciona por 8 horas. La opción AUTO
activa la luz entre las horas que usted seleccione.
Cuando suena una alarma, oprima cualquier botón
para silenciarla. Si no lo hace, el aviso se repetirá
una vez en 5 minutos.
Programación
Para programar una alarma, gire la Corona para ver
una alarma ya existente o sin usar y tire hacia afuera
de la Corona. Gírela para cambiar el valor intermi-
tente. Oprima MODE para programar la hora, día o
días activos y el mensaje. Para guardar los cambios,
pulse la Corona hacia adentro.
AGENDA
Esta función le informa de sus citas.
Operación
OTROS MODOS
Use el software para descargar otros modos en el
reloj. Refiérase a Ayuda del software.
DEMO
Su reloj puede estar previamente cargado con una
versión demostrativa (Demo). Puede salir del modo
demo oprimiendo el botón MODE. Demo se desacti-
va cuando programe la fecha o envíe datos al reloj.
Cuando oiga la alerta, oprima cualquier botón para
silenciarla. Si no lo hace, el aviso se repetirá una vez
en 5 minutos.
Programación
Para programar una cita, gire la Corona para ver una
cita ya existente o sin usar; tire hacia fuera de la
Corona y gírela para cambiar el valor intermitente.
Oprima MODE para programar el tiempo, frecuencia,
hora de alerta y mensaje. Para guardar los cambios,
pulse la Corona hacia adentro.
Para cambiar a SÍ, NO o
AUTO
Oprima START/SPLIT o
STOP/RESET
Para cambiar entre SÍ y
NO
Oprima START/SPLIT o
STOP/RESET
Para elegir la hora de
activación y desactivación
Tire hacia afuera de la
Corona, gírela y oprima
MODE
Señal sonora cada hora
Cuando se activa esta función, se escucha una señal
cada hora. Esta función puede activarse (OFF),
desactivarse (ON) o dejarse en automático (AUTO).
Cuando se activa, se escucha una señal cada hora.
La opción AUTO activa esta función entre las horas
que usted seleccione.
Sonido al pulsar botones
Cuando se activa esta función, el reloj emite un
sonido cada vez que se oprime un botón.
Programación
Para modificar o crear una nota, gire la Corona para
ver una nota ya existente o sin usar y tire hacia
afuera de la Corona. Gírela para cambiar la letra indi-
cada por el cursor. Oprima MODE para pasar a la
próxima posición. Para guardar los cambios, pulse
la Corona hacia adentro.
Para activar o desactivar
una cita
Oprima START/SPLIT
Para ver citas
Gire la Corona
Para borrar una cita
Mantenga oprimido
STOP/RESET
MODE
Corona
STOP/
RESET
START/
SPLIT
Conector
USB
Señal
cada
hora SÍ
Agenda de
próximos
3 días
Cuenta
regresiva
funcionando
Cronómetro
funcionando
NIGHT-MODE
SÍ
Alarma o alerta de
evento dentro de
12 horas
Cuando finalice la cuenta regresiva se emitirá una
señal sonora de aviso que continuará hasta que se
oprima cualquier botón o la Corona.
Programación
Gire la Corona hasta ver un contador; tire hacia
afuera de la Corona. Gírela para cambiar el valor
intermitente. Oprima MODE para programar horas,
minutos, segundos y la acción al final: STOP
(parar), REPEAT (repetir), o (iniciar) CHRONO. Para
guardar los cambios, pulse la Corona hacia adentro.
Día de la
semana
Línea de
tiempo
Fecha
Hora en formato
HH:MM ss
GARANTÍA
Para solicitar servicio de reparación, envíe el reloj a
Timex, a uno de sus afiliados o al distribuidor de Timex
donde lo compró, junto con el cupón original (complete
los datos) para reparación del producto. Sólo en EE.UU.
y Canadá, el cupón original (complete los datos) para
reparación del producto o una declaración por escrito
con su nombre, dirección, teléfono, fecha y lugar de
compra. Para cubrir gastos de manejo y envío, incluya
(no es el costo de la reparación) lo siguiente: en EE.UU.,
un cheque o giro postal ("money order") por US$ 7.00;
en Canadá, un cheque o giro postal por CAN$6.00; en
Reino Unido, un cheque o giro postal por UK£ 2.50. En
otros países, Timex le cobrará por gastos de manejo y
envío. JAMÁS INCLUYA PULSERAS ESPECIALES PARA
RELOJ NI NINGÚN OTRO ARTÍCULO DE VALOR PER-
SONAL EN SU ENVÍO.
Si desea más información sobre la garantía, en EE.UU.
llame al 1-800-448-4639. En Canadá, al 1-800-263-0981.
En Brasil, al 0800-168787. En México, al 91-800-01-060.
En América Central, el Caribe, Bermudas y Bahamas, al
(501) 370-5775 (EE.UU.). En Asia, al 852-2815-0091. En el
Reino Unido, al 44 208 687 9620. En Portugal, al 351 212
946 017. En Francia, al 33 3 81 63 42 00. En Alemania, al
+43 662 88 92130. En Medio Oriente y África, al 971-4-
310850. En otras áreas, consulte al vendedor local de
Timex o al distribuidor de Timex.
GARANTÍA INTERNACIONAL DE TIMEX (EE.UU. -
GARANTÍA LIMITADA) Timex Corporation garantiza su
producto TIMEX® contra defectos de fabricación por un
período de UN AÑO a partir de la fecha de compra origi-
nal. Timex y sus afiliados de todo el mundo cumplirán
con esta Garantía Internacional. Recuerde que Timex, a
su entera discreción, podrá reparar su reloj mediante la
instalación de componentes nuevos o totalmente rea-
condicionados e inspeccionados, o bien reemplazarlo
con un modelo idéntico o similar. IMPORTANTE - ESTA
GARANTÍA NO CUBRE DEFECTOS O DAÑOS A SU PRO-
DUCTO: 1) después de que vence el plazo de la garantía;
2) si el producto inicialmente no se compró a un dis-
tribuidor autorizado de Timex; 3) si las reparaciones efec-
tuadas no las hizo Timex; 4) si son consecuencia de acci-
dentes, manipulación no autorizada o abuso; y 5) si son
en el lente o cristal, pulsera, funda del reloj o transmisor,
accesorios o pila. Timex podría cobrarle por el reemplazo
de cualquiera de estas piezas.
ESTA GARANTÍA Y LOS REMEDIOS QUE ELLA CON-
TIENE SON EXCLUSIVOS Y REEMPLAZAN A
CUALQUIER OTRA GARANTÍA, EXPRESA O IMPLÍCITA,
INCLUSO LA GARANTÍA IMPLÍCITA DE COMERCIABILI-
DAD O ADECUACIÓN PARA UN FIN PARTICULAR. TIMEX
NO SE RESPONSABILIZA DE NINGÚN DAÑO ESPECIAL,
INCIDENTAL O INDIRECTO. Algunos países y estados no
permiten limitaciones en las garantías implícitas y no
permiten exclusiones o limitaciones a los daños, por lo
cual dichas limitaciones podrían no aplicarse al caso
suyo. Esta garantía le concede derechos legales específi-
cos; usted también podría estar amparado por otros
derechos, que varían según el país y el estado donde
viva.
-
 1
1
-
 2
2
-
 3
3
-
 4
4


Timex Data Link USB Guía del usuario
- Categoría
- Relojes
- Tipo
- Guía del usuario
en otros idiomas
- English: Timex Data Link USB User guide
Artículos relacionados
-
Timex Ironman Classic 50 Move+ Guía del usuario
-
-
-
Timex Expedition Double Shock Guía del usuario
-
-
-
-
-
-