Haier HEWFT36BXB El manual del propietario
- Categoría
- Enfriadores de bebidas
- Tipo
- El manual del propietario

Installation and User Manual
Instructions d’installation et
Guide de l’utilisateur
Instrucciones de instalación y
Manual del usuario
HEWFT36BXB
Thermoelectric Wine Cellar
Cave à vin à thermoélectrique
Bodega termoeléctrico
Part # 0570001150 REV A


TABLE OF CONTENTS
WINE CELLAR SAFETY .......................................................................... 2
Proper Disposal of Your Old Refrigerated Appliance ................................ 3
PARTS AND FEATURES ......................................................................... 4
INSTALLATION REQUIREMENTS ............................................................. 4
Location Requirements ................................................................... 4
Electrical Requirements .................................................................. 5
INSTALLATION INSTRUCTIONS ............................................................. 6
Step 1 - Unpack Wine Cellar ............................................................. 6
Step 2 - Make Electrical Connection ................................................... 6
Step 3 - Level Wine Cellar ................................................................ 6
Step 4 - Align Door ......................................................................... 7
CONTROL PANEL AND FEATURES ........................................................... 7
Control Panel ................................................................................ 7
Features ...................................................................................... 7
WINE CELLAR USE ............................................................................... 8
WINE CELLAR CARE ............................................................................. 9
Cleaning ...................................................................................... 9
Power Interruptions ..................................................................... 10
TROUBLESHOOTING .......................................................................... 10
Operation .................................................................................. 10
Temperature and Moisture ............................................................. 11
LIMITED WARRANTY ........................................................................... 11
RECORD KEEPING .............................................................................. 13
1
ENGLISH

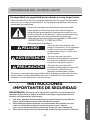
WINE CELLAR SAFETY
Your safety and the safety of others are very important.
We have provided many important safety messages in this manual and
on your appliance. Always read and obey all safety messages.
DANGER
WARNING
CAUTION
This is the safety alert symbol.
This symbol alerts you to potential hazards that can
kill or hurt you and others. All safety messages will
follow the safety alert symbol and either the word
“DANGER,” “WARNING” or “CAUTION.”
These words mean:
An imminently hazardous situation. You
could be killed or seriously injured if you
don’t immediately follow instructions.
A potentially hazardous situation
which, if not avoided, could result in
death or serious bodily injury.
A potentially hazardous situation
which, if not avoided, may result in
moderate or minor injury.
All safety messages will tell you what the potential hazard is, tell you
how to reduce the chance of injury, and tell you what can happen if the
instructions are not followed.
IMPORTANT SAFETY
INSTRUCTIONS
WARNING: To reduce the risk of re, electrical shock, injury to
persons, or damage when using the wine cellar, follow basic
precautions, including the following:
•
Use this appliance only for its intended purpose as described in this
user manual.
•
This wine cellar must be properly installed in accordance with the
installation instructions before it is used. See grounding instructions
in the installation section.
•
Disconnect power before servicing.
•
Replace all parts and panels before operating.
•
Do not repair or replace any part of the appliance unless specically
recommended in the manual. All other servicing should be referred to
a qualied technician.
•
Plug into a grounded 3 prong outlet.
•
Do not remove ground prong.
2
ENGLISH

IMPORTANT SAFETY
INSTRUCTIONS
•
Do not use an adapter.
•
Do not use an extension cord.
•
Do not store foods in wine cellar. Interior temperature may not be
cool enough to prevent spoilage or the temperature may cause
bacteria growth.
•
Use nonammable cleaner.
•
Keep ammable materials and vapors, such as gasoline, away from
wine cellar.
•
This wine cellar should not be recessed or installed in an enclosed
cabinet. It is designed for free-standing installation only.
•
Cabinet edges along stamp/cut-out areas may be sharp. Avoid
placing hands, ngers or other appendages near these areas.
•
If your wine cellar is not being used, remove the door. This will reduce
the possibility of danger to children.
•
Use two or more people to move and install wine cellar.
READ AND SAVE THESE
INSTRUCTIONS
State of California Proposition 65 Warnings:
WARNING: This product contains one or more chemicals known to the
State of California to cause cancer.
WARNING: This product contains one or more chemicals known to the
State of California to cause birth defects or other reproductive harm.
PROPER DISPOSAL OF YOUR OLD REFRIGERATED
APPLIANCE
WARNING
Suffocation Hazard
Remove door or drawer(s) from your old refrigerated appliance.
Failure to do so can result in death or brain damage.
IMPORTANT: Child entrapment and suocation are not problems of the past.
A junked or abandoned refrigerated appliance is still dangerous – even if it will
sit for “just a few days.” If you are getting rid of your old refrigerated appliance,
please follow these instructions to help prevent accidents.
3
ENGLISH

Before You Throw Away Your Old Refrigerated Appliance:
•
Remove the door(s) or drawer(s).
•
Leave the shelves in place so that children may not easily climb inside.
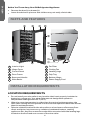
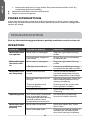
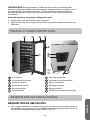
PARTS AND FEATURES
a b
c d
e
g
h
i
j
k
l
f
A
Interior Light
B
Hinge Cover
C
Control Panel
D
Door Frame
E
Recessed Handle
F
Wine Racks
G
Fan Filter
H
Cooling Fan
I
Leveling Legs
J
Drip Tray
K
Bottom HInge
L
Power Supply Cord
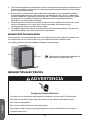
INSTALLATION REQUIREMENTS
LOCATION REQUIREMENTS
•
Do not install your wine cellar in any location that is not properly insulated or
heated e.g. garage etc. Your wine cellar was not designed to operate in
temperature settings below 55°F (13°C).
•
When the room temperature is colder than the control set temperature, the
wine cellar cooling will not operate until the room temperature becomes warmer
than the set temperature.
•
Select a suitable location for the wine cellar on a hard even surface away from
direct sunlight or heat source e.g. radiators, baseboard heaters, cooking
appliances etc. Any
oor unevenness should be corrected with the leveling legs
located on the front and rear corners of the wine cellar.
4
ENGLISH

•
To minimize the risk of rusting, leakage and insulation damage, avoid placing the
wine cellar in a place where heavy moisture is present. Do not directly apply
water onto or into the unit.
•
Your wine cellar is designed for freestanding installation only. It is not designed
for a built-in installation.
RECOMMENDED CLEARANCES
To ensure the wine cellar operates at optimum eciency, you should install it in a
location where there is proper air circulation and electrical connections.
The recommended clearances around the wine cellar:
2"
(5 cm)
2"
(5
cm)
4" (10 cm)
a
2"
(5 cm)
A
Allow enough space to open
the door 120°
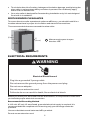
ELECTRICAL REQUIREMENTS
WARNING
Electrical Shock Hazard
Plug into a grounded 3 prong outlet.
Do not remove the ground prong from the power cord plug.
Do not use an adapter.
Do not use an extension cord.
Failure to do so can result in death, fire or electrical shock.
Before you move your wine cellar into its nal location, it is important to make sure
you have the proper electrical connection.
Recommended Grounding Method
A 115 volt, AC only 15-amp fused, grounded electrical supply is required. It is
recommended that a separate circuit serving only your beverage center be
provided.
Use an outlet that cannot be turned
o by a switch.
Do not use an extension cord.
5
ENGLISH

INSTALLATION INSTRUCTIONS
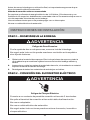
STEP 1 - UNPACK WINE CELLAR
WARNING
Excessive Weight Hazard
Use two or more people to move and install wine cellar.
Failure to do so can result in back or other injury.
1. Remove all packaging material. This includes the foam base and all adhesive
tape holding the wine cellar accessories inside and outside.
2. Inspect and remove any remains of packing, tape or printed materials before
turning on the wine cellar.
3. Dispose of/recycle all packaging materials.
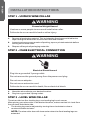
STEP 2 - MAKE ELECTRICAL CONNECTION
WARNING
Electrical Shock Hazard
Plug into a grounded 3 prong outlet.
Do not remove the ground prong from the power cord plug.
Do not use an adapter.
Do not use an extension cord.
Failure to do so can result in death, fire or electrical shock.
1. Move the wine cellar to your desired location.
2. Plug into a grounded 3 prong outlet.
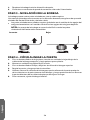
STEP 3 - LEVEL WINE CELLAR
The wine cellar has four leveling legs, one leveling leg in each corner.
After placing your wine cellar in the desired location, make sure that it is level from
front to back and side to side.
•
The leveling legs can be adjusted by turning them clockwise to raise or
counterclockwise to lower.
NOTE: The wine cellar door will close easier when the front leveling legs are
extended.
6
ENGLISH

Raise
Lower
STEP 4 - ALIGN DOOR
1. Using a at-blade screwdriver, gently insert the blade under the top hinge cover
and pry up to remove.
2. Gently move wires aside.
3. Using a Phillips-head screwdriver, loosen the three top hinge screws.
4. Adjust the door and then tighten the screws.
5. Replace the top hinge cover by
rst aligning the back of the cover with the back
of the hinge, and then pressing down rmly on the front of the hinge cover until
it snaps into place.
6. Adjust bottom hinge, if necessary.
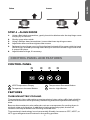
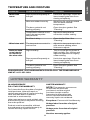
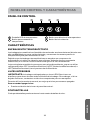
CONTROL PANEL AND FEATURES
CONTROL PANEL
a
b c d
A
LED Temperature Dispay
B
Temperature Increase Button
C
Temperature Decrease Button
D
Interior Light Button
FEATURES
THERMOELECTRIC COOLING
Thermoelectric (also referred to as semiconductor) wine cellars oer high reliability
and low maintenance while precisely maintaining the set temperature for storing
wine.
Because thermoelectric wine cellars do not use a compressor for cooling there is
minimal noise and vibration. In addition to being extremely quiet, the lack of
vibration will keep bubbles from forming in stored wine.
Thermoelectric technology is environmentally friendly, because no CFC, HCFC, or
HCF-type refrigerants are involved in the cooling process.
7
ENGLISH

INTERIOR LIGHTS
IMPORTANT: Your wine cellar is equipped with LED lighting. These lights are
designed to last for the life of your wine cellar. However, if the light stops
operating, please contact a qualied technician for replacement.
During normal operation it is best for the light to remain o.
To Turn On/O the Light:
•
Press the Light button on the control panel.
WINE RACKS
Each wine rack can hold up to four bottles of wine.
WINE CELLAR USE
TEMPERATURE CONTROL
NOTE:
•
When rst plugged in, the LED will display the room temperature. Then, the
internal temperature will appear in the display.
•
Wait at least 30 minutes to allow the wine cellar to acclimatize before
making any temperature adjustments.
Set the control to the desired temperature within the range of 50°F to 66°F (10°C to
19°C).
To Adjust the Temperature:
•
Press the Up Arrow - Increase
•
Press the Down Arrow
- Decrease
IMPORTANT:
•
The actual internal temperature in a thermoelectric wine cellar is dependent
on the room temperature. You can set the temperature within the range,
but the wine cellar may not reach the preset temperature.
•
The wine cellar will not operate if the room temperature is colder than the
wine cellar set temperature. Cooling will begin when the room temperature
becomes warmer than the wine cooler set temperature.
8
ENGLISH

WINE CELLAR CARE
CLEANING
WARNING
Electrical Shock Hazard
Disconnect power before cleaning.
Failure to do so can result in death or electrical shock.
1. Unplug or disconnect power.
2. Prepare a cleaning solution of 3-4 tablespoons of baking soda mixed with warm
water. Use sponge or soft cloth, dampened with the cleaning solution, to wipe
down your wine cellar.
IMPORTANT: Do not use harsh chemicals, abrasives, ammonia, chlorine
bleach, concentrated detergents, solvents or metal scouring pads. SOME
of these chemicals may dissolve, damage and/or discolor your wine cellar.
Before using cleaning products, always read and follow manufacturer’s
instructions and warnings to avoid personal injury or product damage.
3. Rinse with clean warm water and dry with a soft cloth.
4. Plug in or reconnect power.
5. Reset the temperature to the desired setting.
DOOR GASKETS
Gaskets must be kept clean and pliable to assure a proper seal.
•
Clean door gaskets every 3 months with solution of baking soda and warm water.
•
Petroleum jelly applied lightly to the hinge-side gasket will keep the gasket
pliable and assure a good seal.
EXTERNAL FAN FILTER
Over time dirt, dust and hair will collect on the fan
lter causing the cooling system
to not function properly. To maintain optimum cooling and product longevity,
remove and clean the fan lter at least once every 6 months.
1. Unplug or disconnect power.
2. Press downward on the two tabs on the top to release the fan lter from the
cabinet back.
3. Clean the fan
lter.
There are two eective methods to clean the external fan lter:
•
Use a vacuum cleaner hose to suction the dirt, dust and hair from the
lter.
OR
9
ENGLISH

•
Hand wash with warm, soapy water. Rinse well and allow lter to air dry
completely before reinstalling.
4. Replace the fan lter into the cabinet back.
5. Plug in or reconnect power.
POWER INTERRUPTIONS
In the event of a power outage due to a thunderstorm or other cause, unplug the
wine cellar from the electrical outlet. When power has been restored, replug power
cord to AC outlet.
TROUBLESHOOTING
First try the solutions suggested here to possibly avoid the cost of a service call.
OPERATION
PROBLEM
POSSIBLE CAUSE(S) SOLUTION
Wine cellar does
not operate
Wine cellar is unplugged. Plug into a grounded 3 prong
outlet.
Circuit breaker tripped or
fuse blown
Reset/Turn on circuit breaker
or replace fuse.
Wine cellar light
does not come
on
Wine cellar is unplugged. Plug into a grounded 3 prong
outlet.
LED light is burned out. Contact a qualied technician
to replace the burned out LED.
Wine cellar runs
too frequently
Room is warm and/or
humid.
This is normal to maintain
constant temperature during
high temperature, humid days.
Door opened frequently or
left ajar.
Limit door openings. Check for
items keeping the door from
closing completely.
The door gasket is not
sealing properly.
Check gasket for proper seal.
Clean gasket if needed.
The fan lter is blocked. Clean the fan lter. See
“Cleaning.”
Operating noise Your wine cellar has exterior
fans to maintain the set
cooling temperature during
periods of warm room
temperature or heavy use.
It is normal to occasionally
hear air circulation sounds.
Wine cellar door
does not shut
properly
Wine cellar is not level. Level wine cellar. See “Level
Wine Cellar.”
Door is blocked open. Check for and adjust bottles or
shelves that are keeping the
door from closing completely.
10
ENGLISH

TEMPERATURE AND MOISTURE
PROBLEM POSSIBLE CAUSE(S) SOLUTION
Wine is too
warm
Door opened frequently or
left ajar.
Limit door openings. Check for
items keeping the door from
closing completely.
Wine was added recently. Allow time for recently added
wine to reach desired
temperature.
The door gasket is not
sealing properly.
Clean the door gasket. See
“Cleaning.”
Temperature control is not
set to the appropriate
temperature.
Adjust the temperature
control to a colder setting.
Fan lter is dirty. Clean the fan lter. See
“Cleaning.”
Wine is too cold The temperature control is
set too low.
Adjust the temperature to the
next warmer setting; allow
24 hours to adjust.
Moisture build
up on interior
or exterior of
the wine cellar
High humidity This is normal during times of
high humidity. Dry surface and
adjust temperature to slightly
colder setting.
Door opened frequently or
left ajar.
Limit door openings. Check for
items keeping the door from
closing completely.
The door gasket is not
sealing properly.
Clean the door gasket. See
“Cleaning.”
FOR MORE HELP, VISIT HAIERAMERICA.COM OR CALL THE CONSUMER HELP
LINE AT 1-877-337-3639.
LIMITED WARRANTY
IN-HOME SERVICE
FULL TWO YEAR WARRANTY
For 24 months from the date of original
retail purchase, Haier will repair or
replace any part free of charge including
labor that fails due to a defect in
materials or workmanship.
Haier may replace or repair at their sole
discretion any part, subsystem including
the entire product.
Product must be accessible, without
encumbrance and installed properly to
receive warranty repair service.
LIMITED WARRANTY
NOTE: This warranty commences
on the date the item was
purchased, and the original
purchase receipt must be
presented to the authorized
service representative before
warranty repairs are rendered.
Exceptions: Commercial Use Warranty
90 days labor from date of original
purchase
90 days parts from date of original
purchase
No other warranty applies.
11
ENGLISH

FOR WARRANTY SERVICE
All service must be performed by a Haier
authorized service center. For the name
and telephone number of the nearest
authorized service center, please call
1-877-337-3639.
Before calling please have available the
following information:
Model number and serial number of your
appliance. The name and address of the
dealer you purchased the unit from and
the date of purchase.
A clear description of the problem.
A proof of purchase (sales receipt).
This warranty covers carry-in
appliance services within the
contiguous United States and Canada
and where available in Alaska, Hawaii
and Puerto Rico.
What is not covered by this warranty:
Replacement or repair of household
fuses, circuit breakers, wiring or
plumbing.
A product whose original serial number
has been removed or altered.
Any service charges not specically
identied as normal such as normal
service area or hours.
Damage incurred in shipping.
Damage caused by improper installation
or maintenance.
Damage from misuse, abuse accident,
re, ood, or acts of nature.
Damage from service other than an
authorized Haier dealer or service
center.
Damage from incorrect electrical
current, voltage or supply.
Damage resulting from any product
modication, alteration or adjustment
not authorized by Haier.
Adjustment of consumer operated
controls as identied in the owner’s
manual.
Hoses, knobs, lint trays and all
attachments, accessories and
disposable parts.
Labor, service transportation, and
shipping charges for the removal and
replacement of defective parts beyond
the initial 24-month period.
Damage from other than normal
household use.
Any transportation and shipping
charges.
THIS LIMITED WARRANTY IS GIVEN IN
LIEU OF ALL OTHER WARRANTIES,
EXPRESSED OR IMPLIED, INCLUDING
BUT NOT LIMITED TO, THE
WARRANTIES OF MERCHANTABILITY
AND FITNESS FOR A PARTICULAR
PURPOSE
The remedy provided in this warranty is
exclusive and is granted in lieu of all
other remedies.
This warranty does not cover incidental
or consequential damages, so the above
limitations may not apply to you. Some
states do not allow limitations on how
long an implied warranty lasts, so the
above limitations may not apply to you.
This warranty gives you
specic legal
rights, and you may have other rights,
which vary from state to state.
Haier America
Wayne, NJ 07470
12
ENGLISH

RECORD KEEPING
Thank you for purchasing this Haier product.
This user manual will help you get the best
performance from your new wine cellar.
For future reference, record the model number,
serial number, and the date of purchase. The
model/serial number plate is located on the
inside frame of the wine cellar.
Staple your proof of purchase to this manual to
aid in obtaining warranty service if needed.
_________________________
Model number
_________________________
Serial number
_________________________
Date of purchase
13
ENGLISH

ÍNDICE
SEGURIDAD DEL CONGELADOR ........................................................... 29
Cómo deshacerse adecuadamente de su aparato refrigerador viejo ......... 30
PIEZAS Y CARACTERÍSTICAS ............................................................... 31
REQUISITOS DE INSTALACIÓN .............................................................. 31
Requisitos de ubicación ................................................................. 31
Requisitos eléctricos .................................................................... 32
INSTRUCCIONES DE INSTALACIÓN ....................................................... 33
Paso 1 - Desempaque la bodega ...................................................... 33
Paso 2 - Conexión del suministro eléctrico ......................................... 33
Paso 3 - Nivelación de la bodega ...................................................... 34
Paso 4 - Cómo alinear la puerta ....................................................... 34
PANEL DE CONTROL Y CARACTERÍSTICAS ............................................. 35
Panel de control .......................................................................... 35
Características ........................................................................... 35
USO DE LA BODEGA ........................................................................... 36
CUIDADO DE LA BODEGA .................................................................... 36
Limpieza ................................................................................... 36
Cortes de energía ........................................................................ 37
SOLUCIÓN DE PROBLEMAS .................................................................. 38
Funcionamiento .......................................................................... 38
Temperatura y humedad ................................................................ 39
GARANTÍA LIMITADA .......................................................................... 39
INFORMACIÓN A TENER EN CUENTA ...................................................... 41
28
ESPAÑOL

SEGURIDAD DEL CONGELADOR
Su seguridad y la seguridad de los demás es muy importante.
PELIGRO
ADVERTENCIA
PRECAUCIÓN
Este es el símbolo de advertencia de seguridad.
Este símbolo le llama la atención sobre peligros
potenciales que pueden ocasionar la muerte o una
lesión a usted y a los demás. Todos los mensajes de
seguridad irán a continuación del símbolo de
advertencia de seguridad y de la palabra “PELIGRO”,
“ADVERTENCIA” o “PRECAUCIÓN”.
Estas palabras significan:
Se trata de una situación de
peligro inminente. Si no sigue las
instrucciones de inmediato,
usted puede morir o sufrir una
lesión grave.
Se trata de una situación
posiblemente peligrosa que, de
no evitarse, podría causar la
muerte o una lesión grave.
Se trata de una situación
posiblemente peligrosa que, de
no evitarse, podría causar
lesiones moderadas o leves.
Todos los mensajes de seguridad le dirán el peligro potencial, le dirán
cómo reducir las posibilidades de sufrir una lesión y lo que puede
suceder si no se siguen las instrucciones.
Hemos incluido muchos mensajes importantes de seguridad en este
manual y en su electrodoméstico. Lea y obedezca siempre todos los
mensajes de seguridad.
INSTRUCCIONES
IMPORTANTES DE SEGURIDAD
ADVERTENCIA: Para reducir el riesgo de incendio, choque eléctrico,
lesiones a personas o daños al utilizar la bodega, siga precauciones
básicas, incluyendo las siguientes:
•
Use este aparato solamente para el propósito que fue diseñado,
como se describe en este manual para el usuario.
•
Esta bodega debe instalarse correctamente de acuerdo con las
instrucciones de instalación antes de que se use. Vea las
instrucciones de conexión a tierra en la sección de instalación.
•
Desconecte el suministro de energía antes de darle servicio técnico.
29
ESPAÑOL

INSTRUCCIONES
IMPORTANTES DE SEGURIDAD
•
Vuelva a colocar todas las piezas y paneles antes de ponerlo en
funcionamiento.
•
No repare ni reemplace ningún componente del aparato a menos que
se recomiende especícamente en el manual. Todas las demás tareas
de mantenimiento deben ser realizadas por un técnico calicado.
•
Conecte a un contacto de pared de conexión a tierra de 3 terminales.
•
No quite el terminal de conexión a tierra.
•
No use un adaptador.
•
No use un cable eléctrico de extensión.
•
No almacene alimentos en la bodega. La temperatura interior puede
no ser lo
sucientemente fría para evitar el deterioro o la temperatura
puede causar el desarrollo de bacterias.
•
Use un limpiador no inamable.
•
Mantenga los materiales y vapores inamables, tales como gasolina,
alejados de la bodega.
•
Esta bodega no debe estar empotrada o instalada en un armario
cerrado. Se ha diseñado para instalarse de forma independiente
únicamente.
•
Los bordes del armario a lo largo de las áreas de estampado/recortes
podrían tener lo. Evite colocar las manos, los dedos u otras partes
del cuerpo cerca de estas áreas.
•
Si no está utilizando la bodega, quite la puerta. De esta manera,
reducirá la posibilidad de peligro para los niños.
•
Mueva o instale la bodega con la ayuda de dos o más personas.
LEA Y GUARDE ESTAS
INSTRUCCIONES
CÓMO DESHACERSE ADECUADAMENTE DE SU
APARATO REFRIGERADOR VIEJO
Peligro de asfixia
Quite la puerta o el(los) cajón(cajones) de su aparato refrigerador viejo.
No seguir esta instrucción puede ocasionar la muerte o daño al
cerebro.
ADVERTENCIA
30
ESPAÑOL

IMPORTANTE: El atrapamiento y asxia de niños no es un problema del
pasado. Un aparato refrigerador desechado y abandonado es un peligro, aún si
va a quedar ahí “por unos pocos días”. Si usted está por deshacerse de su
aparato refrigerador viejo, siga las instrucciones a continuación para evitar
accidentes.
Antes de descartar su aparato refrigerador viejo:
•
Quite la(s) puerta(s) o el(los) cajón(cajones).
•
Deje los estantes en su lugar así los niños no pueden meterse adentro con
facilidad.
PIEZAS Y CARACTERÍSTICAS
a b
c d
e
g
h
i
j
k
l
f
A
Luz interior
B
Cubierta de la bisagra
C
Panel de control
D
Marco de la puerta
E
Asa empotrada
F
Portabotellas
G
Filtro del ventilador
H
Ventilador de enfriamiento
I
Patas niveladoras
J
Bandeja de goteo
K
Bisagra inferior
L
Cable de suministro de energía
REQUISITOS DE INSTALACIÓN
REQUISITOS DE UBICACIÓN
•
No instale la bodega en cualquier lugar que no esté correctamente aislado o
climatizado, por ej. garaje, etc. La bodega no fue diseñada para funcionar en
ajustes de temperatura por debajo de 55 °F (13 °C).
31
ESPAÑOL

•
Cuando la temperatura ambiente está por debajo de la temperatura jada con el
control, la bodega no funcionará hasta que la temperatura ambiente sea mayor
que la temperatura jada.
•
Seleccione una ubicación adecuada para la bodega en una supercie sólida y
nivelada alejada de la luz solar directa o una fuente de calor, por ej. radiadores,
zócalos radiantes, aparatos de cocción, etc. Cualquier desnivel en el piso debe
corregirse con las patas niveladoras ubicadas en las esquinas inferiores
delanteras y traseras de la bodega.
•
Para minimizar el riesgo de oxidación,
ltraciones y daños al aislamiento, evite
colocar la bodega en un lugar con mucha humedad. No coloque agua
directamente sobre o dentro de la unidad.
•
La bodega está diseñada para instalarse de forma independiente únicamente.
No está diseñada para una instalación empotrada.
REQUISITOS DE UBICACIÓN
Para garantizar que la bodega funciona con
eciencia óptima, deberá instalarlo en
una ubicación con circulación de aire y conexiones eléctricas adecuadas.
Los espacios libres recomendados alrededor de la bodega:
2"
(5 cm)
2"
(5
cm)
4" (10 cm)
a
2"
(5 cm)
A
Deje espacio suciente para abrir la
puerta en un ángulo de 120°
REQUISITOS ELÉCTRICOS
ADVERTENCIA
Peligro de Choque Eléctrico
Conecte a un contacto de pared de conexión a tierra de 3 terminales.
No quite el terminal de conexión a tierra del cable de alimentación.
No use un adaptador.
No use un cable eléctrico de extensión.
No seguir estas instrucciones puede ocasionar la muerte, incendio o
choque eléctrico.
32
ESPAÑOL

Antes de mover la bodega a su ubicación nal, es importante asegurarse de que
tiene la conexión eléctrica adecuada.
Método de conexión a tierra recomendado
Se requiere una fuente de energía eléctrica de 115 Voltios, CA solamente y con
fusibles de 15 amperios, debidamente conectada a tierra. Se recomienda que use un
circuito separado únicamente para la bodega.
Use un tomacorriente que no se pueda apagar con un interruptor.
No use un cable eléctrico de extensión.
INSTRUCCIONES DE INSTALACIÓN
PASO 1 - DESEMPAQUE LA BODEGA
Peligro de Peso Excesivo
Con la ayuda de dos o más personas, mueva e instale la bodega.
No seguir esta instrucción puede ocasionar una lesión en la espalda u
otro tipo de lesiones.
ADVERTENCIA
1. Quite todo el material de empaque. Esto incluye la base de espuma y toda la
cinta adhesiva que mantiene sujetos los accesorios de la bodega adentro y
afuera.
2. Inspeccione y quite los restos de materiales de envío, cinta adhesiva o material
impreso antes de encender la bodega.
3. Deshágase de todos los materiales de embalaje o recíclelos.
PASO 2 - CONEXIÓN DEL SUMINISTRO ELÉCTRICO
ADVERTENCIA
Peligro de Choque Eléctrico
Conecte a un contacto de pared de conexión a tierra de 3 terminales.
No quite el terminal de conexión a tierra del cable de alimentación.
No use un adaptador.
No use un cable eléctrico de extensión.
No seguir estas instrucciones puede ocasionar la muerte, incendio o
choque eléctrico.
33
ESPAÑOL

1. Desplace la bodega hacia la ubicación deseada.
2. Conecte a un contacto de pared de conexión a tierra de 3 terminales.
PASO 3 - NIVELACIÓN DE LA BODEGA
La bodega posee cuatro patas niveladoras, una en cada esquina.
Una vez que la bodega se encuentre en la ubicación deseada, asegúrese de que esté
nivelada del frente hacia atrás y de lado a lado.
•
Las patas niveladoras se pueden regular girándolas en el sentido de las agujas del
reloj para levantarlas o en sentido contrario a las agujas del reloj para bajarlas.
NOTA: La puerta de la bodega se cerrará más fácil cuando las patas
niveladoras del frente estén extendidas.
Levantar
Bajar
PASO 4 - CÓMO ALINEAR LA PUERTA
1. Con un destornillador de hoja plana, inserte con cuidado la hoja debajo de la
cubierta de la bisagra superior y haga palanca para quitarla.
2. Mueva con cuidado los cables hacia un lado.
3. Con un destornillador Phillips, aoje los tornillos de la bisagra superior.
4. Regule la puerta y luego apriete los tornillos.
5. Vuelva a colocar la cubierta de la bisagra superior alineando la parte posterior
de la cubierta con la parte trasera de la bisagra, y luego presionando con rmeza
la parte delantera de la cubierta hasta que encaje en su lugar.
6. Si es necesario, ajuste la bisagra inferior.
34
ESPAÑOL

PANEL DE CONTROL Y CARACTERÍSTICAS
PANEL DE CONTROL
a
b c d
A
Pantalla LED de temperatura
B
Botón para aumentar la
temperatura
C
Botón para disminuir la temperatura
D
Botón de la luz interior
CARACTERÍSTICAS
ENFRIAMIENTO TERMOELÉCTRICO
Las bodegas termoeléctricas (también denominadas semiconductoras) brindan una
alta conabilidad con poco mantenimiento y conservan de manera precisa la
temperatura jada para almacenar el vino.
Debido a que las bodegas termoeléctricas no emplean un compresor de
enfriamiento, el ruido y la vibración son mínimos. Además de ser sumamente
silenciosas, al no vibrar no se formarán burbujas en el vino almacenado.
La tecnología termoeléctrica es segura para el medioambiente, ya que no utiliza
refrigerantes tipo CFC (clorouorocarbono), HCFC (hidroclorouorocarbono) o
HFC (hidrouorocarburo) en el proceso de enfriamiento.
LUCES INTERIORES
IMPORTANTE: La bodega está equipada con luces LED. Estas luces se
diseñaron para durar durante toda la vida útil de la bodega. Sin embargo, si la luz
deja de funcionar, contacte a un técnico competente para su reemplazo.
Durante el funcionamiento normal, es mejor que la luz permanezca apagada.
Para encender/apagar la luz:
•
Presione el botón de la luz en el panel de control.
PORTABOTELLAS
Cada portabotellas puede contener hasta cuatro botellas de vino.
35
ESPAÑOL

USO DE LA BODEGA
CONTROL DE TEMPERATURA
NOTA:
•
Cuando se enchufa por primera vez, la pantalla de led mostrará la
temperatura ambiente. Luego se mostrará en la pantalla la temperatura
interna.
•
Espere al menos 30 minutos para que la bodega se aclimate antes de hacer
cualquier ajuste de temperatura.
Fije el control en la temperatura deseada dentro del rango de 50 °F a 66 °F (10 °C a
19 °C).
Para regular la temperatura:
•
Presione la
echa hacia arriba para aumentar.
•
Presione la echa hacia abajo para disminuir.
IMPORTANTE:
•
La temperatura interna real de la bodega termoeléctrica depende de la
temperatura ambiente. Puede jar la temperatura dentro del rango, pero
quizás la bodega no alcance la temperatura predeterminada.
•
La bodega no funcionará si la temperatura ambiente es inferior a la
temperatura
jada en la bodega. El enfriamiento comenzará cuando la
temperatura ambiente sea más elevada que la temperatura jada de
enfriamiento de la bodega.
CUIDADO DE LA BODEGA
LIMPIEZA
Peligro de choque eléctrico
Desconecte el suministro de energía antes de limpiarlo.
No seguir esta instrucción puede ocasionar la muerte o choque
eléctrico.
ADVERTENCIA
1. Desenchufe o desconecte el suministro de energía.
2. Prepare una solución de limpieza de 3 a 4 cucharadas de bicarbonato de sodio
mezclado con agua tibia. Utilice una esponja o paño suave, humedecido con la
solución de limpieza, para limpiar la bodega.
36
ESPAÑOL

IMPORTANTE: No utilice productos químicos fuertes, abrasivos,
amoníaco, blanqueador con cloro, detergentes concentrados, solventes ni
estropajos de metal. ALGUNAS de estas sustancias químicas pueden
disolver, dañar y/o decolorar la bodega.
Antes de usar productos de limpieza, siempre lea y siga las instrucciones del
fabricante y las advertencias para evitar lesiones físicas o daños al producto.
3. Enjuague con agua tibia limpia y seque con un paño suave.
4. Enchufe o vuelva a conectar el suministro de energía.
5. Vuelva a jar la temperatura en la posición que desee.
JUNTAS DE LA PUERTA
Las juntas deben mantenerse limpias y exibles para asegurar un sellado adecuado.
•
Limpie las juntas de la puerta cada 3 meses con una solución de bicarbonato de
sodio y agua tibia.
•
El petrolato ligeramente aplicado en el lado de las bisagras de las juntas
mantendrá la junta exible y asegurará un buen sellado.
FILTRO EXTERNO DEL VENTILADOR
Con el tiempo, se acumulará polvo, suciedad y pelos en el ltro del ventilador, lo que
hará que el sistema de enfriamiento no funcione de manera adecuada. Para
mantener un enfriamiento óptimo y la durabilidad del producto, quite y limpie el
ltro del ventilador, por lo menos, una vez cada 6 meses.
1. Desenchufe o desconecte el suministro de energía.
2. Presione hacia abajo las dos lengüetas que se encuentran en la parte superior
para liberar el ltro del ventilador de la parte posterior del gabinete.
3. Limpie el
ltro del ventilador.
Existen dos métodos efectivos para limpiar el ltro externo del ventilador:
•
Utilice la manguera de una aspiradora para succionar el polvo, la suciedad y
los pelos del
ltro.
O
•
Lave a mano con agua tibia y jabón. Enjuague bien y deje que el
ltro se
seque al aire por completo antes de volver a instalarlo.
4. Lave a mano con agua tibia y jabón. Enjuague bien y deje que el ltro se seque al
aire por completo antes de volver a instalarlo.
5. Enchufe o vuelva a conectar el suministro de energía.
CORTES DE ENERGÍA
En caso de un corte de luz debido a una tormenta eléctrica u otra causa, desenchufe
la bodega del tomacorriente. Cuando se restablezca la energía, vuelva a enchufar el
cable eléctrico al tomacorriente de CA.
37
ESPAÑOL

SOLUCIÓN DE PROBLEMAS
Pruebe las soluciones sugeridas aquí y posiblemente se evite el gasto de una
visita de servicio técnico.
FUNCIONAMIENTO
PROBLEMA POSIBLE(S) CAUSA(S) SOLUCIÓN
La bodega no
funciona
La bodega está
desenchufada.
Conecte a un contacto de
pared de conexión a tierra
de 3 terminales.
Se disparó el cortacircuitos
o se quemó un fusible.
Reemplace/encienda el
cortacircuitos o cambie el
fusible.
La luz de la
bodega no se
enciende
La bodega está
desenchufada.
Conecte a un contacto de
pared de conexión a tierra
de 3 terminales.
La luz LED está quemada. Llame a un técnico calicado
para cambiar la luz LED
quemada.
La bodega
funciona con
demasiada
frecuencia
La habitación está muy
cálida y/o húmeda
Esto puede ser normal para
mantener la temperatura
constante en los días
húmedos y de altas
temperaturas.
Es posible que se haya
abierto la puerta con
frecuencia o se haya dejado
abierta por mucho tiempo.
No abra la puerta con
frecuencia. Compruebe si hay
elementos de mantenimiento
de la puerta se cierre por
completo.
La junta de la puerta no
sella correctamente.
Verique que la junta selle de
forma adecuada. Limpie la
junta de ser necesario.
El ltro del ventilador está
bloqueado.
Limpie el ltro del ventilador.
Vea la sección “Limpieza”.
Ruido de
funcionamiento
La bodega cuenta con
ventiladores exteriores
para mantener la
temperatura de
enfriamiento jada durante
los períodos de
temperatura ambiente
cálida o durante un uso
intenso de productos.
Es normal escuchar de vez en
cuando sonidos de circulación
de aire.
La puerta de la
bodega no
cierra
correctamente
La bodega no está nivelada. Nivele la bodega.
La puerta está bloqueada
abierta.
Verique y acomode las
botellas o los estantes que
evitan que la puerta cierre por
completo.
38
ESPAÑOL

TEMPERATURA Y HUMEDAD
PROBLEMA POSIBLE(S) CAUSA(S) SOLUCIÓN
El vino está
demasiado
caliente
Es posible que se haya
abierto la puerta con
frecuencia o se haya dejado
abierta por mucho tiempo.
No abra la puerta con
frecuencia. Compruebe si hay
elementos de mantenimiento
de la puerta se cierre por
completo.
Se agregó vino
recientemente.
Deje pasar tiempo para que el
vino recientemente agregado
alcance la temperatura
deseada.
La junta de la puerta no sella
correctamente.
Limpie la junta de la puerta.
Vea “Limpieza”.
El control de la temperatura
no se jó en la temperatura
adecuada.
Regule el control de
temperatura a un ajuste más
frío.
El ltro del ventilador está
sucio.
Limpie el ltro del ventilador.
Vea la sección “Limpieza”.
El vino está
demasiado frío
El control de temperatura se
jó en un ajuste demasiado
bajo.
Ajuste la temperatura en la
zona al próximo ajuste más
cálido; espere 24 horas para
que se ajuste.
Acumulación de
humedad en el
interior o
exterior de la
bodega
Humedad elevada Es normal cuando la humedad
es elevada. Seque la supercie
y je la temperatura en un
ajuste ligeramente más frío.
Las puertas se abren con
frecuencia o
quedan abiertas.
No abra la puerta con
frecuencia. Compruebe si hay
elementos de mantenimiento
de la puerta se cierre por
completo.
La junta de la puerta no sella
correctamente.
Limpie la junta de la puerta.
Vea “Limpieza”.
SI NECESITA MÁS AYUDA, VISITE HAIERAMERICA.COM O COMUNÍQUESE CON
LA LÍNEA DE AYUDA AL CONSUMIDOR LLAMANDO AL 1-877-337-3639.
GARANTÍA LIMITADA
SERVICIO EN EL HOGAR
GARANTÍA COMPLETA POR DOS
AÑOS
Durante 24 meses a partir de la fecha de
compra original en la tienda, Haier
reparará o reemplazará cualquier pieza
del aparato sin costo, incluyendo la
mano de obra, si la misma falla debido a
defectos en los materiales o en la mano
de obra.
Haier puede reemplazar, a su sola
discreción, cualquier pieza, subsistema,
incluso el producto entero.
El producto debe ser accesible, sin
gravamen e instalado correctamente
para recibir el servicio de reparación de
garantía.
39
ESPAÑOL

GARANTÍA LIMITADA
NOTA: Esta garantía comienza en
la fecha de compra de este
producto, y el recibo original deberá
presentarse al representante
autorizado de servicio antes de
hacerse las reparaciones bajo la
garantía.
Excepciones: Garantía uso comercial
90 días en la mano de obra a partir de la
fecha de compra original
90 días en las piezas a partir de la fecha
de compra original
No es aplicable ninguna otra garantía.
PARA OBTENER SERVICIO BAJO LA
GARANTÍA
Póngase en contacto con el centro de
servicio autorizado más cercano a su
localidad. Todo servicio deberá ser
realizado por un centro de servicio
autorizado por Haier. Para obtener el
nombre y el número de teléfono del
centro de servicio autorizado más
cercano, llame al 1-877-337-3639.
Antes de llamar, tenga a mano la
siguiente información:
Número de modelo y de serie del
aparato. El nombre y la dirección del
distribuidor en donde compró la unidad
y la fecha de compra.Una descripción
clara del problema. Un comprobante de
compra (recibo de compra).
Una descripción clara del problema.
Un comprobante de compra (recibo de
compra).
Esta garantía cubre servicios para
electrodomésticos dentro de los
Estados Unidos continental y Canadá y
donde esté disponible en Alaska,
Hawaii y Puerto Rico.
Lo que no está cubierto bajo esta
garantía:
Reemplazo o reparación de fusibles
domésticos, cortacircuitos, cableado o
plomería.
Un producto cuyo número de serie
original haya sido removido o alterado.
Cualquier cargo por servicio que no haya
sido
identicado especícamente como
servicio normal, como puede ser el área
o las horas de servicio.
Daños ocurridos durante el transporte.
Daños ocasionados por la instalación o
el mantenimiento inadecuados.
Daños por el uso incorrecto, abuso,
accidente, incendio, inundación o
fenómenos de la naturaleza.
Daños debidos al servicio efectuado por
un distribuidor o centro de servicio que
sea diferente del autorizado por Haier.
Daños ocasionados por la corriente, el
voltaje o el suministro eléctrico
incorrectos.
Daños que resulten de cualquier
modicación hecha en el producto,
alteración o ajustes no autorizados por
Haier.
Ajuste de los controles manejados por el
cliente según han sido identicados en
el manual del propietario.
Mangueras, perillas, bandejas de pelusa
y todos los otros aditamentos,
accesorios y piezas desechables.
Cargos por mano de obra, transporte
para el servicio y envío para la remoción
y el reemplazo de las piezas defectuosas
que se efectúen después del período
inicial de 24 meses.
Daños ocasionados por un uso diferente
al doméstico normal.
Cualquier gasto de transporte y de
envío.
ESTA GARANTÍA LIMITADA
REEMPLAZA TODAS LAS OTRAS
GARANTÍAS, EXPRESAS O IMPLÍCITAS
QUE INCLUYAN, ENTRE OTRAS, LAS
GARANTÍAS DE COMERCIABILIDAD O
DE CAPACIDAD PARA UN PROPÓSITO
EN PARTICULAR
El recurso provisto en esta garantía es
exclusivo y está otorgado en lugar de
cualquier otro recurso.
Esta garantía no cubre daños
incidentales o consecuentes, de modo
que las limitaciones indicadas
anteriormente pueden no aplicarse en
su caso. Algunos estados no permiten
las limitaciones acerca de cuánto
tiempo dura una garantía implícita, de
modo que las limitaciones arriba
indicadas quizás no le correspondan.
40
ESPAÑOL

Esta garantía le otorga derechos legales
especícos, y es posible que usted
tenga otros derechos, los cuales varían
de un estado a otro.
Haier America
Wayne, NJ 07470
INFORMACIÓN A TENER EN CUENTA
Le agradecemos la compra de este producto de
marca Haier. Este manual para el usuario lo
ayudará a obtener el mejor funcionamiento de
su nuevo bodega.
Para referencia futura, anote el número de
modelo y de serie y la fecha de compra. La placa
con el número de modelo o de serie está
ubicada en una etiqueta dentro de la bodega.
Engrape la prueba de compra a este manual
para asistirle cuando necesite obtener servicio
bajo la garantía.
_________________________
Número de modelo
_________________________
Número de serie
_________________________
Fecha de compra
41
ESPAÑOL

IMPORTANT
Do Not Return This Product To The Store
If you have a problem with this product, please contact the
“Haier Customer Satisfaction Center” at
1-877-337-3639.
DATED PROOF OF PURCHASE, MODEL #, AND SERIAL #
REQUIRED FOR WARRANTY SERVICE
IMPORTANT
Ne pas Réexpédier ce Produit au Magasin
Pour tout problème concernant ce produit, veuillez contacter
le service des consommateurs “Haier Customer Satisfaction Center” au
1-877-337-3639.
UNE PREUVE D’ACHAT DATEE EST REQUISE POUR BENEFICIER DE LA GARANTIE.
IMPORTANTE
No regrese este producto a la tienda
Si tiene algún problema con este producto, por favor contacte el
“Centro de Servicio al Consumidor de Haier” al
1-877-337-3639 (Válido solo en E.U.A).
NECESITA UNA PRUEBA DE COMPRA FECHADA, NÚMERO DE MODELO
Y DE SERIE PARA EL SERVICIO DE LA GARANTÍA
Made in China
Fabriqué en Chine
Hecho en China
Haier America
Wayne, NJ 07470
Printed in China
HEWFT36BXB
Issued: May 2016 Part # 0570001150 REV A
-
 1
1
-
 2
2
-
 3
3
-
 4
4
-
 5
5
-
 6
6
-
 7
7
-
 8
8
-
 9
9
-
 10
10
-
 11
11
-
 12
12
-
 13
13
-
 14
14
-
 15
15
-
 16
16
-
 17
17
-
 18
18
-
 19
19
-
 20
20
-
 21
21
-
 22
22
-
 23
23
-
 24
24
-
 25
25
-
 26
26
-
 27
27
-
 28
28
-
 29
29
-
 30
30


Haier HEWFT36BXB El manual del propietario
- Categoría
- Enfriadores de bebidas
- Tipo
- El manual del propietario
en otros idiomas
- English: Haier HEWFT36BXB Owner's manual
Artículos relacionados
Otros documentos
-
Whirlpool WWC4589BLS Manual de usuario
-
Whirlpool WUW55X15DS00 El manual del propietario
-
-
-
Jenn-Air JUW248RBCX23 El manual del propietario
-
KitchenAid KUWO24RSBX03 El manual del propietario
-
Jenn-Air JUW24FRACX00 El manual del propietario
-
Svan SR5400N El manual del propietario