South Shore 3379261 Instrucciones de operación
- Tipo
- Instrucciones de operación
La página se está cargando...

33XX-261
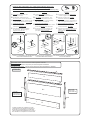
-EXPLODED VIEW
VISIÓN DE CONJUNTO
(Piece numbers for reference)FACING THE UNIT
(Número de las piezas para referencia)FRENTE AL MUEBLE
-
-
VUE EXPLOSÉE (Numéros des pièces pour références)FACE AU MEUBLE
LEFT SIDE
LADO IZQUIERDO
CÔTÉ GAUCHE
RIGHT SIDE
LADO DERECHO
CÔTÉ DROIT
- All parts are marked out or labelled on one side.
- Toutes les pièces sont repérées par marquage sur
un des côtés, ou par étiquetege sur une des faces.
- Todas las piezas están identificadas con una marca
en los dos lados o con etiquetas en una de las caras.
A
A.
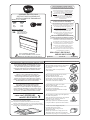
the “quick fit dowel -144-”
into the specified holes.
Fully insert
B.
.
.
To withdraw the “quick fit dowel -144-",
, unscrew it with the hand.
With your thumb, insert the “eccentric-nut -158-”
into the specified holes with the
.
Insert the pieces into one another and make
sure they are .
To lock the pieces together, turn (tighten)
the “eccentric-nut -158-” to the right for
.
do not use any tool
arrow pointing
towards the insertion hole
completely united
slightly more than half a turn
C
D.
E
A.
.
C
nsérer le «goujon à
enfoncer -144-» dans les trous mentionnés.
jusqu’au fondI
«goujon à enfoncer -144-»,
, dévisser le à la main.
Avec le pouce, insérer «l’écrou excentrique
-158-» dans les trous mentionnés,
Joindre les pièces l’une dans l’autre et s’assurer
qu’elles sont l’une contre l’autre
Tourner (serrer) «l’écrou excentrique -158-»
vers la droite, ,
pour bloquer les pièces ensemble.
B
.
D.
E.
Pour retirer le
n’utiliser aucun outil
la flèche vers le trou d’insertion.
bien unies
un peu plus d’un demi tour
.
A.
Introduzca el “clavija -144-”
en todos los agujeros mencionados.
hasta el fondo
B.
.
.
.
Para retirar el “clavija -144-”,
, desatornillar el a la mano.
Introduzca con el pulgar la “tuerca excéntrica
-158-” en los agujeros mencionados, con
inserción.
Una las piezas entre sí. Asegúrese
de que se encuentren .
Haga girar hacia la derecha y ajuste la “tuerca
excéntrica -158-”
para que las piezas queden
atrancadas.
no utilizar
herramientas
la
flecha apuntando hacia el agujero de
bien unidas
dando algo más que una
media vuelta
C
D
E
BD
HOW TO USE THE DOWEL(-144-) AND THE ECCENTRIC NUT(-158-)
EJEMPLO DE UTILIZACIÓN (CLAVIJA(-144-) Y TUERCA EXCÉNTRICA(-158-)
EXEMPLE D'UTILISATION (GOUJON(-144-) ET ECROU(-158-))
-144- -158-
FRANÇAIS
ESPAÑOL
ENGLISH
*** À RETENIR LORS DE L'ASSEMBLAGE
THINGS TO REMEMBER FOR ASSEMBLING/ / A RECORDAR DURANTE EL ENSAMBLAJE***
POUR INFORMATION SEULEMENT A TÍTULO INFORMATIVOFOR YOUR INFORMATION ONLY
-158-
-144-
or
ou
o
-158-
-158-
E
-144-
C
-158-
Q
K-1
G
K
I
L-2
L-1

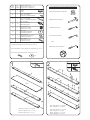
* TOOLS REQUIRED/ HERRAMIENTAS REQUERIDAS:
OUTILS REQUIS/
- HAMMER /MARTILLO
/MARTEAU
- STANDARD /PLANO/PLAT
- PHILLIPS ESTRELLA/ÉTOILE/
- ROBERTSON/ /CUADRADOCARRÉ
/ou/or o
- 2 PEOPLE/ /2 PERSONAS
2 PERSONNES
120
2
1
T
1/4" ROUND HEAD SCREW
ORNILLO 1 1/4" CABEZA REDONDA
VIS 1 1/4" TÊTE RONDE
171
231
9
PLASTIC DOWEL
TARUGO DE PLASTICO
GOUJON DE PLASTIQUE
CODE
CODIGO
CODE
QTY
CANTIDAD
QTE
HARDWARE DESCRIPTION
DESCRIPCION DE LA
DESCRIPTION DE LA QUINCAILLERIE
FERRETERÍA
158
18
15 X 12 MM CAM KLIX
TUERCA KLIX 15 X 12 MM
ÉCROU KLIX 15 X 12 MM
144
18
QUICK FIT DOWEL
CLAVIJA DE FIJACIÓN
GOUJON À ENFONCER
* In the hardware package, you have spare parts -231- and -171-.
*
* En la , tenemos las piezas de reemplazo -231- y -171-.
Dans la quincaillerie, vous avez les pièces de remplacement -231- et -171-.
ferreteria
-231-
-171-
PLASTIC CAP
CAPUCHÓN DE PLÁSTICO
CAPUCHON DE PLASTIQUE
5
99 6
9
T
/16" ROUND HEAD SCREW
ORNILLO 9/16" CABEZA REDONDA
VIS 9/16" TÊTE RONDE
P
E
LASTIC BRACKET
SCUADRA DE PLÁSTICO
ÉQUERRE DE PLASTIQUE (Noir)
191
3
6
FELT
FIELTRO
FEUTRE
6
- Insert -144-(18) into I, L-1, L-2 and Q.
- Insertar -144-(18) en I, L-1, L-2 y Q.
- Insérer -144-(18) dans I, L-1, L-2 et Q.
2
- Insert -231-(6) into G, K-1, L-1 and L-2.
- Insertar -231-(6) en G, K-1, L-1 y L-2.
- Insérer -231-(6) dans G, K-1, L-1 et L-2.
X6
-231-
Required/Requis/Requerido
1
G
K-1
L-1
L-2
I
L-1
L-2
Q
- Stick -6-(6) under L-1, L-2 and Q.
- Coller -6-(6) sous L-1, L-2 et Q.
- Pegar -6-(6) debajo L-1, L-2 y Q.
X18
-144-
Required/Requis/Requerido
-6-
X6

-158-
X3
X3
X18
-99-
-191-
3
E
C
A
H
A
C
I
A
E
L
H
E
C
O
/
/
F
L
H
U
-158-
A
R
R
O
W
T
O
W
A
R
D
S
T
H
E
H
O
L
E
/
F
L
È
C
H
E
V
E
R
S
L
E
T
R
O
U
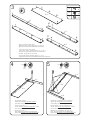
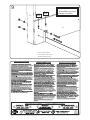
- Screw -191-(3) on K-1 with -99-(3).
- With thumb, insert -158-(18) into G, K, K-1, L-1 and L-2.
(Make sure the little arrow is towards the insertion hole.)
- Atornillar -191-(3) sobre K-1 con -99-(3).
- Con el pulgar, insertar -158-(18) en G, K, K-1, L-1 y L-2.
(Asegurarse que la flecha esté orientada hacia el hueco de inserción.)
- Visser -191-(3) sur K-1 avec -99-(3).
- Avec le pouce, insérer -158-(18) dans G, K, K-1, L-1 et L-2.
(Assurez-vous que la flèche pointe vers le trou d'insertion.)
Required/Requis/Requerido
K-1
G
K
L-1
L-2
5
4
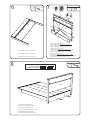
- Insert G and K-1 into L-1.
- Tighten right -158-(3)
on G and K-1 to lock them together.
- Insertar G y K-1 en L-1.
- Girar -158-(3)
hacia la derecha sobre G y K-1 para trancarlos juntos.
little more than a half turn
un peu plus qu'un demi tour
un poco màs que una media vuelta
- Insérer G et K-1 dans L-1.
- Tourner -158-(3) à droite
sur G et K-1 pour les barrer ensemble.
-158-
correct/
correcto
incorrect/
incorrecto
L-1
K-1
G
- Insert K into L-1 followed to L-2 into G, K and K-1.
- Tighten right -158-(7)
on G, K and K-1 to lock them together.
- Insertar K en L-1 seguido de L-2 en G, K y K-1.
- Girar -158-(7)
hacia la derecha sobre G, K y K-1 para trancarlos juntos.
little more than a half turn
un peu plus qu'un demi tour
un poco màs que una media vuelta
- Insérer K dans L-1 suivi de L-2 dans G, K et K-1.
- Tourner -158-(7) à droite
sur G, K et K-1 pour les barrer ensemble.
-158-
correct/
correcto
incorrect/
incorrecto
L-1
K-1
G
K
L-2
La página se está cargando...

60”
54”
9
- Hardware not included.
- Quincaillerie non inclue.
- Herraje no incluido.
-If you are using metal rails
- Si vous utilizes un rail de métal.
- Si utiliza una base de metal.
Q
L-1
Transcripción de documentos
HOW TO USE THE DOWEL(-144-) AND THE ECCENTRIC NUT(-158-) EXEMPLE D'UTILISATION (GOUJON(-144-) ET ECROU(-158-)) EJEMPLO DE UTILIZACIÓN (CLAVIJA(-144-) Y TUERCA EXCÉNTRICA(-158-) FRANÇAIS ENGLISH A. Fully insertthe “quick fit dowel -144-” B. To withdraw the “quick fit dowel -144-", do not use any tool , unscrew it with the hand. A. Introduzca el “clavija -144-” hasta el fondo A. Insérer jusqu’au fond le «goujon à B. Pour retirer le «goujon à enfoncer -144-», D. Insert the pieces into one another and make sure they are completely united . E. To lock the pieces together, turn (tighten) the “eccentric-nut -158-” to the right for slightly more than half a turn. en todos los agujeros mencionados. B. Para retirar el “clavija -144-”, no utilizar n’utiliser aucun outil, dévisser le à la main. herramientas, desatornillar el a la mano. C. With your thumb, insert the “eccentric-nut -158-” C. Avec le pouce, insérer into the specified holes with the arrow pointing towards the insertion hole. -158- ESPAÑOL enfoncer -144-» dans les trous mentionnés. into the specified holes. «l’écrou excentrique -158-» dans les trous mentionnés, la flèche vers le trou d’insertion. C. Introduzca con el pulgar la “tuerca excéntrica -158-” en los agujeros mencionados, con la flecha apuntando hacia el agujero de inserción. D. Joindre les pièces l’une dans l’autre et s’assurer D . Una las piezas entre sí. Asegúrese de que se encuentren bien unidas. qu’elles sont bien unies l’une contre l’autre . E. Tourner (serrer) «l’écrou excentrique -158-» E. Haga girar hacia la derecha y ajuste la “tuerca excéntrica -158-” dando algo más que una media vuelta para que las piezas queden atrancadas. vers la droite, un peu plus d’un demi tour , pour bloquer les pièces ensemble. B A -144- C D E -144- -144- or ou o -158-158-158- -158- *** THINGS TO REMEMBER FOR ASSEMBLING/À RETENIR LORS DE L'ASSEMBLAGE / A RECORDAR DURANTE EL ENSAMBLAJE*** FOR YOUR INFORMATION ONLY POUR INFORMATION SEULEMENT A TÍTULO INFORMATIVO -EXPLODED VIEW (Piece numbers for reference)FACING THE UNIT -VUE EXPLOSÉE (Numéros des pièces pour références)FACE AU MEUBLE -VISIÓN DE CONJUNTO (Número de las piezas para referencia)FRENTE AL MUEBLE 33XX-261 I K G L-1 K-1 LEFT SIDE CÔTÉ GAUCHE LADO IZQUIERDO RIGHT SIDE CÔTÉ DROIT LADO DERECHO L-2 Q - All parts are marked out or labelled on one side. - Toutes les pièces sont repérées par marquage sur un des côtés, ou par étiquetege sur une des faces. - Todas las piezas están identificadas con una marca en los dos lados o con etiquetas en una de las caras. CODE CODE CODIGO QTY HARDWARE DESCRIPTION QTE DESCRIPTION DE LA QUINCAILLERIE CANTIDAD DESCRIPCION DE LA FERRETERÍA 6 FELT FEUTRE FIELTRO 99 6 9/16" ROUND HEAD SCREW VIS 9/16" TÊTE RONDE TORNILLO 9/16" CABEZA REDONDA 120 2 1 1/4" ROUND HEAD SCREW VIS 1 1/4" TÊTE RONDE TORNILLO 1 1/4" CABEZA REDONDA 144 18 QUICK FIT DOWEL GOUJON À ENFONCER CLAVIJA DE FIJACIÓN 158 18 15 X 12 MM CAM KLIX ÉCROU KLIX 15 X 12 MM TUERCA KLIX 15 X 12 MM 171 5 PLASTIC CAP CAPUCHON DE PLASTIQUE CAPUCHÓN DE PLÁSTICO 191 3 PLASTIC BRACKET ÉQUERRE DE PLASTIQUE (Noir) ESCUADRA DE PLÁSTICO 9 PLASTIC DOWEL GOUJON DE PLASTIQUE TARUGO DE PLASTICO 6 231 * TOOLS REQUIRED/ OUTILS REQUIS/ HERRAMIENTAS REQUERIDAS: - 2 PEOPLE/ 2 PERSONNES /2 PERSONAS - HAMMER /MARTEAU /MARTILLO - STANDARD /PLAT /PLANO - PHILLIPS /ÉTOILE/ ESTRELLA or/ou/ o * In the hardware package, you have spare parts -231- and -171-. - ROBERTSON/ CARRÉ /CUADRADO * Dans la quincaillerie, vous avez les pièces de remplacement -231- et -171-. * En la ferreteria, tenemos las piezas de reemplazo -231- y -171-. -171- -231- Required/Requis/Requerido 1 -231X6 Required/Requis/Requerido 2 -6X6 -144X18 L-1 G L-2 K-1 L-1 I L-2 Q - Insert -144-(18) into I, L-1, L-2 and Q. - Stick -6-(6) under L-1, L-2 and Q. - Insert -231-(6) into G, K-1, L-1 and L-2. - Insérer -231-(6) dans G, K-1, L-1 et L-2. - Insérer -144-(18) dans I, L-1, L-2 et Q. - Coller -6-(6) sous L-1, L-2 et Q. - Insertar -231-(6) en G, K-1, L-1 y L-2. - Insertar -144-(18) en I, L-1, L-2 y Q. - Pegar -6-(6) debajo L-1, L-2 y Q. Required/Requis/Requerido O/OW TOWARD S R X3 /FL VERS LE TREC HE 3 E HOLE/FLÈC TH -158- -99- IA EL H UE HAC AR C HAU O X18 -158- K-1 X3 -191- G L-1 K L-2 - Screw -191-(3) on K-1 with -99-(3). - With thumb, insert -158-(18) into G, K, K-1, L-1 and L-2. (Make sure the little arrow is towards the insertion hole.) - Visser -191-(3) sur K-1 avec -99-(3). - Avec le pouce, insérer -158-(18) dans G, K, K-1, L-1 et L-2. (Assurez-vous que la flèche pointe vers le trou d'insertion.) - Atornillar -191-(3) sobre K-1 con -99-(3). - Con el pulgar, insertar -158-(18) en G, K, K-1, L-1 y L-2. (Asegurarse que la flecha esté orientada hacia el hueco de inserción.) 4 5 -158- correct/ correcto -158- incorrect/ incorrecto correct/ correcto incorrect/ incorrecto G L-1 L-1 K K-1 G K-1 L-2 - Insert G and K-1 into L-1. - Tighten right -158-(3)little more than a half turn on G and K-1 to lock them together. - Insert K into L-1 followed to L-2 into G, K and K-1. - Tighten right -158-(7)little more than a half turn on G, K and K-1 to lock them together. - Insérer G et K-1 dans L-1. - Tourner -158-(3) un peu plus qu'un demi tour à droite sur G et K-1 pour les barrer ensemble. - Insérer K dans L-1 suivi de L-2 dans G, K et K-1. - Tourner -158-(7) un peu plus qu'un demi tour à droite sur G, K et K-1 pour les barrer ensemble. - Insertar G y K-1 en L-1. - Girar -158-(3)un poco màs que una media vuelta hacia la derecha sobre G y K-1 para trancarlos juntos. - Insertar K en L-1 seguido de L-2 en G, K y K-1. - Girar -158-(7)un poco màs que una media vuelta hacia la derecha sobre G, K y K-1 para trancarlos juntos. 9 - Hardware not included. L-1 60” 54” - Quincaillerie non inclue. - Herraje no incluido. Q -If you are using metal rails - Si vous utilizes un rail de métal. - Si utiliza una base de metal.-
 1
1
-
 2
2
-
 3
3
-
 4
4
-
 5
5
-
 6
6


South Shore 3379261 Instrucciones de operación
- Tipo
- Instrucciones de operación
en otros idiomas
- français: South Shore 3379261 Mode d'emploi
- English: South Shore 3379261 Operating instructions