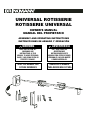
Brinkmann Oven Universal Rotisserie Manual de usuario
- Categoría
- Barbacoas
- Tipo
- Manual de usuario
Este manual también es adecuado para

OWNER’S MANUAL
MANUAL DEL PROPIETARIO
UNIVERSAL ROTISSERIE
ROTISSERIE UNIVERSAL
ASSEMBLY AND OPERATING INSTRUCTIONS
INSTRUCCIONES DE ARMADO Y OPERACIÓN
SAVE THIS MANUAL FOR
FUTURE REFERENCE
WARNING
READ AND FOLLOW ALL
WARNINGS AND
INSTRUCTIONS IN THIS
MANUAL TO AVOID PERSONAL
INJURY, INCLUDING DEATH OR
PROPERTY DAMAGE.
GUARDE ESTE MANUAL
PARA REFERENCIA FUTURA
ADVERTENCIA
LEA Y SIGA TODAS LAS
ADVERTENCIAS E
INSTRUCCIONES EN ESTE
MANUAL PARA EVITAR LESIONES
PERSONALES, INCLUSO MUERTE
O DAÑOS MATERIALES.

WE WANT YOU TO ASSEMBLE AND USE YOUR ROTISSERIE AS SAFELY AS POSSIBLE.
THE PURPOSE OF THIS SAFETY ALERT SYMBOL IS TO ATTRACT YOUR ATTENTION
TO POSSIBLE HAZARDS AS YOU ASSEMBLE AND USE YOUR ROTISSERIE.
WHEN YOU SEE THE SAFETY ALERT SYMBOL
PAY CLOSE ATTENTION TO THE INFORMATION WHICH FOLLOWS!
READ ALL SAFETY WARNINGS AND INSTRUCTIONS CAREFULLY
BEFORE ASSEMBLING AND OPERATING YOUR ROTISSERIE.
1
WARNING
IMPORTANT SAFETY
WARNINGS
• Always check the grill prior to each use as indicated in the “Pre-Start Check List” section of
the Brinkmann Owner’s Manual.
• Keep children and pets away. DO NOT allow children to use or play near the grill or rotisserie.
• DO NOT leave the grill unattended while in use.
• DO NOT use the side burner when using a rotisserie. Burner lid could be hot from prior use.
• To avoid body injury, DO NOT touch spit rod while in use or soon after use, rod can be
EXTREMELY HOT.
• Keep any electrical supply cords away from water or hot surfaces.
• DO NOT operate with a damaged cord or plug.
• Turn rotisserie motor switch to “OFF” before removing plug from outlet.
• Unplug the rotisserie motor when not in use and before cleaning.
• DO NOT exceed 12 lbs. of food on the rotisserie.
• Keep a fire extinguisher acceptable for use with gas products close by. Refer to your local
authority to determine proper size and type.
• For household use only. DO NOT use the grill or this rotisserie for anything other than its
intended purpose.
• DO NOT use while under the influence of drugs or alcohol.
• When using an AC current rotisserie, it must be electrically grounded in
accordance with local codes, or in the absence of local codes:
• In the US: The National Electrical Code – ANSI-NFPA No. 70 – Latest Edition
• In Canada: the Canadian Electrical Code – CSA C22.1
USE CAUTION AND COMMON SENSE WHEN OPERATING YOUR GAS GRILL.
FAILURE TO ADHERE TO THE SAFETY WARNINGS AND GUIDELINES IN THIS MANUAL
COULD RESULT IN SEVERE BODILY INJURY OR PROPERTY DAMAGE.
SAVE THIS MANUAL FOR FUTURE REFERENCE.
ELECTRICAL GROUNDING INSTRUCTIONS:
This appliance (rotisserie motor) is equipped with a three-prong (grounding) plug for
your protection against electrical shock hazard. It should be plugged directly into a
properly grounded three-prong receptacle. DO NOT cut or remove the grounding prong
from this plug.

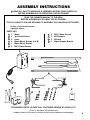
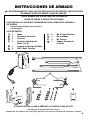
5 M5 X 10mm Screws
5 M5 Washers
5 M5 Nuts
1 Right Support Bracket
PARTS LIST:
1 Motor
5 Spit Rod Sections
2 Forks
2 Motor Mount Bracket (A & B)
1 Motor Mount Bracket
3 M6 X 10mm Screws
1
2
3
6
7
8
ASSEMBLY INSTRUCTIONS
READ ALL SAFETY WARNINGS & ASSEMBLY INSTRUCTIONS CAREFULLY
BEFORE ASSEMBLING OR OPERATING YOUR ROTISSERIE.
READ THE OWNERS MANUAL TO THE GRILL
BEFORE ASSEMBLING OR USING THIS ROTISSERIE.
THE FOLLOWING TOOLS ARE REQUIRED TO ASSEMBLE THIS UNIVERSAL ROTISSERIE:
• Phillips & Flathead Screwdrivers
• Adjustable Wrench
2
(Proof of purchase will be required.)
Inspect contents of the box to ensure all parts are included and undamaged.
3
FOR MISSING PARTS, PLEASE CALL CUSTOMER SERVICE AT 800-527-0717.
5
8
7
10
1
2
4
5
4A
4B
9
10
9
6

Right Support
Bracket
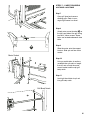
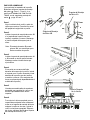
ASSEMBLY STEPS
Most Brinkmann grill models will use motor
mount bracket (Step 1 - Step 6), if your
grill is model 810-7400-S or
810-7500-S, use motor mount bracket
and skip to Step 7.
Step 1
Open grill hood and remove cooking
grills. Refer to your original grill
owner’s manual.
Step 2
Attach motor mount bracket 4B on
the left hand side of the grill using
two screws, washers and nuts.
Note: Motor mount bracket 4B may
be flipped to fit properly on
certain grills.
Step 3
Attach motor mount bracket 4A to
bracket 4B using one screw as
shown. Keep screw loose until height
adjustment has been set.
Step 4
If a notch on the right side of the grill
does not exist for your spit rod,
attach the spit rod support bracket to
the outside right hand side of the grill
using two screws, washers and nuts.
(Two sets of holes are provided
depending on your grill model.)
Step 5
Using a combination of sections,
securely assemble the spit rod to a
length that will rest on both the motor
mount bracket to the spit rod bracket.
Step 6
To set the proper height for your
motor mount bracket, place the motor
on the motor mount bracket, place the
spit rod in the motor and slide the
bracket adjustment up or down until
the spit rod is level. After adjustment
has been made, tighten motor mount
bracket 4A to bracket 4B with screw.
5
4
3
Motor Mount
Bracket 4A
Motor Mount
Bracket 4B

4
Motor Socket
Grill Body Notch
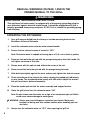
STEPS 7 - 11 ARE FOR MODELS
810-7400-S & 810-7500-S
Step 7
Open grill hood and remove
cooking grills. Refer to your
original grill owner’s manual.
Step 8
Attach motor mount bracket on
the left hand side of the grill using
two M6 X 10mm screws. Screw
holes are located underneath side
table.
Step 9
Slide the motor onto the support
bracket. Slide spit rod into motor
socket.
Step 10
Using a combination of sections,
assemble the spit rod to a length
that will rest on both the motor
mount bracket and the spit grill
body notch.
Step 11
Lock right hand side of spit rod
into grill body notch.
5

5
WARNING
ELECTRICAL GROUNDING INSTRUCTIONS:
This appliance (rotisserie motor) is equipped with a three-prong (grounding) plug for
your protection against electrical shock hazard. It should be plugged directly into a
properly grounded three-prong receptacle. DO NOT cut or remove the grounding prong
from this plug.
OPERATING THE ROTISSERIE:
1. Your grill was pre-drilled from the factory to include mounting holes for the
Brinkmann Universal Rotisserie.
2. Install the rotisserie motor onto the motor mount bracket.
3. Ensure that the rotisserie motor is turned to “OFF.”
Note: Rotisserie motor is capable of turning up to a 12 lb. cut of meat or poultry.
4. Place one fork onto the spit rod with the prongs facing away from the handle. Do
not tighten set screw at this time.
5. Skewer meat with the spit rod and slide to the center of the rod.
6. Place second fork onto the spit rod with the prongs facing the meat.
7. Slide both forks tightly against the meat and securely tighten the fork set screws.
8. Check the balance of the food on the rod by rotating the loaded spit rod loosely
in your hands. The rod should rotate evenly with little effort. Adjust the food on
the spit to achieve a balanced assembly.
9. Place the loaded spit rod into the motor assembly and support bracket.
10. Close the grill lid and turn the rotisserie motor “ON.”
Note: Erratic noises from the motor are a sign of an unbalanced spit rod. Which
could cause severe damage to motor gears.
WARNING: Always use oven mitts/gloves to protect your hands. Metal parts
become hot during use. Use extreme caution when handling spit rod
and forks.
11. Always turn the rotisserie motor to “OFF” when opening the grill lid.
READ ALL WARNINGS ON PAGE 1 AND IN THE
OWNERS MANUAL TO THE GRILL.

6
GRILLING TO PROPER TEMPERATURE:
• Use a meat thermometer to be sure food has reached a safe internal temperature.
• The US Department of Agriculture recommends the minimum temperature be reached
for the following food items:
Pork ----------- 160 degrees F (71° C)
Poultry ------- 180 degrees F (82° C)
Roasts ------- 145 degrees F (62.8° C)
HELPFUL HINTS
• If you pre-cook meat or poultry, do so immediately before grilling.
• Never defrost meat at room temperature or on a countertop.
• Refrigerate leftovers within 2 hours of taking food off the grill.
For additional information, please phone the USDA’s toll free Meat & Poultry Hotline at:
800-535-4555
CLEANING AND MAINTENANCE:
• Spit rod and forks can be disassembled and washed in dish soap and warm water.
Note: All metal parts, with exception of the motor, are dishwasher safe.
• After first use, it is likely that the stainless steel adjacent to the burner will darken.
This is a normal property of stainless steel used on the rotisserie.
• Store motor and other parts in a cool, clean and dry place.
• To prevent electrical shock hazard, DO NOT immerse the motor or cord in water.
ROTISSERIE COOKING CONTINUED:
12. When food is done, use oven mitts/gloves to remove spit rod from motor
assembly.
13. Loosen fork set screws and remove meat by sliding off the end of the spit rod.

7
ES NUESTRO DESEO QUE ARME Y UTILICE SU ASADOR ESTILO ROTISSERIE EN LA
FORMA MÁS SEGURA POSIBLE.
EL PROPÓSITO DE ESTE SÍMBOLO DE ALERTA DE SEGURIDAD ES QUE USTED
PRESTE ATENCIÓN A LOS POSIBLES PELIGROS CUANDO ARME Y UTILICE SU ASADOR
ESTILO ROTISSERIE.
¡CUANDO VEA ESTE SÍMBOLO DE ALERTA DE SEGURIDAD,
PRESTE ESPECIAL ATENCIÓN A LA INFORMACIÓN A CONTINUACIÓN!
LEA DETENIDAMENTE TODAS LAS ADVERTENCIAS DE SEGURIDAD E
INSTRUCCIONES ANTES DE ARMAR Y USAR EL ASADOR ESTILO ROTISSERIE.
ADVERTENCIA
ADVERTENCIAS
IMPORTANTES DE SEGURIDAD
• Siempre revise la parrilla antes de cada uso, tal como se indica en la sección "Lista de
verificación preliminar al encendido" del manual del propietario de Brinkmann.
• Mantenga a los niños y animales de compañía alejados de este artefacto. NO permita que los
niños usen o jueguen cerca de la parrilla o del asador estilo rotisserie.
• NO deje la parrilla desatendida mientras está en uso.
• NO use la hornilla lateral cuando esté usando un asador estilo rotisserie. La tapa de la hornilla
podría estar caliente si se usó anteriormente.
• Para evitar lesiones personales, NO toque la varilla en uso o poco después de su uso ya que
puede estar MUY CALIENTE.
• Mantenga todos los cables de alimentación eléctrica alejados del agua o superficies calientes.
• No opere la unidad con un cordón o enchufe dañado.
• Coloque el interruptor del motor del asador en “OFF” (apagado) antes de desenchufarlo.
• Desenchufe el motor del asador cuando no esté en uso y antes de limpiarlo.
• NO coloque más de 12 libras de comida en el asador estilo rotisserie.
• Mantenga en un lugar cercano un extinguidor de incendios aceptable para usar con productos
de gas. Consulte con su autoridad local para determinar el tamaño y tipo correctos.
• Para uso doméstico únicamente. NO use la parrilla o este asador estilo rotisserie para ningún
propósito que no sea el previsto.
• NO use la parrilla bajo la influencia de alcohol o drogas.
• Cuando use un asador estilo rotisserie de corriente alterna, debe estar conectado a
tierra de acuerdo con los códigos locales o, si no los hay:
• En EE.UU.: El Código Eléctrico de EE.UU. – ANSI-NFPA Nº 70 – última edición
• En Canadá: el Código Eléctrico Canadiense – CSA C22.1
SEA PRECAVIDO Y UTILICE SENTIDO COMÚN CUANDO OPERE LA PARRILLA DE GAS.
HACER CASO OMISO A LAS ADVERTENCIAS DE SEGURIDAD E INSTRUCCIONES EN ESTE
MANUAL PUEDE PRODUCIR GRAVES LESIONES PERSONALES O DAÑOS MATERIALES.
GUARDE ESTE MANUAL PARA REFERENCIA FUTURA.
INSTRUCCIONES PARA CONECTAR A TIERRA LOS ARTEFACTOS
ELÉCTRICOS:
Este artefacto (motor del asador estilo rotisserie) está equipado con un enchufe de tres
clavijas (de puesta a tierra) para proteger al usuario contra el electrochoque. Este
enchufe debe conectarse directamente a un receptáculo para tres clavijas conectado
correctamente a tierra. No corte ni quite la clavija de puesta a tierra del enchufe.

8
(Se requerirá el comprobante de compra.)
Inspeccione el contenido de la caja para verificar que todas las partes están incluidas e intactas.
SI FALTAN PARTES, LLAME A SERVICIO AL CLIENTE AL 800-527-0717.
5 M5 X 10mm Tornillos
5 M5 Arandelas
5 M5 Tuercas
1 Soporte Derecho de
la Varilla
LISTA DE PARTES:
1 Motor
5 Secciones de Varillas
2 Trinches
2 Soporte de Montaje del
Motor (A y B)
1 Soporte de Montaje del Motor
3 M6 X 10mm Tornillos
1
2
3
7
8
9
4
5
INSTRUCCIONES DE ARMADO
LEA DETENIDAMENTE TODAS LAS ADVERTENCIAS DE SEGURIDAD E INSTRUCCIONES
DE ARMADO ANTES DE ARMAR O USAR EL ASADOR.
LEA EL MANUAL DEL PROPIETARIO DE LA PARRILLA
ANTES DE ARMAR O USAR ESTE
ROTISSERIE.
SE NECESITAN LAS SIGUIENTES HERRAMIENTAS PARA ARMAR ESTE UNIVERSAL
ROTISSERIE:
• Destornilladores Phillips y de Punta Plana
• Llave Ajustable
10
6
3
5
8
7
10
1
2
4A
4B
9
6

Soporte Derecho
de la Varilla
9
PASOS DE ASAMBLAGE
La mayoría de los modelos de la parrilla
Brinkmann utilizan el soporte de montaje
del motor (Paso 1 - Paso 6), si su
parrilla es el modelo 810-7400-S o 810-
7500-S, use el soporte de montaje del
motor y siga al Paso 7.
Paso 1
Abra la cubierta de la parrilla y quite las
rejillas para cocinar. Consulte su manual
del propietario original de su parrilla.
Paso 2
Instale el soporte de montaje de motor 4B
a la izquierda de la parrilla con dos
tornillos, arandelas y tuercas. Mantenga
el tornillo aflojado hasta que ajuste la
altura.
Nota: El montaje de motor 4B puede
girarse 180° en occasiones para
ciertos modelos de parrilla.
Paso 3
Instale el soporte de montaje de motor 4A
a 4B usando un tornillo como ilustrado.
Mantenga suelto el tornillo hasta que
ajuste altura.
Paso 4
Si no existe una muesca del lado
derecho del cuerpo de la parrilla, instale
el soporte para la varilla afuera de el lado
derecho de la parrilla con dos tornillos,
arandelas y tuercas. (Dos conjuntos de
hoyos se proporcionan dependiendo de el
modelo de su parrilla.)
Paso 5
Usando una combinación de secciones,
ensamble con seguridad la varilla a una
distancia que descanse en ambos
soportes.
Paso 6
Para ajustar la altura apropiada para su
soporte de montaje de motor, coloque el
motor en el soporte de montaje de motor,
coloque la varilla en el motor y ajuste la
varilla a nivel plano apropiado. Despues
de ajustar, apriete el tornillo de el soporte
de montaje de motor 4A y 4B.
5
4
Soporte de Montaje
de Motor 4B
Soporte de Montaje
de Motor 4A

10
Hueco del Motor
Muesca del
Cuerpo de la
Parrilla
PASOS 7 - 11 SON PARA
MODELOS 810-7400-S Y 810-7500-S
Paso 7
Abra la cubierta de la parrilla y quite
las rejillas para cocinar. Consulte su
manual del propietario original de su
parrilla.
Paso 8
Ate el soporte del montaje de
motor en la izquierda de la
parrilla utilizando dos M6 X 10mm
tornillos. Los hoyos estan
localizados debajo de la mesa
lateral.
Paso 9
Deslice el motor en el soporte.
Coloque la varilla en el hueco del
motor.
Paso 10
Usando una combinación de
secciones, ensamble la varilla a
una distancia que descanse en la
muesca del cuerpo de la
parrilla.
Paso 11
Trabe el lado de mano derecha de
la varrilla en la muesca del cuerpo
de la parrilla.
5

11
ADVERTENCIA
INSTRUCCIONES PARA CONECTAR A TIERRA LOS ARTEFACTOS
ELÉCTRICOS:
Este artefacto (motor del asador estilo rotisserie) está equipado con un enchufe de tres
clavijas (de puesta a tierra) para proteger al usuario contra el electrochoque. Este
enchufe debe conectarse directamente a un receptáculo para tres clavijas conectado
correctamente a tierra. No corte ni quite la clavija de puesta a tierra del enchufe.
FUNCIONAMIENTO DEL ASADOR ESTILO ROTISSERIE:
1. La parrilla viene preparada de la fábrica con agujeros de montaje para instalar el
asador estilo rotisserie Brinkmann Universal Rotisserie.
2. Instale el motor del asador en el soporte de montaje.
3. Verifique que el motor del asador está en la posición “OFF” (apagado).
Nota: El motor del asador puede hacer girar un corte de carne o pollo de 12 libras
máximo.
4. Coloque un trinche en la varilla con las puntas en sentido opuesto a la manija.
Por ahora no apriete el tornillo de fijación.
5. Atraviese la carne con la varilla y deslícela hasta el centro de la misma.
6. Coloque el segundo trinche en la varilla con las puntas hacia la carne.
7. Deslice ambos trinches firmemente contra la carne y apriete bien los tornillos de
fijación de los trinches.
8. Verifique que la carne en la varilla está balanceada girando la varilla con la carne
con las manos. La varilla debe girar en forma pareja sin mucho esfuerzo. Ajuste
la carne en la varilla hasta que quede balanceada.
9. Coloque la varilla con la carne en el motor y soporte.
10. Cierre la tapa de la parrilla y coloque el interruptor del motor del asador en la
posición “ON” (encendido).
Nota: Los ruidos irregulares del motor indican que la varilla está desbalanceada y
se podrían dañar seriamente los engranajes del motor.
ADVERTENCIA: Siempre use guantes para el horno para protegerse las
manos. Las partes metálicas pueden calentarse durante el
uso. Tenga mucho cuidado cuando toque la varilla y los
trinches.
LEA TODAS LAS ADVERTENCIAS EN LA PÁGINA 7 Y EN EL MANUAL
DEL PROPIETARIO DE LA PARRILLA.

12
COCINAR A LA PARRILLA A LA TEMPERATURA APROPIADA:
• Utilice un termómetro para carne para verificar que haya alcanzado una
temperatura interna segura.
• El Departamento de Agricultura de EE.UU. recomienda que los siguientes alimentos
alcancen las siguientes temperaturas mínimas:
Cerdo ----------------------- 160 grados F (71° C)
Ave -------------------------- 180 grados F (82° C)
Asados de carne ------- 145 grados F (62.8° C)
CONSEJOS ÚTILES
• Si precocina carne o pollo, hágalo inmediatamente antes de cocinarlo en la parrilla.
• Nunca descongele carne a la temperatura ambiente o sobre un mostrador.
• Refrigere los restos a más tardar 2 horas después de haber sacado la comida de la
parrilla.
Para mayor información, llame a la Línea de Información sobre Carne y Pollo de USDA
al número sin cargo:
800-535-4555
LIMPIEZA Y MANTENIMIENTO:
• La varilla y los trinches pueden desarmarse y lavarse con agua tibia y jabón para
platos.
Nota: Todas las partes metálicas, con excepción del motor, pueden lavarse en la
lavadora de platos.
• Es posible que después del primer uso el acero inoxidable al lado de la hornalla se
oscurezca. Ésta es una propiedad normal del acero inoxidable utilizado en el
asador.
• Guarde el motor y las otras piezas en un lugar limpio y seco.
• NO sumerja en motor o el cordón en agua para evitar los peligros de electrochoque.
COCCIÓN ESTILO ROTISSERIE - CONTINUACIÓN:
11. Siempre coloque el interruptor del motor de asador en “OFF” (apagado) cuando
abra la tapa de la parrilla.
12. Una vez que la comida esté lista, use guantes para el horno para sacar la varilla
del motor.
13. Afloje los tornillos de fijación de los trinches y saque la carne deslizándola del
extremo de la varilla.

LOOK FOR THESE AND OTHER BRINKMANN ACCESSORIES AT YOUR LOCAL RETAILER WHERE
GRILLS ARE SOLD, OR ORDER DIRECT BY CALLING 800-468-5252.
www.brinkmann.net
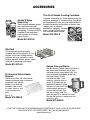
ACCESSORIES
Rib Rack
Chrome-plated rack can greatly
increase the cooking capacity of your
smoker. Holds ribs, chicken halves,
potatoes and corn vertically to triple
cooking capacity. Allows smoke, steam
and heat to penetrate food evenly.
Model 812-3310-0
Smoke’N Spice
Seasoning
These custom blended spices
are a delicious marinade
seasoning for smoke cooking
and grilling. Contains no MSG.
Available in red and white
meat varieties in a money-
saving 2-pack.
Model 812-3322-0
The Art of Smoke Cooking Cookbook
Contains 40 exciting yet simple recipes using the
delicious technique of smoke cooking. Beautifully
photographed full-color, sixty-six page hardback
cookbook presents old favorites as well as new
recipes such as smoked
meatballs & spaghetti, smoked
pizza, smoked tomato soup
and smoked peach cobbler
.
Model 812-3327-0
Professional Shish-Kabob
Skewers
These heavy-duty, 18" shish-kabob
skewers are extra-long for fabulous
restaurant style kabobs.
Made of rust resistant
stainless steel to last
for years. Ideal for use
in our smokers and
grills.
Set of 12
Model 812-2904-0
Deluxe Charcoal Starter
The Brinkmann Deluxe Charcoal Starter is
the fastest and healthiest way to light
charcoal without using lighter fluid. Just
place crumpled newspaper under the
charcoal starter, fill with
charcoal and light. You’ll
have hot, glowing coals in
about 15 minutes with no
unpleasant fumes to affect
the flavor of your food. Our
unique design allows you
to pour the hot coals from
the top or simply slide the
grate out and lift to release hot coals
through the bottom of starter into your
smoker or grill.
Model 812-4080-0

BUSQUE ESTOS Y OTROS ACCESORIOS BRINKMANN EN SU FERRETERÍA O ALMACÉN LOCAL,
SÍRVASE CONTACTAR AL DEPARTAMENTO DE SERVICIO AL CLIENTE AL 800-468-5252.
www.brinkmann.net
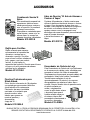
ACCESORIOS
Rejilla para Costillas
Rejilla cromada que aumenta
enormemente la capacidad de
alimentos a cocinar en su
ahumador o parrilla. Se utiliza
para colocar costillas, mitades de
pollo, papas y maíz en sentido
vertical, lo cual triplica la
capacidad de la parrilla. Permite que el humo,
el vapor y el calor penetren de manera
uniforme en los alimentos.
Modelo 812-3310-0
Condimento Smoke’N
Spice
Esta combinación especial de
especias es deliciosa como
adobo para ahumar, cocinar y
asar a la parrilla. No contiene
glutamato monosódico.
Disponible en variedades para
carne blanca y carne roja, se
ahorra dinero si compra un
paquete de ambas variedades.
Modelo 812-3322-0
Libro de Recetas "El Arte de Ahumar o
Cocinar al Vapor"
Contiene 40 excelentes y fáciles recetas que
utilizan la deliciosa técnica de ahumar o cocinar
al vapor. Libro de recetas de tapa dura con
sesenta y seis páginas de hermosas fotografías
en colores, con recetas clásicas favoritas y
recetas nuevas como los espaguetis con
albóndigas de carne ahumadas, pizza ahumada,
sopa de tomate ahumada
y pastel de duraznos al
vapor.
Modelo 812-3327-0
Fierritos Profesionales para
Shish-Kabob
Estos fierritos reforzados de 18 pulgadas
son extralargos para cocinar fabulosos
shish-kabobs estilo restaurante.
Fabricados de acero inoxidable
resistente a la oxidación que
durarán muchos años.
Ideales para usarse en
nuestras parrillas y
ahumadores.
Juego de 12
Modelo 812-2904-0
Encendedor de Carbón de Lujo
Este Encendedor de Carbón de Lujo Brinkmann
es la manera más rápida y más saludable para
encender el carbón sin fluido de encendido.
Simplemente coloque papel arrugado debajo del
encendedor, llénelo con carbón y enciéndalo.
Tendrá brasas calientes al rojo en
aproximadamente 15 minutos, sin vapores
desagradables que afecten el sabor de su
comida. Nuestro diseño único le permite vaciar
el carbón caliente por
arriba o simplemente
correr la rejilla hacia afuera
y levantarla para que el
carbón caliente salga por
el extremo inferior del
encendedor directamente a
la parrilla o ahumador.
Modelo 812-4080-0

140-7100-R
12/06
For 1-year from date of purchase, The Brinkmann Corporation warrants the Brinkmann Universal Rotisserie against defects due to workmanship
or materials to the original purchaser. The Brinkmann Corporation’s obligations under this warranty are limited to the following guidelines:
• This warranty does not cover rotisseries that have been altered/modified or damaged due to: normal wear, rust, abuse, improper
maintenance and/or improper use.
• This warranty does not cover surface scratches, rust or heat damage to the finish, which is considered normal wear.
• The Brinkmann Corporation may elect to repair or replace damaged units covered by the terms of this warranty.
• This warranty extends to the original purchaser only and is not transferable or assignable to subsequent purchasers.
The Brinkmann Corporation requires reasonable proof of purchase. Therefore, we strongly recommend that you retain your sales receipt or
invoice. To obtain replacement parts for your Brinkmann Universal Rotisserie under the terms of this warranty, please call Customer Service
Department at 800-527-0717. A receipt will be required. The Brinkmann Corporation will not be responsible for any rotisseries
forwarded to us without prior authorization.
EXCEPT AS ABOVE STATED, THE BRINKMANN CORPORATION MAKES NO OTHER EXPRESS WARRANTY.
THE IMPLIED WARRANTIES OF MERCHANTABILITY AND FITNESS FOR A PARTICULAR PURPOSE ARE LIMITED IN DURATION TO
1-YEAR FROM THE DATE OF PURCHASE. SOME STATES DO NOT ALLOW LIMITATIONS ON HOW LONG AN IMPLIED WARRANTY
LASTS, SO THE ABOVE LIMITATION MAY NOT APPLY TO YOU.
ANY LIABILITY FOR INDIRECT, INCIDENTAL OR CONSEQUENTIAL DAMAGES ARISING FROM THE FAILURE OF THE BRINKMANN
UNIVERSAL ROTISSERIE TO COMPLY WITH THIS WARRANTY OR ANY IMPLIED WARRANTY IS EXCLUDED. CUSTOMER
ACKNOWLEDGES THAT THE PURCHASE PRICE CHARGED IS BASED UPON THE LIMITATIONS CONTAINED IN THE WARRANTY SET
OUT ABOVE. SOME STATES DO NOT ALLOW THE EXCLUSION OR LIMITATION OF INCIDENTAL OR CONSEQUENTIAL DAMAGES, SO
THE ABOVE LIMITATION OR EXCLUSION MAY NOT APPLY TO YOU. THIS WARRANTY GIVES YOU SPECIFIC LEGAL RIGHTS, AND YOU
MAY ALSO HAVE OTHER RIGHTS WHICH VARY FROM STATE TO STATE.
1 YEAR LIMITED WARRANTY
©2006 The Brinkmann Corporation
Dallas, Texas 75244 U.S.A
www.brinkmann.net
FOR GRILL REPLACEMENT PARTS, COVERS & ACCESSORIES, PLEASE VISIT US ONLINE AT
www.grillpartsonline.com
PARA ENCONTRAR PARTES DE REEMPLAZO PARA SU PARRILLA, CUBIERTAS Y
ACCESORIOS, FAVOR DE VISITARNOS AL www.grillpartsonline.com
Durante un año a partir de la fecha de compra, The Brinkmann Corporation garantiza al comprador original que el Brinkmann Universal
Rotisserie está libre de defectos de materiales o mano de obra. Las obligaciones de The Brinkmann Corporation con respecto a esta garantía
se limitan a lo siguiente:
• Esta garantía no cubre rotisseries que hayan sido alteradas/modificado o dañadas debido a: uso normal, herrumbre, maltrato, mantenimiento
inadecuado y/o uso inapropiado.
• Esta garantía no cubre rayones superficiales, daño por herrumbre o por calor al acabado, lo cual se considera como uso normal.
• The Brinkmann Corporation puede decidir reparar o reemplazar las unidades dañadas cubiertas bajo los términos de esta garantía
• Esta garantía se otorga al comprador original únicamente y no es transferible o asignable a los compradores posteriores.
The Brinkmann Corporation exige un comprobante de compra razonable. Por lo tanto, le recomendamos enfáticamente que retenga su recibo
o factura de venta. Para obtener repuestos para el Brinkmann Universal Rotisserie según los términos de esta garantía, sírvase contactar al
Departamento de Servicio al Cliente al 800-527-0717. Se exigirá la presentación de un recibo. The Brinkmann Corporation no será
responsable de ningún asador estilo rotisserie devuelto a nosotros sin autorización previa.
EXCEPTO POR LO INDICADO ARRIBA, THE BRINKMANN CORPORATION NO OTORGA NINGUNA OTRA GARANTÍA EXPRESA.
LAS GARANTÍAS IMPLÍCITAS DE COMERCIABILIDAD Y ADECUACIÓN CON UN FIN EN PARTICULAR SON DE DURACIÓN LIMITADA DE
1 AÑO A PARTIR DE LA FECHA DE COMPRA. ALGUNOS ESTADOS NO PERMITEN LIMITACIONES DE DURACIÓN DE UNA GARANTÍA
IMPLÍCITA; POR LO TANTO, LA LIMITACIÓN ANTERIOR PODRÍA NO SER APLICABLE EN SU CASO.
SE EXCLUYE CUALQUIER RESPONSABILIDAD POR DAÑOS INDIRECTOS, INCIDENTALES O CONSIGUIENTES DERIVADOS DE LA
FALTA DE CUMPLIMIENTO DE ESTA GARANTÍA O DE CUALQUIER GARANTÍA IMPLÍCITA DEL BRINKMANN UNIVERSAL ROTISSERIE.
EL CLIENTE RECONOCE QUE EL PRECIO DE COMPRA COBRADO SE BASA EN LAS LIMITACIONES CONTENIDAS EN LA GARANTÍA
ANTERIOR. ALGUNOS ESTADOS NO PERMITEN LA EXCLUSIÓN O LIMITACIÓN DE LOS DAÑOS INCIDENTALES O CONSIGUIENTES;
POR LO TANTO, LA LIMITACIÓN O EXCLUSIÓN ANTERIOR PODRÍA NO SER APLICABLE EN SU CASO. ESTA GARANTÍA LE OTORGA
DERECHOS LEGALES ESPECÍFICOS Y USTED PUEDE TENER ADEMÁS OTROS DERECHOS QUE VARÍAN DE UN ESTADO A OTRO.
1 AÑO DE GARANTÍA LIMITADA
-
 1
1
-
 2
2
-
 3
3
-
 4
4
-
 5
5
-
 6
6
-
 7
7
-
 8
8
-
 9
9
-
 10
10
-
 11
11
-
 12
12
-
 13
13
-
 14
14
-
 15
15
-
 16
16


Brinkmann Oven Universal Rotisserie Manual de usuario
- Categoría
- Barbacoas
- Tipo
- Manual de usuario
- Este manual también es adecuado para
en otros idiomas
Artículos relacionados
-
Brinkmann ProSeriesTM Manual de usuario
-
-
-
Brinkmann Select 810-6680-S El manual del propietario
-
-
-
-
