
LIMITED WARRANTY
This boat is intended for pleasure use only. It is covered by a limited warranty which applies for defects and fl aws, which may occur,
despite normal use and regular maintenance, for a period of 2 years from the date of registration. Williams reserves the right to make
warranty coverage contingent upon evidence of proper maintenance. Full warranty terms can be found on the inside back page of
this handbook.
GARANTIE LIMITÉE
Ce bateau est destiné à un usage de plaisance. Il est couvert par une garantie limitée qui s’applique pour tous vices ou défauts qui
pourraient se déclarer en dépit d’une utilisation normale et d’un entretien régulier, pendant une période de 2 ans à partir de la date
d’enregistrement. La couverture sous garantie par Williams est applicable sous réserve d’un entretien régulier par un concessionnaire
agréé, conformement au carnet d’entretien. Tous les termes de la garantie sont lisibles à la fi n de ce manuel.
IGARANZIA LIMITATA
Questo tender è adibito ad uso ricreativo. E’ coperto da una garanzia limitata che copre eventuali difetti che si verifi chino nonostante
un uso corretto del battello ed una manutenzione regolare, per un periodo di 2 anni dalla data di registrazione. La Williams
Performance Tenders si riserva il diritto di riconoscere eventuali lavori in garanzia previa verifi ca di corretta e costante manutenzione.
Le condizioni della garanzia sono contenute all’interno del manuale di manutenzione Williams.
OGRANICENA GARANCIJA
Ovo plovilo je namijenjeno iskljucivo za privatne svrhe. Pokriveno je ogranicenom garancijom na kvarove koji mogu nastati usprkos
normalnom koristenju i održavanju u periodu od 2 godine od dana registracije. Williams zadržava pravo reguliranja garancije ovisno o
kvaliteti održavanja plovila. Uvjeti garancije se mogu nac´ i na zadnjoj unutarnjoj strani prirucˇ nika.
BESCHRÄNKTE GARANTIE
Dieses Boot ist ausschließlich für Vergnügungszwecke vorgesehen und nicht für kommerzielle Zwecke. Die beschränkte Garantie deckt
Fehler und Mängel im Rahmen der normalen Verwendung und regelmäßiger Wartung für einen Zeitraum von 2 Jahren, ab, beginnend
mit dem Tag der Zulassung. Williams behält sich vor im Gewährleistungsfall vom Endbverbraucher einen Nachweis über die erbrachten
Wartungsarbeiten zu verlangen. Die ausführlichen Garantiebedingungen fi nden Sie auf der Rückseite des Service Handbuchs.
GARANTIA LIMITADA
Esta embarcación esta diseñada únicamente para uso recreativo. La garantía limitada cubre defectos y faltas que se produzcan
durante su uso normal y mientras se respeten los periodos de mantenimiento recomendado. Esa garantía limitada tiene una validez
de 2 años a partir de la fecha del registro. Los términos de la garantía se pueden encontrar en la última página de este manual.
SUPPLYING DEALER STAMP:
CACHET DU CONCESSIONNAIRE:
MARCA DI COMMERCIANTE ITALIANA:
PECAT OVLASTENOG ZASTUPNIKA:
HÄNDLER STEMPEL:
STAMPA DEL PROVEDOOR:
OWNERS
HANDBOOK
Williams Performance Tenders Ltd.
Vogue Business Park, Berinsfi eld, Oxfordshire, OX10 7LN, United Kingdom
T: +44(0) 1865 341134 F: +44(0) 1865 341234 W: www.williamsmarine.com

ENGLISH
3
WILLIAMS OWNERS HANDBOOK
PAGES
ENGLISH 3-9
FRANÇAIS 10-16
ITALIANO 17-23
HRVATSKI 24-30
DEUTSCH 31-37
ESPAÑOL 38-44
GENERAL SPECIFICATIONS
CONGRATULATIONS ON YOUR CHOICE
OF A WILLIAMS TURBOJET
This owner’s handbook has been compiled to help you operate your Turbojet with safety and pleasure.
It contains details of the boat and equipment fi tted, together with information on its operation and
maintenance. Please read it carefully, and familiarize yourself with the boat before using it.
The Williams Turbojet uses water jet propulsion. If this is your fi rst boat or you are changing to a
type of boat you are not familiar with, for your own safety, please ensure that you obtain handling
and operating experience before assuming command of the boat. Your dealer, national sailing
federation or yacht club will be pleased to advise you of sea schools, or competent instructors.
The Turbojet is a high performance boat. Williams recommends a minimum standard
of RYA level 2 or ICC (International certifi cate of competency) is attained by the
operator prior to taking control of this boat. This manual assumes the operator has
acquired this standard of qualifi cation and possesses knowledge of basic seamanship.
Please keep this handbook in a secure place and hand it to the new
owner when you sell the boat.
Hull Identifi cation
Number (HIN):
ENGINE SPECIFICATIONS
Engine Weber MPE 750cc turbo
Maximum power 98hp/73kW at 7300rpm (66hp/50kW at 6300rpm)
Fuel Premium unleaded gasoline 92-98 RON
Oil grade 0W40 to 15W50 fully synthetic
Oil capacity 3.5 litres maximum
CLASSIFICATION
Category C – “inshore”: Craft designed for voyages in coastal waters, large bays, estuaries, lakes
and rivers, where conditions up to and including wind force 6 and signifi cant wave heights up to
and including 2m may be experienced. This boat complies with ISO 6185-3. The HIN is located
above jet nozzle below transom step. Record it in the service handbook. The CE plate is located in
the starboard footwell. The CE plate is the certifi cation to European Directive 94/25/CE.
J/T 285 T 325 T 385 T 445
LOA 2.85m 3.30m 3.85m 4.45m
Beam 1.64m 1.68m 1.74m 1.96m
Dry weight 260kg/286kg 296kg 340kg 395kg
Height 910mm 910mm 910mm 1.02m
Max speed 40mph/48-52mph 48-52mph 48-52mph 45mph
Fuel capacity 41 Litres 41 Litres 60 Litres 70 Litres
Seating 3 + 1 4 + 1 5 + 1 6 + 1

ENGLISH
4
ENGLISH
5
CONTROLS AND
INSTRUMENT
CLUSTER
1. Tachometer and hour meter
2. Low oil pressure warning light
3. Fuel gauge
4. Bilge pump switch
5. Speedometer
6. Exhaust temperature light
7. Navigation lights
8. Bilge blower switch
9. ECU malfunction light
10. Engine safety lanyard
11. Fuses (engine compartment)
1
2
3
4
5
7
8
6
9
10
11
1
3
2
4
5
6
7
8
9
10
12
13
14
16
16
17
18
15
16
3
11
16
6
FUELLING
As part of its pre-delivery inspection your new Turbojet has been run and
drained of fuel. When refuelling use only premium unleaded gasoline 92-98 RON.
Ensure ignition is in OFF position.
Remove seat cushion to expose fi ller cap. A key is provided to assist in fi ller cap removal.
Re-fuel in a ventilated area.
Do not overfi ll the tank; be careful not to spill fuel.
Tighten fuel cap securely after re-fuelling.
Open engine hatch and inspect bilges after re-fuelling.
The fi ller cap has an integral breather.
Do NOT hose around the fuel fi ller area as water may enter the fuel tank.
BEFORE USE
Tube pressure will fl uctuate with temperature. Infl ate tubes in sequence to 250mB/3.6psi.
Failure to observe this will compromise the sea-keeping ability and water tight integrity of
the boat. Infl ation valves are fi tted with quarter-turn locks to enable rapid defl ation.
Set valves to shut and infl ate tubes evenly.
Check bilge for fuel or water contamination.
Tighten footwell drain plugs.
Check engine cover latches are secure.
STARTING YOUR TURBOJET
Ensure boat is in a depth of at least 0.5m/2ft of water.
1. Turn on battery isolator.
2. Run bilge blower for 4 minutes.
3. Secure any loose ropes that could get sucked into jet unit.
4. Ensure shift lever is in central position.
5. Connect safety lanyard to switch.
ALWAYS attach yourself to the safety lanyard when engine is running.
6. Turn ignition key until engine starts.
7. Engine RPM will automatically be limited until warm.
1. Battery isolator switch
2. Key switch
3. Circuit breaker
1
2
GENERAL
ARRANGEMENT
1. Water tight storage
2. Mooring cleat
3. Front lifting points
4. Fuel fi ller (under seat)
5. Throttle/shift control
6. Rear lifting points
7. Ski tow (below seat)
8. Running light
9. Key switch and battery
isolator (below seat)
10. Port navigation light
11. Starboard navigation light
12. Storage (below seat)
13. 12v auxiliary power/charge socket
14. CE certifi cation plate
15. Drain plugs (one in forward footwell
and one in each of the rear footwells)
16. Tube infl ation valves
17. Over pressure valve
18. Hull Identifi cation Number (HIN)
(under platform)
19. Flushing attachment
19
3

ENGLISH
6
ENGLISH
7
OPERATING YOUR TENDER
This boat uses a water-jet propulsion system and has unique characteristics in steering. The throttle
produces thrust from the jet pump, the directional control is provided by opening the throttle and
turning the wheel in the direction of your turn. High thrust will turn the boat sharply; low thrust will
produce less turning force. There is no rudder, so while underway there is no steering without thrust.
If weed or debris gets caught in the jet unit during use cavitation can occur causing a decrease in
forward thrust. If this condition is allowed to continue the engine may overheat resulting in serious
damage. If there is any sign of debris or weeds etc. blocking the jet, remove the boat from the
water. Switch off battery isolator and remove all debris from around the jet unit. DO NOT make
repeated attempts to start a blocked or jammed tender as engine damage may result. In case
of diffi culty consult your Williams approved dealer.
TOWING
CAUTION: Risk of engine fl ooding exists. Towing valve fi tted. Valve must be in the
CLOSED position for towing and OPEN position for running. Failure to observe
correct valve position will result in serious engine damage.
MOORING
Do not leave the Turbojet moored for extended periods as this may result in an
accumulation of marine growth and a loss of performance.
BEACHING
DO NOT operate in less than 0.5m/2ft of water as debris may enter the jet unit. DO NOT drive turbojet
onto beach. Stop engine before beaching as damage to pump/engine cooling may occur.
After beaching move boat into deeper water and tilt from side to side several times to remove
sand from intake area – failure to do so could cause damage to jet unit.
TRIM
Do not overload the boat. At all speeds be aware of trim and keep weight evenly distributed.
GENERAL
Operate the boat with due care and at a speed appropriate to the sea conditions. Always carry out
a visual check of the boat and its components prior to use. Adhere to the maintenance/service
schedule as detailed in the service manual.
WARNING LIGHTS
1. EXHAUST TEMPERATURE
This lamp will illuminate if the open loop coolant supply is restricted.
After restarting a hot engine it is normal for the lamp to stay
on for up to 30 seconds. If the lamp stays on for longer than 30
seconds or comes on when engine is above idle, STOP the engine
and check for restriction in coolant system (debris in pump/pipes).
2. ECU MALFUNCTION
This lamp will illuminate if there is a fault with the engine
management system. If this occurs STOP the engine and
refer to Williams approved dealer.
3. LOW OIL PRESSURE
If this illuminates, STOP the engine and refer to Williams
approved dealer.
AFTER USE:
FLUSHING PROCEDURE
To prolong engine life it is very important to fl ush engine of salt water after use and
prior to storage. Failure to carry out fl ushing will signifi cantly reduce the life of
engine components. DO NOT operate throttle out of water. Engine MUST be running
before water is connected. Risk of engine fl ooding exists if water remains on after
engine is switched off.
1. Remove the boat from the water everyday and wash entire boat/jet pump with fresh water.
2. Connect a fresh water hose fi tted with the male connector supplied with the tender to
the coupling.
3. Start engine and immediately turn on water supply.
4. Run engine at idle for approximately 1 minute to completely fl ush the open loop cooling system.
5. Turn off water supply.
6. Allow the engine to run for no longer than 10 seconds for all water to exit from the cooling
system, then turn off the engine. Remove hose connector from transom coupling.
7. Check bilge of boat and dry any residual water. Remove footwell drain plugs.
0.5 Ltr/0.53 qt US
MAX
MIN
OIL LEVEL CHECK
The Weber engine is a ‘dry sump’ type engine, with a separate
oil tank. When the engine is started oil is pumped into the tank.
After the engine has run, oil will slowly return from the tank to
the sump. The engine must be at operating temperature
before an accurate level is indicated on the dip-stick.
The oil level should be between MIN and MAX on the dipstick.
Do not screw in cap to check level. Use the correct grade of oil.
Do not overfi ll.
1. Bilge outlet
2. Open loop coolant
overfl ow
3. Fuel spill overfl ow
4. Right hand rear
footwell drain
5. Pump anode
6. Ride plate anode
7. Left hand rear
footwell drain
8. Front footwell drain
1
2
3
4
6
7
5
8
SERVICING
The important post run-in 1st service is required at 25 hours. Thereafter servicing is required every
50 hours or yearly whichever comes fi rst. Consult your Williams approved dealer for servicing.
Refer to the Williams service manual for periodic engine maintenance.
For parts and accessories please contact your Williams approved dealer.
1
2
3

ENGLISH
8
ENGLISH
9
BOAT SYSTEM ARRANGEMENT
1. Fuel pump and level sender
2. Fuel return
3. Fuel feed
4. Fuel fi lter
5. Closed loop coolant reservoir
6. Oil tank
7. Battery
8. Throttle linkage
9. Shaft seal lubrication
10. Towing valve
SHAFT SEAL
LUBRICATION
Shaft seal lubrication is provided by an automatic
grease unit. Inspect reservoir level approximately
every 10 hours of operation. Use Quicksilver marine
2-4-C grease or equivalent high temperature, high
speed bearing grease to re-fi ll reservoir. Take care
not to over-pressurise system. DO NOT exceed
maximum level indication.
1
2
3
5
6
8
9
7
10
4
FUEL SYSTEM CHECK
WARNING – pressurised fuel system. Inspect system for leaks at scheduled service intervals.
All elements of the fuel system function under pressure (5 bar). The system remains
pressurised after engine is switched off. Extreme care must be taken when removing quick
connectors during fi lter change. Wear eye protection. No naked fl ames.
ROUTINE MAINTENANCE
To ensure long service life and to maintain the tender in a safe and reliable condition please
follow these routine maintenance instructions. Williams cannot accept any responsibility for
damage or injury resulting from incorrect maintenance or improper adjustment carried out
by the owner.
1. Inspect automatic grease unit reservoir and refi ll as required.
2. Check engine oil level (refer to section Oil Level Check in this handbook).
3. Check coolant level.
4. Flush open loop cooling system.
5. Apply a good quality marine grease containing Tefl on (e.g. Quicksilver 101) to all control cables
both under the helm and at the pump.
6. Check bilges for water ingress, oil or fuel contamination.
7. Lightly grease the extending running light pole using white grease or similar.
8. Check condition of the 2 pump anodes.
9. Loss of tube pressure over 24 hours is not unusual. Temperature and atmospheric pressure will
affect tube pressures. Check pressures regularly.
WINTER STORAGE
Refer to the Williams service manual for winterisation procedures.
FUSE IDENTIFICATION
Fuses located under helm station.
1. 12 volt socket – 25 amp
2. Bilge pump fl oat switch – 7.5 amp
3. Navigation lights – 5 amp
4. Bilge pump switch – 5 amp
5. Blower – 7.5 amp
1 2 3 4 5
9

FRANÇAIS
10
FRANÇAIS
11
CARACTÉRISTIQUES GÉNÉRALES
Identifi cation de la coque
Numéro de série (HIN)
CARACTÉRISTIQUES MOTEUR
Moteur Weber MPE 750cc turbo
Puissance maximum 98hp/73kW at 7300rpm (66cv/50kW à 6300rpm)
Fuel Carburant sans plomb 95-98 RON
Viscosité huile OW50 à 15W50 100% synthétique
Capacité huile 3.5 litres maximum
CATÉGORIE DE CONCEPTION
Catégorie C – “à proximité des côtes”: Navires de plaisance conçus pour la navigation à proximité
des côtes et dans de grandes baies, de grands estuaires, lacs et rivières, au cours desquels les vents
peuvent aller jusqu’à la force 6 comprise et les vagues peuvent atteindre une hauteur signifi cative
jusqu’à 2 mètres compris. Ce bateau est conforme à la norme ISO 6185-3. Le numéro d’identifi cation
de la coque se trouve sous la plateforme arrière. Notez le dans le manuel d’entretien. La plaque CE se
trouve sur le franc bord arrière tribord. La plaque CE certifi e la conformité à la Directive 94/25/CE.
COMMANDES ET
INSTRUMENTATION
1. Compte tours et compteur d’heure
2. Indicateur lumineux d’avertissement
de pression d’huile insuffi sante
3. Jauge carburant
4. Pompe de cale
5. Compteur de vitesse
6. Voyant de température d’échappement
7. Feux de navigation
8. Interrupteur de ventilation de cale
9. Indicateur lumineux de mauvais
fonctionnement de l’ECU
10. Cordon coupe circuit de sécurité
11. Fusibles (compartiment moteur)
1
2
3
4
5
7
8
6
9
10
11
AMÉNAGEMENT
GÉNÉRAL
1. Coffre étanche
2. Taquet d’amarrage
3. Points de levage avant
4. Orifi ce de remplissage carburant
(sous le coussin)
5. Boîtier de commande
accélération/inverseur
6. Points de levage arrière
7. Anneau de traction ski nautique
(sous le siège)
8. Feu blanc de route
9. Contacteur à clef et coupe batterie (sous le
siège)
10. Feu de navigation bâbord
11. Feu de navigation tribord
12. Coffre (sous le coussin)
13. Prise auxiliaire 12V
alimentation/charge
14. Plaque CE
15. Nables de vidange (un dans le
plancher avant et un dans chaque plancher
arrière)
16. Valves de gonfl age
17. Valve de surpression
18. Numéro de série HIN
(sous la plateforme)
19. Raccord mâle de rinçage
FELICITATIONS POUR AVOIR CHOISI UN
WILLIAMS TURBOJET
Ce manuel du propriétaire permettra d’utiliser votre Turbojet en toute sécurité et avec un maximum de
plaisir. Il contient un descriptif détaillé du bateau et de ses équipements ainsi que des informations sur
son fonctionnement et son entretien. Prenez le temps de le lire attentivement pour vous familiariser avec
votre nouveau bateau avant de l’utiliser.
Le Turbojet WILLIAMS est équipé d’un mode de propulsion à jet d’eau. S’il s’agit de votre premier bateau
ou que vous ne soyez pas familiarisé avec celui-ci, assurez vous d’acquérir l’expérience nécessaire à
son pilotage et à son fonctionnement avant d’en assumer le commandement. Votre concessionnaire,
la Fédération Française de Voile ou le Yacht Club local, vous indiqueront les coordonnées d’écoles de
navigation compétentes.
Le Turbojet est un bateau doté de hautes performances. Williams recommande qu’une qualifi cation
minimum telle que RYA niveau 2, permis A ou mer, ou certifi cat international de Compétence,
soit acquise par l’utilisateur avant d’en prendre le contrôle. Ce manuel considère que l’utilisateur
ait acquis cette qualifi cation et possède les connaissances de base du marin.
Merci de conserver ce manuel en bonne place et de le faire suivre au nouveau
propriétaire en cas de revente du bateau.
1
3
2
4
5
6
7
8
9
10
12
13
14
16
16
17
18
15
16
3
11
16
6
19
J/T 285 T 325 T 385 T 445
Longueur 2.85m 3.30m 3.85m 4.45m
Largeur 1.64m 1.68m 1.74m 1.96m
Poids à vide 260kg/286kg 296kg 340kg 395kg
Hauteur 910mm 910mm 910mm 1.02m
Vitesse 40mph/48-52mph 48-52mph 48-52mph 45mph
Carburant 41 Litres 41 Litres 60 Litres 70 Litres
Personnes 3 + 1 4 + 1 5 + 1 6 + 1

FRANÇAIS
12
FRANÇAIS
13
REMPLISSAGE CARBURANT
Lors de l’inspection de pré livraison en usine, votre nouveau Turbojet a été mis en route et vidangé de
son carburant. Quand vous remettrez du carburant, utilisez uniquement du sans plomb 95-98 RON.
Assurez vous que le contact soit coupé.
Enlevez le coussin du siège pour atteindre le bouchon de remplissage. Une clef est fournie pour
faciliter le dévissage du bouchon.
Ravitaillez en carburant dans un endroit ventilé.
Ne faites pas déborder le réservoir, prenez garde de ne pas renverser d’essence.
Assurez vous d’avoir bien serré le bouchon de réservoir après remplissage.
Ouvrez le capot moteur et inspectez les fonds de cale après le remplissage.
Le bouchon de remplissage possède une mise à l’air intégrale.
Ne pas laver au jet d’eau autour de la zone de remplissage carburant car l’eau pourrait rentrer dans
le réservoir.
AVANT UTILISATION
La pression du tubulaire varie en fonction de la température de l’air. Gonfl er les compartiments
du tubulaire à 250 mb (3.6 psi) en suivant l’ordre indiqué sur les valves. Le non respect de cette
consigne compromettrait la tenue en mer et l’étanchéité intégrale du bateau. Les clapets des
valves de gonfl age sont de type quart de tour, permettant un dégonfl age rapide.
Vérifi ez que les clapets de valves sont fermés et gonfl ez les tubulaires de façon égale.
Contrôlez qu’il n’y ait pas d’eau ou d’essence dans les fonds de cale.
Mettez en place et bloquez les bouchons de nable.
Contrôlez que les loquets de fermeture du capot moteur soient bloqués.
DÉMARRER VOTRE TURBOJET
Assurez vous que la profondeur d’eau sous le bateau soit au moins de 0.50 mètre.
1. Tourner la clef du coupe batterie pour mettre en tension le circuit.
2. Ventiler la cale moteur en actionnant le blower pendant 4 minutes.
3. S’assurer qu’aucun cordage ne puisse être aspiré dans la turbine du jet.
4. Mettre le levier de commande en position centrale.
5. Brancher le cordon de sécurité au coupe circuit. Attachez toujours le cordon de sécurité à votre
bras ou à votre jambe lorsque le moteur est en marche.
6. Tourner la clef de contact jusqu’au démarrage du moteur.
7. Quand le moteur est froid, le régime moteur est automatiquement limité.
1. Clef coupe batterie
2. Clef de contact
3. Coupe circuit
UTILISER VOTRE ANNEXE
Ce bateau utilise un système de propulsion à jet d’eau qui lui confère des caractéristiques particulières sur
le plan de la conduite. L’accélération produit une poussée de la turbine du jet, le contrôle directionnel se fait
en accélérant et en tournant le volant dans le sens de votre virage. Une forte poussée fera tourner le bateau
brusquement, une faible poussée produira moins de force en virage. Il n’y a pas de gouvernail, il faut
obligatoirement de la poussée pour avoir de la manoeuvrabilité.
Si des algues ou des débris se prennent dans la turbine pendant l’utilisation, un phénomène de cavitation
peut survenir, causant une perte de poussée. Si cette situation se prolonge, le moteur peut surchauffer et
entraîner de graves problèmes mécaniques. S’il y a des signes de débris, algues, etc, obstruant la turbine,
il faut sortir le bateau de l’eau.
Coupez la batterie et enlevez tous les débris du bloc de propulsion jet. En cas de diffi cultés, contactez votre
concessionnaire Williams. Ne pas essayer de redemarrer si le moteur force ou semble bloqué car cela
pourrait gravement l’endommager.
REMORQUAG
ATTENTION: Le risque de noyer le moteur existe. Installer la vanne de remorquage.
La vanne doit être fermée pour le remorquage et ouverte pour la navigation de l’annexe.
Une mauvaise utilisation de la position de cette vanne entrain de sérieux dommages
sur le moteur.
MOUILLAGE
Ne laissez pas votre Turbojet au mouillage pour de longues périodes afi n d’empêcher
l’apparition d’algues et coquillages qui diminueraient les performances.
ACCOSTER SUR LA PLAGE
Ne pas manœuvrer dans moins de 0.50mètre d’eau car des débris pourraient entrer dans la turbine.
Ne pas faire tourner le moteur sur la plage. Coupez le moteur avant d’atteindre la plage pour éviter
d’endommager la turbine et le circuit ouvert de refroidissement moteur. En repartant, poussez le bateau
dans plus de 0.50 mètre d’eau et inclinez le d’un bord à l’autre pour enlever le sable de l’écope d’aspiration.
Le non respect de cette procédure peut endommager le bloc de propulsion jet.
RÉGLAGE DE L’ASSIETTE
Ne pas surcharger le bateau. A toutes les vitesses, soyez conscient de l’assiette du bateau et gardez une
répartition des poids équilibrée.
GÉNÉRALITÉS
Adaptez une conduite responsable et une vitesse appropriée à l’état de la mer. Faites toujours un contrôle
visuel du bateau et de ses équipements avant de l’utiliser. Respectez le programme de révision détaillé
dans le manuel d’entretien.
TÉMOINS D’AVERTISSEMENT
1. TEMPÉRATURE D’ÉCHAPPEMENT
Le témoin s’allumera si l’alimentation du circuit de refroidissement est
obstruée. Lorsque le moteur est chaud, il est normal qu’au redémarrage
le témoin puisse rester allumé pendant 30 secondes. Si le témoin reste
allumé plus de 30 secondes ou s’allume quand le moteur est au dessus
du ralenti, ARRETER le moteur et vérifi er ce qui peut obstruer le
système de refroidissement (débris dans la turbine/durites).
2. FONCTIONNEMENT DÉFECTUEUX DE L’ECU
Ce témoin s’allume s’il y a un problème avec le système de gestion
moteur. Si cela se produit, ARRETER le moteur et s’adresser au
concessionnaire Williams.
3. PRESSION D’HUILE INSUFFISANTE
Si ce témoin s’allume, ARRETER le moteur et s’adresser au
concessionnaire Williams.
1
2
3
1
2
3

FRANÇAIS
14
FRANÇAIS
15
APRÈS UTILISATION:
PROCÉDURE DE RINÇAGE
Afi n de prolonger la vie du moteur, il est très important de rincer le moteur à l’eau douce pour
évacuer le sel après utilisation et avant stockage. L’absence de rinçage à l’eau douce réduira de
manière importante la durée de vie des pièces du moteur. Le moteur doit être en marche avant de
connecter l’eau. Il y a un risque de noyer le moteur si l’eau continue d’arriver après que le moteur
soit arrété.
1. Sortir le bateau de l’eau tous les jours et rincer entièrement le bateau et la turbine à l’eau douce.
2. Connecter un tuyau d’eau douce équipé du raccord male fourni avec l’annexe au raccord femelle fi xé
sur le bateau.
3. Démarrer le moteur et ouvrir l’eau immédiatement.
4. Faire tourner le moteur au ralenti pendant 1 minute environ afi n de rincer complètement le circuit de
refroidissement ouvert.
5. Couper l’eau.
6. Laisser tourner le moteur pendant 10 secondes au maximum pour évacuer toute l’eau du système de
refroidissement, puis arrêter le moteur. Débrancher le tuyau d’eau du raccord male fi xé sur le tableau arrière.
7. Vérifi er les fonds de cale du bateau et sécher toute eau résiduelle. Enlever les bouchons de nable du plancher.
0.5 Ltr/0.53 qt US
MAX
MIN
VERIFICATION NIVEAU D’HUILE
Le moteur Weber est un moteur à carter sec avec un réservoir séparé.
Quand le moteur est en marche, l’huile est pompée directement dans le
réservoir. Après que le moteur ait marché, l’huile retournera doucement
du réservoir au carter. Le moteur doit être à température de
fonctionnement avant que le niveau exact soit indiqué sur la jauge.
Le niveau d’huile doit être entre MIN et MAX sur l’indicateur de jauge.
Ne pas visser le capuchon pour vérifi er le niveau d’huile.
Utiliser le niveau d’huile correct.
Ne pas trop remplir.
1. Evacuation pompe de
cale
2. Sortie d’eau du
refroidissement ouvert
3. Trop plein de carburant
4. Vidange du nable
arrière tribord
5. Anode de turbine
6. Anode de plaque
7. Vidange du nable
arrière bâbord
8. Vidange du nable avant
1
2
3
4
6
7
5
8
RÉVISION
La première révision après rodage est très importante et s’effectue après 25 heures d’utilisation.
La prochaine révision s’effectue après 50 heures ou une fois par an. Contactez votre concessionnaire
Williams pour effectuer l’entretien de votre Turbojet. Consultez le manuel d’entretien Williams pour la
maintenance périodique du moteur.
Contactez votre concessionnaire Williams pour les pièces détachées et accessoires.
DISPOSITION DES ÉLÉMENTS MÉCANIQUES
DU BATEAU
1. Pompe carburant et sonde de
niveau de carburant
2. Durite de retour carburant
3. Durite d’alimentation carburant
4. Filtre essence
5. Réservoir de liquide de refroidissement
du circuit fermé
6. Réservoir d’huile
7. Batterie
8. Liaison du câble d’accélérateur
9. Joint d’étanchéité du palier d’arbre
10. Vanne de remorquage
JOINT D’ÉTANCHÉITÉ
DU PALIER D’ARBRE
La lubrifi cation du joint d’arbre de transmission
est faite par une pompe à graisse automatique.
Contrôler le niveau de réservoir toutes les
10 heures. Utiliser de la graisse marine Quicksilver
2-4-C ou l’équivalent pour compléter le réservoir.
Faire attention à ne pas provoquer une
surpression du système. Ne jamais dépasser
le niveau maximum.
9
1
2
3
5
6
8
9
7
10
4

FRANÇAIS
16
ITALIANO
17
CONTRÔLE DU CIRCUIT DE CARBURANT
Attention ! Circuit carburant haute pression. Contrôler régulièrement le circuit de carburant entre
chaque révision. Tous les éléments du circuit de carburant fonctionnent à une pression de 5 bars.
Le circuit reste sous pression après l’arrêt du moteur. Une extrême précaution doit être prise
lors du remontage des prises rapides du fi ltre à essence. Porter des lunettes de protection.
Pas de fl amme.
ENTRETIEN QUOTIDIEN
Afi n de profi ter pendant de nombreuses saisons de votre annexe et d’en maintenir la sécurité et la
fi abilité, nous vous conseillons de suivre ces instructions d’entretien quotidien : Williams ne peut
être tenu responsable pour tout dommage ou blessure résultant d’un entretien défectueux ou d’un
mauvais réglage effectué par le propriétaire.
1. Contrôler le réservoir de graissage automatique et re-remplir si nécessaire.
2. Vérifi er le niveau d’huile (Se référer au paragraphe « contrôle des niveaux » dans ce manuel).
3. Vérifi er le niveau de liquide de refroidissement.
4. Rincer à l’eau douce le circuit de refroidissement ouvert.
5. Appliquer une graisse de bonne qualité contenant du Téfl on (e.g. Quicksilver 101) sur tous les câbles
de commande, sous la console et sur le jet.
6. Vérifi er qu’il n’y ait pas d’entrée d’eau, de fuite d’huile ou d’essence dans les fonds de cale.
7. Lubrifi er le feu blanc sur mat télescopique à l’aide de graisse blanche ou équivalent.
8. Vérifi er l’état d’usure des deux anodes.
9. La perte de pression du tubulaire après 24 heures n’est pas anormale. La température et la pression
atmosphérique entraînent une variation de la pression du tubulaire. Vérifi er régulièrement la pression
de gonfl age.
HIVERNAGE ET STOCKAGE
Consulter le manuel d’entretien Williams pour la procédure d’hivernage.
IDENTIFICATION
DES FUSIBLES
Les fusibles sont situés sous la console.
1. Prise 12V: fi l rouge/blanc – 25 Amp
2. Flotteur de pompe de cale: fi l bleu/rouge – 7.5 Amp
3. Feux de navigation: fi l orange – 5 Amp
4. Pompe de cale: fi l vert/rouge – 5 Amp
5. Blower: fi l marron – 7.5 Amp
SPECIFICHE GENERALI
CONGRATULAZIONI PER AVER SCELTO UN
TURBOJET WILLIAMS
Questo manuale del Proprietario è stato stilato al fi ne di aiutarvi ad utilizzare il vostro tender in piena sicurezza.
Il manuale contiene dettagli sul battello e sugli accessori inclusi insieme ad informazioni sulle prestazioni e sulla
manutenzione. Per favore, leggere attentamente e familiarizzare con il battello prima di usarlo.
Il Turbojet Williams utilizza la propulsione jet ad acqua. Se questo è il vostro primo battello, o se siete
passati ad esso senza avere familiarita’ con questo tipo di tender, per la vostra stessa sicurezza, per
favore assicuratevi di avere la preparazione e l’esperienza adeguate prima di assumere il comando del
gommone. Il vostro rivenditore o l’importatore sarà felice di indirizzarvi presso le più vicine scuole
nautiche o ai più competenti istruttori privati.
Il Turbojet è un battello altamente performante. La Williams Performance Tender raccomanda che
l’Operatore consegua un minimo standard di Rya livello 2 o un ICC (Certifi cato Internazionale di
Competenza) prima di prendere il comando di questo battello. Questo manuale presume che
l’Operatore sia in possesso di questo requisito standard ed abbia una conoscenza adeguata delle
leggi nautiche basilari.
Per favore tenere questo manuale in un luogo sicuro e cederlo solo al nuovo
Proprietario solo quando venderete il battello.
Numero di Identifi cativo
Carena (HIN):
SPECIFICHE DEL MOTORE
Motore Weber MPE 750 cc Turbo
Potenza massima 98hp/73kW a 7300 rpm (66hp/50kW a 6300rpm)
Carburante
Benzina verde 95-98 RON
Olio Sintetico OW50 a 15W50
Capacità serbatoio olio Massimo 3,5 lt
CLASSIFICAZIONE
Catergoria C – “In prossimità dalla costa”: Battello designato a viaggi in acque costiere, grandi baie,
estuari, laghi e fi umi, dove si rilevano condizioni fi no a ed incluso il vento forza 6 e onde di altezza
signifi cativa fi no a ed inclusi i 2 m. Questo tender segue la normativa ISO 6185-3. Il Numero
Identifi cativo della Carena è situato al di sopra della turbina ed al di sotto della plancetta di poppa.
Registratelo sul manuale del service. La targa CE è situata sulla parete interna in vetroresina sotto la
valvola di gonfi aggio. La targa CE è la certifi cazione di adesione alla Direttiva Europea 94/25/CE.
1 2 3 4 5
J/T 285 T 325 T 385 T 445
Lunghezza 2.85m 3.30m 3.85m 4.45m
Larghezza 1.64m 1.68m 1.74m 1.96m
Peso a secco 260kg/286kg 296kg 340kg 395kg
Altezza 910mm 910mm 910mm 1.02m
Velocità 40mph/48-52mph 48-52mph 48-52mph 45mph
Serbatoio 41 Lt 41 Lt 60 Lt 70 Lt
Posti 3 + 1 4 + 1 5 + 1 6 + 1

ITALIANO
18
ITALIANO
19
PANNELLO
STRUMENTI DI
CONTROLLO
1. Contagiri e contaore
2. Spia per bassa pressione olio
3. Livello benzina
4. Interruttore pompa di sentina
5. Contamiglia
6. Spia temperatura motore
7. Interruttore per luci di navigazione
8. Interruttore per aspiratore locale motore
9. Spia di irregolare funzionamento del motore
10. Braccialetto per spegnimento di emergenza
del motore
11. Scatola fusibili (nel locale motore)
1
2
3
4
5
7
8
6
9
10
11
IMBARCO BENZINA
I controlli effettuati prima dell’immissione su mercato prevedono che il vostro nuovo Turbojet sia
stato messo in moto ed in seguito privato della benzina. Quando imbarcate carburante utilizzate
benzina verde 95-98 RON.
Assicuratevi che il pulsante di accenzione sia in posizione “Off”.
Rimuovete il cuscino del sedile scoprendo il tappo dell’imbarco carburante; la Williams vi fornirà la
chiave per rimuovere il tappo.
Procedete all’imbarco del carburante in un’area ventilata.
Attenti a non immettere troppo carburante; fate attenzione che la benziana non fuoriesca dal serbatoio.
Dopo l’imbarco del carburante riavvitate il tappo assicurandovi che sia ben stretto.
Dopo l’imbarco del carburante aprite il vano motore e controllate le sentine.
Il tappo dell’imbarco carburante è provvisto di uno sfi ato. NON lavare il tender in prossimità del tappo
carburante perchè potrebbe entrare acqua nel serbatoio benzina.
PRIMA DELL’USO
La pressione dei tubolari varia in relazione alla temperatura. Gonfi are i tubolari in sequenza fi no a
raggiungere una pressione di 250 mB/3.6 psi. Eseguire questa procedura in modo scorretto signifi ca
compromettere la capacità del tender di tenere il mare e l’integrità della tenuta stagna del battello.
Le valvole di gonfi aggio sono equipaggiate con sicure ad un quarto di giro per impedire lo
sgonfi aggio rapido.
Posizionare le valvole in chiusura e gonfi ate il tubolare fi no a raggiungere una pressione di 2.9 psi (0.2 bar).
Controllate la sentina per individuare eventuali perdite di acqua o carburante.
Chiudere saldamente gli ombrinali di scarico sulla pavimentazione.
Controllare che le due chiusure della consolle siano ben serrate.
AVVIAMENTO DEL VOSTRO TURBOJET
Assicuratevi che il vostro Turbojet sia immerso in almeno 0,50 m/2 ft di acqua.
1. Inserire lo staccabatteria.
2. Mettere in moto l’aspiratore gas del vano motore per almeno 4 minuti.
3. Tirare a bordo qualunque cima che possa essere aspirata dall’unità jet.
4. Assicurasi che la leva dell’invertitore sia in posizione di folle.
5. Assicurare il bracciale di sicurezza all’interruttore di spegnimento di emergenza.
Attaccate SEMPRE il bracciale al vostro polso quando il motore è in funzione
6. Girare la chiave di avviamento per accendere il motore.
7. La centralina limiterà il numero di giri fi n quando il motore avrà raggiunto la giusta temperatura.
1. Interruttore dello staccabatteria
2. Chiave di avviamento
2. Salvavita
CARATTERISTICHE
GENERALI
1. Gavone di prua
2. Bitta per ormeggio
3. Anelli di sospendita di prua
4. Imbarco carburante (sotto il sedile)
5. Leva inversione marcia
6. Anelli di sospendita di poppa
7. Gancio traina sci su specchio
di poppa
8. Asta luce telescopica
9. Chiave di accensione
e staccabatteria
10. Luce di navigazione rossa
11. Luce di navigazione verde
12. Gavone (sotto il sedile)
13. Presa di corrente/presa per
carica betteria ausiliario 12v
14. Targhetta di certifi cazione CE
15. Scarichi acqua (uno a prua e due
a poppa)
16. Valvole per gonfi aggio tubolare
17. Valvola di sovrapressione
18. Numero di Identifi cazione Carena
(sotto la piattaforma)
19. Innesto kit lavaggio
1
2
3
1
3
2
4
5
6
7
8
9
10
12
13
14
16
16
17
18
15
16
3
11
16
6
19

ITALIANO
20
ITALIANO
21
COME UTILIZZARE IL TUO TENDER
Questo battello utilizza un sistema a propulzione jet ed ha caratteristiche uniche di manovrabilità. La
marcia produce una spinta dall’unità jet; il controllo della direzione di marcia è il frutto di una maggiore
accellerazione unita alla rotazione del volante nella direzione desiserata. Una brusca spinta causerà una
virata violenta; una spinta leggera produrrà una più lenta virata. Non essendo presente la barra del timone,
non è possibile manovrare senza alcuna spinta.
Se rifi uti o alghe vengono risucchiati dall’unità jet durante l’utilizzo, potrebbe verifi carsi un effetto cavitazione,
causando una riduzione di velocità. Senza la rimozione immediata dell’ostruzione, il motore subirà gravi danni
a causa del conseguente surriscaldamento. Qual’ora si presentassero segni di ostruzione dovuti a sacchetti
di plastica, alghe o cime, ecc. togliere il battello dall’acqua. Disattivare lo staccabatteria e rimuovere gli
eventuali detriti dall’unità jet. Non effettuare ulteriori tentativi di mettere in moto un tender bloccato o ostruito
poichè è possibile danneggiare il motore. In caso di diffi coltà contattare il centro assistenza Williams più vicino.
TRAINO
ATTENZIONE: Sussiste il rischio di imbarco d’acqua. Sul tender è installata una valvola
per il traino. La valvola deve essere posizionata su “CHIUSO” durante il traino
e su “APERTO” durante l’utilizzo. L’errato utilizzo della valvola causerà seri danni al
motore. Rivolgersi al Centro Assistenza Autorizzato Williams più vicino per gli accessori
da traino.
ORMEGGIO
Non lasciate il vostro tender ormeggiato per lunghi periodi perchè questo potrebbe causare la formazione
di alghe e denti di cane con conseguente diminuzione nella qualità delle prestazioni.
SPIAGGIA
NON utilizzate il tender in meno di 0,50 m/2 ft di acqua poichè rifi uti o alghe potrebbero entrare nell’unità jet.
NON giudare il tender fi no alla spiaggia. Spegnere il motore prima dello spiaggiamento poichè potrebbero
verifi carsi gravi danni alla turbina ed al sistema di raffreddamento.
Dopo lo spiaggiamento riportare il battello in acque profonde almeno 0,50 m/2 ft e far oscillare da un lato
all’altro il tender varie volte al fi ne di rimuovere eventuali residui di sabbia dall’unità di aspirazione – Non
eseguire correttamente questa manovra potrebbe provocare gravi danni all’unità jet.
ASSETTO
Non sovraccaricare il battello con pesi eccessivi. A tutte le velocità prestate sempre attenzione all’assetto
di navigazione e distribuite i pesi uniformemente.
INFORMAZIONI GENERALI
Utilizzate il tender con la dovuta cura ed a velocità consone alle condizioni del mare. Eseguire sempre un
controllo generale delle condizioni tender e dei suoi componenti prima dell’utilizzo. Aderire al programma
di manutenzione e servizio come imposto dal Manuale di Manutenzione.
SPIE LUMINOSE
1. TEMPERATURA DEL MOTORE
Questa spia si accenderà qualora manchi il liquido refrigerante o in
presenza di ostruzioni nel sistema di raffreddamento.
Dopo aver riavviato un motore “caldo” è normale che la spia resti
accesa per almeno 30 secondi. Se la spia dovesse rimanere accesa per
un tempo più lungo o dovesse attivarsi quando il motore si trova ad alti
regimi, SPEGNERE IMMEDIATAMENTE il motore e controllare se vi è
presenza di ostruzioni nel sistema di raffreddamento (detriti o sabbia nel
sistema di aspirazione dell’acqua situato nel gruppo jet).
2. MALFUNZIONAMENTO DELL’ECU
Questa spia si illuminerà in presenza di un difetto nel sistema
gestionale riscontrato dalla centralina interna del motore.
SPEGNERE IMMEDIATAMENTE il motore e rivolgersi quanto
prima al centro assistenza Williams più vicino.
3. SCARSA PRESSIONE DELL’OLIO
Qualora questa spia si accendesse, SPEGNERE IMMEDIATAMENTE
il motore e rivolgersi quanto prima al centro assistenza Williams più vicino.
PROCEDURA DI LAVAGGIO MOTORE
DOPO L’UTILIZZO
Al fi ne di prolungare la vita del motore è molto importante, dopo l’utilizzo, ripulire il motore
dall’acqua salata prima di metterlo a riposo. Non effettuare questa procedura ridurrà in
modo signifi cativo la vita dei componenti del motore del vostro tender. Non azionare
l’accelleratore fuori dall’acqua. Il motore deve essere messo in moto prima che l’acqua sia
inserita. Il rischio di allagamento del motore sussiste qualora l’acqua rimanga accesa
dopo lo spegnimento del motore.
1. Togliere il tender dall’acqua tutti i giorni e lavare sia il battello che l’unità jet con acqua dolce.
2. Collegare l’innesto del kit lavaggio fornito di serie con il battello all’innesto maschio.
3. Accendere il motore ed immediatamente avviare l’immissione di acqua nel sistema.
4. Lasciare in moto il tender per approssimativamente un minuto al fi ne di lavare via eventuali ostruzioni
nel sistema di raffreddamento.
5. Far cessare l’affl usso d’acqua.
6. Lasciare in moto il tender per non più di dieci secondi al fi ne di permettere l’espulsione di tutta l’acqua
dal sistema di raffreddamento. Rimuovere l’innesto del kit lavaggio.
7. Controllare la sentina del battello per individuare eventuali residui di acqua. Rimuovere i tre tappi degli scarichi.
0.5 Ltr/0.53 qt US
MAX
MIN
1. Scarico pompa di
sentina
2. Scarico acqua per
raffreddamento circuito
chiuso
3. Scarico vaschetta
imbarco carburante
4. Scarico ombrinale su
pavimentazione di
destra
5. Anodo su corpo pompa
6. Anodo su piastra per
protezione gruppo
idrogetto
1
2
3
4
6
7
5
8
SERVICE
Il primo (ed estremamente importante) service del motore deve essere effettuato a 25 ore. In seguito il
service deve essere effettuato ogni 50 ore o una volta l’anno (dipende da quale di questi due eventi si
verifi ca prima). Consultare il vostro rivenditore autorizzato Williams per effettuare il service. Utilizzare
come riferimento il manuale di servizio Williams per un controllo periodico del motore.
Per ricambi ed accessori vi preghiamo di contattare un concessionario autorizzato Williams.
1
2
3
CONTROLLO LIVELLO OLIO
Il motore weber e’ un tipo di motore a coppa asciutta, con un
serbatoio dell’olio separato. Quando il motore viene messo in moto
l’olio pompato nel serbatoio. Dopo che il motore ha girato, l’olio
tornera’ lentamente dalla tanica alla coppa. Il motore deve essere a
temperatura operativa prima che un livello esatto sia indicato
sull’asticella.
Il livello dell’olio dovrebbe essere segnalato tra MIN e MAX
sull’asticella. Non inserire altri oggetti per controllare il livello dell’olio.
Usate il giusto tipo di olio. Non fate traboccare l’olio.
7. Scarico ombrinale su
pavimentazione di sinistra
8. Scarico ombrinale su
pavimentazione frontale

ITALIANO
22
ITALIANO
23
IL MOTORE
1. Pompa e sensore livello benzina
2. Raccordo ritorno carburante
3. Raccordo uscita carburante
4. Filtro benzina
5. Serbatoio del liquido di raffreddamento
6. Serbatoio olio
7. Batteria
8. Rinvio cavo acceleratore
9. Paraolio albero trasmissione
10. Valvola per il traino
INGRASSAGGIO
PARAOLIO SU ASSE
DI TRASMISSIONE
L’ingrassaggio del paraolio sull’asse di trasmissione
è eseguita da un’unità di ingrassaggio automatico.
Controllare approssimativamente ogni 10 ore di
moto il serbatoio del grasso. Usare grasso
“Quicksilver Marine 2-4 C” o un equivalente prodotto
resistente alle alte temperature e velocità per rifornire
il serbatoio. Prestare attenzione a non superare il
livello massimo indicato.
CONTROLLO DEL CIRCUITO DEL CARBURANTE
ATTENZIONE : circuito del carburante pressurizzato. Ispezionare il circuito per eventuali perdite
ad intervalli regolari. Tutti gli elementi del circuito carburante funzionano sotto pressione (5 bar).
Il circuito rimane pressurizzato anche lo spegnimento del motore. Deve essere prestata estrema
attenzione nello scollegare i connettori durante la sostituzione del fi ltro benzina. Indossare occhiali
prottettivi. Mantenersi lontani da qualsiasi fonte di calore.
IL MANTENIMENTO DEL TENDER
Al fi ne di assicurare al vostro tender un vita lunga ed al fi ne di mantenerlo affi dabile e sicuro vi
preghiamo di seguire queste semplici istruzioni per una manutenzione di routine. La Williams
Performance Tender Ltd non può accettare alcuna responsabilità per danno o infortunio causati
da una scorretta manutenzione del mezzo o da un improprio intervento sullo stesso effettuati
dal proprietario.
1. Ripristinare il livello di grasso ogni.
2. Controllare il livello di olio nel motore.
3. Controllare il livello del liquido di raffreddamento.
4. Lavare abbondantemente attraverso il raccordo il sistema di raffreddamento assicurandosi che non
sia ostruito.
5. Applicare grasso marino di buona qualità contenente Tefl on (ad es. Quicksilver 101) su tutti i cavi
telecomandi sia sotto la consolle che sul gruppo idrogetto.
6. Controllare le sentine per individuare eventuale presenza di acqua, di olio o benzina.
7. Ingrassare leggermente l’asta della luce di navigazione telescopica utilizzando grasso bianco o simile.
8. Controllare le condizioni dei due anodi sulla pompa.
9. La perdita di pressione all’interno del tubolare non è insolita oltre le 24 ore. La temperatura esterna
infl uisce notevolmente sulla pressione del tubolare. Controllare la pressione regolarmente.
INVERNAGGIO
Seguire il manuale di manutenzione Williams per effettuare le procedure di invernaggio.
IDENTIFICAZIONE
FUSIBILI
Fuses located under helm station.
1. Presa 12 v: fusibile rosso/bianco – 25 amp
2. Interruttore dell’automatico pompa: fusibile
rosso/blu – 7.5 amp
3. Luci di navigazione: fusibile arancione – 5 amp
4. Interruttore pompa di sentina: fusibile
verde/rosso – 5 amp
5. Aspiratore: fusibile marrone – 7.5 amp
1 2 3 4 5
9
1
2
3
5
6
8
9
7
10
4

HRVATSKI
24
HRVATSKI
25
OPCI PODACI
Identifi kacijski broj
trupa (HIN):
PODACI O MOTORU
Motor Weber MPE 750cc turbo
Maksimalna snaga 98hp/73kW at 7300rpm (66hp/50kW na 6300rpm)
Gorivo Bezolovni benzin 95-98 RON
Tip ulja OW50 to 15W50 potpuno sinteticko
Spremnik ulja 3.5 litre maksimalno
KLASIFIKACIJA
Kategorija C – “obalna”: Plovilo je dizajnirano za plovidbu u obalnim vodama, jezerima i uscima rijeka
pri uvjetima plovidbe; vjetar snage do 6 i visina valova do 2 m. Ovo plovilo je napravljeno prema
standardu ISO 6185-3. Broj trupa se nalazi iznad mlaznice odnosno ispod ukrcajne stepenice. Upisan
je u servisni prirucnik. CE oznaka smjestena je na desnom osloncu za noge. CE oznaka je potvrda od
strane European Directive 94/25/CE.
KONTROLE I
INSTRUMENT PLOCA
1. Brzinomjer i brojac rada motora
2. Signalno svjetlo za nisku razinu ulja u motoru
3. Pokazivac kolicine goriva
4. Prekida
!
kaljužne pumpe
5. Brzinomjer
6. Lampica temperature ispuha
7. Navigacijska svjetla
8. Ozra
!
iva
!
motornog prostora
9. ECU lampica u slucaju kvara
10. Sigurnosna vezica
11. Osiguraci (motorni dio)
1
2
3
4
5
7
8
6
9
10
11
GENERALNI
RAZMJESTAJ
1. Vodonepropusno spremiste
2. Bitva
3. Prednji podizaci
4. Otvor spremnika goriva
(ispod sjedala)
5. Rucica stupnjeva vožnje
6. Zadnji podizaci
7. Kuka za povlacenje skijasa
(ispod sjedala)
8. Svjetlo za vožnju
9. Key i kontakt prekidac
(ispod sjedala)
10. Lijevo navigacijsko svjetlo
11. Desno navigacijsko svjetlo
12. Spremiste (ispod sjedala)
13. 12v generator/uticnica
14. CE oznaka
15. Drenažni cepovi (jedan kod
prednjeg i dva kod zadnjeg
oslonca za noge)
16. Ventil za napuhavanje cijevi
17. Sigurnosni ventil
18. Identifi kacijski broj trupa (HIN)
(ispod platforme)
19. Spojnica za ispiranje
CESTITAMO NA VASEM ODABIRU
WILLIAMS TURBOJET-a
Ovaj prirucnik sastavljen je kako bi Vam olaksao rukovanje sa Vasim Turbojet-om te spojio sigurnost sa
užitkom. Prirucnik sadrži opis brodske opreme zajedno sa uputama za rukovanje i održavanje istih.
Molimo Vas, pažljivo procitajte upute te se upoznajte sa plovilom prije upotrebe.
WILLIAMS Turbojet koristi vodeni jet pogon. Ukoliko Vam je ovo prvo plovilo ili niste upoznati sa njim, radi
Vase osobne sigurnosti, dobro proucite prirucnik o rukovanju sa plovilom prije nego krenete upravljati sa
njim. Vas zastupnik, mjerodavna pomorska institucija ili jedrilicarski klub Vas mogu savjetovati o
osposobljavanju za voditelja brodice te Vas uputiti na nadležne instruktore.
Turbojet je visoko djelotvorno plovilo. Williams preporucuje minimalni standard osposobljenosti
upravljanja plovilom RYA level 2 ili ICC – International certifi cate of compentency, (Hrvatski
zakonodavac je propisao minimalnu osposobljenost upravljanja plovila – “Voditelj brodice kategorije
B”). Ovaj prirucnik podrazumijeva da je vlasnik osposobljen za rukovanje plovilom te da je upoznat
sa osnovama pomorstva.
Molimo Vas, cuvajte ovaj prirucnik na sigurnom mjestu i predajte ga buducem
vlasniku ukoliko prodate plovilo.
1
3
2
4
5
6
7
8
9
10
12
13
14
16
16
17
18
15
16
3
11
16
6
19
J/T 285 T 325 T 385 T 445
Dužina 2.85m 3.30m 3.85m 4.45m
Sirina 1.64m 1.68m 1.74m 1.96m
Težina 260kg/286kg 296kg 340kg 395kg
Visina 910mm 910mm 910mm 1.02m
Brzina 40mph/48-52mph 48-52mph 48-52mph 45mph
Goriva 41 Litara 41 Litara 60 Litara 70 Litara
Sjedala 3 + 1 4 + 1 5 + 1 6 + 1

HRVATSKI
26
HRVATSKI
27
PUNJENJE GORIVA
Kao sastavni dio inspekcije prije isporuke Vaseg Turbojet-a, plovilo je bilo voženo te je sadržaj
goriva kompletno ispražnjen. Kod tocenja goriva koristite iskljucivo benzin 95-98 RON.
Provjerite da je paljenje u OFF poziciji.
Uklonite jastuke sa sjedala kako biste otkrili cep spremnika. Cep spremnika za gorivo otvara se
kljucem.
Tocite gorivo u prozracenom prostoru.
Nemojte pretociti spremnik; pazite da ne prolijevate gorivo.
Cep spremnika dobro zatvorite nakon tocenja goriva.
Nakon tocenja goriva, podignite poklopac motora i provjerite kaljužu.
Cep spremnika goriva ima integrirani odusnik.
Nemojte polijevati vodom cep spremnika kako voda ne bi usla u spremnik.
PRIJE UPOTREBE
Pritisak u tubama može varirati s promjenom temperature. Napumpajte obe tube, jednu za drugom,
na 250mB/3.6psi. Ukoliko nisu, to ce se odraziti na plovnost plovila kao i na njegovu otpornost
odnosno cvrstocu. Ventili za napuhavanje su pricvrsceni sa cetvrt-okretnim zatvaracima kako bi
onemogucili naglo ispuhivanje.
Zatvorite ventile i napumpajte tube.
Provjerite kaljužu da nije doslo do kontaminacije (mijesanja) goriva ili vode.
Stegnite drenažne cepove.
Provjerite da je kvaka na poklopcu motora osigurana.
STARTANJE TURBOJET-a
Provjerite da se plovilo nalazi na najmanje 0,5 m dubine.
1. Ukljucite kontakt.
2. Pokrenite kaljužni ispuh da radi 4 minute.
3. Provjerite da konopi ne vise sa plovila kako se ne bi usisali u jet jedinicu.
4. Provjerite da je mjenjac brzina u centralnoj/neutralnoj poziciji.
5. Povežite sigurnosnu vezicu sa prekidacem.
UVIJEK se povežite sa sigurnosnom vezicom dok motor radi
6. Okrenite kljuc za paljenje dok motor ne starta.
7. Brojac okretaja motora ce se stabilizirati kad se motor zagrije.
1. Kontakt prekidac
2. Prekidac kljucem
3. Kružni prekidacˇ
RUKOVANJE TENDER-om
Ovo plovilo koristi vodeni-jet pogon i ima jedinstvene karakteristike u upravljanju. Ventil prima potisak od jet
pumpe, upravljanje je omoguceno otvaranjem ventila te zakretanjem osovine u stranu u koju vozac okrene
volan. Veliki potisak okrenut ce plovilo brzo, mali potisak proizvodi manji okretni moment. Ne postoji kormilo
tako da u vožnji bez potiska nije moguce kormilariti. Nakon vožnje tendera pri velikim brzinama, važno je motoru
dopustiti na jednu minutu da radi na praznom hodu kako bi se turbo pogon ohladio te ga tek nakon toga ugasiti.
Ukoliko ima bilo kakvih naznaka da korov ili krhotine blokiraju jet obavezno izvadite plovilo iz vode.
Iskljucite kontakt prekidac te ocistite svu necistocu sa jet jedinice. NE pokušavajte pokrenuti zaglavljeni
ili blokirani
!
amac jer to moze prouzrociti kvar motora. U slucaju daljnjih problema kontaktirajte ovlastenog
zastupnika.
TEGLJENJE
Postoji rizik potapanja motora. NE TEGLITI. Kontaktirajte ovlasteni servis za dodatni
pribor. Ventil za tegljenje postavljen. Ventil mora biti u zatvorenoj poziciji za tegljenje
i u otvorenoj poziciji za vožnju. Ako se ne pridržava pravilna pozicija ventila, rezultat
može biti ozbiljno oštec´enje na motoru.
VEZ PLOVILA
Ne ostavljajte Turbojet predugo vezanog u vodi jer to može doprinijeti nakupljanju algi i skoljaka na
podvodnom dijelu trupa te time naskoditi maritimnim sposobnostima plovila.
VOŽNJA U PLITKIM VODAMA
Ne vozite na dubini manjoj od 0.5m/2ft jer bi krhotine mogle uci u jet jedinicu. NE VOZITE Turbojet po
suhome. Zaustavite motor prije prelaska na suho jer može doci do kvara na pumpi za hladjenje motora.
Nakon vožnje u plitkim vodama odvezite plovilo u dublju vodu te ga pod gasom okrecite u lijevu i desnu stranu
nekoliko puta da odstranite pijesak sa usisnog dijela motora-ne ucinite li to moguc je kvar na jet motoru.
TRIM
Ne preopterecujte plovilo.
Pri svakoj brzini pazite na trim plovila te da sve težine budu podjednako rasporedjene.
OPCENITO
Upravljajte plovilom pažljivo i brzinom kojom uvjeti plovidbe to dozvoljavaju. Uvijek vizualno pregledajte
plovilo i njegove sastavne dijelove prije upotrebe. Održavajte/servisirajte plovilo kako je opisano u
prirucˇ niku.
SIGNALNE LAMPICE
1. TEMPERATURA ISPUHA
Ova ce se lampica upaliti ukoliko je dovod hladjenja prekinut. Nakon
ponovnog startanja vec vruceg motora, normalno je da je lampica
upaljena do 30-ak sekundi. Ukoliko je lampica upaljena i dalje ili se upali
pri visim brojevima okretaja, ZAUSTAVITE motor te provjerite da li je
doslo do blokiranja sistema za hladjenje (krhotine u pumpi/cijevima).
2. ECU KVAR
Ova ce se lampica upaliti ukoliko se dogodi kvar na motoru. Ukoliko dodje
do toga, odmah ZAUSTAVITE motor i prijavite kvar ovlastenom servisu.
3. NIZAK TLAK ULJA
Ukoliko se ova lampica upali, ZAUSTAVITE motor i prijavite kvar
ovlastenom servisu.
1
2
3
1
2
3

HRVATSKI
28
HRVATSKI
29
NAKON UPOTREBE:
ISPIRANJ
Kako bi produžili vijek trajanja motora turbojeta, jako je bitno da isperete motor od soli nakon
upotrebe a prije skladistenja. Ne ispiranje motora može znatno stetiti dijelovima motora te njihovom
vijeku trajanja. NE UKLJUCUJTE potisnik izvan vode.
Motor mora raditi prije spajanja vode.
Postoji rizik potapanja motora u slu
!
aju da voda ostane priklju
!
ena nakon gašenja motora.
1. Vadite plovilo svaki dan iz vode te ga isperite zajedno sa jet pumpom koristeci slatku vodu.
2. Prikljucˇ ite dovod slatke vode sa ženskim prikljucˇkom kojeg ste dobili sa tenderom te ga spojite na
spojnicu za ispiranje kraj sjedala za vozacˇ a.
3. Startajte motor te odmah ukljucite dovod slatke vode.
4. Pustite motor da radi oko 1 minute kako bi se prsten sistema za hladjenje kompletno isprao.
5. Zatvorite dovod slatke vode.
6. Ostavite motor da radi ne vise od 10 sekundi kako bi se sva voda iscijedila iz sistema za hladjenje te onda
ugasite motor. Uklonite crijevni prikljucak sa razvodne spojke.
7. Provjerite kaljuže te posusite ostatak vode u njima. Uklonite drenažne cepove.
0.5 Ltr/0.53 qt US
MAX
MIN
PROVJERA NIVOA ULJA
U MOTORU
Weber motori su motori sa tzv. “suhom posudom”, što znacˇ i da imaju
zaseban spremnik ulja. Kada se motor pokrene, ulje se ubrizgava u
spremnik. Dok motor radi, ulje c´ e se nakon nekog vremena lagano
vratiti iz spremnika u posudu. Motor mora postic´i radnu temperaturu
da bi se se uz pomoc´metalne šipke izmjerio tocˇan nivo ulja u motoru.
Prilikom mjerenja nivo ulja mora biti izmed¯u MIN i MAX na metalnoj
šipki. Nemojte zašarafi ti poklopac na vrhu da biste provjerili nivo ulja.
Koristite optimalnu kolicˇ inu ulja,nemojte prepunjavati. Ne pas
trop remplir.
1. Kaljužni odusak
2. Otvoren dovod
hladjenja
3. Sigurnosni ventil
goriva
4. Desni drenažni cep
5. Pumpa anode
6. Spojnica vozne ploce
7. Lijevi drenažni cep
8. Prednji drenažni cep
1
2
3
4
6
7
5
8
SERVIS
Nakon obveznog nultog servisa, preporucˇ a se servis nakon 25 sati rada motora. Nakon toga, preporucˇ a
se servis svakih 50 sati rada motora ili jednom godišnje. Konzultirajte Vašeg Williams zastupnika vezano
uz servis. Proucˇ ite Williams prirucˇ nik vezano uz održavanje motora.
Za narudžbu rezervnih dijelova, kontaktirajte Vašeg Williams zastupnika.
GENERALNI RASPORED MOTORA
1. Pumpa i pokazivac nivoa goriva
2. Povrat goriva
3. Potisnik goriva
4. Filter goriva
5. Zatvoreni prsten spremnika za hladjenje
6. Spremnik ulja
7. Akumulator
8. Spojnica potisnika
9. Osovina brtve
10. Ventil za tegljenje
PODMAZIVANJE
BRTVE OSOVINE
Podmazivanje osovine je automatsko. Provjeriti
rezervoar os sistema podmazivanja svakih 10 sati.
Koristiti Quicksilver marine 2-4-C mast, ili istu mast
po specifi kaciji. Pripaziti da sistem ne bude na
prevelikom tlaku.
NE PREPUNJAVATI PREKO OZNAC
ˇ
ENOG
MAXIMUMA.
9
1
2
3
5
6
8
9
7
10
4

HRVATSKI
30
DEUTSCH
31
PROVJERA SISTEMA GORIVA
UPOZORENJE-sistem goriva pod tlakom. Provjeriti da li ima curenja na sistemu prilikom servisa.
Svi dijelovi sistema goriva rade pod pritiskom od (5 bar). Sistem ostaje pod pritiskom nakon
gašenja motora. Mora se posvetiti velika pažnja kad se vade konektori prilikom izmjene fi ltera.
Nositi zaštitne naocˇale. Pripaziti na vanjske utjecaje koji mogu rezultirati požarom.
ODRŽAVANJE
Kako bi ste osigurali da Vas tender bude siguran i pouzdan, molimo Vas postujte ove odredbe
održavanja Williams nece prihvatiti odgovornost za stete nastale nestrucnim rukovanjem ili
nepravilnim postavljanjem od strane vlasnika plovila.
1. Promjeniti rezervoar za automatsko podmazivanje i nadopuniti ako potrebno.
2. Provjerite nivo ulja u motoru (vidi poglavlje PROVJERA ULJA).
3. Provjerite nivo hladjenja.
4. Isperite otvoreni prsten sistema za hladjenje.
5. Koristite kvalitetno mazivo koje sadrži Tefl on (Quicksilver 101) za podmazivanje kontrolnih kabela
i pumpe.
6. Provjerite kaljuže zbog prodora vode i kontaminacije ulja ili goriva.
7. Premažite polove navigacijskih svjetala koristeci bijelu mast ili njoj slicnu.
8. Provjerite stanje anoda kod dvije pumpe.
9. Pad tlaka u tubama nakon 24 sata nije neuobicajeno. Vanjska temperatura i tlak ce se odraziti na tlak
u tubama. Provjerite tlak.
ZIMSKO CUVANJE PLOVILA
Obratite se ovlastenom Williams servisu za upute o zimskom cuvanju plovila.
OSIGURACI
Osiguraci su smjesteni ispod upravljacke konzole.
1. 12v socket: crveno/bijela žica – 25 amp
2. Prekidac kaljužne pumpe: crveno/plava žica – 7.5 amp
3. Prekidac kaljužne pumpe: zeleno/crvena žica – 5 amp
4. Navigacijska svjetla: narancasta žica – 5 amp
5. Ispuh: smedja žica – 7.5 amp
ALLGEMEINE TECHNISCHE DATEN
Rumpf ID.Nr. (HIN):
TECHNISCHE DATEN, MOTOR
Motor Weber MPE 750 cc Turbo
Max. Leistung 98hp/73kW bei 73001/min (66hp/50kW bei 6300rpm)
Kraftstoff Unverbleites Benzin, 95-98 OZ
Ölgüte OW50 bis 15W50, vollsynthetisch
Ölmenge 3.5 Liter (max.)
KLASSIFIZIERUNG
Kategorie C – “Küste”: Das Boot ist ausgelegt für Fahrten in Küstengewässer, großen Buchten,
Mündungen, Seen und Flüssen, mit Bedingungen bis zu und einschließlich Windstärke 6 und
Wellenhöhen bis zu und einschließlich 2 m. Dieses Boot erfüllt die Bedingungen von ISO 6185-3.
Die Rumpf ID. Nr. (HIN) befi ndet sich über der Strahldüse, unterhalb der Hecktreppe. Notieren Sie
die ID. Nr. ins Service Handbuch. Das CE Schild befi ndet sich im Steuerbord-Fußraum. Das CE
Schild ist das Zertifi kat zur Europäischen Richtlinie 94/25/CE.
J/T 285 T 325 T 385 T 445
Gesamtläng 2.85m 3.30m 3.85m 4.45m
Breit 1.64m 1.68m 1.74m 1.96m
Gewicht, trocken 260kg/286kg 296kg 340kg 395kg
Gesamthöh 910mm 910mm 910mm 1.02m
Geschwindigkeit 40mph/48-52mph 48-52mph 48-52mph 45mph
Kraftstoff Fassungsverm 41
Liter 41 Liter 60 Liter 70 Liter
Sitzplätze 3 + 1 4 + 1 5 + 1 6 + 1
HERZLICHEN GLÜCKWUNSCH ZU IHRER
WAHL EINES WILLIAMS TURBOJET TENDER
Dieses Benutzerhandbuch wurde verfasst um Sie darin zu unterstützen, Ihren Williams Turbojet Tender sicher
und mit Freude bedienen zu können. Der Inhalt wird Sie vertraut machen mit den Details zum Boot sowie der
montierten Ausrüstung, und liefert Informationen über die Bedienung und Wartung. Bitte lesen Sie das
Handbuch mit Aufmerksamkeit und machen Sie sich vor der Benutzung mit dem Boot vertraut.
Der Williams Turbojet Tender wird mittels Wasserstrahl angetrieben. Falls dies Ihr erstes Boot ist oder falls
Sie auf einen Ihnen unbekannten Bootstyp wechseln, bitten wir Sie im Interesse Ihrer eigenen Sicherheit,
dass Sie sich vor Kommandoübernahme des Boots eine gewisse Erfahrung hinsichtlich der Handhabung
und Bedienung aneignen. Ihr Händler oder Yacht Club wird Sie gerne an eine nautische Schule oder an
einen kompetenten Einweiser verweisen.
Der Turbojet Tender ist ein Hochleistungsboot. Bevor Sie dieses Boot führen empfi ehlt Williams
dem Bootsbediener einen Mindestausbildungsstandard zu erlangen der vergleichbar ist mit dem
RYA Schein, Stufe 2 oder des ICC (International certifi cate of competency). Bei Nutzung der
Turbojet Tender gelten jedoch generell die länder-spezifi schen Voraussetzungen des jeweiligen
Landes (z. B. Sportbootführerschein für Binnengewässer/offene See/Bodenseeschifferpatent, etc.)
Dieses Handbuch setzt voraus, das der Bediener sich diesen Qualifi kationsstandard angeeignet hat
und über Basiswissen der Seemannschaft verfügt.
Bitte bewahren Sie dieses Handbuch an einem sicheren Ort auf und reichen Sie es
mit dem Verkauf oder der Weitergabe des Boots an den neuen Eigentümer weiter.
1 2 3 4 5

DEUTSCH
32
DEUTSCH
33
STEUERELEMENTE UND
INSTRUMENTENGRUPPE
1. Tachometer und Stundenzähler
2. Warnlampe, Öldruck niedrig
3. Kraftstoffanzeiger
4. Schalter Kielpumpe
5. Geschwindigkeitsmesser
6. Abgastemperaturlicht
7. Navigationslicht
8. Schalter Kielgebläse
9. ECU Störungsanzeige
10. Schalter für Sicherheitsabschaltung Motor
11. Sicherungen (Motorraum)
1
2
3
4
5
7
8
6
9
10
11
BETANKUNG
Im Rahmen der Inspektion vor der Auslieferung wurde der Motor Ihres neuen Turbojet Tender
betrieben und der Kraftstoff abgelassen. Zur Betankung ist ausschließlich unverbleites Benzin (OZ
95-98) zu verwenden.
Vergewissern Sie sich, dass der Zündungsschalter auf Position AUS (OFF) ist.
Entfernen Sie das Sitzpolster um Zugang zu dem Kraftstoffeinfülltrichter zu erhalten. Entfernen Sie den
Tankdeckel mit dem bereitgestellten Schlüssel.
Achten Sie auf ordnungsgemäße Belüftung beim Betanken.
Überfüllen Sie den Tank nicht; achten Sie darauf, dass kein Kraftstoff verschüttet wird.
Bringen Sie nach dem Betanken den Tankdeckel wieder sicher an.
Öffnen Sie nach dem Betanken die Motorluke und inspizieren Sie die Kielräume.
Der Tankdeckel verfügt über eine integrierte Belüftung. Richten Sie auf keinen Fall den Wasserstrahl
(z. B. beim Abspritzen mit Wasserschlauch) in Richtung des Kraftstoffeinfülltrichters, da gegebenenfalls
Wasser in den Kraftstofftank eindringen könnte.
VOR DER VERWENDUNG
Der Luftdruck in den Schläuchen, ändert sich in Abhängigkeit von der Umgebungstemperatur.
Der Luftdruck in den Schläuchen sollte 250mB/3,6psi nicht überschreiten. Die Nichteinhaltung des
vorgegebenen Luftdrucks beeinfl usst die Seetüchtigkeit und die Wasserdichtigkeit Ihres Bootes.
Zum Ablassen der Luft sind die Schlauchfüllventile sind mit ¼ Umdrehung Schließmechanismen
ausgestattet.
Stellen Sie die Ventile auf „zu“ (shut) und füllen Sie die Schläuche gleichmäßig auf 0,2 bar (2,9 psi).
Prüfen Sie den Kiel auf etwaige Kraftstoff- oder Wasserverschmutzung.
Prüfen Sie den festen Sitz der Ablaufstopfen in den Fußräumen.
Prüfen Sie den festen Sitz der Motorhaubenverschlussbügel.
STARTEN IHRES TURBOJET TENDERS
Vergewissern Sie sich, dass das Boot sich in einer Mindestwassertiefe von 0,5 m/2 ft befi ndet.
1. Schalten Sie den Batterietrennschalter auf an.
2. Lassen Sie das Kielgebläse für 4 Minutes laufen.
3. Befestigen sie lose Leinen/Seile/etc., die in die Jet Einheit gesaugt werden könnten.
4. Vergewissern Sie sich, dass der Schalthebel sich in der mittleren Position befi ndet.
5. Verbinden Sie die Kordel mit dem Motoren-Sicherheitsabschalter. Bei laufendem Motor müssen
Sie IMMER über die Kordel mit dem Sicherheitsabschalter Motor verbunden sein!
6. Drehen Sie den Zündschlüssel bis der Motor startet.
7. Die Motorendrehzahl wird automatisch begrenzt bis der Motor auf Betriebstemperatur ist.
1. Batterietrennschalter
2. Schlüsselschalter
3. Sicherung
ANORDNUNG DER
KOMPONENTEN
1. Wasserfester Stauraum
2. Verzurrklampe
3. Anhebepunkte, vorne
4. Kraftstoffeinfülltrichter
(unterhalb vom Sitz)
5. Gas-/Schalthebel
6. Anhebepunkte, hinten
7. Ski Schleppeinrichtung
(unterhalb vom Sitz)
8. Positionslampe
9. Schlüsselschalter und Batterie-
trennschalter (unterhalb vom Sitz)
10. Hafennavigationslicht
11. Navigationslicht, Steuerbord
12. Stauraum (unterhalb vom Sitz)
13. 12 V Zusatzsteckdose für Strom/
Aufl adung
14. CE Zertifi kationsschild
15. Ablaufstopfen (einer im vorderen
Fußraum und jeweils einer in den
hinteren Fußräumen)
16. Schlauchfüllventile
17. Überdruckventil
18. Rumpf ID Nr. (HIN)
(unterhalb der Plattform)
19. Spüleinrichtung
1
2
3
1
3
2
4
5
6
7
8
9
10
12
13
14
16
16
17
18
15
16
3
11
16
6
19

DEUTSCH
34
DEUTSCH
35
BETRIEB DES TENDERS
Dieses Boot wird über ein Wasserstrahlsystem angetrieben und verfügt über einzigartige Lenkeigenschaften.
Der Schub wird über die Strahlpumpe (Jetpumpe) erzeugt; die Lenkrichtung wird durch Öffnen der Drossel
(Gas geben) und Drehen des Lenkrads in die gewünschte Drehrichtung, erzeugt. Bei hohem Schub können
scharfe Kurven gefahren werden; bei niedrigem Schub wird eine geringere Drehfreudigkeit erzeugt.
Ein Steuerruder gibt es nicht, von daher können Sie auf Fahrt nur mit Schub die Richtung wechseln.
Falls sich Seegras, Verschmutzungen, etc. bei der Benutzung in der Strahleinheit verfangen kann dies zu
Kavitation führen, was wiederum zu einer Schubverminderung führt. Wenn dieser Zustand beibehalten und nicht
abgestellt wird, kann der Motor überhitzen und zu ernsthaften Schäden führen. Bei etwaigen Anzeichen davon,
dass Verschmutzung, Seegras, Tang, etc. den Strahl blockieren, ist das Boot umgehend aus dem Wasser zu
nehmen. Schalten Sie den Batterietrennschalter um (trennen) und entfernen Sie etwaige Verschmutzungen im
Strahlbereich. Vermeiden Sie Startversuche wenn der Anrieb ihres Jet Tenders blockiert ist. Ein Schaden am
Antriebsstrang / Motor könnte die Folge sein. Bei Schwierigkeiten oder Problemen, wenden Sie sich an einen
autorisierten Williams Händler.
SCHLEPPEN
Es besteht die Gefahr den Motor mit Wasser zu füllen. Ein spezielles Ventil wurde hierfür
eingebaut. Wird der Tender geschleppt, muss das Ventil in die CLOSED Position verstellt
werden. Für den Fahrbetrieb muss das Ventil wieder auf die OPEN Position verstellt
werden. Eine falsche Stellung des Ventils kann zu Motorschäden führen.
ANLEGEN
Lassen Sie Ihren Turbojet Tender nicht für längere Zeiträume angelegt, da dies zur
Akkumulation von z. B. Meeresfl ora, und somit zum Leistungsverlust, führen kann.
ANLEGEN AM STRAND/UFER
Betreiben Sie Ihren Turbojet Tender NICHT wenn die Mindestwassertiefe unterhalb von 0,5 m/2 ft ist;
Verschmutzung kann in die Strahleinheit gelangen. Schalten Sie den Motor aus, bevor sie auf den Strand fahren.
Der Jetantrieb sowie das Motorenkühlsystem könnten beschädigt werden.
Nach Anlegen am Strand, schieben Sie das Boot in tieferes Wasser und schwenken es mehrere Male von
Längsseite zu Längsseite um etwaigen Strandsand aus dem Ansaugbereich zu entfernen. Wird dies
unterlassen oder versäumt, können an der Strahleinheit Schäden entstehen.
TRIMM
Überladen Sie das Boot nicht. Beachten Sie bei allen Geschwindigkeiten den Trimm Ihres Boots und
sorgen Sie stets für eine gleichmäßige Gewichtsverteilung.
ALLGEMEIN
Betreiben Sie das Boot mit gebührender Sorgfalt und bei Geschwindigkeiten, die den Bedingungen des
jeweiligen Wassers angemessen sind. Führen Sie vor der Verwendung stets eine Sichtprüfung des Boots
und seiner Komponenten durch. Halten Sie sich an den Wartungs-/Service Plan gemäß den Vorgaben im
Service Handbuch.
WARNLAMPEN
1. ABGASTEMPERATUR
Diese Warnlampe leuchtet auf bei begrenzter Open-Loop Kühlwasserzufuhr.
Nach erneutem Starten des heißen Motors ist es normal, dass diese
Lampe bis zu 30 Sekunden leuchtet. Leuchtet die Lampe länger als 30
Sekunden oder leuchtet sie auf wenn der Motor über Leerlaufdrehzahl
ist, dann schalten Sie den Motor AUS und prüfen ob im Kühlsystem
eine Einschränkung/Begrenzung vorliegt (Schmutz in Pumpe/Rohre).
2. ECU STÖRUNG
Diese Lampe leuchtet auf bei Störungen mit dem Motoren-
Management System. Bei Aufl euchten, schalten Sie den Motor ab
und wenden Sie sich an einen autorisierten Williams Händler.
3. NIEDRIGER ÖLSTAND
Bei Aufl euchten, schalten Sie den Motor ab und wenden Sie sich an
einen autorisierten Williams Händler.
0.5 Ltr/0.53 qt US
MAX
MIN
1. Kielwasserablauf
2. Open-Loop
Kühlwasserüberlauf
3. Kraftstoffüberlauf
4. Fußraumablauf,
rechts hinten
5. Anode der Pumpe
6. Anode der Fahrtplatte
7. Fußraumablauf,
links hinten
8. Fußraumablauf, vorne
1
2
3
4
6
7
5
8
WARTUNG
Die wichtige erste Wartung nach dem Einfahren ist nach 25 Laufstunden erforderlich. Danach sind
Wartungen stets nach 50 Laufstunden erforderlich oder einmal jährlich, je nach dem was zuerst eintritt.
Wenden Sie sich für Wartungsmaßnahmen an Ihren autorisierten Williams Händler. Regelmäßige
Wartungsmaßnahmen am Motor ersehen Sie in Ihrem Williams Service Handbuch.
Für Ersatzteile und Zubehör kontaktieren Sie bitte Ihren autorisierten Williams Händler.
1
2
3
ÖLSTAND PRÜFEN
Der Weber Motor ist ein Trockensumpfmotor mit separatem Öltank.
Bei laufendem Motor, wird das Öl in den Öltank gepumpt. Wird der
Motor abgestellt, läuft das Öl langsam in den Motor zurück. Der
Motor muss betriebswarm sein um den Ölstand am Ölpeilstab
ablesen zu können.
Der Ölstand sollte zwischen MIN und MAX sein. Der Ölpeilstab darf
zur Prüfung nicht eingeschraubt werden. Auf richtige Ölqualität
achten. Den Motor nicht überfüllen.
NACH DER BENUTZUNG:
SPÜLPROZEDUR
Um die Motorlebensdauer zu verlängern ist es sehr wichtig, nach der Benutzung und vor
der Lagerung, etwaiges Salzwasser vom Motor zu spülen. Unterlassung des Spülens führt
zu einer beträchtlichen Lebensdauerkürzung der Motorkomponenten. Betätigen Sie den
Gashebel NICHT wenn der Turbojet Tender außerhalb vom Wasser ist. Starten Sie erst den
Motor bevor Sie das Wasser aufdrehen. Bevor der Motor abgestellt wird, muss erst das
Wasser abgestellt werden da sonst Wasser in die Brennräume des Motor gelangen kann.
1. Nehmen Sie das Boot täglich aus dem Wasser und waschen/spülen Sie das gesamte Boot/Strahlpumpe
mit Frischwasser.
2. Verbinden Sie einen Frischwasserschlauch (mit dem zum Tender mitgelieferten Schlauchkupplungselem
ent) an die Schlauchkupplung.
3. Starten Sie den Motor und schalten die Wasserzufuhr sofort an.
4. Betreiben Sie den Motor für ca. 1 Minute im Leerlauf um das Open-Loop Kühlsystem komplett zu spülen.
5. Schalten Sie die Wasserzufuhr aus.
6. Lassen Sie nun den Motor für höchsten 10 Sekunden laufen um alles Wasser aus dem Kühlsystem zu
entfernen; dann schalten Sie den Motor aus. Entfernen Sie das Schlauchkupplungselement von der
Schlauchkupplung im Heckbereich.
7. Kontrollieren Sie den Kielraum des Bootes und trocknen etwaiges Restwasser. Entfernen Sie alle
Ablaufstopfen in den Fußräumen.

DEUTSCH
36
DEUTSCH
37
ANORDNUNG DER BOOT SYSTEME
1. Kraftstoffpumpe-Geber, Kraftstoffstand
2. Kraftstoff Rücklauf
3. Kraftstoff Zulauf
4. Kraftstofffi lter
5. Closed-Loop Kühlmittelausgleichsbehälter
6. Öltank
7. Batterie
8. Gasgestänge
9. Wellenabdichtung
10. Abschleppventil
SCHMIERUNG DER
ANTRIEBSWELLE
Die Antriebswellenabdichtung wird durch eine
automatische Schmiereinrichtung gewährleistet.
Eine Überprüfung sollte jedoch nach ca.
10 Betriebsstunden erfolgen. Als Schmiermittel
sollte Quicksilver 2-4-C Schmierfett oder ein
vergleichbares Hochtemperaturfett verwendet
werden. Beim nachfetten ist darauf zu achten das
die Max. Markierung nicht überschritten wird.
PRÜFEN DES KRAFTSTOFFSYSTEMS
Vorsicht das Kraftstoffsystem steht unter Druck. Das Kraftstoffsystem wird bei den
vorgeschriebenen Serviceintervallen auf Dichtheit geprüft. Alle im System befi ndlichen Teile,
sind mit einem Druck von ca. 5 bar beaufschlagt. Der Kraftstoffdruck ist auch nach abstellen des
Motors noch im System vorhanden. Besondere Vorsicht ist daher beim Tausch des Kraftsofffi lters
geboten. Geeignete Schutzausrüstung sowie eine Schutzbrille ist zu tragen. Kein offenes Licht
während der Arbeiten am Kraftstoffsystem.
ROUTINEMÄSSIGE WARTUNG
Um lange Lebensdauer zu gewährleisten und zur sicheren und zuverlässigen Aufrechterhaltung
des Tender, bitten wir Sie die Anweisungen der routinemäßigen Wartung einzuhalten. Williams
übernimmt keinerlei Verantwortung für Schäden oder Verletzungen aufgrund falscher Wartung
oder nichtsachgemäßer Einstellungen durch den Eigentümer.
1. Kontrollieren und ggf. Auffüllen der automatischen Schmierung für die Antriebswelle.
2. Kontrollieren Sie den Motorölstand. (Siehe Kapitel Motorölprüfung in diesem Handbuch).
3. Kontrollieren Sie den Kühlmittelstand.
4. Spülen sie das Open-Loop Kühlsystem.
5. Schmieren Sie alle Kabelzüge im Motorraum und an der Pumpe mit hochwertigem, tefl onhaltigem
Marinefett ( z. B. Quicksilver 101).
6. Kontrollieren den Kiel auf eindringendes Wasser, Öl- oder Kraftstoff verschmutzungen.
7. Tragen Sie eine geringe Menge Fett (weiß) oder ähnlich an die ausfahrbare Halterung der
Positionslampe auf.
8. Kontrollieren Sie den Zustand der beiden Pumpenanoden.
9. Ein Druckverlust in den Schläuchen innerhalb von 24 Stunden ist nicht ungewöhnlich. Temperatur
und Luftdruck können den Schlauchdruck beeinfl ussen. Kontrollieren Sie den Druck in den
Schläuchen regelmäßig.
WINTERLAGERUNG
Informationen zur Winterlagerung ersehen Sie im Williams Service Handbuch.
SICHERUNGEN
Die Sicherungen befi nden sich im Motorraum.
1. 12 V Steckdose: rot/weiße Leitung – 25 A
2. Schwimmerschalter Kielpumpe: rot/blaue
Leitung – 7,5 A
3. Navigationsleuchten: orangenfarbige Leitung – 5 A
4. Schalter Kielpumpe: grün/rote Leitung – 5 A
5. Gebläse: braune Leitung – 7,5 A
1 2 3 4 5
1
2
3
5
6
8
9
7
10
4
9

38
ESPAÑOL
ESPAÑOL
39
ESPECIFICACION GENERAL
Numero de identifi cación
del casco (HIN):
ESPECIFICACION DEL MOTOR
Motor Weber MPE 750cc Turbo 4 Tiempo
Potencia Máxima 98hp/73kW a 7300rpm (66hp/50kW a 6300rpm)
Carburante Gasolina Sin Plomo 95-98 RON
Viscosidad de aceite 0W50 a 15W50 sintético
Capacidad de aceite 3.5 Litros Máximo
CLASSIFICACION
Categoría C – “aguas costeras”: La embarcación ha sido diseñada para navegar en aguas
costeras, ríos y lagos, donde las condiciones pueden llegar a fuerza 6 de viento y olas de hasta 2
metros de altura. Este barco esta homologado según el ISO 6185-3. El numero de identifi cación del
casco esta situado por arriba de la turbina de agua en el tablero trasero. Graba este número en el
libro de mantenimiento. La placa del CE esta situado a la derecha del barco. La placa CE esta la
certifi cación según la dirección normativa Europeo 94/25/CE.
CONTROLES Y PANEL
DE INSTRUMENTOS
1. Indicador – Tacómetro y cuenta horas
2. Luz – Testigo de presión de aceite baja
3. Indicador – Nivel de combustible
4. Interruptor – Bomba de sentina
5. Indicador – Velocidad/cuenta milla
6. Luz – Testigo de temperatura de escape
7. Interruptor – Luces de navegación
8. Interruptor – Extractor de gases
9. Luz – Testigo de malfuncionamiento del ECU
10. Cinta de seguridad (Hombre en el agua)
11. Fusibles (adentro compartimiento de motor)
1
2
3
4
5
7
8
6
9
10
11
PLAN GENERAL
1. Cofre de proa
2. Cornamusa
3. Punto de elevación delantero
4. Depósito de carburante
(debajo del asiento)
5. Mando de control
6. Punto de elevación trasero
7. Enganche de esquí (debajo del asiento)
8. Luz de navegación mástil
9. Llave de contacto y interruptor principal
de batería (debajo del asiento)
10. Luz de navegación de estribor
11. Luz de navegación de babor
12. Compartimiento de almacenaje
(debajo del asiento)
13. Cargador de batería 12 voltios
14. Certifi cación CE
15. Tapón de drenaje
(uno delante y dos en trasero)
16. Válvula de infl ación de aire
17. Válvula de sobre presión de aire
18. Numero de identifi cación de casco
(debajo del espejo)
19. Acoplamiento de enjuague
ENHORABUENA EN TU ELECION DE UNA
WILLIAMS TURBOJET
Este manual de usario ha sido creado para ayudarte en el uso del Turbojet para tu seguridad en tu tiempo
de recreo. Contiene detalles sobre la embarcación y su equipamiento instalado, también contiene detalles
sobre el manejo y el mantenimiento necesario. Por favor lee atentamente y familiarizarte con la
embarcación antes de utilizarlo. El Williams Turbojet utiliza una turbina de agua para desplazarse. Si este
es tu primer barco, o estas cambiando a un tipo de barco con el que no estas familiarizado, para tu
seguridad, por favor asegurarte que sepas como maniobrar y obtener experiencia antes de operar tu
embarcación. Tu proveedor, federación de vela o club marítimo estarán encantados de señalarte donde
acudir para sacarte los títulos necesarios para operar la embarcación.
El turbojet es una embarcación de alto rendimiento. Williams recomienda como mínimo un titulo
equivalente a un RYA Level 2 or ICC (Certifi cado de Competencia Internacional) antes de obtener
el control de la embarcación. Este folleto entiende que antes de la compra de la embarcación ya
hayas adquirido los títulos y experiencia necesaria.
Por favor guarda este folleto en un sitio seguro y entrégalo al nuevo
propietario si vendes la embarcación.
1
3
2
4
5
6
7
8
9
10
12
13
14
16
16
17
18
15
16
3
11
16
6
19
J/T 285 T 325 T 385 T 445
Eslora total 2.85m 3.30m 3.85m 4.45m
Manga 1.64m 1.68m 1.74m 1.96m
Peso del barco 260kg/286kg 296kg 340kg 395kg
Altura 910mm 910mm 910mm 1.02m
Velocidad
40 nudos + 40 nudos + 40 nudos + 40 nudos +
Carburante 41 Litros 41 Litros 60 Litros 70 Litros
Personas 3 + 1 4 + 1 5 + 1 6 + 1

40
ESPAÑOL
ESPAÑOL
41
REPOSTANDO
Como parte de la inspección de pre-entrega tu nuevo Turbojet ha sido arrancado y han vaciado el
depósito de carburante. Sólo reposta con gasolina sin plomo 95/98 RON.
Apagar el motor y quitar el contacto antes de repostar.
Quitar el asiento para dar acceso al tapón del depósito de carburante. Hay una llave suministrado para
ayudarte a abrir el tapón.
Repostar en un área aireada y bien ventilada.
No sobre llenar el depósito de carburante, evita derramar gasolina.
Aprieta el tapón del depósito de carburante después de repostar.
Abre la tapa del motor y comprobar fugas en las sentinas después de repostar.
El tapón del depósito del carburante tiene su propio respiradero.
No echar agua cerca del depósito de carburante, ya que puede caer agua dentro del depósito.
ANTES DE USAR
La presion de aire dentro de los tubos puede variar con las temperaturas de ambiente. Hay que infl ar los
tubos de aire en secuencia hasta 250mB/ 3.6 psi. Si no es así comprometes la habilidad de la
embarcación en el agua y la seguridad del barco. Las válvulas de infl ación están equipadas con un
sistema de cuarto de vuelta para desinfl ar la embarcación rápidamente.
Cierra las válvulas de aire y ten los fl otadores infl ados igualmente a 2.9psi (0.2bar).
Comprueba la sentina para fugas de agua o gasolina.
Aprieta los tapones de drenaje.
Comprueba que los enganches de la tapa del motor estén seguras.
ARRANCANDO/ENCENDIENDO TU TURBOJET
Asegurarte de que haya un mínimo de profundidad de 0.5m/0.2ft de agua.
1. Conecta el interruptor principal de la batería.
2. Arranca el extractor de gases por 4 minutos.
3. Asegúrate que no hayan cabos sueltos que puedan interferir o entrar con la turbina.
4. Asegúrate de que estas en neutro/palanca de cambio en el medio.
5. Conecta la cinta de seguridad (hombre en el agua) con el interruptor.
SIEMPRE abróchate la correa cuando el motor este en marcha.
6. Gira la llave de contacto hasta que el motor arranque.
7. Las revoluciones estarán limitadas automáticamente hasta que el motor se caliente.
1. Isolador de bateria
2. Llave de contacto
3. Interuptor circuito
MANEJANDO SU EMBARCACION
Esta embarcación utiliza un sistema de propulsión de agua para desplazarse y tiene características únicas en
el manejo. La aceleración del motor produce una fuerza de propulsión de agua en la turbina que empuja la
embarcación, la dirección funciona cuando aceleras y giras el propulsor en la dirección deseada. Una gran
aceleración hace que la embarcación gire rápidamente y una aceleración lenta hace que gire más despacio.
La embarcación no tiene timón pues necesitas aceleración o fuerza para que la embarcación se mueva.
Las algas, basura y otras cosas encontradas en el mar pueden dañar su turbina si se adentran en el,
puede produzca cavitacion, causando una perdida de fuerza de empuje. Si esta condición pasara en un
tiempo prolongado puede causar que el motor se sobrecaliente resultando en grandes daños al motor.
Si hay indicios de algas, basura u otros residuos tapando la turbina, saca la embarcación del agua.
Apaga el isolador de la batería y remueva todo el material que obstruye la turbina. NO trates de forzar el
arranque del motor si la turbina esta bloqueada porque se puede dañar el motor. En caso de difi cultad por
favor ponte en contacto con tu distribuidor local de Williams.
REMOLCANDO
PRECAUCION: Hay riesgo de inundar motor. Hay una válvula de remolque.
Esta válvula debe estar cerrada al remolcar y abierta mientras se utilizar el motor.
Si no se observa las posiciones correctas de la válvula puede provocar grandes
daños al motor.
ATRACANDO
No dejes tú Turbojet amarrado durante largas temporadas, ya que puede causar que algas crezca en el
casco y puede causar en una pérdida de rendimiento.
EMBARRANCANDO
NO UTILIZAR en menos de 0.5m/2ft de profundidad, ya que algas y otras substancias pueden dañar la
turbina. NO CONDUZCAS hasta la playa. Para el motor antes de llegar a la playa, ya que puedes dañar
la turbina y sistema de refrigeración.
Después de haber estado en la playa, mueve la embarcación a aguas mas profundas y mueve el casco de
lado a lado para quitar cualquier rastro de arena o residuos que estén en la entrada de agua- si no se hiciera
podrías dañar la turbina.
NIVELANDO
No sobrecargar la embarcación con peso. A cualquier velocidad estate atento y distribuye el peso
equilibradamente.
GENERAL
Usa la embarcación con precaución y navega a la velocidad apropiada de acuerdo al estado de mar.
Siempre realiza una inspección visual del barco y sus componentes antes de utilizarla. Sigue los planes
de revisión según el libro de mantenimiento del fabricante.
LUCES DE AVISO
1. TEMPERATURA DE ESCAPE
Esta luz se encenderá si hay un bloqueo en el sistema de refrigeración
abierto. Después de encender el motor cuando este caliente es normal
que esta luz este encendida hasta 30 segundos. Si la luz sigue
encendida después de 30 segundos, APAGA el motor e investiga el
problema. Comprueba el sistema de refrigeración por restricciones.
2. MALFUNCIONAMIENTO DEL ECU
Esta luz se encenderá si hay un problema con el sistema electrónico
de control de motor. Si esta luz se ilumina APAGA el motor y contacta
con tu distribuidor Williams.
3. PRESSION DE ACEITE BAJA
Si esta luz se enciende, APAGA el motor y contacta con tu
distribuidor Williams.
1
2
3
1
2
3

42
ESPAÑOL
ESPAÑOL
43
DESPUES DE USAR:
PASANDO MOTOR POR AGUA DULCE
Para prolongar la vida del motor de tu Turbojet, es muy importante pasar tu motor por agua dulce
después de haberlo usado y antes de almacenarlo. No realizar esta operación reduce la vida de tu
motor. NO ACELERAR las revoluciones del motor fuera del agua. El motor debe estar arrancado
antes de conectar el agua. Hay riesgo de inundar el motor si el agua sigue encendido despues de
apagar el motor.
1. Varar la embarcación diariamente y lavar con agua dulce la embarcación y la bomba de turbina.
2. Conectar una manguera de agua con en conector macho suministrado con el barco e introducirla en el
conector hembra instalado.
3. Arrancar motor y abrir inmediatamente el agua dulce.
4. Arrancar motor a relanti por aproximadamente 1 minuto para enjugar el sistema de refrigeración.
5. Apagar el agua dulce.
6. Dejar el motor arrancado por un periodo de no más de 10 segundos para vaciar toda el agua del sistema
de refrigeración, Apagar el motor. Desconectar el conector en el tablero trasero.
7. Comprobar que la sentina este seca. Quitar tapones de drenaje.
0.5 Ltr/0.53 qt US
MAXIMO
MINIMO
COMPROBAR EL NIVEL
DE ACEITE
El motor Weber es de tipo “carta seca”, con deposito independiente de
aceite. Cuando el motor esta arrancado el aceite de lubricación es
bombeado al deposito independiente. Despues de apagar el motor, una
cantidad cierta de aceite vuelve desde el deposito hasta la carta.
Para controlar el nivel de aceite correcto en el motor, debe estar a
una temperatura adecuada o normal para leer el nivel en la varilla.
El nivel correcto de aceite debe estar entre las marcas de minimo y
maximo en la varilla. No hay que enroscar el tapon de la varilla para
comprobar. Hay que elegir la viscosidad adecuada de aceite, según el
fabricante. No sobrellenar.
1. Salida bomba
de sentina
2. Salida de circuito
refrigerante abierto
3. Desagüe de exceso
de combustible
4. Desagüe tapón de
drenaje bañera
de estribor
5. Ánodo de protección
de turbina
6. Ánodo de protección
del cuerpo de turbina
1
2
3
4
6
7
5
8
SERVICIO:
Es importante que el primer servicio se realice a las 25 horas de su primer uso. De ahí en adelante
es necesario realizar un servicio cada 50 horas o cada año, lo que venga primero. Contacta con tu
distribuidor autorizado de Williams para el servicio. Consulta con el manual de servicio Williams para el
mantenimiento periodico del motor.
Para recambios y accesorios por favor contacta tambien con tu distribuidor autorizado de Williams.
DISTIBRUCION SISTEMA
DE LA EMBARCACION
1. Bomba/Flotador nivel combustible
2. Tubo de retorno de combustible
3. Tubo de alimentación de combustible
4. Filtro de combustible
5. Deposito sistema de refrigerante cerrado
6. Tanque de aceite
7. Batería
8. Conexiones de mando de control
9. Reten de eje/Prensaestopas
10. Válvula de remolque
LUBRICACION DEL
RETEN DEL EJE
La lubricación del reten del eje se consigue mediante
una unidad de engrase automática. Inspeccionar el
nivel cada 10 horas de operación. Utilizar grasa
marina Quicksilver 2-4-C o equivalente para llenar el
depósito. Tener cuidado de no introducir demasiada
presión en el sistema. No exceder el máximo.
7. Desagüe tapón de
drenaje bañera de babor
8. Desagüe tapón de
drenaje bañera de proa
1
2
3
5
6
8
9
7
10
4
9

44
ESPAÑOL
COMPROBACION DEL SISTEMA
DE COMBUSTIBLE
ATENCION: Sistema de combustible presurizado. Inspeccionar el sistema, buscar fugas a
intervalos programados. Todos los elementos del sistema de combustible funcionan bajo presión
(5 bar) El sistema se mantiene presurizado incluso al apagar el motor. MUCHO CUIDADO debe
tenerse cuando se quiten los conectores durante el cambio de fi ltros. Utilizar protección ocular.
No exponer a llamas.
INTERVALES DE MANTENIMIENTO
Para asegurar una vida larga en servicio y para mantener tu embarcación segura y en una
condición fi able, es necesario que sigas los siguientes pasos de mantenimiento. Williams no se
hace responsable de los daños causados por no seguir el mantenimiento o mal ajuste llevado
por el propietario.
1. Engrasar retén de prensaestopas del eje cada 10 horas de uso con grasa Quicksilver marine 2-4-C
o equivalente. Como guía, hay que dar dos bombeos con la pistola de engrase suministrada con la
embarcación. Asegúrate de no sobre presionar la grasa en los retenes de la prensaestopas del eje.
2. Comprobar nivel de aceite.
3. Comprobar nivel de refrigerante.
4. Enjuagar con agua dulce el sistema de refrigeración abierto.
5. Engrasar con grasa con tefl ón (Quicksilver 101 o equivalente) todos los cables de control.
6. Comprobar sentina para fugas de agua, aceite, combustible u otro tipo de contaminación.
7. Lubricar el mástil de la luz de navegación retractable.
8. Comprobar estado de los dos ánodos de protección de la turbina.
9. La perdida de presión de aire en los fl otadores de aire en un tiempo de 24 horas puede ser
considerado normal. La temperatura y presión atmosférica puede infl uir en las presiones dentro de
los fl otadores de aire. Comprobar las presiones regularmente.
MANTENIMIENTO DE INVIERNO
Mire su manual de servicio de Williams para los procesos de hibernación.
IDENTIFICACION DE
FUSIBLES
Los fusibles se encuentran debajo del control
de mando.
1. Enchufe 12 voltios: Cable Rojo/Blanco – 25 Amperios
2. Interruptor automático bomba de sentina: Cable Rojo/
Azul – 7.5 Amperios
3. Luces de navegación: Cable naranja – 5 Amperios
4. Bomba de sentina: Cable Rojo/Verde – 5 Amperios
5. Extractor de gas: Cable marrón – 7.5 Amperios
1 2 3 4 5
WILLIAMS PERFORMANCE TENDERS LTD. 2008 LIMITED WARRANTY CERTIFICATE
Williams Performance Tenders (“Williams”) undertake a PDI (pre-delivery inspection) on all new boats before shipment from factory.
Williams will provide for repairs to their infl atable boats during the specifi c warranty periods provided herein, in accordance with the
following terms, conditions and limitations. Registration of Williams boat – Each Williams boat is supplied to the original customer
with a registration card. The limited Warranty contained herein shall not take effect and shall be deemed null and void unless the
original owner submits a completed registration card to Williams Performance Tenders Ltd, Unit 2 Vogue Business Park, Berinsfi eld,
Oxon OX10 7LN. UK within 30 days from the date of original registration. Williams approved dealers shall be entitled to store boats
for a period of up to 6 months prior to registration provided that: a) The boats are stored in original packaging in accordance with
Williams guidelines; b) Registration is recorded upon handover with delivery hours only.
WARRANTY COVERAGE:
Williams warrants to the original private purchaser of a properly registered craft that: a) All seams of the tubes, infl ation valves, and
the fabric used in the construction of the tube shall be free from defects in material and workmanship for a period of 3 years from
the date of the original registration; b) The fabric of the tube shall be free from deterioration affecting serviceability (i.e. cracking,
porosity, but not discolouration, fading or chaffi ng) for a period of 3 years from the date of the original registration; c) the fi breglass
hull shall be free from defects in material and workmanship for a period of 1 year from the date of the original registration; d) all
components fi tted to the boat at the Williams factory or subsequently replaced under warranty shall be free from defects in material
and workmanship for a period of 1 year from the date of the original registration. The warranty period for commercial use owners
will be 4 months from the date of original registration. The obligation of Williams under this Limited Warranty is limited to repairing or
replacing, as Williams may elect at its sole discretion, any parts that prove, in Williams’ sole judgement, to be defective in material
or workmanship. THIS LIMITED WARRANTY SHALL BE THE ORIGINAL PURCHASER’S SOLE AND EXCLUSIVE REMEDY.
WHAT IS NOT COVERED:
This Limited Warranty shall not apply to: a) normal wear and tear; b) any minor boat damage, including but not limited to, gel coat
crazing, fading or blistering; c) Any damage to Williams boats due to negligence, accident, misuse, alteration, improper operation,
collision, fi re, theft, vandalism, riot, explosion, objects striking the boat, improper maintenance and storage; d) Any damage caused
by towing a Williams boat, any damage caused by lifting or recovering a Williams boat; e) Tubes exposed to harsh or corrosive
chemicals; f) any parts installed by anyone other than Williams factory personnel; g) any damage caused by after-market parts;
h) Williams boats purchased for commercial/governmental use; i) any work carried out on a Williams boat by an unauthorised
service centre and/or without Williams’ prior approval; j) labour, freight, delivery, storage or other similar charges; k) defects caused
or worsened by failure to adhere to the instructions concerning the treatment, maintenance and care of the boat; l) Damage
caused by water ingestion. Sometimes equipment installed on a Williams boat (such as electronics) carry their own individual
warranties provided by their respective manufacturers. In such cases any warranty claims regarding those parts must be directed
to those manufacturers and not Williams. Williams reserves the right to make warranty coverage contingent upon proof of
proper maintenance.
HOW TO OBTAIN WARRANTY REPAIR:
Prior to any work being commenced on a Williams boat, the warranty claim must be approved in writing by Williams Performance
Tenders Ltd. In order to obtain warranty repair approval, the original owner must send written notifi cation, along with a copy of the
bill of sale, and photograph depicting the damage and/or defect sought to be repaired to Williams Performance Tenders Ltd,
Unit 2 Vogue Business Park, Berinsfi eld, Oxon OX10 7LN. U.K. If Williams fi nds that the specifi c defect and/or damage is covered
under this Limited Warranty, Williams will advise the owner in writing where to send (via pre-paid freight) the boat or part(s) for repair
or replacement. In many cases the local authorised Sales and Service Centre may be utilised for repairs. In others the boat or parts
must be repaired by Williams personnel only. Williams does not assume any liability for any work performed on a Williams boat at
an unauthorised Service Centre and/or without Williams’ prior approval. All parts replaced under this Limited warranty become the
property of Williams.
MISCELLANEOUS:
Williams does not authorise any person to create for it any other obligation or liability in connection with its boats. THIS LIMITED
WARRANTY AND WILLIAMS’ OBLIGATION HEREUNDER IS IN LIEU OF ALL WARRANTIES EXPRESS OR IMPLIED, INCLUDING
WITHOUT LIMITATION THE WARRANTIES OF MERCHANTABILITY AND FITNESS FOR A PARTICULAR PURPOSE. Williams will not
be liable for any incidental or consequential damages resulting from breach of this limited warranty, including without limitation, loss
of infl atable boat use, storage, payment for loss of time, inconvenience, boat rental expense, and local taxes required on warranty
repairs. Williams reserves the right to alter models, change colours, specifi cations, materials, equipment, component parts, prices
or cease production of certain models at any time without prior notice, and such changes, alterations, or cessation shall be made
without Williams incurring any obligations to equip or modify infl atable boats produced prior to the date of such changes or
alterations. This Limited Warranty shall be governed by and construed and enforced in accordance with UK Law.
Transcripción de documentos
LIMITED WARRANTY This boat is intended for pleasure use only. It is covered by a limited warranty which applies for defects and flaws, which may occur, despite normal use and regular maintenance, for a period of 2 years from the date of registration. Williams reserves the right to make warranty coverage contingent upon evidence of proper maintenance. Full warranty terms can be found on the inside back page of this handbook. GARANTIE LIMITÉE Ce bateau est destiné à un usage de plaisance. Il est couvert par une garantie limitée qui s’applique pour tous vices ou défauts qui pourraient se déclarer en dépit d’une utilisation normale et d’un entretien régulier, pendant une période de 2 ans à partir de la date d’enregistrement. La couverture sous garantie par Williams est applicable sous réserve d’un entretien régulier par un concessionnaire agréé, conformement au carnet d’entretien. Tous les termes de la garantie sont lisibles à la fin de ce manuel. IGARANZIA LIMITATA Questo tender è adibito ad uso ricreativo. E’ coperto da una garanzia limitata che copre eventuali difetti che si verifichino nonostante un uso corretto del battello ed una manutenzione regolare, per un periodo di 2 anni dalla data di registrazione. La Williams Performance Tenders si riserva il diritto di riconoscere eventuali lavori in garanzia previa verifica di corretta e costante manutenzione. Le condizioni della garanzia sono contenute all’interno del manuale di manutenzione Williams. OGRANICENA GARANCIJA Ovo plovilo je namijenjeno iskljucivo za privatne svrhe. Pokriveno je ogranicenom garancijom na kvarove koji mogu nastati usprkos normalnom koristenju i održavanju u periodu od 2 godine od dana registracije. Williams zadržava pravo reguliranja garancije ovisno o kvaliteti održavanja plovila. Uvjeti garancije se mogu naći na zadnjoj unutarnjoj strani priručnika. BESCHRÄNKTE GARANTIE Dieses Boot ist ausschließlich für Vergnügungszwecke vorgesehen und nicht für kommerzielle Zwecke. Die beschränkte Garantie deckt Fehler und Mängel im Rahmen der normalen Verwendung und regelmäßiger Wartung für einen Zeitraum von 2 Jahren, ab, beginnend mit dem Tag der Zulassung. Williams behält sich vor im Gewährleistungsfall vom Endbverbraucher einen Nachweis über die erbrachten Wartungsarbeiten zu verlangen. Die ausführlichen Garantiebedingungen finden Sie auf der Rückseite des Service Handbuchs. GARANTIA LIMITADA Esta embarcación esta diseñada únicamente para uso recreativo. La garantía limitada cubre defectos y faltas que se produzcan durante su uso normal y mientras se respeten los periodos de mantenimiento recomendado. Esa garantía limitada tiene una validez de 2 años a partir de la fecha del registro. Los términos de la garantía se pueden encontrar en la última página de este manual. SUPPLYING DEALER STAMP: CACHET DU CONCESSIONNAIRE: MARCA DI COMMERCIANTE ITALIANA: PECAT OVLASTENOG ZASTUPNIKA: HÄNDLER STEMPEL: STAMPA DEL PROVEDOOR: Williams Performance Tenders Ltd. Vogue Business Park, Berinsfield, Oxfordshire, OX10 7LN, United Kingdom T: +44(0) 1865 341134 F: +44(0) 1865 341234 W: www.williamsmarine.com OWNERS HANDBOOK CONGRATULATIONS ON YOUR CHOICE OF A WILLIAMS TURBOJET PAGES ENGLISH 3-9 3 This owner’s handbook has been compiled to help you operate your Turbojet with safety and pleasure. It contains details of the boat and equipment fitted, together with information on its operation and maintenance. Please read it carefully, and familiarize yourself with the boat before using it. The Williams Turbojet uses water jet propulsion. If this is your first boat or you are changing to a type of boat you are not familiar with, for your own safety, please ensure that you obtain handling and operating experience before assuming command of the boat. Your dealer, national sailing federation or yacht club will be pleased to advise you of sea schools, or competent instructors. The Turbojet is a high performance boat. Williams recommends a minimum standard of RYA level 2 or ICC (International certificate of competency) is attained by the operator prior to taking control of this boat. This manual assumes the operator has acquired this standard of qualification and possesses knowledge of basic seamanship. FRANÇAIS 10-16 Please keep this handbook in a secure place and hand it to the new owner when you sell the boat. Hull Identification Number (HIN): GENERAL SPECIFICATIONS ITALIANO HRVATSKI 17-23 24-30 J/T 285 T 325 T 385 T 445 LOA 2.85m 3.30m 3.85m 4.45m Beam 1.64m 1.68m 1.74m 1.96m Dry weight 260kg/286kg 296kg 340kg 395kg Height 910mm 910mm 910mm 1.02m Max speed 40mph/48-52mph 48-52mph 48-52mph 45mph Fuel capacity 41 Litres 41 Litres 60 Litres 70 Litres Seating 3+1 4+1 5+1 6+1 ENGINE SPECIFICATIONS Engine DEUTSCH 31-37 Weber MPE 750cc turbo Maximum power 98hp/73kW at 7300rpm (66hp/50kW at 6300rpm) Fuel Premium unleaded gasoline 92-98 RON Oil grade 0W40 to 15W50 fully synthetic Oil capacity 3.5 litres maximum CLASSIFICATION ESPAÑOL 38-44 Category C – “inshore”: Craft designed for voyages in coastal waters, large bays, estuaries, lakes and rivers, where conditions up to and including wind force 6 and significant wave heights up to and including 2m may be experienced. This boat complies with ISO 6185-3. The HIN is located above jet nozzle below transom step. Record it in the service handbook. The CE plate is located in the starboard footwell. The CE plate is the certification to European Directive 94/25/CE. ENGLISH WILLIAMS OWNERS HANDBOOK FUELLING GENERAL ARRANGEMENT 1. Water tight storage 2. Mooring cleat 3. Front lifting points 4. Fuel filler (under seat) 5. Throttle/shift control 6. Rear lifting points 7. Ski tow (below seat) 8. Running light 9. Key switch and battery isolator (below seat) As part of its pre-delivery inspection your new Turbojet has been run and drained of fuel. When refuelling use only premium unleaded gasoline 92-98 RON. Ensure ignition is in OFF position. 1 Remove seat cushion to expose filler cap. A key is provided to assist in filler cap removal. Re-fuel in a ventilated area. 2 Do not overfill the tank; be careful not to spill fuel. 3 16 Tighten fuel cap securely after re-fuelling. 3 16 Open engine hatch and inspect bilges after re-fuelling. The filler cap has an integral breather. Do NOT hose around the fuel filler area as water may enter the fuel tank. 15 10. Port navigation light 12 BEFORE USE 4 Tube pressure will fluctuate with temperature. Inflate tubes in sequence to 250mB/3.6psi. Failure to observe this will compromise the sea-keeping ability and water tight integrity of the boat. Inflation valves are fitted with quarter-turn locks to enable rapid deflation. 11. Starboard navigation light 12. Storage (below seat) 10 13. 12v auxiliary power/charge socket 11 Set valves to shut and inflate tubes evenly. 14. CE certification plate 15. Drain plugs (one in forward footwell and one in each of the rear footwells) 16. Tube inflation valves 5 Check bilge for fuel or water contamination. 5 Tighten footwell drain plugs. 16 16 6 17. Over pressure valve 6 9 14 19 18. Hull Identification Number (HIN) (under platform) Check engine cover latches are secure. 17 STARTING YOUR TURBOJET 13 Ensure boat is in a depth of at least 0.5m/2ft of water. 8 19. Flushing attachment 1. Turn on battery isolator. 7 2. Run bilge blower for 4 minutes. 18 3. Secure any loose ropes that could get sucked into jet unit. 4. Ensure shift lever is in central position. 5. Connect safety lanyard to switch. ALWAYS attach yourself to the safety lanyard when engine is running. 6. Turn ignition key until engine starts. CONTROLS AND INSTRUMENT CLUSTER 1. Tachometer and hour meter 2. Low oil pressure warning light 3. Fuel gauge 4. Bilge pump switch 5. Speedometer 6. Exhaust temperature light 7. Navigation lights 8. Bilge blower switch 9. 3 1 7. Engine RPM will automatically be limited until warm. 5 2 6 8 9 11 7 3 4 1 2 10 ECU malfunction light 1. Battery isolator switch 10. Engine safety lanyard 2. Key switch 11. Fuses (engine compartment) 3. Circuit breaker ENGLISH ENGLISH 4 OPERATING YOUR TENDER This boat uses a water-jet propulsion system and has unique characteristics in steering. The throttle produces thrust from the jet pump, the directional control is provided by opening the throttle and turning the wheel in the direction of your turn. High thrust will turn the boat sharply; low thrust will produce less turning force. There is no rudder, so while underway there is no steering without thrust. If weed or debris gets caught in the jet unit during use cavitation can occur causing a decrease in forward thrust. If this condition is allowed to continue the engine may overheat resulting in serious damage. If there is any sign of debris or weeds etc. blocking the jet, remove the boat from the water. Switch off battery isolator and remove all debris from around the jet unit. DO NOT make repeated attempts to start a blocked or jammed tender as engine damage may result. In case of difficulty consult your Williams approved dealer. AFTER USE: FLUSHING PROCEDURE 7 To prolong engine life it is very important to flush engine of salt water after use and prior to storage. Failure to carry out flushing will significantly reduce the life of engine components. DO NOT operate throttle out of water. Engine MUST be running before water is connected. Risk of engine flooding exists if water remains on after engine is switched off. 1. Remove the boat from the water everyday and wash entire boat/jet pump with fresh water. 2. Connect a fresh water hose fitted with the male connector supplied with the tender to the coupling. 3. Start engine and immediately turn on water supply. TOWING 4. Run engine at idle for approximately 1 minute to completely flush the open loop cooling system. CAUTION: Risk of engine flooding exists. Towing valve fitted. Valve must be in the CLOSED position for towing and OPEN position for running. Failure to observe correct valve position will result in serious engine damage. 5. Turn off water supply. 6. Allow the engine to run for no longer than 10 seconds for all water to exit from the cooling system, then turn off the engine. Remove hose connector from transom coupling. MOORING 7. Check bilge of boat and dry any residual water. Remove footwell drain plugs. Do not leave the Turbojet moored for extended periods as this may result in an accumulation of marine growth and a loss of performance. BEACHING DO NOT operate in less than 0.5m/2ft of water as debris may enter the jet unit. DO NOT drive turbojet onto beach. Stop engine before beaching as damage to pump/engine cooling may occur. 1. Bilge outlet 2. Open loop coolant overflow 3. Fuel spill overflow After beaching move boat into deeper water and tilt from side to side several times to remove sand from intake area – failure to do so could cause damage to jet unit. 4. Right hand rear footwell drain 5. Pump anode TRIM 6. Ride plate anode Do not overload the boat. At all speeds be aware of trim and keep weight evenly distributed. 7. Left hand rear footwell drain 8. Front footwell drain GENERAL Operate the boat with due care and at a speed appropriate to the sea conditions. Always carry out a visual check of the boat and its components prior to use. Adhere to the maintenance/service schedule as detailed in the service manual. WARNING LIGHTS 3 1 2 8 4 7 6 5 OIL LEVEL CHECK The Weber engine is a ‘dry sump’ type engine, with a separate oil tank. When the engine is started oil is pumped into the tank. After the engine has run, oil will slowly return from the tank to the sump. The engine must be at operating temperature before an accurate level is indicated on the dip-stick. 1. EXHAUST TEMPERATURE This lamp will illuminate if the open loop coolant supply is restricted. After restarting a hot engine it is normal for the lamp to stay on for up to 30 seconds. If the lamp stays on for longer than 30 seconds or comes on when engine is above idle, STOP the engine and check for restriction in coolant system (debris in pump/pipes). 3 The oil level should be between MIN and MAX on the dipstick. Do not screw in cap to check level. Use the correct grade of oil. Do not overfill. MAX 0.5 Ltr/0.53 qt US MIN 2. ECU MALFUNCTION This lamp will illuminate if there is a fault with the engine management system. If this occurs STOP the engine and refer to Williams approved dealer. 3. LOW OIL PRESSURE If this illuminates, STOP the engine and refer to Williams approved dealer. 1 2 SERVICING The important post run-in 1st service is required at 25 hours. Thereafter servicing is required every 50 hours or yearly whichever comes first. Consult your Williams approved dealer for servicing. Refer to the Williams service manual for periodic engine maintenance. For parts and accessories please contact your Williams approved dealer. ENGLISH ENGLISH 6 8 BOAT SYSTEM ARRANGEMENT FUSE IDENTIFICATION 9 3 1 1. 12 volt socket – 25 amp 2. Bilge pump float switch – 7.5 amp 3. Navigation lights – 5 amp 4. Bilge pump switch – 5 amp 5. Blower – 7.5 amp ENGLISH ENGLISH Fuses located under helm station. 1 2 3 4 5 2 FUEL SYSTEM CHECK WARNING – pressurised fuel system. Inspect system for leaks at scheduled service intervals. All elements of the fuel system function under pressure (5 bar). The system remains pressurised after engine is switched off. Extreme care must be taken when removing quick connectors during filter change. Wear eye protection. No naked flames. ROUTINE MAINTENANCE 4 8 7 10 6 5 To ensure long service life and to maintain the tender in a safe and reliable condition please follow these routine maintenance instructions. Williams cannot accept any responsibility for damage or injury resulting from incorrect maintenance or improper adjustment carried out by the owner. 1. Inspect automatic grease unit reservoir and refill as required. 2. Check engine oil level (refer to section Oil Level Check in this handbook). 3. Check coolant level. 4. Flush open loop cooling system. 5. Apply a good quality marine grease containing Teflon (e.g. Quicksilver 101) to all control cables both under the helm and at the pump. 9 6. Check bilges for water ingress, oil or fuel contamination. 7. Lightly grease the extending running light pole using white grease or similar. 1. Fuel pump and level sender 6. Oil tank 8. Check condition of the 2 pump anodes. 2. Fuel return 7. Battery 3. Fuel feed 8. Throttle linkage 9. Loss of tube pressure over 24 hours is not unusual. Temperature and atmospheric pressure will affect tube pressures. Check pressures regularly. 4. Fuel filter 9. Shaft seal lubrication 5. Closed loop coolant reservoir 10. Towing valve WINTER STORAGE Refer to the Williams service manual for winterisation procedures. SHAFT SEAL LUBRICATION Shaft seal lubrication is provided by an automatic grease unit. Inspect reservoir level approximately every 10 hours of operation. Use Quicksilver marine 2-4-C grease or equivalent high temperature, high speed bearing grease to re-fill reservoir. Take care not to over-pressurise system. DO NOT exceed maximum level indication. 9 FELICITATIONS POUR AVOIR CHOISI UN WILLIAMS TURBOJET AMÉNAGEMENT GÉNÉRAL Ce manuel du propriétaire permettra d’utiliser votre Turbojet en toute sécurité et avec un maximum de plaisir. Il contient un descriptif détaillé du bateau et de ses équipements ainsi que des informations sur son fonctionnement et son entretien. Prenez le temps de le lire attentivement pour vous familiariser avec votre nouveau bateau avant de l’utiliser. FRANÇAIS Le Turbojet WILLIAMS est équipé d’un mode de propulsion à jet d’eau. S’il s’agit de votre premier bateau ou que vous ne soyez pas familiarisé avec celui-ci, assurez vous d’acquérir l’expérience nécessaire à son pilotage et à son fonctionnement avant d’en assumer le commandement. Votre concessionnaire, la Fédération Française de Voile ou le Yacht Club local, vous indiqueront les coordonnées d’écoles de navigation compétentes. Le Turbojet est un bateau doté de hautes performances. Williams recommande qu’une qualification minimum telle que RYA niveau 2, permis A ou mer, ou certificat international de Compétence, soit acquise par l’utilisateur avant d’en prendre le contrôle. Ce manuel considère que l’utilisateur ait acquis cette qualification et possède les connaissances de base du marin. Merci de conserver ce manuel en bonne place et de le faire suivre au nouveau propriétaire en cas de revente du bateau. 11 1. Coffre étanche 2. Taquet d’amarrage 1 3. Points de levage avant 4. Orifice de remplissage carburant (sous le coussin) 5. Boîtier de commande accélération/inverseur 6. Points de levage arrière 2 3 16 16 15 7. Anneau de traction ski nautique (sous le siège) 8. Feu blanc de route 9. Contacteur à clef et coupe batterie (sous le siège) 12 4 10. Feu de navigation bâbord 11. Feu de navigation tribord 10 12. Coffre (sous le coussin) Identification de la coque Numéro de série (HIN) 3 11 13. Prise auxiliaire 12V alimentation/charge CARACTÉRISTIQUES GÉNÉRALES J/T 285 T 325 T 385 14. Plaque CE T 445 Longueur 2.85m 3.30m 3.85m 4.45m Largeur 1.64m 1.68m 1.74m 1.96m Poids à vide 260kg/286kg 296kg 340kg 395kg Hauteur 910mm 910mm 910mm 1.02m Vitesse 40mph/48-52mph 48-52mph 48-52mph 45mph Carburant 41 Litres 41 Litres 60 Litres 70 Litres Personnes 3+1 4+1 5+1 6+1 CARACTÉRISTIQUES MOTEUR Moteur Weber MPE 750cc turbo Puissance maximum 98hp/73kW at 7300rpm (66cv/50kW à 6300rpm) Fuel Carburant sans plomb 95-98 RON Viscosité huile OW50 à 15W50 100% synthétique Capacité huile 3.5 litres maximum CATÉGORIE DE CONCEPTION Catégorie C – “à proximité des côtes”: Navires de plaisance conçus pour la navigation à proximité des côtes et dans de grandes baies, de grands estuaires, lacs et rivières, au cours desquels les vents peuvent aller jusqu’à la force 6 comprise et les vagues peuvent atteindre une hauteur significative jusqu’à 2 mètres compris. Ce bateau est conforme à la norme ISO 6185-3. Le numéro d’identification de la coque se trouve sous la plateforme arrière. Notez le dans le manuel d’entretien. La plaque CE se trouve sur le franc bord arrière tribord. La plaque CE certifie la conformité à la Directive 94/25/CE. FRANÇAIS 10 5 16 16 15. Nables de vidange (un dans le plancher avant et un dans chaque plancher arrière) 6 6 9 14 19 17 13 16. Valves de gonflage 8 17. Valve de surpression 7 18. Numéro de série HIN (sous la plateforme) 18 19. Raccord mâle de rinçage COMMANDES ET INSTRUMENTATION 3 1 5 1. Compte tours et compteur d’heure 2 2. Indicateur lumineux d’avertissement de pression d’huile insuffisante 3. Jauge carburant 6 8 9 4. Pompe de cale 5. Compteur de vitesse 6. Voyant de température d’échappement 7. Feux de navigation 8. Interrupteur de ventilation de cale 9. Indicateur lumineux de mauvais fonctionnement de l’ECU 10. Cordon coupe circuit de sécurité 11. Fusibles (compartiment moteur) 10 11 7 4 REMPLISSAGE CARBURANT Lors de l’inspection de pré livraison en usine, votre nouveau Turbojet a été mis en route et vidangé de son carburant. Quand vous remettrez du carburant, utilisez uniquement du sans plomb 95-98 RON. Assurez vous que le contact soit coupé. Enlevez le coussin du siège pour atteindre le bouchon de remplissage. Une clef est fournie pour faciliter le dévissage du bouchon. Ravitaillez en carburant dans un endroit ventilé. Ne faites pas déborder le réservoir, prenez garde de ne pas renverser d’essence. Assurez vous d’avoir bien serré le bouchon de réservoir après remplissage. FRANÇAIS Ouvrez le capot moteur et inspectez les fonds de cale après le remplissage. Le bouchon de remplissage possède une mise à l’air intégrale. Ne pas laver au jet d’eau autour de la zone de remplissage carburant car l’eau pourrait rentrer dans le réservoir. AVANT UTILISATION La pression du tubulaire varie en fonction de la température de l’air. Gonfler les compartiments du tubulaire à 250 mb (3.6 psi) en suivant l’ordre indiqué sur les valves. Le non respect de cette consigne compromettrait la tenue en mer et l’étanchéité intégrale du bateau. Les clapets des valves de gonflage sont de type quart de tour, permettant un dégonflage rapide. Vérifiez que les clapets de valves sont fermés et gonflez les tubulaires de façon égale. Contrôlez qu’il n’y ait pas d’eau ou d’essence dans les fonds de cale. Mettez en place et bloquez les bouchons de nable. Contrôlez que les loquets de fermeture du capot moteur soient bloqués. DÉMARRER VOTRE TURBOJET Assurez vous que la profondeur d’eau sous le bateau soit au moins de 0.50 mètre. UTILISER VOTRE ANNEXE 13 Ce bateau utilise un système de propulsion à jet d’eau qui lui confère des caractéristiques particulières sur le plan de la conduite. L’accélération produit une poussée de la turbine du jet, le contrôle directionnel se fait en accélérant et en tournant le volant dans le sens de votre virage. Une forte poussée fera tourner le bateau brusquement, une faible poussée produira moins de force en virage. Il n’y a pas de gouvernail, il faut obligatoirement de la poussée pour avoir de la manoeuvrabilité. Si des algues ou des débris se prennent dans la turbine pendant l’utilisation, un phénomène de cavitation peut survenir, causant une perte de poussée. Si cette situation se prolonge, le moteur peut surchauffer et entraîner de graves problèmes mécaniques. S’il y a des signes de débris, algues, etc, obstruant la turbine, il faut sortir le bateau de l’eau. Coupez la batterie et enlevez tous les débris du bloc de propulsion jet. En cas de difficultés, contactez votre concessionnaire Williams. Ne pas essayer de redemarrer si le moteur force ou semble bloqué car cela pourrait gravement l’endommager. FRANÇAIS 12 REMORQUAG ATTENTION: Le risque de noyer le moteur existe. Installer la vanne de remorquage. La vanne doit être fermée pour le remorquage et ouverte pour la navigation de l’annexe. Une mauvaise utilisation de la position de cette vanne entrain de sérieux dommages sur le moteur. MOUILLAGE Ne laissez pas votre Turbojet au mouillage pour de longues périodes afin d’empêcher l’apparition d’algues et coquillages qui diminueraient les performances. ACCOSTER SUR LA PLAGE Ne pas manœuvrer dans moins de 0.50mètre d’eau car des débris pourraient entrer dans la turbine. Ne pas faire tourner le moteur sur la plage. Coupez le moteur avant d’atteindre la plage pour éviter d’endommager la turbine et le circuit ouvert de refroidissement moteur. En repartant, poussez le bateau dans plus de 0.50 mètre d’eau et inclinez le d’un bord à l’autre pour enlever le sable de l’écope d’aspiration. Le non respect de cette procédure peut endommager le bloc de propulsion jet. 1. Tourner la clef du coupe batterie pour mettre en tension le circuit. RÉGLAGE DE L’ASSIETTE 2. Ventiler la cale moteur en actionnant le blower pendant 4 minutes. Ne pas surcharger le bateau. A toutes les vitesses, soyez conscient de l’assiette du bateau et gardez une répartition des poids équilibrée. 3. S’assurer qu’aucun cordage ne puisse être aspiré dans la turbine du jet. 4. Mettre le levier de commande en position centrale. 5. Brancher le cordon de sécurité au coupe circuit. Attachez toujours le cordon de sécurité à votre bras ou à votre jambe lorsque le moteur est en marche. 6. Tourner la clef de contact jusqu’au démarrage du moteur. 7. Quand le moteur est froid, le régime moteur est automatiquement limité. GÉNÉRALITÉS Adaptez une conduite responsable et une vitesse appropriée à l’état de la mer. Faites toujours un contrôle visuel du bateau et de ses équipements avant de l’utiliser. Respectez le programme de révision détaillé dans le manuel d’entretien. TÉMOINS D’AVERTISSEMENT 1. TEMPÉRATURE D’ÉCHAPPEMENT Le témoin s’allumera si l’alimentation du circuit de refroidissement est obstruée. Lorsque le moteur est chaud, il est normal qu’au redémarrage le témoin puisse rester allumé pendant 30 secondes. Si le témoin reste allumé plus de 30 secondes ou s’allume quand le moteur est au dessus du ralenti, ARRETER le moteur et vérifier ce qui peut obstruer le système de refroidissement (débris dans la turbine/durites). 3 1 2 1. Clef coupe batterie 2. Clef de contact 3. Coupe circuit 3 2. FONCTIONNEMENT DÉFECTUEUX DE L’ECU 1 Ce témoin s’allume s’il y a un problème avec le système de gestion moteur. Si cela se produit, ARRETER le moteur et s’adresser au concessionnaire Williams. 2 3. PRESSION D’HUILE INSUFFISANTE Si ce témoin s’allume, ARRETER le moteur et s’adresser au concessionnaire Williams. 14 APRÈS UTILISATION: PROCÉDURE DE RINÇAGE DISPOSITION DES ÉLÉMENTS MÉCANIQUES DU BATEAU 15 Afin de prolonger la vie du moteur, il est très important de rincer le moteur à l’eau douce pour évacuer le sel après utilisation et avant stockage. L’absence de rinçage à l’eau douce réduira de manière importante la durée de vie des pièces du moteur. Le moteur doit être en marche avant de connecter l’eau. Il y a un risque de noyer le moteur si l’eau continue d’arriver après que le moteur soit arrété. 1. Sortir le bateau de l’eau tous les jours et rincer entièrement le bateau et la turbine à l’eau douce. 2. Connecter un tuyau d’eau douce équipé du raccord male fourni avec l’annexe au raccord femelle fixé sur le bateau. 3 1 2 4. Faire tourner le moteur au ralenti pendant 1 minute environ afin de rincer complètement le circuit de refroidissement ouvert. FRANÇAIS FRANÇAIS 3. Démarrer le moteur et ouvrir l’eau immédiatement. 5. Couper l’eau. 6. Laisser tourner le moteur pendant 10 secondes au maximum pour évacuer toute l’eau du système de refroidissement, puis arrêter le moteur. Débrancher le tuyau d’eau du raccord male fixé sur le tableau arrière. 7. Vérifier les fonds de cale du bateau et sécher toute eau résiduelle. Enlever les bouchons de nable du plancher. 1. Evacuation pompe de cale 4 3 1 2. Sortie d’eau du refroidissement ouvert 2 8 7 3. Trop plein de carburant 10 6 4. Vidange du nable arrière tribord 5 5. Anode de turbine 6. Anode de plaque 7. Vidange du nable arrière bâbord 8 4 7 6 5 9 8. Vidange du nable avant VERIFICATION NIVEAU D’HUILE Le moteur Weber est un moteur à carter sec avec un réservoir séparé. Quand le moteur est en marche, l’huile est pompée directement dans le réservoir. Après que le moteur ait marché, l’huile retournera doucement du réservoir au carter. Le moteur doit être à température de fonctionnement avant que le niveau exact soit indiqué sur la jauge. Le niveau d’huile doit être entre MIN et MAX sur l’indicateur de jauge. Ne pas visser le capuchon pour vérifier le niveau d’huile. Utiliser le niveau d’huile correct. Ne pas trop remplir. MAX 0.5 Ltr/0.53 qt US MIN RÉVISION La première révision après rodage est très importante et s’effectue après 25 heures d’utilisation. La prochaine révision s’effectue après 50 heures ou une fois par an. Contactez votre concessionnaire Williams pour effectuer l’entretien de votre Turbojet. Consultez le manuel d’entretien Williams pour la maintenance périodique du moteur. Contactez votre concessionnaire Williams pour les pièces détachées et accessoires. 1. Pompe carburant et sonde de niveau de carburant 2. Durite de retour carburant 3. Durite d’alimentation carburant 4. Filtre essence 5. Réservoir de liquide de refroidissement du circuit fermé 6. 7. 8. 9. 10. Réservoir d’huile Batterie Liaison du câble d’accélérateur Joint d’étanchéité du palier d’arbre Vanne de remorquage JOINT D’ÉTANCHÉITÉ DU PALIER D’ARBRE La lubrification du joint d’arbre de transmission est faite par une pompe à graisse automatique. Contrôler le niveau de réservoir toutes les 10 heures. Utiliser de la graisse marine Quicksilver 2-4-C ou l’équivalent pour compléter le réservoir. Faire attention à ne pas provoquer une surpression du système. Ne jamais dépasser le niveau maximum. 9 IDENTIFICATION DES FUSIBLES CONGRATULAZIONI PER AVER SCELTO UN TURBOJET WILLIAMS Les fusibles sont situés sous la console. Questo manuale del Proprietario è stato stilato al fine di aiutarvi ad utilizzare il vostro tender in piena sicurezza. Il manuale contiene dettagli sul battello e sugli accessori inclusi insieme ad informazioni sulle prestazioni e sulla manutenzione. Per favore, leggere attentamente e familiarizzare con il battello prima di usarlo. 1. Prise 12V: fil rouge/blanc – 25 Amp 2. Flotteur de pompe de cale: fil bleu/rouge – 7.5 Amp 3. Feux de navigation: fil orange – 5 Amp 4. Pompe de cale: fil vert/rouge – 5 Amp 1 2 3 4 5 FRANÇAIS 5. Blower: fil marron – 7.5 Amp CONTRÔLE DU CIRCUIT DE CARBURANT Attention ! Circuit carburant haute pression. Contrôler régulièrement le circuit de carburant entre chaque révision. Tous les éléments du circuit de carburant fonctionnent à une pression de 5 bars. Le circuit reste sous pression après l’arrêt du moteur. Une extrême précaution doit être prise lors du remontage des prises rapides du filtre à essence. Porter des lunettes de protection. Pas de flamme. ENTRETIEN QUOTIDIEN Afin de profiter pendant de nombreuses saisons de votre annexe et d’en maintenir la sécurité et la fiabilité, nous vous conseillons de suivre ces instructions d’entretien quotidien : Williams ne peut être tenu responsable pour tout dommage ou blessure résultant d’un entretien défectueux ou d’un mauvais réglage effectué par le propriétaire. Il Turbojet Williams utilizza la propulsione jet ad acqua. Se questo è il vostro primo battello, o se siete passati ad esso senza avere familiarita’ con questo tipo di tender, per la vostra stessa sicurezza, per favore assicuratevi di avere la preparazione e l’esperienza adeguate prima di assumere il comando del gommone. Il vostro rivenditore o l’importatore sarà felice di indirizzarvi presso le più vicine scuole nautiche o ai più competenti istruttori privati. Il Turbojet è un battello altamente performante. La Williams Performance Tender raccomanda che l’Operatore consegua un minimo standard di Rya livello 2 o un ICC (Certificato Internazionale di Competenza) prima di prendere il comando di questo battello. Questo manuale presume che l’Operatore sia in possesso di questo requisito standard ed abbia una conoscenza adeguata delle leggi nautiche basilari. Per favore tenere questo manuale in un luogo sicuro e cederlo solo al nuovo Proprietario solo quando venderete il battello. Numero di Identificativo Carena (HIN): SPECIFICHE GENERALI J/T 285 T 325 T 385 T 445 2. Vérifier le niveau d’huile (Se référer au paragraphe « contrôle des niveaux » dans ce manuel). Lunghezza 2.85m 3.30m 3.85m 4.45m 3. Vérifier le niveau de liquide de refroidissement. Larghezza 1.64m 1.68m 1.74m 1.96m Peso a secco 260kg/286kg 296kg 340kg 395kg Altezza 910mm 910mm 910mm 1.02m Velocità 40mph/48-52mph 48-52mph 48-52mph 45mph Serbatoio 41 Lt 41 Lt 60 Lt 70 Lt Posti 3+1 4+1 5+1 6+1 1. Contrôler le réservoir de graissage automatique et re-remplir si nécessaire. 4. Rincer à l’eau douce le circuit de refroidissement ouvert. 5. Appliquer une graisse de bonne qualité contenant du Téflon (e.g. Quicksilver 101) sur tous les câbles de commande, sous la console et sur le jet. 6. Vérifier qu’il n’y ait pas d’entrée d’eau, de fuite d’huile ou d’essence dans les fonds de cale. 7. Lubrifier le feu blanc sur mat télescopique à l’aide de graisse blanche ou équivalent. 8. Vérifier l’état d’usure des deux anodes. 9. La perte de pression du tubulaire après 24 heures n’est pas anormale. La température et la pression atmosphérique entraînent une variation de la pression du tubulaire. Vérifier régulièrement la pression de gonflage. 17 SPECIFICHE DEL MOTORE HIVERNAGE ET STOCKAGE Motore Consulter le manuel d’entretien Williams pour la procédure d’hivernage. Potenza massima 98hp/73kW a 7300 rpm (66hp/50kW a 6300rpm) Carburante Benzina verde 95-98 RON Olio Sintetico OW50 a 15W50 Weber MPE 750 cc Turbo Capacità serbatoio olio Massimo 3,5 lt CLASSIFICAZIONE Catergoria C – “In prossimità dalla costa”: Battello designato a viaggi in acque costiere, grandi baie, estuari, laghi e fiumi, dove si rilevano condizioni fino a ed incluso il vento forza 6 e onde di altezza significativa fino a ed inclusi i 2 m. Questo tender segue la normativa ISO 6185-3. Il Numero Identificativo della Carena è situato al di sopra della turbina ed al di sotto della plancetta di poppa. Registratelo sul manuale del service. La targa CE è situata sulla parete interna in vetroresina sotto la valvola di gonfiaggio. La targa CE è la certificazione di adesione alla Direttiva Europea 94/25/CE. ITALIANO 16 CARATTERISTICHE GENERALI IMBARCO BENZINA I controlli effettuati prima dell’immissione su mercato prevedono che il vostro nuovo Turbojet sia stato messo in moto ed in seguito privato della benzina. Quando imbarcate carburante utilizzate benzina verde 95-98 RON. 1. Gavone di prua 2. Bitta per ormeggio Assicuratevi che il pulsante di accenzione sia in posizione “Off”. 1 3. Anelli di sospendita di prua Rimuovete il cuscino del sedile scoprendo il tappo dell’imbarco carburante; la Williams vi fornirà la chiave per rimuovere il tappo. 4. Imbarco carburante (sotto il sedile) 2 5. Leva inversione marcia 6. Anelli di sospendita di poppa 7. Gancio traina sci su specchio di poppa Procedete all’imbarco del carburante in un’area ventilata. 3 16 8. Asta luce telescopica Attenti a non immettere troppo carburante; fate attenzione che la benziana non fuoriesca dal serbatoio. 3 Dopo l’imbarco del carburante riavvitate il tappo assicurandovi che sia ben stretto. 16 Dopo l’imbarco del carburante aprite il vano motore e controllate le sentine. 15 Il tappo dell’imbarco carburante è provvisto di uno sfiato. NON lavare il tender in prossimità del tappo carburante perchè potrebbe entrare acqua nel serbatoio benzina. 9. Chiave di accensione e staccabatteria 10. Luce di navigazione rossa 12 PRIMA DELL’USO 4 11. Luce di navigazione verde La pressione dei tubolari varia in relazione alla temperatura. Gonfiare i tubolari in sequenza fino a raggiungere una pressione di 250 mB/3.6 psi. Eseguire questa procedura in modo scorretto significa compromettere la capacità del tender di tenere il mare e l’integrità della tenuta stagna del battello. Le valvole di gonfiaggio sono equipaggiate con sicure ad un quarto di giro per impedire lo sgonfiaggio rapido. 12. Gavone (sotto il sedile) 13. Presa di corrente/presa per carica betteria ausiliario 12v 10 11 ITALIANO 14. Targhetta di certificazione CE 15. Scarichi acqua (uno a prua e due a poppa) 19 5 Posizionare le valvole in chiusura e gonfiate il tubolare fino a raggiungere una pressione di 2.9 psi (0.2 bar). 16 16. Valvole per gonfiaggio tubolare 6 17. Valvola di sovrapressione 6 9 14 19 18. Numero di Identificazione Carena (sotto la piattaforma) 16 Controllate la sentina per individuare eventuali perdite di acqua o carburante. 17 Chiudere saldamente gli ombrinali di scarico sulla pavimentazione. Controllare che le due chiusure della consolle siano ben serrate. 13 AVVIAMENTO DEL VOSTRO TURBOJET 8 19. Innesto kit lavaggio Assicuratevi che il vostro Turbojet sia immerso in almeno 0,50 m/2 ft di acqua. 7 18 1. Inserire lo staccabatteria. 2. Mettere in moto l’aspiratore gas del vano motore per almeno 4 minuti. 3. Tirare a bordo qualunque cima che possa essere aspirata dall’unità jet. 4. Assicurasi che la leva dell’invertitore sia in posizione di folle. 5. Assicurare il bracciale di sicurezza all’interruttore di spegnimento di emergenza. Attaccate SEMPRE il bracciale al vostro polso quando il motore è in funzione PANNELLO STRUMENTI DI CONTROLLO 3 1 1. Contagiri e contaore 6 8 9 4. Interruttore pompa di sentina 11 7 3 4 1 5. Contamiglia 2 6. Spia temperatura motore 7. Interruttore per luci di navigazione 7. La centralina limiterà il numero di giri fin quando il motore avrà raggiunto la giusta temperatura. 2 2. Spia per bassa pressione olio 3. Livello benzina 6. Girare la chiave di avviamento per accendere il motore. 5 10 8. Interruttore per aspiratore locale motore 9. Spia di irregolare funzionamento del motore 10. Braccialetto per spegnimento di emergenza del motore 1. Interruttore dello staccabatteria 11. Scatola fusibili (nel locale motore) 2. Salvavita 2. Chiave di avviamento ITALIANO 18 COME UTILIZZARE IL TUO TENDER Questo battello utilizza un sistema a propulzione jet ed ha caratteristiche uniche di manovrabilità. La marcia produce una spinta dall’unità jet; il controllo della direzione di marcia è il frutto di una maggiore accellerazione unita alla rotazione del volante nella direzione desiserata. Una brusca spinta causerà una virata violenta; una spinta leggera produrrà una più lenta virata. Non essendo presente la barra del timone, non è possibile manovrare senza alcuna spinta. Se rifiuti o alghe vengono risucchiati dall’unità jet durante l’utilizzo, potrebbe verificarsi un effetto cavitazione, causando una riduzione di velocità. Senza la rimozione immediata dell’ostruzione, il motore subirà gravi danni a causa del conseguente surriscaldamento. Qual’ora si presentassero segni di ostruzione dovuti a sacchetti di plastica, alghe o cime, ecc. togliere il battello dall’acqua. Disattivare lo staccabatteria e rimuovere gli eventuali detriti dall’unità jet. Non effettuare ulteriori tentativi di mettere in moto un tender bloccato o ostruito poichè è possibile danneggiare il motore. In caso di difficoltà contattare il centro assistenza Williams più vicino. TRAINO Al fine di prolungare la vita del motore è molto importante, dopo l’utilizzo, ripulire il motore dall’acqua salata prima di metterlo a riposo. Non effettuare questa procedura ridurrà in modo significativo la vita dei componenti del motore del vostro tender. Non azionare l’accelleratore fuori dall’acqua. Il motore deve essere messo in moto prima che l’acqua sia inserita. Il rischio di allagamento del motore sussiste qualora l’acqua rimanga accesa dopo lo spegnimento del motore. 1. Togliere il tender dall’acqua tutti i giorni e lavare sia il battello che l’unità jet con acqua dolce. 2. Collegare l’innesto del kit lavaggio fornito di serie con il battello all’innesto maschio. 3. Accendere il motore ed immediatamente avviare l’immissione di acqua nel sistema. 5. Far cessare l’afflusso d’acqua. 6. Lasciare in moto il tender per non più di dieci secondi al fine di permettere l’espulsione di tutta l’acqua dal sistema di raffreddamento. Rimuovere l’innesto del kit lavaggio. 7. Controllare la sentina del battello per individuare eventuali residui di acqua. Rimuovere i tre tappi degli scarichi. ORMEGGIO Non lasciate il vostro tender ormeggiato per lunghi periodi perchè questo potrebbe causare la formazione di alghe e denti di cane con conseguente diminuzione nella qualità delle prestazioni. SPIAGGIA 1. Scarico pompa di sentina NON utilizzate il tender in meno di 0,50 m/2 ft di acqua poichè rifiuti o alghe potrebbero entrare nell’unità jet. NON giudare il tender fino alla spiaggia. Spegnere il motore prima dello spiaggiamento poichè potrebbero verificarsi gravi danni alla turbina ed al sistema di raffreddamento. 2. Scarico acqua per raffreddamento circuito chiuso Dopo lo spiaggiamento riportare il battello in acque profonde almeno 0,50 m/2 ft e far oscillare da un lato all’altro il tender varie volte al fine di rimuovere eventuali residui di sabbia dall’unità di aspirazione – Non eseguire correttamente questa manovra potrebbe provocare gravi danni all’unità jet. 3. Scarico vaschetta imbarco carburante ASSETTO Non sovraccaricare il battello con pesi eccessivi. A tutte le velocità prestate sempre attenzione all’assetto di navigazione e distribuite i pesi uniformemente. INFORMAZIONI GENERALI Utilizzate il tender con la dovuta cura ed a velocità consone alle condizioni del mare. Eseguire sempre un controllo generale delle condizioni tender e dei suoi componenti prima dell’utilizzo. Aderire al programma di manutenzione e servizio come imposto dal Manuale di Manutenzione. SPIE LUMINOSE Questa spia si illuminerà in presenza di un difetto nel sistema gestionale riscontrato dalla centralina interna del motore. SPEGNERE IMMEDIATAMENTE il motore e rivolgersi quanto prima al centro assistenza Williams più vicino. 3. SCARSA PRESSIONE DELL’OLIO Qualora questa spia si accendesse, SPEGNERE IMMEDIATAMENTE il motore e rivolgersi quanto prima al centro assistenza Williams più vicino. 5. Anodo su corpo pompa 6. Anodo su piastra per protezione gruppo idrogetto 2 4 8 7 6 7. Scarico ombrinale su pavimentazione di sinistra Il motore weber e’ un tipo di motore a coppa asciutta, con un serbatoio dell’olio separato. Quando il motore viene messo in moto l’olio pompato nel serbatoio. Dopo che il motore ha girato, l’olio tornera’ lentamente dalla tanica alla coppa. Il motore deve essere a Questa spia si accenderà qualora manchi il liquido refrigerante o in presenza di ostruzioni nel sistema di raffreddamento. 2. MALFUNZIONAMENTO DELL’ECU 4. Scarico ombrinale su pavimentazione di destra 3 1 5 8. Scarico ombrinale su pavimentazione frontale CONTROLLO LIVELLO OLIO 1. TEMPERATURA DEL MOTORE Dopo aver riavviato un motore “caldo” è normale che la spia resti accesa per almeno 30 secondi. Se la spia dovesse rimanere accesa per un tempo più lungo o dovesse attivarsi quando il motore si trova ad alti regimi, SPEGNERE IMMEDIATAMENTE il motore e controllare se vi è presenza di ostruzioni nel sistema di raffreddamento (detriti o sabbia nel sistema di aspirazione dell’acqua situato nel gruppo jet). 21 4. Lasciare in moto il tender per approssimativamente un minuto al fine di lavare via eventuali ostruzioni nel sistema di raffreddamento. ATTENZIONE: Sussiste il rischio di imbarco d’acqua. Sul tender è installata una valvola per il traino. La valvola deve essere posizionata su “CHIUSO” durante il traino e su “APERTO” durante l’utilizzo. L’errato utilizzo della valvola causerà seri danni al motore. Rivolgersi al Centro Assistenza Autorizzato Williams più vicino per gli accessori da traino. ITALIANO PROCEDURA DI LAVAGGIO MOTORE DOPO L’UTILIZZO ITALIANO 20 3 1 2 temperatura operativa prima che un livello esatto sia indicato sull’asticella. Il livello dell’olio dovrebbe essere segnalato tra MIN e MAX sull’asticella. Non inserire altri oggetti per controllare il livello dell’olio. Usate il giusto tipo di olio. Non fate traboccare l’olio. MAX 0.5 Ltr/0.53 qt US MIN SERVICE Il primo (ed estremamente importante) service del motore deve essere effettuato a 25 ore. In seguito il service deve essere effettuato ogni 50 ore o una volta l’anno (dipende da quale di questi due eventi si verifica prima). Consultare il vostro rivenditore autorizzato Williams per effettuare il service. Utilizzare come riferimento il manuale di servizio Williams per un controllo periodico del motore. Per ricambi ed accessori vi preghiamo di contattare un concessionario autorizzato Williams. 22 IL MOTORE IDENTIFICAZIONE FUSIBILI 23 Fuses located under helm station. 1. Presa 12 v: fusibile rosso/bianco – 25 amp 2. Interruttore dell’automatico pompa: fusibile rosso/blu – 7.5 amp 3. Luci di navigazione: fusibile arancione – 5 amp 3 1 1 2 3 4 5 4. Interruttore pompa di sentina: fusibile verde/rosso – 5 amp 2 5. Aspiratore: fusibile marrone – 7.5 amp CONTROLLO DEL CIRCUITO DEL CARBURANTE ATTENZIONE : circuito del carburante pressurizzato. Ispezionare il circuito per eventuali perdite ad intervalli regolari. Tutti gli elementi del circuito carburante funzionano sotto pressione (5 bar). Il circuito rimane pressurizzato anche lo spegnimento del motore. Deve essere prestata estrema attenzione nello scollegare i connettori durante la sostituzione del filtro benzina. Indossare occhiali prottettivi. Mantenersi lontani da qualsiasi fonte di calore. 10 6 ITALIANO 7 5 IL MANTENIMENTO DEL TENDER Al fine di assicurare al vostro tender un vita lunga ed al fine di mantenerlo affidabile e sicuro vi preghiamo di seguire queste semplici istruzioni per una manutenzione di routine. La Williams Performance Tender Ltd non può accettare alcuna responsabilità per danno o infortunio causati da una scorretta manutenzione del mezzo o da un improprio intervento sullo stesso effettuati dal proprietario. 1. Ripristinare il livello di grasso ogni. 2. Controllare il livello di olio nel motore. 3. Controllare il livello del liquido di raffreddamento. 9 4. Lavare abbondantemente attraverso il raccordo il sistema di raffreddamento assicurandosi che non sia ostruito. 1. Pompa e sensore livello benzina 6. Serbatoio olio 5. Applicare grasso marino di buona qualità contenente Teflon (ad es. Quicksilver 101) su tutti i cavi telecomandi sia sotto la consolle che sul gruppo idrogetto. 2. Raccordo ritorno carburante 7. Batteria 6. Controllare le sentine per individuare eventuale presenza di acqua, di olio o benzina. 3. Raccordo uscita carburante 8. Rinvio cavo acceleratore 7. Ingrassare leggermente l’asta della luce di navigazione telescopica utilizzando grasso bianco o simile. 4. Filtro benzina 9. Paraolio albero trasmissione 8. Controllare le condizioni dei due anodi sulla pompa. 5. Serbatoio del liquido di raffreddamento 10. Valvola per il traino 9. La perdita di pressione all’interno del tubolare non è insolita oltre le 24 ore. La temperatura esterna influisce notevolmente sulla pressione del tubolare. Controllare la pressione regolarmente. INVERNAGGIO INGRASSAGGIO PARAOLIO SU ASSE DI TRASMISSIONE L’ingrassaggio del paraolio sull’asse di trasmissione è eseguita da un’unità di ingrassaggio automatico. Controllare approssimativamente ogni 10 ore di moto il serbatoio del grasso. Usare grasso “Quicksilver Marine 2-4 C” o un equivalente prodotto resistente alle alte temperature e velocità per rifornire il serbatoio. Prestare attenzione a non superare il livello massimo indicato. Seguire il manuale di manutenzione Williams per effettuare le procedure di invernaggio. 9 ITALIANO 4 8 24 CESTITAMO NA VASEM ODABIRU WILLIAMS TURBOJET-a Ovaj prirucnik sastavljen je kako bi Vam olaksao rukovanje sa Vasim Turbojet-om te spojio sigurnost sa užitkom. Prirucnik sadrži opis brodske opreme zajedno sa uputama za rukovanje i održavanje istih. Molimo Vas, pažljivo procitajte upute te se upoznajte sa plovilom prije upotrebe. GENERALNI RAZMJESTAJ 1. Vodonepropusno spremiste 2. Bitva WILLIAMS Turbojet koristi vodeni jet pogon. Ukoliko Vam je ovo prvo plovilo ili niste upoznati sa njim, radi Vase osobne sigurnosti, dobro proucite prirucnik o rukovanju sa plovilom prije nego krenete upravljati sa njim. Vas zastupnik, mjerodavna pomorska institucija ili jedrilicarski klub Vas mogu savjetovati o osposobljavanju za voditelja brodice te Vas uputiti na nadležne instruktore. 3. Prednji podizaci Turbojet je visoko djelotvorno plovilo. Williams preporucuje minimalni standard osposobljenosti upravljanja plovilom RYA level 2 ili ICC – International certificate of compentency, (Hrvatski zakonodavac je propisao minimalnu osposobljenost upravljanja plovila – “Voditelj brodice kategorije B”). Ovaj prirucnik podrazumijeva da je vlasnik osposobljen za rukovanje plovilom te da je upoznat sa osnovama pomorstva. 6. Zadnji podizaci Molimo Vas, cuvajte ovaj prirucnik na sigurnom mjestu i predajte ga buducem vlasniku ukoliko prodate plovilo. 25 1 4. Otvor spremnika goriva (ispod sjedala) 2 5. Rucica stupnjeva vožnje 3 16 7. Kuka za povlacenje skijasa (ispod sjedala) 3 16 15 8. Svjetlo za vožnju 9. Key i kontakt prekidac (ispod sjedala) 12 4 10. Lijevo navigacijsko svjetlo 11. Desno navigacijsko svjetlo Identifikacijski broj trupa (HIN): 12. Spremiste (ispod sjedala) 10 11 13. 12v generator/uticnica 14. CE oznaka HRVATSKI J/T 285 T 325 T 385 T 445 Dužina 2.85m 3.30m 3.85m 4.45m Sirina 1.64m 1.68m 1.74m 1.96m Težina 260kg/286kg 296kg 340kg 395kg Visina 910mm 910mm 910mm 1.02m Brzina 40mph/48-52mph 48-52mph 48-52mph 45mph Goriva 41 Litara 41 Litara 60 Litara 70 Litara Sjedala 3+1 4+1 5+1 6+1 PODACI O MOTORU 15. Drenažni cepovi (jedan kod prednjeg i dva kod zadnjeg oslonca za noge) 5 16 16. Ventil za napuhavanje cijevi 18. Identifikacijski broj trupa (HIN) (ispod platforme) 14 17 13 8 7 19. Spojnica za ispiranje 18 KONTROLE I INSTRUMENT PLOCA Weber MPE 750cc turbo Maksimalna snaga 98hp/73kW at 7300rpm (66hp/50kW na 6300rpm) 2. Signalno svjetlo za nisku razinu ulja u motoru Gorivo Bezolovni benzin 95-98 RON 3. Pokazivac kolicine goriva Tip ulja OW50 to 15W50 potpuno sinteticko 4. Prekida! kaljužne pumpe Spremnik ulja 3.5 litre maksimalno 3 1 5 1. Brzinomjer i brojac rada motora 2 6 8 9 5. Brzinomjer 6. Lampica temperature ispuha 7. Navigacijska svjetla Kategorija C – “obalna”: Plovilo je dizajnirano za plovidbu u obalnim vodama, jezerima i uscima rijeka pri uvjetima plovidbe; vjetar snage do 6 i visina valova do 2 m. Ovo plovilo je napravljeno prema standardu ISO 6185-3. Broj trupa se nalazi iznad mlaznice odnosno ispod ukrcajne stepenice. Upisan je u servisni prirucnik. CE oznaka smjestena je na desnom osloncu za noge. CE oznaka je potvrda od strane European Directive 94/25/CE. 6 9 19 17. Sigurnosni ventil Motor KLASIFIKACIJA 16 6 HRVATSKI OPCI PODACI 8. Ozra!iva! motornog prostora 9. ECU lampica u slucaju kvara 10. Sigurnosna vezica 11. Osiguraci (motorni dio) 10 11 7 4 PUNJENJE GORIVA RUKOVANJE TENDER-om Kao sastavni dio inspekcije prije isporuke Vaseg Turbojet-a, plovilo je bilo voženo te je sadržaj goriva kompletno ispražnjen. Kod tocenja goriva koristite iskljucivo benzin 95-98 RON. Ovo plovilo koristi vodeni-jet pogon i ima jedinstvene karakteristike u upravljanju. Ventil prima potisak od jet pumpe, upravljanje je omoguceno otvaranjem ventila te zakretanjem osovine u stranu u koju vozac okrene volan. Veliki potisak okrenut ce plovilo brzo, mali potisak proizvodi manji okretni moment. Ne postoji kormilo tako da u vožnji bez potiska nije moguce kormilariti. Nakon vožnje tendera pri velikim brzinama, važno je motoru dopustiti na jednu minutu da radi na praznom hodu kako bi se turbo pogon ohladio te ga tek nakon toga ugasiti. Provjerite da je paljenje u OFF poziciji. Uklonite jastuke sa sjedala kako biste otkrili cep spremnika. Cep spremnika za gorivo otvara se kljucem. Tocite gorivo u prozracenom prostoru. Nemojte pretociti spremnik; pazite da ne prolijevate gorivo. Cep spremnika dobro zatvorite nakon tocenja goriva. Nakon tocenja goriva, podignite poklopac motora i provjerite kaljužu. Cep spremnika goriva ima integrirani odusnik. Nemojte polijevati vodom cep spremnika kako voda ne bi usla u spremnik. PRIJE UPOTREBE Pritisak u tubama može varirati s promjenom temperature. Napumpajte obe tube, jednu za drugom, na 250mB/3.6psi. Ukoliko nisu, to ce se odraziti na plovnost plovila kao i na njegovu otpornost odnosno cvrstocu. Ventili za napuhavanje su pricvrsceni sa cetvrt-okretnim zatvaracima kako bi onemogucili naglo ispuhivanje. Zatvorite ventile i napumpajte tube. Provjerite kaljužu da nije doslo do kontaminacije (mijesanja) goriva ili vode. Stegnite drenažne cepove. Provjerite da je kvaka na poklopcu motora osigurana. Ukoliko ima bilo kakvih naznaka da korov ili krhotine blokiraju jet obavezno izvadite plovilo iz vode. Iskljucite kontakt prekidac te ocistite svu necistocu sa jet jedinice. NE pokušavajte pokrenuti zaglavljeni ili blokirani !amac jer to moze prouzrociti kvar motora. U slucaju daljnjih problema kontaktirajte ovlastenog zastupnika. TEGLJENJE Postoji rizik potapanja motora. NE TEGLITI. Kontaktirajte ovlasteni servis za dodatni pribor. Ventil za tegljenje postavljen. Ventil mora biti u zatvorenoj poziciji za tegljenje i u otvorenoj poziciji za vožnju. Ako se ne pridržava pravilna pozicija ventila, rezultat može biti ozbiljno oštećenje na motoru. VEZ PLOVILA Ne ostavljajte Turbojet predugo vezanog u vodi jer to može doprinijeti nakupljanju algi i skoljaka na podvodnom dijelu trupa te time naskoditi maritimnim sposobnostima plovila. VOŽNJA U PLITKIM VODAMA Ne vozite na dubini manjoj od 0.5m/2ft jer bi krhotine mogle uci u jet jedinicu. NE VOZITE Turbojet po suhome. Zaustavite motor prije prelaska na suho jer može doci do kvara na pumpi za hladjenje motora. Nakon vožnje u plitkim vodama odvezite plovilo u dublju vodu te ga pod gasom okrecite u lijevu i desnu stranu nekoliko puta da odstranite pijesak sa usisnog dijela motora-ne ucinite li to moguc je kvar na jet motoru. STARTANJE TURBOJET-a Provjerite da se plovilo nalazi na najmanje 0,5 m dubine. 1. Ukljucite kontakt. TRIM Ne preopterecujte plovilo. 2. Pokrenite kaljužni ispuh da radi 4 minute. Pri svakoj brzini pazite na trim plovila te da sve težine budu podjednako rasporedjene. 3. Provjerite da konopi ne vise sa plovila kako se ne bi usisali u jet jedinicu. HRVATSKI 27 4. Provjerite da je mjenjac brzina u centralnoj/neutralnoj poziciji. 5. Povežite sigurnosnu vezicu sa prekidacem. UVIJEK se povežite sa sigurnosnom vezicom dok motor radi OPCENITO Upravljajte plovilom pažljivo i brzinom kojom uvjeti plovidbe to dozvoljavaju. Uvijek vizualno pregledajte plovilo i njegove sastavne dijelove prije upotrebe. Održavajte/servisirajte plovilo kako je opisano u priručniku. 6. Okrenite kljuc za paljenje dok motor ne starta. 7. Brojac okretaja motora ce se stabilizirati kad se motor zagrije. SIGNALNE LAMPICE 1. TEMPERATURA ISPUHA Ova ce se lampica upaliti ukoliko je dovod hladjenja prekinut. Nakon ponovnog startanja vec vruceg motora, normalno je da je lampica upaljena do 30-ak sekundi. Ukoliko je lampica upaljena i dalje ili se upali pri visim brojevima okretaja, ZAUSTAVITE motor te provjerite da li je doslo do blokiranja sistema za hladjenje (krhotine u pumpi/cijevima). 3 1 2. ECU KVAR 2 Ova ce se lampica upaliti ukoliko se dogodi kvar na motoru. Ukoliko dodje do toga, odmah ZAUSTAVITE motor i prijavite kvar ovlastenom servisu. 3. NIZAK TLAK ULJA 1. Kontakt prekidac 2. Prekidac kljucem 3. Kružni prekidač Ukoliko se ova lampica upali, ZAUSTAVITE motor i prijavite kvar ovlastenom servisu. 3 1 2 HRVATSKI 26 28 NAKON UPOTREBE: ISPIRANJ GENERALNI RASPORED MOTORA 29 Kako bi produžili vijek trajanja motora turbojeta, jako je bitno da isperete motor od soli nakon upotrebe a prije skladistenja. Ne ispiranje motora može znatno stetiti dijelovima motora te njihovom vijeku trajanja. NE UKLJUCUJTE potisnik izvan vode. Motor mora raditi prije spajanja vode. Postoji rizik potapanja motora u slu!aju da voda ostane priklju!ena nakon gašenja motora. 1. Vadite plovilo svaki dan iz vode te ga isperite zajedno sa jet pumpom koristeci slatku vodu. 3 1 2. Priključite dovod slatke vode sa ženskim priključkom kojeg ste dobili sa tenderom te ga spojite na spojnicu za ispiranje kraj sjedala za vozača. 2 3. Startajte motor te odmah ukljucite dovod slatke vode. 4. Pustite motor da radi oko 1 minute kako bi se prsten sistema za hladjenje kompletno isprao. 5. Zatvorite dovod slatke vode. 6. Ostavite motor da radi ne vise od 10 sekundi kako bi se sva voda iscijedila iz sistema za hladjenje te onda ugasite motor. Uklonite crijevni prikljucak sa razvodne spojke. 7. Provjerite kaljuže te posusite ostatak vode u njima. Uklonite drenažne cepove. 4 1. Kaljužni odusak 2. Otvoren dovod hladjenja 3 1 3. Sigurnosni ventil goriva 8 7 2 10 6 5 4. Desni drenažni cep 5. Pumpa anode 6. Spojnica vozne ploce HRVATSKI 8. Prednji drenažni cep 4 8 7 6 9 5 PROVJERA NIVOA ULJA U MOTORU Weber motori su motori sa tzv. “suhom posudom”, što znači da imaju zaseban spremnik ulja. Kada se motor pokrene, ulje se ubrizgava u spremnik. Dok motor radi, ulje će se nakon nekog vremena lagano vratiti iz spremnika u posudu. Motor mora postići radnu temperaturu da bi se se uz pomoćmetalne šipke izmjerio točan nivo ulja u motoru. Prilikom mjerenja nivo ulja mora biti izmed̄u MIN i MAX na metalnoj šipki. Nemojte zašarafiti poklopac na vrhu da biste provjerili nivo ulja. Koristite optimalnu količinu ulja,nemojte prepunjavati. Ne pas trop remplir. MAX 6. Spremnik ulja 2. Povrat goriva 7. Akumulator 3. Potisnik goriva 8. Spojnica potisnika 4. Filter goriva 9. Osovina brtve 5. Zatvoreni prsten spremnika za hladjenje 10. Ventil za tegljenje 0.5 Ltr/0.53 qt US MIN SERVIS Nakon obveznog nultog servisa, preporuča se servis nakon 25 sati rada motora. Nakon toga, preporuča se servis svakih 50 sati rada motora ili jednom godišnje. Konzultirajte Vašeg Williams zastupnika vezano uz servis. Proučite Williams priručnik vezano uz održavanje motora. Za narudžbu rezervnih dijelova, kontaktirajte Vašeg Williams zastupnika. 1. Pumpa i pokazivac nivoa goriva HRVATSKI 7. Lijevi drenažni cep PODMAZIVANJE BRTVE OSOVINE Podmazivanje osovine je automatsko. Provjeriti rezervoar os sistema podmazivanja svakih 10 sati. Koristiti Quicksilver marine 2-4-C mast, ili istu mast po specifikaciji. Pripaziti da sistem ne bude na prevelikom tlaku. NE PREPUNJAVATI PREKO OZNAČENOG MAXIMUMA. 9 30 OSIGURACI HERZLICHEN GLÜCKWUNSCH ZU IHRER WAHL EINES WILLIAMS TURBOJET TENDER Osiguraci su smjesteni ispod upravljacke konzole. 1. 12v socket: crveno/bijela žica – 25 amp Dieses Benutzerhandbuch wurde verfasst um Sie darin zu unterstützen, Ihren Williams Turbojet Tender sicher und mit Freude bedienen zu können. Der Inhalt wird Sie vertraut machen mit den Details zum Boot sowie der montierten Ausrüstung, und liefert Informationen über die Bedienung und Wartung. Bitte lesen Sie das Handbuch mit Aufmerksamkeit und machen Sie sich vor der Benutzung mit dem Boot vertraut. 2. Prekidac kaljužne pumpe: crveno/plava žica – 7.5 amp 3. Prekidac kaljužne pumpe: zeleno/crvena žica – 5 amp 4. Navigacijska svjetla: narancasta žica – 5 amp 5. Ispuh: smedja žica – 7.5 amp 31 1 2 3 4 5 PROVJERA SISTEMA GORIVA UPOZORENJE-sistem goriva pod tlakom. Provjeriti da li ima curenja na sistemu prilikom servisa. Svi dijelovi sistema goriva rade pod pritiskom od (5 bar). Sistem ostaje pod pritiskom nakon gašenja motora. Mora se posvetiti velika pažnja kad se vade konektori prilikom izmjene filtera. Nositi zaštitne naočale. Pripaziti na vanjske utjecaje koji mogu rezultirati požarom. ODRŽAVANJE Kako bi ste osigurali da Vas tender bude siguran i pouzdan, molimo Vas postujte ove odredbe održavanja Williams nece prihvatiti odgovornost za stete nastale nestrucnim rukovanjem ili nepravilnim postavljanjem od strane vlasnika plovila. Der Williams Turbojet Tender wird mittels Wasserstrahl angetrieben. Falls dies Ihr erstes Boot ist oder falls Sie auf einen Ihnen unbekannten Bootstyp wechseln, bitten wir Sie im Interesse Ihrer eigenen Sicherheit, dass Sie sich vor Kommandoübernahme des Boots eine gewisse Erfahrung hinsichtlich der Handhabung und Bedienung aneignen. Ihr Händler oder Yacht Club wird Sie gerne an eine nautische Schule oder an einen kompetenten Einweiser verweisen. Der Turbojet Tender ist ein Hochleistungsboot. Bevor Sie dieses Boot führen empfiehlt Williams dem Bootsbediener einen Mindestausbildungsstandard zu erlangen der vergleichbar ist mit dem RYA Schein, Stufe 2 oder des ICC (International certificate of competency). Bei Nutzung der Turbojet Tender gelten jedoch generell die länder-spezifischen Voraussetzungen des jeweiligen Landes (z. B. Sportbootführerschein für Binnengewässer/offene See/Bodenseeschifferpatent, etc.) Dieses Handbuch setzt voraus, das der Bediener sich diesen Qualifikationsstandard angeeignet hat und über Basiswissen der Seemannschaft verfügt. Bitte bewahren Sie dieses Handbuch an einem sicheren Ort auf und reichen Sie es mit dem Verkauf oder der Weitergabe des Boots an den neuen Eigentümer weiter. Rumpf ID.Nr. (HIN): 1. Promjeniti rezervoar za automatsko podmazivanje i nadopuniti ako potrebno. 3. Provjerite nivo hladjenja. ALLGEMEINE TECHNISCHE DATEN J/T 285 T 325 T 385 T 445 Gesamtläng 2.85m 3.30m 3.85m 4.45m Breit 1.64m 1.68m 1.74m 1.96m Gewicht, trocken 260kg/286kg 296kg 340kg 395kg Gesamthöh 910mm 910mm 910mm 1.02m Geschwindigkeit 40mph/48-52mph 48-52mph 48-52mph 45mph Kraftstoff Fassungsverm 41 Liter 41 Liter 60 Liter 70 Liter Sitzplätze 4+1 5+1 6+1 4. Isperite otvoreni prsten sistema za hladjenje. 5. Koristite kvalitetno mazivo koje sadrži Teflon (Quicksilver 101) za podmazivanje kontrolnih kabela i pumpe. 6. Provjerite kaljuže zbog prodora vode i kontaminacije ulja ili goriva. HRVATSKI 7. Premažite polove navigacijskih svjetala koristeci bijelu mast ili njoj slicnu. 8. Provjerite stanje anoda kod dvije pumpe. 9. Pad tlaka u tubama nakon 24 sata nije neuobicajeno. Vanjska temperatura i tlak ce se odraziti na tlak u tubama. Provjerite tlak. ZIMSKO CUVANJE PLOVILA Obratite se ovlastenom Williams servisu za upute o zimskom cuvanju plovila. 3+1 TECHNISCHE DATEN, MOTOR Motor Weber MPE 750 cc Turbo Max. Leistung 98hp/73kW bei 73001/min (66hp/50kW bei 6300rpm) Kraftstoff Unverbleites Benzin, 95-98 OZ Ölgüte OW50 bis 15W50, vollsynthetisch Ölmenge 3.5 Liter (max.) KLASSIFIZIERUNG Kategorie C – “Küste”: Das Boot ist ausgelegt für Fahrten in Küstengewässer, großen Buchten, Mündungen, Seen und Flüssen, mit Bedingungen bis zu und einschließlich Windstärke 6 und Wellenhöhen bis zu und einschließlich 2 m. Dieses Boot erfüllt die Bedingungen von ISO 6185-3. Die Rumpf ID. Nr. (HIN) befindet sich über der Strahldüse, unterhalb der Hecktreppe. Notieren Sie die ID. Nr. ins Service Handbuch. Das CE Schild befindet sich im Steuerbord-Fußraum. Das CE Schild ist das Zertifikat zur Europäischen Richtlinie 94/25/CE. DEUTSCH 2. Provjerite nivo ulja u motoru (vidi poglavlje PROVJERA ULJA). 32 ANORDNUNG DER KOMPONENTEN BETANKUNG Im Rahmen der Inspektion vor der Auslieferung wurde der Motor Ihres neuen Turbojet Tender betrieben und der Kraftstoff abgelassen. Zur Betankung ist ausschließlich unverbleites Benzin (OZ 95-98) zu verwenden. 1. Wasserfester Stauraum 2. Verzurrklampe Vergewissern Sie sich, dass der Zündungsschalter auf Position AUS (OFF) ist. 1 3. Anhebepunkte, vorne 4. Kraftstoffeinfülltrichter (unterhalb vom Sitz) Entfernen Sie das Sitzpolster um Zugang zu dem Kraftstoffeinfülltrichter zu erhalten. Entfernen Sie den Tankdeckel mit dem bereitgestellten Schlüssel. 2 Achten Sie auf ordnungsgemäße Belüftung beim Betanken. Überfüllen Sie den Tank nicht; achten Sie darauf, dass kein Kraftstoff verschüttet wird. 5. Gas-/Schalthebel 6. Anhebepunkte, hinten 3 16 7. Ski Schleppeinrichtung (unterhalb vom Sitz) 3 Bringen Sie nach dem Betanken den Tankdeckel wieder sicher an. 16 Öffnen Sie nach dem Betanken die Motorluke und inspizieren Sie die Kielräume. 15 Der Tankdeckel verfügt über eine integrierte Belüftung. Richten Sie auf keinen Fall den Wasserstrahl (z. B. beim Abspritzen mit Wasserschlauch) in Richtung des Kraftstoffeinfülltrichters, da gegebenenfalls Wasser in den Kraftstofftank eindringen könnte. 8. Positionslampe 9. Schlüsselschalter und Batterietrennschalter (unterhalb vom Sitz) 12 VOR DER VERWENDUNG 4 10. Hafennavigationslicht Der Luftdruck in den Schläuchen, ändert sich in Abhängigkeit von der Umgebungstemperatur. Der Luftdruck in den Schläuchen sollte 250mB/3,6psi nicht überschreiten. Die Nichteinhaltung des vorgegebenen Luftdrucks beeinflusst die Seetüchtigkeit und die Wasserdichtigkeit Ihres Bootes. Zum Ablassen der Luft sind die Schlauchfüllventile sind mit ¼ Umdrehung Schließmechanismen ausgestattet. 11. Navigationslicht, Steuerbord 12. Stauraum (unterhalb vom Sitz) 10 11 13. 12 V Zusatzsteckdose für Strom/ Aufladung 5 14. CE Zertifikationsschild 15. Ablaufstopfen (einer im vorderen Fußraum und jeweils einer in den hinteren Fußräumen) 33 Stellen Sie die Ventile auf „zu“ (shut) und füllen Sie die Schläuche gleichmäßig auf 0,2 bar (2,9 psi). 16 6 6 9 14 19 16. Schlauchfüllventile 17. Überdruckventil 16 Prüfen Sie den Kiel auf etwaige Kraftstoff- oder Wasserverschmutzung. 17 Prüfen Sie den festen Sitz der Ablaufstopfen in den Fußräumen. Prüfen Sie den festen Sitz der Motorhaubenverschlussbügel. 13 STARTEN IHRES TURBOJET TENDERS 8 18. Rumpf ID Nr. (HIN) (unterhalb der Plattform) Vergewissern Sie sich, dass das Boot sich in einer Mindestwassertiefe von 0,5 m/2 ft befindet. 7 18 19. Spüleinrichtung 1. Schalten Sie den Batterietrennschalter auf an. 2. Lassen Sie das Kielgebläse für 4 Minutes laufen. 3. Befestigen sie lose Leinen/Seile/etc., die in die Jet Einheit gesaugt werden könnten. 4. Vergewissern Sie sich, dass der Schalthebel sich in der mittleren Position befindet. 5. Verbinden Sie die Kordel mit dem Motoren-Sicherheitsabschalter. Bei laufendem Motor müssen Sie IMMER über die Kordel mit dem Sicherheitsabschalter Motor verbunden sein! STEUERELEMENTE UND INSTRUMENTENGRUPPE 3 1 6. Drehen Sie den Zündschlüssel bis der Motor startet. 7. Die Motorendrehzahl wird automatisch begrenzt bis der Motor auf Betriebstemperatur ist. 5 1. Tachometer und Stundenzähler 2 6 3. Kraftstoffanzeiger 4. Schalter Kielpumpe 8 9 5. Geschwindigkeitsmesser 3 4 1 6. Abgastemperaturlicht 2 7. Navigationslicht 8. Schalter Kielgebläse 11 7 DEUTSCH DEUTSCH 2. Warnlampe, Öldruck niedrig 10 9. ECU Störungsanzeige 10. Schalter für Sicherheitsabschaltung Motor 11. Sicherungen (Motorraum) 1. Batterietrennschalter 2. Schlüsselschalter 3. Sicherung BETRIEB DES TENDERS Dieses Boot wird über ein Wasserstrahlsystem angetrieben und verfügt über einzigartige Lenkeigenschaften. Der Schub wird über die Strahlpumpe (Jetpumpe) erzeugt; die Lenkrichtung wird durch Öffnen der Drossel (Gas geben) und Drehen des Lenkrads in die gewünschte Drehrichtung, erzeugt. Bei hohem Schub können scharfe Kurven gefahren werden; bei niedrigem Schub wird eine geringere Drehfreudigkeit erzeugt. Ein Steuerruder gibt es nicht, von daher können Sie auf Fahrt nur mit Schub die Richtung wechseln. Falls sich Seegras, Verschmutzungen, etc. bei der Benutzung in der Strahleinheit verfangen kann dies zu Kavitation führen, was wiederum zu einer Schubverminderung führt. Wenn dieser Zustand beibehalten und nicht abgestellt wird, kann der Motor überhitzen und zu ernsthaften Schäden führen. Bei etwaigen Anzeichen davon, dass Verschmutzung, Seegras, Tang, etc. den Strahl blockieren, ist das Boot umgehend aus dem Wasser zu nehmen. Schalten Sie den Batterietrennschalter um (trennen) und entfernen Sie etwaige Verschmutzungen im Strahlbereich. Vermeiden Sie Startversuche wenn der Anrieb ihres Jet Tenders blockiert ist. Ein Schaden am Antriebsstrang / Motor könnte die Folge sein. Bei Schwierigkeiten oder Problemen, wenden Sie sich an einen autorisierten Williams Händler. SCHLEPPEN Nach Anlegen am Strand, schieben Sie das Boot in tieferes Wasser und schwenken es mehrere Male von Längsseite zu Längsseite um etwaigen Strandsand aus dem Ansaugbereich zu entfernen. Wird dies unterlassen oder versäumt, können an der Strahleinheit Schäden entstehen. 2. Open-Loop Kühlwasserüberlauf 3 1 3. Kraftstoffüberlauf 2 4. Fußraumablauf, rechts hinten 5. Anode der Pumpe TRIMM 6. Anode der Fahrtplatte Überladen Sie das Boot nicht. Beachten Sie bei allen Geschwindigkeiten den Trimm Ihres Boots und sorgen Sie stets für eine gleichmäßige Gewichtsverteilung. 7. Fußraumablauf, links hinten ALLGEMEIN Betreiben Sie das Boot mit gebührender Sorgfalt und bei Geschwindigkeiten, die den Bedingungen des jeweiligen Wassers angemessen sind. Führen Sie vor der Verwendung stets eine Sichtprüfung des Boots und seiner Komponenten durch. Halten Sie sich an den Wartungs-/Service Plan gemäß den Vorgaben im Service Handbuch. 4 8 7 8. Fußraumablauf, vorne 6 5 ÖLSTAND PRÜFEN WARNLAMPEN 1. ABGASTEMPERATUR DEUTSCH 3. Starten Sie den Motor und schalten die Wasserzufuhr sofort an. 1. Kielwasserablauf Betreiben Sie Ihren Turbojet Tender NICHT wenn die Mindestwassertiefe unterhalb von 0,5 m/2 ft ist; Verschmutzung kann in die Strahleinheit gelangen. Schalten Sie den Motor aus, bevor sie auf den Strand fahren. Der Jetantrieb sowie das Motorenkühlsystem könnten beschädigt werden. Bei Aufleuchten, schalten Sie den Motor ab und wenden Sie sich an einen autorisierten Williams Händler. 2. Verbinden Sie einen Frischwasserschlauch (mit dem zum Tender mitgelieferten Schlauchkupplungselem ent) an die Schlauchkupplung. 7. Kontrollieren Sie den Kielraum des Bootes und trocknen etwaiges Restwasser. Entfernen Sie alle Ablaufstopfen in den Fußräumen. ANLEGEN AM STRAND/UFER 3. NIEDRIGER ÖLSTAND 1. Nehmen Sie das Boot täglich aus dem Wasser und waschen/spülen Sie das gesamte Boot/Strahlpumpe mit Frischwasser. 6. Lassen Sie nun den Motor für höchsten 10 Sekunden laufen um alles Wasser aus dem Kühlsystem zu entfernen; dann schalten Sie den Motor aus. Entfernen Sie das Schlauchkupplungselement von der Schlauchkupplung im Heckbereich. Lassen Sie Ihren Turbojet Tender nicht für längere Zeiträume angelegt, da dies zur Akkumulation von z. B. Meeresflora, und somit zum Leistungsverlust, führen kann. Diese Lampe leuchtet auf bei Störungen mit dem MotorenManagement System. Bei Aufleuchten, schalten Sie den Motor ab und wenden Sie sich an einen autorisierten Williams Händler. Um die Motorlebensdauer zu verlängern ist es sehr wichtig, nach der Benutzung und vor der Lagerung, etwaiges Salzwasser vom Motor zu spülen. Unterlassung des Spülens führt zu einer beträchtlichen Lebensdauerkürzung der Motorkomponenten. Betätigen Sie den Gashebel NICHT wenn der Turbojet Tender außerhalb vom Wasser ist. Starten Sie erst den Motor bevor Sie das Wasser aufdrehen. Bevor der Motor abgestellt wird, muss erst das Wasser abgestellt werden da sonst Wasser in die Brennräume des Motor gelangen kann. 5. Schalten Sie die Wasserzufuhr aus. ANLEGEN 2. ECU STÖRUNG 35 4. Betreiben Sie den Motor für ca. 1 Minute im Leerlauf um das Open-Loop Kühlsystem komplett zu spülen. Es besteht die Gefahr den Motor mit Wasser zu füllen. Ein spezielles Ventil wurde hierfür eingebaut. Wird der Tender geschleppt, muss das Ventil in die CLOSED Position verstellt werden. Für den Fahrbetrieb muss das Ventil wieder auf die OPEN Position verstellt werden. Eine falsche Stellung des Ventils kann zu Motorschäden führen. Diese Warnlampe leuchtet auf bei begrenzter Open-Loop Kühlwasserzufuhr. Nach erneutem Starten des heißen Motors ist es normal, dass diese Lampe bis zu 30 Sekunden leuchtet. Leuchtet die Lampe länger als 30 Sekunden oder leuchtet sie auf wenn der Motor über Leerlaufdrehzahl ist, dann schalten Sie den Motor AUS und prüfen ob im Kühlsystem eine Einschränkung/Begrenzung vorliegt (Schmutz in Pumpe/Rohre). NACH DER BENUTZUNG: SPÜLPROZEDUR 3 1 2 Der Weber Motor ist ein Trockensumpfmotor mit separatem Öltank. Bei laufendem Motor, wird das Öl in den Öltank gepumpt. Wird der Motor abgestellt, läuft das Öl langsam in den Motor zurück. Der Motor muss betriebswarm sein um den Ölstand am Ölpeilstab ablesen zu können. Der Ölstand sollte zwischen MIN und MAX sein. Der Ölpeilstab darf zur Prüfung nicht eingeschraubt werden. Auf richtige Ölqualität achten. Den Motor nicht überfüllen. MAX 0.5 Ltr/0.53 qt US MIN WARTUNG Die wichtige erste Wartung nach dem Einfahren ist nach 25 Laufstunden erforderlich. Danach sind Wartungen stets nach 50 Laufstunden erforderlich oder einmal jährlich, je nach dem was zuerst eintritt. Wenden Sie sich für Wartungsmaßnahmen an Ihren autorisierten Williams Händler. Regelmäßige Wartungsmaßnahmen am Motor ersehen Sie in Ihrem Williams Service Handbuch. Für Ersatzteile und Zubehör kontaktieren Sie bitte Ihren autorisierten Williams Händler. DEUTSCH 34 36 ANORDNUNG DER BOOT SYSTEME SICHERUNGEN 37 Die Sicherungen befinden sich im Motorraum. 1. 12 V Steckdose: rot/weiße Leitung – 25 A 2. Schwimmerschalter Kielpumpe: rot/blaue Leitung – 7,5 A 3. Navigationsleuchten: orangenfarbige Leitung – 5 A 4. Schalter Kielpumpe: grün/rote Leitung – 5 A 3 1 5. Gebläse: braune Leitung – 7,5 A 2 1 2 3 4 5 PRÜFEN DES KRAFTSTOFFSYSTEMS Vorsicht das Kraftstoffsystem steht unter Druck. Das Kraftstoffsystem wird bei den vorgeschriebenen Serviceintervallen auf Dichtheit geprüft. Alle im System befindlichen Teile, sind mit einem Druck von ca. 5 bar beaufschlagt. Der Kraftstoffdruck ist auch nach abstellen des Motors noch im System vorhanden. Besondere Vorsicht ist daher beim Tausch des Kraftsofffilters geboten. Geeignete Schutzausrüstung sowie eine Schutzbrille ist zu tragen. Kein offenes Licht während der Arbeiten am Kraftstoffsystem. 4 8 7 10 6 5 ROUTINEMÄSSIGE WARTUNG Um lange Lebensdauer zu gewährleisten und zur sicheren und zuverlässigen Aufrechterhaltung des Tender, bitten wir Sie die Anweisungen der routinemäßigen Wartung einzuhalten. Williams übernimmt keinerlei Verantwortung für Schäden oder Verletzungen aufgrund falscher Wartung oder nichtsachgemäßer Einstellungen durch den Eigentümer. 1. Kontrollieren und ggf. Auffüllen der automatischen Schmierung für die Antriebswelle. 2. Kontrollieren Sie den Motorölstand. (Siehe Kapitel Motorölprüfung in diesem Handbuch). 3. Kontrollieren Sie den Kühlmittelstand. 9 4. Spülen sie das Open-Loop Kühlsystem. 6. Kontrollieren den Kiel auf eindringendes Wasser, Öl- oder Kraftstoff verschmutzungen. 1. Kraftstoffpumpe-Geber, Kraftstoffstand 6. Öltank 2. Kraftstoff Rücklauf 7. Batterie 7. Tragen Sie eine geringe Menge Fett (weiß) oder ähnlich an die ausfahrbare Halterung der Positionslampe auf. 3. Kraftstoff Zulauf 8. Gasgestänge 8. Kontrollieren Sie den Zustand der beiden Pumpenanoden. 4. Kraftstofffilter 9. Wellenabdichtung 5. Closed-Loop Kühlmittelausgleichsbehälter 10. Abschleppventil 9. Ein Druckverlust in den Schläuchen innerhalb von 24 Stunden ist nicht ungewöhnlich. Temperatur und Luftdruck können den Schlauchdruck beeinflussen. Kontrollieren Sie den Druck in den Schläuchen regelmäßig. WINTERLAGERUNG SCHMIERUNG DER ANTRIEBSWELLE Die Antriebswellenabdichtung wird durch eine automatische Schmiereinrichtung gewährleistet. Eine Überprüfung sollte jedoch nach ca. 10 Betriebsstunden erfolgen. Als Schmiermittel sollte Quicksilver 2-4-C Schmierfett oder ein vergleichbares Hochtemperaturfett verwendet werden. Beim nachfetten ist darauf zu achten das die Max. Markierung nicht überschritten wird. Informationen zur Winterlagerung ersehen Sie im Williams Service Handbuch. 9 DEUTSCH DEUTSCH 5. Schmieren Sie alle Kabelzüge im Motorraum und an der Pumpe mit hochwertigem, teflonhaltigem Marinefett ( z. B. Quicksilver 101). 38 ENHORABUENA EN TU ELECION DE UNA WILLIAMS TURBOJET PLAN GENERAL 1. Cofre de proa Este manual de usario ha sido creado para ayudarte en el uso del Turbojet para tu seguridad en tu tiempo de recreo. Contiene detalles sobre la embarcación y su equipamiento instalado, también contiene detalles sobre el manejo y el mantenimiento necesario. Por favor lee atentamente y familiarizarte con la embarcación antes de utilizarlo. El Williams Turbojet utiliza una turbina de agua para desplazarse. Si este es tu primer barco, o estas cambiando a un tipo de barco con el que no estas familiarizado, para tu seguridad, por favor asegurarte que sepas como maniobrar y obtener experiencia antes de operar tu embarcación. Tu proveedor, federación de vela o club marítimo estarán encantados de señalarte donde acudir para sacarte los títulos necesarios para operar la embarcación. 2. Cornamusa El turbojet es una embarcación de alto rendimiento. Williams recomienda como mínimo un titulo equivalente a un RYA Level 2 or ICC (Certificado de Competencia Internacional) antes de obtener el control de la embarcación. Este folleto entiende que antes de la compra de la embarcación ya hayas adquirido los títulos y experiencia necesaria. 8. Luz de navegación mástil Por favor guarda este folleto en un sitio seguro y entrégalo al nuevo propietario si vendes la embarcación. 39 3. Punto de elevación delantero 4. Depósito de carburante (debajo del asiento) 1 5. Mando de control 2 6. Punto de elevación trasero 7. Enganche de esquí (debajo del asiento) 3 16 9. Llave de contacto y interruptor principal de batería (debajo del asiento) 16 15 10. Luz de navegación de estribor 11. Luz de navegación de babor 12 12. Compartimiento de almacenaje (debajo del asiento) Numero de identificación del casco (HIN): 3 4 13. Cargador de batería 12 voltios 10 14. Certificación CE 11 15. Tapón de drenaje (uno delante y dos en trasero) ESPECIFICACION GENERAL 16. Válvula de inflación de aire J/T 285 T 325 T 385 T 445 17. Válvula de sobre presión de aire Eslora total 2.85m 3.30m 3.85m 4.45m Manga 1.64m 1.68m 1.74m 1.96m 18. Numero de identificación de casco (debajo del espejo) Peso del barco 260kg/286kg 296kg 340kg 395kg Altura 910mm 910mm 910mm 1.02m Velocidad 40 nudos + 40 nudos + 40 nudos + 40 nudos + Carburante 41 Litros 41 Litros 60 Litros 70 Litros Personas 3+1 4+1 5+1 6+1 ESPECIFICACION DEL MOTOR 5 16 16 6 6 9 14 19 17 13 19. Acoplamiento de enjuague 8 7 18 Motor Weber MPE 750cc Turbo 4 Tiempo CONTROLES Y PANEL DE INSTRUMENTOS Potencia Máxima 98hp/73kW a 7300rpm (66hp/50kW a 6300rpm) 1. Indicador – Tacómetro y cuenta horas Carburante Gasolina Sin Plomo 95-98 RON Viscosidad de aceite 0W50 a 15W50 sintético Capacidad de aceite 3.5 Litros Máximo 3 1 2 2. Luz – Testigo de presión de aceite baja 3. Indicador – Nivel de combustible 4. Interruptor – Bomba de sentina 5 6 8 9 5. Indicador – Velocidad/cuenta milla 11 7 4 CLASSIFICACION 7. Interruptor – Luces de navegación Categoría C – “aguas costeras”: La embarcación ha sido diseñada para navegar en aguas costeras, ríos y lagos, donde las condiciones pueden llegar a fuerza 6 de viento y olas de hasta 2 metros de altura. Este barco esta homologado según el ISO 6185-3. El numero de identificación del casco esta situado por arriba de la turbina de agua en el tablero trasero. Graba este número en el libro de mantenimiento. La placa del CE esta situado a la derecha del barco. La placa CE esta la certificación según la dirección normativa Europeo 94/25/CE. 9. Luz – Testigo de malfuncionamiento del ECU 8. Interruptor – Extractor de gases 10. Cinta de seguridad (Hombre en el agua) 11. Fusibles (adentro compartimiento de motor) 10 ESPAÑOL ESPAÑOL 6. Luz – Testigo de temperatura de escape 40 REPOSTANDO MANEJANDO SU EMBARCACION Como parte de la inspección de pre-entrega tu nuevo Turbojet ha sido arrancado y han vaciado el depósito de carburante. Sólo reposta con gasolina sin plomo 95/98 RON. Apagar el motor y quitar el contacto antes de repostar. Quitar el asiento para dar acceso al tapón del depósito de carburante. Hay una llave suministrado para ayudarte a abrir el tapón. Repostar en un área aireada y bien ventilada. No sobre llenar el depósito de carburante, evita derramar gasolina. Aprieta el tapón del depósito de carburante después de repostar. Abre la tapa del motor y comprobar fugas en las sentinas después de repostar. El tapón del depósito del carburante tiene su propio respiradero. No echar agua cerca del depósito de carburante, ya que puede caer agua dentro del depósito. ANTES DE USAR La presion de aire dentro de los tubos puede variar con las temperaturas de ambiente. Hay que inflar los tubos de aire en secuencia hasta 250mB/ 3.6 psi. Si no es así comprometes la habilidad de la embarcación en el agua y la seguridad del barco. Las válvulas de inflación están equipadas con un sistema de cuarto de vuelta para desinflar la embarcación rápidamente. Cierra las válvulas de aire y ten los flotadores inflados igualmente a 2.9psi (0.2bar). Comprueba la sentina para fugas de agua o gasolina. Aprieta los tapones de drenaje. Comprueba que los enganches de la tapa del motor estén seguras. ARRANCANDO/ENCENDIENDO TU TURBOJET Asegurarte de que haya un mínimo de profundidad de 0.5m/0.2ft de agua. 1. Conecta el interruptor principal de la batería. 41 Esta embarcación utiliza un sistema de propulsión de agua para desplazarse y tiene características únicas en el manejo. La aceleración del motor produce una fuerza de propulsión de agua en la turbina que empuja la embarcación, la dirección funciona cuando aceleras y giras el propulsor en la dirección deseada. Una gran aceleración hace que la embarcación gire rápidamente y una aceleración lenta hace que gire más despacio. La embarcación no tiene timón pues necesitas aceleración o fuerza para que la embarcación se mueva. Las algas, basura y otras cosas encontradas en el mar pueden dañar su turbina si se adentran en el, puede produzca cavitacion, causando una perdida de fuerza de empuje. Si esta condición pasara en un tiempo prolongado puede causar que el motor se sobrecaliente resultando en grandes daños al motor. Si hay indicios de algas, basura u otros residuos tapando la turbina, saca la embarcación del agua. Apaga el isolador de la batería y remueva todo el material que obstruye la turbina. NO trates de forzar el arranque del motor si la turbina esta bloqueada porque se puede dañar el motor. En caso de dificultad por favor ponte en contacto con tu distribuidor local de Williams. REMOLCANDO PRECAUCION: Hay riesgo de inundar motor. Hay una válvula de remolque. Esta válvula debe estar cerrada al remolcar y abierta mientras se utilizar el motor. Si no se observa las posiciones correctas de la válvula puede provocar grandes daños al motor. ATRACANDO No dejes tú Turbojet amarrado durante largas temporadas, ya que puede causar que algas crezca en el casco y puede causar en una pérdida de rendimiento. EMBARRANCANDO NO UTILIZAR en menos de 0.5m/2ft de profundidad, ya que algas y otras substancias pueden dañar la turbina. NO CONDUZCAS hasta la playa. Para el motor antes de llegar a la playa, ya que puedes dañar la turbina y sistema de refrigeración. Después de haber estado en la playa, mueve la embarcación a aguas mas profundas y mueve el casco de lado a lado para quitar cualquier rastro de arena o residuos que estén en la entrada de agua- si no se hiciera podrías dañar la turbina. NIVELANDO 2. Arranca el extractor de gases por 4 minutos. 3. Asegúrate que no hayan cabos sueltos que puedan interferir o entrar con la turbina. 4. Asegúrate de que estas en neutro/palanca de cambio en el medio. 5. Conecta la cinta de seguridad (hombre en el agua) con el interruptor. SIEMPRE abróchate la correa cuando el motor este en marcha. 6. Gira la llave de contacto hasta que el motor arranque. No sobrecargar la embarcación con peso. A cualquier velocidad estate atento y distribuye el peso equilibradamente. GENERAL Usa la embarcación con precaución y navega a la velocidad apropiada de acuerdo al estado de mar. Siempre realiza una inspección visual del barco y sus componentes antes de utilizarla. Sigue los planes de revisión según el libro de mantenimiento del fabricante. 7. Las revoluciones estarán limitadas automáticamente hasta que el motor se caliente. LUCES DE AVISO 1. TEMPERATURA DE ESCAPE Esta luz se encenderá si hay un bloqueo en el sistema de refrigeración abierto. Después de encender el motor cuando este caliente es normal que esta luz este encendida hasta 30 segundos. Si la luz sigue encendida después de 30 segundos, APAGA el motor e investiga el problema. Comprueba el sistema de refrigeración por restricciones. 1 ESPAÑOL 2 1. Isolador de bateria 2. Llave de contacto 3. Interuptor circuito 3 2. MALFUNCIONAMIENTO DEL ECU 1 Esta luz se encenderá si hay un problema con el sistema electrónico de control de motor. Si esta luz se ilumina APAGA el motor y contacta con tu distribuidor Williams. 2 3. PRESSION DE ACEITE BAJA Si esta luz se enciende, APAGA el motor y contacta con tu distribuidor Williams. ESPAÑOL 3 42 DESPUES DE USAR: PASANDO MOTOR POR AGUA DULCE DISTIBRUCION SISTEMA DE LA EMBARCACION 43 Para prolongar la vida del motor de tu Turbojet, es muy importante pasar tu motor por agua dulce después de haberlo usado y antes de almacenarlo. No realizar esta operación reduce la vida de tu motor. NO ACELERAR las revoluciones del motor fuera del agua. El motor debe estar arrancado antes de conectar el agua. Hay riesgo de inundar el motor si el agua sigue encendido despues de apagar el motor. 1. Varar la embarcación diariamente y lavar con agua dulce la embarcación y la bomba de turbina. 2. Conectar una manguera de agua con en conector macho suministrado con el barco e introducirla en el conector hembra instalado. 3 1 2 3. Arrancar motor y abrir inmediatamente el agua dulce. 4. Arrancar motor a relanti por aproximadamente 1 minuto para enjugar el sistema de refrigeración. 5. Apagar el agua dulce. 6. Dejar el motor arrancado por un periodo de no más de 10 segundos para vaciar toda el agua del sistema de refrigeración, Apagar el motor. Desconectar el conector en el tablero trasero. 7. Comprobar que la sentina este seca. Quitar tapones de drenaje. 1. Salida bomba de sentina 2. Salida de circuito refrigerante abierto 8 2 3. Desagüe de exceso de combustible 7 4. Desagüe tapón de drenaje bañera de estribor 6. Ánodo de protección del cuerpo de turbina 7. Desagüe tapón de drenaje bañera de babor 5 4 8 7 6 5 9 8. Desagüe tapón de drenaje bañera de proa COMPROBAR EL NIVEL DE ACEITE El motor Weber es de tipo “carta seca”, con deposito independiente de aceite. Cuando el motor esta arrancado el aceite de lubricación es bombeado al deposito independiente. Despues de apagar el motor, una cantidad cierta de aceite vuelve desde el deposito hasta la carta. MAXIMO El nivel correcto de aceite debe estar entre las marcas de minimo y maximo en la varilla. No hay que enroscar el tapon de la varilla para comprobar. Hay que elegir la viscosidad adecuada de aceite, según el fabricante. No sobrellenar. 1. Bomba/Flotador nivel combustible 6. Tanque de aceite 2. Tubo de retorno de combustible 7. Batería 3. Tubo de alimentación de combustible 8. Conexiones de mando de control 4. Filtro de combustible 9. Reten de eje/Prensaestopas 5. Deposito sistema de refrigerante cerrado 10. Válvula de remolque 0.5 Ltr/0.53 qt US Para controlar el nivel de aceite correcto en el motor, debe estar a una temperatura adecuada o normal para leer el nivel en la varilla. MINIMO SERVICIO: ESPAÑOL 10 6 Es importante que el primer servicio se realice a las 25 horas de su primer uso. De ahí en adelante es necesario realizar un servicio cada 50 horas o cada año, lo que venga primero. Contacta con tu distribuidor autorizado de Williams para el servicio. Consulta con el manual de servicio Williams para el mantenimiento periodico del motor. Para recambios y accesorios por favor contacta tambien con tu distribuidor autorizado de Williams. LUBRICACION DEL RETEN DEL EJE La lubricación del reten del eje se consigue mediante una unidad de engrase automática. Inspeccionar el nivel cada 10 horas de operación. Utilizar grasa marina Quicksilver 2-4-C o equivalente para llenar el depósito. Tener cuidado de no introducir demasiada presión en el sistema. No exceder el máximo. 9 ESPAÑOL 5. Ánodo de protección de turbina 4 3 1 44 IDENTIFICACION DE FUSIBLES WILLIAMS PERFORMANCE TENDERS LTD. 2008 LIMITED WARRANTY CERTIFICATE Los fusibles se encuentran debajo del control de mando. Williams Performance Tenders (“Williams”) undertake a PDI (pre-delivery inspection) on all new boats before shipment from factory. 1. Enchufe 12 voltios: Cable Rojo/Blanco – 25 Amperios following terms, conditions and limitations. Registration of Williams boat – Each Williams boat is supplied to the original customer 2. Interruptor automático bomba de sentina: Cable Rojo/ Azul – 7.5 Amperios 3. Luces de navegación: Cable naranja – 5 Amperios Williams will provide for repairs to their inflatable boats during the specific warranty periods provided herein, in accordance with the with a registration card. The limited Warranty contained herein shall not take effect and shall be deemed null and void unless the original owner submits a completed registration card to Williams Performance Tenders Ltd, Unit 2 Vogue Business Park, Berinsfield, 1 2 3 4 5 4. Bomba de sentina: Cable Rojo/Verde – 5 Amperios 5. Extractor de gas: Cable marrón – 7.5 Amperios Oxon OX10 7LN. UK within 30 days from the date of original registration. Williams approved dealers shall be entitled to store boats for a period of up to 6 months prior to registration provided that: a) The boats are stored in original packaging in accordance with Williams guidelines; b) Registration is recorded upon handover with delivery hours only. WARRANTY COVERAGE: Williams warrants to the original private purchaser of a properly registered craft that: a) All seams of the tubes, inflation valves, and COMPROBACION DEL SISTEMA DE COMBUSTIBLE ATENCION: Sistema de combustible presurizado. Inspeccionar el sistema, buscar fugas a intervalos programados. Todos los elementos del sistema de combustible funcionan bajo presión (5 bar) El sistema se mantiene presurizado incluso al apagar el motor. MUCHO CUIDADO debe tenerse cuando se quiten los conectores durante el cambio de filtros. Utilizar protección ocular. No exponer a llamas. the fabric used in the construction of the tube shall be free from defects in material and workmanship for a period of 3 years from the date of the original registration; b) The fabric of the tube shall be free from deterioration affecting serviceability (i.e. cracking, porosity, but not discolouration, fading or chaffing) for a period of 3 years from the date of the original registration; c) the fibreglass hull shall be free from defects in material and workmanship for a period of 1 year from the date of the original registration; d) all components fitted to the boat at the Williams factory or subsequently replaced under warranty shall be free from defects in material and workmanship for a period of 1 year from the date of the original registration. The warranty period for commercial use owners will be 4 months from the date of original registration. The obligation of Williams under this Limited Warranty is limited to repairing or replacing, as Williams may elect at its sole discretion, any parts that prove, in Williams’ sole judgement, to be defective in material or workmanship. THIS LIMITED WARRANTY SHALL BE THE ORIGINAL PURCHASER’S SOLE AND EXCLUSIVE REMEDY. INTERVALES DE MANTENIMIENTO WHAT IS NOT COVERED: Para asegurar una vida larga en servicio y para mantener tu embarcación segura y en una condición fiable, es necesario que sigas los siguientes pasos de mantenimiento. Williams no se hace responsable de los daños causados por no seguir el mantenimiento o mal ajuste llevado por el propietario. crazing, fading or blistering; c) Any damage to Williams boats due to negligence, accident, misuse, alteration, improper operation, 1. Engrasar retén de prensaestopas del eje cada 10 horas de uso con grasa Quicksilver marine 2-4-C o equivalente. Como guía, hay que dar dos bombeos con la pistola de engrase suministrada con la embarcación. Asegúrate de no sobre presionar la grasa en los retenes de la prensaestopas del eje. h) Williams boats purchased for commercial/governmental use; i) any work carried out on a Williams boat by an unauthorised 2. Comprobar nivel de aceite. 3. Comprobar nivel de refrigerante. This Limited Warranty shall not apply to: a) normal wear and tear; b) any minor boat damage, including but not limited to, gel coat collision, fire, theft, vandalism, riot, explosion, objects striking the boat, improper maintenance and storage; d) Any damage caused by towing a Williams boat, any damage caused by lifting or recovering a Williams boat; e) Tubes exposed to harsh or corrosive chemicals; f) any parts installed by anyone other than Williams factory personnel; g) any damage caused by after-market parts; service centre and/or without Williams’ prior approval; j) labour, freight, delivery, storage or other similar charges; k) defects caused or worsened by failure to adhere to the instructions concerning the treatment, maintenance and care of the boat; l) Damage caused by water ingestion. Sometimes equipment installed on a Williams boat (such as electronics) carry their own individual warranties provided by their respective manufacturers. In such cases any warranty claims regarding those parts must be directed to those manufacturers and not Williams. Williams reserves the right to make warranty coverage contingent upon proof of 4. Enjuagar con agua dulce el sistema de refrigeración abierto. proper maintenance. 5. Engrasar con grasa con teflón (Quicksilver 101 o equivalente) todos los cables de control. HOW TO OBTAIN WARRANTY REPAIR: 6. Comprobar sentina para fugas de agua, aceite, combustible u otro tipo de contaminación. Prior to any work being commenced on a Williams boat, the warranty claim must be approved in writing by Williams Performance 7. Lubricar el mástil de la luz de navegación retractable. Tenders Ltd. In order to obtain warranty repair approval, the original owner must send written notification, along with a copy of the 8. Comprobar estado de los dos ánodos de protección de la turbina. 9. La perdida de presión de aire en los flotadores de aire en un tiempo de 24 horas puede ser considerado normal. La temperatura y presión atmosférica puede influir en las presiones dentro de los flotadores de aire. Comprobar las presiones regularmente. bill of sale, and photograph depicting the damage and/or defect sought to be repaired to Williams Performance Tenders Ltd, Unit 2 Vogue Business Park, Berinsfield, Oxon OX10 7LN. U.K. If Williams finds that the specific defect and/or damage is covered under this Limited Warranty, Williams will advise the owner in writing where to send (via pre-paid freight) the boat or part(s) for repair or replacement. In many cases the local authorised Sales and Service Centre may be utilised for repairs. In others the boat or parts must be repaired by Williams personnel only. Williams does not assume any liability for any work performed on a Williams boat at an unauthorised Service Centre and/or without Williams’ prior approval. All parts replaced under this Limited warranty become the MANTENIMIENTO DE INVIERNO Mire su manual de servicio de Williams para los procesos de hibernación. property of Williams. MISCELLANEOUS: Williams does not authorise any person to create for it any other obligation or liability in connection with its boats. THIS LIMITED WARRANTY AND WILLIAMS’ OBLIGATION HEREUNDER IS IN LIEU OF ALL WARRANTIES EXPRESS OR IMPLIED, INCLUDING WITHOUT LIMITATION THE WARRANTIES OF MERCHANTABILITY AND FITNESS FOR A PARTICULAR PURPOSE. Williams will not be liable for any incidental or consequential damages resulting from breach of this limited warranty, including without limitation, loss of inflatable boat use, storage, payment for loss of time, inconvenience, boat rental expense, and local taxes required on warranty ESPAÑOL repairs. Williams reserves the right to alter models, change colours, specifications, materials, equipment, component parts, prices or cease production of certain models at any time without prior notice, and such changes, alterations, or cessation shall be made without Williams incurring any obligations to equip or modify inflatable boats produced prior to the date of such changes or alterations. This Limited Warranty shall be governed by and construed and enforced in accordance with UK Law.-
 1
1
-
 2
2
-
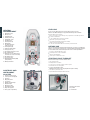 3
3
-
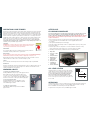 4
4
-
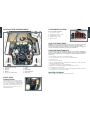 5
5
-
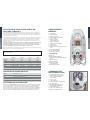 6
6
-
 7
7
-
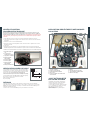 8
8
-
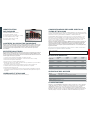 9
9
-
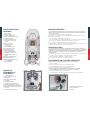 10
10
-
 11
11
-
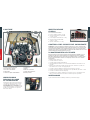 12
12
-
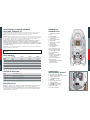 13
13
-
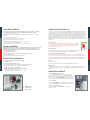 14
14
-
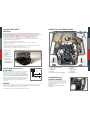 15
15
-
 16
16
-
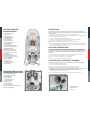 17
17
-
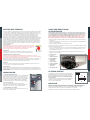 18
18
-
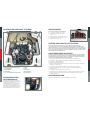 19
19
-
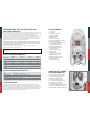 20
20
-
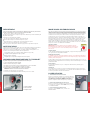 21
21
-
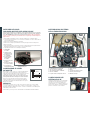 22
22
-
 23
23


Williams Turbojet T 385 Owner's Handbook Manual
- Tipo
- Owner's Handbook Manual
- Este manual también es adecuado para
en otros idiomas
- français: Williams Turbojet T 385
- italiano: Williams Turbojet T 385
- English: Williams Turbojet T 385
- Deutsch: Williams Turbojet T 385
Artículos relacionados
-
Williams Turbojet 325 Owner's Handbook Manual
-
Williams SportJet 460 Owner's Handbook Manual
-
Williams sportjet Owner's Handbook Manual
-
-
-
-
Otros documentos
-
Sea Ray 1991 LAGUNA 23 OUTBOARD El manual del propietario
-
 Plastimo P380HA El manual del propietario
-
sauermann SI61CE02UN23 El manual del propietario
-
CHERNE 270032 Manual de usuario
-
 JOHNSON PUMP - SPX FLOW 36152 Manual de usuario
-
Mercury 40 FourStroke Operation and Maintenance Manual
-
Rockwell A-B Quality 6185-F Quick Start

