
www
.
T
r
a
il
F
X
.
c
om
Page 1 of 7
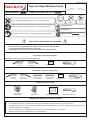
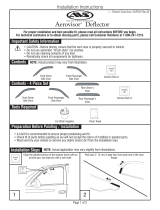
Tape On Style Window Vents
Part Numbers:
REMOVE CONTENTS FROM BOX. VERIFY ALL PARTS ARE PRESENT.
READ INSTRUCTIONS CAREFULLY BEFORE STARTING INSTALLATION.
30-60 min
CUTTING NOT
REQUIRED
DRILLING NOT
REQUIRED
support@trailfx.com
1 866 638 4870
LIMITED LIFETIME
RAM 1500 Quad Cab 2019 O
Rev R01;101620
PUTTY KNIFE MAY BE NEEDED FOR SPECIFIC APPLICATIONS.
Contents - 2 Piece Set
NOTE: Actual product may vary from illustration.
Tools Required
Car Wash Supplies Clear Towel Alcohol Pad
Adhesive Promoter
Front Passenger
Side Vent
Front Driver
Side Vent
Adhesive Promoter
Rear Passenger
Side Vent
Front Passenger
Side Vent
Front Driver
Side Vent Rear Driver
Side Vent Alcohol Pad
Contents - 4 Piece Set
K-520 Primer Adhesion Promoter
General Information
3M K520 is a type of adhesion promiting primer which
provides a superior adhesion( PP) etc...
Adhesive Promoter
K-520 Primer Adhesion Promoter
General Information
3M K520 is a type of adhesion promiting primer which
provides a superior adhesion( PP) etc...
K-520 Primer Adhesion Promoter
General Information
3M K520 is a type of adhesion promiting primer which
provides a superior adhesion( PP) etc...
Alcohol Pad
Alcohol
Pad
Alcohol
Pad
Alcohol
Pad
Important Safety Information
Before driving, ensure that the window vents are properly secured to vehicle.
Do not use automatic "brush style" car washes as window vents may accidentally be pulled off the vehicle.
Do not use cleaning solvents of any kind on the acrylic surface of the window vents to avoid accidental damage.
Periodically check the window vents to ensure they remain securely fastened to the vehicle.
Preparation Before Installation
Wash your vehicle to remove any dirt or grime from the area where the hood protector will be attached
and dry thoroughly with a clean towel.
Check fit of parts before painting as we will not accept the return of modified or painted parts.
A trial fit is recommended to ensure proper positioning and fit.

www
.
T
r
a
il
F
X
.
c
om
Page 2 of 7
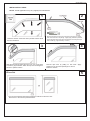
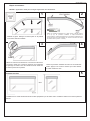
INSTALLATION STEPS
NOTE: Actual application may vary slightly from illustrations.
4 Piece Set
Slide the front flange behind the mirror cap, use a putty knife
to create a gap if needed. Attach the top and rear flanges to
the door’s painted surface.
Lower the window. Clean the door’s painted surface where
the visor will attach.
Remove tape liner by pulling on free ends. Apply
pressure to top and rear tape flanges to secure.
Raise the window.
The rear visor attaches with same preparation methods as the front visor.
Attach visor to the vehicle’s painted surface.
1
2
3
4
5
Rev R01;101620
K-520 Primer Adhesion Promoter
General Information
3M K520 is a type of adhesion promiting primer which
provides a superior adhesion( PP) etc...
Remove the tape liner from the rear flange. Peel back 2” of tape
liner from each end of top flange. Lightly apply adhesion promoter
to the tape area which has been exposed from removing the tape
liner and let dry ( approximately 1 minute )

www
.
T
r
a
il
F
X
.
c
om
Page 3 of 7
Tape On Style Window Vents
Part Numbers:
REMOVE CONTENTS FROM BOX. VERIFY ALL PARTS ARE PRESENT.
READ INSTRUCTIONS CAREFULLY BEFORE STARTING INSTALLATION.
30-60 min
CUTTING NOT
REQUIRED
DRILLING NOT
REQUIRED
support@trailfx.com
1 866 638 4870
LIMITED LIFETIME
RAM 1500 Quad Cab 2019 O
Rev R01;101620
PUTTY KNIFE MAY BE NEEDED FOR SPECIFIC APPLICATIONS.
Preparación antes de instalar o pintar
•Se recomienda realizar un ajuste de prueba para asegurar el posicionamiento y ajuste correctos.
•Compruebe que las piezas se ajusten correctamente antes de pintarlas, ya que no aceptaremos la devolución de
piezas modificadas o pintadas.
•Lave los canales de la ventanilla del vehículo para quitar los desechos y la suciedad.
•Seque los canales de la ventanilla con una toalla limpia.
Contenido - Juego de dos piezas
NOTA: El producto real puede variar de la ilustración.
Contenido - Juego de cuatro piezas
Herramientas necesarias
Promotora adhesiva
Visera del
conductor
Visera trasera
lateral izquierdo
Visera trasera
lateral derecho
Visera del
acompanante Pano esterilizado
Promotora adhesiva
Suministros de
lavado de autos Toalla limpia Almohadilla de alcohol Promotora adhesiva
Alcohol
Pad
Pano esterilizado
Alcohol
Pad
Alcohol
Pad
Visera del
conductor
Visera del
acompanante
K-520 Primer Adhesion Promoter
General Information
3M K520 is a type of adhesion promiting primer which
provides a superior adhesion( PP) etc...
K-520 Primer Adhesion Promoter
General Information
3M K520 is a type of adhesion promiting primer which
provides a superior adhesion( PP) etc...
K-520 Primer Adhesion Promoter
General Information
3M K520 is a type of adhesion promiting primer which
provides a superior adhesion( PP) etc...
Información importante de seguridad
• PRECAUCIÓN - Antes de conducir, asegúrese de que la visera deflectora esté correctamente anclada al vehículo.
• No utilice servicios automáticos de limpieza de vehículos que utilizan cepillos.
• No utilice limpiadores al solvente de ningún tipo.
• Compruebe periódicamente que todos los componentes estén ajustados.

www
.
T
r
a
il
F
X
.
c
om
Page 4 of 7
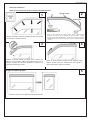
Pasos de instalación
Nota: El uso real puede variar levemente de ilustraciones.
Juego de cuatro piezas
Deslice el reborde frontal por detrás de la cubierta del
espejo. Si es necesario, utilice una espátula para crear el
espacio. Coloque los rebordes superiores y traseros a la
superficie pintada de la puerta.
Baje la ventanilla. Limpie la superficie pintada de la puerta
en donde se colocará la visera.
Retire la cinta protectora tirando de los extremos libres.
Aplique presión sobre los rebordes de cinta superior y
trasero para ajustar. Suba la ventanilla.
La visera trasera se coloca siguiendo los mismos pasos que para la visera frontal.
Coloque la visera sobre la superficie pintada del vehículo.
1
2
3
4
5
Rev R01;101620
K-520 Primer Adhesion Promoter
General Information
3M K520 is a type of adhesion promiting primer which
provides a superior adhesion( PP) etc...
Quite la cinta protectora del reborde trasero. Retire 2 pulgs. de cinta
protectora de cada uno de los extremos del reborde superior. Aplique
ligeramente el promotor de adhesión en el área de la cinta que ha quedado
expuesta al retirar el revestimiento de la cinta y deje secar (aproximadamente
1 minuto).

www
.
T
r
a
il
F
X
.
c
om
Page 5 of 7
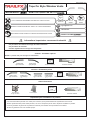
Tape On Style Window Vents
Part Numbers:
REMOVE CONTENTS FROM BOX. VERIFY ALL PARTS ARE PRESENT.
READ INSTRUCTIONS CAREFULLY BEFORE STARTING INSTALLATION.
30-60 min
CUTTING NOT
REQUIRED
DRILLING NOT
REQUIRED
support@trailfx.com
1 866 638 4870
LIMITED LIFETIME
RAM 1500 Quad Cab 2019 O
Rev R01;101620
PUTTY KNIFE MAY BE NEEDED FOR SPECIFIC APPLICATIONS.
Préparation pour l’installation / la peinture
•Il est recommandé de procéder à un essai pour s’assurer que le positionnement et l’ajustement sont corrects.
•Vérifier l’ajustement des pièces avant peinture, car nous n’acceptons pas le retour de pièces modifiées ou peintes.
•Laver les glissières de glaces de la portière du véhicule pour éliminer toute poussière et tous débris.
•Sécher les glissières avec une serviette propre.
• ATTENTION – Avant de conduire, s’assurer que la visière est solidement assujettie sur le véhicule.
• Ne pas utiliser les stations de lavage de voitures à brosses.
• Ne pas utiliser de solvants.
• Vérifier régulièrement le serrage des composants.
Informations importantes concernant la sécurité
Contenu - Ensemble 2 pièces
NOTE: Le produit réel peut changer de l’illustration.
Contenu - Ensemble 4 pièces
Outils nécessaires
Fournitures de
lavage de voiture
Serviette propre Tampon a 'alcool Promoteur adhésif
Alcohol
Pad
K-520 Primer Adhesion Promoter
General Information
3M K520 is a type of adhesion promiting primer which
provides a superior adhesion( PP) etc...
Promoteur adhésif
K-520 Primer Adhesion Promoter
General Information
3M K520 is a type of adhesion promiting primer which
provides a superior adhesion( PP) etc...
Alcohol
Pad
Tampons a l’alcool
Alcohol
Pad
Promoteur adhésif
K-520 Primer Adhesion Promoter
General Information
3M K520 is a type of adhesion promiting primer which
provides a superior adhesion( PP) etc...
Tampons a l’alcool
Visiere avant
cote conducteur
Visiere avant
cote conducteur
Visiere avant
cote passager
Visiere avant
cote passager
Visiere arriere
cote passager
Visiere arriere
cote conducteur

www
.
T
r
a
il
F
X
.
c
om
Page 6 of 7
Étapes d’installation
NOTE: L’application réelle peut changer légèrement des illustrations.
Ensemble 4 pièces
L’installation de la visière arrière demande la même préparation que la visière avant. Installer la visière sur la surface peinte du
véhicule.
Glisser le rebord avant derrière le couvercle de rétroviseur.
Au besoin, utiliser une couteau à mastiquer pour permettre
le passage du rebord. Fixer les rebords avant et arrière sur
la surface peinte de la portière.
Abaisser la glace. Nettoyer la surface peint de la portière
où la visière doit être installée.
Retirer la protection d’adhésif en tirant sur les extrémités
libres. Appuyer sur le haut et l’arrière pour faire adhérer
le ruban. Relever la vitre.
1
2
3
4
5
OU
Rev R01;101620
K-520 Primer Adhesion Promoter
General Information
3M K520 is a type of adhesion promiting primer which
provides a superior adhesion( PP) etc...
Retirer la protection d’adhésif de la patte arrière. Décoller environ
5 cm (2 po) de protection d’adhésif à chaque extrémité du
rebord supérieur. Appliquez légèrement le promoteur d'adhérence sur
la zone du ruban qui a été exposée en retirant la doublure du ruban
et laissez sécher (environ 1 minute).

www
.
T
r
a
il
F
X
.
c
om
Page 7 of 7 Rev R01;101620
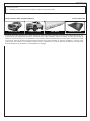
PRODUCT CARE
Periodically check the product to ensure all fasteners are tight and components are intact.
Check out these other TrailFX Products!! www.TrailFX.com
Keystone Automotive Operations Inc. (KAO) warrants this product to be free of defects in material and workmanship at the time
of purchase by the original retail consumer. KAO disclaims any other warranties, express or implied, including the warranty of
fitness for a particular purpose or an intended use. If the product is found to be defective, KAO may replace or repair the p roduct
at our option, when the product is returned prepaid, with proof of purchase. Alteration to, improper installation, or misuse of this
product voids the warranty. KAO’s liability is limited to repair or replacement of products found to be defective, and specif ically
excludes liability for any incidental or consequential loss or damage.
TONNEAU COVERSTEP BARSFENDER FLARESHOOD SHIELDS
-
 1
1
-
 2
2
-
 3
3
-
 4
4
-
 5
5
-
 6
6
-
 7
7


TrailFX 4809H Guía de instalación
- Tipo
- Guía de instalación
en otros idiomas
- français: TrailFX 4809H Guide d'installation
- English: TrailFX 4809H Installation guide
Artículos relacionados
Otros documentos
-
 Auto Ventshade Aerovisor Installation Instructions Manual
-
AutoVentshade 794008 El manual del propietario
-
AutoVentshade 56044096 El manual del propietario
-
-
-
AutoVentshade 94714 El manual del propietario
-
-
-
-
