Cuisinart DGB-1 Guia de referencia
- Categoría
- Cafeteras
- Tipo
- Guia de referencia

Single Cup Grind & Brew
™
Coffeemaker
Enjoy your cup of gourmet coffee!
QUICK REFERENCE GUIDE
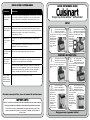
SETUP
Flush out the system before
using your coffeemaker:
Fill the reservoir with 16 oz.
of water. Place a 16-oz. cup on the drip
tray. Press the
Grind Off button.
Then press the
ON/OFF button.
Do not add
coffee. Discard
water.
Add water to the reservoir
depending on the amount
of coffee you’d like to brew.
Hint: Use the cup you are going to
brew your coffee
into.
Lift off the grinder cover
and ll grinder with
desired quantity of beans
(see recommendations in Instruction
Booklet). Replace
grinder cover,
and close
coffeemaker lid.
Pull out coffee lter
basket compartment,
remove cover, and place
the gold-tone lter or #2 paper lter
into basket.
NOTE: If using
pre-ground
coffee, add
to lter now.
Replace cover
and push
compartment
back into place.
Place the right size cup
on drip tray and press
Grind & Brew button to
begin brewing. Drip tray is removable
to accommodate
taller mugs.
NOTE: Press
GRIND OFF
before pressing
Grind & Brew if
using pre-ground
coffee.
Fully immerse the charcoal
water lter in cold tap water
and soak for 15 minutes (full
instructions in Instruction Booklet).
Remove lter
holder, place
soaked lter
into holder,
and insert
into water
reservoir.
BREWING INSTRUCTIONS
Para más consejos útiles, véase el manual de instrucciones.
RESOLUCIÓN DE PROBLEMAS
IMPORTANTE
No tire este folleto a la basura. Lea esta información antes de usar su nueva
cafetera por primera vez. Guarde esta información para futura referencia.
Estos útiles consejos complementan el manual de instrucciones. Para
lograr un rendimiento óptimo y una operación segura, lea el manual de
instrucciones.
1.
1. 2.
3. 4.
2.
Problema: Solución:
Los indicadores
luminosos están
parpadeando
Si la luz roja y la luz azul está parpadeando al mismo tiempo, esto indica
que es tiempo de eliminar los depósitos de sarro del sistema interno.
Véase las instrucciones en la página 8 del manual de instrucciones.
Las luces parpadean durante el ciclo de limpieza; esto es normal.
Nada ocurre al
presionar el botón
GRIND & BREW
Averigüe que la toma de corriente a la cual está conectada el cable está
funcionando. Puede que las piezas del molinillo no estén en su sitio.
Cerciórese que el depósito de café en grano y la tapa del molinillo estén
debidamente instalados, y que la tapa de la cafetera está
completamente cerrada.
El molinillo no
muele los granos
de café
Los granos de café están demasiado apretujados. No pase la línea
"MAX".
La opción GRIND OFF (sin molienda) está activada. Presione el botón
GRIND OFF otra vez para desactivarlo.
Hay residuos de
café sobre la tapa
del molinillo
Esto siempre ocurre después de moler café en granos. No afectará el
sabor del café siempre que prepare tazas consecutivas.
El café no está
suficientemente
fuerte o está
demasiado fuerte
Véase los consejos en la página 7 del manual de instrucciones. Ajuste
la cantidad de café a su gusto, pero nunca llene de depósito de café
con más de seis cucharadas o pase la línea MAX.
Si el conducto de salida del café molido está sucio, es posible que
residuos de café estén obstruyendo el flujo de café, haciendo que el
café sea menos fuerte que de costumbre. Cerciórese de limpiar el
conducto de salida del café molido cuando limpia el molinillo.
Siguen cayendo
gotas de café
después de final
de la preparación
Esto puede ocurrir con filtros de papel; es normal.

For more helpful hints see Instruction Booklet
TROUBLESHOOTING GUIDE
PG-32499ESP ©2014 Cuisinart
IMPORTANT
Do not throw these instructions away. Read before operating your
new brewing system. Keep for future reference.
These helpful hints are intended to be a supplement to the Instruction Booklet.
In order to ensure safe operation and optimum performance,
please read the entire Instruction Booklet.
Cafetera de una taza con molinillo incorporado Grind & Brew
™
¡Disfrute de su café gourmet!
GUÍA DE REFERENCIA RÁPIDA
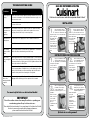
INSTALACIÓN
Antes de preparar café por
primera vez, limpie el sistema
interno de la cafetera: Llene del
depósito de agua con 16 onzas (475 ml) de
agua. Coloque una
taza grande sobre
la bandeja de
goteo. Presione el
botón GRIND OFF.
Después, presione
el botón ON/OFF.
No use café. Tire el
agua.
Agregue la cantidad deseada
del agua al depósito de agua,
dependiendo de la cantidad de
café que desea preparar.
Consejo: utilice la
taza en la cual va a
tomar café.
Abra el molinillo y llene éste
con la cantidad deseada de
café en grano (véase las
recomendaciones en el manual de
instrucciones).
Cierre la tapa del
molinillo y la tapa
de la cafetera.
Abra el compartimiento del
portafiltros, retire la tapa y
coloque el filtro dorado
permanente o un filtro de papel no. 2 en el
portafiltros.
NOTA: si usa café
molido, coloque el
café en el filtro
ahora. Cierre la
tapa y el
compartimiento del
portafiltros.
Coloque la taza sobre la
bandeja de goteo y presione
el botón GRIND & BREW para
empezar la preparación.
Retire la bandeja de
goteo para
acomodar tazas
grandes.
NOTA: para
preparar café con
café molido,
presione el botón
GRIND OFF.
Remoje el filtro de carbón en
agua fría durante 15 minutos
(véase las instrucciones en el
manual de instrucciones). Retire el soporte del
filtro del depósito de
agua, ensarte filtro
en el soporte y
regrese el soporte
en el depósito.
INSTRUCCIONES DE PREPARACIÓN
Problem: Solution:
Indicator lights are
flashing
If both red and blue indicator lights are flashing simultaneously, it is time
to clean the coffeemaker. See decalcification instructions on page 8 of
the instruction booklet.
If indicator lights are alternately flashing blue and red, your coffeemaker
is in the “clean” mode.
Pressed Grind &
Brew button, but
nothing is
happening
Check that the outlet you are using has power. The grinder assembly
may not be properly in place. Make sure the grinder and cover are
properly positioned, lid is fully closed and try again.
Coffeemaker not
grinding beans
Coffee beans are too tightly packed. Do not fill above Max Fill line.
Grind Off is selected. Press the button again to deselect.
Coffee residue
appears on lid of
grinder
This is normal and will occur each time you grind beans. It should not
affect coffee flavor when brewing consecutive cups.
Coffee is not
strong enough/too
strong
Our recommended coffee recipe is provided on page 7
of the instruction
booklet.
Tastes vary and you should adjust the proportions according to
your own preferences. Just be sure not to fill the grinder with more than
six scoops or above the Max Fill line.
If the chute on the coffee grinder is not cleaned, it is possible for it to
collect enough residue to inhibit the flow of coffee grinds into the filter
basket – this will make your coffee weaker than expected. Be sure to
clean the chute portion when cleaning the coffee grinder.
Coffee is dripping
after coffee
brewing should be
complete
If you are using a paper filter, it is possible for coffee to continue
dripping after the brewing cycle has completed – this is normal.
1.
1. 2.
3. 4.
2.
Transcripción de documentos
RESOLUCIÓN DE PROBLEMAS Problema: Los indicadores luminosos están parpadeando QUICK REFERENCE GUIDE Solución: Si la luz roja y la luz azul está parpadeando al mismo tiempo, esto indica que es tiempo de eliminar los depósitos de sarro del sistema interno. Véase las instrucciones en la página 8 del manual de instrucciones. Single Cup Grind & Brew™ Coffeemaker SETUP Las luces parpadean durante el ciclo de limpieza; esto es normal. Nada ocurre al presionar el botón GRIND & BREW Averigüe que la toma de corriente a la cual está conectada el cable está funcionando. Puede que las piezas del molinillo no estén en su sitio. Cerciórese que el depósito de café en grano y la tapa del molinillo estén debidamente instalados, y que la tapa de la cafetera está completamente cerrada. El molinillo no muele los granos de café Los granos de café están demasiado apretujados. No pase la línea "MAX". Hay residuos de café sobre la tapa del molinillo Esto siempre ocurre después de moler café en granos. No afectará el sabor del café siempre que prepare tazas consecutivas. El café no está suficientemente fuerte o está demasiado fuerte Véase los consejos en la página 7 del manual de instrucciones. Ajuste la cantidad de café a su gusto, pero nunca llene de depósito de café con más de seis cucharadas o pase la línea MAX. Siguen cayendo gotas de café después de final de la preparación Esto puede ocurrir con filtros de papel; es normal. La opción GRIND OFF (sin molienda) está activada. Presione el botón GRIND OFF otra vez para desactivarlo. 1. Flush out the system before using your coffeemaker: Fill the reservoir with 16 oz. of water. Place a 16-oz. cup on the drip tray. Press the Grind Off button. Then press the ON/OFF button. Do not add coffee. Discard water. 2. Fully immerse the charcoal water filter in cold tap water and soak for 15 minutes (full instructions in Instruction Booklet). Remove filter holder, place soaked filter into holder, and insert into water reservoir. BREWING INSTRUCTIONS Si el conducto de salida del café molido está sucio, es posible que residuos de café estén obstruyendo el flujo de café, haciendo que el café sea menos fuerte que de costumbre. Cerciórese de limpiar el conducto de salida del café molido cuando limpia el molinillo. 1. Add water to the reservoir depending on the amount of coffee you’d like to brew. Hint: Use the cup you are going to brew your coffee into. 3. Para más consejos útiles, véase el manual de instrucciones. IMPORTANTE No tire este folleto a la basura. Lea esta información antes de usar su nueva cafetera por primera vez. Guarde esta información para futura referencia. Estos útiles consejos complementan el manual de instrucciones. Para lograr un rendimiento óptimo y una operación segura, lea el manual de instrucciones. Pull out coffee filter basket compartment, remove cover, and place the gold-tone filter or #2 paper filter into basket. NOTE: If using pre-ground coffee, add to filter now. Replace cover and push compartment back into place. 2. Lift off the grinder cover and fill grinder with desired quantity of beans (see recommendations in Instruction Booklet). Replace grinder cover, and close coffeemaker lid. 4. Place the right size cup on drip tray and press Grind & Brew button to begin brewing. Drip tray is removable to accommodate taller mugs. NOTE: Press GRIND OFF before pressing Grind & Brew if using pre-ground coffee. Enjoy your cup of gourmet coffee! TROUBLESHOOTING GUIDE Problem: Indicator lights are flashing GUÍA DE REFERENCIA RÁPIDA Solution: If both red and blue indicator lights are flashing simultaneously, it is time to clean the coffeemaker. See decalcification instructions on page 8 of the instruction booklet. Cafetera de una taza con molinillo incorporado Grind & Brew™ INSTALACIÓN If indicator lights are alternately flashing blue and red, your coffeemaker is in the “clean” mode. Pressed Grind & Brew button, but nothing is happening Check that the outlet you are using has power. The grinder assembly may not be properly in place. Make sure the grinder and cover are properly positioned, lid is fully closed and try again. Coffeemaker not grinding beans Coffee beans are too tightly packed. Do not fill above Max Fill line. Grind Off is selected. Press the button again to deselect. Coffee residue appears on lid of grinder This is normal and will occur each time you grind beans. It should not affect coffee flavor when brewing consecutive cups. Coffee is not strong enough/too strong Our recommended coffee recipe is provided on page 7 of the instruction booklet. Tastes vary and you should adjust the proportions according to your own preferences. Just be sure not to fill the grinder with more than six scoops or above the Max Fill line. If the chute on the coffee grinder is not cleaned, it is possible for it to collect enough residue to inhibit the flow of coffee grinds into the filter basket – this will make your coffee weaker than expected. Be sure to clean the chute portion when cleaning the coffee grinder. Coffee is dripping after coffee brewing should be complete 1. Antes de preparar café por primera vez, limpie el sistema interno de la cafetera: Llene del depósito de agua con 16 onzas (475 ml) de agua. Coloque una taza grande sobre la bandeja de goteo. Presione el botón GRIND OFF. Después, presione el botón ON/OFF. No use café. Tire el agua. 2. Remoje el filtro de carbón en agua fría durante 15 minutos (véase las instrucciones en el manual de instrucciones). Retire el soporte del filtro del depósito de agua, ensarte filtro en el soporte y regrese el soporte en el depósito. INSTRUCCIONES DE PREPARACIÓN 1. Agregue la cantidad deseada del agua al depósito de agua, dependiendo de la cantidad de café que desea preparar. Consejo: utilice la taza en la cual va a tomar café. 2. Abra el molinillo y llene éste con la cantidad deseada de café en grano (véase las recomendaciones en el manual de instrucciones). Cierre la tapa del molinillo y la tapa de la cafetera. If you are using a paper filter, it is possible for coffee to continue dripping after the brewing cycle has completed – this is normal. 3. For more helpful hints see Instruction Booklet IMPORTANT Do not throw these instructions away. Read before operating your new brewing system. Keep for future reference. These helpful hints are intended to be a supplement to the Instruction Booklet. In order to ensure safe operation and optimum performance, please read the entire Instruction Booklet. PG-32499ESP ©2014 Cuisinart Abra el compartimiento del portafiltros, retire la tapa y coloque el filtro dorado permanente o un filtro de papel no. 2 en el portafiltros. NOTA: si usa café molido, coloque el café en el filtro ahora. Cierre la tapa y el compartimiento del portafiltros. 4. Coloque la taza sobre la bandeja de goteo y presione el botón GRIND & BREW para empezar la preparación. Retire la bandeja de goteo para acomodar tazas grandes. NOTA: para preparar café con café molido, presione el botón GRIND OFF. ¡Disfrute de su café gourmet!-
 1
1
-
 2
2


Cuisinart DGB-1 Guia de referencia
- Categoría
- Cafeteras
- Tipo
- Guia de referencia
en otros idiomas
- English: Cuisinart DGB-1 Reference guide
