Tripp Lite Aisle Containment System Guía de instalación
- Tipo
- Guía de instalación

1
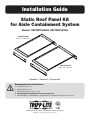
Installation Guide
Static Roof Panel Kit
for Aisle Containment System
Models: SRCTMTCVR600, SRCTMTCVR750
1111 W. 35th Street, Chicago, IL 60609 USA • tripplite.com/support
Copyright © 2019 Tripp Lite. All rights reserved.
Español 5 • Français 9 • Русский 13
SRCTMTCVR600
Width: 24” (600 mm)
SRCTMTCVR750
Width 30” (750 mm)
Recommended Installation Order:
1. SRCTMTFRM Frame Kit
2. SRCTMTTLBM Beam Kit
3. SRCTMTSDD Sliding Double-Door Kit
4. SRCTMTCVR600, SRCTMTCVR750 Static Roof Panel Kit
5. SRCTMTR600SH, SRCTMTR600TL, SRCTMTR750SH, SRCTMTR750TL Adapter Riser Panels

2
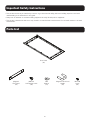
Important Safety Instructions
Parts List
• This product should only be installed by someone of good mechanical ability, with basic building experience and a full
understanding of the instructions in this guide.
• Always use an assistant or mechanical lifting equipment to safely lift and position equipment.
• This product is intended for indoor use only. Install in a controlled indoor environment. Do not install outdoors or in harsh
environments.
Roof Panel
(x1)
Magnetic
Filler Panel
(x2)
M6 x 12
Self-Tapping Screw
(x4)
M6
Washer
(x4)
Magnetic Filler Panel
Handle
(x4)
M4 x 10
Screw
(x8)

3
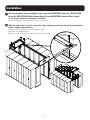
Installation
1
Before proceeding with installation, make sure the SRCTMTFRM Frame Kit, SRCTMTTLBM
Beam Kit, SRCTMTSDD Sliding Double-Door Kit and SRCTMTRXXX Adapter Riser Panels
(if necessary) have been properly assembled.
Refer to the products’ Installation Guides for more information.
2
With the help of an assistant, place the static roof panels onto the top of the containment
frame’s upper support beams.
Secure the panel to the beam using the included screws.
Repeat for each additional panel.
Note: Leave screws loose and do not tighten until all panels are installed.
M6 x 12
Self-Tapping
Screw (x4)
M6 Washer
(x4)

4
1111 W. 35th Street, Chicago, IL 60609 USA • tripplite.com/support
19-04-415 93-388D_RevA
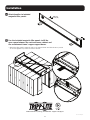
Installation
3
Attach handles to included
magnetic filler panels.
4
Use the included magnetic filler panels to fill the
open space between the rack enclosure cabinet and
the containment frame’s upper support beam.
• Attach the filler panel’s magnetic side to the support beam and slide down to provide
an air seal against top of rack enclosure cabinet.
M4 x 10
Screw (x4)

5
Guía de Instalación
Juego de Panel de Techo Estático para
Sistema de Contención para Pasillo
Modelos: SRCTMTCVR600, SRCTMTCVR750
1111 W. 35th Street, Chicago, IL 60609 EE. UU. • tripplite.com/support
Copyright © 2019 Tripp Lite. Todos los derechos reservados.
English 1 • Français 9 • Русский 13
SRCTMTCVR600
Ancho: 600 mm [24"]
SRCTMTCVR750
Ancho 750 mm [30"]
Orden Recomendado de Instalación:
1. Juego de Bastidor SRCTMTFRM
2. Juego de Viga SRCTMTTLBM
3. Juego de Puerta Deslizante Doble SRCTMTSDD
4. Juego de Panel Estático de Techo SRCTMTCVR600, SRCTMTCVR750
5. Paneles Elevadores con Adaptador SRCTMTR600SH, SRCTMTR600TL, SRCTMTR750SH, SRCTMTR750TL

6
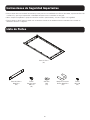
Instrucciones de Seguridad Importantes
Lista de Partes
• Este producto debe ser instalado únicamente por una persona con habilidades mecánicas adecuadas, experiencia básica de
construcción y que haya comprendido a cabalidad las instrucciones contenidas en esta guía.
• Utilice siempre un ayudante o equipo de elevación mecánico para levantar y colocar el equipo con seguridad.
• Este producto se diseñó para ser usado solo en interiores. Instale en un ambiente interior controlado. No lo instale en
ambientes exteriores o exigentes.
Panel de Techo
(x1)
Panel de Relleno
Magnético
(x2)
Tornillo
Autorroscante
M6 x 12
(x4)
Arandela
M6
(x4)
Manija de Panel de
Relleno Magnético
(x4)
Tornillo
M4 x 10
(x8)

7
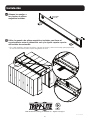
Instalación
1
Antes de continuar con la instalación, asegúrese de que el juego de bastidor SRCTMTFRM,
el juego de viga SRCTMTTLBM, el juego de puerta deslizante doble SRCTMTSDD y los
paneles elevadores con adaptador SRCTMTRXXX (si fueran necesarios) se han
ensamblado correctamente.
Para más información, refiérase a las Guías de Instalación del producto.
2
Con la ayuda de un asistente, coloque los paneles de techo estáticos en la parte superior
de las vigas de soporte superiores del bastidor de contención.
Fije el panel a la viga usando los tornillos incluidos.
Repita para cada panel adicional.
Nota: Deje los tornillos flojos y no los apriete hasta que todos los paneles
estén instalados.
Tornillo
Autorroscante
M6 x 12 (x4)
Arandela M6
(x4)

8
1111 W. 35th Street, Chicago, IL 60609 EE. UU. • tripplite.com/support
19-04-415 93-388D_RevA
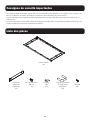
Instalación
3
Coloque las manijas a
los paneles de relleno
magnético incluidos.
4
Utilice los paneles de relleno magnéticos incluidos para llenar el
espacio abierto entre el gabinete de rack y la viga de soporte superior
del bastidor de contención.
• Fije el lado magnético del panel de relleno a la viga de soporte y deslice hacia abajo para proporcionar
un sello de aire contra la parte superior del gabinete de rack.
Tornillo M4 x
10 (x4)

9
Guide d'installation
Ensemble de panneau de toit statique
pour système d’enceinte pour allée
Modèles : SRCTMTCVR600, SRCTMTCVR750
1111 W. 35th Street, Chicago, IL 60609 USA • tripplite.com/support
Droits d'auteur © 2019 Tripp Lite. Tous droits réservés.
English 1 • Español 5 • Русский 13
SRCTMTCVR600
Largeur : 600 mm (24 po)
SRCTMTCVR750
Largeur 750 mm (30 po)
Ordre d'installation recommandé :
1. Ensemble de cadre SRCTMTFRM
2. Ensemble de montant SRCTMTTLBM
3. Ensemble de porte double coulissante SRCTMTSDD
4. Ensemble de panneau de toit statique SRCTMTCVR600, SRCTMTCVR750
5. Panneaux de base pour adaptateurs SRCTMTR600SH, SRCTMTR600TL, SRCTMTR750SH, SRCTMTR750TL

10
Consignes de sécurité importantes
Liste des pièces
• Ce produit ne devrait être installé que par une personne ayant de bonnes aptitudes en mécanique et une expérience de
base en construction de même qu'une pleine connaissance des instructions du présent manuel.
• Toujours faire appel à un assistant ou utiliser de l'équipement de levage mécanique pour soulever et mettre en place
l'équipement.
• Ce produit est prévu pour être utilisé à l'intérieur uniquement. Installer dans un environnement intérieur contrôlé. Ne pas
installer à l'extérieur ou dans des environnements difficiles.
Panneau de toit
(x1)
Panneau de
remplissage
magnétique
(x2)
Vis autotaraudeuse
M6 x 12
(x4)
Rondelle
M6
(x4)
Poignée de panneau
de remplissage
magnétique
(x4)
Vis
M4 x 10
(x8)

11
Installation
1
Avant de procéder à l'installation, s'assurer que l'ensemble de cadre SRCTMTFRM,
l'ensemble de montant SRCTMTTLBM, l'ensemble de porte double coulissante SRCTMTSDD
et les panneaux de base pour adaptateur SRCTMTRXXX (le cas échéant) ont été
correctement assemblés.
Consulter les guides d'installation des produits pour plus d'informations.
2
Avec l'aide d'un assistant, placer les panneaux de toit statiques sur le dessus des montants
de support supérieurs du cadre de l'enceinte.
Fixer le panneau au montant en utilisant les vis incluses.
Répéter pour chaque panneau supplémentaire.
Remarque : Laisser les vis desserrées et ne les serrer qu'une fois tous
les panneaux installés.
Vis
autotaraudeuse
M6 x 12 (x4)
Rondelle M6
(x4)

12
1111 W. 35th Street, Chicago, IL 60609 USA • tripplite.com/support
19-04-415 93-388D_RevA
Installation
3
Fixer les poignées aux
panneaux de remplissage
magnétiques inclus.
4
Utiliser les panneaux de remplissage magnétiques inclus pour combler
l'espace vide entre l'armoire pour boîtiers pour bâti et le montant
de support du cadre de l'enceinte.
• Fixer le côté magnétique du panneau de remplissage au montant de support, puis le glisser vers le bas pour
permettre un joint d'étanchéité à l'air contre la partie supérieure de l'armoire pour boîtiers pour bâti.
Vis M4 x 10
(x4)

13
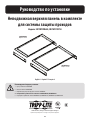
Руководство по установке
Неподвижная верхняя панель в комплекте
для системы защиты проходов
Модели: SRCTMTCVR600, SRCTMTCVR750
1111 W. 35th Street, Chicago, IL 60609 USA • tripplite.com/support
Охраняется авторским правом © 2019 Tripp Lite. Перепечатка запрещается.
English 1 • Español 5 • Français 9
SRCTMTCVR600
Ширина: 600 мм
SRCTMTCVR750
Ширина: 750 мм
Рекомендуемый порядок установки:
1. Корпус в комплекте SRCTMTFRM
2. Балка в комплекте SRCTMTTLBM
3. Раздвижная двустворчатая дверца в комплекте SRCTMTSDD
4. Неподвижная верхняя панель в комплекте SRCTMTCVR600, SRCTMTCVR750
5. Переходные вертикальные панели SRCTMTR600SH, SRCTMTR600TL, SRCTMTR750SH, SRCTMTR750TL

14
Важные указания по технике безопасности
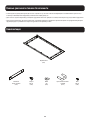
Комплектация
• Установка данного изделия должна производиться только специалистом с достаточной технической квалификацией и базовыми навыками строительства, в
полной мере понимающим смысл информации, изложенной в настоящем руководстве.
• Для безопасного подъема и надлежащего размещения оборудования обязательно обращайтесь за помощью или пользуйтесь грузоподъемным оборудованием.
• Данное изделие предназначено для использования только в закрытых помещениях. Устанавливать в закрытом помещении с контролируемыми параметрами
окружающей среды. Не устанавливать на открытом воздухе или в неблагоприятных условиях.
Верхняя панель
(1 шт.)
Магнитная
панель-заглушка
(2 шт.)
Саморез
M6 x 12
(4 шт.)
Шайба
M6
(4 шт.)
Ручка магнитной панели-
заглушки
(4 шт.)
Винт
M4 x 10
(8 шт.)

15
Установка
1
Перед началом установки необходимо убедиться в правильности сборки корпуса SRCTMTFRM, балки SRCTMTTLBM,
раздвижной двустворчатой дверцы SRCTMTSDD и переходных вертикальных панелей SRCTMTRXXX
(при необходимости).
Более подробная информация представлена в руководствах по установке соответствующих изделий.
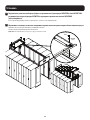
2
Обратившись за помощью, поместите неподвижные верхние панели на верхние опорные балки защитного корпуса.
Прикрепите панель к балке при помощи винтов, находящихся в комплекте.
Повторите эти действия для каждой дополнительной панели.
Примечание. Не затягивайте винты до тех пор, пока не будут установлены все панели.
Саморез M6 x 12
(4 шт.)
Шайба M6
(4 шт.)

16
1111 W. 35th Street, Chicago, IL 60609 USA • tripplite.com/support
19-04-415 93-388D_RevA
Установка
3
Прикрепите ручки к магнитным
панелям-заглушкам, входящим в
комплект.
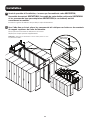
4
Для заполнения свободного пространства между корпусом шкафа и верхней опорной
балкой защитного корпуса следует использовать магнитные панели-заглушки,
входящие в комплект.
• Прикрепите панель-заглушку намагниченной стороной к опорной балке и сдвиньте ее вниз для обеспечения
воздухонепроницаемого уплотнения в верхней части корпуса шкафа.
Винт M4 x 10
(4 шт.)
-
 1
1
-
 2
2
-
 3
3
-
 4
4
-
 5
5
-
 6
6
-
 7
7
-
 8
8
-
 9
9
-
 10
10
-
 11
11
-
 12
12
-
 13
13
-
 14
14
-
 15
15
-
 16
16


Tripp Lite Aisle Containment System Guía de instalación
- Tipo
- Guía de instalación
en otros idiomas
Artículos relacionados
-
Tripp Lite Aisle Containment System Guía de instalación
-
-
-
-
Tripp Lite SRSEHOOD Manual de usuario
-
-
-
-
-