Thulos TH-PC450 El manual del propietario
- Categoría
- Picadoras
- Tipo
- El manual del propietario

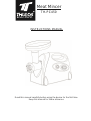
Picadora De Carne
MANUAL DE INSTRUCCIONES
Leer este manual atentamente antes de utilizar el aparato por primera vez.
Guarde este manual para futuras consultas.
TH-PC450

Estimado cliente:
Agradecemos la confianza depositada en nosotros al adquirir este producto Thulos®.
Nuestro principal empeño es ofrecer artículos excelentes, manteniendo los más estrictos controles
de calidad y cumpliendo todas las normativas vigentes de seguridad, con el objetivo de presentar
un producto perfecto y seguro para el uso doméstico.
Instrucciones De Seguridad.
- Verificar que la corriente eléctrica de su casa sea la misma que la del aparato.
- Este aparato ha sido diseñado solamente para uso doméstico.
- Nunca dejar enchufado el aparato cuando no está en uso.
- Desenchufar siempre antes de desmontar ó montar cualquier accesorio del aparato.
- Nunca dejar el aparato sin supervisión cuando esté en uso y/ó haya niños cerca del aparato.
- Nunca tire del cable para transportar o mover el aparato. Coja el aparato con ambas manos.
- No instale la cuchilla ni el disco de corte al usar el accesorio para "Kebbe".
- No introduzca los alimentos con las manos, siempre use el empujador.
- Nunca introduzca alimentos duros como huesos, nueces, etc.
- No introduzca jengibre ni otros productos de fibra dura.
- El aparato no debe funcionar de forma continuada más de 10 minutos seguidos.
- Utilizar el aparato a intervalos de 10 minutos para que el motor se enfríe.
Es decir, dejar enfriar el motor 10 minutos por cada 10 minutos funcionando.
- Nunca usar la función reversa mientras el aparato está en funcionamiento, es decir,
no cambie de "ON" a "R" directamente sin esperar a que el motor del aparato esté totalmente
parado y viceversa.
Poner en OFF y esperar al menos un minuto a que el motor quede completamente parado.
El aparato puede producir chispas internas y averiarse el motor.
- Para evitar que la máquina se atasque, no aplique demasiada presión.
- No intente reemplazar las piezas ni reparar el aparato usted mismo.
- Si la máquina, enchufe ó cable sufren algún daño, lo deberá reparar un servicio técnico especializado.
- Esta máquina no ha sido diseñada para ser usada por personas (incluidos niños) con capacidades
físicas, sensoriales o mentales reducidas, o personas sin experiencia ni conocimientos, a menos que se
encuentren supervisados o reciban instrucciones acerca de cómo usar el aparato en forma segura por
una persona responsable de su seguridad.
- Esta máquina no es un juego de niños. La limpieza no pueden hacerla niños.
- El padre, madre ó tutor del niño o de la persona con capacidad limitada será total responsable.
NOTA IMPORTANTE.
- Antes de utilizar el aparato picando carne para consumir, se aconseja picar carne desechable para
eliminar posibles impurezas adheridas a las piezas del aparato, bien sea por el primer uso del aparato
ó bien sea por restos de un uso anterior.

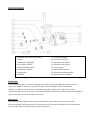
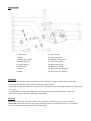
Partes Del Aparato.
Primer Uso.
- Lavar todas las piezas y accesorios excepto la carcasa principal con agua tibia y jabón neutro.
- Secar bien todas las piezas con un paño de fibra secante ó papel de cocina absorbente.
- Montar la máquina con las piezas y accesorios necesarios según para lo que vaya a usarla.
- Se aconseja picar primero un poco de carne desechable para eliminar posibles impurezas de fábrica
que no se hayan ido con el lavado de las piezas.
Advertencia.
Carne desechable no quiere decir carne en mal estado, nunca utilizar carne en mal estado.
Carne desechable significa recortes de carnes que no se quiera utilizar porque lleven mucha grasa,
ó recortes de carnes al limpiarla que se vayan a desechar.
1. Bandeja de entrada de alimento. 9. Tornillo de empuje.
2. Motor. 10. Disco de corte fino.
3. Interruptor (ON/0/R). 11. Disco de corte medio.
4. Interruptor (ON/R). 12. Disco de corte grueso.
5. Botón de desbloqueo. 13. Aro de ajuste.
6. Entrada de cabezal. 14. Cuchilla para cortar.
7. Empujador. 15. Accesorio para embutidos.
8. Cabezal. 16. Accesorio para "Kebbe".

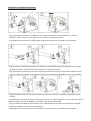
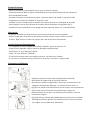
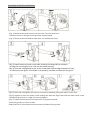
Montaje De La Máquina Picadora.
- (Fig.1) Sostenga el cabezal e introdúzcalo en la boca de entrada. Gire el cabezal en la misma
dirección que se muestra en la figura hasta escuchar un pequeño sonido.
- (Fig.2) Mueva suavemente el cabezal para asegurarse de que esté instalado correctamente.
- (Fig.3) Instale el tornillo de empuje en el cabezal, introduciendo el extremo largo primero y luego
girando levemente el tornillo hasta que calce en la carcasa del motor.
- (Fig.4) Coloque la cuchilla de corte en el eje del tornillo de empuje con el filo hacia la parte frontal,
como se indica en la figura. Si la cuchilla no queda correctamente instalada, la carne no se molerá.
- (Fig.5) Coloque el disco de corte que desea usar junto a la cuchilla, encajando las pestañas en las
ranuras.
- (Fig.6) Apoye o presione el centro del disco de corte con un dedo luego con la otra mano, atornille la
tuerca de ajuste hasta que quede bien apretada. No apriete demasiado.
- (Fig.7) Instale la bandeja de alimentación en el cabezal hasta que quede correctamente encajada.
- Instale la moledora sobre una superficie firme.
- Mantenga libre las entradas de aire ubicadas en la parte inferior y costados de la moledora.

Picado De Carne.
- Cortar la carne en trozos pequeños (usar carne sin hueso ni grasa).
- El tamaño de corte debe ser aprox. 20x20x60mm para que pasen fácilmente por la abertura
de la bandeja de entrada.
- Enchufe la máquina a la toma de corriente y mueva el botón (4) "ON/R" a la posición ‘ON’.
- Luego pulsar el botón (3) "ON/0/R" a la posición ‘ON’.
- Coloque la carne cortada como se describe en el punto anterior en la bandeja de entrada.
- Para empujar la carne hacia la boca de entrada, utilice solamente el empujador (fig.7).
- Cuando termine el picado de carne, apagar del interruptor(3) 'poner a 0' y desenchufarla.
Advertencia.
- El aparato no debe funcionar de forma continuada más de 10 minutos seguidos.
- Utilizar el aparato a intervalos de 10 minutos para dar tiempo a que el motor se enfríe.
Es decir, dejar enfriar el motor 10 minutos por cada 10 minutos funcionando.
Función Reversa (Para atascos).
- Si la máquina se atasca, apagar del botón(3) "ON/0/R", poner en posición "0".
- Esperar unos segundos a que el motor se detenga completamente.
- Seleccionar "R" en el botón(4) "ON/R".
- Pulsar "R" en el botón(3) "ON/0/R".
- El tornillo de empuje rotará en sentido contrario, vaciando así el cabezal.
- Si con esto no se quita el atasco, desmontar las piezas y accesorios y limpiar todo.
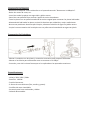
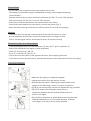
Desmontar La Máquina.
- Asegúrese de que el motor esté completamente detenido.
- Desenchufe la máquina de la corriente eléctrica.
- Desmontar la máquina siguiendo los pasos que se muestran en las
imágenes del apartado "Montaje" en sentido inverso, de 6 a 1.
- (Fig.8) Si no puede sacar fácilmente el aro de ajuste, use herramientas.
- (Fig.9) Para retirar el disco de corte fácilmente, coloque un
destornillador entre el disco y el cabezal para levantarlo, como se
muestra en la figura.
- (Fig.10) Presione el botón para desbloquear antes de sacar el cabezal.
Sostenga el cabezal y gírelo en la misma dirección, como se muestra
en la figura; así se puede sacar fácilmente.

Limpieza De La Máquina.
- Desmonte la máquina como se describe en el apartado anterior "Desmontar La Máquina".
- Retire los restos de carne, etc.
- Lavar bien todas las piezas con agua tibia y jabón neutro.
- Secar bien con paño de fibra secante ó papel de cocina absorbente.
- Frote las piezas con un paño humedecido en aceite vegetal para mantener las piezas lubricadas.
- Manteniendo lubricadas las piezas, evitará el deterioro por oxidación y mejor rendimiento.
- Nunca usar productos abrasivos para limpiar, solamente solución de agua con jabón neutro.
- Limpie la carcasa exterior de la máquina con un paño suave humedecido en agua con jabón.
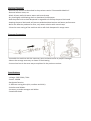
Preparación De Embutidos.
- Montar la máquina con las piezas y accesorios necesarios para preparar embutidos.
- Montar el accesorio para embutidos como se muestra en el dibujo.
- Proceder y usar de la misma forma que se ha explicado en los apartados anteriores.
Especificaciones.
- Voltaje: 220V-230V / 50Hz.
- Potencia: 1200W
- Función Retroceso.
- 3 discos de corte distintos (fino, medio y grueso).
- Cuchillas de acero inoxidable.
- Accesorio para hacer embutidos y Kebbe.
- Cabezal desmontable.

Meat Mincer
INSTRUCTIONS MANUAL
Read this manual carefully before using the device for the first time.
Keep this manual for future reference.
TH-PC450

Dear Customer:
We appreciate the trust placed in us when purchasing this Thulos® product.
Our main effort is to offer excellent items, maintaining the strictest quality controls and complying
with all current safety regulations, with the aim of presenting a perfect and safe product for
domestic use.
Safety Instrucciones.
- Verify that the electric current of your home is the same as that of the appliance.
- This appliance has been designed for domestic use only.
- Never leave the appliance plugged in when it is not in use.
- Always unplug before disassembling or mounting any accessory of the device.
- Never leave the device unsupervised when it is in use and / or there are children near the device.
- Never pull the cable to transport or move the device. Hold the device with both hands.
- Do not install the blade or cutting disc when using the "Kebbe" accessory.
- Do not introduce food with your hands, always use the pusher.
- Never introduce hard foods such as bones, nuts, etc.
- Do not introduce ginger or other hard fiber products.
- The device must not operate continuously for more than 10 minutes in a row.
- Use the device at intervals of 10 minutes for the engine to cool.
That is, let the engine cool for 10 minutes for every 10 minutes running.
- Never use the reverse function while the appliance is in operation, that is,
Do not change from "ON" to "R" directly without waiting for the appliance motor to be fully
stopped and vice versa.
Turn OFF and wait at least one minute until the engine is completely stopped.
The device may cause internal sparks and the engine may break down.
- To prevent the machine from clogging, do not apply too much pressure.
- Do not try to replace the parts or repair the device yourself.
- If the machine, plug or cable is damaged, it must be repaired by a specialized technical service.
- This machine has not been designed for use by people (including children) with capacities
reduced physical, sensory or mental, or people without experience or knowledge, unless
are supervised or receive instructions on how to use the device safely by
A person responsible for your safety.
- This machine is not a children's game. Cleaning cannot be done by children.
- The father, mother or guardian of the child or the person with limited capacity will be fully
responsible.
WARNING.
- Before using the device to chop meat for consumption, it is advisable to chop disposable meat to
remove possible impurities adhered to the parts of the device, either by the first use of the device
or by remains of a previous use.

Device Parts.
First Use.
- Wash all parts and accessories except the main housing with warm water and neutral soap.
- Dry all parts well with a fiber cloth or absorbent paper towel.
- Assemble the machine with the necessary parts and accessories according to what you are going to
use it for.
- It is advisable to chop some disposable meat first to eliminate possible factory impurities
that have not gone with the washing of the pieces.
Warning.
Disposable meat does not mean meat in poor condition, never use meat in poor condition.
Disposable meat means cuts of meat that you don't want to use because they carry a lot of fat,
or cuts of meat when cleaned that will be discarded.
1. Food inbox. 9. Thrust screw.
2. Motor. 10. Fine cutting disc.
3. Switch (ON / 0 / R). 11. Medium cutting disc.
4. Switch (ON / R). 12. Thick cutting disc.
5. Unlock button. 13. Adjustment ring.
6. Head input. 14. Blade for cutting.
7. Pusher. 15. Accessory for sausages.
8. Head. 16. Accessory for "Kebbe".

Assembly of the Mincer Machine.
- (Fig. 1) Hold the head and insert it into the inlet. Turn the head on it
direction shown in the figure until you hear a small sound.
- (Fig. 2) Gently move the head to make sure it is installed correctly.
- (Fig. 3) Install the thrust screw in the head, inserting the long end first and then
turning the screw slightly until it fits into the motor housing.
- (Fig. 4) Place the cutting blade on the thrust screw shaft with the edge towards the front,
as indicated in the figure. If the blade is not properly installed, the meat will not grind.
- (Fig. 5) Place the cutting disc you want to use next to the blade, fitting the tabs into the slots.
- (Fig. 6) Support or press the center of the cutting disc with one finger then with the other hand, screw
the adjusting nut until it is tight. Do not overtighten.
- (Fig. 7) Install the feed tray on the head until it is properly seated.
- Install the grinder on a firm surface.
- Keep free the air inlets located at the bottom and sides of the grinder.

Minced Meat.
- Cut the meat into small pieces (use meat without bone or fat).
- The cutting size should be approx. 20x20x60mm to easily pass through the opening
from the inbox.
- Plug the machine into an outlet and move the button (4) "ON / R" to the "ON" position.
- Then press button (3) "ON / 0 / R" to the "ON" position.
- Place the cut meat as described in the previous point in the inbox.
- To push the meat towards the inlet mouth, use only the pusher (fig. 7).
- When the meat mincing is finished, turn off the switch (3) 'set to 0' and unplug it.
Warning.
- The device must not operate continuously for more than 10 minutes in a row.
- Use the appliance at 10 minute intervals to allow time for the engine to cool.
That is, let the engine cool for 10 minutes for every 10 minutes running.
Reverse Function (For Obstructions).
- If the machine gets stuck, turn off the button (3) "ON / 0 / R", put it in position "0".
- Wait a few seconds for the engine to stop completely.
- Select "R" on button (4) "ON / R".
- Press "R" on button (3) "ON / 0 / R".
- The thrust screw will rotate in the opposite direction, thus emptying the head.
- If this does not clear the obstruction, disassemble the parts and accessories and clean everything.
Disassemble Machine.
- Make sure the engine is completely stopped.
- Unplug the machine from the electric current.
- Disassemble the machine following the steps shown in the
images in the "Mounting" section in reverse, from 6 to 1.
- (Fig. 8) If you cannot easily remove the adjustment ring, use tools.
- (Fig. 9) To remove the cutting disc easily, place a
screwdriver between the disc and the head to lift it, as
shown in the figure.
- (Fig. 10) Press the button to unlock before removing the head.
Hold the head and turn it in the same direction, as shown
in the figure; This way it can be easily removed.

Machine Cleaning.
- Remove the machine as described in the previous section "Disassemble Machine".
- Remove leftover meat, etc.
- Wash all parts well with warm water and neutral soap.
- Dry thoroughly with blotting cloth or absorbent kitchen paper.
- Rub the pieces with a cloth dampened in vegetable oil to keep the parts lubricated.
- Keeping the parts lubricated, will prevent oxidation deterioration and better performance.
- Never use abrasive products to clean, only water solution with neutral soap.
- Clean the outer casing of the machine with a soft cloth dampened in soapy water.
Sausage Preparation.
- Assemble the machine with the necessary parts and accessories to prepare sausages.
- Mount the sausage accessory as shown in the drawing.
- Proceed and use in the same way as explained in the previous sections.
Specifications.
- Voltage: 220V-230V / 50Hz.
- Power: 1200W
- Backspace function.
- 3 different cutting discs (thin, medium and thick).
- Stainless steel blades.
- Accessory to make sausages and Kebbe.
- Detachable head.

EAN Negro/Black: 8436572761216
EAN Rojo/Red: 8436572761209
www.thulos.com
thulos@thulos.com
Servicio Técnico / Technical Service: sat@grupothulos.com
Picadora De Carne / Meat Mincer
TH - PC450
1200W
-
 1
1
-
 2
2
-
 3
3
-
 4
4
-
 5
5
-
 6
6
-
 7
7
-
 8
8
-
 9
9
-
 10
10
-
 11
11
-
 12
12
-
 13
13


Thulos TH-PC450 El manual del propietario
- Categoría
- Picadoras
- Tipo
- El manual del propietario
en otros idiomas
- English: Thulos TH-PC450 Owner's manual
Otros documentos
-
Tefal FP4111A1 Manual de usuario
-
Moulinex HV8 ME683832 Manual de usuario
-
HAEGER BL-15B.013A Manual de usuario
-
Silvercrest SFW 350 D2 Instrucciones de operación
-
Bosch MUZ9HA1 Manual de usuario
-
Silvercrest 302971 Operating Instructions Manual
-
Philips HR2734 Manual de usuario
-
Kenwood MG476 El manual del propietario
-
Kenwood MG510 El manual del propietario
-
 Elma Nº 32 Aries Revolution 1.5 S El manual del propietario
