Kenmore 116.33720200 El manual del propietario
- Categoría
- Aspiradoras
- Tipo
- El manual del propietario

Owner'sManual
ManualDel Propietario
VacuumCleaner
Aspiradora
Model, Modelo
116.33720
116.33721
CAUTION:
Read and follow all
safety and operating
instructions before first
use of this product.
CUIDADO:
Lea y sigue todas las
instrucciones de operaci6n
y seguridad antes del uso de
este producto.
/
L_
_w,,Z
N
Seam, Roebuckand Co., HoffmanEstates, IL 60179 U.S.A.
www.sears.com
Part No. C_1ZBVW10UQ(_ Printed in U.S,A.

:::::_;;;: : :: ::: : :: :::_:::: ::::;: '::':':::::::_::: ................. _............... _................ _E_:!_i!i!!i_i_i_`_:_::::_;:_!_!_!_•:_:::_??_•_:::::_:_?_:_H_ I..... _::_:!::_:_:_:_:_:_:_:_:_:__ _:_ ........ _ ............ _:_;_,_ .,:,: ;_ .: _. . ,.... • '::::::!_i!:i:!:i:_i_ii:i_i:i:_i!ii:i:i:i:!i__,!iii_._!:!i:_ii_i:i_!!!!!_ I::I i:!_!:!:i;_:_!::_:ii_!_!_!;!:i:_i::i:i:i:I
I
BeforeUsing Your New Vacuum ........ 2
Kenmom Vacuum Cleaner Warranty .... 2
ImportantSafety Instructions ........... 3
Parts and Features ................... 4
AssemblyInstructions ............... 5-6
OperatingInstructions................. 7
Pile HeightSelectionand Setting ........ 7
Reteasing the Handle ................. 8
ON/OFF Switch ..................... 8
Attachments ..................... 9-10
Attachment Use Chart ............... 10
Vacuuming Tips .................... 11
Performance Features ............... 11
Vacuum Cleaner Care ............... 12
VacuumStorage ................... 12
Cleaning Exteriorand Attachments ..... 12
Dust Bin Cleaning ................ 13-14
Secondary Filter Cleaning ............ 14
FilterChanging/Cleaning ............. 15
Belt Changing and Agitator Cleaning .. 16-17
Clog Removal ..................... 18
MotorProtector ..................... 18
Agitator Servicing ................... 19
Agitator Assembly .................. 19
Troubleshooting ..................... 2o
llil;i_ii_!iiiiiiiiiiiiiiiiii;i!iii_!!ii!i!iiiiiii!i!ili!!!_ iiiii!!i!i!_!_iiiiii ii!!!!i!i! iiii;i iiiiiiii i !!!!!!iiiiiiiilliiiiiii_iiii;;iiiii_;_!!! iiii_;_;_iiiiiiiii!!!iiiiiii ;]
]
Please read this guide. It wilt help you assemble and operate your new Kenmore vacuum in
the safest and most effective way.
For more information about vacuum cleaner care and operation, call your nearest Sears store.
You will need the complete model and serial numbers when requesting inforrnation. Your vacu-
um's model and serial numbers are located on the Model and Serial Number Plate.
Use the space below to record the model number and serial number of your new Kenmore
vacuum.
\,
Model No.
Serial No.
Date of Purchase
Keep this book and your sales check (receipt) in a safe place for future reference.
LIMITED ONE YEAR WARRANTY ON KENMORE VACUUM CLEANER
This warranty is for one year from the date of purchase, and includes only private household
vacuum cleaner use. During the warranty year, when this vacuum cleaner is operated and
maintained according to the owner's manual instructions, Sears will repair any defects in
material or workmanship free of charge.
This warranty excludes vacuum bags, belts, light bulbs, and filters, which are expendable parts
and become worn during normal use.
Forwarrantyservice, retum thisvacuum cleaner to the nearest Sears Service Center inthe
UnitedStates.
This warranty applies only while this product is in use in the United States. This warranty gives
you specific legal rights, and you may also have other rights which vary from state to state.
Sears, Roebuck and Co., D/817 WA, Hoffman Estates, IL 60179
2

Your safety is importantto us.To reduce the risk offire, electricalshock,injuryto per-
sons ordamage when usingyour vacuum cleaner, follow basicsafety precautions
includingthe following:
Read this manual before assembling or
using your vacuum cleaner.
Use your cleaner only as described in
this manual. Use only with Sears recom-
mended attachments.
To reduce the risk of electrical shock -
Do not use outdoorsor on wet surfaces.
Disconnect electrical supply before any
servicing or cleaning. Failure to do so
could result in electrical shock or per-
sonal injury.
Always turn cleaner off before unplug-
ging.
Do not unplug by pulling on cord. To
unplug, grasp the plug, not the cord.
Do not use with damaged cord or plug. If
cleaner is not working as it should, has
been dropped, damaged, left outdoors,
or dropped into water, return it to a
Sears Service Center.
Do not pull or carry by cord, use cord as
a handle, close door on cord, or pull
cord around sharp edges or corners.
Do not run cleaner over cord. Keep cord
away from heated surfaces.
Do not leave cleaner when plugged in.
Unplug from outlet when not in use and
before servicing.
Do not allow to be used as a toy. Close
attention is necessary when used by or
near children.
Do not handle plug or cleaner with wet
hands.
Do not use with any opening blocked;
keep free of dust, lint, hair and anything
that may reduce air flow.
Keep hair, loose clothing, fingers, and all
parts of body away from openings and
moving parts.
Do not use cleaner without dust bin
and/or filters in place,
Always clean the dust bin after vacuum-
ing carpet cleaners or freshener, pow-
ders and fine dust. These products clog
the filters, reduce airflow and can cause
damage to the cleaner. Failure to clean
the dust bin could cause permanent
damage to the cleaner.
Do not use the cleaner to pick up sharp
hard objects, small toys, pins, paper
clips, etc. They may damage the clean-
er or dust bin.
Do not pick up anything that is burning
or smoking, such as cigarettes, match-
es, or hot ashes.
Do not use cleaner to pick up flammable
or combustible liquids (gasoline, clean-
ing fluids, perfumes, etc.), or use in
areas where they may be present. The
fumes from these substances can create
a fire hazard or explosion.
Use extra care when cleaning on stairs.
Do not put on chairs, tables, etc. Keep
on floor.
You are responsible for making sure that
your vacuum cleaner is not used by any-
Do not put any objects into openings, one unable to operate it properly.
SAVE THESE NSTRUCTIONS
Proper assembly and safe use of your vacuum cleaner are your responsibilities. Your
cleaner is intended only for household use. Read this Owner's Manual carefully for
important use and safety information. This guide contains safety statements under
warning and caution symbols. Please pay special attention to these boxes and follow
any instructions given. WARNING statements alert you to such dangers as fire, elec-
trical shock, burns and personal injury. CAUTION statements alert you to such dan-
gers as personal injury and]or property damage.

[_!!_i_i_i_ii_iiiiii!ii_ii_iiii_!iiii!_i!iiiiiiiii_iiii_iiiiiii!iiiiiii!iii!i_i_i_i_i_i_i_i_i_i_i_i_!_i_i_i_i_i_i_i_ii:i_i_i:i_!_i:i_i:!;i_;i _:: _:_m;_;;_;_;_;:_:;_;_;_mi_;_;_;_i;i;i;_;:::_:_:_:;_;%_%_;_;_;_]
It is important to know your vacuum cleaner's parts and features to assure its proper and safe
use. Review these before using your cleaner.
Item Part No. Part No.
In U.S. In Canada
Belt 20-5275 20-40096
Hose
Dust Bin
Release
Power
Cord
Hose
Holder
Cord Hook
Nozzle
Cover
Primary -Dust
Filter Bin
(Inside)
, Exhaust
Filter
(Inside)
Screw
Brush
Wand
Retainer/
Carry Handle
Furniture
Guard
Nozzle Cover
Retainers
Nozzle
Base
On/Off
Switch
\
Handle
Release
Pedal_
Model/Serial
Numbers
Crevice
Tool
Motor
Protector
Shoe
Hose
EXTENSION HOSE KITS
SOME MODELS
Extension Hose
!IWUWUlllIIII,II[IIIIIIIII[I[(II[[I!
_Fi SOME MODELS
_-_-- Adaptor
oor BrUShan d
4

Before assembling vacuum, check the
PACKING LIST on the cover of the separate
Repair Parts List. Use this list to verify that
you have received all the components of
your new Kenmore vacuum.
ElectricalShock Hazard
Do notplug intothe electricalsupply
untilthe assembly iscomplete. Failure
to do so could resulttn electricalshock
orinjury.
HANDLE ASSEMBLY
Remove the screw located just below the
top edge of the back of the vacuum.
Position the handle as shown in the illustra-
tion below.
While holding the power cord out of the way,
slide the handle into the opening at the top
of the vacuum.
Handle
Screw
Hole
Insert the screw so it passes through the
handle into the vacuum.
Begin to tighten the screw with your fingers.
It may be necessary to adjust the handle
slightly.

Do not overtightan.
Overtighteningcouldstripthe screw
holes.
Do not operate the cleaner withoutthe
screw inplace.
Using
driver,
the screw.
CORD ASSEMBLY
Make sure the quick release cord hook is in
the upright position. Remove the wire tie
from the power cord.
\,
Lock the cord into
place by forcing it
into the locking
notch on the body
of the quick
release cord hook
as shown. This
helps keep the
power cord out
from under the
vacuum cleaner
agitator.
Notch
Power
Quick
Release
Cord
Power
Con
Lower
Cord
Wrap the
power cord
around the
quick release
cord hook
and lower
cord retainer,
then lock the
power cord
plug onto the
power cord.
ATTACHMENT STORAGE
After the handle has been assembled to the
body and the power cord has been wrapped
around the cord hooks, the attachments can
be placed in their holders.
1. Snap the suction inlet end of the hose
into the back of the vacuum cleaner.
2. Place the hose behind the handle and
over the hose holder.
3. Place the hose in the front slot of the
tool holder, twisting and pushing down over
the short hose to assure a good connection.
4. Place the extension wand in the rear slot
of the tool holder.
5. Slide the crevice tool into the slot beside
the wand.
6. Place the dusting brush or combination
brush on the wand with the brush portion
up.
Handle -
Brush
Extension
Wand
Suction
Inlet
Tool
Holder
Tool

HOW TO START
Qulck
Re/ease
Hook
1.Turn the quick
release cord
hook to either
side and down
to release the
power cord.
2, Release the power cord plug from the
power cord and pull the cord off the quick
release cord hook. Check to be sure the
power cord is still locked into the locking
notch in the quick release cord hook.
NOTE: To reduce the risk of electric shock,
this vacuum cleaner has a polarized plug;
one blade is wider than the other. This plug
will fit in a polarized outlet only one way. If
the plug does not fit fully in the outlet,
reverse the plug. If it still does not fit, con-
tact a qualified technician to install the prop-
er outlet. Do not change the plug in any
way.
PersonalInjury and Product
Damage Hazard
• DO NOT plugin ifswitchis in the
ON position,Personalinjuryor
damage couldresult.
• DO NOT useoutlets above coun-
ters. Damage from cord to items in
surroundingarea could occur.
3. Plug the polarized power cord into a
120 Volt outlet located near the floor.
J iiiiii!i!!iiiiliiiiiiiiiii!iiiiiiii ii!ilili!ii!}i!i!iiii!i!i!ili}i iiii ii iiiiiiii!i!
I
SUGGESTED PILE HEIGHT SE-I-FINGS
Models with no selector adjust automatically
tor varying carpet heights.
SOME MODELS
To select a pileheight setting:
Turn off cleaner. Select a pile height setting
by tilting the cleaner back until front wheels
are lifted slightly off the floor as illustrated.
Slide the adjustment lever to the correct
setting.
You may need to raise the height to make
some jobs easier, such as scatter rugs and
longer pile carpets. Suggested settings are:
Models with two (2) positions:
HIGH: medium to long pile.
LOW: short to medium pile.
Models with four (4) positions:
HIGH: shag carpet, long pile, plush, scatter
rugs
MED: medium to long pile.
LOW: short to medium pile.
EX LOW: very low pile.
Place unit in "HIGH" when using attach-
ments to prevent possible floor damage.
ATTENTION: Special care is required when
vacuuming certain types of carpet or floor
covering. Always check the carpet or floor
covering manufacturer's recommended
cleaning instructions before vacuuming.
7

Release the handle by placing your foot on
the foot rest and pull back on the handle
until it releases from its upright position.
\
Foot Rest For
SOME MODELS
Release the handle by pressing down on
the handle release pedal with your foot and
pulling back and down on the handle with
your hand.
Handle
Release Pedal
To start the vacuum cleaner, step on the
ON/OFF switch located on the back of the
vacuum. To stop the vacuum cleaner, step
on the switch a second time.
8

IlliliiiliilqilEii}iiii iiiiill Ei;i{iiiii !iliiiiiiilil i i ii!ii!ii J y iiii iiii J i i iiiiiiiii
ii iiiiiiii!iiiiiiiiiiiiiiii;i;iiiiiiiiiiiiiiii!i!i!iiiii!iii!!iiii!!iiiiiiiiiiiiiiiii_{_i_i_i_i_i;_i_i;i!ii!i!iii_i_ii_i_i_ii_i_s_i!i!_i!i_ii_ii_i_i_iii_i_i!!!!! iiiiiiiliiiiiiiiiiiil! iiill 1
Personal InjuryHazard and Property
Hazard
DO NOT place hands or feet under-
neath the unitat anytime. When using
attachments,the agitator continues
rotating. Do not allowthe cleaner to
remain in just one place for a period of
time as the agitator may damage the
floorsurface. Avoid placingthe cleaner
onfurniture, the fringed area of rugs,
deep pile carpeting,or carpeted stairs.
The ideal positionfor the cleaner when
usingattachments isfor the unitto be
ona level area withthe handle inthe
position.
TO USE ATTACHMENTS
_ CAUTION
OT tip vacuum cleaner forwards or
ays when using attachments,
The attachments will fit on the hose or the
wand. In addition, the dusting brush or
combination brush will also fit on the crevice
tool.
The hose and wand can be pulled off the
short hose by grasping the cuff and twisting
while pulling up.
!
f._ CAUTION
DO NOT pull the vacuum cleaner
around the room by the hose.
Property damage could result.
The attachments can be added to the hose
if the item to be cleaned is not far from the
cleaner. The hose on some models will
expand.
NOTE: When cleaner is turned on, the hose
on some models will have a tendency to
collapse due to suction of the cleaner.
If more reach is needed, the wand can be
attached to the hose and the attachments
can be added to the wand.
CAUTION
When using attachments, be careful
not to overextendthe hose length
when reaching. Tryingto reach
beyond the hose reach couldcause
the cleaner to tip over.
SOME MODELS
An extra wand, without tabs, is included.
This extra wand can be added to the
wand with tabs for extra reach. Insert
wand and twist a quarter of a turn to
secure fit.
J_ _Dus_ng Brush Crevice Tool Wand
I E/E (Some Models)
W/J_ Brush (Some \ \ [
Models) L_ Brush
If the dusting brush/combination brush is
being used and more distance is
needed, the crevice tool can be added to
the wand, then the dusting
brush/combination brush can be added
to the crevice tool.
TO STORE
ATTACHMENTS
Return the hose to its position on the
short hose and the attachments to their
holders.
CAUTION
Attachments used in dirty areas, such
as under a retdgerator, should not be
used on other surfaces until they are
washed. They could leave marks.
9

CAUTION
When usingthe regular hose or with
the extension hose attached, the
cleaner shouldbe on a solidsurface
on the same level or below the level of
the _er's feet. DO NOT use the hoses
when the cleaner Is above the level of
the user'sfeet,
EXTENSION HOSE
SOME MODELS
Some models include an extra hose which
connects to the stretch hose on the vacuum
for a longer cleaning reach.
Unit Hose tam Extension Hose
Insert the two tabs on the end of the
extension hose into the two "J" shaped slots
on the unit hose and twist to connect.
All attachments and the wand can be
attached to the open end of the hose.
FLOOR BRUSH AND WAND
SOME MODELS
Some models have an extra brush and wand
for cleaning bare floors. Twist one end of the
adaptor into the floor brush and the other
end into the straight wand. Connect the
straight wand to the telescopic wand and
then to the vacuum hose or extension hose.
01
Wand--}
ATTACHMENT
DUSTING BRUSH <_
CREVICE TOOL
COMBINATION BRUSH
Handi-Mate ® Jr.
Furniture*
X
X
X
X
CLEANING AREA
Between
Cushions*
x
Drapes* Stairs
x X
x
x x
x
Walls
X
The motor protector may open when using attachments or when cleaning new carpet due to
reduced air flow caused by the attachments themselves or by new carpet fuzz filling the bag
quickly.
*Always clean attachments before using on fabrics.
10

PersonalInjuryHazard
Use care ifvacuum cleaner is placed
on stairs, If itfalls, pemonal injuryor
propertydamage could result.
Carpet edges
Guide either side or the front of the nozzle
along a baseboard. The full length brushes
help remove trapped dirt at carpet edges.
Stairs
Put handle in full uprightposition. Use the
crevicetool or dustingbrush.Set the On/Off
switch to ON.
MOTOR PROTECTION
SYSTEM
Thermal Protector
This vacuum has a thermal protector which
automatically trips to protect the vacuum
from overheating. If a clog prevents the
normal flow of air to the motor, the thermal
protector turns the motor off automatically to
allow the motor to cool in order to prevent
possible damage to the vacuum.
To correct problem:If this occurs, turn the
vacuum off and unplug the power cord from
the outlet to allow the vacuum to cool and
thethermal protector to reset, Check for
and remove clogs,if necessary. Also check
and clean/replacoany cloggedfilters. Wait
approximately thirty (30) minutes and plug
the vacuum in and turn back on to see if the
motor protector has reset.The motor
protector willnot reset if the vacuum is not
turned off even if the vacuum has cooled
down.
PERFORMANCE
INDICATOR
SOME MODELS
When the unit is running with normal air
flow, the light on the performance indicator
is off. The light comes on whenever the
airflow becomes blocked, if that occurs,
check the dust bin, clean/replace clogged
filters, and check other possible clog
locations shown in CLOG REMOVAL.
To correct problem: See the TROUBLE-
SHOOTING chart.
NOTE: The -
also come on
attachments, _ ¥_'eg°r_oancer
due to _ _ I\
reduced {;:::; (._ _.J_ \ _"
airflow \\
through the I_k,,_ /_
attachment. _ _ /
11

Always follow all safety precautions when
cleaning and servicing the vacuum
cleaner.
ElectricalShock And Personal Injury
Hazard
Disconnectelectrical supplybefore
servicingor cleaning the unit.Failure
to do so could resultin electricalshock
or personalinjuryfrom cleaner sud-
denlystarting.
iiiiiiiiiiiiiiiiiiiiiiiiiiiiiiiiiiiii; @ iii i;iiiiiii; i i !ii iiii iiiiiiii i i i i!i!! i i ! i;! i i i ii iii i i i i i i i ii!i! i i iiiiiii i i i i i i i i iiiiiiiiii i i iiii]
Gather the power cord and wrap it loosely
around the quick release cord hook and
lower cord retainer.
Store the cleaner in a
dry, indoor area, on
the floor with the
handle locked in the
Quick
R_eese upright
Cord position.
Power
Lower
Cord
WARNING
ElectricalShock And Personal Injury
Hazard
Wrapping the cord too tightly puts
stresson the cord and can cause cord
damage. A damaged cord is an electri-
cal shockhazard and could cause per-
sonalinjury or damage.
Unplug cord from wall outlet.
DO NOT drip water on cleaner.
To reduce static electricity and dust build-
up, wipe outer surface of cleaner using a
clean, soft cloth that has been dipped in a
solution of mild liquid detergent and water,
then wrung dry. Wipe dry after cleaning.
Wash attachments in warm soapy water,
nnse and air dry. Do not clean in dishwash-
er.
Do not use attachments ifthey are
wet. Attachments used in dirty areas,
such as under a refrigerator, should
not be used on other surfaces until
they are washed. They could leave
marks.
12

!_ii;!:: ;::ii:!:_i:i; :::::;:::::!:;;::::::::;;;:;:::;:;;::;;;:::::;;:::;:::;;:::;ii:ii:i:::;:::::::::::::::::::::::::::::::: :::::::::::;;;::: ::::::: _ _::::::_':;;;;;; :;;_;_; ; ;_;;: :_:: : :.:4:,:.:,:.:<+:,::4,:,:,:,:,:;:,:<<;:;:;:;:.;;................ ; ;. ;;|
I
i_i_i_i_i!i!i!i!i!i_i_i_i!i!i!i!i!i_i_i_i_i!i_i_!!]_iii_i_i!i_i_i_i_ilii_i_i!i_i_i_iii_i_i!iiiii!i!iii!i_i!i_i!i!i!i!iii_i!i_i_i_i_i_i_iii_iii_]ii_ii!iiiiii!_ii_ !! _iiiiii!i!_iiiiiiiiiiiiiii!ii!illiii_iiiiiiiiiiiiiiiiiiii ii!iiiiiiiiiiiiii!iiiiii!i!!i_i_i
_______________________________________________________________________________________________________________________________________________________________________________________________________________________________________________________________________________________!_!____ __ __ __ _!_!_!___!_i__i_i_i_i_i_i___i_i_i_i!_!i_i_i!!_!_i_i_i_!_i_i_i_ i i_i_!_ii!_!_!_i_!_!_!!_!_!__|
Always emptythe dust bin when dirtlevel
reaches the =MAXFILL" line.
TO REMOVE DUST BIN
! WARNING
Alwaysunplugpower cord from electri-
cal outletbefore performingany ser-
viceon vacuum.
Lift dust bin ban- DustBin _t_
Release
die located at the Handle --
top of the dust
bin. Dust
Bin --
!
Pull the handle
forward and lift
dust bin up and
out of the vacu-
um cleaner.
Dust Bin
Secondary
Remove any
clogs that
might be
located in the
dust bin port
or the sec-
ondary filter.
TO EMPTY DUST BIN
Turn This Direction Closed
To Open For Emptying (For Use)
1
Open
(For Emptying}
Rotate dust bin lid assembly counterclock-
wise as indicated on the lid and lift off.
Pour dust bin contents
into a trash container.
TO CLEAN FILTER
The filter may be Filter
cleaned by Cover
tapping it on a firm
surface or by
rinsing it under a
faucet. See Filter
Changing/Cleaning t-,_,
section Rinse with
water only, do not
use any detergent or
soap. Allow the filter to dry for 24 hours
before putting it back into the vacuum.
13

TO REPLACE DUST BIN
Turn This Direction Open
To Close For Use (For Emptying)
Closed
(For Use)
Place dust bin lid assembly back onto top of
dust bin. Align lid marks with bin marks as
shown above in Open (For Emptying).
Rotate lid clockwise while pressing down-
ward so that marks align as shown in
Closed (For Use),
[/
Place dust bin /'_
back into vacuum
cleaner by insert-
ing the bottom first
and tilt back with
the dust bin han-
dle raised.
Dust Bin
Release
Push forward and
lower the dust bin
handle to lock
dust bin in place.
\
Check secondary filter'frequently and clean
when dirty.
Electrical Shock Hazard
Do not operatethe cleaner withoutthe
motorsafety filter. Be surethe filter is
properlyinstalledto prevent motorfail-
ure and/or electricalshock.
Always unplugpower cordfrom electri-
cal outletbefore performingany ser-
vice on vacuum.
SECONDARY FILTER
FOAM
Remove the dust bin as outlined in the
DUST BiN CLEANING section,
Remove secondary filter from vacuum
cleaner.
Secondary
Filter--
Wash the secondary filter in warm soapy
water; rinse and dry thoroughly by squeez-
ing the filter in your hand and letting it air
dry,
DO NOT wash in the dishwasher.
DO NOT install damp.
Replace dry secondary filter. Ensure filter is
properly installed over filter opening.
Replace the dust bin as outined in the
DUST BiN CLEANING section.
14

WARNING I
ElectricalShock Hazard
Unplugpower cord from elect..dcaloutlet.
Do notoperate the cleaner withoutthe
pdmaryor exhaustfilters. Be surethe
filtersare properlyinstall.ed,to prevent
motorfadureand/or electricalshock.
PRIMARY FILTER
Check primary filter frequently and clean
when dirty.
TO REMOVE PRIMARY FILTER
Remove the dust bin and dust bin lid
assembly as outlined in the DUST BIN
CLEANING section. While holding the pri-
mary filter over a trash container grasp filter,
rotate and lift off.
Clean primary filter by
gently tapping over a trash
container. Locking
Tap on several
sides to
ensure best Filter
cleaning, c_re,
Slot
Rinse with water only as needed (see Dust
Bin Cleaning).
When cleaning the filter no longer restores
vacuum suction to full power you need to
replace the filter.
TO REPLACE PRIMARY FILTER
Make sure that the slots
of the filter line up with Filter-_
the locking tabs on the
filter cover. Replace filter
and rotate filter until
slots lock onto tabs
in cover. F,Iter S!o
Cove_
Tab
Note: Under normal use and care, your filter
can be expected to last up to 3 years.
Re-attach the filter cover and filter to dust
bin (see Dust Bin Cleaning). Place dust bin
back into cleaner.
EXHAUST FILTER
FOAM
Press inward on each side of
exhaust filter cover and pull out J I
to remove from vacuum ' I
cleaner. Press I
Inward
Remove the
frame and filter.
Push only on Filter
filter frame, not Filter _#/
on filter itself. Frame
Wash the exhaust filter in warm soapy
water; rinse and dry thoroughly by squeez-
ing the filter in your hand and letting it air
dry.
DO NOT wash in the dishwasher.
DO NOT install damp.
Replace the exhaust filter, carefully position-
ing it so that it fits into the frame.
Exhaust
Filter
Cover
Replace the
exhaust filter
cover by placing
tabs in slots and
pushing in until
cover snaps into
€ place.
15

Electrical ShockOr Personal Injury
Hazard
Disconnectelectricalsupplybefore
servicingor cleaningthe unit. Failure
to do so couldresultin electricalshock
or personalinjuryfrom cleaner sud-
denlystarting,
Frequently check and remove hair, string
and lint build-up in the brush area. If build-
up becomes excessive, follow the steps
below. Should the belt become loose or
should it break, follow the Belt Removal
Instructions.
TO REMOVE NOZZLE COVER
Disconnect electrical supply.
To protect the floor surface, always place
paper under the nozzle any time the nozzle
cover is removed.
Release the nozzle cover by rotating the
nozzle cover retainers.to the UNLOCK
position. Grasp back of nozzle on each side
and lift up to remove it from nozzle cover.
Nozzle
Cover
Carefully remove any residue that may exist
in the belt area.
PersonalInjury Hazard
Always unplugthe vacuum cleaner
beforecleaning the brusharea as agi-
tator may suddenlyrestart. Failure to
do so can resultin personal injury.
TO REMOVE BELT/CLEAN
AGITATOR
Position hands on the agitator. If the belt is
still attached to the agitator, there will be
tension on it.
Carefully lift the right end of the agitator and
then lift the left end.
Remove the worn or broken belt from the
motor drive shaft.
Personal Injury Hazard
Be careful when removingthe agitator
as the belt tensionis high.Failureto
do so couldresultin personal injury
from the agitator releasingquicklyand
snappingaway.
16

Remove the agitator to check for string and
hair build-up.
NOTE: In order to keep cleaning efficiency
high and to prevent damage to your vacu-
um, the aeitator must be cleaned every time
the belt is chanaed.
The agitator must also be cleaned accord-
ing to the following schedule:
Vacuum Use
HEAVY -
(used daily)
MODERATE -
(used 2-3 times/week)
LIGHT -
(used 1time/week)
Clean Aaitator
every week
every month
every 2 months
Cap
Cut off any carpet
pile, hair or lint
entangled around
the agitator and
remove any string
or debris located
near the end
caps.
TO REPLACE BELT
P-Motor
Shaft
"New
Belt
Belt
Pulley
Seat left end of agitator into nozzle base. To
seat agitator end, place rounded portion of agi-
tator end cap down into slot in nozzle base.
Loop the new belt on the motor shaft.
NOTE: Use Belt #20-5275
Loop the other end of belt onto the belt
pulley on the right end of agitator.
Pull right end of agitator forward and seat it
into nozzle base
/
Agitator
Base
End
Cap
--Base
Slot
Press firmly, checking to see that each
end is completely inserted.
Agitator
Check to see that the belt is centered on the
belt pulley and that the agitator turns freely.
Nozzle
Cover
\
Nozzle Cover
Retatoen;
Make sure the nozzle cover retainers are in
the UNLOCK position. Hook the front of the
nozzle cover on to the nozzle base and
rotate downward. Once in place, rotate the
nozzle cover retainers to the LOCK position.
17

ElectricalShock Or Personal Injury
Hazard
Disconnectelectricalsupply before
servicingor cleaningthe unit. Failure
to do so could resultin electricalshock
or personal injuryfrom cleaner sud-
denlystarting.
Always follow all safety precautions when
cleaning and servicing the vacuum cleaner.
If the cleaner does not seem to have ade-
quate suction, first check if the dust bin is
full or if a filter is clogged. See DUST BIN
CLEANING and FILTER CLEANING /
CHANGING.
If the dust bin and filter areas are free of
clogs, check the hose area. Remove the
suction inlet by depressing the two tabs that
secure it to the back of the vacuum and
check for clogging in this area.
Hose
Tabs
Inlet
Motor
Hose
Replace the suction inlet and remove the
other end of the hose from the tool holder.
Plug in the vacuum and turn it on. While
running the vacuum cleaner, stretch the
hose in and out to remove the clog.
Turn the unit off and unplug the unit.
If the clog still exists, pull the short hose out
of the tool holder and inspect the short
hose.
Remove any visible clogs.
NOTE: Do not block motor protector.
This vacuum has a motor protector by*pass
valve which automatically opens to provide
cooling air to the motor when a clog
prevents the normal flow of air. If the by-
pass valve opens to prevent motor
overheating and possible damage to the
vacuum, a change of sound will be noticed
as air rushes through the valve opening. If
this occurs, turn the vacuum off and unplug
the power cord from the outlet. Then check
for clogs as described under the CLOG
REMOVAL section.
The motor protector by-pass valve may open
when using attachments or when cleaning
new carpet, due to reduced air flow caused
by the attachments themselves or by new
carpet fuzz filling the dust bin quickly.
18

::::::_:::::: ::::::::;::::_::::::_ ::: ":y:'::'::::: :: :::'::::: :: : :,:.:::::::::::: :::: :?:::::::: : ';':?:':'_':::y:::::::: ,,:.;:::::.:::::,:, :::::.:.:.:::.f:?:.:--:: ¸;:¸:¸:¸:¸:¸:.:.:.:¸:¸:¸:¸:¸:¸:¸:¸:1
I:::::::::::::::::::::::::::::::::::::_:::: :: : ;:::;::• : • ;; _. : ::; • . • ::::: ;;::_ ::;;; ::;It :9::: : ;;: :: :::: :::
_iiiiiiiiiiiiiiiiiiiiiiii_iiiiiiiiiiiiiii_ii_i_ii_i_iiii_i_i_ii_ii:_i_iiiii_i_iii_ii_i_ii_ii!:_:_i_iii_i_iii_ii_iiiiii_i_i!_:ii_i_iit_:_i_!_i_i_iii_ii_iii_ii_i_i_ill_it_i!i_iiii_ii_i_i!i!iti!i!_:!i_ii`_iii_I%ii_i_!ii_iiii_iiiii_i_iii_i_i_ii_i_i_ii!_iii_i_i_ii_i_ii_i_iii_ii_:_i]
ElectricalShockOr PersonalInjury
Hazard
Disconnectelectricalsupplybeforeser-
vicingor cleaningthe unit. Failureto do
so couldresultinelectricalshockor
personalinjuryfromcleaner suddenly
starting.
TO CHECK AGITATOR
t]_ Turn the vacuum
_" ' = over to check for
worn brushes.
When brushes are
worn to the level of
the base belt guard,
Base Belt Guard replace the agitator.
TO REPLACE AGITATOR
Remove the nozzle cover and agitator. See
BELT CHANGING AND AGITATOR
CLEANING.
Replace agitator with a new one.
Reassemble the belt, agitator and nozzle
cover. See BELT CHANGING AND
AGITATOR CLEANING.
Belt Pulley
End Cap
End Cap
19

i ,:::::: ....: ;;::::::: _ ::_:::: ::::::::::: :::: ::: :: : _ _ _: _ :: _ : .:.:?:._:::T:.::,_:.:::.:.:::T:.:.:::.:.:.::T:,-:-:'::': '¸ ::::.:.:.:.:::..:.:.::::.:::::T:T..T:T:T;.:.::!.:.:::---:-:.:.:._.:::::: ¸ --:::::.:.:.:i::: -:|
I
Review this chart to find do-it-yourself solutions for minor performance problems. Any service
needed, other than those described in this owner's manual, should be performed at a Sears
service center,
so couldresultin electrical shock or personal injury.
Cleanerwonl run.
Poorjob of dirtpick-up.
Cleaner picks up
moveablerugs or
pushestoohard.
Agitatordoes notturn.
Performanceindicator,
somemodels,is red.
Air flow restricted
witt_attachmentuse.
Soundchanges.
1. Unplugged at waltoutlet.
2, Tripped circuit breaker/blown fuse
at household service panel.
3. On/off switch not turnedon.
4, Thermal protector tripped.
1. Full or clogged duel bin.
2. Wrongpileheightset_ng.(somemodels
3. Worn agitator.
4. Clogged nozzle or dust bin port.
5. Clogged hose,
6. Hole in hose.
7. Broken/misplaced bell.
8. Hose not inserted fully.
9. Motor protectionsyslem activated,
10. Dirty filters.
1. Wrongpileheightsetling.(somemodels)
1. Broken bell.
2, Belt installedincorrectly.
1, Full orcloggeddust bin.
2. Dirty fillers.
3. Clogged airflow passage.
4. Cerlale altachment tools.
1, Attachment use restricts air flow.
2, New carpel fuzz clogged air path.
1. Plugin firmly, pushon/off switch to on.
2. Reset circuit breaker or replace fuse.
3. Push on/off switch to on.
4. Reset thermal protector, (page 11)
1. Clean dust bin, (pages 13, 14).
2. Adiusl setting, (page 7).
3. Replace agitator, (page 19)
4. Check CLOG REMOVAL, (page 18).
5. Check for clogs, (page 18).
6. Replace hose.
7. Replace/fix belt, (pages 16, 17).
8. Insert hose fully, (page).
9. Check forclogs. (page 18).
10. Clean/change filters, (page 15).
1. Adjustsetting, (page 7).
1, Replace belt, (pages 16, 17).
2. Check BELT CHANGING AND
AGITATOR CLEANING, (pa_les 16.17).
1, Clean dustbin, (pages 13, 14).
2. Clean/change tilters. (page 15).
3. Clear clog from airflow passage,
(page 18).
4. This isnormal, Light should go off
when tool is removed.
1, Check ATTACHMENTS, (page 9).
2. Check CLOG REMOVAL and clean
hose. (page 18).
20

E_1_'_1_E_E_EE_E`E_E_EE_1_EE_EE_E_:_:_E_._:_;_:_:_:_:_:_:_:_:_:_:_:_:_:::_:_:_::::_::::_::::`:_:_::;_;;:; ::::: ::::::::: :::::: :;; :_::::: :_::::::i:_:;:::::::::::::::::::::::::::::::::::::::::::::::::r
_i_i_i_i_i_i_i_i_i_i_i_iiiiiii_iii_iii_iiiiiiiiiii_iiiiiiiiiii_i_iii_iiiiiiiiiiiiiiiiiiiiiiiiiiiiiiiiiiiiiiiiiiiiiiiiii_i!_!i_iii_iii!_i_i_i_i_i_ii_i_i_iiiiiiiiii_ii!i!_!iiii_i!i!i!i!_!_ii!i_ii_i_iiiiiiiiiii_iii_i!i_i_i_i_i_i_i_!i!_!i!_iiii!i_i!iii_i_ii_i_i_i_i_i_;i!i!iii!!_i_i_i_i_ii!!i!i!!!i!i!iiiiii!iii!iiiii_iii_ii!iiii_i_i_iiii!i!i!i!i!i!i_i!i_i_i_i_i_i!i_ii_i!i_iiiiiiiiiiiiii!i!i!iiiiiiiiiiiiiiii!i!ililili!i!iiiiiiii!i!i!i!iiiii
Antesde usersuaspiradoranueva ....... 1
Garantiade la espiradora de Kenmore..... 1
InstrucdonesImportantesde
seguddad .............................2
Piezesycaracterfstlcas.................3
Instruccionesde ensamblamiento.......4-,5
Instrucciones de opemci6n ............... 6
Ajustey selecci6nde nivelde pelode la
alfombra ............................ 6
Desprendimientodelmango .............. 7
Interruptor deencendido/apagado......... 7
Accesorios ......................... 8-9
Cuadrode usode losaecesorios.......... 9
Sugerenciasparaaspirer ............... 10
Caraoteristicasde rendimiento........... 10
Cuidado de la espiradora ............... 1t
Almacenamientode la aspiradora ........ 11
Limpiezadelexteriory de los accesorios... 11
Lirnpiandoel cubode la basura........ 12-13
Limpiezadelfiltro secundario ........... 13
Cambio/limpie del filtros ............... 14
Cambio de laeorreay limpiezadel
agitador ......................... 18-20
C6mo eliminarlos residuosde basura
en losconductos..................... 17
Protectorde motor .................... 17
Guidadodel agitador .................. 18
Ensambledelagitador ................. 18
Reconocimientode problemas........... 19
i;ii!iii_i_iiii_i_!_;_;_;_i_i_;_i_i_i;;_iii;;iiiiiiiiiiiiiiiiiii_!i!ii!i_i_;_;iiiiiiiiii!ii!!__ii_iiii;i;i!i!i_i_iiii;;i!i_iiiiiii_i;_;!!!i!i!i!_ii!ii_!_ii_iii!!!_i_i_iiii!_iiiiii!i!i!i!i!i_i_i_i_iii_i_ii!i!i!i!i_i_i_i_i_i_iiiiiiii!i!i!i!i!i!i_i!i_i;i;;i!i!i!i_i!ii_i_i_iiiii_ii!i!!i!_i_ii_iiiiiiiiiiiiii_iiiiiii_i_ii_ii!ii!_!iiiiiiiiiiii!iiiiii_i_i_ii_iii_i
Per favor lea esta guia que le ayudaraa assemblary operar su aspiradora nuevade Kenmoreen una manera
mas segura y effective.
Para mas informaci6n acerca del cuidado y operaci6n de esta aspirador, Ilame a su tiendaSears mascercana.
Cuando prequntepot informaci6nusted necisitar;_el n_mero completo de serie y rnodelo de la aspiradoraque
esta Iocado en la placa de los nemeros de modeloy serie.
Use el espaciode abajo para registrar el n0mero de modeloy serie pare su nuevaaspiradorade Kenmore.
NLimerode Modelo
Numero de Serie
Fechade Compra
Matengaeste libro y su reciboen u lugar seguro para referenciasfutures.
GARANT[ALIMITADADE UN A_IODE LA ASPIRADORAKENMORE
Esta garantia es por un aSo desdela fechade compra,e incluyesolamenteel uso de la aspiradoraen
hogaresprivados.Durante el aSode garantia, cuando la aspiradoraes operada y mantenida de acuerdoal
manualde instruccionesdel dueSo,Sears reparar_,cualquierdefecto en materialeso fabricacibnlibre de
cargo.
Estagarantla excluyelasbolsas de colecci6n,correas, lamparillas, yfiltros, las cuales son partes gastables
que sedeterioran conel uso normal.
Pareelserviciodegarant|a,retomeesta aspiradoraalCentrode ServicioSearsn_s cercanoen los Estados
Unides.
Esta garantia seaplica solamente mientrasesteproducto esta en uso en los Estados Unidos.Estagarantia
le da a usted derechos legalesespecificos, y usted puede tenet tambien otros derechos loscuales varian de
estado a estado.
Sears, RoebuckandCo., D/817 WA,Hoffman Estates, IL60179

Susegurtdades muyimportantepara nosotros.Para mducirelriesgode incendio,chequeeldctrico,
lesl6ncorporalo dafiosal utJlizarsuaspiradora,actdedeacuerdoconprecaucionesbdsicasde
seguddad,entreelias:
Leaeste manualantes de armar outilizar su
aspiradora.
Use suaspiradora _nicamenteen la forma
descrita en este manual.Use _nicamentecon
accesorios recomendadosper Sears.
Para reducirel riesgode cheque el_ctrico, no use
suaspiradoraal aire libre ni sobre superficies
moiadas.
Desconectela fuente de electricdad antes de dar
servicioo limpiar. De Iocontrario podria causar
un cheque el_ctricoo lesi6n corporal.
Siempredebeapagar su aspiradoraantes de
desconectarla.
No desconecle la aspiradoratirando del cord6n
electrico.Para desconectarla, hale el enchufe, no
el cord6n.
Nousela aspiradorasi el cord6n o el enchufe
est,. daSado.Si la aspiradora no est,.
funcionando adecuadamente o si se ha dejado
caer, est_ dahada, s_ ha dejado expuestaa ]a
intemperie o se ha dejado caer en agua, devuel-
valaa un Centre de servicio de Sears.
Nohale ni transporte ]aaspiradora per el cord6n;
no use el cord6n come mango; no cierre puertas
sobreel cord6n; nohale el cord6n sobre robot-
desagudos ni esquinas.No pasela aspiradora
sobreel cord6n. Mantenga el cord6n alejado de
superficies calientes.
Noabandone la aspiradoracuando este conec-
tada. Descon_,,ctelacuando no la este usando y
antes de darle servicio.
Nopermita que sea utilizada comejuguete. Se
requieretoner mayor cuidadocuando sea
utilizadaen la proximidad de niSoso por ni_os.
NOtoque laaspiradora ni el enchufecon las
rnanosrnojadas.
No coloque objetos en las aberturas.
NOutilice la aspiradorasi algunaabertura esta
bloqueada; rnantengalalibre de polvo, pelusa,
cabellos y cualquiera cosa que podrfa disminuir
el flujo de aire.
Mantengael cabeUo,ropasuelta,dedos y todas
las partes del cuerpo alejadosde lasaberturas y
piezas mecanicas.
No usela aspiradorasin tenorinstalada la cube
de la basuray/o losfiltros.
Limpiesiempreel cubede la basuradeepuesde
aspirar de la alfombra limpiadores o refrescant-
es, pelves y depositos fines.Estos productos
tapanlos filtros, reducenel flujode aire y pueden
causar daSoa la limpiadora.
No use la aspiradorapara ]evantarobjetos agu-
dos, juguetes pequeSos,alfileres,sujetapapeles,
etc.Podrian daSarla aspiradorao la cube de la
basura.
No levanteninguna cosa que seeste quemando
o emitiendo humo, come cigarrillos,cerillos o
cenizascalientes.
No usela aspiradoraparaaspirarliquidos
inflamableso combustibles(gasolina, liquidos
para limpieza_perfumes,etc.) ni la useen
lugares donde estos podrian estar presentes. Los
vapores de estas sustanciaspueden crear un
peligro de incendioo explosi6n.
Tongaculdadoespecialal utilizar la aspiradora
en escalones. No la coloquesobre sillas, mesas,
etc.Mant_ngala en el piso.
Ustedes responsablede asegurarque su aspira-
dora no sea utilizadaper ninguna personaque no
pueda manejarlacorrectamente.
GUARDE ESTAS INSTRUCClONES
El armado yuse seguro de su aspiradora sonsu responsabilidad.Esfaaspiradora ha side diseSada
exclusivamentepara use domestico.La aspiradoradeber_ almacenarseen un lugar seco y en el inte-
rior.Lea este Manualdel propietariodetenidamente, pues contiene informaci6n importante sobresegu-
ridad y use. Esta quia contiene informaci6nsobre seguridad debajo de simbolos de advertiencia
cuidado. Per favorponga atenci6n especial a estas instruccJonesdadas. Advertencia: Este informaci6n
le alertara con el poligro de fuego, cheques electricos, quemadas y lesiones. Cuidado: Este
inlormaci6n le alertara a peligroscome lesiones y daSosde propiedad.
2

Esimportanteconcerlaspiezasycaracteristicasdesuaspiradoraparaasegurarsuusoadecuadoyseguro.
Examinelasantesdeusarsuaspiradora.
Objeto Pieza N" Pieza No
en EUA en Canad_
Lamparilla 20-5240 20-40600
Correa 20-5275 20-40096
Soporte para
la manguera
Manija de
soltar el
cubo de la
Cord6n
el_ctrico.
Tornillo
de mango.
Interruptor de
encendido/
apagado
ador de
liberacibn
rapide del primario
cord6n (dentfo)
para
sacud_
Tubo Cubierta
de la
boquilla
inferior para
el cord6n/Mango
para transportar
Protector
• Herramienta de meubles
para tapices Soportes de la
Protector cubierta de boquilla
de motor
la basura
escape
(dentro)
Base de
boquifla
Pedal de
liberacion
del mango
N_meros de
series del modelo
Manguera
corta
JUEGOSDEMANGUERA
DEEXTENSION
ALGUNOS MODELOS
Manguera de extensi6n
!lultcl(lu(lllu(ll(clli,,
_c ALGUNOS
-..-- MODELOS
Adaptador
epillo paraTP::S
u ])
3

Antesde armar la aspiradora, chequee la LISTA
DE EMBALAJE en la cubierta separada de la Lista
de Partes para Reparaci6n. Use esta lista pare veri-
ficar que ha recibido todas las componentes de su
nuevaaspiradora Kenmore.
Peligrode choqueek_ctrico
Noconectela aspiradora haste que termine
de armada.De Io contradopoddacauserun
choqueelSctdcoo lesi6ncorporal,
MONTAJE DEL MANGO
Quite el tornillodel mango Iocalizadojusto debajo
del horde superior de la parte posterior de la aspi-
radora,verJlustraci6nde arriba.
Coloque el mango comose veen el diagrama
abajo.
AI mantenerla manguera de maneraque no inter-
fera, rnuevael mangoa laabertura en la parte
superior de la aspiradora.
Oriflclo para
el tornglo del
mango
Inserteel tornillo pare que pasepar el mangode la
aspiradora.
Empiece a apretarel tornillocon los dedos. Quiz_.
sea necesario ajustar un pocoel mango.
4

CUIDADO
No aprletedemasiadoel tomillo.
SiIo apdetademasiadopodriaarruinarlosori-
flciospara eltomillo.
No operelaaspiradorasintenerinstaladoet
tomillo.
Apriete el tornil]o conun destornillader.
\
COLOCACI6N DEL CORD6N
Aseg6resede que el sujetador superior del cordon
de liberaci6n rapida seencuentre en posici6nverti-
caLQuiteel alambre con el que est_ atadoel cordon
el_ctrico.
t'k
Fijeel cord6n en \_._
posici6n,forz#_ndolo
en ]a ranura de ¢
bloqUeoubicada enel bloeueo
cuerpo del sujetador
de liberaci6nr_pida
del cord6n, como se
muestra.Esto ayudaa
que el corden no se
enrede debajo del Cord6n
agitadorde la eki_r/€o_'_
aspiradora. _!i
Sujetador de_ !
liberaci6n
o,
CorddnT_
eldctrico _.
Comparti.'J____.
miento _ I--
inferior para j ]
el cordbn I[
AI mantener el
corden e]ectrico de
una manera que
no interfera, ponga
el cordSnel_ctrico
alrededor del suje-
tador de liberai6n
rapidadel eord6n y
alrededor del
Compartimiento
inferior pard el
cord6n y luego
cierre el enchule
del cordon electri-
co en el cordon
electrico.
COLOCACIONDE LOS
ACCESORIOS
Unavez que hayacoloeado el mangoen la unided,y
el cord6n hayasido enrollado en lossujetadores,
podra prooedera colocar los accesorios en sus
respectivosreceptaculos.
1. Cierreel finpard aspiraci6n de la mangueraen la
parte detraserade la aspiradora.
2. Coloque la mangueradetras de] mangoy eneima
del soporte de manguera.
3, Coloquela mangueraen la ranura delantera en
etsoporte de herramientas, girando y empujando
hacia abajo hacia la mangueracorta para asegurar
una conexoi6n buena.
4. Coloqueel tubo de extensi6nen la ranura
detrasera en el soporte de herramientas.
5. Mueva la herramientapara hendiduras hacia la
ranura al ladodel tubo.
6. Conecte el cepillo de polvo o el cepillo de usos
mLiltiplescon el tubo con los cepillos haciaarriba.
- Ceplllo para
sacudir
Abertura de - Herram/enta
aspiracibn pata tapices
Tenador de
herramienfas
5

PARA COMENZAR
1. Gire el
Ilberacl(m sujetadordel
cordSn de
€ord6n lade a lade y
hacia abajo
para liberar
el cord6n
electrico.
2, Desprendael enchufe del cordSnel_ctrico y quite
el cord6n del sujetador superior.Compruebe que el
cord6n el_ctrico siguefijado en la ranura de bloqueo
del sujetador superior.
NOTA:Parareducir el riesgo de chequeel_ctrico,
esta aspiradoracuenta con una clavija polarizada,
unode loscontactos esmas anchoque el otto. La
elavijas61opuede introducirsede unamanera en el
enchufe.Si la clavija no cabe bien en el enchufe,
inviertala.Si a6n no cabe, Uamea un e]ectricista
paraque instale un enchufe correcto. Noaltere la
clavi[ade ninguna manera.
Paligrode lesi6n personaly defio al producto
• NO conectelaaspiradoraslel interrupterestd
enla posJci6nON. Podrlaresultaren lesk_n
personalodaSo,
• NO useIo6enchufesIoca]izadossobrelos
muebles,Losobjetoscercanospodrfanresultar
dar_dos.
3. Conecteel cordon el_ctrico polarizadoen un
enchufe de 120 voltios que se encuentre cerca del
piso.
ALGUNOS MODI LOS
Para seleccionar unajustede nivalde pelo de la
alfombra:
Apague la aspiradora.Seleccione un nivelde ajuste
inclinandola aspiradora hacia arras hastque las
ruedasdelanteras est_n un pose despegadas del
piso.
Deslicela palanca de ajuste de nivel de pelo de la
alfombraa la posici6ndeseade.
Losmodelos sin selector ajustan autom_ticamente
para el pelusode alfombrade varias alturas.
SUGERENCIASDE AJUSTEDENIVEL DE PELO
ALFOMBRA
Para que se lefaciliten algunastareas de limpieza,
come per ejemplo tapetes aueltos y alfombrasde
pelo large,puede que sea necesarioelevar ajuste
de nivelde pelo de la alfombra.Los ajustes sugeri-
dos son los suguientes.
Los modelosde dos (2) posiciones:
HIGH:pelocorto o mediano.
LOW: pelo meidano o poco large.
Losmodelosdecuatro(4) posleiones:
HIGH:pelo_spero y lanudo,pelo largo,felpa, alfom*
bras otapetesirregulares.
MED: pelo mediano o poco largo.
LOW:pelocortoo meiano.
EX LOW: pelo muy corto.
6
Pongala unidaden"HIGH" cuando utilicelos acce-
sodaspara prevenirposibles daSosal piso.
Atenci6n:Se requiere el cuidado especialcuando
pasala aspiradora sobre ciertasclases de alfombra
o cubierta de piso.Siempre revise las instrucciones
de la limpieza recomendada de fabficante para la
alfombra o la cubierta de piso antes de pasar la
aspiradora

Suelteelmangoporpisarenelpedaldeliberacion
ytirarlohaciaarrasbasraqueliberedesuposici6n
vertical.
Pedalde la
Ilberacl6n
r--n
ALGUNOS MODELOS
Suelteel mango por apretar haciaabajo con el pie
en el pedal de liberaci6n y tirar del mango hacia
atr_.sy hacia abajocon la mano,
Pedal do Ilberacl6n
del mango
fiiiiiiiiiiiiiiiiiiliiiiiiiiiiiiiiiiiiiiiiiiiiiiii!iiiiiiiiiiiiiiiii@ iiii ii i iiiiiiiiiiiiiiiiiiiiiiiiiiiiiiiiiiiiiiiiiiiiili
_!!_i!i_iii_i_iiiiiiii!i_!_!_!_!_!_!_!_!i!_!i_ii_i!i_i!i_i_i_i_i_i_i_!_!_!_!i!i_i_ii_i_i_i_i_i_!i_i_i_i_i_i!_i_i_i_i_i_i_i_i_!_i_i_!_i_!_!_!_i_i_ii_i!i_i_i_i_i_!ii_!_!i_i_i_i_i_i_i!_i_i_i_i_i_i_i_i_ii!i!i_i_i_i_i_i_i!i_i_i_i_i_i_i_iiiiii!_i_iiiiiiiiii_i_i_i_i_i_i_!_!i!_iiii!i_i_i_i_i_i_!_!i_i_i_i_i_iii_
Para encenderla aspiradora, pise en el control de
ON/OFF colocado en la parte detrasera de la aspi-
radora. Paraapagar la aspiradora, pise en el con-
trol otravez,
Interruptorde
ancendldo/

: ::::_; ::::::::: ::::::::::::::::::_;:::;:::::::::::: ::: ;::::::::::: ::" : • . • ::::::_:: :::::::::::: _ ; : ::::::;;;::_::::::_:::: :::::::::;: ;:::::::::::
Peligrode choqueel_'trlcoo leslbncorporal
No pongalas manosolos piesdeba_odela
mbquinacuandoaFnadela manguera.Mientras
se usanlosaccesorios, laagitadorempiezaa
girar.No dejeque laaspiradorase quedeen
uns_lolugarporun periodoextendido,porque
laagitadorpuedehacerdai'ioa lasuperficie
delsuelo.No pongalaaspiradomencimade
muebles,enel fleco de laalfombra,en una
sffombradepelolargo,nienescalems
affombradas.La posid6nidealparela
aspiradoracuandose usanlosaccesodes
est_en un_rea planeconel mango enla
posici6nvertical.
COMOUTILIZARLOS
ACCESORIOS
Coloque la aspiradoraen una superficie planay pon-
ga el graduadorde alturaen HIGH,
Losaccesorios podr,_ncolocarse en la manguera o
en el tubo. Ademas,el ce_pillopara polvo tambien
podr_colocarse en la boquilla pare huecos reduci-
dos.
La mangueray el tubopueden sacarsede Jaman-
gueracorta tom_,ndolosporel extremo y tirando ha-
ciaarriba.
! CUIDADO
NO tire de la aspiradora pot la mangueraen
la habitation,Podrl'anocurrir daSos a susper-
tenencias.
LosaccesorJosse pueden conectar ala manguerasi
el obietoque sedesea limpiar no esta.lelos de la
aspiradora.La manguera, en algunos modeles,se
expandir_.
NOTA:Cuando la aspiradora este prendida, la
manguera,en algunosmodelos, tenderaa caerse
debido ala succi6n de]a aspiradora.
Si desea mas extensi6n, puede coneclar el tubo a la
mangueray los accesorios al tubo.
AI utilizar los accesodospare limpiar, tenga
cuidedo de no sobrepasar el alcance de la
rnanguera.Si Io hace,podn'aocasionarque la
aspiradora se caige.
ALGUNOS MODELOS
Se incluye un tubo extra,sin pestaSas,pare un ma-
yor alcance.El tubo extrase puedeeonectaral tubo
con pestaSaspara Iograrun mayor alcance.Intro-
duzca el tubo y d_le un cuarto de vuelta para asegu-
ratio.
Herramlentapara hendlduras
Cepllloparasacudlr Tubo
J_]m (Algunosmodelos) ._
lille Comblnaclrm \ \ T
(Algunosmodelo$)L'_ Ceplllo
Si utiliza el cepillo pare polvo/cepillopare
combinacibn y necesita m&saicance, puedeconec-
tar la boquilla parehuecos reducidosal tube y el ce-
pilfopara polvo/cepillopara combinacionen la boqui-
Jlapara huecos reducidos.
ALMACENAJEDELOS
ACCESORIOS
Devuelva la manguera a sulugar en la manguera
corta y las herramientasa susoporte.
CUIDADO
Asegbresede limpiarlos accesodosdespu_
de uUlizariosen -_reassucias,debaJodel
refdgemdor,antesde usadosenotrassuperfi-
cies,ya que podriandejarmamas.
8

Cuandouselamangueraenformanormalo
conlamangueradeextensi6nInstalada,la
esplmdoradebemantenersesebreuna euperfl-
de flrme al mismonlvelo a un nlvelinferior
que lospiesdel usuario.NO uselasmangue-
rascuandolaaspiradoraest6 a unnivelrnds
alto que lospiesdetusuario,
MANGUERA DE EXTENSION
ALGUNOS MODELOS
Unos modelos incluyenuna mangueraauxiliar que
conecta con la manguerade estirar en la aspiradora
para una extensi6nm_.slargapara limpiar.
Manguera de la unidad Manguera de extension
Insertelas dos leng_etasen el extremode la
manguerade extensi6nen las dos ranurasformadas
como la letraJ en la aspiradoray gire para conectar.
Se puede conectartodas las herramientasy el tubo
con el extremoabbrte de la manguera.
CEPILLO PAPA PISOS Y TUBO
ALGUNOS MODELOS
Unosmodelos tienen uncepilloy un tuboauxiliares
para limpiar los suelos sinalfombras.Gire el extremo
del adaptador haciael cepillode sueloy el otro
extremo haciael tubo recto.Conecte el tubo recto
con el tubo telesc6pico y luegocon la mangueraen
la aspiradorao con la manguerade extensi6n.
(11
ACCESORIO
CEPILLO PARA SACUDIR <_
HERRAMIENTAPARA
HENDIDURAS
CEPILLO PAFIA
COMBINACION
Handi-Mate® Jr.
Muebles"
X
X
X
X
AREA A LIMPIAR
Entre
coijines*
X
Cortinas* Escalones
X X
X
X X
X
Paredes
x
La v_lvulade desviaci6n puede estar abierta mientras se usanlos accesorios o para limpiar una aJfombra
nuevaa causa de un flujo reducido de aire por los accesorios mismos o por la pelusa de la alfombra que ]lene
la bolsa rapidamente.
• Siempre limpielos accesorios antes de usar eobreteias.
9

ADVERTENCIA
Peligrode lesi6npersonal
Act_econprecaucl6nsicolocaleaspiradora
sobreescalones,SJ$ecae, podffacauser
lesionpersonalodafioa lapropiedad,
Odllasde alfombras.
Guie unode loscostadoso laparte anterior dela
boquilla a Io largodel borde de lapared.Los cepi-
Iloslargosayudana aspirerla tierraatrapada en las
orillasde las alfombras.
Escalones.
Coloque el mangoen la posici6nvertical. Use la
herramienta para hendiduraso el cepillo para
sacudir.Coloqueel interruptor de encendido/apaga-
do en ON.
SISTEMA DE PROTECTI6N
DE MOTOR
ProtectorTermEd
Esta aspiradoratieneunprotector termalque se
ajusta autorn&ticamentepare proteger a la
aspiradoradel sobrecalentamiento.Si una
obstrucci6nimpide el flujo normal de aire al motor,el
protectortermal apaga el motor autom_ticamente
para permitir que el motorse enfrfe a fin de evitar
posiblesdaSosa la aspiradora.
Parecormgirel problema:Si esto ocurre, apague la
aspiradoray desenchufe_e4cord6n del tomacorriente
para permitirque la aspiradorase enfrfe y que el
protectortermal se reajuste. Busquey saquelas
obstrucciones,sies necesado. Examinetambi6ny
reeroplace/liropieeualquierfiltroobstruido. Espere
aproxiroadamentetrelnta (30) roinutos y enchufe la
aspiradorayvoit6ela pare vet si elprotectordel
motor se ha reejustado.El protector del motorno se
reajustarztsJno se ha apagadola aspiradoraaun
cuandelaaspiradorase hayaenfdado,
INDICADOR DE RENDIMIENTO
ALGUNOS MODELOS
Cuando la unidad este funcionando con el flujo
normal de aire, el indicador de rendimiento est,_
apagado. Se enciende la luz cuando el flujo de
aire este obstruido. Si eso ocurre, chequee el
cubo de la basura, limpie/reemplace filtros
tapados, y chequee otros lugares posibles de
atascaduras que se muestran en COMO
ELIMINAR LOS RESIDUOS DE BASURA EN
LOS CONDUCTOS.
Pare corregir
el problema:
Vease el
diagrama
RECONOCI-
MIENTO DE
PROBLE-
MAS.
NOTA: Es
posible que la
luz encienda al
usar los
accesorios
porque el flujo
de aire es
reducido por
los accesorios.
10

liiilTii;i:ii_ii;_iii______i_ii_iii!!i;i¸!!!i"iii!i!ii!iiii_iiiililiiii;_i:_ii'ii_i_!!iiiiii__i_iiiiiii_iiiii_iili_ii_i:i_i_i_ii_i_i_i_iii_iiiiiii_iil¸i;iiiiiii_i_i_iiiiii_iiiiiiii_'i_!_i_i_i•_iiii_ili;i_iiiii__:_i_iii_i_ii_iiiiiiiiiii_;i'i!ii"ii!ilI¸iii_i_i_i_i_iiiiiiii¸iii'i'!i_iii_i_i_i_'_iiiiiiiiiii|
• ::::: ::::::: :::::_:::::::::::::::_:::::::::::_:_:::::::::::::_:::;::::::;::_:::_::_, • : .: _ ._:. : : ._ :: ::_ : : : : : • •:'• .; .,:,•., . .::;_ _ _:::: :::::::: ::::::: :::::;;;:; : : ::::::::_;:: :::
_i_ _,_ _ _._ __:_iiiiiiii!iiiiiiiiii_iiii!iiiiiiiiiiiiiiiiii!iii!i_iiiiiii_:_::,_ :_ : _ _ _i_:_ '_i_-.' .: : • _ii !__i_ _iiiiiiiiiiii!iiii_i_ _i!_iiii!_i_
Siga siempre todas las instrucciones de seguridad
al limpiar y darle servicio a su aspiradora.
Peligrodechoqueel_trico olesiOncorporal
Desconectelaunidadantesdelimpiada o
dadeservicio.De Iocontrario podrfaprodu-
cirseun choqueel_trico o causarlesioncor-
poralsi la aspiradoraarrancade rnanera
imprevista.
::::::::::::::::::::::::::::::::::::::::::::::::::::::::::::::::::::::::::::::::::::::::::::::::::::::::::::::::::::::::::::::::::::::::::::::::::::::::::::::::::::::::::::::::::::::::::::::::::::::::::::: _ ::::::::::::::::::::::::::::::::::::::::::::::::::::::::::::::::::::::::::::::::::::::::::::::::::::::
;:::::::_:::;:;:;::::::::_::::::::::::::::::::::::::::::::::. ;:.:;_,:,: ::::::::;.;...:._,:.:.:<<,:_::_::.:. :: ::+::.:.:::::::.:.:::::.:.;:::::::,::::.:::::.>::_::::: ::::_::::_;_:;_;_;_::_:::`::_::::_::::::_:_::::::_;_:::_:_:::::::::::::::::::: ::::::; :::::::::::::::::::::::::::
iiiiii!iiiililililiiiiiiiiiiiiiiiiiiii i i i i i i i i!i i i!i!i i!i!i!i!
Recoja el cordon electrico y pSngalosueltamente
alrededordel soporte de liberaciSnrapida y alrede-
dor del soporte inferiorpara el cordon.
S_etadorde_
libe_c_n
rapidedel
cordbn
Guarde la aspirado-
ra bajo techo en un
lugar seco,con el
mangoen posiciSn
vertical.
el_ctrico
miento
inferior para
el cordon
Pellgrodechoqueel_trlco olesi6ncorporal
Si enrolla el corddn muy apretadopuede ten-
sarlomucho y causede daSos.Ded_ame, el
cordbnpodrfacauserdescargas el_ctdcasy le-
sioneso daSospersonales.
Desenchufe el cord6n del tomacorriente en
la pared.
NO derrame agua sobre el limpiador.
Para reducir la electricidad esta.tica y la
acumulaci6n de polvo, frote la superficie
exterior de la aspiradora con un paso blan-
do que ha sido inmerso en una soluciSn de
detergente liquido suave y agua, entonces
exprimalo seco. Frote seco despues de
limpiar.
No uselos acsesodesslostan mojados.
Losaccesoriosque se utilican en _reos
suclas,debaJodel refdgerador,nodeben
usarsean otrassuperficiessinantesser
lavados.Podr_andejarmarcas.
Lave los accesorios en agua jabonosa
caliente, enjuague y sequelos al aire. No
los limpie en un lavaplatos.
11

Slemprevac[eel cubode la basuracuandoel nivel
de basuraalcanzala I[nea 'MAX FILL.'
PARASACAR ELCUBO DE LA BASURA:
ADVERTENCIA
Siempredesconecteel cordon61ectdcoantes
de repararalgunapartede la aspiradora.
Levantela mani- Manijade
jadel cubo de la soltarel cubo
basura ubicada
al topedel cubo
de la basura. Cubo de
Tire de la manija
haciaadelante y
levanteel cubo de
la basura hacia
arriba y afuera
de la aspiradora.
Portlllo del
cubo de la
FIItro
Remueva
cualquier
obst&culoque
pueda estar
Iocalizadoen
laentrada del
cubo de la
basura o en el
filtro secun-
dario.
PAPAVACIAR ELCUBODE LA BASURA:
T orne en esta Abierto
direcciOn vaclar (Para vaciar)
Cerrado
(Parausa#
Rote el montaje de la tapadel canastode basura
contra las agujas del reloi como est_ indicado en la
tapa y levantela haciaafuera.
Vacie el contenido del
cubo de la basura adentro
del tarrode basura.
PARALIMPIAR EL PRE-FILTRO
El filtro puede
limpiarse
golpeandolo
solore una
superficiefirme
o enjuagandolo
bajo una Ilarede
agua.Enjuagar
con agua
solamente, no
utilizar
detergente o
jab6n. Dejarque
_F ubierta
del filtro
iltro
el filtro se seque pot 24 horasantes de poner de
regresoen la aspirdora.
12

PAPA REEMPLAZAR EL CUBO DE LA BASUPA
Tome en esta Abierto
direcci6n (Para vaclar)
Cerrado
(Para usar)
Coloque la tapa del canasto de basura sobre el
canasto de basura. Alinee las marcas como se
muestra bajo Abierto (Para Vaciar).Rote la tapa en
eentido de las agujasdeLreloi presionandohacia
abajo hasta alinear las marcascomo se muestra
arriba de Cerrado(Para Usar),
Pongael cubode ta
basura de vueltaaden-
tro de la aspiradora
insertando el fondo
priroeroe inclinando
arrascon la roanija del
cuba de la basura lev-
antada.
soltarelcubo _;_'
de la basura"--_
Cubo de I
la basura_-
Baje la manija
del eubode la
basurapara
ajustar el eubo
de la basura en
su lugar
iiiiiiiii iiiii i iiiii i i i iiiiilliiiiiiiii iiiiii iiiiiii' iiiiliiiilliiiiiiiiii]
_i _iii_Eilililili[_iii_i_iii_E_i_ii_ i_ii_!i!_ _I_E_I_E E_I !_i_] i _i_i_i_ii_!![_ _[_i_i_i_i]_!_I_E _ili_i_i_i_i_!_!_i_i_i_iiiii!i ____iiiili_i!i_i_i_i!i!iiii!iii!I
Examineel secondaryfilter del motor de vez en FIItto
cuando y limpie cuandoeste sucio, s=mundarlo
Peligmdechoqueel_ctdco
No operela aspiradorasinelfiltrode
seguridaddelmotor.Aseg_uresede que el
filtro est6secoe Instaladoadecuadamente
paraimpedirque el motorfalley/o que se
produzcaunchoqueek_tdco,
Sieropredesconesteel cord6n_lectricoantes
de repararalgunapartede la aspiradora.
FILTROSECUNDARIO
ESPUMO
Remuevael cubo de la basura como se describe en
la secci6n LIMPIANDOEL CUBO DE LA BASURA.
Remuevael filtro secundario de la aspiradorade
polvo.
Laveel liltro secundario con agua caliente y
jab6n, enju_gueloy s6quelo bien apretandolo con la
manoy dejando que se seque al aire libre.
NOIo lave enla lavadorade platos.
NOIo instale hOmedo.
Reemplaceliltrosecundario seco. Asegure que el
liltro est', insta_adopropiamente sob_ela abertura
del filtro,
Reemplaceel cubo de labasura como se describe
en la secci6n LIMPiANDO EL CUBO DE LA
BASURA.
13

Peligrode choqueel6ctdco
Desenchufeel cabledepoderdeltomacorri-
ente.No operela limpiadorasinel filtmpd-
maflo o elflltrode escape. Est6seguroque el
flltrosest_instaladopropiamenteparaprevenir
falladelmotorylosacudideel_ica.
FILTRO PRIMARIO
Examine el filtro primario de vez en cuando y limpie
cuandoeste sucio.
PAPA SACAR EL FILTRO PRIMARIO
Saque el montaje de la tapa
del canasto de Filrro
basura como Tabulacibn
se muestra en ElBloquear
la secci6n
LIMPIEZA DEL
CANASTO DE
BASUR CLEAN- uu_le._
ING section, u_l i-mr_,
Mientras mantiene el filtro primario sobre un
recipientede basuratorte.el filtro,rotelo y lev_ntelo.
Limpie el filtro primario golpeandolo suavemente
sobre un recipientede basura.
Golpee en varios lados para asegurar la mejor
limpieza.
Enjuaguecon agua solamentecomo sea nece-
sario(vet Limpieza del Canasto de Basura).
Cuando limpiandoel filtro no se reestablece la
succi6n de vacio a su poder total, usted necesita
reemplazar el filtro.
PARA REEMPLAZAR EL Filtro_._\,
FILTRO PRIMARIO _
Est_ seguro que las ranuras del _////_/"
filtro est&n alineadas con .,4"_b. _,_
las long,eras de _ _'_1_
cierre en la cubier. _\_ Ranura
ta del fillro Cubler_a "._\ "_-y_
• De _ tr_ _ / labulaciGn
Reemplace el ill- ,-'t=to _1ul_,,t.*..
troy h_galo rotar hasta que las ranuras calzan
con las lengOetas en la cubierta.
Nota: Bajo uso normal y cuidado, su filtro puede
durar hasta 3 ahos.
Reajuste la cubierta del filtro y el filtro al canasto
FILTRO DE ESCAPE
Eatecartucho del filtro escape se tiene que cambiar
est_ sucio.Debe cambiarse periodicamentesegOn
lascondiciones de uso.
[] filtmno se puedelavarpuesperdeddsucapaci-
dadpara abaparaltrapar polvo,
II
Apriete hacia aden- ,4/_fet'e
tro de cada 1adode ha_ adentro
la cubiertadel filtro Cublerta
de escape y tire de/fltb.o
hacia afuera para
removerde la aspi*
radora de polvo.
Remuevael cartucho del filtro de escape.
Reemplace el filtro de
escape,posicionando-
Iocuidadosamente
para que quepa dentro
del marco.
El lado blanco
debe encararse
haciael oper-
ador.
Capltulo
Del Filtro
Filtro
Laveel fi]tro del escape en agua jabonosa tibia;
enjuague y sequ_a rondo exprimiendoel filtro en
su mano, dejandolo secar al aire.
NOlavaren el lavaplatosautomatico.
NOinstalehumedo.
EmpujeQnicamenteel cartuchode filtro, no el filtro
mismo.
Cubierta
del filtro
\
Reemplacela
cubierta del filtro
de escape ponien-
do las lengOetas
en las ranurasy
empujando aden-
tro hasta que la
cubierta calza en
su lugar.
14

Peligrodechoqueel6ctrico o lesi6ncorporal
Desconectelaunidadantesdelimpiarlao
dadeservicio.De Iocontrariopodrfaprodu-
drse undnoqueeklc'0'lcoocausarlesi6ncor-
petal sllaasplradoraarranca demanera
Imprevlsta.
Frecuentementereviseel area del cepillo y quite
todo pelo,cordon o pelusaque se haya acumulado.
Di la acumulaciones excesiva,siga las instruc-
ciones a continuacion. Si la correa seallojara o
rompiera, siga[as[nstruccionesparaquitar la cor-
tea.
PARAQUITARLACUBIERTADE LA
BOQUILLA
Desenchufela unidad de la corriente electrica.
Paraproteger la superficiedel suelo,siempre ponga
papeldebajo de la boca de la maquinacuando se
saca la cubierta de la boquilla.
Liberelacubierta de boquilla per girar los soportes
de la cubierta de boquilla a la posiciSn UNLOCK.
Agarre ambos ladosla parte traserade la boquilla y
tevantela cubierta paraquitafla de la base de la
boquil]a.
Cublerta
dela
Soportes d_ la ]
cublerta de
boquilla
Cepilleo quite cualquier residuoque est_ en al area
de correas.
Peligro de lesi6n personal
Siempredesenchufelaaspimdoraantesde
limplarel dreadel cepillo,ya que6ste podrfa
empezara funcionar repenUnamente.No
hacedopodrfaresultaran unalesl_ personal.
PARA QUITAR LA CORREN
LIMPIAR EL AGITADOR
Agltador
Coloque las manos en el agitador. Si la correa ya
est_ instalada en el agitador, babra tension en el
agitador. Tengacuidado cuando levantael agitador
de la boquilla.
Quite [acorrea desgastada o rotadel eje de trans-
misiSndel motor.
Quite toda basurao restos del area que recorreIs
correa o del area del cepillocilindrico.
ADVERTENClA
Peligro de lesi6npersonal
Tengacuidadoal quitar elcepilloillndrico,
la tensi6nde lacorreaes grands. SIno
tieneprecaucJ6npoddasufrtrunatesi6n
personalsiel ceptllose liberardpidamante
y saledisparado.
15

Concuidadoquitelaagitadorparavetsisehan
acumuladohilosypelo.
NOTA:Paramantenerunaaltaelicienciade
limpiezayevitareldaSoalaaspiradora,hay aue
limoiarel aaitador cada vez que se cambia ]a
correa.
Tambienhayque Iimpiar el agitador segtJnel sigu-
iente horatio:
umDleel
Frecuente - cada semana
(usadadirariamente)
Moderado- cada mes
(usada2 o 3 veces
por semana)
Ugero - cada 2 meses
(usada 1 vez pot semana)
Corte pelusa, el
pelo o la borra
enredados en el
agitador y guite el
hilo o los restos
ubicacados en las
tapas del extremo.
PARA CAMBIAR }_ACORREA
z-4k k .s,,.Isl6.
_
_tTe8
Inserte el [ado izquierdode agitador en la base de
la boquilla.Parainsertar el agitador, coloque ]aparte
redonda de la tapa del extremo, presionandolo hacia
dentro de la ranurade la base de la boquilla,
Coloque la nuevacorrea alrededor del eje de
transmision de motor.
Nora: usecorrea#20-5275
Agltador Base
--Ranura de la
base de
boqullla
Inserteel agitator pot insertar la parte redondade la
tapa en la ranura de la base de la boquilla.
Agltador
Haga presion firmemente,asegurandosede que ha-
yah entrado bien ambosextremos.
Verifiqueque la correaeste centrada en el polea
para correa y que el cepillocilindrico gire libremente.
Cublerta I
de la
Soportes de la
cublerta de boqullla
Asegurese de que los soportes de la cubierta de la
boquilla esten en la posiciSnUNLOCK. Conecte la
parte delanterade cubierta de boquilla conla base
de la boquilla ygire haciaabajo. Cuando esl{_en su
lugar apropiado, gire los soportesde la cubierta de
la boquilla a la posicion LOCK,
Inserte la correaalrededor del extremo derechodeJ
agitador.
Tire del agitador yasientelo en la base de la
boquilla.
16

Peligrodechoqueel_'trico olesi6ncorporal
Desconectelaunldadantesde limplarlao
darleservicio.DeIocontrariopodrfaprodu-
cirseunchoqueek_-trlcoocausarlesi6ncor-
poralsilaespiradoraarrancademanera
imprevista.
Procedasiempre con precaucionesde seguridad al
Iimpiar y dar servicio la aspiradora,
Si consideraque la aspiradorano aspira bien
asegerese primerode que labolsa no est_ Ilenay
de que el filtro no este atascado.Consulte lasins-
truccionessobre LIMPIANDOEL CUBO DELA
BASURA y CAMBIO/LIMPIEDESFILTROS.
Si laa zonasdel filtro yla cube de la basura no estan
atascadas,examine la zona de la manguera. Quite
la aberturade aspiracion pot apretar las dos
lengOetasque la asegurana la parte detrasera de la
aspiradoray revisesi hay residuosen el area.
aspiraclOn
Protector herramlentas
co_a
Reemplazala abertura de aspiraci6n y saque el
otto fin de la mangueradel soporte de herramien-
tas. Enchufela aspiradoray enci_ndala Conla
aspiradora encendida, estire la manguerapara
quitar el residuo. Apague la aspiradoray des-
ench0fela,
Si todavia hay residuos,quite la mangueracorta de
su soporte y revise la mangueracorta.
Quite los residuos visibles.
demotor ""
NOTE: No obstruye el protector de motor,
Esta aspiradoratieneuna v_lvula de desviaci6n
que sirve come protectorde motorque seabre
automaticamente para proveerun flujo de aire al
motor cuando un zueco impida que circule el
aire al motor,Si seabre la v&lvulabypasspara
impedirque se recalenteel motor y que no
haga dafio a la aspiradora, se notar_un cambio
de sonido mientrasel aire pasaper la abertura
de la v_.lvula.Cuando ocurre,apague la
aspiradoray desenchufeel cordbn del
tomacorriente.Despu6s, inspecci6nelapara
encentrar zuecoscomo se describe bajo la
seccionCOMO ELIMINARLOS RESIDUOS DE
BASURA ENLOS CONDUCTOS.
La valvula de desviaci6npuede estar abierta
mientrasse usanlos accesorios o para limpiar
una alfombranuevaa causa de un flujo redueido
de aire por los accesorios mismos o per la
pelusade la alfombraque Ilenela cubede la
basura rapidamente.
@
17

Pellgmdechoqueeldctricoo lesl6ncorporal
Desconectela unldadantes delimpladao
darleservicio.De Iocontradopodrl'aprodu-
cirseun choqueet_ctricoo causarlesioncor-
poralsila espimdora_rranca de m_nera
imprevist_
PARAEXAMINAR EL AGITADOR
Protectordele
correade labase
Coloque la
aspiradoracon la
base hacia arriba
pare revisarsi los
cepillos esten en
males condiciones.
Cuando los cepillos
esten gastados al
nivel del protector de
base, reemplazcael
agitador.
PAPA QUITAR EL AGITADOR
Quite la cubierta de la boquilla y el agitador. Vease
CAMBIO DE LA CORREAY LIMPIEZA DEL
AGITADOR,
Reemplazcael agitador con un nuevo.
Rearme la coffee, el agitadory la cubierta de la
boquilla. V_ase CAMBtO DE LA CORREAY
LIMPIEZA DELAGITADOR
Polea pare correa
Tape del
extremo
Unldad del agltador
Tape del
extremo
18

I_,____________,__,_,_,,,,,,,_,,,,,,,_, _**__i _'_'_',_,_,*_? ,iil_i_i!__i_iiii_iiiiiliiiii!iiiiii_i_i_i_i_J_i_i_i_i_i_i_i_i_i_i_i_i_,l
I
iiiiii_i_i_i_i_ii_iiii_iiiiiiiiiii!iiiii!ii!i!!!!!!ii_iiii_!i!i!ii!iiiiii_i_i_i_i_i_i_iii_iiii_;_i_iiii_i_i_i_!i!i_i_ii_i_i_i_i!i_i_iiiii_!i!ii!ililili!i!ililililililii!iiiiiiii!iii!iii!i!i!il!iiiilili_!i!i!i!_i_!_!_i_i_i_!_i_iiiiiiiiiiiiiiiiiiiiiiiiiiiiiiiiiiiiiiiiill
Consulteeste cuadro para encontrarsoluciones que usted mismo puede realizarcuando tenga problemas
menoresde rendimiento. Cualquier servicio que necesiteaparte de otros descritos en este manual tienenque
set hechos por un represetantede servicio autorizado Sears.
_arla, De Io_ntrario podrfa produ-
cirseunchoqueel_rico o causarlesk_ncorporal.
I I
Laesplrado_nofundona.
Noa,_p_msa_ctorlame_e.
La asplr_doralevantatapetes
o es_{cu_ empu_ar.
Elensamb_edelagitador
nogira.
Elbldlcadordere_dlmlento,
a_gunosmodelos,e.._ roJo.
P,eitricd_ delflujode e_
u_ode losao_e_ono_.
Cambiodesonldo.
1. Estadesconectada.
2. Cortacireuitos botado o fusible quernado en
el tablerode servJciode la residencia.
3. _tercuptor de Bncen_ido/apagado no
ect_ en la position ON.
4. Protector termal aetivado
1. Cubo de ta bas_ra Ileno o atascado
2. Ajuste incorreclo de nivel de pelode la alfombra.
S. Agitado_ desgaslado
4. Boquil_a. o portitlo de la cubo de la bas_ra
atascada.
5. Mang_era atascado.
6. Manguera rota
7, Corre_ rota
8. La manguera no esla bien inserlada.
9. ActivaeiSn del sistema de protection del molo_
10. Fiff_os de seguridad
I. Ajucte incorrecto de i_ivel de peso de la a_oenbra.
1, Co,tea rota,
2. Selector de piso con alfombra y plso sin
alfombra en i_ $elecci6n de piso sin a_mbt_.
3. Correainsfalada incorrectamente.
1. Ctibo de la basura Iteno o atascado
2. Filtros de seguridad.
3. Conducto de flujo de aire atascado
4. C_ertosaccesorios.
1. El uso de los accesorios limila eHlujo de aire.
2. La pelusa de una affombra nueva
obstruye el paso de aire
1. Conecde blen, optima selector de
encendi_e/apagado a la posici(_n ON,
2. Restablezca el cortaeircuitos o
cami_e el fusible.
3, Co_oque el inlerruptor de ericendido/apagado
en la posicibn ON.
4. Reajuste el protector termal, (pagma 10)
1. Cubode_abas_ralimpio (p_ginas 12, 13)
2. Ajusle el _ivel. (pagina 6)
3, Cambieelagilador.(pa_ina 18)
4. Revise COM6 ELIMtNAR LOS RESIDUOS DE
BASURA F.N LOS CONDUCTOS, (p&gina 17),
5. LimpL_r tubo para el mugre, (p_,gina t7)
6. Cambie la mangt_era.
7. Cambielacor_ea.(paginas 15.16)
8, Inserte bien la mang_era , (p&gina 6)
9, Determine sie×islen hloqueos, (p_gina 17)
10. Limpie/cambie elfiltros. (pagina !4).
1. Aiuste ei nivel, (pagina 6).
1. Cambiela correa, (paginas 14, 15).
2, Cambie el selector en ta selecci(_n
con alfombra (pagina 6)
3, Revtse CAMalO DE LA CORREA y
UMPIEZA DEL CEPILLO. (paginas 15-16)
1. Cubodeta basuralimpio (paginas 12, 13)
2. Limpielcambie el filtros, tpf_gina 14)
& Retire el material bloquea_te del conducto
de aire= {paginal 7).
4. Esto es normal. La luz _ebe apagarse al
quitar _aherramJen_a
Revise USO DE LOS ACCESORiOS, {pagina 9)
Revise COMO ELIMINAR LOS RESIDUOS
DE BASURA EN LOS CONDUCTOS
y limpie ]a mangueta, (pagina 17).
19

Your Home
For repair - in your home - of all major brand appliances, iiiii!iiiii!iii!i!i
lawn and garden equipment, or heating and cooling systems,
no matter who made it, no matter who sold it! ......
For the replacement parts, accessories and
owner's manuals that you need to do-it-yourself.
For Sears professional installation of home appliances
and items like garage door openers and water heaters.
1-800-4-MY-HOME ® Anytime, day or night
(1-800-469-4663) (U.S.A. and Canada)
www,sears,com www.sears,ca
Our Home
For repair of carry-in products like vacuums, lawn equipment,
and electronics, call or go on-line for the nearest
Sears Parts and Repair Center.
'1-800-488-1222 Anytime, day or night (U,S,A, only)
www.sears=com
To purchase a protection agreement on a product serviced by Sears:
1-800-827-6655 (U.S.A.) 1-800-361-6665 (Canada_
Au Canada _our service en fran_,ais:
1-800-LE-FOYER Mc
(1-800-533--6937_
www,sears.ca
Para pedir servicio de reparaci6n
a domicilio, y para ordenar piezas:
1-888-SU-HOGAR sv
(1-888-78#6427)
© Sears.Roebud_andCo.
® Registered Trademark / T_,_Trademark / sM Service Mark of Sears, Roebuck and Co.
® Marca Registrada / ru Marca de Fabriea / SMMarca de Servicio de Sears, Roebuck and Co.
MCMarque de commerce / MB Marque deposee de Sears, Roebuck and Co.
-
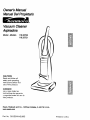 1
1
-
 2
2
-
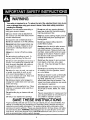 3
3
-
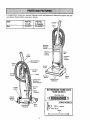 4
4
-
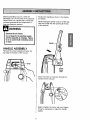 5
5
-
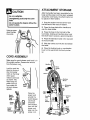 6
6
-
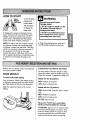 7
7
-
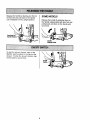 8
8
-
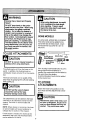 9
9
-
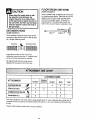 10
10
-
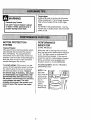 11
11
-
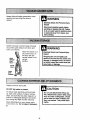 12
12
-
 13
13
-
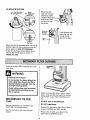 14
14
-
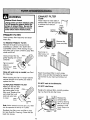 15
15
-
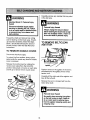 16
16
-
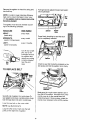 17
17
-
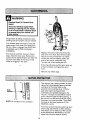 18
18
-
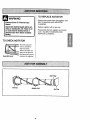 19
19
-
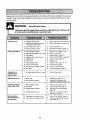 20
20
-
 21
21
-
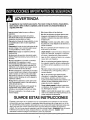 22
22
-
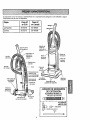 23
23
-
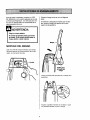 24
24
-
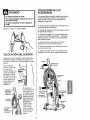 25
25
-
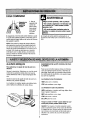 26
26
-
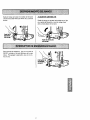 27
27
-
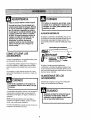 28
28
-
 29
29
-
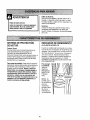 30
30
-
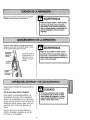 31
31
-
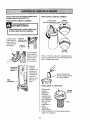 32
32
-
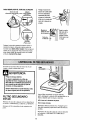 33
33
-
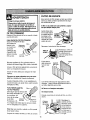 34
34
-
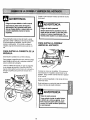 35
35
-
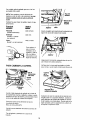 36
36
-
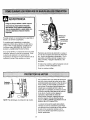 37
37
-
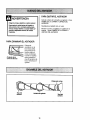 38
38
-
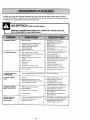 39
39
-
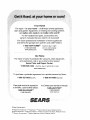 40
40


Kenmore 116.33720200 El manual del propietario
- Categoría
- Aspiradoras
- Tipo
- El manual del propietario
en otros idiomas
- English: Kenmore 116.33720200 Owner's manual
Artículos relacionados
-
Kenmore 116.32720 El manual del propietario
-
-
-
-
-
-
Kenmore 116.32720 El manual del propietario
-
-
-