
Single Pole Motion Sensing Switch
WARNING: For indoor use only. The Single Pole Motion Sensing Switch
detects motion to turn on lights for an adjustable amount of time. A built-in
photo cell can be set to keep lights off when the lights aren't needed. The
unit has excellent sensitivity and a wide 150˚ detection range. It can be used
with incandescent lighting as well as rapid start fluorescent lighting.
Installation is as easy as replacing a wall switch. However, some codes
require installation by a qualified electrician.
Features include:
150˚ motion detection angle.
Adjustable on-time from 5 sec. to 20 min.
Adjustable photocell.
Works with incandescent and rapid start
fluorescent lighting.
Works with motors up to 1/8 hp.
Slide switch selectable OFF, ON AND AUTO modes.
Included are:
The sensor switch
Cover plate
3 wire connectors
2 large screws
2 small screws.
INSTALLATION
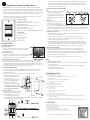
1. SELECT A LOCATION
New Application
Choose a location where the motion sensor has
a clear view of the entire area where occupant
motion may occur.
Retrofit Application
Motion sensing switch will replace existing wall
switch. Use only where the existing switch location
provides a clear view of the occupied area.
General Application Information
The detector is more sensitive to motion across the front of the sensor
than to motion towards the sensor. The detector senses heat in motion
and possible heat sources that change temperature quickly. Therefore, to
avoid false triggering, avoid placing the sensor where it will be aimed at air
conditioners, heaters, and other sources of heat or cold.
2. INSTALLING THE SWITCH
If you are unsure or uncomfortable about performing this installation,
consult a qualified electrician. WARNING: Turn power off at the circuit
breaker before wiring.
Remove the decorative coverplate (secured by two screws).
Remove Control Cover. (Press
in with screwdriver. Swing out
cover to remove.)
Remove the existing switch (if
this is a retrofit application).
Connect the detector as
shown in the diagram. Before
installing the detector into the
box, make sure there is no wire
exposed at the connection.
Typical Installation
Mount the detector into the wall
box with the mounting screws.
For test purposes, use a small
screwdriver to turn the time
control fully counter-clockwise and the light control fully clockwise. Turn the
power back on at the circuit breaker.
•
•
•
•
•
•
•
•
•
•
•
•
•
•
•
•
•
Set the switch to the AUTO mode. When unit stabilizes (about 1 minute) the
light may flash 3 times indicating the sensor is ready to detect motion. If
motion is detected, the lights will turn on. The lights will turn off 5 seconds
after motion is no longer detected.
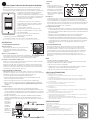
3. ADJUST TIME & LIGHT SENSITIVITY
Time
The length of time that the lights
stay on is adjustable from 5
seconds to 20 minutes. Use a
small phillips screw driver to set
the time by using the diagram as
a guide.
Light Level
The sensor can be prevented
from turning on lights when
there is already enough light in
the room. Use a small phillips screw driver to set the light level using this
diagram as a guide. In the fully clockwise position, the sensor turns on lights
even in full daylight. In the fully counter-clockwise position, the sensor only
turns on lights when the surrounding light level is very low.
To adjust the photocell:
When the light in the room is at the level you want the lights to turn on, set
the switch to the AUTO position.
Put the TIME control to the 5 sec. (fully counter-clockwise) position.
Put the LIGHT control to the minimum dark (fully counter-clockwise)
position. Wait for the lights to turn off.
Turn the LIGHT adjustment clockwise in very small steps and wait 2
seconds before moving your hand in front of the sensor. Repeat until the
lights controlled by the sensor come on. The light will now come on when
the light level is at or below the present level and motion is detected.
4. FINISH INSTALLATION
Replace control panel cover and install the decorative wall plate. In
installations where the motion sensor switch is combined with other
switches or outlets on an expanded box, a combination wall plate will need
to be purchased. Various combination wall plates are available at Home
Centers and Electrical Supply Stores.
Slide the switch a couple of times to make sure it operates freely.
USE
MODE SELECTION SWITCH
Moving the switch selects one of three modes of operation: OFF, AUTO, ON
OFF: Lights stay off.
AUTO: Lights come on for time set when motion is detected and the light
level is below the set level.
ON: Lights stay on continuously.
TROUBLESHOOTING
Light does not come on.
Circuit breaker or fuse is turned off.
If the lamp being controlled has another switch, it may be turned off.
Bulb is defective.
LIGHT control is set too far toward the DARK position.
MODE switch is set to OFF instead of AUTO.
Poor connection.
Lights do not stay on in the Auto mode.
Motion has stopped in the room.
TIME control is set for too short a delay.
Light does not turn off.
Incorrect wiring.
MODE switch is set to ON instead of AUTO.
Motion is still present.
Delay set by TIME control has not expired.
Light comes on for no reason in the Auto mode.
Heating or cooling objects (such as air vents, appliances, or drafts through the wall box) are
causing false triggering.
Switch on the sensor has been turned off and back on.
There was a momentary power interrup-tion. The light will turn off automatically when the "on"
time expires.
SPECIFICATIONS
Electrical input: 120V, 60 Hz
Fluorescent Load: (2 tube minimum) 30 Watt minimum 400 Watt maximum Rapid Start
Motor Load: 1/8 HP maximum
Incandescent: 500W maximum
On-Time: Adjustable approximately 5 sec. to 20 min.
Photocell Sensor: From full daylight to less than 1 FC.
Coverage: up to 15 ft. at 150˚, up to 30 ft. in front of the sensor
Questions? Visit us at www.jascoproducts.com
•
1.
2.
3.
4.
•
•
•
•
•
•
•
•
•
•
•
•
•
•
•
•
•
•
O
F
F

Interruptor Detector de Movimiento Unipolar
ADVERTENCIA Para uso en espacios interiores solamente. El Interruptor
Detector de Movimiento Unipolar detecta movimiento para encender
luces durante un lapso ajustable de tiempo. Puede ajustarse una fotocelda
integrada para mantener las luces apagadas
cuando no se necesitan. La unidad tiene
excelente sensibilidad y una amplia cobertura de
detección de 150º. Puede usarse con iluminación
incandescente como también con iluminación
fluorescente de inicio rápido.
La instalación es tan fácil como reemplazar
un interruptor de pared. Sin embargo, algunos
códigos requieren instalación por un técnico
eléctrico calificado.
La características incluyen:
Ángulo de detección de movimiento de 150º.
Tiempo encendido ajustable de 5 seg. a 20 min.
Fotocelda ajustable.
Funciona con iluminación incandescente y
fluorescente de inicio rápido.
Funciona con motores de hasta 1/8 hp.
Interruptor deslizante con selección de modos OFF, ON y AUTO.
Incluye: • Interruptor sensor • Placa • 3 conectores de cable • 2 tornillos grandes • 2 tornillos pequeños.
INSTALACIÓN
1. SELECCIONE UNA UBICACIÓN
Aplicación Nueva
Elija un lugar donde el detector de movimiento
tenga una vista clara de toda el área en la
cual pueda presentarse el movimiento de los
residentes.
Aplicación De Readaptación
El interruptor detector de movimiento reemplazará
el interruptor de pared existente. Use solamente donde el lugar del
interruptor existente ofrezca una clara vista del área ocupada
Información General Para La Aplicación
El detector es más sensible al movimiento a lo largo de la parte frontal del
sensor que al movimiento hacia el sensor.
El detector percibe calor en movimiento y posibles fuentes térmicas que
cambian la temperatura rápidamente. Por lo tanto, para evitar una falsa
activación, no coloque el sensor frente a sistemas de aire acondicionado,
calentadores y otras fuentes de calor o frío.
2. INSTALACIÓN DEL INTERRUPTOR
ADVERTENCIA Antes de conectar los cables, desconecte el suministro de
energía en el disyuntor. Si no esta seguio o incomodo acerca de realizar esta
instalación consulte con un electricista calíficado electricista.
Retire la placa decorativa (asegurada con dos tornillos).
Retire la cubierta de control. (Presione con un destornillador, haciendo
palanca en la cubierta para retirarla).
Retire el interruptor existente (si es una aplicación de readaptación).
Conecte el detector como se muestra en el diagrama. Antes de instalar el
detector en la caja, asegúrese de que no quedan cables expuestos en la
conexión.
Instalación Típica
Monte el detector en la caja de pared con los tornillos de montaje.
Para efectos de pruebas, utilice un pequeño destornillador para hacer girar
el control de tiempo completamente en sentido contrahorario y el control de
luz completamente en sentido horario. Conecte nuevamente el suministro de
energía en el disyuntor.
Coloque el interruptor en modo automático (AUTO). Cuando la unidad se
estabilice (aproximadamente 1 minuto), la luz puede parpadear 3 veces
para indicar que el sensor está listo para detectar movimiento. Si se detecta
movimiento,
las luces se
encenderán.
Las luces se
apagarán
5 segundos
después de
que no se
detecta más
movimiento.
•
•
•
•
•
•
•
•
•
•
•
•
•
3. AJUSTES
Tiempo
El lapso de tiempo que las
luces permanecen encendidas
es ajustable de 5 segundos a
20 minutos. Use un pequeño
destornillador de cruz para
ajustar el tiempo teniendo en
cuenta el siguiente diagrama
como guía.
Nivel De Luz
Se puede evitar que el sensor encienda las luces cuando ya hay suficiente
luz en la habitación.. Use un pequeño destornillador de cruz para fijar el
nivel de luz utilizando este diagrama como guía. En la posición totalmente
hacia la derecha, el sensor enciende las luces, incluso a plena luz del día.. En
la posición totalmente hacia la izquierda, el sensor sólo enciende las luces
cuando el nivel de luz ambiente es muy bajo.
Para ajustar la fotocelda:
Cuando la luz de la habitación se encuentra en el nivel que usted desea que
se enciendan las luces, ajuste el interruptor en la posición automático (AUTO).
Coloque el control de tiempo (TIME) en la posición de 5 segundos (totalmente
hacia la izquierda).
Coloque el control de luz (LIGHT) en la posición de oscuridad mínima
(totalmente hacia la izquierda). Espere que las luces se apaguen.
Gire el ajuste de luz (LIGHT) en sentido horario a pasos muy cortos y espere
2 segundos antes de pasar la mano por delante del sensor. Repita hasta que
se enciendan las luces controladas por el sensor. Ahora la luz se encenderá
cuando el nivel de luz esté en o por debajo del nivel actual y se detecte
movimiento.
4. INSTALACIÓN COMPLETA
Coloque nuevamente la cubierta del panel de control e instale la placa
decorativa de pared. En instalaciones en las que el interruptor sensor
de movimiento GE se combina con otros interruptores o tomas en una
caja expandida, será necesario comprar una placa de pared combinada.
Diversas placas de pared combinadas están disponibles en centros de
materiales de construcción y almacenes de suministros eléctricos.
Deslice el interruptor un par de veces para asegurarse de que funciona
libremente.
USO
INTERRUPTOR DE SELECCIÓN DE MODO
Seleccione uno de tres modos de operación moviendo el interruptor: OFF
(apagado), AUTO (automático), ON (encendido)
OFF Las luces permanecen apagadas.
AUTO: Las luces se encienden durante el tiempo fijado cuando se detecta
movimiento y el nivel de luz está por debajo del nivel fijado.
ON Las luces permanecen encendidas continuamente.
SOLUCIÓN DE PROBLEMAS
La luz no se enciende.
El disyuntor o fusible está apagado.
Si la lámpara que se desea controlar tiene otro interruptor, éste puede estar apagado.
La bombilla está defectuosa.
El control de luz (LIGHT) está ajustado demasiado lejos hacia la posición de oscuridad (DARK).
El interruptor de modo (MODE) está ajustado en apagado (OFF) en lugar de automático (AUTO).
Conexión deficiente.
Las luces no permanecen encendidas en el modo automático (AUTO).
Ha cesado el movimiento en la habitación.
El control del tiempo (TIME) está ajustado para un retardo muy corto.
La luz no se apaga.
Cableado incorrecto.
El interruptor de modo (MODE) está ajustado en encendido (ON) en lugar de automático (AUTO).
Aún hay movimiento.
No ha expirado el retardo fijado por el control de tiempo (TIME).
La luz se enciende sin motivo en modo automático (AUTO).
Objetos que producen calor o frío (tales como ventilas, electrodomésticos o corrientes a través de
la caja de pared) causan falsa activación.
El interruptor del sensor ha sido apagado y encendido nuevamente.
Hubo una interrupción momentánea de la energía. La luz se apagará automáticamente cuando
expire el tiempo de “encendido”.
ESPECIFICACIONES
Entrada eléctrica: 120V, 60 Hz
Carga fluorescente: (2 tubos mínimo) 30 vatios mínimo 400 vatios máximo
Inicio Rápido
Carga del motor: 1/8 HP máximo
Incandescente: 500W máximo
Tiempo encendido: Ajustable aproximadamente 5 seg. a 20 min.
Sensor de fotocelda: De plena luz del día a menos de 1 FC.
Cobertura: hasta 15 pies a 150º, hasta 30 pies frente al sensor
¿Tiene preguntas? Visítenos en www.jascoproducts.com
•
•
•
•
•
•
•
•
•
•
•
•
•
•
•
•
•
•
•
•
•
-
 1
1
-
 2
2


Jasco Home Security System 57884 Manual de usuario
- Tipo
- Manual de usuario
en otros idiomas
Otros documentos
-
GE 15314 Guía del usuario
-
Heath Zenith Motion Sensing 3-Way Wall Switch SL-6107 Manual de usuario
-
-
-
-
-
Hubbell EDTV CLT2054 Manual de usuario
-
Desa SH-5710 Manual de usuario
-
Defiant DF-5512-WH-D Guía de instalación
-
Legrand FSP-202D Guía de instalación