Transolid VT30.5X22-1OU-4W-4 Guía de instalación
- Tipo
- Guía de instalación

Transolid, Div. • 400 Dietz Road • Warren, OH 44483 • (800) 766-2452 • www.transolid.com
Vanity Top Installation Instructions
Natural Quartz and Natural Granite
Thank you for purchasing a Transolid
®
Vanity Top. Please read the instructions carefully
prior to installing the top. These are basic instructions for installation in a step-by-step
sequence that will work in most types of installations. If you have an installation that is
not covered here, please contact Transolid for additional information.
Tools and Supplies Needed for Installation
• Silicone Caulk • Shims / Blocks
1. Unpack the vanity top and inspect it for any damage. Report any
damage to your place of purchase.
2. Make sure the top sits securely on the cabinet. Transolid recom-
mends using shims in areas where there is not a solid point of
contact or where the top is not level on the cabinet.
3. Install the faucet and the drain assembly according to the
manufacturer’s instructions.
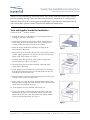
4. Wipe off the top of the vanity cabinet with a damp cloth to remove
any dirt. Apply a generous (1/2”) bead of silicone around the top
edges of the vanity cabinet. See Figure 1.
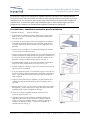
5. Carefully lower the top onto the vanity cabinet, making sure
that the shims stay in place. See Figure 2.
6. Attach the drain pipe to the drain assembly. Attach the water
supply lines to the faucet.
7. If back splash is to be installed, do so at the this time. Test t the
back splash to determine proper t, and which side will face out
and which side will face the wall.
8. Wipe the bottom of the back splash and the top of the vanity with
a damp cloth to remove any dust or dirt.
9. Apply a thin (1/4”) bead of silicone along the bottom edge of the
back splash and several thin beads along the back (wall) side of the
splash. Set the back splash into place.
10. If side splashes are to be installed, follow steps 7-9.
11. Apply a thin bead of caulk around all of the joints, such as the
one between the top of the back splash and the wall, the side
splash and the wall, the vanity top and the back splash, and the
vanity top and the side splash. See Figure 3.

Transolid, Div. • 400 Dietz Road • Warren, OH 44483 • (800) 766-2452 • www.transolid.com
Instrucciones para instalar una cubierta de lavabo de las líneas
cuarzo natural y granito natural
Gracias por comprar una cubierta de lavabo Transolid. Por favor, lea cuidadosamente
las instrucciones antes de instalar la cubierta. Estas son las instrucciones básicas para su
instalación en una secuencia paso a paso que funcionará en la mayoría de los tipos de
instalaciones. Si usted una tiene una instalación que no está cubierta aquí, por favor
pónganse en contacto con Transolid para obtener información adicional.
• Sellador de silicón • Calzas / Bloques
1. Desempaque la cubierta de lavabo e inspeccione si tiene algún
daño, y en su caso si lo tuviera, informe cualquier problema al
lugar de compra.
2. Cerciórese de que la tapa se siente con seguridad en el gabinete.
Transolid recomienda usando las calzas en áreas donde no hay
un punto sólido del contacto o donde no está la tapa llano en el
gabinete.
3. Instale la llave mezcladora y el montaje del desague de acuerdo
con las instrucciones del fabricante.
4. Limpie la parte superior del gabinete con una franela húmeda para
eliminar cualquier suciedad. Aplique una generosa cantidad (1/2“)
de silicón en la parte superior de los bordes de la supercie del
gabinete, o donde la cubierta haga contacto. (Ver Fig. 1).
5. Cuidadosamente coloque el ITB sobre el gabinete, asegúrandose
de que las calzas permanezcan en su lugar. (Ver Fig. 2).
6. Conecte la tubería al drenaje. Conecte las líneas del suministro de
agua en la llave mezcladora.
7. Si se va el chapoteo trasero a ser instalado, haga tan en el este vez.
Pruebe el ajuste el chapoteo trasero para determinar ajuste apropi-
ado, y a que el lado hará frente hacia fuera y que hará frente el
lado a la pared.
8. Limpie la parte inferior de los respaldos y la parte superior de la
cubierta con una franela húmeda para quitar cualquier polvo o
suciedad.
9. Aplique una na capa (1/4”) de silicón a lo largo del borde inferior
del respaldo y varias capas nas a lo largo de la parte trasera del
respaldo (pared). Ajuste el respaldo en su lugar.
10. Si en van a instalar respaldos lateraless, hacerlo en este
momento. Siga los pasos 7-9
11. Aplique un grano no de calafatean alrededor de todos los
empalmes, tales como el que está entre la tapa del chapoteo
trasero y la pared, el chapoteo lateral y la pared, la tapa de la
vanidad y el chapoteo trasero, y la tapa de la vanidad y el
chapoteo lateral. (Ver Fig. 3).
Herramientas y suministros necesarios para la instalación
..
-
 1
1
-
 2
2


Transolid VT30.5X22-1OU-4W-4 Guía de instalación
- Tipo
- Guía de instalación
en otros idiomas
Artículos relacionados
-
Transolid VT61x22-1RV-96-A-W-8 Guía de instalación
-
Transolid K-FUSB241810 Guía de instalación
-
Transolid FUSS361810 Guía de instalación
-
Transolid K-STDE33226-4 Guía de instalación
-
-
Transolid KKM-DTDE332210-FR2 Guía de instalación
-
Transolid K-RTDE3322-01 Guía de instalación
-
Transolid K-RUDO3120-16 Guía de instalación