
CAUTION – RISK OF SHOCK – Disconnect Power at the main circuit
breaker panel or main fuse box before starting and during the
installation.
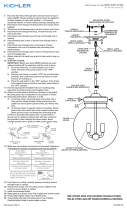
NOTE direction of swivel in accordance with ceiling.
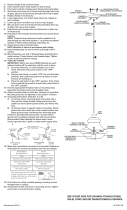
1) Slip cap up over end of bottom stem.
2) Threadthatendofbottomstemontotopofxturebody.
3) Passxturewirethroughremainingstemsandscrewstemstogether.
NOTE: Threadlockingcompoundmustbeappliedtoallstemthreads
asnotedwithsymbol(3)topreventaccidentalrotationofxtureduring
cleaning,relamping,etc.
4) Threadswivelontoendoflaststem.
5) Passthreadedpipeonendofswivelupthroughholeincanopy.
6) Sliplockwasheroverendofthreadedpipeprotrudingfrominside
canopy.Threadhexnutontothreadedpipe.Tightenhexnuttosecure
swiveltocanopy.
7) Findtheappropriatethreadedholesonmountingstrap.Assemble
mountingscrewsintothreadedholes.
8) Attachmountingstraptooutletbox.(Screwsnotprovided).Mounting
strapcanbeadjustedtosuitpositionofxture.
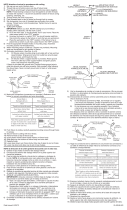
9) Groundinginstructions:(SeeIllus.AorB).
A) Onxtureswheremountingstrapisprovidedwithaholeandtwo
raiseddimples.Wrapgroundwirefromoutletboxaroundgreen
groundscrew,andthreadintohole.
B) Onxtureswhereacuppedwasherisprovided.Attachground
wirefromoutletboxundercuppedwasherandgreenground
screw,andthreadintomountingstrap.
Ifxtureisprovidedwithgroundwire.Connectxturegroundwireto
outletboxgroundwirewithwireconnector.(Notprovided.)Afterfollowing
theabovesteps.Neverconnectgroundwiretoblackorwhitepower
supplywires.
10)Makewireconnections(connectorsnotprovided.)Referencechart
belowforcorrectconnectionsandwireaccordingly.
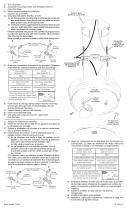
11) Pushxturetoceiling,carefullypassingmountingscrewsthroughholes
incanopy.
12)Securexturetoceilingwithknurlknobs.
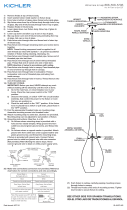
13)Removenialsattopofxturebody.
14)Insertplasticwasherbelowmetalwasheronxturebody.
15)Slideglassupoverbottomofxturebodyandoverstem.
16)Replacenials.
17)Lowerglassdownoverxturebody.Allowtopofglasstorestonnials.
18)Lowercapdownandallowcuptosetontopofglass.
PRECAUCIÓN – RIESGO DE DESCARGA ELÉCTRICA – Desconecte la
electricidad en el panel principal del interruptor automático o caja
principal de fusibles antes de comenzar y durante la instalación.
NOTE la dirección de la unión giratoria de acuerdo con el cielo raso.
1) Desliceeltapahastaelextremodelvástagoinferior.
2) Enrosqueeseextremodelvástagoinferiorenlapartesuperiordel
cuerpo del artefacto.
3) Paseelcabledelartefactoatravésdelosvástagosyvástagosde
tornillo. NOTA: El compuesto para rosca estanca se debe aplicar a
todaslasroscasdelvástagocomosenotóconelsímbolo(3) para
impedirlarotaciónaccidentaldelartefactodurantelalimpieza,
instalacióndeunabombillanueva,etc.
4) Enrosqueelunióngiratoriaenelextremodelvástagoúltimo.
5) Paseeltuboroscadoenelextremodelunióngiratoriaatravésdel
agujeroenelescudete.
6) Resbalelaarandeladeseguridadencimadeltuboroscadoquesobresale
deadentrodelcapuchón.Atornillelatuercahexagonalaltuboroscado.
7) Ensamblelostornillosdemontajeenlosoriciosroscadosenlabarra
de montaje.
8) Unirlaabrazaderademontajealacajadeconexiones.(Noseproveen
tornillos).Laabrazaderademontajepuedeajustarseparaacomodarla
posicióndelartefacto.
GREEN GROUND
SCREW
CUPPED
WASHER
OUTLET BOX
GROUND
FIXTURE
GROUND
DIMPLES
WIRE CONNECTOR
OUTLET BOX
GROUND
GREEN GROUND
SCREW
FIXTURE
GROUND
A
B
Connect Black or
Red Supply Wire to:
Connect
White Supply Wire to:
Black White
*Parallel cord (round & smooth) *Parallel cord (square & ridged)
Clear, Brown, Gold or Black
without tracer
Clear, Brown, Gold or Black
with tracer
Insulated wire (other than green)
with copper conductor
Insulated wire (other than green)
with silver conductor
*Note: When parallel wires (SPT I & SPT II)
are used. The neutral wire is square shaped
or ridged and the other wire will be round in
shape or smooth (see illus.)
Neutral Wire
DateIssued:02/09/17
IS-42044-US
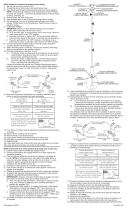
9) InstruccionesdeconexiónatierrasolamenteparalosEstadosUnidos.
(VealailustracionAoB).
A) Enlaslámparasquetieneneleje,demontajeconunagujero
ydoshoyuelosrealzados.Enrollarelalambreatierradelacaja
tomacorrientealrededordeltornilloverdeypasarloporelaquiero.
B) Enlaslámparasconunaarandelaacopada.Fijarelalambre
atierradelacajatomacorrientedelajodelaarandelaacoaday
tornilloverde,ypaserporelejedemontaje.
Silalámparavieneconalambreatierra.Conecterelalambreatierra
delalámparaalalambreatierradelacajatomacorrienteconunconector
dealambres(noincluido)espuésdeseguirlospasosanteriores.Nunca
conectarelalambraatierraalosalambreseléctrosnegrooblanco.
10)Hagalesconexionesdelosalambres(noseproveenlosconnectores.)
Latabladereferenciadeabajoindicalasconexionescorrectasylos
alambres correspondientes.
11) Empujeelartefactohaciaeltecho,pasandocuidadosamentelostornil
losdemontajeatravésdelosoriciosenelescudete.
12)Asegureelartefactoaltechoconlasperillasestriadas.
13)Retireloscapuchonesdelapartesuperiordelcuerpodelartefacto.
14)Insertelaarandeladeplásticodebajodelaarandelademetalenel
cuerpo del artefacto.
15)Desliceelvidriohaciaarribayporencimadelabasedelcuerpodel
artefactoydelvástago.
16)Remplaceloscapuchones.
17)Desliceelvidriohaciaabajoyporencimadelcuerpodeartefacto.La
parte superior del vidrio debe descansar sobre los capuchones.
18)Deslicelatapahaciaabajohastaapoyarlasobrelapartesuperiordelvidrio.
ARANDELA
CONCAVA
TIERRA DE LA
CAJA DE SALIDA
TORNILLO DE TIERRA,
VERDE
DEPRESIONES
TIERRA
ARTEFACTO
CONECTOR DE ALAMBRE
TIERRA DE LA
CAJA DE SALIDA
TORNILLO DE TIERRA,
VERDE
TIERRA
ARTEFACTO
A
B
Conectar el alambre de
suministro negro o rojo al
Conectar el alambre de
suministro blanco al
Negro Blanco
*Cordon paralelo (redondo y liso)
*Cordon paralelo (cuadrado y estriado)
Claro, marrón, amarillio o negro
sin hebra identificadora
Claro, marrón, amarillio o negro
con hebra identificadora
Alambre aislado (diferente del verde)
con conductor de cobre
Alambre aislado (diferente del
verde) con conductor de plata
*Nota: Cuando se utiliza alambre paralelo
(SPT I y SPT II). El alambre neutro es de forma
cuadrada o estriada y el otro alambre será de
forma redonda o lisa. (Vea la ilustracíón).
Hilo Neutral
MOUNTINGSTRAP
ABRAZADERADEMONTAJE
CANOPY
ESCUDETE
STEM
VARILLA
KNURLKNOB
PERILLAESTRADA
SWIVEL
UNIÓNGIRATORIA
4
3
3
3
GLASS
VIDRIO
FIXTUREBODY
CUERPODELARTEFACTO
HEXNUT
TUERCAHEXAGONAL
LOCKWASHER
ARANDELADESEGURIDAD
CAP
TAPA
PLASTICWASHER
ARANDELADEPLÁSTICO
METALWASHER
ARANDELADEMETAL
We’re here to help 866-558-5706
Hrs: M-F 9am to 5pm EST
-
 1
1
Kichler Lighting 42044CH Manual de usuario
- Tipo
- Manual de usuario
- Este manual también es adecuado para
en otros idiomas
- English: Kichler Lighting 42044CH User manual
Artículos relacionados
-
 Kichler Lighting 42046NICS Manual de usuario
-
 Kichler Lighting 42047NBR Manual de usuario
-
 Kichler Lighting 42167OZWH Manual de usuario
-
 Kichler Lighting 42329OZCS Manual de usuario
-
 Kichler Lighting 208WH Manual de usuario
-
 Kichler Lighting 42588OZ Manual de usuario
-
Kichler Lighting 42141NICS Manual de usuario
-
 Kichler Lighting 42328NICS Manual de usuario
-
 Kichler Lighting 42456NBR Manual de usuario
-
 Kichler Lighting 42475OZMER Manual de usuario


