LG WT4970CW El manual del propietario
- Categoría
- Lavadoras
- Tipo
- El manual del propietario
Este manual también es adecuado para

Life's Good
OWNER'S MANUAL
WASHING MACHINE
Before beginning installation, read these instructions carefully. This will simplify
installation and ensure that the washer is installed correctly and safely.
Leave these instructions near the washer after installation for future reference.
P/No. :MFL39760232
ver°060612.00 WWW, Ig.co m

2 PRODUCT FEATURES
PRODUCT FEATURES
The inverter motor, which is directly connected to the tub, minimizes energy Joss and produces little noise and vibration.
Should you; experience any technical difficulty with your washing machine, it has the capability of transmitting data by phone to
the Customer Information Center. The call center agent records the data transmitted from your machine and uses it to analyze
the issue, providing afast and effective diagnosis (Refer to page 35).
Regular cleaning of the tub on a monthly basis using TUB CLEAN will; keep the tub clean and fresh.
Use this option to disable the controls during awash cycle. This option can prevent children from changing cycles or operating
the machine.
This washer is designed to save rinse water by using the SMARTRINSE TM with jet spray in COTTON/NORMAL and HEAVY
DUTY cycles
The Fuil stainless steel drum offers extreme durability.

IMPORTANT SAFETY INSTRUC]IONS 3
IMPORTANT SAFETY INSTRUCTIONS
READ ALL INSTRUCTIONS BEFORE USE
A WAR N IN G
For your safety, the information in this manual must be followed to minimize the risk of fire or explosion, ebctric shock, or to
prevent property damage, injury to persons, or death.
Your Safety and the safety of others are very important.
We have provided many important safety messages in this manual and on your appliance. Always read and obey ali safety
messages,
This is the safety abrt symbol
This symbol alerts you to potential hazards that can kill or hurt you and others.
AI! safety messages will follow the safety alert symbol and either the word DANGER, WARNING or CAUTION.
These words mean:
A DANGER
You will be kitbd or seriously injured if you don't immediately follow instructions.
A WARNING
You can be killed or seriously injured if you don't follow instructions,
CAUTION
You may be stightly injured or cause damage to the product if you do not follow instructions.
Ail safety messages wili tell you what the potentiai hazard is, teii you how to reduce the chance of injury, and teii you what can
happen if the instructions are not followed.
BASIC SAFETY PRECAUTIONS
A WAR NING
To reduce the risk of fire, electric shock, or iniury to persons when using this app%nce, foilow basic precautions, including the
following
• Use this appliance onlyfor its intended purpose as described
in this owner*s Manual
• Before use, the washer must be properly installed as
described in this manual,
• Do not wash a_icles that have been previously cleaned in,
washed in, soaked in, or spotted with gasoline, dry cleaning
solvents, or other flammable or explosive substances, as
they give off vapors that could ignite or explode.
- Do not add gasoline, dry cleaning solvent, or other
flammable or explosive substances to the wash water,
These substances give off vapors that could ignite or
explode
• Under certain conditions, hydrogen gas may be produced
in a hot water system that has not been used for 2 weeks
or more. HYDROGEN GAS iS EXPLOSIVE If the hot "water
system has not been used for such a period, before using
the :washer, turn on all hot water faucets and let the water
flow from each for several minutes. This will rebase any
accumulated hydrogen gas. As the gas is flammable, do not
smoke or use an open flame during this _me,
• Do not allow children to play on or in the washer, Close
supervision of children is necessary when the ,washer is
used near children.
° Before the washer is removed from ser_ce or discarded,
remove the lid to prevent children from climbing inside.
• Do not install or store _e washer where it will be exposed
to the weather or freezing temperatures.
• Do not tamper with controls.
• Keep the area underneath and around your appliances free
of combustible materials (lint, paper, rags, etc,), gasoline,
chemicals and other flammable vapors and liquids.
• Do not repair or replace any part of the washer or attempt
any ser_#icing other than as described in this manual. We
strongly recommend that any service be performed by a
qualified technician.
• See Installation Instructions for grounding requirements,
• AU.'4AYS follow the fabric care instructions supplied by the
garment manufacturer,
• Do not place items exposed to cooing oil in your washer.
Items contaminated with cooking oils may contribute to a
chemical reaction that could cause a load to catch fire,
• Use fabric softeners or products to eliminate static only as
recommended by the manufacturer.
° This washer is not designed for maritime use or for mobile
instaliations such as in RVs, aircraft, etc.
° Turn off the water faucets and unplug the washer if the
machine is to be left for an extended period of time, such as
during vacations,
° Do not use to dry articles containing foam rubber or
similarly textured rubber-like materials.
° Packaging material can be dangerous for children, There is a
risk of suffocation! Keep all packaging from children,
° Always check the inside of the washer for foreign objects
before loading laundry, Keep the lid closed when not in use,
° Do not reach into the appliance if the tub or agitator is
moving,
WARNING : This product contains chemicals known to the
State of California to cause cancer and birth defects or other
reproductive harm, Wash hands after handling,

4 IMPORTXNT SAFETY INSTRUCTIONS
IMPORTANT SAFETY INSTRUCTIONS
READ ALL INSTRUCTIONS BEFORE USE
For your safety, the information in this manual must be fotlowed to minimize the risk of fire or explosion, electric shock, or to
prevent property damage, injury to persons, or death.
_G_ROUNDING!
This appliance must be grounded. In the event of malfunction or breakdown, grounding will reduce the risk of electric shock by
providing a path of least resistance for electric current. This appliance is equipped with a cord having an equipment-grounding
conductor and grounding plug_ The plug must be plugged into an appropriate outlet that is properly installed and grounded in
accordance with all local codes and ordinances.
WAR NIN G
Improper connection of the equipment-grounding conductor can result in risk of electric shock Check with a qualified electrician
or servicer if you are in doubt as to whether the appliance is properly grounded. Do not modify the plug provided with the
appliance. If it does not fit the outlet, have a proper outlet instalied by a qualified electrician. Failure to follow those warnings can
cause serious injury, fire, electric shock, or death

IMPORTANT SAFETY INSTRUC]IONS 5
IMPORTANT SAFETY INSTRUCTIONS
READ ALL INSTRUCTIONS BEFORE USE
",NARNIN G
For your safety, the information in this manual must be foltowed to minimize the risk of fire or explosion, electric shock, or to
prevent property damage, injury to persons, or death
A WA RNING
To reduce the risk of fire, electric shock, or injury to persons when using this appJiance, follow basic precautions, including the
following
• Refer to INSTALLATION INSTRUCTIONS for detailed
grounding procedures. Installation instructions are packed
with the washer for instaHer's reference If the washer is
moved to a new bcation, have it checked and reinstalled by a
qualified service technician Failure to follow this warning can
cause serious iniury, fire, electric shock, or death
• Do not, under any circumstances, cut or remove the third
(ground) prong from the power cord. Failure to follow this
warning can cause serious iniury, fire, electric shock, or
death
• For personal safety, this appliance must _ properly
grounded. Failure to follow this warning can cause serious
injury, fire, electnc shock, or death
• The power cord of this appliance is equipped with a 3-prong
(grounding) plug which mates with a standard 3_prong
(grounding) wall outlet to minimize the possibility of electric
shock frorn this appliance
° This washer must be plugged into a 120 VAC, 60 Hz
grounded outlet. Failure to follow this warning can cause
serious iniury, fire, ebctric shock, or death
° Have the ,tall outlet and circuit checked by a qualified
electrician to make sure the outlet is properly grounded.
Failure to follow this warning can cause serious injury, fire,
electric shock, or death
• Where a standard 2-prong wall outlet is encountered, it
is your personal responsibility and obligation to have it
replaced with a properly grounded _rong wall outlet.
Failure to follow this warning can cause serious injury, fire,
electric shock, or death
° Do not install on _rpet. Install washer on a solid floor.
Failure to follow this warning can cause serious leak damage
• Do not remove ground prong. Do not use an adapter or
extension cord. Plug into a grounded _rong outlet. Failure
to follow these warnings can cause serious injury, fire,
electric shock, or death
• The washer should always be plugged into its own individual
electrical outlet wfiich has a voltage rating that matches the
rating plate. This provides the best performance and also
prevents overloading house wiring circuits which could cause
a fire hazard from overheated wires
• Never unplug your washer by pulling on the power cord.
Always grip plug firmly and pull straight out from the outlet
Failure to foilow this warning can cause serious injury, fire,
electric shock, or death
• Re_ir or immediately replace all power cords that have
become frayed or otherwise damaged. Do not use a cord
that shows cracks or abrasion damage along _s length or at
either end. Failure to follow this warning can cause serious
injury, fire, electric shock, or death
• When installing or moving the washer, be _reful not to
pinch, crush, or damage the power cord. Failure to follow
this warning can cause serious iniury, fire, ebctric shock, or
death
• The washer must be installed and electrically grounded by
a qualified service person in accordance with local codes to
prevent shock hazard and assure stability during operation
• The washer is heaw/. Two or more people may be needed
to install and move the appliance. Failure to do so can resuk
in back or other injury.
• Store and install the washer where it will not _ exposed
to temperatures below freezing or exposed to outdoor
weather conditions. Failure to follow this warning can cause
serious leak damage
• Do not instil the washer in humid spaces to reduce the risk
of electric shock Failure to foJiow this warning can cause
serious injury, fire, electric shock, or death
• To reduce the risk of injury to persons, adhere to all industry
recommended safety procedures including the use of long
sleeved gloves and safety glasses. Failure to follow all of
the safety warnings in this manual could result in property
damage, injury to persons or death
• Never attempt to operate this appliance if it is damaged,
malfunctioning, partially disassembled, or has missing or
broken parts, including a damaged cord or plug
• To minimize the possibility of electric shock, unplug this
appliance from the power suppty or disconnect the washer
at the household distribution pane_by removing the fuse
or switching off the circuit breaker before attempting any
maintenance or cleaning

6 IMPORTANT SAFETY INSTRUCTIONS
IMPORTANT SAFETY INSTRUCTIONS
READ ALL INSTRUCTIONS BEFORE USE
For your safety, the information in this manual must be followed to minimize the risk of fire or explosion, electric shock, or to
prevent property damage, iniury to persons, or death,
SAFETY INSTRUCTIONS FOR USE, CARE, CLONING, AND DISPOSAL
To reduce the risk of fire, e_ectric shock, or injury to persons when using this appliance, follow basic 9recautions, including the
following.
• Unplug the washer before cleaning to avoid the risk of
electric shock.
• Never use harsh chemicals, abrasive cleaners, or solvents
to clean the washer. They will damage the finish,
• Do not put oily or greasy rags or clothing on top of the
,washer. These substances give off vapors that could ignite
the materials,
• Do not wash items that are soiled with vegetable or cooking
oil. These items may contain some oil after laundering, Due
to the remaining oil, the fabric may smoke or catch fire by
itself,
• Disconnect this appliance from the power supply before
attempting any user maintenance. Turning the controls to
the OFF position does not disconnect this appliance from
the power supply. Failure to follow this warning cars cause
serious iniury, fire, electric shock, or death,
o Do not combine laundry products for use in one load unless
specified on the label.
° Do not mix chlorine bleach "with ammonia or acids such
as vinegar. Follow package directions when using laundry
products. Incorrect usage can produce poisonous gas,
resulting in serious injury or death.
• Do not reach into the ,washer while pars are moving.
Before loading, unloading, or adding items, press the START/
PAUSE button and allow the drum to coast to a complete
stop before reaching inside. Failure to follow this warning
can cause serious injury, fire, electric shock, or death,
• Do not allow children to play on or in the _'_sher. Close
supervision of children is necessary Wen the washer
is us_ near children. As children grow, teach them the
proper, safe use of all applian_s. Failure to comply with
these warnings could result in serious iniury to persons or
death.
• Destroy the carton, plastic leg, and other packing materials
after the washer is unpacked. Children might use them for
play. _rtons covered with rugs, bedspreads, or plastic
sheets can become airtight chambers. Failure to comply
with these warnings could result in serious injury to persons
or death,
° Keep laundry products out of children's reach. To prevent
injury to persons, observe all warnings on product labels.
Failure to comply with these warnings could result in serious
injury to persons or death,
° Remove the lid to the washing compartment to avoid the
danger of children or small animals getting trapped inside
before your washer is removed from service or discarded.
Failure to do so can result in serious iniury to persons or
death,
• Keep hands and foreign objects clear of the lid and latch area
"when closing the lid. Failure to keep hands clear can result
in personal injury.
SAVE THESE INSTRUCTIONS

TABLE OF CONTENTS 7
TABLE OF CONTENTS
3
3
4
5
6
PRODUCT FEATURES
IMPORTANT SAFETY INSTRUCTIONS
BASIC SAFETY PRECAUTIONS
GROUNDING iNSTRUCTIONS
SAFETY INSTRUCTIONS FOR INSTALLATION
SAFETY INSTRUCTIONS FOR USE, CARE,
CLEANING, AND DISPOSAL
8 INTRODUCING YOUR WASHING MACHINE
8 Parts and Accessories
9 Control panel features
11 INSTALLATION INSTRUCTIONS
! 1 Installation Overview
12 Checking and choosing the proper location
13 Unpacking the washer
14 Connecting the water lines
15 Connecting the drain tine
16 Leve_ing the washing machine
17 Plugging in the power cord and grounding
17 Test run
18
18 Sorting wash loads
18 - Precautions for fabric care before wash cycle
18 - Fabric care labels
18 - Sorting laundry
19 Using detergent/fabric softener
19 - Recommended detergent
19 - Loading the dispenser
21 USING YOUR WASHING MACHINE
21 Basic operation
22 Cycle guide
23 Main cycle
23 - Normal items, COTTON/NORMAL
23 - Wrinkle free items, PERM,PRESS/CASUAL
23 - Heavy soiled items, HEAk,^_' DUTY
23 - Blankets or bulky items, BULK'F/BEDDING
23 - For white fabrics, BRIGHT WHITES TM
2:3 - Clean tub, TUB CLEAN
23 -_Quick wash, SPEED WASH
23 - Sheer items, DELICA'TES
24 Cycle setting buttons
24 Setting options before cy_sle
24 _ Setting the water temperature, WASH TEMR
24 _ Setting soil level of laundry, SOIL LEVEL
24 - Setting spin speed, SPIN SPEED
24 _ Tuning on/off melody and button tones,
SIGNAL ON/OFF
24 - SPECIAL USE
25 - Setting RINSE + SPIN, RINSE + SPIN
25 - Setting SPIN ONLY_ SPIN ONLY
25 - Setting STAIN CARE _, STAIN CARE _
25 - Setting soak, SOAK
25 - Saving energy, COLDVVASH TM
25 - Adding extra rinse cycle, EXTRA RINSE _WATERPLUS
25 - Setting fabric softener of laundry, FABRIC SOFTENER
26 _,Presetting the start tirne_ DELAY WASH
26 _ Setting customized wash cycle, CUSTOM
PROGRAM _PGMSAVE
26 Setting options during cycle
26 - Button lock feature, SIGNAL OFF-LOW-HIGH 'CH_LOLOCK
26 - Setting water plus, WATER PLUS
27 - Setting add garments of laundry', ADD GARMENTS
28
28
28
28
29
29
29
Care
- Cleaning the water inlet filters
Care in cold climates
Clean the drum, TUB CLEAN
Cleaning 1he detergent box
30 TROUBLESHOOTING
30 Checking error messages
32 Normal sounds you may hear
32 Before calling for service
35
35
SPECIFICATIONS
TM
USING SMARTDIAGNOSlS
36 WARRANTY

8 INTRODUCING YOUR WASHING MACHINE_
INTRODUCING YOUR WASHING MACHINE
Parts and Accessories
{See page l9}
box
panet
(See page 9)
Identify
HOT and COLD
Power
cord
i
I
i
I
Dram hose
• Tie Strap (for securing drain hose) Optional Accessories
o Hot and Cold Water Hoses
_@NOTE
• Contact LG Customer Service at 1 800-243-0000 (1_888-542 2623 in Canada} if any accessories are missing or to purchase
accessories
• Always purchase good quality hoses, Leaking caused by poor quality hoses or by improper installation is not covered by the
manufacturer's warranty,
• The images in this guide may be different from the actuai components and accessories, and are subiect to change by the
manufacturer without prior notice for product improvement purposes,

IN_TRODUC/NG YOUR WASHING MACHINE 9
Control panel features
Cycle
LED Selector
Display Knob
Wash Soil Spin Special
Tamp, Level Speed Use
Selection Selection Selection Selection
Button Button Button Button
Power Start/
Bu#on Pause
Button
Button ........ " De_ription
. POWER ON/OFF BUTTON
oPress to turn the washer ON, Press again to turn the washer OFF.
NOTE: If the washer remains idle for 4 m nutes after turning the washer off, the water in the tub wi!
drain,
NOTE: An alarm wI1 sound 1 minute prior to draining, and 'dr' will appear on the display. You may
restart the washer at this time. However, once the washer initiates drain rig, all functions will
be suspended, and 'dr' witl be displayed until draining is complete.
CYCLE SELECTOR KNOB
Turn the Cycle Selector Knob untt the des red cycle s selecte& Once the desired cycle has been
selected, the standard presets wilt be shown in the display These settings can be adjusted using
the cycle setting buttons before starting the cycle.
START_AUS_
®0
• START/PAUSE BUTTON
- Turn this button to START the setected cycle,
If the washer is running, use this button to PAUSE the cycle without losing the current settings
NOTE: If 'you do not press the START/PAUSE button within 4 minutes of selecting a cycle, the
washer automaticaIIy turns off,
NOTE: tf the washer remains idle for 8 minutes after pausing the cycle, the water in the tub will
drain.
• CYCLE MODIFIER BU_ONS
Use these buttons to select the desired cycle options for the selected cycle. Press the button for
that setting unti the ind cator light for the desired value is lit
• OFRON BU_ONS
The option buttons aiow you to select add tonal cycle options and wii{ iight when selected. Certain
buttons also aIJow you to activate special functions by pressing and hotding the button for 3
seconds, For detailed information about the individual options, please see the following pages,
• LED DISP_Y
The display shows the settings, estimated time remaining, options, and status messages for your
washer, The display will reman on through the cycle,

10 NTRODUCING'fOURWASHINGMACHINE.
Lid lock
indicator
T
Cycle Delay Estimated time remaining/
status wash error message display
indicator indicator
• ESTIMATED TIME REMAINING
- When the START/PAUSE button is pressed, the washer automaticaiiy detects the wash load
(we ght) and optim zes the washing time based on the selected cycle and options. The dspay wiHt
then indicate the est mated time remaining for the selected wash cycle.
0 CYCLE STATUS INDICATOR
oThis portion of the display shows which stage of the wash cycle is currently underway
(LOAD SENSING, WASH, %NSE, or SPIN).

INSTALLATION INSTRUC] IONS 11
INSTALLATION INSTRUCTIONS
Insfallafion Overview
Checking and choosing the
proper location
1
Unpacking the washer
(4) (6)
Connecting the drain line
b d
Raise Lower
Leveling the washing
machine
Connecting the water line
Plugging in the power cord
and grounding
Test run
r A WARNING
• Washer is heavy! Two or more people are required when moving and unpacking He washer. Failure to do so can result in
back or other injur%
, Store and install the washer where it will not be exposed to temperatures below freezing or exposed to outdoor weather
_nditions. Failure to follow this warning can cause serious injury, fire, electdc shock, or death
• Properly ground _sher to conform with all governing codes and ordinances. Failure to follow this warning can cause
serious injury, fire, electric shock, or death,
• To reduce the risk of electric shock, do not install the washer in humid spaces. Failure to follow this warning can cause
serious injury, fire, electdc shock, or death,
• The base opening must not be obstructed by carpeting when the washer is installed on a carpeted floor,
° Do not remove ground prong. Do not use an adapter or extension cord. Plug into a grounded 3_rong outlet. Failure to
follow this warning can cause serious injury, fire, electric shock, or death

12 NSTALLA_T ION _NSTRUCTIONS
Checking and choosing the proper
Install the washing machine on a solid floor that is strong and
rigid enough to support the weight of the washing machine,
even when fully loaded, without flexing or bouncing. If the
floor has too much flex, you may need to reinforce it to make
it more rigid, if the floor is not solid, it may cause severe
vibration and noise.
1 Clean the floor before instaffation.
Make sure to select solid and smooth ground.
2 Two or more people are needed for moving and
unpacking the washing machine.
3 Allow for sufficient space between the walls and the
washing machine for installation.
You must allow sufficient space for water lines, the drain
line, and airflow,
55 314"
(141.7 cm)
(with lid
open}
._,4 _ 1"
(:iO cm)(2.5 crl
27"
_ (6&6 cm}............
453/8"
(115,3 cm}

INSTALLATIONINSTRUC]IONS13
Unpacking the washer
1 After the washer is in the home, remove the carton and
Styrofoam@ shipping base from the washer
3 Unfasten the power cord from the back of the
washer.
When removing the washer from the carton base, be sure
to remove the tub support in the middle of the carton base.
If you must lay the washer down to remove the base
packaging materials, always protect the side of the washer
and lay it carefully on its side. Do NOT lay the washer on its
front or back.
TOOLS YOU WILL NEED
" Adjustable Pliers
• Carpenter's Level
Tub support
Carton Base
2 Remove the packing block containing the owner's
manual, parts and laundry product samples_

14 NSTALLAT_ON _NSTRUCTIONS
Connecting the water lines
Check the rubber seals on both sides of the hose,
oInsert a rubber seal into the threaded fittings on each
hose to prevent leaking.
Rubber seal
[__
Rubber seal
Water hose
(To water inlet on the
washing machine)
Water hose
(To tap)
4
Connect the hoses to the water inlets tightly by hand and
then tighten another 2/3 turn with pliers,
- Connect the blue hose to the cold water inlet and the
red hose to the hot water in_et,
water inl
Cold water inlet
2 Connect the water supply hoses to the HOT and COLD
water faucets tightly by hand and then tighten another
2/3 turn with pliers.
.-Connect the blue hose to a cold water faucet and the
red hose to a hot water faucet.
5 Check for leaks by turning on the faucets.
•-If water leaks, check steps 1to 4 again,
NOTE ................................................................................................................................................................................................................................................................................
• Periodically check the hoses for cracks, leaks and wear,
and replace the hoses every 5 years.
° When moving or installing the machine do not stretch,
crush of kink the hoses,
• Water supply pressure must be between 14.5 PSI and
116 PSI (100-_800 kPa), If the water supply pressure is
more than 116 PSI, a pressure reducing valve must be
instafled,
° To provide optimum washing performance the hot
water temperature should be set at 120-135°F (48_57°C)
and the coJd at 60°F (15°C).
3
After connecting inlet hose to water faucets, turn on the
water faucets to flush out foreign substances (dirt, sand
or sawdust) in the water lines. Let water drain into a
bucket, and check the water temperature,

_NSTALLATION iNSTRUCTIONS 15
Connecting the drain line
Secure the drain hose in place to prevent moving and leaking.
NOTE
° The drainhose shouldbe properlysecured,Failureto
propedy secure the drain hose can result in flooding
and malfunction.
• Total height of the house end should not exceed 96
inches (244.8 cm) from the bottom of the washer,
• The drain must be installed in accordance with any
applicable local codes and regulations.
• Make sure that the water lines are not stretched,
pinched, crushed, or kinked,
C_ipthe end of the hose into the elbow bracket.
Connect the elbow bracket within 4 inches (10cm) from the
endd the drain hose. If the drain hose is extended more than
4 inches (10 cm) beyond the end of the e{bow bracket, mold,
or microorganisms could spreadto the inside of the washer.
No more fhan
4 inches (10 crn)
[
2 Hang the end of the drain hose over the sde of the laundry tub
1 insert the end of the drain hose into the standpipe
Drain Hose
Use a tie strap to secure the drain hose in place,
Drain Hose
3 Use a tie strap to secure the drain hose in place,
...... ............
_ (99cm)
// _ T .
Cable Tie
Cable Tie

1_ NSTALLATION _NSTRUCTIONS
Leveling the Washing machine
The washer spins at very high speeds, up to 1,000 RPM.
• Adjust the _eveling feet only as far as necessary to
level the washer Extending the leveling feet more than
necessary can cause the washer to vibrate,
° All four leveling feet must rest solidly on the floor. Rock
the washer gently from corner to corner to make sure
that the washer does not rocL
- Before installing the washer, make sure the floor is
clean, dry and free of dust, dirt, water and oils so the
washer feet cannot slide easily Leveling feet that can
move or side on the floor can contribute to excess
vibration and noise due to poor contact with the floor.
1 Position the washer in the final location,
taking special care to not pinch, strain, or crush the water
and drain lines. Place a level across the top of the washer.
2 Adjust the leveling feet. Turn clockwise to raise the
washer or counterclockwise to lower it_
3
Raise Lower
To make sure that the washer is properly level, open
the lid and look from above to see if it is same as shown
bebw, If you have a level, check your washer with the
level
alse
I/
If the washer is not level, adjust the leveling feet. Turn
clockwise to raise, counterclockwise to lower.
to side
to back
4
Check the washing machine's level again.
- Push or rock the top edges of the washing machine
gently to make sure that the washing machine does not
rock.
oIf the washing machine rocks, repeat steps 1 to 3
WARNING
• Using the washing machine without ieveling, it may
result in malfunction caused by the production of
excess vibration and noise,
• Use the leveling feet only wfien you level the ,washing
machine, _fyou raise the leve_ing feet unnecessarily, it
may cause abnormal vibration of the washing machine.
\
• To check if the washer is level side to side, close the lid
and place a tevel at the back of the lid.
• To check if the washer is level front to back, phce a level at
the side of the washer on the edge where the cabinet side

NSTALLA]"ION/NSTRUCfIONS 17
Plugging in the power cord and
Make sure to ground the washing machine to prevent a short
circuit or an electric shock when plugging in.
Plug in the electrical outlet without additional grounding,
A WARNING
• Thepewer outlet must be within _ inches (1.5 m) of either
side of the washer.
, Theappliance and outlet must be positioned so that the plug
iseasilyaccessible,
• Do not overload the outlet with more than one appliance.
, Theoutlet must be grounded in accordance with current
wiring codes andregulations,
• Time-delayfuse or circuit breaker is recommended
, It is the personal responsibility and ob igation of the product
owner to have aproper outlet installed bya qualified
electrician,
• Do not use a _rn or damaged power cord or power plug,
Replaceor repair it immediately, Failure to do so may'resutt
in death, fire, electric shock, or malfunction.
, Do not mod_ the power cord and take care not to damage
it wC_eninstalling or mo'dng the washing machine. Failureto
do so may result in death, fire, electric shock, or malfunction
, Make sure that the washing machine is grounded.
• Conne_ this washing machine to agrounded _Uet
conforming tothe rating prior to use, Failureto do so may
result n fire, e_ectricshock, or malfunction.
• Do not use adaptors or extension cords, The washing
machine shoutd always be plugged into its own indivdual
eiectrical outlet which hasa voltage rating that matches the
rating pate Failureto do so may result in fire, electric shock
or disorder
• Do not damage or cut off the ground prong of the power
cord, Doing so may cause death, fire, electric shock, or
product malfunction.
Test run
Check if the washing machine is propedy installedand run a
1
2
3 Press _)to RINSE + SPIN.
4 Press _
- The wash cycle starts.
5
Load the washing machine with 6 pounds of laundry,
Check if water is supplied, that the washing machine
does not rock or vibrates excessively, and that it drains
well during the spin cycie
- If water leaks during water supply, see page 14,
Connecting the water lines to connect them properly',
If the washing machine rocks and vibrates excessively,
see page 16_Le-v,eling the washing machine to level it
again_
=If the drain does not work, see page 15, Connecting the
drain line to install it properly,

18 PREPARATION
PREPARATION
Sorting wash loads
Precautions for fabric care before wash cycle
Read and observe the following to prevent shrinkage or damage to clothes.
A CAU TIO N Donotwash or spin any item labeled
or known to be water-proof or water-resistant, even if the
product care label on the item permits machine washing.
Failure to follow these instructions could result in severe
damage to your laundry, your washer and/or property damage
as a result of abnormal vibration of the washer
- Examples of water-proof or water.-resistant items include
certain mattress pads, mattress covers, rain gear, camping
gear, skiing apparel, outdoor gear and similar items.
Check all pockets to make sure that they are empty.
-.Items such as clips, matches, pens, coins, and keys can
damage both your washer and your clothes
Close zippers, hooks, and drawstrings to prevent these
items from snagging or tangling on other clothes
Pretreat heavily stained areas before washing,
Doing so will produce clean, stain-free results,
Combine large and small items in a load. Load large items
first.
Large items should not be more than half of the total
washloa&
_1,The washer can be fully loaded, but the drum should not
be tightly packed with items.
Do not wash single items, except for bulky items such as
blankets Make sure to wash laundry in similar types of
loads.
oWashing a single small item may result in the tub
becoming unbalanced, vibrating and making a noise.
Brush heavy soil, dust, or hair off fabrics before washing,
--Laundry may not wash clean if there is dirt or sand on
the fabrics, or they may damage due to particles rubbing
against sheer fabrics.
Wash btankets individually,
Washing more than one blanket together may produce
unclean results due to tangling or an unbalanced load.
Always separate fabrics according to their colors and wash
them separately to prevent colors from running.
-.Fabrics may damage or become stained due to fabric
dyes
running, or due to foreign obiects transferring from one
fabric to another
Fabric care labels
Most articles of c!othing feature fabric care labels that include
instructions for proper care,
Washing
Water Temperature
Bleach symbols
_41!4
W
Directions
Hand Wash
Mach ne Wash, Normal Cycte
Use Permanent PressA/Vdnkle
Resistantwash ng machine
_L_i setting (which a or
has CO0_ down
cold spraybefore the reduced
spin)
Use Gentle/Deficatewashing
machine setting (slow agitation
and/or reduced wash time}.
Do Net Wash
Do Not Wring
o_
Q
A
Hot
Warm
Cold!Cool
Any Bleach (When Neededt
Only NonoChiorine Bleach (When
Needed}
Do Not BIeach
Sorting laundry
It is recommended that you sort laundry into similar loads
that are washable in the same cycle,
Refer to the following chart for sorting clothes
Whites / Ughts / Darks
Heavy /Normal / Light
Delicates / Easy Care / Sturdy Cottons
Lint Producers / Lint Collectors

PREPARATEON 19
Using detergent/fabric softener
Recommended defergenf
Make sure to use HE (High-Efficiency) detergent for Top
loading washing machines HE detergents dissoJve more
efficiently and produce fewer suds to ensure efficient
washing and rinsing. Use the correct amount of detergent as
indicated on the label of the detergent packaging.
Designed specially to use only
HE (High-Efficiency) detergent
Loading fhe dispenser
The detergent dispenser drawer of the washing machine has
a dispenser compartment for each detergent type. Add the
appropriate detergents into its respective compartments,
1 Pull out the detergent dispenser drawer
....@ NOTE
- Only use HE detergents, since using a regular
detergent may produce excessive suds,
• HE detergents produce fewer suds, dissolve more
efficiently to improve washing and rinsing performance,
and help to keep the interior of ,/our washer clean,
- Use Jessdetergent for soft water.
• Wipe up any spi_lsimmediately, as liquids could
damage the finish and the control panel of the washing
machine.
• Using too much detergent can cause a build-up in
the tub resulting in unsatisfactory performance and
machine malfunction
• If you use a detergent that does not dissolve easily or a
detergent with high viscosity, it will leave a residue on
the tub, which may not rinse properly
2
Add the appropriate detergent to its allocated
compartment,
if you use a liquid detergent, check if the liquid
detergent cup is in place.
-If you use a powdered detergent, remove the liquid
detergent cup and put the powder in the main wash
detergent compartment.
Main V/ash
Liquid Detergent
Corot:
°Insert
3
Liquid Fabric
Softener
Compartment
Main Wash
Powder Detergent
Compartment
Close the detergent dispenser drawer slowty.
Slamming the detergent dispenser drawer may result in
the detergent overflowing into another compartment or
pouring into the tub earlier than programmed.

20 PREPARATION
This compartment holds laundry detergent for the main wash
cycle, which is added to the load at the beginning of the
cycle. Always use HE (High-Efficiency) detergent with your
washing machine
Never exceed the manufacturer's recommendations when
adding detergent. Using too much detergent can result
in detergent buildup in cbthing and the washer Either
powdered or liquid detergent may be used,
.@ NOTE
• Liquid or powdered color-safe bleach may be added
to the main wash compartment with detergent of the
same type.
• When using liquid detergent, make sure the liquid
detergent cup and insert are in place. Do not exceed
the maximum fill line
° When using powdered detergent, remove the insert
and liquid detergent cup from the compartment.
Powdered detergent will not dispense with the _iquid
detergent cup and insert in place.
This compartment holds liquid chlorine Meach, which will be
dispensed automatically at the proper time during the wash
cycle Avoid overfilling or splashing when adding bleach
to the dispenser The maximum capacity of the bleach
dispenser is one cup of bleach per wash cycJe, Overfilling
could result in premature dispensing of Meach, which will
result in fabric damage.
....@ NOTE
• Do not add powdered or liquid color safe bleach to this
compartment
° Always folJow the manufacturer's recommendations
when adding bleach. Do not exceed the maximum fill
line, Using too much bleach can damage fabrics
° Never pour undiluted liquid chlorine Meach directly onto
the load or into the drum. Fabric damage can occur.
This compartment hoJds liquid fabric softener, which will be
automatically dispensed during the final rinse cycle.
,--@NOTE
° AJways follow the manufacturer's recommendations
when adding fabric softener. Do not exceed the
maximum fill line. Using too much fabric softener may
result Jn stained clothes,
• Dilute concentrated fabric softeners with warm water
Do not exceed the maximum fill Jine.
• Never pour fabric softener directly onto the Joador into
the drum,
Fabric
Softener
Main V_/ash
Detergent

USING YOUR WASHING MACHINE 21
USING YOUR WASHING MACHINE
Basic operation
SORT LAUNDRY AND LOAD WASHER.
ADD DETERGENT BLEACH AND SOFTENER.
This compartment holds liquid fabric softener, which will be automatically dispensed during the
final rinse cycle. Refer to pages 19-20 for details.
TURN ON THE WASHER.
Press the POWER button to turn on the washer.
SELECT CYCLE.
Turn the knob to desired cycle. The display win show the preset WASH TEMP SOIL LEVEL,
SPIN SPEED for that cycle.
®®®@
SELECT CYCLE MODIFIER BUTTONS. If you would like to change the modifier for that cycle,
press the appropriate cycle settings button(s) until the indicator light for the desired
setting is lit_
NOTE: To protect your garments, not ever,/WASH TEMR temperature, SPiN SPEED, SOIL
LEVEL, or OPTION is available with every cycle.
SELECT OPTION BUTTONS Select any additional cycle options, such as FABRIC SOFTENER or
DELAY VVASH
NOTE: To protect 'your garments, not every WASH TEMP. temperature, SPiN SPEED, SOIL
LEVEL, or OPTION is available with ever,i cycle,
STA_T_AUSE
Press @,
- The washing machine win start.
When the melody plays if the sound is turned on, the wash cycle is finished
When the washing cycle is finished, the lid will unlock. Open the lid and remove the laundry
immediately.
WARNING
To reduce the risk of fire electric shock, or injury to persons, read the IMPORTANT SAFETY INSTRUCTIONS before
operating this appliance,
%

22 USNGYOUR WASHING MACHINE
Cycle guide
The cycle guide beEow shows the options and recommended fabric types for each cycle_ !iii!!ii!!i!i!i!!iii!,!i!!i!i_i_!_,_i!_i=Defaul_tsetting
Tub Clean
Bright Whites TM
Bulky/Bedding
Refer to page 29.
White fabrics
Large items such
as blankets and
somforters
O
O
O
• •
O O
O
Duty
Perm Press
Casual
Cotton/Normal
Speed Wash
Del cates
Use the BulkylBedding cycle for items such as pittows, comforters and other articles which have difficultly absorbing water ONLY
WASH SMALL LOADS to make sure there is plenty of room for the load to move during washing. Keep like items together; do
not mix large bulky items with smalier clothing items. Failure to follow these instructions may result in damage to the clothing or
to the washer.
Heavy soiled cotton
fabrics
Dress shirts/pants,
wrinkle-freeclothing,
polyJcottonblend clothing,
tablecloths
3otton, shirts, jeans
_oxs, pants
Lightly soiled and
smalt loads
Normal
Eco Warm _edium Light
Cold _ow
ECOWarm N
3old ow Light
Cold '._oSpin
Hot
Eco Warm _edium Light
_otd _JoSpin
Heavy
Eco Warm
Cold Vledium
Tap Cold Zow
_1oSpin
Warm High Heavy
Eco Warm Vledium Normal
Dress shirts,folouses,
nylons, sheer or lacy
0 TM
O
O
O
O
O
O
garments
(less than 8 Ibs.) _o Spin
NOTE: To protect your garments, not ever,! Wash Temp., Spin Speed, Soil Level, or Option is available with every cycle.
• • • •
• • • •
• • • •
• • • •
• • • •

USING YOUR WASHING MACHINE 23
Main cycle
You can wash laundry items more thoroughly by selecting
the wash cycle that best suits the type of items to be
washed. Turn the knob to desired cycle. When you select a
wash cycle, the light for the corresponding wash cycle will
turn on, See page 2t Basic operation, for more details on
operating methods.
Normal items, COTTON/NORMAL
Use this cycle to wash normal items, except bulky items
such as blankets and fabrics such as wool or silk
Sheer items, DELICATES
This cycle is for washing lingerie or sheer and lacy clothes
which can easily be damaged.
Wrinkle free items, PERM,,PRES UAL
This cycle is for washing items such as wrinkle-free clothes
or tablecloths to minimize wrinkles,
Heavy soiled items, HEAVY DUW
This cycle is for washing heavily soiled laundry though more
powerful tub rotation,
Blankets or bulky items, BUL EDD_NG
This cycle is for washing blankets or bulky items.
For white fabrics, BRIGHTWHITES
This cycle is for washing white items only.
Clean tub, TUB CLEAN
Use this cycle to clean the tub of your washing machine.
Quick wash, SPEED WASH
Use the Speed Wash cycle to quickiy wash iightiy soiled
clothing and smalJ load, For high wash and rinse efficiency,
it is recommended te wash small loads of 2=3lightly soiled
garments.
"@ NOTE
Use a little detergent in this cycle. If you want more
rinsing, you can add extra rinse by using the Extra Rinse
button.

24 USNG YOUR WASHING MACHINE
Cycle setting buttons
Each cycle has preset settings that are selected
automatically You may also customize the settings using
the cycle setting buttons Press the button for that option to
view and select other settings.
The washer automatically adjusts the water level for the
type and size of wash load for best results and maximum
efficiency, It may seem there is no water inside the drum in
some cycles, but this is normal.
Seffing options before cycle
You can select and add the desired optional functions before
you start the washing machine.
Setting the water temperature, WASH TEMR
Set the water temperature for the wash cycle. Set the
appropriate temperature, as specified in the fabric care iabel.
1
2
Turn the cycle selector knob to the desired cycle.
Press _{_Jrepeatedly to select the desired water
temperature:
When an optional item is selected, an indication light for
the corresponding optional item turns on
3 Press the desiled option button to use the other options
4
..-Skip to step 4 to use the default setting without
changing the options.
Press _.
4
Skip to step 4 to use the default setting without
changing the options.
Press _.
NOTE
This feature needs more time for heavily soiled loads or
less time for lightly soiled loads,
Setting spin speed, SPIN SPEED
You can set the desired spin speed,
Use this feature properly according to the characteristics of
the load,
1
2¸
Turn the cycle selector knob to the desired cycle,
Press _} repeatedly to select the desired spin speed.
When an optional item, is selected, an indication light for
the corresponding optional item turns on
3 Press the desired option to use the other options,
Skip to step 4 to use the default setting without
changing the options.
4 Press _,
Tuning on/off melody and button tones,
S_GNAL ON/OFF
The washing machine plays a melody when the wash cycle
is finished. The buttons make a sound each time a button is
pressed The melody and button tones can be adjusted the
volume as desired.
Adiusts the volume of the endoof_.cycle signal or
Setting soil level of laundry, SOiL LEVEL
You can wash your laundry more thoroughly by setting the
proper soil level on the washing machine.
1
2
Turn the cycle selector knob to the desired cycle.
Press (_#_)repeatedly to select a soil level.
- When an optional item is selected, an indication light for
the corresponding optional item turns on.
SPECIAL USE
Select any additional option, such as RINSE+SPiN,
SPIN ONUY, STAIN CARE TM or SOAK. If you
press SPECIAL USE button without selecting a
cycle, COTTON/NORMAL cycle with SOAK is
automatically selected.
3 Press the desired option to use the other options.

USING YOUR WASHING MACHINE 25
SeWing RINSE + SPIN, RINSE + SP_N
Select this option to rinse and spin a load separately from a
regular cycle. This can be helpful in preventing fresh stains
from setting in fabrics. You can change spin speed by
pressing SPIN SPEED respectively_
1 Press the POWER button to turn on the washer.
2 Press the @ button until the RINSE+SPIN indicator
light is lit (The cyclelight will turn off,)
3 Press the (_ button to start the cycle. The washer will
Seffing SPIN ONLY, SP_N ONLY
This button activates the SPIN ONLY cycle to drain and spin.
1 Press the POWER button to turn on the washer.
2 Press the ¢_) button until the SPIN ONLY indicator light
is lit
3 Press the @ button to start the cycle, The washer will
Saving energy, COL©WASH TM
For maximum efficiency, wash only small loads, (less than 8
ibs.)
1 Turn the cycle selector knob to the desired cycle.
2 Press _ The washer will automatically adjust the
3 Set any other desired options.
4 Press _,
Seffing STAIN CARE TM, STAIN CARE _
STAIN CARETM may be selected as an option with HEAVY
DUTY, COTTON/NORMAL cycles. Wash only small loads for
optimum fabric care (Jess than 8 Ibs)
1 Press the POWER button to turn on the washer.
2 Press the _ button until the STAIN CARETM indicator
light is lit,
3 Press the (._ button to start the cycle. The washer will
NOTE
• If you select STAIN CARE TM, the COLDVVASH TM option
is not available.
Se_ing soak, SOAK
Al!ows the consumer to remove stains more thoroughly by
specifying additional time for the clothing to soak during
washing At the end of SOAK, the wash cycle wiil be started
without drain. Cycle time will be increased by 30 minutes,
It is normal that washer do weak agitation during SOAK
cycle.
Adding extra rinse cycle, EXTRA R_NSE ow_;_:_r*_Js
You can add an extra rinse cycle to the default rinse cycle.
1
2
4
Turn the cycle selector knob to the desired cycle,
Press _%_
light will turn on.
Press the desired option to use the other options,
Skip to step 4 to use the default setting without
changing the options
Seffing fabric softener of laundry, FABRIC
The fabric softener is dispensed in the final rinse.
FAbRiC Select FABRIC SOFTENER button to change final
soFr_ rinse type from spray rinse to rinse.

26 USNGYOUR WASHING MACHINE
Preseffing the start time, DELAY WASH
You can set the desired start time.
1 Turn the cycle selector knob to the desired cycle.
2 Press the desired option to use the other options
3 Press repeatedly to select the desired start time.
o light will turn on,
- The set start time appears on the display panel,
- Each press of the button increases the delay time by
one hour, up to !9 hours,
4 Press _.
Setting customized wash cycle, CUSTOM
PROGRAM _'sMsaw:
CUSTOM PROGRAM allows you to store a customized
wash cycle for future use. It allows you to save favorite
temperature, spin speed soil level, and other options for a
cycle, and then recatl them at the touch of a button,
1
2
3
4
5
Press the POWER button to turn on the washer.
Turn the cycle selector knob to select the desired cycle
_ light will turn on.
Press the cycle modifier button to change the desired
setting,
Press the cycle option button to add the desired options.
Press and hold the CUSTOM PROGRAM button for 3
seconds.
To recall a custom program:
1 Press the POWER button to turn on the washer
2 Press the CUSTOM PROGRAM button. The stored
settings will be displayed
3 Press the START/PAUSE button to start the cycle. (if
you press any other button, CUSTOM PROGRAM is
automatically dese_ected and indicator light off.)
Setting options during cycle
You can add the desired options during the wash cycle,
Button lock feature, SIGNAL OFFoLOW
H_GH c:_L/>LOCK
You can lock the washing machine to prevent children or
others from changing the cycb settings by pressing the
buttons during the cycle.
Press and hold for 3 seconds during the wash cycle
- When the CHILD LOCK is enabled, aL-Lmessage and the
remaining wash time are displayed, in turn, on the display
panel of the washing machine
(When the CHILD LOCK is activated,)
Press and hold for 3 seconds during the wash cycle.
NOTE
Once the controls are locked, they must be manuaiiy
/ unlocked to restore operation,
Seffing water plus, WATER PLUS
Select this option to add extra water to the wash and rinse
cycles for superior resuks, especially with iarge or bulky
items,
Press and hold the _ button for 3 seconds to activate or
deactivate WATER PLUS,
If you chose the WATER PLUS option, you can hear the
beeper sound, There is no sound in case of SIGNAL OFR
1 Press the _ button during wash or rinse cycle_(Jt is not
available in spin cycle)
2 Press and hold the EXTRA RINSE.
3 Press the @ button to start the cycle,
4 If you want to use additional water, repeat steps 1
through 3

USING YOUR WASHING MACHINE 27
Seffing add garments of laundry, ADD
Laundry may be added to the load at the proper
time in the wash cycle.
When the ADD GARMENTS light is illuminated, it is safe to
pause the cycle and add more items to the load.If garments
are added when the ADD GARMENTS light is off, the washer
will not adiust for these items which could result in poor
performance or fabric damage,
To add garments while the ADD GARMENTS light is on:
1 Press _-_ button to pause the washer.
2 Open the lid when it unlocks
3 Add'your additional items_
4 Close the lid
@
5 Press ...... button to resume the wash cycle.
.@NOTE
If the washer remains idle for 8 minutes after pausing
the cycle, the water in the tub will drain.

28 MA NTENANCE
MAINTENANCE
Cleaning the Water Inlet Filters
if the washer detects that water is not entering the
dispenser, an error message will show on the display, If
you live in an area with hard water, this may be caused by
clogged inlet filters_
Care in cold climates
1 Turn off both: water taps completeiy, Unscrew the hot and
cold water lines from the back of the washer,
2 Carefully remove the filters from the water inlets, and
soak them in white vinegar or a lime scale remover, Rinse
thoroughly before reinstalling. Press the filters back into
place and reattach the water lines. Do NOT operate the
washer without the inlet filters
Inlet
WA RNING ...............................................................................................................................................................................
° Unplug the power _rd and turn off the fau_ before
cleaning. Failure to do so may cause electric shock.
• Do not use the washing machine without the inlet
filters, If you use the washing machine without the
inlet filters it will cause leaks and malfunction
• If you use the washing machine in an area with hard
water, the inlet filter may clog due to lime buildup,
Contact your nearest LG customer service center if the
inlet filter is not clean or is missing.
t
2
Turn off the faucets connected with the water lines,
Pour hot water on the frozen faucets to thaw the water
lines and pull them out.
3
4 Connect the water lines with the water inlets of the
washing machine and faucets.
See page 14, Connecting the water lines for details.
5 Turn on the faucets,
6 Press @,
_ to RINSE + SPIN.
7 Press
8 Press (_
Verify the water fills properly.
Immerse the water lines in hot water to thaw them,
1 Pour hot water in the washer tub and close the lid.
o Leave it for 10 minutes.
2 Press_ after 10 minutes.
_'_) to SPIN ONLY.3 Press
4
Press @.
- Check if the water drains.

MAINTENANCe] 29
Periodica!ly clean the washing machine to maintain its
performance and to prevent malfunction,
Clean the drum, TUB CLEAN
Using the washing machine in a humid space for a long
period of time may lead to a buildup of black mold and germs
in the air inside the washer tub and affect your health, If you
clean the washer tub regularly on a monthly basis using TUB
CLEAN it will keep the washer tub clean for hygienic use.
2
3
Add tub cleaner or lime scale remover into the detergent
dispenser drawer,
Do not exceed the maximum detergent limit line when
you add it, Detergent may remain in the washer tub
after cleaning
When you use liquid chlorine bleach, load it into the
liquid chlorine bleach compartment.
- When you use a powdered cleaner, pull out the liquid
detergent cup and add it into the main wash detergent
compartment
- When you use cleaning _blets, place them directly into
the washer tub, (Do not add tablet cleaner to the drawer,)
Press @,
Turn the cycle selector knob to TUB CLEAN.
The indication light for TUB CLEAN turns on.
4 Press _.
,-@ NOTE
- Never load taundry while using TUB CLEAN The
laundry may damage or become contaminated Make
sure to clean the washer tub when it is empty,
• It is recommended to leave the lid open after finishing
the laundry to keep the tub clean
• It is recommended that TUB CLEAN should be
repeated monthly
° if mildew or musty smell already exists, run TUB
CLEAN for 3 consecutive weeks
Cleaning the detergent box
Leaving detergent in the detergent for an extended period of
time or using the washing machine for a long period of time
may cause the build-up of scales in the detergent. Pull out
and clean the detergent once aweek
1 Remove the drawer by pulling it straight out until it stops.
Lift up on the front of the drawer and pull it out.
2
Remove the inserts from, the 2 compartments; rinse the
inserts and the drawer with warm water to remove traces
of accumulated laundry products,
3 To clean the drawer opening, use a small, non-metal
brush to dean the recess. Remove all residues from the
upper and lower parts of the recess
4 Return the inserts to the proper compartments and
replace the drawer
WAR NING
Do not spray water inside the washing machine. Doing
so may cause fire or electric shock
NOTE

30 TROUBLESHOOTING
TROUBLESHOOTING
Checking error messages
If the following message appears on the display, check the foiiowing and take the appropriate corrective action
Water in the washer
drains slowly or not
at all, or the display
shows:
Washer fills with water
slowly or not at all, or
the display shews:
Washer will not turn on
The display shows:
The display shews:
The display shows:
The display shows:
P_sible Buses Solutions---
- Drain hose is bent, pinched, or clogged. • Make sure the drain hose is free of clogs, kk_ks, etc.,
and is not pinched behind or under the washer,
• Water pressure to tap or house is too tow.
- Power cord is not properly plugged in.
- House fuse is blown, circuit breaker has
tripped, or power outage has occurred.
The lid is not dosed properly
. Lid lock switch error
• Water level is too high due to a faulty water
valve,
- Clutch error
• Make sure that the water taps are open fully
Make sure the hoses are not kinked or pinched Be
careful when moving the washer,
° Ciean the inlet filters, See the Care and Cleaning
section.
• Check another faucet in the house to make sure that
household water pressure is adequate
• Make sure that the plug is plugged securely into a
grounded, %prong, 120_VAC, 60-+_z.outlet
• Reset circuit breaker or replace fuse, Do not increase
fuse capacity, if the problem is a circuit overload, have
it corrected by a qualified electrician,
• Make sure that the lid is closed properly and press the
START/PAUSE button. After starting a cycle, it may
take a few moments before the drum begins to turn or
spin, The washer will not spin unless the lid is locked
(LID LOCK light will turn on}.
• if the lid is closed and locked and the open lid error
message is displayed, call for service,
° If you press the START button while the lid is open, dE
error message will be displayed
• Make sure that the lid is closed properly and press the
START/PAUSE button, The washer will not spin unless
the lid is locked (LID LOCK light witl turn on},
° If the lid is closed and the lid lock error message is
ed, call for service.
- Close the water taps, unpkig the washer, and call for
service.
° Unplug the washer, and call for service,
• Water supply taps are not open fully.
° Water line hoses are kinked, pinched, or
bent.
° Water irfiet filters are clogged,

TROUBLESHOO[ tNG 3_
Checking error messages (conf.)
The display shows:
The display shows:
The display shows:
The display shows:
The display shows:
The display shows:
• The washer has detected an out of balance
load.
• If the uE rebalance (see above) is not
successful, this error will be displayed.
° The load is too small,
• Heavy articles are mixed with lighter items.
• The load is out of balance.
• Thermistor error
• The water level sensor is not working
correctly.
• Thermal overload protection circuit in the
motor has been tripped,
If an error message is displayed for
4 minutes, the water in the tub wiii
automatically drain. An alarm will sound 1
minute prior to draining, and 'dr' will appear
on the display. You may restart the washer
at this time. However, once the washer
initiates draining, all functions will be
suspended, and 'dr' will be displayed until
draining is complete.
If the washer detects a load that is too far out of
balance to spin, it will display this code while it is
attempting to rebalance the load, The washer will add
water and try to redistribute the toad automatical!y,
This display is for your information only, and no action
is required.
• The automatic attempt to rebalance the load was not
successful. The cycle has been paused to allow the
load to be manually adjusted_
• Smal_loads may need additional items to be added to
al!ow the washer to balance the loads.
o The load may have heavy items loaded with lighter
items, Always try to wash articles of somewhat similar
weight to allow the washer to evenly distribute the
weight of the load for spinning
• Manually redistribute the load if articles have become
tangled preventing the automatic distribution from
working properly.
• Unplug the washer and call for service.
, Close the water taps, unplug the washer, and call for
service.
o Allow the washer to stand for 30 minutes to allow the
motor to cool; then restart the cycle. Jfthe LE error
code still appears, unplug the washer and call
for service.
• This is normal.

32 TROUBLESHOOTING
Normal sounds you may hear
The following sounds may be heard while the washer is operating, They are normal,
Clicking:
• Lid lock relay when the lid locks and unlocks,
• The washer will make a series of clicking noises as it changes the cleaning mode,
High pitched noise:
The wash basket spins faster to remove moisture from the load,
Spraying or hissing:
Water spraying or circulating during the cycle,
Humming or gurgling:
Drain pump pumping water from the washer at the end of a cycle,
Water sloshing sound:
A liquid in the balance ring around the wash basket he_ps the basket spin smoothly.
(Washer is turned off and tub is rotated,)
Sound of water being added after the ,washer has already been operating:
• The washer adapts to the load size and type to add more water to the cycle as needed.
• The wash load may be unbalanced If the washer senses that the load is unbalanced, it will stop and refill to redistribute the
load
- The washer may be diluting laundry additives to add to the wash load,
Before calling for service
Your washing machine is equipped with an automatic error--monitoring system to detect and diagnose probtems at an early stage.
If your washer does not function properly or does not function at all, check the following before you call for service.
Possible _u:s_ ' Solutions
Railing and clanking - Foreign obiects, such as keys, coins, or
noise safety pins, may be in drum or pump
Thumping sound
Vibrating noise
Water leaking around
washer
Excessive sudsing
• Heavy wash loads may produce a thumping
sound.
• Washer load may be out of balance.
• Wash load may be unevenly distributed in
the drum
° Not all leveling feet are resting firmly on
the floor
- Floor not rigid enough.
• Fill hose connection is loose at tap or
washer.
• House drain pipes are clogged.
- Large items such as pillow and blanket
over the tub.
• Too much detergent or incorrect detergent,
• Stop washer and check drum for foreign obiects, if
noise continues after the washer is restarted, cail for
service,
• This is normal If sound continues, the washer is
probably out of balance. Stop and redistribute the
wash load
, Sto_,pand redistribute the wash load
° Stop washer and rearrange the wash toad.
e
t
Adjust the leveling feet. Make sure aHfour feet are in
firm contact with the floor while the washer is in the
spin cycle with a load.
Make sure that the floor is solid and does not flex.
Refer to Flooring in the Installation section.
Check hoses Check and tighten hose connections.
Unclog drain pipe, Contact a plumber if necessary,
Check the cycle If you wash large items, use BULKY/
BEDDING cycle.
Stop washer and check the load position. Lay bulky
items into the tub.
Reduce detergent amount or use low-sudsing
detergent,
Only use detergent with the HE
(High-Efficiency) logo,

"[ROUBLESHOOTgNG 33
Washer won't • Control panel is asleep • This is normal. Press POWER.
operate • Washer is unplugged ° Make sure cord is plugged securely into a working outlet
° Water supply is turned off • Turn both hot and cold faucets fully on.
- Controls are not set properly • Make sure the cycle was set correctly, close the lid and
press START.
° Lid is open-safety feature - Close lid and reset cycle, to the beginning if necessary.
Prevents the washer from filling
and operation when lid is up
- Circuit breaker/fuse is tripped/ • Check house circuit breakers/fuses, Replace fuses or
blown reset breaker The washer should have a dedicated circuit.
° Electronics need to be reset ° Press the POWER button,
• START was not pressed after a - Press START.
cycle was set
- Extremely low water pressure
° Washer is too cold
Washer not filling • Filter clogged or fill hoses may be
pro_ kinked
• Energy efficiency
• Insufficient water supply
o The washer automatically adjusts
the wash time for the amount of
laundry, water pressure, water
temperature, and other operating
conditions.
• Check another faucet in the house to make sure that
household water pressure is adequate,
• If the washer has been exposed to temperatures below
freezing for an extended period of time, allow it to warm
up before pressing POWER Otherwise, the display wilt
not come on,
° Make sure that filters (blue and orange screens must be
free of solids) on the unit are not clogged_ Turn off water
and check filter by disconnecting hose at machine, Check
that fili hoses are not kinked or clogged.
° This is an energyoefficient washer, As a result the
temperature settings for this washer may be different
than nomenerg__y.-efficient washers.
• Make sure that the water supply is turned on.
° Make sure that the water faucets are turned to their
completely open positions.
° The washer lid must be closed for all washer cycte
operations. If the lid is opened during washer operation,
all functions will stop, including water filling,
° Make sure that the fill hoses connect the hot water supply
to the hot inlet on the washer, and the cold water supply
to the cold inlet on the washer (hot to hot, cold to cold).
° Water may not cover the top level of the clothes, This is
normal for this high-efficiency washer_ The water fill is
optimized by the system for best wash performance.
• Ensure that the drain hose is not kinked. Per the
recommended installation instructions, the drain outlet
cannot be over 8' above the floor,
, Check all fill and drain hose connections to ensure that
they are tight and secure.
° Oversudsing may create leaks, and may be caused by
the type and amount of detergent used_ High-.efficiency
detergent is recommended Make sure that detergent
and any additives are put into the correct dispenser
compartments, Follow the detergent manufacture's
recommendations for the amount of detergent, but try
using less detergent, especialiy if home water conditioning
or water softening units are used
• This is normal. The washer adjusts cycle time
automatically to provide optimal results for the selected
cycle.
° If you press the START button while the lid is open, dE
error message will be displayed.
Wash cycle time is longer
than usual
Water I_ks
• The washer lid is open
• Incorrect fill hose connection
° Water fil! optimization
Washer "will not • l(]nk;ed°dra_:__hose or"dr-a_nlocated
drain water higher than 8' above floor
Water leaks every load ° Hoses not installed correctly
- Oversudsing of detergent

34 TROUBLESHOOT'_NG
Incomplete or no dispensing
of detergent
• Detergent compartments clogged
from incorrect filling
° Too much detergent use
• Insufficient water supply
° Normal residue
• Make sure that detergent and additives are put in to the
correct dispenser compartments. If liquid detergent is
used, make sure that the liquid detergent cup and insert
are in the detergent compartment. If powdered detergent
is used, make sure that the liquid detergent cup and insert
are not used, For all detergent types, always make sure
that the dispenser drawer is fully closed before the start
of the cycle.
° Make sure that the suggested amount of detergent is
used per the manufacture's recommendations_ You may
also dilute the detergent with water to the maximum fill
line on the compartment to avoid clogging Use only, HE
......(High-Efficiency) deter._ent.
• Make sure that the water supply is turned on. Make sure
that the water faucets are turned to their completely open
positions.
• Normal operation, Residual may remain in the dispenser
of the compartments. The dispenser box may be removed
for occasional c_eaning with warm water and a scrub
brush
Premature ° Bleach dispenser filled for future • You cannot store bleach in the dispenser for future use
dispensing of bleach load • The bleach dispenser will be dispensed every load for
optimal safety of the washer.
• Ove°rfi[_ng :t_leblea_s}i_d[:s°penser • Ove:;filirng the dispenser with bleach may lead to
premature dispensing There is a maximum fill line
indicated on the bleach dispenser to help avoid overfilling.
Clogging of bleach ° Bleach dispenser is not seated ° Make sure that the bleach cover is properly seated and
snapped into place before the start of the cycle,
° insufficient cleaning
Poor stain removal ° Presoak not selected •
• Add laundry products to the °
washer drum. °
• Washer not unloaded promptly,.
• Does not properly sort the °
c[othes.
Staining
Wrinkling ° Washer _::_o{]J°r]]oadedpromptly
• Washer overloaded,
• Hot and cold water inlet hoses are
reversed.
You may remove and clean the bleach cover with warm
water and a scrub brush to clear dogging.
We recommend that you select presoak when defining
your wash cycle. Always make sure that any additives,
such as your high efficiency liquid detergent, are added
to the pretreat dispenser bin before starting the cycle.
Always refer to your clothes care label before treating
stains,
Load the laundry products into the dispenser
Always remove kems from the washer as soon as
the cycle is completed.
Always wash dark colors separately from light colors
and whites to prevent discoloration_ If possible, do
not wash heavily soiled items with lightly soiled
ones.
Alway,s remove kems from the washer as soon as the
cycle is completed_
The washer can be fully loaded, but the drum should not
be tightly packed with items_ The lid of the washer should
c_ose easily.
Hot water rinse can set wrinkles in garments. Check the
inlet hose connections.

SPECIFICATIONS/USING SMARTDIAGNO%S _ 35
SPECIFICATIONS
Model 1CW
Description Top--Loading Washer
Electrical requirements 120 VAC @ 60 Hz.
Max_ water pressure 14.5-116 PSI (100-800 kPa)
Dimensions 27"(W) X 283/S'(D} X 45"s/s"(H), 553ia'(H with lid open)
68.6 cm (W) X 72i cm (D) X ! 15_3 cm (H), 141.7 cm (H with lid open)
Net weight 145.5 Ibs. (66 kg)
Max. spin speed 1,100 RPM
USING SMARTDIAGNOSIS TM
- Onty use this feature when nstructed to do so by the call centen The transmission sounds simitar to a fax machine, and so has
no meaning except to the call center.
SMARTDIAGNOStS TM cannot be activated if the washer does not power up tf this happens, then Iroubleshooting must be done
without SMARTDIAGNOSIS TM
If you experience probterns with your washer, call 1--800-243-OOOO (1_888_542-2623 in Canada) r-___ltowthe calt center agent's
instructions, and perform the following steps when requested:
1. Press the _ to turn on the washer_ De not press any other buttons.
2. When instructed to de so by the ca!l center, place the mouthpiece of your phone very close to the POWER button.
3 Press and hold _-_._/for three seconds, while holding the phone mouthpiece to the icon or POWER button
4. Keep the phone in place until the tone transrnission has finished. This takes about 17 seconds, and the display wit count down
the tirne.
• For best results, de not r-nove the phone while the tones are being transmitted and de not touch the console wth the phone.
, If the cati center agent is not able to get an accurate record ng of the data, you r'nay be asked to try again.
- Pressing the POWER button during the transmission wiII shut off the SMARTDIAGNOSIS TM.
5. Once the countdown s over and the tones have stopped, resume your conversation with the call center agent, who witt then be
able to assist you using the information transmitted for analysis at the call center.

36 WARRANTY
LG WASHING MACHINE LIMITED WARRANTY (USA)
WARRANTY:
LG Ebctron cs U.S,A., Inc, ('LG'} warrants your LG Washing Mach ne ('product'/against defect in materfals or workmanship under normal
household use, durng the warranty period set forth below LG will at its option, repair or replace the product, This limited warranty is valid only
to the orig hal retait purchaser of the product, is not assignabie or transferrabb to any subsequent purchaser or user, and applies only when the
product is purchased through an LG authorized dealer or distributor and used wthin the United States ("U S,') including US Territories,
Note: Reptacement products and repair parts may be new or factory-remanufactured and are warranted for the remaining portion of the original
unit's warranW period or ninety (90t days, whichever is longer. Piease retain dated receipt or delivery ticket as evidence of the Date of Purchase
for proof of warranty (you may be required to submit a copy to LG or authorized representative),
WARRANTY PERIOD:
Period
_ope of Warranty
Remark
One (1) year from date of
original retail purchase:
Any internal/functional
Parts & Labor
LG will provide parts & labor to
repair or replace defective parts.
Ten (1O)years from date of
original retail purchase:
Drum Motor
(Stator, Rotor, and Hall Sensor)
Lifetime from date of
original retail purchase:
Stainless Steel Drum
Parts only. Customer will _ responsible for any labor or in-home
service to replace defective parts.
HOW SERVICE IS HANDLED: In-Home Service
In-home service will be provided, as available, during _e warranty period subject to servicer availability ,within the U.S. To receive in-home
service, the product must be unobstructed and accessible to service personnel, ff the in-home service repair cannot be completed, it may be
necessary to remove, repair and return the product. If in-home service is unavailable, LG may elect, at its option, to provide for transportation
of the product to and from an LG authorized service center.
THIS LIMITED WARRANTY DOES NOT CODER:
I. Service trips to deliver, pick up, or install the product or for instruction on product use.
2. Replacing house fuses or resetting of circuit breakers, correction of house wiring or plumbing, or correction of product installation,
3. Damage or failure caused by leaky/broken/frozen water pipes, restricted drain lines, inadequate or interrupted water supply or inadequate
Supply of air.
4. Damage or failure caused by accidents, pests and vermin, lightning, wind, fire, floods or acts of God.
5. Damage or failure resulting from misuse, abuse, improper installation, repair or maintenance. Improper repair includes use of parts not
approved or specified by LG.
6. Damage or failure caused by unauthorized modification or alteration to the product.
7. Damage or failure ceused by incorrect electrical current, voltage, or plumbing codes.
8 Cosmetic damage, including scratches, dents, chips or other damage to the finish of the product, unless such damage results from defects
in materials or workmanship and is reported to LG within seven (7) calendar days from the date of delivery.
9. Damage or missing items to any display, open box, discounted, or refurbished product.
10. Product w_nere the original factory serial numbers have been removed, defaced or changed in any way.
11. Repairs when product is used in other than normal and usual household use (e.g. rental, commercial use, offices, or recreational facilities)
or centrary to the instructions outlined in the owner's manual.
12. The removal and reinstailation of the Product ff it is installed in an inaccessible location
THIS WARP_NTY IS IN LIEU OF ANY OTHER WARRANTY, EXPRESS OR IMPLIED, INCLUDING AND WITHOUT LIMITATION TO, ANY
WARRANTY OF MERCHANTABILITY OR FITNESS FOR A PARTICULAR PURPOSE. TO THE EXTENT ANY IMPLIED WARRANTY IS REQUIRED
BY LAW, THIS WARI_AN_ IS LIMITED IN DURATION TO THE TERM PERIOD EXPRESSED ABOVE. REPAIR OR REPLACEMENT AS PROVIDED
UNDER THIS WARR.ANTY IS THE EXCLUSIVE REMEDY FOR THE CUSTOMER. NEITHER THE MANUFACTURER NOR ITS U.S. DISTRIBUTOR
SHALL BE LIABLE FOR ANY INCIDENTAL, CONSEQUENTIAL, INDIRECT, SPECIAL, OR PUNITIVE DAMAGES OF ANY NATURE, INCLUDING
AND WITHOUT LIMITATION TO, LOST REVENUES OR PROFITS, OR ANY OTHER DAMAGE, WHETHER BASED IN CONTRACT, TORT, OR
OTHERWISE,
SOME STATES DO NOT ALLOW THE EXCLUSION OR LIMITATION OF INCIDENTAL OR CONSEQUENTIAL DAMAGES OR LIMITATIONS ON
HOW LONG AN IMPLIED WARRANTY LASTS, SO THE ABOVE EXCLUSION OR LIMITATION MAY NOT APPLY TO YOU. THIS WARRANTY
GIVES YOU SPECIFIC LEGAL RIGHTS AND YOU MAY ALSO HAVE OTHER RIGHTS THAT VARY FROM STATE TO STATE.
HOW TO OBTAIN VVARR,_NTY SERVICE & ADDITIONAL INFORMATION: Write your warranty information below:
Call 1-800-243-0000 or visit our website at vwcw,lg.com.
Mail to: LG Customer Information Center (A_N: CIC)
201 James Record Road, Huntsville, AL 35824
Product Registration Information:
Model:
Serial Number:
Date of Purchase:

WARRANTY37
LG WASHING MACHINE LIMITED WARRANTY (CANADA)
WARRANTY:
Should your LG Washer ("Product") fai! due to a defect in mater al or workmanship under normal home use during the warranty period set fo_h
below, LG Canada witl at its option repair or replace the Product upon receipt of proof of original retait purchase This warranty is valid onfy to the
originat retail purchaser of the product and applies only to a Product d stributed in Canada by LG Canada or an authorized Canadian distributor
thereof The warranty only applies to Products located and used wthin Canada.
Period
Scope of Warranty
Remark
One (1) year from the date of original
retail purchase
Parts and Labor
(internal,ffunctional parts only)
VVasher
Ten (10) years from the date of
original retail purchase
DD Motor
(Stator, Rotor, Hall Sensor)
Five ( 5 ) years from the date of original
retail purchase
Stainless steel Drum
Extended Component Warranty (Parts Only)
(Consumer will _ charged for Labor after one (1) year from the date of
purchase)
I_ Replacement products and parts are warranted for the remaining portion of the originat warranty period or ninety (90) days, whichevei is greater.
I_ Replacement products and pa_ts may be new or remanufactured.
I_ LG Authorized Service Center warranties their repair work for thirty (30) days
LG Canada's sole liabil_¢ is limited to the warrant,,, set out above. Except as expressly provided above, LG Canada makes no and hereby
disclaims all other warranties and conditions respecting the product, whether express or implied, including, but not limited to, any implied
warranty or condition of merchantability or fitness for a particular purpose, and no representations shall be binding on LG Canada. LG Canada
does not authorize any person to create or assume for it any other warranty obligation or liability in connection with the product, To the extent
that any warranty or condition is implied by law, it is limited to the express warranty period above. LG Canal, the manufacturer or distributor
shall not be liable for any incidental, consequential, special, direct or indir_ damages, loss of goodwill, lost profits, punitive or exemplary
damages or any other damage, whether arising
Directly or indirectly from any contractual breach, fundamental or otherwise, or from any acts or omissions, tort, or otherwise.
This warranty gives you specific legal rights. You may have other rights which may vaD' from province to province depending on appt cabte provincial Iaws.
Any term of this warranty that negates or varies an',!impiied condition or warranty under provincial law is severable where it conflicts with
provincial law without affecting the remainder of this warranty's terms.
1. Service trips to deiiver, pick up, or insta{I the product; instructing a customer on opera[on of the product; _epar or replacement of fuses or correctfon of wiring or
correction o[ unauthorized repairs/installation
2. FaihJred 1heproduct to perform during power failures and interruptions o_ nadequa[e e/eclricat service.
3. Damage caused by _eakyor broken water pipes, frozeI_ water pipes, restricted drak_ nee inadequate or into rupted water suppty or inadequate supply of at.
4. Darnage _esu_ting fK_moperating the Produc! n a corrosive atmosphere o_ contrary to the }nstn_ctions outlined in the Product owners manual
5. Darnage to the P_oduct caused by accidents, pesta and vermin, lightning, wnd, fire, floods or acts of God
6. Damage resulting from [he msuse, abuse irnp_ope_ installation, repair or ma n_enance of the Product. Improper repair incIudes use d parts no1approved or specified by
LG Canada.
7 Damage o_'product ta ture caused by unauthorized modfficat on or alteration, or use fol other than ts intended purpose, or resu[ling hem any wate_ teakage due to
improper {ns_a_ation
8 Darnage or Product faiiure caused by ncorrect electrical current, vottage, commercial el industr a{ use, or use of accessories, eomponerlts, or dean{ng produc[s that are
not approved by LG Canada.
g. Damage caused by transpodation and handling, including scratches, dents, chips, and!or other damage to the finish of your product, unless such damage results from
def_ts in mare_ aisor workmanship and is reported within one (1) week of deliver',/.
10. Dan_age or missing items to any display epen bo×, discounted, or refurbished P_oduct.
I Roducts with or gina} serial numbers that have been removed, altered, or cannot be readily determined Model and Serial numbers, ato_lg wilh originai _etai{sa_esreceipt,
are required for warranty validation.
!2. Increases in uti_}ty costs and additional utility expenses
!3 RepIacement of ght bu_bs,fi_ters, or any consumable #arts
!4 Repairs when your P_oduct s used in other than normal and usual household use (including, without limitation, commerda_ use_ in offices o_ recreationai faci_it as} or
contrary to the instructions outlined in the Product owner's manual.
I5. Costs associated wffh removal of the Product from your home for repairs
16. Tbe remova_ and reinstallat on of the Product if }t is installed in an inaccessiMe _ocation or is not nstal ed n accordance with published installation nslruct one, including
the P{oduct owner's and instdlat on manuals.
17. Accessoriea to the P_oduct such as Id bins drawers, handles, shelves etc Also excluded ae parts bee des [hose that were originally included with the Product.
At_costs associated with the above exctuded circumstances shatl be borne by the consumer
For complete warranty details and customer assistance,
please catl or vsit our website:
Catl 1-888-542.-2623 (24 hours a day, 365 days ayear) and select the
appropriate option from the menu, or vist our website
at http:i/www.ig.com
Write your warranty information below:
Product Registrat on information:
Model
Serial Number:
Date of Purchase:

38 MEMO

Life's Good
MANuAL PRoP_ETAR_o
LAVADORA
Antes de cornenzar la instalaci6n, lea afentamente estas instrucciones.
Esto simplifi car_ la instataci6n y asegurar_ que fa lavadora est_
instalada en forma correcta y segura. Conserve estas instrucciones
cerca de Ja lavadora iue9o de is instaJaci6n para futuras consultas.
P/No.:MFL39760232 www, Jg.cor_

2 CARACTERiS;T/CAS DEL RRODUCTO
CARACTERiSTICAS DEL PRODUCTO
El motor inverter, el cual esta conectado directamente al tambor, m:inimiza Jap@rdidade energia y produce menos ruido y
vibraciones.
Si experimenta alguna dificultad tecnica con su lavadora, este tiene la capacidad de transmitir informaci6n pot tet6fono al Centro
de Atenci6n al Cliente. El agente de servicio aJcliente guarda la informaci6n transmitida de su mSquina y la utiliza para anafizar el
problema, facilitandole un diagn6stico rapido ,/efectivo. (ConsuJte la pagina 35)
La limpieza regular del tambor, una vez al mes, con TUB CLEAN mantendra el tambor limpio y fresco.
Use esta opci6n para desactivar los controles durante un ciclo de lavado.Esta opci6n evita que los niF!os puedan cambiar los
ciclos o e! funcionamiento de la mSquina,
Esta lavadora esta disenada para ahorrar agua durante el lavado mediante el uso deJSMART RINSETM con spray de chorro en los
ciclos de lavado ALGODONiNORMAL y MUY SUCJO_
El tambor de acero inoxidable de mSxima capacidad ofrece una durabilidad 6ptima,

INSTRUCC_ONES IMPORTANTES DE SEGUR/DAD 3
INSTRUCClONES IMPORTANTES DE SEGURIDAD
LEA TODAS LAS INSTRUCCIONES ANTES DE USAR
A ADVERTENCIA
Per su seguddad, debe seguir la informacion indicada en este manual para minimizar el riesgo de incendio o explosion descarga
electrica, o para prevenir danes a la propiedad, lesiones personales o muerte.
Su seguridad y la de otros es muy importante.
Hemos incluido muchos mensajes importantes de seguridad en este manual yen su electrodomestico. Lea y cumpla siempre
con todos los mensajes de seguridad
Este es e! simbolo de alerta de seguridad,
El mismo alerta sobre potenciales riesgos de muerte o heridas tanto para usted come para otras personas,
Todostosmensajesde segurdadestaranacontinuacionde[simbolodealertade seguridady con lapalabraPELIGRO,ADVERTENCtAoPRECAUCION
Estas palabras significan:
A PELIGRO
Corre riesgo de muerte o de sufrir heddas serias si no sigue las instrucciones inmediatamente.
A ADVERTENClA
Corre riesgo de muerte o de sufrir heridas serias si no sigue las instrucciones.
A PRECAUClON
De no seguir las instrucciones podria sufdr dahos leves o causar daBos en el producto
Todos los mensajes de seguridad le indicarSn cu_l es el riesgo potenciat, c6mo reducir las posibilidades de sufdr heridas y qu6
podria suceder si no se siguen las instrucciones.
A ADVERTENCIA
Para minimizar el riesgo de incendio o explosion, descarga electdca, o para prevenir lesiones personales cuando use
electrodomesticos, se deben seguir precauciones basicas de seguridad, inctu]endo las siguientes:
• Ufllice este electrodom6stico solo _ra los fines para los que fue
disefiado, seg_n Io descrito en este manual del usuario.
N'ufllisez votre laveusequ'aux fins prevues decrites dans ce
manuel du proprietaire.
• #ates de usar, la lavadoradebe estar correctamente instalada
come se describe en este manual.
• No laveartfculos que hanside limpiados, lavados, remoja_s o
salpicados previamente con gasolina,disolventes de iimpieza en
seco, uotras substancias inflamables o explosivas,ya que emanan
vaporesque podrian encenderse oexpIotar
• No agregue gasolina, disolventes de limpieza en seco u otras
substancias exJplosivasal aguade ]avado.Estassubstancias emanan
vaporesque podrian encenderse oexplotar
• Bale ciertas cond ciones, se puede producir gas hidrogeno en un
sistema de aguacaliente que no se haya usado per un plazo de 2
semanaso mas. EL GAS HiDROGENOESEXPLOSIVO.Si no se
ha usadoel sistema de agua_liente durante tal periodo, antes de
utilizar la lavadora, abra todas las Ilavesde agua caliente y deje que
el agua fluya durante algunos minutes. Esto }iberaracuatquiergas
hidrogeno acumu_ado,Yaque el gas es inflamable, no fume ni use
ninguna llama abier_ durante este periodo,
• Nodejequelosnifiosjueguenenlalavadoraodentrode ella,Esnec_ario
supe_sar decercaalosni5osai utiiizalalavadoracercadeetloa,
• Antes de poner la lavadorafuera de servicio o de tirarla, quite la
puerta para prevenir que los nines se metan dentro.
• No instale ni guarde la lavadora en lugares donde estar_ ex_uesta a
ia intemperie o a teml:eraturas de congelamiento,
• No toquetee los controles,
• Mantenga el _rea alrededor y bajo el dispositivo libre de materiales
combustibles, come pelusa, papel, trapos, productos quimicos, etc,
* No repare ni _mbie ninguna piezade la la_dora ni intente
dar un mantenimiento diferente al descrito en este manual
Recomendamos enfaticamente queel manten miento tobrinde uRa
persona catificada,
. Vealas in_ucciones deinstalaci6npara losrequisites detoma a tierra.
- Siga SlEMPRElas instrueciones _ cuidado de la tela suministradas
per el fabricante de las prendas.
* No coloque articul_s expuestos aaceite de cocina en su lavadora,
Losarticulos contaminados con aceites de cocina podrian causar
una reaccion quimica que causeque la carga de _avadose incendie
o Uses_vizadores de tela o productos para elimirar estatica
unicamente del m@ recomendado _r el fabricante.
o Estalavadorano esta dise#_adapara use marine o instalacones
moviles taIes come vehiculos recreativos, aeronaves, etc.
° No utilice la lavadora para secar artJculosque ccntengan _ucho,
foam, o materiales con texturas similares a _ucho.
° Cierre las Ilavesde aguay desenchufelalavadorasi noLftilizar,_la uni_d
per unperiodo pro!ongadodetieml_9,r_gmodurante lasvacaciones.
* Etmaterial de empaquepodria resultar petigroso para losniSos.
Existe etpeligro de sofocaci6n! Mantengatodos los materiales de
empaque fuera del alcancede los nifios.
. Antes de cargar la lavadora, siempre revise que no hayaobjetos
extranos en su interior, Mantenga la puerta cerra_ cuando no se
use,
° No col_ue hs manes dentro del electrc_lom_stico siel tamber o el
agitador est_n en movimiento.
. ADVERTENClA:Este producto contiene quirecos conoddos per el
Estadode California de causar cancer Ldvese/as manes despu_s
de manipular.

4 NSTRUCC_ONES IMPORTANTES DE SEGURIDAD
INSTRUCCIONES IMPORTANTES DE SEGURIDAD
LEA TODAS LAS INSTRUCCIONES ANTES DE USAR
AADVERTENCiA
Per su seguridad, se debe seguir la informacion indicada en este manual para mhlimizar el riesgo de incendio o explosion,
descarga electrica, o para prevenir danos a la propiedad, lesiones personales, o muerte.
Este aparato debe ser conectado a tierra. En el caso de descompostura o mal funcionamiento, la conexion a tierra reduce el
riesgo de recibir una descarga electrica al proveer una via de menor resistencia a la corriente electrica Este aparato esta equipado
con un cable que tiene un conductor de equipo a tierra y una clavija de tierra La clavija debe ser conectada en una toma de
corriente adecuada que este apropiadamente instalada y conectada a tierra de acuerdo con los codigos y ordenanzas locales
ADVERTENCIA
Una conexion inapropiada del conductor de equipo a tierra puede resuttar en riesgo de recibir una descarga electrica Vedfique con
un electricista calificado si tiene dudas sobre si el aparato esta correctamente conectado a tierra. No modifique la claviia provista
con el aparato. Si no encaia con la toma de corriente, !lame a un electricista calificado para que instale una toma de corriente
adecuada. Si no se cumple con esta advertencia se podran producir heridas graves, incendios, descargas electricas, o muerte

INSTRUCC+ONES IMPOR+_NTES DE SEGUR/DAD 5
INSTRUCClONES IMPORTANTES DE SEGURIDAD
LEA TODAS LAS INSTRUCCIONES ANTES DE USAR
A ADVERTENCIA
Pot su seguddad, se debe seguir la informacion indicada en este manua_ para minimizar ebriesgo de +ncendio o explosion,
descarga electric& o para prevenir danos a la propiedad, lesiones personales o muerte,
A ADVERTENCIA
Para minimizar et desgo de incendio o explosion, descarga e_ectdca, o para prevenir lesiones personales cuando use
electrodomesticos, se deben seguir precauciones basicas de seguddad, incluyendo las siguientes:
• Cc,nsulte lasINSTRUCCIONESDE INSTALACIONparaun pr,_edimiento
detalladode cone>donatierra. Lasnstrucciones de instalacon son
incluidascon sulavadoraparaset utilizadascome referencia Simueve
latavadoraauna nuevaubcacidn,contrate aunapersonadel servicio
catificadaparaque +arevisey reinstale+Si nose cumpteconesta
advertenca se podranproducirheridasgraves,incendios,descargas
electricas,o muerte,
• 8ajo ningur_acircunstanciadeber_co_r o eliminar istercera punta
(detoma atierra) delcablede alimentaci6n.S+nose cumpleconesta
adve_enciasepodranproducirheridasgraves,incendios,descargas
etectricas,o muerte.
• Parasu seguridadpersonal,este electrcdomestico debeestar
adecuadamenteconectadoatierra. Sino secumplecon esta
advertenciasepodranproducirhefidasgraves,incendios,descargas
etectricas,o muerte.
• El_ble de corriente de este electr_:lomestico contiene unenchufede
3 cables(cone>donatierra) queseconectaaun tomacorriente de _red
estandar de3 cables(conexJona tJerra)paraminimizarlaposiblidadde
riesgosde descargase+ectricaspot partedelmismo.
• Lalavadoradeberaestar conectadaa untoma_rriente con c_r_4on
atierra de 120VAC,60 Hz+Si nose cumpe con esta advertenciase
podranproducirheridasgraves,incendios,descargase+ectricas,o
mue_e,
• Contzateaunelectricista calfficadoparaquerevise eltomacorriente
y elcircuit(>electrico con elfin de asegurarque el enchufeeste
oarrectamente cone_.adoatierra. Si nosecumple conesta adve_encia
sepodranproducirheridasgraves,incendios,descargaselectricas,o
muerte.
, Encasode contarcon untomac_rriente de _red de 2 cables,es su
responsabilidady obligacionreemplazadoper untomacorriente de
_red de3 cablescorrectamente cone_do a tierra. Sino secumple
con estaadvertenciasepodranproducirheridasgraves,incendios,
descargase+ectricas,o mue_e,
+Noinstale lalavadorasobre unaalfombra.Ingle la lavaderasebre un
pisos61ido.Elincumptimientodeesta advertenciapuede causarda_os
provocadospot fugade agu&
• Noeiimine el cablede cone>donatierra, No useun adaptadorocable
de extensi6n.Conectela lavadoraen untomacorriente concone>don
atierra de3 cables.Sino secumplecon estaadvertenciasepodran
producirheridasgraves,incendos,descargaselectricas,o muerte,
• _ lavadoradeber_estar siempre conectadaa unenchufe individual
con un indicede voltaic equivalentea[que figura on suetiquetade
caracteristicas tecnicas.Estogarantizael mejorfuncionamientoy
ademasprevienela sobrecargade los circuitosdeIhogar,o cuatpodria
ocasionarriesgosde incendiodebidoal recalentamientodecanes
•Nuncadesenchufesu lavadoratirandodelcablede corriente. Siempre
tome el enchufefirmemente y jaleelmismo I-mciafuera _ra retirarlo.
Sino secumplecon estaadvertenciase podranproducirheridasgraves,
ncendos+descargase+ectricas,omuerte,
• Repareo reernplacede inmediatotodos loscablesde corriente petados
oconcualquiertipo dedane,No use uncable_n c,._tadurasoabrasion
sobre suextensiono extremes. Si nosecumple conesta advertencia
sepodranproducirheridasgraves,incendios,descargaselectricas,o
muerte.
• AIinstalaro cambiarde lugar lalavadora,evite todotipo de cortes
uotros danosen el cabledocorriente. Sino secumptecon esta
adve_enciasepodranproducirheridasgraves,incendios,descargas
electricas o muerte,
• Lalavadoradebeser instaladay conectadaa tierra por unapersona
especializadadel_rvicio tecnico cumpliendocon losoadigoslocales
paraprevenirresgosde descargasy asegurarlaestabiidadduranteel
funcionamiento
• Lalavadoraespesada,Senecesitandoso maspersonaspara instalary
_asladarel elect_-odomestico.Siesto nosecumpIese podranproducir
diversasheridas,
• Almaceneeinstale lalavadoradonde noest6 ex43uestaatemperaturas
bajocare oa oo_iciones climn,tticasen _r_s exteriores. Si nose
cumpleconesta advertenciase podrSnproducirdaSospotfugasde
agua
• Conel fin de reducir etriesgo dedescargaselectricas noins'talela
lavadoraenespacioshumedos. S}no secumpleconestaadve_enca
sepodranproducirheridasgraves,incendios,descargasetectricas+o
mue_e
•Parareducir el ri_go dolesiones per_nales, cumplacontodos
los procedimientosde seguridadreo3mendadosper la industria,
incluyendeel usede guantescon mangaslargasy gafasdeseguridad.
Encasodeno cumplircontodas lasadvertenciasde seguridadde
este manualse podrSnproducirda_ossobrelapropedad,fesiones
personaIesola muerte.
• Nuncaintente _,{lizareste electrodomes_Jcosiesta danado,tiene
unafalls,esta parcialmentedesarmado,tiene partes danadasole
fa_n pares, incluidoun cableo un enchufedanado.Paraminmizar
la posbitidadde queocurrauna descargaelectric& antesde rea+izar
cuatquiertareade mantenimientoolimpiezadesconecteeste
electrodomesticodeIsumin+stroetectricoo desconecteIalavadorade]
panelde distribucionde +acasaqutandoel fusibie odesconectandoel
disyuntor.

6 NSTRUCCIONES IMPORTANTES DE] SEGURIDAD
IMPORTANTES DE SEGURIDAD
LEA TODAS LAS INSTRUCCIONES ANTES DE USAR
A ADVERTENCIA
Pot su seguridad, se debe seguir la informacion indicada en este manual para minimizar el riesgo de incendio o expJosion,
descarga electrica, o para prevenil danos a la propiedad, lesiones personales o muerte.
INSTRUCClONES DE SEGURIDAD P/_ _ UTILI_ClON, CUID,_DO Y LIMPIEZA, Y LA EUMINAClON
A ADVERTENCIA
Para minimizar el desgo de incendio o explosion, descarga electrica, o para prevenir lesiones personaEes cuando use
electrodomesticos, se deben seguir precauciones basicas de seguridad, incluyende las siguientes:
• Desenchufe la lavadora antes de limpiar la misma para evitar
el riesgo de descargas electricas.
• Nuna utilic_ qul'micos fuertes, limpiadores abrasivos o
solventes para limpiar su lavadora. Los mismos daSaran el
acabado de la unidad.
• No coloque trapos con grasa o aceite encima de la lavadora,
Estas sustancias emiten vapores que podrfan prender fuego
a _osmateriales.
• No lave prendas que esten sucias con aceite vegetal o de
cocin& Las mismas pueden quedar con algo de aceite luego
del lavado Debido ai aceite que permanece, ta tela puede
despedir humo o prenderse fuego por si so!&
• Desconecte este electrodomestico del tomacorriente antes
de realizar cualquier ti_ de mantenimiento. Colocar los
controles en la po-sicion OFF (apa_do) no desconecta el
electrodomestico de la toma de corriente, No cumplir con
esta advertencia, podr8 ocasionar heridas graves, incendios,
descargas e_ectricas, o muerte.
• No combine diferentes productos de lavanderia en una
misma _rga a menos que esto se especifique en ta eSqueta.
• No mezcle cloro con amon[aco o _cidos come el vinagre,
Siga las instrucciones del paquete cuando utilice productos
de lavanderfa. E_uso incorrecto puede producir gases
t6xicos, Io que podda resultar en lesiones graves o la muerte.
• No coloque las manos dentro de la lavadora cuando sus
partes esten en movimiento. Antes de cargar, descargar o
agregar prendas, pulse el boton de INICIO/PAUSA y espere
hasta que el tambor se detenga totalmente antes de colocar
las manes dentro. Si no se cump_e con esta advertencia
se podran producir heridas graves, incendios, descargas
electricas, o muerte.
• No _rmita que los ninos jueguen sobre o dentro de la
lavadora. Si hay ninos cerca mientras la lavadora esta en
funcionamiento es necesario supervisarios de c_r_. A
medida que los ninos crezcan, enseneles sobre el uso
adecuado y seguro de todos los electrodomesticos, Siestas
advertencias no se cumplen se poddan producir heridas
graves.
° Destruya la bolsa plastica y otros materiales de embalaje
una vez retirada la lavadora. Es posible que los nines deseen
usarlas para jugar, Los cartones cubiertos con alfombra,
_lchas o laminas de plastjco se pueden con,_rtir en
camaras hermeticas. Si estas advertencias no se cumplen se
podrian producir heridas graves o muerte.
° Mantenga ios productos de lavanderia fuera del alcance
de los ninos. Para evitar heridas, cumpla con todas las
advertencias que figuran en las etiquetas de los productos.
Si estas advertencias no se cumplen se podrian producir
heridas graves,
° Antes de que su lavadora sea quitada de servicio o
desechada, quite la puerta del compa_imiento de la la;,adora
para evitar el peligro de que los niSos o pequeSos animales
queden atrapados dentro. El no haceflo puede ocasionar
lesiones personales graves o la muerte,
° Mantenga las manos y objetos extraSos alejados del ,_rea
de la _pa y el cierre cuando est_ cerrando la tap& En caso
contrario, podr{a sufrir lesiones.
GUARDE ESTAS IIVSTRUCCIONES

iNDICE
3
3
4
5
CARACTERISTICAS DEL PRODUCTO
INSTRUCCIONES IMPORTANTES DE
PRECAUCtONES BASICAS DE SEGURIDAD
INSTRUCCIONES PARA LA CONEXION A TIERRA
INSTRUCCIONES DE SEGURIDAD PARA LA IN-
STALACION
INSTRUCCiONES DE SEGURIDAD PARA LA UTI-
LiZACION, CUIDADO Y LIMPIEZA, Y LA ELIMIo
NACION
8 INTRODUCCiON A LA LAVADORA
8 Psrtes y Accesorios
9 Csracter[sticas del panel de control
11 INSTRUCCIONES DE INSTALACION
! 1 Perspectiva general de instalaci6n
12 Comprobaci6n y elecd6n de Ja ubicsci6n adecusda
13 Desernbalaje de Is lavadora
14 Conexi6n de las tuberias de agua
15 Conexi6n de! tubo de desagOe
16 Nivelaci6n de ta Javadora
17 Conexi6n del enchufe y la foma de fierra
17 Pruebs de funcionamiento
18
18
!8
Clasificsci6n de las cargas de lavado
- Precauciones pars el cuidsdo de los tejidos antes
del ciclo de lavado
18 Etiquetas de cuidado de las telas
18 Clasificaci6n de la carga de ropa
19 Ufilizaci6n del defergente/suavizante
19 - Detergente recomendado
19 _ Csrgsndo el dispensador
21 UTILIZACION DE LA LAVADORA
2 ! Funcionsmiento b4_sico
22 GuFs de cidos
23 Ciclo principal
23 Ropa normal, COTTON/NORMAL
23 - Ropa sin arrugas, PERM,PRESS/CASUAL
23 Muy sucias de algod6n, HEAVY DUTY
23 - Mantas o tops voluminosa, BULKY/BEDDING
23 o Pars tejidos blancos, BRIGHT WHITES TM
23 - Limpieza del tambor, TUB CLEAN
23 Lsvado r_pido, SPEED WASH
23 - Prendss delicadas, DELICATES
24 Botones de ajuste de ciclo
24 Opciones de ajuste antes del ciclo
24 Ajuste de la temperatura deJ agua, WASH TEMR
24 - Ajuste del nivel de sudedad de ta co!ada, SOIL LEVEL
24 - Ajuste de la vetocidad de cenfr fugadQ SPIN SPEED
25 Encender/apagar Ja rne_od_a y los tonos de los
botones SIGNAL ON/OFF
25 - SPECIAL USE (USO ESPECIAL)
25 Ajuste de RINSE + SPIN, RINSE + SPIN
25 Ajuste de SPIN ONLY, SPIN ONLY
25 _ Ajuste de STAIN CARE _'_,STAIN CARE TM
25 - Ajuste de soak, SOAK
25 - Ahorro de energ_a, COLDWASH TM
26 Afladiendo cido de e_uague extra, EXTRA RINSE WA_ERPLUS
26 - Ajuste del suavizante de Is coJada, FABRIC
SOFTENER
26 - Preajuste del fiempo de inicio, DELAY WASH
26 - Aiuste de un ciclo de lavado personaJizadQ
CUSTOM PROGRAM "PGMSAVE
27 Opciones de ajuste durante el cicio
27 _ Bot6n de funci6n de b!oqueo, SIGNAL OFF-
LOW-H IGH "CHL_LOCK
27 - Ajuste de wafer plus, WATER PLUS
27 - Ajuste de_ a_adir prendas de la colads,
ADD GARMENTS
28
MANTENIMIENTO
28 Cuidados
28 - Limpieza de los fiJtros de entrada de agus
28 Cuidados en dirnas frlos
29 Limpieza
29 - Lirnpieza del tamboB TUB CLEAN
29 - Cuidado y limpieza de Is tavadora
30 SOLUCION DE PROBLEMAS
30 Comprobaci6n de los mensajes de error
32 Ruidos norrnales que puede escuchar
32 Antes de solicitar asistencia t@cnica
35 ESPECIFICACIONES
35 UTILIZACION DEL SMARTDIAGNOSiS TM
36 GARANTJA

8 NTRODUCCtON A LA LAVADORA
INTRODUCCION A LA LAVADORA
Partes y Accesorios
Dispensador
caj6n
(v_ase p&gina 19)
Puerta
Pies de
nivelaci6n
Entradas de agua
Cable de
alimenfaci6n 4
, I_ --Manguera
de desagQe
• Correade sujeci6n (paraasegurar la manguera de drenaie) Accesorios Optional
• Mangueras de agua fria y caliente
_-@NOTA ........................................................................................................................................................................................................................................................................
• P6ngase en contacto con el Departamento de atenci6n al diente de LG, en eJnQmero 1_800-243 0000 (1_888%42 2623 en
Canada) si falta alguno de los accesorios.
• Compre mangueras de buena calidad, Las fugas causadas per mangueras de baia calidad o una instalaci6n incorrecta no es
est_n cubiertas por la garantia del fabricante
° Las imagenes de esta guia pueden no coincidir con los componentes y accesodos reales, y estan sujetas a cambios sin
previo aviso para mejoras en el producto,

INTRODUCC_ON A LA LAVADORA 9
Caracferisficas del panel de control
PantaHa
LED
Selecfor de Ciclos
©Wav_F_ '°
Bot6n de
Encendido
START/?AUSE
Bof6nde Bof6nde Bof6nde Bof6n de
SeJecci6nde Se_ecd6n Se/ecci6nde Selecci6n
TemperafuradeNivelde Vebddadde de se_at
deAgua Sudedad Cenfrifugado
Bof6n de
Inicio/
Pausa
®®
" BOTON DE ENCENDIDO/APAGADO
- Pulse para encender la tavadora. Pulse de nuevo para apagarla.
NOTA: Si la arandeb permanece inactiva durante 4 minutos tras apagar la bvadora, e{ agua del
tambor se drenara.
NOTA: Sonara una alarma I minuto antes del vaciado de agua y aparecera "dr" en la pantalla_ Puede
reiniciar ia lavadora en este momento. Sin embargo, una vez que la lavadora haya in ciado et
vaciado de agua, todas Ias funciones se suspenderan y se mostrara "dr" hasta que el vaciado
de agua haya terminado
SELECTOR DE ClCLOS
,-Gire el selector de cco del pomo hasta el ciclo deseado esta seleccionado. Una vez seleccionado
el ciclo, se mostraran en la pantaila los preajustes estandar Dichos ajustes se pueden modificar
mediante los begones de conf guraci6n de ciclo antes de iniciar el lavado.
• BOTON DE INICIO/PAUSA
- Pulse este bot6n para e[ INtCtO del ciclo setecc onado, Si la favadora esta en funcionamiento, utilice
este bot6n para ta PAUSA del ciclo sin perder los ajustes estabtecidos.
NOTA: Si no puisa el bot6n de _NtCIO/PAUSA en 4 minutos como maximo despues de seteccionar
et ciclo, ia lavadora se apagara automaticamente,
NOTA: Si la bvadora permanece inactiva durante 8 minutos despu¢s de la pausa det c{clo, e_tambor
se vaciara de agua,
• BOTONES DE MODIFICAClON DE ClCLO
Utilice estos botones para seteccionar las opciones que desea aplicar al cicio seleccionado. Putse el
boton para ese aiuste hasta que el indicador luminoso del vaior deseado se itumine
Ciertos botones tamb en te permiten activar funciones espec{ficas at pulsar durante 3 segundos el
bot6n_
Para informaci6n deta! ada sobre opciones individuales_ consulte las paginas siguientes_
• BOTONES DE OPCIONES
- Estos botones te permiten seteccionar opciones de cicio adicionales que se ituminaran cuando los
seleccione,
• PANTALLA LED
- La pantalta muestra la configuracion e! tiempo estimado restante y los mensa]es de estado de su
iavadora La pantalla permanecera encendida durante et ciclo.

10 NTRODUCCtONALALAVADORA
Indicador de
bloqueo de puerta
indicador de
finalizaci6n de
ciclo
T
Indicador del Pantalla de tiempo restanfe
programa esfimado/mensaje de error
de inicio de
lavado
• TIEMPO REST,aNTE ESTIMADO
- At pulsar ei bot6n de INJCIOiPAUSA, ia lavadora detecta automaticamente la carga (peso/del
lavado y optimiza et tiempo de lavado segOn e! ciclo ',/fas opciones se_eccionadas.
La pantal_a indicara entonces el tiempo restante estimado para et cido de lavado seleccionado.
" INDICADOR DE FIN_IZACION DE ClCLO
Esta parte de la pantatla muestra qu6 parte del cicb de lavado est_ en curso(DETERMINACION
DE CARGA, LAVADO, ENJUAGUE o CENTRIFUGADO),

/NSTRUCC1ONES DE INSTALAC/ON 11
INSTRUCCIONES DE INSTALACION
Perspectiva general de insfalaci6n
(21 (s)
Comprobaci6n y elecci6n de Desembalaje de la lavadora Conexi6n de los fubos de
la ubicaci6n adecuada agua
(4) (5) (e)
Conexi6n del fubo de
desagQe
;x ;;;;y _::x_ ¸
b d
Mas bajo Mas alfo
Nivelaci6n de la lavadora
Conexi6n del enchufe y la foma
de fierra
Prueba de funcionamiento
ADVERTENCIA
• La lavadora es pesad& Se necesitan dos o m_s personas para instalar y trasladar el ele_rodom6stico. Si esto no se
cumple se podrSn sufrir heridas en la espalda u otras herida
• Almacene e instale lalavadora en un lugar no expuesto a tem_raturas inferiores alas de congelaciOn ni a la intemperie. Si
no se cumple con esta advertencia se podrSn producir heridas graves, incendios, descargas electricas o muerte
• Para su seguridad personal, este electrodom6stico debe ser conectado a tierra adecuadamente.
• Conecte a tierra la lavadora siguiendo todos los c6digos y ordenanzas legales. Si no se cumple con esta advertencia se
podran producir heridas graves, incendios, descargas electricas o muerte
° La apertura de la base no debe estar obstruida pot una alfombra cuando la iavadora se instale en un piso alfombrado
. No elimine el cable de conexJ6n a tjerra, rio use un adaptador o prolongador. Enchufe en un tomacorriente con conexJOn a
_erra de 3 cables. Si no se cumple con esta advertencia se podran producir heridas graves, incendios, descargas electricas
o muerte,

12 NSTRUCC_ONES DE NSTALACfON
Comprobaci6n y elecci6n de ia ubicaci6n
Instale Jalavadora sobre un suelo con la resistencia y rigidez
suficiente para soportar el peso de la maquina, incJuso con
la carga compJeta, sin que se fiexione o rebote. Si el suelo
tiene una flexibilidad excesiva, quizSs deba reforzarse para
hacer{a m8s rigid& Si el suelo no es resistente, puede causar
vibraciones y ruidos intensos.
1 LimpJe eJsueJo antes de Jainstalaci6n.
AsegOrese de seleccienar un suelo resistente y liso.
2 Se necesitan dos o m_s personas para mover y
desempacar JaJavadora.
3 Deje espacio suficiente entre Jasparedes y la Javadora
para su instaJaci6n.
Deje espacio suficJente espacio para las tubedas de agua, el
tubo de desagOe y el fluio de aire.
_ 4_' i _
0 cm) (2,5 c_
27"
_* (68,6 cm) _
453/8 "
(115,3 cm)
,-@ NOTA
• Antes de instalar la lavadora, asegurese de que eJpiso
est6 limpio, seco y libre de poJvillo, suciedad, agua y
aceites para que fas patas de la lavadora no puedan
deslizarse fScilmente. Si las patas niveladoras se
despJazan o desiizan sobre el piso, pueden producirse
vibraciones ,/ruidos excesivos debido a un contacto
deficiente con el sueio

/NSTRUCC1ONES DE INSTALAC/ON 13
Desembalaje de ia iavadora
1 Cuando reciba la lavadora en su casa, retire la base
de cart6n y poliestireno utilizada para el envio del
electrodom6stico.
3 Afioje el cable de alimentaci6n de ]a parte trasera de la
lavadora
t
AI retirar la lavadora de la caja de cart6n, asegOrese de retirar
el Soporte de base del medio de la base de cart6n,
Si debe asentar la lavadora hacia abajo para quitar !os
materiales de embala}e de la base, siempre proteja el lado
de la lavadora y depositela con cuidado sobre su iado, NO
asiente la lavadora sobre su parte frontal o posterior.
f,
HERRAMIENTAS A UTILIZAR
• Aiicates regulables
• Nivei de carpintero
Soporte de base
Base de carf6n
2 Retire la parte del embala}e que incluye el Manual de!
propietario, las piezas '¢las muestras de productos para
el lavado.

14 NSTRUCC_ONES DE NSTALACfON
Conexi6n de las fuberias de agua
Revise las juntas herm6ticas de goma de ambos
extremes de la manguera.
Inserte una junta de goma en los acoples roscados de
cada manguera para evitar fugas.
Junta herm6fica de
9oma
[__
Junta herm_tica
de goma
I i_ Manguera de agua
(AI grifo)
Manguera de agua
(A enfrada de agua de la
Lavadora)
Tras conectar las mangueras a! grifo de agua, abra las
llaves de agua para eliminar sustancias extraF_as(suciedad,
arena o serrin) de las tuberias de agua. Drene el agua en
un cube '/revise la temperatura de{ agua.
Conecte las mangueras alas entradas de agua con la
mano a continuaci6n, utilice unos alicates para apretar{as
otro 2,/3de vuelta.
- Conecte la manguera azu[ a la entrada de agua fda y la
manguera roia a la entrada de agua caliente.
de agua calienfe
Entrada de agua fria
-....
2
Conecte las tuberias de agua a las Haves de paso de agua
caliente y fria y apriete las conexiones con la mano A
continuacion, utiiice unos alicates para apretarlas otro 2/3
de vuelta.
.oConecte la manguera azul a un grifo de agua fria y la
manguera roja a un grifo de agua caliente,
5 Compruebe que no haya fugas abriendo las tlaves de agua.
-_Si hay fugas de agua, verifique de nuevo los pasos 1 a4
NOTA
° Revise peri6dicamente las mangueras per si hubiera
grietas, fugas y desgaste, y sustitQyalas cada 5 a6os,
° Para mover o instalar la iavadora, no estire, aplaste ni
doble Jasmangueras.
° La presi6n de las tuberias de agua debe ser entre
14.5 PSI y 116 PS!(100 _800 kPa). Si la presi6n de la
tuberia de agua es superior a 116 PS_(799,7 kPa), debe
instalarse una v61vula reductora de presi6n.
• Para el 6ptimo desempeho de su lavadora, la
temperatura de su agua caliente debe ser entre 120-
135'_F(48%7°C) y el de su agua fria debe set 60"F(15_C).

INSTRUCCIONES DE INSTALACfON 15
Conexibn det tubo de desagiJe
Fiieeltubode@sag@paraevitarquesemuevay queseproduzcar,fugas.
@ NOTA
• La manguera de desagOedebe fiiarse correctamente Encaso
contrario, podra resuttar en inundaci6no funcionamiento
incorrecto
• Latongitudtotatde Iamanguerade drena}edebeset inferiora 96
pulgadas(2,_m) desdeiapa_einferiordela lavadora
• El desag(Jedebe instalarse de acuerdocon tasregutaciones
nacionalesy locales aplicabtes.
• No estre as mangueras de agua intencionalmente y
asegOresede que no queden aplastadaspot otros obietos.
Fije el extremo de la manguera en el soporte de codo
- Conecteei codo a unadistancianosuperiora4 pulgadas(10cm}
delextremo dela manguerade desagOeSieIcodosecolocaa
unadistanciasuperiora4putgadas
(10cm) del extremode famanguerade@sag@, podrianaparecer
hongoso microorganismosen e}interiordela tavadora
No m_s de 4
pulgadas(10 era)
1 Inserteelext/'emode lamanguerade desag6eenettubo desubida
Manguera de drenaje
Utiiice una brida para fijar fa manguera de desagOe en su posici6n.
39_
(99cm)
2 Cuelgueel extremo de la mangue_ade desag0edet iadode latin&
3
Manguera de drenaje
Uti[ice una brida para fijar [a manguera de desagOe en su
posici6n
Sujetacables Sujetacables

16 NSTRUCC_ONESDENSTALACfON
Nivelado de la lavadora
La Javadora centrifuga a veJocidades muv eievadas, de hasta
1000 rpm,
- Ajuste el pie de nivelaci6n s61osi es preciso para nivelar
la lavadora, La lavadora puede vibrar si extiende el pie
de nivelaci6n mas de Io necesado
• Los cuatro pies de nivelaci6n deben apoyarse con
firmeza en el suelo. Balancee la lavadora con cuidado
apoyandose en un lado y otro, para comprobar si esta
debidamente equilibrada,
- Antes de instalar la lavadora, asegOrese de que el
suelo esta _impio, seco y sin polvo, suciedad, agua o
restos de aceite para evitar que el pie de apoyo de ta
lavadora se desJice facilmente. Si el pie de nivelaci6n
se mueve o desliza pot el suelo contribuira a que haya
mas vibraci6n y ruido debido a la falta de contacto con
el sue!o,
• Para comprobar si esta nivelada de un lade a otto, cerrar la
tapa y coloque un niveJ en la parte trasera de la tap&
• Para comprobar si esta nivelada de ta parte delantera a
la trasera, coloque un nivel a un Jadode la lavadora en el
borde donde el lado de la estructura coincide con la cubierta
superior.
-?
a lado
arfe
delantera a
frasera
2
3
Coloque la lavadora en su posici6n final, teniendo
cuidado de no pinzar, forzar o aplastar las J[neasde agua
y desagQe.Coloque un nivet en la parte superior de la
lavadora.
Aiuste el patas niveladoras. Gire hacia la derecha para
subir la Javadora o hacia la izquierda para bajarla.
Mas bajo Mas alto
Para asegurarse de que la lavadora esta nivelada
correctamente, abra la cubierta y mire desde arriba para
ver si es Io mismo que se muestra desde al arriba Si
tiene un nivel, compruebe la nivelaci6n exacta de la
lavadora.
I/
Si la lavadora no est& nivelada, ajuste eJpatas niveladoras_
Gire hacia la derecha para subir o hacia ta izquierda para bajar.
Compruebe de nuevo que la lavadora est@nivelada
- Empuie o sacuda los extremos superiores de la lavadora
suavemente para asegurarse que _amaquina no est@
meci6ndose.
En caso que la lavadora est@meciendose, repita los
pasos 1 a 3
A PRECAUCiON .....................................................................................................................................................
• Si utiliza la lavadora sin nivelarJa, pueden producirse
fallos de funcionamiento causados per el exceso de
vibraciones y ruido.
• Utilice las pa_s de nivelaciOn s61opara nivelar la
lavador& Si eleva las paras de nivelaciOn de forma
innecesaria, puede causar vibraciones an6malas de _a
!avadora

/NSTRUCC1ONES DE/NSTALAC_ON 17
Conexi6n del enchufe y ia foma de fierra
Conecte a tierra la lavadora para evitar un cortocircuito o
descargas el@ctricas durante la conexi6n.
Conecte el enchufe en la toma sin conexi6n a tierra adidonal.
. Eltomacorriente _ estar dentro de un _rea minima de
1.5 m (60 pulg_das) a cualquiera de _ lades de la lavad_ora.
• El electrod_m6stico y el tom_corriente deben estar
colc_._ de forma _1que se pueda acceder al enc_ufe
facilmente.
• No s.obr_rgar el tomacorrierCte con m_s de un
electrodomestico.
• Eltomacorriente deber_ estar p,JeStOatierra de acuerdo
cc,'_los codigos y las regulac_Jnes de cableado ac_Jales.
• _ recomienda util_r un fusible de dem_a de tiempo o
dis:,_Jntor.
• Es responsabilidad y obligation personal del dueno de!
producto pedir aun electdcista calificado que instale el
tomacomente adecuado,
• No _lic_ un cable o enchufe desgast_do o da_._de.
Re_relos o sustit_yalo_sinmediatamente. En caso
contrario, podria haber peligro de incendio, descargas
el6ctricas o fallos del aparato.
• No rr,3difique el cable de alimentaci6n y tenga _do
de no deSarlo durante lains_laci6n o (>Jar_lomueva la
la._.4Jc_-a.Encaso contrario podda haber peligro de incendio,
descargas electricas o fallos del aparato.
• _segSrese de que la lavadora est6 _ a tierra.
• Conecte _ I_v_ora a una toma el_'tr_ dedicada y
adecu_ a su capacidad. En caso contrario, podria haber
peligro de descargas el6ctricas, incendio o fallos, del
aparato.
• No util_ce o cables de extens'_n. La lavadora
debera set conectada siempre en su propia toma de
alimentaci6n, compatible con Ioindicado en la placade
caracteristicas. En case contrario, podria hab_r pe!igro de
descargas electdcas, incendio o fallos del aparato.
• No daSeni corte el conductor de tierra interno d_ enchufe.
Encaso contrario, podria haber peligro de mue¢[e, incendio,
descargas electricas o falbs del aparato.
Prueba de funcionamienfo
Compruebe si la lavadora ha sido instatado correctamente y
realice una prueba de funcionamiento.
1 Cargue la lavadora con 6 libras (3 kg) de ropa,
2 Pulse @
3 Pulse _.)para RINSE + SP_N,
i
4 Pulse @,
- Se inicia e_ciclo de iavado,
5
Compruebe si se suministra agua, que la maquina no
se est6 meciendo ni vibre en exceso, y que desagOe
correctamente durante el cic!o de centrifugado
- Si se producen fugas de agua durante el suministro de
agua, consuke la pagina 14, ConexJ6n correcta de las
tuberias de agua,
- Si la iavadora se mese y vibra excesivamente, consulte
la pSgina 16, Nivelaci6n de la lavadora, para nive{arla de
nuevo,
- Si el desagOe no funciona consu_te ta pagina 15,
Conexi6n del tuls.o de desagQe, para instalado
correctamente

18 PREPARAC ©N
PREPARACION
Clasificaci6n de las cargas de lavado
Precauciones para el cuidado de los tejidos antes del ciclo de lavado
Lea y cumpla con tas siguientes instrucciones para evitar que la ropa se encoja o se dahe.
A PR ECAU C I0 N No aveosequepor
centrifugado ningOn artfc-dJo etiquetado o que se sabe que es
a prueba de agua o resistente al agua, aOn cuando la etiqueta
de cuidados del producto _rmita usar lavadora.
Ei no seguir estas instrucciones puede resultar en da_o
severo para sus prendas su lavadora yio propiedad como
resultado de la vibraci6n anormal de la Uavadora.
- Eiemp!os de articulos a prueba de agua o resistente al
agua incluyen ciertos tapetes para colch6n, fundas para
colchones, equipo para la {luvia, equipo para acampar, ropa
para esquiar, equipo para exteriores y artfcuios similares.
I, Revise todos los bolsiHos para asegurarse de que esten
vacios.
. Articulos como ctips, ceriHos, plumas, monedas y Haves
pueden danar su lavadora o sus prendas.
I, Cierre las cremaiteras, ganchos y cordones para prevenir
que estos articuios se enganchen o enreden en otras
prendas.
ReaJice un pretratamiento de Jas5teas mSs sucias antes
del lavado.
De este modo, Iograr5 mejores resuJtados.
Combine prendas grandes y peque_as en una carga
Cargue primero las prendas grandes.
Las prendas grandes no deberSn set mSs de la mitad de la
carga de lavado total
Se puede cargar la lavadora completamente, pero et
tambor no puede quedar colmado de prendas.
No lave prendas individuales, a menos que se trate de
ropa voluminosa, como mantas o similares Asegurese de
lavar la ropa en tipos simiiares de cargas.
Si lava una sola prenda, puede desequilibrarse e! tambor
y se produciran vibraciones y ruidos.
I, Cepilie Jasuciedad, polvo o cabeHo de Jos tejidos antes del
Javado.
La ropa no quedar5 Jimpia si hay suciedad o arena en los
teiidos, o podria da¢_arsedebido al frotamiento de Jas
particulas contra tejidos deJicados.
4, Lave ias mantas individualmente,
- Si lava mSs de una manta junta puede resultar en
mantas no limpias si las mantas se enredan o si se
desequilibra la carga
Etiquetas de cuidado de las telas
La mayoria de las prendas de vestir tienen etiquetas de
cuidado de las telas para {ograr un cuidado adecuado
Lavado
Temperatura del agua
Btanqueado
W
W
ot_
oe
o
A
Ins_ucci0nes
Lavado a mango
Lavado amaquina cicle nermal
Utilice el aiuste de planchado
3ermanentei tea stente a
las arrugas (tacualtiene un
enfriado o roc adocon aguafria
antes delcentrifugado reducdo
_ elaiuste de prendas
delicadas (agitaciOnlenta yie
tiempo de lavadoreducido}.
No escurrir
Caliente
Tibia
Frio
Cuatquierblanqueadorcuando
sea necesario
Sotobtanqueadorsin teifa
cuando sea neoesario
No utiiizar blanqueador
Clasificaci6n de la carga de ropa
Se recomienda clasificar la ropa en cargas similares que
puedan lavarse en el mismo ciclo_
Consulte el cuadro siguiente para clasificar la ropa.
_ tancos / Qaros / Oscuros
Muy sucio / Normal / Poco sucio
Delicados / Nor'mates /Algodones res stentes
Productores de pelusa / Recogen pelusa
Separe fas prendas por colores y 15velas por separado para
evitar que se corran los colores.
- Los teiidos pueden daharse o quedar manchadas debido
al teflido de tos colores o por objetos extraFlos que se
transfieren de un tejido a otro

PREPARAC_ON 19
Ufilizaci6n de defergenfe/suavizanfe
Defergenfe recomendado
AsegOrese de utiiizar detergentes de aita eficiencia (HE) para
maquinas de carga frontal Los detergentes de alta eficiencia
se disuelven mejor y producen menos espuma para Iograr un
lavado y enjuague mSs eficiente. UtiJice la cantidad correcta
de detergente, siguiendo las instrucciones en baetfqueta de!
empaque del detergente,
Dise_ada especia|mente para utilizar s61o
detergente de alta eficiencia (HE}
Cargando el dispensador
E_caj6n dispensador de detergente de la lavadora tiene un
compartimiento dispensador para cada tipo de detergente,
A_ada los detergentes adecuados en sus compartimentos
respectivos
1 Saque eJcai6n dispensador de detergente
-@ NOTA
• UtiJice s61o detergente de alta eficieneia, ya que el uso
de un detergente regular puede producir exceso de
espumas,
° Los detergentes de alta eficiencia producen menos
espuma, se disueJven de forma m_s eficiente para
mejorar el Javadoy e_enjuague, y ayudan a mantener
ifmpio el interior de la lavadora,
• Utilice menos detergente para agua blanda,
• Limpfe inmediatamente JassaJpicaduras de detergente,
ya que podrfan dafiar el acabado y el panel de control
de la lavadora,
° La utilizaci6n de demasiado detergente puede causar
acumulacf6n en el tambor y afectar eJ funcionamiento
de la iavadora,
° Si utiiiza un detergente que no se disuelve con
facilidad o un detergente de aita viscosidad, este dejar8
residuos en el tambor, !os cua_es podran no enjuagarse
correctamente,
2
Ahada ei detergente apropiado en el compartimento
correspondiente,
- Si utiiiza un detergente Jfquido aseg@ese que este
co_ocada la cajita del detergente _iquido,
=Si utiliza detergente en polvo, retire la caiita del
detergente Jiquido y ponga eJdetergente en polvo en el
compartimento del detergente del _avado principal
Comparfimento
para el deter_
liquido
Comic
para el llquido
suavizante
Compartimento
para el defergente
del lavado principal
3
Cerre ei caj6n dispensador tentamente
Si cierra el caj6n con fuerza puede desbordarse el
detergente aotto compartimento o dispensarse en eJ
tambor antes de Io programado,
@ NOTA
permanezca en los compartimientos de suministro aJ
finai del ciclo,

20 PREPARACION
Este compartimiento alberga el detergente para el ciclo de
lavado principal, el cuaJ se agrega a la carga al principio del
cicio, Use siempre detergente tfpo HE (Alta eficiencia )con
su lavadora.
Cuando agregue detergente nunca sobrepase las
recomendaciones del fabricante Utilizar demasiado
detergente puede resultar en JaacumuJacion del mismo
en las prendas yen la Javadora. Se puede utilizar tanto
detergente liquido como en polvo.
....@ NOTA
° Se puede agregar blanqueador compatiMe con la ropa
de color, Hquido o en polvo al compartimiento de lavado
principal junto con detergente del mismo tipo,
° Cuando utilice detergente I_quido, asegOrese de que la
cajita e inserto se encuentren colocados en su sitio. No
exceda la tinea de Ilenado maximo.
° Cuando utilice detergente en polvo, quite el inserto y la
cajfta de detergente tiquido del compartimiento.
El detergente en po_vo no se dispensara si estan
colocados la cajita de detergente liquido y el inserto.
Este compartimiento alberga blanqueador liquido, que se
dispensara automaticamente en el momento adecuado de_
ciclo de lavado.
Un Ilenado excesivo puede causar una dosificaci6n prematura
de ia lejfa, y daf/ar los tejidos.
NOTA
• No agregue blanqueador compatible con la ropa de
cobr liquido o en polvo a este compartimiento,
• Siga siempre las recomendaciones del fabncante
cuando agregue blanqueador. No exceda la _ineade
tlenado maximo. Usar demasiado blanqueador puede
danar las telas.
• Nunca agregue blanqueador liquido no diluido
directamente en la carga o en el tambor. Puede da_ar
las telas.
Este compartimiento alberga el suavizante liquido de telas,
que se dispensara automaticamente durante el cicto de
eniuague final,
......
• Siga siempre las recomendaciones del fabricante
cuando agregue suavizante. No exceda la linea de
Ilenado maximo, Usar demasiado suavizante puede
causar que _astelas se manchen.
° Diluya con agua caliente los suavizantes de tela
concentrados. No exceda la linea de Ilenado maxhT_O.
• Nunca agregue suavizante de teia directamente en la
.. carga o en el tambor
Suavizanfe
Defergente de
lavado principal

UTIUZACJONDE:LALAVADORA21
UTILIZACION DE LA LAVADORA
Funcionamienfo b sico
ELIJA LA ROPA A LAVAR Y LA CARGA.
Encender la maquina.
Pulse el bot6n POWER para encender la mSquina.
3 ENCIENDA LA LAVADORA.
Pulse el bot6n de ENCENDIDO!APAGADO para encender la lavadora.
4
SELECCIONE UN CICLO.
Gire el pomo de ciclo deseado, La pantalla mostrara la LAVADO TEMP, (WASH TEMP.) el NIVEL
DE SUCIEDAD, (SOIL LEVEL) ta VELOCIDAD DE CENTRIFUGADO (SPIN SPEED) para ese ciclo.
®
STAR,/PAUSE
SELECCIONE UN BOTON DE MODIFICACION DE CICLO Si quiere cambiar el modificador de
ese ciclo, pulse el!los botoneis de configuraci6n de ciclo correspondienteis hasta que se ilumine
el indicador del valor deseado
NOTA: Para proteger sus prendas, no todas las temperaturas de lavado (WASH TEMP.} la
velocidad de centrifugado, (SPIN SPEED) el nivel de suciedad (SOIL LEVEL) o las opciones estan
disponibles en cada cicio,
SELECCIONE LOS BOTONES DE OPCIONES Seleccione cualquier opci6n de ciclo adicional,
como SUAVlZANTE o RETRASAR LAVADO pulsandola.
NOTA: Para proteger sus prendas, no todas las temperaturas de lavado (WASH TEMP.) la
velocidad de centrifugado, (SPIN SPEED) el nivel de suciedad (SOIL LEVEL) o ias opciones estan
disponibles en cada ciclo,
Pulse @.
- La lavadora se pondr_ en funcionamiento.
8
Cuando suena la meiodia, si se activa el sonido, el ciclo de lavado ha terminado
Cuando haya terminado el ciclo de lavado, se desbloquear8 la puerta. Abra la puerta y retire la
colada inmediatamente.

22 UTLIZACION DE LA LAVADORA
Guia de ciclos
La siguiente guia de ciclos muestra [as opciones y los tipos de prendas que se recomiendan para cada ciclo.
Tub Clean
(Lir_pieza de latina
Bright Whites_M
Bulky/Bedding
(Voluminoso /
Ropa de cama)
Heavy Duty
(Fuerte)
Perm Press
Casual
(Pianchado
Perm. Casuat_
Cotton/Normal
(Aigod6n / Normat)
Speed Wash
(Lavar rapido)
Delicates
(Delicada)
Consulte ta
_ina 29
Prendas blancas
Prendas grandes
eomo mantas o
edredones
= Ajuste 3redeterminado
• •
* Utilice el ciclo Bulky/Bedding (Voluminoso / ropa de cama) para articulos como atmohadas, edredones y otros a_iculos que
tengan problemas para absorber el agu& LAVE SOLAMENTE CARGAS PEQUENAS para asegurarse de que queda sitio
para que ta carga se mueva durante el lavado. Agrupe los articulos simitares, no mezcle art[culos votuminosos con pequeffas
jprendas, No se_i.L_tas instrucciones mdas o a la lavadora.
Prendas de algodon Daliente
muysucias _bi } i _ i :
Camisas de etiqueta/
Atgod6n, Camisas,
Vaqueros, Calcetines
Pantalones
EcoTibia
Fria
EcoTibia
Fria
Saliente
EcoTibia
Fria
Frta det grifo
EcoTibia
Fria
Fria det grifo
Xbia
EcoTibia
:ria
Media
Lento
Lento
SIncentrifugado
Media
SIncentr#ugado
Media
Lento
R&pido
Media
:Normal
Ligero
_ _i_ .........
Jgero
a_ ....
Jgero
k4uysucio
Normal
_uy sucio
Normal
• I
i •
i !t t
0
i o
I
t
I
J
!
1t
i •
i •
i •
i •
I
II
t
I
I
Cargas poco sucias y
pequ:effas
Camisasdeetiquetat
biusas,prendasdenylon,
muyfinasodeencaje
menosde8 iibras)
t
O
NOTA: Para proteger sus prendas, no todas [as Lavado Temp., ia Veiocidad de Centrifugado, el Nivel de Suciedad o las opciones
estSn disponibles en cada cicio.
0

UTIUZACION DE LA LAVADORA 23
Ciclo principal
Puede lavar la ropa de forma mas intensiva seleccionando el
ciclo de lavado mas adecuado para el tipo de prendas que se
van a lavar. Gire el Selector de Ciclos aJcicUodeseado
Cuando seJeccione un ciclo de lavado, se iiuminara ia Juz
para el ciclo de lavado correspondiente. Consulte ta pagina
21, Funcionamiento b_sico, para mas informaci6n sobre !os
metodos de funcionamiento.
Ropa normal, COTTON/NORMAL
Utilice este ciclo para lavar prendas normales, excepto tejidos
delicados, como lana o seda.
Prendas delicadas, DEL!CATES
Este ciclo se utiliza para lavar lenceria o ropa con enca}es que
se pueda da_ar facilmente
i O NOTA
Si pu_sa@ '/, luego, _ sin se_eccionar otto ciclo, la
lavadora cambiar_ aCO.ON/NORMAL
Ropa sin arrugas, PERM PF1ESS/CASUAL
Este ciclo se utiliza para Javarropa sin arrugas o manteles,
para reducir la aparici6n de arrugas.
Muy sucias de algod6n, HEAW DUT
Este cic!o es para lavado de ropa muy sucia, a trav6s de
rotaci6n mas potente del tambor.
Mantas o ropa voluminosa, BULKY/BEDDING
Este ciclo se utifiza para et lavado de mantas o ropas voluminosas.
Para tejidos blancos, BRIGHT Wk' ITESTM
Este ciclo de lavado es s61opara la ropa blanca.
Limpieza del tambor0 TUB CLEAN
Utilice este ciclo cuando quiera limpiar la tina de su iavadora.
Lavado r_pido, SPEED SH
Use e! cicfo de lavado de ve!ocidad para lavado rapido de ropa
levemente sucia y carga pequena. Para el lavado y enjuague
de alta eficiencia se recomiendan cargas pequenas de 2_3
prendas levemente sucias

24 UTLIZACION DE LA LAVADORA
Bofones de ajusfe de ciclo
Cadacido tiene ajustes preprogramables que se seleccionan
automaticamente. Tambien puede persona}izarlos ajustes util zando
los botones de programacion de ciclos. Apriete eI boton paraver
esa opcion y sebcc onar otros aiustes.
Lalavadoraajustaautomaticamente et nivei de aguasegun el
tipo y tamano de la cargade tavadoparaproporcionar tosmqores
resultados y eficiencia maxima Puede parecer que no hay agua
dentro deltambor en a_gunoscidos, pete esto esnormal
Ajusfe del nivel de suciedad de la colada,
SO_L LEVEL
Puede hacer un la'vado m_s intensivo de la ropa ajustando el
nivel de suciedad en ia lavadora.
1 Gire el Selector de Ciclos al cicb deseado.
2 Pulse _'_) repetidamente para seleccionar un nivel de
suciedad
Cuando se seleccione una opci6n, se ik_minar{_ la luz de
la opci6n correspondiente.
3 Pulse el bot6n de la opci6n deseada para utitizar otras
Opciones de ajuste antes del ciclo
Usted puede seleccionar y agregar las opciones deseadas
antes de iniciar la lavadora.
4
Salte al paso 4 para utilizar los ajustes por defecto sin
cambiar las opciones.
Pulse _
Ajuste de la temperatura del agua,
WASH TEMR
Ajuste la temperatura del agua para el ciclo de lavado.
Sebccione la temperatura adecuada, seg{m Io especificado
en la etiqueta de iavado de la ropa_
1 Gire el Selector de Cic!os ai ciclo deseado.
2 Pulse @ repetidamente para seleccionar la temperatura
de agua deseada,
Cuando se seleccione una opci6n, se iiuminara la luz de
la opci6n correspondiente.
3 Pulse el bot6n de ta opci6n deseada para utilizar otras
opciones.
Salte al paso 4 para utilizar los ajustes por defecto sin
cambiar tas opciones.
4 Pulse _o.
_-@NOTA
• Los enjuagues fdos utilizan menos energia,
• Su lavadora cuenta con un elemento de calentamiento
que propulsa ta temperatura del agua caiiente para
ajustes extra calientes (Extra Hot)_ Esto brinda un meior
desempe_o de lavado con configuraci6n normal del
calentador de agua.
Ajuste de la velocidad de centrifugado,
SPIN SPEED
Puede seleccionar la velocidad de centrifugado que desee.
Utilice esta funci6n correctamente, segOn las caracteristicas
de la carga,
1 Gire el Selector de Ciclos al ci;clo deseado
2 Pulse t_,' repetidamente para seleccionar la velocidad de
centrifugado deseada
Cuando se seleccione una opci6n, se iluminara la luz de
ia opci6n correspondiente.
3 Pulse el bot6n de la opci6n deseada para utilizar otras
opciones.
Sake al paso 4 para utilizar los aiustes por defecto sin
cambiar las opciones.
4 Pulse _.

UTIUZACJON D_[ LA LAVADORA 25
Encender/apagar la melodia y los fonos de
los bofones, S_GNAL ON!OFF
La lavadora emite una meJod[a cuando el cicJo de lavado
ha terminado, Los botones hacen un sonido cada vez que
se pulsan. Los tonos de la meJodia y Jos botones se puede
activar y desactivar si se desea,
Ajuste el volumen de la alarma de finaiizaci6n de
_ _ ciclo, o desactivela,
SPECIAL USE (USO ESPECIAL)
Seleccione cualquier opci6n adicional, como
RINSE+SPIN, SPIN ONLY, STAIN CARET_ o SOAK.
Si pulsa el boton de SPECIAL USE sin seleccionar
un ciclo, se seleccionar8 de forma autom8tica la
opci6n COTTON/NORMAL con SOAK
Ajuste de RINSE + SPIN, RINSE + SP_N
Utilice este ciclo para obtener un enjuague intenso seguido
de un centrifugado a alta velocidad, Puede cambiar la
velocidad del centrifugado pulsando los boton SPIN SPEED.
1 Pulse el bot6n de encendido!apagado para encender la
lavadora,
3 Pulse el bot6n de L_ para iniciar el ciclo. La iavadora se
iniciar_ de forma a_?_matica.
Ajusfe de SPIN ONLY, SP_N ONLY
Este bot6n activa el ciclo SPIN ONLY para exputsar el agua
de la lavadora y centrifugar ta ropa
1 Puise el bot6n Encendido para encender la lavadora,
2 Pulse et bot6n _ hasta que la luz del indicador SPIN
ONLY se encien'_J'a,
3 Pulse el bot6n de @ paracomenzar el ciclo. La lavadora se
pondra en func_onamiento automatlcamente,
Ajusfe de STAIN CARE TM,STAIN CARE _
Puede seleccionarse STAIN CARE TMcomo una opci6n con
los ciclos HEAVY DUTY (dta resistencia), COTTON/NORMAL
VTOWELS, Lave Qnicamente cargas pequefias para
conseguir un cuidado 6ptimo de los tejidos.
Pulse el bot6n de encendidoiapagado para encender la
lavadora
2 Pulse el bot6n [,_"],/hasta que Ialuz del indicador STAIN
CARE _Mse encienda,
3 Pulse el bot6n de (_ para iniciar el ciclo. La lavadora se
iniciara de forma a_{'_)_matica,
Ajusfe de soak, SOAK
Permite al usuario eliminar las manchas mSs facilmente al
especificar un tiempo adicional para que la ropa permanezca
inmersa en el agua durante el iavado, AI final del remojo, se
iniciar8 el ciclo de lavado sin desagOe, El tiempo del ciclo se
puede aumentar en intervalos de 30 minutos. Es normal que la
iavadora realice algQnmovimiento de giro durante este ciclo.
Ahorro de energia, COLDWASH TM
Para una mayor eficiencia, lave Qnicamente cargas pequenas
(menos de 8 libras) y utilice la velocidad baja de centrifugado.
F@ NOTA
Si selecciona STAIN CARE rM,la opci6n COLDWASH TM
_ no esta disponible,
\
1 Gire el Selector de Cicios al ciclo deseado,
2. Pulse La lavadora ajustara automaticamente las
configuraciones del ciclo,
3. Programe cualquiera de las demas opciones deseadas,
4, Pulse @.

26 UTLIZACION DE LA LAVADORA
Afiadiendo ciclo de enjuague extra,
EXTRA R_NSE w,_rE/_p___s
Puede aBadir un ciclo de eniuague extra al cic!o de enjuague
pot defecto,
1 Gire e! Selector de Ciclos al ciclo deseado.
2 Pulse _<,
- Se iluminara la _uz
3 Pulse el botdn de la opcidn deseada para utilizar otras
opciones.
4
Sake aJpaso 4 para utilizar los ajustes por defecto sin
cambiar tas opciones
Pulse @,
_uste del suavizante de la colada,
FABRIC SOFTENER
El suavizante se dispensa en el aclarado final.
SeJeccione el bot6n de FABRIC SOFTENER para
sorr_ cambiar eJtipo de aclarado final de acJarado por
chorro a actarado intenso.
Preajuste del tiempo de inicio, DELAY WASH
Puede ajustar el tiempo de inicio deseado.
1 Gire el Selector de Cicios ai ciclo deseado=
2 Pulse eJbot6n de Jaepci6n deseada para utiJizar otras
4
Pulse repetidamente para seleccionar el tiempo de
inicio deseado.
- Se iiuminara la luz
-Cada vez que se aprieta este boton se aumenta e!
tiempo de demora en lapsos de 1 hora, hasta 19 horas,
Pulse _.
Ajuste de un ciclo de lavado personalizado,
CUSTOM PROGRAM _p_s_sAv_
CUSTOM PROGRAM le permite guardar un ciclo de lavado
personalizado para su utiJizaci6n posterior, Le permite
guardar la temperatura favorita, ia velocidad de centrifugado,
el nivel de suciedad y otras opciones ap_icabJesa un ciclo que
despu@s se activan con s6to pulsar un bot6n
2
4
Presione el bot6n de encendido para accionar la lavadora
Gire el bot6n de seJecci6n de cicio para eJegir el ciclo
deseado
Se iluminar_ la luz.
Pulse los botones de modificaci6n de ciclo para cambiai
los aiustes deseados,
Pulse el bot6n de opci6n de ciclo para cambiar las
opciones deseadas
5 Pulse durante aprox, 3 segundos el bot6n de CUSTOM
PROGRAM
Para acceder a un programa personalizado:
1 PresioneeJbot6n de encendido paraaccionar la Javadora
Pulse el bot6n CUSTOM PROGRAM. Se mostraran los
aiustes guardados.
Pulse el bot6n de INICIO!PAUSA para iniciar el cic!o
(Si pulsa cua_quier otto bot6n, CUSTOM PROGRAM se
desmarcara automaticamente a la vez que se apaga la luz
indicadora),

UTIUZACJON D_[ LA LAVADORA 27
Opciones de _usfe duranfe el ciclo
Puede a_adir las opciones deseadas durante el ciclo de lavado,
Bof6n de funci6n de bloqueo, SIGNAL
OFF oLOWoH_GH _CH_LD LOCK
La lavadora emite una melodia cuando el ciclo de lavado
ha terminado Los botones hacen un sonido cada vez que
se pulsan. Los tonos de la melodia y los botones se puede
activar y desactivar si se desea,
Mantenga pulsado pot 3 segundos durante el ciclo de
lavado.
Una vez este activado singal off, el alarma sonar8 una vez
(Si est8 desactivada la se¢_alacOstica de fin de ciclo)
Mantenga pulsado pot 3 segundos durante el ciclo de
lavado.
Una vez este activado Signal on, el alarma sonar8 una vez
Ajusfe del a_adir prendas de la colada,
ADD GARMENTS (ANADIR PREN©AS}
Los productos se a_aden a la carga en el
momento adecuado durante e! cicio de _avado
Cuando se ilumina el indicador ADD GARMENTS
(AF_adirropa), se puede hacer una pausa en et ciclo y a_adir
mas prendas. Si se a_aden prendas con el indicador ADD
GARMENTS apagado, la lavadora no se aiustara para estas
prendas y puede reducirse el rendimiento de lavado o
daP_arselos tejidos.
Para a_adir ropa con el indicador ADD GARMENTS iluminado:
1 Pulse el bot6n de _ para pausar la lavadora.
2 Abra latapa cuando se haya desbJoqueado,
3 A_ada las prendas adicionales.
4 Cierre la cubierta,
5 Pulse _
Ajusfe de wafer plus, WATER PLUS
SeJeccione esta opci6n para a_adir mas agua a los ciclos
de lavado y aciarado para obtener unos resultados 6ptimos,
sobre todo con las prendas grandes y voluminosas. Pulse
durante 3 segundos el bot6n de _ para activar o
desactivar WATER PLUS,
Si elige la WATER PLUS opci6n de agua mSs, se puede oir el
sonido de Jaalarma, No hay sonido en el case de la SIGNAL
OFF
@
I Pulse el bot6n de ...........durante el ciclo de iavado o
aclarado.(No est_ disponible en el ciclo de centrifugado)
2 Presione y sostenga EXTRA RINSE
3 Pulse el bot6n de _ para iniciar el ciclo.
4 Si quiere utitizar adicionalmente la opci6n EXTRA RINSE,
repita los pasos 1 a 3.

28 MAN;TENtMIENTO
Limpieza de los filfros de enfrada de agua
Si la lavadora detecta que el agua no est8 entrando en e_
dispensador, un mensaje de error se mostrara en Iapantalta.
Si usted vive en una zona con agua dura, esto puede ser
causado por fHtros de entrada obstruida.
¢uidados en climas frios
1 Apague los grifos de agua por completo,Desenrosque las
lineas de agua fda y caliente de la parte posterior de la lavadora,
Cierre las Ilaves de paso conectadas a ]as tubedas de
agua,
Vierta agua caliente en las Ilaves congeladas para
descongelar las tuberlas y su61telas.
3 Sumerja las tuberias de agua en agua caliente para
2 Retire con cuidado tosfiltros de las tomas de aguay rem6ielos
en vinagre Mancoo un removedor de cal,siguiendo las
instrucciones del fabricante, Eniuaguelos afondo antes de
reinstalarlos. Ponga los filtros en su lugary vue_vaa conectar las
Ifneasde agua, La lavadora no funciona sin fiitros de entrada.
4
Conecte las tuberias de agua a las entradas de Jalavadora
y las Ilaves de agua,
=Consulte en la pagina 14, Conexi6n de las tuberias de
agua, para informaci6n acerca de las conexi6n de las
tuberias de agua
5 Abra las Ilaves de paso,
6 Pulse @.
7 Pulse _ para RINSE + SPIN.
8 Pulse _,
- Verifique que el agua se Ilene correctamente
Filfro
ADVERTENCIA
• Desconecte el enchufe y cierre las Ilaves de paso antes
de la limpieza. En caso contrario, pueden producirse
descargas el6ctrfcas
- No utilice la lavadora sin los filtros de entrada, En
caso contrario, poddan producirse fugas y faflos de
funcionamiento,
° Si utiliza la lavadora en un 8rea con agua dura, ei filtro
podria obstruirse debido a la acumulaci6n de cal.
P6ngase en contacto con el servicio de atenci6n al
cliente de LG si no se puede limpiar correctamente et
filtro o se ha perdido,
! Vierta agua caliente en el tambor de la favadora y cierre la
puerta.
Deie el agua adentro durante 10 minutos.
2 Pulse _ despu6s de 10 minutos,
3 Pulse @ para SPIN ONLY.
4 Pulse _0
- Verifique si se vacla el agua,

MANT_:[NIM/ENI O 29
Limpieza
Limpie la lavadora peri6dicamente para mantenerla en
perfecto estado y evitar fallos de funcionamiento.
Limpieza dei fambor, TUB CLEAN
La utilizaciOn de la lavadora en un lugar con humedad
durante un periodo de tiempo prolongado puede causar
la acumuJaci6n de moho negro y g6rmenes en el aire del
interior del tambor y afectar su salud.
Si lirnpia el tambor regularmente una vez al mes con la TUB
CLEAN, mantendr8 el tambor limpio yen buenas condiciones
higienicas.
2
3
Aflada un limpiador para tambor o removedor de cal en el
cai6n dispensador de detergente.
o,Cuando Io aBada, no exceda la i/nea del nivel mSximo
para detergente Puede quedar detergente en eJtambor
tras la limpieza.
- Cuando utili_ Manqueador con lejia, cSrguelo en el
compartimento de la lejfa.
- Cuando utili_ un limpiador en polvo, saque ta cajita del
detergente Ifquido y aSadaio en el compartimento de_
detergente de lavado principal.
- Cuando utilice tabletas, col6que_as directamente dentro
de{ tambor.
Pulse @_
Gire el Seiector de Ciclos al TUB CLEAN.
Se Huminara la tuz TUB CLEAN.
Pulse _.
,-@ NOTA
° No cargue ropa durante la TUB CLEAN. La ropa podda
da_arse o contaminarse
Aseg0rese de limpiar del tambor cuando est6 vacio.
• Se recomienda dejar la puerta abierta despues de
finalizado el lavado para mantener limpia la cubeta.
• Se recomienda usar el programa de TUB CLEAN una
vez al mes,
• Si ya se hubiera formado moho o se percibiese olor
a humedad, ejecute el programa de TUB CLEAN
semanaimente durante 3 semanas
Cuidado y limpieza de la lavadora
Si deja detergente en el caj6n dispensador durante un
periodo prolongado de tiempo o utiliza la lavadora durante
mucho tiempo, puede acumularse cal en e_cai6n. Retire y
limpie el cai6n una vez pot semana.
1 Retire el cai6n tirando de 61hacia afuera hasta que se
detenga, Levante Japarte delantera del cai6n y tire de
ella.
2 Quite las inserciones de los 2 compartimentos; enjuague
las inserciones y el caj6n con el agua caliente para quitar
rastros de productos de lavanderia acumuiados,
3 Para limpiar la apertura del caj6n, utilice un pequeSo
cepillo no metalico para Jimpiar la cavidad. Quite todos los
residuos de la parte superior e inferior de Jacavidad.
4
Vuelva a colocar los insertos de los compartimentos
adecuados y vueJva a colocar el caj6n,
A ADVERTENClA
causar un incendio o descargas eJectricas

30 SOLUC_ON DE PROBLEMAS
SOLUCION DE PROBLEMAS
Comprobaci6n de los mensajes de error
Si aparece el siguiente mensaje en la pantalia, compruebe Io siguiente y tome la acci6n correctiva apropiad&
El agua de la lavadora
_le lentamente, no sale
o en la pantalla se lee:
La lavadora se Ilena de
agua lentamente, no se
Ilena o en la pantalla se
lee:
La lavadorano se
enciende
En la pantallase lee:
En la pantallaso lee:
En la pantallase lee:
En la pantallase lee:
- La manguera de desagOe est_ curvada,
pinzada u obstruida,
" L[osgriffo]s°de_suim_in_;:_ode agua no est_n
totalmente abiertos.
• Las mangueras de la linea de agua estan
deformadas, pinzadas o dobladas.
o Los filtros de entrada de agua estan
obstruidos,
° La presi6n de agua a! gnfo o en casa es
insuficiente.
° El cable de alimentaci6n no est8 conectado
correctamente.
° El fusible est_ fundido, el disyuntor se ha
desconectado o se ha producido un corte
La puerta no est8 cerrada correctamente,
- Error del interruptor de bloqueo de puerta
• El nivel de agua es demasiado alto debido a
un fallo en la valvula de agua,
• Error de acople
• AsegOrese de que la manguera de desagOe no
presente ninguna obstrucci6n, deformaci6n, etc, y que
no este pinzada en la parte trasera o con la lavadora.
• Aseg_],:e_sede°-quc7io_}s_g_iTf]os_a_g°i_a est6n
compJetamente abiertos.
• Aseg0rese de que las mangueras no esten deformadas
ni pinzadas. Tenga cuidado cuando mueva la lavadora.
• Limpie los fiitros de entrada. Consulte la secci6n
Limpieza y mantenimiento
. Compruebe en otra Ilave de paso de la casa para
asegurarse de que la presi6n del agua es adecuada.
• AsegOrese de que el enchufe est6 correctamente
puesto a tierra, con una toma de 3 pOas, 120 V de CA
y 60oHz,
- Restablezca e! disyuntor o cambie el fusible. No
aumente la capacidad del fusible. Si el problema radica
en la sobrecarga del circuito, este deber8 ser reparado
por un electricista cualificado,
• AsegOrese de que la puerta est@ bien cerrada y pulse
el bot6n de INICIOiPAUSA, La lavadora no centrifugara
a menos que Japuerta este bloqueada (En la pantaRa
se leer_ BLOQUEAR PUERTA),
° Si la puerta esta cerrada y aOn se muestra e_mensaje
de error por bloqueo de puerta, solicite asistencia
t6cnica,
• Asegurese de que la tapa este bien cerrada y pulse
el bot6n START / PAUSA. La lavadora no centrifuga
a menos que la tapa est8 cerrada (Se iluminara la luz
cierre de la tapa)
° Si la tapa est8 cerrada y el cierre de la tapa mensaje de
error Ilame al servicio t@cnico.
• Cierre los gnfos de agua, desenchufe la lavadora y
solicite asistencia t@cnica.
• Desenchufe la lavadora y solicite asistencia t6cnica.

SOLUCION DE[ PROBLEMAS 3_
Comprobaci6n de los mensajes de error (conf.)
En lapan_lla se lee:
En la _ntalla se lee:
En la pantalla se lee:
En la _ntalla se lee:
En lapantallase lee:
En la Icentalla se lee:
• La lavadora ha:detectado una carga
desbalanceada.
• Si el rebalanceo uE (vet arriba} no tiene
exito, mostrara este error.
• La carga es demasiado pequeF_a
• Hay articulos pesados mezclados con
articulos mSs ligeros,The load is out of
balance
- La carga est8 desbalanceada.
• Error del termistor
• El sensor del nivel de agua no funciona
correctamente.
. El circuito de protecci6n contra ta
sobrecarga t6rmica en el motor se ha
desconectado
Si un mensaje de error permanece durante
4 minutos, el agua del tambor se vaciar8
automaticamente. Sonar_ una alarma
yyl minuto antes del vaciado de agua
y aparecera "dr" en Japantalla. Puede
reiniciar ia iavadora en este momento.
Sin embargo, una vez que la lavadora
haya iniciado el vaciado de agua, todas las
funciones se suspenderan y se mostrara
"dr" hasta que el vaciado de agua haya
terminado,
Si la lavadora detecta una carga demasiado
desbalanceada como para poder girar, mostrar8 este
c6digo mientras intenta rebalancear la carga, La
lavadora agregara agua e intentara redistribuir _acarga
autom_ticamente, Esta pantaila es Onicamente para su
informaci6n y no requiere ninguna acci6n,
• El intento automStico para rebalancear la carga no tuvo
@xito.El ciclo se puso en pausa para permitir que la
carga se aiuste manualmente,
- Puede set que necesite agregar articulos adicionaJes
alas cargas pequeflas para que ia lavadora pueda
balancear _ascargas_
- Puede ser que la carga contenga articulos pesados y
otros ross ligeros. Siempre trate de lavar articulos que
de alguna manera sean de pesos simitares para ayudar
a Jalavadora a distribuir el peso de _acarga para una
buena rotaci6n.
• Redistribuya manuaJmente la carga si los articu}os
se han enredado y no permiten que _adistribuci6n
automatica funcione apropiadamente
- Desenchufe ia lavadora y solicite asistencia tecnica.
• Cierre los grifos de agua, desenchufe la lavadora y
solicite asistencia t6cnica
• Deje la lavadora en repose durante 30 minutes para
refrigerar el motor y despues, reinicie el ciclo. Si el
error "LE" sigue apareciendo, desenchufe la tavadora
y solicite asistencia tecnica,
° Esto es normal.

32 SOLUC_ON DE PROBLEMAS
Ruidos normales que puede escuchar
Los siguientes sonidos se pueden escuchar mientras que la hvadora est_ en funcionamiento. Son normaJes
Chasquidos:
• La cerradura de la puerta cuando el rele de la cerradura de la puerta se abre,
• La lavadora har_ una serie de chasquidos mientras se cambia el mode de limpieza.
Ruido de alta frecuencia:
La cesta de hvado gira m_s rSpido para quitar h humedad de la carga.
Pulveriaci6n o silbidos:
La pulverizaci6n de agua o circuhci6n durante el cicto,
Zumbido o gorgoteo:
La bomba de desagOe de bombeo de agua de Jahvadora al final de un ciclo.
Sonido del agua salpi_ndo:
Un liquido en el aniJlo de equilibrado de todo el tambor de hvado ayuda a la canasta a girar sin problemas. (La hvadora se apaga y
el tambor gira.)
El sonido del agua que se aBade despu6s de que la lavadora "_ ha estado operando:
• La hvadora se adapta aJtamaF_oy tipo de carga para a_adir mas agua en el ciclo, segOn sea necesario,
• La carga de hvado pl_ede estar desequiJibrada. Si la lavadora detecta que la carga est8 desequilibrada, se parara y relienar_ para
redistribuir la carga
• La hvadora puede diluir los aditivos de hvanderia para aF_adirlosa la carga de hvado.
Antes de solicifar asisfencia f cnica
Su Javadora esta equipada con un sistema de control de error automatico para detectar y diagnosticar problemas en una etapa
temprana, Si Jalavadora no funciona correctamente o no funciona en absoluto, compruebe Io siguiente antes de Hamar al servicio
t6cnico.
Probiema
Agitad6n provocando • Los objetos extrai_os, tales como Haves, •
ruido monedas o alfileres de seguridad, puede
estar en el tambor o en la bomba
Sonido de golpes • .
o
o
=
Ruido de vibraci6n - •
alrededor de la lavadora
Excesodeespuma
Lavar cargas pesadas puede producir un
sonido de goJpes
La carga de la hvadora puede estar
desequilibrada.
La carga del lavado puede estar distribuida
de manera desigual en el tambor.
No todos ios pies de nivelaci6n descansan
firmemente en el suelo,
Suelo insuficientemente rigido.
• VueJva a conectar la manguera si se ha
soltado del grifo o de la Javadora.
• La entrada de las tuberias de drenaje est8
obstruida.
° Articulos de gran tama5o, tales como una
almohada y una manta dentro del tambor,
° Demasiado detergente o detergente
incorrecto.
Pare la hvadora y compruebe si hay obietos extraSos
en el tambor o en el filtro de drenaje, Si e{ ruido
continOa despu6s de que se reinicie la tavadora, Ilame
a/servicio t@cnico,
Esto es normal. Si el sonido continOa, la tavadora
lavadora estS, probablemente, maI equilibrada. Detener
y redistribuir la carga de lavado.
Detener y redistribuir la carga de hvado.
Pare la lavadora y reorganice la carga de la hvado,
Aiuste las patas de nivelaci6n. AsegOrese de que
los cuatro pies estan firmemente en contacto con
el suelo, mientras que h lavadora est_ en el dclo de
centrifugado, con una carga
AsegOrese de que el suelo es s6lido e inflexible,
Consulte "Suelo" en la secci6n de instalaci6n.
Comprobar las mangueras. Compruebe y apriete las
conexiones de h manguera.
Desatascar el tubo de drenaje P6ngase en contacto
con un fontanero si fuera necesario.
Compruebe el ciclo, Si lavaarticuJos grandes, vohminosos
utilice el ciclo VOLUMINOS / ROPA DE CAMA,
Pare la lavadora y compruebe la posici6n de carga.
Coloque los objetos voluminosos en la tambor.
Reduzca la cantidad de detergente o use detergente
de baja espuma.
S61ouse detergente con el Iogotipo HE
(alta eficiencia}

SOLUCION DE PROBLEMAS 33
La lavadora no funciona • Panel de control esta dormido • Esto es normal. Pulse ENCENDIDO.
• La iavadora esta desenchufado ° AsegOrese que la cuerda esta bien tapada en una salida
en funcionamiento,
o E_suministro de agua est8 • Gire totalmente abiertos tanto grifos ca_ientes como frios.
apagado
• Los controles no°se_estaMecen • As_g:Ore_ede °q°ue*e] cic[o-se _establecido
correctamente correctamente, cierre la tapa y pulse INiCJAR.
o La tapa est8 aMerta, la • Cierre la tapa y restablezca el ciclo, hasta e_comienzo si
caracteristica de seguddad impide fuera necesario.
que la carga de la lavadora y la
operaci6n con Jatapa abierta
° El cortocircuito / fusible se ha • Compruebe los cortacircuitos / fusibles de casa. Sustituya
accionado / estropeado fusibles o reajuste el interruptor. La lavadora debe tener
un circuito dedicado.
o • Pulse el boron Encendido,
• o Pulsar INiCIAR
o
se Ilena con
propiedad
La lavadora no vada el agua
estancada en el tam_r,
La electr6nica tiene que ser
reajustada
INICIAR no ha side presionado
despues de que se haya
estab!ecido e! cicio
Baja presi6n de agua
extrema
La lavadora esta demasiado fria
• Fiitro obstruido o las mangueras
de Iienado pueden estar dobladas
• Eficiencia energ@tica
• Abastecimiento de agua
insuficiente
• [Ta°Ti*apade_lavadora esta abierta
• La conexi6n de la manguera es
incorrecta
• Optimizaci6n de Ilenado de agua
o Manguera de drenaje quebrada
o desag0e situado a mas 8" por
encima del sue/o
El agua se escapa en cada - Las mangueras no est8n instaladas
carga correctamente
• Revise otra Ilave en el hogar para asegurar que la presion
es adecuada,
• Si la Javadora ha sido expuesta atemperaturas bajo cero
durante un periodo prolongado de tiempo, permita que se
catiente antes de presionar ENCEND1DO. De Jocontrario,
la pantaila no se encender8.
• AsegOrese de que los filtros (pantallas azul y naranja deben
estar iibres de s61idos) de Jaunidad no esten obstruidos.
Apague e_agua y compruebe el fikro desconectando ia
manguera a _amSquina. Verifique que las mangueras no
estan dob!adas o congestionadas,
• Se trata de una lavadora con eficiencia energ@tica. Per
consiguiente, !os ajustes de temperatura para esta
lavadora pueden ser diferentes de Jaslavadoras sin
eficiencia energ6tica,
• AsegOrese de que e_suministro de agua este abierto.
AsegOrese de que los gdfos de agua vuetven a sus
posiciones comp_etamente abiertos,
• La tapa de lavadora debe estar cerrada para todas las
operaciones del ciclo de lavado. Si Jatapa se abre durante
el lavado, todas las funciones se detendran, inc!uyendo el
agua de Ilenado.
• AsegOrese de que las mangueras conectan el suf%nistro
de agua caliente a la entrada caJiente de la bvadora, y
el suministro de agua fria a la entrada fda de ia tavadora
(caliente a caliente, fdo a frio)o
- El agua no puede cubrir el niveJ superior de la ropa.
Esto es normal para esta Javadora de aita eficiencia. El
relleno de agua es optimizado por el sistema para mejor
rendimiento de lavado,
o AsegOrese de que la manguera del desagOe no es_@
doMada. Pot instrucciones de instalaci6n recomendadas,
la saJida de desagOe no puede set mSs de 8" encima del
suelo
° Revise todas las conexiones de las mangueras para
asegurarse de que est6n apretadas y seguras.

34 SOLUC_ON DE PROBLEMAS
Fugas de agua
incomplete o ninguna
distribuci6n de detergente
° Use excesivo de detergente
• Los recipientes de detergentes se
obstruyeron debido aun relteno
incorrecto
° Demasiado use de detergente
° Abastecimiento de agua
insuficiente
• Residues normales
Dosifi_ci6n prematura de la • El recipiente de lejia se lien6 para
lejia la futura carga
° Excesivo ilenado del recipiente de
lejia
Taponamiento de lejia • El recipiente de lejia no se
encuentra bien coJocado,
, Etuseexcesivopuedecrearfugas,quepuedensetcausadas[>o_ettipo
y lacantidaddedetergenteutilizadoSerecomiendadete_gentedeairs
eficienciaAseg0resequeetdetergentey cuatquieraditivosonpuestos
enlosrecipientesde uniondetdosificador.SignInsrecomendacionesdet
fabricantedeidetergenteparatacantidaddedetergentepetetratede
usarmenosdetergente,sabretodosi eiacondicionamientedeaguade
casa0!asunidadesemolientesdeaguaestSnsiendousados.
° AsegOresequeel detergentey losaditivossonpuestosen aIon
recipientesdedosficadoreorrectosSise utilizadetergenteiiquido_
aseg0reseque laca}adeldispensadordeldetergenteliquidoest8
enel recipienteded0sificadorSise utiJizadetergentepulverzado,
aseg0reseque lacaindeldispensadordeIdetergenteliquidonoesta
sendo usada.Paratodotipo dedetergente,aseguresesempredeque
tac deldispensadorestatotalmentecerradaantesdeiniciarel ciclo.
° AsegOrese de la cantidad sugedda de detergente utilizado
per Ins recomendaciones del fabricante, Tambi@n puede
diluir el detergente con agua en la linen de tlenado m$ximo
de la bandeja para evitar obstrucciones. Se recomienda el
deter_ gente de alta eficiencia .para esta lavadora,
• Aseg0rese de que el suministro de agua est6 abierto,
Aseg0rese de que los gdfos de agua w_elven asus
posiciones completamente abiertos.
• Funcionamientonorto!!.Los_esiduospuedenpermanecerenlos
contenedoresdelacaiadispensadora.Lacajadeldispensadorsepuede
quitarpara/alimpiezadevezencuanr_aconaguatibiay uncepitlodeffegar.
° No puede almacenar la lejia en el dosificador para el future
use. El recipiente de lejia sera dispensado para cada carga
para la seguridad 6ptima de la lavadora_
° Ei tlenadoexcesivodeIrecipientecon_ateiiapuede tIevara ta
distribuci6nprematura.Hayunalinende %nadomSximoindicadoen
el recipientede leiiaparaevitare! Ilenadoexcesivo.
• Aseg0rese de que la tapa de ia le}ia este bien coiocada y
trabada en su lugar antes de iniciar el ciclo.
° Limpieza insuficiente • Usted puede quitar y limpiar la tapa de lejia con agua tibia
y limpiar con un cepillo para eliminar el taponamiento.
El tieml_a del ciclo de Invade •
es rr_s largo de Io habitual °
A4c_ariciOnde manchas
LalavadoraajustaautomSticamente
el tempo de Invadeseg0n }acantidad
de ropa, tapresi6n del agua,su
temperatura y otras condiciones
° Armadalos productos de Invade en
el tambor de la lavadora
° La lavadora no se ha descargado
° La ropa no se ha clasificado
oorrectamente.
• La lavadora no se ha des cargado
con prontitud,
• Se ha introducido demasiada ropa.
• Se han intelcambiado las
mangueras de entrada de agua
caliente y fria.
/_,oarici6n de arrugas
Esto es norma_ La lavadora ajusta el tiempo dei ciclo
automaticamente para ofrecer unos resultados 6ptimos
en el cicJo seleccionado.
° Introduzca los productos de Invade en el dispensador
• Saque las prendas de la lavadora tan pronto come finalice
el ciclo.
• Lave siempre los colores oscuros separados de los claros
para evitar que se desti_an. Si es posible, no lave prendas
muy sucias con arras que no Jo esten tanto.
° Saque Ins prendas de la la_;adora_-n° pronto co:mo_f_ce
el ciclo_
° La lavadora se puede cargar hasta su capacidad m_xima,
pete Ins prendas no deben estar comprimidas en el
tambor. La puerta de la lavadora debe cerrarse facilmente,
° El cic_o de Invade en agua caliente puede producir mas
arrugas en Ins prendas. Revise Ins conexiones de la
manguera de entrada.

ESPECIF_CACIONES/UiqL_ZAC/©N D_L SMARTDIAGNOSIS _' 35
ESPEClFICACIONES
Requiskos ei@ctricos
Presi6n mEx. de agua
Medidas
Peso neto
Velocidad max de centfifugad0
Lavadora de carga superior.
20 VAC @ 60 Hz.
27"(An) X 28s/s" (F)X 453/_:/'(AI), 55;3/4"(Fcon puerta abierta)
68,6 cm (An) X 72,1 cm (F) X 115,3 cm (AI), 141,7 cm (F con puerta abierta)
45,5 Ibs. (66 kg)
: 1100 rpm
UTILIZACION DEL SMARTDIAGNOSIS
Utflce esta funci6n s61o cusndo ssi se to indique et agente deJ Centro de Ate_ci6n ai Ctiente. La lransmisi6r_ tiene uf_ sonido sirfl _a_aJ de un
fax, y no fiche n r_gOn significado, exceplo pars et Centro de Alenci6n sl CIienfe
Et SMARTDD_(;NOSISJ _ no puede acNvarse si Is tavsdors no encier_de. Si esto ocurr% deber_n utiJizs;se los proced mier_tos norma es de
soluci6n de problemss.
Si experiments atgOr_ probtema con su lavadora, _lame st n0mero ]-8OO-243-OOOO(3-888--542-2623 en Canad{_) ?Siga las instruec or_es de
nuesbo agerffe y esfos paso% cuando ss_ se to sol cilen:
I Pulse ei bot6n encender a lavadora_ No pulse nirtg0n otto bot6n
2_ Cusndo as se io solicite et sgente, coloque el auricular del teI6fono muy cerca de_ bot6n POWER.
3. Mante_gs pu_ssdo el bot6n \.J_ dursnte t_es segundos, mienffas ma_tiene e} audcuis_ del tel6f0no }unto aI icono o bot6n POWER.
4. Mante_lga e_ tei6fono eness posici6n hasps que hays fina_izsdo Is trs_smis 6n det lorlo $er;_n unos 17 segur_dos, y Is psntatls contsr_!_ et
tiempo,
• Para k)grar los mejores resu!t_dos, no muevs el tel@fono mientrss se trarssmiten tos torsos y r_o toque la consoJa con el tel@fer_o
, Si el agente no _ogra reslizsr uns grabaciEn precisa de los datos, quiz{_s te pids que to in_en_e de nuevo_
, Si msntiene el bot6n POWER pu}sado dursnte Is transmisi6n se apagar5 et SMARTDtAGNOSiS'_L
5_ Cuando hays te_minado el recuento y se _ayan detenido los to, o% vuelva a habtar con el agente, que ie podr5 ayuda_ con ia informaci6n
t_ansmitida pars su an&l sis.

36 GARANTiA
GARANTiA LIMITADA PARA LAVADORA LG (EE.UU.)
COBERTURA DE LA GARANTiA:
LG ElectronicsUSA _nc('LG"I gdantiza su avadoraLG ("produdo' }contracualquierdefeclo en ma_eraleso mano deob_abap un usodomestico normal duranteel
periodode garanttain@ca@m_sadelante,y LG_dr_ repararo sustituk elFoducto, ba_ su exclusivocriterio, Estagaranth limita@tJenevatidez_/o paraeIcompra_r
minorislaoriginaldel producto<no puedecederseo transferilse acualquiercomp_adoro usuarioposte_iohy se apIicas61ocuandoel producto sehayaadquiddoatravesde
undistdbukkx [.G autodzadoyse hayautilizadoen Es_adoUnidos("EE,UU*'/, inckli_s los TerritoriosdeEEUU,
Nora: Los p_oductos de sustltuci6n o piezas de reparaci6n pueden set nuevos o remanufacturados en f8brica y tendr_n garantfaparaet tier_po restante del
per odo origina de garantia o noventa (90! dias, el que sea mas largo, Guarde la factura o et iust ficante de compra como prueba de tafecha de compra para ta
garantia (so le podda pedir que envie una copiaa LG o un representante autorizado),
PERIODO DE GARANTiA:
Periodo
Alcance de la garant_
Ob_sercaci6n
Un (1/aSo a partir de la fecha de
compra original:
Cualquier pieza interna/funcional
LG suministrar_ las piezas y la mano
de obra para la reparaci6n o sustituir_
las lsiezas defe_uosas.
Diez (10) afios a pa_ir de la fecha de
compra original:
Motor dot tamb_sr
(estator, rotor y sensor Hall)
Toda la vida t_til de_ la fecha de
compra original:
Tambor de acero inoxidable
S61opieza& El diente ser_ responsable de la mano deobra o la reparaci6n a
domicitio para la sustituci6n de las piezasdefectuosas.
COMO SE PRESTA EL SERVlCIO: Ser4cio a demicilio
E!ser',.4cioa ®miciiio _ prestar& seg_n es.t6 disponible, durante el perlodo de garantla segtan _ disponibilided del personal de serv_cio t6cnico
en EE.UU. Para recibir servicio a domicilio el prodecto de_r_ estar accesible y sin obstrucciones para el personal de servicio. Si no se puede
prestar el servicio de reparaci6n a domicilio, puede set necesario retirar, reparar y devolver el producto. Si no est_ dispenible el servicio a
domi¢ilio, LG pedr_ decidir si facilitar_ transpose para el producto a y desde cualquier servicio t6coico de LG, segt3n su elecci6n.
ESTA GARi_TIA LIMiTADA NO CUBRE:
1. Desp_amientos de servi_ para el en_3, rect_gidao instalaci6n del
prodecto o para dar ins_trucciones sobre la u_lizaci6n _1 producto.
2. Sustj_ci6n de I_ fusibles de la viviende o puesta en funcionamiento
de los disyuntores, correcci6n de la instalaci6n el6ctrica de la casa o
fontaner_, o correcci6n de la instalaci6n del producto.
3. _5os o fallos causados per tubos de agua con fugas o roturas, tubss
de agoa congelados, tubos de desagiJe atas_des, suministro de agua
i_ o con interrupciones o suministro de aire ir_slecuado.
4. DaSos al prodecto causados pot accidentes, pestes e insectos0
rayos, viento, fuego, inundaciones o causas de fuerza mayor.
5. DaSos o fallos resultantes de un uso inadecuado, abusos,
instalaci6n, reparaciones o mantenimiento incorrectos. _s
reparaciones incorrectas incluyen la utilizaci6n de piezas no
aprobadas o especrficadas per LG,
6. DaSos o fallos causados per la modificaci6n u alteraci6n no
autorizada del producto.
7. Dar_oso fallos causados per la corriente el_ctrica, tensi6n o
c6digos de fontaneria incorrectos.
8. DaSos cosm_ticos, incluidos araSazos, abolladuras u otros daSos
en el acabado del producto, a menos que los daSos sean resultado
de defectos de materiales o mano de obra y se informe a LG en un
plazo de siete (7)dias caienderios a partir de la fecha de entxega,
9. DaSos o falta de elementos en cualquier producto de expesici6n,
caja abierta, de descuento o reacondicionado.
10. Productos en los que se haya borrado, desdibujado o cambiado el
nOmero de serie original de f_ibric&
11+ Reparaciones cuando se est_ dando al producto una utilizaci6n
diferente del uso dom_sflco normal (per ejemplo, alquiler, uso
comercial, oficinas e instalaciones recreativas) o contraria alas
instrucciones del manual del propietar_ del producto.
12. La retirada y nueva iostalaci6n dei producto si se ha instalade en
una ubicaci6n inaccesible.
ESTA GARANTIA EXCLUYE CUALQUIER OTRA G#_JNTIA, EXPRESA O IMPLICITAo INCLUYENDO Y SIN LIMITACION A CUALQUIER
GARANTIA DE COMERClABILIDAD O ADECUAClON A UN FIN PARTiCU_R, EN EL GRADO EN QUE CUALQUIER GARANT[A IMPLICITA SEA
REQUERIDA POR LEY, ESTA GARANTIA SE LIMITAR_ EN SU DURACION AL PERIODO INDICADO ANTERIORMENTE, l_ REPARACl0N O
SUSTITUCION
B_O ESTA G_ANTIA ES LA 0NICA SOLUCION PARA EL CLIENTE, NI EL FABRICANTE, NI SUS DISTRIBUIDORES EN EE,UU. SER/_N
RES_NSABLES DE CUALiQUIER DAf40 INCIDENTAL, CONSECUENCtAL, INDIRECTO, ESPECIAL O PUNITiVO DE CUALQUIER TIPO,
INCLU|DAS SIN LIMITACION0 P_RDIDAS DE INGRESOS O BENEFICIOS, O CUALQUIER OTRO DAI_O BASADOS EN CONTRATOS,
RESPONSABILIDADES EXTRACONTRACTUALES O DE OTRO TIPO.
INCLUYENDO Y SIN LIMIT_.CION A, PERMITEN LA EXCLUSION O UMtTACION DE LOS D/_;;4OSINCIDENTALES O CONSECUENCIALES O
LAS LIMITACIONES SOBRE LA DURACION DE UNA GARANTtA IMPLICITA, POR LO QUE PUEDEN NO SER A_LICABLES A SU CASO LAS
CITADAS EXCLUSIONES. ESTA GARANTIA LE CONFIERE DERECHOS LEG#J_ES ESPEC[FICOS Y TAMBI_N PUEDE TENER OTROS DERECHOS
QUE VARIAN DE UNOS ESTADOS A OTROS.
COMO OBTENER SERVlCIO DE GARANTIA E |NFORMACION ADICIONhJ_:
Marne al nQmero 1_0-24-3_0C¢30 o visite nuestro sitio web en www.lg.com.
Si desea ponerse en contacto per correo: Centro de informaci6n al cliente LG (ATT: ClC)
201 James Record Road, Huntsville, AL 35824

Life's Good
hs plod_ct q_a lies for E:NE_(_Y S/AR i_t the
fac$oydefa_J { ksme Use} se_ _1_
Cha_'/gnfj file [actoydefaq{$ setti_sgs ) enabhng oher
_eatu es tsay _c ease power corist_Ysp ioh _t/sl (:ou(_
exceed t_e I_eits ecessa y t) qusl ty fo NE[_Q'¢ STAR
1_800-243-0000 JSA
1-888o542-2623 CANADA
-
 1
1
-
 2
2
-
 3
3
-
 4
4
-
 5
5
-
 6
6
-
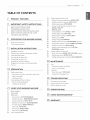 7
7
-
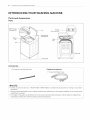 8
8
-
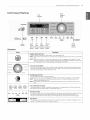 9
9
-
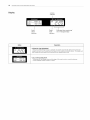 10
10
-
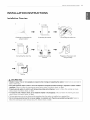 11
11
-
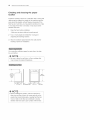 12
12
-
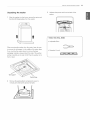 13
13
-
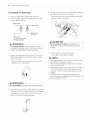 14
14
-
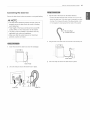 15
15
-
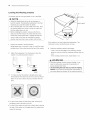 16
16
-
 17
17
-
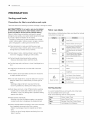 18
18
-
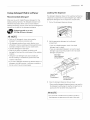 19
19
-
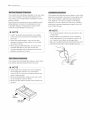 20
20
-
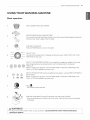 21
21
-
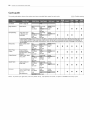 22
22
-
 23
23
-
 24
24
-
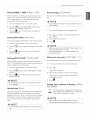 25
25
-
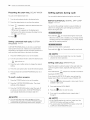 26
26
-
 27
27
-
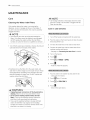 28
28
-
 29
29
-
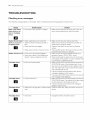 30
30
-
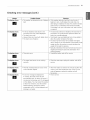 31
31
-
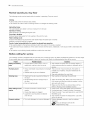 32
32
-
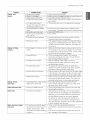 33
33
-
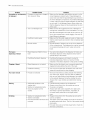 34
34
-
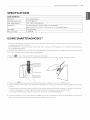 35
35
-
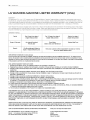 36
36
-
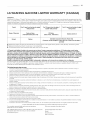 37
37
-
 38
38
-
 39
39
-
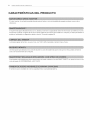 40
40
-
 41
41
-
 42
42
-
 43
43
-
 44
44
-
 45
45
-
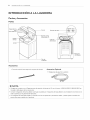 46
46
-
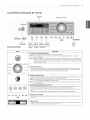 47
47
-
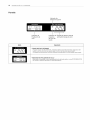 48
48
-
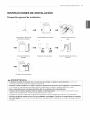 49
49
-
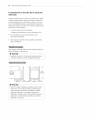 50
50
-
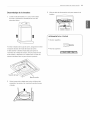 51
51
-
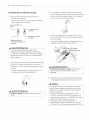 52
52
-
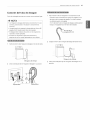 53
53
-
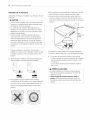 54
54
-
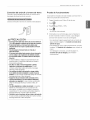 55
55
-
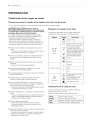 56
56
-
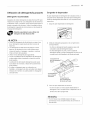 57
57
-
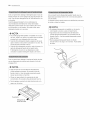 58
58
-
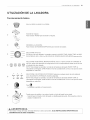 59
59
-
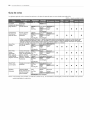 60
60
-
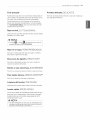 61
61
-
 62
62
-
 63
63
-
 64
64
-
 65
65
-
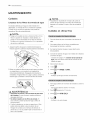 66
66
-
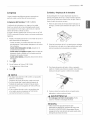 67
67
-
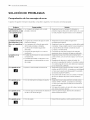 68
68
-
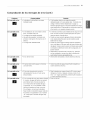 69
69
-
 70
70
-
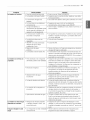 71
71
-
 72
72
-
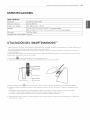 73
73
-
 74
74
-
 75
75


LG WT4970CW El manual del propietario
- Categoría
- Lavadoras
- Tipo
- El manual del propietario
- Este manual también es adecuado para
en otros idiomas
- English: LG WT4970CW Owner's manual

