Kenmore Elite 79631403410 Manual de usuario
- Categoría
- Lavadoras
- Tipo
- Manual de usuario
Este manual también es adecuado para

Use & Care Guide
Manual de Uso y Cuidado
English / Espafio|
For best results,a low sudsi_g HEHigh Effidency
Detergent made for high dflciency washers must
be used.
Paraobtene_ losn ÷jo_esresult_ados,debera
_ti z_%seun dete_genteH_paralavadorasde
a_taeficaciay baja esl:_um&
Model/Modelo: 796.3140"
I(enmore Elite°
T o i
c Was
_'_= color number, nOmero de coior
CG
carga
IIIIIIIIIIIIIIIIIIILIIIIIIIIIIIfllillll
MFL39760256
vet.073114,00
Sears Brands Management Corporation
Hoffman Estates, IL 60179 U,S,A.
www.kenmore,com
www.sears,com
®

IMPORTANT SAFETY INSTRUCTIONS ........................... 3-5
GROUNDING REQUIREMENTS ........................................... 5
FEATURES AND BENEFITS
Key Parts and Components ............................................... 6
Optional Accessories .......................................................... 6
Included Accessories .......................................................... 6
INSTALLATION REQUIREMENTS
Key Dimensions and Specifications ...................................7
Choose the Proper Location ............................................. 7
Flooring ................................................................................. 7
Clearances ........................................................................... 7
INSTALLATION INSTRUCTIONS
Unpacking and Removing Shipping Material ................ 8
Connecting the Water Lines............................................... 9
Connecting the Drain Hose ............................................. 10
Connect to the Power Supply .......................................... 10
Leveling the Washer ....................................................... 11
HOW TO USE
Control Panel Features ..................................................... 12
Operating the _A/asher..................................................... 13
Cycle Guide ................................................................. _4-15
Sorting "_/ash Loads ......................................................... 16
About the Dispensers ........................................................ ] 7
Detergent and Dispenser Use......................................... 18
Time and Status Display ................................................. 19
Cycle Modifier Buttons ...................................................... 20
Option Buttons ............................................................ 21-23
Accela 'vA/ash.................................................................. 21
Stain Boost...................................................................... 21
Extra Rinse..................................................................... 21
Water Plus...................................................................... 21
Add a Garment ............................................................. 21
Chime ................................................................................ 21
Fabric Softener .............................................................. 22
My Cycle ......................................................................... 22
Soak ................................................................................. 22
Delay Wash ................................................................... 22
Rinse & Spin ................................................................... 22
Control Lock.................................................................... 22
Special Drain Feature ....................................................... 22
CARE AND CLEANING
Regular Cleaning .......................................................... 23
Maintenance ................................................................... 24
Cleaning the VCasher.....................................................25
KENMORE CONNECT TM SYSTEM..................................... 26
Using the Kenmore Connect TM System .......................... 26
TROUBLESHOOTING GUIDE
Normal Sounds "YouMay Hear ....................................... 27
Before Calling for Service ........................................ 27-32
Error Codes ................................................................. 31-32
WARRANTY .......................................................................... 33
SERVICE ................................................................. Back Cover
In the space below, record the date of purchase, model,
and serial number of your product. "Youwill find the
model and serial number printed on an identification
plate located inside the washer lid. Have these items of
information available whenever you contact Sears
concerning your product.
Model No.
Date of Purchase
Serial No.
Save these instructions and your sales receipt for
future reference.
Master ProtectionAgreements
Congratulations on makinga smartpurchase.Yournew
Kenmore® product isdesigned and manufactured for years
of dependable operation. But likeall products, it may require
preventive maintenance or repair from time to time. That's
when having a Master ProtectionAgreement can saveyou
money and aggravation.
TheMaster ProtectionAgreement also helpsextend the life of
your new product. Here'swhat the Agreement_ includes:
• Paris and labor needed to help keep products operating
properlyunder normal use,notjustdefects.Our coveragegoes
well beyondthe product warranty. No deductible,nofunctional
failureexcludedfrom coverage- real protection.
• Expertservice by a force of more than 10,000 authorized
Searsservicetechnicians,which means someoneyoucantrust
will be working onyourproduct.
• Unlimitedservice callsand nationwide service,as oftenas
youwantus,whenever"youwantus.
• "No-lemon" guarantee - replacement of your covered
product if four or moreproduct failures occurwithin twelve
months.
• Product replacement if your covered product can not
be fixed.
• Annual Preventive Maintenance Check at your request - no
extra charge.
• Fast help by phone - we call it Rapid Resolution. Phone
support from a Sears representative on all products. Think of us
as a "talking owner's manual,"
• Power surge protection against electric damage due to
power fluctuations.
• $250 food loss protection annually for any food spoilage that
is the result of mechanical failure of any covered refrigerator
or freezer,
Rentalreimbursementif repair of your covered product takes
longer thanpromised.
° 25°//odiscountoff the regular priceof any non-coveredrepair
serviceand related installedparts.
Once you purchasetheAgreement,a simple phone call isall
that it takesfor you to scheduleservice. Youcan call at any
time day or night or schedulea serviceappointment online.
TheMaster ProtectionAgreement isa rlsbfree purchase.
If you cancel for any reasonduring the product warranty
period, we will provide a full refund, or a prorated refund any
time after the productwarranty period expires.Purchaseyour
Master ProtectionAgreementtoday!
Somelimitations and exclusionsapply.
Forpricesand additionalinformationinthe U.S.A.
call 1-800-827-6655.
_Coverage in Canada varieson someitems.
Forfull detailscall SearsCanada at 1-800-361-6665.
SearsInstallation Service
For Searsprofessional installation of homeappliances,
garage door openers, water heaters, and other major home
items,in the U.S.A.or Canada call: 1-800-4-MY-HOME®.
2

Therearemanyimportantsafetymessagesinthismanualandonyourappliance.Alwaysreadandabe-i
allsafetymessages.
Thisisthesafetyalertsymbol.Thissymbolalertsyoutopotentialhazardsthatcanresultinprop-
ertydamageand/orseriousbodilyharmor death.
All safetymessageswillfollowthesafetyalert symbol and either the word DANGER, _VARNING
or CAUTION. These words mean:
Indicates a hazardous situation which, if not avoided, will result in death or serious injury.
indicates a hazardous situation which, if not avoided, could result in death or serious injury.
Indicates a hazardous situation which, if not avoided, could result in minor or moderate
injury.
All safety messages will tell you what the potential hazard is, tell you how to reduce the chance of iniury, and tell
you what can happen if the instructions are not followed.
• Use this appliance only for its intended purpose as
described in this Use & Care Guide.
• Before use, the washer must be properly installed as
described in this manual.
° Do not wash articles that have been previously
cleaned in, washed in, soaked in, or spotted with
gasoline, dry cleaning solvents, or other flammable
or explosive substances, as they give off vapors that
could ignite or explode.
• Do not add gasoline, dry cleaning solvents, or other
flammable or explosive substances to the wash water.
These substances give off vapors that could ignite or
explode.
° Under certain conditions, hydrogen gas may be
produced in a hot water system that has not been
used for two weeks or more. HYDROGEN GAS IS
EXPLOSIVE. If the hot water system has not been used
for such a period, before using the ,washer, turn ON
all hot water faucets and let the water flow from each
for several minutes. This will release any accumulated
hydrogen gas. As the gas is flammable, do not smoke
or use an open flame during this time.
° Do not allow children to play on or in the washer.
Close supervision of children is necessary ,when the
washer is used near children.
• Before your washer is removed from service or
discarded, remove the lid to the -washing compa_ment
to avoid the danger of children or small animals
getting trapped inside. Failure to do so can result in
serious personal injury or death.
3
"Do not install or store the washer where it will be
exposed to the weather or freezing temperatures.
• Do not tamper with controls.
•Keep the area underneath and around your appliance
free of combustible materials (lint, paper, rags, etc.),
gasoline, chemicals and other flammable vapors and
liquids.
• Do not repair or replace any part of the washer or
attempt any servicing other than as described in this
manual. VVe strongly recommend that any service be
performed by a qualified technician.
•See Installation Instructions for grounding
requirements.
•ALWAYS follow the fabric care instructions supplied by
the garment manufacturer.
° Do not place items exposed to cooking oil in your
washer. Items contaminated with cooking oils may
contribute to a chemical reaction that could cause a
load to catch fire.
"Use fabric softeners or products to eliminate static
only as recommended by the manufacturer.
° Thiswasher is not designed for maritime use or for
mobile installations such as in RVs,aircraft, etc.
°Turn OFF the water faucets and unplug the washer if
the machine is to be left for an extended period of
time, such as during vacations.
• Packaging material can be dangerous for children.
There isa risk of suffocation. Keep all packaging
from children.
° Always check the inside of the washer for foreign
objects before loading laundry. Keep the lid closed
when not in use.
WARNING: This product contains chemicals known
to the State of California to cause cancer and birth
defects or other reproductive harm. Washhandsafter
handling.

Toreducethe riskoffire, electricshock,or injuryto persons
when usingthisappliance,follow basicprecautions,including
thefollowing.
* Unplugthewasherbeforecleaning toavoid theriskof
electricshock.
• Never useharshchemicals,abrasivecleaners,or solventsto
cleanthewasher.Theywill damagethe finish.
• Do notputoily or greasyragsor clothingontop of the
washer.Thesesubstancesgive offvaporsthat could ignite
thematerials.
° Do natwashitemsthat aresoiledwith vegetableor cooking
oil. Theseitemsmay contain someoil after laundering and
may catch fire.
• Disconnectthisappliancefrom thepowersupply before
attemptingan',,usermaintenance.Turningthecontrolsto
the OFF positiondoesnotdisconnectthisappliancefrom the
powersupply.Failureto follow this warningcan causeserious
injury,fire, electricshock,or death.
° Do notcombinedetergents,fabricsofteners,and/or other
laundryproductsfromdifferentmanufacturersfor usein a
load,unlessspecifiedonthe label.
° Do notmix chlorinebleachwith ammoniaor acidssuch
asvinegar.Followpackagedirectionswhen usinglaundry
products,incorrectusagecan produce poisonousgas, resulting
in seriousinjuryor death.
° Do notreachintothewasherwhile parts aremoving.Before
loading,unloading,oraddingitems,pushinthecycleselector
knoband allowthetubtocoasttoa completestopbefore
reachinginside.Failureto follow thiswarningcancauseserious
injury,fire, electricshockor death.
• Referto INSTALLATIONINSTRUCTIONSfor detailed
groundingprocedures.Installationinstructionsare packedin
thewasherfor the installer'sreference_If thewasherismovedto
a newlocation,haveit checked and reinstalledbya qualified
servicetechnician.Failure to follow this warningcancause
seriousinjury,fire, electricshock,or death.
• Do not,underany circumstances,cutor removethe third
(ground)prongfromthepowercord.Failureto followthis
warningcancauseseriousiniury, fire, electricsh_k, or death.
• Forpersonalsafety,this appliancemustbeproperly
grounded.Failureto followthis warning can causeserious
injury, fire, electric shock,or death.
• The power cordof this applianceis equippedwith a
3-prong(grounding)plugwhichmateswitha standard3-prong
(grounding)wall outletto minimizethepossibilityofelectric
shockhazardfrom thisappliance.
° Thiswasher mustbe pluggedintoa 12OVAC,60Hz
groundedoutlet.Failureto followthiswarning can cause
seriousinjury,fire, electric shock,or death.
• Have the wall outletand circuitcheckedby a qualified
electricianto makesuretheoutletisproperlygrounded,
Failureto followthis warning can causeseriousinjury,fire,
electric shock,or death.
• Wherea standard 2-prongwall outletisencountered,it
isyour personalresponsibility and obligationto haveit
replacedwith a properlygrounded3-prongwall outlet.
Failuretofollow this warning can causeseriousinjury,fire,
electric shock,or death.
• Do not install on carpet.Install the washer on a solid floor.
Failuretofollowthiswarningcan causeseriousleak damage.
• Do not remove groundingprong. Do not usean adapteror
extensioncord.Plugintoa grounded3-prongoutlet.Failure
to follow thesewarningscan causeseriousinjury,fire, electric
shock,or death.
• Do not,under any circumstances,cutor remove the third
(ground)prongfromthe powercord.Failuretofollowthis
warningcancauseseriousinjury,fire,electricshock,or death.
that matchesthe rating plate.Thisprovidesthe best
performanceand also preventsoverloadinghousewiring
circuitswhich couldcausea fire hazard from overheated
wires.
• Neverunplug your washer by pulling anthe powercord.
Always grip plugfirmly and pull straightout from the
outlet.Failureto follow this warning cancauseserious
injury,fire,electricshock,or death.
• Immediately repair or replaceall powercordsthat have
becomefrayed or otherwisedamaged. Do notusea cord
that showscracksor abrasiondamage along itslength or
at eitherend. Consultwith a qualified servicetechnician.
Failureto follow this warning cancauseseriousinjury, fire,
electricshock,or death.
• Wheninstallingor movingthe washer,becareful notto
pinch,crush,or damage thepower cord. Failuretofollow
this warning cancauseseriousinjury, fire, electricshock,or
death.
• The washer mustbeinstalledand electricallygrounded
bya qualified servicetechnicianin accordancewith local
codesto preventshockhazard and assurestabilityduring
operation.
• The washer isheavy. Two or more peoplewill be needed
to installand movetheappliance. Failureto do socan
resultin damage to propertyor seriousbodilyinjury.
• Storeand installthewasher where it will not beexposed
to temperaturesbelowfreezing orexposedto outdoor
weather conditions.Failuretofollow thiswarning can
causeseriousleakdamage.
• Toreducethe riskof electricshock,do not installthe
washer in humidspaces. Failureto follow this warning can
causeseriousinjury, fire,electricshock,or death.
• Toreduce therisk of personalinjury,adheretoall industry
recommendedsafety proceduresincludingthe useof long
sleevedglovesand safety glasses.Failureto follow all of
the safetywarnings in this manualcouldresultin property
damage, personalinjuryor death.
• Neverattempttooperatethisapplianceif it isdamaged,
malfunctioning,partiallydisassembledor hasmissingor
brokenparts,includinga damaged cordorplug.
•To minimizethepossibilityof electricshock,unplugthis
appliancefrom the power supplyor disconnectthewasher
at thehouseholddistributionpanelby removingthe fuse
or switchingoff the circuitbreakerbeforeattemptingany
maintenanceor cleaning.
• Toreducethe riskof electricshock, do nottouchthe power
plugwith wet hands.
4

° Do not allow children to play on or in the washer.
Close supervision of children is necessary when the
washer is used near children. As children grow, teach
them the proper, safe use of all appliances. Failure
to comply with these warnings could result in serious
personal injury'.
* Destroy the carton, plastic bag, and other packing
materials after the washer is unpacked. Children
might use them for play. Cartons covered with rugs,
bedspreads, or plastic sheets can become airtight
chambers. Failure to comply with these warnings could
result in serious personal injury.
• Keep laundry products out of children's reach. To
prevent personal injury, observe all warnings on
product labels. Failure to comply with these warnings
could result in serious personal injury.
°Before your -washer is removed from service or
discarded, remove the lid to the washing compartment to
avoid the danger of children or small animals getting
trapped inside. Failure to do so can result in serious
personal injury or death.
IMPORTANT: Please read carefully.
TO CONNECT ELECTRICITY
Improper connection of the equipment-grounding
conductor can result in risk of electric shock. Check
with a qualified electrician or service technician
if you are in doubt as to whether the appliance
is properly grounded. Do not modify the plug
provided with the appliance. If it does not fit the
outlet, have a proper outlet installed by a qualified
electrician. Failure to follow these warnings can
cause serious injur_; fire, electric shock, or death.
GROUNDING INSTRUCTIONS
This appliance must be grounded, In the event of
malfunction or breakdown, grounding will reduce
the risk of electric shock by providing a path of least
resistance for electric current. This appliance is equipped
with a cord having an equipment-grounding conductor
and grounding plug. The plug must be plugged into
an appropriate outlet that is properly installed and
grounded in accordance with all local codes and
ordinances.
3-prong
grounding type
wall receptacle
Ensure proper
ground exists
before use.
5

KEY PARTS AND COMPONENTS
LID LOCK
The washer lid is locked during operation. The
lid can be unlocked by pressing the START/
PAUSE button to stop the washer.
ULTRA-CAPACITY STAINLESS STEEL TUB
The ultra-large stainless steel tub offers extreme
durability.
SOFT CLOSE, TEMPERED GLASS LID
The soft close hinges allow the lid to close gently
and quietly. The tempered glass is durable and
makes it easy to observe the washer.
O FRONT TOUCH
PANEL
The front touch panel is specially designed to
be water resistant and provides easy access to
controls, eliminating the need to reach for rear
controls. The soft-surface touch buttons add a
premium touch.
0 SMARTRINSE
This washer is designed to save rinse water by
using a jet spray rinse system in NORMAL and
HEAVY DUTY cycles.
O KENMORE CONNECT TM
Should you experience any problems with
your washing machine, it has the capability
of transmitting data via your telephone to
the Kenmore Connect Team. This gives you the
capability of speaking directly to our specially
trained technTcians. The technician records the
data transmitted from your machine and uses
it to analyze the issue, providing a fast and
effective diagnosis.
BLEACH DISPENSER
The Bleach Dispenser compartment holds liquid
bleach, that is dispensed automatically at the
proper time during the wash cycle.
DISPENSER DRAWER
Add detergent or softener to the main wash
compartment of the dispenser drawer. Cleaning
products are dispensed automatically at the
proper time during the wash cycle.
Hot Water Co_d Water
Inlet valve Inlet valve
Drain
Hose
Power
Cord
'-Optional Accessory -_
Hot and cold water hoses (with 2 seals per
hose, 1 at each end/
Included Accessory
Cable tie (for securing drain hose)
6

| KEY DIMENSIONS AND SPECIFICATIONS
Description
Rated Voltage/Frequency
Dimensions
Net "vVeight
Top-Loading Washer
120VAC, 60Hz
27"(W) X 28 3/8"(D) X 41 3/10"(H), 55 3/8"(H with lid open)
68.6 cm (W) X 72.1 cm (D) X 105.0 cm (H), 140.6 cm (H with lid open)
137.8 Ibs. (62.5kg)
CHOOSE THE PROPER LOCATION
WARNING
*Washerisheavy. Two or more peopleare requiredwhen
movingand unpackingthe washer.Failureto do so may
result in damage to property or seriousbodily harm.
* Storeand installthe washer where itwill not beexposed
seriousinjury, fire, electric shock,or death.
warning can cause seriousinjury,fire, electric shock,or
death.
• Toreducethe riskof electricshock,do notinstallthe
washer in humidspaces.Failureto follow this warningcan
cause seriousinjury, fire, electric shock,or death.
• Toensure properair flaw, do not blockthe large opening
on the bottomof the washer with carpetingor other
materials.
' Do notremovegroundprong.Do notusean adapter or
extensioncord. Plugintoa grounded3-prongoutlet. Failure
to follow this warning can causeseriousinjury, fire, electric
shock,or death.
NOTE:Installingthe washerin a humidspace,or installingor
storingthe washer whereit will be exposed to theweather or
freezing temperatures,may resultinrustor other damage that
isnotcovered by the product warranty.
PowerOutlet
' Thepoweroutlet mustbe within 60 in. (1.5m)of either side
of the washer.
' Theappliance and outlet mustbe positioned sothat the plug
is easily accessible.
• Do not overload the outlet withmore than
one appliance.
• Theoutlet mustbe grounded in accordance with current
wiring electric codes and regulations.
• Time-delay fuseor circuit breaker isrecommended.
NOTE:It isthe personal responsibility and obligation of the
product owner to have a proper outlet installeclby a qualified
servicetechnician.
FLOORING
• Tominimize noiseand vibration, the washer MUSTbe
installed on a solidly constructed floor. Seethe NOTEto your
right.
• Allowable slopeunder the entire washer isa maximum I in.
difference from sideto side or from front to back.
° Installing on carpeting and soft tile surfaces is
not recommended.
• Never install the washer on a platform or weakly
supported structure.
CLEARANCES
7
4! 3/_o"
(105.0 cm)
f
1" ___ 27 ,_ _ !"
(2_5cm) -_ (68.6 cm) (2 5cm}
Toensuresufficientclearance for water linesand airflow, allow
minimumclearancesof at least 1 in.(2.5 cm)at the sidesand
4 in.(10 cm)behind the unit.Be sureto allow for wall, door, or
floor moldingsthat may increasethe required clearances.
32"
(81.1 cm)
28 3is" [}1_:
(72.1 cm)
I
55 3/s'
(140.6 cm)
(with open rid)
26 3/4"
(68 cm}
3 !/2"
(9 cm)
Minimum vertical space from floor to overhead
shelves, cabinets, ceilings, etc., is 56 in.
NOTE: The washer must be installed on firm flooring
to minimize vibration during the spin cycle. Concrete
flooring is best, but a wood floor is sumcient, provided
it isbuilt to FHA standards. The washer should not be
installed on rugs or exposed to weather.

UNPACKING AND REMOVING SHIPPING MATERIAL
When removing the washer from the carton base, be
sure the plastic tub support comes off with the base.
If you must lay the washer down to remove the base
packaging materials, always protect the side of the
washer and lay it carefully on its side. DO NOT lay
the washer on itsfront or back.
f
Tubsupport
Carton Base
1. After removing the carton and shipping material,
lift the washer off the foam base. Make sure the
plastic tub support comes off with the base and
is not stuck to the bottom of the washer.
2. Save the foam block for future use. If the washer
must be moved in the future, this will help prevent
damage to the washer during transportation.
3. Carefully remove the two foam pads which cover
the top sides of the tub guide, making sure not to
leave behind any pieces of the foam.
J
4. Unfasten the power cord from the back of the
washer.
TOOLS YOU WILL NEED
• Adjustable Pliers
• Carpenter's Level
NOTE: To prevent damage, do not remove the foam
block until the washer is at the final location.
8

CONNECTING THE WATER LINES
• IMPORTANT: Use new hoses when installing the
washer. Do NOT reuse old hoses.
* IMPORTANT: Use ONLY the inlet hoses provided by
Kenmore. Aftermarket hoses are not guaranteed to fit or
function correctly. Other hoses may not tighten correctly
and could cause leaks. Subsequent damage to product
or property will not be covered under the terms of the
product warranty.
• Water supply pressuremust be between 14.5 psi and
116psi (100_800 kPa). if the water supply pressure is
more than 116psi, a pressure reducing valve must be
installed.
* Periodically check the hose for cracks, leaks, and
wear, and replace the hose if necessary.
• Make sure that the water linesare not stretched,
pinched, crushed, or kinked.
• The washer should never be installed or stored in a
location subject to freezing temperatures. Damage to the
water linesand internal mechanisms of the washer can
result,if the washer was exposed to freezing temperatures
prior to installation, allow it to stand at room temperature
for several hours before useand check for leaks prior to
operation.
.
Rubber Sea[ Rubber Seal
(towater inlet
on washer)
WaterHose
(to tap)
Inspect the threaded fitting on each hose and make
sure there is a rubber seal in place in both ends.
3. Always run a gallon or two of water through each inlet
hoseto flush dirt, scale and other debris out of the
water lines. Doing so will help prevent future problems
with clogged filter screens,and will also allow you to
verify which hose ishot and which iscold.
J
4. Attach the (red) hot water line to the hot water inlet on
the back of the washer. Attach the (blue) cold water
line to the cold water inleton the back of the "washer.
Tighten the fittings securely. Turn ON both faucets
all the way and check for leaks at both ends of the
hoses.
f "x
Water
2. Connect the water supply hosesto the HOT and
COLD -water faucets tightly by hand and then tighten
another 2/3turn with pliers.
NOTE: Be careful not to cross-thread the hose
fittings. Thiswill damage the vaFzeand could result in
property damage from leaks.
9

CONNECTING THE DRAIN HOSE
•The drain hose should always be properly secured.
Failure to properly secure the drain hose can result in
flooding and property damage.
• The drain must be installed in accordance with any
applicable local codes and regulations.
• Make sure that the drain hose is not stretched,
pinched, crushed, or kinked.
Option 1: Standpipe
f %
Draln Line
Standpipe
35"_47"
(09~1.2 m)
Bend the outlet end of the drain hose to form a
U shape, insert the end of the drain hose into the
drain. If the drain is large enough for the flange on
the hose to fit inside, then do not insert the flange
more than 1-2 inches into the drain. Use the tie strap
included with the installation materials in the foam
block in the tub to secure the drain hose to the drain.
Option 2: Laundry Tub
Tub
Tie Strap
Drain Hose
J
Bend the end of the drain hose to the desired shape
and support it on the edge of the laundry tub. Use a
tie strap to secure the drain hose in place.
CONNECT TO THE POWER SUPPLY
Washer should be plugged into a 120-VAC, 60-Hz
grounded 3-prong outlet. Plug in the washer.
If the water valves and drain are built into the wall,
fasten the drain hose to one of the water hoses with
the cable tie (ribbed side on inside).
Improper connection of the equipment-
grounding conductor can result in risk of electric
shock. Check with a qualified electrician or
service technician if you are in doubt as to
whether the appliance is properly grounded.
Do not modify the plug provided with the
appliance. If it does not fit the outlet, have a
proper outlet installed by a qualified electrician.
Failure to follow these warnings can cause
serious injury, fire, electrical shock, or death.
C_bie lie
If your drain isa standpipe, fasten the drain hose to the
standpipe with the cable tie provided.
NOTE:
• Normal height of the end of the hose should be
approximately 35"_47" (0.9_1.2 m) from the floor.
• Do not installthe end of the drain hose lower than 29
in. (0.7 m) or higher than 96 in. (243.8 cm) above the
bottom of the washer or more than 60 in.(152.4 cm)
away from the washer.
• Never seal the drain hose to the drain. If no air gap is
present, water can be siphoned out of the tub resulting
in poor wash/rinse performance or clothing damage.
10

LEVELING THE WASHER
The tub of your new washer spins at very high
speeds. To minimize vibration, noise, and unwanted
movement, the floor must be a level, solid surface.
NOTE: Adjust the leveling feet only as far as
necessary to level the washer.
Extending the leveling feet more
than necessary can cause the
washer to vibrate, oy
NOTE: Before installing the
washer, make sure that the floor
is clean, dry and free of dust, dirt,
water and oil so the washer feet
cannot slide easily. Leveling feet
that move or slide on the floor can contribute to
excess vibration and noise due to poor contact with
the floor.
All four leveling feet must rest solidly on the floor.
Attempt to rock the washer from corner to corner
to make sure that all four leveling feet are in firm
contact with the floor.
1. Position the washer in its final location, taking
special care not to pinch, strain, or crush the
water and drain lines. Place a level across the top
of the washer.
I "vt/
,, Raise Lower ,
2. Adjust the leveling feet, Turn clockwise to raise
the washer or counterclockwise to lower it.
• To check if the washer is level from side to side,
place a level on the back edge of the lid.
"To check if the washer is level front to back, place
a level at the side of the washer on the edge where
the cabinet side meets the top cover. Do not place
the level on the top or the lid] Using these surfaces
will result in the washer being unlevel.
to Side
"Front to Back
Lower .... Raise
Wrong Right
3. To make sure that the washer is properly level,
open the lid and look from above to see if the
tub is centered. If the tub is NOT centered (as
shown in the drawing on the left), readjust the
feet. tf you have a level, check your washer with
the level.
11

WARNING: To reduce the risk of fire, electric shock,or injury to persons, read and follow this
entire Use & Care Guide, including the important Safety Instructions, before operating this washer.
CONTROL PANEL FEATURES
0
0
POWER (ON/OFF) BUTTON
Pressto turn the washer ON. Pressagain to turn
the washer OFF. Pressingthe POWER button dur-
ing a cycle will cancel that cycle and any load
settingswill be lost. The lid will unlock after o
brief pause.
NOTE: If the washer remains idle for four minutes
after turning the washer off, any water left in
the tub will automatically be drained. An alarm
will sound one minute prior to draining, and 'dr'
will appear on the display. "Youmay restart the
washer at this time. However, once the washer
initiates draining, all functions will be suspended
and cycle settings lost, and 'dr' will be displayed
until draining is complete.
CYCLE SELECTOR BUTTON
Press the cycle b_rrtonto select the desired cycle. Press
the Specialties button repeatedly to cycle through
the specialty cycles. Once the desired cycle has been
selected, the standard presets will appear in the dis-
play. These settings can be adjusted using the cycle
setting buttons any time before starting the cycle.
@
G
START/PAUSE BUTTON
Press this button to start the selected cycle.
If the washer isrunning, use this button to pause the
cycle without losing the current settings.
NOTE: If you do not press the START/PAUSE button
within four minutes of selecting a cycle, the washer
automatically turns OFF. if the washer is paused
during a cycle for more than four minutes, the cycle
will be cancelled and any water remaining in the
tub wilt be drained. An alarm will sound at three
minutes to warn you that the tub is about to drain.
CYCLE MODIFIER BUTTONS
Use these buttons to adiust the settingsfor the se-
lected cycle. The settings light up above the
buttons to show the current selection.
A
SPECIAL CYCLE AND OPTION BUTTONS
These buttons allow you to select speclo_ cycles or
options.
TIME AND STATUS DISPLAY
The display showsthe cycle statusand estimated
time remaining.
NOTE: To protect your clothing, not all settings are available on all cycle selections.
12

| OPERATING THE WASHER
Bleach
POWER
N_rm_t
w_ H_
Co_ L_w
START
PAUSE
@
@
O
O
@
O
@
SORT LAUNDRY AND LOAD WASHER
Sort laundry by fabric type, sol level, color and load size, as
needed. Open the door and load the itemsinto the washer.
ADD CLEANING PRODUCT
Add High-Efficiency (HE) detergent to the detergent dispenser
drawer, For proper wash performance, always measure
the detergent using the measuring device provided by the
detergent manufacturer.
TURN ON THE WASHER
Press the PO\A/ER buffon to turn ON the washer. The lights
above the cycle buttons will illuminate and a chime will sound.
SELECTA CYCLE
Press the cycle button directly or the Specialties button repeat-
edly to select the desired cycle.
The preset "Wash Temp, Spin Speed, Soil Level, and Option
settings for that cycle wil be shown.
SELECTCYCLE MODIFIERS & OPTIONS (optional)
Default settingsfor the selected cycle can now be changed if
desired. Use the cycle modifier buttons.
NOTE: To protect your fabrics, not all modifiers are
available on al! cycles. A different chime will sound and the
LEDwill not come on if the selection isnot allowed. Cycle op-
tions can also be added by usingthe option buttons.
BEGIN CYCLE
Press the START/PAUSE button to begin the cycle. The door will
lock, and the washer '*,ill briefly tumble the load without water
to measure its weight. Once the weight of the load is mea-
sured, the washer will begin the selected wash cycle.
ADD A GARMENT LIGHT
The ADD A GARMENT light will illuminate near the
beginning of the wash cycle to indicate when it is safe to add
itemsto the load. Press the START/PAUSE button to pause the
cycle and add any additional items to the load.
NOTE: it is not recommended to add items unless the ADD
A GARMENT light is illuminated, as this could result in poor
performance.
O RESUME CYCLE
Press the START/PAUSE button to resume the wash cycle.
Do not stand on top of the appliance or place objects (such as
laundry, lighted candles, lighted cigarettes, dishes_chemicals,
metal objects, etc.) on the appliance.
Failure to follow these cautions can cause fire, electric shock,
problems with the product, or iniury.
_3

CYCLE GUIDE
Thecycle guide below showsthe default settings, available options and recommended fabric
types for each cycle. Allowable modifier adjustments are shown below the default setting for
each cycle.
= Available Option
_ili = Default Setting
Normal Cotton, shirts, jeans, Hot Extra Hi h I
socks,pants Cool Mediu I Heavy
Cold .... I Light
TapCold r_o _pm I
Whites Heavily to normally
soiledwhite cottons Warm
Cool
Heavy Heavily soiled Hot
Duty cotton fabrics Cool
Cold
Extra High
High
Low
No Spin
Normal
Light
Extra High
Medium Normal
Low Light
0
_ TapCold _ No Spin .....
Cotton, underwear,
Sanitize pillow covers,
w/Oxi *_ bedsheets, baby
wear(less than 12
Ibs).
Extra High
Medium Normal
Low Light
No Spin
ilillliHHi t!ii i
Bulky/ Large items such Hot Extra High I
Bedding as a_anKeTSaria Cool Medium I Heawt
comTorrers Cold Low I Light
TapCo!d No Sp!nI
Clean
Washer
Protocol P172
Sanitization Performanceof Residentialand
Commercial, Family SizedClothes Washers
**Certified by NSF:NSFInternational (formerlythe National
Sanitation Foundation), certifies that the Sanitize w/Oxi
cycle reduces 99.9% of bacteria on laundry, and none of the
bacteria will carry over onto the next laundry load when used
in conjunction with Oxi products. Follow product manufacturer's
instructionsfor usingOxi products with this cycle.
NOTE:
To protect your garments, not every wash temperature, spin speed, soil level, or option is available with every cycle.
A chime will sound and the LED will not light if the selection is not allowed.
_When a cycle is selected, the default time for that cycle isdisplayed. This time will change as modifiers or options
are selected. Once the START/PAUSE button ispressed, the washer will measure the size of the load. The estimated
time may change once the load size has been measured. The washer automatically adjusts the wash time for the
amount of laundry, water pressure, water and other operating conditions.
These cycles use various wash motions to enhance cleaning and/or fabric care performance. The wash motions may
sound different at different stages of the ".,ashcycle. This is normal.
14

CYCLE GUIDE
Thecycle guide below showsthe default settings, available options and recommended fabric
types for each cycle. Allowable modifier adjustments are shown below the default setting for
each cycle.
- Available Option
Default Setting
Express
Wash
Cold
Clean
Towels
Deep
"Wash
Delicates
Ultra
Wash
Lightly soiled
clothing and small
loads
Small loads of
cotton, linen,
towels, shirts,
sheets,jeans, mixed
loads
Towels
Towels,shirts,
sheets,jeans, mixed
loads
Dressshirts/
blouses, nylons,
sheer or lacy
garments
Heavily soiled
cotton fabrics
Cool
Cold
TapCold
Hot
Cool
Cold
TapCold
Hot
Cool
Cold
TapCold
War m
Cool
Cold
Extra High
Medium
Low
No Spin
Extra High
Medium
Low
No Spin
Extra High
Medium
Low
No Spin
Extra High
High
Low
No Spin
High
Medium
No Spin
Extra High
Medium
Low
No Spin
Heavy
Normal
Heavy
Light
Heavy
Light
Heavy
Light
Heavy
Normal
NOTE:
To protect your garments, not every wash temperature, spin speed, soil level, or option is available with every cycle.
A chime will sound and the LED will not light if the selection is not allowed.
_When a cycle is selected, the default time for that cycle is displayed. This time will change as modifiers or options
are selected. Once the START/PAUSE button is pressed, the washer will measure the size of the load. The estimated
time may change once the load size has been measured. The washer automatically adjusts the wash time for the
amount of laundry, water pressure, water and other operating conditions.
_The Deep Vv'ashcycle adds water to the .wash cycle and raises the water temperature for efficient wash
performance.
These cycles use various wash motions to enhance cleaning and/or fabric care performance. The wash motions may
sound different at different stages of the wash cycle. This is normal.
15

SORTING WASH LOADS
CAUTION
° Do not load items higher than the top edge of the tub.
Failure to foliow this caution can resultin leakage or
damage to fabrics.
"Use the BULKY/BEDDING cycle for buoyant or
nonabsorbent items such as pillows or comforters.
Failure to follow this caution can result in leakage.
-If possible, do not wash any water-resistant items.
If you must, please select the Bulky/Bedding cycle.
- Examples of water-proof or water-resistant items
include certain mattress pads, mattress covers, rain
gear, camping gear, skiing apparel, outdoor gear and
similar items.
Grouping Similar Items
For the best washing results, and to reducethe possibility
of damage to clothing, care should be taken to sort the
clothing into loads that are made up of similar items.
Mixing different fabric types and/or softlevels can result
in poor wash performance, color transfer or discoloration,
fabric damage or linting.Fabrics should be sorted into
groups as described below.
Colors
Sort articles by color. Wash dark clothes together in
aseparate load from light colors or whites. Mixing dark
clothes with light clothes can result in dye transfer or
discoloration of the lighter clothes.
Soil Level
'C/ash heavily soiled clothing together. VVashing lightly
soiled clothing in the same load with heavily soiled
clothing could result in poor wash performance for the
lightly soiled clothing.
Fabric Type
Delicate articles should not be mixed with heavier or
sturdier fabric types. Washing delicates in a load
with heavy fabrics can result in damage to the more
delicate fabrics. Washing heavier fabrics in a delicate
load can result in poor wash performance for the
heavier fabrics and possible damage to the delicates.
Lint Type
Some fabrics attract and bind lint to them while others
give off lint in the laundry process. Avoid mixing these
lint collectors and lintproducers in the same load. Mixing
these fabrics will result in pilling and linting on the lint
collectors. (For example, lint collector - knit sweater; lint
producer - terrycloth towels.)
I
Sort Laundry...
by Colors
Whites
Lights
Darks
by Soil
Heavy
Normal
Light
by Fabric
Deffcates
Easy Care
Sturdy
by Lint
Lint Producer
Lint Collector
Fabric Care Labels
Many articles of clothing include a fabric care label.
Using the chart below, adiust the cycle and option
selections to care for your clothing according to the
manufacturer's recommendations.
f
Fabric Care Labels
Machine
cycle ,_r,=_
Water • • • 00 •
temperature _ w_,_ _i
Bleach
Am/b_h Only nen_chlorl_ bbeach _ _ N_ch
_h_ need_} (,,_en_eeded)
Loading the Washer
"Check all pockets to make sure that they are empty.
Items such as clips, matches, pens, coins, and keys can
damage both your washer and your clothes.
• Close zippers, hooks, and drawstrings to prevent these
items from snagging or tangling on other clothes.
• Pretreat heavily stained areas for best results.
• Combine large and small items in a load. Load large
items first.
• Large items should not be more than half of the total
wash load.
•The washer can be fully loaded, but the tub should
not be tightly packed with items. The lid of the washer
should close easily.
• To prevent an out-of-balance load, do not wash
single items. Add one or two similar items to the load.
Large, bulky items, such as a blanket, comforter, or
bedspread, should be washed individually.
• The washer will not fill or operate with the lid open.
NOTE: Use the BULKY/BEDDING cycle for large or
bulky items such as poly-filled jackets, comforters,
pillows, etc. These items may not be as absorbent
as other laundry items and should be sorted into a
separate wash load for optimal results.
Bulky items should be placed as far down in the tub as
possible for optimal results. Always place buoyant items
at the bottom of the tub.
The washer will automatically detect the load size.
Because of the high-e_ciency wash system, the water
level may not completely cover the load.
16

1 ABOUT THE DISPENSERS
The automatic dispenser consists of two compartments
which hold:
"Liquid fabric softener.
° Liquid or powdered detergent for main wash.
Main W'ash
Main Wash Liquid Detergent
Powder Detergent
Compartment Compartment
Liquid Fabric
Softener
Compartment
Insert
Dispenser Drawer
Main Wash Detergent Compartment
Thiscompartment holds laundry detergent for the main
wash cycle. The detergent isadded to the load at the
beginning of the cycle. Always use High-Emciency (HE)
detergent with "your"washing machine. Either powdered
or liquid detergent may be used.
Never exceed the manufacturer's recommendations
when adding detergent. Using too much detergent can
result in detergent buildup in clothing and the washer.
When using liquid detergent, make sure the liquid
detergent cup and insertare in place. Do not exceed
the maximum fill line.
When using powdered detergent, remove the liquid
detergent cup from the compartment. Powdered
detergent willnot dispense with the liquiddetergent
cup in place.
Fabric Softener Compartment
This compartment holds liquid fabric softener, which is
automatically dispensed during the final rinse cycle.
Never exceed the manufacturer's recommendationswhen
adding softener. Using too much fabric softener can result
in buildup in clothing and the washer.
• Always follow the manufacturer's recommendations
when adding fabric softener. Do not exceed the
maximum fill line. Using too much fabric softener may
stain clothes.
• Dilute concentrated fabric softeners with warm water.
Do not exceed the maximum fill line.
. Never pour fabric softener directly onto the load or
into the tub.
S _ _
Liquid Bleach Compartment
The bleach dispenser isa separate compa_ment at
the left front of the tub opening. This compartment
holds liquid bleach, which is dispensed automatically
at the proper time during the wash cycle. Any liquid
remaining in the dispenser at the end of the cycle is
water, not bleach.
"Do not add powdered bleach to this compartment.
The bleach compartment is designed to dispense liquid
bleach only. Powdered or liquid color-safe bleach will
not dispense properly.
•Always follow the manufacturer's recommendations
when adding bleach. Never add more than one cup
and do not exceed the maximum fill line sincethis can
cause the bleach to be dis_nsed immediately,resulting in
damage to fabrics. Using too much bleach can damage
fabrics.
• Never pour undiluted liquid chlorine bleach directly
onto the load or into the tub. Fabric damage can occur.
"Do not usecolor-safe bleach or Oxi products inthe
same cycle with liquid chlorine bleach.
Do NOT mix chlorine bleach with ammonia or
acids, suchas vinegar or rust/scale remover.
Mixing chemicals like these can produce a lethal
gas, resulting in severe injury or death.
17

DETERGENT AND DISPENSER USE
A Word About Detergents
High-Emciency (HE) detergents produce fewer suds,
dissolve more efficiently to improve washing and
rinsing performance, and help to keep the interior of
your washer clean. Using detergent that isnot HE may
cause oversudsing and unsatisfactory performance
which could result in error codes, cycle failure, and
machine damage.
Maximum __J
_--Normal Load Am u ,._____.j
Liquid Powdered
Detergent Detergent
J or proper wash performance, always measure the
detergent using the measurements provided by the
detergent manufacturer.
The normal amount of HE detergent needed, for
average loads, is less than V2 of the recommended
maximum. Use less detergent for soft water, light soll
or smaller loads. Never use more than the maximum
amount recommended by the detergent
manufacturer.
Designed to use only
High-Efficiency (HE) detergent
IMPORTANT:Yourwashing machine isdesigned for use
with only High-Efficiency (HE)detergents. HEdetergents
are formulated specifically for High-Efficiency washers
and contain suds-reducing agents_Always look for the
HEsymbol when purchasing detergent.
IMPORTANT: Not all detergents are the same. Pay
careful attention to the amount of detergent used to avoid
overusing, poor rinsing and detergent buildup in clothing,
and residue buildup that can contribute to odors in the
machine. NEVER usea cup or scoop other than the one
supplied by the manufacturer of the detergent you
are using. Never usemore than the maximum amount of
detergent recommended by the manufacturer.
Always measure the detergent amount. While HE
detergents are designed for this type of washing
machine, be careful when measuring the detergent. For
most normal loads, no more than 1/4to V2 of cap or
scoop of HE detergent should be used.
NOTE: Extra care mustbe exercised when using 2X and
3X concentrated detergents because even a little bit extra
can contribute to the problems mentioned above.
NOTE: Detergents designated as HEcompatible may not
provide optimal results.
Using the Softener and Detergent Dispenser
To add detergent, bleach, and fabric softener to the
outomatlc dispenser:
O Open the dispenser drawer,
O Load the laundry products into the
appropriate compartments.
O Close the drawer before starting the cycle.
NOTE: It isnormal for a small amount of water to
remain in the bleach and softener compartments at the
end of the cycle.
IMPORTANT: Do not place or store laundry products,
suchas detergenb bleach, or liquid fabric softener, on
top of your washer or dryer. Wipe up any spills immedi-
ately. These products can damage the finish and controls.
Using the Liquid Bleach Dispenser
The bleach dispenser automatically dilutes and dispenses
liquid bleach at the proper time in the wash cycle.
O
Check clothing care labels for special instructions.
Measure liquid bleach carefully, following
instructions on the bottle. High-emciency washers
use less water, so less bleach is needed. One half
cup is enough for most loads.
Carefully pour the pre-measured amount of bleach
directly into the bleach dispenser. If you are using
powdered bleach of any kind, pour it directly into
the tub before adding the laundry. Never add
powdered bleach to the liquid bleach dispenser.
• Never pour undiluted liquid chlorine bleach directly
onto clothes or into the tub.
• Do not pour powdered bleach into bleach
dispenser.
• Do not place laundry items on top of the bleach
dispenser when loading and unloading the washer.
• Alwaysmeasureand pour bleachcarefully.Avoid overfilling
or splashingwhenadding bleachto thedispenser.The
maximumcapacity of the bleachdispenserisonecup of
bleach perwashcycle. Overfilling could resultin bleach
being dispensedimmediately.
18

TIME AND STATUS DISPLAY
The time and status display shows the estimated time remaining and cycle progress.
CYCLE STATUS INDICATOR
These LEDswill illuminate when a cycle isselected
to indicate which stages will run. When a cycle is
running, the LEDwill blink for the active stage. Once
a stage is complete, the LEDwill turn off. If a cycle
is paused, the active LEDwill stop blinking.
O
ESTIMATED TIME REMAINING
When a cycle is selected, the default time for
that cycle is displayed. This time will change as
modifiers or options are selected. Once the START,,"
PAUSEbutton is pressed, the washer will measure
the size of the load. The estimated time may
change once the load size has been measured.
NOTE: The time shown isonly an estimate. This time
is based on normal operating conditions. Several
external factors (load size, room temperature,
incomingwater temperature, etc.) can affect the
actual time.
19

CYCLE MODIFIER BUTTONS
Each cycle hasdefault settings that are selected
automatically. "Youmay also customize these settings
using the cycle modifier buttons. Pressthe button for
the desired modifier until the indicator light for the
desired setting is lit. The washer automatically adjusts
the water level for the type and size of wash load for
best results and maximum efficiency.
Due to the high-e_ciency nature of this product,
water levels may be much lower than expected. This is
normal and cleaning/rinsing performance will not be
compromised.
NOTE: To protect your garments, not every wash/rlnse
temperature, spin speed, soil level, or option isavail-
able with every cycle. A chime will sound and the LED
will not light if a selection isnot allowed.
Hot
Cool
Tap Cold
Extra High
High
Medium
Low
No Spin
Heavy
Normal
Light
0 WASH TEMP
WASH TEMP selects the wash and rinse temperature
combination for the selected cycle. Pressthe VVASH
TEMP button until the indicator light for the desired
setting islit.
° Select the wash temperature suitable for the type
of load you are washing. Follow the garment
fabric care labels for best results.
• Cold rinses use lessenergy. The actual cold rinse
temperature depends on the temperature of the
cold water at the faucet.
O
O
SPIN SPEED
Higher spin speeds extract more water from clothes,
reducing drying time and saving energy.
Pressthe SPIN SPEEDbutton until the desired speed
isselected. Some fabrics, such as delicates, require
a slower spinspeed. To protect your clothing, not all
spin speeds are available for all cycles.
SOIL LEVEL
Adjusting the soil level setting will modify the
cycle times and/or wash actions. Pressthe SOIL
LEVELbutton until the desired soil level isselected.
2O

OPTION BUTTONS
Your washing machine features several additional cycle
options that customizecyclesto meet your individual needs.
O TurnON the washer and pressthe cycle button to select
the desired cycle. If the cycle selectionis changed after
the options have been selected, all settings will be
changed to the default settingsfor thenew cycle.
O Use the modifier buttons to the for
cycle adjust settings
that cycle.
O Press cycle option option(s) you
the
button(s)
for
the
would like to add. Thebutton will light when that option
isselected, if the selected option isnot allowed for the
selected cycle, the chime will soundtwice to alert you
and the LEDwill not illuminate.
O Pressthe START/PAUSEbutton to start the cycle. After a
brief delay, the lid will lock and the cycle will begin.
NOTE:
• Toprotect your garments, not every option isavailable with
every cycle.
• if the START/PAUSEbutton is not pressedwithin four
minutesto start the cycle, the control will shut off and all
settingswill be lost.
ACCELA WASH
Adding this option reduces the cycle time while
_maintalning wash performance similar to the same
cycle without ACCELA WASH.
STAIN BOOST
m ¸oo
_'_'_, -_IUse this option for heavily soiled
loads that need improved staintreatment.
When Stain Boon is selected, the wash cycle
will begin with warm water to help prevent the setting
of certain types of stains. Then, as the cycle progresses,
hot water will be added to gradually increase the water
temperature to help remove stains that require treatment
at higher temperatures
NOTE:
• Bestresultsare obtained with smaller loads (lessthan 6 Ib).
• If you select Stain Boost,the SaveEnergy+ option isnot
available.
EXTRA RINSE
Thisoption will add an extra rinseto the se-
lected cycle. Use thisoption to help ensurethe
removal of detergent or bleach residue from
fabrics. Liquid fabric softener, if used,is always
dispensed in the final rinse.
NOTE: You cannot select the EXTRARINSEoption with the
RINSE& SPIN cycle.
WATER PLUS
_e_ Usethis option if you wish to add more water to
[_s_!___olyour wash load. Thisoption is especially useful
for large or bulky loads.
ADD A GARMENT
The ADD A GARMENT light will
illuminate during the early stage of the
wash cycle to indicate that it issafe to
pause the cycle to add more items.
Once the ADD A GARMENT light goes out, additional
laundry should not be added to the load. Doing so may
result in unsatisfactory performance because the washer
will not compensate for the additional garments.
O Pressthe START/PAUSEbutton to pause the washer.
O Open the lid after it unlocks.
Add your additional items.
O Close the lid.
O Pressthe START!PAUSEbutton. Thecycle will resume
after the lid locks.
• Chime / Pressrepeatedly to adjust the volume of
_"_ J the chime. The chime will sound at the new
volume with each press of the button. When
no chime is hoard_ the chime isoff. The volume settings
are LOW - HIGH - OFF.
The chime volume can be adjusted at any time as long as
the washer is turned ON.
21

OPTION BUTTONS
FABRIC SOFTENER
Fabric softener is dispensed in the final rinse.
This washer is designed to save rinse water by
using a jet spray rinse system (SMARTRINSE)
in NORMAL and HEAVY DUTY cycles. Pressthe FABRIC
SOFTENER button to change the final rinse from spray
rinse to regular rinse so that the fabric softener is most
effective°
NOTE: Select the FABRIC SOFTENER option or
EXTRA RINSE option if liquid fabric softener is used
in NORMAL and HEAVY DUTY cycles. Failure to
select one of these options will greatly reduce the
effectiveness of the softener.
MY CYCLE
• My MY CYCLEallows you to store a customized
I cyde I wash cycle for future use. itallows you to save
............................favoritetemperature, spinspeed, soil level, and
other options for a cycle, and then recallthem at thetouch
of a button.
NOTE: "Youcan only save one cycle at a time. Pressing
and holding the MY CYCLE button will overwrite any
previously saved cycle.
To save a MY CYCLE:
Press the POV_/ERbutton to turn on the washer.
Press the cycle button to sele_ the desired cycle.
O ressthe cycle modifier buttes to change the desired
settings.
O Pressthe option buttons to add the desired options.
O Press and hold the MY CYCLE button.
To recall a MY CYCLE:
Pressthe POWER button to turn on the washer.
O Pressthe MY CYCLEbutton.Thestoredsettingswill be
displayed.
O Pressthe START/PAUSE button to start the cycle.
NOTE: MY CYCLE can be adjusted the same as any
other cycle. However, once any other button ispressed,
the MY CYCLE button LED will turn off indicating that
the settings are no longer those of your saved cycle.
_s_ Thisoption provides a maximum 180-minute presoak
prior to the start of the selected cycle. Usethe SOAK
option to presoak garmentsto help remove difficult
spotsor stainson fabrics. At the end of the presoak time, the
selectedcycle will begin with the samewater usedfor the
soak.
DELAY WASH
I. Delay Once you have selected the cycle and• 'Wash I other settings, press this button to delay the
start of the wash cycle. Each press of the
button increases the delay time by one hour, for up to
19 hours. Once the desired delay time is set, press the
START/PAUSE button to start the delay time.
NOTE: if the START/PAUSE button isnot pressed to
begin the delay time, the washer will automatically shut
off after four minutes.
RINSE & SPIN
/' Ri,,_I Select this option to rinse and spin a load
L_s_. I separately from a regular cycle. This can be
helpful in preventing fresh stains from setting in
fabrics. You can change the spin speed by pressing the
SPIN SPEED button
Pressthe START/PAUSE button to turn on the
washer.
O Pressthe RINSE & SPIN button.
O Pressthe SPIN SPEEDbutton to select the desired
spin speed. Selecting NO SPIN is not allowed.
O Pressthe START/PAUSE button.
CONTROL LOCK
Usethis option to disable the controls. Thisfea-
ture can prevent children from changing cycles or
operating the machine. Once the control lock is
set,it mustbe deactivated before any controls, except the
POWER button, can be used. Once the washer has shutoff,
the POWER button will allow the machine to be turned ON,
but the controls will still be locked. When the controls are
locked, r_
Lu will display alternately with the estimated time
remaining.Pressand hold the CONTROL LOCK button for
three secondsto activate or deactivate Control Lock.
| SPECIAL DRAIN FEATURE
This washer isequipped with a special feature that is
designed to make your washer as safe as possible.
If the washer ispaused or shut off while there is still water
in the tub, the water will drain after several minutes. This
helps keep children safe by reducing the possibilityof
water remaining in the tub. The washer can be restarted
any time before the drain begins.
If no action istaken, the dr" error code will display and
the water will drain from the tub. Once the washer begins
draining the water, the controls are disabled and the
drain processcannot be interrupted. Once the water is
completely drained, the washer will shut off.
NOTE: in the unlikely event that the washer experiences
a problem that causes an error code to be displayed, the
washer will still drain after several minutes. However, only
the original error code will be displayed.
22

WARNING: To reduce the riskof fire, electricshock,or injury to persons,read and follow this entire Use&
Care Guide, includingthe Important Safety !nstructions, before operating thiswasher,
i nplugthe washer I_efore cleaning to avoid the riskof electricshock.Failureto follow thiswarningcan cause seri-
ousinjury,fire, electric shock,or death.
Never useharsh chemicals,abrasive cleaners, or solvents to clean the washer. They will damage the finish.
REGULAR CLEANING
Cleaning the Exterior
Proper care of your washer can extend itslife. Theoutside
of the machine can be cleaned with warm water and a
mild, nonabrasive household detergent.
Immediately wipe off any spills with a soft, damp cloth.
IMPORTANT: Do not usesolvents,cleaning alcohols,or
similar products. Never usesteel wool or abrasive cleaners
because they can damage the surface.
Care and Cleaning of the Interior
Use a towel or soft cloth to wipe around the washer lid
opening and lid glass.
Always remove itemsfrom the washer as soonas the cycle
iscomplete. Leaving clamp itemsin the washer con cause
wrinkling, color transfer, and odor. Runthe CLEAN '_LASH-
ERcycle once a month, or more often if needed, to remove
detergent buildup and other residue.
Clean Washer Cycle
O Remove any clothing in the tub.
O Add liquid chlorine bleach or another tub cleaner
designed specifically for cleaning washers.
- If using liquid chlorine bleach
Add liquid chlorine bleach to the bleach
compartment.
NOTE: Add one cup of liquid bleach. Do not exceed the
maximum fill line and do not pour undiluted liquid bleach
directly intothe tub.
Storing the Washer
If the washer will not be used for an extended period of
time and isin an area that could be exposed to freezing
temperatures, perform the following steps to protect the
washer from damage.
O Turn OFF the water supply.
O isconnecthosesfrom water supplyand drain water
from hoses.
O Plug the cord into properly grounded el_ricol
power
a
outlet.
O Add 1 of nontoxic recreationalvehicle
gallon (RV)
an-
tifreeze tothe empty tub and closethe lid. NEVERuse
automotive antifreeze.
O Pressthe POWER bbCton,then pressthe DRAIN & SPIN
button. Pressthe START/PAUSE button to activate
the drain pump. Allow the drain pump to run
for one minute, then press the POWER button to
shut off the washer. This will expel some of the
antifreeze, leaving enough to protect the washer
from damage.
O Unplug the power cord, dry the tub interior with a soft
cloth, and close the lid.
O Removethe insertsfrom the Drain
dispenser.
any
water
in the compartments and let them dry.
O Store the washer in an upright position.
- If using powdered cleaners
Removethe liquid detergent cup and add powder
cleaner to the main "washcompartment of the dis-
penser drawer.
- If usinga tablet cleaner
Putthe tablet diredly into the tub.
NOTE:
° Do not add tablet cleaner to the dispenser drawer.
• Do not add any laundry detergent or fabric softener to
the dispenser drawer when usingCLEAN \,A/ASHER.
O Close the lid and press the PO'vVERbutton to turn the
washer ON. Pressthe CLEANVCASHERbutton,then
pressthe START/PAUSEbL,Ctonto begin the cycle.
Selecting any other cycle after CLEANWASHERhas
been selected will cause the CLEANWASHERcycleto
be cancelled.
O After the cycle ends, open the lid and allow the tub
interior to dry completely.
O Toremove the antifreeze from the washer after
storage, run a complete EXPRESS"WASH cycle using
detergent. Do not add laundry to thiscycle.
Removing Mineral Buildup
If you live in an area with hard water, mineral scale
can form on internal components of the washer. Use of
a water softener isrecommended in areas with hard
water.
Use a descaler, such as Washer Magic ®, to remove
visible mineral buildup. After descaling, always run the
CLEAN W'ASHER cycle before washing clothing.
Mineral scale and other spots may be removed from
the stainless steel tub using a stainless steel cleaner. Do
NOT use steel wool or abrasive cleaners.
Leave the Lid Open
If the washer will not be used for several days, leave
the lid open overnight to allow the tub to dry,
NOTE: Runthe CLEAN VVASHERcycle once a montl_ If a
mildewy or musty smell ispresent, run the clean washer
cycle once a week for three consecutive weeks.
23

MAINTENANCE
Cleaning the Water Inlet Filters
If the washer does not fill properly, an error message
will show on the display. The inlet valve filter screens
could be plugged by hard water scale, sediment in the
water supply, or other debris.
NOTE: The inlet screensprotect the delicate parts of
the inlet valve from being damaged by particles that
could enter the valves with the water supply. Operat-
ing the washer with these filters removed could cause a
valve to stick open resulting inflooding and/or property
damage.
@ @
Inlet Filter
O Turn OFF both water faucets completely. Unscrew
the hot and cold water lines from the back of the
washer.
IMPORTANT: Only use inlet hoses provided by KEN-
MORE. Aftermarket hoses are not guaranteed to fit or
function correctly. Other hoses may not tighten correctly
and could cause leaks. Subsequent damage to prod-
uct or property will not be covered under the termsof
the product warranty_ Hoses can be ordered by calling
1-800-4-MY-HOME _.
Carefully the filters from the valves
remove water
and soak them in white vinegar or a lime scale re-
mover, following the manufacturer's instructions. Be
careful not to damage the filters while cleaning,
Rinse before Press the filters
thoroughly reinstalling.
back into place.
Before reattaching the hoses, flushthe hoses and
water lines by running several gallons of water into
a bucket or drain.
24

CLEANING THE WASHER
Proper Use of Detergent
Using too much detergent is a common cause of laundry problems. Today's detergents are formulated to be
effective without visible sudsing. Be sure to carefully read and follow manufacturer's recommendations for how
much detergent to use in your wash. You can use less detergent if you have soft water, a smaller load, or a
lightly soiled load.
NOTE: Use only low-sudsing, high-efficiency detergent. These detergents can be identified by the HE logo.
Care and Cleaning of the Washer
!
f
J
J
J
Lid: .Wash with a damp cloth on the outside and
inside and then dry with a soft cloth.
Exterior: Immediately wipe off any spills. Wipe with
damp cloth. Do not touch the surface or the display
with sharp objects.
Moving and Storage: Contact a service technician
to remove water from the drain pump and hoses.
Reinstall the foam tub block to protect the washer
from damage while moving. Do not store the washer
where it will be exposed to outdoor weather
conditions.
Long Vacations: Be sure water supply is shut off at
the faucets. Follow the instructions if the washer will
be exposed to freezing temperatures.
Dispenser Drawer: Detergent and fabric softener
may build up in the dispenser drawer. Remove the
drawer and inserts and check for buildup once or
twice a month.
Remove the drawer by pulling it straight out until
O t stops. Lift up on the front of the drawer and puff
it completely out.
0
0
Remove the inserts from the two compartments.
Rinse the inserts and the drawer with warm water
to remove buildup from laundry products.
To clean the drawer opening, use a small, non-
metal brush to clean the recess. Remove all
residue from the upper and lower parts of the
recess.
O
Return the inserts to the proper compartments
and replace the drawer, Set the drawer into the
opening at an angle as shown above, then lower
it and slide it into place.
25

Should you experience any problems with your
washing machine, it has the capability of transmitting
data via your telephone to the Kenmore Connect
Team. This gives you the capability of speaking
directly to our specially trained technicians. The
technician records the data transmitted from your
machine and uses it to analyze the issue, providing a
fast and effective diagnosis.
If you experience problems with your washer, call
1-800-4-MY-HOME ®. Only use the Kenmore Connect
System feature when instructed to do so by the
Kenmore Connect Team. The transmission sounds that
you will hear are normal and sound similar to a fax
machine.
Kenmore Connect cannot be activated unless your
washing machine is turned on by pressing the POWER
button. If your washing machine is unable to turn
on, then troubleshooting must be done without using
Kenmore Connect.
1 Using the I(enmore Connect TM System
Firsb call 1-800-4-MY-HOME® (1-800-469-4663). If the number of the phone you are using is on file and is
associated with your washer, you will be quickly relayed to a I<enmore Connect team agent. Follow the technician's
instructions and perform the following steps only when requested to by the Kenmore Connect Team agent.
HOLD the mouthpiece of your phone over the POWER button, when instructed to do so by
the call center, no more than one inch from (but not touching) the machine.
NOTE: Do not press any other buttons or turn the cycle selector knob.
PUSH and hold the WASH TEMP button while continuing to hold your phone to the
POWER button.
LISTEN for three beeps. After you hear the three beeps, release the "WASHTEMP button.
Keep the phone in place until the tone transmission has finished. This takes about 6 seconds,
and the display will count down the time. Once the countdown is over and the tones have
stopped, resume your conversation with the technician, who will then be able to assist "you
in using the information transmitted for analysis.
NOTE:
• For best resuffs, do not move the phone while the tones are being transmitted.
° If the call center agent is not able to get an accurate recording of the data, you may be
asked to try again.
26

NORMAL SOUNDS YOU MAY HEAR
The following sounds may be heard while the washer is
operating. They are normal.
Lid lock relay when the lid locks and unlocks.
Spraying or hissing:
"Water spraying or circulating during the cycle.
Humming or gurgling:
Drain pump ispumping water from the washer at times
during a cycle.
BEFORE CALLING FOR SERVICE
Your washing machine isequipped with an automatic error-monitoring system to detect and diagnose problems at
an early stage. If your washer does not functionproperly or does not functionat all, check the following before you
call for service:
Vibrating noise
Foreignobjects,s_Jchaskeys,coins,or safetypins,
may be intub or pump.
Heavy wash loads may produce a thumping
sound.
Washer load may be out of balance.
Packagingmaterialswere notremoved.
Wash load may be unevenlydistributed in
thet,jb.
Not all leveling feet are resting firmly and
evenly on the_oor.
Stop washer,checktub and drain filter for foreign obiects.
if noisecontinuesafter washerisrestarted,call for service.
Thisisnormal. If sound continues, washer isprobably
out of balance. Stop and redistribute wash load.
Pausethe cycle and redistribute the load after the lld
unlocks.
Seethe UNPACKINGAND REMOVINGSHiPPiNGMATE-
RIALsectioninthe installationrequirements.
Pausethecycleand redistributetheload after the lid
unlocks.
See Leveling theWasher inthe Installation Instructions.
Make sure that the floor is solid and does not flex.
Floor not rigid enough. See Flooring in the Installation Requirements.
Water leaking Inlet hose connection islooseat faucet Check hosesfor leaks, cracks and splits.
or washer. Check and tightenhose connections.
House drain pipes are clogged. The washer pumps out water very rapidly, Check for
water backing up out of the drain pipe during drain.
If water isseen coming out of the drain, check for
proper drain hoseinstallation and check for restric-
tions inthe drain. Contact a plumber to repair drain
pipe.
Drain hose has come out of drain or Tie drain hose to inlet hose or standpipe to prevent it
isnot inserted far enough, from coming out during drain. For smaller drain pipes,
insert the drain hose intothe pipe as far as the drain
hose flange. For larger drain pipes, insert the drain
hose into the pipe 1-2 inches past the flange.
Use the BULl<Y/BEDDING cycle for large or bulky
A large item such as a pillow or blanket is items Use extra care and never wash more than half
above the top of the tub. a load of items that float such as piltows.
Stop the washer and check the load. Make sure the
load does not crest above the top edge of the tub.
Wrinkling Washer not unloaded promptly. Always remove itemsfrom the washer as soon as the
cycle iscomplete.
Washer overloaded.
Hot and cold water inlet hoses are reversed.
The washer can be fully loaded, but the tub should
not be tightly packed with items.The lid of the
washer should close easily.
Hot water rinse can set wrinkles in garments. Check
the inlet hose connections
27

BEFORE CALLING FOR SERVICE (continued)
Excessivesudsing Toomuchdetergentor incorrect HEdetergentsare formulated specificallyfor
detergent, High-Efficiencywashersand containsuds-reducing
agents. Only usedetergent with the High-Effi-
ciency (HE)logo. Fordetergent quantities refer
tothe How to Usesection.
Bleachor softener dispensed Dispensercompartment isoverfilled causing
too soon. bleach or softenerto dispenseimmediately.
ALWAYSmeasure bleach to preventoverfilling -
one cup maximum.
Dispenserdrawer closed too quickly causing
softener to dispenseimmediately.
Bleachor softener was added Always usethedispensersto ensurethat laundry
directly to the wash load inthe tub. productsare properly dispensed at the right
timeinthe cycle.
Washer was not unloaded promptly, Always remove itemsfrom:the washer assoonas
possible after the cycle iscomplete.
Clotheswere not properly sorted. Always wash dark colorsseparately from light
colors and whitesto prevent discoloration.
Never wash heavily soiled itemswashed with
lightly soiled items,
Washerwill notturn ON Powercord isnot properly plugged in. Make surethat the plug isplugged securely into
a grounded, 3-prong, 120-VAC, 60-Hz outlet.
NOTE: ff the washer stopped Housefuse isblown, circuit breaker has Resetcircuit breaker or replace fuse.Do not
during a cycle due to a lossof tripped, or power outage hasoccurred, increasefuse capacity. If the problem isa circuit
power, the washer will resumethe overload, have it corrected by a qualified
cycle where it stopped whenthe electrician.
power isrestored. Housefuse is blown, circuit breaker has Resetcircuit breaker or replace fuse. If more
tripped, due to multiple than one appliance is connected to the outlet,
appliances on oneoutlet, call an electrician to have an additional circuit
installed.
WashcycletimeisIof_ thanusual
Mustyormildewyodorinwasher
Water leaks
Thewasherautomaticallyadjusts_e
washtime for Me amountof laundry,
water pressureand otheroperating
conditions,
Incorrect or too muchdetergent has
been used.
Insideof tub was notcleaned properly.
Oversudsing of detergent.
Thisisnormal.Th,e washeradjustscycletimeau_to-
matlcallytoprovideoptimalresultsfor the:.elected
cycle.Thetime remainingshowninthedisplay isonly
an estimate.Actualtimemayvary,
Useonly High-Efficiency (HE)detergent in accor-
dance with the manufacturer's instructions.
Runthe CLEANWASHERcycle regularly.
Oversudsing may create leaks, and may be
caused by the type and amount of detergent
used. High-Efficiency detergent isthe only
detergent recommended. Make surethat
detergent and any additives are put into the
correct dispenser compartments. The normal
amount of detergent to useis 1,_to 1/2of
the maximum amount recommended by the
detergent manufacturer. Always reduce the
amount of detergent if the load is small or
lightly soiled, or if your water is very soft.
Never usemore than the maximum amount
recommended by the detergent manufacturer.
28

BEFORE CALLING FOR SERVICE (continued)
Control panel has powered off due toWasher will not operate
inactivity,
Washer is unplugged.
Water supply is turned off.
Controls are not set properly.
Lid is open
Washer not filling
properly
Circuit breaker/fuse istripped/blown.
Control needs to be reset.
START/PAUSE was not pressed after a cycle
was set.
Extremely low water pressure.
Washer is too cold,
Filter clogged.
Inlet hoses may be kinked
Energy efficiency.
Insufficient water supply.
The washer lid is open.
Hot and cold inlet hoses are reversed.
Water level is too low.
This is normal. Pressthe POWER button to turn
the washer on.
Make sure cord is plugged securely into a
working outlet.
Turn both hot and cold faucets fully on.
Make sure the cycle was setcorrectly, close the
lid and press the START/PAUSEbutton.
The washer will not operate if the lid isopen.
Close the lid and make sure that nothing is
caught under the lid preventing itfrom closing
completely.
Check house circuit breakers!fuses. Replace
fuses or reset breaker. Thewasher should be
on a dedicated branch circuit, The washer will
resume the cycle where it stopped once power
is restored.
Pressthe POWER button, then re-select the
desired cycle and press the START!PAUSE
button.
Pressthe POWER button then re-select the
desired cycle and press the START/PAUSE
button. Thewasher wil shut off if the START/
PAUSEbutton is not pressed within four minutes.
Check another faucet in the houseto make sure
that household water pressure is adequate.
If the washer has been exposed to
temperatures below freezing for an extended
period of time, allow it to warm up before
pressing the POWER button. Otherwise, the
display will not come on.
Make sure the inlet filters on the fill valves
are not clogged. Refer to the filter cleaning
instructions.
Check that inlet hoses are not kinked or
clogged,
This is an energy-efficient washer. As a result,
the temperature settings for this washer may be
different than non-energy-efficient washers.
Make surethat both hot and cold water faucets
are turned on all the way.
he washer will not operate if the lid isopen.
lose the lid and make sure that nothing is
caught under the lid preventing itfrom closing
completely
Check inlet hoseconnections. Make sure the hot
water supply is connected to the hot inlet valve,
and the cold water supply is connected to the
cold inlet valve.
This is a high efficiency washer. The water will
not normally cover theclothes. The fill level is
optimized for the wash motion to achieve the
best wash performance.
29

BEFORE CALLING FOR SERVICE (continued)
Washer will not drain water Kinked drain hose. Ensurethat the drain hose isnot kinked.
Drain located higher than 96 in. Make surethat the drain hoseis no higher
above the floor, than 8 ft. above the bottom of the.washerand is
no morethan 5 ft.away from the washer.
Poorstain removal: Proper options not selected. Heavier soils and tougher stains may require
extra cleaning power. Select SOAK to boost
the cleaning power of the selected cycle.
Previously set stains. Articles that have.previously been washed
may have stains that have been set.These
stains may be difficult to remove and may
require hand washing or pre-treating to aid in
stain removal,
Bleach does not dispense Bleach dispenser cover isnot properly Make surethat the bleach cover isproperly
installed, installedand snapped intoplace before the
beginning of the cycle.
Bleach dispenser isdirty or clogged. Lift out the bleach dispenser cover and clean
out the reservoir. Lint and other foreign debris
that collects in the insidethe dispenser may
prevent proper dispensing of the bleach.
Premature dispensingof bleach Bleach dispenser filled for future bad. You cannot store bleach in the dispenser for
future use. The bleach will be dispensedevery
load.
Overfilling the bleach dispenser, Overfilling the bleach dispenser will causethe
bleach to dispense immediately,which will
damage items in the tub. ALWAYSmeasure .
bleach, but neverfill above the MAX line on the
dispenser.One cup of bleachisnormal,I:,Jtnever
add morethanonecup.
Incomplete or no dispensingof Detergent compartments clogged Make surethat detergent and additives are
from incorrect filling, put into the correct di"spensercompartments.
If liquid detergent is used,make sure that
the fiquid detergent cup and insertare in
the detergent compartment. If powdered
detergent is used,make sure that the liquid
detergent cup and insert are not used.For
all detergent types, always make surethat
the dispenser drawer isfully closed before the
start of the cycle.
Too much detergent used. Make surethat the suggested amount of
detergent is used per the manufacturer s
recommendations. You may also dilute the
detergent with water to the maximum fill line
on the compartment to avoid clogging. Use
only HE (High- Efficiency) detergent.
NOTE: Always useas litt{e detergent as
possible. High-Efficiency washers need very
little detergent to achieve optimum results.
Using too much detergent will cause poor
wash and rinse performance and may
contribute to odors in washer.
Insufficientwater supply. Make surethat both hot and cold water
faucets are turned on all the way.
Normal residue. It is normal for a small amount of detergent
to remain in the dispenser, if this residue
builds up it can interfere with normal
dispensing of products. Refer to the cleaning
instructions.
Water leaks every load Hosesnot installedcorrectly. Check all fill and drain hoseconnections to
ensurethat they are tight and secure.
30 ¸

| BEFORE CALLING FOR SERVICE (continued)
Error Codes
The display shows:
The display shows:
The display shows:
Washer fills with wa-
The lid is not closed properly.
Lid lock switch error.
Special Drain Feature.
V-/ater supply faucets are not fully open.
Water line hoses are kinked, pinched,
or crushed.
Water inlet filters are clogged.
Water supply pressure to faucet or
house istoo low.
\A!ater supply connected with leak-
limiting hoses.
Make sure that the lid is closed
roperly and press the START/PAUSE
utton. After starting a cycle, it may
take a few moments before the tub
begins to turn or spin, The washer will
not spin unless the lid is locked.
if the lid is closed and the lid lock
error message isdisplayed, call for
service.
Make sure that the lid isclosed prop-
erly and press the START/PAUSE but-
ton. The washer will not operate unless
the lid is locked.
Make sure that nothing is caught
under the lid, including shipping mate-
rial or clothing.
Make sure that the latch mechanism is
fully retracted.
If the lid is closed and the lid lock
error message is displayed, call for
service.
If the washer is paused during a cycle
for more than four minutes, tile cycle
will be cancelled and any water
remaining in the tub will be drained.
An alarm will sound at three minutes
to warn you that the tub is about to
drain.
Make sure that the water faucets are
fully open.
Make sure the hoses are not kinked or
pinched. Be careful when moving the
Washer during cleaning and mainte-
nance.
Clean the inlet filters. See Mainte-
nance in the Care and Cleaning sec-
tion.
Check another faucet inthe house to
make sure that household water pres-
sure is adequate and flow is not re-
stricted. Disconnect the inlet hose from
the washer and run a few gallons of
water through the hose to flush the
water supply lines. If flow is too low,
contact a plumber to have the water
lines repaired.
Hoses designed to limit leaks can trip
falsely andprevent the washer from
filling. The use of leak limiting hoses is
not recommended.
NOTE: If an error message is displayed for four minutes, the water in the tub will automatically drain. An alarm will sound
one minute prior to draining and the original error code will continue to be displayed.
31

BEFORE CALLING FOR SERVICE (continued)
Water in the washer drains Drain hose iskinked, pinched, or
slowly or not at all, or the clogged.
display shows:
Drain discharge is more than 96 inches
above bottom of washer.
The display shows:
The display shows:
__
The display shows:
I L-E!
The display shows:
The washer has detected an out of
balance load.
if the ub rebalance (see above) isnot
successful,this error will be displayed.
The load istoo small.
Heavy articles are mixed with lighter
items.
The load isout of balance.
Control error.
Water level istoo high due to a faulty
water valve.
Make sure the drain hose isfree of
clogs, kinks, etc., and isnot pinched behind
or under the washer.
Adjust or repair drain. Maximum drain
height is96 inches (8 ft.)
If the washer detects a load that is too
far out of balance to spin, it will dis-
play this code while it is attempting to
rebalance the load. The washer will
add water and try to redistribute the
load automatically. This display is for
your intormation only, and no action is
required.
automatic attempt to rebala_ the load
was not_ssfuL Thecyclehasbeen paused
to allow the load to be marCJallyadjusted.
Small loadsmay need additional itemsto be
added to ailow the washerto balance the
loads.
Tke load may have heavy itemsloaded with
lighter items.Always try to washarticlesof
somewhatsimilar weightto allow thewasher
toevenly distribute _ weight of the load for
sp_nnJng.
Manually redistributethe load if articleshave
become tangled preventing the automatic
distributionf_ornworking properly.
Unplug the washer and wait 60 seconds.
Reconnectpower and try again, ff the error
reappears, call for serw'ce.
Close the water faucets, unplug the wash-
er, and call for service.
The display shows: Thewater level sensor isnot working Close the water faucets, unplug the wash-
correctly, er, and call for service.
The display shows: A motor error has occurred. Allow the washer to stand for 30 minutes
and then restart the cycle. If the LEerror
code persists, call for service.
The display shows: Clutcherror. Mechanical failure.
Unplug the washer and call for service.
The display shows: Foreign objects, such as coins, pins, dips, Turn off the washer and then press the
etc., caught between the wash plate Power button. Pressthe spin speed button
_| and the inner basket, without selecting a cycle to drain and
spin the load.
When the spin is complete, remove the
clothes and then find and remove any
objects caught in the wash plate.
Always check pockets, etc., before wash-
ing to prevent error codes or damage to
the washer or c!othing.
32

f
KENMORE ELITE LIMITED WARRANTY
FOR ONE YEAR from the date of sale this appliance is warranted against defects in material or workman-
ship when it iscorrectly installed, operated and maintained according to all supplied instructions.
WITH PROOF OF SALE,a defective appliance will receive free repair or replacement at option of seller.
Toarrange for warranty service, call 1-800-4-MY-HOME® (1-800-469-4663)
This warranty applies for only 90 DAYSfrom the sale date if this appliance isever used for other than
private household purposes.
This warranty covers ONLY defects in material and workmanship, and will NOT pay for:
1. Expendable itemsthat can wear out from normal use,including but not limited to filters, belts, bags or
screw-in base light bulbs.
2. A service technician to instructthe user in correct product installation, operation or maintenance.
3. A service technician to dean or maintain this product.
4. Damage to or failure of this product if it isnot installed, operated or maintained according to the all
instructions supplied with the product.
5. Damage to or failure of this product resulting from accident, abuse, misuseor use for other than itsin-
tended purpose.
6. Damage to or failure of this product caused by the use of detergents, cleaners, chemicals or utensils
other than those recommended in all instructionssupplied with the produ_.
7. Damage to or failure of parts or systems resulting from unauthorized modifications made to this product.
Disclaimer of implied warranties; limitation of remedies
Customer's sole and exclusive remedy under this limited warranty shall be product repair or replacement as
provided herein. Implied warranties, including warranties of merchantability or fitness for a particular pur-
pose, are limited to one year or the shortest period allowed by law. Seller shall not be liable for incidental
or consequential damages. Some states and provinces do not allow the exclusion or limitation of incidental
or consequential damages, or limitation on the duration of implied warranties of merchantability or fitness,
sothese exclusions or limitationsmay not apply to you.
This warranty applies only while this appliance isused in the United States.
This warranty gives you specific legal rights, and you may also have other rights which vary from state
to state.
Sears Brands Management Corporation, Hoffman Estates, IL 60179
NJ
33

INSTRUCCIONES IMPORTANTES
SABRESEGURIDAD.................................................................35-37
REQUISITOS DECONEXI(_N A TIERRA......................................37
FUNCIONES Y VENTAJAS
Piezosy componentes clave ....................................................38
Accesorio Opcional .....................................................................38
Accesorios inciuidos............._.......................................................38
REQUISITOS DE INSTALACION
DimensionesVespecificacionesclove....................................39
Escoiae_lugor adecuado ...........................................................39
Tipo de piso...................................................................................39
Desempaquetadoy desembalajedel material
de transporte ............................................................................... 40
Conexi6nde _astuberiasde agua..........................................41
Conexi6n de la manguera de drenaie .................................... 42
Conexi6ndel suministroel_ctrico..............................................42
Nivelaci6nde la lavadora.........................................................44
INSTRUCCIONESDEusa
Funcionesdelpaneldecontrol.................................................44
Manejode _alavadora..............................................................45
Gu_adeciclos.........................................................................46_47
Clasificad6nde loscargosde lavado....................................48
Acercade losdispensadores....................................................49
Usa de[ detergente y del dispensador ................................... 50
Pantalia de tiempo y estado .................................................... 51
Botonesmodificadoresde cido................................................52
Botones de opci6n ................................................................. 53-54
Lavadooccela.........................................................................53
Tratamiento con vapor ........................................................... 53
Enfuagueextra.........................................................................53
Agregueel agua.....................................................................53
Agregar una prenda..............................................................53
Avisosonoro..............................................................................53
Suavizante ................................................................................. 54
Middo ......................................................................................54
Remojo ....................................................................................... 54
Lavadodemorado....................................................................54
Aclarado y centrifugado.......................................................54
BIoqueode los controles ........................................................ 54
Funci6nde drenaieespecial.....................................................54
CUIDADOY LIMPIEZA
Limpieza regular ......................................................................... 55
Mantenimiento .............................................................................. 56
Umpiezade la lavadora............................................................57
SiSTEMAKENMORECONNECTTM ..............................................58
TM
Usedel sistemaKenmoreConnect .......................................58
GUJADESOLUCI6NDEPROBLEMAS
Sonidosnormalesquesepuedenescuchor..........................59
Antesde soffcitarasistenciat_cnica...................................61_64
C6digosde error...................................................................63-64
GARANTIA._.....................................................................................65
SERVICIOTECNICO.................................................Contraportada
Enelespaciode abajo,registrela fechade lacompra,el modeloy
nOmerodeseriedel producto.Ustedencontrar6elngmerode modelo
y de serieimpresoenunaplacade identificaci6nubicadadentrode
la tapa de lalavadoro.Tengaestainformaci6ndisponiblecuandose
comuniqueconSearsconrelaci6na suproducto.
N.° de modelo
Fecha de compra
N,° de serie
Guarde estasinstruccionesy surecibo de ventapara referencia
futura.
Acuerdosmaestrosdeprotecci6n
Feliadadespar haberrealizadounacomprainteligente.
Sunuevoproducto Kenmare®est6diseSadoy fabricado
para brindar amosde funcionamientofiable. No obstante,
al igualquecualquierotro producto,esposibleque requiera
un mantenimientopreventivoo alguna reparaci6ncoda cierto
tiempo.Ahi escuandocantor conunAcuerdomaestrode
protecci6npuedeayudarle a ahorrartiempo ydinero.
Elacuerdomaestrode protecci6ntambi6n Ioayuda a extender
la vida 6til de sunuevoproducto.ElAcuerdo*inc_uyelos
siguientespuntos:
• Piezasy manodeobranecesariaspara mantenerlos
productosenbuenfuncionamientobajounusanormal,no
0nicamentelosdefectosdefabricaci6n.Nuestracoberturava
muchomasall6 de la garantiadel producto.No hayninguna
falia funcionaldeduciblequeseexcluyadela cobertura:se
tratadeunaprotecci6nreal.
• Servicioexpertomedianteungrupodem6sde10,000
t_cnicosautorizadosde Sears,Ioquesignificaquealguienen
quienpuedeconfiar va a trabajar ensuproducto.
• Visitasa sudomicilioilimitadasy servicioentodoel pais
todaslasvecesquehasnecesite,cuandonosnecesite.
' Garantiapot defectosdefabricaci6n:reemplazo de su
producto siseproducencuatroo m6sfolios dentro de losdace
meses,
• Reemplazodel producto:si_steno puede repararse,
° Controlde mantenimientopreventivoanuala pedido,sin
cargosextra.
• Ayudar6pidapartel_fono:Io Ilamamosresoluci6nr6pida.
Soportetelef6nicodeunrepresentantedeSearssabretodos
losproductos.Pienseennosotroscomaun"manual de usuario
• Protecci6ndepicasdetensi6ncontradafios el_ctricosdebidos
a fluctuacionesdela energia.
• Protecci6nanualde $250 parp_rdidadecomidaquese
hayaproducidocomaresultadounafalla mec6nicacualquier
refrigeradoro congeladorcubierto,
° Reintegroparalquilersila reparaci6ndesuproductotarda
m6sdeio prometido.
° 25% dedescuentodelprecionormaldecualquierserviciode
reparaci6nnocublertoy depiezasrelacionadasinstaladas.
UnavezqueadquieraelAcuerdo,s6btienequehacerunIlamado
telef6nicoparaprogramarel servicio.PuedeIlamarencualquier
momentade diao de noche,o coordinarunserviciot6cnicoonline.
ElAcuerdomaestrode protecci6nesuna compra sinriesgos.
Si ustedIocancetapar cualquierraz6nduranteel periodode
garantia del producto,le devolveremosla totalidad det dinero,
o unadevoluci6nprorrateadaen cualquiermomentadespu6s
de queexpireel periodo de garantia.Adquiera haymismosu
Acuerdomaestrode protecci6n.
Seaplicanalgunaslimitacionesy exclusiones.
Paraconsultarpreciosy einformaci6nadicionalenlosEE.UU.
Ilame al 1-800-827-6655.
* LacoberturaenCanad6variaen algunosaspectos.
Param6sdetalles,llame a SearsCanad6a 1-800-361-6665.
Serviciodeinstalaci6ndeSears
34
Parasolicitor Ioinstolaci6nprofesiona!de Searsde
electrodom_sticos,dispositivospara apertura de puertasde
garaje, calentadoresde agua y otroselectrodom_sticos,Jlame
en losEE.UU.o Canad6 a:1-800-4-MY-HOMEO.

Enestemanualyensuelectrodom_stlcofigurantouchesmensajesimportantesdeseguridad.Leaycumplasiempre
conredeslosmensaiesdeseguridad.
Esteeselsimbolodealertadeseguridad.Estesimbo!oIoalertasabreposiblesriesgosquapuedenresultar
endefiessobrelapropiedadyio lesionesfisicasgravesolamuerte.
Todoslosmensaiesdeseguridadestar6nacontinuaci6ndelsimbolodealertadeseguridadydelas
palabrasdeserialdePELIGRO,ADVERTENCIAoPRECAUCION.Estaspalabrassignifican:
Indicaunasituaci6npeligrosaque,sinoseevita,puedeproducirlesionesgravesolamuerte.
indicaunasituaci6npeligrosaque,sinoseevita,podriaprovocarlesionesgravesolamuerte.
Indicaunasituaci6npeligrosaqua,sino seevita, puedeproduciruna lesi6nmanoro moderada.
Todos los mensajes de seguridad le indicar6n cu61 es el posible peligro, Io qua debe hacer pare reducir la pro-
babilldad de lesiones y io que puede ocurrlrle si no se siguen las instrucciones.
Parereducirelriesgode incendio,descargael_ctricao
lesionespersonalesal utilizaresteeledrodom_sfico,sigaestas
precaucionesb6sicas,entrelasque seincluyenlassiguientes:
• Utilice esteelectrodomestico solo paras losfines paros los
que fue disenado, segunIo descrito en este manual del
usuario.N'utilisez votre laveusequ/aux fins prevuesdecrites
dans ce manueldu proprietaire.
• Antes de utilizer le lavadora, esnecesario instalarla
correctamente, seg0nsedescribe en estemanual.
• No lave articulos qua previamente hayan side limpiados,
lavados, sumergidoso salplcados con gasoiina, disolventes
de limpieza en secoo cualquier otra sustancia inflamableo
explosiva, ya que pueden desprender vapores que podrian
incendiarseo explotar.
• No agregue gasolina, disolventesde [impieza en seco
u otras sustanciasexplosivasal ague de lavado. Estas
sustanciasemanan vapores que podrlan encenderseo
explorer.
• Bajo ciertas condiciones,sepuede producir gas hidr6geno
en un sistemade agua caliente qua no sehaya usado
per un plazo de 2 semanaso m6s. ELGAS HIDROGENO
ESE×PLOSIVO.Si no seha usado el sistemade agua
caliente durante tel periodo, antes de utilizar la lavadora,
abra todas las ilaves de ague caiiente y deje que el ague
fluya durante algunos minutes. Estoliberar6 cualquier gas
hidr6geno acumu!edo. Yaque el gas es inflamable,no fume
ni useninguna llama abierta durante este per_odo.
• No deje qua los nifiosjueguen en la lavadora o dentro
de ella. Cuando se usela iavadora cerca de los nifios se
necesitasupervisi6nminuciosa.
• Antesde porter la lavadora fuera de servicio o de tirarla,
quite la tape del compartimiento de lavado para evitar el
peligro que nifios o pequefios animales sequeden atrapados
en el interior. Si noserespeta este advertencia, pueden
producirse [esionesgraves e incluso la muerte.
° No instale ni guarde la lavadora cuando est_ expuesta
ale intemperie o temperatures de congelamiento.
• Mantenga el area alrededor y baio el dispositivo libra
de materiales combustibles,come pelusa,papel, trapos,
productosquimicos, etc.
• No toquetee loscontroles.
• No repare ni cambie ninguna plaza de la lavadora
ni intente dar un mantenimiento diferente al descrito
en este manuel. Recomendamosenf6ticamente qua el
mantenimiento Io brinde una personacalMcada.
• Vea lasInstruccionespara la instalaci6npara referirse
a losrequisitesde conexi6n a tierra.
• Siga SIEMPRElas instruccionesde cuidado de la prenda
provistas per el fabricante de las prendas.
• No caloque prendasexpuestasa aceite comestibleen su
lavadora. Lesprendascontaminadas con aceitescomestibles
podrian contribuir ala formaci6n de una reacci6n qulmica
qua causequa una carga de lavado seincendie.
° Usesuavizanteso productos para eliminar est6tica
Onicamentedel mode recomendado per el fabricente.
• Esta[avedoranoesta dise_ada pare usemarine o
instalacionesm6viles tales come vehiculos recreativos,
aeronaves,etc.
• Cierre lasIlaves de ague y desenchufela lavadora siva a
deiar la lavadora sin funcionar per un perbdo prolangado
de tiempo, coma durante las vacaciones.
• Elmaterial deembalaie podria resultar peligroso para
losnifios. Existeriesgode asfixia.Mantenga todoslos
elementosde embalaie fuera del alcance de losnifios.
• Antes de cargar la lavadora, siempre revisequa no haya
objetos extrafios en suinterior. Mantenga la puerta cerrada
cuando no se use.
ADVERTENCIA:Esteproductocontiene quimicosconocidos
per el Estadode California decausar ccincer.L6vese/as
manesdespu_sde manipular.
35

* Desenchufela iavadoraantesdeprocedera sulimpiezapara
evitarposiblesdescargasel6_ric6s.
. Noutilicenuncaproductosqu{micosfuertes,limpiadoresabrasivos
o disolventespara limpiarla lavadora.Dafiar6nelacabado.
* Nocoloquetraposgrasososoaceitosossobrela lavadora.Estas
sustanciasdespidenvaporesquapodrianprenderfuegoa los
materiales.
° Nolaveprendasquaest6nsuciasconaceitevegetalo decocina.
LosmismaspuedenquedarconalgodeaceiteluegodelJavadoy
prendersefuego.
* Desconecteesteelectrodom6sticodela tomadecorrienteantesde
realizarcuaiquierfunci6ndemantenimiento.Colocarloscontroles
enla pesici6nOFF(apegado)nodesconectaelelectrodom6stico
dela tomadecorriente.Sinosecumpleconestaadvertenciase
podr6nproducirlesionesgraves,incendios,descargasel6ctricaso
muerte.
oNocombinedetergentes,suavizantesy otrosproductosde
lavander{adediferentesfabricantesenunamismacarga,a menos
quaas_seespecifiqueenlaetiqueta.
* Nomezcleblanqueadorcondoro conamoniacoo6cidos,como
vinagre.Sigalasdireccionesdel paqueteal usarproductosde
lavander_a.Unusoindebidopuedeproducirgasesvenenosos,ioqua
puederesultarenheridasgravesolamuerte.
° Nocoloquelasmanosdentrodela lavadoracuandosuspartes
est6nenmovimiento.Antesdecargar,descargaro agregar
prendas,presionela perillaselectoradeciclosy esperehastaque
la tinasedetengatotalmenteantesdemeterlasmanosdentro.
Sinosecumpleconestaadvertenciasepodr6nproducirlesiones
graves,incendios,descargasel6ctricasomuerte.
. ConsultelosINSTRUCCIONESDEINSTALACIONparaobtener
informaci6ndetalladadelosprocedimientosdec0nexi6na tierra.
Juntoconlalavadoraseencuentranlasinstruccionesdeinstalaci6n
comoreferencia.Sicambiaradelugarlalavadora,contratea una
personadelserviciocalificadaparaqualacontroley reinstale.Sino
secumpleconestaadvertenciasepodr6nproducirlesionesgraves,
incend_os,descargasel6ctricaso muerte.
* Bajoningunacircunstancia,torteoquitela terceraclavija
(deconexi6na tierra)delcableel6ctrico.Sinosecumplecon
estaadvertenciasepodr6nproducirlesionesgraves,incendios,
descargasei6ctricaso muer_'e.
* Potmotivosdeseguridadpersonal,esteelectrodom6sticodebe
estarconectadoa tierraadecuadamente.Sinosecumplecon
estaadvertenciasepodr6nproducirlesionesgraves,incendios,
descargasel6ctricaso muerte.
° Elcabledeallmentaci6ndeesteelectrodom6stlcoest6equlpado
conunenchufedetresdavijas (deconexi6na tierra)quacoincide
conunatomadecorrienteparatresclavl]as(deconexi6na tierra)
paraas!minimizaria posibllidaddedescargael6ctricadeeste
electrodom6stico.
° Estalavadoradebeestarenchufadaa unatomadecorrientede
120V deCA,60 Hzy conconexi6na tierra.Sino secumpiecon
estaadvertenciasepodr6nproducirtesionesgraves,incendios,
descargasel6ctricaso muerte.
*Solicitea unelectricistacalificadoquecontroielatoma de
corrientey elcircuitoei6ctricoparaasegurarsedequala tomade
corrienteest6correctamenteconectadaa tierra.Sinosecumple
conestaaclvertenciasepodr6nproducirlesionesgraves,incendios,
descargasel6ctricasomuerte.
*Nocombinedet_-gentes,suavizantespararopeyotrospr_uctosde
layander{adediferentesfabricantesenunamismacolada,a menos
quaas[Ioespecifiquetaetiqueta.
"No mezcleblanqueadorconcloroconamoniacoo6cidos,como
vinagre.Parausarprodu_osdelavander{a,sigalosin_uccionesdel
paquete.Unusoindebidopuedeproducirgasesvenenosos,Ioque
puederesultarenheridasgravesolamuerte,
* Nocoloquelasmanosdentrodelalavadoracuando6staest6en
funciona_niento.Antesdecargar,descargaroagregarprendas,
esperea quela tinasedetengatotalmenteantesdemeterlosmanos
clentro._i nosigueestaaclvertenciasepedr[anproducirlesiones
graves,incendio,electrocuci6nola muerte.
oLalavadoradeber{aestarsiempreconectadaa untomadecorriente
individualquetencjaunvoltajenominalquacorrespondaalas
especificacionesdevoffajenominalde.laplaca.Deestem_o
obtendr6unrendimiento6primoytambi6nevitar6queseprc,cluzca
sobrevoltajeenelcableadodela casaquepudiesefavorecerel
riesgodeincendioper sobrecalentamientodeloscables.
* Nuncadesenchufesulavadoratirandodelcabledealimentaci6n.
Coiael enchufefirmementeytiredelmismohaciafuerapa_ sacarlo
dela tomadecorriente.Sinosigueestaadvertenciasepodrfan
producirlesionesgraves,incendio,el_trc_cuci6no la muerte.
* Repareo reemplacedeinmediatotodosloscablesdealimentaci6n
quaest_npeladoso da_adosdeaigOnmodo_Nouseuncablecon
cortadurasoabrasi6nenalgunapartedelmismoo ensusextremos.
Consulteunprofesionalcual_ficadodelserviciot6cnico.Sinosigue
estaadvertenciase_r{an producirlesionesgraves,incendio,
electrocuci6no lamuerte.
oAIinstalarocambiardelugarla lavadora,evitepinzar,aplastar
odafiareicabledeaiimentaci6n.Sinosigueestaadvertenciase
podrianprodb_irlesionesgraves,incendio,electrocuci6no lamuerte.
* Lalavadoradebesetinstaladaconunatomaatierraapropiada
perunt6cnicocualificadocjuecumplaconlosc6digoslocales,para
evitarriesgosdeelectrocuc_6ny garantizarlaestabilidaddelaperato
durantesutuncionamiento.
. Lalavadoraespesada.Senecesitandosom6spersonaspara
instalary moverelelectrodom6stico.Sinosecumpleesta
advertencia,sepedrfanproducirdafiosenla propiedadydafios
corperalesgraves.
* Noalmaceneniinstalela lavadoraenlugaresexpuestosa
temperaturasbajoceronia inclemenciasmeteorol6gicas.Sinosigue
advertencia,sepodr[anproducirdafiosperfiltraciones.
° Conelfindereducirelriesgodeel_rocuci6nnoinstalela lavadora
enespaciosh0medos.Sinosigueestaadvertenciasepod6an
producirlesionesgraves,incer_dio,electrocuci6nola muerte.
° Afindereducirelriesgodelesi6npersonal,debeadherirsea todos
!osprocedimientosdeseguridadrecomendadosperla industria,
inclusoelusode guantes_demangoiargaygafasdes_guridad.El
incumplimientodeestasadvertenciasdeseguridadenestemanual
pedrianocasionardanga lapropiedad,les16npersonalomuerte.
* Nuncaintenteutilizaresteelectromodomesticosiestadanado,tiene
unafalla,estaparcialmentedesarmado,tienepartesdanadaso le
faltanpartes,incluidouncableoun enchufedanado.
° Paraminimizarla posibilidaddequec_:urraunadescargaelectrica,
antesde reaiizarcualquiertareademantenimientoo limpieza
descon_cteesteelectrodomesticodelsuministroelectricoo
desconectelalavadoradelpaneldedistribuciondelacasaquitando
eIfusibleo desconectandoeldisyuntor.
36

• No deje que los ni_osjueguen en la lavadora o dentro
de ella. Cuando se usala lavadora cerca de los ni_osse
necesitasupervisi6nminuciosa. A medida que los ni_os
crecen,ens6_elesel usoapropiado y segurode todos los
e_ectrodom6sticos.No cumplir con estasadvertencias
puede provocar lesionesfisicas graves.
• Destruya elcart6n, la bolsa de p_6sticoy otros materiales
de embala_edespu_sde desempaquetar la lavadora. Los
ni_ospodrian utilizarlos para jugar. Loscartones cubiertos
con las mantas, las colchas, o las hojas pl6sticas pueden
convertirseen compartimientos herm6ticos. No cumplir con
estasadvertencias puede provocar lesionesfisicas graves.
• Guarde los productos de lavanderia fuera del alcance de
losni_os. Paraevitar tesionespersonales,observe todas las
advertencias de lasetiquetas del producto. No cumpiir con
estasadvertencias puede provocar lesionesfisicas graves.
•Antes de poner la lavadora fuera de servicioo de tirarla,
quite la tapa del compartimiento de lavado para evitar
el pe_igroque nJ_oso peque_osanimales sequeden
atrapados en el interior. Si no serespeta esta advertencia,
pueden producirse lesionesgraves e incluso la muerte.
IMPORTANTE: Lea atentamente
la siguiente informaci6n.
PARA CONECTAR LA ELECTRICIDAD
Una conexi6n inadecuadadel conductor de conexi6n
a tierra del equipo puede ocasionar un riesgode
descarga el_ctrica. Consultea un el6ctrico o t6cnico
calificado si tiene dudas sobre siel electrodom_stico
est6 correctamente conectado a tierra. No modifique
el enchufe que seentrega con el electrodom_stico.
Si no enca_aen la toma de corriente, solicite a un
electricista adecuadamente formado que le instale
una toma de corriente apropiada. Si no secumple con
estasadvertencias sepodr6n producir lesionesgraves,
incendios,descargasel_ctricas o muerte.
INSTRUCCIONES DE CONEXION A TIERRA
Esteelectrodom_sticodebe estar conectadoa tierra. Encaso
de falla o mal funcionamiento,la conexi6na tierra reduceel
riesgode descargael6ctrica,al brindar a la corrienteel_ctrica
unatrayectoria de una menorresistencia.Esteelectrodom6stico
est6equipado con uncable que disponede unconductorde
conexi6na tierra del equipo y unenchufeconconexi6na tierra.
Elenchufedebe conectarsea una toma de corrienteadecuada
que est6correctamenteinstalada y con conexi6na tierra seg0n
losc6digosy ordenanzaslocales.
Enchufe de 3 clavijas de
3 clavijas con conexi6n
a tierra
Enchufe de 3
claviias
con conexi6n a
tierra
Verifique
que haya
una cone×i6n
a tierra
adecuada
antes del uso.
37

PIEZAS Y COMPONENTES CLAVE
O BLOQUEODELATAPA
Latapa de la Javadoraest6bloqueada duranteel
funcionamiento.Latopa sepuededestrabarpresionandoe{
bot6nSTART/PAUSEpara detenerla lavadora.
O
0
O
TINA DEACEROINOXIDABLEDEULTRA-CAPACIDAD
Latinade oceroinoxidablede capacidad ultra grande
brinda una durabiJidadsuperior.
TAPADECiERRESUAVE
Latapa de cierresuaveesundispositivode seguridadque
cierrala tapa consuavidad.Lasbisagrasde cierresuave
permitenquela tapa secierresuavey silenciosamente.
PANELDECONTROLTRASEROCON PANTALLALED
Lapantalla LEDdef6cil lecturamuestrolasopcionesdel
ciclo, losajustes,el estadodel cic!oy el tiemporestante
estimado.
0
SMARTRINSE
Estalavadoraest6dise_adapara ahorrar aguaenel
eniuaguemedianteel usade unsistemade eniuaguecon
rociadoa chorroen losciclosNORMAL/CASUALy HEAVY
DUTY.
0
0
KENMORECONNECTTM
SiexperimentaaJg6nproblemacon{a _avadora,podr6
transmitirdatosa trovesdeltel_fono conel equipo
KenmoreConnect.Asipodr6 hablar directamentecon
nuestrost_cnicosespecioJizados.El t_cnicograba losdabs
transmitidosdesde[a m6quinay losutiJizapara analizarel
problema,ofreciendoun diagn6sticor6pido y eficaz.
DISPENSADORDEBLANQUEADOR
Estecompartimientocontieneel blanqueadorconcloro
Iiquido,quesedispensar6de forma autom6ticaen el
momentoadecuadoduranteel cicJode tavado.
O
GAVETADELDISPENSADOR
Agrecjuedetergenteo suavizanteal compartimientode
lavado principal de la gaveta deldispensodor.Losproductos
de limpieza sedistrlbuyende forma autom6tica enel
momentoadecuado delcicb de lavado.
rAccesorio Opcional _"_
• Mangue_as de csguacatiente y agua fria (camdos sel_os
pot manguera, I en coda extremo)
Accesoriosincluidos
" Sujetador de cable (para asegurar Ia manguera de
drena_e)
Manguera
de drenaje
V6ivula de entrada V61vulade entrada
de agua caliente de agua fria
, TM
:i ......i
Cable
de energia
38

DIMENSIONES Y ESPECIFICACIONES CLAVE
Descripci6n
Tensi6nnominaly frecuencia
Dimensiones
Peso neto
Lavadora de carga superior
120 V de CA, 60 Hz
27" (anchura)X 28 3/8" (profundidad)X 41 3/10" (altura),55 3/8" (alturaconla tapaabierta)
68,6 cm(anchura)X72,1 cm(profundidad)X t0&0 cm(altura),140,6cm(alturaconla tapa abierta)
137.8 kg/62,5 libras)
ESCOJA EL LUGAR ADECUADO
ADVERTENCIA
* Lalavadoraespesada.Senecesitandoso m6spersonaspare
trasiadary desempaquetarlalavadora.Sinosecumpleesta
advertencia,sepodr6nproducirdafiosenIa propiededy graves
da_ospersonales.
"No almaceneniinstalelalavadoraenlegatesexpuestosa
temperaturasdecongelaci6nnia inclemenciesmeteorol6gicas.
Sinosecumpleconestaadvertenclasepodr6nproducirlesiones
graves,incendios,descargaselactricaso muerte.
"Conectela lavadoraadecuadamentea tierraseg6nlosc6digosy
lasordenanzasvigentes.Sinosecumpleconestaadvertencia,se
podr6nproducirtesionesgraves,incendios,descargasei_ctricaso
muerte,
• Conelfin dereduclrel riesgodedescargasel_ctricasno
instalela lavadoraenespacioshOmedos.Sinosecumplecon
estaadvertencia,sepodr6nproducklesionesgraves,incendios,
descargaset_ctricaso muerte.
• Pareasegurarunadecuadoflujo del aire,nobloqueela gran
aberturasituadaenla parteinferiordelalavadoraconuna
alfombrauafrosmateriales.
• Noelimineelcabledeconexi6na tierra.Nouseunadaptadoro
prolongador.Enchufeenunatomadecorrlenteconconexi6na
tierrade3 clavijas.Sinosecumpleconestaadvertenciasepodr6n
producirtesionesgraves,incendios,descargasel_ctricaso muerte.
NOTA:Lainstalaci6nde la lavedoraenunlugarhOmedo,ni instalar
o almacenarla lavadoradondeest_expuestaala intemperieo a
temperaturasbajo cero,puededar lagera oxidacionesy otrosda5os
quanoest6ncubiertospar la garantladel producto.
Tomedecorriente
• Latomadecorrientedebeesterdentrode un6reaminimade1,5m
(60pulgades)a cualquieradelostedosdeia lavadora.
• Elelectrodom_stlcoy la tomedecorrientedebenestarcolocados
deformatelquasepuedaaccederal enchufef6cilmente.
• Nosobrecargartatomede corrienteconm6sdeun
electrodom_stico.
• Latomadecorrientedeber6estarconectadaa tierradeacuerdo
conlosc6digosy lasregulacionesdecaNeadoactuales.
• Serecomiendautitizarunfusiblededemorade tiempoodisyuntor.
NOTA:Esresponsabiiidadyobligaci6npersonaldeldue5odel
productopedira unapersonadelserviciot_cnicocalificadoqua
instalelatomadecorrienteadecuada.
| TiPO DE PISO
•Para minimizar el ruido y vibraci6n, seDEBEinstalar la
lavadora en unpiso s61idamenteconstruido. Ver la NOTA
ala derecha.
• La cuesta permisibledebajo de toda la lavadora esuna
diferencia m6xima de 2,5 cm. (1pulgada) de lado a iado
o entre la parte delantera y la trasera.
| ESPACiOS DE INSTALACI6N
_F
105_0 cm
(41 3/_0 pulg)
2.5cm 68.6 cm 2.5cm
(1 pulg.}_ _ (27 puig.) _ -,q_(1 pug.)
Para asegurar que se haye dotodo de suficienteespecio
pare lastuberias de ague y fluio de aire, deie espaciosmini-
mosde par Io menos2,5 cm (1 pulgada) en los lados y de
10 cm (4 putgadas) detr6s de la unidad. No olvide tener en
cuenta lasmolduras de paredes_ puertas o piso, que podrian
aumentar la distancia de separacidn necesaria.
140.6 cm
(55 3!s pulg)
(with open lid}
81,1 cm
(32 pulg.)
-,*too
El espacio vertical minima desde el
9 cm
(3 1/2putg.}
)isoa los estantes
superiores, muebles, techo, etc., esde 1,40 metros (56 pulgadas).
NOTA:Sedebeinstalaria lavedoraen unpisofirmepara
minimizerla vibraci6nduranteel centrifugado.Elpisode concreto
esel major,pero unpisode maderaessuficiente,siemprequa
sehayaconstruidorespetandolosest6ndaresFHA.Nosedebe
instalarla lavadorasabrealfombreso expuestaala intemperie.
• No se recomiendan las superficies alfombradas o
de baldosas blandas.
• Nunca instale la lavadora en una plataforma o estructura
soportada con pace solidez.
39

DESEMPAQUETADO Y DESEMBALAJE DEL MATERIAL DE TRANSPORTE
AIretirar la lavadora de la basede cart6n,oseg_resede queel
soportede pl6sticode la tinasaleiuntoconla basede cart6n.
Si debe asentarla lavadora hacia abaio paro quitar los
materialesde embalaje de la base,s_empreproteja el Iodo de
la lavadora y deposffe_aconcuidado sabresulado. NUNCA
asientela lavadorasabresuportefrontal o posterior.
Soporte de
la tina
I. Despu6sde quitar el cart6n y el material de embalaje,
levante y saquela lavadorade la base de espuma.
Aseggresede que el soporte de pl6stico de la tina sale
con la base y no sequeda atascado en la porte inferior
de la lavadora.
2_
Retireel bloque de espumaque contieneel manual
del propietarionlaspiezas,de agua y losmuestrasde
producto de lavander{a. Guarde el bloque de espuma
para un usafuturo. Sien el futuro debe trasladaren una
mudanza la lavadora, estebloque ayudar6 a impedir
dafios a la lavadora durante el transporte.
NOTA: Para evitar cualquier daBo, no retire el bbque de
espuma hasta que la lavadora no est_en suubicaci6n final.
olchoneta
3. Retirecuidadosamente lasdosprotecciones de espuma
que cubren loslados superioresde la guia de la cuba,
asegur6ndose de nodejar ning0n testa de espuma.
4, Libereel cable de affmentaci6n de la parte posterior
de la lavadora.
fHERRAMIENTAS QUE NECSITAR,_
• Pinzas ajustables
° Nivel de carpintero
4O

CONEXION DE LAS TUBERJAS DE AGUA
* IMPORTANTE:Usemangueras nuevascuando instalela
lavadora. NO reutilice lasantiguasmangueras.
"iMPORTANTE:SOLO uselas manguerasde entrada
suministradascon KENMORE.Lasmangueras comerciales
no tienen garantia de queseajusteno funcionen
correctamente. Otras mangueras puede que no seaprieten
correctamente y ocasionen fugas. Losda_ossubsiguientes
a los productos o la propiedad no quedar6n cubiertos de
acuerdo con lost_rminos de la garantla de1producto.
• La presi6ndel suministrode ague debe estarentre 14,5
psi y 116psi (100_800 kPa).Si In presi6ndel suministrode
agua essuperior a 116psi,se deber6 instalaruna v6tvule de
reducci6n de ta presi6ndel agua.
• Peri6dicamente,compruebe 1asmanguerasen buscade
grietas,fugas y desgastes0y reemptacela manguera sies
necesario.
• Aseg6resede que las mangueras no est_nestiradas,
pinzadas, aplastadaso retorcidas.
• La lavadora no sedeberla instalarni almacenar en un
lugar sometido a temperatures de congelaci6n. Pueden
daSarselas tuberias de agua y mecanismosinternos de la
lavedora. Si la lavadora estuvo expuestaa temperaturas
de congelaci6n antesde la instalaci6n, permitaque
permanezca a temperature ambiente por varias horasantes
de usada y verifique la presenciade p6rdidasantes del
funcionamiento.
Sello de caucho Sello de caucho
Manguera
de agua
(entrada de
ague en la
lavadora)
de agua (a
ia tuberfa)
J
inspeccione el accesorio roscado de cede manguera y
verifique que haya un sello de goma enambos extremos.
Llavede agua
2. Conectelasmangueras de suministrode agua alas
Ilavesde pasode agua caliente y frfa y apriete las
conexionescon la mano. A continuaci6n, utilice unos
alicates pare apretarlas otros 2/3de vuelta.
41
3. Siempredeje fluir uno o dos litros de agua a trav6sde
cada manguera de entrada para ayudar a evitar futuros
problemascon pantallas de filtro obstruidas at vaciar la
suciedad, dep6sitos de minerales y otros residuosde las
tuberias de ague. De paso, al hacerlo comprobar6 cu61
es la manguera de ague caliente y cu61la de ague frla.
4_
Conectela tuberia de ague caliente (roja) ala entrada de
ague caliente ubicada en la parte trasera de la lavado-
ra. Conecte la tuberia de ague fria (azul) a la entrada
de agua fria situadaen la parte posteriorde la lava-
dora. Aiuste las unionesconfirmeza. Abra las Ilavesde
paso del agua y revise sihay fugas.
NOTA:AsegOresede no enroscarmal los eccesoriosde
ia manguera. Ya que ello da_aria la v61vulay podrla
provocardaSosa la propiedad debldo aias fugas.

•Lamangueradedrenajesiempredebeestarasegurada
adecuadamente.Noaseguraradecuadamentelamanguerade
drenajepuederesultareninundaci6no da5osa la propiedad.
• Eldrenajedebe instalarsesegOntodoslosc6digosy
regulocioneslocalesvigentes.
•Aseg_resede que la manguerade drenaie noest6estirada,
pinzada,aplastada o retorcida.
Opci6n 1: Tuba vertical
CONEXi6N DE LA MANGUERA DE DRENAJE
Opci6n 2: Lavadero
Tube vertical
0_9_-1.2 m
Linea de drenaje
Manguera de drenaje
_J
Dobie el extremode la manguera dedrenajehasta que tenga
la forma deseaday eng6ncheloal horde clellavadero. Use
una correa para asegurarla manguerade drenaje en sulugar.
CONEXION DEL SUMINISTRO ELECTRICO
Doble el extremode salidade la manguerade drenajehasta
format una U.Ingreseetextremode ta manguerade drenaje
en el desagOe,Si eldesaggeesIo suficientementeanchocoma
para que elreborde de la mangueraencajedentro,entonces,no
nserteetreborde mrs de 2-5 cm (1-2puigadas)enel desagge.
Usela correa,incluldacon losmaterialesde instalaci6nque
habia enel bJoquede espumade la tina, para asegurarla
manguerade drenaje al desagL_e.
La lavadora requiere una toma de corriente de ! 20
V de CA, 60 Hz y tres clavijas con conexi6n a fierra.
Enchufe la lavadora.
Sujetadordecable
Si lasv61vulasde agua y el desaggeest6ninstaladasen la
pared,sujete la manguerade drenaje a una de lasmangueras
de agua con la correa (el lado estriado hacia el interior).
S_Jje_dordeable
S[el desag(Jeesunatuber(avertical, sujetela manguerade
drenajea la tuberiaverticalcon la correa suministrada.
NOTA:
• Laaltura totaldel extremode la mangueradeberia estar
aproximadamentea 0,9-1,2 metros(35"~47") del piso.
• No instalarel extremode la mangueraa unaalturade m6sde
243,8cm (96pulgadas)sabrela parteinferiorde lalavadora.
• Nuncasellela manquerade drenajeal desagOe.Sinohayninguna
ranuradeaire,puec]ecrearseunefectosif6ny elaguaverse
im_lida fueradela tinaIoqueocasionar(aunareducci6ndel
rendimientodel lavado/enjuagueodaSosenlasprendas.
Una conexi6n inadecuada del conductor de conexi6n
a tierra del equipo puede ocasionar un riesgo de
descarga el_ctrica. Consulte a un el_ctrico o t_cnico
calificado si tiene dudas sabre si el electrodom_stico
est6 correctamente conectado a tierra, No modifique
el enchufe que seentrega con el electrodom_stico.
Si no encaja en la toma de corriente, solicite a un
electricista adecuadamente formado que le instale
una toma de corriente apropiada. Si no secumple
con estas advertencias se podr6n producir lesiones
graves, incenclios,descargas el_ctricas o muerte.
42

NIVELACION DE LA LAVADORA
La tina de su nueva lavadora gira a velocidades muy
elevadas. Para minimizar la vibraci6n, los ruidos y
los movimientos no deseados, el piso deber6 ser una
superficie perfectamente nivelada y s6ffda.
NOTA: Ajuste las patas niveladoras soloen la medida
necesaria para nivelar la lavadora.
La extensi6nde las paras niveladoras
m6s de Io necesario puede causar
vibraci6n de la lavadora.
NOTA: Antes de instalar la lavadora,
aseggrese de que el piso est_ limpio,
seco y llbre de polvo, suciedad, agua
y aceites, de forma que las patas
de apoyo del electrodom_stico no
puedan deslizarse con facilidad.
Las paras de apoyo poddan moverse o desiizarse,
conllevando una vibraci6n y ruido excesivos derivados de
un contacto deficiente con el piso.
Las cuatro patas niveladoras deben apoyarse
firmemente en el piso. Intente mover la lavadora de
una esquina hacia otra para asegurar que las cuatro
patas niveladoras tengan un contacto firme sobre el
piso.
1. Coloque la lavadora en el lugar final,tomando
la precauci6n especial de no apretar, forzar ni
aplastar las tuberias de drenaje y agua. Coloque
un nivel sobre la parte superior de la lavaclora.
Subir
Bajar
1
2. Ajuste la pata niveladora. Gire en sentido horario
para levantar la lavadora yen sentido antihorario
para bajarla.
• Para comprobar si la lavadora est6 nivelada de lado
a lado, coloque un nivel en el filo posterior de la
tapa.
• Para comprobar si la tapa est6 nivelada de adelante
hacia atr6s, coloque un nivel en el lateral de la
lavadora en el horde donde se unen el lateral del
mueble y la tapa superior. No coloque el nivel en la
parte superior ni en la tapa. Si utiliza esas referencias,
el resultado ser6 una lavadora desnivelada.
lado a lado
"De taparte
frontat a la
parte trasera
J
Mal Bien
3. Para asegurarse de que la lavadora est6
correctamente nivelada, abra la tapa y mire desde
arriba para ver si la tina est6 centrada. Si la tina
NO est6 centrada como muestra el dibu]o a la
izquierda_ vuelva a ajustar la pata. Si tiene un nivel,
compruebe la lavadora con el nivel.
43

ADVERTENCIA: Para reducir el riesgo de incendio, descarga el_ctrica o lesiones personales, lea
y cumpla completamente este manual de usa y cuidado, incluyendo las instrucciones importantes sabre
seguridad, antes de poner en funcionamienta la iavadora.
FUNCIONES DEL PANEL DE CONTROL
R_se Boos_
Soak / S_ff_
w_j7 So_o
_eNy@
R_n_e
_6 L_
Spin
..... f
O BOTON POWER
(ENCENDER!APAGAR)
Presioneeste bot6n para prender la lavadora. Presi6-
nelo de nuevopara apagarla, AI presionar el bot6n
POWERdurante unciclo, secancelar6 el ciclo y todos
bs ajustesde cargo se perder6n. Lo tapa sedestra-
bar6 tras una breve pauso.
NOTA: Si la lavadora permanece inactiva
durantecuatro minutostras apagarta, sectrenar6
outom6ticamente toda el acjuaque permanezcaen Io
tina. Unaolarma sonar6 un minuto antes del drenaje
y el c6dicjo de "dr" aparecer6 en pantallo. En ese
momenta puede reiniciar la lavadora.Sin embargo,
en cuanto seinicieel drenaje, sesuspender6ntodas
losfunciones y el mensaje "dr" semostrar6 hasta que
secomplete el drenaje y todos losajustesdel ciclose
O PERILLADEL SELECTOR DE CICLO
Gire esta perilla para seleccionarel ciclo que desee.
Unovez seleccionado el cido deseado, semostrar_n
en pantalla losajustesest6ndar para dicho ciclo.
Estosaiustespueden cambiarse utilizando los botones
de ajuste del ciclo encualquier momentaantes de
que el ciclo comience,
O BOT6N START/PAUSE
Presioneeste bot6n para iniciar el ciclo seleccionodo.
Si la lavadoro est6 funcionado, useeste bot6n para
poner en pausael ciclosinperder losaiustesactuales.
NOTA: Si no presionael bot6n START/PAUSEantes de
que transcurran4 minutostras seleccionar un ciclo, la
iovadoro seapogar6 autom6ticamente. Siio Iovodora
est_ en pausa durante un ciclo par m6sde cuotro
minutos,secancelar_ el ciclo y sedrenar6 el acjuoque
permanezca en la tina. Una alarma sonar6 a lostres
minutospara advertirle de que la tina est6 a punto de
drenarse.
O
BOTONES MODIFICADORES DE CICLO
Ufilice estosbotones para definir los aiustesdel ciclo
seleccionado. Losindicadoresluminososubicodos sabre
losbotones muestronla selecci6nactual.
O ICLO ESPECIAL Y BOTONES DE OPCI()N
Estosbotonesle permiten selecdonarciclosu opciones
especiales,
A
PANTALLA DE TIEMPO Y ESTADO
La pantalla muestro el estado del ciclo y el tiempo
restanteestimado.
NOTA: Para proteger susprendas, no todos los ajustes est6n disponibles para todas los selecciones de
ciclos.
44

MANEJO DE LA LAVADORA
Bleach
Detergent
POWER
_:_k _brl_ Wor_ H_h
S_ffener C_ _t_ N_m_J
........_ .................................]_=pJ LS_.J L_k_.J
Rilse _C_l
ASpin B to_k
START
PAUSE
O
O
O
O
CLASIFICACIONDE LASPRENDASY CARGADE LALAVADORA
Closifique los prendos por tipo de tela, nivel de suciedad, color y
tamafio de Io carga, segOnsea necesario.Abra la tapa y cargue
las prendas seleccionodosen Io lavadora.
PRODUCTODELIMPIEZA
Agregue detergente de alta eficiencia (HE)al dispensador de
detergente.
PRENDERLA LAVADORA
Presioneel bot6n POWERpora prender la lavadora. Losluces
alrededor de Io perilla del selector seiluminor6ny seemitir6 un
aviso sonoro.
SELECCIONARUN CICLO
Gire la perilo de_selectorde cicIo en cuctquier direcci6npara
seleccionarel ciclo que desee.MY CYCLE,DRAIN& SPINy CLEAN
WASHERseselecciononpresionando losbotones de opci6n. Se
mostrar6n losvalores predefinidos de temperaturode lavodo y
eniuague, velocidad de centrifugado, nivel de suciedad y losaiustes
de opci6n para dlcho ciclo.
SELECCIONARLOSMODIFICADORESDECICLOY LASOPCIONES
Si Io desea, ahora puede cambiar losajustespredeterminados del
ciclo seleccionado.Use losbotones modificadores de ciclo WASH
TEMP,SPINSPEED,SOILLEVEL.
NOTA: No todaslos opciones est6n disponibles para todoslos
ciclos. Sonar6 un aviso sonoro diferente y e_LEDno seencender6 si
no sepermite una determinada selecci6n.
INICIAR ELCICLO
Presioneel bot6n START/PAUSEpara que comienceel ciclo. La tapa
se bloquear6 y Io lavadoro se agitar6 brevemente sinogua para
medir el peso de la cargo.
LUZ PARA AGREGAR UNA PRENDA
La IuzADD A GARMENT seprender6alprincipiodelcicIode
lavadoparoindlcorque esseguroagregarm6s prendosa ia
cargo.Presioneelbot6nSTART!PAUSEparapausarelcicloy
agregar prendos a Io cargo.
NOTA: No serecomienda agregar prendasa menosque la luz ADD
A GARMENT est_encendida, ya que podria reducir el rendimiento
del lavado.
FIN DELCICLO
AI finalizar el ciclo, sonar6 un aviso sonoro. Retireinmediatamente
la ropa de la lavadora para reducir lasarrugas.
45

GUJA DE CICLOS
La siguiente guia de ciclosmuestra losoiustespredeterminodos, asi coma losopciones _ = Opci6n disponible
disppnibles y lostipos de teiidos recomendados para cada ciclo. Debaio del aiuste
predeterminadopara coda dclo, semuestran lOSaiustesmodificadores permitidos. = Ajuste predetermlnado
Normal Coton,chemises,jeans, Catiente
(normal soxs,pantalon Media ExtraMediaR6pidoMuysucio _ _ _ _
Frla Sincentrifugad0Ligero
Friadelgrifo
N
Whites ExtraRdpido
(blancas) Prendasblancas Tibia R6pid0 Normal _ _ _ _
Media Lento Ligero
Sincentrifugad0
HeavyDuty
(mucha Prendasdealg0d6nmuy Caliente ExtraR6pido
suciedad) sucias Media Media Normal _ _ _ _
Fria Lento Ligero
Friadelgrifo Sincentrifugad0
Sanitizew V_tementstr_ssates, ExtraR6pida
/Oxi ** telsquev_tementsde Media Normal _ _ _
travail,couches,etc. Lento Ligero
Sincentrifugad0
Prendasgrandescoma
cobe_oresy edredones
Bulky/
Bedding
(pre?das
v01umMosas
ydecama)
Caliente ExtraR6pido
Media Media Muysucio
Fria Lento Ligero
Friade!grifo SincentriflJgad0
Clean
Washer
*CERTIFICADOPORNSF:NSF: International (anteriormente,
National Sanitation Foundation, Fundaci6n Nacional de
Saneamiento),certifica que el ciclo de deslnfecci6n SANITIZE
reduce el 99,9% de las bacterias presentesen la colada y que
no setransmitir6 ninguna bacteria a la siguiente cargo.
I
Protocolo P172
Desempenode desinfeccionde lavadorasde ropa
residencialesy comerciatesde tamano familiar.
NOTA: Para proteger susprendas, no todas las temperaturas de lavado, velocidades de centrifugado, niveles de
suciedad y opciones est6n disponibtes para todos los ciclos. Sonar6 un aviso sonora y el LED no se iluminar6 si no
se permite una determinada selecci6n.
*La lavadora ajustar6 de farina autom6tica el tiempo de lavado para la cantidad de colada, presi6n del agua,
agua y dem6s condiciones de funcionamiento.
Estosciclos usan diferentes movimientos de lavado para optimizar el rendimiento de la limpieza o el cuidado
de las prendas. Losmovimientos de lavado pueden sonar de forma distinta en las cliferentes fases del ciclo de
lavado, Estoes normal.
46

GUJA DE CICLOS
Lasiguiente guia de cidos muestra losaiustespredeterminados,asi coma las opciones
disponibles y los tipos de teiidosrecomendados para cada cido. Debaio del ajuste
precleterminado para cada ciclo,se muestranlosajustesmodificadores permitidos.
@ -- Opci6n disponible
= Aiuste predeterrnlnado
ExpFess
Wash Ropaconpoca ExtraR6pido
(Lavado suciedadycargas Media Media Muysucio
expr_s) pequefias Fria Lento No,at
@ @ @ @
ColdClean
(Lavage6
froid)
Towels
(Serviettes)
DeepWash
Petiteschargesde
coton,lingedemaison, ExtraR6pido
chemises,draps,jeans, Media M_ys_io
chargesmixtes. Lento Ligero
Sincentrifugedo
Caliente ExtraR6pido
Serviettes Media Media Muys_io
Fr_a Lento Ligero
Friadelgrifo Sincen_ifugedo
Toallas,camisas, Caliente ExtraR6pido
s6banas,vaqueros, Media R6pido Muys_io
cargasmixtas Fria Lento Ligero
@
0
@ @
Friadelgrifo Sincentrifugado .....
Delicates Blusasdevestiry
(Prendas camisasdeetiqueta, Tibia R6pido @ @ @ @
delicadas) nylons,prendascon Media Media M_!s_io
enca]esomuyfinas Fria SincentrifugedoNormal
UltraWash Prendasdealgod6n ExtraR6pido
muysucias Media
Lento
Sincent;Hfuged0
NOTA: Para proteger sus prendas, no todas ias temperaturas de lavado, velocidades de centrifugado, niveles de
suciedad y opciones est(_ndisponibles para todos los ciclos. Sonar6 un aviso sonora y el LED no se iluminar6 si no
se permite una determinada selecci6n.
*La lavadora aiustar6 de farina autom6tica el tiempo de iavado para la cantidad de colada, presi6n del agua,
agua y dem(_scondiciones de funcionamiento.
Estosciclos usan diferentes movimientos de lavado para optimizar el rendimiento de la iimpieza o el cuidado
de las prendas. Los movimientos de lavado pueden sonar de forma distinta en las diferentes fases del ci¢lo de
lavado. Estoes normal.
47

| C_SIFICACI6N DELASCARGAS DE LAVADO
• No cargue prendas a trav_s de la tina. Si no se sigue
esta aclvertencia, podrian producirse fugas o daSosen los
tejidos.
• Use el ciclo BULl<Y/BEDDING (prendas voluminosas y
de coma) para los prendas fiotantes o no absorbentes,
como almohadas o edredones. Si no sesigue esta
advertencia, se pueden producir fugas.
• Si es posible, no lave la rope resistente al agua. Si debe
hacerlo, seleccione el ciclo de ropa voluminosa/ropa de
cama,
- Ejemplosde articulosa prueba de agua o resistente
al agua incluyen ciertostapetes para colch6n, fundas
para colchones,equipo para la Iluvia, equipo para
acampar, ropa para esquiar, equipo para exteriores y
articulos similares.
Agrupaci6n de prendas similares
Paraobtener los mejores resultadosal lavar y reduclr
los posibilidades de daBar los prendas, esnecesario
tener cuidado a lahora de dasificar la ropa en colaclas
formodas pot prendas similares. Si se mezclan diferentes
tipos de tejidos o niveles de suciedad, el rendimiento
del lavado sever6 degrodado, y podrlan producirse
transferendos de color o decoloraciones, daSos enlos
tejidos o formaci6n de pelusas en las prendas. Lostejidos
se deben clasificar en grupos tal como se describe a
continuaci6n.
Colores
Clasifique las prendes por color. Las prendas oscuras
juntas en una cargo separada de los prendas blancas
o de co!ores claros. Mezclar prendas oscuras con
prenclas claras puede dar como resultado el tinte o ia
decoloraci6n de las prendas m6s claras.
Nivel de suciedad
Lave la ropa muy sucia junta. Si se lava ropa que no est6
muy suciaen la misma colada que la ropa muy sucia,es
muy posible que la rope con poca suciedad no se lave
bien.
Tipo de _ido
Losprendas delicados no sedeben mezclar con prendas
m6s pesadas y resistentes.Laver prendas delicadas junto
con teiidos pesados puede causer da_os en los prendas m_s
delicadas. Si se lavan prendas pesadas en unacargo de
rope delicada, puede resultar que la ropa pesada nose lave
correctamente y que seproduzcen da_os en las prendas
delicadas.
Tipo de pelusas
Aicjunos tejidos atraen los pelusas mientres que otros
sueltan pelusas en el proceso de lavado. Evite mezclar
prendas recolectoras de pelusas con prendas cjeneradoras
de pelusas en la misma colada. Si mezcla estos dos tipos
de tejidos, se formar6n bolas y pelusasen los prendas
recolectoras de pelusas. (Por ejemplo, recolector de
pelusas: buzo de tejido o punto; productor de pelusas:
toalla de felpa).
Sort Laundry... _"_
by Colors I by Soil j by Fabric by Lint ! I
I t Whites IHeavy i Delicates Lint Producer I I
I t Lights I Normal Easy Care Lint Collector I I
'\.J Darks I Light Sturdy , LJ"
Etiquetas de cuidado de las prendas
Muchas prendas de vestir incluyen una etiqueto de
cuidado de la prenda. Utilice el siguientediogroma para
ajustar el ciclo y los opcionesparo cuidar Io prenda de
acuerdo con las recomendaciones del fabricante.
Fabric Care Labels
Mac.ioo
wash
cycle _._ _
Water O0 • O0 •
temperature _ _ _,®_
Bleach
Any bIe_ Only r_n-f;htorl_e bl_h D_ _ b_h
J
Cargo de la iavadora
• Compruebe que todos los bolsillos est6n vacios. Objetos
como clips, cerillas, boligrafos, moneclas y Ilaves pueden
da5ar tanto la lavadora como los prendas.
• Cierre cremalleras, broches y cordones pare evitar
enganches o enredos en otras prendas.
•Aplique un tratamiento previo alas 6reas muy sucias
para mejorar el resultado.
• Mezcle prendas grandes y pequeSas en la misma carga.
Cargue primero las prendas grandes.
•Las prendas grandes no deben ocupar m6s de la mitad
de la carga total de la colada.
• La lavadora se puede career completamente, pero la
tino no debe estar abarrotada con prendas. La tapa de
la lavadora sedeberia cerrar con facilidad.
• Pare evitar una colada desequiiibrada, no lave prenclas
Onicas.Agregue una o dos prendas similares ala
colada. Lasprendas grandes y voluminosas, como los
cobertores, edredones o colchas, deberian lavarse
individualmente.
• Lo lavadora no se Ilenar6 de ague ni funcionar(_ sila
tape est6 abierta.
NOTA: Use el ciclo pare prendos voluminosas y de coma
con
rope voluminosa como chaquetones rellenos, edredones,
almohadas, etc. Esposible que estas prendas no seen tan
absorbentes como otras prendas y deberian lavarse en
una colada independiente para lograr unos resultados
6ptimos.
Losprendas voluminosassedeben colocar Io m6s abajo
posible dentro de la tina para obtener losmejores resultados.
Coloque siempre losobjetos fiotantes en la porte inferior de
la tina.
Lo lavadora detector6 de forma autom6tica el tama5o
de la cargo. Debido al sistema de lavado de alta
eflciencia, es posible que el nivel de ague no cubra
completamente la carga de rope.
48

| ACERCA DE LOS DISPENSADORES
El dispensador autom6fico est6 compuesto de dos
compartimientos que contienen:
oSuavizante liquido.
° Detergente en potvo o liquido para el lavado
principal.
S
Compartimlento
principal de
detergente en poivo
para lavadora
Compartimiento
de suavizador
de tela liquido
Compartimiento
principal de
detergente ffquido
lavadora
Inserfo
Compartimiento del detergente del lavado
Este compartimiento contiene e] detergente para el ciclo
principaE del lavado. El detergente seagrega a la carga
al principio del ciclo. Utilice siempre detergente de alta
eficiencia (HE)con su lavadora. Se puede usar tanto
detergente liquido coma en polvo.
AI agregar el detergente,nunca exceda las
recomendacionesdel fabricante. Siusa demasiado
detergente, puede sucederque en lugarde diiuirsese
acumuleenla ro_ y enla lavadora.
Cuando usedetergente liquido, aseg0resede que el
recipiente para el detergente liquido y el insertoest6n en
susitio. No exceda la ffnea de Ilenado m6ximo.
Cuando usedetergente en polvo, retire el recipiente del
detergente liquido del compartimiento. El detergente
en polvo no sedispensar6 si el recipiente de detergente
ffquido est6 en el compartimiento.
Compartimiento del suavizante
Este compartimiento contiene el suavizante llquido, que
se dispensar6 de forma autom6tica durante el ciclo de
enjuague final.
AI agregar el suavizante,nunca exceda las recomenda-
clones
del fabricante. Si usa demasiado suavizante, puede
suceder que en lugar de diluirse se acumule en la ropa y
en la lavadora.
° AI agregar el suavi_nte, respetesiempre las
recomendaciones del fabricante. No exceda la linea de
!lenado m6ximo. El usade demasiado suavizante puede
manchar lasprendas.
° Diluya el suavizante concentrado con agua templada.
No exceda la linea de ilenado m6ximo.
• Nunca vierta el suavizante directamente en la carga o
dentro de la tina.
hquldo
%............ ,_,I
Compartimiento del blanqueador liquido
El dispensador del blanqueador es un compartimiento
independiente situado en la parte delantera izquierda de
la abertura de la tina. Estecompartimiento contiene el
blanqueador de clara liquido, que sedispensar6 de forma
autom6tica en el momenta adecuado durante el ciclo de
lavado. Cualquier llquido que haya en el dispensador al
final del ciclo ser6 agua, no blanqueador.
• No agregue blanqueador con protector de color liquido
o en polvo a este compartimiento. El compartimiento del
blanqueador est6 diseSado para dispensar 0nicamente
blanqueador de clara liquido. El blanqueador con
protector de color liquido o en polvo no se dispensar6
correctamente.
•AI agregar e! blanqueador, respete siempre las
recomendaciones del fabricante. Nunca agregue m6s
de un vasito y no exceda la llnea de Ilenado m6ximo ya
que eso podria provocar que el blanqueador se dispense
inmediatamente y daSe losteiidos. Usar demasiado
blanqueador puede daSar lostejidos.
• Nunca vierta el blanqueador de clara liquido sin diluir
directamente en la carga o dentro de la tina. Se pueden
producir da_os en el teiido.
• No utilice cloro decolorante ni productos de Oxi en el
mismo ciclo con el blanqueador liquido de cloro.
NO mezcle blanqueador con clara con
amoniaco o 6cidos, coma vinagre o productos
anti6xido o antiherrumbre.
La mezcla de productos quimicos de este
tipo puede generar gases letales, que pueden
ocasionar lesiones graves e inclusola muerte.
49

| USO DEL DETERGENTE Y DEL DISPENSADOR
Unas palabras sobre los detergentes
Losdetergentesde alta eficiencia (HE)generan menos
espuma y sedisuelven m6seficazmente para mejorar e_
rendimiento del lavado y del en]uacjue,adem6s de ayudar
a mantener limpio el interiorde la lavadora. Usar un
detergente que no esde alta eficiencia puede provocarun
excesode espuma y un rendimiento poco satisfactorio que
podr_andar como resultado c6digos err6neos,erroresde
ciclo y da_os a la m6quina.
Uso de suavizante y de dispensador de
Para agregar detergente, blanqueador y suavizante
aJ dispensador automatTco:
O Abra la gaveta del dispensador.
O Cargue los productos de lavado en el
compartimiento adecuado.
O Cierre la gaveta antes de comenzar el cicio.
Detergente Detergente
liquido en polvo
Para un rendimiento adecuado del lavado, mida
siempre el detergente usando tas medidas que
proporciona el fabricante del detergente,
La cantidad normal de detergente necesaria, para
las cargas habituales, esmenos de la 1/2del m6ximo
recomendodo. Usemenosdetergente siel agua esblanda,
la ropa tiene poca suciedad o las cargas son peque_as.
1"4uncause m6s de la cantidad m6xima recomendada por
el fabricante de1 detergente.
Disefiado para usar s61o
detergente de alta eficiencia (HE)
IMPORTANTE:Sulavadora est_ disefiadapara su uso
exclusivocondetergentes de alta eficiencia (HE).
Losdetergentes HEest6n formulados espedficamente
_ara lavadoras de alta eficiencia y contienenagentes
reductores de espuma.Cuando compre detergente, busque
siempre el simbolo HE,de alta eficiencia.
IMPORTANTE: No todos los detergentes son iguales.
Tenga cuidado con la cantidad de detergente que
use para evitar un uso excesivo, un maUen]uague y
la acumulaci6n de detergente en la ropa, adem6s,
la acumulaci6n de residuos puede contribuir a la
aparici6n de olores en la m6quina. NUNCA use un
recipiente o una bola distinta de la suministrada
pot el fabricante del detergente que est6 usando.
Nunca use m6s de la cantidad m6xima de detergente
recomendada por el fabricante.
Recuerde medir siempre la cantidad de detergente,
como los detergentes de alta eficiencia est6n
diseSados para este tipo de lavadoras, es necesario
tener cuidado al medir el detergente. Para la mayoria
de coladas normales, se debe usar entre 1/4y la 1/2del
recipiente o bola del detergente de alta eficiencia.
NOTA: Debe tener un extremo cuidado cuando use
detergentes concentrados 2X y 3X, ya que incluso muy
poca cantidad m6s puede contribuir a la aparici6n de
los problemas antes mencionados.
NOTA: Esposible que los detergentes denominados
como compatibles con alta eficiencia no proporcionen
resultados 6ptimos.
NOTA: Esnormal que al finalizar el cido haya una
pequefia cantidad de agua en los compartimientos del
blanqueador y del suavizante.
IMPORTANTE: No colaque ni almacene productos de
lavado, como detergente, blanqueador o suavizante
ffquido, encima de la lavadora o la secadora. Seque
los derrames inmediatamente. Estos productos pueden
da_ar la pintura y los controles.
Uso del dispensador de blanqueador iiquido
El dispensador de blanqueador, de forma autom6tica,
diluye y dispensa blanqueador con cloro liquido en el
momento adecuado del ciclo de lavado.
Compruebe las etiquetas de cuidado de las prendas
en busca de instruccionesespeciales.
O Con cuidado, vierta la cantidad de blanqueador
medida previamente directamente en el dispensador
de blanqueador. Si usa blanqueador en polvo de
alggn tipo, vi6rtalo directamente en la tina antes de
agregar la carga. Nunca agregue blanqueador en
polvo al dispensador de blanqueador I_quido.
• Nunca vierta el blanqueador con cloro iiquidosin
diluir directamente en ta ropa o dentro de la tina.
• No vierta blanqueador en polvo en el dispensador de
• blanqueador.
No coloque prendas encima del dispensador de
blanqueador al Ilenar o vaciar la lavadora.
• Siempre mida y vierta el blanqueador con mucho
cuidado. Cuando agregue el blanqueador al
dispensador,evite el sobretlenado y las salpicaduras. La
capacidad m6xima del dispensador de blanqueador
esuna taza de blanqueador pot cicto de lavado.
Elsobrellenado podrla dar como resultado que el
blanqueador sedispensede forma autom6tica.
5O

PANTALLA DE TIEMPO Y ESTADO
La pantalla de tiempo y estado muestra el tiempo estimado restante y el progreso del ciclo.
O
A
INDICADOR DE ESTADO DEL CICLO
Estos LEDse ituminancuando se selecciona un ciclo
para indicar las fases que se van a realizar. Cuan-
do un ciclo est6 en marcha, el LEDparpadear6
para la fase activa. Una vez completada la fase,
el LEDse apagar6. Si un ciclo est6 en pausa, el
LEDactivo dejar6 de parpadear.
O
TIEMPO ESTIMADO RESTANTE
Cuando se selecciona un ciclo, se muestra el tiempo
estimado para dicho cicio. Esetiempo puede
cambiar a medida que se agregan opciones o si
se modifican los ajustes. Una vez se pulsa el bot6n
START/PAUSE, la lavadora medir6 el tama_o de la
carga. El tiempo estimado que se muestra puede
cambiar si el control modifica el ciclo debido al
tama_o de la carga.
NOTA: El t_empo que se muestra es s61ouna
estimaci6n. Este tiempo est6 calculado en base a
condiciones normales de funcionamiento. Algunos
factores externos (tama6o de la carga, temperatu-
ra de la habitaci6n, temperatura del agua entran-
te, etc.) pueden afectar al tiempo real.
51

BOTONES MODIFICADORES DE CICLO
Cada ciclo dispone de ajustes predeterminados que
se seleccionan autom6ticamente. Tambi_n puede
personalizar estos ajustes utilizando los botones
modificadores de ciclo. Presione el bot6n del
modificador deseado hasta que se prenda la luz
indicadora del ajuste deseado. La lavadora ajustar6
de forma autom6tica el nivei de agua para et tipo
y tama_o de la carga que lavar para obtener los
mejores resultados y la m6xima eficiencia. Debido
a la naturaleza de alta eficiencia de este producto,
los niveles de agua pueden set mucho menores de
Io esperado. Esto es normal y el rendimiento de la
limpieza y el enjuague no se ver6 afectado.
NOTA: Para proteger sus prendas, no todas las
temperaturas de Ic_vado/enjuague, velocidades de
centrifugado, niveles de suciedad y opciones est_n
disponibles para todos los ciclos. Sonar6 un aviso
sonora y el LEDno se iluminar6 si no se permite una
determinada selecci6n.
Hot
Warm
Cool
Cold
Tap Cold
Extra High
High
Medium
Low
No Spin
Normal
Light
Soil
O WASH TEMP (temperatura clel agua)
V4ASH TEMP selecciona la combinaci6n de
temperaturas de Uavado y enjuague para el ciclo
seleccionado. Presione el bot6n WASH TEMP hasta
que se prenda la luz de1 indicador para el aiuste
deseado.
• Seleccione la temperatura del agua deseable
para el tipa de carcja que va a lavar. Para
obtener los mejores resultados, siga las
instrucciones de las etiquetas de cuidado de las
prendas.
• Losenjuacjues frios usan menos energia. La
temperatura real del enjuacjue frio depende de la
temperatura del agua fria de la Ilave.
O
O
SPIN SPEED (velocidad de centrifugado)
Las velocldades de centrifugado m6s attas extraen
mrs agua de la ropa, Io que reduce el tiempo de
secado y ahorran energia.
Presione el bot6n SPIN SPEEDhasta que seleccione
la velocidad deseada. Algunas telas, coma ias
prendas delicadas, requieren una velocidad de
centrifugado m6s lenta. Para proteger su ropa,
no todas las velocidades de centrifugado est6n
disponibles para todos los ciclos.
SOIL LEVEL(nivel de suciedad)
Cuando se ajusta el nivel de suciedad, se modifica
el tiempo del ciclo y/o las acciones de lavado.
Presione el bot6n SOIL LEVEL hasta que seleccione
el nivel de suciedad deseado.
52

BOTONES DE OPCI6N
La lavadora inctuyevaries opciones adicionales
pare daptar losciclosa susnecesidades particulares.
O Prenda la lavadora (posici6nON) y gire la perilla del
selector pare seteccionar el ciclo deseado. Si despu_s
de seleccionar losopciones semodifica la selecci6n
del cido, redes los aiustescambiar6n a losajustes
predeterminados del nuevociclo.
Uselos botones modificadores de cido pare configurar
losaiustespara eseciclo.
Presionelos botonesde opci6n de ciclo pare los
opcionesque desee agregar. El bot6n seprender6
cuando seleccionela opci6n. Sila opci6n seleccionada
no se permite pare el ciclo seleccionado,el aviso
sonorosonar6 dosvecespara alertarle y el LEDno se
iluminar6.
O Presioneel bot6n START/PAUSEpare iniciarel
ciclo.Trasuna breve demora, la tapa setrabar6 y
comenzar6 el ciclo.
NOTA:
• Pare proteger susprendas, no redes los opcionesest6n
disponibles para redes losciclos.
• Si nose presionael bot6n START/PAUSEen cuatro minutes
para iniciar el ciclo, el control seapagar6 y seperder6n
todos losajustes.
ACCELA WASH
At a_adlrse ta opci6n ACCELA Vv'ASHsereduce
el tiempo del ciclo, pare se iogran resultados
similares al mismo ciclo sin ACCELA WASH.
STAIN BOOST
Useesta opci6n para ropa muy suciaqua neceslta
un tratamiento especial pare los manchas.Cuando
seseleccionaStain Boosbel ciclo de lavado
comienzacon agua templada pare ayudar a evitar
qua no sedesprendan ciertos tipos de monchos.De este
mode, seg0navance el ciclo, seaumentar6 gradualmente
la temperatura del ague pare eliminar los manchasqua
requieren tratamientos contemperaturas m6s altos.
NOTA:
• Losmejores resultesdosseobtienen con cerges m6s
pequeSes(menosde treskg.)
• Si seleccionaStain Boostle opci6n Save Energy+ no est6
disponibte.
EXTRA RINSE (enjuague extra)
Esta opci6n agregar6 un eniuague extra
al ciclo seleccionado. Use esta opci6n para
asegurarse de la total eliminaci6n de los
residues de detergente o blanqueador de
los telas. El suavizante iiquido, si se usa, siempre se
dispensa en el enjuague final.
NOTA: No se puede seleccionar la opci6n EXTRA
RINSE con el ciclo RINSE & SPIN.
WATER PLUS (Agregue el agua)
_ tilice esta opci6n sidesea agregar m6sagua a su
carga de lavado. Estaopci6n es especiaimente 6til
pare cargas grandes o volumlnosas.
ADD A GARMENT (agregar una prenda)
La luz ADD A GARMENT seprender6
durante le primera fase del ciclo de
lavado para indicarqua esseguro
pausar el ciclo para egregar m6s prendes. Cuando se
apague la luz ADD A GARMENT,no sedeber6 agregar m6s
rope ala carga. Si Io hece, esposible que el rendimiento
no sea satisfactorio ya qua la lavadora no realizer6 las
compensacionesnecesariaspare les prendas adicionales.
Presioneel bot6n START/PAUSE la lavadorepara poner
en pause.
O Abra la tape cuando sedestrabe.
O Agregue las prendas adicionales.
O Cierre la tapa.
O Presioneel bot6n START/PAUSE.El ciclo continuar6
luego de que setrabe la tepa.
CHIME (aviso sonoro)
Chtme_1 Presi6nelorepetides vecespare ajustar el volumen
l o _,_o, del aviso sonora.Eleviso sonar6 con el nuevo
volumencon cada presi6n del bot6n. Cuando no
seoiga ning_naviso sonoro,sedebe a qua est6 desactivado.
Losajustesde volumen sonLOW (bajo) - HIGH (alto)- OFF
(desactivado).
53

BOTONES DE OPCION
FABRIC SOFTENER (suavizante)
EIsuavizante sedistribuye en el enjuague final. Esta
lavadora est6 diseF,ada para ahorrar agua en el
enjuague mediante el usade un sistemade en]uague
con rociado a chorro en losciclos NORMAL/CASUAL y
HEAVYDUTY.Presioneel bot6n FABRICSOFTENERpara
cambiar el en]uague final de enjuague con rociado al
enjuague normalpara que e_suavizante seam6s eficaz.
NOTA: Seleccione la opci6n FABRICSOFTENERo EXTRA
RINSEsi seusasuavizanteen _oscicios NORMAL/CASUAL
y HEAVYDUTYSi no seiecciona unade estasopciones,se
reducir6 enormementela efectividad del suavizante.
MY CYCLE (mi ciclo)
My I Elbot6nMY CYCLEle permite guardar unciclo
t * cycae de tavado personalizadopara utilizarloen otro
momenta.Deestamanera,podr6 guarder sus
ajustesfavoritosde temperature,velocidad de centrifugado,
nivelde suciedady dem6sopcionespare uncic!oy, m6s
adeiante,recuperarloscans61opresionarun bot6n.
NOTA: $61opuede guardar un ciclo a _avez. AI mantener
presionado el bot6n MY CYCLE,sesobrescribir6 cuaiquier
cicio previamente guardado.
Paraguardar un ciclopersonalizado:
O Presioneel bot6n POVCER la lavadora.pare
prender
O Gire la del selector de ciclo seleccionar
perilla para
el clclo que desee.
O Presioneel bot6n de MODIFICADOR DECICLO pare
cambiar el aiuste deseado.
O Presloneel bot6n de DECICLO pare agregar
OPCION
lasopciones deseadas.
O Mantenga presionado el bot6n MY CYCLE.
Pararecuperarun ciclopersonalizado:
O Presioneel bot6n POWER la lavadora.
prender
pare
O Presioneel bot6n MY CYCLE.Semostrar6n los
ajustes
guardados.
Presioneel bot6n START/PAUSEpara que comience
_el cic:lo.
NOTA: El ciclo personalizado sepuede ajustar de la misma
manera que cualquier otro ciclo. No obstante, una vez que
sepresiona cualquier otto bot6n, el LEDseapagar6 para
indicar que los ajustesya no coinciden exactamente con los
del ciclo personalizado.
SOAK (remojo)
Estaopci6n proporciona un remojado previo
max 180 minutosantes de que comienceel ciclo
seleccionado. Usela opci6n SOAK para remoiar
previamente las prendas conel fin de eliminar las manchas
dificiles de las prendas. AI final del tiempo de remoio, el
ciclo seleccionado comenzar6 con la mismaague usada
para el remoio.
DELAY WASH (lavado demorado)
I OeJayI Despu_sde seleccionarel ciclo y lOSdem6s
• Wash ajustes,presioneeste bot6n para demorar el
iniciodel ciclo de lavado. Coda presi6ndeLbot6n
aumenta unahare al fiempo de demora, as{hasta 19horas.
Unavez establecido el fiempo de demora, presioneel bot6n
START/PAUSEpara que comiencea correr el tiempo de
demora.
NOTA: Si no se presionael bot6n START/PAUSEpara que
comience a correr el fiempo de retraso,la lavadora se
apagar6 de farina autom6tica al cabo de cuatro minutos.
RINSE & SPIN (aclarado y centrifugado)
Utilice esteciclo para obtenerun enjuagueintenso
seguido de un centrifugado a alta velociclad, Puede
cambiar la velocidad del centrifugado pulsando los
baton SPiNSPEED.
O Presioneel bot6n START/PAUSEpare prender la
lavadora.
O Presioneel bot6n RINSE& SPIN.
seleccionar ta opci6n NO SPIN.
O Presioneel bot6n START!PAUSE.
CONTROL LOCK (bloqueo de los controles)
I_Co,t_o_I Ufiliceestaopci6nparedeshabiiitarloscontroles.Esta
imm_kL=,,] funci6nimpideque losniSoscambienloscicloso manejen
la m6quina.Unavezacfivadoel bloqueode loscontroles,
esnecesariodesactivarloantesde quesepuedausercualquierade
loscontrotes,exceptoel bot6nde atimentaci6n.Unavezapagada la
lavadora,el bot6nde alimentaci6npermitir6prenderla m6qulna,
pero loscontroiescontinuar6nbioqueados.Cuandoloscontroleses-
t6nbloqueados,el mensaje[L aparecer6alternativamentejuntocon
e!tiempoestimadorestante.MantengapresionadoeJbot6nRINSE
& SPINdurontecincosegundospare activaro desactivarel bloqueo
de loscontroles.
FUNCION DE DRENAJE ESPECIAL
Estalavadoraest_equipadaconunafunci6nespecial
diseSadaparequesulavadoraseaIom6sseguraposible.
Sila lavadoraentraenpausao seapagamientrasa6nhayaguaen
la tina,elaguasedrenar6transcurridosvariosminutos.Estoayudaa
protegera losniSosya quereducelaposibilidaddequequedeague
enla tlna.Latavadarasepuedereiniciarencualquiermomentaantes
de quecomienceel drenaje.
Si noserealizaningunaacci6n,aparecer6e!c6digode error dr"
y sedrenar6el aguadetatina. Encuantola lavadoracomience
ei procesode drenaje,sedeshabiiitar6nloscontrotesy nose
podr6interrumpirel procesodedrenaje.Cuandosehayadrenado
completamenteel ague,la lavadoraseapagar6.
NOTA:Enel pocoprobablesupuestodequela lavadorapresente
unproblemaquecausequesemuestreunc6digodeerroren
pantalla_la lavadoraaOnasidrenar6transcurridosvariosminutos.Sin
embargo,s6!osemostrarael c6digodeerrororiginal.
54

Parareducirelriesgodeincendio_descargael_ctricaolesionespersonales,leay cumplacompletamente
estemanualdeusoy cuidado,incluyendolasinstruccionesimportantessobreseguridad,antesdeponerenfuncionamientola lavadora
• Desenchufelalavadoraantesdeprecedera sulimpiezaparaevitarposiblesdescargasel_ctricasSinosesigueestaadvertencia,
podrianocasionarseriesgosde lesionesgraves_incendio,descargael_ctricao,incluso,muerte.
' NoutUicenunca_uctos quimicosflJertes,limpiadoresabrasivoso€lisolventes10amlimpiarlalavadoraDa_ar6nelacabado
LIMPIEZA REGULAR
Limpieza del exterior
Unoscuidados adecuados prolongar6n la vida 6til de la
lavodora. Puede limpiar e! exterior de la m6quina con agua
coliente y un detergente dom_stico suave y no abrasivo.
Limpie inmediotamentecualquier derrame con un paso
suave y hOmedo.
IMPORTANTE:No utilice alcoholes de limpieza, disolventes
ni productos similares.No utilicenuncalana met61icani
limpladores abrasivos; pueden da_ar la superflcie.
Cuidado y limpieza del interior
Useuna toalla o un trapo suave para limpiar alrededor
de la abertura y del cristal de la tapa de ta lavadora.
Siempre saque los prendas de la lavadora en cuanto se
complete el clclo.Dejar prendas h_medasen la lavadora
puede ocasionar la aparici6n de arrugas, transferencias
de color y olores. Utilice el ciclo CLEANWASHERuna vez
al rues,o m6s a menudosi esnecesario, para eliminar la
acumulaci6nde detergente y dem6s residuos.
Ciclo de limpieza de la lavadora
OSaque toda la de la tina.ropa
O gregue blanqueador conclorollquido uotro limpiadorde
tinasdise_adoespec_ficamentepara limpiar _avadoras.
Siusablanqueadorconcloroliquido
Agregueblanqueadorconctoro liquido al compartimiento
de!blanqueador.
NOTA:Agregue unataza de b_anqueadorliquido.No exceda
la linea de Ilenado m6ximoy novierta blanqueador Iiquidosin
dituir directamenteen latina.
Siusalimpiadores enpoivo
Retirela taza dedetergenteliquido y agregueel limpiador
en polvoal compartimientode lavado principalde la
gaveta del dispensador.
Siusaun limpiador entabletas
Ingresela tabletadirectamenteenla tina
NOTA:
• No ingreseel limpiador entabletasen la gaveta del
dispensador.
• No acjreguedetergentenisuavizantea la gaveta del
dispensadorcuandousela opci6nCLEANWASHER.
Cierrela el bot6n POWER encender
tapa Ypresione para
la lavadora. Presioneel bot6nCLEANWASHER,y bego
presioneel bot6nSTART/PAUSEpara inlciarel ciclo.Si
seleccionacualquierotro ciclodespu_sde seleccionarCLEAN
WASHER,bar6 quesecance[eel clcloCLEANWASHER.
Cuandoflnalice elcicb, abra la tapa y deje que el interior
de la tina sesequecompletamente.
NOTA:Utilice el ciclode LIMPIEZADELALAVADORAuna
vezal mes.Sipercibeolor a humedado moho,utilice el ciclo
de limpiezade la tavadorauna veza la semanadurantetres
semanasconsecutivas.
Almacenamiento de la lavadora
Si no se va a usar la lavadora durante un periodo
prolongado y se encuentra en una zona de inviernos
rigurosos, realice los siguientes pasos para proteger la
lavadora de cualquier alamo.
Cierre el suministro de agua.
Desconecte las mangueras del suministro de agua y
drenaie el agua contenida en las mangueras.
Enchufe el cable de alimentaci6n a una toma de
corriente conectada a tierra adecuadamente.
O Agregue 3,5 litros de anticongelante no t6xico de tipo
RVen la tina vacia y cierre la tapa.
Presioneel bat6n POWER y luegopulseel bot6n DRAIN
& SPIN.Presioneel bot6n START/PAUSEpara activar
la bomba de desag6e. Deje que la bomba de drenaje
funcione duranteunminuto y luego presioneel bot6n
POWER para apagar la lavadora. Estoexpulsar6 parte
del anticongelante, dejando el suficiente para proteger la
lavadora.
Desenchufe el cable de alimentaci6n, el interior
seque
de la tina con un trapo suave y cierre la tapa.
@
Retire los insertosdel dispensador. Drene el agua de
los compartimientos y d_ielos secar.
O Almacene la lavadora en posici6n vertical.
O ara extraer el anticongeiante de la iavadora tras el
almacenamiento, ejecute un ciclo DELAVADO EXPRES
completo usando detergente. No agregue ropa a este
ciclo
Eliminaci6n de la acumulaci6n de minerales
Si vive en una zona donde el agua es dura, se pueden
format dep6sitos de minerales en los componentes internos
de la lavadora. Se recomienda usar un descalcificador en
zonas con agua dura.
Use undesincrustante, como Washer Magic ®, para
eliminar la acumulaci6n visible de minerales. Despu_sde
desincrustar, ejecute siempre un ciclo CLEAN WASHER
antes de proceder a lavar ropa.
Losdep6sitos minerales y dem6s manchas se pueden
eliminar de la tina de acero inoxidable usando un
limpiador para acero inoxidable. NO utilice nunca lana
met61ica ni limpiadores abrasivos.
Deje la tapa abierta
Si no va a usar la lavadora en varios dias,deje la tapa
abierta durante la noche para permitir que se sequela
tina.
55

MANTENIMIENTO
Limpieza de los filtros de entrada de agua
Si la lavadora no se Ilena correctamente, en la pantalla
aparecer6 un mensaje de error. Las pantallas del filtro
de la v61vula de entrada podrlan estar taponadas pot
dep6sitos de agua dura, sedimentos en el suministro de
agua u otros residuos.
NOTA: Las pantallas de entrada protegen las partes
delicadas de la v61vula de entrada para que no
vean da_adas por partlculas que podrian ingresar en
las v61vulas con el suministro de agua. Si se quitan
estos filtros y se utiliza la lavadora, la v61vula podria
quedarse atascada abierta Io que ocasionaria una
inundaci6n y/o dafios en la propiedad.
/
Ffftro de
entrada
@
O Cierre las dos Ilaves de acJua
completamente.
Desatornille las tuberias de agua caliente y fr_a de
la parte posterior de la lavadora.
IMPORTANTE: SOLO use las mangueras de entrada
suministradascon KENMORE. Lasmangueras
comerciales no tienen garantfa de que se ajusten o
funcionen correctamente. Otras mangueras puede que
no se aprieten correctamente y ocasionen fugas. Los
da_os subslguientes a los productos o la propiedad no
quedar6n cubiertos de acuerdo con los t_rminos de la
garantia del producto.
O
@
O
Con cuidado retire los filtros de las v61vulas de
agua y p6ngalos a remojo con vinagre o con un
removedor de sarro, siguiendo las instruccionesdel
fabricante. Tenga cuidado de no da_ar los filtros
durante la limpieza.
Enjuague abundantemente antes de volver
a instalarlos. Presione sobre los filtros para
colocarlos en su sitio.
Antes de volver a conectar las mangueras, deje
correr varios litros de agua por las mangueras y
tuberfas de agua en un cubo o un desagLie.
56

LIMPIEZA DE LA LAVADORA
Uso adecuado del detergente
Usar demasiado detergente esuna de lascausashabitualesde los problemas de lavanderia, Losdetergentes actuales
est6n formutados para sereficaces sinespuma visible. AsegOresede leer y cumplir los recomendaciones del fabricante
acerca de cu6nto detergente usar en el lavado. Se puede usar menos detergente si el agua es blanda, la carga de ropa
es peque_a o tiene poca sucieclad.
NOTA: Use s61octetergentes de alta eficiencia y poca espuma. Podr6 identificar estos detergentes por el Iogotipo
HE.
Cuidado y iimpieza de la lavadora
f
1
Tapa: Limpiecon un trapo hgmedoel exterior y el interiory,
a continuaci6n, sequecon untrapo suave.
Exterior:Seque losderramesinmediatamente,Limpiecon
untrapo hOmedo.No toque la superficiede la pantalla con
objetos punzantes.
Mudanza y almacenamiento:Solicite a un t_cnico de
mantenimiento que saqueel agua de las manguerasy de la
bomba de drenaje. Vuelvaa colocar el bloque de espuma
de la tina para protegerla lavadora durante la mudanza.
No almacene fa lavadora donde pueda estar expuestaa la
intemperie.
Vacaciones largas: Aseg_resede que el suministrode
agua est6cortado en las Ilaves.Siga las instrucciones
sila lavadora va a estar expuestaa temperaturas de
congelaci6n.
Gaveta del dispensador:El detergentey el suavizante
puedenhaberseacumulado en la gaveta del dispensador.
Extraiga la gaveta y los insertosy compruebe si hay
acumulaciones una o dosvecesporrues.
O Saque la gaveta tirando de ella hasta que se
detencja. Levante la porte delantera de la cjaveta y
s6quela completamente.
0
Retire los insertos de los dos compartimientos.
Enjuague los insertosy la gaveta con agua templada
para diluir los acumulaciones de productos de
tavanderia.
O Para limpiar la abertura de la gaveta, use un cepillo
peque_o que no sea met6tico para limpiar el hueco.
Elimine todos los residuos de la parte superior e
inferior del hueco.
O Vuelva a instalar los insertosen los compartimientos
correspondientes y vuelva a colocar la gaveta.
Coloque la gaveta en la abertura en 6ngulo como
se muestra en la siguiente imogen y luego b6jela y
desllcela en susitio.
57

Si experimenta algOn problemo con la lavadora, podr6
transrnitir datos o trav_s del tel_fono con el equipo
Kenmore Connect. Asi podr6 hablar directamente con
nuestros t_cnicos especializados. El t_cnico grabo los
datos transmitidos desde la m6quina y los utiliza para
anolizor el problema, ofreciendo un diagn6stico r6pido
y eficaz.
Si experimento prob_emoscon Io lavaclora, Ilame al
1-800-4-MY-HOME:_. $61o utilice el sistema Kenmore
Connect cuando se Io pida el equipo de Kenmore
Connect. Los sonidos de transmisi6n que oir6 son
normoles y suenan de forma parecido a un equipo de
fclx,
t<enmore Connect no se puede octivar o menos que
la lavadora se enciendo pulsado el bot6n POVVER,
Si Io lavodoro no se puede encender, Io soluci6n
de problemas deber6 Ilevarse a cobo sin utilizor
Kenmore Connect.
Uso del sistema Kenmore Connect TM
Primero, comuniquese al 1-800-4-MY-HOME® (1-800-469-4663). Si el nOmero del tel_fono que est6 utilizando est6
en eWarchivo, y se asocia con la lavadora, usted set6 retransmitido r6pidamente a un agente de1 equipo Kenmore
Connect. Siga las instrucciones del t6cnico y siga estos pasos cuando se le solicite.
MANTENGA el micr6fono del tel_fono sobre el bot6n de ENCENDIDO, cuando el centro
de ilamadas se Io solicite, a no m6s de 2,5 cm (pero sin tocar) la m6quina.
NOTA: No pulse ningOn otro bot6n ni gire el mando del selector de ciclo,
MANTENGA PULSADO el bot6n de WASH TEMP mientras sigue sujetando el tel_fono
sobre el bot6n POWER.
ESPEREA ESCUCHAR tres pitidos. Tras escuchar los tres pitidos, suelte el bot6n de WASH
TEMP.Mantenga el tel_fono en su sitio hasta que haya terminado la transmisi6n de tonos.
Esto tarda unos6 segundos yen la pantalla aparecer6 el recuento de tiempo. Una vez
finalizada la cuenta atr6s y cuanclo los tonos se hayan detenido, reanude su conversaci6n
con el t_cnico que le podr6 ayudar a utilizar la informaci6n transmitida para el an61isis.
NOTA:
• Para obtener mejores resultados, no mueva el tel_fono mientras se est_n trasmitiendo los
tonos.
• Si el agente del centro de Ilamadas no puede grabar con precisi6n los dotos, quiz6 le
pida que Io intente de nuevo.
58

SONIDOS NORMALES QUE SE PUEDEN ESCUCHAR
Los siguientes sonidos se pueden ofr mientras la lava-
dora est6 en funcionamiento. Son ruidos normales,
Clics:
Rel_ del bloqueo de la tapa cuando la tapa se traba
y destraba.
Rociaclo o sibiiante:
Agua roci6ndose o circulando durante el ciclo.
Zumbido o borboteo:
La bomba de drenaie bombeando agua desde la
lavadora durante un ciclo.
ANTES DE SOLICITAR ASISTENCIA TECNICA
Su lavadora est6 equipada con un slstema autom6tico de monitorizaci6n de errores para detector y diagnosticar
problemas en una fase temprana. Si tu lavadora no funciona correctamente o no funciona en absoluto, comprue-
be io siguiente antes de Ilamar al servicio t_cnico:
Ruldo Obietos extrafios, coma Ilaves, monedas, o Detenga ta lavadora, compruebe la tina y el filtro de drenaie en
met61ico y de imperdlbles, pueden estar en la tlna o en la busca de obietos extrafios. Si despu_s de reiniciar la lavadora el
traqueteo bgmba ruido c0ntin_9, !!ame 9! servici0.
Sonido de
Ruido de
vibraci6n
Fuga de
agua
Los cargas de prendas pesadas pueden
_roducir un sonido de golpes.
Esposible que la carga de la lavadora
est_ desbalanceada.
No se han retirado todos los materiales del
embalaje.
Esposible que la carga de lavado no est_
uniformemente distribuida en la tina.
No todas las paras niveladoras se
encuentran apoyadas firmemente en el
_iso.
El piso no es to suficientemente rigido.
La conexi6n de los mangueras de agua
no est6 bien encajada en la Ilave o en la
lavadora.
Los tuberias de drenaje de la casa est6n
taponadas.
La manguera de drenaje se ha salldo del
drenaie o
no est6 insertada Io suficiente.
Una prenda grande, coma una almohada
o un cobertor, est6n sabre la porte superior
de la tina.
Esta es normal. Si el sanido continOa, es posible que la lavadora
est6 desbalanceada. Det_,ngala y redistrlbuya ta cargo de
lavado.
Pause el ciclo y redistribuya la carga despu_s de que la tapa se
destrabe.
Consulte la secci6n DESEMPAQUETADO Y DESEMBALAJE DEL
MATERIAL DE TRANSPORTE en los requisltos de instalaci6n.
Pause el ciclo y redlstribuya la carga despu_s de que la tapa se
destrabe.
Consulte la secci6n Niveiaci6n de la lavadora en tas Instrucciones.
Aseg0rese de que el piso sea s61ido y no ceda. Consulte la
secci6n Tipo de piso en Requisitos de instalaci6n.
Compruebe los mangueras en busca de fugas, grietas y rupturas.
Compruebe y apriete los conexiones de las mangueras.
La lavadora bombea agua muy r6pidamente. Compruebe si
durante el drenaie, el agua vuelve hacia atr6s y se sale de la
tuberia de drenaie. Si ve agua saliendo del desagiJe, compruebe
que ia instalaci6n de la manguera de drenaie es correcta y
busque si hay alg0n tapanamiento en el desagL_e_P6ngase en
contacto con unplomero para reparar la tuberia de drenaje.
Amarre la manguera de drenaje a la manguera de entrada o
a una tuberia fija para impedir que se pueda salir durante el
drenaje. Deberla estar insertada al reborde en los tuberias de
drenaje m6s pequefias o el reborde deberfa estar insertado entre
3 y 5 centimetros en la tuberia de drenaie.
Use el ciclo BULKY/BEDDING para las prendas grandes o
voluminosas. Tenga mucho cuidado y nunca lave m6s de la mitad
de la carga con prendas que fiotan, coma los almohadas.
Pare la lavadora y compruebe la carga. AsegOrese de que la
cargo no sobrepasa la porte superior de la tina.
La lavadora no se ha descargado
inmediatamente.
La lavadora est6 sobrecargada.
Los mangueras de entrada de agua fria y
caliente est6n invertidas.
Siempre saque las prendas de la lavadora en cuanto secomplete
el ciclo.
La lavadora se puede cargar completamente, pero la tina no
debe estar abarrotada con prendas. La tapa de la lavadora se
deberia cerrar con facilidad.
El eniuague con agua caliente puede hacer aparecer arrugas en los
prendas, Compruebe las conexiones de los manguems de entrada.
59

ANTES DE SOLICITAR ASISTENCIA TECNICA (continuaci6n)
Exceso de espuma
Manchas
Demasiado detergente o detergente
inadecuado.
El b{anqueador o el suavizante se hart
distribuido demasiado pronto.
El blenqueador o el suavlzante se han
agregado directamente ala carga
de lavado en la tina.
Losdetergentes HEest6nformulados especiflcamente
para lavadoras de aite eflciencia y contienen agentes
reductores de espuma. Utilice s61odetergentes con
el Iogotipo de effa eficiencia (HE).Para informaci6n
sobre lascentidades de detergente, consultela secci6n
Instrucciones.
El compertimiento del dispensedor se ha
sobrellenado Io que ha ocasionado que ei
blanqueador o el suavizante se distribuyan
inmediatamente. SIEMPRE mida el blanqueador
para evitar el sobrellenado - una taza a] m6ximo.
Le geveta del dispensador se cerr6 demesiedo
r6pido provocando que el suavizante se
distribuyera inmediatamente.
Use siempre los dlspensadores pare asegurarse
de que los productos de iavander_a se distribuyen
correctamente en el momento adecuado del ciclo.
La lavadora no se descarg6 Siempre saque ]as prendas de ia lavadora Io
inmediatamente, antes posible en cuanto se complete el ciclo.
La ropa no se agrup6 correctamente. Siempre lave los colores oscurosseparados de los
coloresclaros y ios blancospare evitar la decoloraci6n.
Nunca lave prendas con mucha suciedad junto con
arras con poca suciedad.
La lavadora no se prende.
NOTA: Si la lavadora se
detiene durante un ciclo
debido a una interrupci6n
en el suministro el6ctrico,
la lavadora continuer6 el
el suministro.
El cable de alimentaci6n no se ha
enchufado de forma adecuada.
Se ha fundido el fusible, ha saltado el
disyuntor o se ha producido un carte
de suministro el_ctrico en la vivienda,
Se ha fundido el fusible, ha saitado
el disyuntor, debido ala conexi6n
de varios eiectrodom_sticos en una
misma toma de corriente.
Aseggrese de que el enchufe est6 correctamente
enchufado a una toma de corriente de 120 V de
CA, 60 Hz y tres clavijas con toma de tierra.
Reinicie el disyuntor o susfituya el fusible. No
aumente la capacidad del fusible. Si el problema
es una sobrecarga del circuito, haga que Io
solucione un electricista cualificado.
Reinicie ei disyuntor o sustituyeel fusible. Si hey
m6s de un electrodom_stico conectedo ala tome
de cordente, Hame a un eiectricista para que ie
instele un circuito adicional.
El ciclo de lavado tarda La lavadora aiusta de forma Esto es normal La iavadora ajusta el tiempo
m6s de Io normal autom6tica el tiempo de lavado en de dclo de forma autom6tlca pare brindar los
funci6n de Eacantidacl de rope pare resultados 6ptimos para el cicto seleccionado. El
laver, la presi6n del agua y dem6s tiempo restante que se muestra en la pantalia es
condiciones de funcionamiento, s61ouna estimaci6n. El tiempo real puede varlet.
Olor a humedad o moho en
la lavadora
Se ha estado usando demasiado
detergente o un detergente
inadecuado.
El interior de ia tina no se lav6
correctamente.
Exceso de espuma de detergente.
Fugas de agua
Use s61o detergente de alta eficiencia (HE) de
acuerdo con las instrucciones del febricante.
Ejecute el cicle de limpleza, CLEAN WASHER, con
regularidad.
El exceso de espuma puede provocar fugas, y
puede estar ocasionado por el tipo y la cantidad
de detergente usedo. _lo serecomienda el uso de
detergente de aIte eficiencia. Aseggrese de que
el detergente y cualquier aditivo seagregan a los
compartimientos adecuados del dispensador. La
cantidad de detergente normal que se debe user est6
entre una V4parte y la _/_de la cantidad m6xima
recomendada por el fabricante del detergente.
Siempre reduzce le cantidad de detergente si la carge
espeque_a o tiene paca sucieded, o si el ague es
muy blanda. Nunca usem6s de ia cantidad m6xima
recomendade por el fabricante del detergente.
6O

ANTES DE SOLICITAR ASISTENCIA TECNICA (continuaci6n)
La lavadora no
funciona
La lavadora no
se Ilena de agua
correctamente
El panel de control se ha apagado debido a
la inactividad.
La lavadora est6 desenchufada.
El suministro de agua est6 cerrado,
Los controles no est6n ajustados
correctamente,
La tapa est6 abierta
El disyuntor ha saltado o el fusible se ha
fundido.
Se debe reiniciar el control.
No se presion6 START/PAUSE despu4s de
ajustar un ciclo.
La presi6n del agua es extremadamente baja.
La lavadora est6 demasiado fria.
El filtro est6 taponado.
Las mangueras de entrada pueden estar
retorcidas
Eficiencia energ4tica.
Insuficlente suministrode acjua.
La tapa de la lavadora est6 abierta.
Las mancjueras de entrada de agua fria y
caliente est6n invertidas.
El nivel de agua est6 demasiado bajo.
Estoesnormal.Presioneel bot6n POWERpara
prender la lavadora.
Aseg6rese de que el cable est6 correctamente
enchufado en una toma de corriente que funcione.
Abra completamente las dos Ilaves de agua fria y
caliente.
AsegOrese de que eJciclo se a_ust6correctamente,
cierre la tapa y presione el bot6n START/PAUSE.
La lavadora no funcionar6 si la tapa est6 abierta.
Cierre la tapa y aseggrese de que no hay nada
atascado bajo la tapa que impida que se cierre
completamente.
Compruebe los disyuntores y fusibles de la casa.
Sustituya los fusibles o reinicie el disyuntor. La lavadora
debeda estar en un ramal de circuito dedicado. La
lavadora continuar6 el ciclo en el lugar en que se
detuvo una vez restaurada la alimentaci6n.
Presione el bot6n POWER, luego vuelva a seleccionar
el ciclo deseado y presione el bot6n START/PAUSE.
Presione el bot6n POWER, luego vueiva a seleccionar
el ciclo deseado y presione el bot6n START!PAUSE.
La lavadora se apagar6 si no sepresiona el bot6n
START/PAUSEdespu4s de cuatro minutos.
Compruebe otra Ilave de la casa para asegurarse de
que la presi6n del agua es la adecuada.
Si la lavadora ha estado expuesta a temperaturas
por debajo del punto de congelaci6n durante un
periodo prolongado de tiempo, permita que se
caliente antes de presionar el bot6n POWER. En otro
caso, la pantalla no se prender6.
Aseg6rese de que los filtros de entrada de las
v61vulas de Ilenado no est6n taponados. Consulte las
instrucciones de limpieza de filtros.
Compruebe que las mangueras de entrada no est6n
retorcidas ni atascadas.
Esta es una lavadora energ4ticamente eficiente.
Por Io tanto, los ajustes de temperatura para esta
lavadora pueden set distintos de las lavadoras que
no son eficientes energ6ticamente.
AsegOrese de que las ilaves de agua fria y caliente
est4n completamente abiertas.
La lavadora no funcionar6 si la tapa est6 abierta.
Cierre la tapa y asegOrese de que no hay nada
atascado ba]o la tapa que impida que se cierre
completamente.
Compruebe las cone×Jones de las mangueras de
entrada. Aseggrese de que el suministro de agua
caliente est6 conectado a la v61vula de entrada de
agua caliente y de que el suministro de agua fria est6
cenectado a la v61vula de entrada de agua fria.
Esta lavadora es de alta eficiencia, Normalmente el
agua no cubrir6 las prendas. El nivel de Ilenado est6
optimizado para el movimiento de lavado y, de esta
manera, Iograr el mejor rendimiento de lavado.
61

| ANTES DE SOLICITAR ASISTENCIA TECNICA (continuaci6n)
La lavadora
no drena
Mala
eliminaci6n de
las manchas
La manguera del drenaje est6
retorcida.
El desag_e est6 ubicado a una altura
superior a los 243,8 cm (8 pies) pot
encima de1 piso.
No se seleccionaron las opciones
adecuadas.
Manchas asentadas previamente.
AsegOrese de que la manguera de drenaje no est6 retorcida.
Aseg0rese de que la manguera de drenaje no est_ a una
altura superior a los 243,8 cm (8 pies) pot encima de la
parte inferior de la lavadora y que no est6 a una distancia
superior a los 1,5 metros (5 pies) de la lavadora.
Las prendas muy sucias o con manchas resistentespueden
requerir un poder limpiador adicionaL Seleccione SOAK para
mejorar el poder de limpieza del ciclo seleccionado.
Los prendas que se han lavado anteriormente pueden tenet
manchas que ya se hayan asentado. Esas manchas pueden
set muy dificiles de eliminar y pueden requerir ser lavadas a
mano o la aplicaci6n de un tratamiento previo que ayude a
eliminar las manchas.
El La tapa del dispensador del AsegOrese de que la tapa del dispensador del blanqueador
blanqueador no est6 instalada est6 correctamente instalada y bien cerrada en su sitio antes
no se correctamente, de comenzar el ciclo,
El dispensador del blanqueador est6 Levante la tapa del dispensador del blanqueador y limpie
sucio u taponado, el dispensador. Las pelusas y otros residuos extrafios que
se acumulan dentro del dispensador pueden impedir la
correcta distribuci6n del blanqueador.
Prematura El dispensador del blanqueador est6 No puede almacenar el blanqueador en del dispensador
distribuci6n relleno para una carga futura, para un futuro uso. El blanqueador se distribuir6 en cada
del carga.
Sobre[lenado de[ dispensador del El sobrelienado de[ dispensador de blanqueador ocasionar6
bianqueador, que el blanqueador se distribuya inmediatamente, Io
que da_ar6 las prendas en la tina. SIEMPRE mida et
blanqueador, pero nunca reilene por encima de _affnea
MAX del dispensador. Una taza de blanqueador es normal,
pero nunca agregue m6s de una taza.
Compartimientos de detergente Aseggrese de que el detercjente y losaditivos se acjrecjan
o nm_una taponados debido a un reHenado a loscompartimientos adecuados del dispensador. Si usa
distribuci6n de incorrecto, detergente liquido, aseggrese de que la taza para el detercjente
ffquido y el inse_o est_n en el compartimiento de detercjente.
Si usa detergente en polvo0aseggrese de que no se usen la
taza para el detercjente liquido ni el inserto. Para todos los
tipos de detergente, aseg0rese siempre de que la gaveta de1
dispensador est6 totalmente cerrada antes del inicio del ciclo.
Se us6 demasiado detergente. Aseggrese de usar la cantidad de detergente sugerlda en las
recomenclaciones del fabricante. Para evitar taponamientos,
uede diluir el detercjente con acjua basra la linea de
enado maximo en el compartimiento. Use s61odetercjentes
HE (alta eficiencia).
NOTA: Siempre use la menor cantidad posible de
detergente. Las lavadoras de atta eficiencia requieren
muy poca cantidad de detergente para Iograr resuttados
6ptimos. La utilizaci6n de demasiado detergente reduce el
rendimiento del lavado y el enjuacjue, y puede contribuir a
la aparici6n de olores en la lavadora.
Insuficiente suministro de acjua. Aseg0rese de que las Haves de acjua fria y cafiente est6n
completamente abiertas.
Residuo normal. Es normal que una pequefia cantidad de detergente
permanezca en el dispensador. Si este residuo se acumula,
puede interferir en Ja distribuci6n normal de los productos.
Consuffe 1asinstrucciones de limpieza.
Fugas de Las mangueras no est6n instaladas Compruebe todas las conexiones de las mangueras de
agua en todas correctamente, entrada y drenaje para asecjurarse de que est6n ajustadas y
las cargas seguras.
62

ANTES DE SOLICITAR ASISTENCIA TECNICA (continuaci6n)
C6digos de error
La pantalla muestra: La tapa no se cierra correctamente. Aseg0rese de que la tapa est6 correctamente
cerracla y presione el bot6n START/PAUSE.
Despu_s de iniciar un ciclo, tomar6 unos
momentos antes de que la tina comience a
' cjirar o centrifugar. La lavadora no comenzar6
a centrifugar hasta que Latapa no est_
trabada.
Si la tapa est6 cerrada y se muestra el
mensaje de error de bloqueo de la tapa,
Hame al servicio t_cnico.
=
La pantalla muestra: Error del interruptor de bloquea de Aseg0rese de que la tapa est6
la tapa. correctamente cerrada y presione el bot6n
START/PAUSE. La lavadora no funcionar6 a
menos que la tapa est_ trabada.
Aseggrese de que no hay nada atascado
bajo la tapa, coma material de embalaie o
ropa.
Aseg0rese de que el mecanismo del pestillo
est_ completamente retra_do.
Si la tapa est6 cerrada y se muestra el
mensaje de error de bioqueo de la tapa,
Ilame al serv_cio t_cnico.
La pantalla muestra: Funci6n de drenaje especial. Si la lavadora est6 en pausa durante un ciclo
par m6s de cuatro minutos, se cancelar6 el
ciclo y se drenar6 el agua que permanezca
en la tina. Una alarma sonar6 a los tres
minutos para advertirle de que la tina est6 a
punta,de drenarse.
La lavadora se rellena con Las Ilaves de suministro del agua no Aseg_rese de que las Ilaves de agua est6n
est6n completamente abiertas, totalmente abiertas.
muestra: Las mangueras de las tuberfas de Aseg0rese de que las mangueras no est_n
agua est6n retorcidas, pinzadas u retorcidas ni pinzadas. Tenga cuidado al
desplazar la lavadora durante las tareas de
taponadas,
limpieza o mantenimiento.
Los filtros de entrada de agua Limpie los fiffros de entrada. Consuffe el
estan taponados, apartado Mantenimiento en la secci6n
Cuidado y limpieza.
La presi6n del suministro de agua a Compruebe otra Ilave de la casa para
la Ilave o a la casa es demasiado asegurarse de que la presi6n de agua es la
baia" adecuada y que el fluio no est6 restringido.
Desconecte la manguera de entrada de la
lavadora y de]e que corran algunos litros de
agua a trav_s de la manguera para purgar
las tuberias de suministro de agua. Si el tluio
es demasiado d_bil, contacte con un plomero
para que repare las tuberias de agua.
Suministro de agua conectado a Las mangueras diseSadas para limitar
mangueras con limitaci6n de fugas, las fugas pueden a_ivarse err6neamente
y evitar que la lavadora se Ilene. No
se recomienda el usa de mangueras con
limitaci6n de fugas.
NOTA: Si se muestra un mensaie de error durante cuatro rninutos, el agua de la tina se drenar6
autom6ticamente. Una alarma sonar6 un minuto antes del drenaje y el c6digo de error original continuar6
mostr6ndose en pantalla.
63

| ANTES DE SOLICITAR ASISTENCIA TECNICA (continuaci6n)
o la pantalla muestra:
La manguera de drenaje est6 retorcido,
apretada o taponada.
La descarga del desag6e est6 a m6s de
243,8 cm (96 pulgadas) par encima de
la porte inferior de la lavadora.
La lavadora ha detectodo una cargo
desbalanceada.
La cargo es demasiado peque_a.
Hay articulos pesados mezdados con
arffculos m6s ligeros.
La carga est6 desbalonceada.
Error de control.
Elnivei de ague es demasiado alto
debido a una v61vula de agua con fallo.
Elsensor de nivel de ague no funclona
correctamente,
T _--1 Se ha produddo un error del motor.
L
LII
La pantalla muestra:
La pantalla muestra:
La pantalla muestra:
La pantalla muestra:
Lapantalla muestra:
La pantalla muestra:
AsegOresede quela manguerade drenaieest_
Iibre de taponemientos,dobladures,etc.,y no est_
apretada deba[o de la levadora.
Aiusteo repare el drenaje. Laaltura m6ximadel
drenaie esde 243,8 cm(96 puIgadas).
Sila lavadora detecte unacargo demesiedo
desbalanceedacomapare poder girer, mostrer6
estec6digomientrasintentarebalancear la cargo. Le
lavadore agregor6 ague e intentar6redistribuir te
cargo autom6ticamente.Estapantalla es6nicamente
pare suinformaci6ny norequiere ninguneacci6n.
Si el rebalanceo uE(vet arriba) no tiene Elintentoautom6ticopare rebalenceer la cargo no
_xito, mostror6 este error, tuvo_xito. Etcic!osepusoenpausepare permitk que
la cargo seaiuste manualmente.
Puedeser quenecesiteagregar artkulos edicionales
a ias cargospequeSespare que le lavadora puedo
botanceerloscergos.
Puedeser quela carga contengaarticulospesedos
y arrasm6sligeros.Siempretrate de laver artkutos
quede alguna maneraseende pesossimilerespare
ayuder a la Iovadore a distribuir el pesode la cargo
para una buenarotaci6n.
Redistribuyamanuelmentetacerga silosarticulos
sehenenredado y nopermiten quela distribuci6n
autom6ticafuncioneapropiadamente.
Desenchufela lavadora y espere60 segundos.
Vuelvaa conectarlay pruebede nuevo.Si el error se
vuelvee producir,Jlameal serviciot_cnico.
Cierre losIlavesde ague, desenchufela lavadora y
Ilameal serviciot_cnico.
Qerre losIlavesde ague, desenchufela lavedora y
llame al serviciot_cnico.
Deieque la tavadora descansedurante30 minutesy,
a continuaci6n,reinicleel cicb. Siel c6digode error
LEperslste,Ilameat serviciot_acnico.
La pantalla muestra: _ Error de embrague. Foliornec6nica.
Desenckufela lavadora y Ilameat serviciot_cnico,
Losobietos extra6os coma monedas_
posadores, clips, etc., atrapados entre
la chapa de lavado y el cesta interior.
La pantalla muestra:
Apague la lavadoro y pulse el bot6n de
Encendidoi Apagado. Pulse el bot6n de
velocidad de centrifugado sinseleccionar un
ciclo pare vaciado y centrifugado de ta cargo.
Cuando haya finalizado el centrifugado,
saquela rope y encuentre y retire losobietos
atrapados en Io chapo de lavado,
Compruebe siempre los bolsillos, etc., antes del
lavado pare evitar c6digos de error o defies en
la lavadora o la rope.
64

Garantla limitada de I(enmore Elite
POR UN AI(_O a partir de la fecha de venta, este electrodom_stico est6 cubierto pot la garantla
contra defectos de material o mano de obra cuando la instalaci6n, operaci6n y mantenimiento del
electrodom_stico son correctos y siguen todas las instrucciones suministradas_
JUNTO CON LA PRUEBA DE VENTA, el electrodom_stico defectuoso recibir6 sin cargo su reparaci6n
o reemplazo, a opci6n del vendedor.
Para solicitar servicio en garantla, comuniquese al: 1-800-4-MY-HOME® (1-800-469-4663).
Esta cobertura de garantia aplica s61o por 90 d_as a partir de la fecha de venta si el
electrodom_stico es utilizado para otro fin que no sea de uso dom_stico.
Esta garantia cubre 0nicamente los defectos de material ¥ mano de obra, ¥ NO pagar6:
1. Elementos consumibles que puedan desgastarse debido al uso normal, incluyendo entre otros, los
filtros, correas, bombillas y bolsas extraibles.
2. Un t_cnico de servicio para ensefiar al usuario la instalaci6n, funcionamiento o mantenlmiento
correctos del producto.
3. Un t_cnico de servicio para realizar labores de limpieza o mantenimiento del producto.
4. Dafios o aver_as como consecuencia de no seguir todas las instruccionesde instalaci6n,
funcionamiento o mantenimiento incluidas con el producto.
5. Dafios o aver_as en caso de accidente, abuso, uso inadecuado o uso con prop6sitos distintos a los
fines para los que el producto fue disefiado.
6. Da_os o averias en caso de utilizar detergentes, limpiadores, sustancias qu_micas o utensilios
distintos a los recomendados en las instrucciones incluidas con el producto.
7. Dafios o fallas de los componentes o sistemas como resultado de modificaciones hechas sin
autorizaci6n a este producto.
Descargo de responsabilidad de garantias implicitas; limitaci6n de acciones legales
El 0nico y exclusivo recurso del cliente bajo esta garantia limitada ser6 la reparaci6n del producto
como se indica en la presente. Las garantias implicitas, incluyendo garantias de comerciabilidad
y aptitud para un objetivo particular, se encuentran limitadas a un afio o al periodo m6s corto
permitido por la ley. Sears no ser_ responsable de los da_os incidentales o derivados. Algunos
estados y provincias no permiten la exclusi6n o limitaci6n de dafios o limitaciones incidentales o
resultantes, o limitaciones sobre la duraci6n de garantias implicitas o de comerciabilidad o aptitud,
por Io tanto las limitaciones o exclusiones anteriores pueden no aplicarse en su caso.
Esta garantla podr6 aplicarse s61o si este electrodom_stico se utiliza en los Estados Unidos.
Esta garant_a le otorga derechos legales especiflcos, y usted tambi_n puede contar con otros
derechos, que pueden variar de estado a estado.
Sears BrandsManagement Corporation, Hoffman Estates,IL 60179
65

66

67

Your Home
For troubleshooting, product manuals and expert advice:
www.managemylife.com
For repair - in your home - of all major brand appliances,
lawn and garden equipment, or heating and cooling systems,
no matter who made it, no matter who sold it!
For the replacement parts, accessories and
owner's manuals that you need to do-it-yourself.
For Sears professional installation of home appliances
and items like garage door openers and water heaters.
(1-800-469.4663)
Call anytime, day or night (U.S.A. and Canada)
www,sears.com www.sears.ca
Our Home
For repair of carry-in items like vacuums, lawn equipment,
and electronics, call anytime for the location of your nearest
Sears Parts & Repair Service Center
1-800-488-1222 (U,S.A,) 1-800-469-4663 (Canada)
w_vw.sears,com www.sears.ca
To purchase a protection agreement on a product sep¢iced by Sears:
1-800-827-6655 (U.S.A.) 1-800-361-6665 (Canada)
Para pedir servicio de reparaci6n Au Canada pour service en frangais:
a domicilio, y para ordenar piezas: 1-800-LE-FOYER Mc
1-888-S U-H OGAR ® (1-800-533-6937)
(1-888-784 -6427 ) www. sea rs.ca
sesrs
® Registered Trademark / T_ Trademark of KCD IP, LLC in the United States, or Sears Brands, LLC in other countries
@ Marca Registrada / 7_ Marca de Fabrica de KCD IP, LLC en Estados Unidos, o Sears Brands, LLC in otros paises
_A,cMarque de commerce ! MDMarque d6pos6e de Sears Brands, LLC
-
 1
1
-
 2
2
-
 3
3
-
 4
4
-
 5
5
-
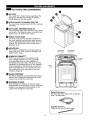 6
6
-
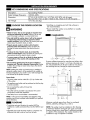 7
7
-
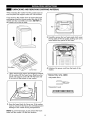 8
8
-
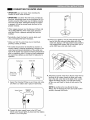 9
9
-
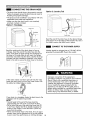 10
10
-
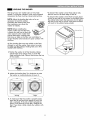 11
11
-
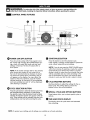 12
12
-
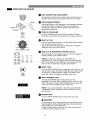 13
13
-
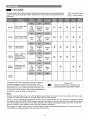 14
14
-
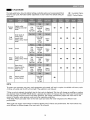 15
15
-
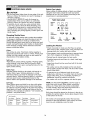 16
16
-
 17
17
-
 18
18
-
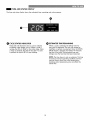 19
19
-
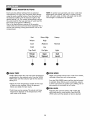 20
20
-
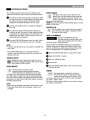 21
21
-
 22
22
-
 23
23
-
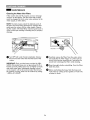 24
24
-
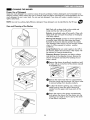 25
25
-
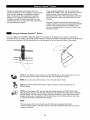 26
26
-
 27
27
-
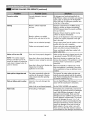 28
28
-
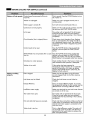 29
29
-
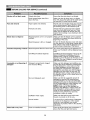 30
30
-
 31
31
-
 32
32
-
 33
33
-
 34
34
-
 35
35
-
 36
36
-
 37
37
-
 38
38
-
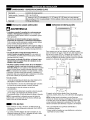 39
39
-
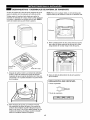 40
40
-
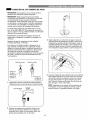 41
41
-
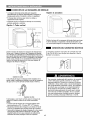 42
42
-
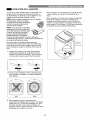 43
43
-
 44
44
-
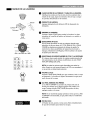 45
45
-
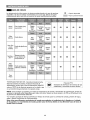 46
46
-
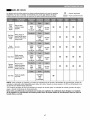 47
47
-
 48
48
-
 49
49
-
 50
50
-
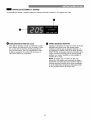 51
51
-
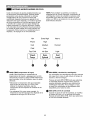 52
52
-
 53
53
-
 54
54
-
 55
55
-
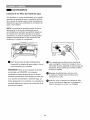 56
56
-
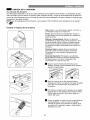 57
57
-
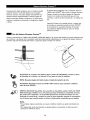 58
58
-
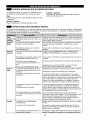 59
59
-
 60
60
-
 61
61
-
 62
62
-
 63
63
-
 64
64
-
 65
65
-
 66
66
-
 67
67
-
 68
68


Kenmore Elite 79631403410 Manual de usuario
- Categoría
- Lavadoras
- Tipo
- Manual de usuario
- Este manual también es adecuado para
en otros idiomas
Artículos relacionados
-
 Kenmore Elite 79631412310 El manual del propietario
-
 Kenmore Elite 79629478000 El manual del propietario
-
 Kenmore Elite 41072 El manual del propietario
-
 Kenmore Elite 79631513211 El manual del propietario
-
 Kenmore Elite 796.3121 El manual del propietario
-
Kenmore 79629278900 Manual de usuario
-
 Kenmore Elite 79641963610 El manual del propietario


Otros documentos
-
LG WT5480CW/00 El manual del propietario
-
LG WT4970CW El manual del propietario
-
-
-
LG WM3001HWA El manual del propietario
-
-
Husky POWERWASHER 1750 US Manual de usuario
-
Hotpoint VLSR1090G8WW Guía de instalación