ZyXEL PLA-402 V2 El manual del propietario
- Categoría
- Adaptadores de red PowerLine
- Tipo
- El manual del propietario


ENGLISH
2
You can use your PLA402 v2s to connect networking products on a home network using
the standard electrical wiring in your house. The PLA402 v2 also allows you to be more
flexible in expanding your network by adding coaxial cable capability. This expands your
HomePlug AV network across the coaxial cables in your building.
To create a secure HomePlug AV network you can use the ENCRYPT button on the rear
panel of the PLA402 v2.
As an example, this Quick Start Guide shows you how to use two PLA402 v2s (B and C) to
connect your computer (A) to a modem (D) on your home network for Internet access. You
can connect other networking products, such as a router or switch, the same way. This
example uses both a powerline connection and coaxial connection.
The coaxial connection offers a greater range than a powerline connection. This makes it
suitable for setting up networks in large areas such as apartment buildings, communities,
hotels and ships.
This Quick Start Guide shows you how to complete the following:
1 Connect a PLA402 v2 to a Cable/DSL modem.
2 Connect a PLA402 v2 to a computer in your home.
3 Use the PLA402 v2’s ENCRYPT button to set up a HomePlug AV secure home
network.
See the User’s Guide on the included CD for details on all of the PLA402 v2’s features. If a
screen does not pop-up when you insert the included CD, use Windows Explorer (My
Computer) to go to the CD-ROM (commonly drive D) and browse for the User’s Guide.
A
B
C
D
Internet
ENGLISH

ENGLISH
3
" Your PLA402 v2 is only compatible with HomePlug AV products with the
latest firmware. You can upgrade your other ZyXEL HomePlug AV products
by downloading the latest firmware from the ZyXEL website
(www.zyxel.com).
1 Connecting the PLA402 v2 to a Modem
1 Use an Ethernet cable to connect the LAN port (A) on the PLA402 v2 to an available
Ethernet LAN port (B) of your modem.
2 Connect the PLA402 v2 to a power outlet. Your power cable and outlet may look
different.
A
B

ENGLISH
4
• You can also connect a coaxial cable to a coaxial outlet.
Ensure the coaxial cable connector is properly connected to the coaxial port. You may
have to screw it in. The coaxial connection will extend beyond your house so use the
ENCRYPT button to secure your network after completing the connection.
The power ( ) light should be on and the Ethernet ( ) light should be on or blinking.
V If none of the lights are on, unplug your device and recheck your hardware
connections.
2 Connecting the PLA402 v2 to a Computer
1 Use an Ethernet cable to connect the LAN port (A) on the PLA402 v2 to the Ethernet
port (B) on your computer.
A
B

ENGLISH
5
2 Connect the PLA402 v2 to a power outlet. Your power cable and outlet may look
different.
• You can also connect a coaxial cable to a coaxial outlet.
The power ( ) light should be on and the Ethernet ( ) light should be on or blinking. If
these lights are not on, unplug your device and recheck your hardware connections.
• If the HomePlug ( ) lights turn on the first time you set up your PLA402 v2s, your
HomePlug AV network is ready for use. However, the PLA402 v2s may both be using
the default network name HomePlugAV. This well-known network name allows access to
your HomePlug AV network. You can make your network name more secure by going to
the next section to set up a HomePlug AV network with ENCRYPT.
• If the HomePlug ( ) lights do not turn on, go to the next section to set up a HomePlug
AV network with ENCRYPT.

ENGLISH
6
V If you are having trouble setting up your connections, make sure:
• Your outlets are working properly. Unplug the PLA402 v2 and plug in another electrical
appliance that you know works.
• The Ethernet cables you are using are Category 5 or higher. Most cables are labeled with
their specifications.
• All Ethernet and power cables are securely connected.
3 Set Up a HomePlug AV Network with ENCRYPT
Use the ENCRYPT button to set up a secure connection between your PLA402 v2 and
another ENCRYPT-enabled device (The PLA-400 v2 is shown as an example).
" Use the ENCRYPT feature on two devices at a time.
1 Place the powerline devices close to each other, as you only have two minutes to press
the ENCRYPT buttons on both devices. You can disconnect the devices from your
computer or modem (or other networking equipment) if you need to, but the powerline
devices need to be plugged into power outlets.
2 Press the ENCRYPT button at the rear of both of your devices for 10~15 seconds. This
sets up a random network name.

ENGLISH
7
3 Press the ENCRYPT buttons at the rear of your powerline devices for 1~2 seconds
4 While the devices are connecting, the power ( ) and HomePlug ( ) lights blink. Also
several times all lights blink at the same time and the HomePlug ( ) light shows red.
5 Wait for about one minute while your powerline devices connect. The power ( ) light is
steady when the ENCRYPT process times out, the HomePlug ( ) light is steady if you
have a successful connection.
V If the power ( ) light does not blink, you have probably pressed the
ENCRYPT button for too long. Try again, pressing the ENCRYPT button for
1~2 seconds.
V If the HomePlug ( ) lights on both powerline devices do not light up, the
powerline devices are not connected. Repeat steps 2 and 3 in this
section. If that doesn’t work, see the User’s Guide for more suggestions.
2 SEC.
WITHIN
120 SEC.
PRESS
PRESS
2 SEC.
PRESS
10~15 SEC.
A
B
C

ENGLISH
8
6 To add another powerline device (C) to your network, connect it with one of the
powerline devices (A or B) already connected to your powerline network (See steps 2
and 3 in this section).
7 If you disconnected your powerline devices from your computer or modem (or any other
networking product connected to your powerline device) in step 1 of this section, you
can now reconnect them.
V If the HomePlug ( ) light is off, use the PLA-4xx configuration utility (see
the User’s Guide for details) to detect all other HomePlug AV devices on
your power line network. Try plugging a second HomePlug AV device into
an adjacent socket (to your PLA402 v2) and see if the HomePlug ( ) light
comes on.
C
A or B
B
A
Procedure to View a Product’s Certification(s)
1 Go to www.zyxel.com.
2 Select your product from the drop-down list box on the
ZyXEL home page to go to that product's page.
3 Select the certification you wish to view from this
page.

ENGLISH
9

DEUTSCH
10
Mit dem PLA402 v2 können Sie zu Hause Netzwerkgeräte über das herkömmliche
Stromnetz zu einem Heimnetzwerk zusammenschließen. Mit dem PLA402 v2 können Sie
Ihr Netzwerk flexibel erweitern, indem Sie zu Ihrem Netzwerk die Anschlussmöglichkeit
von Koaxialkabeln hinzufügen. Dadurch wird das HomePlug AV-Netzwerk auf die
Koaxialkabel im Gebäude erweitert.
Verwenden Sie die ENCRYPT-Taste, um ein sicheres HomePlug AV-kompatibles
Powerline-Netzwerk einzurichten.
In dieser Kurzanleitung wird beispielhaft gezeigt, wie Sie mit zwei PLA402 v2 (B und C)
Ihren Computer (A) für den Internetzugang an ein Modem (D) Ihres Heimnetzwerks
anschließen können. Auf die gleiche Art können Sie andere Netzwerkgeräte wie Router
oder Switches anschließen In diesem Beispiel wird sowohl eine Powerline-Verbindung als
auch eine Koaxialverbindung gezeigt..
Diese Kurzanleitung enthält die folgenden Anleitungen:
1 Anschließen eines PLA402 v2 an ein Kabel-/DSL-Modem.
2 Anschließen eines PLA402 v2 an einen Heimcomputer.
3 Richten Sie mit der Taste ENCRYPT (Verschlüsseln) des PLA402 v2 ein sicheres
HomePlug AV-Heimnetzwerk ein.
Eine Beschreibung aller Funktionen des PLA402 v2 finden Sie im Benutzerhandbuch, dass
auf der CD enthalten ist. Wenn die CD nach dem Einlegen nicht gestartet wird, rufen Sie mit
Windows Explorer (Arbeitsplatz) die CD-ROM auf (normalerweise Laufwerk D), und öffnen Sie
dort die Datei des Benutzerhandbuchs.
A
B
C
D
Internet
DEUTSCH

DEUTSCH
11
" Der PLA402 v2 ist nur kompatibel mit HomePlug AV-Produkten, die über
die neueste Firmware verfügen. Sie können andere ZyXEL HomePlug AV-
Produkte aktualisieren, indem Sie die neueste Firmware von der ZyXEL-
Website (www.zyxel.com) herunterladen.
1 Anschließen des PLA402 v2 an ein Modem
1 Schließen Sie ein Ethernet-Kabel an den LAN-Port (A) des PLA402 v2 und an einen
freien Ethernet-LAN-Port (B) des Modems an.
2 Schließen Sie den PLA402 v2 an eine Netzsteckdose an. Ihr Stromkabel kann etwas
von der Abbildung abweichen.
A
B

DEUTSCH
12
• Sie können auch ein Koaxialkabel an einen Koaxialanschluss anschließen.
Stellen Sie sicher, dass der Koaxialstecker fest am Koaxialanschluss angeschlossen ist.
Möglicherweise müssen Sie ihn dazu etwas hineindrehen. Da die Koaxialverbindung aus
ihrem Haus hinausführt, sollten Sie nach dem Anschluss des Geräts mit der Taste
ENCRYPT das Netzwerk sichern.
Die Netz-LED ( ) beginnt zu leuchten, und die Ethernet-LED ( ) beginnt zu leuchten oder
zu blinken.
V Wenn keine der LEDs leuchtet, prüfen Sie noch einmal alle
Kabelverbindungen.
2 Anschließen des PLA402 v2 an einen Computer

DEUTSCH
13
1 Schließen Sie ein Ethernetkabel an den LAN-Anschluss (A) des PLA402 v2 und an den
Ethernetanschluss (B) des Computers an.
2 Schließen Sie den PLA402 v2 an eine Netzsteckdose an. Ihr Stromkabel kann etwas
von der Abbildung abweichen.
A
B

DEUTSCH
14
• Sie können auch ein Koaxialkabel an einen Koaxialanschluss anschließen.
Die Netz-LED ( ) beginnt zu leuchten, und die Ethernet-LED ( ) beginnt zu leuchten oder
zu blinken. Sollten die LEDs nicht leuchten, trennen Sie das Gerät vom Stromnetz, und
prüfen Sie die Kabelverbindungen.
• Wenn die HomePlug-LED ( ) leuchtet, nachdem Sie den PLA402 v2 das erste Mal
eingerichtet haben, kann das HomePlug AV-Netzwerk verwendet werden. Möglicher-
weise verwenden beide PLA402 v2 den Standardnetzwerknamen HomePlugAV. Dieser
bekannte Netzwerkname ermöglicht den Zugriff auf Ihr HomePlug AV-Netzwerk. Sie kön-
nen den Netzwerknamen sicherer machen, indem Sie wie im nächsten Abschnitt bes-
chrieben ein HomePlug AV-Netzwerk mit der Verschlüsselungsfunktion ENCRYPT
(Verschlüsseln) einrichten.
• Wenn die HomePlug-LEDs ( ) nicht leuchten, richten Sie wie im nächsten Abschnitt
beschrieben ein HomePlug AV-Netzwerk mit der Verschlüsselungsfunktion ENCRYPT
(Verschlüsseln) ein.
V Wenn Sie Probleme haben, das Gerät anzuschließen, stellen Sie sicher,
• dass die Netzsteckdose richtig funktioniert. Trennen Sie den PLA402 v2 vom Stromnetz
und schließen Sie an dieselbe Netzsteckdose ein anderes Gerät an, von dem Sie wissen,
dass es funktioniert.
• dass Sie Ethernetkabel der Kategorie 5 oder höher verwenden. Bei den meisten Kabeln
sind die Spezifikationen aufgedruckt.
• dass alle Ethernet und Stromkabel fest angeschlossen sind.

DEUTSCH
15
3 Einrichten eines Powerline Netzwerks mit ENCRYPT
Richten Sie mit der ENCRYPT-Taste eine sichere Verbindung zwischen Ihrem PLA402 v2
und einem anderen ENCRYPT-fähigen Gerät ein (als Beispiel zeigt die Abbildung den
PLA-400 v2).
" Verwenden Sie die ENCRYPT-Funktion an zwei Geräten gleichzeitig
1 Stellen Sie die Powerline-Geräte nahe beieinander auf, sodass Sie genügend Zeit
haben, beide Geräte mittels ENCRYPT Taste einzurichten. Nachdem Sie das erste
Powerline-Gerät eingerichtet haben, haben Sie noch 120 Sekunden Zeit, um das
zweite Powerline-Gerät einzurichten. Die Verbindung zum Computer oder Modem (oder
einem anderen Netzwerkgerät) kann getrennt werden, aber die Powerline-Geräte müssen
am Stromnetz angeschlossen bleiben.
2 Drücken Sie länger als 10 Sekunden auf die ENCRYPT-Taste, die sich an der
Rückseite der Geräte befindet. Dadurch wird ein zufälliger Netzwerkname eingerichtet.

DEUTSCH
16
3 Drücken Sie 1 bis 2 Sekunden lang auf die ENCRYPT-Taste, die sich an der Rückseite
des Powerline-Geräts befindet.
4 Die Stromanzeige-LED ( ) und die HomePlug-LED ( ) sollten jetzt blinken. Es kann
vorkommen, dass alle LEDs gleichzeitig blinken, und dass auch die HomePlug-LED
( ) rot leuchtet.
5 Es dauert etwa eine Minute, bis die Powerline-Geräte eine Verbindung hergestellt
haben. Die LED-Anzeige Power ( ) leuchtet dauerhaft, wenn der ENCRYPT-Vorgang
abgelaufen ist, die LED-Anzeige HomePlug ( ) leuchtet ständig, wenn die Verbindung
erfolgreich hergestellt wurde.
V Wenn die LED-Anzeige Power ( ) nicht blinkt, haben Sie möglicherweise
zu lang auf die Taste ENCRYPT gedrückt. Drücken Sie noch einmal 1 bis 2
Sekunden lang auf die Taste ENCRYPT.
2 SEK.
LANG
INNERHALB
VON 120 SEK.
DRÜCKEN SIE
DRÜCKEN SIE
2 SEK
.LANG
DRÜCKEN SIE
10 SEK LANG
A
B
C

DEUTSCH
17
V Wenn die HomePlug-LEDs ( ) an beiden Powerline-Geräten nicht
leuchten, sind die Powerline-Geräte nicht verbunden. Wiederholen Sie die
in diesem Abschnitt beschriebenen Schritte 2, und 3 Weitere Hinweise
finden Sie im Benutzerhandbuch.
6 Wenn Sie ein weiteres Powerline-Gerät (C) an das Netzwerk anschließen möchten,
stellen Sie die Verbindung zu anderen Powerline-Geräten (A oder B) her, die bereits an
das Netzwerk angeschlossen sind (siehe Schritte
2 und 3 in diesem Abschnitt) .
7 Wenn Sie Ihren Computer oder Ihr Modem (oder ein anderes Netzwerkgerät, das mit
dem verbunden ist) in Schritt 1 dieses Abschnitts abgetrennt haben, können Sie diese
Geräte nun wieder anschließen.
V Wenn die HomePlug-LED ( ) nicht leuchtet, versuchen Sie, mit dem
PLA-4xx-Konfigurationsprogramm (Informationen dazu finden Sie im
Benutzerhandbuch) alle anderen HomePlug AV-Geräte zu ermitteln, die
sich im Powerline-Netzwerk befinden. Schließen Sie ein zweites HomePlug
AV-Gerät an eine dem PLA402 v2 benachbarte Steckdose an, und prüfen
Sie, ob die HomePlug-LED ( ) nun leuchtet.
Herzlichen Glückwunsch! Auf diese Weise können Sie mit Ihren Powerline-Geräten und
allen Geräten, die Sie an die Powerline-Geräte angeschlossen haben wie Computer oder
Netzwerkmodems, ein Heimnetzwerk errichten.
C
A oder B
B
A

DEUTSCH
18
.
Schritte zum Ansehen von Produktzertifizierung(en)
1 Zu www.zyxel.com.
2 Wählen Sie auf der ZyXEL-Homepage aus der Drop-
down-Liste Ihr Produkt aus, um zur entsprechenden
Produktseite zu gelangen.
3 Wählen Sie auf dieser Seite die gewünschte
Zertifizierung aus.
CE-Konformität
Das Produkt entspricht den grundlegenden
Anforderungen der Richtlinie 1999/5/EG
(R&TTE) sowie den übrigen einschlägigen
Bestimmungen des FTEG und ist zum Betrieb in der EU
und Schweiz vorgesehen. Das Produkt ist eine
Einrichtung der Klasse A. Diese Einrichtung kann im
Wohnbereich Funkstörungen verursachen; in diesem Fall
kann vom Betreiber verlangt werden, angemessene
Massnahmen durchzuführen.

DEUTSCH
19

ESPAÑOL
20
Puede utilizar sus PLA402 v2 para conectar los dispositivos de red en una red doméstica
utilizando el cableado eléctrico de su casa. El PLA402 v2 también le permite ser más
flexible al poder ampliar su red incorporando la capacidad del cable coaxial. Esto amplía
su red HomePlug AV por todos los cables coaxiales del edificio.
Utilice el botón ENCRYPT para configurar una red de línea eléctrica segura compatible
con HomePlug AV.
Como ejemplo, esta Guía de instalación rápida le muestra cómo utilizar dos PLA402 v2 (B
y C) para conectar su ordenador (A) a un módem (D) en su red de casa para acceso a
Internet. Puede conectar otros dispositivos de red, como un router o switch, del mismo
modo. Este ejemplo utiliza una conexión de línea eléctrica y una conexión coaxial.
Esta Guía de instalación rápida le muestra cómo completar lo siguiente:
1 Conectar un PLA402 v2 a un módem Cable/DSL.
2 Conectar un PLA402 v2 a un ordenador en su hogar.
3 Utilizar el botón del PLA402 v2 ENCRYPT para configurar una red doméstica segura
HomePlug AV.
Consulte la Guía del usuario en el CD incluido para más detalles sobre todas las
características del PLA402 v2. Si no aparece una pantalla al insertar el CD incluido, utilice
Windows Explorer (Mi PC) para ir al CD-ROM (normalmente la unidad D) y busque Guía
del usuario.
A
B
C
D
Internet
ESPAÑOL

ESPAÑOL
21
" Su PLA402 v2 sólo es compatible con productos HomePlug AV con el
último firmware. Puede actualizar sus productos ZyXEL HomePlug AV
descargando el último firmware desde el sitio web de ZyXEL
(www.zyxel.com).
1 Conectar el PLA402 v2 a un módem
1 Utilice un cable Ethernet para conectar el puerto LAN (A) del PLA402 v2 a un puerto
LAN Ethernet disponible (B) de su módem.
A
B

ESPAÑOL
22
2 Conecte el PLA402 v2 en una toma de corriente. Su cable de alimentación y toma de
corriente pueden ser distintos.
• También puede conectar un cable coaxial en una toma coaxial.
Compruebe que el conector del cable coaxial esté bien conectado al puerto coaxial. Puede
que necesite enroscarlo. La conexión coaxial sale fuera de su casa, utilice el botón
ENCRYPT para asegurar su red tras completar la conexión.
La luz alimentación ( ) debería estar encendida y la luz Ethernet ( ) debería estar
encendida o parpadeando.
V Si el LED LINK no está encendido, inténtelo utilizando otra toma de
corriente.

ESPAÑOL
23
2 Conectar el PLA402 v2 a un ordenador
1 Utilice un cable Ethernet para conectar el puerto LAN (A) del PLA402 v2 al puerto
Ethernet (B) del ordenador.
2 Conecte el PLA402 v2 en una toma de corriente. Su cable de alimentación y toma de
corriente pueden ser distintos.
A
B

ESPAÑOL
24
• También puede conectar un cable coaxial en una toma coaxial.
La luz alimentación ( ) debería estar encendida y la luz Ethernet ( ) debería estar
encendida o parpadeando. Si estas luces no están encendidas, desenchufe su dispositivo
y vuelva a comprobar las conexiones del hardware.
• Si la luz HomePlug ( ) se enciende la primera vez que configura sus PLA402 v2, su
red HomePlug AV está lista ser usada. Sin embargo, ambos PLA402 v2 pueden utilizar
el nombre de red predeterminado HomePlugAV. Este conocido nombre de red permite el
acceso a su red HomePlug AV. Puede hacer que su nombre de red sea más seguro yendo
a la siguiente sección para configurar una red HomePlug AV con ENCRYPT.
• Si la luz HomePlug ( ) no se enciende, vaya a la siguiente sección para configurar
una red HomePlug AV con ENCRYPT.
V Si tiene problemas configurando sus conexiones, compruebe si:
• Sus tomas funcionan correctamente. Desenchufe el PLA402 v2 y enchufe otro aparato
eléctrico que sepa que funciona.
• Los cables Ethernet que utiliza son de Categoría 5 o mayor. La mayoría de cables están
etiquetados con sus especificaciones.
• Todos los cables Ethernet y de corriente están conectados de forma segura.
3 Configurar una red Powerline con ENCRYPT
Utilice el botón ENCRYPT para configurar una conexión segura entre su PLA402 v2 y
otro dispositivo compatible con ENCRYPT (el PLA-400 v2 aparece como ejemplo).

ESPAÑOL
25
" Utilice la característica ENCRYPT en dos dispositivos al mismo tiempo.
1 Coloque los dispositivos cerca el uno del otro, para tener tiempo para configurar cada
uno. Tras configurar el primer dispositivo de línea eléctrica, tendrá 120 segundos para
configurar el segundo dispositivo.
2 Pulse el botón ENCRYPT en la parte posterior de los dos dispositivos durante más de
10 segundos. Esto configura un nombre de red al azar.
3 Pulse el botón ENCRYPT de la parte posterior de su dispositivo de línea eléctrica
durante 1-2 segundos.
4 Las luces de alimentación ( ) y HomePlug ( ) deberían estar parpadeando.
Ocasionalmente todas las luces pueden parpadear al mismo tiempo y la luz HomePlug
( ) también puede que aparezca en rojo.
5 Espere alrededor de un minuto mientras sus dispositivos de línea eléctrica se
conectan. La luz de alimentación ( ) se enciende fija cuando se acaba el tiempo de
proceso de ENCRYPT (CIFRADO), la luz HomePlug ( ) se enciende fija cuando se
establece la conexión con éxito.
2 SEG.
EN 120
SEG.
PULSE
PULSE
2 SEG.
PULSE
10-15 SEG.
A
B
C

ESPAÑOL
26
V Si la luz de alimentación ( ) no parpadea, probablemente ha mantenido
pulsado el botón ENCRYPT demasiado tiempo. Vuelva a intentarlo,
pulsando el botón ENCRYPT durante 1 o 2 segundos.
V Si las luces HomePlug ( ) en ambos dispositivos de línea eléctrica no
se encienden, los dispositivos de línea eléctrica no están conectados.
Repita los pasos 2 y 3 en esta sección. Si esto no funciona, consulte la
Guía del usuario para más sugerencias.
6 Para agregar otro dispositivo de línea eléctrica (C) a su red, conéctelo a uno de los
dispositivos de línea eléctrica (A o B) ya conectados a su red de línea eléctrica (ver
pasos 2 y 3 en esta sección).
7 Si desconectó su ordenador o módem (o cualquier otro producto de red conectado a su
dispositivo de línea eléctrica) en el paso 1 de esta sección, ahora puede volver a
conectarlo.
V Si la luz HomePlug ( ) está apagada, utilice la utilidad de configuración
PLA-4xx (consulte la guía del usuario para los detalles) para detectar el
resto de dispositivosHomePlug AV en su red de línea eléctrica. Intente
enchufar un segundo dispositivo HomePlug AV en un enchufe adyacente
(a su PLA402 v2) y observe si el LED HomePlug ( ) se enciende.
C
A o B
B
A

ESPAÑOL
27
¡Enhorabuena! Esto conecta sus dispositivos de línea eléctrica y cualquier producto que
haya conectado a sus dispositivos de línea eléctrica, como su ordenador o módem de red.
Procedimiento para ver la(s) certificación(es) del
producto
1 Vaya a www.zyxel.com.
2 Seleccione su producto de la lista desplegable en la
página inicial de ZyXEL para ir a la página de ese
producto.
3 Seleccione el certificado que desee visualizar en esta
página.
Conformità CE
Questo prodotto soddisfa le richieste
tecniche della direttiva 1999/5/EG (R&TTE)
ed è previsto per il funzionamento nella UE
e in Svizzera.Il prodotto è dispositivo della classe A.
Questo dispositivo può causare nel settore abitativo dei
radiodisturbi.
In questo caso può essere richiesto al gestore di
prendere opportune misure.

FRANÇAIS
28
Vous pouvez utiliser vos PLA402 v2s pour connecter les produits réseau sur un réseau
domestique en utilisant le circuit électrique standard de votre maison. Le PLA402 v2 vous
offre plus de flexibilité et étend votre réseau en ajoutant la capacité du câble coaxial.
PLA402 v2 Cela étend votre réseau HomePlug
AV au travers des câbles coaxiaux du
bâtiment.
Utilisez la fonctionnalité ENCRYPT (CRYPTAGE) presse-bouton pour installer un réseau
de courant porteur en ligne compatible HomePlug AV sécurisé.
En guise d'exemple, ce guide de mise en route rapide vous montre comment utiliser deux
PLA402 v2s (B et C) pour connecter votre ordinateur (A) à un modem (D) sur votre réseau
domestique pour accéder à Internet. De même, vous pouvez connecter d'autres produits
réseau, tels qu'un routeur ou un commutateur. Cet exemple utilise à la fois une connexion
par courant porteur en ligne et une connexion coaxiale.
Ce guide de mise en route rapide vous montre comment effectuer les opérations
suivantes:
1 Connecter un PLA402 v2 à un modem câble/DSL.
2 Connecter un PLA402 v2 à un ordinateur dans votre maison.
3 Utiliser le bouton ENCRYPT (CRYPTER) du PLA402 v2 pour installer un réseau
domestique sécurisé HomePlug AV.
Consulter le guide de l’utilisateur sur le CD inclus pour les informations détaillées sur
toutes les fonctionnalités de PLA402 v2. Si aucun écran n’apparaît quand vous insérez le
CD inclus, utilisez Windows Explorer (Explorateur Windows) (My Computer) (Poste de
travail) pour aller au CD-ROM (habituellement lecteur D) et recherchez le guide de
l’utilisateur.
A
B
C
D
Internet
FRANÇAIS

FRANÇAIS
29
" Votre PLA402 v2 est uniquement compatible avec les produits HomePlug
AV ayant le dernier microprogramme. Vous pouvez mettre à niveau vos
autres produits ZyXEL HomePlug AV en téléchargeant le dernier
microprogramme depuis le site web de ZyXEL (www.zyxel.com).
1 Connecter le PLA402 v2 à un modem
1 Utilisez un câble Ethernet pour connecter le port (A) LAN sur le PLA402 v2 à un port
(B) LAN Ethernet disponible de votre modem.
A
B

FRANÇAIS
30
2 Connectez le PLA402 v2 à une prise d'alimentation. Votre câble d'alimentation et la
prise sont peut-être différents.
• Vous pouvez aussi connecter un câble coaxial à une prise coaxiale.
Vérifiez que le connecteur du câble coaxial est correctement connecté au port coaxial.
Vous devrez peut-être le visser. La connexion coaxiale s'étend au-delà de votre maison
aussi utilisez le bouton ENCRYPT (CRYPTER) pour sécuriser votre réseau après avoir
effectué la connexion.
Le voyant marche ( ) doit être allumé et le voyant Ethernet ( ) doit être allumé ou
clignotant.

FRANÇAIS
31
V Si aucune des LED n'est allumée, débranchez votre appareil et vérifiez à
nouveau les connexions de votre matériel.
2 Connecter le PLA402 v2 à un ordinateur
1 Utilisez un câble Ethernet pour connecter le port LAN (A) sur le PLA402 v2 au port
Ethernet (B) sur votre ordinateur.
2 Connectez le PLA402 v2 à une prise d'alimentation. Votre câble d'alimentation et la
prise sont peut-être différents.
A
B

FRANÇAIS
32
• Vous pouvez aussi connecter un câble coaxial à une prise coaxiale.
Le voyant marche ( ) doit être allumé et le voyant Ethernet ( ) doit être allumé ou
clignotant. Si ces voyants ne sont pas allumés, débranchez votre appareil et revérifiez les
connexions matérielles.
• Si le voyant liaison ( ) s'allume lors de la première installation de vos PLA402 v2s,
votre réseau HomePlug AV est prêt à être utilisé. Cependant, les PLA402 v2s peuvent
tous deux utiliser le nom de réseau par défaut HomePlugAV. Ce nom de réseau bien
connu permet d'accéder à votre réseau HomePlug AV. Vous pouvez améliorer la sécurisa-
tion de votre nom de réseau en allant à la prochaine section pour installer un réseau
HomePlug AV avec ENCRYPT.
• Si le voyant liaison ( ) ne s'allume pas, allez à la prochaine section pour installer un
réseau HomePlug AV avec ENCRYPT.
V Si vous rencontrez des difficultés pour établir vos connexions, vérifiez que:
• Vos prises fonctionnent correctement. Débranchez le PLA402 v2 et branchez un autre
appareil électrique dont vous êtes sûr de l'état de marche.
• Les câbles Ethernet que vous utilisez sont de Catégorie 5 ou supérieure. La plupart des
câbles portent une étiquette avec leurs spécifications.
• Tous les câbles Ethernet et les câbles d'alimentation sont correctement connectés.

FRANÇAIS
33
3 Installer un réseau de courant porteur en ligne avec
ENCRYPT
Utiliser le bouton ENCRYPT (CRYPTER) pour installer une connexion sécurisée entre
votre PLA402 v2 et un autre périphérique ENCRYPT (Voir le PLA-400 v2 comme
exemple).
" Utiliser la fonctionnalité ENCRYPT (CRYPTER) simultanément sur deux
périphériques.
1 Placez les périphériques de courant porteur en ligne proches les uns des autres, afin
d'avoir le temps d'installer chacun d'eux. Après avoir installé le premier périphérique de
courant porteur en ligne, vous avez 120 secondes pour installer le second périphérique
de courant porteur en ligne.
2 Appuyez sur le bouton ENCRYPT (CRYPTER) situé au dos de chacun de vos
périphériques pendant au moins 10 secondes. Cela définit un nom de réseau aléatoire.

FRANÇAIS
34
3 Appuyez sur le bouton ENCRYPT (CRYPTER) situé au dos de votre périphérique de
courant porteur en ligne pendant 1 à 2 secondes.
4 Les voyants Power (Marche) ( ) et HomePlug ( ) devraient clignoter.
Occasionnellement tous les voyants peuvent clignoter simultanément et le voyant
HomePlug ( ) peut aussi s'illuminer en rouge.
5 Patientez environ une minute le temps que vos périphériques de courant porteur en
ligne se connectent. Le voyant d'alimentation ( ) est fixe quand le délai du processus
ENCRYPT expire, le voyant HomePlug ( ) est fixe si vous avez réussi à établir une
connexion.
V Si le voyant d'alimentation ( ) ne clignote pas, vous avez probablement
appuyé trop longtemps sur le bouton ENCRYPT (CRYPTER). Essayez à
nouveau, en appuyant sur le bouton ENCRYPT (CRYPTER) pendant 1~2
secondes.
2 SEC.
DE 120 SEC.
APPUYEZ
APPUYEZ
2 SEC.
10~15 SEC.
A
B
C
EN L’ESPACE
APPUYEZ
PENDANT

FRANÇAIS
35
V Si les voyants HomePlug ( ) des deux périphériques de courant porteur
en ligne ne s'allument pas, les périphériques de courant porteur en ligne
ne sont pas connectés. Répétez les étapes 2 et 3 dans cette section. Si le
problème persiste, consultez le guide de l'utilisateur pour plus de
suggestions.
6 Pour ajouter un autre périphérique (C) de courant porteur en ligne, connectez-le avec
l'un des périphériques (A ou B) de courant porteur en ligne déjà connectés à votre
réseau de courant porteur en ligne (Voir les étapes 2 et 3 dans cette section).
7 Si vous avez déconnecté votre ordinateur ou votre modem (ou tout autre produit
réseau connecté à votre périphérique de courant porteur en ligne) dans l'étape 1 de
cette section, vous pouvez maintenant les reconnecter.
V Si le voyant HomePlug ( ) est éteint, utilisez l'utilitaire de configuration
PLA-4xx (consultez le guide de l'utilisateur pour les instructions détaillées)
pour détecter tous les autres périphériques HomePlug AV sur votre réseau
de courant porteur en ligne. Essayez de brancher un second appareil
HomePlug AV dans une prise adjacente (à votre PLA402 v2) et vérifiez si le
voyant HomePlug ( ) s'allume.
Félicitations! Ceci connecte vos périphériques de courant porteur en ligne et tout les
produits que vous avez connecté à vos périphériques de courant porteur en ligne, tels que
votre ordinateur ou votre modem réseau domestique.
C
A ou B
B
A

FRANÇAIS
36
Procédure permettant d’afficher la (les)
certification(s) d'un produit
1 Allez à www.zyxel.com.
2 Sélectionnez votre produit dans la liste déroulante
dans la page d'accueil du ZyXEL pour aller à la page
de ce produit.
3 Sélectionnez la certification que vous désirez
consulter dans cette page.
Conformité CE
Le produit satisfait aux exigences
techniques de la directive 1999/5/CE
(R&TTE) et est conçu pour être utilisé au
sein de la Communauté européenne et en Suisse. Le
produit fait partie de la classe A, ce qui signifie que son
exploitation peut entraîner des bruits parasites dans les
zones d'habitation ; le cas échéant, l'exploitant peut être
tenu de prendre des mesures appropriées pour remédier
au dérangement.

FRANÇAIS
37

ITALIANO
38
È possibile utilizzare i PLA402 v2 per collegare dispositivi di rete a una rete domestica
utilizzando come cablaggio la rete elettrica presente nella propria casa. PLA402 v2
consente di avere anche una maggiore flessibilità espandendo la rete tramite l'aggiunta
della funzione del cavo coassiale. In questo modo è possibile estendere la rete HomePlug
AV nell'edificio utilizzando cavi coassiali.
Utilizzare la funzione del pulsante ENCRYPT per configurare con una sola operazione una
rete powerline sicura compatibile HomePlug AV.
In questa Guida introduttiva si mostra a titolo di esempio come utilizzare due PLA402 v2
(B e C) per collegare il computer (A) a un modem (D) nella rete domestica per accedere a
Internet. Allo stesso modo sarà possibile collegare altri dispositivi di rete, quali un router o
uno switch. Questo esempio utilizza sia una connessione powerline che una connessione
coassiale.
In questa Guida introduttiva viene spiegato come completare le attività seguenti:
1 Collegare un PLA402 v2 a un modem Via cavo/DSL.
2 Collegare un PLA402 v2 a un computer di casa.
3 Utilizzare il pulsante ENCRYPT PLA402 v2 del per configurare una rete domestica
HomePlug AV protetta.
Fare riferimento alla Guida utente memorizzata sul CD fornito a corredo per i dettagli di
tutte le funzioni dell'PLA402 v2. Se all'inserimento del CD fornito a corredo non viene
visualizzata automaticamente una schermata, aprire il contenuto del CD (generalmente il
disco D:) con Risorse del computer e individuare la Guida utente.
A
B
C
D
Internet
ITALIANO

ITALIANO
39
Il PLA402 v2 è compatibile solo con i prodotti HomePlug AV dotati del
firmware più recente. È possibile aggiornare gli altri prodotti ZyXEL
HomePlug AV scaricando il firmware più recente dal sito Web di ZyXEL
(www.zyxel.com).
1 Collegamento del PLA402 v2 a un modem
1 Utilizzare un cavo Ethernet per collegare la porta LAN (A) del PLA402 v2 a una porta
LAN (B) disponibile sul modem.
A
B

ITALIANO
40
2 Collegare PLA402 v2 a una presa elettrica. Il cavo di alimentazione e la presa possono
apparire differenti.
• È anche possibile collegare un cavo coassiale a una presa coassiale.
Assicurarsi che il connettore del cavo coassiale sia collegato correttamente alla porta
coassiale. Può essere opportuno avvitarlo in posizione. Il collegamento coassiale si
estenderà al di fuori della casa, pertanto è opportuno utilizzare il pulsante ENCRYPT
(crittografia) per proteggere la rete una volta terminato il collegamento.
La spia alimentazione ( ) si dovrebbe accendere e la spia Ethernet ( ) dovrebbe essere
accesa o lampeggiante.

ITALIANO
41
V Se nessuno dei LED è acceso, scollegare il dispositivo e ricontrollare i
collegamenti hardware.
2 Collegamento di PLA402 v2 a un computer
1 Utilizzare un cavo Ethernet per collegare la porta LAN (A) di PLA402 v2 alla porta
Ethernet (B) sul computer.
2 Collegare PLA402 v2 a una presa elettrica. Il cavo di alimentazione e la presa possono
apparire differenti.
A
B

ITALIANO
42
• È anche possibile collegare un cavo coassiale a una presa coassiale.
La spia alimentazione ( ) dovrebbe essere accesa e la spia Ethernet ( ) dovrebbe
essere accesa o lampeggiante. Se queste spie non sono accese, scollegare il dispositivo e
ricontrollare i collegamenti hardware.
• Se le spie HomePlug ( ) si accendono la prima volta che si configura il PLA402 v2, la
rete HomePlug AV è pronta all'uso. Tuttavia entrambi i PLA402 v2 potrebbero utilizzare
il nome di rete predefinito HomePlugAV. Questo nome di rete predefinito consente di
accedere alla rete HomePlug AV. Per rendere la rete più sicura, passare alla sezione seg-
uente e configurare una rete HomePlug AV con ENCRYPT.
• Se la spia HomePlug ( ) non si accende, passare alla sezione seguente per config-
urare una rete HomePlug AV con ENCRYPT.
V Se si hanno problemi con la configurazione, verificare gli aspetti seguenti.
• Le prese funzionano correttamente. Scollegare PLA402 v2 e collegare un altro dispositivo
elettrico sicuramente funzionante.
• I cavi Ethernet utilizzati siano di Categoria 5 o superiore. La maggior parte dei cavi sono
etichettati con le specifiche tecniche.
• Tutti i cavi Ethernet elettrici sono saldamente collegati.
3 Configurazione di una rete Powerline con ENCRYPT
Utilizzare il pulsante ENCRYPT per configurare una connessione sicura tra il PLA402 v2
e un altro dispositivo dotato di funzione ENCRYPT (il PLA-400 v2 viene utilizzato come
esempio)
.

ITALIANO
43
" Utilizzare la funzione ENCRYPT su due dispositivi alla volta.
1 Posizionare i dispositivi powerline vicini tra loro, in modo da avere il tempo di
configurarli uno alla volta. Dopo aver configurato il primo dispositivo powerline, si
hanno 120 secondi a disposizione per configurare il secondo dispositivo powerline.
2 Tenere premuto per almeno 10 secondi il pulsante ENCRYPT che si trova dietro i
dispositivi. In questo modo viene impostato un nome di rete casuale.
3 Tenere premuto il pulsante ENCRYPT che si trova dietro al dispositivo powerline per 1
- 2 secondi.
4 Le spie di alimentazione ( ) e HomePlug ( ) dovrebbero lampeggiare. In alcuni
casi è possibile che tutte le spie lampeggino contemporaneamente e che anche la spia
HomePlug ( ) diventi rossa.
5 Attendere circa un minuto affinché i dispositivi powerline si connettano. La spia di
alimentazione ( ) si accende fissa quando il processo di crittografia ENCRYPT termina,
la spia HomePlug ( ) si accende fissa se la connessione ha esito positivo.
ENTRO
120 SEC.
PREMERE
2 SEC.
PREMERE
10~15 SEC.
A
B
C
PER
PER
PREMERE
2 SEC.
PER

ITALIANO
44
V Se la spia di alimentazione ( ) non lampeggia è possibile che il pulsante
ENCRYPT sia stato premuto per troppo tempo. Eseguire un'altra volta
l'operazione, premendo il pulsante ENCRYPT per 1-2 secondi.
V Se le spie HomePlug ( ) su entrambi i dispositivi powerline non si
accendono, i dispositivi powerline non sono connessi. Ripetere i passi
2 e
3 di questa sezione. Se non funziona, vedere la Guida dell'utente per
ulteriori suggerimenti.
6 Per aggiungere un altro dispositivo powerline (C) alla rete, connetterlo con uno dei
dispositivi powerline (A o B) già connessi alla rete powerline (vedere i passi 2 e 3 in
questa sezione).
7 Se si è scollegato il computer o il modem (o qualsiasi altro prodotto di rete connesso al
dispositivo powerline) al passo 1 di questa sezione, a questo punto è possibile
ricollegarlo.
V Se la spia HomePlug ( ) si spegne, utilizzare l'utilità di configurazione del
PLA-4xx (vedere la Guida dell'utente per i dettagli) per rilevare tutte le altre
periferiche HomePlug AV della rete powerline. Provare a collegare un
secondo dispositivo HomePlug AV a una presa di corrente adiacente (al
PLA402 v2) e vedere se la spia HomePlug ( ) si accende.
C
A o B
B
A

ITALIANO
45
Congratulazioni. La procedura consente di collegare dispositivi powerline e qualsiasi altro
dispositivo connesso ai dispositivi powerline, quali un home computer o un modem di rete.
Procedura per visualizzare le certificazioni di un
prodotto
1 Visitare il sito www.zyxel.com.
2 Selezionare il prodotto dall'elenco di riepilogo a
discesa nella Home Page di ZyXEL per passare alla
pagina del prodotto in questione.
3 Selezionare da questa pagina la certificazione che si
desidera visualizzare.

SVENSKA
46
Dina PLA402 v2-enheter kan användas för att ansluta nätverksprodukter i ett
hemmanätverk via vägguttagen i husets vanliga elnät. PLA402 v2 gör det även lättare att
utvidga ditt nätverk tack vare stöd för koaxialkabelanslutning. Det gör att ditt HomePlug
AV-nätverk även kan omfatta koaxialkablarna i byggnaden.
Använd funktionen med tryckknappen ENCRYPT för att installera ett säkert HomePlug AV-
kompatibelt elnätsburet nätverk.
I den här snabbstartguiden förklarar vi hur du kan använda två PLA402 v2-enheter (B och
C) för att ansluta din dator (A) till internet via ett modem (D) som är kopplat till ditt
hemmanätverk. Det går att ansluta andra nätverksenheter, t.ex. en router eller en switch,
på samma sätt. I detta exempel utnyttjas anslutningar via både elnätet och
koaxialkabelnätet.
Denna snabbstartguide visar hur du gör följande anslutningar:
1 Anslutning av en PLA402 v2 till ett kabelmodem/DSL-modem.
2 Anslutning av en PLA402 v2 till en dator du har hemma.
3 Använd knappen ENCRYPT på PLA402 v2 för att installera ett säkert HomePlug AV
hemmanätverk.
Se bruksanvisningen på den medföljande CD-skivan för information om alla funktioner hos
PLA402 v2. Om en startbild inte visas när du sätter i den medföljande CD-skivan, använd
Windows Explorer (Utforskaren i Den här datorn) för att gå till CD-ROM-enheten (vanligtvis D)
och söka efter User’s Guide.
A
B
C
D
Internet
SVENSKA

SVENSKA
47
" Din PLA402 v2 är bara kompatibel med HomePlug AV-produkter som har
den senaste programvaran (firmware). Du kan uppgradera dina andra
ZyXEL HomePlug AV-produkter genom att hämta den senaste fasta
programvaran från ZyXELs webbplats (www.zyxel.com).
1 Ansluta PLA402 v2 till ett modem
1 Anslut ena änden av en Ethernetkabel till LAN-porten (A) på PLA402 v2 och den andra
till en Ethernet LAN-port (B) på modemet.
A
B

SVENSKA
48
2 Anslut PLA402 v2 till ett eluttag. Elkablarna och uttagen hos dig kan se annorlunda ut
än i detta exempel.
• Du kan även ansluta en koaxialkabel till ett koaxialuttag.
Försäkra dig om att koaxialkabelns anslutningsdon är korrekt anslutet till koaxialporten. Du
kanske måste skruva in det på plats. Eftersom koaxialanslutningen kommer att nå utanför
byggnaden bör du använda knappen ENCRYPT för att säkra nätverket efter att du har
upprättat anslutningen.
Lampan Ström ( ) bör lysa och lampan Ethernet ( ) bör lysa med fast sken eller blinka.
V Om ingen indikatorlampa tänds, koppla bort enheten och kontrollera dina
maskinvaruanslutningar på nytt.

SVENSKA
49
2 Ansluta PLA402 v2 till dator
1 Använd en Ethernet-sladd för att ansluta LAN-porten (A) på PLA402 v2 till datorns
Ethernet-port (B).
2 Anslut PLA402 v2 till ett eluttag. Elkablarna och uttagen hos dig kan se annorlunda ut
än i detta exempel.
A
B

SVENSKA
50
• Du kan även ansluta en koaxialkabel till ett koaxialuttag.
Lampan Ström ( ) bör lysa och lampan Ethernet ( ) bör lysa med fast sken eller blinka.
Om ingen indikatorlampa tänds kopplar du bort enheten och kontrollerar alla
maskinvaruanslutningar.
• Om lamporna HomePlug ( ) tänds första gången du installerar dina PLA402 v2 är
HomePlug AV-näverket klart att användas. Det är möjligt att båda dina PLA402 v2
använder standardnätverksbeteckningen HomePlugAV. Den här välkända
nätverksbeteckningen ger tillgång till HomePlug AV-nätverket. Det går att öka säkerheten
för nätverksbeteckningen genom att följa instruktionerna i nästa avsnitt för installation av
ett HomePlug AV-nätverk med ENCRYPT (kryptering).
• Om lamporna HomePlug ( ) inte tänds, se nästa avsnitt om installation av ett
HomePlug AV-nätverk med ENCRYPT (kryptering).
V Om du har problem med att ställa in dina anslutningar, kontrollera att:
• Dina uttag fungerar som de ska. Koppla ur PLA402 v2 och anslut en annan elapparat som
du vet fungerar.
• Ethernet-kablarna du använder är av kategori 5 eller högre. De flesta sladdar är märkta
med sina specifikationer.
• Alla Ethernet och strömkablar är ordentligt anslutna.

SVENSKA
51
3 Installera ett HomePlug AV-nätverk med ENCRYPT
(kryptering)
Använd knappen ENCRYPT för att ställa in en säker anslutning mellan PLA402 v2 och en
annan ENCRYPT-anpassad enhet (PLA-400 v2 visas som exempel).
" Använda ENCRYPT-funktionen på två enheter samtidigt.
1 Placera strömlinje enheterna nära varandra så att du har tillräckligt med tid för att
installera var och en. När du har installerat den första strömlinje enheten, har du 120
sekunder på dig att installera den andra strömlinje enheten.
2 Håll knappen ENCRYPT på baksidan av båda enheterna intryckt i mer än 10 sekunder.
Detta ställer in ett slumpmässigt nätverksnamn.
3 Håll knappen ENCRYPT på baksidan av strömlinje enheten intryckt i 1-2 sekunder.
4 Strömlampan ( ) och lampan HomePlug ( ) ska blinka. Ibland händer det att alla
lampor blinkar på samma gång och lampan HomePlug ( ) kanske lyser rött.
2 SEK.
INOM LOPPET
AV 120 SEC.
TRYCK I
TRYCK I
2 SEK.
TRYCK I
10~15 SEK.
A
B
C

SVENSKA
52
5 Vänta i cirka en minut medan strömlinje enheterna ansluter. Strömlampan ( ) lyser
stadigt när KRYPTERINGS-processens tid är klar, lampan HomePlug ( ) lyser
stadigt om anslutningen har lyckats.
V Om strömlampan ( ) inte blinkar, har du antagligen tryckt in knappen
ENCRYPT för länge. Försök igen och tryck på knappen ENCRYPT i 1~2
sekunder.
V Om lamporna HomePlug ( ) på båda strömlinjeenheter inte tänds, är
strömlinjeenheterna inte anslutna. Upprepa steg 2 och 3 i det här avsnittet.
Om detta inte fungerar, se bruksanvisningen för fler förslag.
6 För att lägga till ytterligare strömlinje enheter (C) till ditt nätverk, anslut den till en av
i nätverket redan aktiva strömlinje enheter (A eller B)
(se steg 2 och 3 i detta
avsnitt).
7 Om du kopplade bort datorn eller modemet (eller någon annan nätverksprodukt som
var ansluten till din strömlinje enhet) i steg 1 av det här avsnittet kan du nu ansluta dem
igen.
C
A eller B
B
A

SVENSKA
53
V Om HomePlug-lampan ( ) är släckt använder du konfigurationsverktyget
PLA-4xx (se Användarhandboken för mer information) för att upptäcka alla
andra HomePlug AV-enheter som ingår i ditt elnätsburna nätverk. Pröva att
ansluta en andra HomePlug AV-enhet till ett angränsande uttag (till din
PLA402 v2) och kontrollera om HomePlug-lampan ( ) tänds.
Grattis! Detta ansluter dina strömlinje enheter och eventuella produkter du har anslutit till
dina strömlinje enheter, som t.ex. din hemdator eller ett nätverksmodem.
Procedur för att visa en produkts certifikat
1 Gå till www.zyxel.com.
2 Välj din produkt från rullgardinslistrutan på ZyXEL:s
hemsida för att gå till denna produkts sida.
3 Välj det certifikat som du vill titta på från denna sida.
Transcripción de documentos
PLA402 v2 PowerLine Hybrid Adapter Quick Start Guide Version 3.05 12/2007 Edition 1 CONTENTS ENGLISH 2 DEUTSCH 10 ESPAÑOL 20 FRANÇAIS 28 ITALIANO 38 SVENSKA 46 Copyright © 2007. All rights reserved. ENGLISH You can use your PLA402 v2s to connect networking products on a home network using the standard electrical wiring in your house. The PLA402 v2 also allows you to be more flexible in expanding your network by adding coaxial cable capability. This expands your HomePlug AV network across the coaxial cables in your building. To create a secure HomePlug AV network you can use the ENCRYPT button on the rear panel of the PLA402 v2. As an example, this Quick Start Guide shows you how to use two PLA402 v2s (B and C) to connect your computer (A) to a modem (D) on your home network for Internet access. You can connect other networking products, such as a router or switch, the same way. This example uses both a powerline connection and coaxial connection. A B Internet C D The coaxial connection offers a greater range than a powerline connection. This makes it suitable for setting up networks in large areas such as apartment buildings, communities, hotels and ships. This Quick Start Guide shows you how to complete the following: 1 Connect a PLA402 v2 to a Cable/DSL modem. 2 Connect a PLA402 v2 to a computer in your home. 3 Use the PLA402 v2’s ENCRYPT button to set up a HomePlug AV secure home network. See the User’s Guide on the included CD for details on all of the PLA402 v2’s features. If a screen does not pop-up when you insert the included CD, use Windows Explorer (My Computer) to go to the CD-ROM (commonly drive D) and browse for the User’s Guide. 2 ENGLISH " Your PLA402 v2 is only compatible with HomePlug AV products with the latest firmware. You can upgrade your other ZyXEL HomePlug AV products by downloading the latest firmware from the ZyXEL website (www.zyxel.com). 1 Connecting the PLA402 v2 to a Modem 1 Use an Ethernet cable to connect the LAN port (A) on the PLA402 v2 to an available Ethernet LAN port (B) of your modem. B A 2 Connect the PLA402 v2 to a power outlet. Your power cable and outlet may look different. 3 ENGLISH • You can also connect a coaxial cable to a coaxial outlet. Ensure the coaxial cable connector is properly connected to the coaxial port. You may have to screw it in. The coaxial connection will extend beyond your house so use the ENCRYPT button to secure your network after completing the connection. The power ( V ) light should be on and the Ethernet ( ) light should be on or blinking. If none of the lights are on, unplug your device and recheck your hardware connections. 2 Connecting the PLA402 v2 to a Computer 1 Use an Ethernet cable to connect the LAN port (A) on the PLA402 v2 to the Ethernet port (B) on your computer. A B 4 ENGLISH 2 Connect the PLA402 v2 to a power outlet. Your power cable and outlet may look different. • You can also connect a coaxial cable to a coaxial outlet. The power ( ) light should be on and the Ethernet ( ) light should be on or blinking. If these lights are not on, unplug your device and recheck your hardware connections. • If the HomePlug ( ) lights turn on the first time you set up your PLA402 v2s, your HomePlug AV network is ready for use. However, the PLA402 v2s may both be using the default network name HomePlugAV. This well-known network name allows access to your HomePlug AV network. You can make your network name more secure by going to the next section to set up a HomePlug AV network with ENCRYPT. • If the HomePlug ( ) lights do not turn on, go to the next section to set up a HomePlug AV network with ENCRYPT. 5 ENGLISH V If you are having trouble setting up your connections, make sure: • Your outlets are working properly. Unplug the PLA402 v2 and plug in another electrical appliance that you know works. • The Ethernet cables you are using are Category 5 or higher. Most cables are labeled with their specifications. • All Ethernet and power cables are securely connected. 3 Set Up a HomePlug AV Network with ENCRYPT Use the ENCRYPT button to set up a secure connection between your PLA402 v2 and another ENCRYPT-enabled device (The PLA-400 v2 is shown as an example). " Use the ENCRYPT feature on two devices at a time. 1 Place the powerline devices close to each other, as you only have two minutes to press the ENCRYPT buttons on both devices. You can disconnect the devices from your computer or modem (or other networking equipment) if you need to, but the powerline devices need to be plugged into power outlets. 2 Press the ENCRYPT button at the rear of both of your devices for 10~15 seconds. This sets up a random network name. 6 ENGLISH 3 Press the ENCRYPT buttons at the rear of your powerline devices for 1~2 seconds A PRESS 10~15 SEC. B PRESS 2 SEC. WITHIN 120 SEC. C PRESS 2 SEC. 4 While the devices are connecting, the power ( ) and HomePlug ( several times all lights blink at the same time and the HomePlug ( ) lights blink. Also ) light shows red. 5 Wait for about one minute while your powerline devices connect. The power ( ) light is steady when the ENCRYPT process times out, the HomePlug ( ) light is steady if you have a successful connection. V V If the power ( ) light does not blink, you have probably pressed the ENCRYPT button for too long. Try again, pressing the ENCRYPT button for 1~2 seconds. If the HomePlug ( ) lights on both powerline devices do not light up, the powerline devices are not connected. Repeat steps 2 and 3 in this section. If that doesn’t work, see the User’s Guide for more suggestions. 7 ENGLISH 6 To add another powerline device (C) to your network, connect it with one of the powerline devices (A or B) already connected to your powerline network (See steps 2 and 3 in this section). A B A or B C 7 If you disconnected your powerline devices from your computer or modem (or any other networking product connected to your powerline device) in step 1 of this section, you can now reconnect them. V If the HomePlug ( ) light is off, use the PLA-4xx configuration utility (see the User’s Guide for details) to detect all other HomePlug AV devices on your power line network. Try plugging a second HomePlug AV device into an adjacent socket (to your PLA402 v2) and see if the HomePlug ( ) light comes on. Procedure to View a Product’s Certification(s) 1 Go to www.zyxel.com. 2 Select your product from the drop-down list box on the ZyXEL home page to go to that product's page. 3 Select the certification you wish to view from this page. 8 ENGLISH 9 DEUTSCH Mit dem PLA402 v2 können Sie zu Hause Netzwerkgeräte über das herkömmliche Stromnetz zu einem Heimnetzwerk zusammenschließen. Mit dem PLA402 v2 können Sie Ihr Netzwerk flexibel erweitern, indem Sie zu Ihrem Netzwerk die Anschlussmöglichkeit von Koaxialkabeln hinzufügen. Dadurch wird das HomePlug AV-Netzwerk auf die Koaxialkabel im Gebäude erweitert. Verwenden Sie die ENCRYPT-Taste, um ein sicheres HomePlug AV-kompatibles Powerline-Netzwerk einzurichten. In dieser Kurzanleitung wird beispielhaft gezeigt, wie Sie mit zwei PLA402 v2 (B und C) Ihren Computer (A) für den Internetzugang an ein Modem (D) Ihres Heimnetzwerks anschließen können. Auf die gleiche Art können Sie andere Netzwerkgeräte wie Router oder Switches anschließen In diesem Beispiel wird sowohl eine Powerline-Verbindung als auch eine Koaxialverbindung gezeigt.. A B Internet C D Diese Kurzanleitung enthält die folgenden Anleitungen: 1 Anschließen eines PLA402 v2 an ein Kabel-/DSL-Modem. 2 Anschließen eines PLA402 v2 an einen Heimcomputer. 3 Richten Sie mit der Taste ENCRYPT (Verschlüsseln) des PLA402 v2 ein sicheres HomePlug AV-Heimnetzwerk ein. Eine Beschreibung aller Funktionen des PLA402 v2 finden Sie im Benutzerhandbuch, dass auf der CD enthalten ist. Wenn die CD nach dem Einlegen nicht gestartet wird, rufen Sie mit Windows Explorer (Arbeitsplatz) die CD-ROM auf (normalerweise Laufwerk D), und öffnen Sie dort die Datei des Benutzerhandbuchs. 10 DEUTSCH " Der PLA402 v2 ist nur kompatibel mit HomePlug AV-Produkten, die über die neueste Firmware verfügen. Sie können andere ZyXEL HomePlug AVProdukte aktualisieren, indem Sie die neueste Firmware von der ZyXELWebsite (www.zyxel.com) herunterladen. 1 Anschließen des PLA402 v2 an ein Modem 1 Schließen Sie ein Ethernet-Kabel an den LAN-Port (A) des PLA402 v2 und an einen freien Ethernet-LAN-Port (B) des Modems an. B A 2 Schließen Sie den PLA402 v2 an eine Netzsteckdose an. Ihr Stromkabel kann etwas von der Abbildung abweichen. 11 DEUTSCH • Sie können auch ein Koaxialkabel an einen Koaxialanschluss anschließen. Stellen Sie sicher, dass der Koaxialstecker fest am Koaxialanschluss angeschlossen ist. Möglicherweise müssen Sie ihn dazu etwas hineindrehen. Da die Koaxialverbindung aus ihrem Haus hinausführt, sollten Sie nach dem Anschluss des Geräts mit der Taste ENCRYPT das Netzwerk sichern. Die Netz-LED ( zu blinken. V ) beginnt zu leuchten, und die Ethernet-LED ( ) beginnt zu leuchten oder Wenn keine der LEDs leuchtet, prüfen Sie noch einmal alle Kabelverbindungen. 2 Anschließen des PLA402 v2 an einen Computer 12 DEUTSCH 1 Schließen Sie ein Ethernetkabel an den LAN-Anschluss (A) des PLA402 v2 und an den Ethernetanschluss (B) des Computers an. A B 2 Schließen Sie den PLA402 v2 an eine Netzsteckdose an. Ihr Stromkabel kann etwas von der Abbildung abweichen. 13 DEUTSCH • Sie können auch ein Koaxialkabel an einen Koaxialanschluss anschließen. Die Netz-LED ( ) beginnt zu leuchten, und die Ethernet-LED ( ) beginnt zu leuchten oder zu blinken. Sollten die LEDs nicht leuchten, trennen Sie das Gerät vom Stromnetz, und prüfen Sie die Kabelverbindungen. • Wenn die HomePlug-LED ( ) leuchtet, nachdem Sie den PLA402 v2 das erste Mal eingerichtet haben, kann das HomePlug AV-Netzwerk verwendet werden. Möglicherweise verwenden beide PLA402 v2 den Standardnetzwerknamen HomePlugAV. Dieser bekannte Netzwerkname ermöglicht den Zugriff auf Ihr HomePlug AV-Netzwerk. Sie können den Netzwerknamen sicherer machen, indem Sie wie im nächsten Abschnitt beschrieben ein HomePlug AV-Netzwerk mit der Verschlüsselungsfunktion ENCRYPT (Verschlüsseln) einrichten. • Wenn die HomePlug-LEDs ( ) nicht leuchten, richten Sie wie im nächsten Abschnitt beschrieben ein HomePlug AV-Netzwerk mit der Verschlüsselungsfunktion ENCRYPT (Verschlüsseln) ein. V Wenn Sie Probleme haben, das Gerät anzuschließen, stellen Sie sicher, • dass die Netzsteckdose richtig funktioniert. Trennen Sie den PLA402 v2 vom Stromnetz und schließen Sie an dieselbe Netzsteckdose ein anderes Gerät an, von dem Sie wissen, dass es funktioniert. • dass Sie Ethernetkabel der Kategorie 5 oder höher verwenden. Bei den meisten Kabeln sind die Spezifikationen aufgedruckt. • dass alle Ethernet und Stromkabel fest angeschlossen sind. 14 DEUTSCH 3 Einrichten eines Powerline Netzwerks mit ENCRYPT Richten Sie mit der ENCRYPT-Taste eine sichere Verbindung zwischen Ihrem PLA402 v2 und einem anderen ENCRYPT-fähigen Gerät ein (als Beispiel zeigt die Abbildung den PLA-400 v2). " Verwenden Sie die ENCRYPT-Funktion an zwei Geräten gleichzeitig 1 Stellen Sie die Powerline-Geräte nahe beieinander auf, sodass Sie genügend Zeit haben, beide Geräte mittels ENCRYPT Taste einzurichten. Nachdem Sie das erste Powerline-Gerät eingerichtet haben, haben Sie noch 120 Sekunden Zeit, um das zweite Powerline-Gerät einzurichten. Die Verbindung zum Computer oder Modem (oder einem anderen Netzwerkgerät) kann getrennt werden, aber die Powerline-Geräte müssen am Stromnetz angeschlossen bleiben. 2 Drücken Sie länger als 10 Sekunden auf die ENCRYPT-Taste, die sich an der Rückseite der Geräte befindet. Dadurch wird ein zufälliger Netzwerkname eingerichtet. 15 DEUTSCH 3 Drücken Sie 1 bis 2 Sekunden lang auf die ENCRYPT-Taste, die sich an der Rückseite des Powerline-Geräts befindet. A DRÜCKEN SIE 10 SEK LANG B DRÜCKEN SIE 2 SEK.LANG INNERHALB VON 120 SEK. C DRÜCKEN SIE 2 SEK. LANG 4 Die Stromanzeige-LED ( ) und die HomePlug-LED ( ) sollten jetzt blinken. Es kann vorkommen, dass alle LEDs gleichzeitig blinken, und dass auch die HomePlug-LED ( ) rot leuchtet. 5 Es dauert etwa eine Minute, bis die Powerline-Geräte eine Verbindung hergestellt haben. Die LED-Anzeige Power ( ) leuchtet dauerhaft, wenn der ENCRYPT-Vorgang abgelaufen ist, die LED-Anzeige HomePlug ( ) leuchtet ständig, wenn die Verbindung erfolgreich hergestellt wurde. V Wenn die LED-Anzeige Power ( ) nicht blinkt, haben Sie möglicherweise zu lang auf die Taste ENCRYPT gedrückt. Drücken Sie noch einmal 1 bis 2 Sekunden lang auf die Taste ENCRYPT. 16 DEUTSCH V Wenn die HomePlug-LEDs ( ) an beiden Powerline-Geräten nicht leuchten, sind die Powerline-Geräte nicht verbunden. Wiederholen Sie die in diesem Abschnitt beschriebenen Schritte 2, und 3 Weitere Hinweise finden Sie im Benutzerhandbuch. 6 Wenn Sie ein weiteres Powerline-Gerät (C) an das Netzwerk anschließen möchten, stellen Sie die Verbindung zu anderen Powerline-Geräten (A oder B) her, die bereits an das Netzwerk angeschlossen sind (siehe Schritte 2 und 3 in diesem Abschnitt) . A B A oder B C 7 Wenn Sie Ihren Computer oder Ihr Modem (oder ein anderes Netzwerkgerät, das mit dem verbunden ist) in Schritt 1 dieses Abschnitts abgetrennt haben, können Sie diese Geräte nun wieder anschließen. V Wenn die HomePlug-LED ( ) nicht leuchtet, versuchen Sie, mit dem PLA-4xx-Konfigurationsprogramm (Informationen dazu finden Sie im Benutzerhandbuch) alle anderen HomePlug AV-Geräte zu ermitteln, die sich im Powerline-Netzwerk befinden. Schließen Sie ein zweites HomePlug AV-Gerät an eine dem PLA402 v2 benachbarte Steckdose an, und prüfen Sie, ob die HomePlug-LED ( ) nun leuchtet. Herzlichen Glückwunsch! Auf diese Weise können Sie mit Ihren Powerline-Geräten und allen Geräten, die Sie an die Powerline-Geräte angeschlossen haben wie Computer oder Netzwerkmodems, ein Heimnetzwerk errichten. 17 DEUTSCH . Schritte zum Ansehen von Produktzertifizierung(en) 1 Zu www.zyxel.com. 2 Wählen Sie auf der ZyXEL-Homepage aus der Dropdown-Liste Ihr Produkt aus, um zur entsprechenden Produktseite zu gelangen. 3 Wählen Sie auf dieser Seite die gewünschte Zertifizierung aus. CE-Konformität Das Produkt entspricht den grundlegenden Anforderungen der Richtlinie 1999/5/EG (R&TTE) sowie den übrigen einschlägigen Bestimmungen des FTEG und ist zum Betrieb in der EU und Schweiz vorgesehen. Das Produkt ist eine Einrichtung der Klasse A. Diese Einrichtung kann im Wohnbereich Funkstörungen verursachen; in diesem Fall kann vom Betreiber verlangt werden, angemessene Massnahmen durchzuführen. 18 DEUTSCH 19 ESPAÑOL Puede utilizar sus PLA402 v2 para conectar los dispositivos de red en una red doméstica utilizando el cableado eléctrico de su casa. El PLA402 v2 también le permite ser más flexible al poder ampliar su red incorporando la capacidad del cable coaxial. Esto amplía su red HomePlug AV por todos los cables coaxiales del edificio. Utilice el botón ENCRYPT para configurar una red de línea eléctrica segura compatible con HomePlug AV. Como ejemplo, esta Guía de instalación rápida le muestra cómo utilizar dos PLA402 v2 (B y C) para conectar su ordenador (A) a un módem (D) en su red de casa para acceso a Internet. Puede conectar otros dispositivos de red, como un router o switch, del mismo modo. Este ejemplo utiliza una conexión de línea eléctrica y una conexión coaxial. A B Internet C D Esta Guía de instalación rápida le muestra cómo completar lo siguiente: 1 Conectar un PLA402 v2 a un módem Cable/DSL. 2 Conectar un PLA402 v2 a un ordenador en su hogar. 3 Utilizar el botón del PLA402 v2 ENCRYPT para configurar una red doméstica segura HomePlug AV. Consulte la Guía del usuario en el CD incluido para más detalles sobre todas las características del PLA402 v2. Si no aparece una pantalla al insertar el CD incluido, utilice Windows Explorer (Mi PC) para ir al CD-ROM (normalmente la unidad D) y busque Guía del usuario. 20 ESPAÑOL " Su PLA402 v2 sólo es compatible con productos HomePlug AV con el último firmware. Puede actualizar sus productos ZyXEL HomePlug AV descargando el último firmware desde el sitio web de ZyXEL (www.zyxel.com). 1 Conectar el PLA402 v2 a un módem 1 Utilice un cable Ethernet para conectar el puerto LAN (A) del PLA402 v2 a un puerto LAN Ethernet disponible (B) de su módem. B A 21 ESPAÑOL 2 Conecte el PLA402 v2 en una toma de corriente. Su cable de alimentación y toma de corriente pueden ser distintos. • También puede conectar un cable coaxial en una toma coaxial. Compruebe que el conector del cable coaxial esté bien conectado al puerto coaxial. Puede que necesite enroscarlo. La conexión coaxial sale fuera de su casa, utilice el botón ENCRYPT para asegurar su red tras completar la conexión. La luz alimentación ( ) debería estar encendida y la luz Ethernet ( encendida o parpadeando. V ) debería estar Si el LED LINK no está encendido, inténtelo utilizando otra toma de corriente. 22 ESPAÑOL 2 Conectar el PLA402 v2 a un ordenador 1 Utilice un cable Ethernet para conectar el puerto LAN (A) del PLA402 v2 al puerto Ethernet (B) del ordenador. A B 2 Conecte el PLA402 v2 en una toma de corriente. Su cable de alimentación y toma de corriente pueden ser distintos. 23 ESPAÑOL • También puede conectar un cable coaxial en una toma coaxial. La luz alimentación ( ) debería estar encendida y la luz Ethernet ( ) debería estar encendida o parpadeando. Si estas luces no están encendidas, desenchufe su dispositivo y vuelva a comprobar las conexiones del hardware. • Si la luz HomePlug ( ) se enciende la primera vez que configura sus PLA402 v2, su red HomePlug AV está lista ser usada. Sin embargo, ambos PLA402 v2 pueden utilizar el nombre de red predeterminado HomePlugAV. Este conocido nombre de red permite el acceso a su red HomePlug AV. Puede hacer que su nombre de red sea más seguro yendo a la siguiente sección para configurar una red HomePlug AV con ENCRYPT. • Si la luz HomePlug ( ) no se enciende, vaya a la siguiente sección para configurar una red HomePlug AV con ENCRYPT. V Si tiene problemas configurando sus conexiones, compruebe si: • Sus tomas funcionan correctamente. Desenchufe el PLA402 v2 y enchufe otro aparato eléctrico que sepa que funciona. • Los cables Ethernet que utiliza son de Categoría 5 o mayor. La mayoría de cables están etiquetados con sus especificaciones. • Todos los cables Ethernet y de corriente están conectados de forma segura. 3 Configurar una red Powerline con ENCRYPT Utilice el botón ENCRYPT para configurar una conexión segura entre su PLA402 v2 y otro dispositivo compatible con ENCRYPT (el PLA-400 v2 aparece como ejemplo). 24 ESPAÑOL " Utilice la característica ENCRYPT en dos dispositivos al mismo tiempo. 1 Coloque los dispositivos cerca el uno del otro, para tener tiempo para configurar cada uno. Tras configurar el primer dispositivo de línea eléctrica, tendrá 120 segundos para configurar el segundo dispositivo. 2 Pulse el botón ENCRYPT en la parte posterior de los dos dispositivos durante más de 10 segundos. Esto configura un nombre de red al azar. 3 Pulse el botón ENCRYPT de la parte posterior de su dispositivo de línea eléctrica durante 1-2 segundos. A PULSE 10-15 SEG. B PULSE 2 SEG. EN 120 SEG. C PULSE 2 SEG. 4 Las luces de alimentación ( ) y HomePlug ( ) deberían estar parpadeando. Ocasionalmente todas las luces pueden parpadear al mismo tiempo y la luz HomePlug ( ) también puede que aparezca en rojo. 5 Espere alrededor de un minuto mientras sus dispositivos de línea eléctrica se conectan. La luz de alimentación ( ) se enciende fija cuando se acaba el tiempo de proceso de ENCRYPT (CIFRADO), la luz HomePlug ( ) se enciende fija cuando se establece la conexión con éxito. 25 ESPAÑOL V V Si la luz de alimentación ( ) no parpadea, probablemente ha mantenido pulsado el botón ENCRYPT demasiado tiempo. Vuelva a intentarlo, pulsando el botón ENCRYPT durante 1 o 2 segundos. Si las luces HomePlug ( ) en ambos dispositivos de línea eléctrica no se encienden, los dispositivos de línea eléctrica no están conectados. Repita los pasos 2 y 3 en esta sección. Si esto no funciona, consulte la Guía del usuario para más sugerencias. 6 Para agregar otro dispositivo de línea eléctrica (C) a su red, conéctelo a uno de los dispositivos de línea eléctrica (A o B) ya conectados a su red de línea eléctrica (ver pasos 2 y 3 en esta sección). A B A o B C 7 Si desconectó su ordenador o módem (o cualquier otro producto de red conectado a su dispositivo de línea eléctrica) en el paso 1 de esta sección, ahora puede volver a conectarlo. V Si la luz HomePlug ( ) está apagada, utilice la utilidad de configuración PLA-4xx (consulte la guía del usuario para los detalles) para detectar el resto de dispositivosHomePlug AV en su red de línea eléctrica. Intente enchufar un segundo dispositivo HomePlug AV en un enchufe adyacente (a su PLA402 v2) y observe si el LED HomePlug ( ) se enciende. 26 ESPAÑOL ¡Enhorabuena! Esto conecta sus dispositivos de línea eléctrica y cualquier producto que haya conectado a sus dispositivos de línea eléctrica, como su ordenador o módem de red. Procedimiento para ver la(s) certificación(es) del producto 1 Vaya a www.zyxel.com. 2 Seleccione su producto de la lista desplegable en la página inicial de ZyXEL para ir a la página de ese producto. 3 Seleccione el certificado que desee visualizar en esta página. Conformità CE Questo prodotto soddisfa le richieste tecniche della direttiva 1999/5/EG (R&TTE) ed è previsto per il funzionamento nella UE e in Svizzera.Il prodotto è dispositivo della classe A. Questo dispositivo può causare nel settore abitativo dei radiodisturbi. In questo caso può essere richiesto al gestore di prendere opportune misure. 27 FRANÇAIS Vous pouvez utiliser vos PLA402 v2s pour connecter les produits réseau sur un réseau domestique en utilisant le circuit électrique standard de votre maison. Le PLA402 v2 vous offre plus de flexibilité et étend votre réseau en ajoutant la capacité du câble coaxial. PLA402 v2 Cela étend votre réseau HomePlug AV au travers des câbles coaxiaux du bâtiment. Utilisez la fonctionnalité ENCRYPT (CRYPTAGE) presse-bouton pour installer un réseau de courant porteur en ligne compatible HomePlug AV sécurisé. En guise d'exemple, ce guide de mise en route rapide vous montre comment utiliser deux PLA402 v2s (B et C) pour connecter votre ordinateur (A) à un modem (D) sur votre réseau domestique pour accéder à Internet. De même, vous pouvez connecter d'autres produits réseau, tels qu'un routeur ou un commutateur. Cet exemple utilise à la fois une connexion par courant porteur en ligne et une connexion coaxiale. A B Internet C D Ce guide de mise en route rapide vous montre comment effectuer les opérations suivantes: 1 Connecter un PLA402 v2 à un modem câble/DSL. 2 Connecter un PLA402 v2 à un ordinateur dans votre maison. 3 Utiliser le bouton ENCRYPT (CRYPTER) du PLA402 v2 pour installer un réseau domestique sécurisé HomePlug AV. Consulter le guide de l’utilisateur sur le CD inclus pour les informations détaillées sur toutes les fonctionnalités de PLA402 v2. Si aucun écran n’apparaît quand vous insérez le CD inclus, utilisez Windows Explorer (Explorateur Windows) (My Computer) (Poste de travail) pour aller au CD-ROM (habituellement lecteur D) et recherchez le guide de l’utilisateur. 28 FRANÇAIS " Votre PLA402 v2 est uniquement compatible avec les produits HomePlug AV ayant le dernier microprogramme. Vous pouvez mettre à niveau vos autres produits ZyXEL HomePlug AV en téléchargeant le dernier microprogramme depuis le site web de ZyXEL (www.zyxel.com). 1 Connecter le PLA402 v2 à un modem 1 Utilisez un câble Ethernet pour connecter le port (A) LAN sur le PLA402 v2 à un port (B) LAN Ethernet disponible de votre modem. B A 29 FRANÇAIS 2 Connectez le PLA402 v2 à une prise d'alimentation. Votre câble d'alimentation et la prise sont peut-être différents. • Vous pouvez aussi connecter un câble coaxial à une prise coaxiale. Vérifiez que le connecteur du câble coaxial est correctement connecté au port coaxial. Vous devrez peut-être le visser. La connexion coaxiale s'étend au-delà de votre maison aussi utilisez le bouton ENCRYPT (CRYPTER) pour sécuriser votre réseau après avoir effectué la connexion. Le voyant marche ( clignotant. ) doit être allumé et le voyant Ethernet ( 30 ) doit être allumé ou FRANÇAIS V Si aucune des LED n'est allumée, débranchez votre appareil et vérifiez à nouveau les connexions de votre matériel. 2 Connecter le PLA402 v2 à un ordinateur 1 Utilisez un câble Ethernet pour connecter le port LAN (A) sur le PLA402 v2 au port Ethernet (B) sur votre ordinateur. A B 2 Connectez le PLA402 v2 à une prise d'alimentation. Votre câble d'alimentation et la prise sont peut-être différents. 31 FRANÇAIS • Vous pouvez aussi connecter un câble coaxial à une prise coaxiale. Le voyant marche ( ) doit être allumé et le voyant Ethernet ( ) doit être allumé ou clignotant. Si ces voyants ne sont pas allumés, débranchez votre appareil et revérifiez les connexions matérielles. • Si le voyant liaison ( ) s'allume lors de la première installation de vos PLA402 v2s, votre réseau HomePlug AV est prêt à être utilisé. Cependant, les PLA402 v2s peuvent tous deux utiliser le nom de réseau par défaut HomePlugAV. Ce nom de réseau bien connu permet d'accéder à votre réseau HomePlug AV. Vous pouvez améliorer la sécurisation de votre nom de réseau en allant à la prochaine section pour installer un réseau HomePlug AV avec ENCRYPT. • Si le voyant liaison ( ) ne s'allume pas, allez à la prochaine section pour installer un réseau HomePlug AV avec ENCRYPT. V Si vous rencontrez des difficultés pour établir vos connexions, vérifiez que: • Vos prises fonctionnent correctement. Débranchez le PLA402 v2 et branchez un autre appareil électrique dont vous êtes sûr de l'état de marche. • Les câbles Ethernet que vous utilisez sont de Catégorie 5 ou supérieure. La plupart des câbles portent une étiquette avec leurs spécifications. • Tous les câbles Ethernet et les câbles d'alimentation sont correctement connectés. 32 FRANÇAIS 3 Installer un réseau de courant porteur en ligne avec ENCRYPT Utiliser le bouton ENCRYPT (CRYPTER) pour installer une connexion sécurisée entre votre PLA402 v2 et un autre périphérique ENCRYPT (Voir le PLA-400 v2 comme exemple). " Utiliser la fonctionnalité ENCRYPT (CRYPTER) simultanément sur deux périphériques. 1 Placez les périphériques de courant porteur en ligne proches les uns des autres, afin d'avoir le temps d'installer chacun d'eux. Après avoir installé le premier périphérique de courant porteur en ligne, vous avez 120 secondes pour installer le second périphérique de courant porteur en ligne. 2 Appuyez sur le bouton ENCRYPT (CRYPTER) situé au dos de chacun de vos périphériques pendant au moins 10 secondes. Cela définit un nom de réseau aléatoire. 33 FRANÇAIS 3 Appuyez sur le bouton ENCRYPT (CRYPTER) situé au dos de votre périphérique de courant porteur en ligne pendant 1 à 2 secondes. A APPUYEZ PENDANT 10~15 SEC. B APPUYEZ 2 SEC. EN L’ESPACE C DE 120 SEC. APPUYEZ 2 SEC. 4 Les voyants Power (Marche) ( ) et HomePlug ( ) devraient clignoter. Occasionnellement tous les voyants peuvent clignoter simultanément et le voyant HomePlug ( ) peut aussi s'illuminer en rouge. 5 Patientez environ une minute le temps que vos périphériques de courant porteur en ligne se connectent. Le voyant d'alimentation ( ) est fixe quand le délai du processus ENCRYPT expire, le voyant HomePlug ( ) est fixe si vous avez réussi à établir une connexion. V Si le voyant d'alimentation ( ) ne clignote pas, vous avez probablement appuyé trop longtemps sur le bouton ENCRYPT (CRYPTER). Essayez à nouveau, en appuyant sur le bouton ENCRYPT (CRYPTER) pendant 1~2 secondes. 34 FRANÇAIS V Si les voyants HomePlug ( ) des deux périphériques de courant porteur en ligne ne s'allument pas, les périphériques de courant porteur en ligne ne sont pas connectés. Répétez les étapes 2 et 3 dans cette section. Si le problème persiste, consultez le guide de l'utilisateur pour plus de suggestions. 6 Pour ajouter un autre périphérique (C) de courant porteur en ligne, connectez-le avec l'un des périphériques (A ou B) de courant porteur en ligne déjà connectés à votre réseau de courant porteur en ligne (Voir les étapes 2 et 3 dans cette section). A B A ou B C 7 Si vous avez déconnecté votre ordinateur ou votre modem (ou tout autre produit réseau connecté à votre périphérique de courant porteur en ligne) dans l'étape 1 de cette section, vous pouvez maintenant les reconnecter. V Si le voyant HomePlug ( ) est éteint, utilisez l'utilitaire de configuration PLA-4xx (consultez le guide de l'utilisateur pour les instructions détaillées) pour détecter tous les autres périphériques HomePlug AV sur votre réseau de courant porteur en ligne. Essayez de brancher un second appareil HomePlug AV dans une prise adjacente (à votre PLA402 v2) et vérifiez si le voyant HomePlug ( ) s'allume. Félicitations! Ceci connecte vos périphériques de courant porteur en ligne et tout les produits que vous avez connecté à vos périphériques de courant porteur en ligne, tels que votre ordinateur ou votre modem réseau domestique. 35 FRANÇAIS Procédure permettant d’afficher la (les) certification(s) d'un produit 1 Allez à www.zyxel.com. 2 Sélectionnez votre produit dans la liste déroulante dans la page d'accueil du ZyXEL pour aller à la page de ce produit. 3 Sélectionnez la certification que vous désirez consulter dans cette page. Conformité CE Le produit satisfait aux exigences techniques de la directive 1999/5/CE (R&TTE) et est conçu pour être utilisé au sein de la Communauté européenne et en Suisse. Le produit fait partie de la classe A, ce qui signifie que son exploitation peut entraîner des bruits parasites dans les zones d'habitation ; le cas échéant, l'exploitant peut être tenu de prendre des mesures appropriées pour remédier au dérangement. 36 FRANÇAIS 37 ITALIANO È possibile utilizzare i PLA402 v2 per collegare dispositivi di rete a una rete domestica utilizzando come cablaggio la rete elettrica presente nella propria casa. PLA402 v2 consente di avere anche una maggiore flessibilità espandendo la rete tramite l'aggiunta della funzione del cavo coassiale. In questo modo è possibile estendere la rete HomePlug AV nell'edificio utilizzando cavi coassiali. Utilizzare la funzione del pulsante ENCRYPT per configurare con una sola operazione una rete powerline sicura compatibile HomePlug AV. In questa Guida introduttiva si mostra a titolo di esempio come utilizzare due PLA402 v2 (B e C) per collegare il computer (A) a un modem (D) nella rete domestica per accedere a Internet. Allo stesso modo sarà possibile collegare altri dispositivi di rete, quali un router o uno switch. Questo esempio utilizza sia una connessione powerline che una connessione coassiale. A B Internet C D In questa Guida introduttiva viene spiegato come completare le attività seguenti: 1 Collegare un PLA402 v2 a un modem Via cavo/DSL. 2 Collegare un PLA402 v2 a un computer di casa. 3 Utilizzare il pulsante ENCRYPT PLA402 v2 del per configurare una rete domestica HomePlug AV protetta. Fare riferimento alla Guida utente memorizzata sul CD fornito a corredo per i dettagli di tutte le funzioni dell'PLA402 v2. Se all'inserimento del CD fornito a corredo non viene visualizzata automaticamente una schermata, aprire il contenuto del CD (generalmente il disco D:) con Risorse del computer e individuare la Guida utente. 38 ITALIANO Il PLA402 v2 è compatibile solo con i prodotti HomePlug AV dotati del firmware più recente. È possibile aggiornare gli altri prodotti ZyXEL HomePlug AV scaricando il firmware più recente dal sito Web di ZyXEL (www.zyxel.com). 1 Collegamento del PLA402 v2 a un modem 1 Utilizzare un cavo Ethernet per collegare la porta LAN (A) del PLA402 v2 a una porta LAN (B) disponibile sul modem. B A 39 ITALIANO 2 Collegare PLA402 v2 a una presa elettrica. Il cavo di alimentazione e la presa possono apparire differenti. • È anche possibile collegare un cavo coassiale a una presa coassiale. Assicurarsi che il connettore del cavo coassiale sia collegato correttamente alla porta coassiale. Può essere opportuno avvitarlo in posizione. Il collegamento coassiale si estenderà al di fuori della casa, pertanto è opportuno utilizzare il pulsante ENCRYPT (crittografia) per proteggere la rete una volta terminato il collegamento. La spia alimentazione ( ) si dovrebbe accendere e la spia Ethernet ( accesa o lampeggiante. 40 ) dovrebbe essere ITALIANO V Se nessuno dei LED è acceso, scollegare il dispositivo e ricontrollare i collegamenti hardware. 2 Collegamento di PLA402 v2 a un computer 1 Utilizzare un cavo Ethernet per collegare la porta LAN (A) di PLA402 v2 alla porta Ethernet (B) sul computer. A B 2 Collegare PLA402 v2 a una presa elettrica. Il cavo di alimentazione e la presa possono apparire differenti. 41 ITALIANO • È anche possibile collegare un cavo coassiale a una presa coassiale. La spia alimentazione ( ) dovrebbe essere accesa e la spia Ethernet ( ) dovrebbe essere accesa o lampeggiante. Se queste spie non sono accese, scollegare il dispositivo e ricontrollare i collegamenti hardware. • Se le spie HomePlug ( ) si accendono la prima volta che si configura il PLA402 v2, la rete HomePlug AV è pronta all'uso. Tuttavia entrambi i PLA402 v2 potrebbero utilizzare il nome di rete predefinito HomePlugAV. Questo nome di rete predefinito consente di accedere alla rete HomePlug AV. Per rendere la rete più sicura, passare alla sezione seguente e configurare una rete HomePlug AV con ENCRYPT. • Se la spia HomePlug ( ) non si accende, passare alla sezione seguente per configurare una rete HomePlug AV con ENCRYPT. V Se si hanno problemi con la configurazione, verificare gli aspetti seguenti. • Le prese funzionano correttamente. Scollegare PLA402 v2 e collegare un altro dispositivo elettrico sicuramente funzionante. • I cavi Ethernet utilizzati siano di Categoria 5 o superiore. La maggior parte dei cavi sono etichettati con le specifiche tecniche. • Tutti i cavi Ethernet elettrici sono saldamente collegati. 3 Configurazione di una rete Powerline con ENCRYPT Utilizzare il pulsante ENCRYPT per configurare una connessione sicura tra il PLA402 v2 e un altro dispositivo dotato di funzione ENCRYPT (il PLA-400 v2 viene utilizzato come esempio). 42 ITALIANO " Utilizzare la funzione ENCRYPT su due dispositivi alla volta. 1 Posizionare i dispositivi powerline vicini tra loro, in modo da avere il tempo di configurarli uno alla volta. Dopo aver configurato il primo dispositivo powerline, si hanno 120 secondi a disposizione per configurare il secondo dispositivo powerline. 2 Tenere premuto per almeno 10 secondi il pulsante ENCRYPT che si trova dietro i dispositivi. In questo modo viene impostato un nome di rete casuale. 3 Tenere premuto il pulsante ENCRYPT che si trova dietro al dispositivo powerline per 1 - 2 secondi. A PREMERE PER 10~15 SEC. B PREMERE PER 2 SEC. ENTRO 120 SEC. C PREMERE PER 2 SEC. 4 Le spie di alimentazione ( ) e HomePlug ( ) dovrebbero lampeggiare. In alcuni casi è possibile che tutte le spie lampeggino contemporaneamente e che anche la spia HomePlug ( ) diventi rossa. 5 Attendere circa un minuto affinché i dispositivi powerline si connettano. La spia di alimentazione ( ) si accende fissa quando il processo di crittografia ENCRYPT termina, la spia HomePlug ( ) si accende fissa se la connessione ha esito positivo. 43 ITALIANO V V Se la spia di alimentazione ( ) non lampeggia è possibile che il pulsante ENCRYPT sia stato premuto per troppo tempo. Eseguire un'altra volta l'operazione, premendo il pulsante ENCRYPT per 1-2 secondi. Se le spie HomePlug ( ) su entrambi i dispositivi powerline non si accendono, i dispositivi powerline non sono connessi. Ripetere i passi 2 e 3 di questa sezione. Se non funziona, vedere la Guida dell'utente per ulteriori suggerimenti. 6 Per aggiungere un altro dispositivo powerline (C) alla rete, connetterlo con uno dei dispositivi powerline (A o B) già connessi alla rete powerline (vedere i passi 2 e 3 in questa sezione). A B A o B C 7 Se si è scollegato il computer o il modem (o qualsiasi altro prodotto di rete connesso al dispositivo powerline) al passo 1 di questa sezione, a questo punto è possibile ricollegarlo. V Se la spia HomePlug ( ) si spegne, utilizzare l'utilità di configurazione del PLA-4xx (vedere la Guida dell'utente per i dettagli) per rilevare tutte le altre periferiche HomePlug AV della rete powerline. Provare a collegare un secondo dispositivo HomePlug AV a una presa di corrente adiacente (al PLA402 v2) e vedere se la spia HomePlug ( ) si accende. 44 ITALIANO Congratulazioni. La procedura consente di collegare dispositivi powerline e qualsiasi altro dispositivo connesso ai dispositivi powerline, quali un home computer o un modem di rete. Procedura per visualizzare le certificazioni di un prodotto 1 Visitare il sito www.zyxel.com. 2 Selezionare il prodotto dall'elenco di riepilogo a discesa nella Home Page di ZyXEL per passare alla pagina del prodotto in questione. 3 Selezionare da questa pagina la certificazione che si desidera visualizzare. 45 SVENSKA SVENSKA Dina PLA402 v2-enheter kan användas för att ansluta nätverksprodukter i ett hemmanätverk via vägguttagen i husets vanliga elnät. PLA402 v2 gör det även lättare att utvidga ditt nätverk tack vare stöd för koaxialkabelanslutning. Det gör att ditt HomePlug AV-nätverk även kan omfatta koaxialkablarna i byggnaden. Använd funktionen med tryckknappen ENCRYPT för att installera ett säkert HomePlug AVkompatibelt elnätsburet nätverk. I den här snabbstartguiden förklarar vi hur du kan använda två PLA402 v2-enheter (B och C) för att ansluta din dator (A) till internet via ett modem (D) som är kopplat till ditt hemmanätverk. Det går att ansluta andra nätverksenheter, t.ex. en router eller en switch, på samma sätt. I detta exempel utnyttjas anslutningar via både elnätet och koaxialkabelnätet. A B Internet C D Denna snabbstartguide visar hur du gör följande anslutningar: 1 Anslutning av en PLA402 v2 till ett kabelmodem/DSL-modem. 2 Anslutning av en PLA402 v2 till en dator du har hemma. 3 Använd knappen ENCRYPT på PLA402 v2 för att installera ett säkert HomePlug AV hemmanätverk. Se bruksanvisningen på den medföljande CD-skivan för information om alla funktioner hos PLA402 v2. Om en startbild inte visas när du sätter i den medföljande CD-skivan, använd Windows Explorer (Utforskaren i Den här datorn) för att gå till CD-ROM-enheten (vanligtvis D) och söka efter User’s Guide. 46 SVENSKA " Din PLA402 v2 är bara kompatibel med HomePlug AV-produkter som har den senaste programvaran (firmware). Du kan uppgradera dina andra ZyXEL HomePlug AV-produkter genom att hämta den senaste fasta programvaran från ZyXELs webbplats (www.zyxel.com). 1 Ansluta PLA402 v2 till ett modem 1 Anslut ena änden av en Ethernetkabel till LAN-porten (A) på PLA402 v2 och den andra till en Ethernet LAN-port (B) på modemet. B A 47 SVENSKA 2 Anslut PLA402 v2 till ett eluttag. Elkablarna och uttagen hos dig kan se annorlunda ut än i detta exempel. • Du kan även ansluta en koaxialkabel till ett koaxialuttag. Försäkra dig om att koaxialkabelns anslutningsdon är korrekt anslutet till koaxialporten. Du kanske måste skruva in det på plats. Eftersom koaxialanslutningen kommer att nå utanför byggnaden bör du använda knappen ENCRYPT för att säkra nätverket efter att du har upprättat anslutningen. Lampan Ström ( V ) bör lysa och lampan Ethernet ( ) bör lysa med fast sken eller blinka. Om ingen indikatorlampa tänds, koppla bort enheten och kontrollera dina maskinvaruanslutningar på nytt. 48 SVENSKA 2 Ansluta PLA402 v2 till dator 1 Använd en Ethernet-sladd för att ansluta LAN-porten (A) på PLA402 v2 till datorns Ethernet-port (B). A B 2 Anslut PLA402 v2 till ett eluttag. Elkablarna och uttagen hos dig kan se annorlunda ut än i detta exempel. 49 SVENSKA • Du kan även ansluta en koaxialkabel till ett koaxialuttag. Lampan Ström ( ) bör lysa och lampan Ethernet ( ) bör lysa med fast sken eller blinka. Om ingen indikatorlampa tänds kopplar du bort enheten och kontrollerar alla maskinvaruanslutningar. • Om lamporna HomePlug ( ) tänds första gången du installerar dina PLA402 v2 är HomePlug AV-näverket klart att användas. Det är möjligt att båda dina PLA402 v2 använder standardnätverksbeteckningen HomePlugAV. Den här välkända nätverksbeteckningen ger tillgång till HomePlug AV-nätverket. Det går att öka säkerheten för nätverksbeteckningen genom att följa instruktionerna i nästa avsnitt för installation av ett HomePlug AV-nätverk med ENCRYPT (kryptering). • Om lamporna HomePlug ( ) inte tänds, se nästa avsnitt om installation av ett HomePlug AV-nätverk med ENCRYPT (kryptering). V Om du har problem med att ställa in dina anslutningar, kontrollera att: • Dina uttag fungerar som de ska. Koppla ur PLA402 v2 och anslut en annan elapparat som du vet fungerar. • Ethernet-kablarna du använder är av kategori 5 eller högre. De flesta sladdar är märkta med sina specifikationer. • Alla Ethernet och strömkablar är ordentligt anslutna. 50 SVENSKA 3 Installera ett HomePlug AV-nätverk med ENCRYPT (kryptering) Använd knappen ENCRYPT för att ställa in en säker anslutning mellan PLA402 v2 och en annan ENCRYPT-anpassad enhet (PLA-400 v2 visas som exempel). " Använda ENCRYPT-funktionen på två enheter samtidigt. 1 Placera strömlinje enheterna nära varandra så att du har tillräckligt med tid för att installera var och en. När du har installerat den första strömlinje enheten, har du 120 sekunder på dig att installera den andra strömlinje enheten. 2 Håll knappen ENCRYPT på baksidan av båda enheterna intryckt i mer än 10 sekunder. Detta ställer in ett slumpmässigt nätverksnamn. 3 Håll knappen ENCRYPT på baksidan av strömlinje enheten intryckt i 1-2 sekunder. A TRYCK I 10~15 SEK. B TRYCK I 2 SEK. C INOM LOPPET AV 120 SEC. TRYCK I 2 SEK. 4 Strömlampan ( ) och lampan HomePlug ( ) ska blinka. Ibland händer det att alla lampor blinkar på samma gång och lampan HomePlug ( ) kanske lyser rött. 51 SVENSKA 5 Vänta i cirka en minut medan strömlinje enheterna ansluter. Strömlampan ( ) lyser stadigt när KRYPTERINGS-processens tid är klar, lampan HomePlug ( ) lyser stadigt om anslutningen har lyckats. V V Om strömlampan ( ) inte blinkar, har du antagligen tryckt in knappen ENCRYPT för länge. Försök igen och tryck på knappen ENCRYPT i 1~2 sekunder. Om lamporna HomePlug ( ) på båda strömlinjeenheter inte tänds, är strömlinjeenheterna inte anslutna. Upprepa steg 2 och 3 i det här avsnittet. Om detta inte fungerar, se bruksanvisningen för fler förslag. 6 För att lägga till ytterligare strömlinje enheter (C) till ditt nätverk, anslut den till en av i nätverket redan aktiva strömlinje enheter (A eller B) (se steg 2 och 3 i detta avsnitt). A B A eller B C 7 Om du kopplade bort datorn eller modemet (eller någon annan nätverksprodukt som var ansluten till din strömlinje enhet) i steg 1 av det här avsnittet kan du nu ansluta dem igen. 52 SVENSKA V Om HomePlug-lampan ( ) är släckt använder du konfigurationsverktyget PLA-4xx (se Användarhandboken för mer information) för att upptäcka alla andra HomePlug AV-enheter som ingår i ditt elnätsburna nätverk. Pröva att ansluta en andra HomePlug AV-enhet till ett angränsande uttag (till din PLA402 v2) och kontrollera om HomePlug-lampan ( ) tänds. Grattis! Detta ansluter dina strömlinje enheter och eventuella produkter du har anslutit till dina strömlinje enheter, som t.ex. din hemdator eller ett nätverksmodem. Procedur för att visa en produkts certifikat 1 Gå till www.zyxel.com. 2 Välj din produkt från rullgardinslistrutan på ZyXEL:s hemsida för att gå till denna produkts sida. 3 Välj det certifikat som du vill titta på från denna sida. 53-
 1
1
-
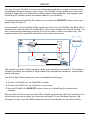 2
2
-
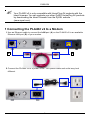 3
3
-
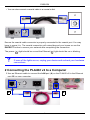 4
4
-
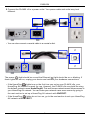 5
5
-
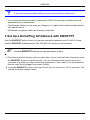 6
6
-
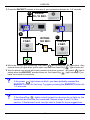 7
7
-
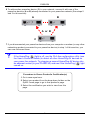 8
8
-
 9
9
-
 10
10
-
 11
11
-
 12
12
-
 13
13
-
 14
14
-
 15
15
-
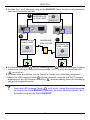 16
16
-
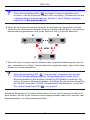 17
17
-
 18
18
-
 19
19
-
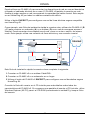 20
20
-
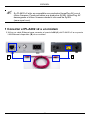 21
21
-
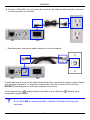 22
22
-
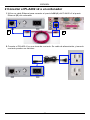 23
23
-
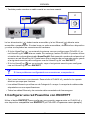 24
24
-
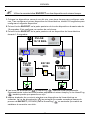 25
25
-
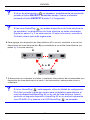 26
26
-
 27
27
-
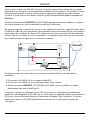 28
28
-
 29
29
-
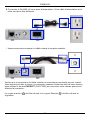 30
30
-
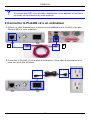 31
31
-
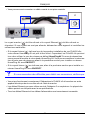 32
32
-
 33
33
-
 34
34
-
 35
35
-
 36
36
-
 37
37
-
 38
38
-
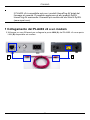 39
39
-
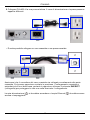 40
40
-
 41
41
-
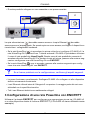 42
42
-
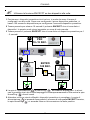 43
43
-
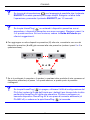 44
44
-
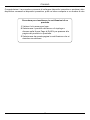 45
45
-
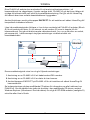 46
46
-
 47
47
-
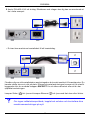 48
48
-
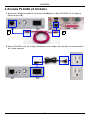 49
49
-
 50
50
-
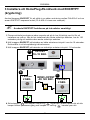 51
51
-
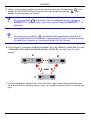 52
52
-
 53
53


ZyXEL PLA-402 V2 El manual del propietario
- Categoría
- Adaptadores de red PowerLine
- Tipo
- El manual del propietario
en otros idiomas
- français: ZyXEL PLA-402 V2 Le manuel du propriétaire
- italiano: ZyXEL PLA-402 V2 Manuale del proprietario
- English: ZyXEL PLA-402 V2 Owner's manual
- Deutsch: ZyXEL PLA-402 V2 Bedienungsanleitung
- svenska: ZyXEL PLA-402 V2 Bruksanvisning
Artículos relacionados
-
ZyXEL Communications PLA-470 Manual de usuario
-
 ZyXEL Communications PLA491 Manual de usuario
-
 ZyXEL Communications PLA450 v2 Manual de usuario
-
 ZyXEL Communications NBG318S-Serie Manual de usuario
-
ZyXEL Communications PLA5206 El manual del propietario
-
ZyXEL PLA5405 El manual del propietario
-
ZyXEL PLA4111 Guía de inicio rápido
-
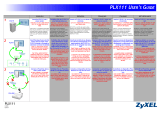 ZyXEL Communications plx111 Manual de usuario
-
 ZyXEL Communications NBG318S Series El manual del propietario
-
 ZyXEL Communications PLA-450 Guía de inicio rápido


