MTD 1P65B0B Manual de usuario
- Categoría
- Cortadoras de césped
- Tipo
- Manual de usuario

Safe Operation Practices • Set-Up • Operation • Maintenance • Troubleshooting • Warranty
OPER roR's
UAL
Model1P65BOBShown
139 cc OHV Vertical Shaft Engine
MTD LLC, P.O. BOX 361131 CLEVELAND, OHIO 44136-0019
PrintedInUSA FormNo.769-07390
(November8,2011)

ToTheOwner
1
ThankYou
This Operator's Manual isan important part of your new engine. Itwill help you prepare and maintain the engine for the best
performance. Pleaseread and understand the contents before operating the engine.
Tableof Contents
Safe Operation Practices ........................................ 3
Safety Labels ............................................................ 5
Set-Up ....................................................................... 6
Controls & Features ................................................. 8
Operation ................................................................. 9
Maintenance & Adjustments ................................. 10
Troubleshooting ..................................................... 14
Replacement Parts ................................................. 15
Warranty ................................................................. 19
Spanish .................................................................... 21
RecordProductInformation
Before operating your new engine, please locate the model plate on the engine and record the information in the provided area
below. This information will be necessary, should you seek technical support via our web site or with your local dealer.
MODEL NUMBER
DEDEDED
SERIAL NUMBER
I3EDEEEEEEIEEE
CustomerSupport
Please do NOT return the machine to the retailer or dealer without first contacting the Customer Support Department.
If you have difficulty assembling this product or have any questions regarding the controls, operation, or maintenance of
this machine, you can seek help from the experts. Choose from the options below:
Visit us on the web at www.mtdproducts..com
_!_ See How-to Maintenance and Parts Installation Videos at www, mtdparts,com/KnowledgeCenter
Call a Customer Support Representative at (800) 800-7310 or (330) 220-4683
Write to MTD LLC• P.O. Box 361131 • Cleveland, OH • 44136-0019

importantSafeOperationPractices
2
WARNING! This symbol points out important safety instructions which, if not followed,
could endanger the personal safety and/or property of yourself and others. Read and follow
all instructions in this manual before attempting to operate the equipment. Failure to
comply with these instructions may result in personal injury. When you see this symbol.
HEED IT'S WARNING!
CALIFORNIA PROPOSITION 65
WARNING! Engine Exhaust, some of its constituents, and certain vehicle components
contain or emit chemicals known to State of California to cause cancer and birth defects
or other reproductive harm.
DANGER! This machine was built to be operated according to the safe operation practices
in this manual. As with any type of power equipment, carelessness or error on the part of the
operator can result in serious injury. This machine is capable of amputating fingers, hands,
toes and feet and throwing foreign objects. Failure to observe the following safety
instructions could result in serious injury or death.
4_
5.
Training 4.
5.
1. Read, understand and follow all instructions on the engine
and in the manual(s) before attempting to assemble and
operate. Keep this manual in a safe place for future and
regular reference and for ordering replacement parts.
2. Be familiar with all controls and their proper operation.
Know how to stop the engine and disengage them quickly.
3. Never allow children under 14 years of age to operate the
engine. Children 14and over should read and understand
the instructions and safe operation practices in this manual
and be trained and supervised by an adult.
Never allow adults to operate the machine without proper
instruction.
Keep the area of operation clear of all persons, particularly
small children and pets. Stop machine if anyone enters the
atea.
Preparation
1. Thoroughly inspect the area where the equipment is to
be used. Remove all stones, sticks, wire and other foreign
objects which could be tripped over and cause personal
injury.
2. Wear sturdy, rough-soled work shoes and close fitting
slacks and shirts. Loose fitting clothes or jewelry can be
caught in the moving parts. Never operate the machine in
bare feet or sandals.
3_
Disengage clutch levers and shift (if equipped) into neutral
("N") before starting the engine.
Never leave the engine running while unattended.
Never attempt to make any adjustments while the engine
is running, except where specifically recommended in the
operator's manual.
SafeHandling 0f Gas01ine:
To avoid personal injury or property damage, use extreme care
in handling gasoline. Gasoline is extremely flammable and the
vapors are explosive. Serious personal injury can occur when
gasoline is spilled on yourself and/or your clothes which can
ignite. Wash your skin and change clothes immediately.
1. When adding fuel, turn engine OFF and let engine cool at
least 2 minutes before removing the gas cap.
2. Fill fuel tank outdoors or in well ventilated area.
3. Use only an approved gasoline container.
4. Never fill containers inside a vehicle or on a truck or trailer
bed with a plastic liner. Always place containers on the
ground away from your vehicle before filling.
5. If possible, remove gas-powered equipment from the truck
or trailer and refuel it on the ground. If this is not possible,
then refuel such equipment on a trailer with a portable
container, rather than from a gasoline dispenser nozzle.
6. Keep the nozzle in contact with the rim of the fuel tank or
container opening at all times until fueling is complete. Do
not use a nozzle lock-open device.

11.
12.
13.
14.
7. Donotoverfillfueltank.Filltanktofullasindicatedbythe
fuellevelindicatorinstalledinsideofthefueltank.Donot
over-filltoallowspaceforfuelexpansion.Onsomemodels,
afuellevelindicatormayNOTbepresent,inthisinstance,
fillthetanknomorethan1/2inchbelowthebottomofthe
fillernecktoallowspaceforfuelexpansion.
8. Replacefuelcapandtightenuntilthecapratchets.
9. Ifgasolineisspilled,wipeitofftheengineandthe
equipment.Movethemachinetoanotherarea.Waitfive
minutesbeforestartingtheengine.
10. Toreducefirehazards,keepthemachinefreeofgrass,
leavesorotherdebrisbuildup.Cleanupoilorfuelspillage
andremoveanyfuel-soakeddebris.
Keepgasolineawayfromsparks,openflames,pilotlights,
heat,andotherignitionsources.
Neverfuelequipmentindoorsbecauseflammablevapors
willaccumulateinthearea.
Extinguishallcigarettes,cigars,pipes,andothersourcesof
ignition.
Checkfuelline,tank,cap,andfittingsfrequentlyforcracks
orleaks.Replaceifnecessary.
Operation
1. When starting the engine, make sure spark plug, muffler,
and fuel cap are in place.
2. Do not crank engine with spark plug removed.
3. If fuel spills, wait until it evaporates before starting engine.
4. Allow muffler, engine cylinder, and fins to cool before
touching.
5. Keep children away from hot or running engines. They can
suffer burns from a hot muffler.
6. Remove accumulated combustibles from muffler and
cylinder area.
7. Operate equipment with all guards in place.
8. Keep hands and feet away from rotating parts.
9. Tie up long hair and remove jewelry.
10. Do not wear loose-fitting clothing, dangling drawstrings or
items that could become caught.
11. When starting the engine, pull cord slowly until resistance
is felt, then pull rapidly (if not electric start).
12. Remove all external equipment/engine loads before
starting engine.
13. Direct coupled equipment components such as, but not
limited to blades, impellers, pulleys, sprockets, etc., must
be securely attached.
Maintenance& Storage
1. Keep the engine in safe working order
2. Allow the engine to cool at least five minutes before
storing. Never tamper with safety devices. Check their
proper operation regularly.
3. Check bolts and screws for proper tightness at frequent
intervals to keep the engine in safe working condition.
Visually inspect the engine for any damage.
4. Before cleaning, repairing or inspecting; stop the
engine and make certain all moving parts have stopped.
Disconnect the spark plug wire and ground it against the
engine to prevent unintended starting.
5. Do not change the engine governor settings or over-speed
the engine. The governor controls the maximum safe
operating speed of the engine.
6. Maintain and replace safety and instruction labels as
necessary.
7. Always refer to the operator's manual for important details
if the machine is to be stored for an extended period of
time.
8.
9.
If the fuel tank has to be drained, do this outdoors.
Observe proper disposal laws and regulations for gas, oil,
etc. to protect the environment.
Donot modify engine
To avoid serious injury or death, do not modify engine in any
way. Tampering with the governor setting can lead to a runaway
engine and cause it to operate at unsafe speeds. Never tamper
with factory setting of engine governor.
Notice Regarding Emissions
Engines which are certified to comply with California and federal
EPA emission regulations for SORE (Small Off Road Equipment)
are certified to operate on regular unleaded gasoline, and
may include the following emission control systems: Engine
Modification (EM), Oxidizing Catalyst (OC), Secondary Air
Injection (SAI) and Three Way Catalyst (TWC) if so equipped.
SparkArrestor
WARNING! This machine is equipped with an
internal combustion engine and should not be used
on or near any unimproved forest-covered, brush
covered or grass-covered land unless the engine's
exhaust system is equipped with a spark arrestor
meeting applicable local or state laws (if any).
Ifa spark arrestor is used, it should be maintained in effective
working order by the operator. In the State of California the
above is required by law (Section 4442 of the California Public
Resources Code). Other states may have similar laws. Federal laws
apply on federal lands.
A spark arrestor for the muffler is available through your
nearest engine authorized service dealer or contact the service
department, P.O.Box 361131 Cleveland, Ohio 44136-0019.
4 J SECTION 2 -- IMPORTANT SAFE OPERATION PRACTICES

SafetySymbols
This page depicts and describes safety symbols that may appear on this product. Read, understand, and follow all instructions on the
machine before attempting to assemble and operate.
READ THE OPERATOR'S MANUAL(S)
Read, understand, and follow all instructions in the manual(s) before attempting to
assemble and operate
WARNING--GASOLINE IS FLAMMABLE
Allow the engine to cool at least two minutes before refueling.
WARNING-- CARBON MONOXIDE
Never run an engine indoors or in a poorly ventilated area. Engine exhaust contains carbon
monoxide, an odorless and deadly gas.
WARNING-- ELECTRICAL SHOCK
Do not use the engine's electric starter in the rain
WARNING-- HOT SURFACE
Engine parts, especially the muffler, become extremely hot during operation. Allow engine
and muffler to cool before touching.
WARNING! Your Responsibility -- Restrict the use of this power machine to persons who read, understand and
follow the warnings and instructions in this manual and on the machine.
SAVETHESEINSTRUCTIONS!
SECTION 2 -- IMPORTANT SAFE OPERATION PRACTICES S

Set-Up
3
Gas&OU
NOTE:The engine is shipped without gasoline or oil in the
engine. Running the engine with insufficient oil can cause
serious engine damage and void the engine warranty.
WARNING! Always keep hands and feet clear of
equipment moving parts. Do not use a pressurized
starting fluid. Vapors are flammable.
0il Recommendations
Before starting engine, fill with motor oil, capacity is 600 ml/20
oz. Refer to viscosity chart in Fig. 3-1 for oil recommendations.
Do not over-fill. Use a synthetic or non-synthetic 4-stroke, or an
equivalent high detergent, premium quality motor oil certified to
meet or exceed U.S. automobile manufacturer's requirements for
service classification SG, SF.Motor oils classified SG, SFwill show
this designation on the container.
SAE 10W-30 is recommended for general, all temperature use. If
single viscosity oil is used, select the appropriate viscosity for the
average temperature in your area from the chart below.
_ m_l_mm 20w
___ 20
__30
40 I!II1_
20w40, !0w50 ____mlbb
I ,v
15w40, 15w50 _____mullll_
®,
(°C)-300 -200 -10° 0° 10° 200 300 400
(°F)-20o 0° 200 400 600 800 1000
J
Figure 3-1
1. Single Viscosity
2. Multi Viscosity
CAUTION: Do not use non-detergent oil or 2-stroke engine oil. It
could shorten the engine's service life.
NOTE:A 5w30 synthetic oil may be used to improve start ability
for cold weather (temperatures below 400 F).
CheckingOilLevel
IMPORTANT: Be sure to check the oil while on a level surface with
the engine stopped.
NOTE: Your engine may be equipped with either a short or
extended oil dipstick. Follow the appropriate instructions below
for the engine on your unit.
Short Dipstick
I. Remove the oil filler cap/dipstick and wipe the dipstick
clean. See Fig. 3-2.
f
Fill
between
highand
low marks
%
2.
3.
4.
Figure 3-2
Insert the cap/dipstick into the oil filler neck, but do not
screw it in.
Remove the oil filler cap/dipstick. If the level is low, slowly
add oil until oil level registers between high (H) and low (L).
See Fig. 3-2.
Replace and tighten cap/dipstick firmly before starting
engine.
NOTE: Do not overfill. Overfilling with oil may cause
smoking, hard starting, spark plug fouling, or oil saturation
of air cleaner.

ExtendedDipstick
1. Remove the oil filler cap and wipe the dipstick clean. See
Fig. 3-3.
Oil Filler
Cap/Dipsticl
\\
Upper Limit
J
Figure 3-3
2. Insert the dipstick into the oil filler neck. Turn the dipstick a
1/4 turn into the locked position to fully seat.
3. Remove dipstick. If the level is low, slowly add oil to the
upper limit on the dipstick. See Fig. 3-3 inset.
4. Reinsert the dipstick into the locked position before
starting the engine.
NOTE: Do not overfill. Overfilling with oil may cause
smoking, hard starting, spark plug fouling, or oil saturation
of air cleaner.
FuelRequirements
CAUTION: Operating the engine with E85 fuel, an
oil/gasoline mixture, dirty gasoline, or gasoline over
• 30 days old without fuel stabilizing additive may
result in damage to your engine's carburetor.
Subsequent damage would not be covered under
the manufacturer's warranty.
Use automotive gasoline (unleaded or low leaded to minimize
combustion chamber deposits) with a minimum of 87 octane.
Gasoline with up to 10% ethanol or 15% MTBE (Methyl Tertiary
Butyl Ether) can be used. Never use an oil/gasoline mixture or
dirty gasoline. Avoid getting dirt, dust, or water in the fuel tank.
DO NOT use E85 gasoline.
WARNING! Gasoline is extremely flammable and is
explosive under certain conditions.
Refuel in a well-ventilated area with the engine stopped.
Do not smoke or allow flames or sparks in the area where
the engine is refueled or where gasoline is stored.
Do not overfill the fuel tank. After refueling, make sure the
tank cap is closed properly and securely.
Be careful not to spill fuel when refueling. Spilled fuel or
fuel vapor may ignite. If any fuel is spilled, make sure the
area is dry before starting the engine.
Avoid repeated or prolonged contact with skin or
breathing of va pot.
Adding Fuel
WARNING! An adult should fuel this engine. NEVER
allow children to refuel its engine. Gasoline (fuel)
vapors are highly flammable and can explode. Fuel
-- vapors can spread and be ignited by a spark or flame
many feet away from engine. To prevent injury or
death from fuel fires, follow these instructions:
DO NOT use leaded fuel.
Fuel must be fresh and clean. NEVER use fuel left over
from last season or stored for long periods.
NEVER mix oil with fuel.
DO NOT use fuel containing Methanol (Wood
Alcohol)
NOTE: Before refueling, allow engine to cool two minutes.
1. Clean around fuel fill before removing cap to fuel.
2. Fill tank until fuel reaches 1/2inch below the bottom of the
filler neck to allow space for fuel expansion. Be careful not
to overfill.
3.
Replace the gasoline cap and tighten securely. Wipe up
spilled fuel before starting engine. If fuel is spilled DO NOT
start engine. Move machine away from area of spillage.
Avoid creating any source of ignition until fuel vapors are
gone.
SECTION 2 -- SET-UP 7

ControlsandFeatures
4
Fuel Ca
Air Cleaner
Primer±
Oil Fill Cap
Oil Drain_
SparkPlug
t If Equipped
Muffler
i
Choke (If Equipped)
Figure 4=1
OilDrain
The choke control is located on the left side of the handle and
when activated, closes the choke plate on the carburetor and
aids in starting the engine. Pull the choke control to activate the
choke on the engine. Use of the choke may not be necessary if
the engine is warm or the air temperature is high.
Primer(IfEquipped)
The primer is located on the left side of
the engine, on the front of the air cleaner.
Pressing the primer forces fuel directly into
the engine's carburetor to aid in starting the
engine.
Removing the oil drain plug will drain the oil from the engine.
The engine is equipped with a side drain, and on select units, you
may also access a bottom drain.
Oil FillCap
Remove the oil fill cap to check the oil level and add oil.
FuelCap
Remove the fuel cap to add fuel.
StarterHandle
Pull the starter handle to start the engine.

Operation
Pre-OperationCheck
The engine is shipped without gasoline or oil in the engine. See
the Set-Up Section of this manual for instructions on adding oil
and gasoline.
Determine TheStarting System
Before starting the engine, you must determine the type of
starting system that is on your engine. Your engine will have one
of the following types:
• Auto=Choke System: This features an automatic choke
that does not have a manual choke or primer.
• Primer System: This features a primer on the engine.
To start your engine, follow the instructions for your type of
starting system.
Note: Equipment may have remote controls. See the equipment
manual for location and operation of remote controls.
Startingthe Engine
i_ WARNING: Always keep hands and feet clear of
equipment moving parts. Do not use a pressurized
starting fluid. Vapors are flammable.
Aut0-Ch0keSystem
1. Standing behind the mower, depress the blade control
handle and hold it against the upper handle. See Fig. 5-1.
2. Pull the starter grip lightly until resistance is felt, then pull
rapidly to overcome compression, prevent kickback and
start engine. Repeat if necessary.
IMPORTANT: Do not allow the starter grip to snap back
against the engine. Return it gently to prevent damage to
the starter.
Primer System
1. Push primer 3 times. Wait about two seconds between
each push. See Fig. 5-2. In temperature below 50°F, prime
5 times. After the engine is warmed up, one prime may be
needed for all temperatures.
2. Standing behind the mower, squeeze and hold the blade
control against upper handle.
3. Pull the recoil starter lightly until resistance is felt, then pull
rapidly to overcome compression, prevent kickback, and
start the engine. Repeat if necessary. See Fig. 5-2.
IMPORTANT: Do not allow the recoil starter to snap back
against the rope guide.
If engine does not start, it may be necessary to re-prime
the engine.
F
Figure 5=1
F
Figure 5-2
StoppingEngine
1. Release blade control.
,J

EngineMaintenance
6
WARNING: Shut offthe engine before performing
any maintenance. To prevent accidental start-up,
disconnect the spark plug boot.
IMPORTANT: If engine must be tipped to transport equipment
or to inspect or remove grass, keep spark plug side of engine
up. Transporting or tipping engine spark plug down may cause
smoking, hard starting, spark plug fouling, or oil saturation of air
cleaner.
MaintenanceSchedule
Periodic inspection and adjustment of the engine is essential
if high level performance is to be maintained. Regular
maintenance will also ensure a long service life. The required
service intervals and the kind of maintenance to be performed
are described in the table below. Follow the hourly or calendar
intervals, whichever occur first. More frequent service is required
when operating in adverse conditions.
WARNING: If the engine has been running, the
muffler will be very hot. Be careful not to touch the
muffler.
EachUseor
EveryS Hrs.
,/
EverySeason
or25 Hours
EverySeason
orSOHours
EverySeason
or 100Hours
Service
Dates
FirstSHours
CheckEngineOilLevel
ChangeEngineOilff _/ _/
CheckAirCleaner V/
ServiceAirCleanerf M/
CheckSparkPlug V/
ReplaceSparkPlug V/
CleanEngineShroud V/
Cleanaroundmuffler V /
ReplaceFuelFilter V/
f Service more frequently when used in dusty areas.
ff Every season or 25 hours if operating under heavy load or high ambient temperature.

Oil Service
Check oil level regularly.
Be sure correct oil level is maintained. Check every five
hours or daily before starting engine. See oil checking
procedure in the Operation section.
OilChange
1.
2.
IMPORTANT: Be sure to check engine on a level surface with the
engine stopped. Drain the oil while the engine is still warm to
assure rapid and complete draining.
Remove all fuel from tank by running engine until it stops
from lack of fuel.
Remove drain plug and allow oil to drain into a suitable
container. See Fig. 6-1.
/
Cap
Figure 6-1
WARNING: Before tipping engine or equipment to
drain oil, drain fuel from tank by running engine
until fuel tank is empty.
3. Reinstall the drain plug and tighten it securely.
4. Refill with the recommended oil and check the oil level.
Refer to the Set-Up Section and follow the appropriate
instructions for a short or extended dipstick.
5. Reinstall the oil fill cap securely.
IMPORTANT: Used motor oil may cause skin cancer if repeatedly
left in contact with the skin for prolonged periods. Although this
is unlikely unless you handle used oil on a daily basis, it is still
advisable to thoroughly wash your hands with soap and water as
soon as possible after handling used oil.
NOTE: Please dispose of used motor oil in a manner that is
compatible with the environment. We suggest you take it in a
sealed container to your local service station for reclamation. Do
not throw it in the trash or pour it on the ground.
AirFilter Service
Paper filters cannot be cleaned and must be replaced once a year
or every 100 operating hours; more often if used in extremely
dusty conditions.
WARNING: Never use gasoline or low flash point
solvents for cleaning the air filter element. A fire or
explosion could result.
IMPORTANT: Never run the engine without the air filter. Rapid
engine wear will result.
NOTE: Your engine may be equipped with either a dual element
rectangle paper filter with foam pre-filter or a single element
oval foam filter. The dual element type has a long rectangular
shaped air filter cover with a thumb screw towards the rear of
the engine to access the air filter elements. The single element
type has a short rectangular shaped air filter cover with a primer
on the air filter base at the front of the engine. Follow the
appropriate instructions below for the engine on your unit.
DualElementAirFilter
Remove the thumb screw and the air filter cover. Remove
the foam and paper elements. See Fig. 6-2. Replace paper
element when dirty or damaged. Clean foam element or
replace when damaged.
Paper Element
Thumb
Screw
Foam Element
Figure 6=2
SECTION 6 -- MAINTENANCE 11

2. F
To clean foam element, remove it from the air filter cover
and wash in a mild liquid detergent and water. Squeeze
or press the foam element to rinse out dirt and water. Do
not twist; this could damage or tear the foam element.
Allow to dry thoroughly before using. DO NOT oil the foam
element.
Single ElementAir Filter
1. Remove the air filter cover by squeezing the front and
back sides to release the tab at the front of the air filter
cover. See Fig. 6-3. Clean foam element or replace when
damaged.
F
k.
Paper
Element
Figure 6-3
Tab
J
2. To clean foam element, remove it from the air filter base
and wash in mild liquid detergent and water. Squeeze or
press the foam element to rinse out dirt and water. Do not
twist, this could damage or tear the foam element. Allow to
dry thoroughly before using. OIL the foam element with a
light engine oil.
SparkPlugService
WARNING: DO NOT check for spark with spark
plug removed. DO NOT crank engine with spark
plug removed.
To ensure proper engine operation, the spark plug must be
properly gapped and free of deposits.
1. Remove the spark plug boot and use a spark plug wrench
to remove the plug. See Fig. 6-4.
WARNING: If the engine has been running, the
muffler will be very hot. Be careful not to touch the
muffler.
2.
3.
Spark Plug
F
Figure 6=4
Visually inspect the spark plug. Discard the spark plug
if there is apparent wear, or if the insulator is cracked or
chipped. Clean the spark plug with a wire brush if it is to be
reused.
Measure the plug gap with a feeler gauge. Correct as
necessary by bending side electrode. See Fig. 6-5. The gap
should be setto 0.030 in.
Electrode
Figure 6-5
4. Check that the spark plug washer is in good condition
and thread the spark plug in by hand to prevent cross-
threading.
5. After the spark plug is seated, tighten with a spark plug
wrench to compress the washer.
12 I SECTION 6-- MAINTENANCE

NOTE:When installing a new spark plug, tighten 1/2 turn
after the spark plug seats to compress the washer. When
reinstalling a used spark plug, tighten 1/8-1/4 turn after the
spark plug seats to compress the washer.
IMPORTANT:The spark plug must be securely tightened.
An improperly tightened spark plug can become very hot
and may damage the engine.
FuelFilter Service
The fuel filter cannot be cleaned and must be replaced once a
year or every 100 operating hours; more often if run with old
gasoline.
1. Remove all fuel from tank by running engine until it stops
from lack of fuel.
2. Remove hose clamp from fuel line and remove fuel line
from tank outlet. See Fig. 6-6.
Figure 6=6
3. Pull out old fuel filter from tank outlet. Replace when dirty
or damaged.
4. Grasp new fuel filter from shouldered end and insert it
completely to the shoulder into the tank outlet. See Fig. 6-6
inset.
5. Replace fuel line and hose clamp.
CleanEngine
If the engine has been running, allow itto cool forat least half
an hour before cleaning. Periodically remove dirt build-up from
engine. Clean finger guard and around muffler. Clean with a
brush or compressed air.
IMPORTANT: Do not spray engine with water to clean because
water could contaminate fuel. Using a garden hose or pressure
washing equipment can also force water into the air cleaner or
muffler opening. Water in the air cleaner will soak the paper
element, and water that passes through the element or muffler
can enter the cylinder, causing damage.
WARNING: Accumulation of debris around muffler
could cause a fire. Inspect and clean before every
use.
Storage
CAUTION: Failure to use a fuel stabilizing additive
or completely run the engine until it's out of fuel
before off-season storage may result in damage to
your engine's carburetor. Subsequent damage
would net be covered under the manufacturer's
warranty.
Engines stored between 30 and 90 days need to be treated with
a gasoline stabilizer and engines stored over 90 days need to be
drained of fuel to prevent deterioration and gum from forming
in fuel system or on essential carburetor parts. If the gasoline in
your engine deteriorates during storage, you may need to have
the carburetor, and other fuel system components, serviced or
replaced.
1. Remove all fuel from tank by running engine until it stops
from lack of fuel.
WARNING: Never leave engine unattended while
running.
2.
3.
4.
Change oil. See Oil Change section.
Remove spark plug and pour about 1/2 an ounce of engine
oil into cylinder. Replace spark plug and crank slowly to
distribute oil.
Clean debris from around engine, under finger guard, and
under, around and behind muffler. Touch up any damaged
paint, and coat other areas that may rust with a light film
of oil.
5. Store in a clean, dry and well ventilated area away from any
appliance that operates with a flame or pilot light, such
as a furnace, water heater, or clothes dryer. Also avoid any
area with a spark producing electric motor, or where power
tools are operated.
6. If possible, also avoid storage areas with high humidity,
because that promotes rust and corrosion.
7. Keep the engine level in storage. Tilting can cause fuel or
oil leakage.
Removing FromStorage
1.
2.
3.
Check your engine as described in the Pre-Operation Check
section of this manual.
If the fuel was drained during storage preparation, fill the
tank with fresh gasoline. If you keep a container of gasoline
for refueling, make certain it contains only fresh fuel.
Gasoline oxidizes and deteriorates over time, causing hard
starting.
If the cylinder was coated with oil during storage
preparation, the engine will smoke briefly at startup. This
is normal.
SECTION 6 -- MAINTENANCE 13

Troubleshooting
7
Problem
Engine Fails to start
Engine runs erratic
Cause
1. Blade control disengaged (Lawn mower
only).
2. Spark plug boot disconnected.
3. Fuel tank empty or stale fuel.
4. Fuel shut-offvalve closed Ofequipped).
5. Engine not primed (if equipped with primer).
6. Faulty spark plug.
7. Reduced fuel flow/Blocked fuel filter.
8. Engine flooded.
g. Engine not choked (ifequipped with choke).
10.Burnt fuse. (Electric Start only)
1. Spark plug boot loose.
2. Reduced fuel flow/Blocked fuel filter.
Remedy
1, Engage blade control,
2. Connect wire to spark boot.
3. Fill tank with clean, fresh gasoline.
4. Turn on fuel shut-off valve.
5. Prime engine as instructed in the Operation
section.
6. Clean, adjust gap, or replace.
7. Replace fuel filteras instructed in the
Maintenance section.
8. Walt a few minutes to restart, but do not
prime.
9. Choke engine. See engine manual.
10.Replace fuse (see Service Section of Unit).
1. Connectand tighten spark plug boot.
2. Replace fuel filter as instructed in the
Maintenance section.
3. Ventin gas cap plugged.
4. Water or dirt in fuel system.
3. Clear vent.
4. Drain fuel tank. Refill with fresh fuel.
5,
6.
Dirty air cleaner. 5.
Unit running with CHOKE (if equipped) 6.
applied.
Engine oil level low. 1.
Air flow restricted. 2.
Spark plug gap too close. 1.
Refer to engine manual.
Push CHOKE knob in.
Engine overheats 1. Fill crankcase with proper oil.
2. Clean area around and on top of engine.
Occasional skips 1. Adjust gap to .030".
(hesitates) at
high speed
Idles poorly 1. Spark plug fouled, faulty, or gap too wide. 1. Reset gap to .030" or replace spark plug.
2. Dfftyalrcleaner. 2. Refertoenglnemanual.

ReplacementParts
1-
Component _ Part Number and Description
951-10292 Spark Plug
951-10732
951-10298
951-10300
Air Cleaner (Oval)
Air Cleaner Kit (Square)
Fuel Cap Assembly
951-10358 Fuel Filter
Phone (800) 800-7310 or (330) 220-4683 to order replacement parts or a complete Parts Manual (have your full model number and
serial number ready). Parts Manual downloads are also available free of charge at www.mtdproducts.com.
15

9

17


FEDERALand/orCALIFORNIAEMISSIONCONTROLWARRANTY STATEMENT
YOUR WARRANTY RIGHTS AND OBLIGATIONS
MTDConsumerGroupInc,the UnitedStatesEnvironmentalProtectionAgency(EPA),and,forthoseproductscertifiedforsalein the stateofCalifornia,the
CaliforniaAirResourcesBoard(CARB)are pleasedtoexplainthe emission(evaporativeand/orexhaust)controlsystem(ECS)warrantyonyouroutdoor2006
andlatersmalloff-roadspark-ignitedengineandequipment(outdoorequipmentengine)InCalifornia,newoutdoorequipmentenginesmustbedesigned,builtand
equippedtomeetthe State'sstringentanti-smogstandards(inotherstates,1997andlatermodelyearequipmentmustbedesigned,built,andequippedto meet
theU.S.EPAsmalloff-road,sparkignitionengineregulations.MTDConsumerGroupIncmustwarrantthe ECSonyouroutdoorequipmentenginefor the periodof
timelistedbelowprovidedtherehasbeennoabuse,neglector impropermaintenanceofoutdoorequipmentengine.
YourECSmayincludepartssuchasthecarburetor,fuel-injectionsystem,the ignitionsystem,catalyticconverter,fueltanks,fuel lines,fuelcaps,valves,canisters,
filters,vaporhoses,clamps,connectors,andotherassociatedemission-relatedcomponents.
Whereawarrantableconditionexists,MTDConsumerGroupIncwill repairyouroutdoorequipmentengineatnocosttoyouincludingdiagnosis,partsandlabor.
MANUFACTURER'S WARRANTY COVERAGE:
Thisemissioncontrolsystemiswarrantedfortwo years.Ifanyemission-relatedpartonyouroutdoorequipmentengineisdefective,the partwill berepairedor
replacedbyMTDCONSUMERGROUPINC.
OWNER'S WARRANTY RESPONSIBILITIES:
Asthe outdoorequipmentengineowner,youareresponsiblefor performanceofthe requiredmaintenancelistedinyourowner'smanual.MTDConsumerGroup
Increcommendsthat youretainallreceiptscoveringmaintenanceonyouroutdoorequipmentengine,butMTDConsumerGroupInccannotdeny warrantysolely
forthe lackof receipts.
Asthe outdoorequipmentengineowner,youshouldhoweverbe awarethat MTDConsumerGroupIncmaydenyyouwarrantycoverageifyouroutdoorequipment
engineor aparthasfailedduetoabuse,neglect,orimpropermaintenanceor unapprovedmodifications.
Youare responsiblefor presentingyouroutdoorequipmentengineto MTDConsumerGroupInc'sdistributioncenterorservicecenterassoon asthe problem
exists.Thewarrantyrepairsshouldbecompletedin areasonableamountoftime,nottoexceed30 days.Ifyouhaveaquestionregardingyourwarrantycoverage,
youshouldcontacttheMTDConsumerGroupIncServiceDepartmentat 1-800-800-7310orviaemailathttp://support.mtdproducts.com
GENERAL EMISSIONS WARRANTY COVERAGE:
MTDConsumerGroupIncwarrantstothe ultimatepurchaserand eachsubsequentpurchaserthattheoutdoorequipmentengineis: Designed,builtandequipped
soasto conformwithall applicableregulations;andfreefromdefectsin materialsand workmanshipthatcausethe failureofa warrantedparttobe identicalin all
materialrespectstothat partas describedin MTDConsumerGroup Inc'sapplicationforcertification.
Thewarrantyperiodbeginsonthedatetheoutdoorequipmentengineisdeliveredto anultimatepurchaserorfirst placedintoservice.Thewarrantyperiodistwo
years.
Subjecttocertainconditionsand exclusionsasstatedbelow,the warrantyonemission-relatedpartsis asfollows:
1. Anywarrantedpartthat isnotscheduledfor replacementas requiredmaintenancein thewritteninstructionssupplied,iswarrantedforthe warrantyperiod
statedabove.Ifthepartfailsduringthe periodofwarrantycoverage,thepartwill berepairedor replacedbyMTDConsumerGroupIncaccordingto subsection
(4)below.Anysuchpart repairedor replacedunderwarrantywillbewarrantedforthe remainderof the period.
2. Anywarrantedpartthat isscheduledonlyfor regularinspectionin the writteninstructionssuppliediswarrantedforthe warrantyperiodstatedabove.Anysuch
partrepairedor replacedunderwarrantywill bewarrantedforthe remainingwarrantyperiod.
3. Anywarrantedpartthat isscheduledforreplacementasrequiredmaintenancein thewritteninstructionssuppliediswarrantedforthe periodoftimebeforethe
firstscheduledreplacementdatefor thatpart.Ifthe partfails beforethefirst scheduledreplacement,the partwill berepairedorreplacedbyMTDConsumer
GroupIncaccordingto subsection(4)below.Anysuchpartrepairedor replacedunderwarrantywill bewarrantedfor the remainderofthe periodpriortothe
firstscheduledreplacementpointforthe part.
4. Repairor replacementofanywarrantedpart underthewarrantyprovisionshereinmustbeperformedatawarrantystationatno chargetothe owner.
5. Notwithstandingthe provisionsherein,warrantyservicesor repairswill beprovidedatallof ourdistributioncentersthatarefranchisedtoservicethe subject
enginesor equipment.
6. Theoutdoorequipmentengineownerwill notbe chargedfor diagnosticlaborthat isdirectlyassociatedwithdiagnosisof adefective,emission-relatedwar-
rantedpart, providedthatsuchdiagnosticworkis performedata warrantystation.
7. MTDConsumerGroupIncisliablefor damagestootherengineor equipmentcomponentsproximatelycausedbya failureunderwarrantyof anywarranted
part.
8. Throughoutthe off-roadengineandequipmentwarrantyperiodstatedabove,MTDConsumerGroupIncwillmaintainasupplyofwarrantedpartssufficientto
meetthe expecteddemandfor suchparts.
9. Anyreplacementpartmaybe usedinthe performanceof anywarrantymaintenanceor repairsandmustbeprovidedwithoutchargetotheowner.Suchusewill
notreducethe warrantyobligationsofMTDConsumerGroupInc.
10.Add-onor modifiedpartsthatarenotexemptedbythe AirResourcesBoardmaynot beused.Theuseofany non-exemptedadd-onor modifiedpartsby the
ultimatepurchaserwill begroundsfor disallowingawarrantyclaims.MTDConsumerGroup Incwill notbeliabletowarrantfailuresofwarrantedpartscaused
bythe useofa non-exemptedadd-onor modifiedpart.

WARRANTED PARTS:
Therepairorreplacementofanywarrantedpart otherwiseeligibleforwarrantycoveragemaybeexcludedfromsuchwarrantycoverageif MTDConsumerGroup
Incdemonstratesthatthe outdoorequipmentenginehasbeenabused,neglected,orimproperlymaintained,andthat suchabuse,neglect,or impropermainte-
nancewasthe directcauseof the needfor repairor replacementofthe part.Thatnotwithstanding,anyadjustmentofa componentthat hasafactoryinstalled,
andproperlyoperating,adjustmentlimitingdeviceisstilleligibleforwarrantycoverage.Further,the coverageunderthiswarrantyextendsonlyto partsthatwere
presentonthe off-roadengineandequipmentpurchased.
Thefollowingemissionwarrantypartsarecovered(ifapplicable):
(1)FuelMeteringSystem
• Coldstartenrichmentsystem(softchoke)
• Carburetorandinternalparts(orfuel injectionsystem)
• Fuelpump
• Fueltank
(2)Air InductionSystem
• Aircleaner
• Intakemanifold
(3) IgnitionSystem
• Sparkplug(s)
• Magnetoignitionsystem
(4) ExhaustSystem
• Catalyticconverter
• SAI(Reedvalve)
(5) MiscellaneousItemsUsedinAboveSystem
• Vacuum,temperature,position,timesensitivevalvesand switches
• Connectorsandassemblies
(6) EvaporativeControl
• Fuelhose
• Fuelhoseclamps
• Tetheredfuel cap
• Carboncanister
• Vapor lines
GDOC-100223Rev.A

Medidas importantes de seguridad • Configuraci6n • Funcionamiento ° Mantenimiento
° Soluci6n de problemas ° Garantia
MANUAL DELOPERADOR
1P65BOBModeloquefigura
Motor de 139 cc con eje vertical y v_lvulas en cabeza
MTD LLC. APARTADO POSTAL 361131 CLEVELAND, OHIO 44136-0019
ImpresoenEstadosUnidosdeAmerica
FormNo.769-07390
(Noviembre8,2011)

A!propietario
1
Gracias
Este Manual del Operador esuna parte importante de su nuevo motor. Leayudar_fia preparar y mantener la unidad para obtener los
mejores resultados. Antes de operar el motor leacuidadosamente y comprenda todo el manual.
indite
Medidas importantes de seguridad ...................... 3
Configuraci6n .......................................................... 6
Contro/es y Caractefisticas ..................................... 8
Funcionamiento ...................................................... 9
Mantenimiento y Ajustes ....................................... 10
Soluci6n de problemas .......................................... 14
Piezas de Reemplazo ................. 15 (Manual ingles)
Garantfa ...................................... Cubierta posterior
Registrode informaci6ndeproducto
Antes de operar su motor nuevo, por favor Iocalice su placa de modelo en el motor y registre la informaci6n en el _rea situada a
continuaci6n. Si tiene que solicitar soporte t&cnico a trav_s de nuestro sitio web o de un distribuidor de servicio local, necesitar_ esta
informaci6n.
f
_0MERO DE MODELO
[-113[-113[-113[-1
NOMERO DE SERIE
[2[2[2DF1DF1DF1Dr--1D
Asistendaai Ciiente
Por favor, NO devuelva la unidad al minorista o distribuidor sin ponerse en contacto primero con el Departamento de
Asistencia a/Cliente.
En caso de tener problemas para montar este producto o de tener dudas con respecto a los controles, fundonamiento o
mantenimiento del mismo, puede solicitar la ayuda de expertos. Elija entre las opciones que se presentan a continuaci6n:
0 Visite nuestro sitio web en www.mtdproducts.com
VerVideos demostrativos de instalaci6n de mantenimiento y piezas en www.mtdparts.com/KnowledgeCenter
0 Llame a un representante de Asistencia al Cliente al (800) 800-7310 6 (330) 220-4683
0 Escribanos a MTD LLC• EO. Box 361131 • Cleveland, OH • 44136-0019

Medidasimportantes deseguridad
2
iADVERTENCIA! La presencia de este s[mbolo indica que se trata de instrucciones de
seguridad importantes que debe respetar para evitar poner en riesgo su seguridad personal
y/o material y la de los demos. Lea y siga todas las instrucdones de este manual antes de
poner en fundonamiento este equipo. Si no respeta estas instrucciones puede provocar
lesiones personales. Cuando vea este s[mbolo. TENGA EN CUENTA LA ADVERTENCIA.
PROPOSICION 65 DE CALIFORNIA
iADVERTENCIA! El escape del motor de este producto, algunos de sus componentes y
algunos componentes del veh[culo contienen o liberan sustancias qu[micas que el estado
de California considera que pueden produdr cSncer, defectos de nadmiento u otros
problemas reproductivos.
iPELIGRO! Esta mSquina est_ diseEada para set utilizada respetando las normas de seguridad
contenidas en este manual. AI igual que con cualquier tipo de equipo motorizado, un descuido o
error pot parte del operador puede producir lesiones graves. Esta m_quina es capaz de amputar
dedos, manos y pies y de arrojar objetos extraEos con gran fuerza. De no respetar las
instrucciones de seguridad siguientes se pueden producir lesiones graves o la muerte.
Capacitad6n
1. Lea, entienda y cumpla todas las instrucciones incluidas en
el motor y en los manuales antes de montarlo y utilizarlo.
Guarde este manual en un lugar seguro para consultas
futuras y peri6dicas, asi como para solicitar repuestos.
2. Familiaricese con todos los controles y con el uso adecuado
de los mismos. Sepa c6mo detener el motor y desactivar
los controles r_pidamente.
3. No permita nunca que los ni_os menores de 14ahos
utilicen este motor. Los ni_os de 14 ahos en adelante deben
leery entender las instrucciones de operaci6n y normas
de seguridad contenidas en este manual yen el motor y
deben set entrenados y supervisados pot un adulto.
4. Nunca permita que los adultos operen la m_quina sin
recibir antes la instrucci6n apropiada.
5. Mantenga el _rea de operaci6n despejada de personas,
particularmente de ni_os peque_os y mascotas. Detenga la
m_quina si alguien se acerca.
Preparativos
1. Inspeccione minuciosamente el _rea donde utilizar_ el
equipo. Quite las piedras, palos, alambres y otros objetos
extrahos con los que se pueda tropezar y provocar lesiones
personales.
2. Utilice zapatos de trabajo resistentes, de suela fuerte, asi
como pantalones y camisas ajustados. Las prendas sueltas
y las alhajas se pueden enganchar en las piezas m6viles.
Nunca opere la m_quina descalzo o con sandalias.
3. Antes de arrancar el motor, desenganche las palancas del
embrague y despl_celas (en caso de haber) a la posici6n
neutral ("N").
4. Nunca deje el motor en marcha sin vigilancia.
5. Nunca intente realizar ajustes mientras el motor est_
en marcha, excepto en los casos especificamente
recomendados en el manual del operador.
Manejosegurode la gasolina:
Para evitar lesiones personales o dahos materiales sea
sumamente cuidadoso al manipular la gasolina. La gasolina es
sumamente inflamable y sus vapores pueden causar explosiones.
Si se derrama gasolina encima o sobre la ropa se puede lesionar
gravemente ya que se puede incendiar. L_vese la piel y c_mbiese
de ropa de inmediato.
1. Cuando agregue combustible, APAGUE el motor y d_jelo
enffiar por Io menos 2 minutos antes de sacar la tapa del
combustible.
2.
Llene el tanque de combustible al aire libre o en un _rea
bien ventilada.
3.
4.
Utilice s61o los recipientes para gasolina autorizados.
Nunca Ilene los recipientes en el interior de un vehiculo
o cami6n o caja de remolque con recubrimiento pl_stico.
Coloque siempre los recipientes en el piso y lejos del
vehiculo antes de Ilenarlos.
5. Si es posible, retire el equipo a gasolina del cami6n o
remolque y 116nelo en el suelo. Si esto no es posible, Ilene el
equipo en un remolque con un contenedor port_til, en vez
de con una boquilla dispensadora de gasolina.
6. Mantenga la boquilla de Ilenado en contacto con el
borde del dep6sito de combustible o con laabertura del
recipiente en todo momento, hasta terminar la carga. No
utilice un dispositivo para abrir/cerrar la boquilla.

7. NoIlenedemasiadoeltanquedecombustible.Llene
eltanquecompletoindicadopotelindicadordenivel
decombustibleinstaladoenelinteriordeldep6sitode
combustible.Nom_sderellenoparadejarespaciopara
laexpansi6ndelcombustible.Enalgunosmodelos,un
indicadordeniveldecombustiblenopuedeestarpresente,
enestecaso,llenareltanquesinpulgadam_sde1/2pot
debajodelaparteinferiordelabocadeIlenadoparadejar
espacioparalaexpansi6ndelcombustible.
8. Reemplacelatapadecombustibleyaprietehastaquela
tapadetrinquetes.
9. Limpieelcombustiblequesehayaderramadosobreel
motoryelequipo.Trasladelam_quinaaotrazona.Espere
cincominutosantesdeencenderelmotor.
10. Parareducirelriesgodeincendiomantengalam_quina
limpiadepasto,hojasydelaacumulaci6ndeotros
desechos.Limpielosderramesdeaceiteocombustibley
saquetodoslosresiduosembebidosdecombustible.
11. Mantengalagasolinaalejadadechispas,llamasexpuestas,
llamaspiloto,calor,yotrasfuentesdeignici6n.
12. Nuncacarguecombustibleenelequipoeninteriores
porqueseacumulanvaporesinflamablesenel_rea.
13. Apaguetodosloscigarrillos,cigarros,pipasyotrasfuentes
deignici6n.
14. Verifiquefrecuentementelalineadecombustible,el
dep6sito,eltap6n,ylosaccesoriosbuscandorajaduraso
p_rdidas.Reempl_celosdesetnecesario.
Fundonamiento
1. AI arrancar el motor, asegOrese de que la bujia, el silenciador
y la tapa del combustible est_n en su lugar.
2. No d_ arranque al motor si no est_ la bujia de encendido.
3. Si se derrama combustible, espere hasta que se evapore
antes de encender el motor.
4. Permita que el silenciador, el cilindro del motor, y las aletas
se enfrien antes de tocarlos.
5. Mantenga a los ni_os alejados de los motores en marcha o
calientes. Pueden sufrir quemaduras por el contacto con un
silenciador caliente.
6. Extraiga el combustible acumulado en el silenciador y el
cilindro.
7. Haga funcionar el equipo con todos los protectores
colocados.
8. Mantenga las manos y los pies alejados de las piezas
giratorias.
9. Atese el cabello si Io Ileva largo y no use alhajas.
10. No use ropa demasiado holgada, con cordones colgantes o
partes que se puedan enganchar.
11. Para encender el motor, jale de la cuerda lentamente hasta
que sienta resistencia, luego jale r_pidamente (Si no es de
arranque el_ctrico).
12. Antes de arrancar el motor, retire todos los equipos
externos/cargas del motor.
13. Los componentes del equipo acoplados directamente,
tales como por ejemplo, cuchillas, rotores, poleas, ruedas
dentadas, etc, deben estar firmemente conectados.
MantenimientoyAlmacenamiento
1. Mantenga el motor en condiciones seguras de
funcionamiento.
2. Deje que motor se enfrie pot Io menos cinco minutos antes
de guardarla. Nunca altere los dispositivos de seguridad.
Controle peri6dicamente que funcionen correctamente.
3. Controle frecuentemente que todos los pernos y
tornillos est_n bien ajustados para mantener el motor
en condiciones seguras de funcionamiento. Inspeccione
visualmente el motor para determinar si est_ dahado.
4. Antes de limpiar, reparar o revisar el motor, det_ngalo y
aseg0rese que todas las partes mdviles se hayan detenido.
Desconecte el cable de la bujia y pdngalo haciendo
masa contra el motor para evitar que se encienda
accidentalmente.
5. No cambie la configuracidn del regulador del motor ni Io
opere a sobrevelocidad. El regulador del motor controla la
velocidad m_xima segura de funcionamiento del motor.
6. Mantenga y reemplace las etiquetas de seguridad e
instrucciones segOn sea necesario.
7. Consulte siempre el manual del operador para conocer la
informaci6n importante relativa al almacenamiento de la
m_quina durante un plazo prolongado.
8. Si debe vaciar el tanque de combustible, h_galo al aire libre.
9. Respete las normas referentes a la disposicidn correcta y las
reglamentaciones sobre gasolina, aceite, etc. para proteger
el medio ambiente.
Avisoreferidoa emisiones
Los motores que est_n certificados y cumplen con las regulaciones
de emisiones federales EPAy de California para SORE (Equipos
peque_os todo terreno) est_n certificados para operar con
gasolina comun sin plomo y pueden incluir los siguientes sistemas
de control de emisiones: Modificacidn de motor (EM) y catalizador
de tres vias (TWC) si est_n equipados de esa manera.
Amortiguadordechispas
IADVERTENCIA! Esta m_quina est_ equipada con
un motor de combusti6n interna y no debe ser
utilizada en un terreno agreste cubierto por bosque,
malezas o hierba ni en las proximidades del mismo,
excepto si el sistema de escape del motor est_
equipado con un amortiguador de chispas que
cumpla con las leyes locales o estatales
correspondientes, en caso de haberlas.
Si se utiliza un amortiguador de chispas el operador Io debe
mantener en condiciones de uso adecuadas. En el Estado de
California las medidas anteriormente mencionadas son exigidas
por ley (Articulo 4442 del C6digo de Recursos Publicos de
California). Es posible que existan leyes similares en otros estados.
Las leyes federales seaplican en territorios federales.
Puede conseguir el amortiguador de chispas para el silenciador a
tray, s de su distribuidor de mantenimiento de motores autorizado
m_s cercano o poni_ndose en contacto con el departamento de
servicios, Apartado Postal 361131 Cleveland, Ohio 44136-0019.
4. I SECCION _ -- _V_EDIDAS IMPORTANTES DE SEGURIDAD

SimbolosDeSeguridad
Esta p_gina representa y describe la seguridad los simbolos que pueden parecer en este producto. Lea, comprenda, y siga todas
instrucciones en la m_quina antes procurar para reunir y operar.
LEA EL MANUAL(S) DEL OPERADOR
Lea, comprenda, y siga todas instrucciones en el manual (manuales) antes procurar para
reuniry operar
ADVERTENClA-- GASOLINA ES INFLAMABLE
Allow the engine to cool at least two minutes before refueling.
ADVERTENClA-- MONOXIDO DE CARBONO
Nunca corra un motor dentro ni en un _rea mal ventilada. El escape del motor contiene
mon6xido de carbono, un gas inodoro y mortal.
ADVERTENCIA -- ELECTROCHOQUE
No use eljuez de salida el_ctrico del motor en la Iluvia.
ADVERTENCIA -- SUPERFICIE CALIENTE
Las partes del motor, especialmente el silenciador, Ilega a set muy caliente durante la
operaci6n. Permita motor y silenciador para ponerse frfo antes de tocar.
IADVERTENCIA! Su responsabilidad:Restrinja el uso de esta m_quina motorizada a las personas que lean,
comprendan y respeten las advertencias e instrucciones que figuran en este manual y en la m_quina.
GUARDEESTASINSTRUCCIONES
SECCION _ -- _EDIDAS IMPORTANTES DE SEGURIDAD

Configuraci6n
3
Gasolinay aceite
NOTA: El motor se despacha sin gasolina ni aceite en su interior.
Hacer funcionar el motor sin suficiente aceite puede causarle
graves dahos y anula la garantia del motor.
i_ IADVERTENCIA! Siempre mantenga las manosy
los pies alejados de las piezas m6viles del equipo.
No utilice fluidos comprimidos para arrancar. Los
vapores son inflamables.
Rec0mendad0ness0breel aceite
Antes de poner en marcha el motor. Refiera a la carta de la
viscosidad en fig. 3-1 para las recomendaciones del aceite. La
capacidad es de 600 ml/20 onzas. No Io Ilene en exceso. Use un
aceite para motor de sint_ticos o no sint_ticos cuatro tiempos,
o un aceite detergente de calidad premium equivalente con
certificado que cubra o exceda las exigencias de los fabricantes
de autom6viles americanos respecto de la clasificaci6n de
servicio SG y SF.Los aceites para motor con la clasificaci6n SG, SF
tienen est_ designaci6n en el envase.
__ 20w
___ 20
__m30
40m_
20w40, __Ow50___ __
I v
15w40, 0____ __
®,
10w40 ____ _/_lbL
I v
10w30 ____ _m
(°C)-30°C-20°C-10°C O°C 10°C 20°C30°C40°C
(°F)-20 ° 0° 200 400 600 800 1000
Figura 3-1
Se recomienda SAE 10W-30 para uso general, a todas las
temperatures. Si utiliza aceite con viscosidad monogrado,
seleccione en la tabla pot de arriba de la viscosidad adecuada
para la temperatura media de su zona.
1. Viscosidad monogrado
2. Viscosidad multigrado
NOTA: No utilice aceites sin detergente ni aceite para motor de
dos tiempos. Podria reducirse la vida util del motor.
NOTA: Un aceite sint_tico 5W30 puede set utilizado para mejorar
la capacidad de inicio de clima frio (temperaturas pot debajo de
400 F).
Verifkad6n del niveldeaceite
IMPORTANTE: Asegurese de comprobar el aceite sobre una
superficie nivelada y con el motor apagado.
NOTA: El motor puede estar equipado con un relleno de aceite
de corta o larga varilla de medici6n. Siga las instrucciones
indicadas a continuaci6n para el motor de su cortadora.
Varillade medid6ncorta
Retire el tap6n de Ilenado de aceite/la varilla de medici6n y
limpie la varilla de medici6n de aceite. Vea la Fig. 3-2.
F
Llenar
Figura 3=2
2. Introduzca el tap6n / la varilla de medici6n de aceite dentro
del cuello de Ilenado de aceite pero no los atornille.
3. Saque el tap6n / la varilla de medici6n de aceite. Si el
nivel es bajo, agregue lentamente aceite hasta que el nivel
registrado est6 en un punto intermedio entre alto y bajo,
Fig. 3-2.
4. Vuelva a colocar el tap6n / la varilla de medici6n de aceite
bien ajustados antes de poner en marcha el motor.
NOTA: No Io Ilene en exceso. Si se carga demasiado aceite
se puede generar humo, causar humo, problemas de
arranque, suciedad en la bujia y saturaci6n de aceite en el
purificador de aire.

Varillade medid6n larga
1. Retire el tap6n de Ilenado de aceite/la varilla de medici6n y
limpie la varilla de medici6n de aceite. Vea la Fig. 3-3.
Tap6n de
Ilenado
aceite/Varilla
de medici6n
Limite
superior
\
\\
J
Figura 3-3
2. Inserte la varilla en el cuello de Ilenado de aceite. Gire
la varilla de 1/ 4 vuelta en la posici6n de bloqueo en su
totalidad asiento.
3. Retire la varilla. Si el nivel est,1 bajo, agregue aceite
lentamente hasta el limite superior de la varilla de
medicidn. Vea el recuadro de la Fig. 3-3.
4. Vuelva a insertar la tira reactiva en la posici6n de bloqueo
antes de arrancar el motor.
NOTA: No Io Ilene en exceso. El exceso de aceite puede
causar ahumado, problemas de arranque, suciedad en la
bujia y saturaci6n de aceite en el purificador de mire.
Requisitess0breel combustible
PRE(:AUClON: El funcionamiento del motor con el
combustible E85, una mezcla de aceite con la
gasolina, la gasolina sucia, o la gasolina de m_is de
30 dims de edad que no ha sido aditivo estabilizador
de combustible puede resultar en da_os al
carburador de su motor. Dahos posteriores no
estarian cubiertos pot la garantia del fabricante.
Utilice gasolina para autom6viles (sin plomo o bajo contenido de
plomo para minimizar los dep6sitos en la c_fimara de combusti6n)
con un minimo de 87 octanos. Se puede usar gasolina con hasta
un 10% de etanol o un 15% de MTBE (_ter metilico terciario-
butilico). Nunca use una mezcla de aceite y gasolina ni gasolina
sucia. Evite que se introduzca suciedad, polvo o agua en el
tanque de combustible. NO utilice gasolina E85.
iADVERTENCIA! La gasolina es sumamente
inflamable y bajo determinadas condiciones es
explosiva.
Cargue combustible en un _fireabien ventilada y con el
motor apagado. No fume ni permita llamas o chispas en
el lugar donde se carga combustible o se encuentra el
dep6sito de combustible del motor.
No Ilene en exceso el tanque de combustible. Despu_s de
cargar combustible, asegOrese de que el tap6n del tanque
est,1 bien cerrado y asegurado.
Tenga cuidado de no derramar combustible al cargarlo. El
combustible derramado o sus vapores se pueden incendiar.
Si se derrama combustible, asegurese de que el _irea est,1
seca antes de arrancar el motor.
Evite el contacto prolongado con la piel o la inhalaci6n de
los vapores.
Cargade combustible
ADVERTENCIA! Un adulto debe de combustible de
este motor. NUNCA permita que los ni_os para
abastecerse de combustible del motor tis. La
gasolina (combustible) vapores son altamente
inflamables y pueden explotar. Los vapores del
combustible puede extenderse y set encendida pot
una chispa o llama muchos metros de distancia del
motor. Para evitar lesiones o la muerte pot el
incendio del combustible, siga estas instrucciones:
NO use gasolina con plomo.
El combustible debe ser fresco y limpio. NUNCA use
el combustible sobrante de la temporada pasada o
almacenados durante largos periodos.
NUNCA mezcle el aceite con el combustible.
NO utilice combustible que contenga metanol (alcohol de
madera)
NOTA:Antes de cargar, deje que el motor se enfrie dos minutos.
1. Antes de sacar latapa para cargar combustible, limpie
alrededor.
2.
Cargue el dep6sito hasta que el combustible Ilegue a 1/2
pulgada pot debajo de la base del cuello de Ilenado para
dejar espacio para la expansi6n del combustible. Tenga
cuidado de no Ilenar en exceso.
3. Vuelva a colocar la tapa de la gasolina y ajustela bien.
SEGCION3 -- CONFIGURACION 7

ControlesyCaracter sticas
4
Tapa de la
gasolina
Depurador de aire
Cebadort
Tapa del
Tubo de
drenaje
t De Ser Equipado
SUenciaclor
Buiia de
encendido
PerUlade Est_rter(DeSetequipado)
Figura 4-1
Tubodedrenaje
La perilla de est_rter se encuentra ya sea en el lado izquierdo de
la palanca y cuando est_ activado, se cierra la v_lvula de la perilla
de est_rter en el carburador y ayuda en arrancar el motor. Tire
la perilla de est_rter para activar el est_rter en el motor. El uso
del est_rter puede no set necesario si el motor es caliente o la
temperatura de aire es alta.
Cebador(DeSerequipado)
El cebador es Iocalizada en el lado izquierdo
del motor, en el frente del depurador de aire. ,#_ ':_
AI presionarel cebadorseenvfa combustible _ _i,directamente al carburador del motor para
ayudar al encendido el motor. _,_-:_
AI sacar la tapa de drenado del aceite, _ste se drena del motor.
El motor est.1 equipado con un drenaje lateral, yen algunas
unidades, tambi_n puede acceder a un drenaje inferior.
Tapadeiaceite
Saque la tapa del aceite para verificar el nivel del mismo y
agregar m_s.
Tapade ia gasolina
Saque la tapa de la gasolina para agregar combustible.
Manijadelarrancador
Tire de la manija del arrancador para encender el motor.

Funcionamiento
Control previoai funcionamiento
El motor se despacha sin gasolina ni aceite en su interior.
Consulte la Secci6n Configuraci6n incluida en este manual para
ver las instrucciones para la carga de aceite y gasolina.
Determinar el Sistemade Arranque
Antes de arrancar el motor, debe determinar el tipo de sistema
de arranque queest_ en su motor. Su motor tendr_ uno de los
siguientes tipos:
• Auto=Choke clel sistema: Esta cuenta con un starter
autom_tico que no tiene una estrangulacidn manual o
cartilla.
Cebado del sistema: Este cuenta con un manual sobre el
motor.
Para arrancar el motor, siga las instrucciones para su tipo de
sistema de arranque.
Nora: El equipo puede tener controles remotos. Consulte el
manual del equipo para la ubicaci6n y funcionamiento de los
controles remotos.
Encendidodeimotor
ADVERTENCIA: Siempre mantenga las manos y
los pies alejados de las piezas m6viles del equipo.
No utilice fluidos comprimidos para arrancar. Los
vapores son inflamables.
Aut0-Ch0kedel sistema
1.
2.
Col6quese detr_s de la podadora, apriete la manija de
control de la cuchilla y sost6ngala contra la manija superior.
Vea la Fig. 5-1.
Sostenga firmemente las dos manijas juntas, tome la
manija del arrancador de retroceso y tire de la cuerda para
sacarla con un movimiento r_pido y continuo. Vea la Fig.
5-1. Mantenga firme la manija del arrancador, deje que la
cuerda regrese lentamente al arrancador.Repita hasta que
el motor est6 en marcha. Deje que la cuerda se enrosque
lentamente de regreso.
IMPORTANTE: No permita que el juez de salida de
retroceso se rompa atr_s contra la gufa de cuerda.
Cebad0rdelsistema
1. Oprima el cebador 3 veces. Espere aproximadamente dos
segundos entre cada presi6n. Vea la Fig. 5-2. En climas con
temperaturas de abajo de 50°F, optima el cebador 5 veces.
Despu6s de que el motor es calentado, un tiempo puede
ser necesario para todas las temperaturas.
2. Col6quese detr_s de la podadora, apriete la manija de
control de la cuchilla y sost6ngala contra la manija superior.
3. Tire suavemente de la empuhadura del arranque hasta
sentir la resistencia, luego tire r_pidamente para reducir la
compresi6n, impedir la tensi6n de retroceso y arrancar el
motor. Repita de ser necesario. Vea la Fig. 5-2.
F
Figura 5=1
F
Figura 5=2
IMPORTANTE: No permita que el juez de salida de
retroceso se rompa atr_s contra la gufa de cuerda.
Si el motor no comienza, repita pasos 1-3.
Detenci6ndelMotor
1. Suelte la manija de control de la cuchilla o apague el
interruptor del motor.

MantenimientoyAdjustes
6
ADVERTENCIA: Apague el motor antes de realizar
el mantenimiento. Para evitar una puesta en marcha
accidental, desconecte la funda de la bujia.
IMPORTAIVTE: Si el motor debe inclinarse para transportar
equipo o para inspeccionar o extraer pasto, mantenga el lado de
la bujia del motor hacia arriba. Si la bujia del motor se transporta
o se inclina hacia abajo puede causar humo, un arranque dificil,
contaminaci6n de la bujia o saturaci6n con aceite del depurador
de aire.
CalendariodeMantenimiento
La inspeccidn y los ajustes periddicos del motor son esenciales
si se desea mantener un alto nivel de desempe_o. El
mantenimiento regular tambi_n garantizar_ una prolongada
vida util del motor. Los intervalos de mantenimiento requeridos
y el tipo de mantenimiento a ser realizado se describen en la
tabla de m_s abajo. Siga los intervalos pot hora o calendarios, Io
que ocurra primero. Cuando se opera en condiciones adversas es
necesario Ilevar a cabo un mantenimiento m_s frecuente.
_L DVERTENCIA: Si el motor ha estado
funcionando, el silenciador estar_ muy caliente.
Tenga cuidado de no tocar el silenciador.
Pdmeras5 Cadausoo Cadatempo- Cadatempo- Cadatempo- Fechasde
radaocada radao cada radaocada Manten-
horas cada5horas
25horas 50horas 100horas imiento
Inspecdoneelaceitedelmotor V/
Cambieel aceitedelmotortt v/ v/
Inspecdoneeldepuradordeaire V/
Mantenimientodeldepuradordeairet
Inspecdoneslasbujiasdeencendido V/
Mantenimientodebujia V/
Limpiela protecd6nde retenci6n V/
Limpiealrededordelsilenciador V/
SustituyaFiltrodeCombustible V/
f Cuando seutiliza en _reas polvorientas, el mantenimiento debe ser m_s regular.
ff Sise opera bajo carga pesada o en temperatura ambiente alta.

Mantenimientodeiaceite
Inspeccione el nivel de aceite regularmente.
AsegOrese de que se mantenga el nivel de aceite correcto.
Inspeccione cada cinco horas o diariamente antes de poner
en marcha el motor.
Cambiode aceite
IMPORTANTE: Asegurese de inspeccionar el motor sobre una
superficie nivelada y con el motor apagado. Drene el aceite
mientras el motor est6 caliente para asegurar un drenaje r_pido
y completo.
1. Extraiga todo el combustible del dep6sito haciendo
funcionar el motor hasta que se detenga pot falta de
combustible.
2. Retire el tap6n de Ilenado de aceite y permitiendo que el
aceite se drene en un recipiente adecuado. Vea la Fig. 6-1.
Tap6n
de Drenaje
Tap6n
de Drena
Accesible)
Figura 6=1
ADVERTENCIA: Antes de inclinar el motor o
equipo para drenar el aceite, drene el combustible
del dep6sito haciendo funcionar el motor hasta que
el dep6sito de combustible est6 vacio.
3. Vuelva a colocar el tap6n de drenaje y apri6telo
firmemente.
4. Vuelva a Ilenar con el aceite recomendado y controle el
nivel de aceite. Consulte la secci6n Configuraci6n y siga las
instrucciones apropiadas para un varilla de medici6n corta
o larga.
5. Vuelva a colocar el tap6n de Ilenado de aceite y asegurelo
firmemente.
IMPORTANTE: El aceite del motor usado puede causar
c_ncer de piel si entra en contacto con la piel de manera
reiterada y pot periodos prolongados. Si bien esto es
improbable a menos que manipule aceite usado todos los
dias, sin embargo es recomendable lavarse bien las manos
con jab6n y agua inmediatamente despu6s de haber
manipulado aceite usado.
NOTA: Elimine el aceite del motor usado de la manera que
sea compatible con el medio ambiente. Sugerimos que Io
coloque en un recipiente sellado y Io Ileve a la estaci6n de
servicio local para su recuperaci6n. No Io tire a la basura o
Io vierta sobre el suelo.
Mantenirnientodei Depuradorde Aire
Los filtros de papel no pueden ser limpiados y deben ser
sustituidos una vez al aho o cada 100 horas de operaciones; m_s
a menudo de ser usado en condiciones muy polvorientas.
_ DVERTENCIA: Nunca use gasolina osolventes de
punto de encendido bajo para limpiar el elemento
del depurador de aire. PodHa producirse un
incendio o explosi6n.
IMPORTANTE: Nunca opere el motor sin el depurador de aire
instalado. Resultar_ en desgaste r_pido del motor.
NOTA: Su motor puede estar equipado con un filtro de papel de
elemento doble rect_ngulo de espuma pre-filtro o un elemento
de filtro ovalada unica espuma. El tipo de elemento dual tiene
un largo filtro de aire en forma rectangular, cubierta con un
tornillo de pulgar hacia la parte trasera del motor para acceder
a los elementos del filtro de aire. El tipo de elemento tenga una
corta filtro de aire en forma rectangular, cubrir con una cartilla
en la base del filtro de aire en la parte delantera del motor. Siga
las instrucciones indicadas a continuaci6n para el motor de su
cortadora.
Filtr0 de Element0D0ble
Retire el perno de mariposa y la cubierta del depurador de
aire. Retire los elementos de espuma y papel. Vea la figura
6-2. Sustituya el elemento de papel cuando sucio o dahado.
Sustituya el elemento de espuma cuando dahado.
Elemento de _
Perno de
Elemento de
espuma
Figura 6=2
SECCION 6 -- _V_ANTENIMIENTO Y ADJUSTES 11

2. F
Para limpiar el elemento de espuma, retire del filtro de aire
y I_ivese en detergente liquido y agua. Squeeze o presione
el elemento de espuma para limpiar la suciedad y el agua.
No retuerza, Io que podria da_ar o romper el elemento de
espuma. Permita secar a rondo antes de la utilizaci6n. No
haga el petrdleo el elemento de espuma.
Filtrode LInElement0
1.
Quite el filtro de aire, apretando la frente y el dorso para
liberar la lengOeta en la parte delantera de la cubierta del
mismo. V_ase la figura. 6-3. Limpieza de espuma o sustituir
los elementos deteriorados.
Leng_eta
Elemento
de papel
Figura 6=3
2.
Para limpiar el elemento de espuma, retirela de la base
del filtro de aire y lavar con detergente liquido y agua.
Squeeze o presione el elemento de espuma para limpiar la
suciedad y el agua. No tuerza, esto podria dahar o romper
el elemento de espuma. Deje que se seque bien antes de
usar. ACEITE el elemento de espuma con un aceite ligero
para motor.
MantenimientodeBujia
ADVERTENClA: NO pruebe la chispasi no est,1 la
bujia de encendido. NO de arranque al motor si no
est,1 la bujia de encendido.
Para asegurarse de que el motor funcione bien, la
bujia debe tenet una separaci6n correcta y debe estar libre de
dep6sitos.
1. Retire la funda de bujia y utilice una Ilave para bujias para
extraer la bujia.Vea la Fig. 6-4.
i_ ADVERTENCIA: Si el motor ha estado
funcionando, el silenciador estate1 muy caliente.
Tenga cuidado de no tocar el silenciador.
2. Inspeccione visualmente la bujia. Elimine la bujia si
presenta mucho desgaste, o si el aislante est,1 agrietado o
astillado. Limpie la bujia con un cepillo de alambre si se va
a reutilizar.
3.
/
F
4.
5.
Figura 6=4
Mida la separaci6n de bujia con un calibrador. Corrija de ser
necesario torciendo el electrodo lateral. Vea la fig. 6-5. La
separaci6n debe establecerse en 0,030 pulg.
Electrodo
Figura 6=5
Verifique que la arandela de la bujia est_ en buenas
condiciones y enrosque la bujia hacia adentro
manualmente para evitar enrosque cruzado.
Una vez que la bujia est,1 colocada en su lugar, apriete con
una Ilave para comprimir la arandela.
NOTA: Cuando instale una bujia nueva, apriete 1/2 de
vuelta una vez que la bujia se encuentra colocada en su
lugar para comprimir la arandela. Cuando vuelva a colocar
una bujia usada, apriete 1/8 - 1/4 de vuelta una vez que la
bujia se encuentra colocada en su lugar para comprimir la
arandela.
12 I SECClON 6 -- MANTENIMIENTO Y AJUSTES

IMPORTANTE: La bujia debe estar firmemente asegurada.
Una bujia que no se encuentre bien asegurada puede
calentarse mucho y daflar el motor.
ServicioconRitro deCombustible
El filtro de combustible no puede ser limpiado y debe ser
sustituido una vezal aflo o cada 100 horas de operaciones; m_s a
menudo de set dirigido con vieja gasolina.
1. Quite todo el combustible del tanque dirigiendo el motor
hasta que esto se pare a falta del combustible.
2. Quite la c-abrazadera de la linea de combustible y quite la
linea de combustible de la salida de tanque. Vet la Fig. 6-6.
Filtro de
combustible
Figura 6-6
3. Saque el viejo filtro de combustible de la salida de tanque.
Sustituya cuando sucio o daflado.
4. Agarre el nuevo filtro de combustible a partir del final
Ilevado a hombros e ins_rtelo completamente al hombro
en la salida de tanque. Vet la inserci6n de la Fig. 6-6.
5. Sustituya la linea de combustible y la c-abrazadera.
Limpieel Motor
Si el motor ha estado funcionando, d_jelo enfriar durante por
Io menos media hora antes de limpiarlo. De manera regular,
extraiga el pasto y la acumulaci6n de suciedad del motor. Limpie
la protecci6n de retenci6n y alrededor del silenciador. Limpie con
un cepillo o aire comprimido.
IMPORTANTE: No rocie el motor con agua para limpiarlo porque
el agua podria contaminar el combustible. Con una manguera
de jardin o equipo de lavado a presi6n tambi_n puede forzar
agua dentro del depurador de aire o la abertura del silenciador.
El agua en el depurador de aire embeber_ el elemento de papel,
y el agua que pasa a trav_s del elemento o silenciador puede
ingresar en el cilindro, causando daflo.
_ DVERTENCIA: La acumulaci6n de residuos
alrededor del silenciador podfian producir un
incendio. Inspeccione y limpie antes de cada uso.
Aimacenamiento
PRECAUCION: El no usar un aditivo estabilizador
de combustible o en su totalidad haga funcionar el
motor hasta que est_ sin combustible antes de
guardarlo fuera de temporada puede resultar en
daffos al carburador de su motor. Daffos posteriores
no estarian cubiertos por la garantia del fabricante.
Los motores almacenados entre 30 y 90 dias tienen que
ser tratados con un estabilizador de gasolina y los motores
almacenaron m_s de 90 dias necesitan ser drenados de
combustible para evitar que se deterioren y se forme goma en el
sistema combustible o en las piezas principales del carburador. Si
la gasolina en su motor se deteriora durante el almacenamiento,
debe reparar o reemplazar el carburador y otros componentes
del sistema combustible.
1. Extraiga todo el combustible del dep6sito haciendo
funcionar el motor hasta que se detenga pot falta de
combustible.
ADVERTENCIA: Nunca deje el motor desatendido
dirigiendo.
2_
3.
4_
5_
Cambie el aceite del motor. Consulte la secci6n Cambio de
Aceite.
Extriaga la bujia y vierte alrededor de 1/2 onza de aceite
de motor dentro del cilindro. Vuelva a colocar la bujia y
arranque lentamente el motor para distribuir el aceite.
Limpie el pasto y residuos en torno del motor, debajo de
la protecci6n de retenci6n y debajo, alrededor y detr_s del
silenciador. Retoque la pintura dahada, y revista otras _reas
que puedan oxidarse con una pelicula delgada de aceite.
Almacene en un sector limpio, seco y bien ventilado,
lejos de cualquier artefacto que funcione con una
llama o luz piloto como homo, calentador de agua o
secador de ropa. Tambi_n evite cualquier sector con una
chispa produciendo motor el_ctrico o donde se utilizan
herramientas el_ctricas.
6. De ser posible, tambi_n evita _reas de almacenamiento con
mucha humedad para evitar oxidaci6n y corrosi6n.
7. Mantenga el motor nivelado cuando Io almacene.
La inclinaci6n del motor puede resultar en fugas de
combustible o aceite.
RetirardesuAlmacenamiento
2.
3_
Inspeccione su motor como se describe en la secci6n
Control Previo al Funcionamiento de este manual.
Si el combustible fue drenado durante la preparaci6n para
el almacenamiento, Ilene el dep6sito con gasolina nueva.
Si tiene un recipiente de gasolina para Ilenar, asegurese
de que contenga solo combustible sin usar. La gasolina
se oxida y deteriora con el tiempo, causando un arranque
dificil.
Si el cilindro fue revestido con aceite durante la
preparaci6n para el almacenamiento, el motor humear_
brevemente durante el arranque. Esto es normal.
SECCION 6 -- _V|ANTENIMIENTO Y ADJUSTES 13

Soluci6ndeProblemas
7
Problerna
El motor no arranca
El motor funciona de
manera err_itica
El motor recahenta
Saltos ocasionales
(pausas) a
alta velocidad
Funciona mal en
marcha lenta
Causa
1. El control de I_imina se retir6. (Cortadora de
c_sped solo)
2. Alambre de bujia desconectado.
3. Dep6sito de combustible combustible vac[o
o alfiejo.
4. Wqlvula de corte de combustible cerrado (De
ser equipado).
5. ESTARTERno activado (De serequlpado).
6. Bujia defectuosa.
7. Reduccion del flujo de combustible y filtro de
combustible bloqueados.
8. Se ahogo el motor.
9. El motor no est,1 cebado (De ser equlpado).
10.
1.
2.
Fusible quemado. (Principio EI6ctrico $61o)
El cable de la bujia est,1 flojo.
Reducci6n del flujo de combustible y filtro de
combustible bloqueados.
La ventilaci6n en la tapa del combustible
Solud6n
1. Contratar el control de I_fimina.
2. Unir el alambre a la bujia.
3. Llenar el tanque de la gasohna limpia, fresca.
4. Encienda la wilvula de combustible de cierre.
5. Ahogue el motor (ver la secci6n de
Funcionamiento).
6. Limpio, ajuste el hueco, o sustitulr.
7. Reemplace el filtro de combustible como se
indica en la secd6n de mantemmiento.
8. Espere unos minutos para reinidar, pero no
pnmos.
9. Cebe el motor tal como se explica en [a
secd6n de Funcionamiento.
lO.Sustituya el fusible (ver la seccion de
Serviclo).
1. Conecte y ajuste el cable de la bujia.
2. Reemplace el filtro de combustible como se
indica en la secci6n de mantenimiento.
3. Destape la ventilaci6n.
est,1 obstruida.
4. Agua o suciedad en el sistema del
combustible.
5. Elfiltro de aire est,1 sucio.
4,
5,
Vacie el tanque del combustible. Vuelva a
Ilenarlo con combustible limpio.
Refi6rase a la secci6n de mantenimiento de
motor.
6,
1,
2.
1.
La unidad que corre con el ESTA,RTER(De ser
equipado) se aplic6.
Elnivel de acelte del motor esbajo.
Flujode aire restringldo.
La distancia disruptiva de la bujia es muy
pequeffa.
Bujia atorada, averiada o exceso de distanda
disruptwa.
2. Elfiltro de aire est,1 sucio.
6. Perilla de ESTARTERde empuje en.
1. Llene el c_qrtercon aceite adecuado.
2. Retire el alojamiento del soplador y limpielo.
1. Ajuste la distancia disruptiva a 0,76 mm (0,03
pulg).
1,
Reajustela distanda disruptiva a 0,76mm
(0,03)o reemplace la bujia.
2. Refi_rase a la seccl6n de mantenimiento de
motor.

DECLARACIONFEDERALy/oDECALIFORNIASOBRE GARANTJAS EN EL CONTROL DE EIVIISIONES
SUS DERECHOS Y OBLIGACIONES EN CUANTO A LA GARANTJA
MTDConsumerGroupInc,laAgenciadeProtecci6nMedioambientaldelos EstadosUnidos(EPA),y paraaquellosproductoscertificadosparasuventaen el es-
tadode California,elDepartamentode losRecursosdelAire deCalifornia(CARB)secomplacenenexplicarla garanfiaquecubreal sistemade control(ECS)de
emisiones(evaporativasy/ode escape)de suequipoy motor(motordeequiposdeexteriores)deencendidopot chispaparatodoterreno,peque_o,deexteriores
dela_o2006y a_osposterioresEnCalifornia,losnuevosmotoresdeequiposdeexterioresdebenestardise_ados,construidosyequipadosparacumplircon las
estrictasnormasantipoluci6ndel Estado(enotrosestados,losequiposdela_o1997y modelosposterioresdebenserestardise_ados,construidosy equipados
paracumplirconlasregulacionesdemotoresdeencendidoporchispaparatodoterrenopeque_osde laAgenciade Protecci6nMedioambientaldelos Estados
Unidos,(EPA).MTDConsumerGroupInc.debegarantizarel sistemadecontroldeemisiones(ECS)desumotordeequiposdeexteriorespotel periodode
tiempoindicadom_sabajo,siempreycuandonoexistausoincorrecto,negligenciaomantenimientoinadecuadodedicho motor.
SuECSpuedeincluirpiezastalescomoel carburador,el sistemade inyecci6ndecombustible,el sistemadeencendido,elconvertidorcatalitico,losdep6sitos
decombustible,laslineasdecombustible,lostaponesdecombustible,lasv_lvulas,contenedores,filtros, manguerasdevapor,abrazaderas,conectoresyotros
componentesafinesrelacionadosconlasemisiones.
Dondeexistaunacondici6ncubiertaporla garantia,MTDConsumerGroupInc.reparar_su motorde equiposde exterioressincostoalgunoincluyendoel
diagn6stico,las piezasy la manodeobra.
COBERTURA DE LA GARANTJA DEL FABRICANTE:
Estesistemadecontroldeemisionesse garantizaporelt@minode dosaSos.Si algunapiezarelacionadacon lasemisionesdesu motorde equiposde
exterioresesdefectuosa,MTDCONSUMERGROUPINC.reparar_osustituir_dichapieza.
RESPONSABILIDADES DEL PROPIETARIO SEGUN LA GARANTJA:
Ensu car_cterdepropietariodelmotordeequiposdeexteriores,ustedesresponsabledel mantenimientorequeridoqueseespecificaenel manualdel propieta-
rio.MTDConsumerGroupInclerecomiendaqueconservetodoslosrecibosquecubrenel mantenimientode sumotor,noobstanteIocualMTDConsumerGroup
Incnopodr_denegarel cumplimientode lagarantiaQnicamenteporlafaltade los recibos.
Comopropietariodel motordeequiposde exteriores,usteddebesaberqueMTDConsumerGroupInc.puededenegarlacoberturade lagarantiasisumotoro
unapiezadel mismofallandebidoauso incorrecto,negligencia,mantenimientoindebidooamodificacionesnoaprobadas.
Ustedesresponsablede presentarsumotoral centrodedistribuci6no serviciotecnicodeMTDConsumerGroupInc.tan prontocomoaparezcael problema.Las
reparacionescubiertasporlagarantiase debenIlevaracaboen unlapsorazonablequenoexcedade30 dias.Sitienealgunapreguntarespectode lacobertura
dela garantia,p6ngaseen contactoconel DepartamentodelServicioT@nicode MTDConsumerGroupInc.al telefono1-800-800-7310opot correoelectr6nico
enhttp://support.mtdproducts.com
COBERTURA DE LA GARANTJA DE EMISIONES GENERALES:
MTDConsumerGroupIncgarantizaal compradorfinaly acadacompradorsubsiguienteque elmotordeequiposde exteriores:est_ dise_ado,construidoy
equipadodemododecumplircontodaslas regulacionesaplicablesy queseencuentralibrededefectosdematerialesyde fabricaci6nquepudierencausarla
falladeunapiezagarantizadaidentica,entodoslosaspectosmaterialesala piezadescriptaenla solicitudde certificaci6ndeMTDConsumerGroupInc.
El periododegarantiacomienzaenla fechade entregadelmotoralcompradorfinalo en lafechaenquela m_quinaseponeenfuncionamientopot primeravez.
El periododegarantiaesde dosaSos.
Sujetoaciertascondicionesyexclusionesqueseindicanacontinuaci6n,lagarantiadelas piezasrelacionadascon lasemisionesesla siguiente:
1. Cualquierpiezagarantizadaquenoesteprogramadaparaserreemplazadacomopartedel mantenimientorequeridoen lasinstruccionesescritassuminis-
tradassegarantizaporelperiododegarantiaarriba mencionado.Sila piezafalladuranteel periododecoberturade lagarantia,la mismaser_reparada
oreemplazadaporMTDConsumerGroupInc.deacuerdoconelparrafo(4)acontinuaci6n.Cualquierpiezareparadao reemplazadasegQnlagaranfiase
garantizar_potelrestodelperiodode garantia.
2. Cualquierpiezagarantizadaqueeste programadasolamenteparainspecci6nregularenlasinstruccionesescritassuministradassegarantizapotelperiodo
degarantiaarribamencionado.Cualquierpiezareparadao reemplazadasegQnla garantiasegarantizar_pot elrestodelperiodo.
3. Cualquierpiezagarantizadaqueeste programadapara reemplazosegL]nel mantenimientorequeridode conformidadcon lasinstruccionesescritassuminis-
tradas,segarantizaporel periododetiempoanteriora laprimerafechade reemplazoprogramadaparaesapieza.Sila piezafallaantesdelprimerreemplazo
programatic,lamismaser&reparadao reemplazadapot MTDConsumerGroupInc.deacuerdoconel parrafo(4)a continuaci6n.Cualquierpiezareparadao
reemplazadabajogarantiasegarantizar_potel restodelperiodoanterioral primerreemplazoprogramaticpuntualparaesapieza.
4. Lareparaci6noel reemplazodecualquierpiezagarantizadadeconformidadconlasdisposicionesde lagarantiaqueaquiseestipulasedeben realizarenun
centrodegarantiasin costoalgunoparaelpropietario.
5. Noobstantelas disposicionesque aquiseestipulan,losserviciosoreparacionesbajo garantiasesuministrar_nentodosnuestroscentrosdedistribuci6nbajo
franquiciademantenimientoparalos motoresoequiposencuesti6n.
6. El propietariodelmotorde equiposdeexterioresno deber_pagarel trabajodediagn6sticodirectamenteasociadocon unapiezagarantizadadefectuosaen
relaci6nconlas emisiones,siempreycuandodichotrabajode diagn6sticose realiceen uncentrocubiertopot lagarantia.
7. MTDConsumerGroupInces responsablepotdaSoscausadosaotroscomponentesdemotoreso equiposderivadosde lafallabajo garantiadecualquier
piezagarantizada.

8.Durantelatotalidaddelperiododegarantiadelmotoryequipoparatodoterrenoarribamencionado,MTDConsumerGroupIncmantendr_unsuministro
depiezasbajogarantiasuficienteparasatisfacerlademandaesperadadetalespiezas.
9.Cualquierpiezadereemplazosepodr_usarparaelcumplimientodelmantenimientoolasreparacionesbajogarantiaysesuministrar_nsincargopara
elpropietario.Dichousonoreducir_lasobligacionesdegarantiadeMTDConsumerGroupInc.
10.Nosepodr_nusarpiezasadicionalesnimodificadasquenoestenexentasdeacuerdoconelDepartamentodelosRecursosdelAire(AirResourcesBoard).
Elusodecualquierpiezaadicionalomodificadanoexentaporelcompradorfinalser_causaldeinvalidezdelosreclamosbajogaranfia.MTDConsumer
GroupIncnotendr_responsabilidadpotlagarantiadefallasdepiezasgarantizadasquefuerencausadaspotelusodeunapiezaadicionalnoexenta
omodificada.
PIEZAS GARANTIZADAS:
Lareparaci6noelreemplazodecualquierpiezagarantizadaquede otto modopudieseestarcubiertaporlagarantiapodr_set excluidadetalcoberturade
garantiasi MTDConsumerGroupIncdemuestraqueelmotores objetodeusoincorrecto,negligenciao mantenimientoinadecuado,y quetalusoincorrecto,
negligenciaomantenimientoinadecuadofuecausadirectade lanecesidadde reparaci6no reemplazode dichapieza.NoobstanteIoantedicho,cualquierajuste
deuncomponenteconundispositivodelimitaci6nde ajusteinstaladoenf_bricay quefuncioneadecuadamente,podr_setcubiertopot lagarantia.Adem_s,
la coberturabajoestagarantiaseextiendesoloapiezasqueestuvieronpresentesenel motory equipotodoterrenoadquiridos.
Est_ncubiertaslas siguientespiezascongaranfiaparaemisiones(decorresponder):
(1)Sistemademedici6nde combustible
• Sistemade mejoraparainicioenfrio (cebadosuave)
• Carburadory piezasinternas(osistemade inyecci6npotcombustible)
• Bombadecombustible
• Dep6sitodecombustible
(2)Sistemade inducci6ndeaire
• Purificadordeaire
• Colectordeadmisi6n
(3) Sistemadeencendido
• Bujia(s) deencendido
• Sistemade encendidopot magneto
(4)Sistemade encendido
• Convertidorcatalitico
,, SAI(v_lvulaReed)
(5)Componentesvariosutilizadosen el sistemaanterior
• Wlvulas e interruptoresdevacio,temperatura,posici6nsensiblesal tiempo
• Conectoresy montajes
(6) Controlevaporativo
• Manguerade combustible
• Abrazaderasde lamangueradecombustible
• Tap6ndelcombustibleatadopot correa
• Cajadecarbono
• Lineas de vapor
GDOC-100223
-
 1
1
-
 2
2
-
 3
3
-
 4
4
-
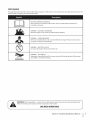 5
5
-
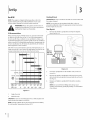 6
6
-
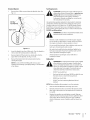 7
7
-
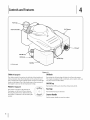 8
8
-
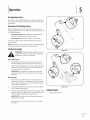 9
9
-
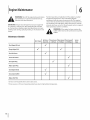 10
10
-
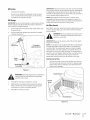 11
11
-
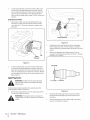 12
12
-
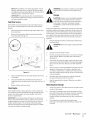 13
13
-
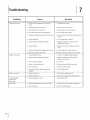 14
14
-
 15
15
-
 16
16
-
 17
17
-
 18
18
-
 19
19
-
 20
20
-
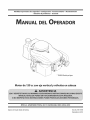 21
21
-
 22
22
-
 23
23
-
 24
24
-
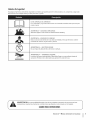 25
25
-
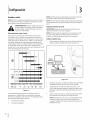 26
26
-
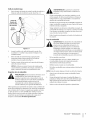 27
27
-
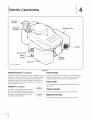 28
28
-
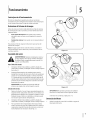 29
29
-
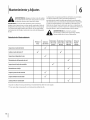 30
30
-
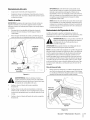 31
31
-
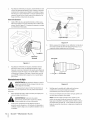 32
32
-
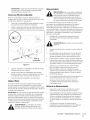 33
33
-
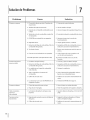 34
34
-
 35
35
-
 36
36


MTD 1P65B0B Manual de usuario
- Categoría
- Cortadoras de césped
- Tipo
- Manual de usuario
En otros idiomas
- English: MTD 1P65B0B User manual
Documentos relacionados
-
MTD 31A-2M1A706 El manual del propietario
-
-
-
-
-
-
-
-
-
MTD 208cc Manual de usuario