HoMedics Well at Walgreens Delux Wrist Blood Pressure Monitor El manual del propietario
- Categoría
- Unidades de presión arterial
- Tipo
- El manual del propietario
Este manual también es adecuado para

DELUXE WRIST
Blood Pressure
Monitor
WGNBPW-720
El manual
en español
empieza en la
página 38
• 5-Year
Limited
Warranty

1
TABLE OF CONTENTS
INTRODUCTORY INFORMATION:
Important Product Notices and
Safety Instructions .......................................... 3
About Blood Pressure ..................................... 5
Blood Pressure Standard ................................ 6
How This Blood Pressure
Monitor Works .................................................. 8
USAGE INFORMATION:
Name/Function of Each Part ........................... 9
Display Explanations ..................................... 10
Installing Batteries ........................................ 12
Wrist Positioning Guide ................................ 14
Setting User Preferences .............................. 15
Applying the Cuff ........................................... 16
Correct Measurement Posture ..................... 18

2
Measurement Procedure ............................... 19
Risk Category Index ...................................... 23
Irregular Heartbeat Detector (IHB) .............. 24
Recalling Values from Memory ..................... 26
Clearing Values from Memory ...................... 27
Important Notes Regarding Your
Blood Pressure Measurement ...................... 28
Care, Maintenance & Cleaning ..................... 29
Potential for Electromagnetic
Interference .................................................... 31
Troubleshooting ............................................. 32
Specifications ................................................ 33
5 Year Limited Warranty ................................ 35

3
IMPORTANT PRODUCT NOTICES AND
SAFETY INSTRUCTIONS
When using your blood pressure monitor, basic precautions
should always be followed. Please read and follow all
instructions and warnings before using this product. Save
these instructions for future reference.
• Pleasenotethatthisisahomehealthcareproductonly
and it is not intended to serve as a substitute for the
advice of a physician or medical professional.
• Thisdeviceusestheoscillometricmethodtomeasure
systolic and diastolic blood pressure, as well as heart rate.
• Do not use this device for diagnosis or treatment of any
health problem or disease. Measurement results are
for reference only. Consult a healthcare professional for
interpretation of blood pressure measurements. Contact
your physician if you have or suspect any medical
problem. Do not change your medications without the
advice of your physician or healthcare professional.
• Thisproductisnotsuitableforpeoplewitharrhythmias.
This device may have difficulty determining the proper
blood pressure for pregnant women and for individuals
with irregular heartbeat, diabetes, poor circulation of
blood, kidney problems or for users who have suffered
from a stroke.

4
• Consultyourphysicianbeforemeasuringblood
pressure at the wrist if you have any of the following
conditions: Severe hypertension, severe diabetes, severe
arteriosclerosis, severe kidney disease or vascular disease
that may compromise circulation.
• Thepulsedisplayisnotsuitableforcheckingthefrequency
of heart pacemakers.
• Electromagneticinterference:Thedevicecontains
sensitive electronic components. Avoid strong electrical or
electromagnetic fields in the direct vicinity of the device (e.g.
mobile telephones, microwave ovens). These may lead to
temporary impairment of measurement accuracy.
• Usebloodpressuremonitoronlyforits
intended use.
• Do not wrap the cuff around body parts other than your
wrist.
• Notforusebyoronpersonsunderthe
age of 18.
• Useonly1.5VAAAalkalinebatteriesfor
power supply.
Blood pressure measurements determined with this device
areequivalenttothoseobtainedbyatrainedobserverusing
the cuff/stethoscope auscultatory method, within the limits
prescribed by the American National Standard, Manual,
electronic, or automated sphygmomanometers.

5
ABOUT BLOOD PRESSURE
What is Blood Pressure?
Blood pressure is the pressure exerted on the artery
walls while blood flows through the arteries. The
pressure measured when the heart contracts and
sends blood out of the heart is systolic (highest) blood
pressure. The pressure measured when the heart
dilates with blood flowing back into the heart is called
diastolic (lowest) blood pressure.
Why Measure Your Blood Pressure?
Among today’s various health problems, those associated
with high blood pressure are very common. High blood
pressure dangerously correlates with cardiovascular
diseases. Therefore, blood pressure monitoring is
important for identifying those at risk.

6
BLOOD PRESSURE STANDARD
The table below contains defined levels for hypertension
that are publicly available from the National Heart Lung and
Blood Institute at the U.S. National Institutes of Health (NIH)
(http://www.nhlbi.nih.gov/health/dci/Diseases/Hbp/HBP_
WhatIs.html). Users can compare their own blood pressure
readings against these defined levels to determine if they
may be potentially at increased risk.
This table is applicable to most adults aged 18 and older.
Blood pressure tends to go up and down, even in people
who normally don’t have high readings. If your numbers stay
above the “normal” range most of the time, you may be at
increased risk and should consult your physician.
Although one can easily find where their own blood pressure
readingsfallonthistable,thismonitorcomesequippedwith
a Risk Category Index that automatically compares each
reading to the defined levels and provides a helpful cue if
Category Systolic (mmHg) Diastolic (mmHg)
Normal Less than 120 and Less than 80
Prehypertension 120-139 or 80-89
High Blood Pressure
Stage 1 140-159 or 90-99
Stage 2 160 or higher or 100 or higher

7
your reading falls into one of the stages that could potentially
indicate increased risk. See page 23 for more information on
this feature.
Please note that cues provided by this monitor are only
intended to assist you in using this table. The table and cues
are only provided for convenience to help you understand
your non-invasive blood pressure reading as it relates to
the NIH information. They are not a substitute for a medical
examination by your physician. It is important for you to
consult with your physician regularly. Your physician will tell
you your normal blood pressure range as well as the point at
which you may actually be considered to be at risk.

8
HOW THIS BLOOD PRESSURE
MONITOR WORKS
This monitor uses innovative technology to detect your blood
pressure. This technology enables the monitor to automatically
inflate and deflate at the appropriate level for each individual.
With one touch of a button, the cuff will automatically inflate
to block the blood flow through your artery. Next, the deflation
process starts.
To help guide your wrist into the ideal position, this blood
pressuremonitorcomesequippedwithanoptionalwrist
positioning guide to help you take an accurate blood pressure
reading. Please see page 14 for more information on this feature.
Please note that any muscle movement during inflation or
deflation will cause measurement error. When measurement is
complete, the monitor will display your systolic pressure, diastolic
pressure, and pulse readings.The monitor automatically finds
where your measurement results fall on the NIH’s National Heart
Lung and Blood Institute’s table and provides a cue if your reading
falls into one of the stages that could potentially indicate increased
risk. See page 23 for more information on this feature.
The appearance of the
icon indicates that a pulse
irregularity consistent with an irregular heartbeat was detected
during measurement. Refer to page 24 for more information on the
Irregular Heartbeat Detector.

9
NAME/FUNCTION OF EACH PART
Accessories for unit :
2“AAA”size,1.5Valkaline
batteries included with the
carrying case with the unit.
User-Select
Button
Wrist Cuff
Battery Cover
(located on
side of unit)
Memory Recall
Button
START/STOP
Button
Date/Time
Set Buttons
LCD Display
Date/Time
Indicator
Wrist
Positioning
Guide

10
PM
AVG.
3
UP
DOWN
ROTATE
RIGHT
LEFT
DISPLAY EXPLANATIONS
Systolic
Pressure
Diastolic
Pressure
Date/Time
Indicator
Heart Rate
Wrist
Positioning
Guide

11
Display Symbols:
User 1: Appears when the monitor is operated by User 1.
User 2: Appears when the monitor is operated by User 2.
Weak Battery Symbol: Appears when batteries should be
replaced.
Pulse Symbol: Shows the heart rate per minute.
Wrist Positioning Guide: See page 14 for more information.
Irregular Heartbeat Detector: See page 24 for more
information.
Memory Average: Displays average of last 3 readings.
Risk Category Index: See page 23 for more information.
PM
AVG.
3
UP
DOWN
ROTATE
RIGHT
LEFT
PM
AVG.
3
UP
DOW N
ROTATE
RIGHT
LEFT
Measurement Error: Wrap the cuff correctly and keep wrist
steady during measurement. Measure again.
Air Circuit Abnormality: Measure again.
Pressure Exceeding 300 mmHg: Switch the unit off to clear,
then measure again.
Error Determining Measurement Data: Measure again.
Component Error: Measure again.
System Error: Measure again.
If and any of the following letters and numbers appear in the
area that systolic pressure should be displayed, an error has occurred
with your reading. See Troubleshooting section of this manual for
more information.
/
START
STOP
M
(No Symbol)

12
INSTALLING BATTERIES
1. The battery cover is located along
the side of the monitor. Remove
battery cover by pressing down
and pulling away from the
monitor.
2. Install batteries according to
the polarity indications inside
the compartment (as shown
in figure 2). Battery Type: 2
Alkaline LR03 (AAA) size
3. Insert the other battery,
according to the polarity
indications inside the
compartment (as shown in
figure 3).
4. Replace the cover by inserting
it back into place.
1.
2.
4.
3.

13
Replace the batteries if:
•Theweakbatterysymbolappearsonthedisplay.
•Nothingappearsonthedisplaywhenthepoweris
switched on.
As the supplied batteries are for test only, they may be
discharged earlier than batteries you buy in stores. Replace
all batteries at one time (as simultaneous set). Use only
1.5VAAAalkalinebatteries.Removebatterieswhenunitis
not in use for extended periods of time. Date and time will
need to be reset if batteries are removed or replaced. Clean
contacts on battery and in battery compartment with a soft
dry cloth each time you install batteries.
Note:
Batteries are hazardous waste. Do not dispose of them
together with the household garbage.

14
WRIST POSITIONING GUIDE
• Whenusingwristbloodpressuremonitors,itisimportant
to take the measurement while relaxing your wrist at heart
level. This will help ensure an accurate reading will be
taken. Because it is difficult to find the ideal location for
a wrist measurement we have included an optional Wrist
Positioning Sensor that will assist in directing your wrist to
the ideal location for a blood pressure measurement.
• AfteryoupressSTART/STOP button, the display will
illuminate with different icons that are designed to help you
move your wrist. Once the ideal location is found, the Pulse
Symbol will flash and measurement will begin.
SYMBOL ACTION
Move your wrist up.
Move your wrist down.
Rotate your wrist to your left.
Rotate your wrist to your right.
PM
AVG.
3
UP
DOWN
ROTATE
RIGHT
LEFT
PM
AVG.
3
UP
DOWN
ROTATE
RIGHT
LEFT
PM
AVG.
3
UP
DOWN
ROTATE
RIGHT
LEFT
PM
AVG.
3
UP
DOWN
ROTATE
RIGHT
LEFT

15
SETTING USER PREFERENCES
1. To adjust the user preferences, press the Date/Time Set
button
located on the top of the monitor.
2. The display will show a blinking ON. By default, the wrist
positioning guide is ON. To turn it OFF, press the
button.
3. Press the Date/Time Set button
again for the display to
show a blinking number, showing the HOUR. Change the
hour by pressing the
button. Each press will increase
the number by one in a cycling manner. Pressing the Date/
Time Set button
will confirm the entry.
4.
Change the MINUTE, MONTH, DAY and YEAR as described
in Step 3 above, using the
button to change the numbers
and the Date/Time Set button
to confirm the entries.
Press the button
turn 3d OFF
blinking 3d ON
confirm entry
blinking HOUR
repeat process to set HOUR, MINUTE,
MONTH, DAY and YEAR
PM
AVG.
3
UP
DOWN
ROTATE
RIGHT
LEFT

16
APPLYING THE CUFF
1. Remove all watches, wrist jewelry, etc. prior to attaching
the wrist monitor. Clothing sleeves should be rolled up
and the cuff should be wrapped around bare skin for
correct measurements.
2. Apply cuff to left wrist with
palm facing up as shown in
Fig. A.
3. Make sure the edge of the
cuff is about 1/4”~1/2” (1 cm)
from the palm as shown in
Fig. B.
Fig. A
Fig. B

17
4. In order to ensure accurate
measurements, fasten the hook
and loop strap securely around
your wrist so there is no extra
space between the cuff and the
wrist as shown in Fig. C. If the
cuff is not wrapped tight enough,
the measurement values will not
be accurate.
5.Ifyourphysicianhasdiagnosed
you with poor circulation in your
left arm, place the cuff around
your right wrist as shown in Fig. D.
Note:
If it is not possible to use the cuff on
your left wrist, it can also be used
on your right wrist. However, all
measurements should be made using
the same wrist.
Fig. C
Fig. D

18
CORRECT MEASUREMENT POSTURE
1. Place your elbow on a table so that
the cuff is at the same level as your
heart as shown in Fig. A. Relax your
entire body, especially between your
elbow and fingers.
Note:
Your heart is located slightly below
your armpit.
2. If the cuff is not at the same level as
your heart or if you cannot keep your
arm completely still throughout the
reading, use a soft object such as a
folded towel to support your arm as
shown in Fig. B.
3. Turn your palm upwards.
4.Situprightinachair,andtake5-6
deep breaths.
5.Avoidleaningbackwhilethe
measurement is being taken as
shown in Fig. C.
Fig. A
Fig. B
Fig. C
(X)

19
MEASUREMENT PROCEDURE
Important Notes:
•Positionthemonitoratthesamelevelasyourheart
during measurement to ensure accurate readings.
•Bloodpressurechangeswitheveryheartbeatandisin
constant fluctuation throughout the day.
•Bloodpressuremeasurementcanbeaffectedbythe
position of the user, his or her physiologic condition
and other factors. For greatest accuracy, wait 1 hour
after exercising, bathing, eating, drinking beverages
with alcohol or caffeine, or smoking to measure blood
pressure.
•Beforeameasurement,itissuggestedthatyousit
quietlyfor15minutesasmeasurementstakenduring
a relaxed state will have greater accuracy. You should
not be physically tired or exhausted while taking a
measurement.
•Duringthemeasurement,donottalkormoveyour
arm or hand muscles.
•Seepage28foradditionalnotesregardingyour
blood pressure measurement.
If you are using this blood pressure monitor for the first
time, please remove the protective film from the screen.

20
1. Press the User-Select button to choose User 1 or
User 2.
2. With the cuff wrapped around your wrist, press
the START/STOP button. Do not start the
measurement process unless the cuff is wrapped
around your wrist.
3. If your wrist is not in the ideal position, the screen
will suggest moving your wrist up or down, or
rotating to the left, or to the right.
SYMBOL ACTION
Move your wrist up.
Move your wrist down.
Rotate your wrist to your left.
Rotate your wrist to your right.
Note:
When the 3d function is turned OFF, this instruction will
not appear.
PM
AVG.
3
UP
DOWN
ROTATE
RIGHT
LEFT
PM
AVG.
3
UP
DOWN
ROTATE
RIGHT
LEFT
PM
AVG.
3
UP
DOWN
ROTATE
RIGHT
LEFT
PM
AVG.
3
UP
DOWN
ROTATE
RIGHT
LEFT
MEASUREMENT PROCEDURE
Important Notes:
•Positionthemonitoratthesamelevelasyourheart
during measurement to ensure accurate readings.
•Bloodpressurechangeswitheveryheartbeatandisin
constant fluctuation throughout the day.
•Bloodpressuremeasurementcanbeaffectedbythe
position of the user, his or her physiologic condition
and other factors. For greatest accuracy, wait 1 hour
after exercising, bathing, eating, drinking beverages
with alcohol or caffeine, or smoking to measure blood
pressure.
•Beforeameasurement,itissuggestedthatyousit
quietlyfor15minutesasmeasurementstakenduring
a relaxed state will have greater accuracy. You should
not be physically tired or exhausted while taking a
measurement.
•Duringthemeasurement,donottalkormoveyour
arm or hand muscles.
•Seepage28foradditionalnotesregardingyour
blood pressure measurement.
OR
PM
AVG.
3
UP
DOWN
ROTATE
RIGHT
LEFT
PM
AVG.
3
UP
DOWN
ROTATE
RIGHT
LEFT

21
4. All digits will light up, checking the display functions.
The checking procedure will be completed after
about 3 seconds.
5.Afterallsymbolsdisappear,thedisplaywillshow
“00”. The monitor is “Ready to Measure” and will
automatically inflate the cuff to begin measurement.
This cuff will then begin deflating as measurement
continues.
Note:
The monitor will re-inflate automatically if the system
detectsthatyourbodyrequiresmorepressurefor
measurement.
PM
AVG.
3
UP
DOWN
ROTATE
RIGHT
LEFT
PM
PM
PM
PM

22
6. When the measurement is completed, the cuff will
deflate entirely and systolic pressure, diastolic pressure
and pulse will be shown simultaneously on the LCD
screen. The measurement is then automatically
stored into memory.
Note:
•Thismonitorautomaticallyturnsoffapproximately1
minute after last operation. You may also press the
START/STOP button to turn the unit off.
•Tointerruptthemeasurement,youmaypressthe
START/STOP button (recommended), MEMORY,
User-Select or Date/Time Set (USER 1/2 / )
buttons. The cuff will deflate immediately after a
button is pressed.
PM

23
RISK CATEGORY INDEX
ThismonitorcomesequippedwithaRiskCategory
Index that automatically compares each reading
to defined levels established by the U.S. National
Institutes of Health’s (NIH) National Heart Lung and
Blood Institute as described earlier in this manual,
and provides a helpful cue if your reading falls into
one of the stages that could potentially indicate
increased risk. No cue is given if the reading falls in
the normal range as defined by NIH. Please note that
cues provided by this monitor are only intended to
assist you in using this table. The table and cues are
only provided for convenience to help you understand
your non-invasive blood pressure reading as it relates
to the NIH information. They are not a substitute for a
medical examination by your physician. It is important
for you to consult with your physician regularly. Your
physician will tell you your normal blood pressure
range as well as the point at which you may actually
be considered to be at risk.
(No Symbol)

PM
Irregular
Heartbeat
Detector
24
IRREGULAR HEARTBEAT DETECTOR (IHB)
The appearance of the icon indicates that
a pulse irregularity consistent with an irregular
heartbeat was detected during measurement. Usually
this is not a cause for concern. However, if the symbol
appears often, we recommend you seek medical
advice. Please note that the device does not replace
a cardiac examination, but serves to detect pulse
irregularities at an early stage.
Movement, shaking or talking during the
measurement can result in pulse irregularities that
may cause the appearance of this icon. Therefore,
it is of great importance to not move or talk during
measurement.

25
To determine the presence of an irregular heartbeat,
the average of the heartbeat intervals is calculated
with the first 3 normal effective heartbeat values. It
is important to note that the average is not a strict
mathematical averaging of all recorded intervals. At
least3beatswith25%orgreaterdifferencefromthe
average heartbeat interval will generate the icon
on the screen.
IMPORTANT INFORMATION:
This blood pressure monitor is not designed for use
by people with arrhythmias nor for diagnosing or
treating an arrhythmia problem. As a safeguard, we
recommend that if you have arrhythmias such as atrial
or ventricular premature beats and atrial fibrillation
or any other special conditions you should check
with your physician before using your blood pressure
monitor.

26
RECALLINGVALUESFROMMEMORY
This monitor can be used by two individuals. Each user
can store up to 60 measurements.
1. Press the User-Select button.
2. Choose User 1 or User 2.
3. Press the MEMORY button to access the memory.
4. The monitor will first display the
calculated average applied to the last 3
memories(“AVG.3”).
5. Everynewpressofthe
MEMORY button will recall
a previous reading. The latest
reading will be recalled first.
PM
PM
PM
PM
AVG.
3

27
CLEARINGVALUESFROMMEMORY
1. Press the User-Select button to select User 1 or
User 2.
2. Press and hold the Date/Time Set and
buttons at the same time while in memory recall
mode and the data for the selected user will be
erased automatically.
OR
PM
AVG.
3
UP
DOWN
ROTATE
RIGHT
LEFT
PM
AVG.
3
UP
DOWN
ROTATE
RIGHT
LEFT

28
IMPORTANT NOTES REGARDING YOUR
BLOOD PRESSURE MEASUREMENT
•Takeyourreadinginacomfortableenvironmentas
measurements can be affected by hot or cold temperatures.
Take your blood pressure at normal body temperature.
•Do not move or talk during measurement as this can elevate
readings.
•Do not move or cross legs during measurement. Keep feet
flat on floor.
•Do not touch cuff or monitor during measurement procedure.
•Itissuggestedthatyoutakeyourmeasurementsatthesame
time each day and use the same wrist for consistency.
•Usersshouldwaitaminimumof5minutesbeforetaking
additional measurements. More time may be necessary
depending upon your physiology.
•The measurement results that users receive are for
reference only. If users have any blood pressure
concerns, please consult a physician.
•Once inflation reaches 300 mmHg, the unit will deflate
automatically for safety reasons.
•This product is not suitable for people with arrhythmias.
• Thisdevicemayhavedifficultydeterminingtheproper
blood pressure for pregnant women and for users with
irregular heartbeat, diabetes, poor circulation of blood,
kidney problems, or for users who have suffered a stroke.

29
CARE, MAINTENANCE & CLEANING
•Cleanthebloodpressuremonitorbodyandcuff
carefully with a slightly damp, soft cloth. Do not
press. Do not wash cuff or use chemical cleaner on
it. Never use thinner, alcohol or petrol (gasoline) as
cleaner.
•Leakybatteriescandamagetheunit.Removethe
batteries when the unit will not be used for a long
time.
•Followlocalordinancesandrecyclinginstructions
reguarding disposal or recycling of the device and
device components, including batteries.
•Iftheunitisstorednearfreezing,allowitto
acclimate to room temperature before use.
•Thisbloodpressuremonitorisnotfieldserviceable.
You should not use any tool to open the device
nor should you attempt to adjust anything inside
the device. If you have any problems with this
device, please contact HoMedics Consumer
Relations (contact information on warranty page).
•Do not immerse the unit in water as this will result in
damage to the unit.
•Do not subject the monitor or cuff to extreme
temperatures, humidity, moisture, or direct
sunlight. Protect from dust.

30
•Do not fold the cuff tightly.
•Do not disassemble the monitor or cuff. If in need of
repair, refer to the warranty section of this manual.
•Do not subject the monitor to extreme shocks
(do not drop on floor).
•Do not inflate the cuff unless wrapped around wrist.
•Do not wrap the cuff around body parts other than your
wrist.
•Do not drop or insert any object into any opening.
•Thismonitormaynotmeetitsperformance
specifications if stored or used outside of these
temperature and humidity ranges:
• Storage/Transportation
Environment
Temperature:
-13°F~158°F
(-25°C~70°C)
Humidity:
Lessthan93%RH
• Operation
Environment
Temperature:
41°F~104°F
(5°C~40°C)
Humidity:
15~93%RH
CARE, MAINTENANCE & CLEANING
•Cleanthebloodpressuremonitorbodyandcuff
carefully with a slightly damp, soft cloth. Do not
press. Do not wash cuff or use chemical cleaner on
it. Never use thinner, alcohol or petrol (gasoline) as
cleaner.
•Leakybatteriescandamagetheunit.Removethe
batteries when the unit will not be used for a long
time.
•Followlocalordinancesandrecyclinginstructions
reguarding disposal or recycling of the device and
device components, including batteries.
•Iftheunitisstorednearfreezing,allowitto
acclimate to room temperature before use.
•Thisbloodpressuremonitorisnotfieldserviceable.
You should not use any tool to open the device
nor should you attempt to adjust anything inside
the device. If you have any problems with this
device, please contact HoMedics Consumer
Relations (contact information on warranty page).
•Do not immerse the unit in water as this will result in
damage to the unit.
•Do not subject the monitor or cuff to extreme
temperatures, humidity, moisture, or direct
sunlight. Protect from dust.

31
POTENTIAL FOR ELECTROMAGNETIC
INTERFERENCE
To avoid inaccurate results caused by electromagnetic interference
betweenelectricalandelectronicequipment,donotusethedeviceneara
cell phone or microwave oven.
ThisdevicecomplieswithPart15oftheFCCRules.
Operation is subject to the following two conditions:
(1) this device may not cause harmful interference,
and (2) this device must accept any interference
received, including interference that may cause
undesired operation.
NOTE:ThemanufacturerisnotresponsibleforanyradioorTV
interferencecausedbyunauthorizedmodificationstothisequipment.
Suchmodificationscouldvoidtheuserauthoritytooperatetheequipment.
NOTE:Thisequipmenthasbeentestedandfoundtocomplywiththe
limitsforaClassBdigitaldevice,pursuanttoPart15oftheFCCRules.
These limits are designed to provide reasonable protection against harmful
interferenceinaresidentialinstallation.Thisequipmentgenerates,uses
andcanradiateradiofrequencyenergyand,ifnotinstalledandusedin
accordance with the instructions, may cause harmful interference to radio
communications. However, there is no guarantee that interference will
notoccurinaparticularinstallation.Ifthisequipmentdoescauseharmful
interference to radio or television reception, which can be determined by
turningtheequipmentoffandon,theuserisencouragedtotrytocorrect
the interference by one or more of the following measures:
•Reorientorrelocatethereceivingantenna.
•Increasetheseparationbetweentheequipmentandreceiver.
•Connecttheequipmentintoanoutletonacircuitdifferentfrom
that to which the receiver is connected.
•Consultthedealeroranexperiencedradio/TVtechnicianforhelp.

32
Note: If the unit still does not work, contact HoMedics Consumer
Relations. Under no circumstance should you disassemble or
attempt to repair the unit by yourself. Contact information for
HoMedics Consumer Relations Department can be found on
the warranty page.
SYMPTOMS
POSSIBLE
CAUSES
CORRECTION
Unit does not turn on
when the START/STOP
button is pushed.
Batteries have
run down.
Replace them
with two new AAA alkaline
batteries.
Battery polarities have
been positioned incor-
rectly.
Re-insert the
batteries in the
correct positions.
EE measurement error
symbol shown on dis-
play or the blood pres-
sure value is displayed
excessively low
(or high).
Cuff has been placed
incorrectly.
Wrap the cuff properly so
that it is positioned correctly.
Measure again.
Did you talk or
move during
measurement?
Keep wrist steady during
measurement. Measure
again.
Shaking of the wrist with
the cuff on.
E1 error symbol shown
on display
Air circuit
abnormality.
Measure again.
E2 error symbol shown
on display
Inflation pressure exceed-
ing 300 mmHg.
Switch the unit off, then
measure again.
E3 error symbol shown
on display
Error determining mea-
surement data.
Measure again.
E4 error symbol shown
on display
Component malfunction. Measure again.
EP error symbol shown
on display
System error. Measure again.
TROUBLESHOOTING
If any abnormality arises during use, please check the following points:
POTENTIAL FOR ELECTROMAGNETIC
INTERFERENCE
To avoid inaccurate results caused by electromagnetic interference
betweenelectricalandelectronicequipment,donotusethedeviceneara
cell phone or microwave oven.
ThisdevicecomplieswithPart15oftheFCCRules.
Operation is subject to the following two conditions:
(1) this device may not cause harmful interference,
and (2) this device must accept any interference
received, including interference that may cause
undesired operation.
NOTE:ThemanufacturerisnotresponsibleforanyradioorTV
interferencecausedbyunauthorizedmodificationstothisequipment.
Suchmodificationscouldvoidtheuserauthoritytooperatetheequipment.
NOTE:Thisequipmenthasbeentestedandfoundtocomplywiththe
limitsforaClassBdigitaldevice,pursuanttoPart15oftheFCCRules.
These limits are designed to provide reasonable protection against harmful
interferenceinaresidentialinstallation.Thisequipmentgenerates,uses
andcanradiateradiofrequencyenergyand,ifnotinstalledandusedin
accordance with the instructions, may cause harmful interference to radio
communications. However, there is no guarantee that interference will
notoccurinaparticularinstallation.Ifthisequipmentdoescauseharmful
interference to radio or television reception, which can be determined by
turningtheequipmentoffandon,theuserisencouragedtotrytocorrect
the interference by one or more of the following measures:
•Reorientorrelocatethereceivingantenna.
•Increasetheseparationbetweentheequipmentandreceiver.
•Connecttheequipmentintoanoutletonacircuitdifferentfrom
that to which the receiver is connected.
•Consultthedealeroranexperiencedradio/TVtechnicianforhelp.

33
Note: These specifications are subject to change without notice.
Power Source:
Two1.5VDC(AAA)Alkalinebatteries
Measurement
Method:
Oscillometric
Measurement
Range:
Pressure: 40~280 millimeters Mercury (mmHg)
Pulse: 40~199 beats/minute
Accuracy:
Pressure: ±3 mmHg
Pulse:±5%ofreading
Pressure Sensor:
Semi-conductor
Inflation:
Pump driven
Deflation:
Automatic Pressure release valve
Memory Capacity:
60 memories for each User (120 total)
Auto-shut-off:
1 minute after last button operation
Operation
Environment:
Temperature:41°F~104°F(5°C~40°C)
Humidity:15%~93%RH
Storage/
Transportation
Environment:
Temperature:-13°F~158°F(-25°C~70°C)
Humidity:Lessthan93%RH
SPECIFICATIONS

34
Weight:
0.24lbs(107g)(withoutbatteries)
Wrist
Circumference:
5.3”-7.7”(13.5cm-19.5cm)
Accessories:
2 AAA alkaline batteries, instruction
manual, hard plastic storage case
Dimensions:
2.72”(L)x3.07”(W)x1.11”(H)
69mm(L)x78mm(W)x28.5mm(H)
InternallyPoweredequipment
TypeBFEquipment
IPx0-No special protection against the
ingress of water.
Not suitable for use in presence of
flammable anesthetic mixture wth air,
oxygen or nitrous oxide. Continuous
operation with short-time loading.
Note: These specifications are subject to change without notice.
Power Source:
Two1.5VDC(AAA)Alkalinebatteries
Measurement
Method:
Oscillometric
Measurement
Range:
Pressure: 40~280 millimeters Mercury (mmHg)
Pulse: 40~199 beats/minute
Accuracy:
Pressure: ±3 mmHg
Pulse:±5%ofreading
Pressure Sensor:
Semi-conductor
Inflation:
Pump driven
Deflation:
Automatic Pressure release valve
Memory Capacity:
60 memories for each User (120 total)
Auto-shut-off:
1 minute after last button operation
Operation
Environment:
Temperature:41°F~104°F(5°C~40°C)
Humidity:15%~93%RH
Storage/
Transportation
Environment:
Temperature:-13°F~158°F(-25°C~70°C)
Humidity:Lessthan93%RH

For service or repair,
do not return this unit
to the retailer. Contact
HoMedics Consumer
Relations at:
Email:
cservice@
homedics.com
Phone:
1-800-466-3342
Business Hours:
8:30am-7pm ET
Monday-Friday
LIMITED FIVE YEAR WARRANTY
HoMedics sells its products with the intent that they are free of defects in
manufacture and workmanship for a period of five years from the date of
original purchase, except as noted below. HoMedics warrants that its products
will be free of defects in material and workmanship under normal use and
service. This blood pressure monitor meets the simulated measurement cycles
test requirement per EN1060-3, part 8.10. This warranty extends only to
consumers and does not extend to Retailers.
To obtain warranty service on your HoMedics product, contact a Consumer
Relations Representative by telephone at 1-800-466-3342 for assistance.
Please make sure to have the model number of the product available.
HoMedics does not authorize anyone, including, but not limited to, Retailers,
the subsequent consumer purchaser of the product from a Retailer or remote
purchasers, to obligate HoMedics in any way beyond the terms set forth
herein. This warranty does not cover damage caused by misuse or abuse;
accident; the attachment of any unauthorized accessory; alteration to the
product; improper installation; unauthorized repairs or modifications; improper
use of electrical/power supply; loss of power; dropped product; malfunction
or damage of an operating part from failure to provide manufacturers
recommended maintenance; transportation damage; theft; neglect; vandalism;
or environmental conditions; loss of use during the period the product is at
a repair facility or otherwise awaiting parts or repair; or any other conditions
whatsoever that are beyond the control of HoMedics.
This warranty is effective only if the product is purchased and operated
in the country in which the product is purchased. A product that requires
modifications or adoption to enable it to operate in any other country than the
country for which it was designed, manufactured, approved and/or authorized,
or repair of products damaged by these modifications is not covered under
this warranty.
®
Distributed by
®
Distribuido por
HoMedics, Inc.
3000 Pontiac Trail
Commerce
Township, MI
48390
Printed in China
Made exclusively for

HoMedics® is a registered trademark of HoMedics, LLC.
© 2012 HoMedics, LLC. All rights reserved.
IB-WGNBPW720
P/N: 323102020 Ver. 001
THE WARRANTY PROVIDED HEREIN SHALL BE THE SOLE AND EXCLUSIVE
WARRANTY. THERE SHALL BE NO OTHER WARRANTIES EXPRESS OR
IMPLIED INCLUDING ANY IMPLIED WARRANTY OF MERCHANTABILITY OR
FITNESS OR ANY OTHER OBLIGATION ON THE PART OF THE COMPANY WITH
RESPECT TO PRODUCTS COVERED BY THIS WARRANTY. HOMEDICS SHALL
HAVE NO LIABILITY FOR ANY INCIDENTAL, CONSEQUENTIAL OR SPECIAL
DAMAGES. IN NO EVENT SHALL THIS WARRANTY REQUIRE MORE THAN
THE REPAIR OR REPLACEMENT OF ANY PART OR PARTS WHICH ARE FOUND
TO BE DEFECTIVE WITHIN THE EFFECTIVE PERIOD OF THE WARRANTY.
NO REFUNDS WILL BE GIVEN. IF REPLACEMENT PARTS FOR DEFECTIVE
MATERIALS ARE NOT AVAILABLE, HOMEDICS RESERVES THE RIGHT TO
MAKE PRODUCT SUBSTITUTIONS IN LIEU OF REPAIR OR REPLACEMENT.
This warranty does not extend to the purchase of opened, used, repaired,
repackaged and/or resealed products, including but not limited to sale of such
products on Internet auction sites and/or sales of such products by surplus
or bulk resellers. Any and all warranties or guarantees shall immediately
cease and terminate as to any products or parts thereof which are repaired,
replaced, altered, or modified, without the prior express and written consent
of HoMedics.
This warranty provides you with specific legal rights. You may have additional
rights which may vary from state to state. Because of individual state
regulations, some of the above limitations and exclusions may not apply to
you.

DE LUJO PARA LA MUÑECA
Monitor de presión
arterial
WGNBPW-720
• Garantía
limitada
por 5 años

DE LUJO PARA LA MUÑECA
Monitor de presión
arterial
WGNBPW-720
• Garantía
limitada
por 5 años

39
ÍNDICE
INFORMACIÓN INICIAL:
Avisos importantes del producto e
instrucciones de seguridad .......................... 41
Acerca de la presión arterial ........................ 43
Valores estándar de la presión arterial ....... 44
Cómo funciona este monitor de presión
arterial ............................................................ 46
INFORMACIÓN DE USO:
Nombre/función de cada pieza ..................... 47
Explicaciones de la pantalla ......................... 48
Instalación de las baterías ............................ 50
Guía de posición de la muñeca .................... 52
Configuración de preferencias del usuario . 53
Aplicación del brazalete ................................ 54

40
Postura correcta para la medición ............... 56
Procedimiento de medición .......................... 57
Índice de categoría de riesgo ....................... 61
Detector de latidos cardíacos irregulares
(IHB) ................................................................ 62
Cómo recuperar valores de la memoria ...... 64
Cómo borrar valores de la memoria ............ 65
Notas importantes con respecto a la
medición de presión arterial......................... 66
Cuidado, mantenimiento y limpieza ............. 67
Potencial de interferencia
electromagnética ........................................... 69
Diagnóstico y resolución de problemas ...... 70
Especificaciones ............................................ 71
Garantía limitada por 5 años ........................ 73

41
AVISOSIMPORTANTESDELPRODUCTOE
INSTRUCCIONES DE SEGURIDAD
Cuando utilice el monitor de presión arterial, debe respetar
siempre las precauciones básicas. Lea y siga todas las
instrucciones y advertencias antes de utilizar este producto.
Guarde estas instrucciones para referencia futura.
• Tengaencuentaqueesteproductodecuidadodelasalud
es solamente para uso doméstico y por lo tanto no está
diseñado para sustituir los consejos de un médico ni de un
profesional médico.
• Estedispositivoutilizaelmétodooscilométricoparamedirla
presión arterial sistólica y diastólica, y la frecuencia cardíaca.
• No utilice este dispositivo para el diagnóstico o tratamiento
de ningún problema de salud o enfermedad. Los resultados
de medición son de referencia únicamente. Consulte a un
profesional de la salud para conocer la interpretación de las
mediciones de la presión arterial. Póngase en contacto con
sumédicositieneunproblemamédicoosospechaquelo
tiene. No cambie sus medicinas sin el consejo de su médico
o profesional de la salud.
• Esteproductonoesadecuadoparapersonasconarritmia.
Este dispositivo puede tener dificultad para determinar la
presión arterial correcta en mujeres embarazadas y en
personas con latidos irregulares, diabetes, mala circulación,
trastornosrenalesousuariosquehansufridounaccidente
cerebrovascular.

42
• Consulteconsumédicoantesdemedirselapresiónarterial
en la muñeca si tiene alguna de las siguientes afecciones:
hipertensión grave, diabetes grave, arteriosclerosis grave,
enfermedadrenalgraveoenfermedadvascularquepueda
afectar la circulación.
• Lapantalladepulsonoesadecuadaparaverificarla
frecuencia de marcapasos.
• Interferenciaelectromagnética:eldispositivocontiene
componentes electrónicos sensibles. Evite los campos
eléctricos o electromagnéticos fuertes cercanos al
dispositivo (por ejemplo, teléfonos celulares, hornos de
microondas),yaquepuedencausarproblemastemporales
para medir con precisión.
• Utiliceelmonitordepresiónarterialúnicamenteparaeluso
para el cual fue diseñado.
• Nouseelbrazaleteenotrapartedelcuerpoquenoseala
muñeca.
• Esteproductonoesaptoparaserusadoporpersonas
menores de 18 años.
• SolamentesedebenutilizarbateríasalcalinasAAAde1,5V
como fuente de energía.
Lasmedicionesdelapresiónarterialquesedeterminen
conestedispositivosonequivalentesalasqueobtieneun
observadorcapacitadoqueuseelmétododeauscultación
con brazalete/estetoscopio, dentro de los límites prescritos por
la Norma Nacional Estadounidense de Esfigmomanómetros
manuales, electrónicos o automatizados.

43
ACERCA DE LA PRESIÓN ARTERIAL
¿Qué es la presión arterial?
Lapresiónarterialeslapresiónqueseejerceenlas
paredes de las arterias cuando la sangre fluye por las
arterias.Lapresiónquesemidecuandoelcorazón
se contrae y envía la sangre es la presión arterial
sistólica(lamásalta).Lapresiónquesemidecuando
el corazón se dilata y la sangre entra se llama presión
arterial diastólica (la más baja).
¿Por qué se debe medir la presión arterial?
Entre los distintos problemas de salud de la actualidad,
sonmuycomuneslosqueseasocianconlahipertensión
(presión arterial alta). La hipertensión se relaciona
peligrosamente con enfermedades cardiovasculares. Por
lo tanto, controlar la presión arterial es importante para
identificaralaspersonasqueestánenriesgo.

44
VALORESESTÁNDARDELA
PRESIÓN ARTERIAL
En la siguiente tabla se incluyen niveles definidos de
hipertensión disponibles para el público en el Instituto
Nacional del Corazón, los Pulmones y la Sangre (National
Heart Lung and Blood Institute) de los Institutos Nacionales
de la Salud (National Institutes of Health, NIH) de los Estados
Unidos (http://www.nhlbi.nih.gov/health/dci/Diseases/Hbp/
HBP_WhatIs.html). Los usuarios pueden comparar sus propias
lecturas de presión arterial con estos niveles definidos para
determinarsiesposiblequecorranmayorriesgo.
Esta tabla se aplica a la mayoría de los adultos mayores de 18
años.
La presión arterial tiende a subir y bajar, incluso en personas
quenormalmentenotienenlecturasaltas.Siobtiene
resultadosquepermanecenporencimadelrango“normal”
lamayoríadeltiempo,esposiblequecorraunriesgomayory
debería consultar a su médico.
Categoría
Presión sistólica
(mmHg)
Presión diastólica
(mmHg)
Normal Menorque120 y Menorque80
Prehipertensión 120 a 139 o 80 a 89
Hipertensión
Etapa 1 140a159 o 90 a 99
Etapa 2 160 o mayor o 100 o mayor

45
Si bien en esta tabla es posible encontrar fácilmente la
categoríaenlaqueseencuentrasupropialecturade
la presión arterial, este monitor cuenta con un Índice de
categoríaderiesgoquecomparaautomáticamentecada
lectura con estos niveles definidos y brinda una guía útil si su
lecturaestádentrodeunadelasetapasqueposiblemente
podrían indicar un mayor riesgo. Consulte la página 61 para
obtener más información sobre esta función.
Tengaencuentaquelasguíasqueproporcionaestemonitor
están destinadas únicamente a ayudarlo con el uso de esta
tabla. La tabla y las guías se proporcionan únicamente
para su comodidad y para ayudarlo a entender su lectura
no invasiva de presión arterial según se relaciona con la
información de los NIH. No sustituyen a un examen médico
realizadoporsumédico.Esimportantequeconsultea
su médico regularmente. Él le explicará su rango normal
depresiónarterialademásdelpuntoenelquesepuede
considerarqueustedestárealmenteenriesgo.

46
CÓMO FUNCIONA ESTE MONITOR DE
PRESIÓN ARTERIAL
Este monitor utiliza tecnología innovadora para detectar la
presiónarterial.Estatecnologíapermitequeelmonitorse
infle y desinfle automáticamente en el nivel apropiado de
cada persona. Al presionar un botón, el brazalete se inflará
automáticamenteparabloquearlacirculacióndesangreatravés
de la arteria. Luego, comienza el proceso de desinflado.
Para ayudarlo a colocar la muñeca en la posición ideal, este
monitor de presión arterial cuenta con una guía de posición
delamuñecaparaquepuedaobtenerunalecturaprecisade
lapresiónarterial.Consultelapágina52paraobtenermás
información sobre esta función.
Tengaencuentaquecualquiermovimientomuscularduranteel
proceso de inflado o desinflado causará un error en la medición.
Cuando haya finalizado la medición, el monitor mostrará lecturas
de la presión sistólica y diastólica, y del pulso. El monitor busca
automáticamentelacategoríaenlaqueseencuentransus
resultados de medición en la tabla del Instituto Nacional del
Corazón, los Pulmones y la Sangre de los NIH, y brinda una
guíasisulecturaentraenunadelasetapasquepodríaindicar
un mayor riesgo. Consulte la página 61 para obtener más
información sobre esta función.
Sidurantelamediciónsedetectóunairregularidaddepulsoque
concuerda con latidos cardíacos irregulares, aparece el ícono
queloindica.Consultelapágina62paraobtenermás
información sobre el detector de latidos cardíacos irregulares.

47
NOMBRE/FUNCIÓN DE CADA PIEZA
Accesorios para la unidad:
2 baterías alcalinas “AAA”
de1,5V,incluidasenel
estuche de transporte con
la unidad.
Botón de
selección
del usuario
Brazalete para
la muñeca
Tapa de las baterías
(ubicada en parte
trasera de la unidad)
Botón para
recuperar
memoria
Botón START/STOP
(comenzar/detener)
Botones de configuración
de fecha y hora
Pantalla LCD
Indicador de
fecha y hora
Guía de
posición de
la muñeca

48
Botones de configuración
de fecha y hora
PM
AVG.
3
UP
DOWN
ROTATE
RIGHT
LEFT
EXPLICACIONES DE LA PANTALLA
Presión
sistólica
Presión
diastólica
Indicador de
fecha y hora
Frecuencia
cardíaca
Guía de
posición de
la muñeca

49
Símbolos de la pantalla:
Usuario 1: aparece cuando el Usuario 1 opera el monitor.
Usuario 2: aparece cuando el Usuario 2 opera el monitor.
Símbolo de batería baja: aparece cuando se deben cambiar
las baterías.
Símbolo de pulso: muestra la frecuencia cardíaca por minuto.
Guía de posición de la muñeca: consultelapágina52para
obtener más información.
Detector de latidos cardíacos irregulares: consulte la página
62 para obtener más información.
Promedio de memoria: muestra un promedio de las últimas 3
lecturas.
Índice de categoría de riesgo: consulte la página 61 para
obtener más información.
PM
AVG.
3
UP
DOWN
ROTATE
RIGHT
LEFT
PM
AVG.
3
UP
DOW N
ROTATE
RIGHT
LEFT
Error de medición: vuelva a colocarse el brazalete correctamente
ymantengalamuñecaquietadurantelamedición.Repitala
medición.
Irregularidad en el circuito de aire: repita la medición.
Presión superior a 300 mmHg: apague la unidad, luego vuelva
a medir.
Error que determina los datos de medición: repita la medición.
Error de algún componente: repita la medición.
Error del sistema: repita la medición.
Si aparece el y alguno de los siguientes números o letras en
el área donde se debe mostrar la presión sistólica, ha ocurrido un
error en la lectura. Consulte la sección Diagnóstico y resolución de
problemas de este manual para obtener más información.
/
START
STOP
M
(No Symbol)

50
INSTALACIÓN DE LAS BATERÍAS
1. La tapa del compartimiento de
las baterías está ubicada sobre
la parte lateral del monitor. Retire
la tapa del compartimiento de las
baterías presionando hacia abajo y
en dirección opuesta al monitor.
2. Instale las baterías siguiendo
las indicaciones de polaridad
queseencuentranenelinterior
del compartimiento (según se
muestra en la figura 2). Tipo de
batería: 2 baterías alcalinas
LR03 tamaño (AAA)
3. Instale la otra batería siguiendo
las indicaciones de polaridad
queseencuentranenelinterior
del compartimiento (según se
muestra en la figura 3).
4.Vuelvaacolocarlatapa,
insertándola nuevamente en
su lugar.
1.
2.
4.
3.

51
Reemplace las baterías si:
•Elsímbolodebateríabajaapareceenlapantalla.
•Noaparecenadaenlapantallacuandoenciendeel
dispositivo.
Comolasbateríasquesesuministransondeprueba
únicamente,puedequesedescarguenantesquelasbaterías
quesecompranenlatienda.Reemplacetodaslasbateríasal
mismo tiempo (como un conjunto simultáneo). Use solamente
bateríasalcalinasAAAde1,5V.Extraigalasbateríascuando
la unidad no esté en uso durante períodos prolongados. Si se
extraen o sustituyen las baterías, será necesario restablecer
la fecha y hora. Limpie los contactos de las baterías y del
compartimiento de las baterías con un paño seco suave cada
vezqueinstalelasbaterías.
Nota:
Las baterías son desechos peligrosos. No las deseche junto
con la basura del hogar.

52
GUÍA DE POSICIÓN DE LA MUÑECA
• Cuandousemonitoresdepresiónarterialparala
muñeca, es importante tomar las mediciones con la
muñeca relajada a la altura del corazón. Esto ayudará a
garantizarqueseobtengaunalecturaprecisa.Comoes
difícil encontrar la ubicación ideal para una medición en
la muñeca, se ha incluido un sensor de posición de la
muñecaopcionalqueloayudaráacolocarlamuñecaenla
posición ideal para la medición de la presión arterial.
• Despuésdepresionarelbotón START/STOP (comenzar/
detener), se iluminará la pantalla y aparecerán distintos
íconos diseñados para ayudarlo a cambiar de posición
lamuñeca.Unavezqueencuentrelaposiciónideal,
el símbolo de pulso se encenderá intermitentemente y
comenzará la medición.
SÍMBOLO ACCIÓN
Mueva la muñeca hacia arriba.
Mueva la muñeca hacia abajo.
Girelamuñecahacialaizquierda.
Gire la muñeca hacia la derecha.
PM
AVG.
3
UP
DOWN
ROTATE
RIGHT
LEFT
PM
AVG.
3
UP
DOWN
ROTATE
RIGHT
LEFT
PM
AVG.
3
UP
DOWN
ROTATE
RIGHT
LEFT
PM
AVG.
3
UP
DOWN
ROTATE
RIGHT
LEFT

53
CONFIGURACIÓN DE PREFERENCIAS
DEL USUARIO
1. Para ajustar las preferencias del usuario, presione el botón de
configuración de fecha y hora ,queseencuentraenlaparte
superior del monitor.
2. En la pantalla aparecerá la palabra ON (activada) intermitente.
De forma predeterminada, la guía de posición de la muñeca está
activada (ON). Para desactivarla (OFF), presione el botón +.
3. Presione nuevamente el botón de configuración de fecha y hora
paraqueenlapantallaaparezcaunnúmerointermitenteque
muestra la HORA. Cambie la hora presionando el botón +. Cada
vezquelopresioneaumentaráenunoelnúmerodemaneracíclica.
Al presionar el botón de configuración de fecha y hora se
confirmarán los datos ingresados.
4. Cambie los MINUTOS, el MES, el DÍA y el AÑO como se describió
en el paso 3 anterior, usando el botón + para cambiar los números
y el botón de configuración de fecha y hora
para confirmar los
datos ingresados.
Presione el botón
desactive 3d
3d ON intermitente
confirme los datos ingresados
HORA intermitente
repita el proceso para configurar la HORA, los
MINUTOS, el MES, el DÍA y el AÑO
PM
AVG.
3
UP
DOWN
ROTATE
RIGHT
LEFT

54
APLICACIÓN DEL BRAZALETE
1.Quíteseelreloj,lasalhajasquetengaenlamuñeca,
etc., antes de colocar el monitor para la muñeca. Deberá
remangarse si tiene mangas largas y deberá colocarse
el brazalete sobre la piel desnuda para obtener una
medición correcta.
2.Coloqueelbrazaleteenla
muñecaizquierdaconla
palma de la mano hacia
arriba, como se muestra en
la Figura A.
3.Asegúresedequeel
borde del brazalete esté a
aproximadamente a 1 cm
(1/4”~1/2”) de la palma de la
mano, como se muestra en la
Figura B.
Fig. A
Fig. B

55
4. Para garantizar mediciones precisas,
ajuste el gancho y la correa con
lazo para asegurarlo alrededor
delamuñecademodoqueno
haya espacio entre el brazalete
y la muñeca, como se muestra
en la Figura C. Si el brazalete no
está colocado lo suficientemente
apretado, los valores de medición
no serán precisos.
5.Sisumédicolehadiagnosticado
mala circulación en el brazo
izquierdo,coloqueelbrazaleteenla
muñeca derecha, como se muestra
en la Figura D.
Nota:
Si no es posible colocar el brazalete en
elmuñecaizquierdo,tambiénlopuede
colocar en el muñeca derecho. Sin
embargo, todas las mediciones deben
realizarse en el mismo muñeca.
Fig. C
Fig. D

56
POSTURA CORRECTA PARA LA MEDICIÓN
1. Coloqueelcodosobreunamesa
demodoqueelbrazaletequedeal
mismonivelqueelcorazón,comose
muestra en la Figura A. Relaje todo
su cuerpo, especialmente la zona
entre el codo y los dedos.
Nota:
El corazón está ubicado ligeramente
debajo de la axila.
2. Si el brazalete no está al mismo
nivelqueelcorazónosinopuede
mantener el brazo completamente
quietodurantelalectura,utilice
un objeto blando, como una toalla
doblada, para apoyar el brazo, como
se muestra en la Figura B.
3. Coloquelapalmadelamanohacia
arriba.
4. Siéntese derecho en una silla y
respireprofundamente5o6veces.
5. Eviterecostarsehaciaatrásdurante
la medición como se muestra en la
Figura C.
Fig. A
Fig. B
Fig. C
(X)

57
PROCEDIMIENTO DE MEDICIÓN
Notas importantes:
• Coloqueelmonitoralmismonivelqueelcorazón
durante la medición para asegurar lecturas precisas.
• Lapresiónarterialcambiaconcadalatidocardíacoy
está en constante fluctuación durante todo el día.
• Lamedicióndelapresiónarterialpuedeverse
afectada por la posición del usuario, sus condiciones
fisiológicas y otros factores. Para obtener la mayor
precisión en la medición de la presión arterial, espere
1 hora después de hacer ejercicio, bañarse, comer,
consumir bebidas con alcohol o cafeína, o fumar.
• Antesdelamedición,sesugierequesesiente
tranquilodurante15minutosyaquelasmediciones
realizadas en un estado relajado tendrán mayor
precisión. No debe estar físicamente cansado ni
agotado cuando realiza una medición.
• Durantelamedición,nohablenimuevalosmúsculos
del brazo ni de la mano.
• Consultelapágina66paraobtenernotasadicionales
con respecto a la medición de la presión arterial.
Si usted está usando este monitor de presión arterial por
primeravez,quitelapelículaprotectoradelapantalla.

58
1. Presione el botón de selección de usuario para elegir
Usuario 1 o Usuario 2.
2. Colóqueseelbrazaleteenlamuñecaypresioneel
botón START/STOP (comenzar/detener). No comience
elprocesodemediciónamenosqueelbrazaleteesté
colocado en la muñeca.
3. Si la muñeca no está en la posición ideal, la pantalla le
sugeriráquelamuevahaciaarribaohaciaabajo,obien,
quelagirehacialaizquierdaohacialaderecha.
SÍMBOLO ACCIÓN
Mueva la muñeca hacia arriba.
Mueva la muñeca hacia abajo.
Girelamuñecahacialaizquierda.
Gire la muñeca hacia la derecha.
Nota:
Si la función 3d no esté activada, estas instrucciones no
aparecerán.
PM
AVG.
3
UP
DOWN
ROTATE
RIGHT
LEFT
PM
AVG.
3
UP
DOWN
ROTATE
RIGHT
LEFT
PM
AVG.
3
UP
DOWN
ROTATE
RIGHT
LEFT
PM
AVG.
3
UP
DOWN
ROTATE
RIGHT
LEFT
PROCEDIMIENTO DE MEDICIÓN
Notas importantes:
• Coloqueelmonitoralmismonivelqueelcorazón
durante la medición para asegurar lecturas precisas.
• Lapresiónarterialcambiaconcadalatidocardíacoy
está en constante fluctuación durante todo el día.
• Lamedicióndelapresiónarterialpuedeverse
afectada por la posición del usuario, sus condiciones
fisiológicas y otros factores. Para obtener la mayor
precisión en la medición de la presión arterial, espere
1 hora después de hacer ejercicio, bañarse, comer,
consumir bebidas con alcohol o cafeína, o fumar.
• Antesdelamedición,sesugierequesesiente
tranquilodurante15minutosyaquelasmediciones
realizadas en un estado relajado tendrán mayor
precisión. No debe estar físicamente cansado ni
agotado cuando realiza una medición.
• Durantelamedición,nohablenimuevalosmúsculos
del brazo ni de la mano.
• Consultelapágina66paraobtenernotasadicionales
con respecto a la medición de la presión arterial.
OR
PM
AVG.
3
UP
DOWN
ROTATE
RIGHT
LEFT
PM
AVG.
3
UP
DOWN
ROTATE
RIGHT
LEFT

59
4. Todos los dígitos se encenderán para verificar las funciones
de la pantalla. El procedimiento de verificación se
completará después de aproximadamente 3 segundos.
5. Unavezquedesaparezcantodoslossímbolos,enla
pantalla aparecerá “00”. El monitor está “Listo para medir”
y el brazalete se inflará automáticamente para comenzar
la medición. El brazalete comenzará a desinflarse a medida
quecontinúalamedición.
Nota:
Este monitor se volverá a inflar automáticamente si el sistema
detectaquesucuerporequieremáspresiónparalamedición.
PM
AVG.
3
UP
DOWN
ROTATE
RIGHT
LEFT
PM
PM
PM
PM

60
6. Cuando haya finalizado la medición, el brazalete se
desinflará por completo y se mostrarán las lecturas
de presión sistólica, presión diastólica y pulso
simultáneamente en la pantalla LCD. La medición se
almacenará automáticamente en la memoria.
Nota:
• Estemonitorseapagaautomáticamenteaproximadamente
1 minuto después de la última medición. También puede
presionar el botón START/STOP (comenzar/detener) para
apagar la unidad.
• Parainterrumpirlamedición,puedepresionarelbotón
START/STOP (comenzar/detener) (recomendado), o los
botones MEMORY (memoria), de selección del usuario o
de configuración de fecha y hora
(USER 1/2/ ).
El brazalete se desinflará inmediatamente después de
presionar un botón.
PM

61
ÍNDICE DE CATEGORÍA DE RIESGO
EstemonitorvieneequipadoconunÍndicede
categoríaderiesgoquecomparaautomáticamente
cada lectura con los niveles definidos establecidos
por el Instituto Nacional del Corazón, los Pulmones
y la Sangre de los Institutos Nacionales de la Salud
(NIH) de los Estados Unidos, como se describió
anteriormente en este manual, y brinda una guía útil
sisulecturaentraenunadelasetapasquepodrían
indicarunriesgomayor.Tengaencuentaquelas
guíasqueproporcionaestemonitorestándestinadas
únicamente a ayudarlo con el uso de esta tabla. La
tabla y las guías se proporcionan únicamente para
su comodidad y ayudarlo a entender su lectura no
invasiva de presión arterial según se relaciona con la
información de los NIH. No sustituyen a un examen
médicorealizadoporsumédico.Esimportanteque
consulte a su médico regularmente. Él le explicará su
rango normal de presión arterial además del punto en
elquesepuedeconsiderarqueustedestárealmente
en riesgo.
(No Symbol)
Etapa 2 de hipertensión
Prehipertensión
Normal (sin símbolo)
Etapa 1 de hipertensión

62
PM
Detector
de latidos
cardíacos
irregulares
DETECTOR DE LATIDOS CARDÍACOS
IRREGULARES (IHB)
Si durante la medición se detectó una irregularidad de
pulsoqueconcuerdaconlatidoscardíacosirregulares,
aparece un ícono queloindica.Generalmente,
esto no es causa de preocupación. Sin embargo, si el
símboloaparececonfrecuencia,recomendamosque
busqueasesoramientomédico.Tengaencuentaque
este dispositivo no sustituye a un examen del corazón,
pero sirve para descubrir irregularidades del pulso en
una etapa temprana.
Si se mueve, tiembla o habla durante la medición,
puedenproducirseirregularidadesdelpulsoque
posiblemente causen la aparición de este ícono. Por
lotanto,esdesumaimportanciaquenosemuevani
hable durante la medición.

63
Para determinar la presencia de un latido cardíaco
irregular, el promedio de intervalos de latidos cardíacos
se calcula con los 3 primeros valores eficaces normales
delatidoscardíacos.Esimportantetenerencuentaque
el promedio no es un promedio matemático estricto
de todos los intervalos registrados. Al menos 3 latidos
cardíacosconunadiferenciadeun25%omásdel
intervalodelatidoscardíacospromedioharánque
aparezca en la pantalla el ícono .
INFORMACIÓN IMPORTANTE:
Este monitor de presión arterial no está diseñado
para ser usado por personas con arritmia, ni para
diagnosticar o tratar problemas de arritmia. Como
medidadepreventivarecomendamosque,sitiene
arritmias como latidos auriculares o ventriculares
prematurosyfibrilaciónauricular,ocualquierotra
afección especial, debe consultar a su médico antes de
usar el monitor de presión arterial.

64
CÓMORECUPERARVALORESDE
LA MEMORIA
Este monitor puede ser utilizado por dos personas. Cada usuario
puede almacenar hasta 60 mediciones.
1. Presione el botón de selección de usuario.
2. Elija Usuario 1 o Usuario 2.
3. Presione el botón MEMORY (memoria) para acceder a la
memoria.
4. El monitor mostrará primero el promedio
calculado aplicado a las últimas 3 memorias
(“AVG.3”).
5. Cadavezquepresioneel
botón MEMORY (memoria) se
recuperará una lectura previa. La
última lectura será la primera en
recuperarse.
PM
PM
PM
PM
AVG.
3

65
CÓMOBORRARVALORESDELAMEMORIA
1. Presione el botón de selección de usuario para
elegir Usuario 1 o Usuario 2.
2. Presione y mantenga presionados al mismo tiempo
el botón de configuración de fecha y hora y
el botón + en el modo para recuperar memoria;
los datos del usuario seleccionado se borrarán
automáticamente.
OR
PM
AVG.
3
UP
DOWN
ROTATE
RIGHT
LEFT
PM
AVG.
3
UP
DOWN
ROTATE
RIGHT
LEFT

66
NOTAS IMPORTANTES CON RESPECTO A
LA MEDICIÓN DE LA PRESIÓN ARTERIAL
•Tomesulecturaenunentornocómodoyaquelasmediciones
pueden verse afectadas por las temperaturas cálidas o frías.
Tome su presión arterial a una temperatura corporal normal.
•Nosemuevanihabledurantelamediciónyaqueestopuede
elevar las lecturas.
•Nomuevanicrucelaspiernasdurantelamedición.Mantenga
los pies bien apoyados sobre el piso.
•Notoqueelbrazaletenielmonitorduranteelprocedimientode
medición.
•Lesugerimosquetomesusmedicionestodoslosdíasa
la misma hora y en la misma muñeca, para establecer una
coherencia.
•Losusuariosdeberánesperarunmínimode5minutosantesde
tomar otras mediciones. Dependiendo de su fisiología, es posible
quenecesitemástiempo.
•Los resultados de las mediciones que los usuarios obtienen
son únicamente para referencia. Si los usuarios tienen
inquietudes en cuanto a la presión arterial, deberán consultar
a un médico.
•Unavezquelaunidadseinflea300mmHg,sedesinflará
automáticamente por motivos de seguridad.
•Esteproductonoesadecuadoparapersonasconarritmia.
• Estedispositivopuedetenerdificultadparadeterminar
la presión arterial correcta en mujeres embarazadas y en
usuarios con latidos cardíacos irregulares, diabetes, mala
circulación, trastornos renales o usuarios que han sufrido un
accidente cerebrovascular.
CÓMOBORRARVALORESDELAMEMORIA
1. Presione el botón de selección de usuario para
elegir Usuario 1 o Usuario 2.
2. Presione y mantenga presionados al mismo tiempo
el botón de configuración de fecha y hora y
el botón + en el modo para recuperar memoria;
los datos del usuario seleccionado se borrarán
automáticamente.

67
CUIDADO, MANTENIMIENTO Y LIMPIEZA
•Limpieelcuerpodelmonitordepresiónarterialyel
brazalete cuidadosamente con un paño suave, apenas
húmedo. No presione demasiado fuerte. No lave el
brazaletenilolimpieconunlimpiadorquímico.Nunca
utilice diluyentes, alcohol ni petróleo (gasolina) para
limpiarlo.
•Lasbateríasconpérdidaspuedendañarlaunidad.Extraiga
las baterías si el producto no se va a utilizar por un período
prolongado.
•Cumplaconlasordenanzaslocalesysigalasinstrucciones
de reciclaje relacionadas con el desecho o reciclaje del
dispositivo y de los componentes del dispositivo, incluidas
las baterías.
•Silaunidadseguardacercadelugaresfríos,permitaque
se adapte a la temperatura ambiente antes de usarla.
•Nopodrárealizarporsucuentaelserviciodeestemonitor
de presión arterial. No utilice ninguna herramienta para
abrir el dispositivo ni intente ajustar nada en el interior
del mismo. Si tiene problemas con este dispositivo,
comuníqueseconRelacionesconelconsumidorde
HoMedics (encontrará la información de contacto en la
página de la garantía).
•Nosumerjalaunidadenaguayaquepuededañarla.
•No exponga el monitor ni el brazalete a temperaturas
extremas, humedad o a la luz solar directa. Protéjalo del
polvo.

68
•No doble el brazalete demasiado apretado.
•No desarme el monitor ni el brazalete. Si alguno de los
componentes necesita reparación, consulte la sección de la
garantía de este manual.
•No exponga el monitor a golpes extremos (no lo deje caer
al suelo).
•Noinfleelbrazaleteamenosqueestécolocadoenla
muñeca.
•Nouseelbrazaleteenotrapartedelcuerpoquenoseala
muñeca.
•No lo deje caer ni inserte ningún objeto en ninguna
abertura.
•Estemonitorpuedenocumplirconsusespecificaciones
de funcionamiento si se guarda o se utiliza fuera de los
siguientes rangos de temperatura y humedad:
CUIDADO, MANTENIMIENTO Y LIMPIEZA
•Limpieelcuerpodelmonitordepresiónarterialyel
brazalete cuidadosamente con un paño suave, apenas
húmedo. No presione demasiado fuerte. No lave el
brazaletenilolimpieconunlimpiadorquímico.Nunca
utilice diluyentes, alcohol ni petróleo (gasolina) para
limpiarlo.
•Lasbateríasconpérdidaspuedendañarlaunidad.Extraiga
las baterías si el producto no se va a utilizar por un período
prolongado.
•Cumplaconlasordenanzaslocalesysigalasinstrucciones
de reciclaje relacionadas con el desecho o reciclaje del
dispositivo y de los componentes del dispositivo, incluidas
las baterías.
•Silaunidadseguardacercadelugaresfríos,permitaque
se adapte a la temperatura ambiente antes de usarla.
•Nopodrárealizarporsucuentaelserviciodeestemonitor
de presión arterial. No utilice ninguna herramienta para
abrir el dispositivo ni intente ajustar nada en el interior
del mismo. Si tiene problemas con este dispositivo,
comuníqueseconRelacionesconelconsumidorde
HoMedics (encontrará la información de contacto en la
página de la garantía).
•Nosumerjalaunidadenaguayaquepuededañarla.
•No exponga el monitor ni el brazalete a temperaturas
extremas, humedad o a la luz solar directa. Protéjalo del
polvo.
• Ambientede
funcionamiento
Temperatura:
5ºC~40ºC
(41ºF~104ºF)
Humedad:
15%~93%RH
• Ambienteparaguardar/
transportar la unidad
Temperatura:
-25ºC~70ºC
(-13ºF~158ºF)
Humedad:
menosdel93%deHR

69
POTENCIAL DE INTERFERENCIA
ELECTROMAGNÉTICA
Para evitar resultados inexactos debido a la interferencia electromagnética entre
losequiposeléctricosyelectrónicos,nouseeldispositivocercadeunteléfono
celular o un horno microondas.
Estedispositivocumpleconlasección15delasnormasde
la FCC. El funcionamiento está sujeto a las dos condiciones
siguientes: (1) este dispositivo no puede causar interferencias
perjudicialesy(2)estedispositivodebeaceptarcualquier
interferenciaquereciba,inclusolainterferenciaquepueda
causar un funcionamiento no deseado.
NOTA: el fabricante no se responsabiliza por ninguna
interferencia de radio o televisión provocada por modificaciones no autorizadas
queserealicenaesteequipo.Talesmodificacionespodríananularlaautoridad
delusuarioparautilizarelequipo.
NOTA:esteequipohasidoprobadoysehacomprobadoquecumpleconlos
límitesparaundispositivodigitaldeClaseB,conformealasección15delas
normas de la FCC. Estos límites están diseñados para proporcionar protección
razonable contra interferencias perjudiciales en una instalación residencial. Este
equipogenera,utilizaypuedeirradiarenergíaderadiofrecuencia,ysinose
instala y se utiliza de acuerdo con estas instrucciones, puede causar interferencia
perjudicial en las comunicaciones de radio. Sin embargo, no existe ninguna
garantíadequenoseproduciráinterferenciaenunainstalaciónparticular.Sieste
equipocausainterferenciaperjudicialalarecepciónderadiootelevisión,locual
puededeterminarseencendiendoyapagandoelequipo,serecomiendaque
el usuario intente corregir la interferencia mediante una o más de las siguientes
medidas:
• Vuelvaaorientaroubicarlaantenaderecepción.
• Aumenteladistanciaentreelequipoyelreceptor.
• Conecteelequipoenuntomacorrientedeuncircuitodiferentealque
esté conectado el receptor.
• Consulteconeldistribuidoroconuntécnicoexpertoenradio/televisión
para obtener ayuda.

70
Nota:Silaunidadaúnsiguesinfuncionar,comuníqueseconRelaciones
con el consumidor de HoMedics. Bajo ningún concepto debe desar-
mar ni intentar reparar la unidad por su cuenta. La información de
contacto del departamento de Relaciones con el consumidor de
HoMedics se encuentra en la página de garantía.
SÍNTOMAS CAUSAS POSIBLES SOLUCIÓN
La unidad no se enci-
ende cuando se presiona
el botón START/STOP
(comenzar/detener).
Se han agotado las bat-
erías.
Cámbielas por dos baterías
alcalinas AAA nuevas.
Los polos de las baterías
no se han colocado cor-
rectamente.
Vuelvaacolocarlasbaterías
en la posición correcta.
Aparece el símbolo de
error de medición EE
en la pantalla o el valor
depresiónarterialque
se muestra es excesiva-
mente bajo (o alto).
El brazalete no se ha
colocado correctamente.
Envuelva el brazalete adec-
uadamenteparaquepueda
colocarse en forma correcta.
Repita la medición.
¿Habló o se movió duran-
te la medición?
Mantenga la muñeca firme
durante la medición. Repita la
medición.
Sacudió la muñeca con el
brazalete colocado.
Aparece el símbolo de
error E1 en la pantalla
Irregularidad en el circuito
de aire.
Repita la medición.
Aparece el símbolo de
error E2 en la pantalla
La presión de inflado excede
los 300 mmHg.
Apague la unidad y repita la
medición.
Aparece el símbolo de
error E3 en la pantalla
Errorquedeterminalos
datos de medición.
Repita la medición.
Aparece el símbolo de
error E4 en la pantalla
Mal funcionamiento de
algún componente.
Repita la medición.
Aparece el símbolo de
error EP en la pantalla
Error del sistema. Repita la medición.
DIAGNÓSTICO Y RESOLUCIÓN DE
PROBLEMAS
Siaparecealgunaanomalíaduranteeluso,verifiquelossiguientespuntos:
POTENCIAL DE INTERFERENCIA
ELECTROMAGNÉTICA
Para evitar resultados inexactos debido a la interferencia electromagnética entre
losequiposeléctricosyelectrónicos,nouseeldispositivocercadeunteléfono
celular o un horno microondas.
Estedispositivocumpleconlasección15delasnormasde
la FCC. El funcionamiento está sujeto a las dos condiciones
siguientes: (1) este dispositivo no puede causar interferencias
perjudicialesy(2)estedispositivodebeaceptarcualquier
interferenciaquereciba,inclusolainterferenciaquepueda
causar un funcionamiento no deseado.
NOTA: el fabricante no se responsabiliza por ninguna
interferencia de radio o televisión provocada por modificaciones no autorizadas
queserealicenaesteequipo.Talesmodificacionespodríananularlaautoridad
delusuarioparautilizarelequipo.
NOTA:esteequipohasidoprobadoysehacomprobadoquecumpleconlos
límitesparaundispositivodigitaldeClaseB,conformealasección15delas
normas de la FCC. Estos límites están diseñados para proporcionar protección
razonable contra interferencias perjudiciales en una instalación residencial. Este
equipogenera,utilizaypuedeirradiarenergíaderadiofrecuencia,ysinose
instala y se utiliza de acuerdo con estas instrucciones, puede causar interferencia
perjudicial en las comunicaciones de radio. Sin embargo, no existe ninguna
garantíadequenoseproduciráinterferenciaenunainstalaciónparticular.Sieste
equipocausainterferenciaperjudicialalarecepciónderadiootelevisión,locual
puededeterminarseencendiendoyapagandoelequipo,serecomiendaque
el usuario intente corregir la interferencia mediante una o más de las siguientes
medidas:
• Vuelvaaorientaroubicarlaantenaderecepción.
• Aumenteladistanciaentreelequipoyelreceptor.
• Conecteelequipoenuntomacorrientedeuncircuitodiferentealque
esté conectado el receptor.
• Consulteconeldistribuidoroconuntécnicoexpertoenradio/televisión
para obtener ayuda.

71
Estas especificaciones están sujetas a cambios sin previo
aviso.
Fuente de energía:
Dosbateríasalcalinas(AAA)de1,5VdeCC
Método de medición:
Oscilométrico
Rango de medición:
Presión: 40~280 milímetros mercurio (mmHg)
Pulso: 40~199 latidos/minuto
Precisión:
Presión: ±3 mmHg
Pulso:±5%delalectura
Sensor de presión:
Semiconductor
Inflado:
Por bombeo
Desinflado:
Válvuladeliberacióndepresiónautomática
Capacidad de
memoria:
60 memorias para cada usuario (120 en total)
Apagado automático:
1 minuto después de haber presionado algún
botón por última vez
Ambiente de
funcionamiento:
Temperatura:5ºC~40ºC(41ºF~104ºF)
Humedad:15%~93%HR
Ambiente para
guardar/transportar
la unidad:
Temperatura:-25ºC~70ºC(-13ºF~158ºF)
Humedad:menosdel93%deHR
ESPECIFICACIONES

72
Peso:
107g(0,24Libras)(sinbaterías)
Circunferencia de la
muñeca:
13,5cma19,5cm(5,3”a7,7”)
Accesorios:
2 baterías alcalinas AAA, manual de
instrucciones, estuche rígido de plástico
Dimensiones:
2,72”(L)x3,07”(A)x1,11”(Alt)
69mm(L)x78mm(A)x28,5mm(Alt)
Este dispositivo utiliza baterías.
EquipotipoBF.
IPx0 - Ninguna protección especial contra la
entrada de agua.
No apto para uso en presencia de mezcla
anestésica inflamable con aire, oxígeno u
óxido nitroso. Funcionamiento continuo con
tiempo de carga reducido.
Nota: Estas especificaciones están sujetas a cambios sin previo
aviso.
Fuente de energía:
Dosbateríasalcalinas(AAA)de1,5VdeCC
Método de medición:
Oscilométrico
Rango de medición:
Presión: 40~280 milímetros mercurio (mmHg)
Pulso: 40~199 latidos/minuto
Precisión:
Presión: ±3 mmHg
Pulso:±5%delalectura
Sensor de presión:
Semiconductor
Inflado:
Por bombeo
Desinflado:
Válvuladeliberacióndepresiónautomática
Capacidad de
memoria:
60 memorias para cada usuario (120 en total)
Apagado automático:
1 minuto después de haber presionado algún
botón por última vez
Ambiente de
funcionamiento:
Temperatura:5ºC~40ºC(41ºF~104ºF)
Humedad:15%~93%HR
Ambiente para
guardar/transportar
la unidad:
Temperatura:-25ºC~70ºC(-13ºF~158ºF)
Humedad:menosdel93%deHR

Por servicio o reparación,
no devuelva esta unidad
al distribuidor. Póngase en
contacto con Relaciones
con el Consumidor de
HoMedics por el:
Correo electrónico:
Teléfono:
1-800-466-3342
Horario comercial:
8:30 am a 7pm Hora
del Este
De lunes a viernes
GARANTÍA LIMITADA POR CINCO AÑOS
HoMedics vende sus productos con la intención de que no tengan defectos de
fabricación ni de mano de obra por un plazo de cinco años a partir de la fecha
de compra original, con las siguientes excepciones. HoMedics garantiza que sus
productos no tendrán defectos de material ni de mano de obra bajo condiciones
de uso y servicio normales. Este monitor de presión sanguínea cumple con
los requisitos de la prueba de ciclos de medición simulada según la norma
EN1060-3, parte 8.10. Esta garantía se extiende únicamente a consumidores y no
a distribuidores.
Para obtener servicio de garantía en su producto HoMedics, póngase en contacto
con un Representante de Relaciones con el Consumidor por el teléfono 1-800-
466-3342 para obtener asistencia. Asegúrese de tener a mano el número de
modelo del producto.
HoMedics no autoriza a nadie, incluyendo, pero sin limitarse a, distribuidores,
posteriores consumidores compradores del producto a un distribuidor, o compra-
dores remotos, a obligar a HoMedics de forma alguna más allá de las condiciones
aquí establecidas. La garantía de este producto no cubre daños causados por uso
inadecuado o abuso, accidente, conexión de accesorios no autorizados, alteración
del producto, instalación inadecuada, reparaciones o modificaciones no autoriza-
das, uso inadecuado de la fuente de energía/electricidad, cortes de energía, caída
del producto, funcionamiento incorrecto o daño de una pieza de funcionamiento
debido al no cumplimiento del mantenimiento recomendado por el fabricante,
daños durante el transporte, robo, descuido, vandalismo, condiciones climáticas,
pérdida de uso en el período durante el cual el producto está en una instalación
de reparación o a la espera de piezas o reparación, o cualquier otra condición, sin
importar cual sea, que se encuentre fuera del control de HoMedics.
Esta garantía es válida únicamente si el producto es comprado y operado en el
país en el cual se compró el producto. Un producto que requiera modificaciones
o adaptación para habilitar su funcionamiento en cualquier país que no sea aquél
para el que fue diseñado, fabricado, aprobado y/o autorizado, o la reparación de
productos dañados por estas modificaciones no están cubiertos bajo esta garantía.
®
Distributed by
®
Distribuido por
HoMedics, LLC
3000 Pontiac Trail
Commerce Township,
MI 48390
Impreso en China
Fabricado exclusivamente para

HoMedics ® es una marca registrada de HoMedics, LLC.
© 2012 HoMedics, LLC. Todos los derechos reservados.
IB-WGNBPW720
P/N: 323102020 Ver. 001
LA GARANTÍA AQUÍ ESTABLECIDA SERÁ LA ÚNICA Y EXCLUSIVA
GARANTÍA. NO HABRÁ NINGUNA OTRA GARANTÍA EXPRESA NI
IMPLÍCITA, INCLUYENDO NINGUNA GARANTÍA DE COMERCIALIZACIÓN O
APTITUD NI NINGUNA OTRA OBLIGACIÓN POR PARTE DE LA COMPAÑÍA
CON RESPECTO A PRODUCTOS CUBIERTOS POR ESTA GARANTÍA.
HOMEDICS NO TENDRÁ RESPONSABILIDAD ALGUNA POR NINGÚN DAÑO
INCIDENTAL, CONSECUENTE NI ESPECIAL. BAJO NINGÚN CONCEPTO
ESTA GARANTÍA REQUERIRÁ MÁS QUE LA REPARACIÓN O CAMBIO
DE ALGUNA PIEZA O PIEZAS QUE SE HALLEN DEFECTUOSAS DENTRO
DEL PERÍODO DE VIGENCIA DE ESTA GARANTÍA. NO SE EFECTUARÁN
REEMBOLSOS. SI NO HAY PIEZAS DE REPUESTO DISPONIBLES PARA LOS
MATERIALES DEFECTUOSOS, HOMEDICS SE RESERVA EL DERECHO DE
REALIZAR SUSTITUCIONES EN VEZ DE REPARAR O CAMBIAR.
Esta garantía no se extiende a la compra de productos abiertos, usados,
reparados, embalados otra vez y/o abiertos y vueltos a cerrar, incluyendo
entre otras cosas la venta de dichos productos en sitios de remate por
Internet y/o la venta de dichos productos por revendedores o mayoristas.
Todas y cada una de las garantías cesarán y terminarán inmediatamente
con respecto a cualquier producto o pieza del mismo que estén repara-
dos, cambiados, alterados o modificados sin el consentimiento previo
explícito y por escrito de HoMedics.
Esta garantía le proporciona derechos legales específicos. Es posible que usted
tenga derechos adicionales que pueden variar de un país a otro. Debido a las regu-
laciones de ciertos países, es posible que algunas de las limitaciones y exclusiones
no se apliquen en su caso.

IB-WGNBPW720

WRIST POSITIONING GUIDE
• When using wrist blood pressure monitors, it is important to take the
measurement while relaxing your wrist at heart level. This will help ensure an
accurate reading will be taken. Because it is difficult to find the ideal location
for a wrist measurement we have included an optional Wrist Positioning
Sensor that will assist in directing your wrist to the ideal location for a blood
pressure measurement.
• After you press START/STOP button, the display will illuminate with different
icons that are designed to help you move your wrist. Once the ideal location
is found, the Pulse Symbol will flash and measurement will begin.
SYMBOL ACTION
Move your wrist up.
Move your wrist down.
Rotate your wrist to your left.
Rotate your wrist to your right.
If and any of the following letters and numbers appear in the area that
systolic pressure should be displayed or the wrist icon appears, an error has
occurred with your reading.
P/N:323102150 Ver. 001
Component Error: Measure again.
Wrist Is Not In The Ideal Position:
Measure again. Once the wrist
positioning sensor guides your wrist to
your ideal location, keep arm still until
measurement is completed.
PP-WGNBPW720INS

GUÍA DE POSICIÓN DE LA MUÑECA
• Cuando use monitores de presión arterial para la muñeca, es importante
tomar las mediciones con la muñeca relajada a la altura del corazón. Esto
ayudará a garantizar que se obtenga una lectura precisa. Como es difícil
encontrar la ubicación ideal para una medición en la muñeca, se ha incluido
un sensor de posición de la muñeca opcional que lo ayudará a colocar la
muñeca en la posición ideal para la\ medición de la presión arterial.
• Después de presionar el botón START/STOP (comenzar/detener), se
iluminará la pantalla y aparecerán distintos íconos diseñados para ayudarlo a
cambiar de posición la muñeca. Una vez que encuentre la posición ideal, el
símbolo de pulso se encenderá intermitentemente y comenzará la medición.
SíMBOLO ACCIÓN
Mueva la muñeca hacia arriba.
Mueva la muñeca hacia abajo.
Gire la muñeca hacia la izquierda.
Gire la muñeca hacia la derecha.
Si aparece la palabra y alguno de los siguientes números o letras en
el área donde se debe mostrar la presión sistólica, o si aparece el ícono de la
muñeca, significa que ha ocurrido un error en la lectura.
Error de algún componente: repita la
medición.
La muñeca no se encuentra en la
posición ideal: repita la medición.
Una vez que el sensor de posición
de la muñeca guíe a la muñeca a la
posición ideal, mantenga el brazo
quieto hasta que finalice la medición.
PP-WGNBPW720INS
P/N:323102150 Ver. 001
-
 1
1
-
 2
2
-
 3
3
-
 4
4
-
 5
5
-
 6
6
-
 7
7
-
 8
8
-
 9
9
-
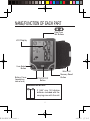 10
10
-
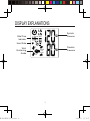 11
11
-
 12
12
-
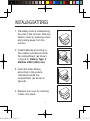 13
13
-
 14
14
-
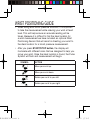 15
15
-
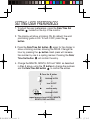 16
16
-
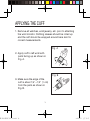 17
17
-
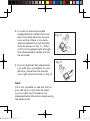 18
18
-
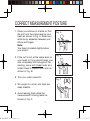 19
19
-
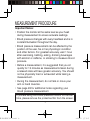 20
20
-
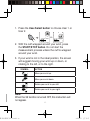 21
21
-
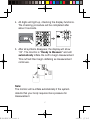 22
22
-
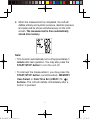 23
23
-
 24
24
-
 25
25
-
 26
26
-
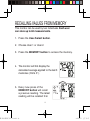 27
27
-
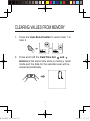 28
28
-
 29
29
-
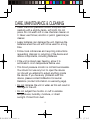 30
30
-
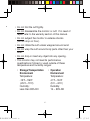 31
31
-
 32
32
-
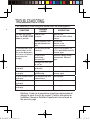 33
33
-
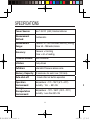 34
34
-
 35
35
-
 36
36
-
 37
37
-
 38
38
-
 39
39
-
 40
40
-
 41
41
-
 42
42
-
 43
43
-
 44
44
-
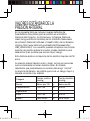 45
45
-
 46
46
-
 47
47
-
 48
48
-
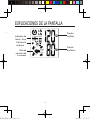 49
49
-
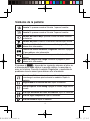 50
50
-
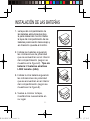 51
51
-
 52
52
-
 53
53
-
 54
54
-
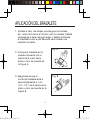 55
55
-
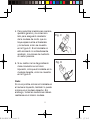 56
56
-
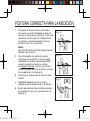 57
57
-
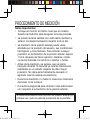 58
58
-
 59
59
-
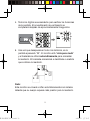 60
60
-
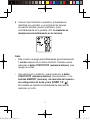 61
61
-
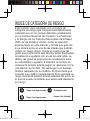 62
62
-
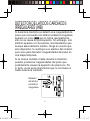 63
63
-
 64
64
-
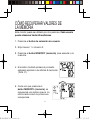 65
65
-
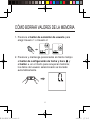 66
66
-
 67
67
-
 68
68
-
 69
69
-
 70
70
-
 71
71
-
 72
72
-
 73
73
-
 74
74
-
 75
75
-
 76
76
-
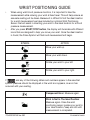 77
77
-
 78
78


HoMedics Well at Walgreens Delux Wrist Blood Pressure Monitor El manual del propietario
- Categoría
- Unidades de presión arterial
- Tipo
- El manual del propietario
- Este manual también es adecuado para
en otros idiomas
Artículos relacionados
-
HoMedics BPW-040HP Manual de usuario
-
-
-
HoMedics BPW-370BT Manual de usuario
-
HoMedics BPW-360BTPU Premium Wrist Blood Pressure Monitor El El manual del propietario
-
-
-
Walgreens Well at Walgreens Delux Wrist Blood Pressure Monitor Manual de usuario
-
-