Lo siento, pero no encuentro información sobre el producto "Stack-On HDS553030H1EY21" en el manual de instrucciones proporcionado. Por lo tanto, no puedo responder a su solicitud.

40-0000119-2103 112
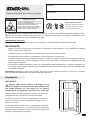
IMPORTANT:
Fireproof Safes Instructions
®
• Locate the safe’s serial number located on the back or bottom front corner of the safe, then record on page 1
of this manual.
• Keep keys and combination in a secure place away from children.
• Do not store the back up key, your combination, or this document in the safe.
• Do not move or attempt to move this safe using its handle. The handle must only be used for opening and closing
the safe’s door. Using the handle to move the safe can compromise the safe’s integrity and void the warranty.
• Do not store electronic media, computer disks, audio-visual media or photographic negatives in this safe. This material
will not survive the rated internal temperature of the safe. This material may be damaged or destroyed by heat.
WARNING: Keep your safe closed and locked at all times when not in use. Children could accidentally be
locked inside the safe.
IMPORTANT:
Battery Disposal
Please dispose of the used
batteries per municipal or
provincial law.
Serial #
Combination #
Tip-Over Hazard
A child or adult can tip the safe and be
killed or seriously injured.
Failure to secure the safe as shown in
these instructions can result in death or
serious injury to children and adults.
Children should not play with or around
the safe at any time.
WARNING
WARNING: This product can expose you to chemicals including Di(2-ethylhexyl)phthalate (DEHP) which is
known to the State of California to cause cancer and birth defects or other reproductive harm. For more
information go to www.P65Warnings.ca.gov.
REGISTER THIS PRODUCT
For warranty and customer support, please register this product at www.Stack-On.com/product-registration.
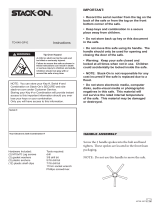
Getting Started
Select safes are delivered with a Safety Interlock
Screw which must be removed in order for you to lock
your safe. Failure to do so will compromise the safety
and security of your safe.
First, open the safe by turning the handle clockwise and
pulling the door open.
Locate the Safety Interlock Screw on the side of the door.
Remove using a Phillips screwdriver and discard the screw.
Your safe can now be closed and locked. Do not lock your
instruction manual and/or keys in the safe. You will need this
manual for the instructions on locking and unlocking the safe.
Safety Interlock Screw

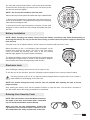
Electronic Lock
Entering Your Security Code
After installing the battery, the electronic lock is ready for use.
To use the lock for the first time, press the following numbers/symbols in the order provided: 1-5-9-#.
NOTE: You should change the entry code as soon as possible after opening the safe to insure
proper security.
After entering the factory code, turn the handle clockwise to open the door. You will have 5 seconds to
turn the handle before the locking mechanism is reactivated.
NOTE: This safe includes a red reset button located on
the inside of the door and covered with a removable
cap. To use the reset button, remove the cap.
When you have set your combination, replace the
cap securely over the reset button. Failure to do so
will compromise the safety and security of the safe.
The factory preset code is 1 - 5 - 9 - # and should be changed before using the safe. It is the owner’s
responsibility for safekeeping of the new code.
40-0000119-2103 212
NOTE: When changing the battery, always hold the battery connecting cap while disconnecting or
attaching the battery. Do not pull on the wires. Doing so could cause the power supply to disconnect
from the lock.
This safe uses one 9V alkaline battery. Under normal use, batteries will last about 1 year.
When the battery is low, a red indicator light will appear on the
keypad after pressing any button. Be sure to test your battery
every six months by entering your code. If the low battery
indicator light appears, promptly replace the battery.
To replace the battery, remove the keypad face by pressing the tab
and turning the keypad face as shown in the illustration. Replace
the old battery and screw the keypad face back in place.
Battery Installation
TAB
For safes with multi-spoked handles, remove the spoke included
in the instruction sheet bag or protective foam. Screw the spoke
into the hub and hand tighten.
NOTE: Do not use this handle to move the safe.
Remove the key from the packet and follow the steps outlined below:
1. Remove the keypad face by pressing the tab and turning it as
shown in the illustration. The keypad can hang by the connecting
cable while unlocking the safe.
2. Insert the key in the key hole and turn clockwise 1/4 turn (until
stopped) in order to unlock the safe. Rotate the handle and open
the door.
TAB

If an incorrect security code is entered 3 times the safe will automatically lockout for 15 seconds before you
can try your code again. If the incorrect code is entered 2 additional times there will be a 5 minute lockout
before you can try your code again.
Lockout Mode
Silencing the Keypad
You can turn off the “Beep” sound of the keypad by entering the code - 6 - 3 - 3.
To turn the “Beep” sound on, enter the code - 6 - 6.
Locking The Safe
To lock the safe, close the door and rotate the handle counterclockwise until it stops. If the handle is not
turned until it stops, the locking mechanism will not lock.
NOTE: Because the locking mechanism is deactivated for approximately 3 to 6 seconds after the
combination is entered, wait a minimum of 6 seconds from the time the combination is entered to
lock the safe.
NOTE: Always confirm the door is closed and the lock has engaged before leaving the safe unattended.
40-0000119-2103 312
To enter your personal security code you will need to follow the steps listed below:
1. After opening the electronic safe (with the preset factory code of 1 - 5 - 9 - #), locate the small red
reset button on the inside of the door near the hinge.
2. Press the red reset button and then release it; you will hear a beep. A yellow light on the faceplate will
activate and stay on for a period of time while you enter your personal security code. You can only
enter the code while the yellow light is illuminated.
With the door open and the yellow light activated, enter your 3 - 8 digit code. Confirm your code by
pressing the ⁕ symbol on the keypad. Before closing the door, enter your code followed by the # symbol
to be sure that it releases the handle and allows you to turn it. You should see the live action bolts retract.
If the code fails, go through steps 1 and 2 again. If the code works successfully, record your combination
and keep it in a secure location away from children and not inside the safe. You should then close and
lock the door.
NOTE: DO NOT SHUT THE DOOR UNTIL YOU HAVE CONFIRMED THAT YOUR NEW SECURITY
CODE WORKS CORRECTLY.

40-0000119-2103 412
A "Backup Key" has been provided in case you have forgotten or lost your security code. To open the safe using
the backup key follow the steps below:
1. Remove the cover by pressing the tab and turning the cover as
shown in the illustration. The lock can hang by the connecting
cable while unlocking the safe.
2. Insert the key in the keyhole and turn clockwise 1/4 turn (until stopped)
in order to unlock the safe. Rotate the handle and open the door.
3. Keep the door open until you have entered a new security code.
Before entering your new code, remove the key and screw the
cover back in place.
4. Enter your new security code using the instructions provided in this
document.
Backup Key
TAB
Stack-On recommends seeking the services of a professional to install your safe; local safe
dealers and locksmiths usually offer this service. By choosing to install your safe on your own,
you agree to take any responsibility for damages (physical or to your property) that may occur.
Securing The Safe
IMPORTANT: The safe must be removed from the skid/legs and fastened to the floor using appropriate
hardware. Failure to do so will void the warranty.
Place the safe in the desired location. With your safe open, lift the interior carpeting up and locate the
mounting hole bushings. These bushings are filled with fire resistant caulking which must be drilled out before
mounting the safe to the floor. Use a 3/8" diameter drill bit to drill out this caulking. Continue to use this drill
to mark the hole location on the floor. Move the safe away. Drill pilot holes in the floor as follows: For a wood
floor drill 5/16" diameter x 2-1/2" deep pilot holes. For a masonry floor drill 7/16" diameter x 2-1/2" deep pilot
holes for the anchors.
IMPORTANT: When you drill out the fire resistant caulking from the mounting holes, you must mount
the safe to the floor using lag bolts and gasket washers. Failure to do so will void the fire rating.
Reposition the safe and secure the safe with the lag bolts and gasket washers. Replace the carpeting.
Selecting Your Location
For optimal security, your safe must be mounted to the floor. The
safe should be installed in a dry, secure area, adjacent to a side
wall and with minimal space on either side.
The safe should be flat against the wall and floor. Remove the
baseboard if necessary.
CHILDREN SHOULD NOT PLAY WITH OR AROUND THE
SAFE AT ANY TIME.
Before determining where to place your safe, verify the load bearing weight capacity of the floor
where the safe will reside or stairs the safe will encounter. Measure doorways ahead of time to be
sure your safe will safely pass through the necessary doorway. Select a location that is suitable
for bolting down your safe for extra theft protection.
Stack-On Tips
Tip-Over Hazard
A child or adult can tip the safe and be killed or seriously injured.
WARNING

IMPORTANT
Keep keys and combination away from children. Keep this record of your serial and key numbers in a secure place
separate from your safe. If you lose your keys you will need this information as a reference for obtaining new keys.
ORDERING A REPLACEMENT KEY
Visit www.stack-on.com/key-replacement-form and follow the online instructions.
• Use only Duracell or Energizer batteries that expire 5 years ahead from current year.
Change battery at least every 6 months.
• Use red head anchors 3-3/4 x 3/8 to bolt the safe.
• Before mounting the safe make sure to write down the serial number.
• Do not put safe in a damp or humid area.
• Keep page 1 of this manual somewhere safe and away from children (not inside the safe).
• Do not overload the safe; overloading the safe can put pressure against the door which can keep the
safe from closing or opening properly.
• Avoid applying excessive force to the handle. If the safe does not open, please contact our customer
support department.
Recommendations
NOTE: Do not store electronic media, computer disks, SD cards, audio-visual media or photographic
negatives in this safe. In the event of a fire, these materials will not survive the rated internal
temperature of the safe and could be damaged or destroyed.
40-0000119-2103 512
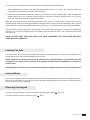
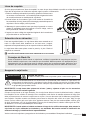
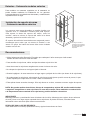
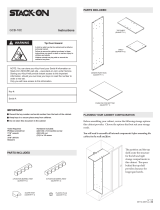
For models with adjustable shelving, the shelves can be installed
by placing the shelf clips (included) in the desired locations.
Once installed, place the shelf on top of the shelf clips.
Shelves - Select Models Only
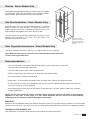
Your door organizer provides a variety of storage options for your supplies.
Note: Make sure the door accessories do not interfere with items in the safe
or when closing the safe door.
Door Organizer Accessories
- Select Models Only
Adjustable gun rests are may be installed with 4 "L" brackets
using 2 screws for each bracket. To adjust the barrel rest
height, remove the screws, reposition the barrel rest to your
desired height and tighten the screws into the track.
The gun barrel rest should be permanently secured to avoid
shifting when accessing your guns. The gun barrel rest
should be level when in use.
Gun Rest Installation - Select Models Only
Image demonstrates
placement of the shelves.
It does not necessarily
reflect the configuration of
your safe.

40-0000119-2103 612
LIMITED LIFETIME WARRANTY AND GUARANTEE
(Valid Only for Purchases in North America)
R
If your Stack-On Fire Resistant Steel Safe suffers damage due to theft or fire at any time while still owned by the original
owner, Stack-On will either repair or replace (at Stack-On’s discretion) your safe free of charge. If Stack-On chooses to repair
the safe, such repair work may be performed by a local technician approved by Stack-On. Depending on the extent of the
damage, Stack-On may require the safe be returned to the factory for repair. If the safe is so returned, Stack-On will pay the
freight to the factory as well as the return freight. If the safe is replaced, Stack-On will pay the freight. This guarantee does not
cover labor costs for removal or installation of the safe and its contents. Any repair, dismantling, or tampering undertaken
without the prior written approval or direction of Stack-On will nullify this guarantee. Personal property in the safe is not
covered under this guarantee.
In addition, Stack-On Fire Resistant Steel Safes are warranted to be free from defects in material and workmanship for as long
as the original consumer owns the product (unless shorter periods are provided below). Locks and paint are warranted for a
period of five (5) years from the date of original consumer purchase. This warranty extends to the initial consumer only. If you
believe there is a defect in material or workmanship in your Stack-On Fire Resistant Steel Safe during the warranty period,
please contact our customer service department at the address and in the manner set forth below. If Stack-On is properly
notified during the warranty period and, after inspection confirms there is a defect, Stack-On will, at its sole option, provide
repair parts or exchange the product at no charge, or refund the purchase price of the product.
THIS WARRANTY DOES NOT COVER ANY PRODUCT, OR ANY PART OF ANY PRODUCT, WHICH HAS BEEN
SUBJECT TO EXCESSIVE USE, ACCIDENT, NEGLIGENCE, IMPROPER INSTALLATION, INCORRECT MAINTENANCE,
ALTERATION OR REPAIR BY ANYONE OTHER THAN STACK-ON, ABUSE, OR MISUSE.
THIS WARRANTY IS EXCLUSIVE AND EXPRESSLY IN LIEU OF ALL OTHER WARRANTIES EXPRESSED OR IMPLIED
INCLUDING THE WARRANTIES OF MERCHANTABILITY AND FITNESS FOR A PARTICULAR PURPOSE, WHICH ARE
HEREBY DISCLAIMED AND EXCLUDED. STACK-ON SHALL NOT BE SUBJECT TO ANY OTHER OBLIGATIONS OR
LIABILITIES. STACK-ON NEITHER ASSUMES NOR AUTHORIZES ANY OTHER PERSON TO ASSUME FOR IT, ANY
OTHER LIABILITY IN CONNECTION WITH THE SALE OF STACK-ON'S FIRE RESISTANT STEEL SAFES.
STACK-ON WILL NOT, UNDER ANY CIRCUMSTANCES, BE LIABLE TO THE INITIAL CONSUMER FOR ANY INCIDENTAL,
CONSEQUENTIAL, SPECIAL, EXEMPLARY, OR PUNITIVE DAMAGES ARISING OUT OF THE PURCHASE OR USE OF
ANY STACK-ON PRODUCT, INCLUDING THE FIRE RESISTANT STEEL SAFES. STACK-ON'S LIABILITY FOR ANY
BREACH OF THIS WARRANTY SHALL BE LIMITED EXCLUSIVELY TO REPAIR OR REPLACEMENT OF THE DEFECTIVE
PRODUCT, AS DESCRIBED ABOVE, OR A REFUND OF THE PURCHASE PRICE OF THE PRODUCT. IN NO EVENT
SHALL STACK-ON'S OBLIGATION UNDER THIS WARRANTY EXCEED THE PRICE OF THE PRODUCT.
THIS WARRANTY GIVES YOU SPECIFIC LEGAL RIGHTS. YOU MAY ALSO HAVE OTHER RIGHTS WHICH VARY FROM
STATE TO STATE.
Please send your claim pursuant to the above guarantee or warranty in writing by regular mail or email to:
Cannon Security Products
2895 W. Capovilla Ave.
Suite 140
Las Vegas, NV 89119
Be sure to include:
• Your name and address
• A description of the warranty claim, fire or theft
• The model number and photographs of the safe
• The serial number off the front or back of the safe
• A copy of the report from the fire department, police or insurance company within 30 days of damage
(applies to units damaged by theft or fire)
• Proof of purchase information of the safe
This product is not designed for the storage of computer disks, CDs, DVDs, audio-visual materials or
photographs/negatives.

IMPORTANTE:
®
• Registre el número de serie que se encuentra en la etiqueta de la parte posterior o en la etiqueta en la esquina
inferior delantera de la caja fuerte.
• Guarde las llaves y la combinación en un lugar seguro fuera del alcance de los niños.
• No guarde la llave de respaldo, su combinación o este documento en la caja fuerte.
• No mueva ni intente mover esta caja fuerte usando la manija. La manija solo debe usarse para abrir y cerrar la
puerta de la caja fuerte. Usar la manija para mover la caja fuerte puede comprometer la integridad de la caja
fuerte y anular la garantía.
• No guarde los medios electrónicos, discos de computadora, medios audiovisuales o negativos fotográficos en
este seguro. Este material no sobrevivirá a la temperatura interna nominal de la caja fuerte. Este material puede
ser dañado o destruido.
Advertencia: mantenga su caja fuerte cerrada y bajo llave en todo momento cuando no esté en uso. Los niños
podrían quedar accidentalmente encerrados dentro de la caja fuerte.
Eliminación de la batería
Por favor deseche la batería
usada de acuerdo con la ley
municipal o provincial.
# de Serie:
# Combinación:
Peligro de vuelco
ADVERTENCIA
Un niño o un adulto puede volcar la caja fuerte
y morir o sufrir lesiones graves.
No asegurar la caja fuerte como se muestra en
estas instrucciones puede resultar en la
muerte o lesiones graves a niños y adultos.
Los niños no deben jugar con la caja fuerte o
alrededor de ella en ningún momento.
ADVERTENCIA: Este producto puede exponerlo a químicos, incluido el Di(2-ethylhexyl) phthalate (DEHP), lo cual es
conocido por el Estado de California que causa cáncer y defectos de nacimiento u otros daños reproducvos. Para
obtener más información, vaya a www.P65Warnings.ca.gov
REGISTRAR ESTE PRODUCTO
Para garana y atención al cliente, registre este producto en www.Stack-On.com/product-registraon
40-0000119-2103 712
Empezando
Instrucciones para ajas fuertes ignífugas
IMPORTANTE:
Algunas cajas fuertes selectas se entregan con un
tornillo de bloqueo de seguridad que debe quitarse para
que pueda bloquear su caja fuerte. De no hacerlo,
comprometerá la seguridad y protección de su caja fuerte.
Primero abra la caja fuerte girando la manija en el sentido de
las agujas del reloj y tirando de la puerta para abrirla.
Localice el tornillo de bloqueo de seguridad en el costado de
la puerta; desatornille con un destornillador Phillips, retire y
deseche el tornillo.
Su caja fuerte ahora puede cerrarse y bloquearse. No guarde
su manual de instrucciones y / o llaves dentro de la caja fuerte.
Necesitará este manual para obtener instrucciones sobre cómo
bloquear y desbloquear la caja fuerte.
Tornillo de bloqueo
de seguridad

Cerradura electrónica
Ingresando su código de seguridad
Después de instalar la batería, la cerradura electrónica está lista para su uso.
Para usar el candado por primera vez, presione los siguientes números / símbolos en el orden en que se
proporcionan: 1-5-9- #.
NOTA: Debe cambiar el código de entrada lo antes posible después de abrir la caja fuerte para
garantizar la seguridad adecuada.
Después de ingresar el código de fábrica, gire la manija en el sentido de las manecillas del reloj para abrir
la puerta. Tendrá 5 segundos para girar la manija antes de que se reactive el mecanismo de bloqueo.
Nota: Esta caja fuerte incluye un botón de reinicio
rojo ubicado en el interior de la puerta y cubierto con
una tapa extraíble. Para utilizar el botón de reinicio,
retire la tapa.
Cuando haya configurado su combinación, vuelva a
colocar la tapa de forma segura sobre el botón de
reinicio. No hacerlo comprometerá la seguridad y
protección de la caja fuerte.
El código predeterminado de fábrica es 1 - 5 - 9 - # y debe cambiarse antes de usar la caja fuerte.
Es responsabilidad del propietario la custodia del nuevo código.
40-0000119-2103 812
NOTA: Al cambiar la batería, siempre sostenga la tapa de conexión de la batería mientras desconecta o
coloca la batería. No tire de los cables. Si lo hace, podría provocar que la fuente de alimentación se
desconecte de la cerradura.
Esta caja fuerte usa una pila alcalina de 9V. Con un uso normal, las baterías durarán aproximadamente 1 año.
Cuando la batería está baja, aparecerá una luz indicadora roja en el teclado
después de presionar cualquier botón. Asegúrese de probar su batería cada
seis meses ingresando su código. Si aparece la luz indicadora de batería baja,
reemplace la batería de inmediato.
Para reemplazar la batería, retire la parte frontal del teclado presionando la
pestaña y girando la parte frontal del teclado como se muestra en la ilustración.
Reemplace la batería vieja y atornille la parte frontal del teclado en su lugar.
Instalación de la batería
PESTAÑA
Para cajas fuertes con múltiples manijas, retire la manija que se
incluye en la bolsa de la hoja de instrucciones o espuma protectora,
atorníllelo en el centro y apriételo a mano.
NOTA: No use esta manija para mover la caja fuerte.
Retire la llave del paquete y siga los pasos que se describen a
continuación:
1. Retire la cara del teclado presionando la pestaña y girándola como
se muestra en la ilustración. El teclado puede colgarse del cable de
conexión mientras se desbloquea la caja fuerte.
2. Inserte la llave en el orificio de la llave y gire 1/4 de vuelta en el
sentido de las manecillas del reloj (hasta que se detenga) para
desbloquear la caja fuerte. Gire la manija y abra la puerta.
PESTAÑA

Si se ingresa el código de seguridad incorrecto 3 veces, habrá un bloqueo automático durante 15
segundos antes de que pueda volver a intentarlo. Si se ingresa el código incorrecto 2 veces más, habrá
un bloqueo de 5 minutos antes de que pueda volver a intentarlo.
Modo de bloqueo
Silenciar el teclado
Puede apagar el sonido “Beep” del teclado ingresando el código - 6 - 3 - 3.
Para activar el sonido "Beep", ingrese el código - 6 - 6.
Bloquear la caja fuerte
Para bloquear la caja fuerte, cierre la puerta y gire la manija en contra de las manecillas del reloj hasta
que se detenga. Si la manija no se gira hasta detenerse, el mecanismo de bloqueo no se bloqueará.
NOTA: Debido a que el mecanismo de bloqueo se desactiva durante aproximadamente 3 a 6
segundos después de ingresar la combinación, espere un mínimo de 6 segundos desde el
momento en que ingresó la combinación para bloquear la caja fuerte.
NOTA: Confirme primero que la puerta esté cerrada y que la cerradura se haya activado antes de
dejar la caja fuerte desatendida.
40-0000119-2103 912
Para ingresar su código de seguridad personal, deberá seguir los pasos que se enumeran a continuación:
1. Después de abrir la caja fuerte electrónica (con el código preestablecido de fábrica de 1 - 5 - 9 - #)
localice el pequeño botón rojo de reinicio en el interior de la puerta cerca de la bisagra.
2. Presione el botón rojo de reinicio y luego suéltelo; escuchará un pitido. Una luz amarilla en la placa
frontal se activará y permanecerá encendida durante un período de tiempo mientras ingresa su código
de seguridad personal. Solo puede ingresar el código mientras la luz amarilla está encendida.
Con la puerta abierta y la luz amarilla activada, ingrese su código de 3 a 8 dígitos. Confirme su código
presionando el símbolo ⁕ en el teclado. Antes de cerrar la puerta, ingrese su código seguido del símbolo
# para asegurarse de que suelte la manija y le permita girarla. Debería ver cómo se retraen los tornillos
de acción en vivo.
Si el código falla, siga los pasos 1 y 2 nuevamente. Si el código funciona correctamente, registre su
combinación y guárdela en un lugar seguro lejos de los niños y no dentro de la caja fuerte. A
continuación, debe cerrar y bloquear la puerta.
NOTA: NO CIERRE LA PUERTA HASTA QUE HAYA CONFIRMADO QUE SU NUEVO CÓDIGO DE
SEGURIDAD FUNCIONA CORRECTAMENTE.

40-0000119-2103 1012
Se le ha proporcionado una "llave de respaldo" en caso de que haya olvidado o perdido su código de seguridad.
Para abrir la caja fuerte con la llave de respaldo, siga los pasos a continuación:
1. Retire la cubierta presionando la pestaña y girando la cubierta como
se muestra en la ilustración. La cerradura puede colgarse del cable
de conexión mientras se desbloquea la caja fuerte.
2. Inserte la llave en la cerradura y gire 1/4 de vuelta en el sentido de
las manecillas del reloj (hasta que se detenga) para desbloquear la
caja fuerte. Gire la manija y abra la puerta.
3. Mantenga la puerta abierta hasta que haya ingresado un nuevo
código de seguridad. Antes de ingresar su nuevo código, retire la
llave y atornille la cubierta en su lugar.
4. Ingrese su nuevo código de seguridad siguiendo las instrucciones
proporcionadas en este documento.
Llave de respaldo
PESTAÑA
Stack-On recomienda buscar los servicios de un profesional para instalar su caja fuerte; los
comerciantes de cajas fuertes y cerrajeros locales suelen ofrecer este servicio. Al elegir instalar
su caja fuerte por su cuenta, acepta asumir cualquier responsabilidad por los daños (físicos o de
su propiedad) que puedan ocurrir.
Asegurar la caja fuerte
IMPORTANTE: La caja fuerte debe quitarse de la base / patas y sujetarse al piso con los accesorios
adecuados. No hacerlo anulará la garantía.
Coloque la caja fuerte en el lugar deseado. Con la caja fuerte abierta, levante la alfombra interior y ubique
los casquillos de los orificios de montaje. Estos casquillos están llenos de masilla resistente al fuego que
debe perforarse antes de montar la caja fuerte en el piso. Use una broca de 3/8 "de diámetro para perforar
este sellador. Continúe usando este taladro para marcar la ubicación del orificio en el piso. Aleje la caja
fuerte. Perfore orificios guía en el piso de la siguiente manera: Para piso de madera taladre orificios guía
de 5/16" de diámetro x 2-1/2" de profundidad. Para un piso de mampostería, taladre orificios guía de 7/16"
de diámetro x 2-1/2" de profundidad para los anclajes.
IMPORTANTE: Cuando taladre el sellador resistente al fuego de los orificios de montaje, debe montar la
caja fuerte en el piso utilizando los tirafondos y sus arandelas. No hacerlo anulará la clasificación de
resistencia al fuego y la clasificación de impermeabilidad.
Vuelva a colocar la caja fuerte y asegurela con los tirafondos y sus arandelas. Reemplace la alfombra.
Peligro de vuelco
Un niño o un adulto puede volcar la caja fuerte y morir o sufrir lesiones graves.
ADVERTENCIA
Selección de su ubicación
Para una seguridad óptima, su caja fuerte debe estar montada en el
suelo. La caja fuerte debe instalarse en un área seca y segura,
adyacente a una pared lateral y con un espacio mínimo a ambos lados.
La caja fuerte debe estar plana contra la pared y el piso. Retire el
rodapié si es necesario.
LOS NIÑOS JAMÁS DEBEN JUGAR CON O ALREDEDOR DE LA CAJA FUERTE.
Antes de determinar dónde colocar su caja fuerte, verifique la capacidad de carga de peso del piso
donde residirá la caja fuerte o las escaleras que encontrará. Mida las puertas con anticipación para
asegurarse de que su caja fuerte pase de manera segura por la puerta necesaria. Seleccione una
ubicación que sea adecuada para atornillar su caja fuerte para una protección adicional contra robos.
Consejos de Stack-On

Para modelos con estantes regulables en la estantería se
puede instalar mediante la localización de los ganchos
correspondientes a las ubicaciones deseadas y estableciendo
la plataforma en su lugar.
La imagen muestra la
colocación de los estantes.
No refleja necesariamente
la configuración de su
caja fuerte.
Estantes - Solamente modelos selectos
IMPORTANTE
Mantenga las llaves y combinación fuera del alcance de los niños. Mantenga este registro de sus números
de serie y llave en un lugar seguro separado de su caja fuerte. Si pierde sus llaves, necesitará esta
información como referencia para obtener nuevas llaves.
PEDIDO DE UNA LLAVE DE REPUESTO
Visite www.stack-on.com/key-replacement-form y siga las instrucciones en línea.
• Utilice únicamente pilas Duracell o Energizer que caduquen 5 años antes que el año actual.
Cambie la batería al menos cada 6 meses.
• Para atornillar la caja fuerte, utilice anclajes de cabeza roja 3-3/4 x 3/8.
• Antes de montar la caja fuerte asegúrese de anotar el número de serie.
• No coloque la caja fuerte en un lugar mojado o húmedo.
• Guarde la página 1 de este manual en un lugar seguro y alejado de los niños (no dentro de la caja fuerte).
• No sobrecargue la caja fuerte; sobrecargar la caja fuerte puede ejercer presión contra la puerta, lo que
puede impedir que la caja fuerte se cierre o abra correctamente.
• Evite aplicar fuerza excesiva al mango. Si la caja fuerte no se abre, contacte a nuestro equipo de soporte.
Recomendaciones
NOTA: No guarde medios electrónicos, discos de computadora, tarjetas SD, medios audiovisuales
o negativos fotográficos en esta caja fuerte. En caso de incendio, estos materiales no sobrevivirán
a la temperatura interna nominal de la caja fuerte y podrían dañarse o destruirse.
40-0000119-2103 11 12
Los soportes para arma ajustables se pueden instalar con
soportes de 4 "L" utilizando 2 tornillos para cada soporte.
Para ajustar la altura del soporte del cañón, retire los
tornillos, vuelva a colocar el soporte del cañón a la altura
deseada y apriete los tornillos en el riel.
El soporte del cañón del arma debe estar asegurado perma-
nentemente para evitar que se mueva al acceder a sus
armas. El apoyo del cañón del arma debe estar nivelado
cuando esté en uso.
Instalación de soporte de arma
- Solamente modelos selectos

GARANTÍA LIMITADA DE POR VIDA Y LO GARANTIZADO
(Válido solo para compras en América del Norte)
R
Si su caja fuerte de Stack-On sufre daños debido a robo o incendio en cualquier momento mientras aún es propiedad del propietario
original, Stack-On reparará o reemplazará (a discreción de Stack-On) su caja fuerte sin cargo. Si Stack-On elige reparar la caja
fuerte, dicho trabajo de reparación puede ser realizado por un técnico local aprobado por Stack-On. Dependiendo de la extensión
del daño, Stack-On puede requerir que la caja fuerte sea devuelta a la fábrica para su reparación. Si se devuelve la caja fuerte,
Stack-On pagará el flete a la fábrica así como el flete de devolución. Si se reemplaza la caja fuerte, Stack-On pagará el flete. Esta
garantía no cubre los costos de mano de obra para el retiro o instalación de la caja fuerte y su contenido. Cualquier reparación,
desmantelamiento o manipulación realizada sin la aprobación previa por escrito o la dirección de Stack-On anulará esta garantía. La
propiedad personal en la caja fuerte no está cubierta por esta garantía.
Además, se garantiza que las cajas fuertes de Stack-On están libres de defectos en el material y la mano de obra durante el tiempo
que el consumidor original sea propietario del producto (a menos que se proporcionen períodos más cortos a continuación). Las
cerraduras y la pintura están garantizadas por un período de cinco (5) años a partir de la fecha de compra original del consumidor.
Esta garantía se extiende únicamente al consumidor inicial. Si cree que hay un defecto en el material o la mano de obra en su caja
fuerte de Stack-On durante el período de garantía, comuníquese con nuestro departamento de servicio al cliente en la dirección
proporcionada en este documento. Si Stack-On recibe una notificación adecuada durante el período de garantía y, después de que
la inspección confirma que hay un defecto, Stack-On, a su exclusivo criterio, proporcionará piezas de reparación o cambiará el
producto sin cargo, o reembolsará el precio de compra del producto.
ESTA GARANTÍA NO CUBRE NINGÚN PRODUCTO, O CUALQUIER PARTE DE CUALQUIER PRODUCTO, QUE HAYA SIDO
SUJETO A USO EXCESIVO, ACCIDENTE, NEGLIGENCIA, INSTALACIÓN INCORRECTA, MANTENIMIENTO INCORRECTO,
ALTERACIÓN O REPARACIÓN POR PARTE DE NINGÚN OTRO QUE NO SEA STACK-ON, NI POR ABUSO O MAL USO.
ESTA GARANTÍA ES EXCLUSIVA Y SUSTITUYE EXPRESAMENTE A TODAS LAS DEMÁS GARANTÍAS EXPRESAS O
IMPLÍCITAS, INCLUIDAS LAS GARANTÍAS DE COMERCIABILIDAD Y APTITUD PARA UN PROPÓSITO EN PARTICULAR,
QUE POR LA PRESENTE SE RECHAZA Y EXCLUYE. STACK-ON NO ESTARÁ SUJETO A NINGUNA OTRA OBLIGACIÓN
O RESPONSABILIDAD. STACK-ON NO ASUME NI AUTORIZA A NINGUNA OTRA PERSONA A ASUMIR EN SU NOMBRE,
NINGUNA OTRA RESPONSABILIDAD EN RELACIÓN CON LA VENTA DE CAJAS FUERTES DE STACK-ON.
STACK-ON NO SERÁ, BAJO NINGUNA CIRCUNSTANCIA, RESPONSABLE ANTE EL CONSUMIDOR INICIAL POR CUALQUIER
DAÑO INCIDENTAL, CONSECUENTE, ESPECIAL, EJEMPLAR O PUNITIVO QUE SURJA DE LA COMPRA O USO DE CUALQUIER
PRODUCTO DE STACK-ON, INCLUYENDO EL ACERO RESISTENTE AL FUEGO. LA RESPONSABILIDAD DE STACK-ON POR
CUALQUIER INCUMPLIMIENTO DE ESTA GARANTÍA SE LIMITARÁ EXCLUSIVAMENTE A LA REPARACIÓN O REEMPLAZO DEL
PRODUCTO DEFECTUOSO, COMO SE DESCRIBE ARRIBA, O AL REEMBOLSO DEL PRECIO DE COMPRA DEL PRODUCTO.
EN NINGÚN CASO LA OBLIGACIÓN DE STACK-ON BAJO ESTA GARANTÍA EXCEDERÁ EL PRECIO DEL PRODUCTO.
ESTA GARANTÍA LE OTORGA DERECHOS LEGALES ESPECÍFICOS. TAMBIÉN PUEDE TENER OTROS DERECHOS
QUE VARÍAN DE UN ESTADO A OTRO.
Envíe su reclamo de conformidad con la garantía anterior por correo postal o correo electrónico a:
Cannon Security Products
2895 W. Capovilla Ave.
Suite 140
Las Vegas, NV 89119
Asegúrate de incluir:
• Su nombre y dirección
• Una descripción del reclamo de garantía, incendio o robo.
• El número de modelo y fotografías de la caja fuerte
• El número de serie en la parte delantera o trasera de la caja fuerte.
• Una copia del informe del departamento de bomberos, policía o compañía de seguros dentro de los 30
días posteriores al daño. (Aplica sólo a unidades dañadas por robo o incendio)
• Comprobante de información de compra de la caja fuerte
Este producto no está diseñado para el almacenamiento de discos de computadora, CD, DVD, materiales
audiovisuales o negativo de fotografías.
40-0000119-2103 1212
-
 1
1
-
 2
2
-
 3
3
-
 4
4
-
 5
5
-
 6
6
-
 7
7
-
 8
8
-
 9
9
-
 10
10
-
 11
11
-
 12
12


Stack-On HDS553030H1EY21 Manual de usuario
- Tipo
- Manual de usuario
- Este manual también es adecuado para
Lo siento, pero no encuentro información sobre el producto "Stack-On HDS553030H1EY21" en el manual de instrucciones proporcionado. Por lo tanto, no puedo responder a su solicitud.
en otros idiomas
- English: Stack-On HDS553030H1EY21 User manual
Artículos relacionados
-
 Stack-On TD-24-GP-E-S Instructions Manual
-
 Stack-On PFS-012-BG-E Manual de usuario
-
 Stack-On PS-1515 Instructions Manual
-
 Stack-On QAS-1512-B Instructions Manual
-
 Stack-On PC-1690 Instructions Manual
-
 Stack-On PFS-012-BG-E Personal Fireproof Safes El manual del propietario
-
 Stack-On STACK ON GCB-18C Convertible Cabinet for 18 Firearms Instrucciones de operación


