La página se está cargando...

For warranty information please visit: kichler.com/warranty
Pour de plus amples informations sur la garantie, cliquez sur le lien ci-dessous : kichler.com/warranty IS-16085BK-CBREV 19-JAN-2021
We’re here to help 844-542-4537
Hrs: M-F 8am to 6pm EST
Nous sommes là pour vous aider 844-542-4537
Heures : du lundi au vendredi, de 8h à 18h (heure de l’Est)
INSTRUCTIONS:
For Assembling and Installing Fixtures in Canada
Pour L’assemblage et L’installation Au Canada
LISTE DES PIÈCES
PRÉCAUTIONS
FCC INFORMATION
Cet appareil est conforme à la section 15 de la réglementation de la FCC. L’exploitation est soumise aux deux conditions
suivantes :
1. Cet équipement ne doit pas causer d’interférences nuisibles, et
2. Cet équipement doit accepter toute interférence reçue, y compris les interférences risquant d’engendrer un
fonctionnement indésirable.
Remarque: Des tests ont confirmé que ce matériel respecte les limites d’un dispositif numérique de catégorie B,
en vertu de la section 15 de la réglementation de la FCC. Ces limites ont été conçues pour fournir une protection
raisonnable contre le brouillage nuisible d’une installation résidentielle. Cet équipement génère, utilise et peut rayonner
de l’énergie radiofréquence et, s’il n’est pas installé et utilisé selon les instructions, peut causer de l’interférence nuisible
aux communications de radio. Cependant, il est néanmoins possible qu’il y ait de l’interférence dans une installation en
particulier. Si cet équipement cause du brouillage nuisible à la réception du signal de radio ou de télévision, ce qui peut être
déterminé en éteignant puis en rallumant l’appareil, l’usager peut essayer de corriger l’interférence en appliquant une des
mesures suivantes :
• Réorienter l’antenne de réception ou changer son emplacement.
• Augmenter la distance séparant l’équipement et le récepteur.
• Brancher le matériel dans la prise de courant d’un circuit diérent de celui auquel le récepteur est branché.
• Consulter le revendeur ou un technicien radio/télé d’expérience.
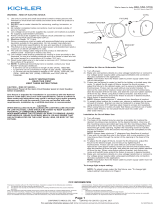
[A] Male Threaded
Portion of Antenna
[B] Nylon Knock-Out
Gasket
[C] Lock Washer
[D] Flat Washer
[E] Nut
[F] Antenna
[G] Smart Control
Timer
[H] Side Receptacle
ATTENTION – RISQUE DE DÉCHARGES ÉLECTRIQUES –
Couper le courant au niveau du panneau du disjoncteur du circuit principal ou de
la boîte à fusibles principale avant de procéder à l’installation.
ATTENTION:
Ce device doit être installé conformément aux codes d’électricité nationaux
(NEC) et satisfaire toutes les spécifications des codes locaux. Si vous ne
connaissez pas les exigences de ces codes, il est recommandé de confier
l’installation à un électricien certifié.
NETTOYAGE :
• Soyez toujours certain que l’alimentation électrique du luminaire est fermée
avant le nettoyage.
• N’utilisez qu’un chion doux humide. Les produits de nettoyage acides/abrasifs
peuvent endommager le fini.
INSTALLATION INSTRUCTIONS
NOTE: Smart Control Timer should be installed to transformer prior to setting up and using the
Kichler Connects App.
1. Turn o power to the transformer that the Smart Control Timer will be installed in.
2. Open the transformer door and unplug internal power cord.
3. Remove Smart Control Timer[G] from packaging & plug it into the internal transformer receptacle.
4. Install the included antenna:
5. Plug internal transformer cord into side receptacle[H] on the Smart Control Timer.
6. Turn power to transformer back on.
7. Download the Kichler Connects App from the Apple App Store or Google Play and follow Quick
Start App Installation instructions to connect your device.
1. Using a flat blade screwdriver and pliers, remove a knock-out blank from transformer
housing, being careful not to scratch the transformer body.
NOTE: We recommend removing a knock-out hole on side of transformer closest to the
Wi-Fi Router.
NOTE: DO NOT use the knock outs on the bottom of transformer housing.
2. Insert nylon knock-out gasket[B] into knockout from the exterior of the transformer.
3. Remove nut[E], flat washer[D], and lock washer from the male threaded portion of the
antenna[A].
4. Insert the male threaded portion of the antenna[A] through the nylon lock-out gasket[B].
5. Place lock washer[C] and flat washer[D] onto male threaded portion of the antenna[A],
then thread on nut[E]. HAND-TIGHTEN ONLY. DO NOT OVER-TIGHTEN.
6. Thread antenna[F] onto male threaded portion of the antenna[A].
7. For best reception, ensure that the antenna[F] is upright with respect to the transformer.
16085BK SMART CONTROL TIMER SPECS:
• Input: 120V 60Hz 10A
• Output: 120VAC 10A Max
• Wifi: 2.4Ghz Only, 802.11b/g/n
• Bluetooth 5
• cUL
• FCC
OUTDOOR USE ONLY
DOM ETRE INST
ALLE A L
’EXTERIEUR
DEVICE DIAGRAM / DIAGRAMME D’DEVICE
PARTS LIST
CAUTIONS
CAUTION – RISK OF SHOCK –
Disconnect Power at the main circuit breaker panel or main fusebox before
starting and during the installation.
WARNING:
This device is intended for installation in accordance with the National Electrical
Code (NEC) and all local code specifications. If you are not familiar with code
requirements, installation by a certified electrician is recommended.
CLEANING:
• Always be certain that electric current is turned o before cleaning.
• Only a soft damp cloth should be used. Harsh cleaning products may damage
the finish.
INSTALLATION INSTRUCTIONS
[A] Male Threaded
Portion of Antenna
[B] Nylon Knock-Out
Gasket
[C] Lock Washer
[D] Flat Washer
[E] Nut
[F] Antenna
[G] Smart Control
Timer
[H] Side Receptacle
NOTE: Smart Control Timer should be installed to transformer prior to setting up and using the
Kichler Connects App.
1. Turn o power to the transformer that the Smart Control Timer will be installed in.
2. Open the transformer door and unplug internal power cord.
3. Remove Smart Control Timer[G] from packaging & plug it into the internal transformer receptacle.
4. Install the included antenna:
G
H
AB
DEF
C
5. Plug internal transformer cord into side receptacle[H] on the Smart Control Timer.
6. Turn power to transformer back on.
7. Download the Kichler Connects App from the Apple App Store or Google Play and follow Quick
Start App Installation instructions to connect your device.
1. Using a flat blade screwdriver and pliers, remove a knock-out blank from transformer
housing, being careful not to scratch the transformer body.
NOTE: We recommend removing a knock-out hole on side of transformer closest to the
Wi-Fi Router.
NOTE: DO NOT use the knock outs on the bottom of transformer housing.
2. Insert nylon knock-out gasket[B] into knockout from the exterior of the transformer.
3. Remove nut[E], flat washer[D], and lock washer from the male threaded portion of the
antenna[A].
4. Insert the male threaded portion of the antenna[A] through the nylon lock-out gasket[B].
5. Place lock washer[C] and flat washer[D] onto male threaded portion of the antenna[A],
then thread on nut[E]. HAND-TIGHTEN ONLY. DO NOT OVER-TIGHTEN.
6. Thread antenna[F] onto male threaded portion of the antenna[A].
7. For best reception, ensure that the antenna[F] is upright with respect to the transformer.
ANTENNA
POINTS UP
ANTENNA
POINTS UP
This device complies with part 15 of the FCC Rules. Operation is subject to the following two conditions:
1. This device may not cause harmful interference, and
2. This device must accept any interference received, including interference that may cause undesired operation.
Note: This equipment has been tested and found to comply with the limits for a Class B digital device, pursuant to
part 15 of the FCC Rules. These limits are designed to provide reasonable protection against harmful interference in
a residential installation. This equipment generates, uses and can radiate radio frequency energy and, if not installed
and used in accordance with the instructions, may cause harmful interference to radio communications. However,
there is no guarantee that interference will not occur in a particular installation. If this equipment does cause harmful
interference to radio or television reception, which can be determined by turning the equipment o and on, the user is
encouraged to try to correct the interference by one or more of the following measures:
• Reorient or relocate the receiving antenna.
• Increase the separation between the equipment and receiver.
• Connect the equipment into an outlet on a circuit dierent from that to which the receiver is connected.
• Consult the dealer or an experienced radio/TV technician for help.
FCC INFORMATION
16085BK SMART CONTROL TIMER SPECS:
• Input: 120V 60Hz 10A
• Output: 120VAC 10A Max
• Wi-Fi: 2.4Ghz Only, 802.11b/g/n
• Bluetooth 5
• cUL
• FCC
Smart Control Timer Installed to Transformer
Smart Control Timer Installed to Transformer

For warranty information please visit: kichler.com/warranty
Para informacion de la garantia por favor visite: kichler.com/warranty IS-16085BK-US
DEVICE DIAGRAM / DIAGRAMA DE DEVICE
PARTS LIST
CAUTIONS
CAUTION – RISK OF SHOCK –
Disconnect Power at the main circuit breaker panel or main fusebox before
starting and during the installation.
WARNING:
This device is intended for installation in accordance with the National Electrical
Code (NEC) and all local code specifications. If you are not familiar with code
requirements, installation by a certified electrician is recommended.
CLEANING:
• Always be certain that electric current is turned o before cleaning.
• Only a soft damp cloth should be used. Harsh cleaning products may damage
the finish.
INSTALLATION INSTRUCTIONS
[A] Male Threaded
Portion of Antenna
[B] Nylon Knock-Out
Gasket
[C] Lock Washer
[D] Flat Washer
[E] Nut
[F] Antenna
[G] Smart Control Timer
[H] Side Receptacle
NOTE: Smart Control Timer should be installed to transformer prior to setting up and using the
Kichler Connects App.
1. Turn o power to the transformer that the Smart Control Timer will be installed in.
2. Open the transformer door and unplug internal power cord.
3. Remove Smart Control Timer[G] from packaging & plug it into the internal transformer receptacle.
4. Install the included antenna:
REV 19-JAN-2021
We’re here to help 844-542-4537
Hrs: M-F 8am to 6pm EST
G
H
AB
DEF
C
5. Plug internal transformer cord into side receptacle[H] on the Smart Control Timer.
6. Turn power to transformer back on.
7. Download the Kichler Connects App from the Apple App Store or Google Play and follow Quick
Start App Installation instructions to connect your device.
1. Using a flat blade screwdriver and pliers, remove a knock-out blank from transformer
housing, being careful not to scratch the transformer body.
NOTE: We recommend removing a knock-out hole on side of transformer closest to the
Wi-Fi Router.
NOTE: DO NOT use the knock outs on the bottom of transformer housing.
2. Insert nylon knock-out gasket[B] into knockout from the exterior of the transformer.
3. Remove nut[E], flat washer[D], and lock washer from the male threaded portion of the
antenna[A].
4. Insert the male threaded portion of the antenna[A] through the nylon lock-out gasket[B].
5. Place lock washer[C] and flat washer[D] onto male threaded portion of the antenna[A],
then thread on nut[E]. HAND-TIGHTEN ONLY. DO NOT OVER-TIGHTEN.
6. Thread antenna[F] onto male threaded portion of the antenna[A].
7. For best reception, ensure that the antenna[F] is upright with respect to the transformer.
ANTENNA
POINTS UP
ANTENNA
POINTS UP
Estamos aquí para ayudarle 844-542-4537
Horario: Lunes-Viernes 8am a 6pm EST (hora oficial del este)
This device complies with part 15 of the FCC Rules. Operation is subject to the following two conditions:
1. This device may not cause harmful interference, and
2. This device must accept any interference received, including interference that may cause undesired operation.
Note: This equipment has been tested and found to comply with the limits for a Class B digital device, pursuant to
part 15 of the FCC Rules. These limits are designed to provide reasonable protection against harmful interference in
a residential installation. This equipment generates, uses and can radiate radio frequency energy and, if not installed
and used in accordance with the instructions, may cause harmful interference to radio communications. However,
there is no guarantee that interference will not occur in a particular installation. If this equipment does cause harmful
interference to radio or television reception, which can be determined by turning the equipment o and on, the user is
encouraged to try to correct the interference by one or more of the following measures:
• Reorient or relocate the receiving antenna.
• Increase the separation between the equipment and receiver.
• Connect the equipment into an outlet on a circuit dierent from that to which the receiver is connected.
• Consult the dealer or an experienced radio/TV technician for help.
FCC INFORMATION
16085BK SMART CONTROL TIMER SPECS:
• Input: 120V 60Hz 10A
• Output: 120VAC 10A Max
• Wi-Fi: 2.4Ghz Only, 802.11b/g/n
• Bluetooth 5
• cUL
• FCC
LISTA DE PARTES
PRECAUCIONES
INFORMACIÓN DE LA FCC
[A] Male Threaded
Portion of Antenna
[B] Nylon Knock-Out
Gasket
[C] Lock Washer
[D] Flat Washer
[E] Nut
[F] Antenna
[G] Smart Control Timer
[H] Side Receptacle
INSTRUCCIONES DE INSTALACIÓN
NOTE: Smart Control Timer should be installed to transformer prior to setting up and using the
Kichler Connects App.
1. Turn o power to the transformer that the Smart Control Timer will be installed in.
2. Open the transformer door and unplug internal power cord.
3. Remove Smart Control Timer[G] from packaging & plug it into the internal transformer receptacle.
4. Install the included antenna:
5. Plug internal transformer cord into side receptacle[H] on the Smart Control Timer.
6. Turn power to transformer back on.
7. Download the Kichler Connects App from the Apple App Store or Google Play and follow Quick
Start App Installation instructions to connect your device.
1. Using a flat blade screwdriver and pliers, remove a knock-out blank from transformer
housing, being careful not to scratch the transformer body.
NOTE: We recommend removing a knock-out hole on side of transformer closest to the
Wi-Fi Router.
NOTE: DO NOT use the knock outs on the bottom of transformer housing.
2. Insert nylon knock-out gasket[B] into knockout from the exterior of the transformer.
3. Remove nut[E], flat washer[D], and lock washer from the male threaded portion of the
antenna[A].
4. Insert the male threaded portion of the antenna[A] through the nylon lock-out gasket[B].
5. Place lock washer[C] and flat washer[D] onto male threaded portion of the antenna[A],
then thread on nut[E]. HAND-TIGHTEN ONLY. DO NOT OVER-TIGHTEN.
6. Thread antenna[F] onto male threaded portion of the antenna[A].
7. For best reception, ensure that the antenna[F] is upright with respect to the transformer.
16085BK SMART CONTROL TIMER SPECS:
• Input: 120V 60Hz 10A
• Output: 120VAC 10A Max
• Wi-Fi: 2.4Ghz Only, 802.11b/g/n
• Bluetooth 5
• cUL
• FCC
PRECAUCIÓN – RIESGO DE DESCARGA ELÉCTRICA –
Desconecte la electricidad en el panel principal del interruptor automático o
caja principal de fusibles antes de comenzar y durante la instalación.
ADVERTENCIA:
Este device está destinado a la instalación de acuerdo con el National
Electrical Code (NEC) y todas las especificaciones del código local. Si no está
familiarizado con los requisitos del código, la instalación se recomienda un
electricista certificado.
LIMPIEZA:
• Asegúrese siempre de que la corriente eléctrica esté apagada antes de limpiar.
• Debe usarse solamente un paño húmedo y suave. Productos de limpieza
abrasivos pueden dañar el acabado.
Este dispositivo cumple con la parte 15 de las Reglas de la FCC. La operación es sujeto a las dos condiciones siguientes:
1. Este dispositivo no puede causar interferencia dañina, y
2. Este dispositivo debe aceptar cualquier interferencia recibida, incluyendo interferencias que puedan causar un
funcionamiento no deseado.
Nota: Este equipo ha sido probado y cumple con los límites para un dispositivo digital de Clase B, de acuerdo
con la parte 15 de las Reglas de la FCC. Estos límites están diseñados para proveer protección razonable contra
interferencias dañinas en una instalación residencial. Este equipo genera, utiliza y puede irradiar energía de
radiofrecuencia y, si no se instala y utiliza de acuerdo con las instrucciones, puede causar interferencias en las
comunicaciones por radio. Sin embargo, no hay garantizar que no se produzcan interferencias en una instalación en
particular. Si este equipo causa interferencia perjudicial a la recepción de radio o televisión, que puede determinarse
encender y apagar el equipo, se recomienda al usuario que intente corregir la interferencia mediante una o más de las
siguientes medidas:
• Reorientar o reubicar la antena receptora.
• Aumente la separación entre el equipo y el receptor.
• Conecte el equipo a una toma de corriente en un circuito distinto al que está conectado el receptor.
• Consulte al distribuidor oa un técnico de radio / TV experimentado para obtener ayuda.
Smart Control Timer Installed to Transformer
Smart Control Timer Installed to Transformer

FEDERAL COMMUNICATIONS COMMISSION (FCC) STATEMENT
This device complies with part 15 of the FCC Rules. Operation is subject to the following two conditions: (1) This device may not cause harmful interference, and (2) this
device must accept any interference received, including interference that may cause undesired operation.
Note: This equipment has been tested and found to comply with the limits for a Class B digital device, pursuant to part 15 of the FCC Rules. These limits are designed to
provide reasonable protection against harmful interference in a residential installation. This equipment generates, uses and can radiate radio frequency energy and, if not
installed and used in accordance with the instructions, may cause harmful interference to radio communications. However, there is no guarantee that interference will not
occur in a particular installation. If this equipment does cause harmful interference to radio or television reception, which can be determined by turning the equipment off
and on, the user is encouraged to try to correct the interference by one or more of the following measures:
Reorient or relocate the receiving antenna.
Increase the separation between the equipment and receiver.
Connect the equipment into an outlet on a circuit different from that to which the receiver is connected.
Consult the dealer or an experienced radio/TV technician for help.
Warning: Changes or modifications made to this device not expressly approved by Kichler Lighting LLC may void the FCC authorization to operate this device.
Note: The manufacturer is not responsible for any radio or TV interference caused by unauthorized modifications to this equipment. Such modifications could void the
user’s authority to operate the equipment.
RF exposure statement:
The transmitter must not be colocated or operated in conjunction with any other antenna or transmitter. This equipment complies with the FCC RF radiation exposure
limits set forth for an uncontrolled environment. This equipment should be installed and operated with a Minimum distance of 20cm between the radiator and any part
of your body.
/