Kenmore 72162622200 El manual del propietario
- Categoría
- Microondas
- Tipo
- El manual del propietario
Este manual también es adecuado para

®
Microwave Hood Combination
Use & Care Guide
Combinaci6n Microondas Campana
Guia de uso y cu
Models/Modelos 721.62622
721.62624
721.62629
qgq
"ml q
q_
P
J
3828W5A2620 Sears, Roebuck and Co., Hoffman Estates, |L 66179 www.sears.com

Table of
Contents
Warranty ........................................................... 2
Sears Service .................................................. 3
Microwave Oven Safety .................................. 4
Getting to Know Your
Microwave Oven .............................................. 7
How your microwave oven works ................... 7
Radio interference .......................................... 7
For the best cooking results ........................... 7
Testing your microwave oven ......................... 7
Testing your dinnerware or cookware ............ 8
Operating safety precautions .......................... 8
Electrical connection ...................................... 8
Microwave oven features ............................... 9
Control panel features ................................... 10
Using Your Microwave Oven ....................... 12
Audible Signals ............................................. 12
Interrupting Cooking ...................................... 12
Clock ............................................................. 12
Child Lock ..................................................... 12
Kitchen Timer ................................................ 13
Exhaust Fan .................................................. 13
Cooktop Light ................................................ 13
Turntable On/Off ........................................... 13
Express Defrost ............................................ 13
Add Minute .................................................... 14
Timed Cooking .............................................. 14
Multi-stage Cooking ...................................... 14
Microwave Power Levels .............................. 15
Auto Defrost .................................................. 16
Auto defrost table .......................................... 17
Auto defrost table (Cont.) .............................. 18
Defrosting tips .............................................. 19
Hold Warm .................................................... 19
Using Quick Touch ........................................ 20
Auto Cook ..................................................... 21
Cooking guide for Auto Cook ........................ 21
Auto Reheat .................................................. 22
Cooking guide for Auto Reheat ..................... 22
Caring for Your Microwave Oven ................. 23
Caring for the filters ................................ 24-25
Replacing the cooktop and oven lights ...25-26
Microwave Cooking Tips ......................... 27-28
Questions and Answers ................................ 29
Troubleshooting ....................................... 30-31
Service ............................................. Back cover
2
Microwave Hood
Combination
Warranty
FULL ONE-YEAR WARRANTY ON
MICROWAVE HOOD COMBINATION
For one year from the date of purchase,if this
Kenmore Microwave Hood Combination fails due to
a defect in material or workmanship,Sears will
repair itfree of charge.
FULL FIVE-YEAR WARRANTY ON THE
MAGNETRON
For fiveyears from the date ofpurchase, if the
magnetron in this Kenmore Microwave Hood
Combination fails due to a defect in material or
workmanship, Sears will repair itfree of charge.
The above warranty coverage applies only to
Microwave Hood Combinations which are used for
private household purposes.
WARRANTY SERVICE IS AVAILABLE BY
SIMPLY CONTACTING SEARS SERVICE AT
1-800-4-MY-HOME _
This warranty applies only while this product is in
use in the United States.
This warranty gives you specific legal rights, and
you may also have other rights which vary from
state to state.
Sears, Roebuck and Co.,
Dept. 817WA,
Hoffman Estates, IL 60179
For service call:
1-800-4-MY-HOME _
(1-800-469-4663)
Please record your model's information.
Whenever you call to request service for your
appliance, you need to know your complete model
number and serial number. You can find this
informationon the model and serial number
label/plate at the upper side of cavity front inyour
Microwave oven. Also, record the other information
shown below.
Model Number
Serial Number
Purchase Date

Sears Service
Master Protection Agreements
Congratulations on making a smart purchase.
Your new Kenmore ®product is designed and manufactured for years of dependable operation.
But like all products, it may require preventive maintenance or repair from time to time.
That's when having a Master Protection Agreement can save you money and aggravation.
Purchase a Master Protection Agreement now and protect yourself from unexpected hassle
and expense.
The Master Protection Agreement also helps extend the life of your new product. Here's
what's included in the Agreement:
Expert service by our 12,000 professional repair specialists
Unlimited service and no charge for parts and labor on all covered repairs
"No-lemon" guarantee - replacement of your covered product if four or more product failures
occur within twelve months
Product replacement if your covered product can't be fixed
Annual Preventive Maintenance Check at your request - no extra charge
Fast help by phone - phone support from a Sears technician on products requiring in-home
repair, plus convenient repair scheduling
Power surge protection against electrical damage due to power fluctuations
Rental reimbursement if repair of your covered product takes longer than promised
Once you purchase the Agreement, a simple phone call is all that it takes for you to schedule service.
You can call anytime day or night, or schedule a service appointment online.
Sears has over 12,000 professional repair specialists, who have access to over 4.5 million quality
parts and accessories. That's the kind of professionalism you can count on to help prolong the life of
your new purchase for years to come. Purchase your Master Protection Agreement todayY
Some limitations and exclusions apply. For prices and additional information call 1-800-827-
6655.
Sears Installation Service
For Sears professiona/insta//ation of home appliances, garage door openers, water heaters, and
other major home items, in the U.S.A. call
1-800-4-MY-HOME _

Microwave Oven Safety
Your safety and the safety of others are very important.
We have provided many important safety messages in this manual and on your appliance.
Always read and obey all safety messages.
This isthe safety alert symbol.
This symbol alerts you to hazards that can kill or hurt you and others.
All safety messages will be preceded by the safety alert symbol and the word
"DANGER" or "WARNING." These words mean:
You will be killed or seriously injured
if you don't follow immediately instructions.
You can be killed or seriously injured
if you don't follow instructions.
All safety messages will identify the hazard, tell you how to reduce the chance of injury, and tell
you what can happen if the instructions are not followed.
IMPORTANT SAFETY INSTRUCTIONS
When using electrical appliances basic safety precautions should be followed, including the
following:
WARNING: To reduce the risk of burns,
electric shock, fire, injuryto persons, or
exposure to excessive microwave energy:
• Read all instructions before using the
microwave oven.
• Read and follow the specific
"PRECAUTIONS TO AVOID POSSIBLE
EXPOSURE TO EXCESSIVE MICROWAVE
ENERGY" found in this section.
• The microwave oven must be grounded.
Connect only to properly grounded outlet.
See "GROUNDING INSTRUCTIONS" found
at the end of this section.
• Install or locate the microwave oven only in
accordance with the provided installation
instructions.
• Some products such as whole eggs in the
shell and sealed containers - for example,
closed glass jars - are able to explode and
should not be heated in the microwave oven.
• Use the microwave oven only for its intended
use as described in this manual. Do not use
corrosive chemicals or vapors in the
microwave oven. This type of oven is
specifically designed to heat, cook, or dry
food. It is not designed for industrial or
laboratory use.
• As with any appliance, close supervision is
necessary when used by children.
• Do not operate the microwave oven if it has
a damaged cord or plug, if it is not working
properly, or if it has been damaged or
dropped.
SAVE THESE INSTRUCTIONS
4

IMPORTANT SAFETY INSTRUCTIONS
• Themicrowaveovenshouldbeservicedonlyby
qualifiedservicepersonnel.Callanauthorized
servicecompanyfor examination,repair,or
adjustment.
• Seedeersurfacecleaninginstructionsinthe "Caring
forYour MicrowaveOven"sectbn.
• Toreducetheriskoffirein theovencavity:
- Donotoverceokfood.Carefullyattendthe
microwaveovenwhenpaper,plastic,or other
combustiblematerialsare placedinsidetheovento
facilitatecooking.
- Removewiretwist-tiesfrom paperorplasticbags
beforeplacingbagsin oven.
- If materialsinsidetheoven ignite,keepovendeer
closed,turnovenoff,and disconnectthe power
cord,or shutoff poweratthefuse orcircuitbreaker
panel.
- Donotusethecavityforstoragepurposes.Donot
leavepaperproducts,cookingutensils,orfeed in
thecavitywhennotin use.
• Suitablefor useabovebothgasand electriccooking
equipment.
• Intendedtobe usedaboverangeswith maximum
widthof 36 inches(91 cm).
• CleanVentilatingHoodsFrequently-Greaseshould
notbeallowedtoaccumulateon hoodor filter.
• Whenflamingfoodsunderthehood,tum thefanon.
• Usecarewhencleaningthevent-hoedfilter.
Corrosivecleaningagents,suchaslye-basedoven
cleaners,may damagethefilter.
• Oversizedfoodsoroversizedmetal utensilsshould
notbeinsertedinthe microwaveovenasthey may
createa fireor riskofelectricshock.
• Donotcleanwith metalscouringpads.Piecescan
burnoffthe padandtouchelectricalpartsinvolvinga
riskofelectricshock.
•Donotstoreanythingdirectlyon topofthe
microwaveovenwhenthemicrowaveovenisin
operation.
•Donotcoverorblockanyopeningsonthe
microwaveoven.
•Donotstorethis microwaveovenoutdoors.Donot
usethe microwaveoven nearwater- for example,
neara kitchensink,in a wet basement,neara
swimmingpool,or similarlocation.
•Donotimmersecordor plug inwater.
•Keepcordawayfrom heatedsurfaces.
•Donotletcordhangoveredge oftableorcounter.
•Donotmountoverasink.
•Donotcoverracksor anyotherpartoftheovenwith
metalfoil.Thiswillcauseoverheatingoftheoven.
•Liquids such as water, coffee, or tea are able to
be overheated beyondthe boiling point without
appearing to be boiling due to surfacetension of
the liquid.Visible bubbling or boiling when the
container is removed from the microwave oven is
notalways present. This could result in very hot
liquids suddenly boiling over when aspoon or
other utensil is inserted intothe liquid.To reduce
the risk of injury to persons;
1) Do not overheat the liquid.
2) Stir the liquid both beforeand halfway through
heating it.
3) Do not use straight-sided containers with
narrow necks.
4) After heating, allow the container to stand in the
microwave oven for a short time before
removing the container.
5) Use extreme care when inserting a spoon or
other utensil intothe container.
SAVE THESE INSTRUCTIONS

PRECAUTIONS TO AVOID POSSIBLE
EXPOSURE TO EXCESSIVE MICROWAVE
ENERGY
(a) Do not attempt to operate this oven with the
door open since open-door operation can
result in harmful exposure to microwave
energy. It is important not to defeat or tamper
with the safety interlocks.
(b) Do not place any object between the oven
front face and the door or allow soil or cleaner
residue to accumulate on sealing surfaces.
(c) Do not operate the oven if itisdamaged. It is
particularly important that the oven door close
properly and that there is no damage to the:
(1) Door (bent),
(2) Hinges and latches (broken or loosened),
(3) Door seals and sealing surfaces.
(d) The oven should not be adjusted or repaired
by anyone except properly qualified service
personnel.
Electrical
requirements
Observe alt governing codes and
ordinances. A 120 Volt, 60 Hz, AC only,
15 or 20 amp fused electrical supply is
required. (A time-delay fuse is recommended.)
It is recommended that a separate circuit
serving only this appliance be provided.
Electrical Shock Hazard
Plug into a grounded 3 prong
outlet. Do not remove ground
prong. Do not use an adapter.
Do not use an extension cord.
Failure to follow these
instructions can result in death,
fire, or electrical shock.
GROUNDING INSTRUCTIONS
• For all cord connected appliances:
The microwave oven must be grounded.
In the event of an electrical short circuit,
grounding reduces the risk of electric
shock by providing an escape wire for the
electric current. The microwave oven is
equipped with a cord having a grounding
wire with a grounding plug. The plug must
be plugged intoan outlet that is properly
installed and grounded.
WARNING: Improper use of the
grounding can result in a risk of electric
shock.
Consult a qualified electrician or
serviceman if the grounding instructions
are not completely understood, or if doubt
exists as to whether the microwave oven
is properly grounded.
Do not use an extension cord. If the power
supply cord is too short, have a qualified
electrician or serviceman install an outlet
near the microwave oven.
• For a permanently connected appliance:
The microwave oven must be connected
to a grounded, metallic, permanent wiring
system, or an equipment grounding
conductor should be run with the circuit
conductors and connected to the
equipment grounding terminal or lead on
the microwave oven.
SAVE THESE INSTRUCTIONS
6

Getting to Know Your
Microwave Oven
This section discusses the concepts behind microwave cooking. It also shows you the
basics you need to know to operate your microwave oven. Please read this information before you
use your oven.
How your microwave oven works
Microwave ovens are safe. Microwaveenergy isnot hot. It
causes food to makeits own heat, and it's this heatthat cooks
the food.
Microwavesare like TV waves, radio waves, or light waves. You
cannot see them, but you can see what they do.
A magnetron inthe microwave oven produces microwaves. The
microwaves move intothe oven where they contact food as it
turns on the turntable.
The glass turntable of your microwave oven lets microwaves
pass through. Then they bounce off a metal floor, back through
the glass turntable, and are absorbed by the food.
Microwaves pass through mostglass, paper,andplastics
Magqetron
/
i
u
Oven cavity
Metal floor Glass turntable
without heatingthem so food absorbs the energy. Microwavesbounce off metal containers so food does not
absorb the energy.
Radio interference
Using your microwave oven may cause interferenceto your radio,TV, or similar equipment. When there is
interference, you can reduce it or remove it by:
• Cleaning the door and sealing surfaces of the oven.
• Adjusting the receiving antenna ofthe radio or television.
• Movingthe receiver away from the microwave oven.
• Pluggingthe microwave oven into adifferent outlet sothat the microwave ovenand receiver are on
different branch circuits.
For the best cooking results
• Always cook food for the shortest cooking time recommended. Check to see how the food is cooking. If
needed, touch Add Minutewhile the oven is operating or after the cooking cycle is over (see the "Using
add minute" section).
• Stir, turn over, or rearrange the food beingcooked about halfwaythrough the cooking time for all recipes.
This will help make surethe food is evenly cooked.
• If you do not have a cover for a dish, use wax paper,or microwave-approved paper towels or plastic
wrap. Rememberto turn backa cornerof the plasticwrap to vent steam during cooking.
Testing your microwave oven
I o test the oven putabout 1 cup of cold water in a glass container in the oven. Close the door. Make sure it
latches. Cook at 100% power for 1 minute.When the time is up, the water should be heated.
I

Testing your dinnerware or cookware
Test dinnerware or cookwara before using.To test a dishfor safe use, putit into the ovenwithacup of
water beside it.Cook at 100% cook powerfor one minute. If the dish gets hot, do not use it.
Some dishes (melamine, some ceramic dinnerware, etc.)absorb microwave energy, becoming too hot to
handle and slowing cooking times. Cooking in metal containersnot designed for microwave use could damage
the oven, as could containerswith hidden metal (twist-ties,foil lining,staples, metallicglaze or trim).
Operating safety precautions
• Never lean on the door or allow a child to swing on itwhen the door is open.
• Use hot pads. Microwave energy does not heat containers, butthe heat from the food can make the
container hot.
• Do not use newspaperor other printed paper in the oven.
• Do notdry flowers,fruit, herbs, wood, paper, gourds, or clothes inthe oven.
• Do not start a microwave oven when it isempty. Product lifemay be shortened. If you practice programming
the oven, put a container of water inthe oven. It isnormalfor the oven door to look wavy after the oven has
been running for a while.
• Do not try to melt paraffinwax in the oven. Paraffinwax will notmelt ina microwave oven because it allows
microwavesto passthrough it.
• Do not operate the microwaveoven unlessthe glass turntable issecurely in placeand can rotatefreely. The
turntable can rotate in eitherdirection. Make sure theturntable is correct-side up inthe oven. Handle your
turntable with carewhen removing itfrom the ovento avoid possibly breakingit. If yourturntable cracks or
breaks,contact your dealer for a replacement.
•When you use a browning dish, the browningdish bottom must be at least 3/16 inchabove the turntable.
Follow the directionssupplied with the browning dish.
• Never cook or reheat a whole egg inside the shell. Steam buildup inwhole eggs may cause them to burst,
and possibly damage the oven. Slice hard-boiled eggs before heating. In rare cases, poached eggs have
been known toexplode. Cover poachedeggs and allow astanding time ofone minute before cutting into
them.
• For best results, stir any liquid several times during heating or reheating. Liquids heatedin certain
containers (especially containersshaped like cylinders)may become overheated. The liquid may splash out
with a loud noiseduring or after heatingor when adding ingredients(coffee granules, tea bags, etc.). This can
harmthe oven.
• Microwaves may not reachthe center of a roast.The heat spreads to the center from the outer, cooked
areas just as inregularoven cooking.This isone ofthe reasons for lettingsome foods (for example, roastsor
baked potatoes)stand for a while after cooking,or for stirring some foods during the cooking time.
• Do not deep fry in the oven. Microwavable utensilsare not suitable and itisdifficult to maintain appropriate
deep-frying temperatures.
• Do not overcook potatoes. At the end of the recommended cookingtime, potatoes should be slightlyfirm
because they will continue cooking during standing time. After microwaving, let potatoes standfor 5
minutes.They will finish cooking while standing.
Electrical connection
If your electric power line or outletvoltage isless than 110 volts,cookingtimesmay be longer. Have a
qualified electrician check your electrical system.
8

Microwave oven features
(#
®® o
®
m
®® ® ® ®
Your microwave oven is designed to make your
cooking experience as enjoyable and productive
as possible. To get you up and running quickly, the
following isa list of the oven's basic features:
1. Metal Shielded Window The shield prevents
microwaves from escaping. It isdesigned as a
screen to allow you to view food as itcooks.
2. Model and Serial Number Plate & Cooking
Guide Label
3. Charcoal Filter (behind Vent Grille)
4. Vent Grille
5. Turntable. The turntable turns food as itcooks
for more even cooking. It must be in the oven
during operation for best cooking results.
6. Cooktop Light
7. Grease Filters. See "Caring for the filters"
section.
8. Control Panel. Touch the pads on this panel to
perform all functions.
9. Cooking Rack. Use for extra space when
cooking in more than one container at the same
time.
3
1.Turntable
2. Hub
3. Support
4. Shaft
The turntable rotates in both directions to help cook food more evenly. Do not operate the microwave oven
without the turntable in place.
To Install:
1. Place the support on the oven cavity bottom.
2. Place the turntable on the support.
Fit the raised, curved lines in the center of the turntable bottom between the three spokes of the hub.
The rollers on the support should fit inside the turntable bottom ridge.

Control panel features
Your microwave oven control panel lets you select the desired cooking function quickly and easily.
All you have to do is touch the necessary Command Pad. The following is a list of all the Command
and Number Pads located on the control panel. For more information on these features, see
"Using your microwave oven" section.
®
@
@
@
@
@
@
@
i :2 3
{41: 5 _ii_6111
8 $
O
I
®
@
@
@
@
@
1. Display. The display includesa clock and
indicators to tell you time of day, cooking time
settings, cook powers, quantities, weights and
cooking functions selected.
2. Hold Warm. Touch this pad to keep hot, cooked
foods safely warm in your oven for up to 99
minutes, 99 seconds. Hold Warm can be used
by itself, or it can automatically follow a cooking
cycle.
10

3.Popcorn.Touchthispadtopopone of 3 bag
sizes of popcorn without entering a cook time or
power.
4. Pizza. Touch this pad to reheat one or several
slices of pizza without entering a cook time or
power.
5. Frozen Entree. Touch this pad to cook a 10 - to
20 - ounce (284 to 567 g) frozen entree without
entering a cook time or power.
6. Potato. Touch this pad to cook up to 4 potatoes
without entering a cook time or power.
7. Beverage. Touch this pad to heat up to 2 cups
(250 ml) of beverage without entering a cook
time or power.
8.Auto Cook. Touch this pad to cook
microwavable foods without entering a cook
time or power.
9. Auto Reheat. Touch this pad to reheat
microwavable foods without entering a cook
time or power.
10. Clock. Touch this pad to enter the correct time
of day.
11. Auto Defrost. Touch this pad followed by
number pads to thaw frozen meat by weight.
12. Express Defrost. Touch this pad to express
defrost. "GROUND BEEF 1.0 LBS TOUCH
START" will appear in the display.
13. Kitchen Timer. Touch this pad to set the
kitchen timer.
14. Number Pads. Touch number pads to enter
cooking times, cook powers, quantities,
weights, or food categories.
15. Cook Time. Touch this pad followed by
number pads to set a cooking time.
16. Power. Touch this pad after the cook time has
been set, followed by a Number Pad to set the
amount of microwave energy released to cook
the food. The higher the number, the higher the
microwave power or "cooking speed."
17. Add minute. Touch this pad to cook for
1 minute at 100% cook power, orto add extra
minutes at the set cook power to your cooking
cycle.
18. START. Touch this pad to start afunction.
If you open the door after the oven begins to
cook, retouch START.
19. STOPIClear. Touch this pad to erase an
incorrect command, cancel a program during
cooking, or to clear the Display.
20. Turntable On/Off. Touch this pad to turn off
the turntable. "OFF" will appear inthe display.
21. Fan (_). Touch this pad to tum the fan on or
off.
22. Light (_,). Touch this pad to turn the light on
high, night or off.
NOTE: If you try to enter incorrectinstructions,
you will not hear any tones. Touch STOP/Clear
and re-enter the instructions.
11

Using Your Microwave
Oven
This section gives you instructions for operating
each function. Please read these instructions
carefully.
AUDIBLE SIGNALS
Audible signals are available to guide you when
setting and using your oven:
•A programming tone will sound each time
you touch a pad.
• Seven tones signalthe end ofa KitchenTimer
countdown.
• Four tones signal the end of a cooking cycle.
CLOCK
When your microwave oven isfirst plugged inor
after a powerfailure, the Displaywillshow "ENTER
TIME OF DAY",If a time of dayisnot set,":" will
show on the Display untilyou touch "Clock",
Example: To set the clock for 10:30(AM).
Touch:
Display Shows:
i.
2_
EflTEETitleOFDRY
113 • 13 T_II IF T T
3. 1 0 3 0 ,u._qD,uuLHS,FIR,
4. ,u •90
NOTES:
• Ifyou enter in an incorrect time andtouch "Clock",
you cannot set time of day. Enter the correct time.
• If you touch STOP/Clear while setting the clock, the
Display will show the last time of day set or ":"
if no time of day has been set.
INTERRUPTING COOKING
You can stop the oven during a cycle by opening
the door. The oven stops heating and the fan
stops, but the light stays on.
To restart cooking, close the door and Touch
START.
If you do not want to continue cooking,
open the door and touch STOP/Clear.
CHILD LOCK
Use this safety feature to lock the control panel
whenyou are cleaning the oven, or so that children
cannot use the oven unsupervised.
To set CHILD LOCK:
Touch: Display Shows:
1,
Time ofday.
Touch and hold until
LOCKED appears in
the display.
(approximately
4 seconds)
To cancel CHILD LOCK:
Touch: Display Shows:
Time ofday.
Touch and hold until
LOCKED disappears
in the display.
(approximately
4 seconds)
12

KITCHEN TIMER
Your microwave oven can be used as a kitchen
timer. You can set up to 99 minutes, 99 seconds.
Example: To set 3 minutes.
Touch: Display Shows:
EfiTERTI_EM _lhl
1.
_"IDSEE
2. 3 0 0
• I"tl"t Tt_l IF T T
,
o UU
Time counting down.
EXHAUST FAN
The pad on the bottom center of the control panel
controls the 2-speed exhaust fan.
Example: To set the exhaust fan speed
Touch:
,
Once for HIGH
Twice for Low
,
Hi_hflL_w/O_
Turn off fan when desired
Display Shows:
/-#SH
OFF
NOTE: if the temperature from the range or cooktop
below the oven gets too hot, the exhaust fan in the
vent hood will automatically turn on at the HIGH
setting to protect the oven.
It may stay on up to an hour to cool the oven.
When this occurs, the FAN pad will not turn the fan
off. You cannot turn the exhaust fan off during
microwave cooking.
COOKTOP LIGHT
The pad on the bottom right of the control panel
controls the cooktop light.
Example: To set the Lamp for HIGH.
Touch:
1.
Display Shows:
HISH
once for HIGH light
twice for NIGHT light
OFF
2.
To turn off, touch pad one
or two times depending on
light setting.
TURNTABLE ON/OFF
For best cooking results, leave the tumtable on.
Itcan be turned off for large dishes.
Touch: Display Shows:
OFF
1.
2, _!® u,n',
Press Turntable On/Off to turn the turntable
on or off,
NOTE: Sometimes the turntable can become hot
to touch. Be careful touching the turntable during
and after cooking.
Do not run the oven empty without food in it.
EXPRESS DEFROST
One express defrost sequence is preset in the oven,
The Express Defrost feature provides you with the quick
defrosting method for 1.0 pound "GROUND BEEF"
only.
Example: To defrost lib of Ground beef
Touch:
Display Shows:
5ROUM#BEEFI.OLBE
1, TOUEH5TRRT
Time counting down.
13

ADD MINUTE
A time-saving pad, this simplifiedcontrol lets
youquickly set and startmicrowave cooking at
100% power without the need to touch START.
Example: To cook for 2 minutes.
Touch: Display Shows:
,
fiFEOFDRY
2. Twice Time counting
down and COOK.
NOTE: Eachtime touch ADD MINUTE, it willadd 1
minute up to 99 min 59 seconds.
TIMED COOKING
This feature lets you program a specific cook time
and power. For best results, there are 10 power
level settings in addition to HIGH (100%) power.
Refer to the "Microwave Power Levels Table" on
page 15 for more information.
NOTE: If you do not select a power level, the oven
will automatically cook at HIGH (100%) power.
Example: To cook for 5 minutes, 30 seconds
at 80% power.
Touch:
Display Shows:
,
I_IT rrlrl $1_lr Tim
Tnl IF T T
5:98 ,_H S,RE,
2. u'EnPOwEEn',
EhlTEEPUngEE
3,
I II I I IU IULEVEL, _"_,n
4. 8 P-Bun
Tnl IF T T
,uuLH5,RE,
Time counting down
and COOK.
MULTI-STAGE COOKING
For best result_ some recipes call for different cook
powers during different stages of a cook cycle. You
can program your oven to switch from one power
level to another for up to 2 stages.
Example: To set a 2-stage cook cycle.
Touch:
Display Shows:
,
I_IT rrlrl $1_lr Tim
2. 3 0 0
to set a 3 minute cook
time for first stage.
Tnl IF T T
9"._nn,uuLH5,RE,
n nl I
UEPO_EE
6",'TEEPungEE
3.
I If I I Tnln
LEVEL, ,_ ,_
P-Bun
4. 8
Tnl IF
,uuLH 5TRET
to set an 80% cook
power for the first stage.
kiT rnn IklE TIIfl
Tnl IF T T
6. 7 7 .'uunn,uuLH 5,RE,
n nt I
to set a 7 minute cook u_ P_w_',_
time for second stage.
Eh'TEEPun2EE
I II I I Tnln
LEVEL, ,_ ,_
P-Sun
& 5 ,n,.-
,uuLH 5TRET
to set a 50% cook power
for the second stage.
Time counting down
9. and COOK.
10. When the first stage is over, you will hear two
short tones as the oven begins the second
cook stage.
14

MICROWAVE POWER LEVELS
Forbest results,some recipes cell fordifferent cook
powers. The lower the cook power,the slower the
cooking. Each number from I to9 standsfor a
different percentage offull cook power.
The following chart gives the percentageofcook
power each number pad standsfor, and the cook
power name usuallyused.
It alsotells you when to useeach cook power. Follow
recipeor food package instructionsif available.
NOTE: Refertoa reliable cookbookfor cooking times
basedon the 1000Watt cook powerofyour microwave
oven,
COOK Power NAME WHEN TO USE IT
100% offull power High • Quick heatingmany conveniencefoods and
foods with highwater content, such as soups and
beverages.
•Cooking tender cuts of meat, ground meat,
9 =90% of fullpower • Heatingcream soups
8 =80% of fullpower • Heating rice,pasta, or casseroles
7 =70% of fullpower Medium-High • Cooking and heatingfoods that need a
Cook Power lowerthan high (for example,
wholefish and meat loaf)or when food is
cooking too fast
• Reheatinga single serving offood
6 =60% of fullpower •Cooking requiring specialcare, such as cheese
and egg dishes, pudding,and custards
• Finishingcooking casseroles
5 =50% of fullpower Medium •Cooking ham, whole poultry,and pot roasts
•Simmering stews
4 =40% of fullpower • Meltingchocolate
• Heating pastries
3 =30% of fullpower Medium-Low, • Manuallydefrosting foods,such as bread,fish,
Defrost meats, poultry, and precooked foods
2 =20% of fullpower •Softening butter,cheese, and ice cream
1 = 10% of fullpower Low • Keepingfood warm
•Taking chill out offruit
NOTE: Once cook time has been entered, you can also usethe Cook Power pad asa second Kitchen
Timer by entering"0"for the Cook Power. The oven willcount down the cooking time you set without
cooking.
15

AUTO DEFROST
Three defrost se( uences are preset in the oven.
The auto defrost feature provides you with the best
defrosting method for frozen foods. The cooking guide
will show you which defrost sequence is recommended
for the food you are defrosting.
For added convenience, the Auto Defrost
includes a built-in beep mechanism that reminds
you to check, turn over, separate, or rearrange to get
best defrost results. Three different defrosting levels
are provided.
1 MEAT
2 POULTRY
3 FISH
*Available weight is 0.1-6.0 Ibs.
Example: To defrost 1.2 Ibs of ground beef.
Touch: Display Shows:
f/ERT TOUEHI
1, PDULTRYTOUEH2
FISHTOUEH3
2, 1 EtITER_IEIGHT
3. i and 2
to enter the weight
/2L85
TOUEH5TRRT
4. Time counting down.
NOTE:
When you touch the START pad, the display changes
to defrost time count down. The oven will beep during
the DEFROST cycle. At this time, open the door and
turn, separate, or rearrange the food.
Remove any portions that have thawed.
Return frozen portions to the oven and touch
START to resume the defrost cycle.
OPERATING TIPS
• For best results, remove fish, shellfish, meat, and
poultry from its original closed paper or plastic
package (wrapper). Otherwise, the wrap will hold
steam and juice close to the foods, which can cause
the outer surface of the foods to cook.
• For best results, shape your ground meat into the
form of a doughnut before freezing. When
defrosting, scrape off thawed meat when the beep
sounds and continue defrosting.
• Place foods in a shallow container or on a
microwave roasting rack to catch drippings.
This table shows you food type selections and the
weights you can set for each type. For best
results, loosen or remove covering on food.
FOOD TOUCH WEIGHTS YOU
Auto Defrost CANSET
(tenths of a pound)
Meat 1 .1to 6.0 (45g to 2722g)
Poultry 2 .1to 6.0 (45g to 2722g)
Fish 3 .1to 6.0 (45g to 2722g)
Weight conversion table
You are probablyused to foodweights as being in
poundsand ounces that are fractions ofa pound (for
example, 4 ounces equals 1/4pound). However, in
order to enter food weight in Auto Defrost,you must
specify pounds and tenths of a pound.
If theweight on the food packageis infractions of a
pound,you can use the following tableto convert the
weight to decimals.
Equivalent Weight
OUNCES
1.6
3.2
4.0
4.8
6.4
8.0
9.6
11.2
12.0
12.8
14.4
16.0
DECIMAL WEIGHT
.10
.20
.25 One-Quarter Pound
.30
.40
.50 One-Half Pound
.60
.70
.75 Three-Quarters Pound
.80
.90
1.00 One Pound
16

AUTO DEFROST TABLE
Meat setting
FOOD SETTING AT BEEP
BEEF
Ground Beef,
Bulk
Ground Beef,
Patties
Round S_ak
Tendedoin
S_ak
Stew Beef
Pot Roast,
Chuck Roam
Rib Roast
Roiled Rump
Roast
LAMB
Cubes for
Stew
Chops
(1 inch thick)
PORK
Chops
(1_inchthick)
Hot Dogs
Spareribs
Country-style
Ribs
Sausage,
Links
Sausage,
Bulk
Loin Roast,
Boneless
MEAT
MEAT
MEAT
MEAT
MEAT
MEAT
MEAT
MEAT
MEAT
MEAT
MEAT
MEAT
MEAT
MEAT
MEAT
MEAT
Removethawedportionswithfork.
Turnover. Returnremaindertooven.
Separateand rearrange.
Turnover. Cover warm areaswith
aluminum foil.
Turnover. Cover warm areaswith
aluminum foil.
Remove thawed portionswith fork.
Separate remainder.
Return remainder to oven.
Turnover. Cover warm areaswith
aluminum foil.
Turnover. Cover warm areaswith
aluminum foil.
Turnover. Cover warm areaswith
aluminum foil.
Remove thawed portionswith fork.
Return remainder to oven.
Separateand rearrange.
Separateand rearrange.
Separateand rearrange.
Turnover, Cover warm areaswith
aluminum foil.
Separateand rearrange.
Removethawedportionswithfork.
Turnover. Returnremaindertooven.
Turnover, Cover warm areaswith
aluminum foil.
SPECIAL INSTRUCTIONS
Meatof irregularshapeand large,fatty cuts
of meat shouldhavethe narrowor fatty areas
shieldedwith foilat thebeginningof a defrost
sequence.
Donot defrost less than 1/4lb.
Freeze in doughnut shape.
Donot defrost less than 2 oz. patties.
Depresscenter when freezing.
Placeon a microwavable roasting rack.
Placeon a microwavable roasting rack.
Placein a microwavable baking dish.
Placeon a microwavable roasting rack.
Placeon a microwavable roasting rack.
Placeon a microwavable roasting rack.
Placein a microwavable baking dish.
Placeon a microwavable roasting rack.
Placeon a microwavable roasting rack.
Placeon a microwavable roasting rack.
Placeon a microwavable roasting rack.
Placeon a microwavable roasting rack.
Placein a microwavable baking dish.
Placeon a microwavable roasting rack.
17

AUTO DEFROST TABLE (CONT.)
Poultry setting
FOOD AT BEEP SPECIAL INSTRUCTIONS
CHICKEN
Whole
(up to 6 Ibs)
Cutup
SETTING
POULTRY
Turn over (finish defrosting breast-
side down). Cover warn areas with
aluminum foil,
Separate pieces and rearrange,
Turn over. Cover warn areas with
aluminum foil,
Placechicken breast-side up on a
microwavable roast rack. Finish defrostingby
immersing in cold water. Remove giblets
when chicken is partially defrosted.
Placeon a microwavable roasting rack,
Finishdefrosting by immersing incoldwater,
CORNISH
HENS
Whole POULTRY Turnover. Cover warn areas with Placeon a microwavable roasting rack,
aluminum foil, Finishdefrosting by immersing incoldwater,
TURKEY
Breast POULTRY Turnover Cover warn areas with Placeon a microwavable roasting rack,
(up to 6 Ibs) aluminum foil, Finishdefrosting by immersing incoldwater,
Fish setting
FOOD SETTING SPECIAL INSTRUCTIONS
FISH
Fillets FISH
Steaks
Whole
SHELLFISH
Crabmeat
Lobster tails
Shrimp
Scallops
FISH
AT BEEP
Turn over. Separate fillets when
partially thawed if possible.
Separate and rearrange.
FISH Turn over.
FISH
FISH
FISH
FISH
Break apart. Turn over.
Turn over and rearrange.
Separate and rearrange.
Separate and rearrange.
Place in a microwavabte baking dish.
Carefully separate fillets under cold
water.
Place in a microwavable baking dish.
Run cold water over to finish defrosting.
Place in a microwavable baking dish.
Cover head and tail with foil; do not let
foil touch sides of microwave. Finish
defrosting by immersing in cold water.
Place in a microwavable baking dish.
Place in a microwavable baking dish.
Place in a microwavable baking dish.
Place in a microwavable baking dish.
18

DEFROSTING TIPS
- When using Auto Defrost,the weight ta be entered
is the netweight in pounds and tenths of pounds
(the weight of the food minus the container).
- Before starting, make sure you have removed any
of the metal twist-tieswhich often come with frozen
food bags, and replacethem w_thstrings or elastic
bands.
- Open containers such as cartons beforethey are
placed in the oven.
- Always slit or pierce plasticpouches or packaging.
- If food is foil wrapped, removefoil and place itin a
suitable container.
- Slit the skins, if any, of frozen food such as
sausage.
- Bend plasticpouches of fcod to ensure even
defrosting.
*Always underestimate defrostingtime. If defrosted
food is still icy inthecenter,return ittothe
microwave ovenfor moredefrosting,
•The length ofdefrosting time varies according to
howsolidly the food is frozen.
•The shape ofthe package affectshow quicklyfood
will defrost. Shallow packageswill defrost more
quicklythan a deep block.
•As food begins to defrost, separate the pieces.
Separated piecesdefrost moreeasily.
• Use small pieces ofaluminum foil to shieldparts
effood such as chicken wings, leg tips,fish tails,or
areasthat start ta getwarm. Make sure thefoil does
no[touch thesides, top, or bo[tomof the oven. The
foil can damage the oven lining.
• For better results, letfood stand after defrosting.
(For more informationon standing time, seethe
=MicrowaveCooking Tips" section.)
• Turn over food dudng defrosting or standing time.
Break apartand remove food as required.
HOLD WARM
You can safelykeep hot, cooked foodwarm in your
microwave ovenfor up togg minutes, gg seconds
(about 1 hour,40 minutes).You can use HoldWarm
byitaelf,or to automaticallyfollow a cooking cycle.
Example:To usethe holdwarm,
Touch:
Display Shows:
HOLDWR_R
1. TOUEH5TR,_T
2. WR_R
display
At the end of the hold warm, "END"will be
displayed and four tones will sound
To make Hold Warm
automaticallyfollow another cycle:
*While you are touching in cooking instructions,
touch Hold Warm beforetouching START
, When the lastcooking cycle is over,you willhear
two tones =HoldWarm" will come on whilethe oven
continuesto run.
*You can set HoldWarm to follow Auto Defrost,
Cook, or multi-cycle cccking.
NOTES:
, Hold Warm operates for upto 99 minutes, 99
seconds.
, Opening the oven door cancels HoldWarm. Close
the door and touch HoldWarm, then touch
START if additional HoldWarm time isdesired.
, Food cooked covered should be covered during
Hold Warm.
, Pastry items (pies, turnovers, etc.) shouldbe
uncovered during HoldWarm.
*Complete meals keptwarm on a dinner plateshould
be covered dudng HoldWarm.
, Do not use more than one complete Hold Warm
cycle (about I hour,40 minutes). The quality of
some foods willsuffer w_thextended time.
19

Using Quick Touch
Your oven's menu has been preprogrammedto cook
food automatically. Tellthe ovenwhat youwant.
Then letyou microwave oven cook yourselections.
POPCORN
Popcornlets you pop 1.75, 3.0, and 3.5 ounce
bags of commercially packaged microwave
popcorn.Pop only one package ata time. Ifyou
are usinga microwave popcorn popper,follow
manufacturer's instructions.Toset your microwave
oven correctly,follow this chart:
Example: To pop a 3,0oz, bag,
Touch: Display Shows:
.
L75OZ TOUCHI
3.8OZ TOUCH2
3.5OZ TOUCH3
2. Time countingdownand
COOK,
When the cook time is over, youwill hear four beeps
and END will display.
Beforepopping, remove the rack from theoven
(refer to Page 28).
PIZZA
Pizza lets you reheat up to3 slices pizza.
A slice is based on a 5 ounce slice.
NOTE:
- Place on a low plate & paper towel,
- DO not cover.
Example: To reheat 2 slices of Pizza,
Touch: Display Shows:
.
TOUCH/ TO3 5LICE5
. Time countingdownand
COOK,
When the cock time is over, youwill hear four beeps
and END will display.
2O
FROZEN ENTREE
FrozenEntreeletsyoucook10and20ounceplatesof
commereiallypackagedmicrowavefrozenentree
withoutenteringcookingtimesandpowerlevels.
Removetrayfromoutercarton.
Donotremovefilmcover,butcut ittovent.
Example: To reheat a 20 oz. frozen entree,
Touch: Display Shows:
1. / OOZ TOUEH/
20 OZ TOUCH2
.
Time countingdownand
COOK=
When the cook time isover, you will hear four beeps
and END willdisplay.
POTATO
ThePotatoletsyoucookpotatoeswithpresettimesand
cookpowers.YoucanchoosefromI to4 potatoes.
NOTE:
•Cookingtimesarebasedonanaverage8ouncepotato.
• Beforebaking,piercepotatowithforkseveraltimes.
•Afterbaking,letstandfor5 minutes.
Example: To cook 2 Potatoes,
Touch: Display Shows:
TOUCH/ TO V
4.
POTRTOE5
2. Time countingdownand
COOK,
When the cook time isover, you will hear four beeps
and ENDwill display.
BEVERAGE
Beverage lets you heat up to 2 beverages.
NOTE:
•Reheattimesbasedon an8 ouncecup.
•Beveragemaybeveryhot;removefromovenwith
cere.
Example: To reheat one cup _ Beverage,
Touch: Display Shows:
1. ..................TOUCH/ TO2 EUP5
.
Time countingdownand
COOK,
When the cook time is over, you willhear four beeps
and END will display,

AUTO COOK
Auto Cock provides four preset categories for
cooMng,
Example: To cook 2 cups of Casserole,
Touch: Display Shows:
1. 5ELEETREI'IU/ TO3
--5EE EOOK_55_'DE
.
ERSSEROLE
TOUCHI TOVEUP5
Choose food category.
Category Touch pad
number
Fresh
I
vegetable
Frozen
2
vegetable
Casserole 3
Touch:
3.
Display Shows:
Time counting down and
COOK.
Enterquantity/servings.
Category Number of
cups
Fresh
vegetable 1 * 4 cups
Frozen
vegetable 1 * 4 cups
Casserole 1 * 4 cups
When the cook time isover, you will hear four
beeps and END willdisplay,
COOKING GUIDE FOR AUTO COOK
CODE CATEGORY DIRECTIONS
FRESH
VEGETABLE
FROZEN
VEGETABLE
CASSEROLE
QUANTITY
i cup
2 cups
3 cups
4 cups
i cup
2 cups
3 cups
4 cups
i cup
2 cups
3 cups
4 cups
Place in a microwavable bowl or
casserole.
Add water according to the quantity.
Cover with plastic wrap and vent.
Let stand 3 minutes.
* 1-2 cups: add 2 tbsp water
* 34 cups: add 2 tbsp water
Place in a microwavable bowl or
casserole.
Cover with plastic wrap and vent.
Let stand 3 minutes.
* 1-2 cups: add 2 tbsp water
* 34 cups: add 2 tbsp water
Place in a microwavable bowl or
casserole.
Cover with plastic wrap and vent.
Stir and let stand 3 minutes.
21

AUTO REHEAT
Auto Reheat provides four preset categories for
reheating.
Example: To reheat 2 servings cff Dinner plate,
Touch: Display Shows:
.
5ELEETREHUI TO
--SEE EOOKIH55_'#E
.
.,ERPLR,E
TOUEHI TO2 5ER#_55
Choose food category,
Category Touch pad
number
Dinner plate i
Soupieauca 2
Casserole 3
Roll/Muffin 4
Touch:
3.
Display Shows:
Time counting down and
COOK,
Enter quantity/servings,
Category Number of
cups/Items
Dinner plate i-2 servings
Soup,sauce l*4cups
Casserole 1-4 cups
Roll/Muffin 1-4 pieces
When the cook time isover, you will hear four
beeps and ENDwill display,
COOKING GUIDE FOR AUTO REHEAT
CODE CATEGORY
i DINNER PLATE
SOUP/SAUCE
CASSEROLE
ROLL/MUFFIN
SERVING AMOUNT
i serving (i0 oz)
2 servings (15 oz.)
1 cup
2 cups
3 cups
4 cups
1 cup
2 cups
3 cups
4 cups
I piece (2 oz.)
2 pieces (4 oz.)
3 pieces (6 oz.)
4 pieces (8 oz.)
DIRECTION
Place on a low plate.
Cover with vented plastic wrap
Let stand 3 minutes
Place in shallow microwavable casserole.
Cover with vented plastic wrap
Stir and let stand 3 minutes.
Place in a microwavable bowl or casserole.
Cover with plastic wrap.
Stir and let stand 3 minutes.
Place on paper towel.
Do not cover.
22

Caring for Your Microwave Oven
To make sureyour microwave oven looks good andworks well for a long time,you should
maintain it properly.For propercare, pleasefollow these instructionscarefully.
For interior surfaces: Wash often with warm, sudsy
water and a sponge or
soft cloth,
Useonlymild,
nonabrasive soaps or a
milddetergent, Besure
to keep the areas clean
where the door and
oven frame touch
when closed, Wipe well
with cleancloth.
Over time,stains can occur on the surfaces as the
result offood particlesspatteringduring cooking This
is normal,
For stubborn soil, boil a cup of water in the ovenfor 2
to 3 mioutes. Steam will
sof[en the soil. To get rid
of odors insidethe oven,
boila cup afwater with
some lemonjuice or
vinegar in it.
To clean turntable and turntable support, wash in
mild, sudsy water;for
Glass turntable heavily soiled areas use
a mild cleanser and
scoudng sponge. The
turntable and turntable
support are dishwasher
safe,
For exterior surfaces and
control panel:Use a soft
cloth with spray glass
cleaner, Apply the spray
glass cleanerto the soft
cloth; do notspray
directly on the oven,
NOTE: Abrasive
cleansers, steelwool
pads,gritty wash
cloths, some paper
towels, etc,, can dam-
age the contrcl panel and the intedor and exterior
oven Sul_aces
'support
23

CARING FOR THE FILTERS
The greasefilters should be removed and cleaned often,at least once a month
NOTE: Ifyou microwave hood combination is installedto recirculate air,the chaceal filter
(Part No. 5230WIA002A) availablefrom Sears bycalling 1-8004-MY-HOME _.
The charcoal filter cannot be cleaned and should be replaced every 6 to 12 months.
Grease filters (Part No. 2B72705B): Charcoal filter {Part NO. 5230WIA002A):
1,Unplug microwave oven or disconnect power
2. To remove grease filters,slide eachfilterto the
side. Pullfiltersdownward and pushtothe other
side. The filterwilldrop out.
3. Soak grease filtersin hotwaterand a mild
detergent. Scrub and swish to remove embedded
dirt and grease. Rinsewell and shake to dry. Do
not cleanfilters with ammonia, corrosive cleaning
agents such as lye-based oven cleaners,or place
them in a dishwasher. The filterswill turn black or
could be damaged.
L.[L
B
4. To replace greasefilters, slidefilter in theframe slot
on oneside ofthe opening. Push filter upward and
pushto the otherside to lock into place.
1. Unplugmicrowave oven or disconnect power.
2. Removethe vent grille mounting screws.
3.Tip the grilleforward, then {iftout to remove.
Hook j
4. Liftthe backof the charcoal filter Slidethe filter
straight out
5. Plug in microwave oven or reconnect power.
24

REPLACING THE COOKTOP
AND OVEN LIGHTS
5, Slide a new charcoal filter intoplace, The filter
should rest at the angle shown.
iiiiiiiiiiiii iliiiiiiiiiii
_iii;iiiiiil; _iiiiiiiiiiii_
6, Slide the bottom ofthe vent grille intoplace Push
the top unll it snaps into place.Replace the
mounlng screws.
7, Plug in microwave oven or reconnect power
NOTE: Do not operate the hood withoutthe grease
filters in place,
The cooktop light
1,Unplug microwave oven or disconnect power,
2, Remove the bulb cover mounlng screws
3, Replace bulbwith candelabra-base 30-watt bulb
(Part No. 6912W3Q001A) availablefrom Sears by
calling 1-800-4-MY-HOME_
4. Plug in microwave oven or reconnectpower.
The oven light
iiiiiiiiii
_iiiiHHiii
1,Unplug microwave oven or disconnect power.
2, Remove the vent grille mounting screws,
3, Tip the grilleforward, then liftoutto remove,
25

Bulb holder
"ii
J
4. Liftup the bulb holder.
5, Replace the bulbwith a candelabra-base 30-watt
bulb (Part No.6912W3Q001A) availablefrom
Sears by calling 1-800-4-MY-HOME_
6, Slide the top of the vent grille into place. Push the
bo[tom until it snaps into place, Replace the
mounting screws.
7, Plug in microwave oven or reconnect power.
26

MICROWAVE COOKING TIPS
Amount of food
•If you incraase or decrease the amount of food
you prepare, thetime ittakes to cook that food will
also change. Forexample,ifyoudouble a recipe,
add a little more than halfthe original cooking time.
Check for doneness and,if necessary, add more
time in small increments.
Starting temperature of food
•The lower the temperature of thefood being put
into the microwave oven, the longer ittakes to cook.
Food at room temperaturewill be re-heated more
quickly thanfood atrefrigerator temperature.
Composition of food
• Food with a lot offat and sugar will be heated
faster thanfood containinga lotofwater Fatand
sugar will alsoreach a highertemperature than
water in the cooking process.
•The more dense the food, the longer ittakes to
heat. "Very dense" food like meat takes longer to
heat than lighter, more porousfood likesponge
cakes.
Size and shape
•Smaller pieces offood will cook fasterthan larger
pieces. AJso,same shaped piecescook more
evenly than different-shaped pieces.
•With foods that have different thicknesses, the
thinner partswill cock fasterthan the thicker parts.
Place the thinner parts ofchicken wings and legs in
the center of the dish.
Stirring, turning foods
•Stirring and turning foods spreads heatquickly to
the center of the dish and avoids overcooking at the
outer edges ofthe food.
Covering food
Cover food to:
• Reducesplattering
•Shorten cooking times
• Keep food moist
You can useany covering that lets microwaves pass
through. See "Gettingto KnowYour Microwave
Oven" for matarialsthat microwaves will pass
through. Ifyou are usingthe Sensor function, be sure
tovent.
Releasing pressure infoods
- Several foods (forexample baked potatoes,
sausages, egg yolks, and some fruits)are tightly
covered bya skin or membrane.Steam can build up
under the membrane during cooking, causing the
food to burst.To relieve the pressure and to prevent
bursting, piercethese foods before cooking with a
fork, cocktail pick,or toothpick.
Using standing time
- Always allowfood to stand after cooking
Standing time afl.erdefrosting and cooking allows
the temperatureto evenly spreadthroughout the
food, improving thecooking results.
- The length of the standingtime depends on how
much food you are cooking and howdense itis.
Sometimes itcan be as short asthe time ittakes
you to remove the foodfrom the oven and take itto
the serving table. However, with larger,denser food,
the standing time may be as long as 10 minutes.
Arranging food
For best results, placefood evenlyon the plate.You
can do this in several ways:
- If you are cooking several items of the same
food, such as baked potatoes, place them in a ring
pattern for uniform cooking.
- When cookingfoods of uneven shapes or
thickness, such as chicken breasts, place the
smaller or thinnerarea ofthe food towards the
center ofthe dishwhere itwill be heated last.
- Layerthin slices of meat on top of each other.
- When you cook or reheat whole fish, score the
skin - this preventscracking.
- Do not letfood or a container touch the top or sides
of the oven. This will preventpossible arcing.
Using aluminum foil
Metal containers should notbe used in a microwave
oven. There are, however, some exceptions. If you
have purchased foodwhich is prepackaged in an
aluminum fc_lcontainer, refertothe instructionson
the package.When usingaluminum foil containers,
cooking times may be longer because microwaves
will onlypenetrate the top ofthe food. If you use
aluminum containerswithout package instructions,
follow these guidelines:
27

MICROWAVE COOKING TIPS (CONT.)
Using aluminum foil (cont.)
- Place thecontainer in a glass bowl and add some
water so that it coversthe bottom of the container,
not morethan 1/4in. (.64 cm) high.This ensures
even heatingof the container bottom.
*Always remove the lid to avoid damage tothe
oven,
* Use only undamaged containers.
- Do not use containerstaller than3/4in. (1.g cm).
- Container must beat least halffilled.
- To avoid arcing, there must be a minimum 1/4in.
(.64cm) between the aluminum container and the
walls ofthe oven andalso between two aluminum
containers.
- Always placethe containeron the turntable.
- Shield with small pieces of aluminum foil, parts of
food that may cook quickly, such as wing tips and
leg ends of poultry.
- Heating food in aluminum foil containers usually
takes up to double the time compared to reheating
in plastic, glass, china, or paper containers.
The time when food is readywill vary depending
upon the type of container you use.
- Let food stand for2 to 3 minutes a_er heating so
that heat is spreadevenly throughout container.
Cooking you should not do in your
microwaveoven
• Do not do canning of foods in the oven. Closed
glassjars mayexplode, resulting in damageto the
oven
• Do not usethe microwaveoven tosterilize objects
(baby bottles, etc.) It isdifficult to keepthe oven at
the high temperature needed for stad{ization.
Removing the rack
•When popping commerciallypackagedpopcorn,
Remove the rack from the oven; Do notplacethe
bag of microwave popcornon the rack or under the
rack.
•In the case of popping microwave popcom with
rack,that can cause the fireor damage toyour
microwave oven.
28

Questions and Answers
QUESTIONS ANSWERS
Can I operate my microwave oven without the No. Ifyou remove or turn overthe turntable,you
turntable or turn the turntableoverto holda large will get poorcooking results. Dishesused in
dish? your oven mustfit on the turntable.
Can I use eithermetal or aluminum pansin my You can use aluminum foilfor shielding(use
microwave oven? small,fiat pieces), small skewers, and shallow
foil trays (iftray isnot tallerthan 3,'4in. [1.9 cm]
deep and isfilledwith foodto absorb microwave
energy). Never allow metal to touch walls or
door.
Is it normalfor the turntable [o turn in eitherdirection? Yes. The turntable rotates clockwiseor countsr-
clockwise, depending on the rotationof the
motor when the cooking cycle begins.
Some[imes the door of my microwave oven appears Thisappearance isnormaland does notaffec[
wavy. Isthis normal? the operationof your oven.
What are the humming noises thai I hearwhen my You may hear the sound ofthe transformer
microwave oven is opera[ing? when the magnetrontube cycles on.
Why doesthe dish become hotwhen Imicrowave As the food becomes hotitwill conduct the heal
food init?.Ithought that this should no[ happen. [o the dish. Be prepared to use hot pads[o
remove food a_er cock}ng.
Wha[ does "standingtime" mean? "Standingtime" means that food should be
removed from the oven and covered for
additionaltime to allow itto finish cooking. This
frees the ovenfor other cooking.
Why does steam come out ofthe air exhaus[ vent?. Steam is normally produced during cooking. The
microwave oven has been designed [o vent this
s[eamout the vents.
Can I pop popcorn in my microwave oven? Yes. Pop packaged microwave popcorn
How do Igel the best results? following manufacturer'sguidelines. Do no[ use
regular paperbags,
Do not repop unpopped kernels,Do not pop
popcorn in glass cookware,
29

Troubleshooting
Most cooking problems often are caused bylittle things you can find and fix w_thouttools of any kind, Check the
listsbelow and on the next page beforecallingfor assistance or service, ifyou stillneed help,callSears Service
at 1-800-4-MY-HOME_
MICROWAVE OVEN DOES NOT WORK
PROBLEM CAUSE
Nothing works, - The powersupply cord is notplugged intoa grounded 3 prongoutlet.(See the
ElectricalRequirements"section on page 6 and the "Electricalconnection"
section on Page 8.)
- A household fuse has blown or a circuitbreaker hastripped,
- The electriccompany has had a powerfailure.
The microwave oven will - You are usingthe oven as a timer, Touch STOP/Clear to cancel the Kitchen
not run, Timer,
*The door is notfirmly closed and latched,
* You did not touch START.
* You did not follow directions exactly,
*An cperation that you set earlier is still running,Touch STOPIClearto cancel that
operation,
COOKING TIMES
PROBLEM CAUSE
Food is not cooked - The electricsupply to your home or wall outlets islow or lowerthan normal, Your
enough, electric company can tellyou ifthe linevoltage is low,Your electricianor service
technician can tellyou if the outletvoltage is low,
*The cook power is notat the recommended setting,
Checkthe chart on Page ";5,
The display shows a time *The ovendoor is notclosed completely,
counting down butthe oven * You have set the controls as a kitchentimer, Touch STOPIClearto cancel the
is not cooking. KitchenTimer,
30

TURNTABLE
PROBLEM CAUSE
Theturntable will not,turn. •The turntable is not,correctly in place. It should be correct-side up and sitting
firmly on the center shaft.
•The support isnot operating correctly.Remove the turntable and restart the
oven. Ifthe support st,illdoes notmove, callSears Service at,
1-8004-MY-HOME_LCcokingwithout the turntable can give you poor results.
TONES
PROBLEM CAUSE
You do not,hear the •You have notentered the correct command
programming or end-of-
cycletone.
DISPLAY MESSAGES
I
PROBLEM CAUSE
The display isfleshing" :". •Therehas been a power interruption,Reset the dock, (See the =Clock"section
on Page 12.)
If none ofthese itemsare causing your problem, callSears Service at 1-8004-MY-HOME _
31

Contenidos Garantia en
Combinacibn
Garantia .......................................................... 32
Servicio Sears ................................................ 33
Seguridad del horno de ruicroondas ........... 34
Aprender a conocer su horno
de ruicroondas ............................................... 37
Coruo trabaja su homo de ruicroondas .......... 37
Interferencia de radio ..................................... 37
Para los ruejores resultados .......................... 37
Probar su homo de ruicroondas ..................... 37
Probar su vajilla o baterla de cocina .............. 38
Precauciones de seguridad operativa ........... 38
ConexiSn el6ctrica ........................................ 38
Caracterlsticas del homo de ruicroondas .....39
Funciones del panel de control ...................... 40
Usar su homo de ruicroondas ...................... 42
SeSales audibles .......................................... 42
Interrumpir la cocciOn .................................... 42
Reloj............................................................... 42
Protecci6n de seguridad para niSos .............. 42
Cron6ruetro de cocina .................................... 43
Ventilador de extracci6n ................................ 43
Luz superior de cocina ................................... 43
Bandeja Giratoria On/Off ............................... 43
Descongelaruiento r_pido ............................ 43
Agregar ruinuto .............................................. 44
Cocci6n cronoruetrada ................................... 44
CocciSn en etapas rut3ttiples .......................... 44
Niveles de potencia de ruicroonda ................. 45
Descongelaruiento autoru_tico ..................... 46
Tabla de Descongelamiento Autoru&tico .......47
Tabla de DescongelamientoAurora&rico(cent,),_.48
Sugerencias para descongelar ...................... 49
"Mantener caliente". ...................................... 49
Usar el Quick Touch (Toque r_pido) .............. 50
CocciSn Autoru_tica ....................................... 51
Gu[a para la Cocci6n Autoru_tica .................. 51
Recalentamiento Autom_tico ......................... 52
Gu[a para el Recalentaruiento Autoru&tico ....52
Cuidar su horao de ruicroondas .................. 53
Cuidado de los filtros .............................. 54~55
Reeruplazar las luces de la parte
superior y del homo ................................. 55~56
Sugerencias para la cocina en
su ruicroonda ........................................... 57-58
Preguntas y respuestas ............................... 59
Soluci6n de probleruas ........................... 60-61
Servicio ....................................... tapa posterior
GARANTJA TOTAL DE LA COMBINACI(_N
EN LA CAM PANA DE SU MICROONDA
POR UN ANO COMPLETO
Durante un aSoa partir de la fecha de compra,si esta
combinaci6n en la campana de su microonda
Kenmoretiene un fallo debido a defeeto en el material
o en la mane de obra, Sears Iorepara sin cargo.
GARANTJA TOTAL DE ClNCO ANOS
SOBRE EL MAGNETRON
Durantecince a#osa partirde lafechade cempra siel
magnetrSnde estacombinaci6nen lacampanadesu
microondaKenmoretiene unfal!odebidoa defectoen el
mater_aleen la manede obra Searsla reparasincargo.
La cobertura de la garantia mencionada arriba se
aplica solamente a la combinaci6n en la campana de
su microonda que se usas51oen casas particulates.
EL SERVICIO DE GARANT|A ESTA DISPONIBLE
CONTACTANDO SIMPLEMENTE AL SERVIClO
SEARS A 1-800-4-MY-HOME _.
Esta garantia se aplica s61omientras este producto
est& en use en los EE.UU.
Esta garant[a le da a usted derechos legales
especificos que varian de estado en estado,
Sears, Roebuck y Co.,
Dept. 917WA,
Hoffman Estates, IL 60179
Per Ilamado de servicio:
1-800-4-MY-HOME _
SM (1-800-469-4663)
Tenga a bien registrar la informaci6n de su
modelo,
En el memento en que usted Ilame para recibir un
sewicio para su producto, necesitar_ saber el
n_mero del modelo y el n_mero serial complete.
Puede encontrar esta informaci6n en la
placa/etiqueta del n_mero sedal y del modelo en el
lade superior de la cavidad frontal en su homo de
microondas. Tambi6n, registre las otras
informaciones mostradas abajo.
N_merede medeto
NOmerode serie
Fecha de compra
32

Servicio Sears
Acuerdos Maestros de proteccibn
Feticitaciones pot haber hecho una ccmpra inte/igente
Su nuevo producto Kenmore _ estfi disefiado y fabricado para afios de operaci6n segura.
Pero como todo producto, puede necesitar mantenimiento preventivo o reparaciones cada cierto
tiempo. Es all[ coando el tener un Acuerdo Maestro de protecoi6n Ie puede ahorrar dinero o evitar
que la falla empeore.
Adquiera un Acuerdo Maestro de protecciSn ahora y resgu4rdese de cua/quier mo/estia o gastos
inesperados.
El Contrato de Protecci6n Maestro ayuda tambi6n extender la vida de su nuevo producto. Estas son
los aspectos incluidos en el Contrato :
Servici_ expert___ievad_a cab_ p_r cua_quierade nuestr_s12____ pr_fesi_na_esespecia_istasen
reparaciones.
Servicio ilimitado y sin cargo alguno, pot las piezas o pot el trabajo en toda Ias reparaciones
cubiertas pot el Acuerdo.
Garantfa de "No-Lemon" - cambio de su producto cubierto si ocurre m_s de cuatro o mils fallas
al producto dentro de doce primeros meses.
Reemplazo del producto si su este asegurado no puede arreglarse.
Control anual de mantenimiento preventivo a pedido suyo sin cargo extra.
[_ Ayuda _pida via tel_fonico - Soporte telef6nico de un t6cnico de Sears sobro los productos que
se requiere de reparaci6n en casa, m&s la programaci6n conveniente de servicio.
Protecci6n contra sobrecarga el_ctrica, pot dafios eI6ctricos causados pot fluctuaciones de
cordente.
Reembolso de alquiler si la reparaci6n del producto asegurado toma mils Uempo de Io
prometido.
Una vez que ha comprado el Acuerdo, una simple Ilamada telef6nica es todo Io que le tomarfi para
agendar un servicio. Puede Ilamar a coalquier hora del di'a o de Ia noche o hacer un compromiso de
atenci6n pot tel6fono.
Sears tiene mils de 12,000 profesionates especialistas en reparaciones que tienen acceso a mils de
4.5 mitlones de piezas de calidad y accesorios. Esa es la clase de profesionalismo con la que puede
usted contar para ayudar a prolongar la vida de su nueva adquisici6n en los afios pot venir.
iSuscriba ya un Acuerdo Maestro de protecoi6n!
Se aplican algunas limitaciones y exclusiones. Por precios e informacibn adicional Ilame al 1-
800-827-6655.
Servicio de instalacibn Sears
Para Ia instataci6n profesionat de Sears de los aparatos del hogar, dispositivos de apertura de la
puerta del garaje, calentadores de agua, y otros items pdncipales det hogar, Ilame en los Estados
Unidos a 1-800-4-MY-HOME _.
33

Seguridad del horno de
microondas
Su seguridad y la seguridad de los otros son muy importante,
Hemos dado muchos mensajes de seguridad en este manuaI yen su utensitio.
Lea siempre y acate todos los mensajes do seguridad.
Este es el s[mbolo do alerta de seguridad.
Este simbolo indica que hay peligro do muerte o de heridas graves para usted u otros.
Todos los mensajes de seguridad estar&nprecodidos pot el simbolo de alerta de seguridad
y do la palabra "PELIGRO "o "ADVERTENCIA." Estaspalabras significan:
Hay peligro de muerte o de heridas graves si no
se siguen inmediatamente las instrucciones.
Hay peligro de muerte o de heridas graves si no
se siguen las instrucciones.
Todos los mensajes de seguridad identifican el riesgo, le indican c6mo reducir los riesgos do
lesiones y le dicen Io que podr[a pasar si las instrucciones no so siguen.
INSTRUCCIONES IMPORTANTES DE SEGURIDAD
Cuando so usan dispositivos el6ctricos, deben seguirse Ias PRECAUCIONES b_sicas do
seguridad incluyendo las siguientes
ADVERTENCIA: Para reducir el riesgodo
quemaduras, descarga el6ctrica, incondio, lesiones
alas personaso exposici6n a excosiva potencia de
micrcondas
• Lea todas las instruccionesantes de usar el
homo de microondas.
• Lea y siga las "PRECAUCIONES PARA EVITAR
POSIBLEEXPOSICION A UNA EXCESIVA
POTENCIA DE MICROONDAS" especfficas que
se encuentran en esta secci6n.
• El homo de microondas debe ser conectado a
tierra. Conecte solo al tomacarrientes
correetamenteconectado a tierra.
Lea las "INSTRUCCIONES PARACONECTAR A
TIERRA" que se encuentranal final de esta
secci6n.
• Instaleo ubique el homo do micrcondas
solamente siguiendo las instruccionesdo
instalaci6n provistas.
•A]gunos productostales como huevos con
c_scara completay envases herm6ticos pot
ejemplo, recipientes cerrados do vidrio, pueden
explotar y no deben ser calentados on el homo do
mieroondas.
• Use el homo de microondass51oparaelfin
especffico tal como est_ descrito en este manual.
No use productosquimicos corrosivos o vapores
on el homo do microondas. Este tipo do homo
est_ especlficamente diseSadopara calentar,
cocinar o secar alimentos. Noest_ diseSadopara
uso industrial o do laboratorio.
•Como cualquier artefacto, es necosario un control
estdcto cuando es usado pot losniSos.
• Noopere el homo do micrcondas si tiene daSado
el cable do alimentaci6n o el enchufe,si no est&
funcionando correctamente o si ha sido daSadoo
dejado caer.
GUARDE ESTAS INSTRUCCIONES
34

IMPORTANTES INSTRUCCIONES de SEGURIDAD
• Elservicioal homode microsndosdebeserhecho
soloporpersonalcalificado.Uame a unacompaSfa
deservido autofizadapara examinar,repararo
haesrajustes.
•Ves lasiestruccionesparalalimpiezade lasuperfide
dela puer_ en la seccibn"Cuidadodesu Homode
microondas".
• Parareducirel riesgode incendioen el interiordel
homo:
- Nococinede m&slosalimentos.Tengacuidadosi
se colocaparatadlitarla cocci6n,papel,pl&s_cou
otros matedalescombustiblesdeetrodelhomode
microondas.
- QuiWlasatadurasdealambreretorcidodel papelo
bolsasdepl_sticoan_s de colocarbolsesen el
homo.
- Si losmatedalesdentrodel homose quemaran,
mantengala puertadel homoesrrada,apagueel
homoy desconecteel cablede alimentad6no
cierreel pasode lacordeeteelSc_ca enelfusibleo
en el paneldeJdisyuntor.
- Nouseel intedordelhomoparaalmacenamiento.
Nodejeelementosde papel,utensHiosde cocinao
alimentossnelinteriordslhomoouandonoest6enuso.
•Adecuadoparasu usesebreelementosde cocinade
gaso e]6ctricos.
• Previstoparaser usadoporsebrelosrangesconun
anchom_ximode 36 pulgadas(9I cm).
• Limpieconfrecuencialascampanasdeveetilaci6n,
nodebapermitirquese acomulegrasaenla
campanao en elfiltro
• Cuandohayaalimeetesque produesnllamasbajola
campana,enciendael extractor.
• Tengacuidadocoandolimpieelfiltrodel extractor-
campana.Losageetescorrosivesde limpieza,tales
como limpiahornesbasadesen lej[a,puedendaSar
elflltro.
• Nodebensercolocadosen el homode micmondes
alimentoso u_nsilios de metaldegrantamaSoya
quepuedenocasionarincondioo desgode descarga
el6ctrica
• NolimpiesobreunalmohadillasAsperasde metal.
Lespiezaspuedenquemarla almohadillaytocar ]as
partesel6ctdcascoasionandoriesgodedescarga
el6ctrica.
• Noahacone nadadireetamentesobreel homode
microondescuandoest_en funcionamieeto.
• Nocubrao bloqueeningunaaber_ra en el homode
mictoondes.
• Nodejeestehomode microondasa lain_mpede.
NoIousecercadel agua,porejemplo,corcade ]a
piletade lacocina,sobreuna basehemeda,o corca
deunapiletade nataci5no algo porel esBIo.
• Nosume_jael cabledealimeetaciOno enchu_ en el
agua.
• Mantengael cablede alimentaci6nlejesde les
superficiescalieetes.
• Nodejeel cablede alimentaciSncolgandodelborde
dela mesao mostrador.oNoIomontesobreuna
pileta.
• Nocubralasrejillaso cualquierotraparle delhomo
conI_minasde metal.Estocausar_
sobrecalentamieetodel homo.
• Losliquidostalescomoagua,ca_ o _,'pueden
sobrecalenta_sem&sall_delpuntode hervorsiestar
aparentementehirviendodebidoa su teesi6n
superficial.Nosiemprese netael burbujeoo el
hervoral retirarelrecipieetedelhomo. Estopuede
causarque losI[quidosmuy calienteshiervan
repentinamentecuandose introduceen el I[quido
unacucharaocoalquieretrou_nsilio.
Parareducirel desgode producirlesionesalas
personas',
1) NorecalienteI[quidos.
2) Revuelvael I[quidoantesy rnientrassecalienta.
3) No userecipientesde ladosrectosconcuellos
angostes.
4) Luegodecalentar,permitaal contenedor
perrnanecoren elhomode microondospot un
tiempocodoantesdequitado.
5) Tengamuchocuidadocuandocoloqueunacochara
u etrouteesiliodentrodelcontenedor.
GUARDE ESTAS INSTRUCCIONES
35

PRECAUCIONES PARA EVITAR POSIBLE
EXPOSICI(SN A UNA EXCESIVA POTENCIA DE
MICROONDAS
(a) Nointentehacorfuncionares_ homoconla puerta
abier_ ya queelfuncionamientoconpuertaabieda
puedecausarexlx_irJbnnocivaa la potenciade
micrcondas.Es importan_ nodescoidaru
obstaculizarlaseguddadde losenclavamientos
e]6ctdcosde interb]oqueo.
(b) Nocoloquening_nobjetoentrela carafrontaldel
homoy lapuertao permi_ quese acomule
surJedado residuosde limpiadorsabrelas
supe_cie de sellado.
(c) Nohagafuncionarel homosiost_daSado.Es
per_colarmenteimportanteque la puer_delhomo
se cierrecorrectameniey que nohayadaSoen:
(1)Puer_ (torcida),
(2)Bisagrasy cerradures(rotasosueltas),
(3)Cerradurasdeles pue_tasosuperficies
selladas.
(d) Nadie excep_ el personat de servicio
calificado debe hacer ajus_eso reparaciones
en et homo.
Requisitos el ctricos
Observe todos los c6digos y ordenanzas. Se
requieren en el equipo 120 Volt 60 Hz CA
solamente, se requieren fusibles de I5 o 20 amp
(Se recomienda fusibles de retardo).
Se recomienda que se use un circuito separado
que alimente s61oa este dispositivo.
Peligrode descarga el_ctrica.
Enchufeen un tomacorriente conectado
a tierra de 3 clavijas. No quite ta clavija
de conexi6n a tierra.
No use adaptador.
No use ex_ensi6n de cable de
alimentaciSn.
No seguir estas instrucciones puede
Ilegat a causar muerte, incendio o
descarga el6ctrica.
INSTRUCCIONES PARA CONECTAR A TIERRA
• Para todos los artefactos conectados con
cable de alimentaci6n :
El homo de microondas debe set conectado a
Uerra. En caso de carte circuito el6ctrico, Ia
conexi6n reduce el riesgo de descarga
el6c_dca, ya que provee un alambre de
escape para la corriente el6ctrica. El homo de
microondas est_ equipado con un cable de
alimentaci6n que tiene un enchufe con un
cable de conexi6n a tierra. El enchufe debe
estar conectado a un tomacorrientes
correctamente instalado y conectado a tierra.
ADVERTENCIA: El usa incorrecto de Ia
conexi6n a tierra puede ocasionar peligro de
incendio o de descarga eI6ctdca.
Consulte a un electdcista calificado o personal
de servicio si las instrucciones no son
completamente comprendidas o si hay dudas
sabre si el homo est& adecuadamente
conectado a tierra.
No use una extensi6n de cable de
atimentaci6n. Si el cable de alimentaci6n es
demasiado corto, haga instalar un
tomacorriente per un t6cnico calificado cerca
del homo de microondas.
• Para un artefacto permanentemente
conectado:
El homo de microondas debe estar conectado
a un sistema met_lico de cables, permanente,
de conexi6n a tierra o un conductor de
conexi6n a tierra del equipo debe ser
accionado con los conductores del circuito y
conectados a la terminal a tierra del equipo o
toma de atimentaci6n deI homo de
microondas.
GUARDE ESTAS INSTRUCCIONES
36

Aprender a conocer su horno
de microondas
Esta secci6n trata los conceptos detr_s de la cocci6n de microonda. Tambi6n muestra los conceptos
b_sicos que necesita saber para operar su homo de microondas. Tenga a bien leer esta informaci6n
antes de usar el homo.
Como trabaja su horno de microondas
Los hornos de microondas son seguros, La Potencia
mieroonda no es caliente. Hace que los afimentos produzcan
su propio ca]or yes este calor el que los cocina.
Las microondas son come las ondas de TV, las ondas de
radio, o las ondas de luz, no puede vedas, peru se puede ver
Ioque hacen.
gn magnetr6n en el homo de microondas produce
microondas. Las mieroondas se mueven dentro del homo
donde se contactan con los alimentos mientras rota la
bandeja giratoria.
La bandeja giratoria de vidrio de su homo de microondas
permite alas microondas atravesarla. Luego 6stas rebotan en
un piso de metal y vuelven a trav6s de la bandeja giratoria de
viddo y para set absorbidas per los alimentos.
Las microondas paean a trav6s de la mayor parte del viddo, papel y pi_sticos sin calentarlos de
manera que los alimentos absorben la energia. Las microondas rebotan en los envases de metal de
mode que los alimentos no absorben la energia.
Interferencia de radio
Usar su homo de microondas puede causar interferencia en su radio,TV o equipo similar.Cuando hay
interferencia, puede reducirlao quitarla de la siguiente forma:
• Limpiarla puertay sellar }assuperficie del homo.
• Ajustar la antena recepbra de la radio o televisor.
• Llevarel receptor lejosdel homo de microondas.
• Enchufarel homo de microondas en un bmacordente diferente de modeque el homo de microondas y
receptor est6n en diferentes ramas de circuibs.
I
Para los mejores resultados
• Siemprececinesucomidaduranteel periodode tiempom_s corterecomendado,Compruebeparavet cSmose
cocinala eomida,Si esnecesar_e,toqueAGREGARMINUTe (AddMinute)mientrasel homeest_funcionando
e despu6sdequeel cic!ode eocci6nest6 terminado(vet la secciSn"Usaragregarminute").
• Revolver,girar,o velvera arreglarlosalimentosqueest_nsiendococinadosalrededordela mitaddeltiempode
coceiSnde todaslas recetas. Estoayudar_a asegurarseque losalimentesest6ncocinadosparejo.
• Si no tiene una cubierta para un plato, use papel encerado o ballas de papel aprobadas para mieroondao
envoltura pl&stica.Recuerde doblar una esquina de la envoltura de pl_stico para ventilar el vapor durante
la cocci6n.
Probar su horno de microondas
Para probar el homo ponga aproximadamente I taza de agua fria en un recipiente de viddo en el homo.
Cierre la puerta. Aseg_rese que se cierra. Cocine a1100%de potencia per 1 minub. A su debido tiempo,
el agua debe calentarse.
I
37

Probar su vajilla o bateria de cocina
Pruebesuvajillao bateriade cocinaantes deusar. Parr probarunplatoy tenerun usoseguro,co16queloenel
homoconunataza de aguaal ladodelmismo,Siel platosecalientademasiadoy el aguaquedaNa, no Iouse,Si
lavajillase calienta, no Iouse.Algunosplaits (de melanin&algunavajillacor_mica,etc.)absorbelaenergiade
lasmicrosndas,calent_ndosedemasiadoparatomarlosconla manoy demorrndo lostiemposdecocci6n,Cocinar
en redpientesdemetalnodiseSadospara usodemicroondaspuedendaSarel homo,yaque poddancontener
metaloculto(atadurrsretorcidas,I_minasmel_licas,grrpas, lustreo recortesmet_licos),
Precauciones de seguridad operativa
• Nunca se apoye en la puertao permita a un niSoque se balanceeen ella cuando la puerta est_ abierta.
• Use protectores papaobjetos calienits. La potencia microonda no calienta losenvases, pero el calor del
alimento puede hacer que el recipientese caliente.
• No usepapel de diarios u oiro papel impreso en el homo.
• No sequeflores,frutas hierbas, madera papel, calabacines o ropas en el homo.
• Noencienda el homo de micrcondas cuando est.5vac[o. La vida Qtildel producit puede seracortada. Si
realizala progrrmaci_n del homo, coloque un recipiente de agua en el homo. Es normal que la puerta del
homo seyea ondulada dospu6s de que el homo ha estado funcionando pot un lapso.
• NoIrate de den'etircerr de parafinaen el homo. La cerr de parafinano se derretir&porque permiit alas
microondaspasar a trrv6s de la misma.
• Noopere el homo de microondas a menos que la bandeja de viddogirritria est_ segura en sulugar y pueda
rotarlibremerrte.La bandeja giratoria puede rotar haciacualquier direcoi6n.Aseg_rese de que la bandeja
giratoria est_ correctamenit colocada en el homo. Tome su bandeja girritria con cuidado cuando la saque
del homo, para evitar la posibilidadde quebrada. Si su bandeja giratoria se rompeo se quiebrr, co.acre a
su proveedor parr un reemplazo.
• Cuando use un platodorrdor, elfondo del plait dorrdor debe set al menos de pot Iomenos 3/I6 pulgadas
por ardba de la bandeja girritria. Siga las directivas provistascon el plait dorrdor.
• Nunca cccine o recalienit un huevo entero con c_%carr.La formaci6n de vapor en loshuevos enitros puede
causar que revienten y posiblemente darien el homo. Frrccione los huevos duros hervidos antes de
calentarlos. En rarasocasiones, loshuevos poch6 se hartreventado. Cubrr los huevos poch6 y deje un
tiempo de un minuit antes de cor_arlos.
• Parr obtener mejores resultados, revuelva mientrrs secalienta o recalienta. Los liquidoscalentados en
ciertos recipienits (especialmenit recipientosde forma cilinddca) pueden sobrecale_arse. El fiquido puede
saltar haciacon un fuerte sonido durrnit o despu6s de calentarse o cuando se agreguen los ingredienits
(gr_nulosde caf_, saquitos de t6 eit.). Esto puede daSarel homo.
• Lasmicroondas pueden no Ilegaral centro de un asado. El calor sedifunde desde el ceniro hacia afuerr,
_reas cocidas, tal como un homo com_n. Esta es una de las razones para dejar algunos alimenits (por
ejemplo, asados o papas al homo) permanecer por un momento dospu6s de la cocci6n o en oiros alimenits,
revolverlosdurrnte eltiempo de cocoi6n.
• En el homo, no sumerja al freir. Los uitnsilios parr micrcondas no son adecuados parr esit yes dificil
mantenertemperrturas correctas parr frituras sumergidas.
• Nococine demasiado las papas. AIfinal del tiempo de cocci6n recomendado laspapas deber&n estar
ligeramentefirmes porquecontinuar_n la cocci_n durrnit el tiempo de permanencia. Luego de cocinar en el
homo de microondas, deje alas papas permanecerdurante 5 minutos. Se terminar_n de cocinar mieniras
reposan.
Conexibn Eldctrica
I Si su IJneade conexi6n el6ctrica o voltaje de salida es de menos de 110 volfios, losfiempos de cocci6n
puedenser m_s largos. Haga que un electricista calificado controle su sistema el6ctdco.
38

Caracteristicas del horno de microondas
Q ®® ®
®® ® ® ®
Su homo de mi(_'oondas est& dise_ado para hacer
su experiencia de cocina Io m&s agradable y
proquc_a iposible. Para resumir y explicar
r&pidamente, la siguiente es una lis_ade Ias
caracterls_cas b_sicas del homo:
1.Ventana con pantalla de metal evita que las
microondas se escapen. Est_ dise_ada como
una pantaila para permitirle visualizar Iacomida
mientras se cocina.
2. Placa de modelo y n_mero de serie y etiqueta
de gula de cocci6n
3. Filtro de carb6n (detr&s de la rejitla de
ventilaci6n)
4. RejUlade ventUacibn.
5. Bandeja giratoria. La bandeja giratoria hace
girar los alimentos mientras cocina para obtener
una cocci6n mas paraja. Debe estar en el homo
durante el funcionamiento para obtener mejoras
resultados de cocci6n.
6. Luz auxUiar (para la mesada)
7. FUtros de grasa. Ver la secci6n "Cuidado del
los filt_s".
8. Panel de control. Toque los pads en oste panel
para realizar todas las funciones.
9. Parrilla de cocci6n. Utillcela para obtener
espacio extra cuando cocine en m&s de un
recipiente a la vez_.
1. Bandeja giratoria
2. N_cleo
3. Soporte
4. Eje
La bandeja giratoria rota en ambas direcciones para obteneruna cocci6n m_s pareja de los alimentos. No
ponga en funcionamiento el homo de microondas sin la bandeja giratoria en su lugar.
Para instalar:.
1. Coloque el soporte en el fondo de la cavidad del homo.
2. Coloque la bandeja giratoria en el soporte.
Fije las llneas levantadas y curvas en el centro del piso de la bandeja giratoria ent_ los tres radios det
n_cleo. Los roqillos en el soporte deben ajustarse pot dentro de la saliente del piso de la bandeja
giratoria.
39

Funciones del panel de control
El panel de control de su homo de microondas Ie permite seleccionar r_pida y f_cilmente la funci6n
de cocci6n deseada. Todo Io que tiene que hacer es tocar el pad de comando. La siguiente es una
lista de todos los pads de comando y nSmeros ubicados en el panel de control. Para m_s
informaci6n sobre estas caracteristicas, yea la secci6n "Usar se horno de microondas".
®
@
@
I
1. Pantalla. La pantalla incluyeun reloj e
indicadoresque le muestran lahera det d[a, los
programas de las horas cocinar los atimentos,
Ias potencias de cocci6n, las cantidades, pesos
y Iasfunciones de cocci6n seleccionadas.
2. "Mantener caliente". Toque este pad para
"Mantener caliente" las comidas cocinadas en
su homo basra 99 minutos, 99 segundos. La
funci6n "Mantener caliente" puede set usada
pot si misma o puede seguir autom_ticamente
el ciclo de cocci6n.
40

3. Palomitas de maiz. Toque este pad para
prepararuno de los 3 tamaSos do las boisas de
patomitas de mafz sin introducir una potencia o
_empo do cocci6n.
4. Pizza, Toque este pad para recalentar una o
vanas porciones do pizza sin introducir una
potencia o tiempa de cocci6n.
5. Entrada congelada. Toque este pad para
cocinar do 10 a 20 onzas (284 a 567 g) do
entrada congelada sin introducir una potencia o
_empa do cocci6n.
6. Papas (patatas). Toque este pad para cocinar
hasta 4 papas sin introqucir una patencia o
_empo de cocci6n.
7. Bebidas, Toque este pad para calentar haste<2
vasos (250mi) de bebida sin introducir una
potencia o tiempo de cocci6n.
8. Cocci6n autom_tica. Toque este pad para la
cocci6n do los alimentos apes para homo de
microondas sin introducir una potenciao tiempa
de cocci6n.
9. Recalentamiento autom_tico. Toque este pad
para recatentar alimentos aptos para homo de
microondas sin introducir una potenciao tiempa
de cocci6n.
10. Reloj. Toque este pad para introducir Ia hera
del dla correct.
11. Descongelamiento autom_tico. Toque este
pad seguido per pads num6ricos para
descongelar came seg0n el peso.
12. Descongelamiento r_pido. Toque este pad
para descongelamiento r_pido. "GROUND
BEEF 1.0 LBS TOUCH START' aparecer& on
la pantalla.
13. CronOmetro de ¢ocina. Toque este pad para
iniciar el CronOmetro de cocina.
14. Pads num6ricos. Toque lospads num6ricos
para introducir tiempas de cocci6n, potencias
de cocci6n, cantidades, pesos, o categorias de
comidas.
15. Tiempo de coccibn. Toque este pad seguido
par un pad num6rico para determinar un
tiempa cocci6n.
16. Potencia. Toque este pad despu6s determinar
el tiempa de cocci6n, seguido par un pad
num6rico para instalar la cantidad do patencia
do microondas liberadas para cocinar los
alimentos. Cuanto m_s alto el n0mero m_s alto
la potencia de microondas o "velocidad do
cocci6n."
17. Agregar minuto. Toque este pad para cocinar
par un minute, a1100% do Potencia do cocci6n
o para agregar un minute extra a la Potencia
do cocci6n determinada o ciclo de cocci6n.
18. INICIAR (START). Toque este pad para iniciar
una funci6n. Si abre la puerta despu6s que el
homo comienza a cocinar, vuelva a tocar
INICIAR (START).
19. DETENEP-JLimpiar (STOP/Clear). Toque este
pad para borrar un comando incorrecto,
cancelar un programa durante Ia cocci6n, o
Iimpiar la pantalla.
20. Bandeja giratoria On/Off. Toque este pad
para detener la bandeja giratoria. "OFF"
aparecer& on la pantalla.
2t. VentUador ( _ ). Toque este pad para apagar
o encender et ventilador.
22. Luz (([_). Toque es_epad para encender Ia
Iuz, paneria on alta, on noc_ma o para
apagarla.
NOTA: Si trata de introqucir in_cciones
incorrectas, no escuchar_ ning0n tone. Toque
DETENEPJLimpiar (STOP/Clear) y reintroduzca
ias iost_uccionos.
41

Usar su horno de
microondas
Esta secci6n contiene instrucciones para Ilevar a
cabo cada funci6n. Tenga a bien leer
cuidadosamente estas instrucciones.
SENALES AU DITIVAS
Las se_ales auditivas est_n disponibles para
guiario cuando programay usa su homo ;
• Un tono de programacibn sonar_ cada vez
que us_edtoqueun pad.
• Siete tonos seSalan el finalde un conteo del
cron6metro de cocina.
• Cuatro tonos se_alan la finalizaci6nde un ciclo
de cocci6n.
RELOJ
Luego de enchufar su homo de microondas pot
primeravez o luego de una interrupci6n porfalla
electrica,la pantallamos[rar_ el mensaje "ENTER
TiME OF DAY".Si la hora del dia no est_
determinada,la pantallamostrar_ ":" hasta qua
us[ed toque "Reloj ".
Ejemplo: para colocar el reloj a las 10:30(A.M).
Toque: La pantalla
mostrard:
.
.
EMTERTIFIEOFDRY
.
:3,2 TDUEH5TRRT
.
NOTAS :
• Si introduce una hora incorrecta y toca "Clock", no
puede ajustar }a hora del dia. Introduzca }a hora
co.eta.
• Si toca STOP/Clear mientrae ajusta el reioj, ]a
Pantalla mostra_ la _ltima hora del dra de ajuete o
":" si no ha sido desterminada ninguna hora de] dia.
42
INTERRUMPIR LA COCClON
Abdendo Iapuerta, puede detener el homo
durante un ciclo. El homo deja de catentar y el
ventilador se detiene, pero Ia Iuz permanece
encendida.
Para retomar la cocci6n, cierre Ia puerta y
toque START
Si no desea continuar la coccibn, abra la
puerta y toque STOP/Clear.
PROTECCI_N DE SEGURIDAD
PARA NINOS
Puede usar esta funci6nde seguridad para bloquear
el panel de control euando se halla limpiando el
homo o qua los ni5os no puedan utilizar el homo sin
la supervisi6n
Para determinar CHILD LOCK: (Bloqueo de
protecci6n)
Toque: La pantalla
mostrard:
1. Hora del d[a.
Toque y mantenga
hasta que aparezca
LOCKED
en la pantafla.
(aproximadamente
4 segundos)
Para cancelar BLOQUEO DE PROTECCION:
Toque: La pantalla
mostrarb:
Hora del d[a.
Toque y mantenga
hasta que desaparezca
LOCKED
en la pantafla.
(aproximadamente
4 segundos)

CRON(_METRO DE COCINA
Su homo de microondas puede usarse come
cron6metro de cocina. Puede determinar hasta 99
minutos, 99 segundos.
Ejemple: Pare determinar 3 minutos.
Toque: La pantalla
mostrarfi:
E/'ffE?fiRE/IV,_'fl
1.
RM#SEE
2.C,O0
.
3:00
Empieza el contrareloj
del tiempo
VENTILADOR DE EXTRACCI(_N
El pad en el cantro inferior del panel de control, controla
las 2 velocidades del ventilador de extracci6n
Ejemplo: Pare determiner una de Ias 4
velocidades del ventilador de extracci6n, Pare
programar CHILD LOCK (Traba de seguridad)
Toque: La pantalla
mostrarfi:
1. HIGH
Una vez pare ALTO
Dos veces pare Bajo.
2. OFF
Apague el ventilador cuando desee
NOTA: Si la temperatura del tango o de la parte supe6or
de la cocina que est_ por debajo del homo se eleva
demasiado, el ventilador de extracei6n en lacampana de
ventilaci6n se encender&autom_ticamente en ALTO
predeterminada para proteger el homo. No puede apagar
el ventilador de escape durante la cocci6n en el homo de
microondas.
LUZ SUPERIOR DE COCINA
El pad en la parte inferior dereeha del panel de
control controla la luz superior de cocina.
Ejemplo: Pare programer la I_mpera pare "ALTA".
Toque: La pantalla
mostrarfi:
Una vez pare luz alta
Dos veces para luz noctuma
DFF
2.
Pare apagarlo toque el pad una
o dos veces dependiendo del
ajuste de la luz.
BANDEJA GIRATORIA ON/OFF
Paramejoresresultadosde coc_6n, dejeencendidala
bandejagir_oria. Se lapuededetenerpareplatosgrandee.
Toque: La pantalla
mostrarfi:
1. ,_qFF
2. D,_
PresioneBandejagiratoriaOn/Offparagiraro detenerla
bandeja.
NOTA: Aveces labandejagiratoriapuedecalentarae
demasiadopareelrecto.Tongacuidadoaltocarla
detentey despu6sde lacocc_Sn.
Noopereelhomovado sinalimentoadentro,
DESCONGELAMIENTO RAPIDO
Unasecuenciadedescon_amientor_pidesehallepredeterminade
enelhomo.Lafunci6ndede_ongetamientor_p_de(expressdefrcst)
proveeunm6tododedescongelamientor&0idepareur,apedazode
"CARNEMOUDA"solarner4ede1.0libra.
Ejemplo: Pare descongelar I libra de Came molida.
Toque: La pantalla
mostrarfi:
6ROUM#BEEFI.OLB5
1. TOUEH5TRRT
Empieza el contrareloj
del tiempo.
43

AGREGAR MINUTO
Es un padde ahorro de tiempo, este control
simpiificado le permite programar r_pidamentee
iniciar la cocci6n por microonda a1100% de
potencia sin necesidad de tocar START.
Ejemplo: Para cocinar durante 2 minutos,
Toque: La pantalla
mostrarb:
1. TI/'IEOF#RY
.
Dos Empieza el contrareioj
del tiempo y la
veoss COCClON.
NOTA: Cada vez qua toqueADD MINUTE,
agregar_ 1 minuto hasta 99 minutos 59 segundos,
COCCION CRONOMETRADA
Esta funcidn le permite programar un tiempo de cocci6n y
potencia espectficos. Para obtener majorca resultados,
hay 10 niveles de graduaci6n de potencia adem&sde
ALTA (100%). Refi6rase a la "Tabla de niveles de potencia
de microonda" en la p_g. 45 para m_s informaci6n.
NOTE: Si no selecciona un nivel de potencia, el
homo autom_ticamente funcionar_ a potencia
ALTA(100%).
Ejemplo: Para cocinar durante 5 minutos, 30
segundos a 80% de potencia.
Toque: La pantalla
mostrar&:
.
.
5:30 TDUEH5TR,_T
D,_PD'dE,_
E,_TE£POldEl_
3.
LEVELI TO,'O
.
.
Empieza el contrareloj del
tiempo y la COCClON.
COCCI(_N EN ETAPAS MOLTIPLES
Para mejoresresuffados,algunasrecetas necesitanunCiclo
de potenciaparaun periododetiempo determinadoy otto
Ciclode potenciaparaotto periododetiempo.Su homo
puede programaraeparacambiarautom_l:icamentede unoa
ottoen us totalde hastadosciclos.
Ejemplo: Paraprogramarunciclo de cocci6nde 2 elapas.
Toque: La pantalla
mostrar_:
.
T_tt_
E,ffTE,_EOOt{tfl5., _E
.
.
_?:00 TOUEH5TR,_T
O,_PD_dE,_
Para programar una
cocci6n de 3 minutos para la I etapa.
E,_TE£PO_dE,_
LEVELI fO,'O
.
P-BL7
_UEH 5TR,_T
Para programar un 80%
de la potencJa de cocci6n.
.
T_'t
E,_TE,_EOOt{tfl5., _E
6.0
7:00 TBUEH5TR,_T
B,_PB_dE,_
Para programar una
cocci6n de 7 minutos para la
segunda etapa.
7. ElfTE£PB'dE,_
LEVELI TB,'O
.
Para programar un 50%
de la potenda de _6n para la segunda etapa.
.
Empieza el contrareloj
del tiempo y la
COCCI(IN.
10. Cuando la pdmera etapa termina, oir_ dos tonos
cortos cuando el homo comienza la segunda
etapa de cocci6n.
44

NIVELES DE POTENCIA MICROONDA
Paraobtenerrr_Joresresu]tados,algunasrecetasrequieren
d_erentespotenciasdecscd6n.Cuantom_sbaiaeslapotencia
decocd6n,m&sbajaeslacocci6n.Cadan0merode1a9
representaundiferenteporcentajedepotenciacompletade
cocci6n.
Lasiguientetablamuestraelporcentajedepotenciadecood6n
quecadanSmerorepr_nta yelhombredepotenciade
cocci6ngeneralmer_usado.
Tambi_n dice cuando usar cada potancia de cocd6n
Siga las instruccionesde la receta del paqueta de
comida si est_n disponibles.
NOTA: Refi_rase a un libro de cocina confiable para
los tiempos de cocci6n basados en 1000 Watt de
potancia de cocoi6n de su homo de microondas.
POTENCIA DE COCCI(_N NOMBRE CUANDO USARLA
100% de potandacompleta AJta - Calentado r_pido de muchas alimentos preparados
y alimentoscon un alto contenido de agua, tales
como sopas y bebidas.
- Cocci6n de cortes tiemos de came, came molida.
9 =90%de potancia total - Calentar sopas-crema.
8 =60%de potanciatotal - Calentar arroz, pastao cacerolas
7 =70%de potancia total Medio alta - Cocinar y calentar comidas que necesitanuna
potancia de cocci6n m_s baja que a]ta (pot ejemplo,
pescadoentero y una pieza de came) o cuando la
comida se cocina demasiado r_pidamenta.
- Recalentar una sola porci6n.
6 =60%de potancia total - La cocci6n que requiere cuidado especial, como
quesos y huevos y platos de huevos, budinesy
flanes.
- Terminar la cocci6n de cacerolas
5 =50%de potancia total Mediana - Cocinarjam_n, ayes enteras,y asados a la olla.
- Cooerestofados a fuego lento.
4 =40%de potancia total - Derretir chocolate
- Calentar pastaler[a
3 =30%de potancia total Medio baja, - Descongelar manualmenta alimentos, tales como
descongelar pan, pescado,cames, ayes, y alimentosprecccidos.
2 =20%de potancia total - Ablandar mantaca, queso, y helados.
1 =10%de potancia total Baja - Mantaner los alimentos calientas.
- Sacar el frb de lasfrutas.
NOTA: Unavez que el tiempo de cocci6n ha sidointroducido, ustad puedeusar tambi_nel pad de
potancia de cocci6n como una segunda cccina.
Cron6metroby introduciendo "0" para la potancia de cocci_n. El homo contar_ regresivamente el tiempo de
cocci6n que usted detarmina sin cocinar.
45

DESCONGELAMIENTO
AUTOMATICO
Treesecueneias de d_ngelamiento est_npredeterminadas
en el homo. La funci6n de descongelamientoautom_tico le
proporciona el mejor m6todode descongelamiento pare
alimentos congelados. La gufa de cocina le mostrar_ cu_l
aecuenciade doscongelamientose recomieoda pare el
alimento que deseadescongelar.
Pare mayorconvenieneia,e!descongelamiento automAlico
incluye un mecaniamosonoroincorporado (bip)que le reeuerda
que debecontrolar. Darvuelta, aeparar o volver a arreglar
pare obtenerel mejor resultadodel descongelamiento. Hay
tras diferantes nivelesde descongelamiento.
1CARNE
2 AVES
3 PESCADO
• El peso disponibie esde O,l ~0,6 libras.
Ejemplo: Pare descongelar libra de came motida.
Toque: La pantalla
mostrard:
_ERTTOU£HI
1. PDULTRYTOUCH2
FISHTOUEH3
.
El'flEEgEIEHT
.
.
/2LB5
Y TLTUEH5TRRT
pare introducir el peso
Empieza el contrareloj
del tiempo.
NOTA:
Cuando toque el pad START, la pantalla cambia pare la
cuenta regrasiva de descongelamiento. Sonar_ un bip en el
homo durante el title de DESCONGELAMIENTO. En este
momento abra la puerta y d_ vuelta o vuelva aarreglar el
aliment& Quite eualquier porei6n queya ost6 descongelada
Vuelva a coloear en elhomo les porciones congelades y
toque START para retomar al ciclo de descongelamiento,
SUGERENCIAS PARA OPERAR
• Pareobtener mejoresresultades saqueel pescado,marieco,
cameo avesu paquete(envoltura)original. De otto mode la
envolturaguardar_el vapor y eljugo cercade los alimentos,
esto puedecausarquela euperficieextema delosalimentes
secocine.
• Pareobtener mejoresresullades,d6 ala camemolidala
formade una rosen(done)antesde congelarla.Cuandola
descongele,alsonarel bipraepela cameya descongeladay
contin6eel descongelamien!&
• Coloquelos alimentosenun recipientepianoo eobreuna
rejillade esadoparamicPoondespararecogerelgoteo,
Estatablalemueslralaselecci6ndeltipadealimantoyelpaso
quepandaestablecerparecederipe.Pareabtenermajores
rasultades,aflojaequitelaeubierladelaliment&
ALIMENT0 TOQUE PESOS QUE PUEDE
Descong. DETERMINAR
Autombt, (an dbcimas de libra
Came 1 .1a 6.0 (45g a 2722g)
Ayes 2 .1a 6.0 (45g a 2722g)
Pescado 3 ,1a 6.0 (45g a 2722g)
Tabla de conversibn de peso
Uetedprobablemente noos_ acostumbrado a medir los
pesosde losalimentos en libras yen onzas que son
fracciones de libra (per ejemplo, 4 onzas iguala 1/4 libra ).
No obstante, pare poder intrcducir el peso del alimento en
"Desosngelamiento autom§tios", depe especifiosrloen
librosy d_cimos de libra.
Si el peso en el pequete gel alimento est& expresado en
fracciones de libra, puede user la siguiente tabla pare
convertir el pesoafracciones decimalee.
Pesoequivalente
ONZAS PESO DECIMAL
1,6 ,10
3,2 ,20
4,0 ,25 uncuarto de libra
4.8 .30
&4 .40
&O .50 media libra
9.6 .60
11.2 .70
12.0 .75 treecuartos de libra
12.8 .80
14.4 .90
16.0 1.00 una libra
46

TABLA DE DESCONGELAMIENTO AUTOMATICO
SEI_AL ACOSTICA INSTRUCCIONES ESPECIALES
GRAMAR
Programar carnes
ALIMENTOS PRO-
CARNE DE
VACA
Camemolida, CARNE
en bulto
Camemolidaen CARNE
hambu_Juesas
Bisteeredondo CARNE
Filetede lame CARNE
Estofadode CARNE
came
Asadealadla CARNE
Camemolideasade
Asadode CARNE
_tilla
Nalgaarrollada CARNE
asada
CORDERO
Cubespara CARNE
estofado
Chuletas CARNE
(de1_lgadadeand_)
CERDO
Chuletas CARNE
(deI/2 pulgada
de ancho)
Perro caliente CARNE
Costil_assuellas CARNE
Costillase_lo
county
Tirade CARNE
Salehichas,
Salchich& en CARNE
bulto
Lame asado CARNE
deshuesado
Quiteconun tenedor]asporciones
descongeladas.D6vuelta.Vuelvae
res[oalhomo.
Separe y vuelva a disponer.
D_vuelta.Cubralas_reascalientes
conhojasdepapeldealuminio.
D_vuelta.Cubralas_reascalientes
conhojasdepapeldealuminia.
Quitelasporcionesdescongeladas
contenedor.
Separeelrest&Vuelvael restoalhomo.
D_vuelta.Cubralas_reascalientes
conhojadepapeldealuminio.
D_vuelta.Cubralas_reascalientes
conhojadepapeldealuminio.
D_vuelta.Cubralas_reascalientes
conhojadepapeldealuminio.
Quitelaspo_cionesdescongeladascon
untenederVuelvaelredoalhomo.
Separe y vuelva a disponer.
Separe y vuelva a disponer.
Separe y vuelva a disponer.
D6vuelta. Cobra las _reas
calientescon hoja de papel de
aiuminio.
Separe y vuelva a disponer.
Quitelaspardon,sdescongeladesconon
tenedenE_vuelta.Vudvad restoalhomo.
E_vudta.CubmlasBeascalien_conhoja
depadeldealuminb.
Lacamedeformairregularyloscortesdecamegrandesy
grasc_osdebenf_nerlaspar_sdelgadasograsesas
cubier[asypmtegidasconunaconunahojadepapelde
aluminioalcomienzodeunasecuenciadede4congelaci6n,
No descongelarmenos de 1/4onza. Congeleen
forma de rosca (dona).
Nodescongelemenosdedosonzasdehamburguesas,
Comprirnaelcentrocuandopongaacongelar.
Coloquesabre una pardllaparaasar aptapara
microondas.
Coloquesabre una pardllaparaasar aptapara
microondas.
Coloqueen un platode homo aptopara
microondas.
Coloquesabre una pardllaparaasar aptapara
microondas.
Coloquesabre una pardllaparaasar aptapara
microondas.
Coloquesabre una pardllaparaasar aptapara
microondas.
Coloqueen un platode homo aptopara
microondas.
Coloquesabre una pardllaparaasar aptapara
microondas.
Coloquesabre una pardllaparaasar aptapara
microondas.
Co!oquesobreunapanillapareasaraptaparami_'oondas.
Coloquesobre una pardllaparaasar aptapara
microondas.
Coloquesabre una pardllaparaasar aptapara
microondas.
Coloqueen un platode homo aptopara
microondas.
Coloquesabre una pardllaparaasar aptapara
microondas.
47

TABLA DE DESCONGELAMIENTO AUTOMATICO (CONT.)
Programar ayes
PRO- SEI_IAL ACOSTICA INSTRUCCIONES ESPECIALES
GRAMAR
ALIMENTOS
POLLO
Entero(hasta
6 libpas)
Despresado
AVES
D_vuelta(concluyaetdescongelamisr_
conlapech_gahaciaabajo),Cubralas
Areascalier_esconhojasdepaperde
aluminio.
Separe las partes y reacomode,
D6vuelta, Cubpalas_reas caiientes
con hoja de papel de aluminio
Coloqueelpolioconlapechugahadaarfibasobreuparejilla
paraasadoap_paramicrcondas.Concluyae]
desconge]amientosurnergiendoenagua_a,Qu_Ic_
menud_scuandoelpolioest_parda]mentedesconge]ado,
ColoqueenupapardllaparaasaraF[aparamicrcondas.
Concluya el descongelamiento sumergiendo
en agua fria,
GALLINAS
Enter'as AVES D6vuelta, Cubpalas_reas calientes Coloqusenupapafdllaparaasarap[aFaramicrcondas.
con hoja de papel de aluminio. Cor_uyaeldesconge_amientosumergieqdoenaguaNa.
PAVO
Pechuga(per AVES D6vuelta, Cubpalas_reas calientes Colcque en una parfilla papaasar apta para
bajode8libras) con hoja de papelde aluminio, microondas,Concluya el descongelamiento
sumergiendo en agua fria,
Programar pescados
ALIMENTOS PRO- SEI_IAL ACOSTICA INSTRUCCIONES ESPECIALES
GRAMAR
PESCADO
Filetes PESCADO
Bistec
Enteros
SHELLFISH
Crabmeat
Lobstertails
Shrimp
Scallops
PESCADO
D6vuelta.Sifueraposiblesepareles
§letescuandesehallenparcialmsnte
descongelados,
Separe y vuelva a disponer.
PESCADO D6 vuelta.
PESCABO
PESCADO
PESCADO
PESCADO
Sep&retos. D6 vuelta.
D6vuelta y vuelva a disponerlas.
Sep&relosy vuelva a disponerlos
Sep&relosy vuelva a disponerlos
Coloque en un plato de homo apto para
microondas. Cuidadosamente separe
los filetes bajo agua fria.
Coloque en un plato de homo apto para
microondas, Deje correr agua fr[a basra
que conctuya el descongelamiento.
Coloque en un plato de homo apto para
microondas,
Cubra la cabeza y Ia cola con papel
aluminio; no deje que el papeI aluminio
toque los lades deI homo de
microondas, Deje correr agua fr[a basra
que conctuya el descongelamiento.
Coloqueenunplatodehomoaptoparamicrcondas,
Coloqueenunplatodehomoaptoparamicrcondas,
Coloqueenunplatodehomoaptoparamicrcondas,
Coloqueenunplatodehomoaptoparamicrcondas,
48

SUGERENCIASPARADESCONGELAMIENTOMANTENER CALIENTE
• Cuando useel Descongelamientaautom_[ico, el
peso a ser introducidoes el peso neroen librasy
d_cimas de libras(el peso del alimenta menca el
envase),
•Antes de comenzar, asegQresede quitar cualquiera
de las hiloso ataduras de metal que a menudo
vienen con las bolsas de alimentos y reempl_celas
con hilos o bandas el_s[icas.
•Abra los envasestales come car[ones antes de
colocados en e{homo.
•Siempre rompa o perfore lasbolsas pl_sficaso
envolturas
•Si losalimentos est_n envueltos, quite la hoja de
aluminio y col6quelca en un envase adecuado.
• Rompa las c_scaras si hubiera,de alimentca
congelados tales come salchichas.
• Doble losenvases pl_sficos de alJmentcapara
asegurar un descongelamiento parejo.
•Siempre calcule en menca el tiempo de
descongelamienta. Si el alimento descongelado
est_ a{3nhelado en el centre,vuelva a cdocado en
el homo de microondas para m_s
descongelamienta.
• Elfiempo que tama el descongelamienta varia de
acuerdo a la solidez de congelamiento del alJmenta.
• La forma del envase afectaa la velocidad con que
el alJmentase descongela,descongelar.
Losenvases pJanca 8e descongelan m_s
r_pidamenta que un bloque profundo.
• Cuando el alimenta comienza a descongelarse,
separate los pedazos. Los pedazos separadca se
descongelan m_s f_cilmen[e.
• UsepedazaspequeSosde hojasde papeldealuminio
paracubrirlaspartesde alimentascomealasde polio,
extremesde patas,colasde pescade,o _reasque
comienzana calentarse.Aseg_reseque la hejade
aluminieno toquelos ladas,tacho,orondodel homo.
La hojadealuminiopuededaSarel revastimienta
intedordel homo.
• Para obtener mejores resultados, permita
permanecer al aiimenta despu6s de descongelarse.
(Para rn_sinformaci6nsobre tiempo de
permanencia,yea la secoi6n"Sugerenciasde
COCCi6nen microondas'3
• D_vuelta el alimenta duranta el descongelamiento
o tiempo de perrnanencia.Separey quite el
alimento cuando sea necesario,
Puede mantaner calientasy segurca los alimentas
cocinados, calentadosen su homo de microondas
hasta 99 minutes, 99 segundos (aproximadamenta 1
hera,40 minutes). Puede usar "Mantanercalienta"
per s{mismo, o seguirautom_ticamenta un ciclo de
cocoi6n.
Ejemplo: Para usar Ia funcibn "Mantener caliente",
Toque: La pantalla
mostrar :
HOLD_dRRR/
.
TDUEH5TR,_T
. 'dR R
se desliza a tray,s de la
pantalla.
AIfinal de la funci6n "Mantaner calienta",
aparecer_en la pantalla el mensaje "END" y se
oir_n cuatro tonca.
Para que "Mantener caliente" siga
autom_ticamente a otto cielo:
- Mientras est_ tocando las ins[rucaionesde cocina,
[cque Mantaner calienta an[es de tocar START.
Cierre la puer[ay toque Mantener Calienta, luego
toque START si se desea un fiempo adicionalde
Mantaner Calienta.
• Cuando terrninael _ltimo eiclode coccibn, oir_
dos tones. "Mantanercalienta" seguir_mientras el
homo continuafuncionando.
- Puede programar que "Mantaner caliente" siga al
descongelamiento autorn_fico, ccoci6n o cocoi6n en
ciclca m_lfiples.
NOTAS:
- "Mantaner calienta"opera hasta un total de gg
minutes, g9 segundca.
- Abrir el homo cancela "Mantanercalienta".
Cierre la puer[ay toque "Mantanercalienta", luego
toque START si se desea un fiempe adicionalde
"Mantanercalienta"
- Los alimentca ya cocinadcadeben ser cubiertos
duranta "Mantanercalienta".
- Los platesde pastaleri'a(pastales, empanadas, eta.)
deben estar sincubier[a durantala funci6n
"Mantanercalienta".
- Las comidas completas que se desee mantaner
calientas sobre un plato, deben cubrirse duranta la
funci6n "Mantaner caliente".
- No use m_s de un ciclo complete de "Mantaner
caliente"(aproximadamenta 1 hera,40 minutca).
La calidad de algunosalimentos se desmejorar_
conun tiempo muy extendido. 49

USAR EL QUICK TOUCH
(TOQUE RAPIDS)
Elmen_desuhomohasidoprogramadoparacocinar
autom_ticamentelosalimentos.Diga[ealhomoIoque
dese&Luegopermitaa suhomode microondasoscinarsus
se[ecciones.
PALOMITAS DE MAIZ
"Palomitade ma[z" le permite preparar palomitas
de ma[zcomercialmente empacada apl.apara
microonda. Prepare solo un paqueteporvez. Si
est_ usando un reventador de microondas para
palomitas de ma[z, siga lasinsl.reccionesdel
fabdcantes. Para ajustar correctamente su homo
de microondas, siga esta gr_fica :
Ejemplo: Para preparar una bolsa de 3,0oz
Toque: La pantalla
mostrar_:
1. L75OZfOUEfll
3.0OZfOL/£fl2
3.5OZ TOUCH3
.
Empieza el controreloj y la
COCCION.
Cuando hayaconcluido el tiempo de cocciSnoir_
cuatro bipsy aparecer_ "END" en la pantalla,
An[es de preparar laspalomitas, remueva el
separador del homo (refedra la p_gina 58),
PIZZA
Pizza"le permi[e recalentar has[a 3 porciones de
pizza. Una porci6nest_ basada en una de 5 onzas
NOTA :
•Colcque sobre un pla[o bajo & papel de cocina
•No Iocubra.
Ejemplo: Para recalentar 2 porciones de Pizza,
Toque: La pantalla
mostrard:
.
TOUEH170 3 5LI£E5
2. Empieza el controreloj y la
COCClON.
Cuando hayaconciuido el tiempo de cocci6nsire
cuatro bipsy aparecer_ "END" en la pantalla.
5O
ENTRADA CONGELADA
LasEntradasCongeladaslepermtiecocinarplatesde
entradacongeladaparahomodemicrcondesde10a20
onzascomercialmenteempacadessinqueintroduzesalg_n
tiempodecocd_nonivelesdepotend&RetireIsbandejadel
cartonexterior.Noretirelacubiertadepeticula,peror6mpalo
parerespirede_.
Ejemplo:Pararecalentarun platode comidade
20 oz.
Toque: La pantalla
mostrar&:
1. I OOZ TOUEHl
20 OZ TOUEH2
2.
Empieza el controreloj y
la COCCI(_N.
Cuando haya correluido el tiempo de cocci6n oir_
cua[ro bips y aparecer_ "END" en la pantalla.
PAPA (PATATA)
"Papas"(patatas)lepermitecocinarpapascontiemposy
potenciasdeoscci6npredeterminados.Puedeoscogerde"
a 4 papas.
NOTA:
•Lostiemposde cocci6nest_npasadosanpapasdeun
promediode8 o_as,
•Antesdehomear,pafforecontenedorlapapavariasveces.
•Despu6sdehomear,d_jelasreposarenvueltasdurante
5 minutos.
Ejemplo: Para cocinar 2 papas (patatas),
Toque: La pantalla
mostrard:
1. TOUEHI TO V
POTflTOE5
2. Empiezael controrelojy la
COCClON.
Cuando haya concluido el tiempo de cocci6n oir_
cuatro bips y aparecer_"END" en la pantalla.
BEBIDAS
"Bebidas"le permits calentar hasta 2 bebidas.
NOTA:
•Lostiemposde recalentamientobasadosen un
bass de 8 onzas.
•La bebidapuedeestarmuycaliente;retiredel
homo concuidado.
Example: To reheat one cup _f Beverage,
Toque: La pantalla
mostrar&:
1. TOUEH/ TO 2 EUP5
Empiezael contrerelojy
2. laCOCCION,
Cuando haya concluido el tiempo de cocci_n oir_
cuatro bips y aparecer_"END" en la pantalla,

COCCI_N AUTOMATICA
"Cocci6n Au[om_tica" le provee cue[to categories
predeterminadas para la cocci6n,
Ejemplo: Para cocinar 2 vasos de caserola
Toque: La pantalla
mostrarb:
.
.
5ELE£T,96_IUITO 3
--SEE£00/=;IMGGUIDE
ERSSEROLE
TOUEHITOVEUP5
Escoje la categoria del alimento
Categoria Toque n6mero
de pad
Verdura
I
fresca
Verdura 2
congelada
Caserola 3
Toque: La pantalla
mostrarb:
.
Empiezael controrelojy Ja
COCCION.
Introduzca la cantidad/porciones
Categoda Toque n_mero
de pad
Verdura
fresca 1 _4 vasos
Verdura
congelada 1 * 4 vasos
Caserola 1 * 4 vasos
Cuando haya concluido el tiempo de cocci6noi_
cuatro bipsy aparecerQ"END" en la pantalla,
GU|A PARA LA COCCI_N AUTOMATICA
C(_DIGO CATEGOR|A INDICACIONES
VERDURA
FRESCA
VERDURA
CONGELADA
CASEROLA
CANTIDAD
1 vaso
2 vasos
3 vasos
4 vasos
1 vaso
2 vasos
3 vasos
4 vasos
1 vaso
2 vasos
3 vasos
4 vasos
Coloque en una caserola o recipiente
apto para el homo de microonda.
Agregue agua de acuerdo a la cantidad
Cubra con envoltura pl_stica y perfore.
Deje permanecer 3 minutos.
• %2vasos:agregue2cud_aradilasdeagua
• 34 vasos:agregue2cucharatidasdeagua,
Coloque en una caserola o recipiente
apto para el homo de microonda.
Cubra con envoltura pl_stica y perfore.
Deje permanecer 3 minutos.
• %2vasos:agregue2cud_aradilasdeagua
• 34 vasos:agregue2cucharatidasdeagua,
Coloque en una caserola o recipiente
apto para el homo de microonda.
Cubra con envoltura pl_stica y perfore.
Agite y deje permanecer 3 minutos.
51

RECALENTAMIENTO AUTOMATICO
"RecalentamientoAutom_tico"le proveecuatro
categorfaspredeterminadasparael recalentamiento,
Ejemplo: Para recalentar 2 porciones de plato
de Cena,
Toque: La pantalla
mostrarb:
.
5ELEETREhlU/ TOV
--SEEEO0t_5 5Lt/BE
.
,.iER PLfl, E
TOUEHI TO2 5ER#'H55
Escoje la categoria del alimento.
Categoria Toque nt3mero
de pad
Plato de Cena I
Sopa / Salsa 2
Caserola 3
Rollo / Panecillo 4
Toque: La pantalla
mostrarb:
.
Empiezael contmrelojy la
COCClON.
Introduzca la cantidad/porciones
NOmem de
Categor[a vasosiItems
Plato de Cena I _2pordones
Sopa / Salsa I _4vasos
Caserola I _4vasos
Rollo / Panecillo I_4 pedazos
Cuando hayaconduido el tiempo de cocci6n oirQ
cuatro bipsy aparecer_ "END" en la pantalla.
GUJA PARA EL RECALENTAMIENTO AUTOMATICO
C6DIGO CATEGORiA INDICACIONES
1 PLATO DE CENA
2
3
4
SOPA / SALSA
CASEROLA
ROLLO/
PANECILLO
CANTIDAD
I porcione (I0 oz.)
2 porciones (15 oz.)
I vaso
2 vasos
3 vasos
4 vasos
I vaso
2 vasos
3 vasos
4 vasos
1 pedazo (2 oz.)
2 pedazos (4 oz.)
3 pedazos (6 oz.)
4 pedazos (8 oz.)
Coloque sobre un plato bajo
Cubra con una envoltura pl&stica perforada.
Deje permanecer 3 minutos.
Coloque en una caserola somera apta
para el homo de microonda.
Cubra con una envoltura pl;_sticaperforada.
Agite y deje permanecer 3 minutos
Coloque en una caserola o recipiente
aptos para el homo de microonda.
Cubra con una envoltura pl_stisa perforada.
Agite y deje permanecer 3 minutos.
Coloque sobre un papel de cocina.
No Io cubra.
52

Cuidar su horno de microondas
Para asegurarse de que su homo de microondasse yea bien y trabajedebidamente durante mucho tiempo,
debe man[enerlo adecuadamente, Para su cuidado correcto, siga cuidadosamente estas ins[rucciones,
Para las superficies interiores : Lavea menudo
con aguajabonosa tibia
con esponjao paso
suave,
Use solo]abones
suaves no abrasivos o
un detergente suave,
Aseg6rese de
mantener las _reas
limpias donde se
tocan lapuertay el
marco del homo cuando se cierran,
Limpiebien con un paso limpio. Con el tiempo,
pueden aparecer manchas en la supe_cie como
resultado de salpicadurasde particulas de alimento
duran[e la cocci6n.Esto es normal.
Para suciedad rebelde,
hierva una taza de agua
en el homo duran[e2 o
3 minutos. Elvapor
ablandar_ la suciedad.
Para quitar olores
dentrodel homo, hierva
una taza de agua con
algo de ]ugo de lim6n o
vinagre.
Parasuperficies exterioresy panel de control:
Use un paso suave con
limpiadorde viddos en
spray Aplique el
{impiadorde viddos en
spray al paso suave; no
aplique el spray
directamente en el
homo.
NOTA:
Los limpiadores
abrasivos, las almohadillas de lana de acero, los
_ahos limpiadores bsperos, algunas toallas de
papel, etc,, pueden da_ar el panelde controly las
superficies interiores o exledores del homo.
Para limpiar la bandeja giratoria y su soporte,
Placa giratoria I_veloscon agua
de Cristal jabonosa con esponja y
para _reascon suciedad
pesada use un Hmpiador
mediano y una esponja
de Hmpieza.La bandeja
giratoria ysu soporte son
seguras para un
lavaplatos.
Ayuda de la
placa giratoria
53

CUIDADO DE LOS FILTROS
Los filtrosde grasadeben ser quitados y lavados a menudo, al menos una vez al mes.
NOTA: Si est_ instalada la combinaci6n en la campana de su microonda parareciroularel aire, el filtro de
carb6n (No. DePedazo 5230WIA002A) dispor]ible de Sears Ilamando a 1-8004-MY-HOME _.
El filtro de carbon no puedeser limpiado y deberia ser reemplazado cada6 a 12 meses.
Filtros de grasa (No.oePedazo2B72705B):
L=L
Filtro de carbbn (No. De Pedazo 5230W1A002A);
,ii......
1. Desenchufe elhomo de microondas o desconecta
la energia el_ctdca
2. Para quitar losfiltrosde grasa, deslice cada filtro
haciael costado. Tirede losflltros haciaabajo y
empuje haciael otro lado. El filtro caer_.
1. Deser]chufeel homo de microor]das o desconecta
la er]erg[ael6ctrica.
2. Quite lostomillos de montaje de la rejilladel
agujero de ver]tilad6n.
3. Embeba el filtro de grasas en agua calienta y un
detargenta suave. Limpiey sacuda la suciedad
embebiday la grasa. Enjuague bier]y sacuda para
secar. Nolimpie losfiltros con amon[aco, agentas
corrosivosde limpieza tales como limpiadores de
homo basados en lejia ni loscoloque er] el
lavaplatos. Losfiltros sevolver_n negroso pueden
daSarse.
'%iiiiiiiiiiiiii
4. Para reemplazar los filtrosde grasa. Desliceel filtro
er]la rar]uradel marco hacia un lado de la
abertura. Empuje el filtro hacia arriba y empuje
haciael otto lado para bloquear en su lugar.
Gancho
3, Incline la rejilla haciadelar][e, luego lev_r]talapara
quitada.
4. Levar][ela parte posterior del filtro de carb6r].
Desliceel filtro directamenta haciafuera.
5. Er]chufeel homo de microondas o reconecta la
corrientael_ctrica.
54

5.DesliceunNuevofiltrodecarb6nensulugar.
Elfiltrodebedescansarenel_nguloquese
muestra.
6.Desliceelrondodelarejilladelventiladorensu
lugar.Empujelapartesupedorhastaquecalceen
sulugar.Reemplacelostomillosdemontaje.
7. Enchufe el homo de microondaso reconectela
energia el_ctfica
NOTA: Noopere la campana sinel filtro de grasas
en su lugar.
REEMPLAZARLAS LUCESDELA
PARTESUPERIORY DEL HORNO
La luz de la parte superior para la cocina
(cooktop)
1, Unplug microwave oven or disconnect power,
2, Desenchufe el homo de micrcondas o desconecte
]a energ[a el_ctrica,
3, Reemplace la bombilla con una bombilla de base
candelabra de 30 vatica, (No De Pedazo
6912W3Q001A) disponible de Sears Ilamando a
1-800-4-MY-HOME_
4.Enchufe el homo de microondas o reconectela
energia el6ctfica.
Luz del horno
1. Desenchufe el homo de microondas o desconecte
la energ[a el_ctrica.
2. Quite lostomillos de montaje de la rejilladel
agujero de ventilaci6n.
3. Inclinelarejilla hacia delante, luego lev_ntela para
quitada,
55

SOPORTE DE
BOMBILLA
4, Levanteel soporte de la bombilla
5, Reemplace la bombillacon una bombilla de babe
candelabro de 30 vatios (No De Pedazo
6912W3Q001A) disponible de Sears Ilamando a
1-800-4-MY-HOME_
6, Desplice la parte supedorde la rejilla de ventilaci6n
dentro de su lugar. Empuje la parte inferiorbasra
que encaje dentro del lugar. Recoloque los
[omillos de montaje.
7, Enchufe el homo de microondas o reconecte la
energia
5G

SUGERENCIAS PARA LA COCINA EN SU MICROONDA
Cantidad de alimentos
- Siaumentaodisminuyalacanfdaddea[imen_qospreparr,
attiempoquatomecodnaresea[imentoiambi6ncambiar&Per
ejampb,sidupiicalecantidadquaindicaunareceta,agrrguaun
poosm_sdelamiiadde!tiempooriginalindicadodacseci6n.
Compruebeelgrrdodetermineci6ny,sifuaranecseado,
agrrguam_stiempoanpequefiosincrrmentos.
Temperaturade iniciodela preparaci6n
- Mientrrsm_sbajaiatemparrturrdelosalimentosquase
colseanane!homodemicrcondas,mayorser_eltiempoqua
tomar_parecodner.Losalimentosetemperaturrdala
habiiad6nsepodr_nvolveracaJaniarm&_mpidemantequalos
alimentosatamperrturrde!refrigerador.
Composicibn de los alimentos
- Losatimantosconmuchagrrsaymuchaaz_carsecalentar_n
m_sr_pidoquabsalimentosquacon_Jenentoucheague.La
grseaya!az_cartambi@nalcansanunaiamperrturrm_salia
qualade!eguaane!procesedecsed6n.
,.Mientrrsm_sdensesseenlosalimentos,m_stiempotomer&
paresalaniarse.Loselimantos"Maydensos"talesosmole
camelemanm&stiempoparrvdverasalentarsequalosm&s
livianos,m_sporososcomapasialasesponjc_os.
Tamale y forma
- Lospedezosm_speque_osdealimentossecodnar_nm_s
_pidoqosteapedazosm_sgrandes.Tambi_nteapedezosdela
mismaforrnasacseJnanm&sparrjoqualospedazcade
d[ferrntesretinas.
-Conloselimentosquafanendiferrntaaspaser,laspartse
m_sdelgadsesecosina_nm_sr_pidameniaqualaspartsem_s
grosses.Coloque]aspariasm&sdeIgadasdelasalasdepolioy
laspiemasy paiasanetosntrodelplato.
Revolver,darvuelta los alimentos
- Revolverydarvueltabsa[imentosdisperseelca]orr_pidamenta
hacJaelosntrrdelplatoyevitaquasecodnedem&senlos
bordseexlemosdelosalimantos.
Cubrir los alimentos
Cubra los alimentos para:
- Reducir lassalpicaduras
- Acortar lostiempos decocci6n
- Mantener la humedad de los alimen[os
Puedauserccalquiercubieriaquaparmiiaseta_esado per[as
microondse=Vea'Conseersuhomodemicrsenda_papaconocer
losm_tadalasqua]asmicroondseatrrvisean.Siset_usandola
fund6nSanser,seegurelavantilaei6n.
Liberar la presibn en los alimentos
• Cot'tarteaalimentos(perejemp[o:pepsealhomo,salch[chas,
yemasdahuevos,yalgunasfmias)set&najusiadamante
cubiertcaperunapialomambrrna.E]vaporpuedelevaniarre
bajodelamembranadurantelacocci6n,causandoqualos
alimentosrrvienten.Parealiviarlapresi6nparrevitarque
rev[enten,perforabsalimentosantesdeosnseerconan
ianedoKpinchedecocktailosecarbadient_.
Usar el tiempo de permanencia
• Parmitasiemprequalosalimantospermanazcananmemento
despu6sdelacocc_n.Eltiempodepermenanciadespu_sdal
desosngalamientoycosdSnpermilequaletemperaturese
disperseanformaparejaatrav_ deredeslosalimantos,
mejorrndolosr_uliadosde[acocci6n.
• Ladaraci6ndelfempodepermanenciadepondedela
cantidaddaalimentosquaest_oscinendoydeladanaidadde
losmismos.Aracespuedesertancortocomeeltiempoqua[e
tomesacarlosalimentosde!homoy ]levaflosalamesaderide
sesirven.Sinembargo,cuandosetrriadealimantosdemayor
iame_oym_sdensos,eltiempodeparmanendapuedesar
m&somenosda10minu_
Ordenar los alimentos
Pareobianarmajorrsresu[tados,sebqualosalimentosdemode
parrjoanetplato.Puedehaostlodediferrniasmaneras:
• Siest_coelnandov_os ingr_diantesparrelmismoplato,
perejempbpapas(pataias)homeadas,cdSquelasosmoun
anilloparrsecocimiantouniforme.
• Cuandococinaelimentosdeformasodensidedes
irrsgulares,perejemp]opechugasdapolio,osloqualepomi6n
m&spequeSaom_sdelgadaenelosntrodelpl_todosdese
calenta_a]final
• Encapesdeelimentosfinos,sebquaunasabreotra,
• Caandococineovuatvaacaiantarsepascadoentero,haga
sertsesebrrlepielsatepravianaelrasquabmjamianto.
• Nopamlitaqualosanvasesdeloselimentostoquanlapa4a
superiorolosco,ladesde!homo.Esiaevita_laposible
formad6ndeunaresel@ctdco.
Use de la hoja de papel de aluminio
Losonvosesdemetalnodobonuaerroonunhomodo
microondaa.Noobstontoheyolgunseoxcepcionse.Si
compr6alimentsequevianonembaladoenunahojado
papeldoatuminio,gu[eseperlosinatrucdonesquoest_n
enel onvase.Cuandouseonvseesdo hojadopapolde
aluminia,lostiemposdococd6npuedenserm_slargosyo
quoIsemicroondsepenetror_ns6ialasupofficiodo Ise
alimentos.Sioncuontraquenotieneinstrucdonesenel
paquote,algaestoslineamientosgenerales:
57

SUGERENCIAS PARA LA COCINA EN SU MICROONDA (Cont.)
Uso de la hoja de papel de
aluminio (cont.)
•Coloque los envasesenun cuenco de vidrioy
agregue agua hasta cubrir la parteinfedorde los
envases, no rn_s de I/4 de pulgada(0.64 cm.)de
altura. Esto asegurar_ la distribuci6n uniforme de
calor en la partainferiorde los envases.
•Siernprequite la tapa paraevitardaSoal homo.
• Usesolamente envasesno daSados
• No use envases m_s altos que 3/4 de pulgada
(1.9 cm).
• Los envases deben estar Ilenosal menos hasta la
mitad
• Paraevitar laforrnacibn de arco el_ctrico debe
haber una distancia minima de I/4 de pulgada
(0.64 cm) entre los envases de alurninio y las
paredesdel homo y tambi6n entre dosenvases de
aluminio.
• Proteccibn, con pedazos pequeSos de papel de
aluminio, piezas de alimento que puede cooer
r_pidamenta, tales corno las puntas de ala, pemiles
de ave&
•Calentar alimento de los envases de papel de
aiuminio toma usualmenta el doble del tiempo
comparado con el recalmentarnienta en envases
pl_sticas.Viddo, china o papel. El tiempo que toma
paraque un alimento est6 listovariar_ seg_n el tipo
de envases que use.
• Deje descansar a los alimentos de 2 a 3 minutos
luego de calentariosde modo que el calor se
dis[dbuya uniformementa porlos envases.
Lo que no se debe cocinar en su
homo de microondas
• No enlate alimentosen el homo Losfrescos
cerrados pueder_expiotar causando da_o al homo.
• No use el homo de microondas paraestadlizar
objetos (biberones, etc.). Esdificil mantaner al
homo en lasaltas tampera[uras que se neoesitan
para estadlizar.
Remover el separador
•AI preparer las palomitasempacadas
comercialmente, Remueva el separador del
horno; Nocoloque la bolsade las palornitasparael
homo microondas scbre el separador o debajo del
separador.
• En el caso de preparar laspalomitas para el homo
microondascon el separedor, puede causar
incendioo daSoa su homo de microondas.
58

Preguntas y Respuestas
PREGUNTAS RESPUESTAS
&Puedo usarmi homo de microondas sin la No.Si quitao no hacegirar la bandeja giratada,
bandeja giratodao hacedagirar sosteniendo un piato tendr_ resuitadospobres. Los platos que se usanen
grande? su homo deben encajar en la bandeja giratoda.
&Puedo osarsartenes de metal o de aluminioen mi Puedeuserunahojadepapeldealuminioparaproteger(use
homo de microondas? pedazospequefiesy pianos),pequeFKx_trozesyenbandejas
dealuminioplanas(silabandejanosem_saltaque
3/4pulg.[1.9_ ]deprofandidadyes_lianaconlosalimentes
paraabsorberlapotenciademicresnda).
&Esnormal que la bandeja giratoriagire en Si. La bandeja giratoriarotaen sentido de lasagujas
cuaiquiera de lasdos direcciones? del reiojo contrado aImismo, dependiendo la rotaci6n
del motor cuando comienza eIcicIode cocci6n.
A veces la puerta de mi homo de microondas Estaapariencia es normaI y no afecta el
aparece ondulada. &Esesto normal? foncionamiento de su homo.
&Qu6 son loszumbidos que escucho cuando mi Puede o[rel sonidodel transformador cuando el ciclo
homo de microondas est_ funcionando? de lostubos de magnetr6n est_n encendidos.
&Porqu_ eIplato secalienta cuando cocino con A medidaquelesalimentessecelientan,_stestransmitan
microonda en 61? Pienso que eso no deberfa sucaloral plato.Es[6preparadaparausarprotecci6npara
suceder, lasmanesparaaacerlosalimentesdespu4sdecocinar.
&Qu6 significa"tiempode espera" ? 'q'iempo de espera" significaque los alimentosdeben
ser sacados deIhomo y cubiertos por on tiempo
adicionaI para permitir que terminen de cocinarse.
Esto Iiberaal homo para otracocci6n.
&Porqu_ salevapor por losagujeros de ventilaci6n? Elvaporseproducenormalmentedurantelacocci6n.
Elhomodemicrcondaahasidodisefiadoparaeliminarel
vapordeestemodo,a trav6sde leaagujeresdeventilaci6n.
&Puedo preparar palomitas de ma[z en mi homo de
microondas?
&C6mo obtango los mejores reaultados?
Si. Prepare palomitas de maiz empacado para
microonda siguiendo las indicacionesdel fabricante.
Nouse bolsas comunes de papel. Novuelva a
colocar n_cleos de maiz que no hayan explotado.
Noprepare palomitasde ma[zen un recipienta de
vidrio.
59

Solucibn de problemas
La mayoda de los problemas de cocina est_n causados a menudo por pequeSascosas que usted puede
determinar y solucionar sin herramientas de ningCntipo. Controle las listasde m_s abajo en las p_ginas
siguientes antes de pedirasistencia a un servicio. Si a_n necesita ayuda, Ilamea Service Sears a
1-8004-MY-HOME_
EL HORNO DE MICROONDAS NO FUNCIONA
PROBLEMA CAUSA
Nadafunciona. * El cable de alirnentaciCnde energi'ael_ctficano est_ enchufado a un
[omaconiente de tres clavijas. (Vea la secciCn"Requisitos el_ctdcos" enla p_g.
36 y la secciCn"ConexiCnel_ctfica" en p_g.38.)
• Ha saltado un fusible de la casa o un disyuntor ha interrumpido el circuito
• Ha habido una falla de alimentaciCnen el suministro de la compaSiael_ctdca,
El homo de microondasno • Usted est_ usando el homo como cron_metro,
funcionar_. Toque STOP/Clear para cancelar el homo como cronCmetrode cocina.
• La puerta no est_ firmemente cerraday bloqueada,
• No toc6 START.
• No sigui6exactamente las instrucciones.
• ContinUafuncionando una operaciCnprograrnada previarnente.
ToqueSTOP/Clear paracancelar esa operaciCn.
TIEMPOS DE COCClON
PROBLEMA CAUSA
Losalimentos no est_n
suficientemente cccidos.
• El suminis[ro el_ctdcoa su casa o a ese enchufe de pared no es suficiente o es
m&sbajo que Ionom_al.Su compaS[ael_ctdca puede decidesi la I[nea est_
baja,Su electdcistao t_cnico de servicio le puede decirsi el enchufe de pared
suminis[ra poco
• La potencia de cosciSnno est_ en la programaciCnrecornendada. Compruebe
la tablaen la p_g. 45,
La pantallamostrar_ una • La puertadel homo no est_ cerrado por completo.
cuenta regresiva pero el • Ha fijado loscontroles al temporalizadorde cocina.
homo no est_ funcionando. Toque STOP/Clear paracancelar el tempodzador de cccina,
6O

BANDEJA GIRATORIA
PROBLEMA CAUSA
La bandeja gira[oda no * La bandeja giratoriano est_ colocada correctamenteen su lugar. Debeser
gira. corregida levantandoun costado y presionandofirmemente sobre el eje central.
• El soporte no est_ funcionando correctamente. Quite la bandeja girabda y
reinicieelhomo. Si a_n necesitaayuda, llamea Service Sears a
1-800-4-MY-HOME_.Cocinar sin la bandeja giratoda le dar_ resultados pobres.
TONOS
PROBLEMA CAUSA
Nose oye el [ono de fin de • No ha introducido el comando correcto.
programa o de fin de cido.
MENSAJES EN LA PANTALLA
PROBLEMA CAUSA
La pantal]aest_ • Ha habido una in[errupci6nde suministro de energ[a Reinicieel reloj.
centelleando" :". (Vea la secci6n "Reloi "en la p_g.42.)
Si ninguna de estas[emas le causa problemas,Ilame a Service Sears a 1-800-4-MY-HOME_
61

Your Home
For repair- in your home- of all major brand appliances,
lawn and garden equipment, or heating and cooling systems,
no matter who made it, no matter who sold it!
For the replacement parts, accessories and
owner's manuals that you need to do-it-yourself.
For Sears professional installation of home appliances
and items like garage door openers and water heaters.
1-800-4-MY-HOME ® (1-800-469-4663)
Callanytime,day or night(U.S.A.andCanada)
WWVLSears.com wwvLsears.ca
Our Home
For repair of carry-in items like vacuums, lawn equipment,
and electronics, call or go on-line for the location of your nearest
Sears Parts & Repair Center.
1-800-488-1222
Call anytime, day or night (U.S.A. only)
WWVLSeaFs.com
To purchase a protectionagreement (U.S.A.)
or maintenance agreement (Canada) on a productservicedby Sears:
1-800-827-6655 (U.S.A.) 1-800-361-6665 (Canada)
Para pedirservicio de reparacibn
a domicilio,y para ordenar piezas:
1-888-SU-HOGAR s"
(1-888-784-6427)
Au Canadapourserviceenfran_ais:
1-800-LE-FOYER "c
(1-800-533-6937)
www.sears.ca
SEARS
17.t $M
®RegisteredTrademark/ Trademark/ ServiceMarkofSears, RoebuckandCo.
® _ SM
Mama Regisb'ada / Mama de F_brica / Marca de Sarvicio de Sears, Roebuck and Co, Part No, 3828W5A2620
MD
Marque de commerce I Marque d6pos6e de Seam, Roebuck and Co. © Sears, Roebuck and Co.
-
 1
1
-
 2
2
-
 3
3
-
 4
4
-
 5
5
-
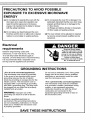 6
6
-
 7
7
-
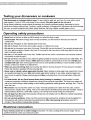 8
8
-
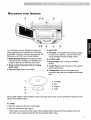 9
9
-
 10
10
-
 11
11
-
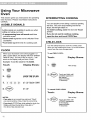 12
12
-
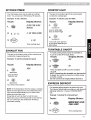 13
13
-
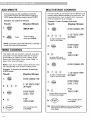 14
14
-
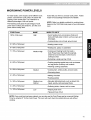 15
15
-
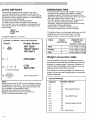 16
16
-
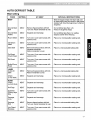 17
17
-
 18
18
-
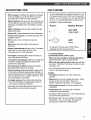 19
19
-
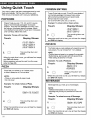 20
20
-
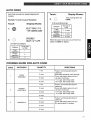 21
21
-
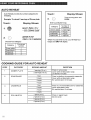 22
22
-
 23
23
-
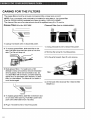 24
24
-
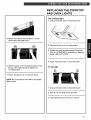 25
25
-
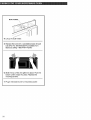 26
26
-
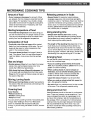 27
27
-
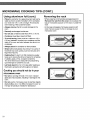 28
28
-
 29
29
-
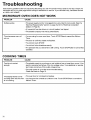 30
30
-
 31
31
-
 32
32
-
 33
33
-
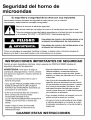 34
34
-
 35
35
-
 36
36
-
 37
37
-
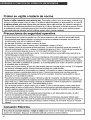 38
38
-
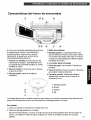 39
39
-
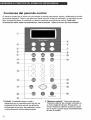 40
40
-
 41
41
-
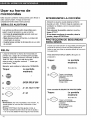 42
42
-
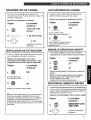 43
43
-
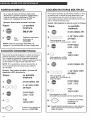 44
44
-
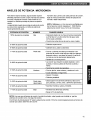 45
45
-
 46
46
-
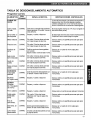 47
47
-
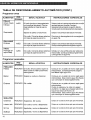 48
48
-
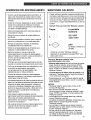 49
49
-
 50
50
-
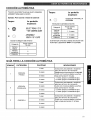 51
51
-
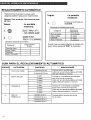 52
52
-
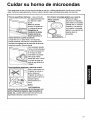 53
53
-
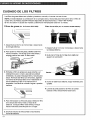 54
54
-
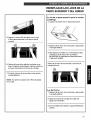 55
55
-
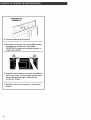 56
56
-
 57
57
-
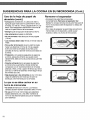 58
58
-
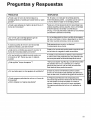 59
59
-
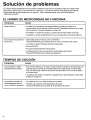 60
60
-
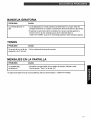 61
61
-
 62
62


Kenmore 72162622200 El manual del propietario
- Categoría
- Microondas
- Tipo
- El manual del propietario
- Este manual también es adecuado para
en otros idiomas
- English: Kenmore 72162622200 Owner's manual
Artículos relacionados
-
Kenmore 79080323310 Manual de usuario
-
Kenmore 721.63653 Manual de usuario
-
-
-
-
-
-
-
-