Aeg-Electrolux T75170AV Manual de usuario
- Categoría
- Secadoras
- Tipo
- Manual de usuario

LAVATHERM 75170AV
EN TUMBLE DRYER USER MANUAL 2
ES SECADORA DE TAMBOR MANUAL DE INSTRUCCIONES 27

SERVICE
When contacting Service, ensure that
you have the following data available.
The information can be found on the
rating plate.
Model
PNC
Serial Number
The following symbols are used in this
user manual:
Warning - Important Safety information.
General information and tips
Environmental information
Subject to change without notice
CONTENTS
4 SAFETY INFORMATION
7 ENVIRONMENT CONCERNS
8 PRODUCT DESCRIPTION
9 ACCESSORIES
10 CONTROL PANEL
11 BEFORE FIRST USE
12 PROGRAMMES
14 USING THE APPLIANCE
17 HINTS AND TIPS
18 CARE AND CLEANING
20 TROUBLE SHOOTER AND SERVICE
22 TECHNICAL INFORMATION
23 INSTALLATION
2

FOR PERFECT RESULTS
Thank you for choosing this AEG product. We have created it to give you
impeccable performance for many years, with innovative technologies that help
make life simpler – features you might not find on ordinary appliances. Please spend
a few minutes reading to get the very best from it.
ACCESSORIES AND CONSUMABLES
In the AEG webshop, you’ll find everything you need to keep all your AEG
appliances looking spotless and working perfectly. Along with a wide range of
accessories designed and built to the high quality standards you would expect, from
specialist cookware to cutlery baskets, from bottle holders to delicate laundry bags…
Visit the webshop at:
www.aeg.com/shop
VISIT OUR WEBSITE FOR:
- Products
- Brochures
- User manuals
- Trouble shooter
- Service information
www.aeg.com
ENGLISH 3

SAFETY INFORMATION
In the interest of your safety and to
ensure the correct use, before instal-
ling and first using the appliance,
read this user manual carefully, in-
cluding its hints and warnings. To
avoid unnecessary mistakes and acci-
dents, it is important to ensure that
all people using the appliance are
thoroughly familiar with its operation
and safety features. Save these in-
structions and make sure that they
remain with the appliance if it is
moved or sold, so that everyone us-
ing it through its life will be properly
informed on appliance use and safe-
ty.
- Read the instruction manual be-
fore the appliance use.
GENERAL SAFETY
• It is dangerous to alter the specifica-
tions or attempt to modify this prod-
uct in any way.
• This appliance is not intended for use
by persons (including children) with
reduced physical and sensory condi-
tions or lack of experience and
knowledge, unless they have been
given supervision or instruction con-
cerning use of the appliance by a
person responsible for their safety.
• Make sure that small children and
pets do not climb inside the drum.
To avoid this, please check into the
drum before using.
• Any objects such as coins, safety
pins, nails, screws, stones or any oth-
er hard, sharp material can cause ex-
tensive damage and must not be
placed into the machine.
• Items such as foam rubber (latex
foam), shower caps, waterproof tex-
tiles (if there is no special drying pro-
gramme), rubber backed articles and
clothes or pillows fitted with foam
rubber pads must not be dried in the
tumble dryer.
• Make sure that there is access to the
mains plug after the installation.
• Always unplug the appliance after
use, cleaning and maintenance.
• Under no circumstances should you
attempt to repair the machine your-
self. Repairs carried out by inexper-
ienced persons may cause injury or
serious malfunctioning. Contact your
local Service Centre. Always insist on
genuine spare parts.
• Items that have been soiled with sub-
stances such as cooking oil acetone,
petrol, kerosene, spot removers, tur-
pentine, waxes and wax removers
should be washed in hot water with
an extra amount of detergent before
being dried in the tumble dryer.
• Danger of explosion: Never tumble
dry items that have been in contact
with inflammable solvents (petrol,
methylated spirits, dry cleaning fluid
and the like). As these substances are
volatile, they could cause an explo-
sion. Only tumble dry items washed
with water.
• Risk of fire: items that have been
spotted or soaked with vegetable or
cooking oil constitute a fire hazard
and should not be placed in the tum-
ble dryer.
• If you have washed your laundry with
stain remover you must execute an
extra rinse cycle before loading your
tumble dryer.
• Please make sure that no gas lighters
or matches have accidentally been
left in pockets of garments incase
they are loaded into appliance
• The condensed water is not applica-
ble to drink or to prepare food. It can
cause health problems to people and
pets.
• Do not seat or lean on the load door.
The appliance can tilt.
4

WARNING!
• Risk of fire! To prevent from
the risk of self combustion
do not stop a tumble dryer
before the end of the dry-
ing cycle unless all items are
quickly removed and spread
out so that the heat is dissi-
pated.
• Lint must not be allowed to
accumulate around the tum-
ble dryer.
• Risk of electric shock! Do not spray
down the appliance with jets of wa-
ter.
• The final part of a tumble dryer cycle
occurs without heat ( cool down cy-
cle ) to ensure that the items are left
at a temperature that ensures that
items will not be damaged.
• The tumble dryer is not to be used if
industrial chemicals have been used
for cleaning.
• Ensure you have good ventilation in
the installation room to avoid the
back flow of gases into the room
from appliances burning other fuels,
including open fires.
INSTALLATION
• This appliance is heavy. Be careful
when you move the appliance.
• When unpacking the appliance,
check that it is not damaged. If in
doubt, do not use it and contact the
Service Centre.
• All packaging must be removed be-
fore use. Dangerous damage can oc-
cur to the product and to property if
this is not adhered to. See relevant
section in the user manual.
• Each electrical work necessary to in-
stall this appliance must be done by
a qualified electrician or competent
person.
• The rear surface of the appliance
must be put against the wall
• If the appliance is installed on the
carpet or equivalent, adjust the feet.
Air must flow freely below the appli-
ance.
• After the appliance installation, check
that it is not squeeze or stay on the
electrical supply cable.
• If the tumble dryer is put on top of a
washing machine, it is mandatory to
use the stacking kit (optional acces-
sory - see chapter: "ACCESSORIES").
• After having installed the appliance,
check that it is not pressing or stand-
ing on its inlet hose.
USE
• This appliance is for domestic use
only. It must not be used for other
functions .
• Only dry fabrics which are applicable
to dry in the tumble dryer. Follow the
instructions on each piece of clothing
label.
• Do not dry not washed items in the
tumble dryer.
• Do not put more load than recom-
mended. Obey the maximum load
volume. See the related chapter in
the user manual.
• Clothes which are dripping wet must
not be put in the tumble dryer.
• Garments which have been in contact
with volatile petroleum products
should not be machine dried. If vola-
tile cleaning fluids are used, care
should be taken to ensure that the
fluid is removed from the garment
before placing in the appliance.
• Do not use the tumble dryer if the
power supply cable, the control pan-
el, the working surface or the base
are damaged so that the inside of
the tumble dryer is accessible.
• Fabric softener or equivalent prod-
ucts must be used as specified by the
fabric softener manufacturer.
• Risk of fire! Do not dry the damaged
items which contain padding or fil-
lings (pillows, jackets, duvets, etc.).
The padding or fillings can get out
and cause the fire.
ENGLISH 5

•
Hot surface: Do not touch the
door light cover surface when the
light is switched on
1)
.
•
Hot surface: Do not touch the
back of the appliance while it is oper-
ating!
CHILD SAFETY
• This machine is not intended for use
by young children or infirm persons
without supervision.
• Children often do not recognise the
hazards associated with electrical ap-
pliances. Children should be super-
vised to ensure that they do not play
with the appliance.
WARNING!
• Danger of suffocation! The
packaging components (e.g.
plastic film, polystyrene) can
be dangerous to children -
Keep them out of children’s
reach.
• Keep all detergents in a safe place
out of children’s reach.
• Make sure that children or pets do
not climb inside the drum.
DISCARD THE APPLIANCE
• Disconnect the mains plug from the
mains socket.
• Cut off the mains cable and discard
it.
• Discard the door catch. This prevents
children or pets to be closed in the
appliance. There is a risk of suffoca-
tion.
1)
Only dryers equipped with internal drum light.
6

ENVIRONMENT CONCERNS
PACKAGING MATERIALS
Recycle the materials with the symbol
. Put the packaging in applicable
containers to recycle it.
The symbol
on the product or on its
packaging indicates that this product
may not be treated as household
waste. Instead it should be taken to the
appropriate collection point for the
recycling of electrical and electronic
equipment. By ensuring this product is
disposed of correctly, you will help
prevent potential negative
consequences for the environment and
human health, which could otherwise
be caused by inappropriate waste
handling of this product. For more
detailed information about recycling of
this product, please contact your local
council, your household waste disposal
service or the shop where you
purchased the product.
ENGLISH 7

PRODUCT DESCRIPTION
1
3
2
5
6
7
8
4
1
Control panel
2
Load door (reversible)
3
Filter
4
Adjustable feet
5
Plastic ring
6
Side/rear ventilation opening
7
Rating plate
8
Drum light
8

ACCESSORIES
STACKING KIT
Product name: SKP11
Available from your authorized dealer.
Stacking kit can be used only with the
washing machines specified in the leaf-
let. See leaflet attached.
Read carefully the instructions supplied
with the kit.
PEDESTAL WITH THE DRAWER
Product name: PDSTP10.
Available from your authorized dealer.
To put the appliance higher at the level
which helps to easy load and remove
the laundry .
The drawer can be use for laundry stor-
age e.g. : towels, cleaning products and
more.
Read carefully the instructions supplied
with the accessory.
VENT KIT
Universal kit for vented dryers where an
outdoor outlet is not possible. The tank
collects lint and condensation, thus
avoiding dirt and damage due to mois-
ture in the room where the tumble dry-
er is placed.
Read carefully the instructions supplied
with the kit.
ENGLISH 9

CONTROL PANEL
1 2 3
456789
1
Programme dial
2
Display
3
Push button Delay start
4
Push button Start/Pause
5
Push button Time
6
Push button Buzzer
7
Push button Long anti-crease
8
Push button Sensitive
9
Push button Delicate
DISPLAY
Symbol Description
delay start
Symbol Description
m / m
anti-crease time
crease guard (dry-
ing phase indica-
tor)
long anti-crease
indicator
drying cycle
phase indicator
clean filter indica-
tor
cooling cycle
phase indicator
child lock activa-
ted
cycle time
-
time programme
interval (10 min. -
3h.)
-
delay start inter-
val (30 min. - 20h.)
10

BEFORE FIRST USE
Clean the tumble dryer drum with a
moist cloth or set a short programme
(e.g. 30 minutes time programme) with
the load of moist cloths.
ENGLISH 11

PROGRAMMES
Pro-
grammes
Load
1)
Properties
Available
functions
Fabric
mark
Cottons
Extra dry 7 kg
To dry thick or multi- layered fab-
rics, e.g. terry towelling items,
bathrobes.
all
2)
Cupboard
dry
7 kg
To dry fabrics of even thicknesses,
e.g. terry towelling items, knitwear,
towels.
all
2)
Iron dry 7 kg
To dry normal thickness cotton or
linen laundry, e. g. bedding, table
linen.
all
2)
Synthetic
Extra dry 3 kg
To dry thick or multi-layered fab-
rics, e. g. pullovers, bedding, table
linen.
all
2)
Cupboard
dry
3 kg
To dry thin fabrics which are not ir-
oned, e.g. easy care shirts, table
linen, baby clothes, socks, lingerie
with bones or wires.
all
2)
Iron dry 3 kg
To dry thin fabrics which are also
to be ironed, e.g. knitwear, shirts.
all
2)
Special
Time pro-
gramme
7 kg
To dry laundry with the time set by
the user.
all without
Sensitive
Freshen up 1 kg
To refresh or gently cleaning tex-
tiles with commercially available
dry cleaning products.
all without
Sensitive
Bed linen 3 kg
To dry bed linen such as: single
and double sheet, pillowcase, bed-
spread.
all without
Sensitive
Jeans 7 kg
To dry leisure clothing such as
jeans, sweat-shirts of different ma-
terial thicknesses (e.g. at the neck,
cuffs and seams).
all
2)
Sport 2 kg
To dry sportswear, thin fabrics, mi-
crofiber, polyester, which are not
ironed.
all without
Sensitive
12

Pro-
grammes
Load
1)
Properties
Available
functions
Fabric
mark
Easy iron
plus
1 kg
(or 5
shirts)
To dry easy care fabrics such shirts
and blouses; for minimum ironing
effort. The results can be different
for to the different types of fabric
and its finish. Put fabrics in the
tumble dryer straight. After the cy-
cle, immediately remove dried fab-
rics and put on a cloths hanger.
all without
Sensitive
Wool care 1 kg
To refresh the cloths made of
wool . The cloths become soft and
cosy. We recommend to remove
the cloths immediately after the
programme end.
Buzzer , De-
lay start
1)
maximal weight of dry clothes
2)
The Delicate and Sensitive functions cannot be set together.
ENGLISH 13

USING THE APPLIANCE
PREPARING THE LAUNDRY
Dry only the laundry applicable
to dry in the tumble dryer. Make
sure if the laundry is applicable
to dry in the tumble dryer. Do
the check of the fabric mark on
the clothes.
Fabric
mark
Property
Applicable to dry in the tum-
ble dryer
Applicable to dry in the tum-
ble dryer at standard tem-
perature
Applicable to dry in the tum-
ble dryer at decreased tem-
perature
Not applicable to dry in the
tumble dryer
Correctly prepare the laundry:
• close zips, button up duvet covers
and attach loose ties or ribbons (e.g.
ribbons of aprons) - laundry can tan-
gle
• make sure the pockets are empty -
remove metal items (paper clips,
safety pins, etc.).
• turn items with 2 fabric layers inside
out (e.g. cotton lined anoraks, the
cotton fabric layer must be external).
Dry only:
• cotton and linen with Cottons pro-
grammes
• synthetic and mixtures with Synthetic
programmes
• separately the strong coloured tex-
tiles and the light coloured textiles -
colours can bleed
• cotton jersey and knitwear only with
the applicable programmes - items
can shrink
Do not put more laundry than
the maximum load which is 7kg.
LOADING THE LAUNDRY
1. Push the appliance door (push
point).
2. Load loosely the laundry.
3. Close the appliance door.
CAUTION!
Do not lock the laundry in be-
tween the appliance door and
rubber seal.
SETTING A PROGRAMME
Use the programme dial to set the pro-
gramme.
SPECIAL FUNCTIONS
Together with the programme you can
set special function or functions.
To activate or deactivate the function
push the applicable push button.
When the function is activated the LED
above the push button comes into the
view.
14

THE DELICATE FUNCTION
To dry more lightly the sensitive and
temperature sensitive textiles (e.g.
acrylic, viscose). For fabrics with the
symbol
on the fabric label. Pro-
gramme operates with decreased heat.
THE SENSITIVE FUNCTION
To dry lightly of fabrics that are fre-
quently worn. Programme starts on full
heat setting, which is then decrease as
the programme continue to be lightly
to the laundry.
THE ANTICREASE FUNCTION
Extends anticrease phase (30 minutes)
at the end of the drying cycle to 90 mi-
nutes. This function prevents laundry
from creases. Laundry can be removed
during the anticrease phase.
THE BUZZER FUNCTION
When the buzzer function is activated
you can hear the buzzer at the:
•cycle end
• anti-crease phase start and end
• cycle interruption
The buzzer function is by default always
on. You can use this function to activate
or deactivate the sound.
THE TIME DRYING FUNCTION
Operates only with the Time pro-
gramme. Lets the user to set special
time of drying programme from mini-
mum 10 min. to maximum of 2 hours (in
10 min. steps).
THE DELAY START FUNCTION
Let to delay the start of a drying
programme from minimum of
30 minutes to maximum of 20
hours.
1. Set the drying programme and
functions.
2. Push the Delay start button again
and again until the necessary time
of the delay come into the view on
the display (e.g.
if the pro-
gramme has to start after 12 hours.)
3. To activate the Delay start function,
push the Start/Pause button. The
time to start decreases on the dis-
play.
CHILD LOCK FUNCTION
A
B
The child lock can be set to prevent the
children to play with the appliance. The
child lock function locks all push but-
tons and the programme dial. To acti-
vate the child lock function push the A
and B buttons at the same time until
the symbol
come into view on the
display. To deactivate push again the
above buttons until the symbol go out
of view.
You can activate the child lock function:
• before you push the Start/Pause but-
ton - the appliance cannot start
• after you push the Start/Pause button
- all the push buttons and the pro-
gramme dial are deactivated
STARTING A PROGRAMME
To activate the programme push the
Start/Pause button. The LED above the
push button changes the colour to red.
CHANGE A PROGRAMME
To change a programme, turn the pro-
gramme dial to
(off) and then set the
programme again.
ENGLISH 15

AT THE END OF PROGRAMME
When the drying cycle is complete, the
symbol flashes on the display. If the
Buzzer function is on, an acoustic signal
sounds intermittently for about one mi-
nute.
The drying cycles (except for the
Wool care programme) are au-
tomatically followed by an anti-
crease phase which continue
around 30 minutes. The laundry
can be removed during the anti-
crease phase (The laundry
should be taken out towards the
end of the anti-crease phase at
the latest to prevent creases
from forming.) . If Long anti-
crease function is set, the anti-
crease phase is increased by 60
minutes.
To remove the laundry:
1.
Turn the programme dial to
(off)
2. Open the appliance door.
3. Remove the laundry.
4. Close the appliance door.
After each drying cycle: clean
the filter
(See chapter CARE AND
CLEANING.)
16

HINTS AND TIPS
ECOLOGICAL HINTS
• Do not use fabric softener to wash
and then dry. In the tumble dryer
laundry becomes soft automatically.
• Use the condensate as distilled wa-
ter, e.g. for steam ironing. If necessa-
ry clean the condensate before (e.g.
with a coffee filter) to remove possi-
ble small pieces of fluff.
• Always keep the airflow slots on the
bottom of the appliance clear.
• Use the load volumes specified in the
programmes chapter.
• Make sure that is good airflow in the
appliance installation position.
• Clean the filter after each drying cy-
cle.
• Spin good the laundry before drying.
AVERAGE LAUNDRY WEIGHTS
bathrobe 1200 g
quilt cover 700 g
man’s work shirt 600 g
man’s pyjamas 500 g
sheet 500 g
tablecloth 250 g
man’s shirt 200 g
night dress 200 g
pillow case 200 g
towelling towel 200 g
blouse 100 g
ladies’ briefs 100 g
men’s underpants 100 g
napkin 100 g
tea cloth 100 g
APPLIANCE SETTINGS
Water hardness
A
B
Water hardness can be different
for different locations. If you
know your local water hardness
you can adjust the sensor in
your appliance to get the better
result of the drying.
1. Turn the programme dial to availa-
ble programme.
2. Push at the same time the A and B
buttons and hold down until one of
the these symbols go into view on
the display:
–
low conductivity <300 μS/
cm
–
medium conductivity
300-600 μS/cm
–
high conductivity >600
μS/cm
3. Push the Start/Pause button again
and again until you set necessary
level.
4. To memorise setting push at the
same time the A and B buttons
Buzzer permanent off
A
B
1. Turn the programme dial to one of
programmes.
2. Push at the same time the A and B
buttons and hold down for approxi-
mately 5 seconds.
3. The buzzer is by default always off.
ENGLISH 17

CARE AND CLEANING
CLEANING THE FILTER
At the end of each cycle the filter indi-
cator is on to tell you that the filter must
be cleaned.
The filter collects the fluff. The
fluff occurs while the cloths are
dried in the tumble dryer.
1. Open the door.
2. Pull the filter.
3. Open the filter.
4. Use a moist hand to clean the filter.
5. If necessary clean the filter with
warm water using a brush.
Close the filter.
6. Remove fluff from the filter socket.
For this a vacuum cleaner can be
used .
7. Put the filter inside the filter socket .
CAUTION!
Do not operate the tumble dry-
er without the filter or with dam-
aged or blocked filter.
Clean the filter after each drying
cycle. Clogged filter increases
the cycle time and causes higher
energy consumption.
CLEANING THE DRUM
WARNING!
Disconnect the appliance be-
fore you clean it.
Use a standard neutral soap detergent
to clean the inner surface of the drum
and drum ribs. Dry the cleaned surfaces
with a soft cloth.
18

CAUTION!
Do not use abrasive materials or
steel wool to clean the drum.
CLEANING THE CONTROL
PANEL AND HOUSING
Use a standard neutral soap detergent
to clean the control panel and housing.
Use a moist cloth to clean. Dry the
cleaned surfaces with a soft cloth.
CAUTION!
Do not use furniture cleaning
agents or cleaning agents which
can cause corrosion to clean the
appliance.
ENGLISH 19

TROUBLE SHOOTER AND SERVICE
TROUBLE SHOOTER
Problem
1)
Possible cause Remedy
Tumble dry-
er does not
work.
Tumble dryer not connected to
mains supply.
Connect in at mains socket.
Check fuse in fuse box (domes-
tic installation).
Loading door opened. Close loading door
The Start/Pause button not
pressed.
Push the Start/Pause button.
Unsatisfac-
tory drying
results.
Incorrect programme set.
Set applicable programme.
2)
The filter clogged.
Clean the filter.
3)
Too high volume of the load.
Respect the maximum load vol-
ume.
Airflow slots covered up. Uncover airflow slots.
Dirt inside the drum. Clean the drum inside.
High water hardness.
Set applicable water hardness
4)
.
Door does
not close
Filter not locked in position.
Put the filter in the correct posi-
tion.
Laundry locked between the
door and the seal.
Put the load correctly in the
drum.
Err (Error)
on the dis-
play.
5)
Attempt to change parameters
after start of the programme.
Turn the tumble dryer off and
on. Set requested parameters.
The function you set is not ap-
plicable with the set programme
Turn the tumble dryer off and
on. Set requested parameters.
No drum
light
6)
Defective drum light.
Contact the service centre to re-
place the drum light.
Abnormally
elapsing
time on the
display
5)
Time to end is calculated on the
basis of: type, volume and
dampness of laundry.
Automatic procedure; this is not
a appliance fault.
Drying cycle
too short
Small laundry volume./Too dry
laundry for selected pro-
gramme.
Select time programme or high-
er drying level (e.g. Extra Dry ).
Drying cycle
too long
7)
The filter clogged. Clean the filter.
Too high volume of the load.
Respect the maximum load vol-
ume.
Laundry insufficiently spun. Spin adequately the laundry.
Very high room temperature -
no appliance fault.
Lower the room temperature if
possible.
20

1)
In case of error message on the display (e.g. E51- only tumble dryer with the display):
Switch the tumble dryer off and on. Set programme. Push the Start/Pause button. Does not
work? - inform local service and quote the error code.
2)
follow programme recommendation - see PROGRAMMES chapter
3)
see CARE AND CLEANINGchapter
4)
see section MACHINE SETTINGS in HINTS AND TIPS chapter
5)
only dryers with the display
6)
Only dryers with drum light.
7)
Note: After maximum 5 hours the drying cycle ends automatically (see Drying cycle
complete section).
DRUM LIGHT
Only use a special bulb which is de-
signed specially for tumble dryers. The
special bulb can be obtained from your
local service centre.
WARNING!
When the appliance is switched
on, the interior lighting switches
itself off after 4 minutes when
the door is open.
WARNING!
Do not use standard bulbs!
These develop too much heat
and may damage the appliance!
Before you replace the bulb,
disconnect the mains plug; with
a permanent connection: fully
unscrew or deactivate the fuse.
1. Unscrew cover above the bulb (this
can be found directly behind the
loading aperture, at the top; refer to
“PRODUCT DESCRIPTION” chap-
ter.)
2. Replace defective bulb.
3. Screw cover back down.
Check the correct positioning of o-ring
gasket before screwing back the door
light cover. Do not operate the tumble
dryer when missing o-ring gasket on
door light cover.
WARNING!
For safety causes , the cover
must be screwed down tightly. If
this is not done, the tumble dry-
er must not be operated.
SERVICE
If there are technical faults, first check if
you can remedy the problem yourself
with the help of the operating instruc-
tions - see section TROUBLE SHOOTER
If you cannot remedy the problem on
your own, get in touch with the Cus-
tomer Care Department or one of our
service partners.
To assist you quickly, these data are
necessary:
– Model name
– Product number (PNC)
– Serial number (Ser. No. is on rating
plate attached to the product - to find it
see chapter PRODUCT DESCRIPTION))
– Type of failure
– Any error messages shown by the dis-
play.
So that you have the necessary refer-
ence numbers from your appliance at
hand, we recommend that you write
them in here:
Mod. .................................
PNC: .................................
Ser. No. .................................
ENGLISH 21

TECHNICAL INFORMATION
height x width x depth 844 x 600 x 580 mm (maximal 640 mm)
drum volume 108 l
maximum depth with the load door
opened
1090 mm
maximum width with the load door
opened
950 mm
adjustable height 850 mm (+ 15 mm - feet regulation)
the appliance weight 31,5 kg
maximum load volume 7 kg
voltage 230 V
frequency 50 Hz
necessary fuse 16 A
total power 2600 W
energy efficiency class C
energy consumption kWh/cycle
1)
3,9 kWh
annual energy consumption 263,1 kWh
type of use Domestic
permitted ambient temperature + 5°C to + 35°C
1)
7 kg of cotton, centrifuged at 1000 rpm with reference to EN 61121
22

INSTALLATION
APPLIANCE POSITIONING
• The tumble dryer must be installed in
a clean position, where dirt does not
collect.
• Air must flow freely around the appli-
ance. Make sure that the front airflow
slots in the bottom of the appliance
are not blocked .
• To keep vibration and noise at the
minimum, when the tumble dryer op-
erates, it must be put on a stable and
flat surface.
• When the appliance is put in its per-
manent position, check if is fully level
with the aid of a spirit level. If it is
not, adjust the feet until it is.
• Do not remove the feet. Do not de-
crease the floor clearance through
thick carpets, bar of wood or equiva-
lent. This can increase the heat which
can cause interference with the oper-
ation of the appliance.
• The temperature of the hot
air which occurs in the tumble
dryer can increase to 60 °C.
The appliance must not be in-
stalled on the floor which is
not resistant to high tempera-
tures.
• When the tumble dryer oper-
ates, the room temperature
must not be lower than +5 °C
and higher than +35 °C. This
can cause unwanted effect on
the performance of the appli-
ance.
• If it is necessary to move the
appliance, it must be moved
vertically.
• The appliance must not be in-
stalled behind a lockable
door, a sliding door, a door
with a hinge on the opposite
side to that of the appliance
in such a way that a full open-
ing of the tumble dryer is re-
stricted.
UNPACKING
CAUTION!
Before use all parts of the transport
packaging must be removed.
1. Open loading door.
2. Pull off adhesive strips from inside
machine on top of drum.
3. Remove foil hose and polystyrene
padding from the machine.
ENGLISH 23

THE VENT HOSE
INSTALLATION
There are 3 vent outlets: on the
left, right side and at the rear.
1. Pull the ring nut A from the vent
outlet at the rear.
2. Screw on the ring nut to the hose
and push it into position.
3. The not used vents must be sealed
with supplied covers.
If the hose is long and the room
temperature low, the moisture
might condense to water inside
the hose. This is an usual occur-
rence. To prevent this water
from the hose, it is recommend
to drill a small hole (via. 3 mm) in
the lowest point of the hose and
to put a small container below
it. (See picture, point B).
Make sure that the vent hose
length is less than 2 m, and that
it contains no more than 2
bends.
As to the outlet itself, if you have deci-
ded on a install wall/window grille, a
good local builder’s merchant can sup-
ply you with the necessary fittings and
installation advice.
WARNING!
It is important not to connect
the vent hose to, for example, a
cooker hood, or a chimney or
flue pipe designed to transmit
the exhaust from a fuel burning
appliance.
Note that to prevent condensation
problems, it is essential that the dryer
be installed with the flexible hose to
transmit its “exhaust” at least beyond
the kitchen units; preferable outside the
kitchen. In order to prevent the appli-
ance from overheating, it is important
24

that the steam exhaust is unobstructed.
Thus, if a permanent hose installed to
an external wall or ceiling, it must be
ensured an exhaust capacity of mini-
mum 150 m3/h. If the dryer is installed
adjacent to kitchen units, make sure
that the vent hose is not squashed. If
the hose is not fully squashed, drying
efficiency will be decreased , resulting
in longer drying times and higher ener-
gy consumption. If the hose is fully
squashed, the automatic cut-outs with
which the appliance is fitted can oper-
ate. When operating the tumble dryer,
the room temperature must not be low-
er than +5°C and higher than +35°C, as
it can affect the performance of the ap-
pliance.
THE LOAD DOOR REVERSAL
WARNING!
Before changing the door stop,
disconnect the mains plug.
1. Open load door.
2. Unscrew hinge A from the front of
the appliance and remove the load
door.
3. Remove cover plates B. To do this,
put a thin screwdriver into the slots
as shown in the illustration, push
down lightly and remove the cover
plates.
A
C
A
B
B
4. Use an applicable tool and apply
pressure to unlock part C, remove
and turn it through 180°, then put
on the other side.
CAUTION!
There is a small spring below
locking block C. To put all parts
together correctly, look at the il-
lustrations:
ENGLISH 25

5. Unscrew hinge A from the load
door and turn it through 180°, then
put on the opposite side and screw
down.
6. Turn cover plates B through 180°
and put them on the opposite side.
7. Unscrew cover plates D from the
front of the appliance, turn through
180° and screw down on the oppo-
site side.
E
E
D
D
FF
8. Unscrew door lock E, push down
lightly and remove from the front of
the appliance.
9. Push snap-in button F in and down,
push cover down lightly and re-
move from front of the appliance.
10. Change door lock E above to the
opposite side, screw down the
door interlock.
11. On the other side, put cover F and
let snap-in button to lock into posi-
tion.
12. Put load door and hinges into re-
cesses on the front of the appliance
and screw down.
Note regarding contact pro-
tection: The appliance is only
secure for operations again
once all plastic parts have been
put.
ELECTRICAL CONNECTION
• Connect the machine to an earthed
socket, in accordance with current
wiring regulations.
• Make sure that the electrical data on
the rating plate agrees with the pow-
er supply.
• Always use a correctly installed
shockproof socket.
• Do not use multiple plugs and exten-
sion cables. There is a risk of fire.
• Should the appliance power supply
cable need to be replaced, this must
be carried out by our Service Centre.
• Make sure not to squash or cause
damage to the mains plug and cable
behind the appliance.
• Do not pull the mains cable to dis-
connect the appliance. Always pull
the mains plug.
• The plug must be dry.
26

SERVICIO TÉCNICO
Cuando se ponga en contacto con el
servicio técnico, asegúrese de tener a
mano los siguientes datos. Puede
encontrar la información en la placa de
características.
Modelo
PNC
Número de serie
En este manual de usuario se utilizan los
símbolos siguientes:
Advertencia - Información importante
sobre seguridad.
Datos y recomendaciones generales
Información medioambiental
Salvo modificaciones
ÍNDICE DE MATERIAS
29 INFORMACIÓN SOBRE SEGURIDAD
32 ASPECTOS MEDIOAMBIENTALES
33 DESCRIPCIÓN DEL PRODUCTO
34 ACCESORIOS
35 PANEL DE CONTROL
36 ANTES DEL PRIMER USO
37 PROGRAMAS
39 UTILIZACIÓN DEL APARATO
42 CONSEJOS
44 MANTENIMIENTO Y LIMPIEZA
46 SOLUCIÓN DE PROBLEMAS Y SERVICIO
49 INFORMACIÓN TÉCNICA
50 INSTALACIÓN
ESPAÑOL 27

PARA OBTENER RESULTADOS PERFECTOS
Gracias por escoger este producto AEG. Este artículo ha sido creado para ofrecer un
rendimiento impecable durante muchos años, con innovadoras tecnologías que
facilitarán su vida y prestaciones que probablemente no encuentre en
electrodomésticos corrientes. Por favor, dedique algunos minutos a la lectura para
disfrutar de todas sus ventajas.
ACCESORIOS Y CONSUMIBLES
En la página web de AEG, encontrará todo lo necesario para la perfecta limpieza y
funcionamiento de todos sus electrodomésticos AEG. Junto con una amplia gama
de accesorios diseñados y fabricados conforme a los elevados estándares de calidad
característicos de la marca, desde utensilios de cocina especializados a cestos de
cubiertos, desde portabotellas a bolsas para el lavado de prendas delicadas...
Visite la tienda web en
www.aeg.com/shop
Consulte en nuestro sitio web:
- Productos
- Folletos
- Manuales del usuario
- Solución de problemas
- Información sobre servicios
www.aeg.com
28

INFORMACIÓN SOBRE SEGURIDAD
En interés de su seguridad y con el
fin de garantizar un uso correcto, an-
tes de instalar y utilizar por primera
vez el aparato, lea detenidamente es-
te manual de usuario, incluyendo sus
consejos y advertencias. Para evitar
errores y accidentes, es importante
que todas las personas que utilicen el
aparato estén perfectamente al tanto
de su funcionamiento y de las carac-
terísticas de seguridad. Conserve es-
tas instrucciones y no olvide guardar-
las junto al aparato en caso de des-
plazamiento o venta para que quie-
nes lo utilicen a lo largo de su vida
útil dispongan siempre de la informa-
ción adecuada sobre el uso y la segu-
ridad.
- Lea el manual de instrucciones
antes de utilizar el aparato.
INSTRUCCIONES GENERALES
DE SEGURIDAD
• Resulta peligroso alterar las especifi-
caciones o intentar modificar este
producto de cualquier forma.
• Este electrodoméstico no está desti-
nado a personas (incluidos niños) con
funciones físicas o sensoriales reduci-
das o con experiencia y conocimien-
to insuficientes, a menos que una
persona responsable de su seguri-
dad les supervise o les instruya en el
uso del electrodoméstico.
• Impida el acceso de los niños y ani-
males domésticos pequeños al inte-
rior del tambor. Para evitarlo, com-
pruebe el interior del tambor antes
de utilizar el aparato.
• Cualquier objeto como, por ejemplo,
monedas, imperdibles, clavos, torni-
llos, piedras o cualquier otro material
duro y afilado puede provocar daños
considerables y no se debe introducir
en la máquina.
• Las prendas como la gomaespuma
(espuma de látex), gorros de ducha,
tejidos impermeables (si no hay nin-
gún programa de secado especial),
prendas y artículos forrados de goma
o almohadas con rellenos de go-
maespuma, no se deben secar en la
secadora.
• Asegúrese de tener acceso al enchu-
fe del suministro de red una vez ins-
talado el aparato.
• Desenchufe siempre el aparato des-
pués de su uso, limpieza y manteni-
miento.
• Bajo ninguna circunstancia debe in-
tentar reparar la máquina por su
cuenta. Las reparaciones realizadas
por personas sin preparación o expe-
riencia pueden causar lesiones per-
sonales o fallos de funcionamiento.
Diríjase a su Centro de servicio local.
Utilice siempre piezas de repuesto
originales.
• Las prendas que se hayan ensuciado
con sustancias como aceite de coci-
na, acetona, gasolina, keroseno, qui-
tamanchas, aguarrás, ceras y quitace-
ras se deben lavar en agua caliente
con una cantidad adicional de deter-
gente antes de secarlas en la secado-
ra.
• Peligro de explosión: no seque nun-
ca prendas que hayan estado en con-
tacto con disolventes inflamables
(gasolina, alcoholes metílicos, líquido
de limpieza en seco, etc.). Dado que
estas sustancias son volátiles, po-
drían provocar una explosión. Seque
sólo prendas lavadas con agua.
• Peligro de incendio: las prendas
que se hayan manchado o empapa-
do de aceite vegetal o de cocina su-
ponen un peligro de incendio y no se
deben introducir en la secadora.
• Si ha lavado la ropa sucia con un qui-
tamanchas, deberá aplicar un ciclo
de aclarado más antes de introducir-
la en la secadora.
• Asegúrese de que no se han dejado
por descuido mecheros de gas o ce-
rillas en los bolsillos de prendas que
se van a introducir en el electrodo-
méstico.
ESPAÑOL 29

• El agua de condensación no se pue-
de usar para beber o preparar ali-
mentos. Puede provocar problemas
de salud en las personas y los anima-
les domésticos.
• No se siente ni se apoye sobre la
puerta de carga, ya que el aparato
puede volcarse.
ADVERTENCIA
• Peligro de incendio: Para
evitar el riesgo de autocom-
bustión, no detenga una se-
cadora antes del final del ci-
clo de secado a menos que
todas las prendas se retiren
rápidamente y se extiendan
para disipar el calor.
• No deben acumularse hila-
chas alrededor de la secado-
ra de tambor.
• ¡Peligro de descarga eléctrica! No
moje el electrodoméstico con cho-
rros de agua.
• La parte final de un ciclo de secado
se produce sin calor (ciclo de enfria-
miento) para garantizar que las pren-
das queden a una temperatura que
no las dañe.
• La secadora no se debe utilizar si se
han empleado productos químicos
industriales para la limpieza.
• Asegúrese de que el recinto de insta-
lación esté bien ventilado para evitar
el revoco de gases en el recinto pro-
cedentes de aparatos que utilicen
otros combustibles, incluyendo lla-
mas al aire libre
INSTALACIÓN
• Este aparato es pesado. Tome las
debidas precauciones cuando des-
place el aparato.
• Al desembalar el aparato, comprue-
be que no esté dañado. Si tiene al-
guna duda, no lo utilice y póngase
en contacto con el centro de servicio
técnico.
• Antes de utilizar el aparato, se debe
retirar todo el embalaje. De lo con-
trario, se pueden producir daños gra-
ves en el producto y daños materia-
les. Consulte el apartado correspon-
diente en el manual del usuario.
• Cualquier trabajo eléctrico que sea
necesario para instalar este aparato
lo debe llevar a cabo un electricista
cualificado o una persona competen-
te.
• La superficie posterior del aparato se
debe colocar contra la pared.
• Si el aparato se instala en una alfom-
bra o similar, ajuste las patas. El aire
debe circular libremente por debajo
del aparato.
• Una vez instalado el aparato, asegú-
rese de que no aplasta ni está enci-
ma del cable de alimentación eléctri-
ca.
• Si la secadora está colocada sobre
una lavadora, es obligatorio utilizar el
kit de torre (accesorio opcional, con-
sulte el capítulo: "ACCESORIOS").
• Una vez instalado el aparato, com-
pruebe que no presione ni se apoye
sobre la manguera de entrada.
USO
• Este aparato está diseñado exclusiva-
mente para uso doméstico. No pue-
de utilizarse para otros propósitos.
• Seque únicamente prendas aptas pa-
ra secar a máquina. Siga las instruc-
ciones de la etiqueta de cada pren-
da.
• No utilice la secadora para secar
prendas no lavadas.
• No la cargue más de lo recomenda-
do. Cumpla el volumen de carga má-
xima. Consulte el apartado corres-
pondiente del manual del usuario.
• No se deben colocar en la secadora
prendas que goteen.
• No se deben secar en la secadora
prendas que hayan estado en con-
tacto con productos volátiles a base
de petróleo. Si utiliza líquidos de lim-
pieza volátiles, asegúrese de que no
queden restos de líquido en la pren-
da antes de introducirla en el apara-
to.
30

• No utilice la secadora si el cable de
corriente eléctrica, el panel de con-
trol, la superficie de trabajo o la base
están dañados y se puede acceder al
interior del aparato.
• Los suavizantes o productos similares
se deben utilizar tal y como se espe-
cifica en las instrucciones del fabri-
cante.
• ¡Peligro de incendio! No seque pren-
das dañadas que tengan acolchados
o rellenos (almohadas, chaquetas,
edredones, etc.). Los acolchados o
rellenos pueden salirse y provocar in-
cendios.
•
Superficie caliente: no toque la
superficie de la luz de la puerta mien-
tras esté encendida.
2)
.
•
Superficie caliente: ¡No toque la
parte posterior de la máquina mien-
tras esté en marcha
SEGURO INFANTIL
• Esta máquina no está destinada a
que la usen niños pequeños o perso-
nas enfermas sin supervisión.
• A menudo, los niños no reconocen
los riesgos asociados a los aparatos
eléctricos Se debe vigilar a los niños
para asegurarse de que no jueguen
con el aparato.
ADVERTENCIA
• Peligro de asfixia. Los compo-
nentes del embalaje (por
ejemplo, la película de plásti-
co o poliestireno) pueden ser
peligrosos para los niños:
manténgalos fuera del alcan-
ce de los niños.
• Guarde los detergentes en un lugar
seguro al que no puedan acceder los
niños.
• Impida el acceso de los niños y los
animales domésticos al interior del
tambor.
DESECHE EL APARATO.
• Desenchufe el aparato de la toma de
red.
• Corte el cable de conexión a la red y
deséchelo.
• Deseche el cierre de la puerta. De
esta forma evitará que los niños o
mascotas queden encerrados en el
aparato. Existe riesgo de asfixia.
2)
Sólo secadoras equipadas con luz interna en el tambor
ESPAÑOL 31

ASPECTOS MEDIOAMBIENTALES
MATERIALES DE EMBALAJE
Recicle los materiales con el símbolo
. Coloque el material de embalaje en
los contenedores adecuados para reci-
clarlo.
El símbolo
que aparece en el
aparato o en su embalaje, indica que
este producto no se puede tratar como
un residuo normal del hogar. Se deberá
entregar, sin coste para el poseedor,
bien al distribuidor, en el acto de la
compra de un nuevo producto similar al
que se deshecha, bien a un punto
municipal de recolección selectiva de
equipos eléctricos y electrónicos para
su reciclaje. Al asegurarse de que este
producto se desecha correctamente,
usted ayudará a evitar posibles
consecuencias negativas para el medio
ambiente y la salud pública, lo cual
podría ocurrir si este producto no se
gestionara de forma adecuada. Para
obtener información más detallada
sobre el reciclaje de este producto,
póngase en contacto con el
Ayuntamiento de su Municipio, ó con la
tienda donde lo compró.
32

DESCRIPCIÓN DEL PRODUCTO
1
3
2
5
6
7
8
4
1
Panel de control
2
Puerta de carga (reversible)
3
Filtro
4
Patas ajustables
5
Anillo de plástico
6
Orificio de ventilación lateral/trase-
ro
7
Placa de características
8
Iluminación
ESPAÑOL 33

ACCESORIOS
KIT DE TORRE
Nombre del producto: SKP11
Disponible en su distribuidor autoriza-
do. Se puede utilizar el kit de torre solo
con las lavadoras especificadas en el fo-
lleto. Consulte el folleto adjunto.
Lea atentamente las instrucciones que
se suministran con el kit
PEDESTAL CON CAJÓN
Nombre del producto: PDSTP10.
Disponible en su distribuidor autoriza-
do.
Para elevar el aparato a un nivel que le
facilite una fácil carga y retirada de la
colada.
El cajón se puede utilizar para guardar
ropa y productos de lavado, por ejem-
plo: toallas, productos de limpieza, etc.
Lea atentamente las instrucciones que
se suministran con el accesorio.
KIT DE VENTILACIÓN
Kit universal para secadoras con ventila-
ción cuando no es posible la salida al
exterior. El depósito recoge la pelusa y
la condensación, evitando la suciedad y
los daños debidos a la humedad en la
habitación donde se encuentra la seca-
dora.
Lea atentamente las instrucciones que
se suministran con el kit
34

PANEL DE CONTROL
1 2 3
456789
1
Selector de programas
2
Visor digital
3
Tecla Inicio diferido
4
Tecla Inicio/Pausa
5
Tecla Tiempo de secado
6
Tecla Alarma
7
Tecla Anti-Arrugas .
8
Tecla Cuidado especial
9
Tecla Delicado
VISOR DIGITAL
Símbolo Descripción
Inicio diferido
m / m
tiempo antiarru-
gas
Símbolo Descripción
antiarrugas (indi-
cador de fase de
secado)
indicador anti-
arrugas largo
indicador de fase
de ciclo de seca-
do
indicador de lim-
pieza del filtro
indicador de fase
de ciclo de enfria-
do
bloqueo de segu-
ridad para niños
activado
tiempo del ciclo
-
intervalo de tiem-
po (10 min. – 3 h)
-
intervalo de inicio
diferido (30 min. -
20h.)
ESPAÑOL 35

ANTES DEL PRIMER USO
Limpie la secadora con un paño húme-
do o ajuste un programa corto (esto es,
el de 30 minutos) con la carga de paños
húmedos.
36

PROGRAMAS
Programas
red.
1)
Propiedades
Funciones
disponibles
Marca
de cla-
sifica-
ción
de teji-
do
Algodón
Extra seco 7 kg
Para secar tejidos gruesos o multi-
capa, por ejemplo, prendas de rizo
o albornoces.
todas
2)
Seco Arma-
rio
7 kg
Para secar tejidos de grosores uni-
formes, por ejemplo, prendas de
rizo, géneros de punto o toallas.
todas
2)
Seco plan-
cha
7 kg
Para secar ropa de algodón o lino
de grosor normal, por ejemplo, ro-
pa de cama o mantelerías.
todas
2)
Synthetics
Extra seco 3 kg
Para secar tejidos gruesos o de va-
rias capas, por ejemplo, suéteres,
ropa de cama o mantelerías.
todas
2)
Seco Arma-
rio
3 kg
Para secar tejidos finos que no se
planchan, por ejemplo, camisas
sintéticas, mantelerías, ropa de be-
bé, calcetines, lencería con balle-
nas o aros.
todas
2)
Seco plan-
cha
3 kg
Para secar tejidos finos que tam-
bién se deben planchar, por ejem-
plo, géneros de punto o camisas.
todas
2)
Especial
Tiempo 7 kg
Para secar ropa con un tiempo de-
terminado por el usuario.
todas sin
Cuidado es-
pecial
Refrescar 1 kg
Para reacondicionar o limpiar texti-
les con suavidad, con productos
de limpieza en seco disponibles
comercialmente.
todas sin
Cuidado es-
pecial
Ropa de ca-
ma
3 kg
Para secar ropa de cama, por
ejemplo: sábanas sencillas y do-
bles, fundas de almohada, cubre-
camas.
todas sin
Cuidado es-
pecial
Los vaque-
ros
7 kg
Para secar ropa informal, como va-
queros, sudaderas, etc., de dife-
rentes grosores (por ejemplo, en el
cuello, los puños y las costuras).
todas
2)
ESPAÑOL 37

Programas
red.
1)
Propiedades
Funciones
disponibles
Marca
de cla-
sifica-
ción
de teji-
do
Ropa de-
portiva
2 kg
Para secar ropa de deporte, teji-
dos finos, microfibra, poliéster,
que no se planchan.
todas sin
Cuidado es-
pecial
Plancha fá-
cil
1 kg (o
5 ca-
misas)
Para secar tejidos de cuidado fácil,
como camisas y blusas; para plan-
char con el mínimo esfuerzo. Los
resultados pueden ser diferentes
para los distintos tipos de tejidos y
su acabado. Ponga la ropa directa-
mente en la secadora. Una vez ter-
minado el ciclo, saque la ropa y
cuélguela en perchas.
todas sin
Cuidado es-
pecial
Lana Re-
fresh
1 kg
Para airear trapos de lana. Los tra-
pos quedan suaves y tersos. Le re-
comendamos sacar la ropa inme-
diatamente después de la finaliza-
ción del programa.
Alarma , Ini-
cio diferido
1)
Peso máximo de ropa seca
2)
Las opciones de Delicado y Cuidado especial no se pueden seleccionar al mismo tiempo
38

UTILIZACIÓN DEL APARATO
PREPARACIÓN DE LA
COLADA
Seque únicamente prendas ap-
tas para secar a máquina. Ase-
gúrese de que las prendas son
aptas para secar a máquina.
Compruebe la marca del tejido
en las prendas.
Marca
de te-
jido
Propiedad
Aplicable al secado en la se-
cadora
Aplicable al secado en la se-
cadora a temperatura están-
dar
Aplicable al secado en la se-
cadora a temperatura infe-
rior
No aplicable al secado en la
secadora
Prepare correctamente la colada:
• cierre las cremalleras, abotone las
fundas de edredón y ate las cintas o
lazos sueltos (por ejemplo, de delan-
tales), ya que la colada se puede en-
redar.
• asegúrese de que los bolsillos están
vacíos; retire los artículos de metal
(clips, imperdibles, etc.).
• Dé la vuelta a las prendas con doble
capa de tela (por ejemplo, en ano-
raks de algodón, la capa de algodón
debe estar hacia afuera).
Sólo secado:
• algodón y lino con programas para
Algodón
• sintéticos y mezclas con programas
para Sintéticos
• por separado las prendas de colores
fuertes y ligeros, ya que pueden des-
teñir
• jerseys de algodón y prendas de
punto solo con los programas corres-
pondientes, ya que pueden encoger
No ponga más prendas de la
carga máxima, que es de 7kg.
CARGA DE LA COLADA
1. Empuje la puerta del aparato (punto
de presión).
2. Cargue la ropa sin apretarla.
3. Cierre la puerta del aparato.
PRECAUCIÓN
No aprisione la colada entre la
puerta del aparato y la junta de
goma.
AJUSTE DE UN PROGRAMA
Utilice el selector de programas para
seleccionar el programa.
FUNCIONES ESPECIALES
Junto con el programa, puede seleccio-
nar una función o funciones especiales.
Para activar o desactivar la función, pul-
se la tecla aplicable.
ESPAÑOL 39

Cuando se activa la función, se visualiza
el LED situado encima de la tecla.
FUNCIÓN DELICADO
Para secar más ligeramente tejidos sen-
sibles en general y sensibles a la tem-
peratura (p. e., acrílicos, viscosa). Para
tejidos con el símbolo
en la etiqueta
de la prenda. El programa se ejecuta
con menos calor.
LA FUNCIÓN CUIDADO
ESPECIAL
Para el secado suave de prendas que
se usan con frecuencia. El programa se
inicia con el ajuste de potencia plena y
la intensidad se va reduciendo paulati-
namente.
FUNCIÓN ANTI-ARRUGAS
Prolonga la fase de antiarrugas extra
(30 minutos) al final del ciclo de secado
hasta 90 minutos. Esta función impide
que se formen arrugas en la colada. La
colada se puede retirar durante la fase
antiarrugas.
FUNCIÓN ALARMA
Cuando la función de la señal acústica
está activada, se puede oír la alarma:
• al final del ciclo
• al inicio y fin de la fase antiarrugas
• interrupción del ciclo
La función de señal acústica está siem-
pre encendida por defecto. Puede utili-
zar esta función para activar o desacti-
var el sonido.
LA FUNCIÓN TIEMPO DE
SECADO
Funciona solo con Tiempo . Permite al
usuario seleccionar un tiempo especial
del programa de secado, entre un míni-
mo de 10 min. hasta un máximo de 2
horas (en pasos de 10 min.).
FUNCIÓN INICIO DIFERIDO
Permite diferir el inicio del pro-
grama de secado desde un mí-
nimo de 30 minutos a un máxi-
mo de 20 horas.
1. Seleccione un programa de secado
y las funciones.
2. Pulse repetidamente el botón Inicio
diferido hasta que aparezca en la
pantalla el tiempo necesario del re-
tardo (p. e.,
si el programa de-
be empezar después de 12 horas).
3. Para activar la función de Inicio dife-
rido , pulse la tecla Inicio/Pausa . El
tiempo hasta el inicio disminuye en
la pantalla.
FUNCIÓN DEL BLOQUEO
CONTRA LA MANIPULACIÓN
POR NIÑOS
A
B
Se puede activar el bloqueo de seguri-
dad para niños para evitar que jueguen
con el aparato. La función de bloqueo
de seguridad para niños bloquea todas
las teclas y el selector de programas.
Para activar esta función, pulse las tec-
las A y B al mismo tiempo, hasta que
aparezca el símbolo
en la pantalla.
Para desactivarla, pulse de nueva las
teclas citada, hasta que desaparezca el
símbolo.
Puede activar la función de bloqueo de
seguridad para niños:
• antes de pulsar la tecla Inicio/Pausa ,
no se puede poner en marcha el apa-
rato
• después de pulsar el botón Inicio/
Pausa , todas las teclas y el selector
de programas están desactivados.
40

INICIO DEL PROGRAMA
Para desactivar el program, pulse la
tecla Inicio/Pausa . El LED situado enci-
ma de la tecla cambia a color rojo.
CAMBIO DE PROGRAMAS
Para cambiar un programa, gire el se-
lector de programas a
(apagado) y
seleccione de nuevo el programa.
AL FINALIZAR EL PROGRAMA
Cuando haya finalizado el ciclo de se-
cado, parpadeará el símbolo
en la
pantalla. Si se ha activado la función
Alarma , la señal acústica correspon-
diente suena de forma intermitente du-
rante un minuto
Los ciclos de secado (excepto el
programa Lana Refresh ), van
seguidos automáticamente de
una fase antiarrugas que dura
unos 30 minutos. Se puede reti-
rar la ropa durante la fase anti-
arrugas (La ropa se retirará an-
tes de finalizar esta fase para
evitar que se formen arrugas.) .
Si se ha seleccionado la función
Anti-arrugas , la fase antiarrugas
se prolonga 60 minutos.
Para retirar la ropa:
1. Gire el selector de programas a la
posición
(apagado)
2. Abra la puerta del aparato.
3. Retire las prendas.
4. Cierre la puerta del aparato.
Después de cada ciclo de seca-
do: limpie el filtro
(Consulte el capítulo CUIDADO
Y MANTENIMIENTO.)
ESPAÑOL 41

CONSEJOS
CONSEJOS ECOLÓGICOS
• No utilice suavizante para lavar y des-
pués secar. En la secadora, las pren-
das se suavizan automáticamente.
• Utilice el condensado como agua
destilada, por ejemplo, para el plan-
chado de vapor. Si fuera necesario,
limpie el condensado antes (p. e.,
con un filtro para café) para eliminar
posibles restos de pelusas.
• Mantenga siempre libres las ranuras
de ventilación situadas en la base del
aparato.
• Utilice los volúmenes de carga que
se especifican en el capítulo de los
programas.
• Asegúrese de que existe una buena
ventilación en la posición de instala-
ción del aparato.
• Limpie el filtro después de cada ciclo
de secado
• Centrifugue bien la ropa antes de se-
carla.
PESOS MEDIOS DE LA
COLADA
albornoz 1.200 g
funda de edredón 700 g
camisa de trabajo 600 g
pijama de hom-
bre
500 g
sábana 500 g
mantel 250 g
camisa de hom-
bre
200 g
vestido de noche 200 g
funda de almoha-
da
200 g
toalla de felpa 200 g
blusa 100 g
ropa interior de
mujer
100 g
ropa interior de
hombre
100 g
servilleta 100 g
paño de cocina 100 g
AJUSTES DEL APARATO
Dureza agua
A
B
La dureza del agua puede ser
diferente según los distintos lu-
gares. Si conoce la dureza del
agua de su zona, puede ajustar
el sensor del aparato para obte-
ner los mejores resultados de
secado.
1. Gire el selector de programas al
programa disponible.
2. Mantenga pulsadas al mismo tiem-
po las teclas A y B hasta que apa-
rezca uno de estos símbolos en la
pantalla:
–
conductividad baja <300
μS/cm
–
conductividad intermedia
300-600 μS/cm
–
conductividad alta >600
μS/cm
3. Pulse la tecla Inicio/Pausa repetida-
mente hasta seleccionar el nivel ne-
cesario.
4. Para memorizar el ajuste, pulse al
mismo tiempo las teclas A y B
42

Alarma permanentemente
desactivada
A
B
1. Gire el selector a uno de los progra-
mas.
2. Mantenga pulsadas al mismo tiem-
po las teclas A y B aproximadamen-
te durante 5 segundos.
3. La alarma está siempre apagada
por omisión.
ESPAÑOL 43

MANTENIMIENTO Y LIMPIEZA
LIMPIEZA DEL FILTRO
Al final de cada ciclo, se ilumina el indi-
cador filtro para indicarle que debe lim-
piarse el filtro.
El filtro recoge las pelusas. Las
pelusas se producen durante el
secado de la ropa en la secado-
ra de tambor.
1. Abra la puerta.
2. Extraiga el filtro.
3. Abra el filtro.
4. Limpie el filtro con una mano hume-
decida.
5. Si es necesario, limpie el filtro con
agua caliente utilizando un cepillo.
Cierre el filtro.
6. Retire las pelusas de la toma del fil-
tro. Puede utilizar un aspirador.
7. Ponga el filtro en el interior de la to-
ma.
PRECAUCIÓN
No utilice la secadora sin el filtro
o con un filtro dañado u obstrui-
do.
Limpie el filtro después de cada
ciclo de secado Un filtro obstrui-
do incrementa el tiempo de los
ciclos y aumenta el consumo de
energía.
LIMPIEZA DEL TAMBOR
ADVERTENCIA
Desconecte el aparato antes de
limpiarlo.
Utilice un detergente de jabón neutro
estándar para limpiar la superficie inte-
rior del tambor y sus aristas. Seque las
superficies limpias con un paño suave.
44

PRECAUCIÓN
No utilice productos abrasivos
ni estropajos de acero para lim-
piar el tambor.
LIMPIEZA DEL PANEL DE
CONTROL Y LA CARCASA
Utilice un detergente de jabón neutro
estándar para limpiar el panel de con-
trol y la carcasa.
Utilice un paño húmero para limpiar.
Seque las superficies limpias con un pa-
ño suave.
PRECAUCIÓN
No utilice productos limpiamue-
bles ni productos de limpieza
que puedan provocar corrosión
para limpiar el aparato.
ESPAÑOL 45

SOLUCIÓN DE PROBLEMAS Y SERVICIO
SOLUCIÓN DE PROBLEMAS
Problema
1)
Causa posible Solución
La secadora
no funciona.
La secadora no está conectada
a la corriente eléctrica.
Conecte el enchufe en la toma
de red. Compruebe el fusible
de la caja (instalación domésti-
ca).
La puerta de carga está abierta. Cierre la puerta.
No se ha pulsado la tecla Inicio/
Pausa .
Pulse la tecla Inicio/Pausa
Los resulta-
dos del se-
cado no son
satisfacto-
rios.
Se ha seleccionado un progra-
ma incorrecto.
Ajuste el programa aplicable.
2)
El filtro está obstruido.
Limpie el filtro.
3)
Demasiada carga.
Respete el volumen máximo de
carga.
Ranuras de flujo de aire cubier-
tas.
Destape las ranuras de flujo de
aire.
Suciedad en el interior del tam-
bor.
Limpie el interior del tambor.
Grado de dureza del agua ele-
vado.
Ajuste una dureza adecuada
4)
.
La puerta no
se cierra
El filtro no está sujeto en su si-
tio.
Coloque el filtro en la posición
correcta.
Colada aprisionada entre la
puerta y la junta.
Coloque la carga correctamente
en el tambor.
Err (Error)
en la panta-
lla.
5)
Intento de cambiar los paráme-
tros después de empezar el pro-
grama.
Apague y vuelva a encender la
secadora. Ajuste los parámetros
necesarios.
La función ajustada no es aplica-
ble con el programa selecciona-
do
Apague y vuelva a encender la
secadora. Ajuste los parámetros
necesarios.
No hay luz
en el tam-
bor
6)
Luz de tambor defectuosa.
Póngase en contacto con servi-
cio técnico para cambiar la luz
del tambor.
Anomalía en
el tiempo
transcurrido
en la panta-
lla
5)
El tiempo hasta el final se calcu-
la en función de: tipo, volumen y
humedad de la colada.
Procedimiento automático; no
es ningún fallo de la máquina.
Ciclo de se-
cado dema-
siado corto
Colada pequeña. Colada dema-
siado seca para el programa se-
leccionado.
Seleccione el tiempo o un nivel
de secado más alto (por ejem-
plo, Extra Seco ).
46

Ciclo de se-
cado dema-
siado largo
7)
El filtro está obstruido. Limpie el filtro.
Demasiada carga.
Respete el volumen máximo de
carga.
La colada no se ha centrifugado
lo suficiente.
Centrifugue la colada adecua-
damente.
Temperatura ambiente muy ele-
vada; no es ningún fallo de la
máquina.
Baje la temperatura ambiente si
es posible.
1)
Si aparece un mensaje de error en la pantalla (por ejemplo, E51, solo secadoras de tambor
con pantalla): Apague y vuelva a encender la secadora. Ajuste el programa. Pulse la tecla
Inicio/Pausa Si no funciona, informe al servicio técnico y anote el código de error.
2)
siga la recomendación del programa; consulte el capítulo PROGRAMAS
3)
consulte el capítulo CUIDADO Y MANTENIMIENTO
4)
consulte la sección AJUSTES DE LA MÁQUINA en el capítulo CONSEJOS
5)
solo secadoras con pantalla
6)
Sólo secadoras con luz.
7)
Nota: Al cabo de un máximo de 5 horas, el ciclo de secado finaliza automáticamente (véase
Ciclo de secado completo).
ILUMINACIÓN
Utilice sólo una bombilla diseñada es-
pecialmente para secadoras de tambor.
La bombilla especial se puede obtener
a través del centro de servicio técnico
local
ADVERTENCIA
Cuando el electrodoméstico es-
tá conectado, la luz interior se
apaga al cabo de 4 minutos si
se mantiene la puerta abierta
ADVERTENCIA
¡No utilice bombillas estándar!
¡Estas bombillas generan dema-
siado calor y pueden dañar el
aparato! Antes de cambia la
bombilla, desconecte la secado-
ra de la rede; con una conexión
permanente: desenrosque el
tornillo por completo o desacti-
ve el fusible.
1. Desenrosque la tapa de la bombilla
(está directamente detrás de la bo-
ca de carga, en la parte superior;
consulte la sección DESCRIPCIÓN
DEL PRODUCTO.)
2. Cambie la bombilla defectuosa.
3. Vuelva a atornillar la tapa.
Compruebe la posición correcta de la
junta tórica antes de volver a atornillar
la tapa de la luz de la puerta. No utilice
la secadora sin la junta tórica en la tapa
de la luz de la puerta.
ADVERTENCIA
Por razones de seguridad, la ta-
pa debe atornillarse con firme-
za. De lo contrario, la secadora
podría dejar de funcionar.
ASISTENCIA
En caso de desperfecto, compruebe
primero si lo puede solucionar perso-
nalmente con la ayuda de las instruc-
ciones; consulte la sección SOLUCIÓN
DE PROBLEMAS
Si no puede resolver el problema, pón-
gase en contacto con el Departamento
de atención al cliente o con uno de
nuestros servicios técnicos autorizados.
Estos datos son necesarios para poder
ayudarle:
- Nombre del modelo
- Número de producto (PNC)
- Nº de serie (el número de serie se en-
cuentra en la placa de características
adherida al producto; para encontrarla,
consulte el capítulo DESCRIPCIÓN DEL
PRODUCTO)
– Tipo de fallo
ESPAÑOL 47

– Mensajes de error que aparecen en la
pantalla.
Para tener a mano los números de refe-
rencia necesarios de su aparato, reco-
mendamos que los anote a continua-
ción
Mod. (Modelo) .................................
PNC (número
de producto):
.................................
Nº serie .................................
48

INFORMACIÓN TÉCNICA
ancho x alto x fondo 844 x 600 x 580 mm (maximal 640 mm)
volumen del tambor 108L
fondo máximo con la puerta de carga
abierta
1090 mm
ancho máximo con la puerta de carga
abierta
950 mm
altura ajustable 850 mm (+ 15 mm - ajuste de patas)
peso del aparato 31,5 kg
volumen máximo de carga 7 kg
tensión 230 V
frecuencia 50 Hz
fusible requerido 16 A
potencia total 2600 W
clase de eficiencia energética C
consumo energético kWh/ciclo
1)
3,9 kWh
consumo energético anual 263,1 kWh
tipo de uso Doméstico
temperatura ambiente permitida + 5°C a + 35°C
1)
7 kg de algodón, centrifugado a 1000 rpm con referencia a EN 61121
ESPAÑOL 49

INSTALACIÓN
COLOCACIÓN DEL
ELECTRODOMÉSTICO
• La secadora de tambor se debe colo-
car en un lugar limpio, donde no se
acumule suciedad.
• El aire debe circular alrededor del
aparato. Asegúrese de que las ranu-
ras de ventilación de la base del apa-
rato no están bloqueadas.
• Para mantener el nivel mínimo de vi-
braciones y ruido cuando se esté uti-
lizando la secadora, ésta debe colo-
carse sobre una superficie firme y ni-
velada.
• Cuando el aparato esté colocado en
su posición permanente, compruebe
si está totalmente nivelada con ayu-
da de un nivel. De no estarlo, ajuste
las patas hasta que lo esté.
• No quite las patas. No reduzca la dis-
tancia sobre el suelo con alfombras
gruesas, tablones de madera o simi-
lares. Esto podría aumentar el calor,
que puede provocar interferencias
con el funcionamiento del aparato.
• La temperatura del aire ca-
liente que circula en la seca-
dora puede subir hasta 60 °C.
El aparato no debe colocarse
sobre suelos que no sean re-
sistentes a altas temperaturas.
• Cuando la secadora esté en
marcha, la temperatura am-
biente no debe ser inferior a
+5 °C ni superior a +35 °C,
pues podría afectar al rendi-
miento del aparato.
• Si fuera necesario mover el
aparato, se debe hacer verti-
calmente.
• El aparato no se debe instalar
detrás de puertas que pue-
dan bloquearse, de puertas
correderas o de puertas con
bisagras por el lado contrario
al del aparato de tal forma
que se impida la apertura
completa de la secadora.
DESEMBALAJE
PRECAUCIÓN
Es necesario retirar todo el material de
embalaje antes del uso.
1. Abra la puerta de carga
2. Retire las cintas adhesivas del inte-
rior de la máquina, sobre el tambor.
3. Extraiga de la máquina la manguera
de lámina de aluminio y el acolcha-
miento de poliestireno.
50

INSTALACIÓN DE LA
MANGUERA DE VENTILACIÓN
Hay 3 salidas de ventilación: en
lado izquierdo, el lado derecho
y en la parte trasera.
1. Extraiga la tuerca anular A de la sali-
da de ventilación de la parte trase-
ra.
2. Atornille la tuerca anular en la man-
guera y empújela a su posición.
3. Las salidas de ventilación no utiliza-
das se sellarán con las tapas sumi-
nistradas.
Si el tubo es largo y la tempera-
tura ambiente es baja, la hume-
dad puede condensarse en
agua dentro del tubo No suele
ocurrir. Para evitarlo, se reco-
mienda hacer un pequeño agu-
jero (3 mm) en el punto más ba-
jo de la manguera y colocar un
pequeño recipiente debajo de
él. (Consulte la imagen, punto
B).
Asegúrese de que la longitud
de la manguera de ventilación
sea inferior a 2 m, y que no ten-
ga más de 2 codos.
En cuanto a la propia salida, si ha opta-
do por la instalación de una rejilla de
ventana/pared, solicite a un estableci-
miento de productos de albañilería los
accesorios y el asesoramiento necesa-
rios para realizar la instalación
ADVERTENCIA
Es importante no conectar el tu-
bo de ventilación, por ejemplo,
a una campana de cocina ni a
una chimenea o tubo de salida
de humos diseñados para elimi-
nar los humos de un aparato
quemador de combustible.
Tenga en cuenta que, para evitar pro-
blemas de condensación, es fundamen-
tal instalar la manguera flexible en la
ESPAÑOL 51

secadora para enviar su vapor al menos
más allá de los módulos de cocina; pre-
feriblemente, fuera de la cocina. Para
evitar que el aparato se sobrecaliente,
es importante que la salida de vapor no
esté obstruida De este modo, si se ins-
tala una manguera permanente en una
pared o techo externos, deberemos
asegurarnos de que la capacidad de sa-
lida no sea inferior a 150 m3/h. Si la se-
cadora se instala junto a módulos de
cocina, compruebe que la manguera
no quede doblada. Si la manguera está
parcialmente aprisionada, la eficacia de
secado se verá reducida, por lo que los
tiempos de secado y el consumo de
energía serán mayores Si la manguera
está completamente aprisionada, pue-
den activarse los dispositivos de desco-
nexión de seguridad de la máquina.
Cuando la secadora esté en marcha, la
temperatura ambiente no debe ser in-
ferior a +5 °C ni superior a +35 °C, pues
podría afectar al rendimiento de la má-
quina
INVERSIÓN DE LA PUERTA DE
CARGA
ADVERTENCIA
Antes de cambiar el tope de
puerta, desconecte el enchufe
de la red eléctrica
1. Abra la puerta de carga.
2. Desatornille la bisagra A de la par-
te frontal de la máquina y retire la
puerta de carga.
3. Retire las placas de puerta B. Para
ello, introduzca un destornillador
en las ranuras, como se indica en la
ilustración, presione ligeramente
hacia abajo y retire las placas.
A
C
A
B
B
4. Con una herramienta adecuada,
presione para desbloquear la pieza
C, retírela y gírela 180°, y colóquela
en el otro lado.
PRECAUCIÓN
Hay un pequeño muelle debajo
del bloque C. Para la correcta
instalación de todas las piezas,
consulte las ilustraciones:
52

5. Desatornille la bisagra A de la
puerta de carga, gírela 180°, coló-
quela en el lado opuesto y atorní-
llela.
6. Gire las placas B 180° y colóquelas
en el lado opuesto.
7. Desatornille las placas de puerta D
de la parte frontal de la máquina,
gírelas 180° y aflójelas en el lado
opuesto
E
E
D
D
FF
8. Desatornille el cierre de puerta E,
empújelo ligeramente hacia abajo
y extráigalo de la parte frontal de la
máquina.
9. Presione el botón a presión F hacia
dentro y hacia abajo, presione la
tapa ligeramente hacia abajo y retí-
rela de la parte frontal de la máqui-
na
10. Cambie el cierre de puerta E al la-
do opuesto y atornille el mecanis-
mo de bloqueo de la puerta.
11. En el otro lado, introduzca la tapa
F, introduzca la tapa y permita que
el botón a presión encaje en su po-
sición
12. Coloque la puerta de carga y las bi-
sagras en los huecos de la parte
frontal de la máquina y atornille.
Nota respecto a la protección
de contactos:La máquina sólo
volverá a ser segura para su uti-
lización una vez colocadas todas
las piezas plásticas
CONEXIÓN ELÉCTRICA
• Conecte la máquina a una toma de
corriente con toma a tierra, conforme
a la normativa vigente sobre cablea-
do.
• Asegúrese de que las especificacio-
nes eléctricas de la placa coinciden
con las del suministro eléctrico.
• Utilice siempre una toma con aisla-
miento de conexión a tierra correcta-
mente instalada.
• No utilice enchufes múltiples ni ca-
bles prolongadores. Existe riesgo de
incendio.
• El centro de asistencia es el único au-
torizado para cambiar el cable de co-
rriente eléctrica del electrodoméstico
en caso necesario.
• Asegúrese de no aplastar ni dañar el
cable de alimentación ni el enchufe.
• No desconecte el aparato tirando del
cable de conexión a la red. Tire siem-
pre del enchufe.
• El enchufe debe estar seco.
ESPAÑOL 53

54

ESPAÑOL 55

www.aeg.com/shop 136915910-A-022011
-
 1
1
-
 2
2
-
 3
3
-
 4
4
-
 5
5
-
 6
6
-
 7
7
-
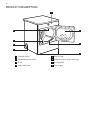 8
8
-
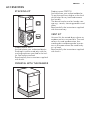 9
9
-
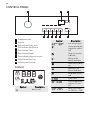 10
10
-
 11
11
-
 12
12
-
 13
13
-
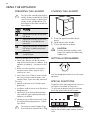 14
14
-
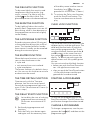 15
15
-
 16
16
-
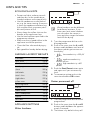 17
17
-
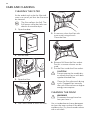 18
18
-
 19
19
-
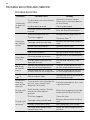 20
20
-
 21
21
-
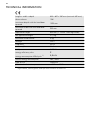 22
22
-
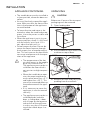 23
23
-
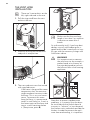 24
24
-
 25
25
-
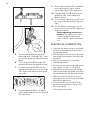 26
26
-
 27
27
-
 28
28
-
 29
29
-
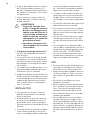 30
30
-
 31
31
-
 32
32
-
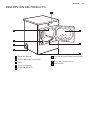 33
33
-
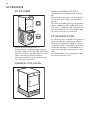 34
34
-
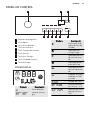 35
35
-
 36
36
-
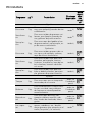 37
37
-
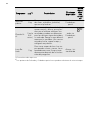 38
38
-
 39
39
-
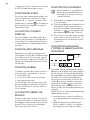 40
40
-
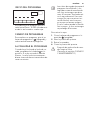 41
41
-
 42
42
-
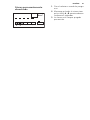 43
43
-
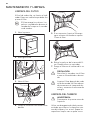 44
44
-
 45
45
-
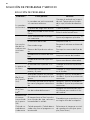 46
46
-
 47
47
-
 48
48
-
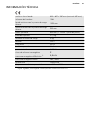 49
49
-
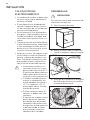 50
50
-
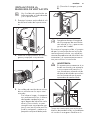 51
51
-
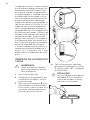 52
52
-
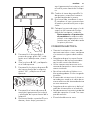 53
53
-
 54
54
-
 55
55
-
 56
56


Aeg-Electrolux T75170AV Manual de usuario
- Categoría
- Secadoras
- Tipo
- Manual de usuario
en otros idiomas
- English: Aeg-Electrolux T75170AV User manual