La página se está cargando ...

1
Connect power to fan and pump
7
Reliez le ventilateur et la pompe à l'alimentation
Schließen Sie den Ventilator und die Pumpe an
Collegare ventola e pompa all'alimentazione
Conecte la alimentación eléctrica del ventilador y de la bomba
Подсоедините провода питания к вентилятору и насосу
Tighten screws on retention ring
6
Serrez les vis sur l'anneau de retenue
Ziehen Sie nun die Schrauben am Halterungsring fest
Avvitare le viti dell'anello di sicurezza
Apriete los tornillos de la anilla
Затяните винты крепежного кольца
Install the cold plate/pump unit
5
Installez la plaque froide et la pompe
Installieren Sie die Kühlfläche/pumpe
Installare la piastra di raffreddamento/unità di pompaggio
Instale la unidad de bomba/placa fría
Установите охлаждающую плату/насос
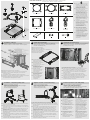
Included Hardware
Install the radiator
EN Install fan as an intake for best performance.
FR Installez le ventilateur en entrée pour optimiser les performances.
DE Installieren Sie den Ventilator am Eingang, um eine optimale
Leistung zu erzielen.
IT Per prestazioni ottimali, installare la ventola come aspiratore.
ES Para obtener el mayor rendimiento, instale el ventilador como entrada.
PY Установите вентилятор в качестве всасывающего устройства,
что позволит повысить производительность системы.
EN Remove adhesive backing.
FR Retirez la protection adhésive.
DE Ziehen Sie den Schutzfilm von der Klebefläche ab.
IT Rimuovere lo strato adesivo.
ES Retire la cubierta del adhesivo.
PY Удалите клейкое покрытие.
EN Tighten screws ½ to ¾ turn only (do not fully tighten).
Reinstall motherboard in chassis.
FR Serrez les vis à moitié ou aux trois-quarts seulement (ne serrez
pas complètement). Replacez la carte mère dans le boîtier.
DE Ziehen Sie die Schrauben um eine ½- bis ¾-Drehung an (ziehen
Sie die Schrauben nicht fest). Installieren Sie die Hauptplatine
wieder im Gehäuse.
IT Avvitare le viti di ½ o ¾ di giro solamente (non avvitarle
completamente). Reinstallare la scheda madre nello chassis.
ES Apriete los tornillos únicamente entre ½ y ¾ giro (no los apriete
totalmente). Vuelva a instalar la placa base en el armazón.
PY Заверните винты на ½-¾ оборота (не затягивайте их полностью).
Установите материнскую плату в корпус.
2 3 4
EN Connect fan power connector
to CPU_FAN header on
motherboard.
FR Branchez le fil d'alimentation
du ventilateur à la fiche
CPU_FAN de la carte mère.
DE Verbinden Sie den Stecker
des Ventilators unter
CPU_FAN mit der Hauptplatine.
IT Collegare il connettore di
alimentazione della ventola
all'header CPU_FAN sulla
scheda madre.
ES Enchufe el conector de
alimentación del ventilador en
el cabezal CPU_FAN de la
placa base.
PY Подключите разъем питания
вентилятора к разъему CPU_FAN
на материнской плате.
Connect pump power connector
to any available 3-pin fan header
on motherboard.
Branchez le fil d'alimentation de
la pompe à une fiche à trois
broches libre sur la carte mère.
Verbinden Sie den Stecker der
Pumpe über einen beliebigen
freien dreipoligen Ventilatoran-
schluss mit der Hauptplatine.
Collegare il connettore di
alimentazione della pompa a
qualsiasi header per ventola a 3
pin disponibile sulla scheda
madre.
Enchufe el conector de aliment-
ación de la bomba en uno de
los cabezales del ventilador de
3 pines de la placa base.
Подключите разъем питания насоса к
любому из доступных 3-контактных
разъемов питания вентилятора на
материнской плате.
1
3
2
4
Installez l'anneau de retenue • Installieren Sie den Halterungsring
Installare l'anello di sicurezza • Instale la anilla de sujeción
Установите крепежное кольцо
EN Remove the plastic shell carefully and insert cold plate into retention
ring, turning clockwise to secure.
FR Retirez soigneusement l'enveloppe en plastique et insérez la plaque
froide dans l'anneau de retenue, en tournant dans le sens horaire pour
la maintenir en place.
DE Nehmen Sie die Plastikabdeckung vorsichtig ab und stecken Sie die
Kühlfläche in den Halterungsring. Arretieren Sie sie durch Drehen
im Uhrzeigersinn.
IT Rimuovere con cura l'involucro in plastica e inserire la piastra di
raffreddamento all'interno dell'anello di sicurezza, ruotando in senso
orario per bloccare.
ES Extraiga la carcasa de plástico con cuidado e introduzca la placa fría
en la anilla de sujeción; a continuación, gire en el sentido de las agujas
del reloj para fijarla.
PY Осторожно снимите пластиковую упаковку и вставьте охлаждающую плату
в крепежное кольцо, поворачивая по часовой стрелке.
EN Turn each screw 2 to 3 times, in the order shown, repeating until
each screw is fully tightened. Do not overtighten.
FR Tournez chaque vis 2 ou 3 fois, dans l'ordre indiqué, en répétant la
procédure jusqu'au serrage complet de toutes les vis. Ne serrez pas
excessivement.
DE Gehen Sie dazu in der abgebildeten Reihenfolge vor. Ziehen Sie
jede Schraube um zwei bis drei Drehungen fest und fahren Sie
dann mit der nächsten Schraube fort. Wiederholen Sie diesen
Vorgang, bis alle Schrauben fest angezogen sind Ziehen Sie die
Schrauben nicht zu fest an.
IT Avvitare ogni vite 2 o 3 volte, nell'ordine mostrato, ripetendo
l'operazione fino a quando tutte le viti sono completamente avvitate.
Non avvitare eccessivamente.
ES Gire cada tornillo 2 ó 3 veces, en el orden mostrado, y repita el
procedimiento hasta que todos estén completamente apretados.
No los apriete demasiado.
PY Затяните винты, заворачивая их на 2-3 оборота в указанном порядке.
Не допускайте чрезмерного затягивания.
Installez le radiateur • Installieren Sie den Kühler
Installare il radiatore • Instale el radiador • Установите радиатор
Installez la plaque arrière • Installieren Sie die Rückwand
Installare la piastra posteriore • Instale la placa de soporte
Установите соединительную плату
INTEL 775/1156/1366
x4 • INTEL 1156/1366INTEL 775/1156/1366
CPU
x4 • INTEL 775
AMD AM2/AM3
x4x4
AMD AM2/AM3
A
D E
E
I
A
H
G
F
H
I
B
F
B
C D
Matériel inclus • Mitgelieferte Montageteile • Hardware incluso
Hardware incluido • Включено следующее оборудование
Install the backplate Install the retention ring
EN Install backplate on the
back of the motherboard
behind theCPU socket.
FR Installez la plaque arrière au
dos de la carte mère,
derrière la fiche du processeur.
DE Installieren Sie die
Rückwand an der Rückseite
der Hauptplatine, hinter
dem Prozessorsockel.
IT Installare la piastra
posteriore sul retro della
scheda madre dietro al
socket della CPU
ES Instale la placa de soporte
en la parte trasera de la
placa base, detrás de la
ranura de la CPU.
PY Установите соединительную
плату на задней стороне
материнской платы,
за гнездом ЦП
EN Once you’ve chosen the correct
backplate, mounting insert, and
retention ring for your processor,
please see the appropriate
assembly guide. (Included
separately in the H50 box)
FR Une fois que vous avez choisi la
plaque arrière, la pièce de
montage et la bague de retenue
correspondant au processeur,
veuillez consulter le guide
d'assemblage approprié. (inclus
séparément dans la boîte H50)
DE Wählen Sie Rückplatte, Monta-
geeinsätze und Sicherungsring
passend für Ihren Prozessor aus,
und konsultierten Sie die
dazugehörigen Montageanleitung
(separat der H50 Verpackung
beigelegt).
IT Una volta scelta la piastra
posteriore, l'inserto di montaggio
e l'anello di ritenzione corretti per
il processore in uso, fare
riferimento alla guida di
assemblaggio appropriata.
(Inclusa separatamente nella
scatola dell'unità H50)
ES Una vez que haya elegido la
placa posterior, el inserto de
montaje y el anillo de retención
correctos para su procesador,
consulte el manual de montaje
correspondiente. (Se incluye por
separado en la caja H50).
PY Как только Вы выберете
соответствующие опорную подкладку,
монтажную прокладку и крепежное
кольцо для Вашего процессора, см.
соответствующее руководство по
сборке. (Содержатся отдельно в
упаковке H50.)
AMD AM2/AM3
C
x2
G
Transcripción de documentos
Included Hardware Matériel inclus • Mitgelieferte Montageteile • Hardware incluso Hardware incluido • Включено следующее оборудование EN Once you’ve chosen the correct backplate, mounting insert, and retention ring for your processor, please see the appropriate assembly guide. (Included separately in the H50 box) I E A 1 F A B C INTEL 775/1156/1366 AMD AM2/AM3 AMD AM2/AM3 FR Une fois que vous avez choisi la plaque arrière, la pièce de montage et la bague de retenue correspondant au processeur, veuillez consulter le guide d'assemblage approprié. (inclus séparément dans la boîte H50) DE Wählen Sie Rückplatte, Montageeinsätze und Sicherungsring passend für Ihren Prozessor aus, und konsultierten Sie die dazugehörigen Montageanleitung (separat der H50 Verpackung beigelegt). B IT G D E F INTEL 775/1156/1366 x4 • INTEL 1156/1366 x4 • INTEL 775 AMD AM2/AM3 CPU H C 2 D Install the radiator Installez le radiateur • Installieren Sie den Kühler Installare il radiatore • Instale el radiador • Установите радиатор 3 G H I x2 x4 x4 Install the backplate Installez la plaque arrière • Installieren Sie die Rückwand Installare la piastra posteriore • Instale la placa de soporte Установите соединительную плату 4 Una volta scelta la piastra posteriore, l'inserto di montaggio e l'anello di ritenzione corretti per il processore in uso, fare riferimento alla guida di assemblaggio appropriata. (Inclusa separatamente nella scatola dell'unità H50) ES Una vez que haya elegido la placa posterior, el inserto de montaje y el anillo de retención correctos para su procesador, consulte el manual de montaje correspondiente. (Se incluye por separado en la caja H50). PY Как только Вы выберете соответствующие опорную подкладку, монтажную прокладку и крепежное кольцо для Вашего процессора, см. соответствующее руководство по сборке. (Содержатся отдельно в упаковке H50.) Install the retention ring Installez l'anneau de retenue • Installieren Sie den Halterungsring Installare l'anello di sicurezza • Instale la anilla de sujeción Установите крепежное кольцо EN Remove adhesive backing. FR Retirez la protection adhésive. DE Ziehen Sie den Schutzfilm von der Klebefläche ab. IT Rimuovere lo strato adesivo. ES Retire la cubierta del adhesivo. PY Удалите клейкое покрытие. EN Install backplate on the back of the motherboard behind theCPU socket. FR Installez la plaque arrière au dos de la carte mère, derrière la fiche du processeur. DE Installieren Sie die Rückwand an der Rückseite der Hauptplatine, hinter dem Prozessorsockel. IT EN Install fan as an intake for best performance. FR Installez le ventilateur en entrée pour optimiser les performances. DE Installieren Sie den Ventilator am Eingang, um eine optimale Leistung zu erzielen. IT Per prestazioni ottimali, installare la ventola come aspiratore. ES Para obtener el mayor rendimiento, instale el ventilador como entrada. PY Установите вентилятор в качестве всасывающего устройства, что позволит повысить производительность системы. 5 Install the cold plate/pump unit Installez la plaque froide et la pompe Installieren Sie die Kühlfläche/pumpe Installare la piastra di raffreddamento/unità di pompaggio Instale la unidad de bomba/placa fría Установите охлаждающую плату/насос EN Tighten screws ½ to ¾ turn only (do not fully tighten). Reinstall motherboard in chassis. Installare la piastra posteriore sul retro della scheda madre dietro al socket della CPU FR Serrez les vis à moitié ou aux trois-quarts seulement (ne serrez pas complètement). Replacez la carte mère dans le boîtier. DE Ziehen Sie die Schrauben um eine ½- bis ¾-Drehung an (ziehen Sie die Schrauben nicht fest). Installieren Sie die Hauptplatine wieder im Gehäuse. ES Instale la placa de soporte en la parte trasera de la placa base, detrás de la ranura de la CPU. IT ES Apriete los tornillos únicamente entre ½ y ¾ giro (no los apriete totalmente). Vuelva a instalar la placa base en el armazón. PY Установите соединительную плату на задней стороне материнской платы, за гнездом ЦП 6 Avvitare le viti di ½ o ¾ di giro solamente (non avvitarle completamente). Reinstallare la scheda madre nello chassis. PY Заверните винты на ½-¾ оборота (не затягивайте их полностью). Установите материнскую плату в корпус. Tighten screws on retention ring 7 Serrez les vis sur l'anneau de retenue Ziehen Sie nun die Schrauben am Halterungsring fest Avvitare le viti dell'anello di sicurezza Apriete los tornillos de la anilla 1 Затяните винты крепежного кольца Connect power to fan and pump Reliez le ventilateur et la pompe à l'alimentation Schließen Sie den Ventilator und die Pumpe an Collegare ventola e pompa all'alimentazione Conecte la alimentación eléctrica del ventilador y de la bomba Подсоедините провода питания к вентилятору и насосу 3 2 EN Connect fan power connector to CPU_FAN header on motherboard. Connect pump power connector to any available 3-pin fan header on motherboard. FR Branchez le fil d'alimentation du ventilateur à la fiche CPU_FAN de la carte mère. Branchez le fil d'alimentation de la pompe à une fiche à trois broches libre sur la carte mère. DE Verbinden Sie den Stecker des Ventilators unter CPU_FAN mit der Hauptplatine. Verbinden Sie den Stecker der Pumpe über einen beliebigen freien dreipoligen Ventilatoranschluss mit der Hauptplatine. IT DE Nehmen Sie die Plastikabdeckung vorsichtig ab und stecken Sie die Kühlfläche in den Halterungsring. Arretieren Sie sie durch Drehen im Uhrzeigersinn. DE Gehen Sie dazu in der abgebildeten Reihenfolge vor. Ziehen Sie jede Schraube um zwei bis drei Drehungen fest und fahren Sie dann mit der nächsten Schraube fort. Wiederholen Sie diesen Vorgang, bis alle Schrauben fest angezogen sind Ziehen Sie die Schrauben nicht zu fest an. Collegare il connettore di alimentazione della ventola all'header CPU_FAN sulla scheda madre. Collegare il connettore di alimentazione della pompa a qualsiasi header per ventola a 3 pin disponibile sulla scheda madre. IT IT ES Enchufe el conector de alimentación del ventilador en el cabezal CPU_FAN de la placa base. Enchufe el conector de alimentación de la bomba en uno de los cabezales del ventilador de 3 pines de la placa base. PY Подключите разъем питания вентилятора к разъему CPU_FAN на материнской плате. Подключите разъем питания насоса к любому из доступных 3-контактных разъемов питания вентилятора на материнской плате. 4 EN Turn each screw 2 to 3 times, in the order shown, repeating until each screw is fully tightened. Do not overtighten. EN Remove the plastic shell carefully and insert cold plate into retention ring, turning clockwise to secure. FR Retirez soigneusement l'enveloppe en plastique et insérez la plaque froide dans l'anneau de retenue, en tournant dans le sens horaire pour la maintenir en place. Rimuovere con cura l'involucro in plastica e inserire la piastra di raffreddamento all'interno dell'anello di sicurezza, ruotando in senso orario per bloccare. FR Tournez chaque vis 2 ou 3 fois, dans l'ordre indiqué, en répétant la procédure jusqu'au serrage complet de toutes les vis. Ne serrez pas excessivement. Avvitare ogni vite 2 o 3 volte, nell'ordine mostrato, ripetendo l'operazione fino a quando tutte le viti sono completamente avvitate. Non avvitare eccessivamente. ES Extraiga la carcasa de plástico con cuidado e introduzca la placa fría en la anilla de sujeción; a continuación, gire en el sentido de las agujas del reloj para fijarla. ES Gire cada tornillo 2 ó 3 veces, en el orden mostrado, y repita el procedimiento hasta que todos estén completamente apretados. No los apriete demasiado. PY Осторожно снимите пластиковую упаковку и вставьте охлаждающую плату в крепежное кольцо, поворачивая по часовой стрелке. PY Затяните винты, заворачивая их на 2-3 оборота в указанном порядке. Не допускайте чрезмерного затягивания.-
 1
1
-
 2
2


Corsair H50 El manual del propietario
- Tipo
- El manual del propietario
- Este manual también es adecuado para
En otros idiomas
- français: Corsair H50 Le manuel du propriétaire
- italiano: Corsair H50 Manuale del proprietario
- English: Corsair H50 Owner's manual
- Deutsch: Corsair H50 Bedienungsanleitung
- русский: Corsair H50 Инструкция по применению
Documentos relacionados
-
Corsair Hydro H60 Guía de instalación
-
-
-
-
Corsair H115i Guía de inicio rápido
-
-
-
-
Corsair AX1500i Manual de usuario
-