
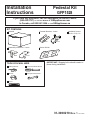
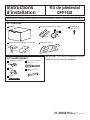
KIT CONTAINS
If you have any questions, call GE Appliances at 800.GE.CARES
(800.432.2737)
or visit our Website at: GEAppliances.com
In Canada, call 800.561.3344
or visit GEAppliances.ca
Pedestal Kit
GFP1528
Installation
Instructions
31-3000210 Rev. 1 08-19 GEA
TOOLS YOU WILL NEED
Safety Glasses
1/4" Socket & Nut Driver
5/8" Open end wrench
Gloves
Level
Rear
Rear
Front
Front
IMPORTANT: Shipping bolts should remain in
place during installation.
Washer/Dryer Brackets - 2 each
Pedestal
Installation Screws
(#8-18 x 7/16) - 22
Pedestal Brackets - 2 each
Drawer Divider

2 31-3000210 Rev. 1
Installation Instructions
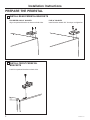
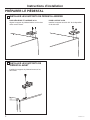
1
INSTALL REAR PEDESTAL BRACKETS
FOR DRYER AND 32" WASHER
Align rear pedestal bracket as shown on both sides.
FOR 34" WASHER
Install bracket rotated 180° from dryer configuration.
2
INSTALL FRONT PEDESTAL
BRACKETS
Install front pedestal brackets on both sides.
PREPARE THE PEDESTAL

31-3000210 Rev. 1 3
Installation Instructions
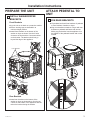
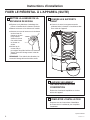
3
INSTALL WASHER/DRYER
BRACKETS
Front Brackets
Ŷ/D\WKHXQLWRQLWVEDFNRQDSURWHFWLYHVXUIDFH
Ŷ(QVXUHOHYHOLQJOHJVDUHWKUHDGHGLQWR
minimum height position.
Ŷ,QVWDOOIURQWEUDFNHWVRQWKHERWWRPRIWKH
washer or dryer as shown. Use the 2 holes
closest to the front and the 2 outermost holes
on the bracket. The bracket should not go
beyond the edge of the appliance.
Rear Brackets
Ŷ,QVWDOOUHDUEUDFNHWVRQWKHERWWRPRIWKH
washer or dryer as shown above. Use the top
2 holes on the bottom of the appliance with the
tab on the bracket facing the outside.
PREPARE THE UNIT
4
JOIN REAR BRACKETS
Ŷ/LIWSHGHVWDODQGKRRNIURQWEUDFNHWVRISHGHVWDO
to front brackets of washer or dryer.
Ŷ$OLJQUHDUEUDFNHWVRQZDVKHURUGU\HUZLWKUHDU
brackets on pedestal and fasten with screws.
Make sure the bracket from the appliance is to
the INSIDE of the pedestal bracket and not the
outside.
ATTACH PEDESTAL TO
UNIT
Front Brackets
Rear Brackets
J

4 31-3000210 Rev. 1
Installation Instructions
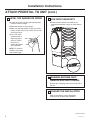
6
JOIN FRONT BRACKETS
Ŷ)DVWHQVFUHZEHWZHHQIURQWEUDFNHWVIRU
pedestal and washer or dryer on both sides of
unit.
7
WASHING MACHINE ONLY:
REMOVE SHIPPING SCREWS
Remove the 4 shipping bolts on the back side of
the unit.
8
FINALIZE THE INSTALLATION
Refer to the washer or dryer installation
instructions to complete the installation.
ATTACH PEDESTAL TO UNIT (cont.)
5
LEVEL THE WASHER OR DRYER
Ŷ/RFDWHWKHOHJVIURPWKHSDUWVSDFNDJHDQG
install to minimum height.
Ŷ6WDQGWKHZDVKHURUGU\HUXSULJKW
Ŷ0DNHVXUHWKDWWKHZDVKHURUGU\HULVOHYHOE\
placing a spirit level on top. Check side to side
and front to back.
Ŷ8VHDRSHQ
ended wrench to
adjust the legs in
and out. Tighten
the lock nut
against the bottom
of the pedestal.
NOTE: To minimize
vibration, the locking
nuts must be tight.
Printed in Taiwan

Des questions? Appelez le 800.561.3344 ou Visitez notre site Web à l’adresse : www.electromenagersge.ca
Kit de piédestal
GFP1528
Instructions
d’installation
OUTILS NÉCESSAIRES
Lunettes de protection
6,35 mm (1/4”) Douille
et tournevis
15,88 (5/8") Clé à
fourche
KIT CONTAINS
Gants
Niveau
Arrière
Arrière
Avant
Avant
IMPORTANT : Les boulons d’expédition doivent
demeurer en place durant l’installation.
Supports laveuse / sécheuse - 2 chacun
Piédestal
Vis d’installation
(#8-18 x 7/16) - 22
Supports de piédestal - 2 chaque
Séparateur de tiroir
31-3000210 Rev. 1 08-19 GEA

2 31-3000210 Rev. 1
Instructions d’installation
1
INSTALLER LES SUPPORTS DE PIÉDESTAL ARRIÈRE
POUR SÉCHEUSE ET LAVEUSE 32 PO
Alignez le support de piédestal arrière sur les deux
côtés comme illustré.
POUR LAVEUSE 34 PO
Installez le support tourné à 180° de la disposition
de la sécheuse.
2
INSTALLER LES SUPPORTS DE
PIÉDESTAL AVANT
Installez les supports de piédestal avant sur les
deux côtés.
PRÉPARER LE PIÉDESTAL

31-3000210 Rev. 1 3
Instructions d’installation
3
INSTALLER LES SUPPORTS DE
LAVEUSE/SÉCHEUSE
Supports avant
Ŷ'pSRVH]O¶DSSDUHLOVXUVRQGRVVXUXQHVXUIDFH
de protection.
Ŷ$VVXUH]YRXVTXHOHVSLHGVGHQLYHOOHPHQWVRQW
vissés à la position de hauteur minimale.
Ŷ,QVWDOOH]OHVVXSSRUWVDYDQWVXUOHEDVGHOD
laveuse ou de la sécheuse comme illustré.
Utilisez les 2 trous les plus près de l’avant et
les 2 trous les plus à l'extérieur sur le support.
Le support ne doit pas aller au-delà du bord de
l’appareil.
Supports arrière
Ŷ,QVWDOOH]OHVVXSSRUWVDUULqUHVXUOHEDVGHOD
laveuse ou de la sécheuse comme illustré
ci-dessus. Utilisez les 2 trous les plus haut dans
le bas de l’appareil, avec la languette sur le
support orientée vers l’extérieur.
PRÉPARER L’APPAREIL
4
JOINDRE LES SUPPORTS
ARRIÈRE
Ŷ6RXOHYH]OHSLpGHVWDOHWDFFURFKHUOHVVXSSRUWV
avant du piédestal sur les supports avant de la
laveuse ou de la sécheuse.
Ŷ$OLJQH]OHVVXSSRUWVDUULqUHVXUODODYHXVHRX
la sécheuse avec les supports arrière sur le
piédestal et vissez les vis. Assurez-vous que
le support de l’appareil est à l’INTÉRIEUR du
support de piédestal et non à l’extérieur.
FIXER LE PIÉDESTAL À
L’APPAREIL
Supports avant
Supports arrière
J

4 31-3000210 Rev. 1
Instructions d’installation
6
JOINDRE LES SUPPORTS
AVANT
Ŷ9LVVH]ODYLVHQWUHOHVVXSSRUWVDYDQWGX
piédestal et de la laveuse ou la sécheuse des
deux côtés de l’appareil.
7
LAVEUSE SEULEMENT :
RETIRER LES BOULONS
D’EXPÉDITION
Retirez les 4 boulons d’expédition sur la face
arrière de l’appareil.
8
COMPLÉTER L’INSTALLATION
Reportez-vous aux instructions d’installation
de la laveuse ou la sécheuse pour compléter
l'installation.
FIXER LE PIÉDESTAL À L’APPAREIL (SUITE)
5
METTRE LA LAVEUSE OU LA
SÉCHEUSE DE NIVEAU
Ŷ5HSpUH]OHVSLHGVGDQVO¶HPEDOODJHGHV
pièces et installez-les à la hauteur minimale.
Ŷ0HWWH]ODODYHXVHRXODVpFKHXVHjO¶HQGURLW
Ŷ$VVXUH]YRXVTXHODODYHXVHRXODVpFKHXVH
est de niveau en
plaçant un niveau
sur le dessus.
Vérifiez le niveau
d’un côtéà l’autre
et d’avant en
arrière.
Ŷ8WLOLVH]ODFOp
ouverte 5/8 po
pour ajuster les pieds intérieurs et extérieurs.
Serrez l’écrou de blocage contre le bas du
piédestal.
REMARQUE : Pour réduire les vibrations, les
écrous de blocage doivent être bien serrés.
Imprimé à Taiwan

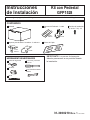
Kit con Pedestal
GFP1528
Instrucciones
de Instalación
HERRAMIENTAS NECESARIOS
Gafas de seguridad
1/4” Toma y Llave de
Tuercas
5/8" Llave de extremo
abierto
CONTENIDOS
Guantes
Nivel
Parte
Trasera
Parte
Trasera
Frente
Frente
IMPORTANTE: Los pernos de transporte
deberán permanecer en su posición durante
la instalación.
Soportes para lavadora / secadora - 2 cada uno
Pedestal
Tornillos de Instalación
(nº 8-18 x 7/16) - 22
Soportes del Pedestal – 2 cada
uno
Divisor del Cajón
Si tiene alguna pregunta, llame GE Appliances a 800.432.2737 o visite nuestro sitio Web en: GEAppliances.com
31-3000210 Rev. 1 08-19 GEA

2 31-3000210 Rev. 1
Instrucciones de instalación
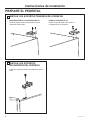
1
INSTALE LOS SOPORTES TRASEROS DEL PEDESTAL
PARA SECADORAS Y LAVADORAS DE 32”
Alinee el soporte trasero del pedestal como se
muestra a ambos lados.
PARA LAVADORAS DE 34”
Instale el soporte girado 180° desde la
configuración de la secadora.
2
INSTALE LOS SOPORTES
DELANTEROS DEL PEDESTAL
Instale los soportes frontales del pedestal a ambos
lados.
PREPARE EL PEDESTAL

31-3000210 Rev. 1 3
Instrucciones de instalación
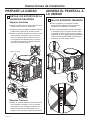
3
INSTALE LOS SOPORTES DE LA
LAVADORA/ SECADORA
Soportes Frontales
Ŷ$SR\HODXQLGDGVREUHVXSDUWHWUDVHUDHQXQD
superficie que cuente con protección.
Ŷ$VHJ~UHVHGHTXHODVSDWDVQLYHODGRUDVVHKD\DQ
girado hasta la posición de la altura mínima.
Ŷ,QVWDOHORVVRSRUWHVIURQWDOHVHQODSDUWHLQIHULRU
de la lavadora o secadora, como se muestra.
8VHORVDJXMHURVPiVFHUFDQRVDOIUHQWH\
los 2 agujeros más alejados sobre el soporte.
La posición del soporte no deberá superar el
extremo del electrodoméstico.
Soportes Traseros
Ŷ,QVWDOHORVVRSRUWHVWUDVHURVHQODSDUWHLQIHULRU
de la lavadora o secadora, como se muestra
más arriba. Use los 2 agujeros superiores en
la parte inferior del electrodoméstico con la
lengüeta sobre el soporte mirando hacia afuera.
PREPARE LA UNIDAD
4
UNA LOS SOPORTES TRASEROS
Ŷ(OHYHHOSHGHVWDO\ORVVRSRUWHVIURQWDOHV
del gancho del pedestal hacia los soportes
IURQWDOHVGHODODYDGRUD\ODVHFDGRUD
Ŷ$OLQHHORVVRSRUWHVWUDVHURVVREUHODODYDGRUD
o la secadora con los soportes traseros sobre
HOSHGHVWDO\UHDOLFHHODMXVWHFRQORVWRUQLOORV
Asegúrese de que el soporte del electrodoméstico
esté sobre la parte INTERIOR del soporte del
SHGHVWDO\QRKDFLDODSDUWHH[WHULRU
ADHIERA EL PEDESTAL A
LA UNIDAD
Soportes Frontales
Soportes Traseros
J

4 31-3000210 Rev. 1
Instrucciones de instalación
Impreso en Taiwán
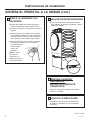
6
UNA LOS SOPORTES FRONTALES
Ŷ$MXVWHHOWRUQLOORHQWUHORVVRSRUWHVIURQWDOHV
GHOSHGHVWDO\ODODYDGRUDRVHFDGRUDDDPERV
lados de la unidad.
7
MÁQUINA LAVADORA
ÚNICAMENTE:
RETIRE LOS PERNOS DE
TRANSPORTE
Retire los 4 pernos de transporte de la parte
trasera de la unidad.
8
FINALICE LA INSTALACIÓN
Consulte las Instrucciones de Instalación de
la lavadora o secadora a fin de completar la
instalación.
ADHIERA EL PEDESTAL A LA UNIDAD (cont.)
5
NIVELE LA LAVADORA O LA
SECADORA
Ŷ8ELTXHODVSDWDVGHOSDTXHWHGHSLH]DV\
realice la instalación hasta la altura mínima.
Ŷ&RORTXHODODYDGRUDRODVHFDGRUDHQSRVLFLyQ
erguida.
Ŷ$VHJ~UHVHGHTXHODODYDGRUDRODVHFDGRUD
esté nivelada colocando un nivel de agua en
su parte superior. Realice un control de lado a
ODGR\GHVGHHOIUHQWHKDVWDODSDUWHWUDVHUD
Ŷ8VHXQDOODYHGHWXHUFDVGH´SDUDDMXVWDU
ODVSDWDVSRUGHQWUR\SRUIXHUD$MXVWHOD
tuerca de bloqueo
contra la parte
inferior del
pedestal.
NOTA: A fin de
PLQLPL]DUODV
vibraciones, se
deberán ajustar las
tuercas de bloqueo.
-
 1
1
-
 2
2
-
 3
3
-
 4
4
-
 5
5
-
 6
6
-
 7
7
-
 8
8
-
 9
9
-
 10
10
-
 11
11
-
 12
12


