Easy Home Crane ULTRASONIC Cool Mist Humidifier Manual de usuario
- Categoría
- Humidificadores
- Tipo
- Manual de usuario
Este manual también es adecuado para

English ·········02
Español ·········21
ULTRASONIC
COOL MIST HUMIDIFIER
HUMIDIFICADOR ULTRASÓNICO
DE NIEBLA FRÍA
User Manual
Manual
del usuario

Table of contents
2
Table of contents
Package contents ................................................................ 4
Components ..............................................................................4
General information ............................................................ 6
Reading and storing these instructions .............................. 6
Proper use ................................................................................. 6
Explanation of symbols .......................................................... 6
Safety ................................................................................... 7
Explanation of instructions ..................................................... 7
General safety information .................................................... 8
First use ...............................................................................12
Checking the humidifier and the packaging contents .... 13
User instructions ............................................................... 14
Operation ........................................................................... 15
Setting the correct humidity output ...................................16
Using essential oils ................................................................. 17
Helpful Hints ............................................................................ 17
Troubleshooting ................................................................ 18
Cleaning and maintenance ............................................... 19
Storage ..............................................................................20
Technical specifications ....................................................20
Disposal ..............................................................................20
Disposing of the packaging ................................................. 20
Disposing of the product ...................................................... 20

Table of contents
3

Package contents
4
A
1
2
3
4
5
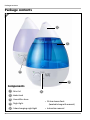
Components
1Mist lid
2Water tank
3Humidier base
4Night light
5Color changing night light
• 2 Extra Aroma Pads
(located in bag with manual)
• Instruction manual
Package contents

Package contents
5
B
1
4
7
12
13
3
6
10
11
16
15
9
2
5
8
14
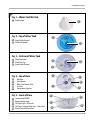
Fig. 1 – Water Tank Mist Lid
1 Vapor Output
Fig. 2 – Top of Water Tank
2 Vapor Outlet Channel
3 Water Tank Handle
Fig. 3 – Bottom of Water Tank
4 Water Tank Valve
5 Water Tank Cap
6 Vapor Outlet Channel
Fig. 4 – Top of Base
7 Nebulizer
8 Valve Opener
9 Water Level Sensor Float
10 Fan Vent
11 Vaporization Chamber
Fig. 5 – Front of Base
12 Control Knob, ON/OFF
13 Power Indicator Light
14 LED Night Light – Blue tank
15 LED Color Changing Night Light – White Tank
16 Aroma Tray with Aroma Pad

General information
6
General information
READ AND SAVE THESE INSTRUCTIONS
These instructions are for this ultrasonic cool mist humidifier (referred to
as “humidifier” below). They contain important information on setup
and handling.
Before using the humidifier, read the instructions for use carefully. This
particularly applies to the safety instructions. Failure to do so may result in serious
injury or damage to the humidifier.
Store these instructions for any further use. Make sure to include these instructions
when passing the humidifier on to third parties.
Proper use
The humidifier is designed exclusively to be used in indoor areas.
It is only intended for personal use and is not suitable for commercial use.
Only use the humidifier as described in the instructions. Any other use is
considered improper and can result in material damage or even in harm to
persons. The humidifier is not a toy.
The manufacturer or retailer assumes no liability for damage resulting from
improper or incorrect use.
Explanation of symbols
The following symbols are used in these instructions, on the product or on the
packaging.
This symbol gives you useful additional information concerning
operation.

Safety
7
FCC PART 18
This device complies with Part 18 of the FCC Rules. Operation is subject to the following
two conditions: (1) this device may cause harmful interference, and (2) this device must
accept any interference received, including interferences that may cause undesired
operation.
Warning: Changes or modifications to this unit not expressly approved by the party
responsible for compliance could void the user’s authority to operate the equipment.
NOTE: This equipment has been tested and found to comply with the limits for a Class
B ISM equipment, pursuant to Part 18 of the FCC Rules. These limits are designed to
provide reasonable protection against harmful interference in a residential installation.
This equipment generates, uses and can radiate radio frequency energy and, if not
installed and used in accordance with the instructions, may cause harmful interference
to radio communications.
However, there is no guarantee that interference will not occur in a particular
installation. If this equipment does cause harmful interference to radio or television
reception, which can be determined by turning the equipment off and on, the user is
encouraged to try to correct the interference by one or more of the following measures:
• Reorient or relocate the receiving antenna.
• Increase the separation between the equipment and receiver.
• Connect the equipment into an outlet on a circuit different from that to which the
receiver is connected.
• Consult the dealer or an experience radio/TV technician for help.
Safety
Explanation of instructions
The following symbols and signal words are used in these instructions.
WARNING!
This signal symbol/word refers to a hazard with a
medium level of risk that, if not avoided, may result
in death or serious injury.
CAUTION!
This signal symbol/word refers to a hazard with a
low level of risk that, if not avoided, may result in
minor or moderate injury.
NOTICE! This signal word warns of possible material
damage.

Safety
8
General safety information
WARNING!
Risk of electric shock!
Faulty installation of electronics or an excessively high supply voltage
may result in electric shock.
− Use only a 110-120V AC outlet. ALWAYS plug and unplug humidifier
with dry hands.
− Only plug the humidifier into an easily accessible outlet. You can
quickly disconnect the plug from the power grid in the event of
an incident.
− Do not operate the humidifier if it is visibly damaged or if the
power plug is defective.
− Do not open the housing. Contact a specialist workshop, for
repairs. If you perform repairs on your own, improperly plug in
the humidifier or incorrectly operate it, any liability and warranty
claims will be deemed invalid.
− In the case of repairs, only parts that correspond to the original
device data may be used. This humidifier contains electrical and
mechanical parts that are essential to ensuring protection against
sources of danger.
− Do not submerge the humidifier or the power plug in water or
other liquids.
− Do not position the humidifier above tubs, sinks or other objects
filled with water.
− Never try to pick up an electronic device connected to the grid if
it has fallen into water. If this happens, immediately unplug the
power plug from the outlet. Never handle the power plug with
wet hands.
− Do not abuse the power cord. Never carry the humidifier by
the power cord or pull the power cord to disconnect the outlet
plug from an outlet; instead grasp the outlet plug and pull to
disconnect.

Safety
9
− Keep the humidifier and the power plug away from open flames
and hot surfaces.
− Do not bend the power cord or lay it over sharp edges.
− If you would like to clean the humidifier or a malfunction occurs,
always switch off the humidifier and unplug it from the grid
− Keep the humidifier, the power cord, and the power plug away
from children.
− Never operate the humidifier with a damaged power supply cord
or plug.
WARNING!
Risks to children and people with reduced physical, sensory or
mental capabilities (for example, partially disabled people, older
people with limited physical and mental capabilities) or a lack of
experience and knowledge.
− This humidifier can be used by children aged eight and older
as well as by people with reduced physical, sensory or mental
capabilities or a lack of experience and knowledge if they
are supervised or have been instructed in the safe use of the
humidifier and understand the dangers that result from said use.
Children may not play with the humidifier. Cleaning and user
maintenance may not be done by children without supervision.
− Keep children younger than eight years of age away from the
humidifier and the connecting line.
− Do not let children play with the packaging film. Children may get
caught in it and suffocate if they play with it.
WARNING!
Explosion and fire hazard!
Improperly handling the humidifier may cause an explosion or a
fire.

Safety
10
− Keep the humidifier away from water, other liquids, open
flames, and hot surfaces.
− Do not cover the humidifier or the power plug with items or
clothing.
− Maintain a distance of at least 2 inches from highly flammable
materials.
− Do not expose the humidifier to excessive heat, such as direct
sunlight, fire or the like.
− Only use the humidifier using the supplied accessories.
NOTICE!
Risk of damage!
Improperly handling the humidifier may cause it to become damaged.
− DO NOT carry water tank by handle when it is filled with water. It is
advisable to carry filled water tank with two hands.
− DO NOT operate outdoors. This humidifier is intended for indoor
use only. Always have water in the tank when operating the unit.
− Use only clean, cool tap water to fill the tank. Filtered or distilled
water is recommended to avoid white dust if tap water is too
hard. DO NOT use hot water.
− DO NOT pour water in any openings other than the water tank.
− Be sure that the water tank cap is firmly tightened. Always have
the mist direction nozzle and the mist chamber in place while the
unit is operating. Rotate the mist direction nozzle so it aims away
from children, walls, furniture, and electrical appliances.
− Unplug the humidifier when not in use and whenever you clean
or move the humidifier.
− Always place the humidifier on a smooth, flat, lint free, non-
metallic, waterproof, level surface, and away from direct sunlight.
Keep the power cord away from heated surfaces and areas where
it could be walked on or tripped over. DO NOT let the cord hang
over the edge of a table or counter.
− DO NOT add medication of any type into the nozzle, base or water

Safety
11
tank. Do not cover any openings on the humidifier or insert
objects into any openings.
− The humidifier should not be left unattended in a closed room as
the air could become saturated and leave condensation on walls
or furniture. Leave room door partly open.
− The humidifier requires daily and weekly cleaning to operate
appropriately. Refer to cleaning instructions.
− When cleaning the inside of the unit keep water away from the
air outlet / fan vent. The exterior may be wiped with a damp
cloth, except the electrical controls, only when the unit is off and
unplugged.
− NEVER use detergents, gasoline, glass cleaner, furniture polish,
paint thinner or other household solvents to clean any part of
the humidifier. Always use a few drops of bleach with water to
clean humidifier. Detergent film dissolved in the water supply can
interfere with the output of the unit.
− Do not tilt or tip the unit or attempt to empty or fill it while it is in
operation.
− Do not touch hot surfaces. Use handles or knobs.
− Use the humidifier only as described in this manual. The use of
accessory attachments not recommended by the manufacturer
may cause damage to the humidifier or personal injuries.
− Do not overfill the water tank.
− Always fill water tank first, then plug the cord into the wall outlet.
To disconnect, always turn OFF first, then unplug from wall outlet.
− Do not let cord hang over edge of counter or touch hot surfaces.

First use
12
First use
WARNING!
Risk of damage!
Read and understand all instructions. Failure to follow all instructions
listed below may result in electric shock, fire or serious personal injury.
The warnings, cautions, and instruction discussed in this instruction
manual cannot cover all possible conditions and situations that may
occur. It must be understood by the operator that common sense and
caution are a factor which cannot be built into this product, but must
be supplied by the operator.
CAUTION!
Risk of damage!
A short power supply cord is provided to reduce the risk of personal
injury resulting from becoming entangled in or tripping over a longer
cord. Extension cords are available from local hardware stores and may
be used if care is exercised. If an extension cord is required, special care
and caution is necessary. Also the cord must be: (1) marked with an
electrical rating of 125V, and at least 13 A., 1625 W., and (2) the cord must
be arranged so that it will not drape over the countertop or tabletop
where it can be pulled on by children or tripped over accidentally.
Polarized plug
This product has a polarized plug (one blade is wider than the
other). To reduce the risk of electric shock, this plug is intended to fit
into a polarized outlet only one way. If the plug does not fit fully into
the outlet, reverse the plug. If it still does not fit, contact a qualified
electrician. Do not attempt to modify the plug in any way.
Electric power
If the electric circuit is overloaded with other appliances, your

First use
13
humidifier may not operate properly. The humidifier should be
operated on a separate electrical circuit from other operating
appliances.
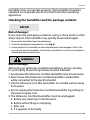
Checking the humidifier and the package contents
NOTICE!
Risk of damage!
If you open the packaging carelessly using a sharp knife or other
sharp objects, the humidifier may quickly become damaged.
1. Remove the humidifier from the packaging
2. Check the package for completeness (see Fig.A).
3. Check whether the humidifier or the individual parts are damaged. If this is the
case, do not use the humidifier. Contact the manufacturer via the service address
indicated on the warranty card.
WARNING!
Risk of damage!
Although your Ultrasonic Cool Mist Humidifier is easy to operate,
for your safety, the warnings below must be followed:
1. Do not place the Ultrasonic Cool Mist Humidifier near a heat source.
2. Never leave the Ultrasonic Cool Mist Humidifier unattended
while connected to the electrical outlet.
3. Use the Ultrasonic Cool Mist Humidifier on a stable surface away
from water.
4. Do not unplug the Ultrasonic Cool Mist Humidifier by pulling on
the power supply cord.
5. The Ultrasonic Cool Mist Humidifier must be unplugged:
A. Before any cleaning or maintenance.
B. Before either filling or emptying.
C. After use.
D. If it appears to be faulty.

User instructions
14
User instructions
NOTICE!
Before each use
CHECK HUMIDIFIER PLACEMENT – Place the Humidifier on a non-
metallic, lint free, waterproof, level surface for best performance.
This is to help disperse the mist in the air and prevent it from being
knocked or tipped over.
CAUTION!
DO NOT operate the humidifier without water in the water tank.
DO NOT plug in the power supply cord with wet hands; electric
shock could happen.
− Be sure the humidifier is turned OFF and the humidifier is
unplugged from the electrical outlet.
− Select a location for your humidifier on a flat surface
approximately 4 inches away from a wall.
− DO NOT place the humidifier on a finished floor or near
furniture which can be damaged by moisture or water. Place
on a water resistant surface.
− DO NOT place humidifier on top of a towel, or a carpeted
surface. This may cause the humidifier to overheat.
− DO NOT place humidifier on a wood surface.

Operation
15
Operation
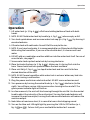
1. Lift water tank (p. 3, fig. A 2 ) off of base holding bottom of tank with both
hands.
2. NOTE: DO NOT hold water tank by handle (p. 4, fig. 2 3 ) when empty or full.
3. Turn tank upside down and unscrew water tank cap (p. 4, fig. 3 5 ) by turning it
counterclockwise.
4. Fill water tank with cold water. Do not fill all the way to the rim.
5. NOTE: If you have hard water, it is recommended to use filtered or distilled water.
While using the humidifier, if you see a film of white dust, it is because of hard
water.
6. DO NOT add any medication or other additives into the water tank itself. For use of
essential oils, see page 17.
7. Screw water tank cap back onto tank by turning clockwise.
8. Place tank onto the base (p. 3, fig. A 3 ). Make sure it is laying flush into the
base. There should not be a space between the tank and base.
9. Place mist lid (p. 3, fig. A 1 ) on top of water tank and turn mist lid to face
desired direction of the mist.
10. NOTE: DO NOT move humidifier while water tank is on base. Water may leak into
the base causing a malfunction.
11. Plug the power cord into an electrical outlet. DO NOT use an extension cord.
12. Turn power on by turning the control knob (p. 4, fig. 5 12 ) clockwise (to the
right). You will hear a minor clicking noise when turning unit on and off. The
green power indicator light will turn on.
13. In a few moments, the mist will start coming through the mist lid. Use the control
knob to adjust the intensity of the mist output. Turning the knob clockwise will
increase the moisture output, turning the knob counterclockwise will reduce the
moisture output.
14. Note: When at maximum level, it is normal to hear a faint dripping sound.
15. Turn on the blue unit LED night light by pressing the ‘LED On/Off’ button (p. 4,
fig. 5 14 or 15 ). To turn it off, press and hold the button for 2 seconds.

Operation
16
16. Turn on the white unit LED color changing night light by pressing the ‘LED On/Off’
button (p. 4, fig. 5 15 ). The LED lights will change continuously in the following
order;
• Purple, dark blue, light blue, green, yellow, orange and red
To turn it off, press and hold the button for 2 seconds.
17. When the humidifier runs out of water, the power light (p. 4, fig. 5 13 ) will turn
red, and the mist output will stop. This is a safety feature to prevent the humidifier
from possibly overheating and damaging the nebulizer (p. 4, fig. 4 7 ). This
safety feature uses a water level sensor (p. 4, fig. 4 9 ) to stop the nebulizer
once the water level sinks below the required level in the water basin.
18. Turn the humidifier off and unplug before removing and refilling the water tank.
Setting the correct humidity output
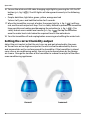
Adjust the mist control so that the mist rises up and gets absorbed by the room
air. Do not turn on too high an output as the mist cannot be absorbed by the air
and accumulates on the surface around the humidifier. If the humidifier is placed
near a fan or air conditioning outlet, the mist may be forced down by the foreign
air stream. Change the location of the humidifier or reduce the output of the other
room conditioning appliances.
Correct Incorrect

Operation
17
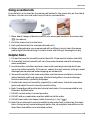
Using essential oils
Essential oils can be used on the aroma pad located in the aroma tray on the side of
the base. You can mix and match any oil scents you would like.
1. Place about 3 drops of desired scent on the aroma pad located in the aroma tray
16 (see above).
2. Push the aroma tray into the base.
3. Each pad should only be used per desired scent.
4. Before attempting to reuse aroma pad with a different scent, clean the aroma
pad by lightly hand washing it in warm water and letting it thoroughly air dry.
Helpful hints
1. It is best to keep the humidity level at about 30-50 percent of relative humidity.
2. The comfort level of humidity will vary from room to room and with changing
room conditions.
3. In cold weather, windows and even some walls may fog or develop frost from
excessive indoor humidity. If this occurs, reduce the mist intensity setting to avoid
damage from condensed water dripping on windowsills.
4. Too much humidity in the room may allow moisture to accumulate on surfaces
where bacteria and fungi can grow. Moisture that gathers may also damage
furniture and walls, especially wallpaper.
5. To eliminate excessive humidity, especially in small rooms, leave the room door
open and adjust the mist intensity control setting.
6. Note: To avoid possible white dust due to hard water, it is recommended to use
filtered or distilled water.
7. DO NOT use hot water. Use cool tap water.
8. DO NOT add any medication or other additives to the water.
9. DO NOT pour water into Vapor Outlet Channel (p. 4, fig. 2 2 ).
10. Note: Do not attempt to move humidifier while water tank is placed on the water
basin. Doing so may cause leakage of water. Also, do not place humidifier on the
floor. Place humidifier on an elevated surface.
16

Troubleshooting
18
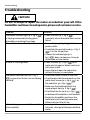
Troubleshooting
CAUTION!
DO NOT attempt to repair the motor or nebulizer yourself. If the
humidifier continues to not operate, please call customer service.
Problem Solution
The power indicator light (p. 4, fig. 5 13 )
is staying red and not turning green:
Humidifier is working than stops:
• Clean the base (p. 3, fig. A 3 )
especially where the water level sensor
float is
If humidifier does not work at all: • Ensure it is properly plugged into a
power outlet.
• Check that the control knob (p. 4, fig. 5
12 ) is in the ON position.
• If Power On indicator light (p. 4,
fig. 5 13 ) does not come on, bring to
authorized service station.
If there is a strange odor: • Clean the tank (p. 3, fig. A 2 )with
water and vinegar or bleach and rinse
with clean water.
• Leave the tank open for some time
without the cap, in a cool place.
The power indicator light (p. 4, fig. 5
13 ) is green but there is no mist being
emitted:
• Check that there is water in the tank.
• Check for possible lime deposits on the
water level sensor (p. 4, fig. 4 9 ) or
the nebulizer (p. 4, fig. 4 7 ) .
• Make sure that nothing blocks the
vapor output slots (p. 4, fig. 3 6 ) .
• Check that the fan vent (p. 4, fig. 4 10 )
on bottom of humidifier is not blocked.
• Empty the humidifier and rinse the
water basin with cool tap water and
allow to dry for 15 to 30 min.
White dust appears and settles outside
the humidifier:
• Area tap water may have too many
minerals, change to filtered or distilled
water.

Cleaning and maintenance
19
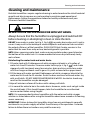
Cleaning and maintenance
Portable humidifiers require regular cleaning in order to reduce the risk of bacterial
growth and also to remove any scale residue to maintain good operational
performance. Follow the procedures below for healthy maintenance of your
Ultrasonic Cool Mist Humidifier.
CAUTION!
NEVER PLUG OR UNPLUG HUMIDIFIER WITH WET HANDS.
Always be sure that the humidifier is unplugged and switched OFF
before cleaning or attempting to clean or store the item.
DO NOT leave water in water tank (p. 3, fig. A 2 ) or water basin when unit is not in
use as it may result in the buildup of mineral deposits and bacteria that can inhibit
the output efficiency of the humidifier. PLEASE NOTE that if water remains in the
water tank for more than a day or two, bacterial growth is possible.
NOTE: When removing water tank, water may accumulate under vapor lid and on
the bottom of the water tank. It is recommended to have a dry cloth ready to dry
wet surfaces.
Disinfecting the water tank and water basin
1. Fill water tank with 2 tablespoons of white vinegar or bleach in a ½ gallon of
water. Let stand 20 minutes. Screw on water tank cap (p. 4, fig. 3 5 ) and shake
vigorously with two hands every few minutes, drain and rinse with clean water
until the vinegar or bleach smell is gone. Dry with a clean cloth or paper towel.
2. Fill the base with water and add 2 tablespoons of white vinegar or bleach to the
water and let it soak for 20 minutes. Drain the base and rinse with cool water. Dry
with a soft cloth. DO NOT IMMERSE WATER BASIN IN WATER. An electric shock may
result or the humidifier may be damaged.
3. Wipe all exterior surfaces of the base with a damp, soft cloth.
4. It is normal for water to be in the water basin. However, water must not get inside
the central body. If this should happen, take the humidifier to an authorized
service center before using it again.
NOTE: It is recommended to clean humidifier with the water and white vinegar
solution as stated above after using the humidifier about once a week or if cleaning
seems necessary.
IMPORTANT: Failure to keep this humidifier clean from mineral deposits normally
contained in any water supply will affect the efficiency of the operation. Customer
failure to follow these instructions may void the warranty.

Storage
20
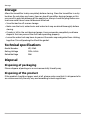
Storage
Allow the humidifier to dry completely before storing. Store the humidifier in a dry
location. Do not place any heavy items on top of humidifier during storage as this
may result in possible damage of the appliance. Always check the plug before use
to assure metal items have not become attached.
• Save the box for off-season storage.
• Make sure the tank, water basin and water tank cap are dried thoroughly before
storing.
• If water is left in the unit during storage, it may evaporate completely and leave
deposits that can prevent the unit from operating properly.
• Leave the water tank cap loose to prevent the water cap and gasket from sticking
together. This will prolong the life of the gasket.
Technical specifications
Model Number HTJ-2060
Rating Voltage 120V / 60Hz
Rated Wattage 25W
Disposal
Disposing of packaging
Please dispose of package in an environmentally friendly way.
Disposing of the product
If the product should no longer work at all, please make sure that it is disposed of in
an environmentally friendly way and according to local regulations.

Índice
21
Contenido del paquete ........................................................................................ 22
Información general ............................................................................................24
Lea y guarde estas instrucciones .................................................................................24
Uso correcto .....................................................................................................................24
Significado de los símbolos ...........................................................................................24
Seguridad ............................................................................................................. 25
Explicación de las instrucciones ...................................................................................25
Información general de seguridad .............................................................................25
Primer uso ............................................................................................................30
Comprobación del humidificador y el contenido del paquete ............................... 31
Instrucciones para el usuario .............................................................................. 32
Funcionamiento ...................................................................................................33
Ajuste de la humedad correcta ................................................................................... 34
Uso de aceites esenciales ..............................................................................................35
Consejos útiles .................................................................................................................35
Solución de problemas ........................................................................................36
Limpieza y mantenimiento .................................................................................. 37
Almacenamiento ..................................................................................................38
Especificaciones técnicas .....................................................................................38
Eliminación ...........................................................................................................38
Eliminación del embalaje ............................................................................................. 38
Eliminación del producto ............................................................................................. 38
Índice

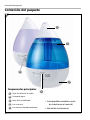
Contenido del paquete
22
A
1
2
3
4
5
Componentes principales
1
Tapa de salida de la niebla
2
Tanque de agua
3
Base del humidicador
4
Luz nocturna
5
Luz nocturna de color cambiante
Contenido del paquete
• 2 almohadillas aromáticas extra
(en la bolsa con el manual)
• Manual de instrucciones

Contenido del paquete
23
B
Fig. 1 – Tapa del tanque de agua
para hacer la niebla
1 Salida de la niebla
Fig. 2 – Parte superior del tanque
de agua
2 Canal de salida de la niebla
3 Manija del tanque de agua
Fig. 3 – Parte inferior del tanque
de agua
4 Válvula del tanque de agua
5 Tapa del tanque de agua
6 Canal de salida de la niebla
Fig. 4 – Parte superior de la base
7 Nebulizador
8 Abertura de válvula
9 Flotador de sensor de nivel de agua
10 Oricio de ventilación del ventilador
11 Cámara de vaporización
Fig. 5 – Parte delantera de la base
12 Perilla de control, ON/OFF
13 Luz indicadora de encendido
14 Luz nocturna a LED - tanque azul
15 Luz nocturna a LED de color cambiante -
tanque blanco
16 Bandeja de aroma con almohadilla aromática
1
4
7
12
13
3
6
10
11
16
15
9
2
5
8
14

Información general
24
Información general
24
Información general
LEA Y GUARDE ESTAS INSTRUCCIONES
Estas instrucciones corresponden a este humidificador ultrasónico de
vapor frío (denominado en lo sucesivo como “humidificador”).
Contienen información importante sobre la configuración y el manejo.
Antes de utilizar el humidificador, lea atentamente las instrucciones de
uso. En particular, preste atención a las instrucciones de seguridad. De lo contrario,
podrían producirse lesiones graves o daños en el humidificador.
Guarde estas instrucciones para un uso posterior. Asegúrese de incluir estas
instrucciones cuando entregue el humidificador a terceros.
Uso correcto
El humidificador está diseñado exclusivamente para ser usado en interiores.
Está concebido solo para uso personal y no es apto para fines comerciales.
Utilice el humidificador solo como se describe en las instrucciones. Cualquier otro
uso se considera incorrecto y puede causar daños materiales o incluso personales.
El humidificador no es un juguete.
El fabricante o vendedor no asume ninguna responsabilidad por los daños que
resulten de un uso inadecuado o incorrecto.
Significado de los símbolos
Los siguientes símbolos se utilizan en estas instrucciones, en el producto o en el
embalaje.
Este símbolo le proporciona información adicional útil sobre el
funcionamiento.

Seguridad
25
Seguridad
25
PARTE 18 DE LA FCC
Este dispositivo cumple con la Parte 18 de las Normas de la FCC. Su funcionamiento
está sujeto a las dos condiciones siguientes: (1) este dispositivo no puede causar
interferencias perjudiciales; y (2) este dispositivo debe aceptar cualquier interferencia
recibida, incluyendo interferencias que puedan causar un funcionamiento no deseado.
Advertencia: Los cambios o modificaciones a esta unidad no aprobados expresamente
por la parte responsable del cumplimiento podrían anular la autoridad del usuario
para operar el equipo.
AVISO: Este equipo ha sido probado y cumple con los límites establecidos para los
dispositivos digitales de Clase B, de acuerdo con la Parte 18 de las Normas de la FCC.
Estos límites están diseñados para proporcionar una protección razonable contra
interferencias perjudiciales en una instalación residencial. Este equipo genera, utiliza y
puede irradiar energía de radiofrecuencia y, si no se instala y utiliza de acuerdo con las
instrucciones, puede causar interferencias molestas en las comunicaciones de radio.
Sin embargo, no hay garantía de que no se produzcan interferencias en una instalación
en particular. Si este equipo causa interferencias molestas en la recepción de radio
o televisión, lo cual puede determinarse apagando y encendiendo el equipo, se
recomienda intentar corregir la interferencia por medio de una o más de las siguientes
medidas:
• Reorientar o reubicar la antena receptora.
• Aumentar la separación entre el equipo y el receptor.
• Conectar el equipo a un tomacorriente en un circuito diferente al que está
conectado el receptor.
• Consultar al distribuidor o un técnico experimentado de radio/televisión para
obtener ayuda.
Seguridad
Explicación de las instrucciones
En estas instrucciones se utilizan las siguientes palabras de advertencia.
¡ADVERTENCIA!
Este símbolo/palabra de advertencia indica un
peligro con un nivel medio de riesgo que, si no se
evita, podría causar la muerte o lesiones graves.
¡PRECAUCIÓN!
Este símbolo/palabra de advertencia indica
un peligro con un nivel bajo de riesgo que, si
no se evita, podría causar lesiones menores o
moderadas.
¡AVISO! Esta palabra de advertencia advierte sobre
posibles daños materiales.

Seguridad
26
Información general de seguridad
¡ADVERTENCIA!
¡Riesgo de descarga eléctrica!
Instalar dispositivos electrónicos de manera defectuosa o una tensión
excesiva de la red pueden provocar una descarga eléctrica.
− Use solo un tomacorriente de 110-120 V CA. SIEMPRE enchufe y
desenchufe el humidificador con las manos secas.
− Enchufe el humidificador a un tomacorriente de fácil acceso, de
forma que pueda desenchufarlo rápidamente de la red eléctrica en
caso de incidente.
− No utilice el humidificador si está visiblemente dañado o si el
enchufe está defectuoso.
− No abra la carcasa. Póngase en contacto con un taller especializado
para las reparaciones. Las reclamaciones de responsabilidad y
garantía no se considerarán válidas si realiza reparaciones por
su cuenta, si enchufa el humidificador de forma incorrecta o si lo
maneja de forma incorrecta.
− En el caso de ser necesario realizar alguna reparación, solo
deben usarse piezas correspondientes al dispositivo original. Este
humidificador contiene partes eléctricas y mecánicas que son
esenciales para asegurar la protección contra fuentes de peligro.
− No sumerja el humidificador o el enchufe en agua u otros líquidos.
− No ponga el humidificador sobre bañeras, lavabos u otros
recipientes llenos de agua.
− No toque nunca un dispositivo electrónico conectado al suministro
eléctrico que se haya caído al agua. Si esto sucede, desenchúfelo
inmediatamente del tomacorriente. No toque nunca el enchufe con
las manos húmedas.
− No maltrate el cable de alimentación. No transporte nunca el
humidificador por el cable de alimentación ni tire de este para
desenchufarlo del tomacorriente; agarre el enchufe y jálelo para
desconectarlo.

Seguridad
27
− Mantenga el humidificador y el enchufe alejado de llamas y
superficies calientes.
− No doble el cable de alimentación ni lo tienda sobre bordes afilados.
− Si desea limpiar el humidificador o si se produce una avería, apague
siempre el humidificador y desenchúfelo de la red
− Mantenga el humidificador, el cable de alimentación y el enchufe
fuera del alcance de los niños.
− No utilice nunca el humidificador con un cable de alimentación o
enchufe dañados.
¡ADVERTENCIA!
Este dispositivo presenta riesgos para niños y personas con
disminución en sus capacidades físicas, sensoriales o mentales
(como personas con discapacidad parcial, personas mayores con
capacidades físicas y mentales limitadas) o carentes de experiencia
y conocimiento.
− Este humidificador puede ser utilizado por niños a partir de 8 años
de edad, así como personas con capacidades físicas, sensoriales o
mentales disminuidas, o con falta de experiencia y conocimiento,
si han recibido supervisión e instrucciones sobre el uso seguro del
humidificador y si entienden los riesgos que entraña. Los niños no
pueden jugar con el humidificador. Los niños sin supervisión no
deben limpiar ni dar mantenimiento al dispositivo.
− Mantenga el humidificador y el cable de alimentación fuera del
alcance de los niños menores de ocho años.
− No permita que los niños jueguen con el material de embalaje;
pueden quedar atrapados en él y asfixiarse.
¡ADVERTENCIA!
¡Peligro de incendio y explosión!
El manejo incorrecto del humidificador puede provocar una
explosión o un incendio.

Seguridad
28
Seguridad
28
− Mantenga el humidificador alejado del agua, otros líquidos,
llamas y superficies calientes.
− No cubra el humidificador o el enchufe con artículos o ropa.
− Mantenga la unidad a una distancia de al menos 5 cm (2
pulgadas) de materiales altamente inflamables.
− No exponga el humidificador al calor excesivo, como el
producido por la luz directa del sol, fuego o fuentes similares.
− Utilice el humidificador solo con los accesorios provistos.
¡AVISO!
¡Riesgo de daños!
El manejo inadecuado del humidificador puede provocar daños al
dispositivo.
− NO transporte el depósito de agua por la agarradera cuando está
lleno de agua. Se recomienda agarrar el depósito lleno de agua
con las dos manos.
− NO utilice este aparato al aire libre. El humidificador está diseñado
solo para uso en interiores. Siempre debe haber agua en el
depósito al utilizar el humidificador.
− Use solo agua limpia y fría de la llave o grifo para llenar el depósito.
Se recomienda utilizar agua filtrada o destilada para evitar
acumulaciones de cal si el agua es demasiado dura. NO use agua
caliente.
− No vierta agua por ninguna abertura excepto la del depósito de
agua.
− Asegúrese de que la tapa del depósito de agua esté bien cerrada.
La boquilla de vapor orientable y la cámara de vapor siempre
deben estar instaladas mientras la unidad está en funcionamiento.
Gire la boquilla de vapor orientable de forma que no se dirija a
niños, paredes, muebles y electrodomésticos.
− Desenchufe el humidificador cuando no lo use y siempre que lo
limpie o lo mueva.
− Coloque siempre el humidificador sobre una superficie lisa, plana,

Seguridad
29
Seguridad
29
sin pelusa, no metálica, impermeable y nivelada lejos de la luz
directa del sol. Mantenga el cable de alimentación alejado de las
superficies calientes y donde pueda pisarse o causar tropezones.
NO permita que el cable cuelgue del borde de una mesa o
mostrador.
− NO agregue ningún tipo de medicamento a la boquilla, la base o
el depósito de agua. No cubra las aberturas del humidificador ni
inserte objetos en ellas.
− El humidificador no debe dejarse sin supervisión en una habitación
cerrada, ya que el aire podría saturarse y dejar condensación en las
paredes y los muebles. Deje la puerta parcialmente abierta.
− El humidificador requiere de limpieza diaria y semanal para
funcionar correctamente. Consulte las instrucciones de limpieza.
− Al limpiar la unidad mantenga el agua alejada de la salida de aire/
ranura del ventilador. El exterior puede limpiarse con un paño
húmedo, excepto los controles eléctricos, solo cuando la unidad
está apagada y desenchufada.
− NUNCA use detergentes, gasolina, limpiavidrios, abrillantador de
muebles, solvente para pinturas u otros solventes domésticos para
limpiar ninguna pieza del humidificador. Agregue siempre unas
pocas gotas de blanqueador al agua para limpiar el humidificador.
La película que se crea al disolver detergente en el agua puede
interferir en el rendimiento de la unidad.
− No incline la unidad ni intente vaciarla o llenarla cuando esté
funcionando.
− No toque las superficies calientes. Utilice los mangos o agarraderas.
− Utilice el humidificador solamente como se describe en este
manual. El uso de accesorios no recomendados por el fabricante
podría causar daños al humidificador o lesiones personales.
− No llene excesivamente el depósito de agua.
− Llene siempre el depósito de agua primero y luego conecte el cable
al tomacorriente. Para desconectar la unidad, siempre apáguela
primero y luego desenchúfela del tomacorriente.
− No deje que el cable cuelgue sobre el borde de una mesa o
mostrador, ni que toque las superficies calientes.

Seguridad
30
Seguridad
30
Primer uso
¡ADVERTENCIA!
¡Riesgo de daños!
Lea y comprenda todas las instrucciones. Si no se siguen todas las
instrucciones enumeradas a continuación, se pueden producir
descargas eléctricas, incendios o lesiones graves. Las advertencias,
precauciones e instrucciones que se detallan en este manual de
instrucciones no cubren todas las condiciones y situaciones posibles
que podrían suceder. El usuario debe entender que el sentido común
y la precaución son factores que no se pueden incluir en el producto,
sino que los debe aportar el usuario mismo.
¡PRECAUCIÓN!
¡Riesgo de daños!
Se proporciona un cable eléctrico corto para reducir el riesgo de
lesiones personales resultantes de enredarse o tropezar con un cable
más largo. Hay disponibles cables de extensión en las ferreterías
locales y estos se pueden utilizar si se tiene cuidado en su uso. Si se
requiere usar un cable de extensión, es necesario tener especial
cuidado y precaución. Además el cable debe: (1) estar marcado con
una clasificación eléctrica de 125 V y al menos 13 A, 1625 W; y (2) el cable
debe colocarse de manera que no cuelgue de un mostrador o mesa
en donde los niños pudieran jalarlo o tropezar con él accidentalmente.
Enchufe polarizado
Este producto cuenta con un enchufe polarizado (una clavija es más
ancha que la otra). Para reducir el riesgo de descarga eléctrica, este
enchufe entra en el tomacorriente polarizado en un solo sentido. Si el
enchufe no entra completamente en el tomacorriente, gire el enchufe.
Si aun así no encaja, contacte a un técnico electricista calificado. No
intente modificar el enchufe de ninguna manera.

Seguridad
31
Seguridad
31
Alimentación eléctrica
Si el circuito eléctrico se sobrecarga con otros electrodomésticos,
es posible que su humidificador no funcione adecuadamente. El
humidificador se debe usar en un circuito eléctrico distinto al de otros
electrodomésticos en funcionamiento.
Comprobación del humidificador y el contenido del
paquete
¡AVISO!
¡Riesgo de daños!
Si no tiene cuidado al abrir el embalaje con un cuchillo u otro objeto
afilado, puede dañar fácilmente el humidificador.
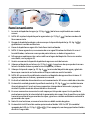
1. Saque el humidificador del embalaje
2. Verifique que no falte ninguna pieza (ver la Fig.A).
3. Compruebe si el ventilador o alguna de sus piezas están dañados. De ser así, no lo
use. Comuníquese con el fabricante utilizando la dirección de servicio indicada en
la tarjeta de garantía.
¡ADVERTENCIA!
¡Riesgo de daños!
Aunque el humidificador ultrasónico de vapor frío es fácil
de utilizar, por su seguridad, deben seguirse las siguientes
advertencias:
1. No coloque el humidificador ultrasónico de vapor frío cerca de una
fuente de calor.
2. No deje nunca el humidificador ultrasónico de vapor frío
desatendido mientras está enchufado.
3. Utilice el humidificador ultrasónico de vapor frío en una
superficie estable alejada del agua.
4. No desenchufe el humidificador ultrasónico de vapor frío
jalando del cable de alimentación eléctrica.

Instrucciones para el usuario
32
5. El humidificador ultrasónico de vapor frío debe desenchufarse:
A. Antes de cualquier operación de limpieza o mantenimiento.
B. Antes de llenarlo o vaciarlo.
C. Después de su uso.
D. Si parece estar defectuoso.
Instrucciones para el usuario
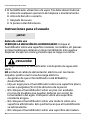
¡AVISO!
Antes de cada uso
VERIFIQUE LA UBICACIÓN DEL HUMIDIFICADOR: Coloque el
humidificador sobre una superficie nivelada, no metálica, sin pelusas
e impermeable para obtener un mejor rendimiento. Esto ayuda a
dispersar el vapor en el aire y previene que se caiga o se incline.
¡PRECAUCIÓN!
NO haga funcionar el humidificador si el depósito de agua está
vacío.
NO enchufe el cable de alimentación eléctrica con las manos
mojadas; podría ocurrir una descarga eléctrica.
− Asegúrese de que el humidificador está APAGADO y
desenchufado.
− Elija un lugar para el humidificador sobre una superficie plana
a unas 4 pulgadas (10cm) de distancia de la pared.
− NO coloque el humidificador sobre un piso con acabado,
ni cerca de muebles que puedan dañarse por acción de
la humedad o del agua. Colóquelo sobre una superficie
resistente al agua.
− NO coloque el humidificador sobre una toalla ni sobre una
superficie alfombrada. Esto podría hacer que el humidificador
se sobrecaliente.
− NO coloque el humidificador sobre una superficie de madera.

Funcionamiento
33
Funcionamiento
1. Levante el depósito de agua (p. 22, fig. A 2 ) de la base sujetándolo con ambas
manos.
2. NOTA: NO sujete el depósito por la agarradera (p. 23, fig. 2 3 ) tanto cuando está
lleno como vacío.
3. Ponga el depósito bocabajo y desenrosque la tapa del depósito (p. 23, fig. 3 5 )
girándola en sentido antihorario.
4. Llene el depósito con agua fría. No lo llene hasta el borde.
5. NOTA: Si tiene agua dura, se recomienda usar agua filtrada o destilada. Al usar el
humidificador, si observa una capa de polvo blanco, se debe al agua dura.
6. NO agregue medicamentos u otros aditivos al agua del depósito. Para usar aceites
esenciales, ver la página 35.
7. Vuelva a enroscar la tapa del depósito de agua en sentido horario.
8. Coloque el depósito en la base (p. 22, fig. A 3 ). Asegúrese de que quede al ras con
la base. No debe haber espacio entre el depósito y la base.
9. Coloque la tapa de vapor (p. 22, fig. A 1 ) encima del depósito de agua y gírela de
forma que se oriente en la dirección en la que se desee emitir la niebla.
10. NOTA: NO mueva el humidificador mientras el depósito de agua está en la base. El
agua puede caer en la base y provocar una avería.
11. Enchufe el cable de alimentación en un tomacorriente. NO use un cable de extensión.
12. Encienda la unidad girando la perilla de control (p. 23, fig. 5 12 ) en sentido horario
(hacia la derecha). Escuchará unos pequeños chasquidos al encender y apagar la
unidad. El piloto verde de alimentación se iluminará.
13. En unos momentos comenzará a salir vapor por la tapa de vapor. Use la perilla de
control para ajustar la intensidad de la generación de vapor. Girar la perilla en sentido
horario aumentará la generación de vapor; girarla en sentido antihorario reducirá la
generación de vapor.
14. Nota: Al nivel máximo, es normal escuchar un débil sonido de goteo.
15. Encienda la luz LED azul de noche oprimiendo el botón ‘LED On/Off’ (Encendido/
apagado del LED) (p. 23, fig. 5 14 o 15 ). Para apagarla, mantenga pulsado el botón
durante 2 segundos.

Funcionamiento
34
16. Encienda la luz LED blanca de noche de color cambiante oprimiendo el botón ‘LED
On/Off’ (Encendido/apagado del LED) (p. 23, fig. 5 15 ). Las luces LED cambiarán
continuamente en el orden siguiente;
17. Púrpura, azul oscuro, azul claro, verde, amarillo, naranja y rojo
18. Para apagarla, mantenga pulsado el botón durante 2 segundos.
19. Cuando el humidificador se quede sin agua, la luz de encendido (p. 23, fig. 5 13 )
se iluminará de color rojo y se dejará de emitir vapor. Esta es una característica
de seguridad para evitar que el humidificador se sobrecaliente y dañe el
nebulizador. (p. 23, fig. 4 7 ). Esta característica de seguridad utiliza un sensor
de nivel de agua (p. 23, fig. 4 9 ) para detener el nebulizador una vez que el
nivel del agua desciende por debajo del nivel requerido en el cuenco de agua.
20. Apague el humidificador y desenchúfelo antes de retirar y rellenar el depósito de
agua.
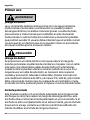
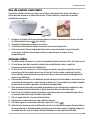
Ajuste de la humedad correcta
Ajuste el control de vapor para que este se eleve y sea absorbido por el aire de
la habitación. No utilice un nivel demasiado alto, ya que el vapor no podrá ser
absorbido por el aire y se acumulará en la superficie alrededor del humidificador.
Si el humidificador se coloca cerca de un ventilador o una salida de aire
acondicionado, el vapor puede ser forzado hacia abajo por la corriente de aire.
Cambie el humidificador de sitio o reduzca la salida de los otros aparatos de
ventilación de la habitación.
Correcto Incorrecto

Funcionamiento
35
Uso de aceites esenciales
Se pueden utilizar aceites esenciales en la lámina absorbente de aroma situada en
la bandeja de aroma en el lateral de la base. Puede mezclar y combinar los aceites
aromáticos que desee.
1. Ponga unas 3 gotas de la esencia deseada en la lámina absorbente de aroma situada
en la bandeja de aroma
16
(ver arriba).
2. Introduzca la bandeja de aroma en la base.
3. Cada lámina absorbente debe usarse para una esencia específica.
4. Antes de reusar la lámina absorbente de aroma con otro aceite esencial, límpiela
a mano con cuidado usando agua caliente y permita que se seque al aire
completamente.
Consejos útiles
1. Se recomienda mantener un nivel de humedad relativa de entre el 30 y el 50 por ciento.
2. El nivel de confort de humedad variará de una habitación a otra y según las
condiciones cambiantes de la habitación.
3. En climas fríos, las ventanas, e incluso algunas paredes, pueden empañarse o crear
escarcha por la humedad excesiva en el interior. Si esto sucede, reduzca el nivel de
intensidad de vapor para evitar que ocurran daños como consecuencia del goteo de
agua en los alféizares.
4. Demasiada humedad en la habitación puede hacer que la humedad se acumule en las
superficies donde pueden crecer hongos y bacterias. La humedad acumulada también
puede dañar muebles y paredes, en especial, empapelados.
5. Para eliminar el exceso de humedad, especialmente en habitaciones pequeñas, deje
abierta la puerta de la habitación y ajuste el control de intensidad de vapor.
6. Nota: Para evitar la formación de posibles capas de polvo blanco debido al agua dura,
se recomienda utilizar agua filtrada o destilada.
7. NO use agua caliente. Use agua fría de la llave.
8. NO agregue medicamentos u otros aditivos al agua.
9. NO vierta agua en el canal de salida del vapor (p. 23, fig. 2
2
).
10. Nota: No intente mover el humidificador mientras el depósito de agua esté colocado en
el cuenco de agua. Hacerlo podría provocar que se derrame agua. Tampoco coloque el
humidificador en el piso. Coloque el humidificador en una superficie elevada.
16

Solución de problemas
36
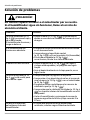
Solución de problemas
¡PRECAUCIÓN!
NO intente reparar el motor o el nebulizador por su cuenta.
Si el humidificador sigue sin funcionar, llame al servicio de
atención al cliente.
Problema Solución
La luz de encendido (p. 23,
fig. 5 13 ) permanece roja y
no se pone verde:
El humidificador funciona y
luego se detiene:
• Limpie la base (p. 22, fig. A 3 ) especialmente
donde se encuentra el flotador del sensor de nivel
de agua
Si el humidificador no
funciona en absoluto: • Asegúrese de que está correctamente enchufado
en un tomacorriente.
• Compruebe que la perilla de control
(p. 23, fig. 5 12 ) está en la posición ON (Encendido).
• Si la luz de encendido (p. 23, fig. 5 13 )
no se ilumina, llévelo a un taller autorizado.
Si detecta un olor extraño: • Limpie el depósito (p. 22, fig. A 2 )con agua y
vinagre o blanqueador y enjuáguelo con agua
limpia.
• Deje el depósito abierto sin la tapa puesta, en un
lugar fresco.
La luz de encendido (p. 23,
fig. 5 13 ) está verde, pero
no se emite vapor:
• Compruebe que hay agua en el depósito.
• Compruebe si hay depósitos de cal en el sensor de
nivel de agua (p. 23, fig. 4 9 ) o en el nebulizador
(p. 23, fig. 4 7 ) .
• Asegúrese de que nada bloquea las ranuras de
salida del vapor (p. 23, fig. 3 6 ) .
• Compruebe que la salida del ventilador (p. 23, fig. 4
10 ) en la parte inferior del humidificador no está
bloqueada.
• Vacíe el humidificador y enjuague el cuenco de
agua con agua fría de la llave y deje secar de 15 a
30 min.
Se forma una capa de
polvo blanco fuera del
humidificador:
• El agua local podría contener demasiados
minerales, cambie a agua filtrada o destilada.

Limpieza y mantenimiento
37
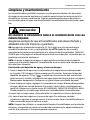
Limpieza y mantenimiento
Los humidificadores portátiles requieren una limpieza periódica a fin de reducir
el riesgo de crecimiento bacteriano y también para eliminar los restos de cal a fin
de mantener un buen rendimiento. Siga los procedimientos que se describen a
continuación para un buen mantenimiento del humidificador ultrasónico de vapor
frío.
¡PRECAUCIÓN!
NO ENCHUFE NI DESENCHUFE NUNCA EL HUMIDIFICADOR CON LAS
MANOS MOJADAS.
Asegúrese siempre de que el humidificador está desenchufado y
APAGADO antes de limpiarlo o guardarlo.
NO deje agua en el depósito de agua (p. 22, fig. A 2 ) o en el cuenco de agua
cuando la unidad no se usa, ya que podrían formarse depósitos de mineral y
crecimiento de bacterias que afectarían a la eficiencia del humidificador. TENGA EN
CUENTA que si deja agua en el depósito por más de uno o dos días, es posible que se
produzca crecimiento bacteriano.
NOTA: Al quitar el depósito de agua, el agua puede acumularse bajo la tapa de
vapor y en el fondo del depósito. Se recomienda tener un paño seco listo para secar
las superficies húmedas.
Desinfección del depósito de agua y el cuenco de agua
1. Llene el depósito de agua con 2 cucharadas de vinagre blanco o blanqueador
en ½ galón (1.9l) de agua. Déjelo reposar por 20 minutos. Enrosque la tapa del
depósito de agua (p. 23, fig. 3 5 ) y agítelo con fuerza con las dos manos cada
pocos minutos, vacíelo y enjuáguelo con agua limpia hasta que el olor a vinagre o
blanqueador desaparezca. Seque con un paño limpio o una toalla de papel.
2. Llene la base con agua y agregue 2 cucharadas de vinagre blanco o blanqueador
al agua y déjala en remojo durante 20 minutos. Vacíe la base y enjuáguela con
agua fría. Seque con un paño suave. NO SUMERJA EL CUENCO DE AGUA EN EL AGUA.
Puede producirse una descarga eléctrica o se puede dañar el humidificador.
3. Limpie con un trapo suave y húmedo todas las superficies externas de la base.
4. Es normal que haya agua en el cuenco de agua. Sin embargo, no debe
introducirse agua en el cuerpo central. Si esto sucede, lleve el humidificador a un
taller autorizado antes de volver a usarlo.
NOTA: Después de utilizarlo, se recomienda limpiar el humidificador con la solución
de agua y vinagre blanco, como se ha indicado anteriormente, aproximadamente
una vez a la semana o si la limpieza parece necesaria.

Almacenamiento
38
IMPORTANTE: No mantener el humidificador limpio de acumulación de minerales
que normalmente se encuentran en cualquier suministro de agua, afectará la
eficiencia del funcionamiento. El incumplimiento de estas instrucciones por parte
del cliente puede anular la garantía.
Almacenamiento
Deje que el humidificador se seque completamente antes de guardarlo. Guarde el
humidificador en un lugar seco. No coloque objetos pesados sobre el humidificador
al guardarlo, ya que esto podría dañarlo. Compruebe siempre el enchufe para
asegurarse de que no haya nada de metal en contacto con este.
• Conserve la caja para guardarlo cuando no lo use.
• Asegúrese de que el depósito, el cuenco de agua y la tapa del depósito de agua
estén secos antes de guardar el humidificador.
• Si queda agua en la unidad al guardarla, podría evaporarse y dejar depósitos que
impidan su correcto funcionamiento.
• Deje la tapa del depósito de agua suelta para evitar que se adhiera a la junta de
estanqueidad. Esto prolongará la vida útil de la junta.
Especificaciones técnicas
Número de modelo HTJ-2060
Tensión nominal 120V / 60Hz
Potencia nominal 25W
Eliminación
Eliminación del embalaje
Elimine el embalaje de forma respetuosa con el medio ambiente.
Eliminación del producto
Si el producto deja de funcionar, asegúrese de eliminarlo de forma respetuosa con
el medio ambiente y de acuerdo con la normativa local.

Notes
39
Notes

Made in China
DIST. & SOLD EXCLUSIVELY BY:
ALDI
BATAVIA, IL 60510
US
WKNF9013
AFTER SALES SUPPORT
SERVICIO POSVENTA
MODEL / MODELO:
HTJ-2060
help@myproduct.care
1-888-367-7373
808674
10/2021
USA
YEAR WARRANTY
AÑOS DE GARANTÍA
2
-
 1
1
-
 2
2
-
 3
3
-
 4
4
-
 5
5
-
 6
6
-
 7
7
-
 8
8
-
 9
9
-
 10
10
-
 11
11
-
 12
12
-
 13
13
-
 14
14
-
 15
15
-
 16
16
-
 17
17
-
 18
18
-
 19
19
-
 20
20
-
 21
21
-
 22
22
-
 23
23
-
 24
24
-
 25
25
-
 26
26
-
 27
27
-
 28
28
-
 29
29
-
 30
30
-
 31
31
-
 32
32
-
 33
33
-
 34
34
-
 35
35
-
 36
36
-
 37
37
-
 38
38
-
 39
39
-
 40
40


Easy Home Crane ULTRASONIC Cool Mist Humidifier Manual de usuario
- Categoría
- Humidificadores
- Tipo
- Manual de usuario
- Este manual también es adecuado para
en otros idiomas
Otros documentos
-
HoMedics HUM-CM50 Manual de usuario
-
Aircare MU320DWAL Manual de usuario
-
-
Vicks VWC775 Series El manual del propietario
-
Sunbeam Humidifier HUMIDIFIERCool Manual de usuario
-
-
-
-