EAS ELECTRIC EMBV38DTN Manual de usuario
- Categoría
- Microondas
- Tipo
- Manual de usuario

MANUAL DE INSTRUCCIONES
INSTRUCTION MANUAL
EMBV38DTN
Microondas 45 cm + Grill +
Función Horno Convección
45 cm Microwave+ Grill +
Convection Oven Function
V.1

Léase estas instrucciones adecuadamente antes de instalar y
hacer funcionar el aparato. Guárdelas para futuras referencias.
1. No intente hacer funcionar este microondas con la puerta abierta, ya
que puede suponer una exposición dañina a la energía del
microondas. Es importante no quitar o manipular las uniones de
seguridad.
2. No coloque ningún objeto entre el panel frontal del microondas y la
puerta, ni permita que se acumulen residuos de suciedad o
limpiadores en las superficies de sellado.
3. No haga funcionar el horno si está averiado. Es muy importante que
esté cerrado adecuadamente para que no hayan daños en el horno.
a. Puerta,
b. Bisagras y cierres (rotos o perdidos),
c. Sellos de puerta y superficies de sellado
4. El microondas debe ser reparado por personal cualificado o por el
servicio técnico.
PRECAUCIONES PARA EVITAR UNA POSIBLE EXPLOSIÓN
POR EXCESIVA ENERGÍA EN EL MICROONDAS
1
V.1

ÍNDICE
PRECACUCIONES PARA EVITAR POSIBLES EXPLOSIONES POR EXCESIVA ENERGÍA.... ..............1
1. ESPECIFICACIONES TÉCNICAS ..................................................................................................................... 3
2. PRECUCIONES SOBRE EL USO ...................................................................................................................... 3
3. PRECAUCIONES DE SEGURIDAD .................................................................................................................. 4
4. PARTES DEL APARATO..................................................................................................................................... 5
5. ANTES DE LA INSTALACIÓN.............................................................................................................................5
6. PANEL DE CONTROL....................................... .............................................................................................. 6
7. FUNCIONAMIENTO .............................................................................................................................................. 6
8. FUNCIONES .......................................................................................................................................................... 6
9. RECOMENDACIONES DE HORNEADO........................................................................................................11
10. LIMPIEZA Y MANTENIMIENTO.. ..................................................................................................................15
11. MANTENIMIENTO ESPECIAL .......................................................................................................................16
12. INSTALACIÓN DEL APARATO ......................................................................................................................16
13. RESOLUCIÓN DE PROBLEMAS...................................................................................................................19
2
14. GARANTÍA COMERCIAL...............................................................................................................................20
15.DISPOSICIÓN SOBRE ELIMINACIÓN..........................................................................................................20
V.1

1. ESPECIFICACIONES TÉCNICAS
MODELO EMBV38DTN
CAPACIDADL 35
VOLTAJEV/FREQUENCIAHz 220-240/50
FUSIBLE DE LÍNEA DE
DISTRIBUCIONA/CORTOCIRCUITOA 16
POTENCIA DE ENTRADAW 1500-1600
POTENCIA DE SALIDAW 1000
FRECUENCIA DE TRABAJOMHz 2450
POTENCIA DE GRILLW 1400-1650
POTENCIA DE CONVECCIÓNW 1350-1500
DIMENSIONESmm 594×580×455
TAMAÑOmm 675×666×525
DIÁMETRO DEL PLATO ROTATIVO (mm 315
PESO BRUTO/NETOKg 38.0/34.3
3
V.1
2.PRECAUCIONES SOBRE EL USO
Este manual es parte integral del aparato. Cuídelo y téngalo a mano durante todo el ciclo de vida del microondas.
Le recomendamos que lea este manual y toda la información detenidamente antes de utilizar el aparato. La
instalación debe ser llevada a cabo por un técnico cualificado de acuerdo con las regulaciones pertinentes. Este
aparato es para uso doméstico y cumple con las directivas de la CEE actualmente vigentes. El aparato es para
cocinar y calentar alimentos.
El fabricante declina toda responsabilidad por otros usos, excepto para cocinar alimentos.
Conserve la documentación de este producto para futuras referencias. Siempre mantenga el manual de
instrucciones a mano. Si presta el microondas a otra persona, el manual también.
Nunca utilice este aparato para calentar habitaciones
Nunca deje residuos de envases desatendidos en casa. Separe los diversos materiales de
embalaje según el tipo y envíelos al centro de eliminación separado más cercano
Este manual contiene las regulaciones sobre reciclado y desecho del producto.
Nunca obstruya los conductos para la ventilacin y la dispersión del calor.
Nunca use estropajos metálicos o raspadores afilados que dañen la superficie del microondas. Use
productos ordinarios no abrasivos con la ayuda de utensilios de madera o plástico si es necesario.
Enjuague bien y seque con un paño suave o una gamuza.
La placa de identificación con los datos técnicos, el número de serie y la marca se encuentra
en una posición visible en el marco de la puerta del horno. La placa de identificación nunca se
debe quitar.
El aparato debe conectarse a tierra de acuerdo con las normas de seguridad del sistema eléctrico.
Si se usa una conexión de toma de corriente y enchufe, verifique que sean del mismo tipo. No utilice
reductores, adaptadores o uniones, ya que causan sobrecalentamiento o quemaduras. La fuente de
alimentación debe ser 220-240V, 50Hz, con un fusible de línea de distribución de 16A como mínimo, o
un disyuntor de circuito de distribución de 16A como mínimo.

3.PRECAUCIONES DE SEGURIDAD
Consulte las instrucciones de instalación para conocer las normas de seguridad para aparatos eléctricos o de gas y
función de ventilación.
Para garantizar su seguridad, todos los aparatos eléctricos solo deben ser instalados y reparados por personal
cualificado, de acuerdo con las regulaciones pertinentes de la ley.
Después de la instalación, realice una prueba rápida en el microondas consultando las instrucciones. Si el aparato
no funciona, desconéctelo y póngase en contacto con el servicio técnico más cercano.
INSTRUCCIONES DE SEGURIDAD IMPORTANTES
LEA ADECUADAMENTE Y GUARDE ESTE MANUAL PARA FUTURAS REFERENCIAS
–ADVERTENCIA: Si la puerta o los sellos de la puerta están dañados, el microondas no debe enchufarse hasta
que hayaN sido reparados por una persona competente;
–ADVERTENCIA: Es peligroso para cualquier persona, que no tenga la cualificación necesaria, llevar a cabo
cualquier operación de servicio o reparación que implique la retirada de la cubierta que protege contra la
exposición a la energía de microondas;
–ADVERTENCIA: Los líquidos y otros alimentos no deben calentarse en recipientes sellados, ya que pueden explotar
–ADVERTENCIA: Las partes accesibles pueden calentarse durante el uso, los niños pequeños deben mantenerse alejados.
–ADVERTENCIA: Solo permita que los niños utilicen el horno sin supervisión cuando se hayan dado las instrucciones
adecuadas para ello.
– Cumpla con la altura mínima de 4 mm de espacio libre necesario sobre la superficie superior del horno;
– Solo use utensilios adecuados para usar en microondas.
– Al calentar alimentos en recipientes de plástico o papel, vigile el horno debido a la posibilidad de ignición;
– Si observa humo, apague o desenchufe el aparato y mantenga la puerta cerrada para sofocar las llamas;
– el calentamiento de las bebidas puede provocar una ebullición eruptiva tardía, por lo que se debe tener cuidado al
manipular el recipiente
– El contenido de los biberones y los frascos de comida para bebés debe agitarse, y la temperatura debe verificarse
antes del consumo para evitar quemaduras.
–Los huevos en su cáscara y los huevos duros enteros no se deben calentar en el de microondas ya que pueden
explotar, incluso después de que el calentamiento por microondas haya terminado
–El microondas se debe limpiar regularmente. Se deben retirar los posibles restos de comida.
–El hecho de no mantener el horno en condiciones de limpieza puede provocar el deterioro de la superficie,
circunstancia que podría afectar negativamente la vida útil del aparato.
–Si el cable de alimentación está dañado, debe ser reemplazado por el fabricante, su servicio técnico o personas
con cualificaciones similares para evitar un peligro.
–Este dispositivo no está destinado a ser utilizado por personas (incluidos niños) con capacidades físicas o
sensoriales físicas reducidas, o con falta de experiencia y conocimiento, a menos que hayan sido supervisados o
instruidos sobre el uso del dispositivo por parte de una persona responsable de su seguridad.
–Los niños deberían ser supervisados para asegurar que no jueguen con el aparato.
–Advertencia: Cuando el aparato está en modo combinación, los niños deberían usar solamente el microondas bajo
la supervisión de un adulto debido a la temperatura que se genera.
–Durante el uso, el aparato se calienta. Se debe tener cuidado para evitar tocar elementos de calefacción
dentro del horno de microondas.
-No use limpiadores abrasivos fuertes o raspadores de metal afilados para limpiar el vidrio de la puerta del horno, ya
que pueden rayar la superficie, lo que podría romper el vidrio.
–ADVERTENCIA: El aparato y sus partes accesibles se calientan durante el uso. Se debe tener cuidado para evitar
tocar elementos de calefacción.
–Los niños menores de 8 años de edad deben mantenerse alejados a menos que supervisen continuamente.
– Este dispositivo puede ser utilizado por niños de 8 años en adelante y personas con capacidades físicas,
4
V.1

Evite dañar el horno siguiendo las siguientes instrucciones
●No obstruya las aberturas de ventilación.
●No mantenga ningún objeto inflamable dentro del horno, ya que podría quemarse si el horno está encendido.
●No use el microondas como una despensa.
●No vierta bebidas (por ejemplo, brandy, whisky, licor, etc.) sobre alimentos calientes. ¡Peligro de explosión!
●Los accesorios tales como rejillas de alambre y bandejas, etc. se calientan en el espacio de cocción. Siempre use
guantes protectores para tocarlos.
●Para evitar quemaduras, use siempre guantes de horno para manipular platos y recipientes y tocar el horno.
●No se apoye en la puerta del horno si está abierta. Esto puede dañarla, especialmente en la zona de bisagra. La
puerta puede soportar un peso máximo de 8 kg.
●Los bastidores pueden soportar una carga máxima de 8 kg. Para evitar dañar el horno, no exceda esta carga.
4.PARTES DEL APARATO
5. ANTES DE LA INSTALACIÓN
El interior del aparato debe limpiarse para eliminar todos los residuos de fabricación. Para obtener más información
sobre la limpieza, consulte el punto "Limpieza y mantenimiento".
1.- Tirador de la puerta
2.- Cristal
3.- Junta de la puerta
4.- Eje de
accionamiento
5.- Anillo de la placa
giratoria
6.- Plato giratorio
7.- Grill
8.-Botón
9.- Panel de control
5
sensoriales o mentales reducidas o por falta de experiencia y conocimiento si se les ha dado supervisión o
instrucciones sobre el uso del dispositivo de manera segura y entienden el peligros involucrados. Los niños no
deben jugar con el aparato. La limpieza y el mantenimiento del usuario no deben ser realizados por niños sin
supervisión.
- ADVERTENCIA: Las partes accesibles pueden calentarse durante el uso. Los niños pequeños deben
mantenerse alejados.
V.1

6. PANEL DE CONTROL
Todos los dispositivos de control del aparato se colocan juntos en el panel de control. La siguiente tabla
muestra iconos de diferentes funciones.
Definición de botones;
Función standby - modo espera (microondas、grill、defrost)
Ajuste de tiempo de cocción (tiempo de cocción, inicio diferido)
Otros ajustes (potencia, peso, selección de modo descongelación)
Ajuste del reloj
Bloqueo infantil
Incrementar(función, potencia, peso)
Disminuir(función, potencia, peso)
Inicio/pausa.
Definición de iconos:
Microondas
Conveccioón
Microondas+convección
Microondas+grill+convección
Tiempo de cocción
Inicio diferido
Potencia del microondas
Temperatura
Grill
Microondas+grill
Grill+convección
Descongelación
Reloj
Bloqueo infantil
Show (Muestra)
Peso
INSTRUCCIONES PARA EL USUARIO
7.FUNCIONAMIENTO
Cuando se utiliza el horno por primera vez, debe calentarse a la temperatura máxima durante el tiempo suficiente
para quemar cualquier residuo aceitoso que quede durante el proceso de fabricación. Si no se hace de este modo,
podría contaminar los alimentos con olores desagradables.
En caso de que se produzca demasiada condensación en el vidrio interior de la puerta del microondas y dentro de la
cavidad, no deje alimentos cocidos en el microondas durante mucho tiempo..
8. FUNCIONES
8.1 Ajuste del reloj
Cuando el microondas está encendido, en la pantalla aparecerá “0:00". Para ajustar la hora pulse y
para aumentar o disminuir la hora. Una vez que esté ajustada, presione el botón“ " para introducir los minutos.
Presione o para aumentar o disminuir los minutos y presione para establecer la hora actual. Presione de
nuevo y el proceso de ajuste de hora finalizará.
6
V.1

El rango del ajuste del reloj está entre 0:00 y 23:59.
Cambie la hora actual.
Cuando el aparato está en standby y el reloj aparece en la pantalla, precione " " durante 3 segundos, el
horario actual empezará a parpadear en la pantalla, y la hora podrá ser ajustada.
Cuando el aparato está en modo standby, presione " ", y el reloj aparecerá en la pantalla; presione " " otra
vez, y el reloj no aparecerá en la pantalla.
8.2 Selección de funciones
Después de presionar " " durante un segundo en el modo standby, el aparato empezará a funcionar en el modo
seleccionado. El tiempo sugerido y los datos (incluidos potencia de microondas, peso,etc...) aparecerán en la pantalla.
Puede seleccionar la función deseada presionando " " o " ".
8.2.1 Función de microondas
'HVSXpVGHVHOHFFLRQDUHVWDIXQFLyQlosLQGLFDGRUes\DSDUHFHUin(QODSDQWDOODDSDUHFH\
:
3UHVLRQHSDUDDMXVWDUHOWLHPSRGHFRFFLyQ&XDQGRODKRUDDFWXDOHVWpSDUSDGHDQGRSUHVLRQHR
SDUDDMXVWDUHOWLHPSRGHFRFFLyQ(OWLHPSRmáximo HVde .00/RVSULPHURVPLQXWRVODSRWHQFLDHV\
ORVUHVWDQWHVPLQutosODSRWHQFLDes del
3UHVLRQHSDUDDMXVWDUODSRWHQFLDGHOPLFURRQGDV&XDQGRODSRWHQFLDHVWpSDUSDGHDQGRSUHVLRQHR
SDUDDMXVWDUODSRWHQFLDGHPLFURRQGDV La potencia del microondas puede ser: 1000/800/600/400/200/0W
3UHVLRQHSDUDLQLFLDUODFRFFLyQ y el tiempo de cocción comenzará a descontarse. (OVíPERORGHPLFURRQGDV
HPSH]DUiDSDUSDGHDU
3DQWDOOD 1000W 800W 600W 400W 200W 0W
3RWHQFLD $Oto Medio-Alto Medio Medio-Bajo Bajo frío
8.2.2 Función grill
Después de seleccionar esta función, los indicadores " y aparecerán. La pantalla mostrará 15:00.
Presione " " para ajustar el tiempo de cocción. Cuando la hora actual está parpadeando, presione " " o
" " para ajustar el tiempo de cocción.
El tiempo máximo son 90.00 minutos.
Presione " " para iniciar la cocción, y el tiempo de cocción comenzará a descontarse. El símbolo del grill
empezará a parpadear
8.2.3 Convección
Después de seleccionar el modo convección " " " " y " " aparecerán y la pantalla mostrará 5.00 y
110ºC.
Presione " " para ajustar el tiempo de cocción, cuando el tiempo actual 5.00 está parpadeando en la
pantalla, el tiempo de cocción podria ajustarse presionando " " o " ".
8.2.4 Microondas + función grill
Después de seleccionar esta función, los indicadores " ", " " y " " se encenderán y en la pantalla aparecerá
10:00 y 400W.
Presione " " para ajustar el tiempo de cocción. Cuando el tiempo actual está parpadeando, presione " " o "
" para ajustar el tiempo de cocción. El tiempo máximo son 90.00 minutos.
Presione " " para ajustar la potencia del microondas. Cuando la presente potencia del microondas (400)
está parpadeando en la pantalla, la potencia puede ajustarse presionando los botones:
Presione " " para iniciar la cocción. El tiempo comenzará a descontarse, el símbolo del microondas+grill
empezará a parpadear.
7
Tabla de potencias del microondas
Presione para establecer la temperatura. Cuando la temperatura actual 110 comienza a parpadear
en la pantalla, se puede ajustar presionando los botones y
Presione " " para iniciar la cocción, el tiempo comenzará a descontarse mientras " " y " "
empieza a parpadear.
El rango de temperatura esté entre 110ºC Y 230ºC.
El tiempo de cocción máximo son 90 minutos.
Nota: Durante el proceso de cocción, el tiempo actual podría ser revisado , presionando " ".
o
V.1

Hay 3 tipos de potencia 600W, 400W, 200W para seleccionar.
El tiempo de cocción máximo son 90 minutos.
●El horno de microondas + Grill es ideal para cocinar rápidamente y dorar los alimentos después de cocinarlos.
Además, también puede asar y gratinar queso. El microondas y el grill funcionan simultáneamente. El
microondas cocina y el grill tuesta.
●Antes de usar un plato en el horno de microondas, asegúrese de que sea adecuado para su uso en el
microondas. Utilice únicamente platos o recipientes que sean adecuados para uso en microondas.
●El plato que se utilizará en la función combinada debe ser adecuado para el uso en microondas y en el grill.
Revise la sección sobre tipos de utensilios de cocina
●Tenga en cuenta que las cifras proporcionadas son meramente indicativas y pueden variar en función del estado
inicial, la temperatura, la humedad y el tipo de alimento.
●Si el tiempo no es suficiente para dorar bien la comida, póngala en el modo grill por otros 5 o 10 minutos.
●Por favor permita los tiempos de reposo y no olvide voltear las piezas de carne. A menos que se indique lo
contrario, use el plato giratorio para cocinar. Los valores dados en las tablas son válidos cuando el microondas
está frío (no es necesario precalentar el microondas).
COMIDA CANTIDAD(G) PLATO POTENCIA
(W)
TIEMPO
(MIN)
TIEMPO
PERMANENTE
(MIN)
PASTA CON
QUESO
500
PLATO HONDO
400
12-17
3-5
PATATAS CON
QUESO
800
600
20-22
3-5
LASAÑA APROX.800
600
15-20
3-5
CREMA DE
QUESO GRATINADA APROX.500
400
18-20
3-5
2 MUSLOS DE
POLLO (GRILL) 200 CADA UNA
400
10-15
3-5
POLLO APROX.1000
400
35-40
3-5
SOPA DE CEBOLLA
CON QUESO 2×200G BOL
400
2-4
3-5
8.2.5Grill+Convección
Después de seleccionar la función, " " " " y " " se encenderán y en la pantalla aparecerá 5:00 y
110ºC.
Presione " " para ajustar el tiempo de cocción. Cuando el tiempo actual esté parpadeando, puede ajustar
el tiempo de cocción, presionando " " o " " , la duración máxima es de 90 minutos.
Presione " " para ajustar la temperatura. Cuando la temperatura actual 110 está parpadeando en la
pantalla, la temperatura puede ser ajustada presionando " " o " ".
Presione " " para iniciar la cocción y el tiempo de cocción comenzará a descontarse mientas
La duración máxima de cocción son 90minutos.
Nota: Durante el proceso de cocción, el tiempo actual puede ser revisado presionando " ".
8.2.6Microondas + convección
'HVSXpVGHVHOHFFLRQDUODIXQFLyQ\VHHQFHQGHUin\HQODSDQWDOODDSDUHFHUi\
: 3UHVLRQHSDUDDMXVWDUHOWLHPSRGHcocción&XDQGRODKRUDactual empiece a parpadear, podrá
ajustarla presionando y . El tiempo máximo de cocción es de 90 minutos.
Presione para establecer la potencia del microondas. Cuando la potencia actual del microonda (400),
comience a parpadear, podrá ajustarla presionando y .
8
PLATO HONDO
PLATO HONDO
PLATO HONDO
PLATO HONDO
BANDEJA AMPLIA
parpadean.
V.1

y " " se encenderán y en la pantalla
8.2.7Microondas+grill+convección
Después de seleccionar la función, los indicadores" " "
aparecerá 10:00 y 400W.
Presione " " para ajustar el tiempo de cocción. Cuando el tiempo programado esté parpadeando,
podrá ajustar el tiempo de trabajo presionando " " o " ". El tiempo de cocción máximo es de 90 minutos.
Presione " " para ajustar la potencia del microondas. Cuando la potencia del microondas 400W esté
parpadeando en la pantalla, la potencia podrá ser ajustada presionando " " o " ".
Presione " " otra vez para ajustar la temperatura. Cuando la temperatura programada 110 esté
parpadeando en la pantalla, la temperatura podrá ser ajustada presionando " " o " ".
Presione " " para iniciar la cocción, el tiempo de cocción comenzará a descomentarse y mientras el
PROGRAMA COMIDA PESO (g)TIEMPO(Min)DURACIÓN
(Min)
PR 01 Carne 100-2000 2:20-43:30 20-30
PR 02 Piezas de ave 100-2500 2:10-58:10 20-30
PR 03 Pescado 100-2000 2:00-40:00 20-30
PR 04 Fruta100-500 2:36-13:00 10-20
PR 05 Pan 100-800 2:25-19:20 10-20
8.3Tiempo de inicio diferido (Cocción automática)
Tras ajustar la función y el tiempo de cocción, presione " " otra vez para ajustar el tiempo de inicio diferido.
" " se encenderá y en la pantalla aparecerá la hora actual parpadeando, presione " " o " " para ajustarla.
9
Pesione de nuevo " " para ajustar la temperatura. Cuando la temperatura programada 110 esté
parpadeando en la pantalla, la temperatura podrá ser ajustada presionando " " o ".
Presione " " para iniciar la cocción, el tiempo de comenzará a descontarse y el símbolo " ",
parpadeará.
símbolo parpadeará.
El tiempo de cocción máximo son 90 minutos.
8.2.8 Descongelación
Después de seleccionar la función, los indicadores " " y " " se encenderán. En la pantalla aparecerá
PR01 y 100. Presione " " para encender el programa de descongelación por peso. Después presione
o para seleccionar el correspondiente programa. Hay 5 programas para elegir desde P0R1 hasta P0R5.
Presione de nuevo para establecer el peso. Después presione y para ajustar el peso. El rango
de eso va desde 100 a 2500 (Los diferentes programas tienen diferentes pesos).
Presione " " para iniciar la cocción y el tiempo de cocción comenzará a descontarse. El símbolo de
descongelación por peso " " parpadeará.
En el proceso de descongelación, el aparato se parará cuando se alcance la mitad del tiempo ajustado,
sonarán 3 pitidos cada 30 segundos para recordarlo. El símbolo " " parará de parpadear mientras la
palabra "turn" aparece parpadeando en la pantalla. En este momento debe abrir la puerta y voltear la
comida. Después, cierre la puerta y presione " " para continuar con la descongelación.
Se puede calcular el tiempo de descongelación de acuerdo con el tipo de comida y el peso, y la potencia
del microondas se puede ajustar automáticamente alcanzando el mejor efecto de descongelación.
Además, la tabla de abajo ofrece referencias de valores de descongelación de acuerdo con el peso, el
tiempo de descongelación y el tiempo de seguimiento.
Presione " " de nuevo, y los minutos comenzarán a parpadear. Presione " " o " " para ajustar los minutos.
Presione " " para confirmar que el inicio diferido se ha ajustado y si presiona " " de nuevo, ,el aparato comenzará
a funcionar directamente.
En la pantalla aparecerá el inicio diferido y el tiempo actual cuando el aparato esté bajo el modo standby. Presione "
durante un segundo si quiere cancelar la función seleccionada.
V.1

8.4 Pausa en el proceso de cocción.
Puede parar el proceso de cocción en cualquier momento, presionando " " o abriendo la puerta del
microondas. Cuando el aparato de repente pare de funcionar, pero en la pantalla aparezca todavía el tiempo
restante de cocción, si lo desea en ese mismo momento usted puede:
* Girar o mover la comida para asegurarse de que está bien cocida.
* Modificar los parámetros de cocción.
* Cancelar el proceso presionando " " durante un segundo
* Para iniciar el proceso, cierre la puerta y presione " ".
8.4.2 Modificación de parámetros
Los parámetros de funcionamiento ( peso, tiempo, potencia, etc...) pueden ser solo modificados cuando el proceso
de cocción haya sido interrumpido. Proceda de la siguiente manera:
* Después de presionar " " un segundo bajo el modo standby, el aparato encenderá la función menú.
* Presione " " y " " " " para ajustar el tiempo de cocción.
* Presione " " para encender el ajuste de potencia.
* Presione " " para continuar con el proceso de cocción
8.5 Finalización de cocción y cancelación del programa
En el final del proceso de cocción deberá escuchar 3 pitidos y en la pantalla aparecerá " End", el símbolo " " se
iluminará.
Los pitidos se repiten cada 30 segundos en 5 minutos hasta que la puerta se abra o se mantenga presionado "
El microondas se cambiará al ajuste OFF.
Durante el proceso de ajuste de programa , presione " " durante 1 segundo y el aparato parará de funcionar
para entrar en el modo standby.
8.6 Demostración y bloqueo infantil
8.6.1 Demostración ( el aparato parece que está en funcionamiento, pero los elementos calefactores no tienen
potencia)
Bajo el modo standby, presione " " y " " al mismo tiempo hasta que aparezca "OFF SHOW" en la pantalla.
Ahora, presione " " o " " una vez, el aparato entrará en modo demostración. Presione " " o " " de nuevo, el
modo finalizará. Después del ajuste, presione para volver al modo standby. Nota: La función de
demostración solo es conveniente para poder demostrar al cliente el uso normal del producto.
Bajo el modo demostración , cualquier función puede ser elegida, el símbolo " " aparecerá, después de presionar "
".
8.6.2 Bloqueo de niños
Bloqueo: en modo standby o en proceso de cocción, presione " " durante 3 segundos y el aparato se bloqueará con
un sonido "di".
Desbloqueo: Presione " " durante 3 segundos, el aparato se desbloqueará después del sonido "di". El símbolo "
" desaparecerá.
10
8.7 Sistema de ventilación
El aparato está equipado con un sistema de ventilación que entra en funcionamiento tan pronto como se inicia una
función de cocción. El funcionamiento de los ventiladores genera un flujo de aire normal que sale por encima de la
puerta y puede continuar por un corto tiempo incluso después de que se apaga el aparato.
8.8 Interruptor de bloqueo de puerta
La luz está encendida cuando el interruptor de bloqueo de la puerta no está conectado o la puerta no se ha cerrado de
manera correcta, y está disponible para configurar el parámetro, pero no puede encender el microondas.
La pantalla muestra "door" cuando presiona el botón de Inicio / Pausa, en la condición de que el interruptor de bloqueo
de la puerta no esté conectado o lapuerta no esté cerrada. Vuelva a configurar la interfaz después de 3 segundos.
V.1

8.9 Luz interior
La luz del aparato se enciende:
1) En el modo de funcionamiento excepto cuando está en pausa.
2) Cuando la puerta del horno se abre en modo de espera;
3) Si la puerta del horno se deja abierta, la luz del horno se apagará automáticamente después de 10 minutos.
9. RECOMENDACIONES DE HORNEADO
9.1 Cocción con microondas
¡Advertencia! Lea la sección " Precauciones de seguridad" antes de comenzar la cocción con su microondas.
Siga las siguientes recomendaciones cuando cocine con su microondas.
● Antes de calentar o cocinar alimentos con cáscara o piel (por ejemplo, manzanas, tomates, patatas,
salchichas), pélelos para que no se quemen. Corte la comida antes de comenzar a prepararla.
● Antes de usar un recipiente o plato, asegúrese de que sea adecuado para uso en microondas (consulte la
sección sobre tipos de utensilios de cocina)
● Al cocinar alimentos con muy poca humedad (por ejemplo, descongelar pan, hacer palomitas de maíz,
etc.), la evaporación es muy rápida. El horno funciona como si estuviera vacío y la comida podría quemarse.
El aparato y el recipiente pueden dañarse en tal situación. Por lo tanto, debe establecer solo el tiempo de
cocción necesario y vigilar de cerca el proceso de cocción.
● No es posible calentar con mucho aceite (freír) en el microondas.
● Si tiene varios recipientes, como tazas, por ejemplo, colóquelos uniformemente en la placa del plato
giratorio.
● No selle las bolsas de plástico con clips metálicos. Utilice clips de plástico en su lugar. Pinche las bolsas
con varios agujeros para que el vapor pueda escapar.
● Compruebe que se alcance al menos una temperatura de 70º al calentar o cocinar los alimentos.
● Puede producirse vapor en la ventana de la puerta del microondas durante la cocción y comenzar a
gotear. Esta situación es normal y puede ser más habitual si la temperatura ambiente es baja. El proceso de
cocción no se ve afectado por esto. Una vez que haya terminado de cocinar, limpie el agua condensada.
● Al calentar líquidos, use recipientes con una amplia abertura para que el vapor se evapore fácilmente.
Prepare los alimentos según las instrucciones y tenga en cuenta los tiempos de cocción y los niveles de
potencia indicados en las tablas.
Tenga en cuenta que las cifras proporcionadas son solo indicativas y pueden variar según el estado inicial,
la temperatura, la humedad y el tipo de alimento. La cocción depende del estado inicial, la temperatura, la
humedad y los diferentes tipos de alimentos. Es recomendable ajustar los tiempos y niveles de potencia
para cada situación. Dependiendo de las características exactas de los alimentos, es posible que necesite
aumentar o acortar los tiempos de cocción o aumentar o disminuir los niveles de potencia.
Cocción con microondas
1. Cuanto mayor sea la cantidad de comida, mayor será el tiempo de cocción. Mantenga eso en mente:
△Doble de cantidad = doble de tiempo
△Mitad de cantidad = Mitad de tiempo
2. Cuanto más baja sea la temperatura, mayor será el tiempo de cocción.
3. Los alimentos que contienen mucho líquido se calientan más rápidamente
4. La cocción será más uniforme si la comida se distribuye uniformemente en el plato giratorio. Si coloca
alimentos densos en la parte exterior del plato y otros menos densos en el centro del plato, puede calentar
diferentes tipos de alimentos simultáneamente.
5. Puedes abrir la puerta de microondas en cualquier momento. Al hacer esto, el microondas se apaga
automáticamente. El microondas solo comenzará a funcionar nuevamente cuando cierre la puerta y presione
la tecla de inicio.
6. Se requiere menos tiempo si cubrimos los alimentos, pero la cubierta debe tener orificios de ventilación
que eviten la presión extrema.
11
V.1

9.1.1 Verduras
Nombre Peso
(gram)
Humedad
(ml)
Potencia Tiempo
(Min)
Tiempo de
seguimiento (Min) Notas
Coliflor
500
100
800
9-11
2-3
Corte en rodajas
Cubra bien
Brocoli
300
50
800
6-8
2-3
Champiñones
250
25
800
6-8
2-3
Zanahorias
300
250
100
25
800
800
7-9
8-10
2-3
2-3
Corte en rodajas
Cubra bien
Patatas
250
25
800
5-7
2-3
Pele y corte en
tamaño uniforme y
cubra bien
Cebolletas
250
25
800
5-7
2-3
Corte en rodajas
Cubra bien
Repollo
congelado
300
50
800
6-8
2-3
Cubra bien
9.2. Descongelación con microondas
Instrucciones generales para descongelar
1. Al descongelar, use solo platos que sean apropiados para microondas.
2. La función de descongelación por peso y las tablas se refieren a la descongelación de alimentos crudos.
3. El tiempo de descongelación depende de la cantidad y el grosor del alimento. Al congelar alimentos, tenga en
cuenta el proceso de descongelación. Distribuya los alimentos uniformemente en el recipiente.
4. Distribuya bien la comida. Puede utilizar papel de aluminio con alimentos delicados. Importante: el papel de
aluminio no debe entrar en contacto con la cavidad interna del microondas, ya que esto puede provocar un arco
eléctrico.
5. Las porciones gruesas de los alimentos se deben voltear varias veces en el proceso de hornear.
6. Distribuya los alimentos congelados de la manera más uniforme posible, ya que las partes estrechas y gruesas
se descongelan más rápidamente que las partes más gruesas y más amplias.
7. Los alimentos ricos en grasas como la mantequilla, el queso y la crema no deben descongelarse completamente.
Si se mantienen a temperatura ambiente, estarán listos para ser servidos en unos minutos. Con la crema ultra
congelada, si encuentra pequeños trozos de hielo en ella, debe mezclarlos antes de servirlos.
8. Coloque las aves de corral en un plato volteado hacia arriba para que los jugos de la carne se puedan escurrir
más fácilmente.
9. El pan debe envolverse en una servilleta para que no se seque demasiado.
10. Retire los alimentos congelados de su envoltorio y no se olvide de quitar las etiquetas metálicas. Para los
recipientes que se utilizan para mantener los alimentos congelados en el congelador y que también se pueden
usar para calentar y cocinar, todo lo que necesita tener en cuenta es que debe quitar la tapa. Para todos los
demás casos, debe colocar los alimentos en recipientes adecuados para el uso en microondas.
11. El líquido resultante de la descongelación, principalmente el de las aves de corral, debe desecharse. En ningún
caso debe permitirse que tales líquidos entren en contacto con otros alimentos.
12. No olvide que al usar la función de descongelación debe permitir un tiempo de reposo hasta que la comida esté
completamente descongelada.
13. En el proceso de descongelación, de la vuelta a la comida cuando el horno de microondas emita la alarma y
muestre "Turn".
12
V.1

Por favor, revise la siguiente tabla con las temperaturas de diferentes comidas
Comida Peso(gram)
Tiempo de
descongelación
(Min)
Tiempo de
seguimiento (Min)
Frecuencia de giro
Carne ( ternera,
cerdo, etc...)
100
200
500
1000
1500
2000
2-3
4-5
10-12
21-23
32-34
43-45
5-10
5-10
10-15
20-30
20-30
25-35
1
1
2
2
2
3
Estofado de carne
500
1000
8-10
17-19
10-15
20-30
2
3
Carne picada
100
500
2-4
10-14
10-15
20-30
2
3
Chorizo
200
500
4-6
9-12
10-15
15-20
2
3
Aves de corral
Pollo
Pato
Filete de pescado
Trucha
Gambas
250
1000
2500
200
250
100
500
5-6
20-24
38-42
4-5
5-6
2-3
8-11
5-10
20-30
25-35
5-10
5-10
5-10
15-20
1
2
3
1
1
1
2
Fruta
200
300
500
4-5
8-9
11-14
5-10
5-10
10-20
1
1
2
Pan
200
500
800
4-5
10-12
15-17
5-10
10-15
10-20
1
1
2
Mantequilla
250
8-10
10-15
Queso
250
6-8
10-15
Crema
250
7-8
10-15
9.3. Cocción con el grill
Para una mejor cocción, utilice la rejilla suministrada.
Inserte la rejilla de manera que no entre en contacto con la superficie metálica de la cavidad del horno para evitar
el peligro de arco eléctrico que pueda dañar el horno.
PUNTOS IMPORTANTES:
1. Se producirá humo y olor cuando se use el modo grill por primera vez. Esto se debe a que el aceite se ha
quedado del proceso de fabricación.
2. El vidrio de la puerta del horno se calienta mucho cuando el horno está funcionando. Mantenga a los niños
alejados.
3. Cuando el modo grill se utiliza durante un período prolongado de tiempo, es normal que los elementos se
apaguen temporalmente debido al termostato de seguridad.
4. Importante: Cuando los alimentos se deben asar o cocinar en recipientes, debe verificar que el recipiente sea
adecuado para uso en microondas. Vea la sección sobre tipos de utensilios de cocina.
5. Cuando se use el modo grill, es posible que existan algunas salpicaduras de grasa sobre los elementos y se
quemen. Esta es una situación normal y no significa que haya ningún tipo de falla de operación.
13
V.1

6. Una vez que haya terminado de cocinar, limpie el interior y los accesorios para que no queden restos de cocción
incrustados
ELEMENTO DEL GRILL
Nombre Cantidad(G) TIEMPO(MIN.) INSTRUCCIONES
PESCADO
SARDINAS
800
6-8 Pescacos
18-24
15-20
SEPARE LIGERAMENTE CON
MANTEQUILLA. TRAS LA MITAD
DEL TIEMPO DE COCCIÓN, GIRE
Y ALIÑE.
CARNE
CHORIZO 6-8 Unidades
22-26
PINCHE A LA MITAD DEL TIEMPO
DE COCCIÓN Y GÍRELOS
HAMBURGUESAS CONGELADAS 3 Unidades
18-20
COSTILLA DE CERDO
(APROX.3 CM THICK)
400
25-30
A LA MITAD DEL TIEMPO DE
COCCIÓN, GÍRELAS Y ÚNTELAS
TOSTADAS 4 Unidades
3/2-3
VIGILE EL PROCESO
SANDWICHES TOSTADOS 2 Unidades
5-10
VIGILE EL PROCESO
9.4 Función pizza
No es necesario precalentar para cocinar pizzas.
Coloque la pizza directamente sobre la bandeja del horneado.
Coloque la bandeja de horneado en el centro del plato giratorio de vidrio en el microondas.
Advertencia: la pared de la cavidad y la bandeja de horneado se calientan mucho. Se debe tener cuidado para
evitar tocar los elementos calefactores, la pared de la cavidad o la bandejade horneado. Se recomienda el uso de
guantes de horno para evitar quemaduras.
9.5 ¿Qué tipo de utensilios se pueden utilizar?
9.5.1Función microondas
Para la función de microondas, observe que el vidrio, la porcelana, la arcilla, el plástico y el papel se pueden usar
como recipientes. No se pueden usar en el microondas bandejas, platos o recipientes metálicos con partes o
decoraciones metálicas. La cristalería y la arcilla con decoración o contenido metálico (por ejemplo, cristal de plomo)
no se pueden usar en el microondas.
Los materiales ideales para el microondas son vidrio, porcelana refractaria o arcilla y plástico resistente al calor. El
vidrio o la porcelana frágiles y muy delgados solo se deben usar por un período corto de tiempo (por ejemplo,
calentamiento)
Siempre use guantes de horno para tocar los alimentos.
Para probar utensilios en el microondas, póngalos en el horno durante 20 segundos a la potencia máxima. Después
de 20 segundos, retírelo del microondas de inmediato. Será adecuado para usar si está frío o ligeramente caliente.
Sin embargo, no será adecuado para horno de microondas si se calienta mucho o provoca arcos eléctricos.
9.5.2 Grill
En el caso de la función de grill, el recipiente debe ser resistente a una temperatura de al menos 300ºC. Los platos
de plástico no son adecuados para la función grill.
9.5.3Funciones combinadas
En las funciones de combinación (microondas + horno convección+grill), el recipiente utilizado debe ser adecuado
para microondas y grill.
9.5.4Recipientes y papel de aluminio
Los alimentos precocinados en recipientes de aluminio o en papel de aluminio se pueden colocar en el microondas
si se respetan los siguientes aspectos.
●Tenga en cuenta que las recomendaciones del fabricante están escritas en el embalaje externo.
●Los recipientes de aluminio no pueden medir más de 3 cm de alto o entrar en contacto con las paredes
de la cavidad (distancia mínima 3 cm). Cualquier papel o tapa de aluminio debe ser retirada.
●El tiempo de cocción es más largo porque los microondas solo penetran en los alimentos desde la parte
superior. Si tiene alguna duda, es mejor usar solo platos adecuados para uso en microondas.
●Importante: el papel de aluminio no puede entrar en contacto con las paredes de la cavidad, ya que esto
puede causar un arco eléctrico.
14
V.1

1. Tapas
Le recomendamos que utilice tapas de vidrio o plástico o film transparente:
2. En caso de evaporación excesiva (principalmente durante tiempos de cocción muy largos)
3. En tiempo de cocción es más corto.
4. El aroma se conserva.
5. La tapa debe tener agujeros o aberturas para que no se produzca presión. Las bolsas de plástico
deben estar abiertas. Los biberones o frascos para bebés con alimentos para bebés y recipientes
similares solo se pueden calentar sin tapas, de lo contrario podrían explotar.
10. LIMPIEZA Y MANTENIMIENTO
Antes de realizar cualquier tarea de mantenimiento, desconecte el aparato del suministro eléctrico. Desconecte el
enchufe de la toma de corriente o el interruptor del circuito de alimentación del microondas.
¡Advertencia! Nunca use un chorro de vapor para limpiar el interior del microondas.
¡Advertencia! El microondas debe limpiarse regularmente, eliminando todos los restos de alimentos. La superficie
del microondas puede deteriorarse si no está limpia. Eso puede reducir la vida útil del aparato y provocar
situaciones peligrosas.
10.1. Limpieza de acero inoxidable
Para mantener el acero inoxidable en buenas condiciones, debe limpiarlo regularmente.
10.2 Rutina de limpieza diaria
Cuando limpie superficies de acero inoxidable, utilice siempre productos específicos que no contengan
abrasivos ni ácidos a base de cloro.
Instrucciones de uso: vierta el producto sobre un paño húmedo y páselo sobre la superficie, luego enjuague
bien y seque con un paño suave.
10.3 Manchas o derramas de alimentos
Nunca use estropajos metálicos o raspadores afilados que puedan dañar la superficie del horno.
Use productos no abrasivos con la ayuda de utensilios de madera o de plástico si es necesario. Enjuague bien y
seque con un paño suave.
10.4 Limpieza de la cavidad del horno
La limpieza es el único mantenimiento que normalmente se requiere. Cada vez que cocine, limpie la cavidad
interior con un paño húmedo, ya que es una forma más fácil de eliminar salpicaduras o manchas que puedan
adherirse a la cavidad.
Para eliminar la suciedad que es más difícil de retirar, use un producto de limpieza no agresivo. No utilice
aerosoles para horno u otros productos de limpieza agresivos o abrasivos.
Mantenga siempre la puerta y el frente del microondas muy limpios para asegurarse de que la puerta se abra y
cierre correctamente.
Asegúrese de que el agua no penetre en los orificios de ventilación del microondas.
Saque regularmente la placa giratoria y el soporte correspondiente y limpie la base de la cavidad.
El horno de microondas no debe funcionar sin un plato giratorio.
Si la cavidad del horno está muy sucia, ponga un vaso de agua en el plato giratorio y encienda el horno de
microondas durante 2 o 3 minutos a máxima potencia. El vapor liberado ablandará la suciedad que luego se puede
limpiar fácilmente con un paño suave. Los olores desagradables (por ejemplo, después de cocinar pescado) se
pueden eliminar fácilmente. Ponga unas gotas de zumo de limón en una taza con agua. Ponga una cucharada de
café en la taza para evitar que el agua hierva. Caliente el agua durante 2 a 3 minutos a la potencia máxima de
microondas.
10.5 Limpieza del techo de la cavidad
Si el techo del microondas está sucio, para evitar el peligro de quemaduras, espere hasta que el grill esté frío antes de bajarlo.
No utilice productos de limpieza abrasivos u objetos afilados.
Para evitar cualquier riesgo, no retire la cubierta.
La cubierta de la lámpara se encuentra en el techo del horno y se puede quitar fácilmente para limpiarla. Para esto,
solo necesita desenroscarla y limpiar con agua y líquido de lavavajillas
10.6 Enjuague de la junta de la puerta y el panel frontal
Enjuague si quedan residuos en la junta de la puerta o en el panel frontal. No utilice herramientas de limpieza
áspera como un cepillo duro, un paño grueso, una malla de alambre, una cuchilla o cualquier otra herramienta
afilada, ya que estas herramientas afiladas pueden rayar el sello de la puerta o la superficie del panel frontal. Por
favor use detergente no abrasivo. Puede utilizar herramientas de limpieza de madera o plástico si es necesario.
15
V.1

10.7 Limpieza de accesorios
Limpie los accesorios después de cada uso. Si están muy sucios, empápelos primero y luego use un cepillo y
una esponja. Los accesorios se pueden lavar en un lavavajillas. Asegúrese de que la placa giratoria y el soporte
respectivo estén siempre limpios. No encienda el microondas a menos que el plato giratorio y el soporte estén en
su lugar.
11. MANTENIMIENTO ESPECIAL
11.1 Remplazamiento de bombilla
Operaciones concretas
Quite el enchufe de la fuente de alimentación.
Quite la pantalla (1) ;
Quite la lámpara halógena ¡Advertencia: está caliente!
Ponga una nueva lámpara halógena (220-240V-25W).
Opere de acuerdo a las instrucciones.
Instale la pantalla bien.
Conecte la corriente
ADVERTENCIA: La bombilla no debe ser remplazada por
un consumidor, ésta debe ser remplazada por personal
cualificado.
12. INSTALACION DEL APARATO
12.1 Antes de la instalación
Abra la puerta del microondas y saque todos los accesorios y retire el material de embalaje.
Asegúrese de que el microondas no esté dañado de ninguna manera. Verifique que la puerta del horno se cierra
correctamente y que el interior de la puerta y el panel frontal del horno no están dañados.
12.2 No use el microondas
Si el cable de alimentación o el enchufe están dañados, si el microondas no funciona correctamente o si se ha
dañado o se ha caído. Ponga el microondas sobre una superficie plana y estable. El microondas no debe
instalarse cerca de fuentes de calor, radios o televisores.
Durante la instalación, asegúrese de que el cable de alimentación no entre en contacto con humedad u objetos
con bordes afilados y la parte posterior del horno. La alta temperatura puede dañar el cable.
¡Advertencia!: Después de instalar el microondas, debe asegurarse de poder acceder al enchufe.
16
V.1

12.3 Posición del microondas
Si coloca el microondas en un armario, éste debe estar aislado, y el espacio entre el borde del armario y el
microondas debe ser superior a 100 mm para garantizar la ventilación
min 600
458
558-565
515
444
594
21
455
542
min500cm
2
min500cm
2
542
455
21
594
444
515
100
448-452
min 600
500cm
2
100
558-565
17
V.1

Hay 4 tornillos en el lado interior del marco de la puerta del microondas.
Nota: No tome el tirador de la puerta como punto de apoyo de fuerza durante la instalación y el
desmontaje.
18
V.1

13. RESOLUCIÓN DE PROBLEMAS
Advertencia: El mantenimiento debe ser realizado por un profesional.
Circunstancias que no necesitan un profesional:
La pantalla no se enciende
■Comprobar el indicador ON o OFF.
Sin respuesta después de presionar cualquier botón
■Compruebe si el bloqueo de seguridad está activado o no.
El horno no responde
■Compruebe que el enchufe esté bien conectado.
■Compruebe si el cable de alimentación del horno está conectado o no.
■Asegúrese de que la puerta del microondas esté cerrada herméticay correctamente.
■Asegúrese de que nada quede atrapado entre la puerta y el panel frontal de la cavidad
Ruido extraño cuando el microondas está en funcionamiento
■Compruebe si hay objetos metálicos dentro del microondas
■Compruebe si el recipiente toca la pared interna del horno por accidente.
■Verifique si el equipo de hornear se afloja o no.
El horno no caliente o lo hace lentamente
■Uso de recipiente metálico por accidente.
■Compruebe si el tiempo de funcionamiento y los ajustes son apropiados.
■La cantidad de comida es demasiado grande
Todavía hay un ruido extraño tras apagar el aparato
■Esto es normal, se necesita algún tiempo para que el ventilador de enfriamiento se enfríe.
La lámpara no funciona después de conectar la alimentación
■No influye en el uso del microondas, si las otras funciones lo hacen correctamente
19
V.1

20
14. CONDICIONES DE LA GARANTIA COMERCIAL
Esta aparato tiene una garantía de reparación de dos años, a partir de la fecha de
venta, contra todo defecto de funcionamiento proveniente de la fabricación,
incluyendo mano de obra y piezas de recambio. Para justificar la fecha de
compra será obligatorio presentar la factura o ticket de compra. La presente
garantía solo será efectiva en España.
EXCLUSIONES DE LA GARANTÍA
• Los aparatos utilizados para uso profesional o no exclusivamente doméstico,
en establecimientos industriales o comerciales.
• Los aparatos utilizados indebidamente, de manera no conforme a las
instrucciones de uso.
• Los aparatos desmontados o manipulados por personas ajenas a los Servicios
Técnicos autorizados.
• Las operaciones periódicas de mantenimiento del producto.
• Las averías producidas por causas fortuitas, siniestros de fuerza mayor o
derivados de una instalación incorrecta.
• Los materiales rotos o deteriorados por desgaste o uso normal del aparato:
juntas, plásticos, cristales, escobillas, etc.
www.easelectric.es
En base a la norma europea del 2002/96/CE de residuos de aparatos eléctricos y
electrónicos (RAEE), los electrodomésticos viejos no pueden
ser arrojados en los contenedores municipales habituales; tienen
que ser recogidos selectivamente para optimizar la recuperación y
reciclado de los componentes y materiales que los constituyan, y
reducir el impacto en la salud humana y el medio ambiente. El
símbolo del cubo de basura tachado se marca sobre todos los
productos para recordar al consumir la obligación de separarlos
para la recogida selectiva. El consumidor debe contactar con la
autoridad local o con el vendedor
para informarse en relación a la correcta eliminación de su electrodoméstico viejo.
15. DISPOSICIÓN SOBRE ELIMINACIÓN
V.1

READ these instructions carefully before installing and operating the oven. Keep them for further reference.
1. Do not attempt to operate this oven with the door open since open door operation can result in harmful exposure
to microwave energy. It is important not to defeat or tamper with the safety interlocks.
2. Do not place any object between the oven front panel and the door or allow soil or cleaner residue to accumulate
on sealing surfaces.
3. Do not operate the oven if it is damaged. It is particularly important that the oven door closed properly and that
there is no damage to the oven.
a) Door (bent),
b) Hinges and latches (broken or loosened),
c) Door seals and sealing surfaces.
4. The oven should not be adjusted or repaired by anyone except properly qualified service personnel.
P
PR
RE
EC
CA
AU
UT
TI
IO
ON
NS
S
T
TO
O
A
AV
VO
OI
ID
D
P
PO
OS
SS
SI
IB
BL
LE
E
E
EX
XP
PO
OS
SU
UR
RE
E
T
TO
O
E
EX
XC
CE
ES
SS
SI
IV
VE
E
M
MI
IC
CR
RO
OW
WA
AV
VE
E
E
EN
NE
ER
RG
GY
Y
1
V.1

CONTENTS
PRECAUTIONS TO AVOID POSSIBLE EXPOSURE TO EXCESSIVE MICROWAVE ENERGY ..............1
1. TECHNICAL SPECIFICATION ........................................................................................................................... 3
2. PRECAUTIONS FOR USE .................................................................................................................................. 3
3. SAFETY PRECAUTIONS .................................................................................................................................... 4
4. GET TO KNOW YOUR OVEN ............................................................................................................................ 5
5. BEFORE INSTALLATION ....................................................................................................................................5
6. DESCRIPTION OF FRONT PANEL CONTROL .............................................................................................. 6
7. USING THE OVEN ................................................................................................................................................ 6
8. FUNCTIONS .......................................................................................................................................................... 6
9. RECOMMENDED BAKING MENU ...................................................................................................................11
10. CLEANING AND MAINTENANCE .................................................................................................................15
11. SPECIAL MAINTENANCE ...............................................................................................................................16
12. INSTALLING THE APPLIANCE ......................................................................................................................16
13. TROUBLE SHOOTING ....................................................................................................................................19
2
13. COMMERCIAL WARRANTY....................................................................................................................................20
13. REMOVAL DISPOSITION.................................................................................................................................20
V.1

1. TECHNICAL SPECIFICATION
MODEL MGC1035SS
CAPACITYL 35
VOLTAGEV/FREQUENCYHz 220-240/50
DISTRIBUTION LINE FUSE A/CIRCUIT
BREAKERA 16
MICROWAVE INPUT WAVE W 1500-1600
MICROWAVE OUTPUT POWER W 1000
MICROWAVE WORKING FREQUENCYMHz 2450
GRILLING POWER W 1400-1650
CONVECTION POWERW 1350-1500
PRODUCT DIMENSION mm 594×580×455
PACKAGE SIZE mm 675×666×525
DIAMETER OF ROTATING PLATEmm 315
GROSS/NET WEIGHTKg 38.0/34.3
2.PRECAUTIONS FOR USE
This manual
life cycle. We urge you to read this maunal and all the information carefully before using the appliance. Installation
should be carried out by qualified technician in compliance with the relevant regulations. This appliance is for
household use and complies with the EEC directives currently in force. The appliance is for cooking and heating food.
The manufacturer declines all liability for other uses except for cooking food.
Keep the documentation of this product for future reference. Always keep the instruction manual handy. If you
lend the microwave to someone else, the manual as well.
Never use this appliance for heating rooms.
Never leave packaging residues unattended in home. Separate the various packaging materials on type and
consign them to the nearest separate disposal centre.
This manual contains the regulations of recycling decommissioned appliances.
Never obstruct vents provided for ventilation and heat dispersal.
Never use metal scouring pads or sharp scrapers which will damage the surface. Use ordinary non- abrasive
products with the aid of wooden or plastic utensils if necessary. Rinse thoroughly and dry with a soft cloth or chamois
leather.
The nameplate with the technical data, serial number and mark is in a visible position on the oven door frame.
The nameplate should never be removed.
The appliance should be connected to earth in compliance with electrical system safety regulations.
If a socket and plug connection is used, check that they are of the same type. Do not use reducers, adapters or
junctions since they cause overheating or burns. the ac power supply must be 220-240V,50Hz,with a minimum 16A
distribution line fuse, or a minimum 16A distribution circuit breaker.
3
V.1

3.SAFETY PRECAUTIONS
Please refer to the installation instructions for the safety regulations for electric or gas appliance and ventilation
functions.
To ensure your safety, all electric appliance should only be installed and serviced by qualified staff, in accordance
with the relevant regulations in law.
After installation, carry out a quick test on the oven referring to the instructions if the appliance fails to operate,
disconnect it and contact the nearest service centre.
IMPORTANT SAFETY INSTRUCTIONS
READ CAREFULLY AND KEEP FOR FUTURE REFERENCE
– WARNING: If the door or door seals are damaged, the oven must not be operated until it has been repaired by a
competent person;
– WARNING: It is hazardous for anyone other than a competent person to carry out any service or repair operation
that involves the removal of a cover which gives protection against exposure to microwave energy;
–WARNING: Liquids and other foods must not be heated in sealed containers since they are liable to explode;
–WARNING: Accessible parts may become hot during use Young children should be kept away.
–WARNING: Only allow children to use the oven without supervision when adequate instructions have been given so
that the child is able to use the oven in a safe way and understands the hazards of improper use;
–the minimum height 4 mm of free space necessary above the top surface of the oven;
–only use utensils that are suitable for use in microwave ovens;
–when heating food in plastic or paper containers, keep an eye on the oven due to the possibility of ignition;
–if smoke is observed, switch off or unplug the appliance and keep the door closed in order to stifle any flames;
–microwave heating of beverages can result in delayed eruptive boiling, therefore care must be taken when handling
the container;
–the contents of feeding bottles and baby food jars shall be stirred or shaken and the temperature checked before
consumption, in order to avoid burns;
–eggs in their shell and whole hard-boiled eggs should not be heated in microwave ovens since they may explode,
even after microwave heating has ended;
–the oven should be cleaned regularly and any food deposits removed;
–failure to maintain the oven in a clean condition could lead to deterioration of the surface that could adversely affect
the life of the appliance and possibly result in a hazardous situation;
–If the supply cord is damaged, it must be replaced by the manufacturer, its service agent or similarly qualified
persons in order to avoid a hazard.
–This appliance is not intended for use by persons (including children) with reduced physical sensory or mental
capabilities, or lack of experience and knowledge, unless they have been given supervision or instruction concerning
use of the appliance by a person responsible for their safety.
–Children should be supervised to ensure that they do not play with the appliance.
–Warning: When the appliance is operated in the combination mode, children should only use the oven under adult
supervision due to the temperatures generated.
–During use the appliance becomes hot. Care should be taken to avoid touching heating elements inside the
Microwave oven.
- Do not use harsh abrasive cleaners or sharp metal scrapers to clean the oven door glass since they can scratch the
surface, which may result in shattering of the glass.
–WARNING: The appliance and its accessible parts become hot during use. Care should be taken to avoid touching
heating elements.
–Children less than 8 year of age shall be kept away unless continuously supervise.
–This appliance can be used by children aged form 8 years and above and persons with reduced physical, sensory
4
V.1

or mental capabilities or lack of experience and knowledge if they have been given supervision or instruction
concerning use of the appliance in a safe way and understand the hazards involved, Children shall not play with the
appliance . Cleaning and user maintenance shall not e made by children without supervision.
–WARNING: Accessible parts may become hot during use. Young children should be kept away.
Avoid damage the oven or other dangerous situation according to the following instructions:
● Do not cover or obstruct the ventilation openings.
● Do not keep any inflammable object inside the oven as it may burn if the oven is switched on.
● Do not use the oven as a pantry.
● Do not pour spirits (e.g. brandy, whisky, schnapps, etc.) over hot food. Danger of explosion!
● Accessories such as wire racks and trays, etc. get hot in the cooking space. Always wear protective gloves or use
oven clothes.
● To avoid being burnt, always use oven gloves for handling dishes and containers and touching the oven.
● Do not lean on the opened oven door. This may damage the oven, especially in the hinge zone. The door can bear
a maximum weight of 8 kg.
● The racks can bear a maximum load of 8 kg. To avoid damaging the oven, do not exceed this load.
4.GET TO KNOW YOUR OVEN
5. BEFORE INSTALLATION
The inside of the appliance should be cleaned to remove all manufacturing residues. For further information
about cleaning, see point „Cleaning and Maintenance‟.
1.- Door handle
2.- Door window glass
3.- Door seal
4.- Drive shaft
5.- Turntable ring
6.- Turntable plate
7.- Grill
8.-Button
9.- Control panel
5
V.1

6. DESCRIPTION OF FRONT PANEL CONTROL
All the appliance‟s control and monitoring device are placed together on the control panel. The table below
displays icons of different functions.
Buttons Definition;
Standby Function (microwave、grill、defrost)
Cooking Time Setting(cooking time、delay start time)
Other Setting (Power、weight、choice of defrost)
Clock Setting
Child Lock
Increase(function、power、weight increase)
Decrease(function、power、weight decrease)
Start/Pause
Icon Definition:
Microwave Grill
Convection Microwave+Grill
Microwave+Convection Grill+Convection
Microwave+Grill+Convection Defrost
Working Time Clock
Delay Time Chrild Lock
Microwave Power Show
Temperature Weight
INSTRUCTIONS FOR THE USER
7.USING THE OVEN
When the oven is used for the first time, it should be heated to the maximum temperature for long enough to
burn off any oily residues left during the manufacturing process, which might contaminate foods with unpleasant
smells.
In case too much condensation produced on the inner glass of the microwave door and inside the cavity, don‟t
leave cooked food in the microwave for long.
8. FUNCTIONS
8.1 Time Setting
When power is on, display screen shows a flashing“0:00; time could be set,Press the button“ ”or“ ”to
increase or decrease to set hour; After hour is set, Press the symbol of clock setting “ ”again to set the minutes.
Press“ ”or“ ”to increase or decrease the minutes and press“ ”to set the current time. Press“ ”again, time set
is finished.
6
V.1

The range of Clock Setting is between 0:00 and 23:59
Change the current time
When the appliance is in standby mode and clock displays on screen, press“ ”for three seconds, the current
time flashes on the screen, and new time could be set.
Clock displays setting
When the appliance is in standby mode, press“”,and clock will displays on screen; press“ ”again, and clock
will not display on screen.
8.2 Selecting The Functions
After pressing“ ”for 1 second under standby mode, the appliance will be on function select mode. Suggested
time and data (including microwave power, weight, etc) will be shown on screen. You can select your wanted function
by pressing “ ” and “ ”.
8.2.1 MicrowaveFunctions
After selecting this function,the indicator“ ”,“ ”and “ ”light up. Screen shows 01:00 and 800W.
Press“ ”to set the cooking time. When the preset time is flashing, press“ ”or“ ”to adjust the cooking time.
The MAX time is 90:00(The first 30 minutes is 100% power, and the rest 60 minutes is 80%)
Press“ ”to set the microwave power. When the preset power is flashing, press“ ”or“ ”to adjust the
microwave power. Microwave power:1000/800/600/400/200/0W
Press“ ”to start cooking, and cooking time will count down. The symbol of microwave“ ”is flashing.
microwave power table
display
1000W
800W
600W
400W
200W
0W
power
high
Mid-high
middle
Mid-low
low
cool
8.2.2 Grill Function
After selecting this function, the indicator “ ”and“ ” light up. Screen shows 15:00
Press“ ”to set the cooking time. When the preset time is flashing, press“ ”or“ ”to adjust the cooking time.
The MAX time is 90:00
Press“ ”to start cooking, and cooking time will count down. The symbol of grill“ ”is flashing.
8.2.3 Convection
After selecting convection function, “ ”“ ” and “ ”light up and the screen shows 5:00 and 110℃
Press “ ” to set cooking time. when the preset time 5:00 is flashing on the screen, the cooking time could be
adjusted by pressing “ ” or “ ”;
Press “ ”to set temperature. when the preset temperature 110 is flashing on the screen, the temperature
could be adjusted by pressing “ ” or “ ”;
Press “ ” to start cooking, the working time will count down while “ ” and “ ” are flashing.
The range of the temperature is from 110℃ to 230℃.
The longest working time is 90 minutes.
Note: During the working process, the current time could be checked by pressing “ ”。
8.2.4 Microwaves + Grill Function
After selecting the function,the indicator “ ”,“ ”and “ ”light up. Screen shows 10:00 and 400W;
Press“ ”to set the cooking time. When the preset time is flashing, press“ ”or“ ”to adjust the cooking time.
The MAX time is 90:00
Press “ ” to set the microwave power.When the preset microwave power 400 is flashing on the screen, the
power could be adjusted by pressing “ ” or “ ”.
Press“ ”to start cooking, and cooking time will count down,The symbol of microwave + grill “ ”is flashing.
7
V.1

There are three kinds of power 600W, 400W, 200W for selecting.
The longest working time is 90 minutes.
●The microwave + Grill are ideal for cooking quickly and browning foods after cooking. Furthermore, you can also
grill and cook cheese covered food. The microwave and the grill work simultaneously. The microwave cooks and
the grill toasts.
●Before using a dish in the microwave oven make sure that it is suitable for microwave use. Only use dishes or
containers that are suitable for microwave use.
●The dish to be used in the combined function should be suitable for microwave and grill use. See the section on
types of ovenware!
●Keep in mind that the figures given are merely indicative and can vary as a function of the initial state,
emperature, moisture and type of food.
●If the time is not enough to brown the food well, put it under the grill for another 5 or 10 minutes.
●Please allow the standing times and don‟t forget to turn the meat pieces. Unless indicated to the contrary, use the
turntable plate for cooking. The values given in the tables are valid when the oven cavity is cold (it is not
necessary to pre-heat the oven).
FOOD
QUANTITY(G)
DISH
POWER
(W)
TIME
(MIN)
STANDING
TIME (MIN)
CHEESE TOPPED
PASTA
500
LOW DISH
400
12-17
3-5
CHEESE TOPPED
POTATOES
800
LOW DISH
600
20-22
3-5
LASANGE
APPROX.800
LOW DISH
600
15-20
3-5
GRILLED CREAM
CHEESE
APPROX.500
LOW DISH
400
18-20
3-5
2 FRESH CHICKEN
LEGS (GRILLED)
200 EACH
LOW DISH
400
10-15
3-5
CHICKEN
APPROX.1000
LOW LAND
WIDE FISH
400
35-40
3-5
CHEESE TOPPED
ONION SOUP
2×200G CUPS
SOUP
BOWLS
400
2-4
3-5
8.2.5Grill+Convection
After selecting the function, the indicator,“”“ ” and “ ” light up with the screen shows 5:00 and 110℃
Press “ ” to set the working time.When the preset time is flashing, you can adjust the working time by pressing
“” and “” , and the longest working time is 90 minutes.
Press “ ” to set the temperature. When the preset temperature 110 is flashing on the screen, the temperature
could be adjusted by pressing “ ” or “ ”.
Press “ ” to start cooking, and the working time count will down while the symbols “ ” and “ ” are flashing.
The range of the temperature for selecting is from 110℃ to 230℃.
The longest working time is 90 minutes.
Note: During the working process, the current time could be checked by pressing “ ”.
8.2.6Microwave+Convection
After selecting the function, “”“ ” and “ ” light up with the screen shows 10:00 and 400W.
Press “ ” to set the working time. When the preset time is flashing, you can adjust the working time by pressing
“ ” and“ ” ,and the longest working time is 90 minutes.
Press “ ” to set the microwave power. When the preset microwave power 400 is flashing on the screen, the
8
V.1

power could be adjusted by pressing “ ” or “ ”.
Press “ ” again to set the temperature.When the preset temperature 110 is flashing on the screen, the
temperature could be adjusted by pressing“ ” or “ ”.
Press “ ” to start cooking, the working time will count down while the symbol “ ” is flashing.
8.2.7Microwave+Grill+Convection
After selecting the function, the indicator “”“ ” and“ ” light up with the screen shows 10:00 and 400W.
Press “ ” to set the working time. When the preset time is flashing, you can adjust the working time by
pressing“ ” and “ ” , and the longest working time is 90 minutes.
Press “ ” to set the microwave power. When the preset microwave power 400 is flashing on the screen, the
power could be adjusted by pressing “ ” or “ ”.
Press “ ” again to set the temperature. When the preset temperature 110 is flashing on the screen, the
temperature could be adjusted by pressing “ ” or “ ”.
Press “ ” to start cooking, the working time will count down while the symbol “ ” is flashing.
There are three kinds of power 600W, 400W, 200W for selecting.
The longest working time is 90 minutes.
8.2.8 Defrost
After selecting the function,the indicator “ ” and “ ” light up. Screen shows PR01 and 100.
Press “ ” to switch to Defrost by Weight program. Then press “ “ or “ ” to select the
correspondingprogram. There will be 5 programs from PR01 to PR05 for choosing;
Press “ ” again to set the weight,then press “ ” or “ ” to adjust the weight. The range of weight is from
100-2500.( Different programs have different weight)
Press “ ” to start cooking, and cooking time will count down. The symbol of defrost by weight “ ” is flashing.
In the defrosting process, the appliance will stop when the time reached the half set time. And there will be three
beeps every 30 seconds for reminding. And the symbol “ ” will stop flashing while the word “turn”appears on the
screen and flash. You should open the door and turn the food over. Then close the door and press “ ” to continue
defrosting.
We can calculate the defrosting time according to different food and weight, and microwave power can adjust
automatically to reach the best defrosting effect. Furthermore, the table beneath offers reference value of defrosting
referring to the weight, which includes weight level, defrosting time and follow-up time.
PROGRAM
FOOD
WEIGHT(Gram)
TIME(Min)
DURATION TIME
(Min)
PR 01
Meat
100-2000
2:20-43:30
20-30
PR 02
Bird species
100-2500
2:10-58:10
20-30
PR 03
Fish
100-2000
2:00-40:00
20-30
PR 04
Fruit
100-500
2:36-13:00
10-20
PR 05
Bread
100-800
2:25-19:20
10-20
8.3Delayed Start Time (Automatic cooking)
After cooking time and function is set, press“ ”again to set delay start time. “ ”lights up, screen displays
current time(hour is flashing), Press “ ” or “ ”to set delay start time(hour),press“ ”again, time(minutes) will
flash. Press “ ” or “ ”to set delay start time(minutes)。Press“ ”to confirm the delay start time setting,If
press“ ”again, the appliance will work directly.
Screen shows the delayed start time and current time in turn when the appliance is under standby mode.
Press“ ”for 1 second if you want to cancel the selected function.
9
V.1

8.4Pause In The Process Of Cooking
8.4.1You can stop the cooking process at any time by pressing“ ”or by opening the oven door. At the same time
when the appliance suddenly stops working, but Screen still displays the rest of the operating time still.
If you wish, at this time you can:
Turn or stir the food to ensure it will be evenly cooked;
Modify the process parameters;
Cancel the process by pressing“ ”for 1 second;
To start the process, closethe door and press“ ”。
8.4.2Modifying parameters
The operating parameters (time, weight, power, etc.) can only be modified when the cooking process has been
interrupted. Proceed as follows:
After pressing“ ”one second under standby mode the appliance will switch to function menu.
Press“ ”and“” or “ ”to set cooking time;
Press“ ”to switch to Power Setting Model;
Press“ ”to continue cooking process。
8.5End cooking and cancel program
At the end of the process you will hear three beeps and the display will show the word „End‟,The symbol“ ”light.
The beeps repeat every 30 seconds in five minutes until the door is opened or “ ”is pressed. The oven returns to
the OFF setting
During the process of setting programm or oven working,press “ ” the for 1 second and the appliance stops
working to go into standby mode
8.6Show Room and Child Lock
8.6.1 Show Room (the appliance seems working but heating elements with no power)
Under standby mode, press“ ” and “ ” at the same time until the words “OFF SHO”appear on the screen。
Now press “ ” or “ ” once, the appliance goes in showing mode. Press “ ” or “ ”again, showing mode will be
closed. After setting, press“ ”to go back to standby mode. Notice: The showing function is convenient for sales, for
normal using, it should be set to off showing mode. So this function is not required to be set.
Under showing mode, whatever function is chosen, the symbol “ ” lights after pressing “ ” .
8.6.2 Child Lock
On Lock:Under standby mode or working process, press “ ” for 3seconds,the appliance will be locked with a
sound “di”.
Unlock: Press “ ” for 3 seconds,the appliance will be unlocked after a sound “di”. The symbol “ ” disappears.
8.7Cooling Fan System
The appliance is equipped with a cooling system which comes into operation as soon as a cooking function
starts.
Operation of the fans generates a normal air flow which comes out above the door and may continue for a short
time even after the appliance is switched off.
8.8 Door Interlock Switch
The light is on when the door interlock switch is not connected or closed incompletely, and it is available to set
the parameter, but you can't start the microwave.
The screen displays “door” when you press Start/Pause button, in the condition that the door interlock switch is
not connected or not closed. It would return to setting interface after 3 seconds.
10
V.1

8.9 Inside Light
The appliance light comes on:
1)、 working condition except pause;
2)、 When the oven door is opened in standby status;
3)、 If the oven door is left open, the oven light will automatically shut-off after 10 minutes。
9. RECOMMENDED BAKING MENU
9.1 Cooking With Microwave
Warning! Read the section ‘Safety Precautions’ before cooking with your microwave.
Follow these recommendations when cooking with microwave:
●Before heating or cooking foods with peel or skin (e.g. apples, tomatoes, potatoes, sausages) peel them
so that they do not burst. Cut the food up before starting to prepare it.
●Before using a container or dish make sure that it is suitable for microwave use (see the section on types
of ovenware)
●When cooking food with very little moisture (e.g. defrosting bread, making popcorn, etc.) evaporation is
very quick. The oven then works as if it was empty and the food may burn. The appliance and the
container may be damaged in such situation. You should therefore set just the cooking time necessary
and you should keep a close eye on the cooking process.
●It is not possible to heat with much oil (frying) in the microwave.
●If you have several containers, such as cups, for example, set them out uniformly on the turntable plate
●Do not seal plastic bags with metal clips. Use plastic clips instead. Prick the bags for several holes so that
the steam can escape.
●Check that they reach at least a temperature of 70℃ When heating or cooking foods.
●There might come steam on the oven door window during cooking and may start to drip. This situation is
normal and may be more noticeable if the room temperature is low. The process of cooking is not
affected by this. After you have finished cooking, clean up the water coming from the condensation.
●When heating liquids, use containers with a wide opening, so that the steam can evaporate easily.
Prepare the foods as per the instructions and keep in mind the cooking times and power levels indicated in
the tables.
Keep in mind that the figures given are only indicative and can vary depending on the initial state,
temperature, moisture and type of food. It is depending on the initial state, temperature, moisture and
different types of food. It is advisable to adjust the times and power levels to each situation. Depending on the
exact characteristics of the food you may need to increase or shorten the cooking times or increase or
decrease the power levels.
Cooking with microwave
1. The greater the amount of food, the longer the cooking time. Keep in mind that:
△Double the quantity = double the time
△Half the quantity = half the time
2. The lower the temperature, the longer the cooking time.
3. Foods containing a lot of liquid heat up more quickly
4. Cooking will be more uniform if the food is evenly distributed on the turntable. If you put dense foods on
the outer part of the plate and less dense ones on the centre of the plate, you can heat up different types
of food simultaneously.
5. You can open the oven door at any time. When you do this the oven switches off automatically. The
microwave will only start working again when you close the door and press the start key.
6. It takes less time if we put a cover over food, but the cover should have vents avoiding extreme pressure.
11
V.1

9.1.1 Vegetables
Name
Weight
(gram)
Water
(ml)
Fire
power
Time
(Min)
Follow-up time
(Min)
Notice
Cauliflower
500
100
800
9-11
2-3
Cut into slices
Cover well
Broccoli
300
50
800
6-8
2-3
Mushroom
250
25
800
6-8
2-3
Peas, carrots,
frozen carrots
300
250
100
25
800
800
7-9
8-10
2-3
2-3
Cut into slices or
blocks, cover well
Potatoes
250
25
800
5-7
2-3
Peel and cut into
uniform size, cover
well
Chives
250
25
800
5-7
2-3
Cut into segments or
slices, cover well
Frozen
cabbage
300
50
800
6-8
2-3
Cover well
9.2. Defrosting with Microwaves
General instructions for defrosting
1. When defrosting, use only dishes that are appropriate for microwaves.
2. The defrost function by weight and the tables refer to the defrosting of raw food.
3. The defrosting time depends on the quantity and thickness of the food. When freezing food keep the defrosting
process in mind. Distribute the food evenly in the container.
4. Distribute the food well. You can use aluminum foil delicate food. Important: The aluminum foil should not come
into contact with the oven inner cavity of the oven as this may cause electrical arcing.
5. Thick portions of food should be turned over several times in the process of baking.
6. Distribute the frozen food as evenly as possible since narrow and thick portions defrost more quickly than the
thicker and broader parts.
7. Fat-rich foods such as butter, cheese and cream should not be completely defrosted. If they are kept at room
temperature thy will be ready to be served in a few minutes. With ultra-frozen cream, if you find small pieces of ice
in it, you should mix these in before serving.
8. Place poultry on an upturned plate so that the meat juices can run off more easily.
9. Bread should be wrapped in a napkin so that it does not become too dry.
10. Remove frozen food from its wrapping and do not forget to take off any metal twist-tags. For containers that are
used to keep frozen food in the freezer and which can also be used for heating and cooking, all you need to do is
take off the lid. For all other cases you should put the food into containers that are suitable for microwave use.
11. The liquid resulting from defrosting, principally that from poultry, should be discarded. In no event should such
liquids be allowed to come into contact with other foods.
12. Do not forget that by using the defrosting function you need to allow for standing time until the food is completely
defrosted.
13. In defrost process, please turn food over when microwave oven alarms and displays "turn".
12
V.1

Please refer to the following table for different temperature of various food.
Name of food
Weight (gram)
Defrosting time
(Min)
Follow-up time
(Min)
Frequency of
turnover
Meat(veal, beef,
pork)
100
200
500
1000
1500
2000
2-3
4-5
10-12
21-23
32-34
43-45
5-10
5-10
10-15
20-30
20-30
25-35
1
1
2
2
2
3
Beef stew
500
1000
8-10
17-19
10-15
20-30
2
3
Minced meat
100
500
2-4
10-14
10-15
20-30
2
3
Sausage
200
500
4-6
9-12
10-15
15-20
2
3
Poultry
Chicken
Dorking
Fish fillet
Trout
Prawn
250
1000
2500
200
250
100
500
5-6
20-24
38-42
4-5
5-6
2-3
8-11
5-10
20-30
25-35
5-10
5-10
5-10
15-20
1
2
3
1
1
1
2
Fruit
200
300
500
4-5
8-9
11-14
5-10
5-10
10-20
1
1
2
Bread
200
500
800
4-5
10-12
15-17
5-10
10-15
10-20
1
1
2
Butter
250
8-10
10-15
Cheese
250
6-8
10-15
Cream
250
7-8
10-15
9.3. Cooking with the Grill
For a better baking, use the rack supplied.
Insert the rack in the way that it doesn‟t come into contact with the metal surface of the oven cavity in case any
danger of electric arcing which may damage the oven.
IMPORTANT POINTS:
1. There will be some smoke and smell when the grill is used for the first time. That is because of oil left from the
manufacture process.
2. The glass of oven door becomes very hot when the oven is working. Keep children away.
3. When the grill is used for extended period of time, it is normal to find that the elements will switch themselves off
temporarily due to the safety thermostat.
4. Important: When food is to be grilled or cooked in containers you should check that the container is suitable for
microwave use. See the section on types of ovenware!
5. When the grill is used it is possible that some splashes of fat may go onto the elements and be burnt. This is a
normal situation and does not mean there is any kind of operation fault.
13
V.1

6. After you have finished cooking, clean the interior and the accessories so that cooking remains do not become
encrusted.
GRILL ELEMENT
Name
QUANTITY(G)
TIME(MIN.)
INSTRUCTIONS
FISH
BASS
SARDINES/GURNARD
800
6-8 FISH
18-24
15-20
SPREAD LIGHTLY WITH BUTTER.
AFTERHALF OF COOKING TIME
TURN AND SPREAD WITH
SEASONNING.
MEAT
SAUSAGES
6-8 UNITS
22-26
PRICK AFTER HALF COOKING
TIME AND TURN
FROZEN HAMBURGERS
3 UNITS
18-20
SPARE RIB (APPROX.3 CM
THICK)
400
25-30
AFTER HALF OF COOKING TIME,
BASTE AND TURN
TOAST
4 UNITS
3/2-3
WATCH TOASTING
TOASTED SANDWICHES
2 UNITS
5-10
WATCH TOASTING
9.4 Pizza function
It is not necessary to pre-heat the browning plate to cook pizzas.
Place the pizza directly on the browning plate.
Place the browning plate on the centre of the glass turntable in the microwave oven.
Warning: the cavity wall and the browning plate become very hot. Care should be taken to avoid touching heating
elements, cavity wall or the browning plate. The usage of oven gloves is strongly recommended to avoid burns.
9.5 What kind of ovenware can be used?
9.5.1Microwave function
For the microwave function, notice that glass, china, clay, plastic, and paper can be used as container. Metal
pans, dishes or containers with metal parts or decorations cannot be used in the microwave. Glassware and clay with
metallic decoration or content (e.g. lead crystal) cannot be used for microwave oven.
The ideal material for microwave oven is glass, refractory china or clay, or heat resistant plastic. Very thin, fragile
glass or china should only be used for short period of time (e.g. heating)
Always wear oven gloves to take mature food.
To test ovenware, put the item in the oven for 20 seconds at maximum microwave power, after 20 seconds, take
the ovenware out immediately, it is suitable to use if it is cold or just slightly warm. However, it is not suitable for
microwave oven if it heats up a lot or causes electric arcing.
9.5.2 Grilling
In the case of the grill function, the ovenware should be resistant to temperature of at least 300℃. Plastic dishes
are not suitable for the grill function.
9.5.3Combination functions
In the combination functions (microwave + conventional heating elements), the ovenware used should be
suitable for microwave and grill.
9.5.4Aluminum containers and foil
Pre-cooked food in aluminum containers or in aluminum foil can be put in the microwave if the following aspects
are respected.
●Be noticed that manufacturer‟s recommendations written on the external packing.
●The aluminum containers cannot be more than 3 cm high or come in contact with the cavity walls
(minimum distance 3 cm). Any aluminum lid or top should be removed.
●The cooking time is longer because the microwaves only permeate into food from the top. If you have any
doubts, it is best to use only dishes suitable for microwave use.
●Important: aluminum foil cannot come into contact with the cavity walls since this may cause electrical
arcing.
14
V.1

●Lids
We recommend you use glass or plastic lids or cling film:
1. In case of excessive evaporation (mainly during very long cooking times)
2. Cooking time is shorter
3. The aroma is preserved
The lid should have holes or openings so that no pressure produces. Plastic bags should be opened.
Baby feeding bottles or jars with baby food and similar containers can only be heated without tops/lids on
otherwise they may burst.
10. CLEANING AND MAINTENANCE
Before carrying out any operations, disconnect the appliance from the electricity supply. Take the plug out of the
socket or switch of the oven‟s power circuit.
Warning! Never use a jet of steam for cleaning the inside of the oven.
Warning! The microwave oven should be cleaned regularly, with all food remains being removed. The surface of
microwave may deteriorate if it is not clean. That may reduce the oven‟s working life and possibly result in a
dangerous situation.
10.1. Cleaning Stainless Steel
To keep stainless steel in a good condition, it should be cleaned regularly.
10.2 Daily Cleaning Routine
When cleaning and caring for stainless steel surfaces, always use only specific products which do not contain
abrasives or chlorine-based acids.
Instructions for use: Pour the product onto a damp cloth and wipe over the surface, then rinse thoroughly and dry
with a soft cloth or chamois leather.
10.3 Food Stains Or Spills
Never use metal scouring pads or sharp scrapers which may damage the surface of the oven.
Use ordinary non-abrasive products with the aid of wooden or plastic utensils if necessary. Rinse thoroughly and
dry with a soft cloth or chamois leather.
10.4 Cleaning The Oven Cavity
Cleaning is the only maintenance normally required. Every time after cooking, clean the inner cavity with a damp
cloth since this is an easier way to remove splashes or spots that may stick to the cavity.
To remove dirt that is harder to shift, use a non-aggressive cleaning product. Do not use oven sprays or other
aggressive or abrasive cleaning products.
Always keep the door and the oven front very clean to ensure that the door opens and closes properly.
Make sure water does not permeate into the microwave ventilation holes.
Regularly take out the turntable plate and the respective support and clean the cavity base, especially after any
liquid spillage.
Microwave should not work without turntable.
If the oven cavity is very dirty, put a glass of water on the turntable and switch on the microwave oven for 2 or 3
minutes at maximum power. The steam released will soften the dirt which can then be cleaned easily using a soft
cloth. Unpleasant odors (e.g. after cooking fish) can be eliminated easily. Put a few drops of lemon juice in a cup with
water. Put a spoonful of coffee in the cup to avoid the water boiling over. Heat the water for 2 to 3 minutes at
maximum microwave power.
10.5 Cleaning The Cavity Ceiling
If the oven ceiling is dirty, to avoid the danger of burning , wait until the grill is cold before lowering it.
Do not use abrasive cleaning products or sharp objects.
To avoid any risk, do not remove the mica cover.
The glass lamp cover is located on the oven ceiling and can be removed easily for cleaning. For this you just
need to unscrew it and clean it with water and dishwashing liquid.
10.6 Rinse Of Door Seal And Front Panel
Please rinse in time if there are residues left in door seal or on front panel. Do not use rough cleaning tools like
hard brush, coarse cloth, wire netting, knife or any other sharp tools, using those sharp tools may scratch door seal or
the surface of the front panel. Please use non-abrasive detergent. You can use wooden or plastic cleaning tools if it is
necessary.
15
V.1

10.7 Cleaning The Accessories
Clean the accessories after each use. If they are very dirty, soak them first of all and then use a brush and
sponge. The accessories can be washed in a dish washing machine.
Make sure that the turntable plate and the respective support are always clean. Do not switch on the oven unless
the turntable and the respective support are in place.
11. SPECIAL MAINTENANCE
11.1 Replacing The Light Bulb
Concrete operations:
Take off the plug from power supply.
Take off the lampshade(1);
Take down halogen lamp(2);Warning: Hot lamp!
Fill new halogen lamp (220-240V-25W).
Operate according to the instruction.
Install lampshade well.
Connect the power.
WARNING: The lamp is not suggested for consumer
to replace. The replacing should be done
by a professional mechanic.
12. INSTALLING THE APPLIANCE
12.1 Before The Installation
Open the oven door and take out all the accessories and remove the packing material.
Make sure that the oven is not damaged by any way. Check that the oven door closes correctly and the inside of
the door and front oven panel are not damaged.
12.2 Do Not Use The Oven
If the power cable or the plug is damaged, if the oven does not function correctly or if it has been damaged or
dropped. Put the oven on a flat and stable surface. The oven should not be installed close to any heat source, radios
or televisions.
During installation, make sure that the power cable does not come into contact with any moisture or objects with
sharp edges and the back of the oven. High temperature can damage the cable. Warning: after the oven is installed
you should make sure you can access the plug.
16
V.1

12.3 Positioning The Oven
If we put the oven into cabinet, the material cabinet should be insulated, and the clearance between the edge of
the cabinet and the oven should be over 100 mm for ventilation.
min 600
458
558-565
515
444
594
21
455
542
min500cm
2
min500cm
2
542
455
21
594
444
515
100
448-452
min 600
500cm
2
100
558-565
17
V.1

There are 4 screws on the inner side of the oven door frame.
Note: Do not take the door handle as force bearing point during the installation and removal.
18
V.1

13. TROUBLE SHOOTING
Warning: Maintenanceshould bedoneby a professionalmechanic.
Circumstances that doesn‟t need a professionalmechanic
With no display!
■Check the time indicator on or off
With no response after press any button!
■Check if safety lock is on or not.
Oven doesn’t work!
■Check the plug plugged well
■Check the oven power connected or not。
■Make sure the oven door closed tightly and rightly.
■Ensure nothing caught between the door and front panel of the cavity.
Strange noise happens when oven is in operation!
■Check if metal objects inside the oven arced or not.
■Check if vessel touches inner wall of oven by accident.
■Check if baking equipment becomes loose or not.
The oven can’t heat or heat very slowly!
■Usage of metal vessel by accident.
■Check if running time and fire gear setting is appropriate.
■Food put in the oven is too big.
There is still noise after the Microwave Oven stops working!
■This is normal, it takes some time for cooling fan to cool down.
Lamp doesn’t work after connecting power!
■It doesn‟t influence the usage of Microwave Oven if other functions work well.
19
V.1

14. CONDITIONS OF COMMERCIAL WARRANTY
This appliance has a repair warranty of two years from the date of
sale, against any malfunction from the manufacture, including labor and
spare parts. To justify the purchase date will be required to submit the
invoice or receipt. This warranty is only effective in Spain.
WARRANTY EXCLUSIONS
The appliances for professional use in industrial or commercial
establishments.
The devices improperly used so not in accordance with
instructions.
The devices dismantled or manipulated by people outside
Technical Services authorized.
Periodic maintenance of the product.
Malfunctions caused by acts of God, force majeure or accidents
resulting from improper installation.
Broken or damaged materials for wear or normal use, joints,
plastic glass, brushes, etc..
www.easelectric.es
20
The european directive to 2002/96/EC on wasted electrical and
electronic equipments (WEEE), requires that old household electrical appliances
must not be disposed of in the normal unsorted municipal waste stream. Old
appliances must be collected separately in order to optimize the recovery and
recycling of the materials they contain, and reduce the impact on human health
and the environment. The crossed out “wheeled bin” symbol on the product
reminds you of your obligation, that when you disposed of the appliances, it
must be separately collected. Consumers should contact their local authority or
retailer for information concerning the correct disposal of their old appliance.
15. Removal disposition
V.1
-
 1
1
-
 2
2
-
 3
3
-
 4
4
-
 5
5
-
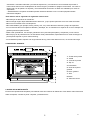 6
6
-
 7
7
-
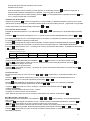 8
8
-
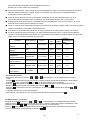 9
9
-
 10
10
-
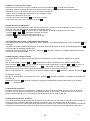 11
11
-
 12
12
-
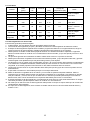 13
13
-
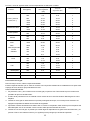 14
14
-
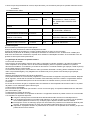 15
15
-
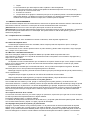 16
16
-
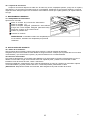 17
17
-
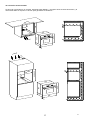 18
18
-
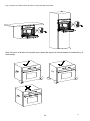 19
19
-
 20
20
-
 21
21
-
 22
22
-
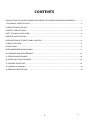 23
23
-
 24
24
-
 25
25
-
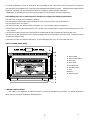 26
26
-
 27
27
-
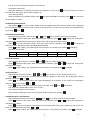 28
28
-
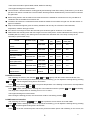 29
29
-
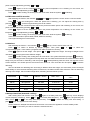 30
30
-
 31
31
-
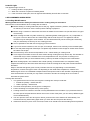 32
32
-
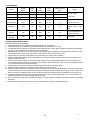 33
33
-
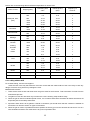 34
34
-
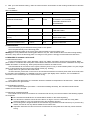 35
35
-
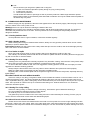 36
36
-
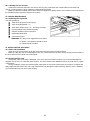 37
37
-
 38
38
-
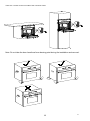 39
39
-
 40
40
-
 41
41


EAS ELECTRIC EMBV38DTN Manual de usuario
- Categoría
- Microondas
- Tipo
- Manual de usuario
en otros idiomas
- English: EAS ELECTRIC EMBV38DTN User manual
Artículos relacionados
Otros documentos
-
Sharp YC-GC52FE Manual de usuario
-
Aspes AMW123PC El manual del propietario
-
GE ZSA1202PSS Manual de usuario
-
GE Profile PSB9240EF3ES El manual del propietario
-
GE Cafe Series 1072552 El manual del propietario
-
GE 1067756 El manual del propietario
-
 GE Profile Series PT9800SHSS El manual del propietario
-
LG MH0843DBK Manual de usuario
-
GE Cafe Series PVM1790DRBB El manual del propietario
-
 GE Profile Series PT7800EKES El manual del propietario

